Transcripts
1. Class Introduction: Turning to photo Black
and White is pretty easy. All you need to do is add a black and white
adjustment layer and just like that, you're done. Well, that did remove
all the color, but there's a lot more to
Black and White than that. That's why I'm excited to tell you about my brand new course, the ultimate guide
to Black and White. In this course, we'll
take a deep dive into the art of Black
and White editing. We'll begin by learning
the best method for converting a photo
to Black and White. After that, I'll show
you powerful techniques for controlling the
light in your photos. Because Black and White
photos don't have any color. Lighting is even more
important than it normally is. I'll show you a ton of different techniques you can use to give you precise control
over your images lighting. Lighting is critical for
making a good black and white. But there's even
more you can do to turn these photos
into works of art. By combining our lighting
techniques with affinities, other tools, we can create amazing Black
and White photos. Just look at these projects we'll be making
throughout the course. There's so much more to
Black and White editing than just removing
all of the color. By the time you
finish this course, you'll have everything
you need to make your very own black and
white masterpieces. But before we jump
into affinity, I want to mention that
this course comes with exercise photos that we'll be using throughout the lessons. I encourage you to download
and use these photos because practicing what you
learn is the best way to retain all of the new
skills you'll be learning. You can download those
files in the next lesson, and then you're ready to begin your journey to becoming
a black and white master. So let's get started.
2. Download the Class Files: Before you begin this class, I recommend you download
the exercise files. These files will be necessary for you to follow along with the tutorials to
download the files, come to the Project
and Resources tab. Then click on the download link. The files will
then be downloaded to your computer and you'll be totally prepared to follow along with the
rest of the class.
3. Black & White Fundamentals: Start off this course,
we'll learn about the fundamental skills you need to make amazing black
and white photos. We'll start off by
learning how to convert your color photo into
black and white. And then we'll take a
look at how to adjust your photos lighting.
Let's get started.
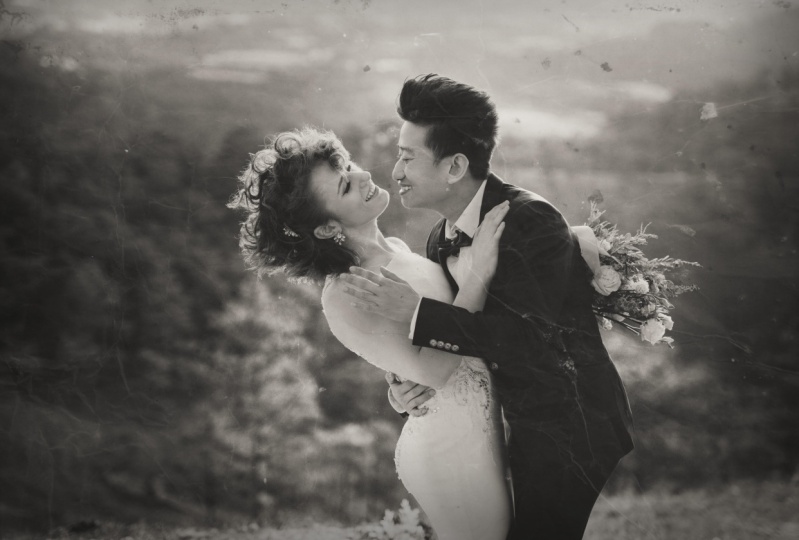
4. The Art of Black & White: Let's talk about the art
of black and white photos. Black and white photos, take away the
distraction of color. It's all about light. This
isn't better or worse. It's just a different art style. In color, a red subject on a green background could look nice because of color contrast. But the same photo in black and white might not
look that special. For black and white photos, we're looking for
light contrast. So a light subject like this spider web against a dark background has
a beautiful contrast, or maybe a dark subject
on a light background, like this dark building
against a bright sky, or maybe a dark moody photo
with a beam of light. So Using the lighting
this way will be our main goal
throughout this course because we want to create
a clear difference between our focal point
and the background. Some other things that you
might want to look for to make your photos look even more interesting in black and white, include interesting textures, shapes, or repeating patterns. Without color, light is what makes your
photos interesting. Make sure to emphasize
that lighting. Now that we know
about some things to look for in black
and white photos. In the next video, I'll show you a great technique for turning
photos black and white.
5. The Best Way to Turn Photos Black & White: Let's take a look
at the best way to turn photos black and white. To start, let's add a black and white adjustment
layer to this photo. I'll go down to our adjustments, and then I'll click
on Black and White. Using this dialog box. We can adjust these
sliders to change how light or dark
certain colors appear. You can see as I bring
the red slider down. You can see her lips get a lot darker as well as
these other elements. You can continue to do this
with the different sliders. Just to see what things
change in the picture. I like to bring
them up and down. This green slider isn't
changing anything because there's no green in this
picture, and that's okay. I'll just move on. This part of the picture is getting
darker as I do this. Same with the blue slider. The magenta tones down these
edges of the picture here. That looks pretty good.
Here's the before and after of turning that
picture, black and white. Now, this is great in all, but there's actually
a hidden problem with the black and
white adjustment. Before we can fully understand
that problem though. First, we need to learn
a little color theory, and it's actually
really interesting. Here I have this color
card file pulled up, and this is just going
to help us learn. I'm also going to change over
here in the color panel. I'm going to change
the wheel to sliders, and then I'll change
it from RGB to HSL. Using these sliders, we can see the different
values of the hue, saturation and luminosity
of all of these colors. Right now I have the white layer selected, this one right here, you can see that this
has a hue of zero, a saturation of zero, and lluminosity of 100. It was brought all the way up
to create that white color. On the opposite end, we have this black
rectangle here. If I click on that layer, we can see that the values have changed so that
they're all zero. For all of the
colors in between, they all have a different hue, but they all have the same
saturation and luminosity. Each one of these
has a saturation of 100 and aluminosity of 50. As I click on each of these, you can see that's true. They're all the same just
with a different hue. Knowing all of that. Let's
see what happens when we apply a black and
white adjustment on top of all of these layers. Before I do though,
picture in your mind what you think this should
look like in black and white. Here's how it turned out.
Does this surprise you? I know it surprised me
when I first saw this. But what's going on here? Why did affinity turn all
of these rectangles white? Shouldn't some of them be
a little bit more gray? I want you to remember
what I showed you earlier. All of the color rectangles have the exact same saturation
and luminosity. Only their hues are different. As far as affinity is concerned, it doesn't actually matter
that all of the hues are different since the black
and white adjustment just removes the hue. If I select one of these color rectangles and change the hue, you can see that nothing
changes about it. But if I change the
saturation or the luminosity, you can see now we're
starting to get some changes. I'll just undo that. I'll turn off the black and
white adjustment because I still think
this is a little strange. To me, this blue looks way
darker than this lime green. Why does it look darker, even though the saturation and luminosity are
the exact same? Well, the simple answer
to this question is that we have weak human eyes. Scientifically, these colors all have the exact same
level of brightness. But as far as our
eyes are concerned, blue will appear darker. That's because the human eye
is very sensitive to greens, but it's not as
sensitive to blues. That's why blues look darker, even if they really aren't. As another example, let's come back to this
portrait photo. I'm just going to delete this
black and white adjustment and add a brand new one. As you can see, her
scan looks way too bright when the photo is
converted to black and white. Technically, affinity might
not be doing anything wrong, but it sure looks wrong. That's the problem
we need to address. But the question is,
what can we do about it? Lucky, for us, there were some really smart people that
ran into the same problem, and they already
found the solution. During the 1950s, the
world was beginning to switch from Black and
white TV to color TV. Obviously, color TVs are great. But during this transition, there was a hurdle to overcome. How could TV stations
play a show in color? But also play that same show on a black and white TV without distorting the
colors brightnesses. As we've seen, turning
colors into black and white is not as straightforward
as it might seem. Well, to solve this problem, they came up with a
formula to calculate the perceived brightness of
a color based on RGB values. This formula is perceived
brightness equals 30% red plus 59%
green plus 11% blue. These percentages
take into account that we see green as
a very bright color, red as a fairly bright color
and blue as a dark color. Using this color code, they could easily convert their color shows
into black and white so that the shows could be broadcasted on all types of TVs. Now that we know
this magic formula, how can we use our
knowledge in affinity? Well, first, we can start adjusting this black
and white adjustment. We know the default values in this adjustment
aren't quite right, so we can actually use the
magic formula to fix it. I'll put it up on the screen just so that we
can reference it. First, red should be 30%. I'll type that in right there. Next, we have yellow, and this is a little strange, but as far as computers
are concerned, yellow is actually red
and green put together. If we add 30% red to 59% green, then we get 89% for yellow. Next, we have green, so
I'll just type in 59%. Then we have Cyan, which is a combination
of green and blue. I'll take 59% green and
I'll add that to 11% blue. Now we have 70%
for Cyan for blue, I'll just type in 11%. Last for Magenta, we're going to add the red and
the blue together. Percent plus 11% equals
41% for magenta. With all of those
values typed in, you can see this
looks so much better. Here's the before and the after. You can see all of
these colors have a better perceived
brightness now. The dark blue is nice and dark and the yellow
is nice and bright. This looks a lot better
for our human eyes. Now, as great as
this formula is, you're probably not
going to remember all of the different
numbers we used. To keep life simple, we can turn this
adjustment into a preset. To turn this into a preset, just have the dialog box up, and then go up here to
click on Add preset. Then we can type in any name
we want for this preset. I'm going to call it accurate black and white, and I'll press. To access this preset, we need to get out the
adjustments panel. Go up to the top of your screen two window and then
click on adjustment. This panel will appear. I'm just going to
tuck this right over here next to
our layers panel so that we can access it at any time because
during this course, we're going to use
this preset a lot. Now that we have
that, we can go to any photo and usually
it'll look like this. I'll delete this layer. We just opened up a photo. We can go to the
adjustment panel now. We can go down to where
it says Black and White. It might be closed,
so just open that up. Then click on accurate
Black and White to apply our perfect values and see this beautiful
black and white. This is such a great starting
point for black and whites. The colors all look very
accurate to what they shod. We'll be using this preset a
lot throughout the course. Make sure to keep this
adjustments panel out. I really like using this
preset as a starting point. But keep in mind you
can always adjust these values if you want for
a little moodier of a look. It's really okay to do that. Often, I'll use this as
a good starting point. Then I'll layer additional
lighting adjustments on top of it to get the right
look that I'm going for. In the next video, I'm going to show you the main
lighting adjustment that I like to use to enhance the lighting in black
and white photos.
6. Curves Adjustment Layer: In this video, I'll
show you how to use the best lighting adjustment
and affinity photo, the curves adjustment layer. To see how this
adjustment works, I've prepared a few
screenshots of it. This is exactly what the adjustment looks
like in affinity, but I've just removed
everything besides the adjustment so that we
can really focus on it. The first thing to know
is that this line, which is called the
spline controls all of the lighting
in your photo. As we move this line up, our photo will become brighter, and as we move this blind down, our photo will become darker. But if that's all
that curves did, it wouldn't be that
special of an adjustment. What sets this adjustment
apart is that we get to choose which part of our photos lighting we want to affect. At the top right of the spline, we can control the brightest
parts of our photo, and at the bottom left, we can control the darkest
parts of our photo. As you might expect, the rest of the line controls all of the
other tones in the photo, ranging from the darkest tones
up to the brightest tones. If you wanted to darken
the shadows in your photo, you would move this
part of the spline. Or if you wanted to brighten the highlights in your photo, you could move this
part of this line. That's about it. That's
the general idea of how to use curves. I know this might sound a
little confusing right now, but it's actually really easy after you've
practiced a little bit. Let's jump back into affinity
photo and try out curves. To start, let's go ahead and
apply the curves adjustment. I'll go to our adjustments, and then I'll click on curves. I'm going to click
right in the middle here and as I bring this up, you can see our
photo gets brighter, and as I bring it down, our photo will get darker. I'm going to reset this
because I want to show you where things can get pretty interesting with the
curves adjustment. We can actually add multiple
points to this line. In this example, here's
the before and after. I've darkened the shadows. But then I brought this part
of the line back up to meet the center so that we're not
darkening the highlights. We've kept the
highlights the same and we're only darkening
the dark areas. You can really see
this with the clouds. As I turn this off, you can see the clouds look exactly
the same between this before and the after because these bright highlights are not being affected at all. We can also do this in reverse. In this case, I brighten
the highlights quite a bit, and then I brought
the line back in the middle so that the shadows
aren't being affected. Here's the before
and after of that. Only the highlights
are getting brighter. The shadow areas
still look the same. That's one way to affect
the lighting in your photo, but I want to show you a
really common thing to do, which is to make the highlights brighter and the shadows darker. This is pretty much
just adding contrast. It's called an S curve because
it looks like an S shape. Here's the before and after. This is such a great
way to quickly add contrast to your photo.
I do this all the time. Just make sure not to
raise it to too much. If you make it a really
obvious S curve, sometimes it just gets
to be a bit too much. Keep it a little more subtle. I also like to make
it so this line crosses right in the
center just to make sure that the midtones stay about the same and
we're only really brightening the highlights
and darkening the shadows. If it's a little off balance, that's okay if that's
what you want, but usually I like to
just do it like that. Another thing that
we can change with the curves adjustment is we can change the black point
and the white point. The black point is
pretty much just adjusting the darkest
part of your photo. You can do that with the shadows node right here to
adjust the black point. I'm going to bring this
up and you can see that the darkest parts of our photo
have all gotten lighter. Instead of looking black, it looks a little bit more gray. For the white point, I can bring this down and
you can see that all of these white areas are looking a little bit
more gray and dull. But how can I do the
opposite to make the shadows even darker or the
highlights even brighter. These nodes can't go any
higher or any lower. But what we can do is
we can actually use them to affect the
slope of this curve. If I bring this point over, you can see we're
darkening the black point. More of the photo is becoming
deep and dark black. We can do the same thing over
here with the highlights, bringing it inward, to make the bright parts even brighter. You can see the
slope of this line is a lot more intense now. That's basically
how you can adjust the black and the white points. I know that was a lot to take in with the curves adjustment. But I want to quickly
edit a few photos using curves just so everything can come together
and make more sense. In the exercise files, there's actually a few more
photos for this lesson. Let's go ahead and
start with this one. I'll add a curves adjustment. This photo is a
little dull and dark. I want to make it brighter. I'm going to just
raise the spline. You can see how much nicer
and brighter that looks. Here's the before and after. Curves can be super
quick to use like that, just quickly brightening
up the photo. For the next one, we have a photo that looks pretty faded. I'd like it to have
more contrast. I'm going to add a
curves adjustment. Then I'm going to do an S curve to bring in that contrast. Here's the before and after. You can see that
already looks better. For this last one, I'd like the shadows to look a little
bit deeper and darker since they look a little
faded right now as a quick bonus tip to quickly
pull up a curves adjustment. You can just press
command or control. And now to make the
shadows darker, I'm going to adjust
the black point by bringing this
over to the right. You can see that already
looks so much better. Here's the before and the after. The curved adjustment can be
a little tricky at first, but it's so flexible
and powerful. After you get the hang of it, it's actually
really easy to use. Great work in this video. In the next one, I'll
show you how you can paint light onto your photos.
7. Overlay Painting: In this video, I'll show you a beautiful and fun technique for painting light
onto your photos. By using the overlay blend mode, we can quickly paint to
shape light onto our photos. First things first, I'm going to go to our adjustment panel. I'm just going to apply the
black and white preset. We can close out of that and
go back to our layers panel. Next, we can go ahead and apply a new pixel layer just so we have something
to paint on top of. Next, I'll grab the paint brush. I'll paint in white paint, I'll make sure that
I'm painting with 0% hardness and a nice low flow. I like to use a lower percentage for our flow so that I can gradually build my paint to build up the
brightness as I go. I'll just go ahead and paint over the path to brighten it. If you want to change
the size of your brush, just use the bracket
keys on your keyboard to shrink down your brush or increase the
size of your brush. I just painted and white
paint all over the path. As you can see, when you just paint straight and
white paint like this, it pretty much just
covers your picture. But if we change the
blend mode to overlay, you can see that this brightens the area in
a very natural way. Here's the before and after. This is such a great
blond mode for adjusting the lighting because
as you can see, it makes it brighter, but if
you paint in black paint, you can actually make your photo deeper and darker as well. I'll just paint in black
paint over our subject to darken her so she contrasts
with the bright background. You can see that this very
naturally darkens her. Here's the before
and after of that. I think I'll just darken a little bit more on
the edge there. Looking good. I'm going to continue to add
more lightness and darkness to this photo with my main goal being to just
increase the contrast, but also increase the
focus on our subject. Because our subject
is very dark, I'm going to brighten
the areas around her just to make her
stand out even more. I'm going to paint
in white paint over this grassy area
and all around her. Maybe the trees a little bit. Then I'm going to
switch my color to black to darken some areas. A super quick way to do this is actually to just press
x on your keyboard. This will switch between
these two colors. X, go ahead and click that anytime you want
to switch up your color. I'm just going to paint in black paint around the edges of the photo to bring the focus
in toward our subject. Here's the before
and after of that. You can see this
technique worked really well to bring the focus
into our subject. I think this technique
works really well on black and white
photos to do that. But it's actually
not that great for color photos because when you're painting with
overlay painting like this, you're not only
changing the lighting, but also the colors
of the photo. I just want to show you this. If you were just to do this on the colored picture, here's
what it would look like. It just looks a little strange. But in black and white, this
actually looks pretty good. Again, here's the
before and after. I might have gone a
little overboard, so I'll just lower the
opacity a little bit. But as you can see,
overlay painting is such an easy way to shape
the light in your photos. We've learned quite a
few different skills in this first chapter
of the course. In the next video, I just want
to cap off this chapter by bringing everything
together with a final project that
we can do together.
8. Lighting Practice Project: This final video of the chapter, we'll do a project together
from start to finish. This will be pretty simple. Since we have the
preset already, we can save some time
by applying that. Let's start by going to
the adjustment panel, and then applying the accurate black and white adjustment. That step one, nice and easy. For the next step
to this project, I'm going to use a
curves adjustment to adjust the lighting. I'm going to press command or control just to
use our shortcut. Then I'm going to
make a little bit of an S curve to add
contrast to this picture. Here's the before and after, and you can already see some improvement
with this picture. As one more step to
finish this off, I want to do some
overlay painting to really enhance this path
leading to the house. I'll add a new pixel layer. I'll set this layer to overlay. Then I can go ahead and grab
the paint brush to paint in white paint and black paint to brighten and darken
different areas. Like I said, I'd like
to enhance this path. I'll go ahead and
paint in white paint. I'll hit x on my keyboard
to switch to white. Then I can go ahead and
paint all along this path. I also want to
enhance the house, so I'll paint in white
paint over the house. I think I also want to paint on the white flowers on the sides. I think they're just so pretty. I'll just paint in white over
the little blossoms there. I'll do the same on
this side of the road. While I still have
the white paint, I'm just going to
lightly paint over the sky with a nice big brush. Now I'll press x to
switch my color to black. I'm just going to
paint in black on this grassy area
over these trees. Just like that. Now I can turn this off so
that we can see the before and the after
before, after. I'm just going to select
both of these layers. You can see the before and after of really enhancing the house at the
end of the road. Just like that, we're done
with this final project. Super easy, super
simple, great job. Now that we finished
this first chapter. In the next one, we're
going to learn how to add our own special lighting
into our photos. I.
9. The Magic of Shapes: Now that we've
learned the basics of Black and White editing. In this chapter,
I'm going to show you some more
interesting techniques. We're going to learn how to take Affinitys shape tools
to adjust the lighting. This is a pretty
fun technique that allows you to change up
the lighting at any time. I think you're
really going to like this one. Let's get started.
10. Creating Light: Let's learn how to create beautiful light by using shapes. I've already applied the black and white preset
right here to this photo. Here's what it
looked like before, and here's the after. For this video, I want
to show you how you can actually use any shape
you want to create light. Let's start by using a circle. I'll just click on the
little gray triangle next to this rectangle to open
up all of our shapes, and I'll grab the ellipse tool. I'm going to hold shift
and then I'll click and drag to add a circle
to our image. To make this look more
like it's lighting up the photo and not just
sitting on top of the photo. I'm going to change the
blend mode to overlay. This looks a little
strange in the sky. I'm just going to
lower it so you can see what this looks
like on the grass here. It's overlaying and
lighting up that area. This looks, I guess, but it's not very natural. There's a few things
we can do to make this look more natural
for our lighting and the first one is to blur
the edges to soften it. To do this, I'm
going to make sure I have the ellipse
still selected. Then I'll go down here
to layer effects. Then I'm going to click on Gaussian Blur and
I'll check that on. Then we can go ahead and
increase the radius. You can see how
that just softens the edges to make it
look more natural. I actually think I'm going
to type in 300 for this, just to really blur the edges, and I think that
looks pretty good. I'll close out of this. Then I want to show you a little trick I like to use with this effect. If you go up to the
context toolbar and click on this icon, it will hide this
blue bounding box whenever you click
and drag it around, which just makes it easier
so that you can see what you're doing without being distracted by these blue lines. I think I'm actually
going to place this right in the center. Maybe I'll make it a
little bit bigger by holding shift and
clicking and dragging. Here we go. I really like
this placed here because it makes our dark
subjects stand out more by having all of
this light around them. I do think this is a
little too intense. I'm going to click and drag on the word opacity here to lower this down. Not bad. Here is the before and after
of that. I really like this. Let's do one more example using a different shape just
so we can practice. This time, I'm going
to use a rectangle. I'm just going to
add the rectangle to this side of our
document right here. I made sure to
overlap it a little bit because we're going
to blur the edges. If it's right against the edge, it's not going to
look very good, but I can show you
that in a minute. Before we do that, I'm going to change the blend
mode to overlay. Then I'll go to
our layer effects. I'll check on Gaussian blur. I'm just going to type in 300, so it's the same
as our last one. I'm going to show you that
if I bring this down, you might start to
see some darkness on these edges because
the edges are blurred. By overshooting a little bit, it just guarantees that this
area stays nice and light as opposed to having some
of that darkness there. That's why I like it to overlap
a little bit like that. With that, you can see
that before and after, I'll just lower the opacity
of the slayer a little bit. Before and after. Very nice. The light does look like it's
coming from the side, as you can see, he's lit up
on this side of his body. It makes sense to add some
more lighting on the side. I'm just going to select these two layers so that
you can see a complete before and after using this
technique for creating light. That's how you can add
light using shapes. This has a lot of fun
applications from adding a brighter source
of light off to the side or enhancing
different areas of the photo. This is quicker than
painting in the light. It's a nice way to
save some time. In the next video, we'll use a very similar technique to add beams of light to a photo.
11. Light Beams: This video, we'll learn
how to make a light beam. This will be a little
different than making a big ball of light like how
we did in the last video. Before I walk you
through this though, I just want to say I did
already apply the preset. Here's the before
and after of that. To get started on
our light beam, the first thing
we're going to do is we're going to grab
the rectangle tool. Then I'm going to
click and drag out a rectangle that I'm going to place diagonally so that it
aligns with the roof here. You can adjust the sizing by using any of the
handles on the side here. That looks pretty good. Again, my rectangle
is going off of the document just to make sure that the whole area is
covered with light. With light beams, they usually
start brighter at the top, closer to the light source, and then they
gradually fade away. To create this effect, we're going to add a
gradient that goes from 100% white down to 0% light. I'm going to grab
the gradient tool. Then I'll just click and
drag to add this gradient. This top color stop is
already 100% white. With this bottom one selected, I'm just going to change
the color to white. If you still have
these sliders out, you can just raise the
luminosity slider to do that. Then you can lower this opacity slider to
fade that color away. Very nice. That's how you
do a transparent gradient. But light beams don't always
fade completely like that. I think I'll raise the
opacity to around 50%. Just so we can make sure
that it stays visible. Then we can go ahead and add our other adjustments to this. For example, I think
I'd like to blur the edges a little so that they don't look quite so harsh. I'll click on the layer effects, and I'll add a Gaussian blur. We can raise this as
much as we'd like. I really like how
that blurring looks. I think I'll type in 200 just
to make this more intense. All right. For anyone wondering, I actually didn't change
it to overlay on purpose. The overlay blend mode
looks really good for naturally making
a photo brighter. But in the case of
this light beam, using the overlay blend mode would make this look a little bit too faded and you wouldn't really be able
to see the light beam. That's why I kept it at
the normal blend mode. To finish off this effect, I want to darken the rest of the photo to make this
light beam stand out more. To do that, I'll
press command or Control M to bring up
our curves adjustments. Then I'm just going
to darken the image. I think this is looking
a little bit too dark. Maybe I'll brighten
the black point a little by bringing that up. You can see that just makes it look a little less intense. All right, very nice. With that, I'll just select these layers so that
we can see the before. And here's the after of adding a light beam
into our photo. In the next video, I'll show you a great technique for
brightening up your subject.
12. Un-Mask the Subject: Let's learn how to
unmask our subject. Sometimes when
adding more light, it might overwhelm
your subjects face. But if you use a mask and simply remove the light off of
your subject's face, you lose the ability to move
your light source around. That all might sound a
little confusing right now. Let me show you the problem. First, I'm going to grab
the rectangle tool, and I'm going to
click and drag to add a rectangle of light
across our subject. Then I'll change the
blend mode to overlay. To get this off of
our subject's face, I'm going to add a
mask to this layer. With this white mask, we can fully see the rectangle, and if I paint in black paint, then we'll be able to remove this lighting from
our subject's face. I'll grab the paint brush
and I'll just quickly paint in black paint to remove
this light from her face. Now I can show you the problem. If we move this
rectangle layer around now because we want to
adjust the light source, you can see that this
hole that we painted in the mask moves
with the rectangle. We'll have to repaint
it and adjust this and it's just
not very flexible. I want to show you
the solution to this. First, I'm going to
delete this mask layer. Then I'm going to duplicate this original photo layer
with command or Control J. I'll just place this
on top of everything, and then I'll place
the black and white adjustment on
top of everything. Your layer should look
like this at this point. Now I'm going to apply a
mask to this layer instead. I'm going to apply a mask and then I'm going to invert this. I'll press command or
control I to do that. Right now, this duplicate
layer is completely hidden, so I can reveal her
face using white paint. I'll grab my paintbrush
and white paint. I'm painting in white
on a black mask to reveal this layer again. You can see what
this looks like, I'll just turn these layers off. You can see I am
just applying this. Her head is on its own layer now, separate from everything, which means that now we can go ahead and move the
rectangle around, and her face will stay totally lit just the
way that we want. That's just a much more
flexible way to do it. Now, if I actually want
this to look good, I would need to polish up
this rectangle a little bit. First, I'm going to go to our layer effects and apply
a gaussian blur to it. This needs quite a
bit more blurring. I think I'll just type
in 300. There we go. That already looks better, but I think I'm going
to go ahead and lower the opacity
of this rectangle. I'll lower that about halfway. Maybe we do want a little bit of lighting on our
subjects face. If that's the case, then
we can go ahead and lower the opacity of this head
layer that we painted. I'm just going to lower
that down about halfway. All right, with that, now I can show you the before and after of this technique. Here it is before and after, let me just get out
the hand tools, so those bounding
boxes disappear. Here is the before and after. We've brightened up the
subject without overdoing it. Great work. In the next video, I'll show you how to add
a mystical fog effect to your black and white photos.
13. Creating Fog: In this video, we'll create
beautiful, mysterious fog. As you can see, I've already applied the black and white
preset to this photo. To add fog, let's go
ahead and start by adding a really long white rectangle
to the bottom of the photo. I'll grab the rectangle tool. Then I'll just click
and drag to add this. Then to blur this, I'm going to go to
our layer effects. I'm going to blur it
quite a bit this time. I'll type in 600. Now you can see what
that looks like. Because we've blurred
the edges a lot, make sure that your rectangle
extends far past the edges. You see the difference there. We have a lot more darkness,
but as we fill this out, the white can go all
the way to the edge, I'll do the same for this bottom part and this part on the side. I don't want to add the
overlay blend mode to this rectangle so
that we can still keep this fog effect a
little bit more thick. But I do think I will reduce
the opacity a little bit. About like that. If you want more precise fog, you can also just paint in
regular old white paint. I just want to show
you that technique. I'll delete this layer. I'll add a new pixel layer. Then I'll grab the paint brush so that we can paint
in white paint with a nice low flow like
that and a really big brush. Now, I'll just paint this across the bottom like
we had it before. But maybe I'll go
up in a few areas. Maybe I'll bring it
more around the side. If you ever paint too much
or you didn't want it, feel free to grab
the eraser tool. I'll just erase
that a little bit. The hardness on my eraser tool
is set to a random amount. Let me just lower the flow
and hardness so it matches our paint brush to create
a softer edge there. All right. And of course, we can always lower the opacity of this layer, just to calm it
down a little bit. And there we have it.
That's how you add fog. It's actually pretty simple. In the next video,
I want to show you a fun new technique for adding a vignette to a black
and white photo.
14. Editable Vignette: Let's learn how
to add a vignette to a black and white photo. As with the other ones
we've done in this chapter, I already applied the
black and white preset. There's the before and after. In this video, I really
want to show you a super cool technique
for creating a vignette. There are so many ways that you can add a vignette
to your photo. But what I really like
about this technique is that it allows you to move
your Vignette around. It's very editable, so I think you're really
going to like this one. First, we're going to add a rectangle that fills
the entire photo. Make sure you have snapping
turned on like this, and we're just going to
bring this all the way to the edge and we're going to snap it to the other
edge like that. For this rectangle, I'm
going to say I want no fill, where this white color is, go right here and click that
so that we have no fill. It looks like we
have a black stroke right now, which is perfect. I'm just going to go up here
to the context toolbar, and I'm going to change
the strokes width. It'll be different
for every photo because this is going in pixels. If your photo is
a little bigger, you might need to
type in a value here. For example, maybe I'll just
type in 200 for this one. We just want a
really large stroke that goes all around the image. With that done, I'm going
to go to our layer effects, and I'm going to
add a gaussian blur to soften the stroke. We can bring that up. Maybe I'll type in 200 for this one. Then we can go ahead
and lower the opacity. This looks a little more subtle. I think I'll lower
mine about halfway. Here's how it's looking so far. Here's the before and after. But now I want to show you
the magic of this fgnette. You can resize this
fgnette from all of the different sides
to choose how big and dramatic you want
this feignette to be. For example, maybe you don't want it on this side
as much because it looks a little obvious with
this water area over here. You can even bring it in
a little more or out. It's fully customizable,
and I think that's something that's just
so cool about this one. With that, you can see
the before and after. As one last tip, you can change the vignette to
be dark or light. All you need to do is have your rectangle selected
and then change the color. If you want this to be
a light dream vignette, it looks like the fog we were working with
in the last video. You can just change the color
of the stroke to white. I'll just change
my back to black because I think that looks
better for this one. But that is an option.
And there you have it. Adding a vignette is such
an easy way to bring the focus in toward your subject in a black and white photo. In the next video,
I want to show you another way you
can bring the focus in toward your subject by adding a blurred photo frame
to your photos.
15. Blurred Photo Frame: Let's make a blurred photo
frame in this video. I've already added our black and white
adjustment to this one. Here's what that looks like.
To make this photo frame. First, I'm going to add a shape to place our
image inside of. To do this, I think
I'm going to go ahead and add an ellipse. I'll click and
drag while holding shift to make a perfect circle. I'm just going to
keep that placed over our subjects like that. Next, I'm going to
go ahead and blur this circle with a layer effect. I'll check on the Gaussian blur, and I'll bring the
blur up to 200. There we go. Then I'll make sure this is below our
black and white adjustment. Let's see what happens if I add our photo as a child
layer to this circle. Well, that doesn't look right. Right now, our photo is blurry. You can't even see the subjects. I just wanted the
edges to be blurry, not the entire photo. I'm going to have to undo this. I'll press command or
Control Z to undo that. To make the photo
not appear blurry. We actually need to rasterize the circle layer so that the blur only appears
on the circle edges. To rasterize this,
go ahead and right click and then go down to
where it says a rasterize. When you click this, a dialog
box will appear right here, and you just want to check,
preserve layer effects. If you preserve
the layer effects, then we're right
back to where we started and our picture
will become blurry. Instead, I want
to rasterize this so that this blurring is
baked into this layer. Now I'm going to make our image, a child there to the circle, and you can see that our
picture isn't blurry anymore. This looks great. I'm going to add a
background color now to complete the look. I'll go to our shapes and I'll add a rectangle
to this document. I'll bring it to
the bottom and we can make this rectangle
any color we want. I think I'm going to
make it a super dark gray color like that. With all this set
up, now we can go ahead and adjust the
position of everything because it looks a little
strange that it's on the bottom part of the
picture instead of centered. I just want to
grab the move tool and show you how we
can move these around. To move this photo layer, first, you need to unlock it, and then you can go
ahead and move this. We can also resize the circle. I'll go ahead and select
that and move it, but it looks like the
child layer moves with it. To avoid this, we can
actually go up to the context toolbar and
click Lock Children. Now that child layer will
stay right where it's positioned and we can move
the circle up to meet it. I want this to be
centered like that, and maybe I'll move this
child layer a bit like that. I can also resize the circle if I want it a
little bit larger. I'll just increase
the size. Like that. Okay, that's it. Now you know how to create this fun, blurred frame effect. Great work on this video
and on this chapter. In the next chapter, we're going to learn a
few techniques to add sharpening and blurring
to black and white photos.
16. Sharpening & Blurring: So far, we've learned a lot of different ways to control
the lighting in our photos. But black and white photos
are more than just lighting. In this chapter, I'll show you some important skills like how to sharpen and blur your
photos. Let's get started.
17. Sharpening Textures: Let's learn how to sharpen textures in a black
and white photo. I've already applied the
preset to this picture. Here's the before and after. Black and White
photos are all about light, contrast, and textures. The best way to
bring out textures is with the clarity filter. I'll go to our filters, and then I'll apply
the clarity filter. I'm going to bring the
strength all the way up to really boost this clarity. Here's the before
and after of that. You can just see, especially in the white parts of the waves, how much of that is
brought out with the clarity filter
before, after. Now, I think this
looks pretty nice, but it's doing some
strange things to the sky and the rocks back here. I'm going to grab my paint
brush and I'll paint in black paint to remove
it from those areas. There's a built in
mask with this filter, so you don't even need to
worry about adding a mask. Just paint this away. I think this is painting it away
a little too slowly. I'm just going to bring
my flow up. There we go. Okay. Now we can see the before and after and how this is
only affecting the waves. I'm going to duplicate this
with command or Control J. Just so we can have a little
bit more clarity still. This time, I'm going to remove it from the white crests of the waves. There we go. Now you can see that before and after and how this is mainly
just affecting the water. We can even do this one more
time to really enhance this. I'll press command
or Control J again. Now the water is just looking so textured and it
looks really cool. I'm going to select all of these layers so that
I can show you the complete before and
here's the after. Before and after. Now, as I'm doing this
before and after, I'm noticing some
strange areas right up here that I don't think I
painted away very well. I'm going to go back
to those layers where I missed out
on some painting, and I'm just going
to make sure that those areas are fully removed. And I'll do the same
for this layer up here since this is
a duplicate copy. All right before and
after, much better. I think this picture is so
beautiful and stunning. These waves have
never looked better. Now that we know how
to sharpen things up, let's take things in the other direction in the next video.
18. Un-Sharpening: This quick video, I'll show you how to unsharpen your photos. I've already applied the
Black and White adjustment. Here's what that looks like. What should you do if you want your photo to be less sharp? Especially in Black
and White editing. There might be times
where you want a softer looking photo to make the image
look a little older. Well, this is
actually super easy. I'm going to go to our filters and I'll apply a Gaussian blur. I'm going to bring
up the radius just a little bit around one pixel. Then I'll just zoom in here so that you can see
the difference. Here's what the picture
looked like before. You can see a lot more texture
on the skin and here is the after before, after. Of course, you could
increase the radius even more if you want
more of a blurred effect. I'm just going to keep
it subtle for this one. I think this looks much
smoother and older and maybe you'd be confused at what time period this
picture was taken in. Nice and simple. You can do this with any photo that
looks a little too intense. In the next video, I'll show
you another way to make your photos look older
by adding some noise.
19. Adding Noise: Let's add some noise
to this photo. I've already applied the
black and white preset. Here's the before and after. Adding noise can make
your photo look older. It can also just add
some extra texture to finish things off nicely
as a finishing step. To do this, let's add
the add noise filter. Let's raise the
intensity nice and high, maybe around 20% to start. Now you can already
see the difference. Here's the before and after adding in all of
that specking noise there. It looks nice, but sometimes it might be a little
bit too much on the face. Here's the before and after. We can actually remove it
from the face a little bit just so it doesn't
look quite so intense. I'm going to grab
my paintbrush and I'll paint in black paint
with a nice low flow. I'll bring it back
down to around 10%. Then I'll just paint this off
of the face a little bit. You don't want to completely
remove it from the face or the face will look a little strange compared to all
of the noise around it. But just removing a little bit will make it look
less intense there. Here's the before and after, and you can see there's some
soft, nice noise there. As a finishing touch, I
think for this picture, I'll actually lower the
intensity a little bit. I'll bring it around 10%. Now you can see some
nice noise there, but it's not quite so
overwhelming. Very nice. Now you know how to easily
add noise to your photos. In the next video, I'll show you a unique way to add a
vignette using a blur.
20. Blurred Vignette: Let's learn about adding a blurred vignette to a
Black and White photo. I've already applied the
Black and White adjustment. Here's the before and after. To add our blurred vignette, I'm going to go
into our filters, and I'm going to apply
the depth of field blur, which you can find right here. This blur is unique where it has a center point that
stays in focus, and then it gradually gets blurrier with each ring
that it goes through. As I raise the radius here, you can see what
that looks like. I'll just make sure preserve
Alpha is checked on so that the edges don't get
all blurry and strange. Then we can adjust these rings to change
the size of this. In this case, I want
to make sure that the couple stays
nice and in focus. I'm going to click on
the center dot here and I'll just put their
faces right in the center, and then we can go ahead and increase the
size from there. Now, a little blur for the
vignette can look nice, but we shouldn't go
overboard with it. I'm just going to bring
this down. Maybe to around. Now you can see the
before and after of this. We've just subtly added
some nice blurring here before and after. I like how this looks
on some of the areas. But on her arm, I think
it looks a little bit strange to have it
lose focus like this. I'll grab my paint
brush and just paint in black paint to remove
this blur from her arm. Let's keep that in focus. If you want, you can even remove it a little bit from her dress. Here is the before
and after now. One thing I like to
do when adding a blur like this is to actually
add a little bit of noise to make this
artificial blur look less fake by
covering it up. I'm going to go to our filters. Then I'll click on Add Noise. I'm just going to increase
the noise to around 10%. So now you can see
what that looks like. Here's the before and
after of adding in that noise. And
there you have it. Now you can make any
photo look more focused on the subject without
it being too obvious. In the next video, we'll play around with another blur effect.
21. Tilt Shift Blur: This video, I'll show you how
to apply a tilt shift blur. I've already applied the
black and white adjustment, here's the before and after. The tilt shift blur effect is just another way to bring the focus in toward the subject. The first thing we need
to do is apply a filter, and we're going to apply
the depth of field filter. Now, by default, this
is set to elliptical, but I'm going to click here and change this to tilt shift. Now we can go ahead
and blur things. You can see with this effect, the center point will stay
focused all across the horizon and it'll gradually
get more blurry as we get farther
from that point. I'll just check on preserve Alpha so the edges
are preserved. Then we can go ahead and adjust
where this is positioned. I would like this village right here to stay nice and in focus, and I'd like the rest of it
to get blurrier from there. I'm going to lower the
radius to around 40 pixels. I still want this
effect to be visible, just not quite so intense. Now you can see what
that looks like. Here's the before and
the after before, after. Now, I like how this looks, but there's one part of this picture that looks
a little strange to me, and that's this tree down here. You can see the bottom
part is blurred, but then it goes
into focus up here. Here's the before and after. I think it makes more
sense if that tree is blurry just all across the tree. To fix this, I'm going
to duplicate the depth of field blur with
command or control J. Then I'm going to open up this by clicking right
here on its icon. Then I'm just going to move this blur so that the
tree becomes blurred. Now I'm going to invert this blur with
command or control I. That way, it's fully invisible, and we can just paint
in white paint on this black mask
to blur the tree. I'll grab my paintbrush. I'll change my paint to white. Then I'll just paint over the
tree to reveal that blur. And we can do this anywhere
else where we might have an area that's sticking
up into the background. Just like that, we're
able to fix that tree. Here's the before and after. To polish off this whole effect, I'd like to add some
noise on top of everything just to make this look a little
less artificial. I'll go into our filters and
apply that add noise filter. Then I'll increase the
noise to around 10%. And you can see the
difference here. Here's the before and after
of adding in that noise, and I'll just select all
of our layers to show you the complete
before and after. I think this effect
works best on landscapes like this,
this looks really good. In the next video,
we'll learn how to add a dreamy glow to black
and white photos.
22. Dreamy Glow: Let's add a dreamy glow
effect to our photos. I've already applied the
black and white preset. So we can go ahead and
get started with this. The first step to creating
a dreamy glow is to go into our filters and add
the lens blur filter. I'm going to bring the
radius all the way up and I'm also going to
check on preserve Alpha. You could also use a Gaussian
blur filter for this, but I found the
lens blur actually works a little bit
better for this effect. Once you have that set up,
we can go ahead and change the blend mode of this blur
from normal to scream. Doesn't this look so pretty? Here's the before and after. This blur adds so much
light to the photo. I want to change up the lighting just a little bit more
to finish this off, and I'll press command or Control M to apply a
curves adjustment. I think I want the shadows
to be a little bit deeper to balance out
all of this lightness. I'm going to go to
the shadow node, and I'm just going to bring it over a little bit to darken it. These deep dark shadows will
just contrast nicely with the brightness of all of the leaves that we
have going on here. Here's the before
and after of that. Of course, you can always
lower the opacities of any of these layers if you
think they're too intense. You can even adjust the
opacity of the blur. But I think I like it
all the way raised up. Here's the complete
before and after. As you can see, this
effect is so pretty. I love how this adds light through the leaves on the trees. If you have a
picture with trees, definitely try this out. I think this will look nice
on a lot of types of photos, but I really like this
effect when the photo is outdoors so that this
glow looks like sunshine. Great work. In the next video, I'll show you a simple
way to add a motion blur.
23. Simple Motion Blur: Let's add a motion blur to
give a photo some movement. Here's the before and after with the black
and white preset. I think this effect looks especially good in
black and white. It's important to
add that preset to create the motion blur, I'm going to go
into our filters, and I'm going to apply
the motion blur. I'm going to really bump up the radius so you can
see how this looks, and I'll check on
preserve Alpha. You can see that this basically blurs the photo horizontally. If you wanted to, you could
change the rotation point. But I think horizontal
blurring looks a lot more normal because
people are moving in horizontal directions
in this photo. I'll leave it at that.
I'm going to lower the radius to maybe around 30%. We still want to be
able to see that there are people who are moving, but I do like quite a bit
of blur for this effect. With that setup, I'm going to invert the layer with
command or control I. Then I can grab my paint brush, set my paint to white, and I can manually paint
this in over the people. I'm just going to paint
anywhere where I see people, and you want to
make sure to blur their whole bodies,
not just their heads. I think I'm going to
increase the flow, just so I don't need to
paint quite so many layers. There we go. Okay. There we go. Now you can see the before
and after of this effect. Doesn't this look so cool? Like I said before,
I think this effect looks especially nice on
black and white photos. As you can see, it
works on a color photo, but it just doesn't quite
have the same impact. But that's just my opinion. Now that you know how to
add a simple motion blur, I'll show you how to do
a more advanced version of this effect in
the next video.
24. Advanced Motion Blur: This video we'll create an
advanced motion blur effect. I've already applied the
black and white adjustment. Here's the before
and after of that. For this advanced motion blur, I'd like to actually blur
the entire background like the world is quickly passing by and the man is
just standing still. In order to only
blur the background, we'll need to make a
selection of the man. I'm going to grab the
selection brush tool. I'll make it a little bit larger using the bracket
keys on my keyboard. Then I can go ahead and
start making my selection. But I already made a mistake. I'll D select with command or control D because we
need to make sure that we have the man's
layer selected so that the selection brush can snap to the edges of the man. That's much better. I'll just paint this all the
way across the man. If you select too
much, remember, you can just hold
down Alt or Option on your keyboard and that
will remove the selection. I'm just going to double
check around all of the edges to make sure
he's nice and selected. I think the selection
looks great, so I'm going to go ahead and hit fine up in the
context toolbar. This will just
soften up the edges. I'll go ahead and apply. And now we have a
great selection here. With the selection still loaded, I'm going to go to our filters
and apply the motion blur. Go to increase the
radius all the way and then I'll check
on preserve Alpha. Obviously, this is the
opposite of what we want. I'm going to de select
with command or control D. Then I'll invert the layer
with command or control I. Just like that, we've
blurred the background. Here's the before and the after. Now, this looks pretty good, but there is one little
problem that you might notice. That's that we have
a little bit of haloing going on around the man. You can see right
here and right here. You can see the man spilling
out onto the background. If you want that,
then that's great. But I think I'd like
to remove that. If you want to do that, then
here's what you need to do. First, I'm going
to hit command or Control Z until we just have
the simple selection again. There we go. There's
no more motion blur. We just have our selection. Now what I'm going to do is I'm actually going to right
click on this layer, and then I'm going
to click Duplicate. This will duplicate
the entire layer, not just what we have selected. With this top layer selected, I'm going to add a mask. Now you can see the man is
all by himself on his layer. Phase one is finished. As a next step, I
actually want to remove the man from
this lower layer. The way we'll do that is we'll
select this bottom layer. Then I'm going to
increase the size of this selection by pressing
command or control B. This will bring up this grow
slash shrink selection box. I'm just going to raise
the radius a little bit. You don't want this
to be too much. I think I'll just type
in five pixels here. You can see the selection is
now hovering around the man. Just to make sure he's fully included every
little bit of him. I'll press apply. Now, with that bigger selection and this lower layer still selected, I'm going to go to the top
of the screen to edit, and then I'm going to
click on In paint. With that finished,
I'm just going to de select with
command or Control D. Now I'm going to show you that the background no longer has the man
on this layer. We fully painted that area. This is perfect because
now we can blur this background layer without the man bleeding onto the edges. With that layer selected, I'm going to go to our filters and all apply the motion blur. Then we can go
ahead and increase the radius and check
on preserve Alpha. You can see there's no
more bleeding of the man, which is p. Here is the before and after adding
this motion blur. Because we have the man and the background on
separate layers. We can actually use
this to our advantage and adjust the lighting a bit. With the background layer, I'm going to press
command or control M, and I'm just going to darken
the background a bit. I'd like to reduce
these white areas just so that they don't
stand out so much. I'm actually going to come over here and I'm going to lower the white point just so it
looks a little bit more gray. That's good for the background. I'm going to click right up here and press
command or Control M. I'm going to apply this as a child layer
to the man's layer. Now you can see as I raise this, we're only affecting the man. I do think I want him to
be a little bit brighter, just so he stands out
from the background more. Maybe I'll increase
the black point by bringing this over just
so the shadows stay nice and dark. All right. Let's take a look at
the difference here. I'm going to need to do some tricky selections of our layers. So I'll hold down
command or control, and I'll click on the
curves adjustments and the motion blur so that we can see a complete
before and after. That's such a big difference. I think this looks so cool. Great work on this chapter. Now we know how to
add sharpness or blurring to any black
and white photo.
25. Black & White + Color: In this chapter, we're
going to move beyond pure black and white and try adding just a
little bit of color. We'll still mostly be
working in black and white, but you can make some pretty interesting effects by adding just a little bit of
color. Let's get started.
26. Sepia: Let's add some CPA tones
to black and white photos. CPA toning can look
good on a lot of black and whites because
black and white photos tend to look bluish and
cooler toned and CPA adds a little bit of
warmth and age to your photo. As you can see, I already have the black and
white preset applied. To create the CPA effect, we're going to use the
lens filter adjustment I like using the
default color for this because it already
has that CPA tone. We can go ahead and increase the optical density
as much as we'd like. I'll put it at 75 for this. As a quick tip, I like to raise the optical
density pretty high. Then later on, I can go back and adjust the opacity at any time. I just find it's faster
to change the opacity and easier to see as you drag
opacity up and down. The same principle goes for
other adjustments as well. If you apply them heavily, then you can lower
the opacity later on. In this picture, I think I
will add one more adjustment because I want the picture to look a little bit more faded. The blacks are so
dark in this one. I'm going to press command or control to add a
curves adjustment. Then I'm just going to raise up the Black point to gray out
the shadows a little bit. Like I said, we can always adjust the opacity
after the fact, to get it just right. I think that looks pretty good. That's a super simple way to add a tint of color to your
black and white photos. Here's the before and
after in the next video, I'll show you how to
add more than one color to your photos.
27. Split Toning: In this video, I'll show
you how to do split toning. I've already applied the
black and white preset. Here's the before and after. Split toning allows us
to apply a color to the highlights and a separate
color to the shadows. I'm going to apply the
split toning adjustment. Then we can go ahead and set
whatever color we'd like. In this case, I think I want the shadows to be blue tones, and the highlights to be more
of a yellow orange color. That's usually a pretty
classic look for this. I'll set this to around 20. Then I'll increase
the saturation to make this more visible. I'll bring this up quite a
bit because it's hard to see, but you can see here
we have a little bit more of that orange
tone for the highlights. Here the before and after. Next, I'll adjust
the shadows Hue. And I want this to
be more blue toned. I'll put it to about
there around 250. Then I can increase the saturation and this seems to be a little
more sensitive. I'll just raise it like that. Here is the before and the
after of that split toning. I think I'll lower
the layer opacity a little bit to make
this more subtle. Here's the before and after now. Beginners tend to
overdo effects like this and even I
overdo it actually. It's great that we can quickly lower the opacity at any time. With that, now we
know how to add multiple colors to a
black and white photo. It's very subtle and beautiful. In the next video, we'll
do a more bold look by adding a pop of color. Oh.
28. Color Pop Effect: Let's add a pop of
color in this video. For this one, I didn't apply the black and white preset yet because we'll add
that a little later. The goal for this effect
is to have one thing be in color and the rest of your picture to be
in black and white. As a first step, we actually
need to select the subject, which is whatever part of the photo that we
want to be in color. I'm going to grab
the selection brush, I'm going to click and drag to select all of these
little tomatoes. The selection is
a little tricky, so take your time to select
all of the little leaves. It won't look right if
you leave those out. Just make sure to do
a thorough selection. Remember that you can
always hold down Alt or Option to remove from
your selection as you go. That was a tricky selection, but I think this
looks pretty good. I'm going to finish
this off by going to the context toolbar
and pressing refine. This will just soften the edges, so I'll just press apply there. Now that we have that selected, I'm going to go to
the adjustment panel, and I'm going to add the
accurate black and white preset. This is done the opposite
of what we want. I'm just going to press command
or Control D to D select. Then I'll invert the adjustment with command or Control I. At this point, you can clean up the effect a little
bit if you need to by painting in black and
white paint on this layer. I'll just grab the
paint brush tool. With a nice small
brush, I think I would like to clean up
some of these areas. I'm just going to
paint around in white and black paint to add and remove black and
white areas to this. I think that looks pretty good. As a bonus, we can change up the color of the subject with
a quick adjustment layer. I'm going to add
the HSL adjustment. I love using this adjustment
to play with the colors. We can increase the
saturation or decrease it. We could also change the hue
by changing the hue slider. If you want them to be a
little bit more orange toned, something like that. Because the rest of the
photo is in black and white, this will only affect the part of the photo that's in color. That's it. Now you know how to add a pop of color to a
black and white photo. In the next video, we're going to do something
a little different and learn a really cool trick using the black and
white adjustment.
29. Black & White Trick: This video, I'll share a really cool trick that you can do with the Black and
White adjustment. This is just a fun little tip. We can use the Black
and White adjustment to change the lighting
in a color photo. To show you this,
I'm just going to apply the accurate
black and white preset. Then I'm going to change the
blend mode of this layer to illuminosity. There it is. You can see that nothing changes when I turn this on and off. But what we can do
is we can adjust the sliders to affect how the lighting of
this picture appears. Now as I move these sliders, you can see the reds
in the picture get brighter and darker as I
move this up and down. The same goes for any of
the other colors too. I'm going to move this
downward to darken it. Then for the
yellows, you can see we're affecting quite
a bit of the picture. A lot of the grass actually is more of a yellow
tone than green. For this one, I think I'll raise it a little
bit to brighten it. Then we do have some green up
in those dark green areas. I'll just slower this
down a little bit. Then for the sand, we're
affecting mostly the sky. I think I'd like this to
be a little deeper and darker to help the white
clouds stand out more. The blue slider can also affect these areas and I'll make
them nice and dark as well. It looks like the magenta
isn't really doing anything. I'll double click to reset
that to the center point. Now, I just want to show you how much we've
affected this picture. Here's the before and the after. This is such a weird
and fun trick. There are a lot of
adjustments that allow you to individually change
the color hues. But there aren't
really adjustments like this where you can individually brighten or darken the colors all in one place. I think this is a
pretty cool trick. Great job on this fun chapter. Now you know all about adding color to black and white photos. In the next chapter, I want
to show you how you can use black and white techniques on photos that look really
boring in color.
30. When Color Can’t Cut It: Sometimes you'll be working with a color photo and you just
can't get it to look right. But when you make your
photo black and white, all of your photos problems
seem to melt away. It's a really
interesting technique. I think you're going
to like this chapter. Let's get started.
31. Color Correction: This video we'll correct colors by turning a
photo black and white. Black and white can save
a photo with bad colors. Now, this particular photo was meant to have this
type of coloring, so I honestly don't
think it looks that bad. But let's say you
have a photo like this that you really wanted
to correct the coloring for. Editing this normally
would be very tricky, but making it look good and
black and white is a cinch. An easy way to do
color correction is just to remove
all of the color. I'll apply the accurate
black and white preset. You can see this already
looks so much better. Then I'll press command or Control M to bring up
the curves adjustment, and we can adjust the lighting. I think I'll make this brighter, but preserve the
shadows a little bit. All right, here's what
that looks like before and after. It's pretty simple. Sometimes the colors in a
photo just can't be saved, so don't fight it. Just black and white it. Sorry. Okay. Now that we know that we can easily color correct by turning a
photo black and white. In the next video, we're going
to correct bad lighting.
32. Lighting Correction: Correct the lighting by turning
a photo black and white. We're going to fix this
underexposed image. Right now it's just so dark. To start, I'm going to add a curves adjustment to show you that we can
brighten it in color. I'm just going to bring this up. Maybe adjust the black point
a little bit to lighten it. You can see that
when you brighten a colored photo to this extent, a lot of the times the colors start to look pretty strange. There's a lot of
green tints going on and I just don't think
this looks very good. But when you make
it black and white, it actually looks cool. I'll apply that preset. Now you can see what this looks like with the
curves adjustment. Here's the before and after. Be we no longer have
those weird colors competed for our attention. We can really just
focus on the picture, and I think this
looks really nice. I'm just going to open
up the curves adjustment now and I'm going to see if
we can edit this anymore. I brand it quite a bit. I adjusted the Blackpoint. We'll bring that
down a little bit. I think this looks really nice. Making a photo black and white lets you much
more dramatically change the lighting
in your photo without needing to
worry about the colors. In the next video, we're
going to fix a dull photo.
33. Dullness Correction: Let's fix a dull photo by
making it black and white. Sometimes a photo just has boring colors and there's not
much you can do about it. In this photo, I wouldn't want to enhance any of these colors. They're just boring and drab. Luckily, even photos with boring colors can be beautiful works of art
in black and white. I'm going to apply the black
and white preset to start. You can already see that
this makes the photo have a much more intentional look now rather than
having drop colors, it looks more purposeful because there's just
no color there. To enhance this even more, I'm going to add a
curves adjustment, and I'm going to
make this curves adjustment super dramatic. I think this photo
needs more brightness, and I'm going to
bring the white point over to enhance that even more. I really want to enhance the white parts of
this photo because I think the white edges of the road really enhance
the shape of them. Now you can see the
before and after of that. You can also see the nice bright head lights reflecting
on the road, which I think looks really nice. I'll just select both of
these layers to see the complete before and after. Turning photos Black
and White really is such an easy fix to make them look more interesting and
intentional. All right. Now that we're done with
this simple chapter. In the next one, we'll
learn about a bunch of different styles that we can use with black and white photos.
34. Black & White Styles: So far, we've learned
about a lot of different tools and
techniques in this course. But in this chapter, we'll bring together everything we've learned to make some really amazing black and white effects. These different styles
are a lot of fun to make, so let's get started.
35. Faded Shadows: This video will do a beautiful
faded shadows effect. Making the picture
look more faded is a very popular effect and
it's also very simple to do. First, you'll need to apply
your black and white preset. Then you can press command or control to bring up
the curves adjustment. Now, there are a couple of different ways you can do this. The first way is to
bring the block point up until you can start to
see those shadows fading, and then bring this
midpoint of the line down to meet the mid
line right here. This makes it so
the darkest shadows are becoming more faded, but the midpoints aren't
becoming too bright. Here's what that looks
like. Here's the before and after. That's pretty simple. But here's another
way you can do this. I'll just reset this
curve and this time, I'll bring the black point
up to fade the shadows, then I'll bring the white point over to brighten the highlights. Here's the before
and after of that. By brightening the highlights, we're really making
the whole picture feel lighter and softer. I like doing it better this way, but you could also just fade the shadows if that's the
look you're going for. That's how you do the
faded shadows effect. In the next video, we'll go in the opposite direction and create a high contrast
black and white photo.
36. High Contrast: Let's make a high contrast
black and white photo. I've already applied the
black and white preset. Now we can go ahead and jump in. First, we'll add a
curves adjustment with command or Control. For this one, I'd just like
to enhance the contrast more by darkening the Black point and brightening the white point. To do that, I'll bring
the Black point over. And I'll bring the
white point over. As I'm doing this, I'm
watching the photo over here so that the white
areas don't get too bright. I think I'll bring it
over about to there. For this photo, I think
I'll also brighten the curve overall by just
bringing this area up. Brighter photos tend
to look better, so I think that
looks pretty nice. In addition to just adding
contrast like this, here's the before and after. Another great way to enhance contrast is to do some painting. I'll add a new pixel
layer and I'll change this layer to
the overlay blend mode. Then I can grab the
paintbrush tool and with a nice low
flow, maybe around 10%. I can paint in black and white to enhance
different areas. For this, I'm going to start
by painting in white paint on all of the light areas in the photo that
I want to enhance. For example, maybe you want to paint white on the
whites of the eyes. I see a few different
highlights on the face. Maybe I'll paint a little bit
on the bridge of her nose, on this light spot on her cheek. Abe that's already bright, can just get a little
bit more brightness. If you want to enhance the shine on her lips, you can
paint over them. Now I'll just switch
my paint color to black so that I can
darken the dark areas. Maybe darkening the
eyebrows and the eyelashes, the iris of the eye. I'll just show you
what this looks like. Here's the before and after of that overlay painting
before and after. Of course, you can lower
the opacity a little if this is a little too intense. I think I'll do that. Of course, you could do more contrast
painting than this. Depending on your photo, it might not all be on
the face of your subject. But basically, you can
just paint white on bright areas and black on dark areas to make
them stand out more. All right. Now that
we know how to create a beautiful
high contrast photo. I want to show you how
to make this effect even more intense
in the next video.
37. Ultra High Contrast: This video we'll make an
ultra high contrast effect. Ultra high contrast works
really well with architecture. Let's see how this works. I've already applied our preset. Here's the before and after. Not a huge change. There wasn't
much color in this photo. To start our ultra
high contrast effect, I'm going to add a
curves adjustment. I'm just going to darken the
black point by bringing this inward and I'll brighten the white point by
bringing this inward. Then we can see before
and after of that. I think that looks pretty good, but I wish I could
brighten the sky more without over brightening
the whole building. Maybe I'll start fresh. I'll delete this curve. I'm going to turn off the
black and white adjustment. Then I'm going to
select the layer with the building on it so that
I can select the sky. I'll grab the
selection brush tool. I'll increase the size
using the bracket keys. Then I can go ahead and paint
over the sky to select it. Remember you can
hold down Alt or Option to remove
from your selection. Make sure this edge
looks really nice. And I think we've
done it. Now I'm going to add a
curves adjustment. I'm going to brighten
the white point until the sky looks
totally white. I'll turn on the black and
white adjustment again. You can see that
looks so much better. I'll just place this above that. Next, I only want to
affect the building. I'm going to invert
the selection by holding command or
Control, Shift I. Now you can see we only
have the building selected, I'm going to apply a curves
adjustment with command or Control M so that I can
only affect the building. I'm going to darken the black point and
brighten the white point, just as we did before, but this time we're only
affecting the building. We can also darken the midtones if we'd like
for a more dramatic look. I'll just press command
or Control D to D select. You can see what
this looks like. Here's the before and
after of the building. Here is the before and after with the sky
being perfectly white. I think this looks great so far. Now, to make this
even more contrasted, we're going to paint
on the building to really enhance the curves. I'll add a new pixel layer and I'll change the
blend mode to overlay. Then we can grab
the paint brush and begin painting in
black and white paint. To start with my black paint. I'm just going to enhance
this indentation right here, and maybe this area over here. Here we go. Then I'll switch my color to white
and I'll paint on the brighter areas like
over here and right here. I think I'll add one more
pixel layer just to keep this separate and I'll do a little
bit more overlay painting. I'm just going to
paint a little bit of lightness on the top here. All right, and now we
can go ahead and see a before and after of
this overlay painting. I love how dramatic this
makes the building look. We've turned a regular
old black and white photo into a work of art. Let me show you the
complete before. And after now, I just
love this effect. It's so pretty and mesmerizing, especially on this curvy
patterned building. I hope you had some
fun with this one. In the next video,
we'll learn how to create a gritty sports effect.
38. Gritty Sports Effect: Let's make a cool
gritty sports effect. This effect is good
for sports photos or gritty lifestyle
type of photos. Let's go ahead and jump in. First, we'll need to apply
the black and white preset. Then we can go ahead and enhance the contrast of the photo
with a curves adjustment. I'm just going to
make this slightly darker for the Black point. And then I'll brighten
the white point. Then I'll make the whole
photo darker overall. Here's that little
added contrast. This photo already had
pretty high contrast. You can see this really
dark shadow here. We didn't need to do too much, but I think that's a
good little improvement. Next, we can do some
overlay painting, just to enhance
things even more. I'll add a new pix layer and
then change it to overlay. Then instead of doing
contour painting, I'm going to grab
the paint brush, and I'm going to paint in
black on the background, and then in white on the man. This will make the
background recede a little bit more and
the man stand out. And I'll just switch
my color to white, and I'll paint this over
the man to brighten him up. Here's the before
and after of that. This is a little bit extreme, so I'll just lower the
opacity before and after. It looks like he has a spotlight on him,
which is perfect. Next, I'm going to
add a little bit of clarity just to
sharpen everything. I'll go to our filters, and then I'll apply
the clarity filter. This is applied
as a child layer. I'm just going to
grab this layer and drag it on top
of everything, so everything is affected. I'll increase the
strength all the way. Now you can start to see
this gritty effect here. Here's the before and after. We're really getting hyper
detail going on here. The only thing I don't
really like with this clarity filter is what
it makes the sky look like. It looks like concrete. This gritty effect
looks good down here, but on the skide it's
just a little strange. Using the paint brush,
I'm going to paint in black paint just to remove
the clarity from the sky. That's better. To
finish this all off, I think I'm going to
do a little bit of split toning to add some
color to the photo. I'll go to my adjustments and apply the split
toning adjustment. I'm going to make the
highlights a yellow color and I'll increase
the saturation. I think I'll just
increase it a bit, and then I'll make the
shadows a blue color. I'll increase that
just a little bit. Here's the before and the
after of that coloring, and I'll just select all of these layers so that we can see a complete
before and after. There we have it, the
gritty sports effect. Very nice. In the next video, we'll learn how to make a
mystical lighting effect.
39. Light in the Darkness: Add a beautiful light
spot to a dark photo. Now, this effect doesn't
work for every photo, but if you have the right photo, this effect can look amazing. To start, let's
just make sure we have the black and
white preset applied. Then we can go ahead and make the photo darker with
a curves adjustment. I'll press command or Control M. Then I'll darken
the black point. Then I'm just going to grab my paint brush and
I'm going to paint in black paint to remove this effect from this bright
area right in the middle. I'll paint it all over
this area and on the path. Now we can see that before and after of
darkening that area. The more we darken the outside, the more attention will be
drawn into this middle area, and the more we brighten
the middle area, the more it will stand out too. Let's go ahead and do that next. I'm going to add
a new pixel layer and I'll change its
blend mode to overlay. Then I'm just going to
paint in white paint over the bright spot to
make it even brighter. I'll paint this on
the path as well. Now you can see what
that looks like. Here's the before and after. Let's do a little bit
more brightening. I'll press command or Control M to bring up the
curves adjustment. I think I would like to
bring up the black point because there are
some dark areas that I would like to
be even brighter, and this will just make them
look a little bit more gray. I'll raise the black point. Then I'll invert this layer
with command or Control I so that I can paint it only on the areas I want to supplied. We have a black mask,
so I need to paint in white paint to reveal this. I'll just paint it around
the edges like this. Then on the path a little bit. Now you can see what
this looks like. Here's the before and after, just adding a little
bit of a halo of light. We're almost done. The last thing I'd like to do is actually darken the
edges a little more, especially up here at the top. I think this is distracting
from the center focal point. I'm going to add a
new pixel layer. I'm going to do something
we don't usually do, which is painting in black
paint directly on the photo, not changing the blend mode, just painting right
on here in black, to darken those areas. You can see the more
we paint in black, the more those areas disappear. You can be heavy handed with
this or just do it lightly. There we go. Here's the before and after
of that painting. I think it looks a little strange to have it
just subtly gray, so I'm going to paint a
little more off that one. To fully darken the edges. Here's the before
and after of that. Now I'll just lit all of our layers to show
you a complete before and after. And
there we have it. That's how you make the light
in the darkness effect. It's so beautiful.
In the next video, we'll play with the light again to make a dramatic backlight.
40. Dramatic Backlight: This video, I'll
show you how to add a dramatic backlight to your
black and white photos. If you haven't heard the
term backlight before, it's exactly what
it sounds like. It's a light that comes from
the back of your subject. Normally, this
doesn't look good for photos because it makes
your subject look darker, but in black and white photos, a dramatic black and white
can look very artsy. To start, I already have the black and white
preset applied. Then we'll need to
separate the subject in the background so that they
each are on their own layer, just like how we did with the
advanced motion blur video. I'm going to need to select
the background layer, and then I'll grab the selection brush tool
and I'll select the people. Once again, remember
that you can always press or Option to remove
from your selection, you can use the bracket keys on your keyboard to make your
brush bigger or smaller. Just make sure to
include everything here. I know it's a little
tricky to select people, especially with their hair. But don't worry. We'll come
back to that in a minute. Just get the main outline
of the people selected. And don't forget to remove
from the center of his arm. With that finished,
I'm just going to press refine in the
context toolbar. Then I'm just going to paint this over the edges of the hair. Mainly, we need to
worry about his hair. I think her hair
looks pretty smooth, so we don't need to
worry about that. I'll just press Apply. Now, I'll just press command or Control
J to duplicate this layer. Then I'll press command
or Control D to D select. Now you can see that the
subjects are on their own layer. Now that we've done that, we can add a light source
behind this layer. I'm going to select the
lower background layer. Then I'm going to
go to our tools and select the Ellipse tool. I'll just click and drag
while holding Shift to make a nice big circle that sits
behind our subjects here. I'm going to change the
blend mode to overlay. Then going into
our layer effects, I can turn on the gaussian
blur and increase this. I think I'll need to
type in a number here. Let's go with 300. With that, we've added a beautiful backlight
area to our photo. Now we can go ahead and refine some of this to make
it look more natural. When you have a bright
back light like this, it makes sense for your
subject to become darker. With the subject layer, I'm just going to add
a curves adjustment, command or Control M.
Then I'll make this a child layer to them so that this only
affects their layer. I do want to make them darker. But I think to do this, I'm going to use the
Black point again. I'll bring the
Black point inward to make the blacks darker. I think I actually
need to reset this. No points in the middle. I'll just bring this
in to darken it, and then I'll darken the
white point as well. You can see this
looks really natural. Here is the before and
after of that darkening. The next thing I want
to add to them is actually some rim lighting
around the edges. I'll press command or Control M. This is still set as a
child layer, which is perfect. I'm just going to make
this nice and bright. Then I'll invert it with
command or control I that I can paint this just on the areas that I want to affect. I'll grab the paint
brush and I'll paint in white paint on the very
edges of our subject. Now, I want this to show up, I'm going to bring the
flow all the way up, and I'm going to use a very
small paintbrush here. I'm just going to paint this on the very edges of our subject. This rim lighting is really just reflecting that we
have light spilling over from behind them and it just really adds to the
realism of this effect. Make sure to paint
this all around the edges and in between
the arm of our subject, that area right there. There actually is
already some rim lighting from the
original photo there. Just follow that. I'll just continue to do this all the
way around our subjects. With that finished, I'll
just show you the before and the before, after. Just a few more layers
to really refine this. I'm going to add
a new pixel layer and I'll do some
overlay painting. I'm just going to dodge
and burn a little bit. With white paint, I'm just
going to add some whiteness, maybe on the edges a little bit. My paint brush is still
fully set to 100% flow. I'm just going to bring that
back down to around 10%. Now, I can gradually add more
lighting in a few areas. Just to soften the edges
that I just painted. Then I'll just switch to
black and I'm going to darken a few areas that are extra far away from the light source. In the middle here, I'll darken. Just really darkening up
all the shadowy areas. Here's the before and after
of that extra painting. Just for good
measure, I'm going to add one more pixel layer. I'm going to paint in
white paint directly on this layer to add
even more back lighting, especially on the
hair right here. I just think this
looks too dark. I'm just going to
paint in white paint to lighten that area up. I think that looks
better. Here's the before and after of that. Now I'll just show
you the before and of all of those
child layers. Now it makes a lot
more sense that they have a light coming
from behind them. I just think this looks
a lot more natural. To finish, I'm just going to add a vignette on top of everything. I'm going to go ahead and use the rectangle
technique for this. All of those layers are
selected right now. I'm just going to
select the top layer, and then I'll click and drag to add a rectangle on
top of everything. I'll make sure we have no fill and a black stroke
that's nice and big. I think for this one, I'm actually going to
make this super big. I'll type in one than. Then I'll go to
our layer effects, and I'll check on the Gaussian
blur and bring this up. Let's go with 500. Very nice. I'll lower the layer opacity
down about halfway. Here's the before
and after of that. I think I just want to resize
the edges a little bit. I'll click on the
up here so that the bounding box will disappear as I make these adjustments. I think I'll bring
that out a little bit. Our subjects head is
pretty close to the top, so I think I'll bring this up. I think that looks good. Here's the before and Maybe he'll bring this edge
down a little as well. And with that, we've turned this boring photo
into a work of art. Now you know how to add
beautiful and dramatic backlding to a Black and White photo. To finish off this chapter, I'll show you a great
method for making your Black and White
pictures look vie.
41. Vintage: Let's make a vintage
black and white photo. I've already applied the
preset to our photo. Once you've done that, the first thing I
like to do to make a photo look more vintage
is add textures to it. Let's go ahead and
start with that. I'll go up to the top two
file and then down to place. I'll select all three of the textures that we have
in the exercise files, and then I'll press open. Now these images are
loaded into my cursor. I'm just going to
click and drag to add each one of these
on top of our photo. Me sure to cover the
entire photo like that. T I'm going to move the black and white adjustment
on top of everything because I don't want any of these colors to be transferred. Everything should stay
nice and black and white. Now I'll go ahead and
adjust these layers so that they blend in with
the photo beneath it. A great way to blend things
is to change the blend mode. With texture one selected, I'm going to change the
blend mode to multiply. You can see this has blended the two layers
together beautifully. We have all these little
spots, a few scratches. I think that looks pretty cool. Here's the before and after. Let's move on to texture two. If I change this one
also to multiply, you can see the photo is
starting to get really dark. In fact, with the
very first layer, it already made
the photo darker. Instead, I'd actually like to make the photo look
a little lighter if I can by changing the
blend mode to screen. Well, now this looks way too
bright, what should I do? Well, here's a little trick. We can invert this layer
with command or control I. This has reversed the
colors in this layer. Now all the dark spots
have become white, and you can see this if I change the blend
mode back to normal. Instead of a white
background with dark spots, we have a dark background
with light spots. When I change the
blend mode two screen, only the light spots stay. It's not making our
photo any darker. Here's the before and
after of this one. In fact, it's making the whole photo look
lighter, which is nice. Let's do the same thing
for this last layer. I'll turn it on. I'll change the blend
mode two screen, and then I'll invert it
with command or control I. Now up here, you might notice that an
assistant has appeared, and this is a total tangent. This isn't that important, but I just thought I'd
share it with you. It says the assistant
has rasterized the layer because it
was not a raster layer. I just wanted to
quickly explain what that means in case
you're confused by this. Whenever you go to file place to add images
into your document, the placed images are
actually image layers, and image layers can't
be edited normally. Only rasterized
layers can be edited. If your assistant
doesn't automatically do this and rasterize
your layers, all you need to do
is right click on your layer and then go down
to where it says Rasterize. Then you should be able to
edit your photo like normal. Now, normally, when we
just file open our photos, those photos are
automatically rasterized, so we don't need to
worry about this. Honestly, I wish that Affinity always just
rasterized any layers, any photos that we
bring in because it's annoyed that they're
not rasterized by default. But I just thought
I'd explain that to you in case you
were confused why the assistant was
appearing. Tangent over. Now that we have all of
our textures blended in. I'm going to select
all of them by holding shift and
clicking on the last one. Then I'll just lower the opacity so that we can see the
photo a little better. As one last thing to
finish off the textures. If there's any spots that
you're not really liking, you can go ahead and select the layer that has those spots. In this case, the dark spot
is coming from texture one. Then you can go over here and select the in painting brush, and with it set
two current layer, you can paint directly on this layer to
remove those spots. The assistant is
rasterizing this layer because we actually didn't
edit this one before. We only edited these top
two by inverting them. Once you have that all painted
away, you're good to go. I didn't actually think
it was that necessary to remove those
spots in this photo, but there might be other photos that
you're trying to turn vintage where spots appear
on your subject's face, and it might not look very good. I just wanted to show you that. With all of those
textures in place, I think this is
looking really good. We just need to add a
few more adjustments to finish off this
vintage effect. For the first one, I'm going to select the black and
white adjustment, and I'm going to
apply a lens filter on top of that to
create this CPA look. You can lower the
opacity if you'd like, but I like the default
settings as they are, so I'll leave that alone. Next, I'm going to fade
the shadows even more. They already look pretty faded, but I'll just add a
curves adjustment, and we can go ahead and adjust the black point by
bringing it up a little bit. I don't want to
overbrighten the photo though I'll bring the mid
tones back down to the center. Here's the before and after, very subtly lightening
up the shadows. I also really like adding a vignette to a
vintage looking photo. I'll grab the rectangle tool. I'll just do this
technique where we say, no fil, we increase
the stroke width, I'll increase this one to one d. I'll go to our layer effects and
apply a Gaussian blur. I'll just type in
300 for this one. I'll lower the layer opacity. Then with the eye
button turned on, we can go ahead and
adjust the edges here, maybe bring it out a
little bit from the sky. Here's the before
and after of that. Next, I think I want to add even more haziness
to this photo. I'll add a new pixel layer. Then I'm going to
grab the paint brush and I'll just paint
in white paint. We'll need to turn this
back to white. There we go. With a nice big brush
and a super low flow, I'm just going to add this
haziness over a few areas. This is also lightning. You can paint this
white color over areas you want to enhance
like the buildings. Little building back here. Here's the before
and after of that. Just some natural fading.
We're almost done. The last things I like to do to make a photo look older is I like to blur the
photo a little bit and then add some noise. First, I'll go into our filters and apply
a gaussian blur. I actually want this to be
applied to the photo layer. I'll bring this down and
place it right above the photos layer.
I'll zoom in here. We can increase
this to around 0.3. Here's the before and
after of blurring that. Then I'm going to add noise
on top of this layer. I'll just bring this
up to around 20%. Now you can see those two
layers working together. Here's the before and after. I think that looks really good. I'm just going to
select our layers now. Not the Black and
White adjustment. But all of the
rest, there we go, and here is the
before and after. This effect works best
when it's with a photo that looks like it could
be from the olden days, not a guy holding his Macbook. Just keep the subject matter in mind as you're doing this. But I think this
effect turned out really nice on this old village. With that, we finished learning about these really cool
Black and White effects. We're done with the chapter and we're almost done
with the course. To finish it off, we'll do some really fun start to finish projects in
the next chapter.
42. Final Projects: Nice job, everyone.
You're almost to the end of the course. But before we finish, we'll bring together
everything that we've learned to create three start to
finish projects together. These projects are
a great way to solidify everything that
you've learned so that you can be totally
prepared to create amazing black and white
photos all on your own. It's going to be a lot of fun, so let's get started.
43. Castle Project: In this video, we'll do a spooky castle project
from start to finish. I chose this photo
because it has a lot of beautiful texture and detail with all of this
beautiful stonework, the windows, and these
gargoyles over here. I also really like
the upward angle. I think it makes you as
the viewer look small, and as you look up at this, it just looks extra
ominous and spooky. I think this will
work really well with all of our edits as
we make this even more creepy looking.
Let's get started. To begin, let's add our preset. Here's the before
and after of that. Next, we can go ahead and
start working on the lighting. I'll press command or control
to add a curves adjustment. For this first curve, let's add an S curve to add a
little bit of contrast. Here's the before
and after of that. I'm going to add one
more curves adjustment, command or Control M. I'd like to brighten the highlights of this photo a little bit more. I'll bring over the white point, but then I'll bring the
mid tones down to meet the line so that we're only really brightening
the brightest areas. Here's the before
and after of that. I think this lighting is
looking really good so far before after Very striking. At this point, I want to do a little bit of
targeted lighting work. We can do some overlay
painting to do this. I'll add a new pixel layer and I'll change the
blend mode to overlay. Then I'll just grab
the paint brush, and we can paint in
white and black paint to brighten and darken areas. I'm going to have my flow set to around 10% so that I can
gradually add this painting. I'll press x on my
keyboard and we can go ahead and start by painting
black on the edges. This will cause these
areas to recede a little bit and draw our
focus in toward the center. I'll press x on my
keyboard and I can brighten the center area to
draw more attention to it. I think that looks pretty good. Here's the before and after
of our overlay painting. To make this extra spooky, we're going to do a
couple of things. We're going to add a vignette around the edges to
add more darkness. Then we're going to
add fog after that. First, let's add our vignette. I'll go to our shapes and
select the rectangle tool. I'm just going to
click over here to deselect this layer just
so that's out of our way. Then I'll click and
drag from edge to edge to add the rectangle. I'll remove the fill, Let's go over to our stroke
size and bring that up. Looks like we're going to need
to raise this quite a bit. Let's try 500. Then I'll go to
our layer effects, and we can go ahead and
apply a Gaussian blur. Let's make this
400, nice and soft. Very nice and I'll just
lower the opacity down. That's looking
pretty good. We can go ahead and adjust the
edges if we'd like. I'll click on the eye, so that disappears there. I actually really like
how this looks already. I'm not sure it needs
much adjusting. Yeah, I think I'll keep
it just how it is. Here's the before and after. Now we can add the fog. I'm going to add a
new pixel layer, and I'll grab the brush tool and we can begin to paint
in white paint. Let me just reset
this so it's white. To start, I'm just
going to paint white on the very
bottom edge of this. I think that looks pretty good, but we can always adjust
the opacity a little bit. I'm going to add
another pixel layer just to keep this separate. I'm going to bring more fog
into the edges of the photo, it's rolling in from
this left side. A great thing about
keeping these layers separate is now I can lower this one's opacity even more to really get the
effect that I want. I think this looks really good. Here is the before and after
adding in that fog effect. To finish this off, I think adding a little
bit of a blue tint to the shadows would really
bring this all together. So I'll go to our
adjustments and apply the split
toning adjustment. And I don't really want to
mess with the highlights. I'm just going to turn
the shadows blue. I think this looks really good. I'm just going to lower
the opacity a little. Here is the before and after turning that
a little bit blue. I just love how this
effect turned out. I'll show you the
complete before and after before and after. We added a lot of
darkness to this, but then we lightened
it up with the fog. I think this looks
very spooky and cool. I hope you enjoyed this project. The next one, we'll do a really fun project with a pop of color.
44. Balloon Project: Let's do another
project together as we make this hot air balloon
really stand out. What I was looking for
for this picture was a colorful subject against
a plain background, just to make it easier to make our selection for the
color pop effect. One other thing I liked about this picture was
that we had that, but we also had all of this
beautiful texture down here with the buildings and
all the overlapping objects. I think this will add
beautiful interest. To get started, before we add the black and
white adjustment, we're first going to select
the balloon to separate it. I'm going to grab
the selection brush. And with a larger brush, I'll just select the balloon.
That was pretty easy. The tricky part is
actually selecting this basket down here
with the tiny people. Just do your best to
make a selection. You can use a super tiny
brush to add in the people. But don't worry
about getting all of these really tiny details. That's not really
going to matter. I think the selection
looks pretty good. I'm going to press refine in the context toolbar and
then I'll press Apply. All right with our
selection made, I'm just going to go to our adjustments and all apply
the black and white preset. I'll deselect with
command or Control D, and then I'll invert this layer with
command or Control I. Just like that, the color
pop effect is looking great. Next, I really want to enhance the colors
in the balloon by making the sky that it's sitting against a more pure white color. To do that, I'm actually
going to select the sky. I'll just temporarily turn off the black and white adjustment
so we can see this better. I'll select the
background layer. Then we can begin to make
a selection of the sky. There we go. Nice and large. That has a pretty good
selection of the sky. I'm just going to zoom in here. I'll hold Alt or
option to remove a few of these objects that
accidentally got selected. This area is a little
tricky right here. With a nice small brush, I'll just hold Alt or option and drag across this
little pole thing. I think that looks pretty good. With the sky selected, I'm just going to press
refine. I'll apply that. Then I'll press command or control M to add in
a curves adjustment. To make the sky white, I'm going to bring
the white point over. But to remove the color, I'll also turn the black and
white adjustment back on. Now you can see what
that looks like. I think having a
wider sky really does help the balloon
stand out more. I'll de select with
command or Control. Now that we have
the sky worked out, let's turn our attention
to the buildings next. I'm going to add a little bit of contrast to the buildings. I'll press Command or
Control M. To start, I'm just going to make a little baby S curve to add contrast. There's the before and
after, very subtle. Then I want to do some
overlay painting, just to enhance
the contrast more. I'll add a new pixel layer. I'll change the len
mode to overlay. Then with the paint brush tool, I can paint in black and white to enhance the different areas. With black paint, I'm
just going to paint under this overhang right here on
this side of the building. Any areas that are d, I'm just going to make
them even darker. In a few spots. Then I'll change my color to
white by pressing x, and I'm going to paint on
this side of the building and on all of these little
white coverings here. Now you can see the
before and after of that. I think this added
contrast is really nice. But one problem
with adding all of this beautiful contrast is that it takes the tension
away from the balloon. I don't really want to do that. To dull the contrast
down a little bit. I'm going to add the
dreamy glow effect. I'll go to our filters
and apply a lens blur. I'll drag this out so it's
no longer chil layer. Then I can raise the radius all the way
and preserve Alpha. Next, we can go ahead and change the blend mode to screen. You can see the beautiful,
dreamy glow effect. I'm just going to
lower this down. I want the lightness to stay. I think that looks
really beautiful, and it has toned down that
contrast a little bit, but you can still see
some beautiful contrast. It's just a little duller.
We're almost done. As a last step, I want to
bring the focus more to the balloon by blurring
everything but the balloon. To do this, I'm going to
do a funny technique. I'll select the top layer. Then I'll right click and go down to where it
says Merge visible. This will take all
of these layers and put them all
on a single layer. With this single layer, I can very quickly grab the Lasso tool and draw a little rough selection
around our balloon. Then I'll press
command or Control J. And then command or
control D to D select. We can delete the merge
visible layer now, and now we have the balloon
all on its own layer. Because it's all
on its own layer. Now we can add a blur underneath this layer and it will only affect all of the lower layers. You can see what
that looks like. This balloon stays
nice and in focus, and since the sky is
all white anyway, that rough selection, you really can't see it.
That's pretty cool. I'm just going to raise
the radius to one pixel, and I'll check on
preserve Alpha. You can see what
this looks like. Here's the before and after
just giving it a subtle blur. Really quick, I just
wanted to point out that now that the balloon
is on its own layer, we could easily resize it if we wanted to
with the move tool. Just don't overlap it
or you'll see the sky. In addition, we could also add any adjustments that we want to this layer as child layers to affect the
colors or the lighting. I just wanted to point that out. Now that this is separate, you really can do whatever
you want with it, which is pretty nice. And with that, we're
done with this project. Here's the complete before
and after. Great work. Aren't color pops so fun? I just love how this
one turned out. In the next video, we'll
finish off this course with a beautiful vintage
looking wedding portrait.
45. Wedding Project: You made it the last
project of the course, Let's make a beautiful
wedding portrait together. I love this picture. They're posed so nicely against
this blurry background. They already have some
nice back lighting. The way they're arched,
add some nice movement, which always makes pictures
look more interesting. To start this edit, let's add the black and
white adjustment. For this project, I
really want to play up the back lighting to make
it look more intense. To ASMxra back lighting, let's actually
select our subjects to separate them
from the background. Just to make the
selection easier, I'll turn off the black and
white adjustment for now. I'll select the
background layer. Then we can grab the
selection brush tool and begin to make our selection. I'm going to really take my time selecting around
all of the flowers. And we can refine
this just like we usually refine hair once
we're done with it. I think our selection
looks pretty good. I'm going to press refine. Like I said, I'm going to paint over the
flowers and the hair. I'm quickly just going to paint all around the edges here. Hare is really tricky to select. But I think Affinity is doing
a pretty good job here. For the flowers, I actually
think this looks pretty good. Maybe I'll just paint over
this area right here. But I think Affinity made a good selection.
I'll press apply. Then I'm going to right click on the background layer and
I'll press duplicate. Now we have two exact copies here and I'll apply
a mask to the top one and then I'll press command
or control D to D select. I like adding a mask to our subjects to separate
them from their background because this just makes
it more flexible if I ever want to add or remove
from the selection. I think this just makes
it less destructive of a way to separate your
subject from their background. That's just the way I'm
going to do it this time. I'll turn the black and white
adjustment layer back on. Now that we have them more separated from their background, we can go ahead and
add back lighting. I'll select the bottom layer, and then I'll grab
the ellipse tool. I'll hold shift to
make a perfect circle, and we can go ahead and add
this behind our subjects. I'm going to change the
blend mode to overlay. Then I'll lower the opacity. We can go ahead and go to layer effects and add a
gaussium blur to this. I think I'll increase
this to 300. Now you can see the
before and after of that. This back lighting
is so beautiful. I think I'll actually duplicate this layer with
command or control J. This begins to make this
area look way too bright. But if I just bring this down, then we can add more light
to this bottom area right here. Before and after. Now you can see
them both together. Here's the before and
after. Very nice. To enhance this even more. Let's add more rim lighting. I'm going to select
our subjects layers and I'll press
command or Control M. We can make this a nice bright curve and then make it a
child layer to our subjects. Now you can see this is only being applied to our subjects. But to turn this
into rim lighting, I actually want to invert this
with command or Control I. That way, I can paint in white on this black mask to reveal this brightness just on the
edges. With white paint. I'm going to go ahead and
paint this over the edges, especially the hair, I think looks really nice with
this rim lighting. With a smaller brush, I'll just bring this
on the edges here. You can't really see
it on the black suit, but there are some bright spots that I'll just brighten
a little bit more. With that, I just finished
painting the rim lighting. Here's the before and after. With this adjustment
layer still selected, I'm actually going to
take a larger brush and I'm just going to brighten
their faces a little bit. Just so we can see them
a little bit better after to enhance the
lighting even more. I think we need to make
our subjects just a little bit darker to contrast
with the back lighting. I'll press command or control. I'm just going to make this
a little bit. No by much. Here's the before and after. With that, we finished
with the back lighting. I think this looks
really beautiful and natural after so pretty. Now that we've finished with
all of that back lighting. The next thing I
want to do is make the photo look a little
bit more vintage. Let's start with the contrast. I'm going to add a curves
adjustment on top. Then I'm just going to reduce the contrast by raising
the black point. I'll also brighten the
white point a bit, just to make the photo
overall a brighter. Before and after. Next, let's add some textures
on top of this. I'm going to go to file place, I'm going to select
these two textures I'm just going to click and drag these over the entire photo. There we go. These have been placed underneath the black and white adjustment,
which is perfect. That's right where I want them. I'll turn off texture two, and I'll select texture one. For this first one, I'm going to change the blend
mode two, multiply. We have about those
beautiful dark spots. Then for texture two, I'm going to change
this one to screen, and then I'll invert it
with command or Control I. Now we have these
beautiful white folds and scratches all over it. This looks really nice. I'll hold shift to select
both of these layers, and I'll just group them
with command or control G, and then I'll lower
the opacity of the whole group to make
this look more subtle. I don't want this to be
a distracting effect. I think I'll lower
it quite a bit for this one. To finish this off. I think it'd look nice
to add a little bit of color and a little
bit of a vignette. To add color, I'll
need to put this on top of the black
and white adjustment, and I'll just add a
length filter adjustment. I'll lower this down. I think
that looks pretty good. Now we can finish this
off with our vignette. I'll grab the rectangle tool. I'll click and drag this out. I'll say I want no fill
and a large stroke. Let's go with 1,000
for this one. I'll go to our layer
effects and apply a gaussian blur at 500 pixels. And I'll lower the opacity down. Just like always, we can
adjust the edges here. I think I'll lower this
down to take it off of her dress like that. Maybe I'll bring this out just
a little bit on each side. I want to make sure this
isn't darkening them at all. I'll just select all those
layers so we can see it complete before and after. This is such a fun effect that can really be
played up like this, where we can make it as
subtle as we'd like. It's just beautiful. Great
work on this project.
46. Class Conclusion: Congratulations. You
finished the course. I am so proud of you. I know that was a lot to learn. I hope you enjoyed
these tutorials, and I can't wait for you to make your very own black and
white masterpieces. Thanks so much for watching, and I'll see you in the next Affinity
Revolution Tutorial.