Transcripts
1. Welcome!: Alright. Welcome, everybody
to my new digital art course, where we are going to create
this painting together with a completely free
software crea. I'm Duplo. I'm an experienced artist
and designer from Germany, and I'm going to be your teacher from whom you're going to learn all kinds of tricks and
strategies for digital art. My favorite styles
are impressionism, abstract art, landscapes,
sometimes a touch of realism. I've also done lots
of design work, be it web design, logo design, or level design for games. And in my opinion,
the best software, by far for making digital art and graphic design is Creta. I mean, it's completely free. It has everything you need,
and I've been using it for many years without even thinking about purchasing
something like Photoshop. Now, in this course, I want
to give you a realistic, practical painting process
that you can follow to figure out how to make
digital art yourself. So I want to enable you to
transform your own ideas into finished paintings that
make sense and are pleasing to look at.
Because here's the problem. Most digital art
education just tells you, this is a nice function, and
that is a nice function, and this is how you
paint this one thing. But how does an artist actually come up
with the subjects? What do they think
during the process? How do they make sure
the colors look good? Which tools do
they actually use? And how can you combine multiple references to create your own unique composition? These are the questions
that I'm going to answer in detail in this course, while making this artwork
together with you. Yes, you can paint this. I'm going to make
sure of that even if you're a total
beginner of art. Now, I have to say
that this is not a course on how to use
Krita specifically. I'm not going to explain every tool and every
function there is, mostly because we don't
actually need them. But if you are a
total software nop, you've never used Krita before, and every time you
use a new program, it takes you ages
to get used to it. I recommend you take
my other course first Krita Quickstart. There I go in depth
on the program and give you some
exercises to practice it. So check it out on my
profile if you need that. This right here is
very project based. I'm just going to give you
a quick overview for Creta, the basic tools, and
then we're going to jump right into
it with the artwork. We're going to paint together, and I'm going to explain what I'm doing and what I'm thinking. And don't worry. The lessons are obviously not as fast
paced as this intro. We're going to collect ideas, forge them into a composition, make a sketch, and fill everything with beautiful
colors and details. And after that, I'm
going to give you some personal advice
for your art journey. So in the end, you
will have one, a very nice painting that you can use as a wallpaper
or whatever, and two the ability to
create many, many more. Now, what you should have for
this course is a computer, obviously that can run Creta, and ideally a drawing tablet of some sort with or without
screen, doesn't matter. Make sure that works for you, and then you're going
to go with our course. So when you are ready, see
you in the first lesson.
2. Why digital art is great: Before we start with
the actual course, I thought it would be
a cool idea to make a little lesson about why
digital art is so great. Why is it useful? Why is it fun? Why should we care about that? Now, you might already be
completely sold on digital art, and you don't need anyone
telling you you should do it. But I still think
that this is good for keeping the bigger
picture in mind. There are actually
very good reasons for why we should
be doing all this, and a little sense of
purpose will give you a lot more motivation
when we enter the process of
creating our artwork. And that's what we need. So let's start with the first and probably one of the
most important reasons. Digital art is a way to create that has a very low threshold. I don't think many people realize how big
that actually is, but digital art is something
that you can always do, and you have to prepare
pretty much nothing. Okay, I know for this course, I said that we're going
to plan the artwork and find a reference and plan the composition
and everything, but that's because
we're going to make an actual big painting. But of course, you don't
always have to do that. Once you know how
the program works, you can always just open it up, make a little tree sketch
or a little abstract artwork or pattern or something whenever
you feel like it. That is so good. You can just always make
something if you want. You don't have to arrange
the canvas or look which paints you have in stock or clean up your
workspace first. No, you can just open
up Krita, right now, scribble with the brushes and see if you can make
something out of that. Now, I'm, of course, not
saying that digital art is superior to traditional
art for that reason. You know, the preparation
and the chaos, it's part of the process, and many artists
actually like it. But just imagine
what would happen if creating was as convenient
in your life as consuming. Think about that for a moment. This is what knowing how to make digital art
essentially gives you. And I must say,
from my experience, when I started
making digital art, I just found myself
making art way more frequently than before because
it's just so convenient. Then the next reason
is a more simple one, but of course, digital
art is very inexpensive. You pretty much only have
the electricity costs of your computer or maybe you
buy a course once in a while. But aside from that,
you really only need one drawing tablet for
100 bucks or something, and it's going to last
for a very long time. I think I bought
mine, I don't know, eight years ago, and it
still works on day one. I think I'm going to be using
it for another eight years. This, of course, depends
on the kind of tablet you use and how intensively
you utilize it. But the point is just that you pretty much don't have
to rebuy anything. In digital art, the
relation between how much you have to invest
and how much art you can create with is pretty insane if you compare
it to anything else. What's also insane is how many options you
have when you make digital art from drawing and calligraphy to
pastel and painting, you have pretty much
everything in Krita, and there are 50 brushes for each of these
methods of creation. If you start combining
these brushes and you throw in the other tools and
filters into the equation, then you end up with so
many different art styles and ways that you can
depict something. To be honest, it's maybe
even a little bit too much, and in the beginning, it can be overwhelming how many
options you have in Krita. But that's why
we're here, right? That's why I'm going to
show you how to pick brushes and how to plan your
artwork and everything. And I'll give you
a good overview of different methods of creation
through our project. So with time, it will
become more clear. You will find the brushes you prefer and the art
style that you like, which is probably different than what you imagine right now. Because Krita just gives you
all these options, right? You can try out everything
and every tool, and suddenly you find something that you want to
use in 50 artworks. You just never know, and that makes digital art very exciting. You can just use one or two
brushes for the rest of your life and just paint all kinds of different
subjects with them, or you can try out a totally different art
style every time, and anything in
between is possible. But what I also really like is that you can always
edit everything. You can go back to
your old artworks and see what they look like with a different color scheme or with a different filter or if
you still have the layers, you can sometimes
even move stuff around and rearrange
your compositions. And if you then don't know
which version you like better, then you can just
save both of them because you can replicate
digital art infinitely. It doesn't get old and
it doesn't go away. So you can always return
to a digital artwork that you left due to a lack
of motivation or skill. And that takes away a lot of the pressure that you
have in traditional art. You don't have to worry
about the paint drawing in a bad way and you have
to finish something now, even though you're not feeling it or wasting your
precious paint. Once again, I know it's
part of the process. Many people like that, and traditional art
definitely makes you very good at planning your artworks in advance and sticking
to the actual plan. But digital arches comes with
this convenience that makes it more likely that you actually make art and
you make it often, and that's what's so
valuable about it. Alright, then what is digital
art actually useful for? What are the practical
implications of making image files
that look nice? That's definitely
not a bad question to ask if you don't
know much about it, but there are probably more things than you're
aware of right now. First of all, you
can, of course, always print them out and treat them like traditional artworks. You can hang them up in
your kitchen and tell all the visitors that
you painted this because it's actually
true. So there is that. For example, this is my
grandma's dog Nellie, who died about a year ago, and I found this little
picture on my phone that I had taken of her and decided
to use it as a reference. So I painted this artwork in Krita and printed it
out in the print shop, so it actually looks
really good now. And then I gifted it
to my grandmother. And you can do this with all your digital paintings
at some point. You know, they don't go
away, they don't get old. You can just at some point, when you have the
means or the time, print them all out, and then
you have them in real life. And they will look
really good if the resolution is high and
you use a quality printer. But even if you don't want or need these artworks
in real life, they are still very
useful because on the Internet on
websites and everything, you always need visuals, and if you know how
to create them, then you can collaborate with many other people and
create great stuff. You can create background
patterns for websites or wallpapers or banners
or profile pictures. People always need that, and
it's not hard to impress them if you know a few basics
of digital art and design. Alright, then the last but certainly not least
important reason for why you should make
digital art is a more classic one that
applies to any art from, and that is simply creative output is satisfying
and relaxing, right? Even if we ignore all
the other reasons, digital art is just fun. It simply feels awesome to make something on your
own step by step, and you slowly see it turn into something
that looks amazing. That's a feeling that I
think we're all looking for, and we're going to get it
in this course for sure. So yeah, you should be
quite convinced now, so I'm going to stop talking and invite you to
the next lesson. So let's explore how
to make digital art.
3. Krita overview: Alright. Ladies and
gentlemen, welcome to Krita. This is a program that we're
going to use in this course. And in this lesson,
I'm going to give you a quick overview
of how it works. So if you're already
familiar with Krita and its basic functions, then you can skip ahead
to the next lesson. Again, this is not
a course on how to use every tool and
function of Krita. I've got a different
course on that, so I'm not going to
repeat everything, but we're not going to use
that many tools anyways. We're going to stick
with the basics and make a clean artwork. So here is everything that
you need to know if you have absolutely zero idea how to
use this awesome software. First of all, you
can download it at krita.org for your
preferred operating system. It works on Windows,
Mac, Linux, whatever. The installation process
of Krita is very simple. It will take you through
it automatically. You don't have to buy anything and you don't even have
to create an account, which is quite impressive for a software of this
magnitude nowadays. You can just download the
software, install it, and open it up, and then
you see this start screen. This is where we're going
to start exploring Krita. Now, first of all, you have the option to make a new file or open up any file. If you click on Open Image, then you can see
that Krita supports pretty much any image file
that you can imagine. So you can pull
any image in here, edit it however
you like, and then save it as one of
these file types. But in our case, let's
just click on new image, so we get this little window
here and there we can change all kinds
of settings about the canvas that we're
going to create. But the only thing that
I'm usually worried about here is the resolution, the image size,
which determines how many pixels our
picture will have. Let's set it to 2000 by 2000
pixels and click on Create. Avala, this is the
user interface of Krita with our canvas
in the middle. So this white box, the canvas is where we can draw and paint and do
all kinds of stuff. And the thing that
the program will save as an image as
soon as we're done. Very nice. You can
zoom in and out by scrolling with your
mouse and you can move around this
canvas by holding down the mouse wheel and then
dragging the canvas. Or you can hold down the
space bar on your keyboard, and then you can also click
and drag this canvas around. Additionally, you can rotate this canvas by pressing
four to rotate it left, six to rotate it to the right, and five to neutralize it. Or you can also find this
little circle down here where you can also rotate the canvas or zoom in
and out on this bar. So this is basically how you
can navigate the canvas, which is something that you do all the time when
making digital art. So I recommend you do this a few times and get very
comfortable with the process. Then the things to the side of our canvas are the dockers. We got the toolbar on the left, all kinds of tools that
you can click on and use. Then on the right side, we got the color selector where you can shift around
to change the hue. And in this triangle,
you can change the value and saturation
of your colors. Below that, we have
the layers which are also very important
for digital art, and below that are
the brushes of Krita, which are some of
the best that you will find in any
digital art software. By the way, if this interface
looks very different for you or you want to change something about it, don't worry. You can easily do that by moving any of these dockers around, as you can see, it's
very customizable. And you can also go
to settings, dockers, and there you have all
these dockers that you can additionally show or hide. These are the ones that
I have and I recommend. And of course, you can
change the appearance of Krita by clicking on themes, and there you have
a few nice options. I mean, pretty much just one
nice option, in my opinion, but yeah, you can just look around here and
see what you like. So yeah, you can take
your time here and adjust the interface to
a way that you like, and then it is time to check out the tools and
functions that we have. We can find those on the
left side on the toolbar. By the way, you can, of
course, also adjust this and right click and change
the size of these icons. And whenever you click
on one of these icons, you have the according
tool selected. First of all, and
most importantly, we got the brush tool for
drawing and painting. This is what we're going to use most of the time in this course. Whenever you have the brush tool selected, which you
can, by the way, also do by pressing
B on your keyboard, B like brush, easy to remember. But whenever you
have it selected, you can apply paint to the canvas by clicking
and dragging. And you're creating digital
art just like that. And of course, you can adjust all kinds of things about
your brush strokes. For example, their shape by clicking on one of
these brushes down here or the size by
sliding here, the opacity, how dense the brush
strokes appear here, and also very important, the color by clicking on any of these colors on
the color selector. You can also pull up
a quick access window for any of these things
by right clicking, right click there you can
select the color, brush, and do a few things with the brush stroke and then right click
again and it's gone. That is a very cool
feature about Krita. Now, really, really important, what I'm always doing in digital art, undoing
and redoing. You can undo any
action by pressing Control C and redoing
action by pressing Control Shift C.
These actions are so important in fact
that I have mapped them to buttons on
my drawing tablet. You can do that in your
drawing tablet software. Just map these hot
keys, Control C, and Control Shift C to
any place where you can quickly access them because you're going to need
them all the time here. Do that right now and then let's check out
these other tools. We have the line tool with
which we can create lines that have the exact properties
of our brush stroke. So we can change
the opacity, size, select a color, select a brush, and then make a line that
looks just like that. That is very useful, especially because you can also
hold shift while dragging your line
to only select from a few given
angles and like that, you can make a perfectly
horizontal line or a perfectly vertical
line like that. Then we got a few
more shape tools, like you can make a
rectangle with this one or circles and ellipses, and you can also make your
own shapes with this tool. You always have a
few options for these tools if you go to
the tool options, which is, by the way, also a
docker that you can activate on settings
and dockers. You should always
have it, I think. It's a very useful one, and
there you can, for example, make your shapes be filled with something or change
something about the outline. And that's especially nice if you want to design something. In our course here, we're not going to use these tools a lot. The same goes for these
next few tools here, like the multi brush
tool, it's funny. You can check it out or
these different curve tools. They were, of course,
always there, but I pretty much
never use them. Let's move on to that one,
the transformation tool. This is where it gets
interesting because now you can see we can actually manipulate
different layers in Creta. Layers are different work
spaces that are overlapping. You can view your layers
on the right side here. Always, you can
create a new layer or right click and
delete a layer. You can double click
to name your layers. And with this
transformation tool, you can move them around and adjust them
however you like. And this is something that
we're going to use later on to fine tune our composition and keep everything
organized and adjustable. That's a very important trick in digital art to always
use a few layers. You can also move your
layers around with this tool or with the crop tool, you can select an area
and then press Enter, and then that's your new image. But yeah, let me undo this. And then we got a few more tools like the gradient tool with which you can make a
nice color transition with a color that
you have selected. You can just make a line
and then along this line, you have a color transition. I often use this tool to create a smooth sky for the
background or something. Okay, then we got the
color picker tool, which lets you pick
any color from the canvas if you want to go back to a color that
you used before. But I think this
tool is unnecessary because whenever you paint something with the
regular brush tool, you can always hold
down Control and click on any color on the canvas,
and then you guard it. Or you can also view your color history here on the right side of
the color selector. You see, there are
all the colors that we've used in order up
to a certain point. Then there are a few
more random tools that are not necessary
for this course like this fill the whole area tool or this measure the distance
between two points tool. And then down here are
the selection tools with which you can
select an area. And whenever you have
an area selected, you can only edit this area
and nothing outside it. So if I make a rectangle here, then I can only draw or
paint inside this rectangle. I can also only
create shapes here. And yeah, that's
basically how it works. Of course, we can
make a circle area or our own angular area
or free hand area. You can always undo an area by pressing Control, Shift and A, then the area is gone and
you can edit everything, or you can go to the
tool options and change how your areas interact
whenever you make a new one. If they're being added or if they should
replace each other or, you can check this out. I usually have it at replace. Whenever I select a new area, it replaces the old one. Unless you hold down shift
while making a new selection, then you can always add another one without
replacing the old one. So, ladies and gentlemen,
I think that is it, for the most important tools
and functions of Krita. I hope I didn't miss
anything important, but yeah, I think we
got it all covered. You should know how to navigate the interface and how to
adjust it to your liking, how to navigate the canvas, how to draw and paint
and do all these things. And you should have at
least a little bit of an understanding of how
layers and selections work. If you're still a bit confused, then feel free to take your time and experiment
with the software. That's still the best
way to learn it. So make a few random documents and just edit stuff about them, make brushstrokes, make shapes, select areas on different
layers, and move them around. And yeah, that way, you will get familiar
with Krita very quickly.
4. How to get brushes: Now, one last thing
before we can move on to the practical part of
the course is brushes. We got to talk about brushes a little bit because in Creta, as you can see, we have many, many nice brushes, but
at least in my opinion, and in the opinion of
many other artists, these brushes are
still not enough. We artists are very
greedy people. We always want more and better
brushes. So what do we do? We download brush bundles
and impart them in Krita. Brush bundles are basically like packages or collections of brushes that other people have created that you can
add to your brush list. Like, for example,
these beautiful RGBA brushes with which you can create very traditional
looking brush throkes. It's super fun to
paint with those. By the way, you can
always search for your brush bundles or types of brushes on these tags here, like all paint brushes or all
RGBA brushes or whatever. So how do you get
a brush bundle? Well, in Krita, you
can go to settings, manage resource libraries,
and there you have an overview of your
brush bundles and you can activate or deactivate them. These are the ones
that I'm using, and I am going to put a link in the course description
or lesson description, where you can download
these brush bundles. So we're all on the same
page in this course. So download them right now, search for the file that says Duplo brush bundles
or something, and then you can store
them in a place on your computer where you can find them, but
they don't annoy you. And then you can go
to Krita settings, manage resource libraries. And if you click on Import, you can search for these brush
bundles and import them. You may then have to click on them manually and activate them, but they should appear down
here in your brush list. If they are not there,
then don't panic. Sometimes you just
have to restart Krita for the new
brushes to show up. But, yeah, that's basically it. You can, of course,
repeat this with other brush bundles that you see other artists use
on the Internet, but we're going to stick with those that we have right now, especially these Meo
impasto brushes. Let me search for the tech real quick. There we have them. I just discovered these
brushes this year, and I've already
used them so much. These brushes are
absolutely incredible. Maybe even my favorite brushes
in all of digital art. I mean, come on, look
at these brush strokes. That's literally like
traditional art. You can mix the paints so well here and create these
unique textures, make sure you have
these brush bundles so we can use them
in our artwork. But before we can start
with that, of course, we have to be clear about what we want to create
in the first place. In the next lesson, let's
collect a few ideas and develop our composition.
See you there.
5. Finding the idea: Every good artwork
starts with a good idea, and this is the topic
of this lesson. Of course, finding an idea for an artwork can happen
in all sorts of ways. You can see something in
real life and be inspired. Maybe you make a photo and
use it as a reference, or maybe you find an image or an artwork on the Internet
that you want to replicate. Or, of course, what could also happen is you have an
idea in your head. Just, Oh, okay, I
want to paint this. Everybody has their
own way to get ideas, and there are so many things
that you can make art about that there is not really something that
I can tell you here. The idea is synonymous
with creativity, and that cannot be
taught by definition. So giving you a precise roadmap
for how you should come up with ideas like this is what you
should draw and paint, it would be a crime
against art itself. What we're doing in this lesson
is just one way to do it. I hope that is
very clear to you. But I think it's a
very interesting way, and it will teach you a lot
about art. So let me explain. The most simple way to handle the idea phase would
be to have an idea, find a reference, and just paint that reference. Very classic. You just open up the image, then you start Creta, and you can immediately begin
with sketching. But doing it that
way, let's be honest, would be a bit boring
because it would only be the tactics of
painting from reference, which we'll of course
cover later on. But you wouldn't learn
anything about composition, which actually is really, really important if you
start out making art. So in this course,
let's start with a position of, I have an idea, but I don't really
know what to do with that idea and how to make
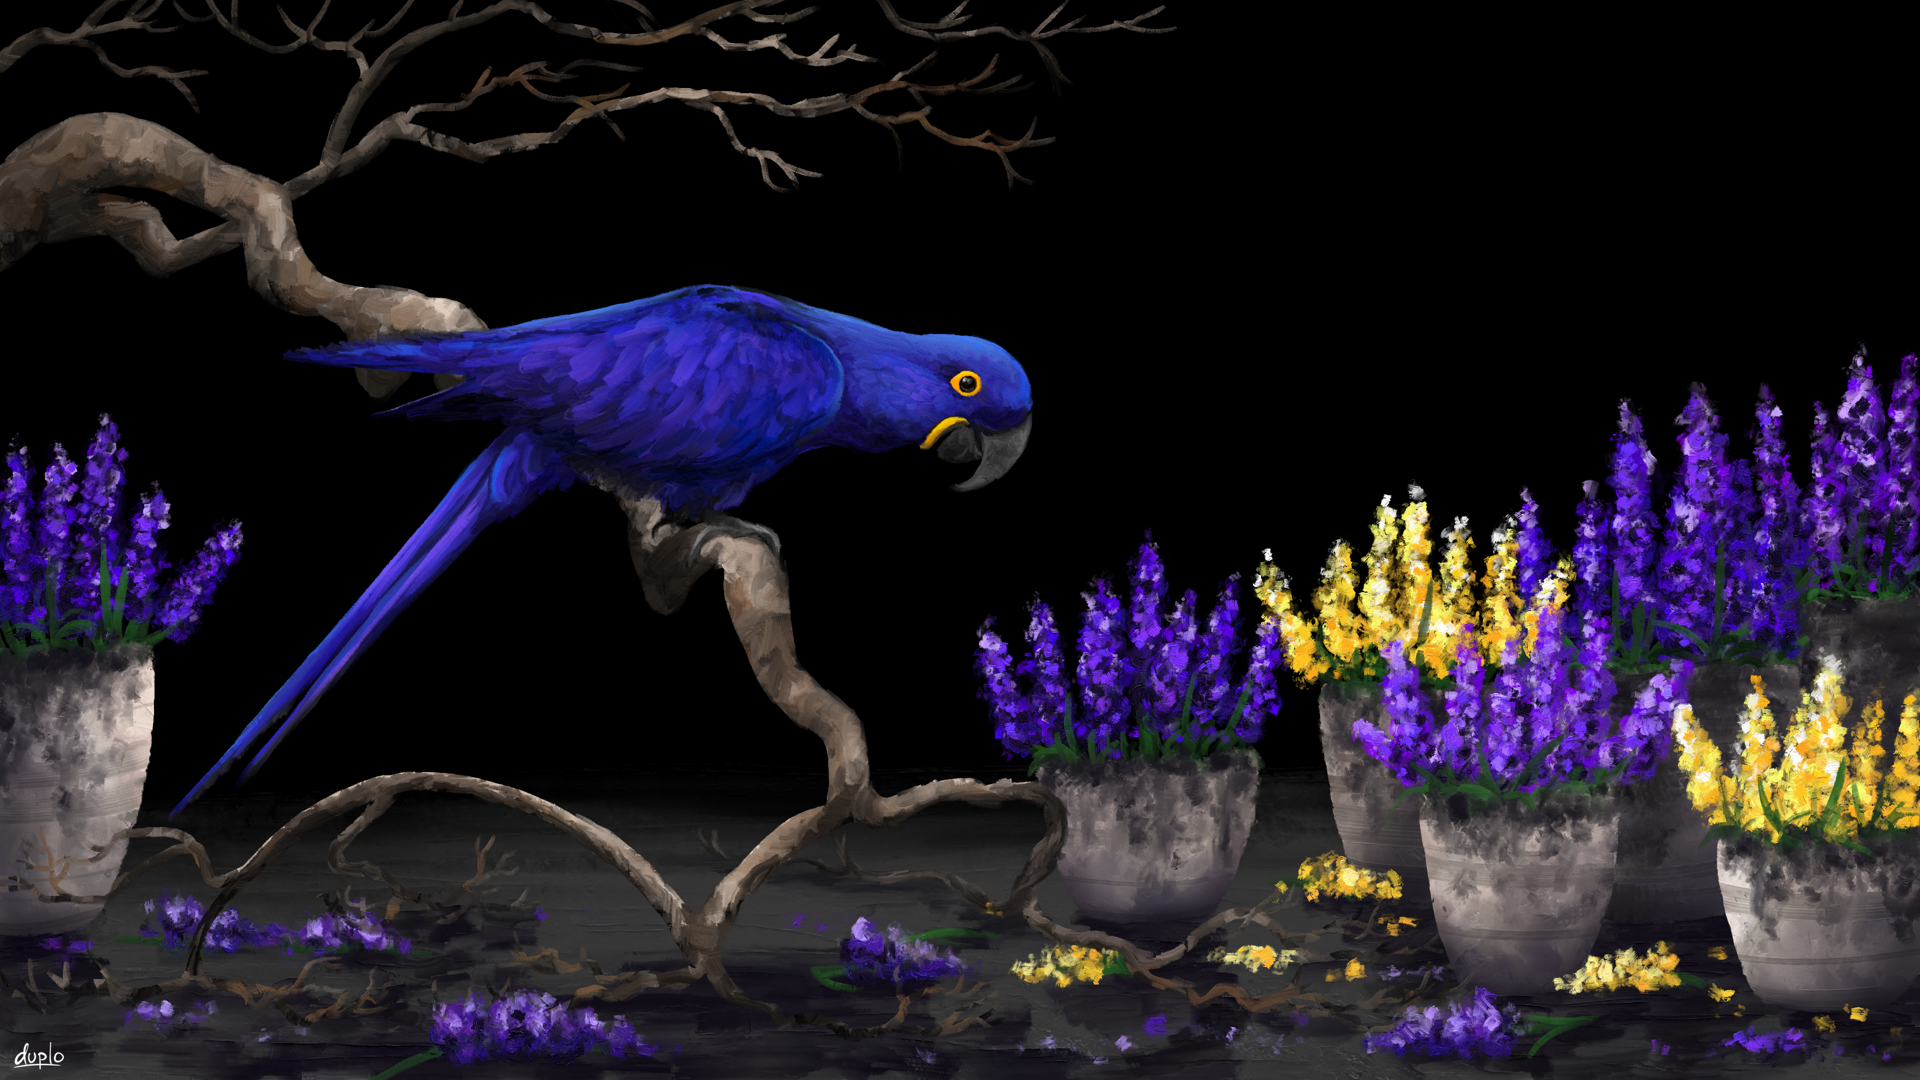
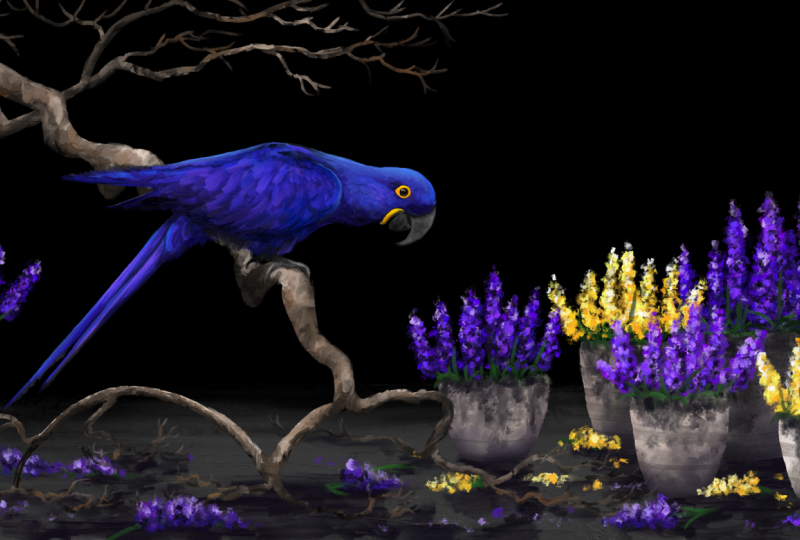
a composition out of it. So my idea is to paint
a hyacinth macaw, which is this blue parrot. I hope I pronounced
that correctly. But, yeah, I recently saw some images of this
hyacinth macaw, and I thought it would be
really cool to paint one. I'm a big fan of these
deep blue feathers, definitely one of my
very favorite colors. But also painting something like a bird is just perfect
for this course, because you can't
mess up as much as in a human, for example. You know, if you
paint a human and the eyes are just slightly off, it just looks totally different, like another person immediately. But if the beak of a bird is a little bit too
small or too big, we as humans, we don't
really notice that. We don't care, right? It's
still gonna look like a bird. So yeah, for beginners, I think this is perfect, but I'm still going to
need a reference for the hyacinth macaw
because I don't have its anatomy
perfectly in my head. So let's open up a
search engine of choice and type in
hyacinth macaw. Now, as an artist, I usually prefer going to a specific stock image
site like paxels.com, if I need a reference, because the images are
usually higher quality. They've been uploaded by
photographers and are not just pulled from random websites like the Google search results. So these images usually have very high resolution and
a clean composition. However, in my case,
I'm searching for something very specific,
a hyacinth macaw. Unfortunately, they're
not going to have that many photos of that
on a stock image website. So I'm using a
standard search engine here to find the reference. But if you want a high
quality reference for something more generic, like, I don't know, a dancer, a squirrel
or an Italian street, then you will usually find a very good selection
of those on something like pixels.com or also pixabay.com or
something like that. That's a little hot
tip for you guys. Anyways, I think I found my reference for
the hyacinth macaw. I like this image for a
few particular reasons, and this is where
the artist's brain comes into play,
so pay attention. First of all, you guys
need to realize that a reference is not
a clear guideline, but just a tool. When I say, I like
this reference, then this doesn't
mean that I want to recreate this exact photo. In fact, I pretty much only
like the hyacinth macaw. So when I was looking
for the reference, I only paid attention to what the blue parrot
looks like in the images. And right here, it's
really fitting. All the rest, the background
and these leaves, the colors, the textures. I'm not really
interested in that. I want to make my
own composition with the hyacinth macaw, and this particular image
works as a reference for that. Parrot is crisp and clean. It has nice details,
super saturated colors. And also, there are two types of contrasts that immediately draw my attention as an art and
design theory connoisseur. We have, of course, a big
complimentary color contrast with this bright yellow
and dark saturated blue. That's the case for every
hyacinth macaw, but, I mean, in this case, I especially like it because the colors
are so clearly visible. Complimentary colors always
draw attention to them, and they are
naturally harmonious. So a hyacinth macaw is a very obvious and
pleasing subject to paint. Now, you might say, but Duplo isn't the
complimentary color of blue orange and the complimentary
color of yellow purple? Because that's what people
usually learn first when they get in touch with color
mixing and color theory. And I'd have to say, Yes,
you're technically correct, but I'm also right because color theory is not such an exact science
that it really matters. You see, complimentary
colors are simply colors that are so
far away from each other on a color wheel
that they have opposing psychological effects
and therefore lots of tension between them. And due to the fact
that there are slightly different color
wheels, this can vary. Depending on which
color wheel you use, the complimentary
color of this dark, saturated blue is
either a little bit more orange or a
little bit more yellow. Both is possible. In fact, if I open up this image in
Krita and I select the colors, then you can see this
bright yellow and this dark blue are on the exact opposite side
of the color wheel, which is an RGB color
wheel in this case. So if you work
with complimentary colors and, for example, search for a
reference with them, then you don't have
to be super precise. That really opens up
many more possibilities. On a color wheel, you can
always slightly shift left or right from a supposed
exact complimentary color, and it will still be a
complimentary color to your color. Looking for a reference
that follows color theory in that way is always
a good way to start. So I really recommend that
you get into the basics of color theory if you really want to develop great compositions. So we definitely already
have complimentary colors on our main subject that will draw attention to it automatically,
and that's great. But the other type of
contrast that I'm seeing here is a little bit harder
to spot and more advanced, and that is a shape contrast. I really like the way that
this parrot is sitting on the branch because they
are very opposing. The branch is very
burly and natural. It has like these, I don't
know how to say, rough edges. And the parrot is
super clean with more geometric shapes that are totally different
to that branch. If we soom into that beak, it almost has this
mathematically perfect rounding, and the feathers of the tail
are completely straight. And that's something that looks really cool to me because it's a big contrast to these round and burly
shapes of the branch. So I think it would be
a cool idea to paint this hyacinth macaw with the
branch that it's sitting on, and we can leave out the background and do
something else there. Because if I think about it, this background not only doesn't really provide
anything interesting, but it also wouldn't fit with our color scheme of
complimentary colors. You see, we naturally have this nice contrast of
yellow and blue already. So having this third
main color green would disturb the color scheme. It would not be an official
color scheme anymore, and it would draw a lot of attention away from this parrot. For example, if we had a more neutral background
like black or white or gray, then the colors of
our main subject, this parrot, would be a lot more intense because the colors
follow a clean color scheme, and I think that would be super nice to have
in our artwork. So I'm planning to
leave this background out and replace it with
something more neutral. Alright. So the
idea currently is to just paint this hi synthmcw
sitting on the branch. And depending on how
big the canvas will be, we'll probably have to extend
this branch a little bit, which will probably work because it's not that hard
to do that with a branch. That is an absolutely
realistic and common way to use a reference in art. It would be a little bit more
difficult if, for example, our parrot was covered in
some of these green leaves. So if we wanted to leave out these leaves due to them not
following our color scheme, then it would be more difficult because we'd have to fill in these empty spaces on the
parrot with our logic, which would probably
lead to many mistakes. So this reference
right here is perfect. We don't have anything
covering the main subject. We can just paint it and leave out the stuff
that we don't like. So I want you to download
this reference right. Now, I'm going to put a link to the website in the
description here. Got it. Well done. Now we have a great
idea for an artwork. It's not completely
done, of course. There are still some steps that we have to take
until we can start. But in the next lesson,
I want to sketch the colors and see what
this actually looks like based on the
idea that we have now and if there are a few
more things that we can add. But, yeah, that's basically my example process for how you
can arrive at a good idea. These are some of the criteria that I'm looking
for in a reference, good colors, good shapes, some contrasts, obviously a
subject that I like to paint. And I'm already thinking
about changes that I could make to the artwork so it looks better
than the reference. For example, if it
follows color theory more precisely because a reference is just a tool and
not a guideline. So I hope you guys are not overwhelmed because this
lesson was a lot of theory, a lot of talking, but I want you to realize
that in reality, this can happen a
lot more quickly. These thoughts are very intuitive if you get into
art a little bit more. You know, you scroll on the Internet looking
for a reference, and suddenly, oh, nice colors, nice shapes, a clearly
visible subject. That would make a
great composition. Maybe I can leave out
this random element so the picture follows
a color scheme, and boom, that's
already an idea. So even though this is like
a ten minute video now, in reality, this process can
happen in a few seconds. So I hope that I
communicated some of these concepts and some of
these thought processes well, and you understand
my decision to use this reference and the
general idea for the artwork. So in the next lesson, let's get a bit more specific with less talking and evolve our
idea into an actual plan.
6. Planning the artwork: Planning the artwork. Now it's getting a
bit more practical. In fact, this is the
first lesson where I'm going to pull up Krita
and make something. You should know the
basics of Krita by now from our overview lesson. So you can participate
here if you want. However, it's not
necessary because this is not yet part of
the actual artwork, but I'm just going to plan
the composition precisely by making a color sketch or composition sketch,
as I like to call it. Although I should mention if you've never worked
with Krita before, this is probably a good way to practice it without any risk. So just follow me
if you need that. We're going to put together
a great composition based on our reference and
a little bit of art theory. And I know at this point,
you might ask yourself, is it really necessary to plan that much before
making an artwork? I mean, we already have a ten minute lesson
about finding an idea. So why are we doing this? I'd say, No, it's not necessary. We could just paint this
hyacinthmic from reference, and we'd have a digital
art course like any other. But I really insist
on giving you this compositional stuff and teaching you frameworks to
think about art differently, because this compositional
stuff is exactly what separates a nice little painting from an outstanding artwork. So if you understand
these principles from the very beginning
and always work like this, then you'll have a
bright future ahead as an artist. I'm
very sure of that. So, listen, right now, we have an idea, but we
don't have a composition. So how do we get from A to B? First of all, we have
to know what we're making the composition
for the format. Will it be a gift card? Will it be a vertical phone background? Will it be a square image? That will obviously
be a big factor for how we should
arrange our subjects. And I think for us, it makes
the most sense to go with a high resolution
wall paper that nicely fills out a
computer screen, so you can use it as a desktop
background or something. For that, I'm going to
make a new image in Creta, by the size 3,840 by 2160, so standard for K. That will
look really nice and crisp. So let's see what
we can do here. I'm going to open up my
reference on my second monitor, but you can probably
see it somewhere here due to the magical
editing of future Duplo. By the way, when you
use a reference, the best is, of course, to
open it up on another monitor. But if you don't have
one, no problem. Use your phone, use a tablet, or print it out.
There's also an option. You just have to be able
to look at an image, so you should be able to
arrange that somehow. I have full confidence in you. Alright, I'm going to block
in the rough shapes of our main subject
with correct colors. Again, this is not yet a
sketch for the final artwork. I just want to see what
our composition looks like so far and how
we can complete it. So we have this hyacinth macaw, which is dark blue
mostly like that. It's round, a bit elliptical, and it has a straight
tail right here. Okay, looks pretty good. I just captured the rough
shapes of the hyacinth macaw. But we also have
a dark beak here. And a little bit of bright
yellow here and here. By the way, it doesn't matter at all which brush you use here, as long as you can roughly
recreate these basic shapes. Now, the hyacinth macaw
sits on a branch, but because the
branch is behind it, let me make a new layer below the subject
layer by clicking on this plus here and moving it below the hyacinth
macaw layer. Now we have two layers, so let's name them so we
don't get confused later on. Parrot and branch. Alright, let's roughly paint that branch on the branch layer. Light, desaturated brown
like this and many curves. Okay, it's going to look
something like this. So I just painted
this somewhere. But using the transformation
tool, this one, we can now move our subject around and
see where it fits best. But because the hyacinth
macaw sits on the branch, we have to move them
around together. So whatever layer you're on, you can hold down Control and
click on the other layer, and then you have both
of them selected, and then you can simultaneously transform them with a
transformation tool. That's a little crea pro trick. So remember this,
hold down Control and you can select trans for
multiple layers at once. And using this
transformation tool, we can adjust the
size of our subject, too, which is, of course, also a key part of
the composition. Now, of course,
the hyacinth macaw will be our main subject. So I want to make it quite big, but not too big, maybe something like this. And then we'll have
a bit more space on the right side to
add something else. And now I can adjust the branch, so it comes nicely from outside the canvas and maybe it stops at the bottom with
a few more curves like this. So let's say that there will be some ground that these
branches can lay on. Okay, so this is
basically how you progress through your whole
color or composition sketch. This is how it works. You just roughly sketch the subjects
and their carding colors, you move them around and
you adjust their size. You can add stuff or take
away stuff and optimize the colors until you end up with a composition
that pleases you. Right here, I have an idea. I really like the small
yellow bit because it's a huge contrast to the
dark, saturated blue. So what if we made the
background very dark? So this yellow can
stand out even more? Because right now with
this white background, it's not as visible. It's not such a huge contrast. But as I've said in
the last lesson, I want a more neutral background to keep the complimentary
color scheme. So I'm just going to go with
very dark gray or black. And yeah, let me make a new
layer below the other ones. Just use the fill bucket
tool, very dark gray, click and oh, yeah, this yellow already
pops way more, and I think this is a nice
basis for our artwork. This dark background looks
very cool and dramatic, and it transforms our yellow
into a super intense accent. Nice. Okay, but let's maybe make the hyacinth macaw
even a little bit bigger. You know, it's
supposed to be the biggest parrot in the world, if I recall correctly, and it's our main subject. So yeah, I think something
like this should be fitting. Let's see if that also
works for the branch. Hm, yeah, maybe like this. Okay, now I think it's good. So what else can we do here? Well, for the ground
in the background, I want something very simple,
nothing too complicated, so we don't have to
work too much on that, and we can keep our nice, dark background to
ameliorate our subject. So I think the only thing
I'm doing here is just add a grayish color transition for the floor on the
bottom of the picture. So there's other stuff
that can stand on it, and I'm going to do that
on this background layer. Actually, I'm tilting my canvas a little bit for
this by pressing four because I'm very bad at painting completely
horizontal lines, and I prefer diagonal lines. So like this, I'm just
making it easier for myself. And then I'm just
making my gray a bit brighter and the
brush a bit bigger, and I'm painting a
smooth colour transition on the bottom of the image here. Now the nice thing is that
we are still following a complimentary color scheme because even though we have
light brown and light gray, these colors are so desaturated that it doesn't really matter. They do not disturb the
blue and the yellow because they are so desaturated
and not very intense. So if you've decided
on a color scheme and you work on a composition, then everything that you add has to follow
this color scheme. So it either has to be very desaturated or the same colors, which would be yellow
or blue in this case. In fact, I could add some very dry desaturated
leaves to this branch. But to be honest, I don't
know yet if I want that, so I'm going to leave that
open for the artwork. Maybe we'll add some
leaves, maybe not. Anyways, we definitely need to add something on the
right side here. There is a lot of empty space, as you can see, which
is not necessarily bad, but I just feel like especially
on the lower part here, there is just something
missing that draws attention and gives the whole thing a
little bit more life. And something that I feel like
would fill out this space quite nicely is some flowers. But I don't want to
add green grass where they grow from because that would disturb the colour scheme. So I think let's just put
them in some flower pots. The good thing about flowers and flower pots is that
they are very flexible. You can give a flower
pot any color you want, and a flower can also
almost have any color. So we can easily stick with our complimentary color scheme if we add the right flowers. So I think I know which kind
of flower I want to add, but I'm going to let you
guys guess which one it is. Which flower fits well
with a hyacinth macaw. Of course, Roses. No, I'm just kidding. Hyacinths
hyacinth his I'm German, so apologies, but
yeah, obviously, it would be quite fitting to add some hyacinths to this artwork. So let me look
them up. And yeah, as you can see, they have this very nice dark blue mostly. So they would fit perfectly. However, before we can pick any of these as an
additional reference, if you already have a reference, it's very important to
watch the lighting. For example, if the light
on our parrot comes from the left and we add a flower pot where the
light comes from the right, it's not going to be a
very coherent artwork. You could, of course,
pick a reference that has different lighting, but then you just manipulate it, so you change the direction of light and shadow to fit
your other reference, but it's definitely
always easier if you pick a reference that you can just replicate in terms
of light and shadow. So let's see. In our
first reference, the lighting seems
quite neutral. It's not very extreme. If we look at the highlight
and shadow areas, the light seems to
come a little bit from above and behind
our hyacinth macaw, which is good because
I think most of these hyacinth references
seem to match that. Now, looking at these
potential references, you might ask yourself, but wouldn't we have to
disturb our color scheme with the green leaves that all
of these hyacinths have? And I'd have to say, yes, we definitely need to add
a little bit of green in order to make these
flowers realistic. But we have two
options to minimize the damage that this could
deal to our color scheme. Number one, as
I've already said, we could desaturate
the green heavily, so it's not very
intense and therefore, it doesn't disturb anything. But looking at these references, most of them are very saturated, so it would not be
fitting to desaturate it. But the other
option is to reduce the amount of green
in terms of volume. You know, most of the
stuff that grows out of the flower pots shall
be the blue blossoms. And we could just have
a tiny little bit of green leaves between
the blossoms and the flower pot, then
it would also work. Because if you have a
color scheme and you add a few other colors
in the details, and they're just in the details, then it will still work
as a color scheme. A color scheme only
has to apply to the big parts that are
important in an image. What you do to the
tiny details in terms of color basically
doesn't matter. That's another little
color theory secret that gives you a lot of
freedom if you apply it well. And this, of course, also works with other color schemes like tetradic analogous, split
complimentary, whatever. So the more you know, the
more options you have. Now let me add a
few of these flower pots with hyacinths on top. Of course, on a new layer, so we can move them around. Actually, I don't think I need a specific reference
for the hyacinths. By looking at their texture, I have basically internalized what they are supposed
to look like, and I think I can
replicate them quite well. So the flower pots will
just be very desaturated, a little bit light
brown like the branch. Then we'll have a tiny bit of
green here for the leaves. And then the hyacinths, which are supposed to be
a bit brighter on top, but it doesn't matter here
for the composition sketch. We just have to remember
it for the actual artwork. So we have consistent
lighting there. Now, very last thing about color theory because
I want a bit of variation in these hyacinths because only blue would be
a bit boring here, I think. Of course, we could make some of them yellow because that's
part of our color scheme. Let's have a look. Can
a hyacinth be yellow? Okay, it looks like it. So let's add one flower pot that has bright yellow hyacinths. Of course, it doesn't matter if these yellow flowers
exist in real life. You're an artist. You can
do whatever you want here. But I just wanted to
know if these exist. But also we can add a
little bit of variety to these blue flowers
and make some of them a little bit more
purple because one, I think that makes it
more interesting and two, it still fits with
our color scheme. See, as long as you vary the hue only on one side of a
complimentary color scheme, it still counts as a
complimentary color scheme. So if we stick with
this one type of yellow and don't shift
anywhere near orange or green in our picture, then we can actually
add a little bit of variation to the hue
on the other side. And for example, add
flowers that are a bit more on the purple
side or, you know, details to the hyacinth macaw that a bit more on
the light blue side, which we'd have to do anyways, if we look at the reference. This would also work
the other way around. If we made a picture
that has all sorts of warm colors from this orange to light green in
this range here, and we add this one
complimentary to it, which would be the dark blue, then it will also count as a
complimentary color scheme, as long as we only have this one dark blue here
and no other variations. So in a complimentary
color scheme, you can always add a
small range of hues, but only on one side. And now we're finally
done with color theory. I promise. I just think about it a lot when I'm planning
my compositions. Now, just a few last words about the arrangement
of our elements. As you can see, I've added a few flower pots here
on different layers, so I can move them
around individually. So I'm going to do that now. As you can see, I can change the size and positioning
of these flower pots, but I can also replicate them by copying and
pasting these layers. So we have a few more pots, but we don't have to paint. So let's see what would
be the best option here. Obviously, later
on in the artwork, you can't just copy and
paste elements like these flower pots
because the viewers will notice that subconsciously
or consciously, and it will heavily downgrade the quality of your artwork. So you should never
copy and paste elements if you don't have a
very good reason to do so. But right here in the
composition sketch, we can do that without
varies because some of these flower pots will look
very simular and well, we just want to test
the composition and see how many flower pots
would be appropriate. Honestly, I don't have a good
composition rule for that, so I'm literally just testing out different positions
and different numbers, and I'm evaluating them based
on what they feel to me. For that, you can see me
zoom out once in a while, and generally, I'm working with the canvas being quite small, because that way I can keep
track of the whole picture, and I can see how
the colors work a bit better than if I'm
zoomed in too much. That's a common tactic, even in traditional art. So people swear on stepping away from the canvas
a little bit, so they can evaluate
the composition better. Also, I think we should add
two yellow flower pots at max because this yellow is really intense with
a dark background. And if we add too many of them, then they might take
away a little bit of attention from
the hyacinth macaw. But like this, if it's
maybe one or two, then they act as a nice balance. By the way, I also don't
want to put any flower pots beneath the parrot
because there is a branch, and I want to keep
that relatively free. A main subject that's
supposed to stand out should pretty much always
have a little bit of empty space around it. So I think like this,
it's pretty good with just this one flower pot on the very left side and the other one being
crowded on the right. Also some of these
flower pots should definitely be overlapping,
like right here. So it looks a bit more
three dimensional. All right. That's a cool
and basic composition. But to spice it up a little bit, let's actually add
a few hyacinths that have fallen on the ground. That's something that could
definitely happen here when you have that
many hyacinths around. I think I got better
at pronouncing that. But yeah, I'm just adding a few yellow and blue
and purple hyacinths to the ground just to give it a bit more detail and
see what it looks like. Yeah, that's worked
out quite well. Now, last but not least, let's simulate some
of these shadows that we will
obviously have here. Light comes from above, so
let's paint a little bit of dark desaturated
shadow underneath each of these elements. And boom, there we have it. I think this is a composition
that we can work with. It's not too complicated, but it has super nice colors with a complimentary
color scheme, but also a few value contrasts with this very bright yellow
and the dark background. And our main subjects
are clearly visible, so we can add lots
of detail to them, and they will look
super awesome. For example, in the artwork, we could add some
subtle textures or patterns to these flower pots. We'll see about that. But yeah, for now, I think we have
a really good plan. So in our artwork, we can
completely focus on painting, and we don't have to make
any boring decisions about composition anymore
and re evaluate everything. That work is done, and it shall not
be underestimated, even though we haven't even started with the
actual artwork yet. This composition will save us a lot of time and
mental energy later on. I'm going to save this
composition as an image that I can look at during
the creation process, but I'm probably going to put
it in the description here so you can download it in case you haven't
made it yourself. So whether you
participated or not, I hope that you understood this decision making process and the reasons for why I'm
doing something like this. If you want an
outstanding artwork, it often makes sense
to plan it in advance. You want to see how
everything fits together, make sure you have good
colors and contrasts, some empty space to frame stuff and direct the eyes of
the viewers, et cetera. And you can model this with a simple composition
sketch like this. So if you think
that you understand these core ideas of
planning an artwork, you can move on to
the next lesson.
7. Choosing the brushes: Okay, guys, one very last preparation lesson
before we start with the artwork because we
have to choose our brushes. I don't always do this, but it's actually fun
and also helpful if you don't already have a lot of experience with Krita brushes, and you don't know
which ones are good. So you can get a little
insight into what I'm thinking about when
selecting the brushes, and maybe you'll find your new favorite
ones here. Who knows? Alright, like the
colors and shapes, I like to roughly sketch the textures before
starting a painting. So I'm choosing the brushes beforehand and adding
them to a brush tag. This is so we can easily access our brushes later on
by right clicking, and we don't have
to search for them. You can see if you right click with a brush on the canvas, you can quickly access all these different
brush sets here, like digital erasers, whatever. So let's get right into it. The first brush I want to use is pretty much always this one, this sketching brush,
pencil for soft. It's my favorite. I know it
works for what I need it for, so I don't need to do
any experimentation. I'll just use this brush.
I know that already. You see, it's this very
smooth pencil brush. You can make thin and
precise lines with it, which is absolutely what
we need for our sketch. So I'm going to right
click on the brush in the brush list, assigned to tag. And then down here
at the bottom, you can create a new tag
by typing in a name, let's say, hyacinth,
and then you can click on this plus
and you have a new tag. Nice. So onto the next one. Now we have to choose
the painting brushes. You know, the ones
that the viewers of the artwork will
actually see in the end. So yeah, those are
really important. The selection of your
brushes obviously heavily depends on the style in which
you want to draw or paint. Krita offers you many
different styles. But I think I'm going with a somewhat impressionistic,
realistic style. So something in between that. So I want some
brushes where you can ideally see bristles
and textures, but I still want to be able to create clean shapes with them. So I'm immediately
scrolling down to this section here where
we find the RGBA, RGBA wet and Meo impaso brushes. Because from my experience, these brushes work
very well for that, and I already know many
of them quite well. Let's look for a
brush with which we could paint the hyacinth macaw. Looking at the reference
for the hyacinth macaw, I see that it has many subtle color transitions
from light to dark. So it would make sense to
truss brush that automatically mixes the paint and also
creates smooth transitions. So this narrows
down our search to the RGBA wet and M
Lo impasto brushes. These RGBA brushes are also nice in terms of texture,
but as you can see, if I scribble with
different colors here, they don't automatically
mix the paint, but they just overlay it. But with the RGBA brush,
for example, with this one, you can see it automatically
creates a transition, and I think that's
exactly what we need. This is also the case
for these mimi Leo impaso brushes which
simulate very thick paint. So let's choose some
dark, hyacinth blue, and imagine what we
could paint with here. So this one has a really
nice texture, but well, it's a little bit too chaotic and it's hard to be
precise with this brush. So it probably doesn't
work for this parrot. And this one. Oh, actually, I really like this brush. We can create some transitions, and it varies in
size a little bit, so we can make some
precise brush strokes. Let's simulate a little
feather texture here. And yeah, this works very well. I think I'm adding this
one to the hyacinth tag. Right click assigned to
tag hyacinth. Here we go. And now, if I right click and
select this hyacinth tag, then you can already see we got the two chosen brushes here. Also, I think this brush
is so precise that it would also work for
the flower pots, maybe, and also the
leaves of the hyacinth. But the hyacinths themselves,
I don't think so. We'll need something
else for that. So let's scribble
a little bit with different brushes and
simulate some hyacinths. For that, I'm already including a few different colors because obviously we'll have
highlights and shadows, so it won't just be one
color for the hyacinth, but I'm also looking for
how these brushes mix the paint and what
the textures look like with a few
different colors, like lighter and darker ones. So I think I like
this one very much, this purple one, very fitting. But yeah, I'm going to assign
it to our hyacinth tag. And then let me look for
something for the flower pots. Obviously, you can also use multiple brushes in one texture. For example, you make
up the feathers of the hyacinth macaw of
three different brushes, but that's a little
bit more advanced, and it's harder to make
it work than if you just stick with one brush because the texture will
be more defined, and it might look
a little bit too chaotic in the end if you
don't know what you're doing, and you use multiple brushes. So let's keep the
number low here. In the end, we can always
scribble a little bit on top with other brushes
and see if we like that. And if we don't be
able to undo it. For the base texture
of the flower pots, I think I'll be using
this RGBA wet brush. Because it's vertical, you can create these very
nice cylinders, and that's what we
need for a flower pot. And for the background
and the floor, I just want a very smooth
and subtle texture, and I already know two brushes that work very well
for that always. And that's these two Mm
Leo impasto brushes. So let me also add
them to the tag. And yeah, I think now we
got a good selection. You don't always
have to reinvent the wheel and test
every brushing crea. Sometimes you can also just rest to the ones that you know. So I hope you trust me, these brushes are really nice. And actually, now we are ready
to start with the artwork. So make sure you also have this brush tag
with these brushes, and then you can move on
to the next lesson. I.
8. Sketching the subject: Alright, now we
have a cool idea. We found a good arrangement
for the composition, and we've chosen
fitting brushes. So there is nothing
standing in our way, and we can start making
the actual artwork. Let's create a new document
by the size 3,840 by 2160, standard four k wallpaper,
just as we've planned. I'm going to make
this as realistic and unfiltered as I can
without making it boring. I'm not going to
cut everything out, so the process looks
artificially perfect, like, Oh, digital art is so easy and fun and everything
works first try. No, we're going to experiment, adjust and probably
fix a lot of mistakes, just like it is always for
every artist at every level. Because digital art is not
just about following a plan, but also about flexible
problem solving. So I'm going to demonstrate
how to do that. And the first thing you should do if you want to
make something with a little bit of
complexity is sketching. That simply means using a light pencil to sketch the
rough outlines and shapes. So you will know where all
the actual brush strokes should go later on. This is just as helpful in digital art as it
is in traditional. Of course, you don't always
have to make a sketch. For example, if you just want to chill and make
something simple, or you want to see the
composition unfold as you go, like an abstract
art, for example, you know, that's
also a way to do it. Not every great artwork in
history is based on a sketch. So it would be untruthful to say that you always
have to make one. However, sketching is still
something that I highly recommend because it just makes the whole process
so much easier. Plus, having this
sketch first makes it more likely that you actually
finish your painting, at least from my experience, because while
making your sketch, you're naturally
already visualizing the finished composition and how everything fits together. So by starting with a sketch, it becomes easier to keep
your focus later on because you always know what
you're working on and how that fits in
the bigger picture. Literally, so yeah,
without further ado, let's do the sketching. Actually, because
we're going to have a black background in
our final artwork, let's already fill the
first layer with black, and then we can sketch in white. I think that's
really cool because it already sets the mood, and it's really
refreshing to sketch white on black once in
a while, in my opinion. For that, I'm simply using
the fill bucket tool, this one, selecting
black as the main color, and then just clicking. So we have our clean,
dark background layer, and then we can go to the
brush tool right click, select our sketching
brush, and then white. But before we draw anything, let's make a new layer by
clicking on this plus icon, then double click it
and call it sketch. That's very important
to remember. Always put your sketch on a separate layer where
you have nothing else. Otherwise, it would not be
possible to delete it later on without dealing damage
to the artwork. Alright. Now we can sketch white on
black, see everything clearly, and always move stuff around or delete it if
we don't like it. Many artists don't realize
that you can actually do this often because they
come from traditional art, and there it's very
difficult to work like this. You know, you would need
a black paper and, like, chalk or something, and
it's just not as precise. But in digital art, you can
do whatever you want, right? So why not try out
something different? I'm going to start with
the hyacinth macaw because that's probably
the most difficult part, and then we got it
out of the way. So I'm opening up my
reference with the parrot. I'm going to show it somewhere here with the editing software. And let's go. By the way, I think it's the best
if you always watch a bit ahead and listen to
my explanation of a step, and then you do it after me. So, are you ready? The
first thing I think about inner sketch is
always the big shapes. I'm looking at the
reference, and I ask myself, how could I break it down into big, simple geometric shapes? You know, stuff like
straight lines, ellipses, circles or
triangles and rectangles. Right here, our hyacinth macaw is mainly one big ellipsis. I hope you can all
see it. So let me draw that very lightly, a rough ellipsis that somewhat resembles the torso of
our hyacinth macaw. And then let's apply a
little more pressure to make it a bit more defined. So a bit more narrow on
the left side like this. And then if we zoom out, I
think this is pretty good. So let me use the
transformation tool and move it to the place where we
want the hyacinth macaw. The transformation
tool, in my opinion, is absolutely essential when sketching because you can
precisely change the angles, the scale, and therefore, all the proportions of what
you want to paint later on. And it's very important that you get those right
while sketching. This is also why I'm using undo and redo a lot,
as you can see here. Later, when we were painting, I'm going to dial it back a
little bit because I think undoing and redoing too
much can make you go crazy. But in this sketch,
I really want to get all the
proportions very good. So I'm really paying
attention here. Basically, sketching
means estimating distances and putting your
best guess down on the paper. You're just looking at the big shapes and
asking yourself, how big should this circle be
compared to that ellipsis, and what are the distance and the angle that they have
in relation to each other. And how long should this line
be compared to that line? And what are the angles? You
want to roughly estimate and then replicate that for all the important
parts of your subject. And so far, it's not
really important how big the subject is or where it's
positioned on the canvas. As you can see, right
now, it's not at all like it is in our
composition sketch, but we can change all of that later on with a
transformation tool. So right now, we only
want to focus on the relative positioning of
the elements that we have, the beak and how big it is compared to the
head, the head, and how big it is
compared to the torso and the distance it has
from it and all that stuff. And we do all of that with very light and scribbly lines just so we know where
everything goes later on. And naturally, as
you're estimating angles and distances and
you're putting many, many guesses on the paper, you will have many, many lines. So once in a while,
I like to activate eraser mode by either pressing E or clicking
on this eraser icon, and I'm erasing all
the lines that I don't need anymore because
I got a better one. That is a good way to keep
an overview because you don't want your sketch to be too crowded with too many lines. Otherwise, when we add too
many lines to our sketch, it's going to be difficult
to look through it during the painting process because we want to put the paint
underneath the sketch. So you pretty much only want the precise outlines and
some other important shapes. For example, right here, I still have this
curvature of the ellipsis, which indicates where the
wing starts because we can also clearly see that curve in our reference, so
I want to keep it. When sketching, stay relatively zoomed out or at least zoom out pretty often because that is the best way to keep track
of all the proportions. Right here, I think
the distance in scaling between the head and
the torso is not very good, so I'm simply using this lasso selection tool to select the area of the
neck and the head. Like this, Control C, delete and Control V to copy, delete and paste it
onto a new layer, and then I can
adjust it a little bit with the
transformation tool. That's a very useful little
trick for sketching. So right here, as you can see, I'm just fixing the
angle a little bit. Then I'm merging my two layers together by pressing Control E, so it's on one layer again. And then I'm simply fixing
the connection of the lines. Now it's time for
the tail feathers, the last big shapes here. But I first wanted to add a bit more detail to
the other shapes. So I know where these
tail feathers go exactly. I am making very
fast brush strokes to get these lines as
straight as I can. You could, of course, also use the line tool for
this if you want to these lines to be perfectly
straight and precise. But I think that would
be unnecessary because it's actually quite fun
to draw these lines. So now it's time for just a little bit more detail on the bottom part of our parrot. Like the feet, which
should go somewhere here. And yeah, as you can see, it's
gotten very chaotic again, so I'm once again
switching to eraser mode and erasing a few
unnecessary lines. Also, the angle of the
feathers in the back need a little bit of fixing. Nice. Now, onto the eye, the eye is very important, no matter if you're painting
an animal or a human, because if the eye is
just a little bit off, your subject looks
totally different. So it will probably take
you a few goes to position the eye correctly
here. Okay, nice. Now I'm going to do
some final fixes, maybe erase some
unnecessary lines and indicate a few more
of these feathers. And actually, I
think this is it. This is definitely
something that has the proportions of
a hyacinth macaw. Just let me scale and
transform it a bit so it looks a little more like
in our composition sketch. And then I'm going to draw
the branch underneath it. Also, very light
lines, very scribbly, but the good thing
about this branch is that it's a branch, and therefore we can
play around with it and adjust it to our liking
without making it look off. Around the hyacinth macaw, I'm definitely replicating
the shapes of the branch in the reference because they just look super
awesome in my opinion, but I'm making it so the branch comes from outside the
picture on the left side, and we have a ground in our composition, unlike
in the reference. So we have to improvise some branch ends here that
fall onto the ground. Don't forget to save
your artwork once in a while once you've
completed a few steps. Krita creates
automatic Save files. So in case your computer
crashes or something, you don't lose all
your progress. But of course, not every second. So save it manually
as a Krita document, so you don't lose your layers, give it a name so
you can find it, and then you can
continue whenever you want. And you know what? I think this is a
very usable sketch. So make sure yours looks
something like this. And because this lesson
is kind of long, let's sketch the rest
of our composition in the next lesson
because even though we've now done the most
difficult part of the sketching, there are still a few things
that are very important.
9. Sketching the composition: Okay, we got the main subject. Now we have to
sketch the rest of the composition and determine
where everything goes. Of course, we already have
a composition sketch, so we know pretty well
what we have to do. But now it's very
important that we find the final arrangement of all the elements and
sketch them accordingly. Because after we start painting, it won't be possible anymore to transform all the
elements as we wish. If we did that, they would
lose a little bit of quality. Let me show you.
You can see if I paint this precise color
transition like this, look at it, and then I use the transformation tool to scale it and move
it around a bit. See, it's not a sharp anymore, and it has a little
bit of that blur, and we definitely
don't want that in our final artwork.
Now, don't worry. You can still move
around painted elements. But if you do it a lot, they will pretty much always lose a little bit of quality, and you might have
to paint over them. This is the actual reason why
I find it very helpful to plan the composition beforehand
and then make a sketch. Because the sketch will not be visible in the final artwork, it doesn't matter at
all if these lines here get a little bit blurry, so we can freely adjust it. This right here, the
sketching is pretty much the final stage in
the process where you can freely determine
the composition if you want optimal quality
in the final result. It's very important that
you're aware of this when you make digital art. So let's go. I'll start by
sketching the ground, which I will indicate with
a simple horizon line. But I want to do
it on a new layer, I'm going to call it ground. The ground or horizon
line is always something that I sketch pretty much
at first because it's easy, and once you have it, it's a really good reference for
placing the other elements. But generally, there is no real rule for what
you sketch first. I usually like to start with the horizon line or with the main subject,
like right here. Make your horizon line very thin and put it
right about here. If you hold down shift
while using the line tool, which you should
definitely do here, then you can make this
line perfectly horizontal. Nice. In the end, we can merge all these
sketch layers into one sketch layer and then
paint the rest underneath it. But for now, we have to find the perfect composition and be able to adjust
everything for that. So every new element
that you add to the sketch should be
on a separate layer. By the way, now that we've
sketched the main subject, we technically don't
need our reference anymore until the painting. So I'm going to replace it with a composition sketch and look at that for the rest of
the sketching here. We could look up a reference
for the hyacinths, but I'm pretty
confident that we'll be able to handle
those by ourselves. We'll just have to
think a little bit and fulfill a few criteria. Light from above, some
variation in the hues, little shadow underneath,
and very little green. But most of these criteria are only important
during the painting. So let's just add some
simple flower pots, of course, on different layers, so we can move them around. In order to keep an overview, I'm going to rename all
these sketch layers to contain the word sketch, so we know exactly which ones to merge
together in the end. I'm going to add another
layer between ground and sketch called
pot sketch one, because I already know that
there will be multiple. So we can switch to our
brush and add a little pot. So dynamic, roughly
symmetrical lines. And it doesn't really matter
where they're positioned now because we can move these
pots around, of course. But, yeah, it should look
something like this with these little curves at
the bottom and the top. These curves bend
downwards because we're looking from above at these pots as the
viewers of this artwork. Alright, time for the
transformation tool. I'm going to move the pot here, and then I'm going
to copy and paste it onto a new layer and
call it pot sketch, too, because I don't want to repeatedly draw this pot with
these nice, precise lines. I think this one
looks pretty good, so I'm just going to replicate it as many times as I need. By the way, I'm quickly going to the ground sketch
layer and lowering the opacity because this line is kind of intense and
it annoys me a bit. Alright, now back to the pots. As you can see, I'm
simply copying and pasting the original flower
pot onto new layers, and then I'm moving
them around and changing their size with
the transformation tool. So the arrangement
somewhat resembles the one that we have in
our composition sketch. I think it's
definitely a good idea to give these flower pots all a little bit different
sizes because otherwise, it's going to look
way too monotonous. This is also the case if you paint stones or
trees, for example, always give them
slightly different sizes unless you have a very
good reason to do so. Like your trees are
in an alley or you paint humans that are obviously very similar in size or
something like that. But generally, if you make up a composition that's
supposed to look pleasing, give your elements different
sizes because that leads to a natural curve that kind of guides the eye
of the viewers. As you can see right here,
these pots on the right, they have kind of
this downward curve if you look at their top edges. And this is most
of the time more satisfying to look at
than if all the elements magically align because that can feel very off and
just unnatural. Alright, now the pots are
aligned quite nicely, so I'm going to scribble a few hyacinths on
each according layer, just like that. Very simple. I'm not even sketching
the leaves here because there will
be very few of them. And technically, we
don't have to sketch these hyacinths
necessarily because we'll know where they
go because of the pods. But I want to see how
this detail and this density that these hyacinths provide fits in the composition. Make sure that you
add a little bit of variation to these
hyacinths and give them slightly different
angles and sizes so they don't all just grow
straight up in a line. I mean, of course, the hyacinths could have been arranged
like that by people, but I think that would be less interesting for
our composition. I want a little bit of
density and chaos here. And I think this density
fits very well in here. Some of these flowers, however, seem a little bit too small
to me compared to the parrot. So I'm once again adjusting some of these layers with a transformation tool. But also, I think our hyacinthmac is a little bit too big if we look at
the composition sketch. So I'm also adjusting it here. It should be something
like that, not too big, so it's still realistic in
comparison to these flowers, but also not too small because
it's our main subject. So I think this
could work here with the tail feathers just barely stopping before this
spot on the left side. Okay, let's rearrange
these flower pots a little bit more. I'm even copying
and pasting one of them because I just want a
little bit more detail here. Also, I feel like
if we want to add two flower pots with
yellow flowers, they should not make
up more than a third. So I want seven
flower pots in total, at least, because this yellow is supposed to be
something special. So I'm also thinking
about stuff like that, like how the colors could
be arranged later on. But don't worry. That's very specific and just
what I'm thinking. So your flower pots could also be arranged a little
bit differently. I just think it would
be very good if they ascend in
height on average, the more you go to
the right side. So we have this falling
line on top that leads the eyes of the viewers
toward the center. So something like
this. Okay, now that we've transformed
the subject layer, we can see that
the branch doesn't extend all the way
to the edge anymore. So let's fix that on our
subject sketch layer. Remember that
branches always get smaller and smaller
the further they grow, so we have to make
this one a little bit thicker as it comes
from outside here. I think this downward curve
is pretty pleasing because it somewhat mirrors these
curve branches on the floor. And while I'm at it, I'm
experimenting by adding a little branch that first grows downward and then upward. So it grows over
our hyacinth macaw and kind of frames it. But just a little bit, so we still have
empty space there. So just a few smaller
branches here, and let's make it grow
outside the canvas again. And actually, I think
I quite like this. So we could also extend this branch and add a few
leaves in our painting. Of course, no green
leaves because that would be too much green and
disturb our colour scheme, but maybe some dried out desaturated leaves or no
leaves and just branches. We'll see about that.
So let me just add a few smaller branches
at the bottom to keep the style of
this tree consistent. And actually, I think now this is exactly the composition
that I want to work with. We have some nice lines that guide the eyes of
the viewers around. We have some empty spaces to
frame our main subject and some additional
interesting elements like these overlapping
branches and flower pots. We've talked a lot
about composition and ended up with a
relatively simple sketch. But I hope that you still
learned a lot from this. Some people like to sketch more, some like to sketch less. It's all on you and what
you can work with best. That's going to show over
time with experimentation. Personally, I think this
right here is well in the middle between being super
rough and very detailed. We get some elements from
both wells, I think. Anyways, we can
definitely use this to add some nice and
colorful paint now. So let's save this and do
that in the next lesson.
10. Painting the parrot: Alright, ladies and
gentlemen, we have arrived. We're going to add paint
to the hyacinth macaw. Since this is our main subject, it's probably going to be the most important
lesson of this course. I mean, okay, that obviously depends on what you're here for. For you, the most
important lesson could be the creator overview or
planning the composition. That's also pretty
important, in my opinion. But from a practical
point of view, this right here
is the real deal. This is where we
are going to score all the points in our artwork. The main subject
that draws attention and looks realistic, I hope. And yeah, let's just start. I hope you all have your hyacinth brush tag
with these brushes, and of course, we will
need the reference. I'm going to do my best and show it somewhere
on the screen here, but if that's too small
for you, then you can, of course, look at
it in another way, for example, by printing it out. In order to start painting, we have to create, of course, a new paint layer, so we don't blur it
together with the sketch. But if we look over
at the layer docker, then we can see we already have all these different
sketch layers, and if we add many
paint layers as well, it's going to be
quite confusing. So I'm going to induce
a little bit of order by clicking on
the small arrow next to the plus here and add a group layer on top of
all the other layers. And then we can mark all the sketch layers by
clicking on the first, holding down shift, and then
clicking on the last one, not the background paint layer. And then we can drag all of these layers into
the group layer. So this group layer is our new sketching layer where all of the
different sketches are. But we don't have to look at all of them at
once all the time, but we can just click on this arrow here to
show or hide them. So you can still edit all
your layers individually, but you can also transform
them all at once. For example, by lowering the opacity of the
whole group here, which I'm going to
do so I can see the paint underneath
more clearly. So set the opacity of your group layer to
about 50 or 60% or so, just so you can still
see these lines, but they are less
intense than before. So yeah, I think now
this is pretty good. I'm going to make a new layer above the background layer and underneath the sketch layer
and call it hyacinth macaw. Now we are all set
to right click with a brush and go to our
hyacinth brush tag, which you hopefully all
have by now and select this blue brush that we've
chosen for the parrot. Now we can start by
blocking in the base color, which of course is
this very dark, saturated, slightly
purplish, hyacinth blue. Damn, that was a
long description, but you can of course also just look at my color selector. But generally, what you
should do now in order to select your colors is look at the reference because all we're going to do in
this lesson is try to recreate the higher synthmc that we see in the reference. So you should look
at the reference more than at me painting. Of course, still pay
attention and listen to these little tips and explanations that
I'm going to give, but keep the bigger goal
in mind to recreate what you see in the reference
and not what I'm painting. This is just my example
process for doing that. Alright, first important
principle here. Always work from the bigger
shapes to the smaller shapes. So right here in this
first step, you can see, I'm literally just blocking in the same blue everywhere where the hyacinth
macaw is blue. So just filllo the
edges that you've defined with your
sketch with blue. The precise tone of the
blue is also not that important because we're going to add lots of detail
on top of this. As you can see, I also
switched up midway, but it should represent the average color that
you see in the reference. Useful trick, of course, for filling something with a color. Make the brush on
the edges smaller, so you're more precise
and in the middle bigger, so you're more efficient. Because the sketch is
pretty good in this case, I'm simply precisely following
these outlines here. But you should
definitely sometimes deactivate the sketch layer
by clicking on this eye icon to compare your general shape to the one that you see in the
reference if it still fits. I think this is pretty good. Let me activate the sketch layer again and add a little bit more blue here where the feet begin because I can see that
in the reference. That is the first step that
you should complete now. Just put blue everywhere
where this hyacinth macaw is blue and make sure the
general shape is accurate. Once you have that,
let's move on and add a little bit more
detail because that is how you always proceed when
painting from reference. You add more and more
layers of detail to the subject that you're working
on. Let me explain this. The first layer of detail
that I'm seeing here would be the hyacinth
macaw is blue, so I add blue everywhere. And the second layer
of detail would be, it's a bit darker blue on the bottom and brighter
blue at the top. So I'm trying to find this average dark blue by looking at the reference and
then the color selector. It could be like here, still saturated, of course, maybe a little bit more purple. And then I'm blocking
in that second layer of detail still with quite
big brass strokes. So you can see I'm
scribbling here roughly in the direction of the
feathers, this darker blue. And then let's make
it even darker. The brush a little bit
smaller to be more precise. And then let's
continue at the head. There I can see
right now there is a little bit more
defined darkness. So I'm blocking
that in right now. And then I'm going back
to the torso and putting that darker blue everywhere
where I think it belongs. So that's also a little bit
on the tail feathers here. And a little bit on the
bottom where the feet begin. And maybe like this
in the middle. You can see it's probably
already too much dark blue, but we can fix that
later on. No problem. We're still pretty much just
trying to get a feel for recreating the shapes and using the brush.
It's always good. If you start an artwork by not thinking too much,
just get started, block in those first
layers of detail, which are not very detailed, of course, and just try to get used to that brush if
it's a new one to you. So once you got that, I think we can move on to the
beak, and of course, first fill it with the
average color that we see, which is maybe this
dark gray here. Even though we are not
painting lots of detail yet, we want to get the outlines of the general shapes very
precisely now because that's going to help
us a lot later on when we want to find out where
to place all that detail. So I'm making my brush very small and filling out
the beak with this gray, short and precise brush
strokes to first define the edges and then fill out
the rest with the color. Then the bottom part
of the beak, I guess, it's the jaw of the parrot
is a little bit darker, so I'm making the gray
a bit darker and then putting that color
there. Same thing. Okay, and while we're at it, maybe also a little bit of chaos and detail on that
other part of the beak. Let me deactivate the
sketch to have a look, and okay, that's already
going somewhere. You should always deactivate your sketch layer
once in a while to just look at the picture and evaluate the proportions
as they are, because this sketch can
obviously always confuse you a little bit because those
lines cover your painting. So right here, I'm already fine tuning the edge of
the beak without even having the sketch layer activated because it would
cover these outlines, and I wouldn't be able
to tell where the beak ends and the background begins, if you know what I'm saying. The sketch layer is important, but it gets less and less important the further
you go in your painting. In order to add more detail
to the beak, for example, I don't need the sketch layer
at all because that one is only useful to determine where the beak is and what
the shape of the beak is. But what's happening
inside the beak, the smaller details,
highlights and shadows. That's something
that we have to find out now by looking
at the reference, and the sketch layer doesn't provide us with any
information for that. It would only confuse us. So you can also break
with the tradition of working in
layers of detail if you have an element that
is very separate from the rest and you
feel like you have the capability to finish
that element now, like this beak, for example, which I actually think is
finished at this point. If I zoom out, I think it looks quite like
in the reference. So let's move back
to the feathers and continue by making the
hyacinth macaw a little bit brighter on top
because that is one of the biggest differences
that I see right now in the reference and
our current painting. That is a very useful question
actually that you can ask yourself if you're confused
where to continue. What is the biggest
difference between the reference and my
painting right now? And this is precisely
why this is just an example process for
painting from reference, because the biggest
difference that you see right now could be something
totally different, you know? You could now paint
the dark feathers on the bottom or the eye
or the tail feathers. There is no exact rule for
what you should paint first. Just the best thing that
I can tell you here is work in these
layers of detail. But then you can, of course, also break with that
if you feel very confident for a
separate element, like the beak in this case. The more I'm painting here, the more I'm understanding
this brush. It's a really nice
one, I must say. And therefore, my
confidence in using it to create detail is
also getting bigger. So here and there, I'm already adding a
few smaller feathers, where I see them
in the reference. You just have to start
by scribbling with roughly correct colors in
these first layers of detail, and then you will naturally find yourself getting more
confident with the brush, and you are ready to add
a little bit more detail, usually by making
the brush smaller. And that is basically how we
are going to proceed through this entire process of
painting from reference. Right here, as I'm activating
the sketch layer again, I'm noticing that
I'll have to define the curve of the wing
a little bit more. You see, for stuff like that, the sketch layer is still
helpful once in a while. And yeah, currently,
I'm not very happy with the hue of the
blue on this wing, so I'm painting over it with
a slightly different blue. By the way, for
selecting your colors, never select colors
from the reference. I know there are fancy tools in these digital art
softwares nowadays, where you can select colors
from elsewhere on the screen, but never ever do that. Always estimate the
colors yourself and put your best guess on
the canvas until it fits. Because if you just select colors with the color
picker tool, for example, first of all, you don't
learn anything about colors and you don't get better
at thinking about color, but also you might just pick
the totally wrong color because screens and images
are made out of pixels, and those can look very different even if they're
directly next to each other. I'm not going to go into the
technical details of that. Just remember, always
pick the colors yourself. That's really
important. By the way, I hope you don't get confused by me rotating the canvas a lot. I just really like doing that. Feels more comfortable to me. Once again, you can tilt your canvas to the
left by pressing four, tilt it to the right,
by pressing six, and neutralize it
by pressing five. You don't have to do
that, but you might find out at some point that you also find this more comfortable. So maybe just try this out
for some angles of painting. Alright, at this point, the outlines of
the whole bird are very precise and actually
very accurate, I think. We even got some more
detailed highlights on top and on the wing. So now let me activate the
sketch layer again and take care of the feet once
again with gray. I'm first blocking in this
average gray that I'm seeing in the reference to
create the basic shapes. And then I'm adding a
little bit more detail. In this case, there is not a
lot of detail on these feet, just some slightly
different grays. So I'm just really focusing on getting the
basic shapes right, and then I'm just putting
some slightly different grays on top of that to make it look
a little bit more varied. And I'm taking care of the transition area between the feet and the torso as well. As you can see, it's a little bit brighter on the right side. And if I deactivate the
sketch, it looks pretty good. So now let's add a few
more detailed feathers. And since this brush is
really fitting for that, I think I'm going to make
it a little bit bigger and paint the feathers with
individual brush strokes. So approximately like that, a little bit brighter blue, a little bit less saturated. And then I'm adding
these feathers with relatively low pressure on my drawing tablet directly with these individual
brushstrokes. I think that works very well here because this brush varies its size and its opacity both at the same time if you vary the pressure on your
drawing tablet. Not every brush can do that, so I'm very happy that
we chose that one. As you can see, it's
really versatile here. And, come on, look at that. That's already really nice. I'm going to admit I
think I got really lucky here with this
layer of detail, but maybe also this
brush is just awesome. So maybe it works
equally well for you. Anyways, it should look
something like this before we move on to
some smaller details. As you can see, we already have a relatively consistent feather
texture by literally just scribbling with the
correct colors in the direction that these
feathers grow, very nice. So I'm looking at
the reference now. What is the big
difference? Aside from the eye and the yellow part? I don't really want
to paint that yet. But yeah, to me, there are a few darker parts
that really stand out these very small,
almost black lines. So I'm making my
brush very small, and I'm trying to place
them where I see them. And then I think
the edge here needs to fade a little
bit into the black, you know, on this
tail feather here. And then I'm trying to add
a few more precise lines on this hyacinth macaw. As you can probably tell, in terms of layers of detail, we've already arrived at
pretty detailed stuff. So I'm adding more and more directional brush strokes
to these feathers, and I'm always zooming
out to evaluate them. Okay, time for the thing that we've worked
on the least yet, which is these long
tail feathers here. And for those, you can see, I'm working with very fast
and dynamic brushstrokes. I think that's going to look
really good in the end. Okay, maybe, like, a little bit of gray detail on
the bottom here, as the reference tells us. And yeah, at the top here, there are these two round
feathers that really annoy me, and I have to put on lots of layers of detail
to make them work. Look at that. Now I feel ready
to add the big contrast, the yellow part and the eye. We could have added it a little
bit earlier, for example, while working on this beak, we could have directly made
this yellow brushstroke here. But honestly, I was in a really good flow for
painting these feathers, so I did not want to break it. Now, however, I'm
pretty content with the feathers and I wouldn't directly know how
to continue them. So that is a perfect moment to move on to something
else, this yellow. So very bright, completely
saturated yellow. So it's the biggest
contrast possible. And then with some small
and precise brush strokes, I am placing this yellow bit, and it immediately
didn't work out, so I'm undoing it to try again. For this yellow part
next to the beak, I'm really zooming out a lot, and I'm putting in
many layers until it really looks like in
the reference because I know as an artist
and a designer that this yellow will
stand out a lot. And if it has the wrong
shape or the wrong color, that will be very noticeable
in the final result. Bright yellow like
this is not only a strong complimentary
color to the dark blue, but it's also the brightest
hue on the color wheel. So with our black background, it's going to pop even more. Both a hue and
value contrast will make all the yellow bits in
this artwork stand out a lot. So they have to be on point. And I'm taking a
lot of time here, even though this yellow bit
is actually just a curve. Okay, then it is time for
the I. But you know what? I don't feel very confident
in placing it correctly, so I'm going to make
a new layer called I. Whenever you add an element
where you already know that you will most
likely have to move it around and make adjustments, just put it on a new
layer to be safe. So right here, I'm
first blocking in this yellow for the outline. And then I'm trying to add
the black for the eye. Plus, we have a tiny bit of
reflections in this eye, which I'm adding with white. Small brush and
very low pressure. Now it's time for the
transformation tool to put this eye in
the right place. That's why I've put it
on a separate layer. Always zoom out so you
can evaluate better. And I think this is perfect. So let me just add a little
bit more reflections in here. That's going to make our
bird look a lot more alive. Of course, these
reflections should be at the top part of the eye because
light comes from above. Now I'm making a few
more adjustments to the yellow bit
next to the beak. I noticed that there should be a bit more of a
curve at the top. So adjust the eye and the yellow part until
they really fit. Now I'm pretty confident that this looks
like the reference. So I'm going back
to the hyacinth macaw and adding more detail. The reference tells
me that there are a few dark parts
left to the eye, so I'm adding those. Then, in order to add highlights to the
curvature of the head, I'm using a few tricks. First, I'm locking
the transparency of the layer so I cannot paint over the edge by clicking on this checker pattern
on the layer here. So now I can add these
small bright brass strokes, and I cannot paint
over the edge. That's very useful
if you want to just add highlights or
shadows to something. But now, as you
can see, the curve is not as smooth anymore, so I'm activating eraser
mode and smoothening it out. I don't know if
that's even a word, but I hope you know what I mean. Nice. Now, look at this. This is already a pretty
decent hyacinth macaw, if you ask me. Now I'm going to add just a
few more detailed feathers on top with this very
saturated deep blue. I think that looks very cool. We're still always
doing the same thing. Look at the reference, ask
what's the biggest difference, then implement it and create visual consistency by moving further and further like that. Sometimes if you zoom out, which you should definitely
do every now and then, you will notice
that a change that you've made may not look good. Like right here, all
these deep blue feathers, I think they're a little
bit too saturated. So I'm undoing many
brush strokes here. Remember that you cannot undo as many brushstrokes
as you like. At some point, Krita
doesn't store them anymore, so it's always better to work in relatively small steps and not add too much stuff at once without evaluating
it for a moment. That is one specific important advice that
I can give you here. Otherwise, this detail
phase is very subjective. You can work in a completely different order to mine here. You just always look
at the reference, search for difference that
you have to implement, and then implement it. First, concerning
the bigger shapes and then the smaller shapes. You just keep going like
that and stay patient for every layer of detail until you arrive at a level of
detail that you like. And right here, I'm just adding a few more thin lines to highlight some of these
outlines of the feathers, just to make them
stand out a bit more. And then that's pretty much it for the feather texter. I
think it looks really cool. So I am very content with my hyacinth
macaw at this point. But I just think it should have a little bit more
brightness on top, but I don't want to mess up the detail that I have
there by painting over it. So I'm making use of another trick that I really
like in digital art. First, unlocking
the transparency of the hyacinth macaw layer. Then I'm scrolling all the way up to select this airbrush. Then some very bright
blue like this, make the airbrush a bit smaller because it's
pretty massive. And then I can just add these smooth highlights on top with very low pressure,
a little bit. And yeah, it's already too much. Let me undo that in
the middle here. I should probably make that brush even smaller,
just like that. Nice. Then let me add a few shadows also with this
brush by switching to black, and then I can paint
just a little bit underneath here to increase
the value contrast. I highly recommend that you
remember this brush in case you need some smooth
highlights and shadows when fine
tuning something. It's very useful
and I use it a lot. Now I think this is the
hyacinth macaw, isn't it? This looks pretty much like
the bird from our reference. We could make some more
adjustments, of course, by adding a few more feathers
or fixing some edges. But honestly, you don't have
to do everything at once. For now, I think I'm absolutely finished with this
hyacinth macaw. I've looked at it a lot, and I'm very content with it now. So I'm going to move on to another element
of our painting, and then in the end, maybe I'll come back and fix
something else here. That is the nice thing
about digital art, right? You don't have to follow
a super precise plan and completely finish one subject until you move on to the next. No, you can be very flexible and technically
do what you want. But I'm very happy that
we've gone so far with the hyacinth macaw because now we're done with
the hardest part, and we can lean back a little
bit in the next lessons. You know, the other subjects are a little bit more
chill and we have to be less precise to make
them look awesome. So, in all seriousness, if your hyacinth macaw looks
something like this and you followed my instructions,
then huge respect. Honestly, you can be
very proud of yours. I know that was a
quite difficult task for the first step
of our painting, but, you know, we got
it out of the way now, so there is no reason why we
shouldn't be finishing this. So, guys, take your time here, make the McCall look good, and then see you in
the next lesson.
11. Painting the branch and ground: Here we go, we've painted
the hyacinth macaw, and we are ready to paint
something else now. So you should all have
your blue parrot, and it should look
something like this. I hope you're content
with it because I am and I'm only going to make very minor adjustments
in the end to this. But in general, this subject
should be considered done. Now the next element
that I want to paint is the one that is closest
to our hyacinth macaw, which is the branch
that it's sitting on. Let's look at the
sketch layer, and yeah, that should actually be
quite easy because we got some nice outlines that we can fill with color, first of all. However, first, I'm going
to merge the eye with the hyacinth macaw
layer by clicking on the eye layer and pressing
Control E because now, of course, the eye
is well positioned and I don't need to
move it around anymore. So do that as well. If you
have these layers separate, we want to keep everything
well organized here. Alright. Now, I haven't actually picked a brush for the
branch specifically, but I'm going to be honest, it just worked out so
well with this blue brush here that I think I'm going to use it for
the branch as well. So let's pick some branch color, some dark, desaturated brown. And well, let's have a look
at the reference first. That's always a good idea. Now, as you can see
in our reference, this branch has a lot
of green moss on top. You see these light
green spots here. And remember what we said
about green in our artwork. We want to minimize it as
much as possible to stay as close as we can to our
complimentary color scheme. The hyacinths will
need a little bit of green in order
to look realistic. But in this case, I think we'll be completely
fine if we just leave this green moss out and make an entirely brown branch. We'll only look at
the reference to determine where is
the branch darker? Where is it brighter? And we do all of that just with brown and make our
own little texture here. That shouldn't be
too hard. All right. So first of all, let's
put the branch on a new layer underneath the
hyacinth macaw. Just branch. And then just as for the parrot, we are first going to block in the base color and get
all the outlines right. So vary the size of your
brush and just fill out this branch with
very desaturated brown. I'm going to start with
these thicker parts first, where I can work
with a bigger brush. But now, as I've painted
underneath the hyacinth macaw, and I compare it
with the reference, I can see that the
hyacinth macaw is definitely
lacking shadow here. We just weren't able
to see it because before the hyacinth macaw
just had black behind it. But now with the
branch, we actually need to do a little
bit of fixing here. So I'm going back to the
hyacinth macaw layer and deactivating the
sketch layer for a moment. And I'm just going to add a few of these very dark feathers. I'm going to try to make it fade out a little bit,
just like this. And then as we've now added some bright
parts for contrast, we can actually see
these feet better, and they need a little
bit of fixing, too. So now I can tell that
the left foot should be way darker and maybe a bit
more precise like this. And, yeah, that's
often the case if you change something
about the background. You may also notice now
that you'll have to adjust the feet a little bit
as you've added the branch. So fix them if you have to. Remember that these are
just very small details, and in the final artwork, these feet will not
be very visible. So just make sure
the general shape is right and the colors, and please don't
obsess over them. You don't need to add
any fancy texture and zoom in really close to the reference to
determine where exactly the highlights and shadows
are on these I don't know, toes or I don't know how
to call it for a bird. But yeah, you get
what I mean, I hope. Just don't obsess over
these tiny details. Alright, let's activate
the sketch layer again and move back to filling the
branch with the main color, which I still have here
in the color history, that's also useful to remember. So we can just continue
exactly where we left. By the way, I also want to
work in layers of detail here. So I'm not even bothering about the small detailed
branches right now, but I'm just filling
out everything where the branches a
bit thicker first. That's just how I
prefer working because that way I can keep the
composition in mind better, and I don't zoom in too much on a tiny part and forget
about the bigger picture. Just big branches first,
small branches later. So it should look
something like this before you move on to
the smaller branches. However, before I add them, let me create the ground first because we've said these small branches lie
on the ground, so I think it would
be very helpful to see where that ground is
and what color it has. So let me go to this
brush, I think. It's a very smooth one
with a nice basic texture. And then let me go to the background paint
layer and add the ground. I don't think the ground has to be separate from the
background in this case. Make the ground with dark
gray just like this, just as we've determined
in our composition sketch. For that, I'm once again tilting the canvas a little bit
because I just feel way more comfortable
painting straight lines at this angle than
completely horizontally. And I want to encourage you to at least try
that out, as well. It could be a great discovery
if that works for you, too. I mean, I use it in pretty much every artwork
where I need to, you know, make some
horizontal lines with a horizon
line or something. So yeah, let's fill this
ground until the horizon line, and then let's make
it smoothly fade out into the black by
lowering the pressure. So if we deactivate
the sketch layer, it should look something
like this. Very smooth. You might have to do a little
bit of fixing by painting over it with black if you went a bit too far,
like I did here. But in general, this should be a quite quick and easy process. As I've said, we don't want anything too complex
or detailed in the background because
we'll have lots of contrast and interesting
subjects in the foreground, and they need to stand out. If there is an
additional texture or something in the background, then it might be a
little bit too much, and our subjects are not
being framed anymore. So just this black with a slight transition from gray to black is
perfect, I think. Alright, let's go
back to the branch. And now I think we don't need
the sketch layer anymore. So I'm going to deactivate it. Then let's go back
to our branch brush, make sure it's very small, and return to the brown. You should still be able to find it in your color history. But if not, then just select this brown that you can
see on my color selector. So very desaturated. Desaturated, of course, because saturated would interfere a little bit too much
with our color scheme. So let's just add some
small detailed branches. Since the reference doesn't
provide us with any of those, we'll have to decide what we want to do with them ourselves. So here's what I'm thinking. The general composition of our composition sketch
was pretty good, so I don't want these branches
to do something super crazy or be very long and
extend this branch too much. I just want them to be
a small finishing touch that is a little
bit more detailed. If the branches are too long
and they go somewhere else, that would change the
composition again. So I don't want to
take any risks here. Then remember what I've
said about the contrast of shape between the hyacinth
macaw and the branch, which I really liked in
our reference, you know, clean geometric shapes in the parrot and wild disorganized
shapes in the branch. Because I found that very cool, I want to continue
like that with the smaller branches to intensify this
contrast even more. So let's also give them
many small curves and make them quite chaotic. Nice. So that's how this tree and especially the
smaller branches now should behave in
terms of composition. But also, in order
to look realistic, they have to follow the
basic principles of trees. If you've taken my
tree master class, then you know what
I'm talking about. But quick overview, branches
get thinner and thinner, the further they grow, so they don't suddenly get thicker, make your brush smaller
and smaller here, then the branches split up more and more the
further they grow, and the style of the structure
has to be consistent. So you don't want any
outlier branches. They should all be in
the same style with these small curves
and these small ends. So, yeah, that's pretty much it. Also, you can see
that I'm making these small branches grow upward pretty much
all of the time, because this part of the
branch lies on the ground, and if it's been lying on
the ground for some time, the branches can pretty
much only grow upward. My God, do you see how
complex it suddenly gets and how many decisions
you have to make as soon as you stop
working with a reference? But, yeah, that's also an
important part of painting. Only reference would
be pretty simple, but also a little
bit boring, right? But yeah, that was kind
of my intention to cover a few different
parts of painting, a few different styles
with this one artwork. And so far, it's worked
out actually quite well, and you should still be
able to follow this. Alright, regarding the
branches at the top, just make them look
something like this. And very important, don't
make them come too close to the hyacinth macaw because
that is our main subject. We want it to be framed, so we need a little bit of empty space around
this main subject. Okay, once you think
that your branch has good general shapes and you
feel ready to add a texture, make a quick check first if
it really grows thinner and thinner everywhere
because that's one of the most common mistakes
when painting branches. Right here, I have to
fix some parts by adding an extra curve just to make sure the branch
is thick enough. All right. Once you got that, it's time to add
some basic shadows. For that, we can look at the reference again just to be sure where the
light comes from. In order to add
shadows, of course, we have to make our
brown darker and even less saturated because that's
what happens in shadows. And I'm going to lock
the transparency of our branch layer so we
cannot paint over the edge. That is very useful for
adding textures like this. So yeah, light comes from the top and a little
bit from behind. So I'm just scribbling on the bottom parts of these
bigger branches here. And also a little
bit randomly on top of these smaller
branches at the ground. There we will have lots
of complexity because these individual
branches are lots of individual shapes with their
own highlights and shadows. But in this case,
I don't want to think too much and
calculate too much. So I'm just scribbling
on top to add this layer of
complexity randomly. Yes, that is allowed. You can save a lot
of time like that, but only if the things are
very small and chaotic, like branches, leaves or any
complex plant, basically. Of course, as soon
as it gets a little bit bigger like this
curve branch here, you should put the shadows where they belong
just to be safe. But in the more detailed parts, like also these smaller
branches at the top here, the viewers of the artwork don't know anyways how that
stuff functions. So feel free to be
completely random here. And I'm also going to work
like that for the highlights, which I'm adding
with a bigger brush first on the bigger branches. And you can see
I'm literally just scribbling here that often
works well for a bark texture. And yeah, for the bigger parts, just look at the reference
to find out where the branch is the brightest
and scribble the most there. And for the very small branches, you can once again fool the viewers and create
the illusion of detail by scribbling
completely randomly. And then I just keep going like that and add a few
more layers of more intense shadows or highlights depending on
what I think is fitting. One very last important
principle to follow here, make sure your texture is
consistent on the whole branch. It doesn't matter at all if it's very detailed or just scribbles, like right here, it
has to be consistent. If you add very dark
shadows somewhere, then they should be everywhere where this branch has shadows. And if you make the texture very detailed and very
dense in one part, then you should
also make it very detailed and dense
in the other parts. So even though this looks like
a very, very simple task, you still have to mind
a few basic principles to make sure this
branch looks good. Alright, in the end, I'm making a few
more adjustments to the part that is directly below the hyacinth macaw
because these claws or feet, whatever you want
to call them, they have a little bit of
shadow underneath too. And maybe just a few more
basic highlights on top. Alright. Now, look at this. This is definitely a branch. Okay, maybe just a few
more bright highlights here because that part is on top and the light
comes from above. But, yeah, I think this
is solid work now. Make sure that your branch also looks something like this. So very simple bar texture, but correct highlights
and shadows in the places that are
relevant to the viewers. In the end, we're going to add some shadows that this branch casts onto the ground because those are
missing right now, but that will be
for another lesson. The branch itself,
the subject is done, and it is exactly
as we've planned. So in the next lesson, let's move on to
the flower pots.
12. Painting the flower pots: All right, right. Next
subject on the list, we get the flower pots. Now, if we look at the
composition sketch, what we've planned,
these flower pots should be very simple. We pretty much only have desaturated brown in the
shape of a flower pot. However, in order
to paint them now, I am going to highlight another technique to progress
through your painting, and that is to improvise
some detail on the fly. Very simple subjects like flower pots that can be
flexible in terms of texture, this is a perfect choice. We have no reference
for these pots, so let's just try to block
in some appropriate colors, and then we can see if we can
maybe add a texture on top. So let's go. We should
definitely activate this sketch layer for this
because we've already found some really nice arrangement
for these flower pots. So now we literally just have to fill them
with a color first. For that, I think it
would be the best if we add an individual layer
for each flower pot. So we are still flexible and we'll be able to make
adjustments in the end. And we should put all
of them in a group so they don't overwhelm all the other layers if we
switch back to them. So I'm going to add
a new group layer. And because we have two
now, let's name them. We got the sketch group and
the I guess, pot group. Sounds great. So if we select this group layer and click
on make a new layer, then this layer should
be added in the group. Perfect. Let's call it pot one. All right. Then we can right click and switch to this brush, which we've chosen for the pots. And then let's choose
an appropriate color. Maybe like this, very gray, but maybe a little bit of color. And then let's start
with this one. Just fill it out
as you see it in the sketch with
these brush strokes. I'm a big fan of this
brush, by the way, for creating a more
painterly look, I use it pretty often. If I want to be precise
with something, in an impressionist painting. Alright, when
everything is filled out and there are no more gaps, let's make a new layer
inside that group again and call it pot two and fill
out this one as well. And yeah, you get it. That's how we're going to
proceed with all of these pots. Very simple. Also, it doesn't really matter in
which order you add them. Just don't add two of these flower pots
on the same layer. They should all have their own. In order to fill these pots, you can see that I'm usually starting on the
edges on the sides because this brush
is very thin when we paint vertically with it,
so that's good for this. And then I'm filling out
the middle with these slightly downward curved,
horizontal bras strokes. Downward curve because
you can see we automatically get a nice little texture with
these bras strokes. And therefore, it's
going to simulate the round shape that
these flower pots have. Remember, they are three
dimensional cylinders, and we're looking at them from slightly above as the
viewers of this artwork. So that is the task that we
should all complete now. Just fill out these flower pots precisely with this color. Make sure you
implement the slight downward curve in your texture, put them all on
individual layers, and make sure the edges
are very precise. So sometimes you may
have to activate eraser mode and erase something when you
paint it over the edge. And maybe also implement a
slight variation of color. You know, some of these
pots a little bit darker, some little
bit brighter, but in general, please stay in this very desaturated
beige territory. All right. Now I think it's a good time to
talk a little bit about the order in which we're painting all
these elements, because that's actually
an important topic. And is there anything that
you can learn from this? Should you as an artist, always start with the main
subject and finish it and then add the next thing and finish it and then the
next thing and finish it? Is that the way to go? If I
had to give a general answer, it would be, No, there are many different
ways you can make art, and you can proceed through your painting process
in all sorts of ways. This right here, the way we're doing it is just an example. We could have, technically, first painted the ground, then the flower pots, then the hyacinths,
then the branch, and the parrot, or we could have started with a branch and
placed the parrot on top of it, and then the hyacinths and
then the ground or whatever. There is no general
rule for this. However, I still have my
personal reasons for why I did it like this in this
particular artwork here, and I'd like to
share them with you. Usually, I am a big proponent of layers of detail applied
to the whole artwork, which means you first finish the background because that's usually the least detailed part. Then you block in
the basic shapes of the foreground of
everything in the foreground, and then you slowly add
more and more layers of detail to the whole thing. This is usually how traditional
artists are working. And I really like
that for landscapes and impressionist paintings
in general, as well. You know, paintings
where everything is more interconnected and overlapping and the shapes are not as clearly
defined as they are here, so it makes sense to work
in layers of detail there. Layers of detail on the whole canvas are also
advantageous when it comes to composition because blocking in the first one or two
layers of detail basically just means developing
the whole composition. You know, the first layer of detail in a painting
that you make that way would pretty much look like our
composition sketch here. So that would be something that I genuinely highly recommend. First block in the
first layer of detail to the whole thing,
develop your composition, and then you get
slightly more detailed with each layer that
you add to the canvas. However, in this case, you can see that we
worked very differently. We started with the
parrot and finished it, and then the branch
and finished it, and now we're at the pots. But this actually works for this painting because first of all, I think it's better to structure the lessons of this
course that way, you know, subject by subject. It's just easier to
follow, I think. But also, we already have
the composition sketch. We've developed it,
and we know what the composition is going
to look like in the end. And the individual elements of the composition
are very separate. You know, all these pots and the ground and the
branch and the parrot, they're all kind of
their own thing. They don't flow into each
other or something like that. So in this case, it makes
sense to work subject by subject and finish one thing
before we move to another. I'm telling you all this because I have to be honest
about the process. This is not how I always work. You can be very flexible when it comes to your
process of painting. It just always depends on
the painting, you know? Right here, I'm
very happy, though, that we started with
the main subject, and we've pretty
much finished it, because that is just
motivating, you know, we've directly completed the
hardest part of the process, the most complex element. And now we're literally just adding some stuff around it to, you know, complete
the composition and make it stand out more. That's basically
all we're doing. So that is a little benefit of completing the hardest part, which is usually
the main subject. First, it's just way easier
to finish the painting. You know, I wouldn't want this parrot to just
sit in the air. I just have to add some stuff around it and finish
this painting. You can probably imagine
that the other way around, there would be way
more resistance if we first had all
the stuff here. And then in the
end, we also have to add the super
detailed parrot. I don't know if I would
complete that step so quickly. Here we go. That's basically all
I wanted to say. The process always depends
on the specific painting, so you can be very flexible. This is just what I was
thinking in this artwork. Maybe it can be helpful.
So look at this. Everything is filled out. Now we could say that these are the
flower pots that we want. This is the level of detail
that we're content with, and we could move
on to the hyacinth. But I think I'm
going to experiment a little bit with more texture. You know, the hyacinth
macaw is very detailed and has all
these nice feathers, so it would not really fit if
we just left it like that. The level of detail
in our artwork should be relatively consistent. It doesn't always have to
be completely consistent. That's also a misconception, but at least these
foreground elements should be in the same wider
category of detail. Let me lock the transparency
of all these pot layers, so we can drop a
nice texture on top without worrying about
painting over the edges. Then let's select this brush, pretty awesome for
painterly textures. Make it quite big and bright
beige. Maybe like this. And let's just scribble with
very low pressure here. That automatically
creates this texture, which I actually
think is really nice. So I'm going to add it to each according pot layer with a few different
overlapping colors, so different tones of beige. Because of the
locked transparency, you can also only paint
on the correct pot. So let's just make this
consistent everywhere. This would, of course,
also work with any other brush that
has a nice texture. I'm just a big fan of this one. Generally, these Mileo impasto brushes here. They are so good. Okay, I think that is
a pretty good basis. Now let me add a little
bit darker beige on the bottom part of each pot because light comes from above, so we'll have a little
bit of shadow there. Now as we get more details, we actually have to think
about stuff like that. But yeah, just a little bit
scribbling with this dark, desaturated brown beige
or whatever it's called. Alright, I think we
can now spice up these shadows a little
bit with a hue. So let me actually
switch to dark, desaturated purple like this. Very desaturated, though. And I'm just scribbling some
more shadows like that. I know purple might seem like
a very weird choice here. I mean, shouldn't we just
make the beige darker? But that's actually
an advanced art trick because colors and
specifically hues always shift a little bit toward
blue and purple in the shadows and toward red
and orange in the highlights. Light and shadow don't just make stuff darker and brighter, but they also shift the
colors a little bit. And you can exaggerate that
effect in your paintings to spice them up a little bit without making them
look unrealistic. The impressionists
and expressionists, for example, they heavily
exaggerate these effects, and they just make
all the shadows completely blue or purple
or something like that, and the highlights
bright and orange. So right here, I also want a little bit of that,
not super extreme, but you can see this purple just makes these
flower pots look a little bit more enriched and interesting and it
doesn't even look wrong. That's a little advanced
art technique that you can pretty much always
apply to an extent, even to artworks that
are realism based. Alright, that's a solid texture. But I just feel like
these flower pots look a bit too two dimensional. So what can we do about that? Well, we could put
an emphasis on their cylindrical shape by adding a few more
defined curves. So let's try that out. I'm going to switch back to
this blue brush because I remember it's really good
for painting precise lines. Then let's make it
very dark gray, but you could also choose
another color here, and let's set the
opacity to about 50%, so we can still see the
texture through these curves. And then I'm trying
to add a few of these curves that follow the
shape of the flower pots. You know, a very classic
texture for a flower pot with these horizontal lines that obviously look like curves
in a three D environment. So try to make them
relatively parallel on each flower pot and also
vary the thickness. Make some very thick lines and some very thin lines because a little bit of variety
can't be bad here. You can see I'm not really
the expert for painting these parallel curves,
but that's no problem. Just takes a bit more time,
but I can just undo and redo until the curves
look somewhat pleasing. Also, they don't have to be 100% precise or
something like that. The hyacinths will be the main focus here because
they will be blue and yellow, very saturated and chaotic. So the viewers will
most likely not look at these flower
pots super closely. Always keep in mind where the most contrast is
in your paintings. What are the things that
really stand out and put most of your effort
into those things. What we're doing right
now is pretty much just a nice little bonus that makes the artwork
feel more complete, but not a focus point that
stands out through contrast. So I think now most of these
curves are appropriate. Nothing amazing but definitely not bad for a small
detail like that. Now I'm going to
each pot layer with this airbrush and intensifying this dark purple contrast a bit more because I think it
works really well here, but still use
relatively low pressure and just at the bottom
of these flower pots. Alright, these flower pots
are very good at this point, but I'm just going to make
a few more adjustments. That's very often the case. If you paint something
without a reference, there are so many adjustments that you want to
make in the end. So one thing I notice is that some of these
flower pots in the back, they should be a bit
darker in general. But in order to avoid
having to paint over them, I'm going to make use of one of my absolute favorite
functions in Krita, and that is the color
adjustment window. Press, control, and you
can adjust the hues and the saturation and the values of the layer that you
are currently on. So I'm just going to
lower the brightness of this pot here, pot five, and pot 72. If you have a little
bit too much purple, you can also decrease
the saturation here. But in general, I think these flower pots are
actually quite good. So I'm just making very slight adjustments to the values here. So, something like that. And the final adjustment, let's go back to this
airbrush and add a few more very
dark purple shadows on the bottom of
these flower pots. Now we're making these shadows very small and very intense, just to indicate
this extra curvature at the bottom that
flower pots often have. Because light comes from above, these will obviously be
way darker than the rest. But also on these flower
pots in the back, I'm going to add a little
bit more shadow because they are covered and surrounded
by other flower pots, and there is less light
reaching there in general. Always think about
stuff like that a little bit and implement it, but don't obsess over it if you're not working
on the main subject. That is my general advice
that I can give you here. So I would say, if
your flower pots look something like that,
that's what we need. So you got a little demo here of making textures and
details up on the way, which is something that you just have to do sometimes
as an artist. Of course, we could have used references for
these flower pots, but I was too lazy
to look them up. For simple elements
like this that are pretty much just
geometric shapes, you can often just make them
up yourself if you follow a few basic principles
like correct lighting, consistent texture, everything
that we've done here. So I hope that you understood the general process of
creating something like this, and you should have some nice
and simple flower pots now. If that's the case, then we can fill them with flowers
in the next lesson.
13. Painting the flowers: Welcome to the lesson
painting the flowers. This is the last big task in our artwork that I'm
seeing right now, you know, other than adding some shadows or adjusting
some stuff in the end. And luckily, I think
it's going to be the most relaxing part of
the artwork, actually. If we know what we're doing and we make a few
correct decisions, this process is going to
be quite chill, I think, because hyacinths or flowers in general are really not
that complex of a subject. We just have to scribble a lot with awesome colors, and
that's pretty much it. First of all, let's
have one last look at actual hyacinth before we
start, just to be sure, right? So these hyacinths, they can have slightly
different colors, mostly blue and purple,
just like we wanted. Then some of them are a
little bit pointy at the top, but most of the time
they are pretty round. Then, actually, I'm going to
look up this word in German, Huertsnton just to get a
few different results now. That's a little trick to get some more interesting
results sometimes. You know, just look
at the word in another language and you
get something different. So, yeah, I think I've
got a pretty good idea what I want to paint now. So I'm not going to pick out
a specific reference here. By the way, I really appreciate that these
green leaves that these hyacinths have are
very simple in general, just, you know, this flat, green, long and nothing complex. That's exactly what
I want. So yeah, I think I'm going to
start with the leaves. Let's put all these
groups of hyacinths on individual layers so we can adjust them separately
from the pots. So on top of pot one,
I'm going to make a new layer called
hyacinths one. And then for these
simple leaves, I think, once again, this brush
will be the best choice. Then some dark, semi
saturated green like this, just as I've seen it
in these references, make the brush a bit
smaller, of course. But now, actually, I think
it would be better if we move this below
the pot one layer. So we can make it look
like these leaves and hyacinths grow out of
the pot, like this. Oh, yeah, that already
looks very good. So let's just make a few small curve brush
strokes here and release the pressure in the end so these leaves
get a bit pointy. What an awesome
brush, by the way. Now let's make the green
a bit brighter and just add a few more
brush strokes on top, which should then be enough
detail for these leaves. You know, just a few dark
parts, some bright parts. That's going to be nice.
Alright, time for number two. Once again, let's make
a new layer called hyacinth two below pot two. And then, oh, that's the
wrong pot. Let me undo this. And yeah, here we go. Just the same thing once again. Try to give your
leaves a few curves and make them go in
different directions. And we're just going to keep going like that for every pot. Just switch back
and forth between the two greens in
your color history, and you can make everything
look nice and consistent. That's the great part. We've
done so much planning and so much sketching that we can
now pretty much just relax. We know where everything
goes, what we have to do. So we're just putting a few nice brush strokes
on the canvas. By the way, if you know me
from my color theory course, then you know that I'm usually a huge proponent of
making a color palette. So why didn't we make a specific color palette
for this painting? So a collection of colors
that we're going to use? Well, actually, we
have a color palette. It's just the
composition sketch. But we have planned our
colors, modeled them, looked what they look
like next to each other with our composition
sketch. That's it. A composition sketch, like
the one that we've made, replaces a color palette because it's pretty much just a more advanced color
palette, right? So this is just for the
ones of you who've taken my color theory course
and got confused here. Yes, make a color palette, model your colors and see what they look like
next to each other. Or if you want to do
even more planning, aside from the colors,
make a composition sketch. It's the same thing. It
has the same purpose. It's just a bit more detailed. Alright. In the end, your leaves should look something like this with one hyacinth layer underneath each
according pot layer. Once you've got that, we can move on and add the hyacinth. Remember, we want to
do it with this brush. And once again, let's start
on hyacinth one, this one. Let's zoom in and select
our hyacinth base color. This flower pot here should
be dark blue or purple. So I'm going to start
here with this color. All right, then let's make
the brush very small, maybe like 30 pixels. And then I'm going to
start just like this. Small, quick circular
movements with the brush. Oh, yeah,
this is working. Look at this hyacinth. Just
a rough shape like this that gets a little bit
thinner at the top and thicker at the
bottom. That's it. And let's repeat that
for the next one, these little dots with the base color that
make a shape like this. Honestly, I think
this is very fun. Make the hyacinths grow
upward like this and make the ones on the sides of these pots fall a little bit, maybe like a slight angle. That's going to
look more natural. Also, give them slightly
different heights like this. That also makes them
look more natural. So yeah, I'm going to work in layers of detail
here once again. So I'm first going to block in the base color for every
group of hyacinths here, and then we're going to add highlights and shadows
everywhere equally. So now these ones are done, we're going to move on to
hyacinth two right here. I think I want to make those ones a little
bit more purple. Remember that we can implement a small range of colors here in this blue,
purple territory. So let's make use of that. Just the small scribbles
on top of the leaves. I'm going to do all the
blue and purple ones first, and the yellow ones in the end. So for now, I'm leaving out the pots where I
want yellow flowers. Just a personal choice here. You can add your flowers in
whatever order you want. Just make sure that
all the flowers have visual consistency, so the hyacinths should be in the same height range and in
the same range of density. Alright, now you know
what to do here. So I'm going to
explain something theoretical because you can
probably see something here. We've moved on from a more realistic to a more
impressionistic style. Now the brush strokes
are a lot more loose and chaotic.
Mixture is good. You know, if the styles fit together to make one
coherent composition, only realism is unnecessary, only impressionism, maybe
not that interesting. But a little combo like this,
we can definitely do that. It is an advanced
topic in digital art, how many different brushes and styles you should
combine in one painting, because there are many options,
and it always depends. It depends on the
types of brushes. You know, some
brushes complement each other and some
bite each other. It depends on how many
subjects you have, how big invisible
your brushstrokes are, and many more things. Sometimes I make a
whole painting with only one brush if the
brush is really good. Right here, it might have actually worked
with the first one because it's so versatile and we've painted a
lot of stuff with it. Most of the time, I use, like, three to five different
brushes, like right here. And there are
artists that somehow manage to use 20
different brushes. I don't know how they
do that, to be honest. What I can say with confidence is that if you're a beginner, definitely limit
your use of brushes. A better brush does not
make you a better artist. It's just another
tool to express. And brushes also
have to be learned. So if you always use a brush you've never used before
for every single painting, it's going to take you some time until you really understand one and learn to use it
in different situations. But still, you
should, of course, experiment with
different brushes and styles because
otherwise you won't find the ones that allow you to make your art
the way you want. So a good middle way
that I've stuck with is to use one brush
for one subject, one brush for the hyacinths, one brush for the ground,
one brush for the parrot, one brush for the pots. Sometimes I combine them. It can look really nice,
like on these pots here, but it's way more
difficult to make that look consistent and
not too chaotic. Try to learn the brushes and
don't move on too quickly. Don't confuse yourself with
too many different styles. Then with time, you will
find your own way of using brushes in Krita. That's
all I can say here. Alright, I've blocked
in the shapes of all these blue and
purple flowers. Now it's time to move
on to the yellow ones. That's gonna be here,
hyacinths five in my case. And then for the color, let's
go with this bright yellow. Maybe a bit more on the
orange side, like here, because we first
want to block in the darker parts. Oh, yes. And you can immediately see these yellow flowers stand out way more against
the dark background. By the way, I think
it's the best if we stick with relatively
low pressure here. So we get all these
small gaps here that make the flowers
look more detailed. And then the last flower pot, hyacinth three, same
thing once again. And yeah, now we already have a pretty good idea what the final painting will look like. All the main stuff
is blocked in. Okay, perhaps let me go to
hyacinth five and make one of them a little bit
higher, just like that. Okay, time for the
second layer of detail. Let's go back to
this blue purple and make it brighter and more saturated because now we're going to paint some
more highlighted parts, starting once again
on hyacinths one. Remember, light
comes from above, so on top of these hyacinths, especially, we're going to drop all these small highlights. Just low pressure and small circular movements
with your brush. And you can see
they already start looking like detailed
hyacinth, just like that. Then let's add a few
random spots on top of this to create more
detail and chaos. And then I'm going to
move on to the next one, for which I'm going to
make the blue a bit more purplish because this is a more purple group
of hyacinths. But yeah, basically, it's
the exact same thing. I'm just varying the
hue a little bit, but same brightness
and same saturation. Just these small, nice dots everywhere to create
a bit more detail. It might take you some time
to get used to this process, but I'm telling
you it's actually very relaxing once you
get the hang of it. Just be patient and take care of each hyacinth to give it
the correct highlights. And if you do that,
just take care of the next hyacinth one by one. It's going to be very
flowy and simple. Once again, I'm first doing
all the blue and purple ones, but it really doesn't matter. Just make sure
that when you make the yellow ones, like
I'm doing it now, you shift the hue even
more away from orange and towards yellow like this and make the yellow
brighter, of course. And then it's the
same thing again. Nice. Now we just keep going like that with more
layers of detail. For these yellow flowers, I think they should
be completely white in the highlights, you know, some reflections
from the light source. That's going to give them a lot of contrast towards
the background, which will look really
cool in the end, I think. So I'm just painting very few, very bright highlights on the very top of these
yellow hyacinths. And on the other
yellow ones as well. After that, on these
blue ones on the left, I also want to give them
some brighter highlights, but not completely white. That would be too much
for these blue hyacinths. And also just at the top here. And you guessed it,
we're going to do the same thing for
the other ones. Remember to always select
the correct layer. That's pretty much
the only danger here. Otherwise, there really isn't anything else I
can tell you here. Just look at what I'm
doing and do it as well. It's a quite repetitive, but also relaxing process. So stay patient here and work one by one on
these hyacinths. I Alright, right. Look at this. Everything is very bright now. But I'm going to be honest,
it's maybe a bit too bright, so I'm adding a layer of very
dark brush strokes as well. Again, first on all the
blue and purple ones. At this point, you don't have
to necessarily follow me, but you can just stop when you think that your
hyacinths look good. I want to make that very clear. We're at this stage in
painting where we just add more layers of
detail until we like it. So there is no clear point where these hyacinths are
officially done. They are done when
you like them. However, I think it's
definitely a good idea to add at least one or
two more layers here, like I'm doing it with these
shadows because more of these slightly different
overlapping colors give the hyacinths more depth and just make them more
interesting to look at. At some point, however,
it's going to look too chaotic and too weird
if you add too many layers. So there is a balance point. But that's a very
subjective thing. By the way, can I point out how easy it is to paint
flowers like that? I mean, don't get me wrong. I don't mean to be offensive if it doesn't work
out for you yet. I can totally understand it. But once you get the hang of it, it's really not that complicated because
you're just doing the same thing over and over again. And that's the best part. You can then always add
these flowers if you want. It's good to have them
in your repertoire for still lives or landscapes
or literally anything. These things like
flowers, trees, rocks, objects that you can
put in pretty much every painting, they so useful. You can adjust them in
so many different ways that they always fit
your composition. So it really makes sense to take some time to learn
and understand them. If you really understand trees, you can always add one
that perfectly fits your composition
and the branches frame the subject or whatever. And if you understand hyacinths and you're comfortable
painting them, you always have
something exciting to add to your artworks, and you can
technically give them any color so they fit a specific color
scheme that you want. Isn't that great. It's just a little benefit
that I wanted to point out. You know, these hyacinths are not just for
this one painting, but by painting many of them, we are practicing them
and getting comfortable. So you have something
beautiful and very flexible in your toolbox as an
artist. Don't forget that. Alright. For these
yellow flowers, I'm just going to add one more
layer with orange on top. Technically, these are supposed
to be the shadow parts, but if I just made them
darker like dark yellow, it would be pretty
ugly, actually. It's not a nice color.
So if you need to add shadows to something
that's yellow, make the shadows orange. That's a little pro trick. So this is what I want my
hyacinth to look like. So make sure yours also
looks something like this. And then let's add a
little bit more of these leaves because we've covered them pretty
much universally here, and I just want some
of them to be visible. However, for that, I'm going on the pot layers and not
the hyacinth layers because now I want these
leaves to actually grow over these pots.
So it looks like this. Just these little curves here. That makes them look
way more interesting. Remember that green is still not a part of
our color scheme, and you want to keep
it very minimal. Just some leaves that grow
out of these pots and over the hyacinth with a few
different tones of green. Okay, that's it. Let's look
at the composition sketch. If this is the
composition that we want, I mean, it looks nice, but yeah, in the composition sketch, we actually have some flowers
lying on the ground, so I think we should
add those as well now. I think there was a pretty
good idea because right now, if I look at this
painting, these colors are a bit too concentrated. You know, I would be nice if
we had a little bit more of that yellow and purple
on the ground, as well. So everything is a bit more
filled out and balanced. So let's make a new layer over this pot group called
flowers floor. And then I'm just going to
start with the green leaves. Let's just put some of them everywhere consistently
on this ground. Obviously, these
flowers and therefore, the leaves should be horizontal because they don't
grow on the ground, but they lie on the ground. Very important
distinction. So yeah, we're just going to
repeat this process once again just with
horizontal hyacinths, blocking the base color,
and then a few layers of highlights and shadows
on top, and that's it. Oh, one more thing. This flower here is behind the branch, but that would make sense. So I'm going to select this, then copy and paste
it onto a new layer and move that layer
above the branch layer. So we have a flowers floor
front layer where we can put the hyacinths that are
in front of the branch. This is very good,
of course, to create a bit more depth and
three dimensionality. I don't know if that's a
word, sorry, but, you know, just these hyacinths
should not be all in one line in front of the branch
or all behind the branch. We want some
variety. By the way, to make this more logical, add yellow hyacinths
on the ground, only on the right side where the yellow hyacinths
actually grow because, you know, they
wouldn't fall like two or 3 meters away from the
flower pot where they grow. So I'm only adding them here. And then after adding
a few highlights, I'm going to spice it
up a bit by adding some individual
blossoms on the floor. You know, just small spots, small parts that have
been separated from the big blossoms in
blue, purple and yellow. And the last step
here is to just make the flowers on the
ground consistent with the ones in the pots. So give them approximately
the same level of detail and the same intensity
of highlights and shadows. For that, you can use your color history on
the right side here. And that's it. Look at this. This is pretty much the artwork. It's not very realistic yet because we'll have to add
some shadows on the ground, and we can maybe fix and
adjust a few things. But we can do that
in the next lesson. Regarding the main subjects,
this is good work.
14. Refining and finishing: Okay, everyone, this is the last practical
lesson of this course, the refining and finishing part. As it's usually the case, for this last stage
of making an artwork, this is going to be
pretty freestyle. So there won't be any
structure like, first, you got to fix this,
then you got to fix that, and then
it's finished. No, this part just consists in looking at your
artwork and thinking, h how could I improve
this a little bit? And that is, of course,
always something different, depending on what kind
of artwork you make. So right here, I'm
just going to take you through my thoughts and
my last actions here. So see this as an example. Now, the first thing
that we should fix here, I've already mentioned it a
few times is the shadows. We have a light source
that comes from above and a little bit
behind the subjects, so we need to add some simple
shadows to the ground. For that, I think I'm going to select this brush, this flat, smooth brush because
I know it very well, and yeah, it's just good. And then let's go to
the background layer, which I haven't even named
just this paint layer one and then select very
dark, desaturated purple. Remember, we can
use blue or purple for shadows as we've
done it for the pots. That's going to make them
look a bit more rich. So, yeah, let's just start. I'm going to make the
brush a bit smaller, til the canvas so I can paint
better horizontal lines. And then I'm going to scribble underneath these
individual objects. Just a little bit. Ight and shadow is a huge topic in art that would
deserve its own course. And I'm going to be honest, it's not my field of expertise. I usually just rely
on a reference if I have something with complex
highlights and shadows, or I make a very impressionist
or expressionist painting where I can just scribble the shadows and exaggerate them. A little bit like right here. You can see this is
not something that requires a lot of
thought and planning. I'm just scribbling underneath
these objects that would cast a shadow to just make
the parts below them darker. And for this painting,
this is definitely fine. We have some simple highlights and shadows that are
not very extreme, and the ground is, of course, not a focus point. So it is not super
important what we do there. So, this should be your mindset when painting these shadows. Let's just spice it
up a little bit. Sometimes when you've added
accidentally too much shadow, you can either undo it or
select your background color and paint over it and then switch back to
your shadow color. So just make sure that your
shadows are consistent. So everywhere where there is a object that's
close to the ground, add a shadow below it. So it should look something
like this in the end. Nice. What else can we do here? Well, if I look at
the whole thing, there is actually
a little problem that I want to fix because the flowers are actually a bit more intense and saturated
than the parrot, even though that one is supposed
to be the main subject. So let me select the hyacinth
macaw layer and open up the color adjustment
window by pressing Control U. So let's increase
the saturation of the parrot just a
little bit, maybe ten. And let's see what
it looks like. And yeah, if I look at the
before or after comparison, I definitely prefer the parrot to be a bit more saturated, so it fits the flowers better. Notice that it might
not necessarily be the case that you also have
to make this adjustment. You also don't want to
oversaturate anything. But this color adjustment
window for individual layers is an insanely useful
tool if you have any imbalances or
just generally things that you want to change
about the colors. So I'm using it very often in the finishing stage of an artwork to just fine
tune everything a bit. Alright, then let's do
a little experiment. Maybe you remember
when I said that we could add leaves
to these branches, just to see how it looks and if that adds anything
to the artwork? Well, at least I remember it, so I'm going to try it out. Let me make a new layer
up of the branch layer called leaves Question mark, because I don't know yet
if I really want these. And let me try painting a few desaturated
leaves with this brush. You know, just some
dry autumn leaves. And, yeah, maybe this is not the best brush for
painting leaves. Let me try this one and just scribble a bit here on top
of these small branches. Well, that's also
not what I want. Maybe you can paint
leaves like this, but I'm gonna keep looking. And this RGBA wet brush, if it's very small, I think, looks pretty cool actually, and it matches the level of detail that we have in
the rest of the artwork. So let's just scribble a
little bit consistently on every small branch. Also
here at the bottom. Remember, we also got
some branches there. Alright, then let's maybe add some more saturated leaves just to spice it
up a little bit. But of course, not too
saturated because you know it. This would disturb our
complimentary color scheme. I really like this brush
for painting leaves, also in other artworks. Now I think these
leaves have become a little bit too invasive
to the artwork, so I want to make some
of them a bit darker. And for that to just make
adjustments to something, I'm going to use a little trick that you should
also know by now. I'm going to lock
the transparency of the layer on the leaves
here, this checker pattern. And then I'm painting
over some of these parts with a darker brown. I want these leaves to mostly be in the background,
just a small detail. So the viewers will
still mostly look at the flower pots and
the hyacinth macaw. Okay, at this point, you can decide whether you want to keep these
leaves or not. Maybe you succeeded better than me. But I'm going to be honest. I actually think if I deactivate
and activate this layer, that the artwork
looks a little bit better without the leaves. So I'm going to keep
this layer deactivated. I don't want too
much going on here. It's already pretty nice. But, you know, that's the cool
thing about art and Creta. You can just decide
what you like better. If you manage to paint
some really nice leaves, then you can also keep them. Just I personally prefer
it without the leaves. That is a defining feature of the finishing
part of an artwork. It's very subjective and up
to your personal preference, but I highly recommend that
you pretty much always experiment a little bit if you think that you're
done with a painting, whether it's adjusting
the colors or adding something on a new
layer where you're not sure if you want to keep
it or not or checking if you could improve the light and shadow qualities of your image. Or right here, I'm scribbling over the branch texture a bit, and I'm seeing if I
could improve it. Just by adding a little bit more saturated brown to spice it up. You know, this texture
is very simplistic, so there is pretty much nothing
that can go wrong here. You don't want to miss out on easy fixes that could
improve your artwork a lot. So always take a bit
of time in the end, look at the artwork and
really ask yourself, what are some simple
things that you could change right now to
make it a little bit better? And that's always
something different. So it's very exciting, actually. So yeah, this branch
is definitely weird, and I'm doodling
many times here with a few different colors just to make it look as
interesting as possible. And I'm still thinking about highlights and
shadows, of course. So up here in these
branches at the top, it's going to be a very complex situation with highlights and shadows because there are so many different
overlapping objects. And this is good because I can pretty much add
these highlights and shadows randomly and define what the highlight
and shadow areas are. However, this big branch, as I know from the reference, should definitely be quite
bright at the top parts. So everywhere here, Then after that, let me fix a few shadows
at the bottom here, once again with this very dark, desaturated purple
and the same brush as the other shadows, of course. But yeah, there is not
much to do, actually. I'm just trying to get the
shadows a bit more consistent. But in general, they're
not that important. However, there is
another thing that I did forget when we speak
about highlights and shadows, and that is the light comes from the top here and these
hyacinth grow over the pots. So there should be a
little bit of shadow from the hyacinths on these
pots, if I think about it. So with that same shadow purple, I'm going on every pot layer and scribbling a few
of these shadows. And I'm going to use this brush for that because it's very chaotic and
represents the shapes of these hyacinths well. You see, we can just scribble
a bit left and right, and we already get a
lot of complexity, which is exactly what I want, because I don't want to
put in too much effort into these shadows and
make them super realistic, but, you know, just something
to make it more logical. So let's keep going on
every single flower pot. Consistency is still
an important factor. If you add shadows to one
of these flower pots, you also have to do
it on the other ones. Otherwise, nothing makes sense. So let's be patient
and scribble. Shouldn't be that complicated. You just want to make it
look something like this. Alright, here we go. That looks a little bit more realistic. Even though I'm not a huge
fan of these shadows, I think they definitely
belong there. But this is how it
goes, you know? If you want the perfect
highlights and shadows, either use a reference
or study highlights and shadows intensively and
calculate everything. These are the only two options. Or you settle for something
that's maybe not optimal, but does the job
like right here. Okay, but now I'm going to
move on to something where I absolutely cannot accept
if it's sub optimal. And that's the hyacinth macaw, which is, yeah, my proudest
work in this painting. So I want to see if I can
improve it just a little bit, because here is the issue. Now we've added these flowers, and these flowers have
a big value range, which means lots of contrast. You see, we got very dark and very bright parts
in these flowers, and that's going to draw a
lot of attention to them. And the hyacinth macaw, as the main subject
should keep up with that. So I think I'm going to add a few more light purple
feathers on top, of course, with this brush. And yet, this purple
seems extreme, but it actually
works quite well if I apply very low pressure. So the brush mixes
these paints together. This is also a good indicator to make sure you're
on the correct layer. You know, if you use
one of these oil paint or watercolor brushes that mix the paint and they suddenly don't mix with what you're
painting on top of, then you are probably
on the wrong layer. Alright, look at this. I think this is actually nicer now. But I could also understand if you don't want
to take the risk to paint anything on top of
your hyacinth macaw anymore, if you are really
content with it. It's just a subtle
thing that I feel like I could improve here,
so I'm doing it. Maybe also a bit of purple on the tail feathers to
spice it up a bit. And then some tiny
details here on the head, you know, just some
very light scribbles. So we have this
bigger value range, which gives us more contrast
and also a bit more detail, which I think won't
look too bad here. I'm not even looking
at the reference here. I'm just improving a little bit on the texture that's
already there. I think this is very good
now with these long, confidently painted feathers and the tiny details
contrasting each other. This is my final version of the hyacinth macaw,
unless, of course, I discover something else
in this finishing phase, but I really don't
think so right now. Okay, and then another
random little thing, I think I'm going to
add a bit more green to these flower pots,
so a few more leaves. So I'm going to
each pot layer and just scribbling a few
more green lines on top. And then I'm doing a quick
light and shadow check again. And to be honest, I think
that this flower pot here, pot six should be a bit darker because it's surrounded
by many other elements, and there are many
hyacins growing on top. So probably not a lot of
light will reach there. So let me lock the transparency of this layer just to be sure. Then use this brush with which we've painted
the other shadows and go back to this very
dark desaturated purple. So I'm just going to slide
left and right on top here with big brush strokes
to make it a bit darker. By doing this, we are getting
rid of some detail here. You see these individuals
scribbly hyacinth shadows. They won't be visible anymore on the spot after we are done. But this is actually
a good thing, and I want it like that
because in the shadows, you always see less detail and the colors blend
more together. So now, as we've defined that this pot is very
dark, very shadowy, also this other pot
here, pot seven, it's actually more realistic
if there is less detail. So here we go. That's
another little tip. Okay, then let me go
back to the branch layer and just paint a bit
more over this texture. Of course, with that
classic brush and brown. As I'm doing that, I'm noticing a little issue with a composition
that's a bit advanced, but it is for sure something
that I want to fix. There is a lot of
empty space underneath where this branch splits and
nowhere else on the ground. You can see there is nothing on the ground in this one part, and in every other
part, we got details, so shadows and flowers
and branches and whatnot. So I want this little
area to blend in more with the rest so it doesn't
stand out unnecessarily. I think a good way to do
that would be to paint another little branch that goes there and fills
out the space. So let me unlock
the transparency of this layer so I can try that. Maybe like this, still in the same style as the
other branches, of course. Otherwise, it would
look inconsistent. So we need a few small
ones that point upward. And a consistent texture. So I'm scribbling over it with a few different
tones of brown. Okay, maybe that's a bit too much in terms of small branches. So let me activate eras them
out and get rid of them. Let's make it nice and
smooth. Just like that. Okay, now, of course, we have to add some
shadows underneath this small branch so
it fits in with rest. So I'm going back to the background layer,
paint layer one, then to this ground
shadow brush, and I'm selecting this
dark purple again. Till the canvas a bit
because I like that better, and then just scribble
some of these shadows. You see, it's just
the same thing again. You can change whatever
you want in the end, but it always has to be consistent with the
other elements, and everything has
to fit together. Last but not least,
I'm going to make a few tiny adjustments
to the branch texture. That's definitely
the weirdest part of this artwork because we didn't
really have a plan for it, and it was very simple
in the reference. But now by just scribbling
in a few different browns, we've actually made it
look quite interesting. But, yeah, I think at this
point, I'm going to stop. This is the finished artwork, and these were the
little adjustments that I felt like making. Okay, I'm going to do one more thing that I
don't always do, but it's actually kind of fun, and that is adding a signature as the very top layer here. I'm going to use one of these
ink brushes for that and select white because everything else wouldn't really
be visible here, or it wouldn't fit, you know, if we used bright
red or something. That would look very bad. So yeah, for signatures, I always go with black or white depending on whether I have
a dark or bright artwork. So yeah, put your
signature where you want. The bottom left or
bottom right of the artwork is usually
the best choice. So for me, that's just
Duplo with a line. But yeah, obviously,
don't follow me here. Put your own signature
there and not just Duplo. Thank you. Make sure your signature is very
small and not too invasive. If it's too big and
it's white, you know, it's going to have
a lot of contrast, so it might distract a bit
from the rest of the artwork. So I'm making this layer even smaller with a
transformation tool. You might ask
yourself, is it really necessary to sign
a digital artwork? I mean, you're probably not going to sell
it or something, but I think you definitely
have the right to do that because you made all
these brtrokes yourself. It's your artwork, so why
not put your name on it? I don't always sign my artworks, but it can be fun.
And that's it. This is the painting.
We've made it. And yeah, congratulations if
you also made it through. That was a pretty big one, but I hope that I
broke it down well, and you were able to follow. Now we have a full painting
with many qualities. We have a nice and
pretty realistic subject that's been framed
with empty spaces. We have lots of value contrasts with the
dark and bright parts. We have obviously a hue contrast with the blue and purple
and the yellow parts. We have contrast of detail
with a background being completely empty
and the foreground has many things going on. Then we have lines that guide the eyes of the
viewers around with these branches and the different heights
of the flower pots, and we have everything
on individual layers, also an underrated quality. So you can adjust everything
if you don't like it. Look at this process. We started with an idea and a reference. We made it into a
composition sketch using art and design principles. Then we made a precise
drawing sketch, filled in the colors and
details, and now we have this. Save it as hyacinth artwork or whatever you want to call it. Maybe you can give it
a more creative name, but my creativity is used
up now, so I don't care. Just save it as your
preferred image file format, and that is it.
15. Krita documents: Hold up little extra lesson because there is something
I almost forgot to say. Always keep your
Krita documents. So this right here, save it as a dot PNG or whatever
you want to look at, but also keep the Krita
document and save it. You want to keep the option
open to edit your artworks, even if you think you're
finished because this actually used to
happen to me quite a lot. I'm done with an artwork. I'm glad I don't have
to look at it anymore for the day. I have
the image file. But then the next
day, I open it up and I immediately notice something
that I want to change. And if there is only a
PNG or JPEG file left, it's gonna be very difficult in many cases. I've been there. There's something very simple
that I want to change, but I just don't
have the layers, and I would have to
change so much about the artwork that the
resistance is just too high, and I don't do anything. And the worst part is,
you're going to be stuck with this
annoying error forever. This sucks because it's really, really hard to unsee something that you
don't like in your art. You, as the artist will always see the bad things
about your art first. The viewers actually not. So it's for your own personal
benefit that you save your Krita documents
so you can avoid getting triggered every time you look at one
of your artworks. Trust me, you don't want that. An exception would be perhaps if you are really
happy with an artwork, some time has passed and you never thought about
changing anything, then you don't necessarily
need the document anymore. But as long as you don't have to save space on your
PC or something, there is no real
reason not to keep your Krita documents around
just in case I'm just saying. For example, you can
make a folder called Krita documents that's separate from your art folder
or something, where you put them all in
so they don't annoy you. I have that, and it's a very good way to keep
everything organized. And if I want to
change something, I can go to this folder and
I have everything at hand. So, yeah, keep that in mind. It's useful to save
your Krita documents.
16. Painting styles and exercises: Alright, ladies and
gentlemen, we got it done. We have made a painting, and it's not a bad one
if you ask me. In this lesson, I
want to conclude a few things and give
you some clarity. Aside from having the artwork
now, what did you learn? And how can you use that
in your art journey? Just sit back and
watch me paint. I promise this is going
to be interesting. Okay, even though we had one
big project in this course, it was kind of a collection of different painting exercises. Maybe you've noticed that. Just in the practical
part alone, we have painting with
reference, realism. We have impression and loose brush strokes without reference. We've taken inspiration from references, but they
made our own thing. That's quite a few different
methods, actually. So even though this might not be your preferred painting
style or subject, it has hopefully still given you many insights
about painting. Maybe you really enjoyed
the part where we painted the parrot
realistically from reference, and you want to keep
making art like this. Or you like creating the more
abstract pots and flowers, and you feel inspired to make more art from
your imagination. I've tried to highlight a few different aspects of painting, so it's up to you.
And you know what? Painting these still
lives with animals and plants is one of
the best exercises, no matter what you want
to do as an artist. I mean, I also like them
as finished paintings. Otherwise, we wouldn't
have done this. But even if you
don't can probably see how much you have to
think when arranging these. You practice color
theory by combining differently colored plants or flowers with animals
or other stuff. You have to use empty
space to frame things. You exercise your vision
for contrast and shapes. You create lines that direct
the eyes of the viewers. You have to think about
simple lighting, even. All of that just because
we made something new that wasn't there before
this composition. Painting a landscape
from reference or a human from reference, it's nice and valuable,
but it just doesn't give you the same freedom because you don't have to
think all that much. Right here, we thought a lot, and we had to make
many, many decisions. And once you're
really comfortable with this decision
making process, you can create your
own compositions with more complex subjects. That's the ultimate goal to be able to create
whatever you want, any scene and make
it look awesome. And you cannot get
there if you just paint bedroom better faces or
bedroom better landscapes. Never, you actually have to
arrange your own compositions like we did it in this project and manage all the tasks
that come with that. Think about color,
shape, contrast, space, subject, the
lighting, you name it. You have to make
your own new thing if you actually want to
stand out as an artist. And as I've hopefully
demonstrated in this course, it's
not even that hard. I mean, there are
still many things you have to do and you have
to invest some time. But if you break it
down into simple steps, it's not that complicated if you make good decisions
regarding composition. So this is the core concept
that I wanted to highlight. Contrary to most
artists, actually, I believe that this
compositional stuff is absolutely something that
beginners should learn, not just painting
something accurately, but thinking about a painting and how it interacts
with the viewers. That is the basis of
art, in my opinion. I think also making
your own compositions is just more motivating and
fulfilling, ultimately. You know, we already
have photographers and filmmakers to capture the beautiful stuff
that's already there. So we don't have to chase
behind them as artists and try to make things look
more and more realistic. It's not a battle that
we're going to win. I mean, it is nice to simply recreate a scene that you
like with a painting. I don't have anything
against that, and, in fact, I do it most of the
time as an artist, but I believe that we as artists can do so
much more if we want. And that's the best
part about it. So I wanted to give
you a strategy that allows you to do that
from the very beginning. Don't shy away from creating your own new scenes.
This is how you do it. Alright, before you leave
this lesson too confused, let me show you some practical exercises that
make you better at composition that you can easily practice anytime
after this course. Because even though you can apply this process
that we've done here to all your artworks
from now, it's still a lot. You're probably not going to make an artwork like
this every day. At least I don't. I mean, I would like to, but I got
other things to do, as well. So in order for
you to internalize this process and
these principles, I thought it would
be a good idea to give you these exercises because they take a fraction of the time that it took
to make this artwork. Okay. Number one,
you can practice composition through simple
subjects and abstract art. Do exactly what we've done here, but maybe with less detail
or even easier subjects. The process is still the same, and you still have to think
about all these principles. You have an idea,
find a reference, make a composition sketch, then a drawing sketch,
and do all that. This can be really fast if you just leave out all
the complex detail, but it can still be
an actual artwork. Because here is the thing. If you apply good color theory and you develop an
awesome composition, it will still look amazing. Those things are far more important than detail,
in my opinion. I mean, think of an
gog, Monet, Picasso. They didn't paint
a lot of detail, but they really understood
composition and just well, they had good ideas, I guess. So see it as an important
exercise to just make compositions with
different levels of density, with color schemes, with empty spaces, do the
things that we've done here, but with dumped
down and simplified subjects or completely abstract, if you just want to practice composition and nothing else. That's also an option. And
then if you feel ready, you can combine your
compositional practice with more detailed subjects, like we've done it
in this course, and this is where your
art gets really amazing. But don't forget that you
can practice composition alone just by making
everything more simple. This is going to
improve your ability to even find references. If you know about
composition and you understand some
basic principles, you're going to find
them in other artworks, photos, or even real life. That happens to me all the time. So this is a good one. Or if that's still too much for you to do on a regular basis, you can do exercise number two, which is just make
composition sketches. If you don't want, you don't have to make an
artwork all the time. It can be great practice
to just think about compositions and developing
the habit of planning them. The good thing is, you can also make the according
artwork later on. The compositions don't go away, but just make them, capture your ideas like that, and create your own
new scenes like this. This is an awesome exercise. Then, number three, look at compositions that others
have made and evaluate them, ideally based on the art
principles that you know. If you like an artwork, ask yourself, what do I
like about this artwork? And what do the
artists do well here? And when doing that, please
try to go beyond the subject. Like, I like this artwork
because the cat is cute. Of course, it is. But
is there anything else that makes the cat
look especially good? Is there some empty
space behind it? Does it have big value contrast? Are there interesting
colors or shapes? If you know a bit
about color theory, look if you can find
a color scheme. If you know about
contrast theory, you'll often find
many contrasts. And if you know about
composition rules, you will often find well positioned empty
spaces and curves. Just for example, you will see that these
principles are everywhere. By consciously noticing them, you will gradually
understand better and better what makes
a good artwork. And this will give you
confidence in your own art, which makes the whole
process more fun. By the way, you can also
do this with a good photo. Look at a photo
that you like and ask yourself what
makes it great. There is no difference
in what makes a good composition between
a photo and a painting. The same principles apply. So look for them and
you will find them, and you will
gradually understand how to use these principles
in your own art. And exercise number four. If all of this
doesn't work for you, you probably just have to learn more about art and
design theory. It can help you a lot to just understand better what
you're working on. There are plenty resources
out there that you can use, and many secrets you didn't
even know you could learn. For example, in my courses,
if I'm allowed to say that. But the point of art
and design theory is just exactly that to enable you to create your own new scenes and
make sure they look good. If you just draw or
paint from reference, you don't have to understand anything about color
theory or shape theory. You just recreate what's already there and you don't have
to think all that much. But if you get more and more familiar with art and
design principles, that allows you to get
more creative and make your own stuff because you will see so many
options to apply them. That is a common
misconception, actually. Art and design theory is not
restricting but liberating. This is 100% true. It's not about making
all your paintings fit a precise rule set. But by knowing these rules, you will realize the
massive amount of opportunities to apply
or combine them. And this enables you to
create whatever you want in a way that makes
sense. That's the point. Recreating a photo every
time you make art is boring. Use references, but do
your own stuff with them, at least once in a while. Thank you. So, ladies and gentlemen, that is
it for this lesson. I hope it was at least
somewhat helpful, very theoretical, but I really believe that this
is important to know.
17. Progressing as an artist: Last but not least,
I want to give you guys some advice for
your art journey. We already here, so I'm
just going to do it. Listen carefully and maybe take some notes while you watch
me paint this artwork. I want to share with you
my general framework to progress as an artist. It's really simple, but it makes a lot of sense,
at least to me. I mean, I'm very
far away from being able to do everything
I want as an artist. There were so many things
I still have to learn. But this framework has
helped me maintain clarity where I am
and what's going on. So I'm just going to
share it with you and hope it helps you
understand something. So basically, there are four main stages that you go
through when you learn art. You can switch back and
forth between them, but in general, it
always goes like this. Number one is learning and understanding the
medium you work with. If you get into watercolors, you should first learn
how to mix colors, how to use a brush, and how to make sure everything
dries correctly. If you get into digital art, you should first
learn the software, how to make and save documents, how to use layers,
what all these tools and shortcuts
mean, and so on. Because that's the basis. If you don't know the
ways to use your medium, you're going to
make many mistakes, be very inefficient
and get confused. Or you're not even
able to make art. You know, if you
don't know how to manage documents
and digital art, or you forget that oil paint has to dry before you
touch the painting, you always have to understand a few basics about the
matter you're working on in order to even start
making art because otherwise, it's going to be difficult to move on to stage number two, which is, you learn different
methods of creation. This should pretty much
always be the second step. For example, you learn what crosshatching is or how to use shape tools and selections or how to make watercolors
flow into each other, or even how to use a specific
brush in digital art. All these options
inside your medium that allow you to make
art in different ways, the different
methods of creation. The reason why you
should get familiar with those right
after learning to use the medium is because they pretty much define
your art style. What's your preferred
method of creation? How many do you use, and how frequently do you
switch between them? For me, that's currently mainly these impasto and
oil paint brushes, many brush strokes
of different colors and often these
thick paint parts. It works great for me now, but only because
I took my time to understand and practice
this method of creation. Before that, I often made art by blocking in colors
and then using a blending brush to create a fine detailed texture on top. That's also a
different thing. There is a pretty much infinite amount of methods of creation, and you cannot ever
learn all of them if you're working with a complex
medium like digital art. Maybe you can discover
the methods of creation of charcoal drawing more
quickly, but you never know. People always discover
something new. The point is just that
you should always look around a bit for these
methods of creation. Finding at least one
that suits you and allows you to make your
art is really important. If you think that all of
digital art consists of filling in colored lines to
create manga illustrations, and therefore you don't
want to get into it, you're wrong, and you're
missing out big time. And if you think that
all oil painters use thin and precise
brushstrokes to make realistic paintings,
you're also wrong. There are different methods of creation in pretty
much every medium. It's going to be difficult for you to draw anything beyond basic if you don't
know that you can tilt a pencil and
use it for blending. So whatever medium
you're learning, discover the different methods of creation as soon as possible. This is your basis to be able to decide where
you want to go. Alright, then stage
number three. This is the one that I
spend the most time at, I think, because this is
learning specific art skills. This is where all the advanced
stuff comes into play that makes your artworks
better perspective, color theory, understanding
light and shadow, or also stuff like the anatomy of humans or the
structure of trees, et cetera, all these
specific topics that you can dive into
if you need them. Most of them are not super
essential because there is always an art style
that completely ignores one of these skills. For example, in
landscape painting, you don't have to understand
the anatomy of dogs, or in inking, you don't have to understand how colors
react to lighting. So generally, you
can choose which skills you want and in which order you
want to learn them. There is no exact
roadmap for that. It just depends on
your art style. There is an infinite
amount of specific skills, but there are also
some basic skills, and I think that you should usually learn the
basic skills first. Basic skills would be the
ones that you need most often like understanding
colors and shapes. Human anatomy is also really helpful and
definitely something that I should catch up
with and perspective too. These are things that I really recommend you dive
into for some time. The extra skills are then more specific like drawing
and painting cats, if you really like
those, understanding how to exaggerate
light in color, if you really like
impressionism, et cetera. Number three is, for example, also what I've taught
you in the last lesson, understanding and practicing, making your own compositions. That's a specific art skill
that's really impactful, and it's one of the few
skills that I also think you need pretty much everywhere
in almost every art style. The good thing about these
specific art skills is that many of them are
medium independent. So you're going to keep them even if you
switch the medium. If you know about the anatomy of dogs and cats and
learn to paint them, you're not going to
start from zero if you switch from watercolors
to oil paint or whatever, or from traditional
to digital art. So you can take most of these specific art skills with you, no matter
where you go. Some art skills, however, are specific to the medium, which is why I put this
at stage number three. You cannot practice any of these art skills if you don't
have a method of creation. This is a stage where you're
going to spend a lot of time because there are just so many skills
that you could learn. And if you stop doing that, art just gets boring at some
point, at least for me. You know, once in a while I dive deep into a new topic that interests me and I think
would make my art better, even though I know my medium and I have my methods
of creation for now, I'm going to stick with
them for some time, but there are always
more specific art skills that I like to add to that. So that's stage number three. And the only thing
left after that would be analyzing and
improving your own work. Stage number four, the
self reflection phase, as they call it. You know, at some
point, you might be completely content with
the way you make your art, and any specific skill wouldn't
really help it anymore. The only thing left is
looking at your own art. Does it achieve
the right things? Does it feel good to make it? Could it evoke something else? This is where you think
about the art itself. All these legendary artists
that you know, at some point, most of them didn't care
about art skills anymore, but they just thought
about their own art and how they could improve it. That is, per definition, something that cannot be taught because it's
too individual. But before you can
do it, of course, you first need to have
some basic art skills, and you need to
actually make art with your medium and the different
methods of creation. You first have to make something before you can reflect on it, and there is no need yet to
obsess about the purpose of your art if you have no skills or no means
to express yourself. So this is always
the last stage, something that most of us just tap into from time to time, but not our main concern
as learning artists. Alright, here's the
point of all this. If you get into something new, always be aware of
this framework. If your art sucks after you switch from traditional
to digital, it's not necessarily
because you're a bad artist or you lack
a specific art skill, but maybe you just haven't fully completed
stage one and two, and you're lacking
understanding in the medium, or you haven't discovered a method of creation
that works for you. This is often the case,
so don't forget that. Don't get discouraged
if your skills are lacking or your
art seems meaningless. If you get stuck on
your art journey, maybe explore a different
method of creation. Try out drawing or
watercolor brush, or maybe just make an artwork with all shape tools
or all selections. That can be a really fun
way to create a mood. Or if you're totally stuck, try out a new medium or
switch back and forth. It doesn't have
to be all digital or all charcoal or anything. But, yeah, I think
digital art is definitely a medium that
has vast opportunities. You can try out so
many different methods of creation pretty
much instantly. And therefore, you can get to the skills practice very soon. That's something unique
about digital art, and I really appreciate that. So I hope you're
going to continue. I hope you can apply many of the teachings
from this course, and I wish you good luck
on your art journey. It's going to be
individual for all of us. At which stage we
spend the most time, at which one we maybe get stuck. So just be aware
of these stages. It can save you from getting discouraged from art altogether. That would really suck because it's very valuable
that we do this. Always keep your head
up, doing something new is hard, you're going
to get through this. And in digital art, especially, you have so many
options that you will always find a way to
express yourself. I'm very sure of that.
Okay, I think that's it. At this point, I'm
literally just rambling. You got your artwork, you
got your little advice, so I'm going to conclude this.
18. Outro: Ladies and gentlemen, thank
you so much for participating and congratulations
for completing the course. Hope you enjoyed it. I'm very grateful that I had
the opportunity to share my passion with you to make
unique digital paintings. And I hope that you're
inspired to make many, many more because that's
what we need, guys. More authentic, beautiful art, more creation. Thank you. That was a fun time, right? You've gotten better
at digital art. I've gotten better
at pronouncing the word hyacinths. I
think it was worth it. Right now, you should have
your finished image file, and you could use it for
many things a wallpaper, a print, a postcard, or just something to look at
for your personal enjoyment. That's also a thing,
right? Don't forget to look at your
paintings once in a while and be proud that you made all these brushstrokes
look like something. No many people can do that. So even if you're not 100%
happy with your artwork, the attempt alone is a huge
win. Always remember this. Don't be afraid to upload and share your project
here on this website. I'm super excited to see
how this worked for you, and I always like to give you personal advice on your project, tell you what's good, and maybe what you could improve, as well. So do that right now, and then it would be awesome
if you could give me a quick review and tell me if you like
this course or not. It's very valuable for me to
know what I could improve, whether it's the
style of teaching, the project, the video quality. Please tell me your honest
opinion and thanks in advance. Alright. Last but not least, don't forget that I also
teach other courses. So check out my profile and see if there is a topic
that interests you. Maybe one of these I think
they're really good. So yeah, have a good
day and keep creating.
 Duplo, Designer, Artist