Transcripts
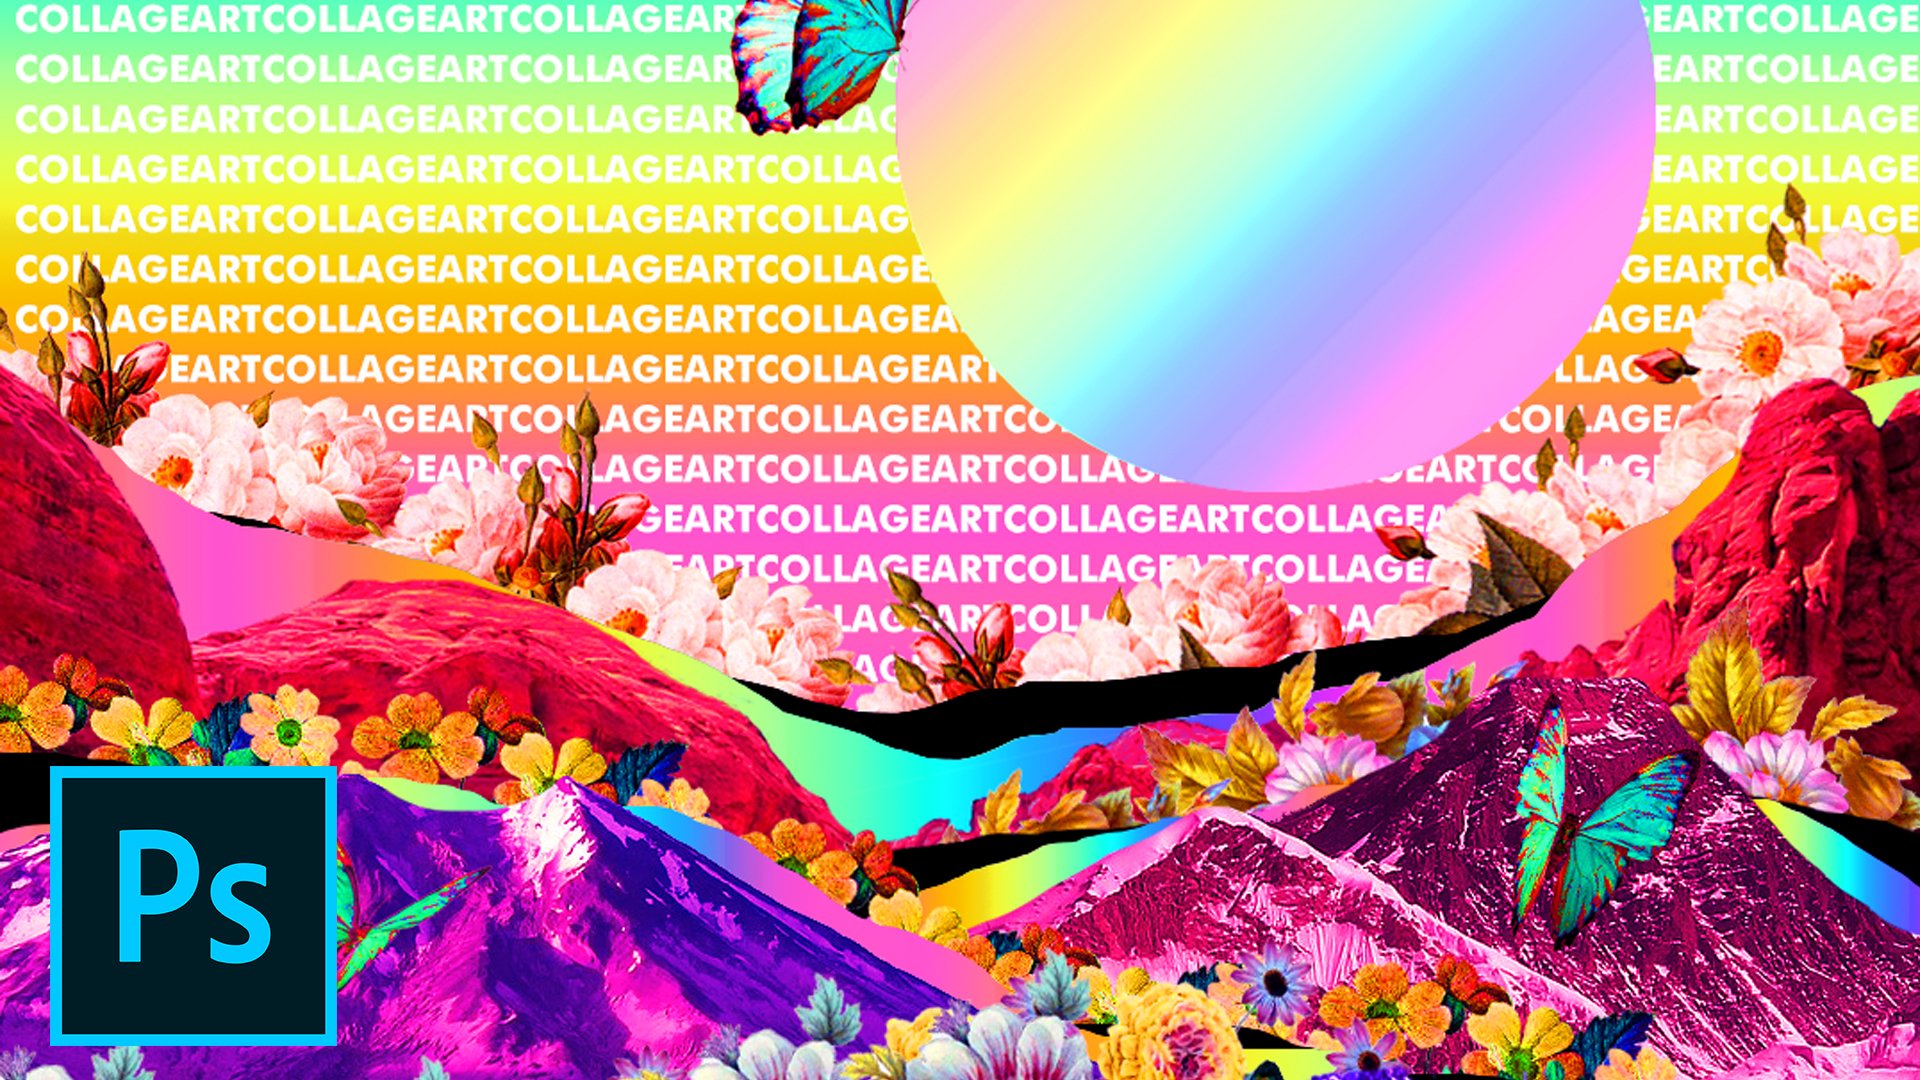
1. Intro: Hi, everyone. My name is Clarence. On this class, you will learn how to create this exact poster. But with the same technique, you can create similar posters to it. You will learn to create a Grady Int some basic patterns and apply them on a random shape. Both So you will work with the brush tool and learn to wear the red revive to your buster. You will need only father shop to create this poster, so make sure to enroll and see the whole video.
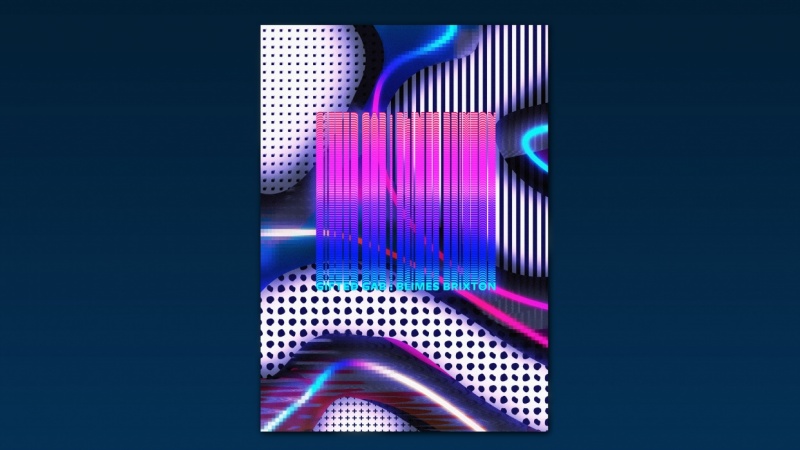
2. Explaining the Process: Hey, guys, Welcome back. So on this part, I'm going toe show you the steps that were going toe take to create the poster. Here is the similar, similar one. So first we're going toe great. A radiant background. Then we're going toe at this random shapes and fill them with some some patterns that we're going to learn how to create. Uh then, after working with some adjustments, we're going to learn how to create this, uh, this random squares using Rush Tau. Then we're going to add this repetitive Pakistan works with some adjustment layers. This is just to show you the steps that we're going to take. Now let's start working on it.
3. Gradient and Random Shapes: Okay, so now we are going to start working with the poster. And the first thing that that we need to do to create this poster is create a radiant. Actually, I've already teach this part on another tutorial, but anyway, I'm teaching it right now shortly. So basically, you just need toe this, Grady, until right here. If you don't have this, I can just right click and you find it on this pain pocket tool. Maybe Maybe you have it like this. Goto Grady Intell going There's great and right here. Onda, you have these default process, Grady INTs. You can go on this, uh, rainbow radiant right here and just change the colors from the default ones with with one that I've created. If you want this Grady in, of course, where you can pick another grading from the Internet are or whatever. So just click on that on, do the same thing with the colors I have already done that. Them here has a color palette tow, not toe with your time, so click create. And here you had the radiant toward toe to save this great. And of course, you just, uh, edit all the colors and just click new and you will have it on this presets grading process here. Okay, so now Goto file new to create a new document To start working with a poster. I usually use this size for the poster toe to thousands with Anto 2400. I've done the resolution 70 to make sure the color modes RGB on the background color. It doesn't really matter because we're going to apply the great. So they create now, ah, creating new layer to apply the Grady untold shift to keep a straight line and just feel this. Ah, this whole space. Yeah, OK, we can change it anytime anyway. So the second step is to create some some random shapes. So let's create a new layer because on these shapes were going toe, Let's some patterns that were going toe to create next and then apply some ghoulish effect . So to create this patterns, these shapes you can use mental to make, like, uh, some random shapes Eso basically you just click on a point, then go to another point, another one and just, uh, I don't know. They create some some random shapes and now just go on the starting point when and something like a round shape appears, that means that we are going to close the path now. Right? Click, click makes election. Ah, think OK? And just supply a color. Whatever. Just goto pain back it too. And apply a a black collar. Whatever. Because we're going to change that anyway because you are going to apply some some cater's . Okay, let's disallow actress from going toe this selection toe right click the select Onda. Uh, now I'm going toe create some some other random shapes. I'm on the same layer where I'm going to add these shapes. Okay, So after we created these shapes, now we're going toe Lernout toe, create some some random patterns and then apply this better stow this black shapes.
4. Basic Patterns: Hey, welcome back. Now that the next step is to create some patterns to apply on this on these shapes that we created, we will create this pattern right here, this one with circles. And we can use the vertical toe, invert the color, then create some stripes. So let's great all of them. I'm going to show you. So goto file new on and make sure the size is like a square ratio. I used this toe 202,400 with and hides toe to feel the whole, uh, most her size. So quick create. First we are going toe learn to create this We go toe view Go to your God layout on Make sure the column and row Saar both selected on the number is two And this gather right here is zero. So you will have this shape like this This one click. Ok, now we're going to apply to squares. So goto this rectangle tool on just told and dragged a great ah square. Now, as you can see, here are two option feel and stroke stroke when there is this red line means that it's none feel also is known So click on that and we're going toe Feel with black and create another square. Ah, now we're going toe Goto added on defined pattern Click Ok, now go to layer new feel there and go toe Better click Ok, And now you can work with the scale for example, as you can see it basically create the pattern. Ah, I suggest you use this five scout but anyway you can see that it grates different shapes in different scarce Samuel. Dude, I'm using this five scale Think OK, now let's create the something like this one again create Ah, a new document with the same size as we did before the great we will do the same thing. So goto view you God layup Collins rolls number is to recreate But now instead, off a rectangle to we're going toe to use the ellipse stool and you can hold safe to keep the great regular circle again Feel with black Try to position it in the center of the square Now you can hold all toe drag it to copy this and ah, now let's get this both selected and hold hold key and drag this down to create this This pattern And now, as we did before we go to edit defined pattern, they could click OK, go to layer. You'll feel their goto pattern. Okay. And the scale Let's use the five scale again. Click OK, now to invent the colors, you just goto this option right here. They can eat and a quick invert. So basically, we have toe two versions off this. No, we're going to create the stripes pattern. Click OK, quick file new the same size as we did before. Click Create Now go to view and you got layout. And now, instead, off rose number to make this zero just on Select this on click. Ok, now goto this rectangle tool and we're going toe feel this. Uh, this left side fill it with a black collar on now is the same steps. Defined pattern. Okay, go to layer. New feel. They're on pattern. Okay. Not work with business with the scale. I think the scale two is okay. Think OK, now let's copy all of these this shape that we created. And so I headed cop emerged. And let's go to the file that we the poster that we are going to create and pays them all here. Okay, so now, after we have them all here we are going toe. I'm going to teach you out. Toe, apply these, uh, on these shapes that we created.
5. Clipping Mask: Okay, so now we have all of these un selected. Let's select the 1st 1 on to apply it on the shapes we goto layer create clipping mask, and basically it becomes part of the layer that is above the pattern. That's unnamed, This first story. But now we we need toe feel this, uh, thes other parts we don't basically, we don't want all the parts with this feather in. So maybe we can just very used the race tool. Uh, and just delete this part. Now we're going toe select the next the next pattern goto layer, create clipping mask. And as you can see, it is a layer above the first patterns, so it covers that. So we will use just the race tool we wanted Toto cover just this second shape. So I'm erasing this, uh, this part right here too. Now again, with the next pattern. Well, the lira create clipping mask and delete the part that you don't want. And again, with the last pattern go to layer, create sleeping mask on deleting all of this. Okay, so now that we created these shapes, we can click on this shape lier Hold, shift, click on the above layer on Goto this group biker right here. So we have this as a group. Let's make a copy just in case we need it. So hold old key and drag it up Now let's uncheck this layer above lets her name This shapes Andi instead off letting and letting it as a group we can rightly can go toe merge group So we have this as ah, the one there And we can drag this down by holding bulky now Use command control T and maybe make this bigger And, uh, I usually make the above lier darker. So go to image adjustments and Hugh separation. Uh, put the lightness down Now let's, uh, ree reposition it after a position that we now we are going toe to learn how toe Great ah glitch effect.
6. Glitch Effect: As I said, Now we're going toe. Create some creature which effect? Let's create another copy of these shapes layer by holding gold and dragging up. Let's rename this, which on position it between both dark and light layers to create a glitch. You can goto this filter, go to style eyes and use the wind effect. If we zoom out, you can see there are three method right here. Win, blast and stagger. I don't know, uh, you can use them all and see what effect they give and what do you like more? But I like this last option usually. So click OK, if you want again. This this effect you can go to filter. And already you have that the last field area Bill applied. So I'm using that again. Nam is in command control t to reposition it and make it like bigger. Now let's make a copy of this above layer by holding gold again, and I will use the invert tool on this layer. Go to a minute adjustments and taking vert on the freeway. Reposition it. It basically involves the colors. We can apply it that it always some parts I can delete it on this part because I don't like it. I just want some highlights of it. Okay, So now usually I create Ah, new layer. And, ah, apply just a dark, dark color of that caller by using a paint bucket tool. Okay, Onda, lower the A positive. And now just Ah, just by using this vector mask. Uh, when you apply the black caller with a brush tool on this white part right here, make sure it is selected. Not on this one, but on this white park on. Let's make the size bigger. You can see that it deletes the the black girl there. So I'm just adding some highlights on this. Now you can play with the A positive and see you can make it like making more contrast rate . I think I'm leaving it like this. But anyway, we can change it anytime we want. Now let's move to the next step
7. Repeating Text: Okay, So now the next step is to create, like a repetitive text toe, create our rectangular shape in the middle of the posters. So let's create a new layer and go toe type toe on Just type on attacks. Whatever. Let's go. Usually goto this idea right here, toe. When you have all the settings for the text, here is the size. I'm just starting like experimenting. Make sure it's something long. I mean, toe create a rectangular shape on this on this part. Anyway, you gonna work with with the size and, uh, maintained. Um, okay, let's make it. What? So we can see on this on this icon, you can change the space with between the letters. I think I'm typing two times experimenting and make this the size smaller I'm using for two reformed. Ah, no, let's copy this Command control. See, And uh, now, instead of having this is a text, we can right click and ah, rest arise, type toe converted toe, toe a layer. And now let's copy this leer by holding gold and dragging up on by using the this first total reposition this. You can just use the arrow key to position it below on. Go to image adjustment. Invert toe, make it black. Let's zoom into short cycle. Show you, uh I think we can, uh, use the white, uh, the white text above. So let's just reposition the layers on the black text by using this move to we can just places like this. I don't know. Yeah, I don't know if you can see. Let's zoom in. Yeah, Basically, what we're going to do is repeat this this text so we can merge this both layers. Eso command control, See on the first layer. Also, the next layer, right click merged layers. Now let's copy this. And by using the move toe, just drag it up with the arrow key on. Basically, we will do the same thing. So merch colors again. Mitt, merge layer. Sorry. Copy the layer drag drag down. Use the move tool. As you can see, we are creating this repetitive text. So please basically is the same the same steps until we create like a like a rectangular shape by this repeating text. Okay, so now, after I created this rectangular shape us by these repeating texts, I will try to position it in the center on now we're going toe Make this more colorful and to select all the text All this layer away the parts of this layer Just ah, hold command control on click on the layer And as you can see it automatically select Andi create a new layer Goto Grady in tool and apply a Grady int by holding shift to create to keep a straight line. Now let's de select this Onda. Uh, now we are going to change the mode from normal. Usually I go to all of this and see what looks better. So let's see, this lighting is an interesting option. Yeah, I think I lately use this hard light Pops, um, for this linear light. Okay? I'm using this hard like option. Hey, I'm grouping this. Ah, so go on this group, Maybe make this bigger. Command control T. Let's see. Okay, So now the next step is to add some random squares with a brush tool. I will teach you out to use to use that. So see you in the next video
8. Flowing Squares: Okay, So before we worked with a brush tool, uh, I think I need to fix this Grady int right here. I don't really like this yellow part, so I'm just applying another. Another Ecologist is Grady Int. Yeah, Let's try on this part. Tour this other part right here. Yeah, it's much better, I think. Anyway, now let's create a mule ear and to create those random squares like like this squares right here. Ah, we just need to goto this brush tool on also making sure the nor the oldest normal on go to settings Goto square brushes like Okay, because square and the selected sect set a size on a Z, you can see it creates this squares, but they are really close to each other, so let's undo that to make that so we just need toe, create some space between the squares. And to do that, we just need to go to this cycle right here. We lead on it and just, ah, change the spacing. Okay, let's see how it looks. Now let's make it. Let's make the size smaller. Now let's apply this to the poster on let's see, to supply some random squares that by just holding quick and you apply the brush. Maybe apply these on the dark parts of the poster. Now again, to select all of these sent. Apply ingredient. Just make sure you are on the square layers. Let's our name this squares and just hold command control and click on the layer on their selected. Now, go to Grady in on Just supply a graded. Okay, Now, let's just select this on on the next part. I'm going toe to show you how to make this. Now, on the next part, I'm going to show you how to make this more like to give a retro vibe by giving biting some glow, like on this one right here on Ben. We will work with the final adjustments. So see, on the nice video
9. Glow Retro Effect: Okay, so now we need to create a new layer on Go to select the highlights of the poster. We can go to cellar color range and goto highlights. And you can play around with this fuzziness and range. Make sure it like, doesn't select all the pulsar, but just some highlights. Ah, click OK on now, As you can see, it selected the highlights of the poster, but we need to copy this. So Goto added, But click copy merged, so it's select it copies everything from all the layers because if you click copied, selected only from one layer based it. So we have it on this layer. Let's rename this low. And to add the globe, we just need toe goto this banding option by right click. And there are two options that we need to check it is color overly? Uh, we don't have a lot to do on this one. Just use this something pink because it gives this retro vibe. Um, like, Okay, I usually use the bland moto color dodge, or you can use ah screen because they're similar. Onda, uh, play around with your bus, idiot. As you can see in some square sits, makes them like, more shiny. I'm living like 50%. And now the the next stop the option that you need to check is this ultra go? As you can see, it immediately gives up another vibe Like, uh, you can change the the color from this purple. Just just see what looks better. I think quick. Okay. And also the blend mode as as in the color overly choose something between this from lightened to lighter color. All of this option right here you can play around with the A positive Onda with the spread size. Basically, I just play around with this and see what looks better. It's not like you need toe Santa a fixed size for this click. OK, After that, we need to work with some final adjustments on colors.
10. Final Adjusements: again when it comes to final adjustments, you have all the options on this part right here. You have, like, brightness and contrast. Uh, so just play around again with these maybe, at some contrast, because it ah depends on what you have come up until now. Because, uh, it is more like experimental and ah, it you may have created another poster, but of course, with the same techniques. Now go to ah, maybe curves and work with with the curves you have rgb or at green Blue. Now you we can work with some color balance and see what looks better maybe make like more blue. Maybe we can lower the a positive on this curves Oh, are Maybe I will see the outer glow. Maybe it's too much. Yes, So I saw do the techniques and you can experiment with all of these. I think I'm living it like this. If you create a poster with these techniques, please at them as a project, I will try toe review of them and add them on my instagram page. You can take me there are just send me your project as a d m and I will share them on myself. Story also, Please leave a review for this class because it is really important to me. Onda, you can suggest me. What would you like to learn next? And I will do Ah class for it, for sure. So yes, you on the next tutorial by
 Klarens Malluta, Visual Artist