Transcripts
1. Intro : [MUSIC] Hi. My name is Yirandava. I'm a freelance
illustrator and designer. Through my creative journey, starting as an award-winning
product designer, I always use illustration as a medium to visualize my ideas. I had a strong patience
for online teaching and creating digital illustrations
over the last few years. I love the freedom it brings. I will describe my
style as geometrical, colorful, and patterned. I'm a big fan of nature
and you can always spot animal or plant illustrations
in my drawings, and today is no exception. While the main
focus of this class is the composition
in illustration, the product of this
class is to create a separate team poster
illustration inspired by nature. The first part of this class will be training our eyes for composition and that will help us understand
basic layouts, things to do or no-nos, and that will be the
key to your success in creating powerful
compositions. Then we will practice with
creating quick thumbnails with four different main composition
layouts: golden ratio, golden triangle, the rule of thirds, and triangle
composition. We will practice
drawing animals, plants, objects, and
fashionable characters, and most importantly, we
will learn how to combine all of them powerfully
in our illustrations. We will work with
the top layers of the rule of chart, the triangle, foreground, middle
ground and background, as well as implied
lines and symmetry. I will supply with many
elements and you will explore the different
compositions you can achieve by using the
same elements each time. Color choice also has a big
role in a strong composition. I will share my tips and
tricks on colors to avoid common mistakes and create even stronger compositions
in your artwork. Finally, I will share basics on how to prepare your
artwork for print. In this class, I will be
using Procreate app on iPad, but feel free to use any
kind of drawing app. If you're eager to upgrade your compositions in
your illustrations, then this class is
definitely for you. Join me in this class and enjoy the process
of coming up with different unique
creative compositions by using the same
elements each time. I encourage you to go out of your comfort zone and see
how creative you can get.
2. Class Journey: I'm so happy that you have decided
to take this class. This class has two main parts. The first part is all about preparation for
your class project. With fun exercises,
we will train our eyes to create well
balanced compositions. Finding invisible
shapes, layouts, guidelines in artworks
will help us to warm-up. Then with a limited
number of basic elements, we will practice creating quick composition thumbnails for four different
composition layouts. The Golden Ratio,
the rule of thirds, the Golden Triangle, and
triangle composition. After that, you will reach four different drawing lessons. This part is optional
because I also prepare cheat sheets with
illustrated elements for your class project. But I encourage you
to take these lessons to improve your skills
in drawing plants, animals, objects,
and characters. Then it comes to second
part, your class project. For your class project, I want you to create separating
poster illustrations. We will practice with creating five different
creative compositions. I prepare cheat sheets including illustrations of
animals, plants, objects, and characters to help you while creating
your compositions. I also prefer some composition
guidelines for you to use. We are going to brainstorm, have to combine all these
illustrated elements in different
compositional layouts. Like working at a
collage artwork, we spend some time here to create well balanced
compositions. We will dive into all the
tips and tricks to master the five main composition
guidelines that have been used for
years by many artists. After you have five different
creative compositions, you will pick one that
you are the happiest with and finalize
it by coloring. We will practice how to
shine each composition. We will work on all
these little changes that bring them to success. You can find all of
these mini exercises, cheat sheets, and
composition tablets in the resources section below. Let's dive into our
warm-up exercises. We start with
training our eyes for better compositions
through artworks.
3. Practice with Photos: The first thing to do to improve your
composition skills is to train your eyes for it. The best way to do
that is to observe. The more you have a look
at the great artwork, the better you will practice composition in your
own illustrations. There are many composition
guidelines used by artists, photographers or directors, and it can be very
helpful to look at their work and try
to understand how they apply these guidelines to their artwork and that's exactly what we're going
to do in this lesson. I prepare a fire full of
artworks and photographs for you and another sheet with the basic composition
guidelines on it. You can download all and
practice finding all the hidden composition guides
such as triangles, circles, golden ratios,
leading lines, and so on. There are two practice sheets. One we are going to
practice together and another one for you to
practice even more. Okay, Let's have
a look at some of the examples of
different compositions. I want you to download
the exercise file that I prepared for you and bring
them into your canvas, then create a new
layer on top of them. Pick a bright color and
you can choose any brush. Now try to find
composition guides or guiding lines in these photos and draw them in this new layer. There are different types
of composition guidelines, and I think the best nodes
are the rule of thirds, the golden triangle
and golden ratio. These are the first
things to search for. A second is leading lines. They can be curved, diagonal, horizontal
or vertical. These are the lines that are leading to the one element in the artwork and the viewer's
eye are drawn along them. It's time to practice finding all these hidden guidelines
or guided lines. I have a few illustration
from Cecil Gariepy. This is the first one. In this artwork, you
can see that there's a hidden spiral guideline and all these characters position
very well along this spiral. This creates a great
flow for the viewer. On the other hand, the
color is all balanced, dark greens in these two, and the light greens
in the other two, and oranges in-between, there isn't a central point
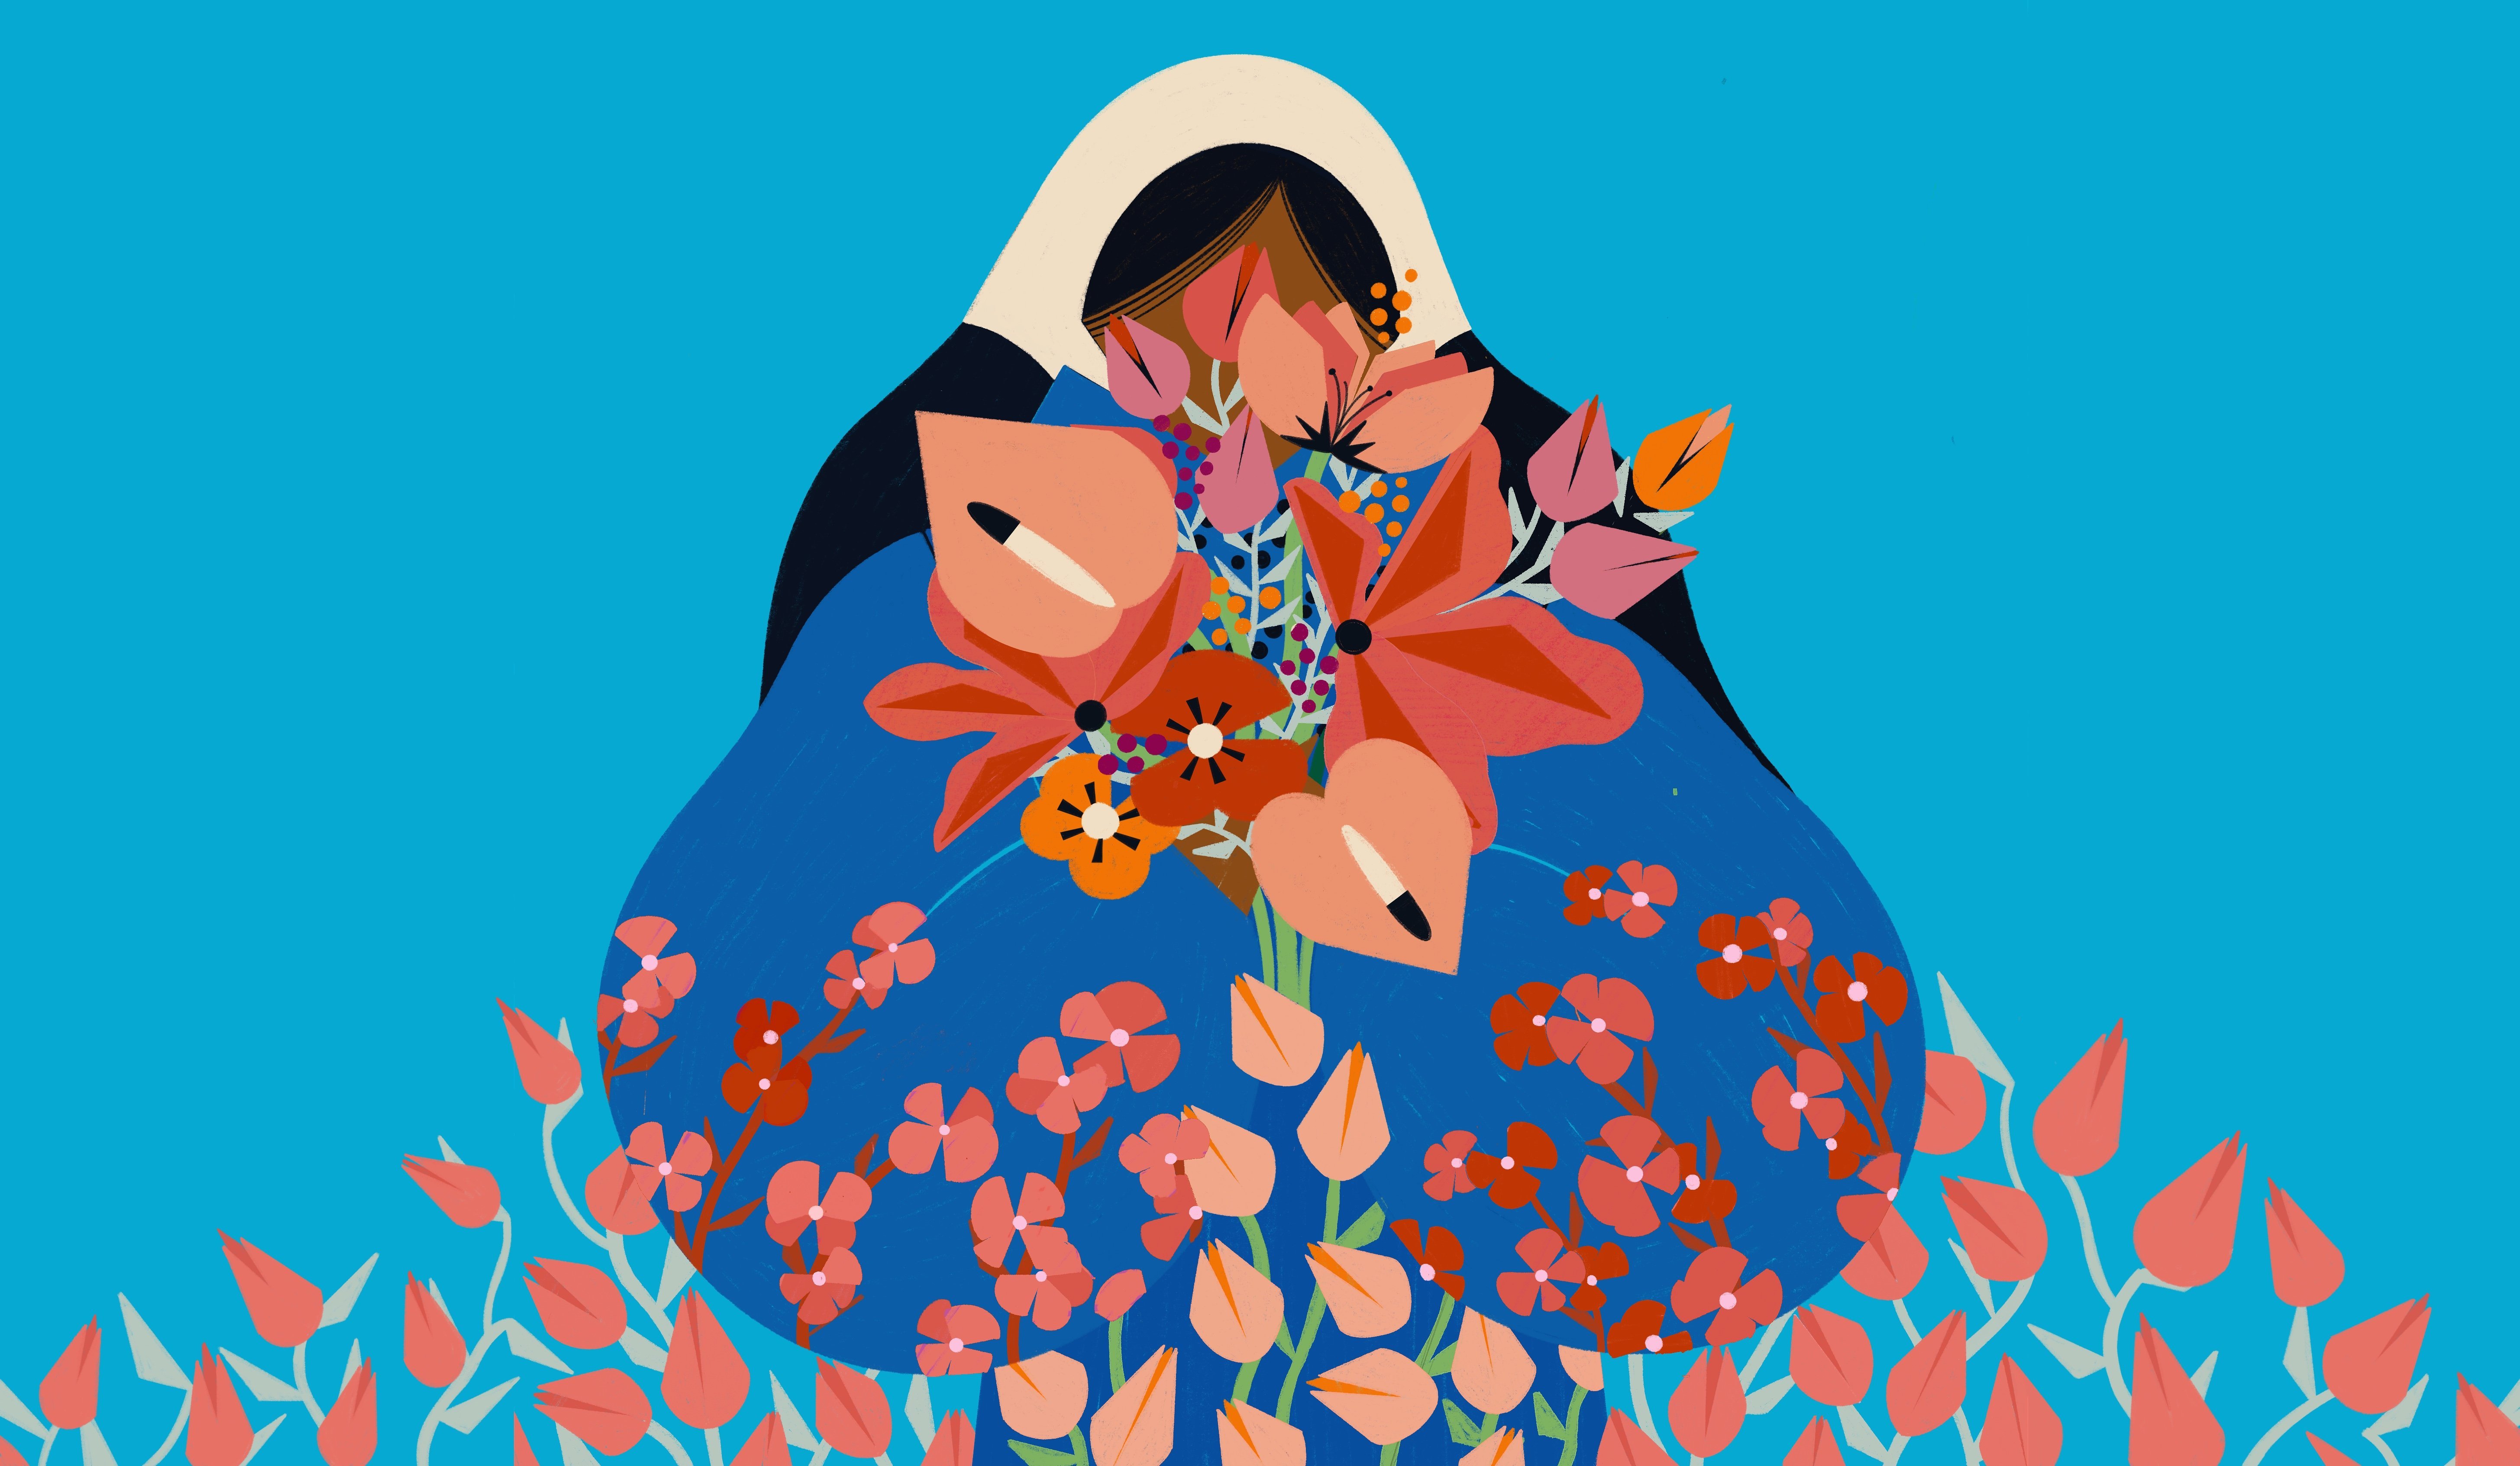
in this composition. Another example from
the same Illustrator. In this image, the first
thing that comes to my mind is some
sort of symmetry, but there's more to it. You can see the diagonal
lines in here and two more over here creates
a perfect golden triangle. Takes to the golden
triangle and symmetry, the composition
is well-balanced. In this example, I want to talk about coloring composition. Blue and orange are the
most dominant colors in this piece and they are
complementary colors. If we divide the piece in two, you can see that all
the blue tones on one side and oranges
on the other side. Composition is divided in two by using colors and it
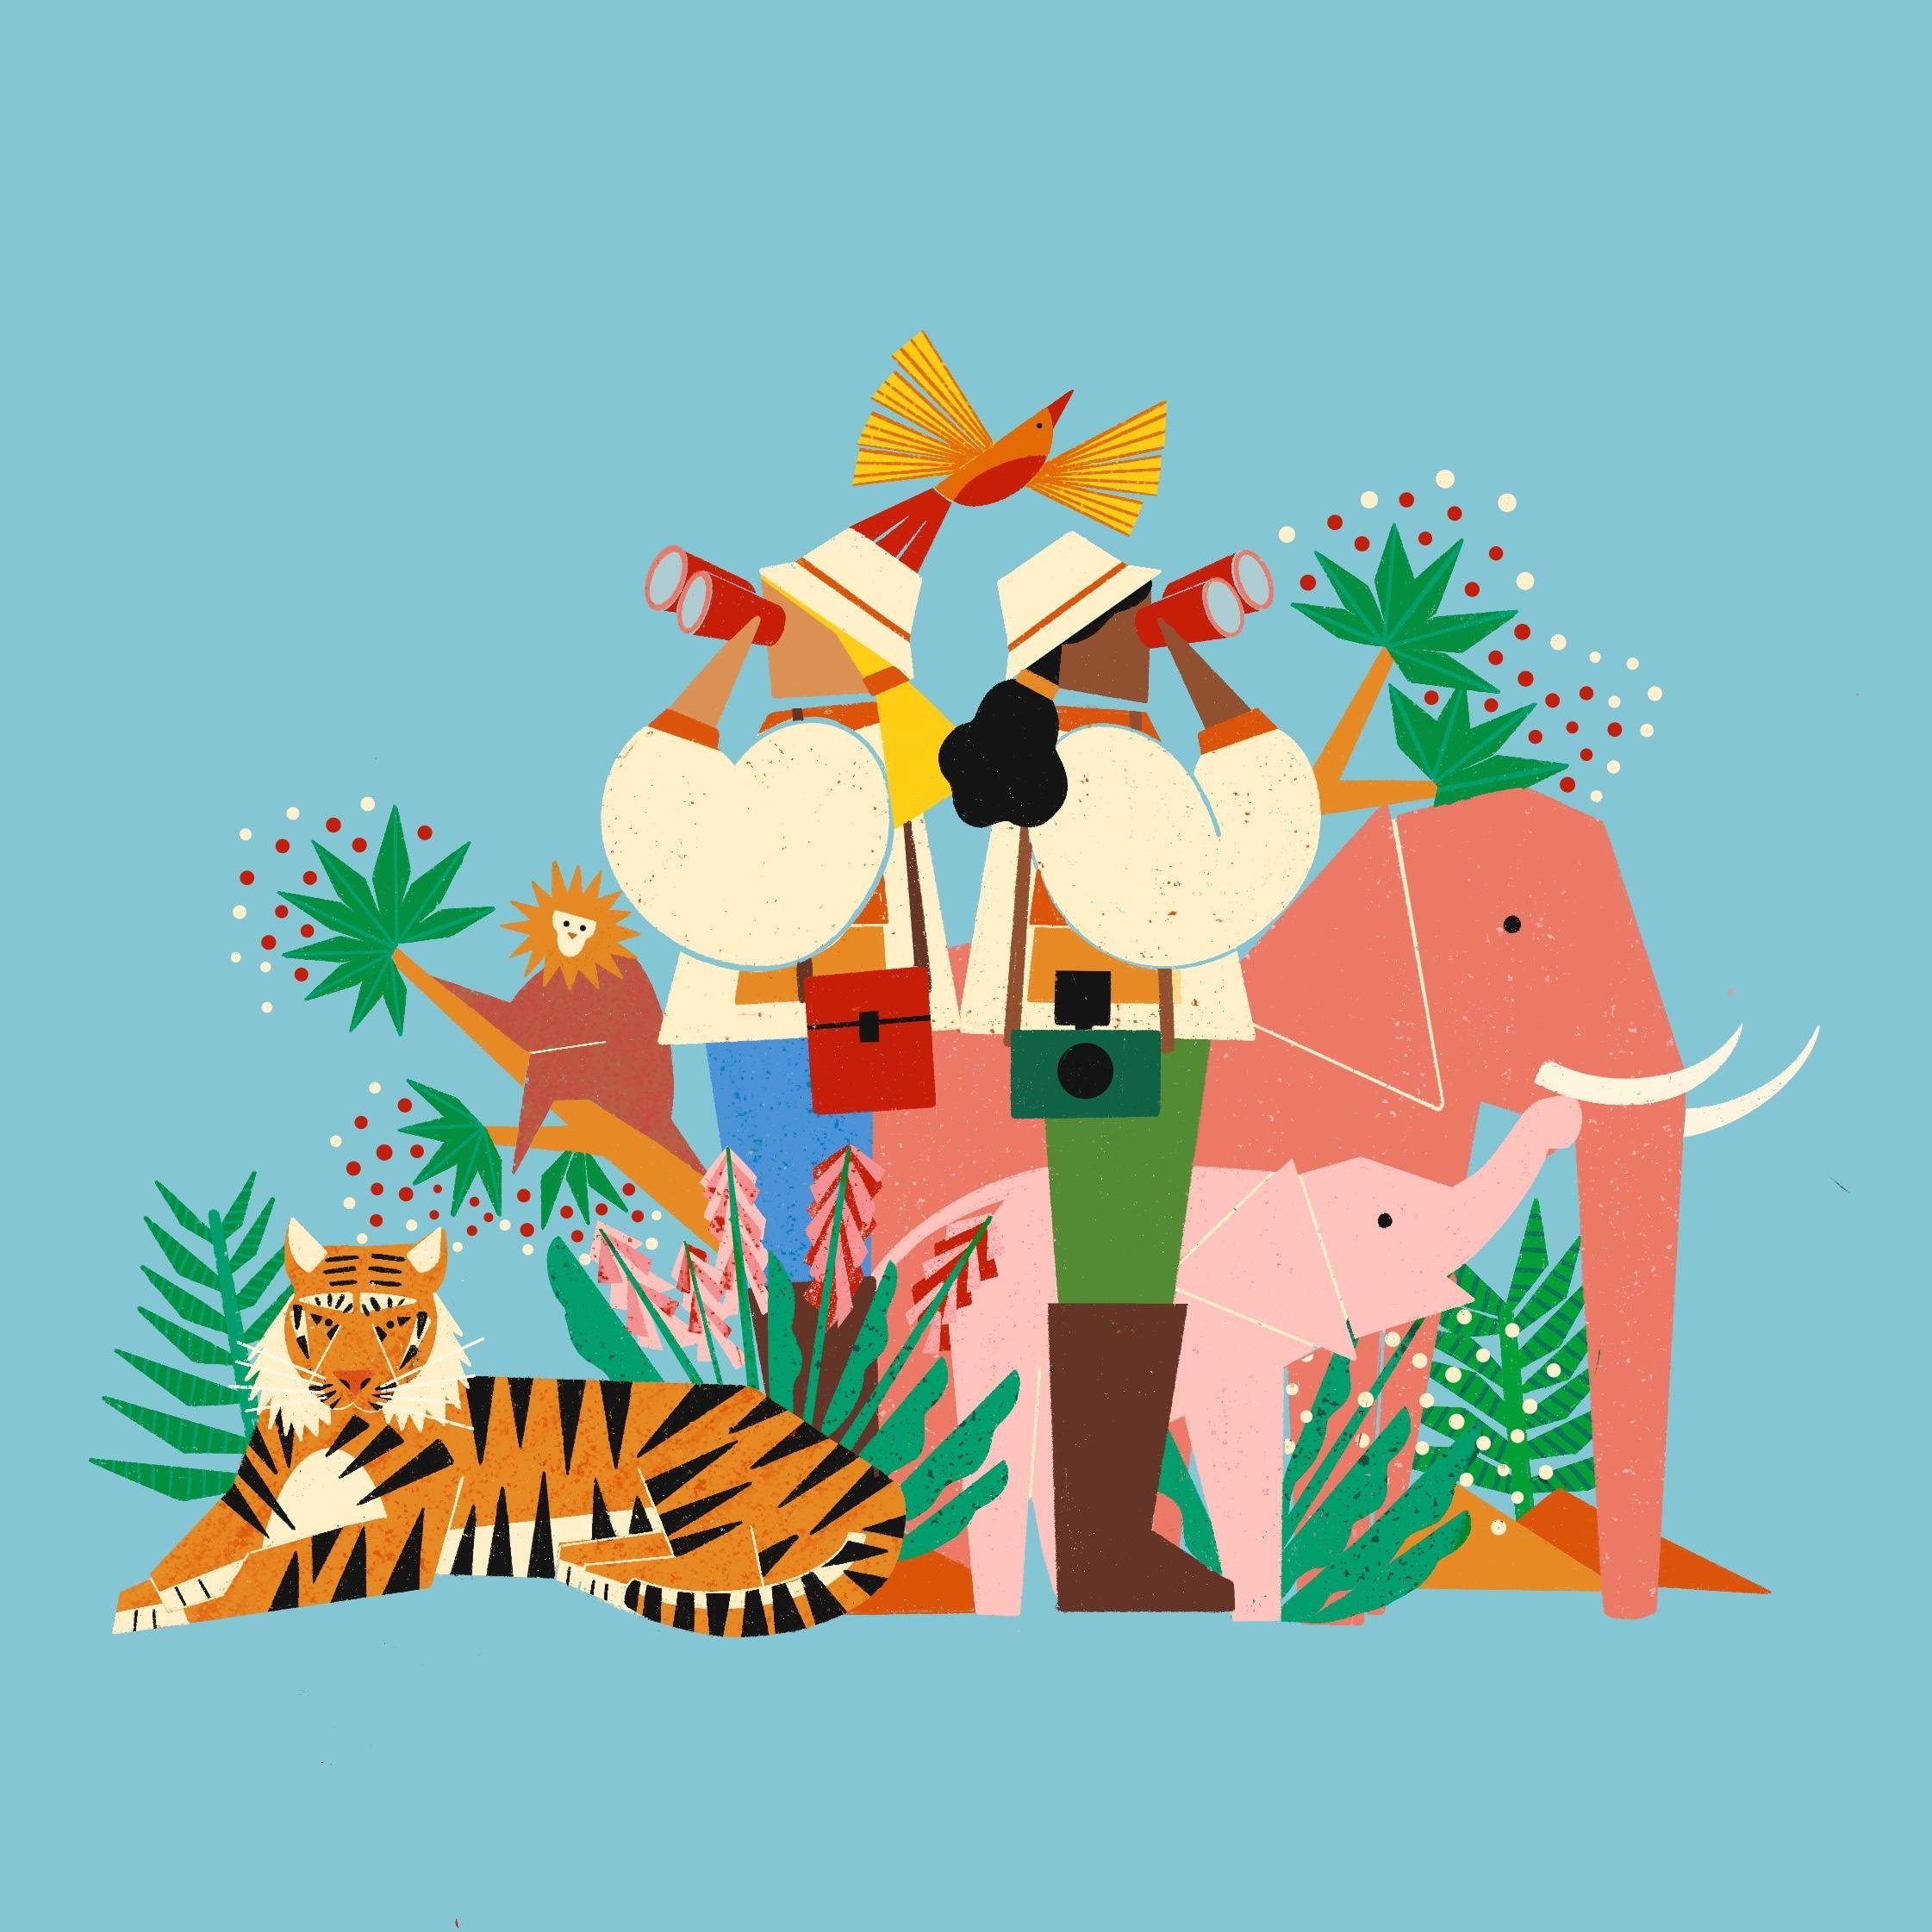
creates a great balance. Here's the last example
from the same illustrator. This one is a more
complicated scene. There is no central
focus on this artwork. All the characters and other elements are in
harmony all over the canvas. This is the same for the colors. Besides that, blue creates a great negative space
among all the elements. It creates a very balanced
composition overall. Let's move to the
another artist's work. Here's the artwork
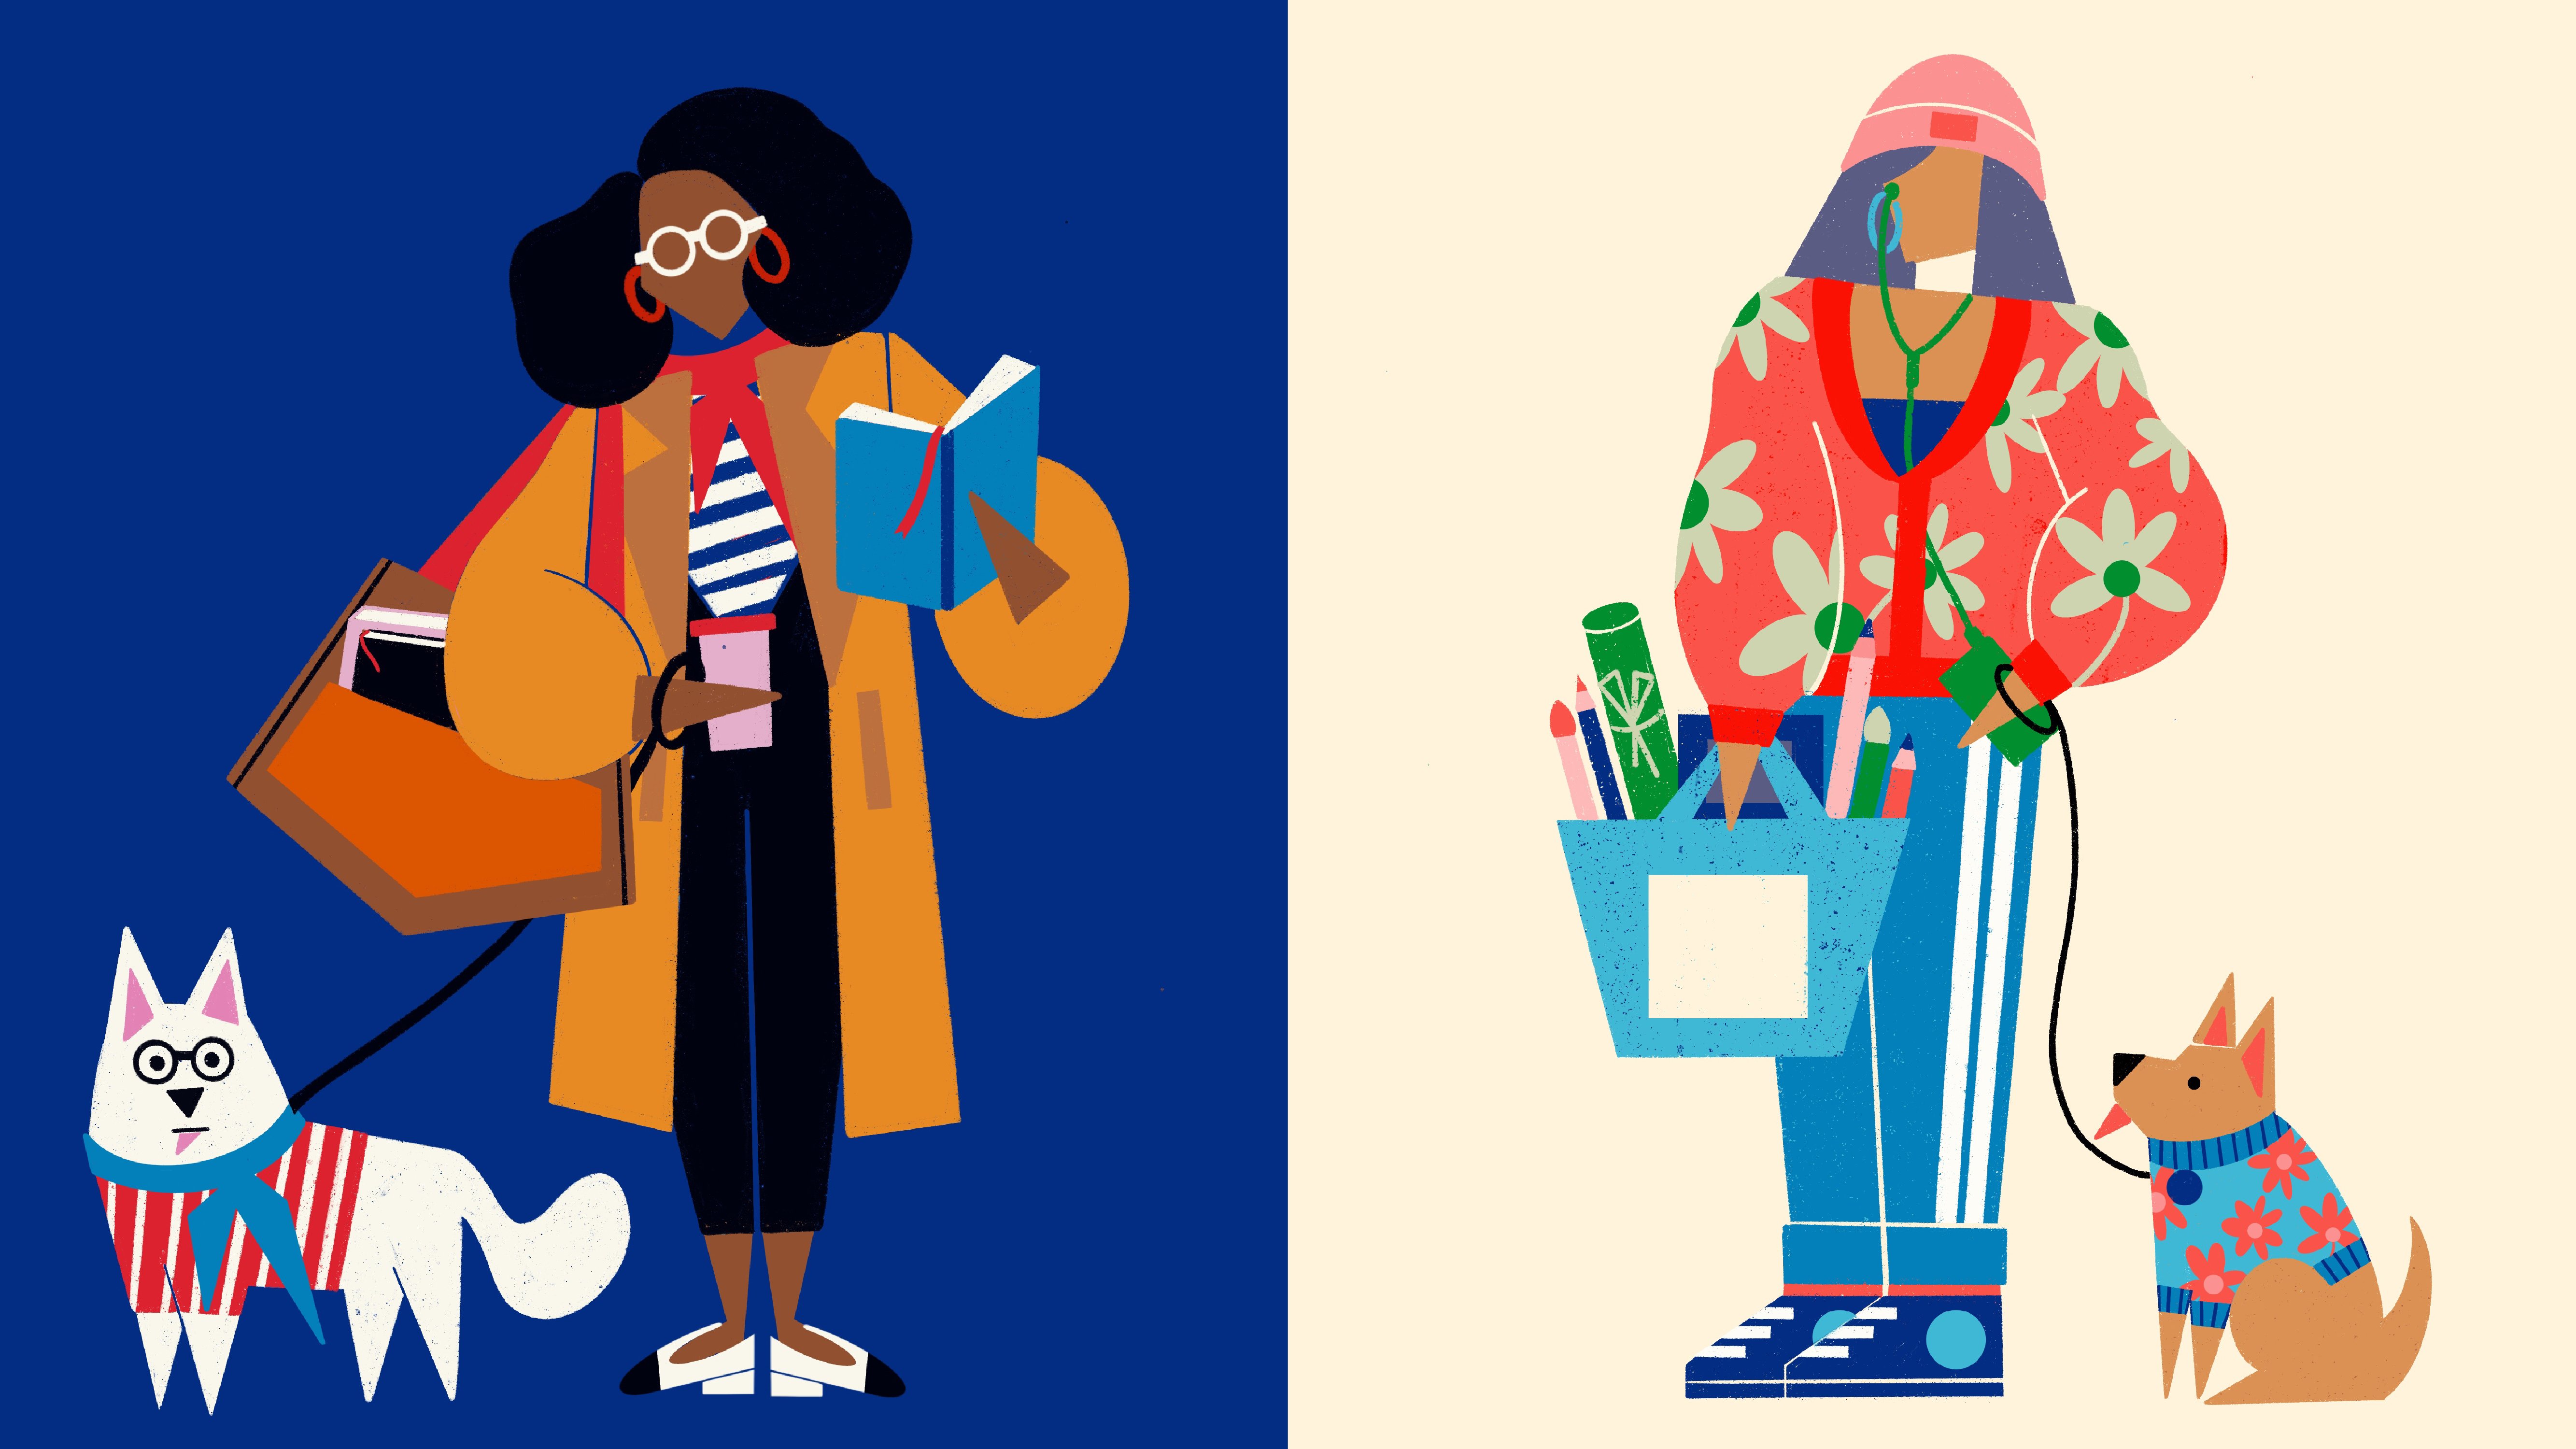
from Lisa Congdon. This is a very common
compositional style among illustrators
and in this work, you can see that
all the elements are all over the canvas. Negative space
in-between the elements has to have a better
composition and you can see that different
sizes in elements add a little more
excitement to the piece. Plus same colors are used in different elements to add
the harmony of the piece. Another example from
the same artist. If you use the rule of thirds, we can see that the head and the pan are positioned
on the line perfectly. However, the composition
guide the artist used more dominantly here
is the golden ratio. Elements perfectly lie in
the golden ratio spiral. It flows nicely
with leading lines. Remember, leading lines are
basically where your eyes look and what kind of direction
the image guides you in. Like face turns to the
plate and then you will look at the tomatoes
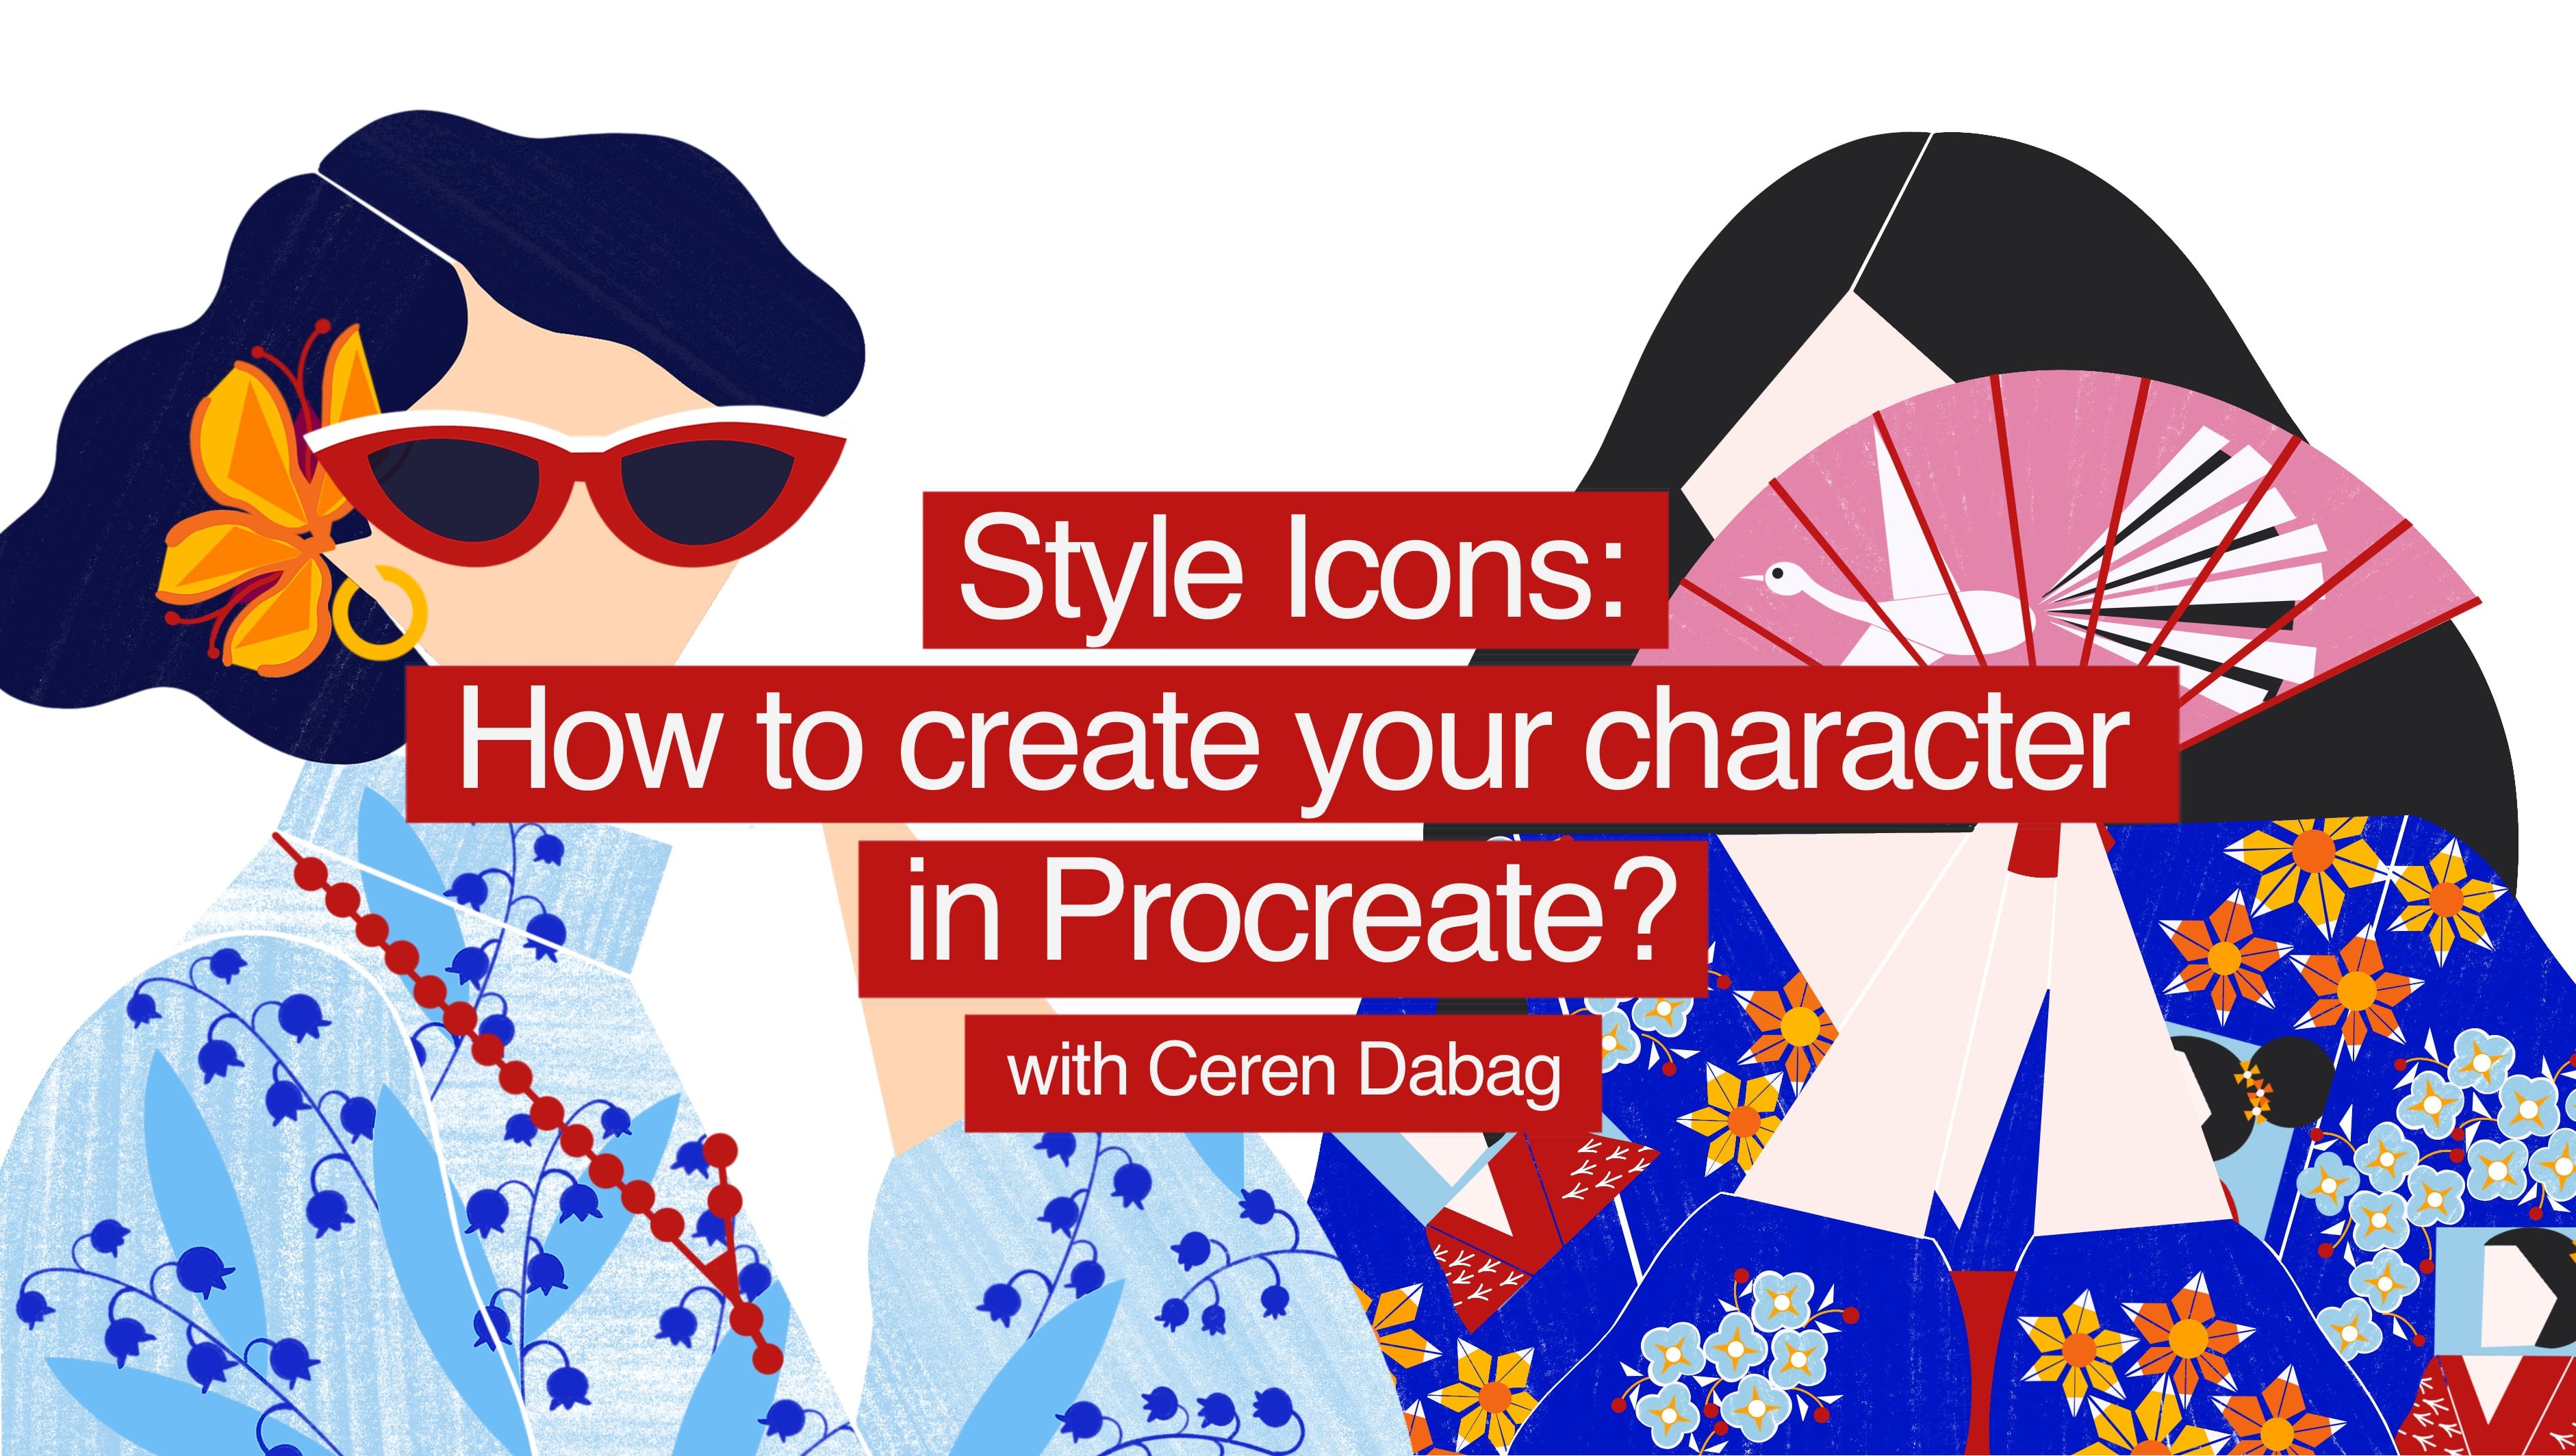
and reach to the pan. Our last example here, we can see that
the image is split into the tiger and the checks, it follows the rule of thirds. You can see the
head of the tiger is on the cross-section
of the rule of thirds and the body lies
on the first chart perfectly than this
on the other side, creates a great negative space. That's a great space
for the slogan. Overall, it creates a
well-balanced composition. We went over many
examples and try to understand how the artists
use composition rules, leading lines, negative
space, colors, and more. Now it's your turn. I want you to download
practice sheets I prepare for you, and train your eye by finding hidden composition guys
in the artwork examples. Join me in the next
lesson where we are going to be practicing creating our composition thumbnails
using composition guidelines
4. Practice with Composition Guidelines: [MUSIC] Since we've practiced retraining our eyes for
composition guides, now we can pass to
the stage where we are going to create our
composition thumbnails. These exercises are so
important for helping you learn how to nail the
composition in your drawings. For this lesson, I created four exercise sheets
for you to practice. You will find exercise
sheets of golden triangle, golden ratio, the rule of thirds, and triangle
composition. I also created a cheat sheet of simple content ideas
to help you to focus on composition
while your practice. In each exercise comes with three thumbnails for
you to work with. You can download them all in the cluster resources
section below. Let's start. I create a square
Canvas with 300 DPI. Then I bring my practice
sheets to my Canvas. I go to settings
and insert a photo. Composition is mostly
playing with contents, shapes, size, negative
space, and color. All your elements should
work together and balance. The basic composition guides will help you a
lot at this point. In this lesson, we are
going to learn how to use them to improve
our compositions. This is what we are going to do. We are going to
create a scene by simply playing with the
elements I gave you. Our main focus will be the arrangement of the
elements in our Canvas. In elementary sheets, there is enough content
for your scene. We are going to exercise with pretty easy content like a sun, a house, a tree, a plant, a person, and so on. You can pick a few
elements and try to combine them in your
thumbnail sheets. You don't need anything fancy or super detailed at this practice. Very rough sketches are enough, so don't worry about very clean lines or
anything like that. I would like to start
with the rule of thirds. Just play with the sizes
of your elements and practice positioning
your content in balance. We're going to use our
guidelines by doing this. Your key elements
should fall along the lines or at the
intersections of them. In this way, you can achieve a more pleasing arrangement and you make it more
engaging to the eye. Outline your composition
and try not to overthink. Quantity is way more important than quality
at this point. I'm going to draw
a little scene of a girl watching the
sunset in the city. I will draw a little
boat on the sea, houses on the back, a sun, and a girl. It's pretty simple scene. Often illustrators pick one of the horizontal lines
as a horizon line. The lower line is
usually picked as the one because it's
easier to do eye. Since the idea of the
rule of thirds places the focus elements along
these lines or intersects, I positioned the boat
along the vertical line. Then I keep the little houses
mainly in the second third. Then I position the sun at
the intersection point. Now I draw my character. I want to create a new
layer to work with. It's going to be a
foreground character. I just use simple geometric
shapes, nothing fancy here. I want my character to take place mostly in the left third, and I play with the size a bit. You don't need to squeeze
the whole body in the scene, so don't be afraid to
go over the lines. This trick might have a
lot with composition. I also position my
character's eye at the intersection point to
attract the viewer's eye. Just some cleaning up and
adding up some details. As you see, we just
created a very quick, simple but nice composition. You see here there is a tangent, per shoulders and horizon
line touch each other. For a better composition, it's also important to
avoid these tangents. I just quickly
rearrange that part a little bit. All done. For the next example, let's draw a character
hiking in the nature. I'm going to start with
drawing my character. Since my character is the
main focus of the piece, I position him along the
vertical line of the rule of thirds and place his head at the intersection of
these two lines. I want to add some background
and foreground elements. I might have some hills. I will draw them in
the lower chart. Maybe I can add some houses and trees far off in the distance. Each element group is set on some of the panels of
the roll-off charts. I tried to add
different elements to create a more
interesting composition. Why we are doing that, placement is one of the most obvious ways that we
can use the rule of thirds. Just keep most of the
points of interest along with the converging
points of these lines, and then place the other things on these panels of
the rule of thirds. For the next example, besides the rule of thirds, I want to add a
diagonal line as well, just to play a little bit more. I might draw a diagonal
horizon with a sunset. Again, keeping one of my
elements in the right chart, and my character
at the intersect. Maybe a foreground element
along with one of the lines. The rule of thirds also
works with vertical Canvas. Just nine equal
rectangles make the work. Just divide your
composition into thirds. For example here, I keep the first third
for the city view. The second one for
the character, and the third one for the
character's dream and of course focus elements
along the green lines. The next composition guideline
is the golden ratio. My exercise sheet
is on my Canvas. Now it's time to
practice creating quick sketches with
golden ratio guidelines. For the first example, let's draw a bird. I draw my birds
along my spiral and try to position the head of the bird at the
center of the spiral. This one is a bit tricky to
practice, but no worries, just try, and with practice, you will get better each time. Since my focus element is done, I just draw some plants
to enrich my composition. All done. For the next exercise, I will draw a girl reading
a book in her room. The middle of the spiral is the focal point of
the composition. I start drawing
her head in here. Then her arm movement
follows the golden spiral. Then I might position her book
at the end of the spiral. As you see, my
character positions along the golden
spiral line very well. Now I can add some
background elements. All done. For the last exercise, I will try to draw a landscape scene by using
the golden ratio as my guide. This time, I want
you to focus on the rectangles instead
of the spiral. It can be a lot
easier to practice the golden ratio in this way. I might draw a house behind the hill at the big right square and maybe another house
just crossing with the spiral and a character
along the spiral. Then just draw a background, might be some mountains
above on the sea. It's up to your imagination. I also want to add a little bird in the middle of the spiral. It's the perfect place since the eye follows
along the spiral. All done. Let's move to
our last composition type, which is triangle composition. Triangle composition is a
very powerful composition. It can add a sense
of visual unity. Let's start with having one strong character
in our drawing. I use this triangle guide
to frame my character. Then we can have our elements around like all these flowers. Also, you can use
these flowers as leading guys up to your main
character's focus point. Just playing with their
forms of it makes the work. Just like that, we have
created a great composition. For the next one, I want to add more elements to my composition. Maybe a house, a few characters, and some tree. Let's see. I imagine two friends enjoys their spare time
on their rooftop. I start with the house. I position the house inside of my triangle and leave some
space for my characters. I can draw a few background
elements outside of my triangle like
houses or some trees. Let's draw these friends. I position them back to back. In this way, they fit my triangle composition
in a better way, creates a very strong image. You can see that the thick lines attract the eye to
the characters. I think it's a very
powerful composition. Last example, I want to draw
a yoga girl in her element. Maybe a little rock
that intersects with this invisible triangle and just some other elements around to create a stronger
composition. All done. Let's move to
our last composition type, which is the golden triangle. This rule is somewhat
like the rule of thirds. Just your Canvas divided
a little different. I plan to draw a
foreground character. With golden triangle, I suggest you fill one of the triangles with
your main subject. My character is my main subject, so I draw her mainly
in this triangle. I also try to align my character's form with
golden triangle lines. I'd like to arm my lines with this line and the flower
aligns with the other line. I think it's also a
good idea to draw my horizon line along
this diagonal line, maybe a house and some
trees in the far. I keep them in this triangle. I might also add
another character like a dog and position
her at this line. Again, it's a simple
but nice composition. For my next example, I want to draw two friends
sitting in a Cafe and talking. Again, I want one of the characters to be a
little bit more dominant. I fill one of the
biggest triangles with my character's body. Since the intersection
points are the ideal place to
position my subject, I try to position her head
at this intersection. I use the same tactic for
the second character, using the second
triangle as my guide. My main subjects are all done. Now, I can just throw
some elements for the background to
enrich the composition. All done. Just another
quick example, I imagine a farmer
in his garden. I use the golden triangle
lines to guide me to draw his house and his tree. I position my character as
one of the small triangles. You can see here that the
house and the tree are more dominant than the
character since I drew them in the
biggest triangles. We practiced with four
different composition guides and I think when you
master these four, you will come a long
way in the composition. Now it's your turn. Use my elements cheat sheet
and composition guides cheat sheets and create
different composition. Be quick and sketch roughly. Play with sizes and positions while using
composition guides. Now that you have exercise with basic composition
guidelines, let's jump into the next class, where we are going to
learn some extra tips in composition before jumping
into our main project. [MUSIC]
5. Composition Tips: [MUSIC] Now, I will talk
about some tips for better compositions and also some common composition killers. The first step for
your composition is to think about your story. What are the elements
that you want to use in your story and which ones are more important
for your story? That will help you to
figure out your elements, position, size, color, and more. I draw a very simple
small scene with a cat, a plant, and a little bird. This drawing is nice but not
telling so much of a story. Let's change it a little. For my second thumbnail, I use the same elements, but with some differences. This time the cat is behind the plant and the bird
is looking at the cat. It's a small difference, but we can feel that there's
a little story here. Maybe the cat is scared of
something that we don't see, and the bird is trying to understand why the
cat is hiding. Or in my third scene, the cat is trying
to catch the bird, but in that moment, a sound distracts him, and the bird is lucky
enough to escape. As you see, moving the
elements around and changing [inaudible] can change
your story completely. Using strong lines built into
elements of the artwork, can move the eye to
the point you want. Even the impression of a line is effective and our
eyes will follow it. Let's try a simple example. I want the cat to be
the main subject. Imagine a table
from the top view. Maybe my cat inside
of a drawing. I draw a hand, the pencils,
maybe some flowers. I also add more elements
to create a balance. Can you see all points
leading to my main subject? This helps my main
subject to pop even more. Sometimes there
are so many things going on in the composition and it can be overwhelming
and unpleasant for the eye. You need to create negative
space for your eyes to rest. This will also have to make
the important areas pop. Here, another example of
the use of negative space. It's good to live negative
space in your artwork, in the direction that
your subject is looking. It will create a
directional flow and a pathway for
the eyes to follow. You can just draw guidelines for your negative space beforehand and use all your elements to create this hidden
negative space for you. Drawing all these
plants can help you to shape your
directional flow. Converging lines are when two lines interact in
an unpleasant way. To put it another way, they are touching
but not overlapping. Like this plant and with this shelf or the
cat with the door, or you can also think about the objects next
to each other in the same order because this
will create a boring scene. In that case, you can easily
shift one of the lines or shapes or push back
one of the elements. This will help you to create a more dynamic and
interesting scene. A few changes and my scene
looks so much better. Thinking about how the image
will look as a silhouette, can help you allow to
check your composition because it shows the main
form in your artwork. If you are fine in
black and white, then you're probably
good to go in colors. What you need to do is
creating a new layer, coloring it in black, and then tap on that layer
and choose color option. Voila, your artwork is
on black and white. Now, you can check the harmony and make necessary changes. The most important
suggestion is the last one. Rules such as golden
ratio or the rule of charts can be helpful to
create a strong composition. But it's really important
to see them as suggestions. If they become restrictive, forget about the rules
and play around. Work on unstructured sketches
and focus on the farm part. We learn all the basics
about composition with so many tips and tricks and practice with a
bunch of exercises. Now, it's time to get ready
for our main project. Join me in the next lesson, where we are going to
exercise sketching some elements to use
in our composition. Get rid of the sketch,
plants, animals, objects, and some facial items. [MUSIC]
6. Drawing Plants: In this lesson series, we are going to draw our
elements for the class project. The theme of our
composition is safari, so we are going to
practice drawing plants, animals, some safari items, and characters with
safari fashion. The following four sketching
lessons are optional. With these lessons,
you can practice creating your elements
for the class project, or you can skip these
lessons and use the elements from the cheat
sheets I prepared for you. We will start with
sketching plants. I have a few
reference images here from different plants
and trees and you can download all these
reference images from the Pinterest folder
I prepared for you. The link is in the Project
and Resources section. Just click the link and download it all and start to
practice with me. I choose two reference images
from my practice sheet. I have one tree and one flower. For our practice, I only have one reference from each species. But I suggest you gather
multiple reference images. For example, if you want
to draw a Joshua tree, check multiple reference
images from the Joshua tree. In this way, you
better understand your subject and be able
to create your sketch. Let's start with this cute tree. I want you to lower
the opacity of your reference layer and
create a new layer on top. First, I want you to understand
your tree specific form. Start with retracing over
your reference image, like drawing the main outlines and try to simplify it as well. For example, here, all the
branches look complicated. But don't worry, you
don't need to draw all the branches
or every flower. Just focus on a few measures. You can ignore some and
maybe add some more from your imagination
in different places. For the flowers, first practice drawing some next to
your main drawing. Try to examine different
petal forms like how they look from the front
or the side or the back. I think it's important
to understand its unique forum before
diving into interoperation. Then you can lower the opacity of your
first sketch layer, create a new layer
on top and down, work on your
interoperation of it. I want to try diagonal forms
instead of rounded lines. Don't worry about this
specific details, in the end, you don't need to carry every detail to
your illustration. I like focusing on a few or maybe just one detail
that catches my eye. These are the three
different types of flowers I want to
use in this tree. Now, you can just work on the
composition of the flowers. Start with drawing a few from one type without overthinking. Add some from the
second type as well. To save some time, I select all and tap Copy. I continue to copy some
and draw some more. Don't forget to add your
tat flower type as well. One more trick here is to
overlap some of your flowers. That can help you with
your composition a lot. I think I'm done
with the flowers. I want to add a few
branches among them. I want to turn off
my reference layer and see how it looks. I feel I can add
some more flowers. Just add flowers until it
feels like a nice composition. That looks good. Let's go
back to the tree trunk now. I want you to reflect
on your own style here. Redraw the trunk in a new layer, but this time, go
with your own lines. I want to go with sharper lines. Now, I want to add
a few more details, like the tree hole here and of course the pattern
of the tree trunk. I think my sketch is complete, let's move into this plant. The plant looks complicated
at first glance, but I'm not going to draw
all the leaves and flowers. Simplifying is your key here. Start with drawing a few
ellipse for the flowers. Don't go into details, we will come to that later. As you see, I don't
draw all of them. Don't be afraid to create
your unique composition, maybe you can change the
places of some of them. For the leaves, I
try to simplify shapes but keep
things recognizable. Try to catch general form of the leaves and create
your own composition. Forget about this complex
arrangement of leaves in this reference and try to
create your composition. Do multiple sketches
if you need to. Play with the places
of the leaves or flowers until you
are happy with it. Don't forget there is no right
or wrong in this drawing, it's all your interpretation. Now, I'm turning the opacity
of my reference layer back up to 100 percent and I'm
bringing it to the corner. I want to work on the details
of the flower separately, so I turn off my sketch layer and run back to my blank canvas. Now you can work
on your flowers. I'm just thinking about, how can I simplify
these details? I try some options right
next to my sketch, maybe some little ellipse
forms or some triangles. Don't forget, you don't
have to be super realistic. Just play around to
make it your own while catching the main
features from this plant. Let's try another one. Just practice until you are
happy with your sketch. I have four different options. I think I want to go with
the third one, so I copy it. Now, I bring back my sketch and apply these
flowers to my plant. I want to clean
unnecessary lines. It looks good. Add these extra details to make your plant drawing a
bit more interesting, like these thorns on the
edges of the leaves. Here's my final sketch. We just sketch one
tree and one plant. To use these sketches
in your class project, I suggest you to
download them as PNG files with a
transparent background. Now it's your turn. I want you to download
the reference photos from the Pinterest folder
I prepared for you. Practice as much as you can with different types of
plants and trees. Focus on simplifying and trying to capture the
main characteristics of your plant and interpret
them in your own style. Don't worry about producing a perfect drawing
when you're starting, just throw many different
plants to develop confidence. Join me in the next lesson
where we are going to be practicing drawing animals
for our composition.
7. Drawing Animals: [MUSIC] Let's practice drawing animals
for your illustration. Don't forget these four
sketching lessons are optional. You can skip these
sketching lessons group and use my sketchy sheets
for the class project. It might be your first time drawing animals or you might be trying to figure out how to
draw animals in your style. Either way, you need to
practice and experiment. Studies about finding
the lines and metals that express
what you see. This is what we are going
to practice in this lesson. The process is first to simplify your subject and then
characterize it. Let's get into it. I have a few reference images from
different animals here. You can download all
these reference images from the Pinterest folder
I prepared for you. The link is in the project
and resources section. Click the link, download all, and start to practice with me. We only have one reference from each animal here but I
suggest you work with more than one reference
image for each animal to get the right sense in terms of characteristics,
colors, and more. Let us start with this monkey. Let's lower the opacity of the reference layer and
create a new layer on top. First, I want you to
break it down into simple shapes that
will help you to understand the basic
structure of the animal. I draw a circle for the head and a
semi-oval for the body. I draw circles for the joints and some lines for
the arms and legs. I will also try to identify the individual
characteristics that make each species unique. For example, a unique
shape to their face or a pattern on their body are some of the things
to pay attention to. As you see here, the
face is very new. I see three circles and the fewer on the cheeks
is very distinctive, so I would like to express
that as well. All done. I'll just bring it to the right. Since we have the
main structure, we can start inserting our
creative style into it. I create a new layer and lower
the opacity of my sketch, and I want to keep my
reference image on the side. I turn the opacity back
up to 100 percent. Let us start experimenting. I'm very much into sharp
lines and a simple look. I like using lots of
triangles in my drawings. I kept this in my mind
for my first try. I tried to simplify
as much as possible. For example, you
don't need to draw all the sections of
its arms or legs. We also don't need to
keep every detail. If you're having
trouble drawing a part, you can use some tricks. For example, instead of drawing this right arm in the behind, I can draw some leaves
to cover that part. Don't forget, it's
your own game. You can always cheat. That's a style. Let's
try another one. I bring back my first sketch and I'm going to use it as
my reference again. I create a new layer
for my new sketch. This time, I would
like to experiment with curvy and smooth lines, and I will try to insert
different details such as feet, hands or fur. Let's play with the fur. We can exaggerate the fur on sub-parts like on the cheeks. You can illustrate fur
in many different ways, just experiment
and try to figure out which styles work
out best for you. Another one is done. Let's try one more time. Every time I try
something different. Maybe I go with sharper
lines or maybe this time I draw hands and feet but
with fewer details. I might try a
different texture for the fur or I can exaggerate
the size in some parts. Opportunities are endless and it's up to your imagination. I have three monkeys all
in different styles. As you can see, I draw the
faces with minimum details. If you want to go
with more details, I suggest you practice
the face separately. In this way, it will
be less intimidating. Let's try to draw some faces. For this monkey, I see
three circles on his face, so I'm going to play with this. You can use just one dot for the eyes or you can
go with more details. You can even add
eyelashes or eyebrows. Try to figure all these
details to make it yours. After drawing more
detailed faces, you can apply your
favorite to your sketch. All here. Now, I want you to choose one of your
monkey sketches. I'm going to choose this one. I want you to apply
this drawing approach and style in your
other animal sketches. If you want with sharp lines, go with sharp lines
in others too. This will help you to have a common language between
all of your animal drawings. Let's try another animal. I continue with this Tiger. This time I skip the first part where
I draw the skeleton. Instead, I work directly on my reference image to find
out the form of my animal. It's faster in this way. But you can always go with the first method and start
by drawing the skeleton. I'm going to trace it
as simply as possible. The trick here is to
apply your lifestyle, the style you choose, and the monkey sketch. For me, it's sharp
and geometrical, like a circle for the head is something that I can emulate in my other animal sketches too or the characteristics
such as fur. How you draw the fur
can be very distinctive and create a common language
in your animal society. If your animal has
a specific pattern, try to figure out how to illustrate that pattern
in the best way. I suggest you to practice a few before you decide on
your final drawing, especially the pattern on
the face can be tricky, so don't forget, you can always practice the face
separate from the body. It looks good. Let's
try another one. I have a mother and a
daughter Cola here. There is no need
to be intimidated by drawing two animals together. The key is the same. Try to simplify what you see. Focus on the forum and
major characteristics. For example, the nose
here is very distinctive, so I make sure that I
got that part right. I copied it on my very
first call a family sketch. Let's continue with another
animal. Here's a bird. When you draw birds, wings and all the
feathers can be tricky. But don't worry, even
the most complex forms can be broken down
into simple shapes. Focus on the forum. Don't get
caught up in the details. For example, first, draw the basic
shape of the wing, and then draw the feathers. You don't need to
draw every feather. Instead, try adding a
small group of lines. It looks good. Let's
try another one. Here's the last one, a leopard, I start with sketching
basic shapes as always. The pattern of the
leopard is a star here, I suggest focusing on how to illustrate the pattern
in your own style. You can create a box on the
side and practice drawing the pattern before drawing
on your leopard sketch. We exercise drawing
a few animals. Now, I want you to bring
all the animals you sketch to your colors and see if they speak the same language
or do you want to make a few changes before
you go further. As you can see, they
all look like a part of a big family with a
similar drawing style. It might be hard to get to that point at first
but seeing them all together will help you a lot to make the
necessary changes. To use these sketches
in your class project, I suggest you to
download them as PNG files with a
transparent background. Now it's your turn. I want you to download the
reference photos and start practicing developing your style when it comes to
drawing animals, look at the animal
structures, movements, and characteristics
such as fewer or a specific pattern and
make them your own. Join me in the next
lesson where we are going to be
practicing drawing some objects from
the separate team for our class project. [MUSIC]
8. Drawing Objects: We sketch plants, and animals. Now it's time to draw
something different. We are going to draw things
you can see on a safari trip, like a typical safari car, a local house, a water
canteen, or a binoculars. These are just a few examples. There are so many things in this group that you
can practice drawing. I have collected a few reference
images for this lesson. You can download all
these reference images from the Pinterest folder
I prepare for you. The link is in the project,
and resources section. Let's start with this car. First, lower the opacity
of your reference layer, and create a new layer on top. As you see this car is
pretty much symmetrical. Opening a drawing guide can
help you with this drawing. To activate your drawing
guide while you are in your sketch layer
go "Settings", and toggle on the
"Drawing guide". Down top on the edit
drawing Guide option and choose symmetry. In the Guide options, you can choose vertical
or horizontal symmetry. I choose vertical. I reorient my reference
according to my drawing guide. I want it to be centered. When the drawing
guide option is on, anything you drawing
on one side of your Canvas will be
mirrored in the other side. Before you start,
don't forget to check if you are on
the assisted layer. Now we can start sketching. I start with the window, as you see my lines mirrored
across my car walls. I outline my reference photo, I go for sharp and
straight lines. But this is a personal choice. If you want rounded
or relaxed lines, just go for it. I don't go for all the details. I choose the one that I
think it's worth to add to my drawing, like this lamps. I like perfect circles. For that, I draw a circle and hold my pencil
on my car walls. Then on the top in
the notification bar, I tap on "Edit Shape" and
select the "Circle option". Pretty much done here. I think the wheels
look too long, so I choose the select
tool and freeform option. I think it's much better now. You don't need to stick with everything in your
reference photo. It's your drawing, so change it if something
looks off to you, and you can always
go for more details. Let's look at the other
reference photos. As you can see, you can
use the symmetry drawing assist on this binocular and
these cute little house. Drawing this binocular can be intimidating since there are
so many things going on. What I'm thinking here is to simplify it as much as I can. The photo has also a
little perspective. You can ignore this and try
to draw it two-dimensional. Start with the biggest parts and then go with smaller parts. You don't need to
draw everything, draw the general outline with your lines is
pretty much enough, and keep going until
it feels right. Just enjoy the process and
try different options, and keep trying until you
are happy with your outcome. Let us try to illustrate
this binocular. Lower opacity of
the reference layer and create a new layer on top, and tap on that layer
and from the options, tap on "Drawing Assist". Let's turn off the reference
photo to see our sketch. I think it looks good, and don't forget you can always turn off the
symmetry guide. Just tap on the "Assisted layer" and turn off
the drawing guide. You can keep going with unsymmetrical lines
in your drawing. We just sketched
two safari objects. To use these sketches
in your class project, I suggest you to
download them as PNG files with a
transparent background. Now it's your turn. I want you to download
the reference photos from the Pinterest folder
I prepare for you, and practice as much as you
can be different objects. This practice is a good chance
to draw different objects, focus on simplifying, and try to capture the
main characteristics, and don't forget to get help from assisted drawing options. Join me in the next lesson
where we are going to create eye-catching safari fashion
looks for our characters.
9. Drawing Characters with Fashion: [MUSIC] It's going to be hard to draw an outfit
from just imagination alone. Therefore, I collected
a few reference images related to Safari Fashion. You can download all
these reference images from the Pinterest folder
I prepare for you. The link is in the project
and resources section. Each reference image has a different detail
that catches my eye. For example, I like
the head here, the boots, and the bandana here. I pretty much like
this top in here. I also have a few references
for character poses. I pretty much like this side
view with the binoculars. I would like to go
with this figure, so I copy this image to use it as a reference for
my character's pose. Now, I want you to
lower the opacity of your reference layer and try to catch the post in a new layer. I use basic geometric shapes and lines to define the
position of my character. I draw a triangle for the body, some circles and
lines for the arms, and some more triangles
for the legs. Since our post is ready now, we can get into the most fun
part, imagining the clothes. I like this head very much, so in a new layer I draw
it in my own style. Now, I use the select tool
and bring it on top of my character and then I
sketch the hair and the face. Okay, I like the shirt and
the bag together here, so I want this combination
for my character's outfit, but I want to change some
parts and add more details. First, I want to
practice sketching the clothes on top of
the reference image. In this way, it will be easier to apply it to the character. Okay. Now, I follow
the main structure by applying the outfit
to my character. Okay, pretty much done with the jacket, so let's continue. I think these boots with socks fit my character perfectly, so I apply them to my character and I imagine very comfy pants. Before going into
refining my sketch, I look at my drawing
one more time and make a few changes and maybe
add more details. Okay, I think the pocket
are here pretty cool, so I want to add
this to her jacket. These details on the arms
are also pretty cool. I'm thinking about how I can apply this to my
character's outfit. We can see the
pocket on the side, and this detail on the arm makes the outfit
more interesting. Maybe she also has
a photo machine. Okay, I think I'm
pretty much done here. This sketch is pretty clean, but if you sketch roughly, you can lower the opacity
of your rough sketch layer, create a new layer on top
and refine your sketch. To use these sketches
in your class project, I suggest you to
download them as PNG files with a
transparent background. Okay. Now, it's your turn. I want you to download
the reference photos from the Pinterest
folder I prepared for you and start practicing drawing characters with different
Safari team outfits. You can find the link in the project and
resources section. I suggest you sketch
different character poses, try different outfits every time you draw a new character. Try sketching shorts or skirts, maybe add a backpack
or a water container. Okay, we completed all
these exercises and learned a lot of tips and
tricks on composition. Now, it's time to put
everything together and create well-balanced,
eye-catching compositions. Join me in the following video, where I'm going to be explaining our class project in detail.
10. Class Project: [MUSIC] It's time for
your class project. For your class project, I want you to create
a safari team poster illustration
combining animals, plants, some objects, and
fashionable characters. We will create our creative
compositions using techniques ranging from the basic composition
topics to collage. To begin, I created two
composition top plates consisting of the rule of thirds and triangle composition. We will combine these
top plates with implied lines,
symmetry and more. I also created four
different cheat sheets as your composition materials. In these cheat sheets you
will find sketches of plants, animals, objects, and
character special items. You can download them all at
the project and resources section under the name
class project material. All these materials
will help you to get an easy start and focus
on composition instead. You can either use
your own sketches from the earlier sketching
lessons or download the sketch elements
from the cheat sheets and directly jump into
the composition play. They're all in PNG format, so easy to play with. We will use two
different coma sizes in our illustrations; one square and one
rectangle comas, both are in a perfect
size if you want to hang your illustration on your wall or give it to a
friend as a gift. Basically, just like
a collage work, you will combine all
these sketch materials to create a creative
composition. Through the following lessons, I will help you with
tips and tricks to create five different
types of illustrations then I want you to pick
one of your sketches and move on to the coloring phase to finalize your illustration. I choose a safari team with
white animals, plants, and safari facial look characters but you can easily
go in another direction, such as choosing
ocean animals and plants with marine
outfit characters. I'll join you with
safari team in your first project and the [inaudible] team can
be your second project. Don't forget, it's all
about your imagination. Join me in the following
video where we are going to create our first
illustration and our first creative
composition is a basic but powerful three
element composition. [MUSIC]
11. Three Elements: We practice with many exercises and draw our elements for
our illustration. Now it's time to experiment with different
composition styles. At our first attempt, we will create a simple
but powerful composition. It will be a tree elements
very focused illustration. I want you to create
300 millimeters to 300 millimeters and
300 DPI canvas. We will create a little board for one of our
favorite elements. The illustration will cause
us all well-focused element and two or three more
element to combine with. Your focus element
might be an animal, a plant, a character,
or an object. That's really up to you. You already have many
sketches from each category, so our task now is to create many collisions
using our drawings. It will be a lot of fun. You can either use the elements from the cheat
sheets I prepare for you or from your sketches
in the previous lessons. I will go with cheat sheets. Let's start. I want my main
character to be an animal, so I bring my animal cheat
sheet to my canvas. It's here. I like this leopard
and I want this one to be my focus element
for my illustration. I choose my selection tool with freehand option
and three fingers on the canvas and I
select "Duplicate." Just like that, I copied
my leopard in a new layer. Now I need to decide the word I want to create for this leopard. For example, I need to decide on all the elements I want
to combine in the sketch. I imagined my leopard
in her little jungle. I will play with
combining my leopard with a few plants from
my plant cheat sheet. I bring my plant cheat
sheet to my canvas. I think I want to add
this one somewhere. Maybe this one true. I duplicate this in a new layer. Now I want you to try
different composition options. Imagine like you're
creating mini collages. I resize all my elements to create a bigger space
to work with it. Now it's time to play. Maybe this plant
can go over here. It can be a good idea to use one element in your
drawing more than once. I want to copy more of this one. Maybe I can place
this one over here. I just play around. Perhaps this one can be in the back and the other
one can be in the front. With that in my mind, I clean unnecessary lines. I imagine this plant
as a big plant, so I copy more of this element. I play with its size and place. I think the tree's top on which the leopard stands
is a little small, so I plan to extend it. I think it looks better. If you see, you can change all these elements as you wish. I think this can be
one of my options. Now, I just need to clean overlapping lines
to see my sketch. I think it looks great as my
first warm-up composition. I only use one
animal and one plant and still came up with
a powerful composition. Basically you need to decide all the elements you will
add to your illustration, play with their sizes
and decide if they will be in the background or
front of your focus element, or maybe how far off. I want to try one more time
with the same leopard. This time I want to combine
at least two plants. To come up with more
successful compositions, you need to loosen up and try different variations and
sketch as many as possible. It's always easier
to choose among a few options instead of trying to make your
first one perfect. Let's play with another one. My leopard and two plant sketches are already
on my canvas. I want to start with
the same plant. Perhaps this time the size can be bigger with more flowers. Maybe I can add some extra
leaves from my imagination. Now I think I can add my second
plant to my composition. There's so much going on on the right side of the leopard. So I want to add my second plant to the left side to
create a balance. The tree trunk is very
short for my scene, so I will extend it. It looks good. I just want to clean overlapping
lines to see my sketch. I keep some parts
of the plants in the back and some in the
front of the leopard. Maybe this big plant
continues at the bottom. I think this one on
the back will be a much better fit
for my composition. I want to add more from the second plant since the
first one is quite dominant. My second drawing
is also complete. I want to see both together
and choose one to go further. I think the second one
is much more interesting with more elements.
I picked this one. After selecting
your composition, I want you to refine your composition sketch
in a new layer with your final decisions and add all the details you need if you use your elements from
the cheat sheets, I encourage you to change the
sketches in your style too. I want to add some details to the tree trunk and
maybe to the layers. We just created a little
world for this leopard. As you see, the composition
looks well-balanced and quite interesting for
only a few elements. Now it's your turn. I want you to create
a composition with at least three elements. Choose one element
is your key element, and this others as your
secondary elements. I suggest you sketch at least two drawings
quickly and finalize one. Don't forget, you can always use the elementary sheets
I prepare for you. You created your first
creative composition sketch. Now, let's jump into the next lesson where
we are going to create your second composition using symmetry and triangle guide.
12. Triangle & Symmetry: [MUSIC] Let's play around to create our
second composition. This time we will go
with this somehow from composition guidelines
for this lesson, we will create our composition
using a triangle shape. You can use a triangle
composition template I prepare for you. As always, you can find it in the Project and
Resources section, or you can draw a
triangle at the center of your canvas. Let's start. I want you to create
a 300 millimeters, so 300 millimeters
and 300 DPI canvas. For this composition,
you can go with a few elements just like
our first composition, but I encourage you to
go with more elements. This time, I plan to
add characters to my composition besides
animals and plants. To begin, I bring my element
cheat sheets to my canvas. All here. I turn off
the layers for now. Now, I bring my triangle
composition guideline. As I said before, you can use either this template
or draw your triangle. I get rid of the title and lowered opacity of my template. This triangle will
help you to place your elements into
your composition. Another method that
we are going to use for this composition
is symmetry. I want you to draw a straight
line from the top corner of your triangle and lowered
opacity of this one too. I will use this triangle
as my guide and experiment to place my
elements inside of it. But that doesn't mean
that there will be nothing outside of a triangle. Leaving some parts of the
elements on the outside of the triangle will
create a grid dynamic. I want you to keep that
in mind before you begin. To start a composition, you need to decide which
word you want to create. We know our theme have a guideline and lots
of elements to use. The only thing you
need to decide is what you want to communicate
with this drawing. Then you will experiment with the size and place
of your elements. For my illustration, I imagine two friends
on a separate trip. I want to create a little
word that reflects what they experience on that
trip. Let's start. I want my character to be the
focus element in my piece, not drawing all the
attention of the viewers, but still being the
center of my drawing. I turn my character
cheat sheet on and copy my character
in a new layer. I play with the size and
bring it to the center. I want to play with
the symmetry here, so I duplicate my character and flipped position
them back-to-back. I suggest you keep
all your elements under the same group. To do that, I just drag my
layer on top of the other one. We have mirror symmetric
two characters here. Symmetry is very pleasing
to the human eye, but I think it can be a little
boring if it's overdue. I like to spice
things up a little. If I draw two
characters like here, I like to vary the elements a bit to make the piece
more interesting, like changing your
characters hairstyle, a few changes in their outfits. They can also have
different accessories. I'm going to make
these changes now. I'm going to change left
one's higher to straight. Maybe this one carries
a vault or can tin or a small bag
inside of a camera. Think about all these
small changes you can to make your character
more interesting. Now it's time to
add more elements. I want you to just
start with animals, so I go to my
animal cheat sheet. Maybe I can add the
other front door, mama and baby elephant. I copy this one to use
in my composition. I just tried to
imagine the verge of these two characters
on the separate trip. I think I might look
good at the corner. I just want to play
with its size. The elephants are quite big. I think they will
look much better on the back of my characters. At the moment,
elements on top of each other looks complicated. I want to clean up a little. I don't want to read my
elephant sketch with an eraser cause I might want to change its place or size
further in my composition. Instead of using
the eraser tool, I will just paint the unwanted
parts with white color. I will do that in
a new top layer with the Clipping Mask feature. In this way, all the lines are still there when I need them. While I'm painting, I
also keep in mind that elephants will be in the back and characters
in the front. Let's add more elements. I go back to my cheat sheet. Maybe I can add this
cool tiger somewhere, so I've copy it. I keep collecting every
element under the same group. Since the tiger is
also a big animal, placing the tiger on
the other side can create a balance for our
symmetric composition. The trick here is to think about your elements, mass, shape, and size when it comes to
balancing your composition. Now I need to decide if it's going to be in front or back. You can try both and
go with your favorite, this tiger doesn't cover
much of my character, so I think I might
keep it in front. I just cleaned intersect lines. As you see, there
is a space here, so I want to search for an
animal that I can add here. I go back to my
cheat sheet to see what I can choose for that spot. I think either of
these monkey or these colors can
fit in that spot. I want to try the monkey, so I copied it. I just play with the size
and place it on that spot. The trick here is to avoid
tangents at all cost. Just leave some part
of their own key on the back of my character. If you miss it, I talk about tangents in the
composition tips lesson. Let's start to add some plants. I think trees are too big for my composition so I just copied all these little plants and see which ones can fit
better to my drawing. I'm still using my triangle
as my main guideline. That means I tried to keep all my elements many
inside of my triangle. My monkey is already on a branch so I can add some
leaves here as a start. I think this plant
sketch might fit here. Maybe more leaves.
It looks good. It might be good to add some
on the other side as well, so I copy this. Maybe I can add some
behind the elephants. I'm careful to change some and not exactly
use the same one, too much symmetry in your
drawing, looks great. I want to add
different plants too, maybe I can add this one right behind this tiger to
create its little [inaudible] I see a spot
next to the the elephants, I think I can use this
plant on that spot to or even you can sketch new elements just from
your imagination. Like I imagine a little rocks here and maybe one more plant. I tried to balance the
symmetry here even though I use different
elements on both sides. In that case, I tried to see them just as shapes inside of figures that will allow you to focus on the balance
of your composition. I continue to create
my composition just like creating
a little collage, mixing my sketch elements. This collage [inaudible]
will help you not get over than with sketching
at this stage. But don't forget this
is not the final. You can always
delete some parts of your elements and make them [inaudible] to your composition. I think it looks quite good. I want to add
something on top to copy my triangle composition. Just go back to your animal or plant cheat sheet to
see what you can add. I think this word can
be a good fit on top. Let's see. Yes, I think it fits perfectly. Let's turn off the
composition top layer to see our final composition. I feel like I can add
some dots as flowers to my plant to have some
more fun with my drawing. I feel like I'm confident
with this composition. Just check how your final
drawing looks on your canvass. You might want to rearrange
its position or its size on your canvass before diving
into refining your sketch. After that, create a
new layer on top of your sketch and
finalize your drawing. Make all the small
changes you need to make. Now it's your turn. I want you to create a
composition using the rule of triangle and
symmetry as your guide. You can find the
elements and composition guide cheat sheets in the
Project and Resources folder. Try to use at least
four to five elements in your composition. After finishing your
second composition with the rule of triangles, join me in the following video where we are going to create another composition by playing three different areas
in your illustration. Background, middle
ground and foreground.
13. Foreground, Middle Ground, Background: [MUSIC] Now it's time to create a composition that includes all the
areas in your canvas. The background, middle-ground,
and foreground. When you create an illustration, you might want to make sure
to create a sense of depth. To do this, you can use
background, middle-ground, and foreground elements
to comprehend each other to make your artwork
feel rich and deep. This composition
style works well especially with the
landscape drawings. In this lesson, we
are going to create a landscape drawing together. First, I want you to
think about your story. I want to create a scene where my character takes a photo of a cool tiger enjoying its
stay in its environment. My main focus will be the tiger, but then also the character. In this type of composition, the action usually happens in the middle-ground
and foreground. I will use these areas
for my focus elements. I suggest you start your
sketch with these two areas, the foreground, and
middle-ground. Let's start. I want you to create
300 millimeters to 300 millimeters and 300
DPI canvas. It's here. Beside composition with
background, middle-ground, and foreground, I also want to use the rule of
charts in my drawing. I can either quickly divide
my canvas into nine, or bring the rule of thirds composition cheat
sheet to my canvas. My guideline is here. I lower the opacity and quickly delete the
title. All set. What I want to do
right now is to bring my first focus element, my tiger to my canvas. Okay, here's my
animal cheat sheet. I'm just going to
copy the tiger. Now I'm thinking
about positioning my tiger on the
top-left intersect, while also keeping it
in my middle-ground. The middle-ground
is a space accruing between the foreground and
the background, like here. I leave my tiger in
here and continue. This is not the final, so I'll try not to
overthink here and just roughly position your
elements on your canvas. Maybe this tiger is in
front of the bushes, so I'll roughly sketch
them. It looks great. Before getting into details, I want to jump into
the foreground to position my foreground elements. The foreground of the artwork is generally closer to the
bottom of the composition. This part of the scene is
closest to the viewer, so the objects
appear to be larger. This is important to keep in mind for this composition type. In the foreground
of my composition, I plan to draw my character
while taking a photo of this tiger and maybe
it's among the bushes. Since the tiger is on the left, I plan to draw my character
on the right, right here. I'm going to sketch my
character very roughly. It's going to be from the back. I use simple shapes, a circle for the head and some basic lines and
triangles for the body. I don't go for the details. The important thing here is to position your character
on the canvas. If you are having problems
with drawing your character, just get help from the
reference photos as we did on the earlier
character drawing lessons. I roughly sketch the
bushes on the left bottom. Later I'm planning
to use elements from my cheat sheet so at the moment, there is no need to think about which plans do we want here. Since they are in
the foreground, you should drop down much
larger compared to the tiger. My foreground and
middle-ground work quite well as an image. To make it a bit more
interesting and put in a scale, I want to create a background. The background is the
furthest away in the scene, and it gives some
context to the scene. Items in the background
might appear far away. They are much smaller in size, duller in the color and contain less detail than objects that
are close to the viewer. Now let's put all this
knowledge into practice. Since my character
is on a safari trip, I want to add a tree, a sun, and some animals
in the background. First, I want to decide where this little scene
is going to be. I think I want to keep it
mainly on the right vertical. I start with my horizon line, and then I roughly sketch my elements with
very basic shapes. Here's a tree right
on the vertical line. Maybe a little
animal family here. I just position them
by using some circles, just thinking about
their masses. Maybe a sun on the
back of the tree. Since they're in the background, I keep them smaller. All done. As you can notice, the composition is
divided into three, background, middle-ground,
and foreground, and there is a comparative
sense of scale here. All these elements comprehend
each other to create my story and create a sense
of depth in my composition. Without the background
or the middle-ground, the character in the foreground
wouldn't make much sense. Since their positions
are all set, now I can choose elements from the cheat sheets and position
them in their place. For that, first, I lower the opacity of my composition sketch layer and create a new layer on top. Now I'm ready to finish
my illustration. All done. When you
complete your sketches, I want to have a look
at your composition one more time and change some parts if it
looks overcrowded, or maybe add more
if it's needed. I also encourage you to draw the elements with your lines, as you see all the
elements are positioned in their own space but still
create a story altogether. If you notice the background and middle-ground
elements overlapped, this helps them to reengage and improve the overall
balance of my composition. Now it's your turn. I want you to create
a composition sketch based on a story
combining foreground, middle-ground, and
background elements. You can also use the rule of
thirds as your second guide. First, focus on positioning the elements with
rough sketches. Then you can use the elements
from the cheat sheets. Join me in the following video where we are going to create another composition using scale changes and
negative space. [MUSIC]
14. Scale Changes & Negative Space: [MUSIC] This style of composition is somehow
one of my favorites. It's basic but still
very effective. We will combine all the elements related to our story
in a basic style, no rules, no leading
lines or shapes. Let's start. This time, I want you to create a
rectangle size cover 300-400 millimeters and 300 DPI. My canvas is ready. First, I want you to bring
all the elements you plan to use in your
composition to your canvas. I bring my cheat sheets. All here. I suggest you try to use elements
from each category, adding at least one or two
characters, a few animals, plants, or objects will bring your composition a
lot more excitement. I'm going to look at my
cheat sheets one by one. First animals, I will select
a few quiet randomly. I want to select this elephant, this tiger, maybe this
cute little monkey. By using the plus sign
on the left bottom, I can select all of
them together at once. I just copy them in a new layer. Now, let's have a
look at the plants. I copy a few from here too. I just think about
which elements can look good with each other. But these are not
final decisions. You can always go back to your cheat sheets and
change the element you use. I want to add a character, so I just copy that one. I keep all the elements
under the same group. This will help me
to bounce between my drawing and my cheat sheets. As of last the
objects cheat sheet, maybe this house or car can be a good idea for my composition. As I said earlier, these selections are not your last decision,
so feel free. You can always go back
to your cheat sheet and add another animal,
plant or object. Now I bring all the elements
I chose to my canvas. All here. Now it's
the most fun part. We are going to experiment
to position them next to each other in
a most pleasing way. In this type of composition, instead of creating one
stroke focal point, we create many soft ones. In this way, then we can
look at your illustration as a whole instead of focusing
on only one element. This will create a routine. Now start positioning them to your canvas without
overthinking. First, think about
their position on your canvas and their
size very roughly. Let's have a look at
what we have so far. I know that I want to keep
the character in the corner, maybe this side or
maybe the other side. Since she is the only
character in the composition, this can be a good idea. She also looked through
a binocular so it might be like she's looking at all
of them from the corner. At the moment, plants
are grouped on the one side and the animals are grouped
on the other side. I suggest you mix all the
elements as much as you can. Let's keep these in mind and try to shape our composition. I want to turn off some of the elements to create
some space to work. I start moving my character
to the other side. Now the animals. So far so good. Let's add our plants too. I want to play with this
monkey sketch a little, don't forget you can
always play with your sketch elements
and make them a better fit for
your composition. Here it feels a little empty, so I'm adding more leaves. I want to play with this one
too and make it stronger. I think it looks great. Let's continue. One of the keys in this
type of composition is to aim for variety
in the scale. This allows you to issue a more dynamic composition and better balance
illustrations. Instead of keeping all your
elements in the same size, I just play around and make some of them bigger or smaller. I don't care about
the reality here. I can make a bird way
bigger done a tree. Another key is to leave enough space between
the elements, variety comes to play
here one more time. Don't forget you can also add some elements or details
from your imagination. Like you can draw
some little plants or animals anything
related to safari team. Or like little dots, lines or it's totally fine to leave it
empty between them. I feel like I'm confident
with this composition. As you see, we created
a strong composition with the safari team without
having a focal point. Now you can create a
new layer on top to finalize your sketch and do all the little changes
you need to do. You can redraw all the
elements in your style. Maybe you can add with more soft and rounded lines instead of my sharp lines here. Now it's your turn. Create a composition
of plants, animals, characters, and objects
using size and placement. Don't forget to leave negative space between
your elements. You can use the elements
from the cheat sheets. We already created four
different compositions. Now join me in the following
video where we are going to create our last drawing
using the rule of thirds.
15. The Rule of Thirds: [MUSIC] Now it's time to play with one of the most common
composition guidelines. The Rule of Thirds. This time, I want to create
a rectangle size canvas 300 millimeters to 400
millimeters and 300 DPI. My canvas is ready, now I bring the rule of thirds composition
guideline to my canvas. You can draw your canvas into three horizontal parts
and three vertical parts. Basically dividing your
canvas into thirds. As we already practiced
in the earlier exercises, the main idea of the rule
of thirds is to place your elements of most interests where these lines intersect. Placing focal points at this
intersection will create a great sense of balance and harmony in your illustrations. Since this is our
fifth composition, I want you to experiment
with creating a more complex scene and use lots of elements in
your composition. I'm thinking about illustrating
a busy forest scene that is going to be much more complicated than earlier ones. A strong foundation with
the rule of thirds will help us to come up with
a powerful composition. Let's start to practice. First, lower the opacity
of your guideline and then bring all your
cheat sheets to your canvas. All here. I want to start
with placing my focal points. First I will choose the animal elements that I
want to use in my composition. I definitely want
to use the mama and baby elephants somewhere
in my illustration. I want to use my
koala family as well, and maybe this monkey. I just copied all. I want these animals
to be my focal points. Therefore, I'm going to position
them at the intersects. I think I'm going to place the elephant on the
left bottom intersect. I'm thinking about positioning the koalas on the
top-right intersection. I think I place my
focal point elements on my composition. You can see all the elements
perfectly lying on each of these cross-sections
of the rule of thirds. For the monkey,
I'm thinking about creating a small word
in one of the charts. I think top-left
chart looks great. I think elephants can be larger. All positioned. I am basically laying down rough ideas
on a very basic level. Just placing them on my
canvas like a collage. What I would like to
do right now is to add secondary elements to
create a whole composition. That means I'm going
to add lots of plants. As you see my koala s and my monkey is already
on a branch, so I'm thinking about sketching
the rest of these trees. I'm having a look at
my plan cheat sheet, if I can find something to use. This branch looks great, I can definitely use this
one my tree. I just copy it. Getting inspired by this sketch, I'm going to roughly sketch my trees mainly in
the top thirds. One around the koala and one around the monkey. Let's start. I want to work on a new layer. I'm creating small environments and keeping down mostly
in their own charts. This will help me to
create a little order on this crowded forests and
balance my composition. As you see I'm using the
cheat sheet element as my reference and drawing very
random leaves on my trees. I think it looks great. Let's continue with
the monkey's tree. I pretty much draw
the leaves as before but I'm thinking about
making a few changes. I can add different flowers
or little trees like here. The key here is even though
you draw pretty much similar things in different
spots of your illustration, make sure that you add
different details. This will bring your composition
a lot more excitement. I think it looks great. As you see, I don't try to squeeze everything
inside of my canvas. You can only see a small part of this big trees in
my illustration. I suggest you try this
tactic in your compositions. You don't need to
show every part of your plants or animals
in your drawing. This will create a great
dynamic in your composition. I think the elephant
looks a little small, so I want to play with its size. Much better. I think I want to add a water to my drawing, like a smaller river. For that, I can use
another guideline, maybe a diagonal
line on my canvas. Just sketching
everywhere very roughly. So far so good. I want to create a combination of plants on the bottom thirds. I go back to my
plant cheat sheet and copy some more
planets to use. Maybe this one is on
the right corner. I suggest you play with your
cheat sheet elements to make them yours and a better
fit for your composition. Perhaps I can sketch
some rocks as well. I want to go back
to my plant sheet and see what else I can add. Try different angles and sizes. I want to add one more
plant for the left corner. It looks great. I
suggest you try to use many elements
in this composition. Just experiment with combine and many objects in a balanced way. I see a spot right here, try it another animal. I want to add the snake, but maybe around on a
branch of this tree. I'll try to imagine different ways that you
can use all these animals. I also want to create
an environment for this mama and baby elephant. Maybe they are in front of a
small tree or a big plant. I roughly sketch a plant from my imagination and mainly
keep it on the another chart. You can always use
reference photos or another plant from
the cheat sheets. We position our main elements in all these thirds of
the rule of thirds. It still feels missing
to me around the river. Maybe I can add some fish. I position my fish group on the horizontal line of
the rule of thirds. I'm adding some bigger ones too. Always go for diversity. Some last touches. Looks great. But these two trees still look similar to me, so I want to add some
flowers to the right one. I think even though this
composition is very crowded, it still looks well-balanced, takes to the rule of thirds. Now it's your turn. Create a composition
of plants, animals, characters, and objects
using the rule of thirds. Experiment with using many
elements as much as you can. We created five
different composition with the [inaudible] team. Join me in the next lesson where I'm going to color one of these illustrations
while giving you some tips on colors
in the composition.
16. Colours in Composition: We sketch five
different composition with the same team using
almost the same elements. Now it's time to color down and create visually
compelling illustrations. Color, if it's used wisely, can bring new heights
to your composition. There are so many ways to
organize colors in a drawing. In this lesson, we will talk
about my process in coloring and some tips on creating
fabulous compositions in color. The first step is color pallets. There are a few websites, and one of them is Adobe Color, that you can experiment with creating your color
palettes with their tools, or you can even choose one from the trending
color palettes. You can easily apply this color palettes to your Procreate. I have a few lessons about
creating your color palettes, or how to color with Procreate tools in
my earlier classes. You can check them out
and learn more in detail. Here's one of my compositions. My first tip is to always start with your
background color. I suggest you experiment with both lighter and darker tones background colors in
your compositions. You will get a different
feeling in both, so think about the message
you want to convey. Use a fixed number of colors. A fixed number of colors can
really help set the mode. You can use different shades to hues of your chosen colors. I like keeping my color palette on the corner of my canvas. I suggest you work with at least two color combinations before working up as your final. I like keeping my
thumbnail small. Sometimes I go even smaller
at the end and see if my key elements pop even
in a small size image. Here are my two thumbnails. I want a strong image, so I will go with this
contrasting color combination. I always start with
my focus element. First, I outline my element
and fill the inside. If I want texture, I use the clipping mask feature. Create a new layer on top, and choose the "Clipping
Mask" feature. Now I don't need to worry
about outlining my tiger. Another trick in my process is using the same color
in different spots. Sometimes I like using them as underneath texture
in some parts. One more trick I always use is checking my colors
in gray scale. Just create a black layer on top and select the
"Saturation" option. Now you are able to see if every element is
readable in your piece. I will continue to color this illustration and
all the other four, then I will show you how
they look in colors, so we can talk about all the color tricks for
each composition type. Here's the first one,
three element composition. I wanted the tiger to
stand out so I used complimentary and saturated
colors like blue and orange. This is the second one. This one is softer
compared to the first one. For the symmetric
type of composition, I use the same tactic in
colors, just like sketching. Look at the characters, catching similar outfits
with jacket colors, but differentiating
in skin tones, pens colors and more. Use similar green tones in different elements overall the composition to
create harmony. The third one is about
deepness in the composition. For this type of composition, it's important to
use lighter tone in the foreground and
the darker tones in the background elements. The fourth one is all
about balance as a whole. The color palette is
limited and you can spot a ton of yellow or blue
almost in every element. I tried to keep all
the elements at the same level with
my color choices. The last one, most
complex composition, darker blues and green tones
are all over the canvas, almost like creating one
dark blue and green layer, and they are lighter tones for your focus elements to pop. We learn many tricks
on coloring to create harmony in
your compositions. Now it's your turn. Color at least one of your
illustrations to the last, and try to create at this color blocking thumbnails
for the rest. Join me in the following
video where I will share how to prepare a
print ready artwork.
17. Create Print Ready Artwork: [MUSIC] In this lesson, I will talk about a few things you need to know for printing. The first thing to think
about is resolution. The standard DPI for
printing is 300 DPI. If you are planning on printing your artwork and want to
print to reproduce well, set your DPI to a minimum 300. The second thing to think
about is color profiles. The color profile for
printing is CMYK. So make sure that you set
your color profile to CMYK. Don't forget, you can change the color profile of your
artwork anytime in Procreate. If you use Illustrator, I suggest you to finalize
your settings in Illustrator. I think it's much
better to add bleed and margins to your artwork
in this program. However, if you
only use Procreate, that's what I do to be safe. If you want your art print in the size of 300-300 millimeters. I will suggest you to create a canvas 270-270 millimeters, that is 30 millimeters smaller. So I create a new custom canvas, CMYK color profile and 300 DPI. I bring my artwork to my canvas. Then I go Settings and click "Canvas" and then
"Crop and Resize" and change my canvas size
to 300-300 millimeters. Resample and snapping
are both deactivated. Done. Now, I just need my
artwork to be centered. Now that I have white
borders around my artwork, I avoid any problems, plus it can be
useful for framing. You should share your
artwork as PDF file for printing and for
the PDF quantity I suggest you to choose best. Now your file is ready to print. Join me in the following
video where I will share my final thoughts about the
composition in illustration. [MUSIC]
18. Final Thoughts: Thank you so much for taking the time
to watch this class. I hope this class help you
feel more confident in creating your compositions
for your illustrations. We learn a lot about basic composition guidelines
that will help you achieve the perfect balance
of composition and color as you sketch
your illustrations. We also practice drawing
wild animals, plants, adventures, character
outfits, and objects. We talk about several tips
and tricks along the way. Now we are ready to create more well balanced
compelling illustrations. Just practice more and more and you will get
better each time. Never be shy to use my composition guidelines
and [inaudible] to come up with different compositions
in your illustrations. I always love seeing what
you guys come up with; so don't forget to post all of your composition
and exercises and five different separate
team compositions to the project section below. You can also tag me if you
share your work on Instagram. I always share a collection of my student's projects
on my Instagram. If you tag me, I can see your
projects and re-post them. I also have two
classes on drawing characters with
fashion which can be interesting if you'd
like to learn more about drawing eye-catching characters
for your illustrations. Another class on creating GIFS and getting
them on Instagram. This class can help you
learn basic animation in Procreate and add some moment
for your new illustrations. Thank you again for
watching my class. I will really
appreciate it if you give me a review and see you in my next class.
 Ceren Dabag, Illustrator