Transcripts
1. Welcome To Class: Come to this class on creating a mini pattern
collection Improcriate. My name is Mil Mai, and I'm a surface pattern designer
from India who loves creating bright and playful
designs that are sold online as fabric,
wallpaper, and more. Over the years, I have developed simple yet effective techniques to create seamless patterns, and I'm really excited
to share this with you. In this class, we will
focus on building a cohesive mini
pattern collection all Iprocriate on your iPad. Whether you are starting
out or already designing, this class is perfect
for you if you want to create patterns and procreate
easily and efficiently. We will start by creating the pattern creation template Inprocriate then I will show you my step by step
process of creating three different patterns
using various repeat methods, which is grade repeat, half drop repeat, and
half brick repeat. Throughout the
class, I will share some tips and
techniques for making patterns that will have a great layout and will look cohesive as a
part of a collection. To make things easier, I have included some bonus
resources for you like a pattern creation template
to jump start your designs, few color palettes to
spark your creativity, and a detailed guidebook covering the repeat
techniques we will use. So you will always
have a reference. By the end of this class, you will have the
skills and feel confident about
creating a sunny, mini collection of tatns
that you can share, sell, or add to your portfolio. So if you're ready,
then grab your iPad, open Procreate,
let's get started.
2. Class Project: For the class project, you can create three different patterns, one pattern for HTP type, which is grid, half
drop, and half brick, or you can create three patterns as part
of a mini collection. After creating your patterns, save it as a JPEG or PNG file, then upload the file to
the projects gallery. You can download
the free resources from the link provided
in the projects and resources section
if you want to use the template and color
palettes that I have provided, or you can use your own
palette and template. Oh.
3. What Is A Pattern Collection: In this lesson, we will
understand what is a pattern collection
and what are the types of patterns
included in a collection. As I have mentioned
in the introduction, that we will be creating a mini pattern collection in
this class using Procreate. But before proceeding further, it's important to know
what is a collection. A pattern collection
is a cohesive set of designs that share
a common theme, style, or color palette. These designs are often
used together to create a harmonious look across various products
or applications. Depending on your target market, the number of patents
in a collection can vary 3-12 patterns. The patterns in a collection are commonly categorized
into three types, and that is hero or
the main pattern, secondary or complex coordinate, and blender or
simple coordinate. A collection can also have placement prints
and border prints. A hero pattern is the main
pattern of the collection, and the other patterns
are based on this. It usually has the
most number of motifs and colors and tells a story
about the whole collection. Next comes the coordinate, which can also look complex, but doesn't overpower
the hero pattern. It is like a supporter. Then comes the blender, which is the simplest pattern
of the whole collection and don't have more than
two or three colors, as these patterns helps to bind the whole
collection together. I won't go deep into this
topic for this class, but you can find some
really good classes on this topic on skill share. In the next lesson,
I will show you the easiest method of
making patterns inpcriate, which is by using the
pattern making template. So let's meet in
the next lesson.
4. Create The Pattern Template: In this lesson, I will show you how to make a
pattern making template in Procreate to create patterns more easily
and efficiently. To make the pattern
creation process more efficient in Procreate, I use the pattern
making template, which helps in removing most of the manual process and also makes this workflow really fast. So first, let's create a canvas, tap on the plus sign, then tap on this icon, and here you can choose
whatever size you want. I mostly go with 3,600 pixel
by 3,600 pixel at 300 DPI. If you want a bigger
or smaller canvas, then you have to do this process again to create the template. Otherwise, it won't
work properly. If you like to use different canvas sizes
for your patterns, then it's better to make
a template for each size. Now here, you can rename
the canvas if you want, and for color profile, I'll go with the second one
here and then tap on create. So here I want to create a
template that can work for multiple repeat types like
grid repeat or full drop, brick by column or
half drop repeat, and also brick by row
or a half brick repeat. First, let's make a template for a grid repeat for which we
will make four quadrants. That will flip horizontally and vertically to make
the pattern repeat. Now, whatever color you
have on the color wheel, it doesn't matter, drag and
drop it onto the canvas. Then tap on the move
tool and tap on snapping to make sure both magnetics
and snapping is turned on, and then drag the whole canvas from the center to
the top left corner. And don't let go of your stylus before
making sure that you have the yellow lines on all the four sides of
the colored square, like you are seeing
on the screen. Then without tapping
anywhere on the screen, tap on the layers panel. Now tap on the layer once. And when you see this menu, then tap on select. Here at the bottom, these
options will appear, tap on Save and load, and then tap on this plus
sign to create a selection. So these selections will
work as placeholders, which will make our
pattern repeat seamlessly. I know if you're seeing this
process for the first time, then it can be a
little confusing. But once you get the hang of it, trust me, it's simple. Okay, so now I will repeat the same process for
the second quadrant. Also, there is no rule
about which one you want to be your first quadrant and which one you want
to be your second. You can choose from any site. But the way I'm showing here is the easiest to
understand and remember. So now I drag and drop the
color again onto the canvas, tap on the move tool and
drag the whole canvas to the top right corner and make sure the yellow lines
appear on all four sides. This is very
important because if there is any pixel gap here, then your pattern also
won't repeat properly. Now without tapping
anywhere on the screen, tap on the layers panel, then tap on the layer, and then on select. And now at the bottom, tap on Save and load and then on the plus sign
to create a selection. Again, dragon drop the
color onto the canvas, tap on the move tune, and drag the whole
canvas to the bottom left corner and make sure the yellow lines appear
on all four sides. Tap on the layers panel, then tap on the layer, and then on select. Then tap on seven load and then on the plus sign
to create a selection. Repeat the SEM process for the forth quadrant by dragging the canvas to the
bottom right corner. Now the template for a
grid repeat is writing, which will be selection one, two, three, and four. Here, if you want,
you can create separate templates for
different repeat types. Just duplicate this canvas
and continue from here, but I like to create one master template
with all my repeats. I will drag and drop the
color again to create a half drop repeat
for which we have to move the canvas to the
left and the right side. Tap on the Bove tool and drag the whole canvas
to the left side first. Don't forget to look for the yellow lines
on all four sides. Tap on the layers panel, tap on the layer ones, and then on select. Now tap on seven load and then on the plus sign
to create a selection. Do the same process
for the right side, dragon drop the color, drag the canvas to the
right side, tap on layer, then tap on select, again, tap on seven load, and then on the plus sign, and our template for the
half drop repeat is dead, which will be selection one, two, three, four, five and six. Now to make a half
brick pet template, we need to drag the canvas to top and bottom instead
of left and right, like we did for half drum. I will drag and drop the
color onto the canvas, tap on the move tool and drag the whole
canvas to the top. Again, making sure
of the yellow lines. Then tap on the layers panel, tap on the layer
and tap on select. And then tap on Seven load and the plus sign to
create a selection. Repeat the same process
for the bottom half. So how this is going to work
is for the great repeat, we need to flip all
the four quadrants. That is selection one, selection two, selection
three, and selection four. For a half drop repeat, we need to flip selection one, selection two, selection,
selection four, selection five and six. And for half brick, we need to flip selection one, two, three, four,
seven and eight. Don't worry, we will
create one pattern for each repeat type shown in this lesson in the
upcoming lessons. So this whole process will
become more clear for you when you will create a
pattern using this template. Also, I will provide
a cheet sheet showing the selections to be flipped for each repeat type so that you can refer
to it if necessary. Now you can delete
this layer and save it as a master template
by tapping here. Include the canvas size
in the name if you are creating template
in different sizes. Now each time I want
to create a pattern, I will swipe towards left on the canvas and tap on
duplicate to create a new one. In the next lesson,
we will start to create our first pattern using the great peat template where we will first sketch the layout
and taste the repeat.
5. PATTERN 1-Sketch The Layout: In this lesson, we will
sketch the motives, first, using a diamond layout to taste the flow of
the pattern and also the repeat using the pattern making template that we had created in
the previous lesson. In Procreate, there
is no way to see how the whole pattern is repeating while you are
making the pattern. What I mean is, for example,
in Adobe Illustrator, you have the pattern
making tool, which shows you on a larger scale how the pattern
will look when repeating. Or in affinity designer, you can make a template
for the same purpose, which I have shown
in this class. But there is no such
provision in Procreate yet. Whenever I want to design
a complex looking layout, I like to use a geometric
shape like a diamond, circle, OG, or scallop as a layout
template so that I can easily plan my pattern
to make sure it has a good flow and
also repeats properly. In this lesson, we will use
a diamond layout to plan our pattern and test it using the pattern
making template. Here I have duplicated the pattern template like I had shown in the
previous lesson. The canvas size is 3,600 pixel
by 3,600 pixel at 300 DPI. For sketching, I'll be using the six B pencil from
the sketching section, and for color, I'll take black. Okay, so first, let's
create the template, dragon drop a color
onto the canvas, tap on the move tool, and then tap on rotate
45 degree once, and then tap on fit to
Canvas beside that. And that's it. This
is our template. Then I'll go to
the layers panel, tap on N here and reduce the opacity so that it
won't be distracting. I'll create a new layer by
tapping on the plus sign, bring the layer
below the template, and swipe on the template
layer to what's left and tap on lock so that I
don't draw here by mista. So for my pattern, I
want something to look like interconnected wines
with flowers and leaves. So I will try to imagine
the layout and start drawing the branches that are flowing in
different directions. I'm simply drawing some curves
to depict the branches. You don't have to be super
accurate at this stage, as it's just a rough sketch. Then I'll try to imagine where I want to place the big flowers. Here's a tip. When I was just beginning to learn
how to make a pattern. I used to use this trick to make the
layout of my pattern, which is to draw a
particular motif, especially the bigger ones
in odd numbers like three, five, seven, et cetera. For some reason,
this trick improves the flow of the pattern
and balances the layout. Do try this technique
for your pattern too. Here you can see I'm placing the big flower at three
different points. Now I'll place
some small flowers at different positions to balance out the
big flowers while keeping in mind the
odd number technique. And now I'll fill the rest of the empty space with leaves. I'm also deciding
at this point if I want the elements to
overlap each other or not. So I'm placing some of the
leaves behind the flowers. Another tip here is, if you decide to
overlap the elements, then do it at three
or more points. Otherwise, if no elements are touching each
other except one, then that one portion will
stick out more in the pattern. So I will draw some more leaves and then we will
t's the pattern. Go to the layers panel and create a new layer
for the background, and then drag and
drop a color onto it. Then I'll tap on the
motif layer and select the background layer by
swiping towards right on it, and then tap on group. Now swipe on the
group towards left and tap on duplicate so that
there will be a backup. Make the backup group invisible and while the
duplicate group is selected, tap on the selection tool, then tap on seven
load at the bottom, and then selection one. I'll quickly rotate the
canvas since this quadrant is supposed to be selection one like we had created the
template in Lesson two. And now tap on the move tool and then tap on flip horizontal, then on flip vertical
at the bottom. I'll again tap on
the selection tool and tap on selection two, then on the move tool and then on flip horizontal
and flip vertical. I'll repeat the same steps
for the other two quadrants, which is selection three
and selection four. Now I'll make the original layer visible and delete
the background layer in the duplicate group. Here you can make
some changes to the middle portion of
the original motifs to make the layout work, or you can do what
I'll do here next. To make the layout
more interesting, I'll draw some new motifs in the center of
the pattern again. First I rotate the
duplicate layer so that it is facing
the right direction. Now you don't have
to rotate it and the pattern layout will
still work perfectly fine. You can write both ways and see which one works
the best for you. Make the original layer invisible and bring
the duplicate layer or the flip motifs out of the group and delete
the empty group. Keeping everything
organized as you go will be really helpful later. Now I'll make a new layer
and taking the black color, I'll sketch the motifs
in the middle portion. And as I had done previously, I'll try to imagine
the placement of the flowers and
see to it that they are not placed in a line but scattered everywhere
throughout the pattern. Then I will fill the rest
of the spaces with leaves. Now I'll hide the diamond template layer and
test the pattern. To do that, swipe downwards with three fingers on the screen
and tap on copy all, swipe downwards
with three fingers again and tap on paste. This will give you a flattened
layer of the pattern. Now, duplicate this
layer three more times by swiping to
the left on the layer. Tap on the first layer, then tap on move tool, and then on this blue dot at the top left corner here type the amount that is
half of the canvas size. In my case, the canvas
is 3,600 pixel, so I will type 1,800 here. I will repeat the whole process
for all the four corners, tap on the next layer and repeat the process
for the top right, bottom left and
bottom right corner. And then I'll merge on the layers by pinching
them with two fingers. And now make the canvas
smaller by zooming out and try to see if
the flow is good or not, and if the motifs are forming
any visible lines or gaps. Though the pattern
looks good overall, I can see some areas that can be improved
like the gap here. And also, it would be good if the position of some of the
big flowers can be changed. Taking time at the
sketching stage will really save you
a lot of time later, and also you would have
a great layout to work on once you move to the
inking or the coloring stage. I'll try to find the
problem areas and rectify it and also taste the pattern again
using the same method. And once I'm happy
with the layout, I delete the flipped corner layer because
we don't need it. We only need the two diamond layout motifs for our pattern. In the next lesson, we will move to my favorite part of
the drawing process, which is inking or drawing
the motifs with colors.
6. PATTERN 1-Draw The Motifs: In this lesson, we will draw the motifs using the
diamond layout and then make the repeat using
the pattern making teplt. So now that we have done the sketching and
tasted the pattern, let's now draw the motexs. I will bring this layer
into the group and then rename the layers so that I can differentiate
between them later. For drawing the flowers, I will choose the dry ink
brush from the inking section, and for the color palette, I will choose this palette, which I have already provided in the projects and resources
section for you to download, or you can choose your
own palette if you want. I will first dragon drop a color onto the
background layer, then tap on the corner
layer and reduce the opacity and keep the
blind mode on multiply. Then I will make a new layer and start drawing my motives. Also make sure to lock the reference layer so that you don't draw over it by mistake. I will make the
diamond tablet layer invisible because I
don't need it right now. I will start with drawing
the branches first, and for each motif, I will make a new layer because I like to separate
my motives by color. This way, I can recolor the
motives later very easily. Now I will move to the flowers. First, I will draw
the big flowers and then I will draw
the small ones. For the sake of this class, I'm dragging and dropping
the colors onto the motifs. But if you're using
a texture brush, then I suggest just color it manually so that you will get
that textured penter look. I will create a new layer and take another color to
draw the smaller flowers. I'm wearing the shape of the
flowers a little bit here. And now I will draw the
nails on a separate layer. Depending on how you want
to arrange the motifs, place your layers accordingly. For example, I want my
leaves behind the flowers, and that's why I will place the leaves layer below
the flower layer. Now I will add some more details to the
leaves and the flowers. And to do that, you can either add some linework or more
textures and shading. I will go with the linework. So first of all, I will
create a new layer above the leaves layer and take
the darker green color, and then I will reduce
the size of my brush to about 7% and then start
drawing the line details. For drawing the line works, you can also take a
different brush or a more solid brush
like the monoline. But I'm okay with
the dry ink brush. Feel free to make any
changes at this stage also. You don't have to stick to the exact sketch that you had drawn in the
previous lesson. I will add some details
to the flowers also. Just make sure to draw the
details on a separate layer if you want to have the option of recoloring them easily later. Similarly, I will now draw the motives for the
center portion, and then we will move to the next stage which
is making the pattern. In the next lesson, we will make the pattern using the pattern
making template that we had created in Lesson two and also test the repeat of
our pattern once more.
7. PATTERN 1-Make The Pattern: In this lesson, we will make the repeat pattern using the pattern making template
and also taste the repeat. As you can see, I have drawn all the motives here
in separate layers, and now I will
group these layers, tap on the first layer, and then select the other layers by swiping towards
right on them, and then tap on group. Then I will rename
the first group as center and the second
group as corner, which we are going to flip
to make the pattern repeat. Here, as you can see, I have a background layer also, which we will need to flip this pattern or else
you can just mark the four corners if you don't want to have a background
layer at this stage. Now to make the pattern, first, I will duplicate
the corner group because I always like
to have a backup. Also I may rename this layer as corner original
for my reference. And I'll make this group invisible and tap on
the duplicate group. While this group is selected, I will tap on the
selection tool, then on selection one, and then tap on the
move tool and tap on flip vertical and flip
horizontal at the bottom here. I will repeat this process
for all the four quadrants, now I will tap on the
selection tool and then tap on the selection two
and tap on Move tool, and then on flip vertical
and flip horizontal. Similarly, repeat this process for selection three
and selection four. Now I will simply make the center group visible to reveal the full
pattern repeat. To test the pattern, I will swipe with three fingers towards
down on the screen, and then tap on copy all, swipe with three fingers on the screen again towards down, and then tap on paste. This will give you a flattened
image of the pattern. Now I will duplicate
this image or layer for three more times tap
on the first layer, and like we had done previously, tap on the move to and
then on the blue dot on the top left corner and type the size that is half
of the canvas size, which in my case is 1,800 since my canvas size
is 3,600 pixels. Like using this method
because I don't have to manually
drag the canvas, which sometimes may leave a white line or a pixel
gap, which I don't want. That's why this method
works best for me. Now, tap on the next layer
and tap on the blue dot on the top right corner and then type the size that is
half of the canvas size. Do the same with the other
two layers by selecting the layer and then tapping on the blue dot on the
bottom left corner, and then on the
bottom right corner. And then you can merge the layers by pinching
them together. Now here I can see
this line of flowers, which is clearly visible and also this is breaking
the flow of the pattern. Let me see if I can rectify it here without
redrawing anything. I'll tap on the duplicate
corner group that I had flipped and rotate this group by 180 degree to change the
position of the flowers. I will tap on rotate 45
degree for four times. Now I create a
flaten layer again, like I had shown by swiping three fingers downwards on
the screen and tapping on copy all and then swiping three fingers
again and tap on paste. I will taste the repeat again. As you can see, the layout
looks much better here. In the first one, there
is this clear line, but in the second one, the
flowers are more scattered. Okay, now that we have
created the pattern, let's save it so
that we can share it online or upload to our
print on demand shops. So tap on the Actions menu, then tap on share, and then tap on JPEG. You can save it as a PNG also. Here you can either
save it as an image on your iPad by tapping
here on save image, or you can save it to an external folder on your
Google Drive or dropbox. In the next lesson, we will move to the coordinating
pattern where we will first catch
the pattern layout and test it using the
pattern making template.
8. PATTERN 2-Sketch The Layout: In this lesson, we
will sketch out the layout and the motives
of the coordinating pattern, and also we will test the repeat using the
pattern making template. I want this pattern
to be simpler than the vein or
the hero pattern, something like vertical vines
with flowers and limbs. And we will use the
half drop repeat for this unlike the first pattern where we had used
the grad repeat. Let's start by toggling
on the drawing guide. Tap on actions, then on Canvas and toggle on
the drawing guide here. Then tap on two degrade. And here in the grid size. If you tap here, you can change the grid size. I'll type 600 and here you can increase or
decrease the thickness. D not toggle on
assisted drawing here. We don't need it. And
then tap on done. I still have the dry
ink brush selected, and I have taken black
color to sketch the layout. Now, following the grid lines, I will draw some curvy
lines vertically like this. You can draw it as close
or as apart as you want. I will be drawing
these three lines. Then I will just draw these small branches like this where I will place
the flowers and leaves. You can have all of it facing the same direction like
upwards or downwards, but I want to make it a
bidirectional pattern, which means some will face
upwards and some downwards. What I'll do is I will tap on the selection tool here and
with free hand selected, I will draw around the
middle wine like this. Then I will tap on
the move tool and rotate it so that it
will face downwards. Now two of my wines are facing
upwards and one downward. Now I will place the
flowers, keeping in mind, they are not very
close to each other, and then I will draw the leaves. You can see here that I'm not touching the top
and bottom edge. Now we will repeat it once
and then draw the rest of it. I will create a background
layer first by tapping on the plus sign here and then
dragon drop a color onto it. Then I'll select both the
layers and group them. Swipe on it towards left
to duplicate it once. While the group is selected, I'll tap on the selection tool. Now tap on seven load. Here I want to make
the pattern using the half drop technique
where the pattern repeats horizontally and then offsets vertically by
half of the height. If you are hearing all of
this for the first time, then don't worry and
just follow along with me step by step and it will
become easy to understand. So here we will clip the
top left and bottom left quadrant and then flip the opposite half or the
right half of the square. Then we will repeat the same for the top right and
the right quadrant, and the opposite or the
left half of the square. You will see what I
mean in a minute. Okay. Now I'll tap
on selection one, then tap on the move tool, then on flip horizontal
and flip vertical. I'll then tap on
selection three, tap on the move tool, and then on flip horizontal
and flip vertical. Tap on the selection tool again, tap on Save and load, and then on selection six and flip it horizontally
and vertically. Now I'll join the
branches wherever necessary and draw more
leaves and flowers. Again, we will repeat the
pattern, but this time, I'll flip selection two selection four and
selection five. I'll tap on the selection tool, then on save a lobe and
tap on selection two. And then on the
move tool and tap on flip horizontal
and flip vertical. I'll repeat the steps for selection four and
selection five. And now I'll again
join the branches and draw more leaves and
flowers to fill the gaps. Oh once I'm done with
sketching the layout, I'll tap on the canvas and make the drawing guide invisible and then to taste the
pattern and swipe with three fingers towards
down on the screen, tap on Copile, swipe with three fingers
again and tap on paste. Then in the layers panel, I'll duplicate this flattened
layer for four times. Then I will tap on
the first layer, tap on the move tool, and then tap on the blue.in the top left
corner like before, type the size that is
half of the canvas size, which is 1,800 pixels for me. Go to the layers panel, tap on the next layer, tap on the move tool, and then on the
blue.in the bottom left corner and
type 1,800 pixel. Now tap on the next layer
and then on the move tool, here you can either
tap on the blue.in the top right
corner, type 1,800, and then drop it half the
length of the quadrant, like I'm doing here, or you can just
tap on the blue.in the middle here on the
right side and type 1,800. Now why I'm doing
this would be easy to understand if you look at a
tossed pattern like this. Here, if I reduce
the size to 1,800, you can see the motifs are
not matching in the middle. But if I drop it down, then it matches since it
is a half drop repeat. Okay, let's return to our pattern and now
tap on the next layer, then tap on the move
tool and then on the blue.in the top right corner
and type 1,800 pixel. Then slide it upwards
till it snaps and make sure to see these yellow lines like you're seeing
on the screen. Also make sure you
have magnetics and snapping on and without
touching anywhere, tap on the layers panel, then tap on the last layer, then on the move tour, and then on the
blue.in the bottom right corner and
type 1,800 pixel. This time, slide it downwards
till it snaps in place, and then you can
merge all the layers. Since it is repeating perfectly, we can move to our next lesson. In the next lesson, we
will draw the motifs with colors and make
our final repeat.
9. PATTERN 2-Inking & Make Pattern: In this lesson, we will
draw the motives and make the final repeat for the coordinating pattern
using the half drop method. Since this is a simple pattern, I can start drawing using
the final repeat sketch as a reference rather than drawing from
the original sketch. But you can start with
the original sketch because either way is fine. I'll first delete the
background from this group, bring the sketch layer out
of the group and delete it. Then I'll reduce the opacity and keep the blending
mode on multiply. I'll then swipe on the group
to what's left and tap on lock so that I don't draw
on this layer by mistake. I now create a new layer below the sketch and drag and drop a color onto it
for the background. Then I'll make
another layer above it and taking the dry ink brush, I'll start drawing the branches. As you can see, I'm drawing
the branches really close to the edges but not crossing it because I can join them later
when I'll flip the canvas. Then I'll make another layer, and using the same color, I will draw the leaves. I always like to keep the
different parts of the motif separate so that I can recolor them easily later if I want. I'll then make another
layer and draw the flowers. Then I'll take a darker color
to draw the details and you'll see that though the flower shapes are
same as the hero pattern, I'm wearing the details here. It is always advisable
to not repeat the same motif again
and again across many patterns in a collection. Try to make the
shape a little bit different or draw the
details differently. After I have drawn everything, I'll tap on the sketch
layer and swipe on the other layers towards
the right to select them, and then tap on group. You can rename everything
here if you want. I'll duplicate this group ones and make the original invisible. While the group is selected, I'll tap on the selection tool, then on Save and load, like we had done in
the previous lesson, I will tap on selection one, then on the move tool, and then on horizontal
and flip vertical. They select it and tap on
the selection tool again and repeat the same steps for selection three
and selection six. I'll again continue
drawing wherever I can. Here, by mistake, I drew the
flower in the wrong layer. But instead of undoing it, I will take the selection tool and draw around the
flower to select it, then swipe with three
fingers on the screen towards down and then
tap on curtain paste. This will paste the flour
in a separate layer, which I can then merge
with the right layer. After drawing everything
here, if you want, you can duplicate
this group once more to keep this as a backup. Usually I do that, but
I'm not doing that here, as I'm sure I don't want to change anything in this pattern. While this group is selected, I'll tap on the selection tool, then on seven load and
then on selection two. Then on the move tool and flip it horizontally
and vertically. I'll repeat the same steps for selection four and
then selection five. And now I draw the rest of the elements and this
pattern will be ready. Now I can name this group as pattern block and
then test the repeat. Make the sketch layer
invisible and then swipe downwards with three
fingers on the screen, tap on copy all, swipe down
again, and tap on paste. Now duplicate this flattened
layer four more times. Then tap on the first layer, then tap on the move tool, and then on the blue.in the
top left corner and type 1,800 pixel or whatever size
is half of your canvas. Tap on the next layer and
then tap on the move tool and tap on the blue dot on the bottom left corner
and type 1,800. Tap on the next layer and now tap on the move tool
again and then on the blue.in the middle here on the right side, and type 1,800. Tap on the next layer and
then on the move tool, and now tap on the blue dot on the top right corner
and type 1,800 pixel. And while it is still selected, slide it upwards till it snaps. Here's a tip if you are facing
problem with the snapping, then make all the other layers invisible and the snapping
feature will work smoothly. Now tap on the last layer, then tap on the move too, and now on the blue dot on the bottom right
corner and type 1,800, and then slide this one
downwards till it snaps. Now you can merge on the layers, and this is our final pattern. In the next lesson, we will make another simple
coordinating pattern using a different layout and
a different repeat.
10. PATTERN 3-Sketch The Layout: In this lesson, we will make another simple
coordinating pattern or a blender using a circle layout. For the layout of a pattern, if you want to use a guide, then you don't have to limit yourself to the
diamond layout only. You can use a circle, a scallop, an OG shape, or any other
geometric shape that will make your patterns
more interesting. So for this pattern,
I use a circle shape. I'll take black color and
roughly try to draw a circle. And hold my Apple
pencil on the screen, and it will snap to
a perfect circle. If it doesn't seem
like a perfect circle, then I can tap here on circle or manually adjust these blue
dots however you want. Now I'll tap on the
move tool and make it just a little bit bigger and try to place
it in the middle. Then I'll turn the opacity down and make a new layer
and start sketching. I'll make these curved
branches with leaves, following the shape of the circle facing
different directions. Once I'm done, I'll
make a new layer for the background and bring
it below the sketch layer, and then dragon drop
a color onto it. Then I'll select both
the layers and group it. Then I will duplicate
this layer like we have been doing for
the other patterns. Now while this
group is selected, I'll tap on the selection tool, then on seven load, and then here we will
do the opposite of what we were doing for
the half drop pattern, meaning for the
half drop repeat, we flipped selection one, three, and selection six. But for half break repeat, we will flip selection one. Two and selection A. Then we will flip
selection three, selection four, and
then selection seven. Remember, for two
quadrants on one side, you also have to flip the half of the canvas on
the opposite side. Now I'll tap on selection
one and then on the move tool and then flip horizontally and flip
vertically at the bottom. Then tap on selection two, then on the move tool and then on flip horizontal
and flip vertically. Again, tap on selection
eight and repeat the steps. Now I'll start sketching
the branches to fill the gaps while keeping in
mind the flow of the pattern, and also making the branches
face different directions. I'll also be careful
about the branches not touching the
edges of the canvas. Once I've filled
most of the spaces, I'll flip it again
and this time, I will flip selection
three, four, and seven. I'll first duplicate
the group at this stage once
again for backup. While the group is selected, I'll tap on the selection
tool, then on Seven load, and then tap on selection three, then on the move tool,
and then on flip horizontally and flip
vertically at the bottom. Again, tap on the
selection four and then selection seven
and repeat the steps. You My pattern looks complete at this point, so I'll just make
a few adjustment and fill any visible gaps. And now to test the
pattern repeat, I'll swipe downwards with
three fingers on the screen, tap on copy all, swipe down again with three fingers
and tap on paste. Now, duplicate this flattened
layer four more times, then tap on the first layer. Then tap on the move tool and
then on the blue.in the top left corner and
type 1,800 pixels or the number that is
half of your canvas size. Tap on the next layer
and then tap on the Move tool and tap on
the blue dot on the top, right corner and
type 1,800 pixel. Tap on the next layer, and now tap on the move
tool again and then like a head shown for
the half drop repeat. Here also you can tap on the blue dot on the
bottom left corner, type 1,800, and slide it to the middle till it
snaps like this. Or simply tap on the
blue.in the middle here at the bottom
and type 1,800 pixel. Tap on the next layer and
then on the move tool, and now tap on the blue dot on the bottom left corner
and type 1,800, and while it is still selected, slide it towards
left till it snaps. Now tap on the last layer, then tap on the move tool
and on the blue dot on the bottom right corner
and type 1,800 and then slide it towards right
till it snaps and make sure you see these yellow lines like you are seeing
on the screen now. Then you can merge the layers, and the pattern is ready. In the next lesson, we will
draw the motifs with colors and make our final repeat using the pattern
making template.
11. PATTERN 3-Inking & Make Pattern: In this lesson, we will
draw the motifs with colors and make the pattern using the
half pre repeat technique. For this pattern, I'll use
the final repeat sketch as reference to draw
the motifs because I know that this pattern
repeats seamlessly, which I had tasted in
the sketching stage. Basically, I'm going in
the reverse direction. This is one of the
benefits of sketching the layout using the
pattern making template. But if you're not sure
about the motifs you have drawn or the way your
pattern layout is looking, then just start drawing using the circle shape as a guide like we did in
the previous lesson. So I first bring the sketch out of the group and
delete the group. Then I'll reduce the opacity, keeping the blending
in multiply. Then I'll make a
new layer below for the background and drag
and drop a color onto it. Make another layer above the background layer and
start drawing the motives. Remember to not touch the edges. I can join the branches later
when I'll flip the canvas. Here's a tip if you want
to color multiple motifs, then instead of
dragging and dropping the color separately
on each motif, just drag and drop onto one, then tap on continue
filling on the top and tap inside each of
the motive to color it. Now, after I have drawn
the first set of motives, I'll select everything along with the sketch and group them and then duplicate
the group ones for backup and rename
the original group. Now while the duplicate
group is selected, I'll flip the canvas using the selections like I had
shown in the previous lesson. So tap on the selection tool, then tap on seven load, and then tap on selection one, then on the move tool, and then on flip horizontally and flip
vertically at the bottom. Again, tap on the
selection tool, then on seven load and then tap on selection two
and repeat the steps. Lastly, tap on selection eight and flip it
horizontally and vertically. Now I will draw all the motifs that are
not touching the edges. Once I'm done, I'll flip the other selections
using the same method. So selection to, then seven
load, then selection three, then both tool and then flip horizontally and flip
vertically at the bottom. Again, tap on selection four and then selection seven
and repeat the steps. Then I'll draw the
rest of the motifs. I can see here there's
a small portion of the leaf that
needs to be drawn. So I may need to flip the
canvas one last time. I just need to bring this portion to the middle
so that I can draw it, which means I need to flip
the top two quadrants that is selection one and
selection two and the bottom half of the
canvas that is selection in. Now my pattern is
ready to be tasted, so I'll make the sketch
layer invisible and rename the group to taste the
pattern repeat and swipe downwards with three
fingers on the screen, tap and copy all, swipe down again with three fingers
and tap and paste. Now to clic at this flattened
layer four more times. Then tap on the first layer,
tap on the move tool, and then on the blue.in
the top left corner and type 1,800 or the number that is half of
your canvas size. Tap on the next layer and then tap on the move tool and tap on the blue dot on the top
right corner and type 1,800. Tap on the next layer and now tap on the move
tool again and tap on the blue.in the middle at the
bottom and type 1,800. Tap on the next layer and
then on the move tool, and now tap on the blue dot on the bottom left corner
and type 1,800 pixels. While it is still selected, slide it towards
left till it snaps. Now tap on the last layer, then tap on the move tool, and now on the blue dot on the bottom right
corner and type 1,800, and then slide this one
towards right till it snaps. Like I had said, if you are facing any problem
with the snapping, then make all the other layers invisible and it
will snap properly. Now you can merge
on the layers and the last pattern of this
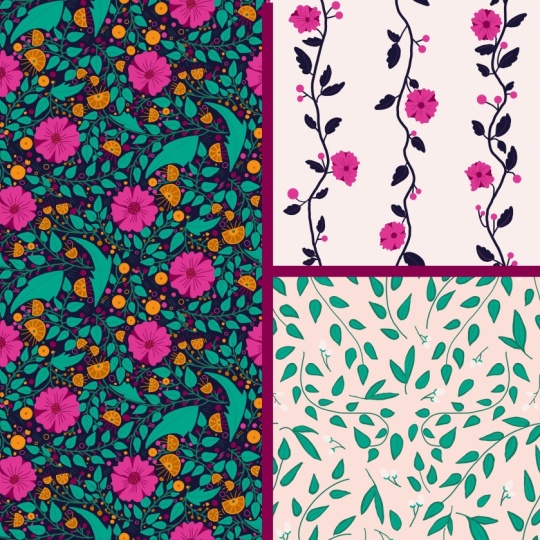
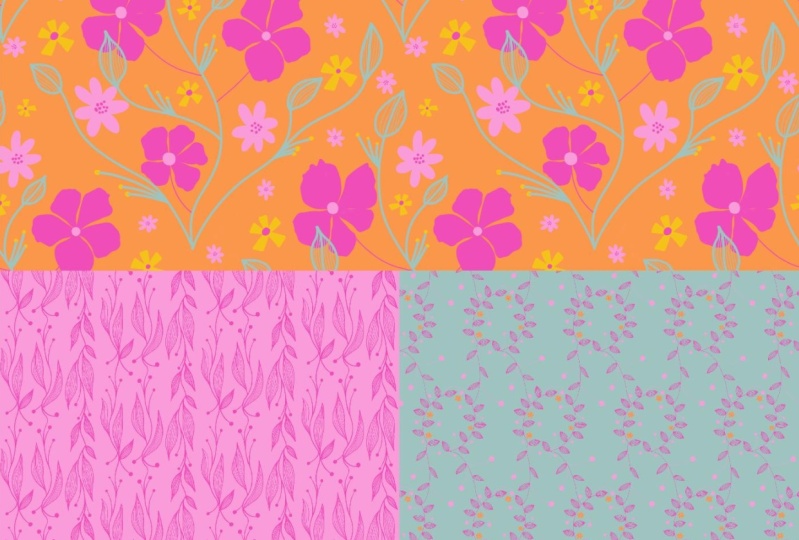
mini collection is writing. Here's the hero or
the main pattern. Here's the codinate and
here's the blender. You can add more patterns to
this collection if you want. I hope you had fun creating this mini collection
as much as I did. See you in the next
lesson where I will jot down a
few of my reasons why I like this workflow. Oh
12. Why You Will Like This Workflow: Why you would like
this workflow. Here are a few reasons why
you would like this workflow. You like drawing your botips in Procreate to get that
hand drawn look. You can use a lot of texture, shading and line
details to achieve an organic and painterly
aesthetic on your drawings. Along with this, Procrit offers an user
friendly interface, making it easy for beginners to start
creating patterns quickly. You want to save time while making a collection
because in Procreate, you can use different layouts to visualize your pattern and also test it again and again using the pattern
making template. Also, Procreate
provides a wide range of tools for pattern making, including brushes, shapes,
and symmetry tool, enabling you to create
intricate designs with ease. You don't want to invest in a subscription plan
as a beginner. As a beginner, it's
understandable to want to invest in your
growth and learning, however, subscribing
to a plan might not be the most efficient
use of your resources. That's why Procreate
would be a better option. You want to have
the whole pattern making process on your iPad. The iPad's portability allows
you to create patterns anywhere whether you are at home in a coffee
shop or traveling. These benefits make Procreate on the iPad a fantastic tool
for creating patterns, whether you are a hobbyist looking to explore
your creativity or a professional designer seeking a powerful and portable
design solution.
13. Thank You: Thank you so much for
taking this class, and I hope now you feel confident
about creating patterns inpropriate and are excited
to create even more patterns. I would love to see your work, so don't forget to upload it
to the project's gallery. Sharing your creation
is a great way to connect with others and
get valuable feedback. If you have any
questions or doubts, then feel free to post it
in the discussion section, and I will be happy to help. If you enjoyed this class, please take a moment
to leave a review. It means a lot to me and
helps me reach more students like you and also lets me know what you found most helpful. For more tips and resources, follow me on Instagram
and tag me at Calabi Mm. And do check out my YouTube
channel where I share tutorials on creating repeating
patterns on your iPad. Also don't forget to subscribe
to my newsletter for free resources and updates
about my future classes. Finally, if you're ready to dive even deeper into
surface pattern design, check out my other classes
here on skill share. I've covered topics
like building a portfolio website
and designing repeat patterns using
different workflows. Thank you again for
joining me in this class. I can't wait to see
your beautiful designs. Until next time, keep creating.
 Mrunmayee Das, Artist and Surface Designer