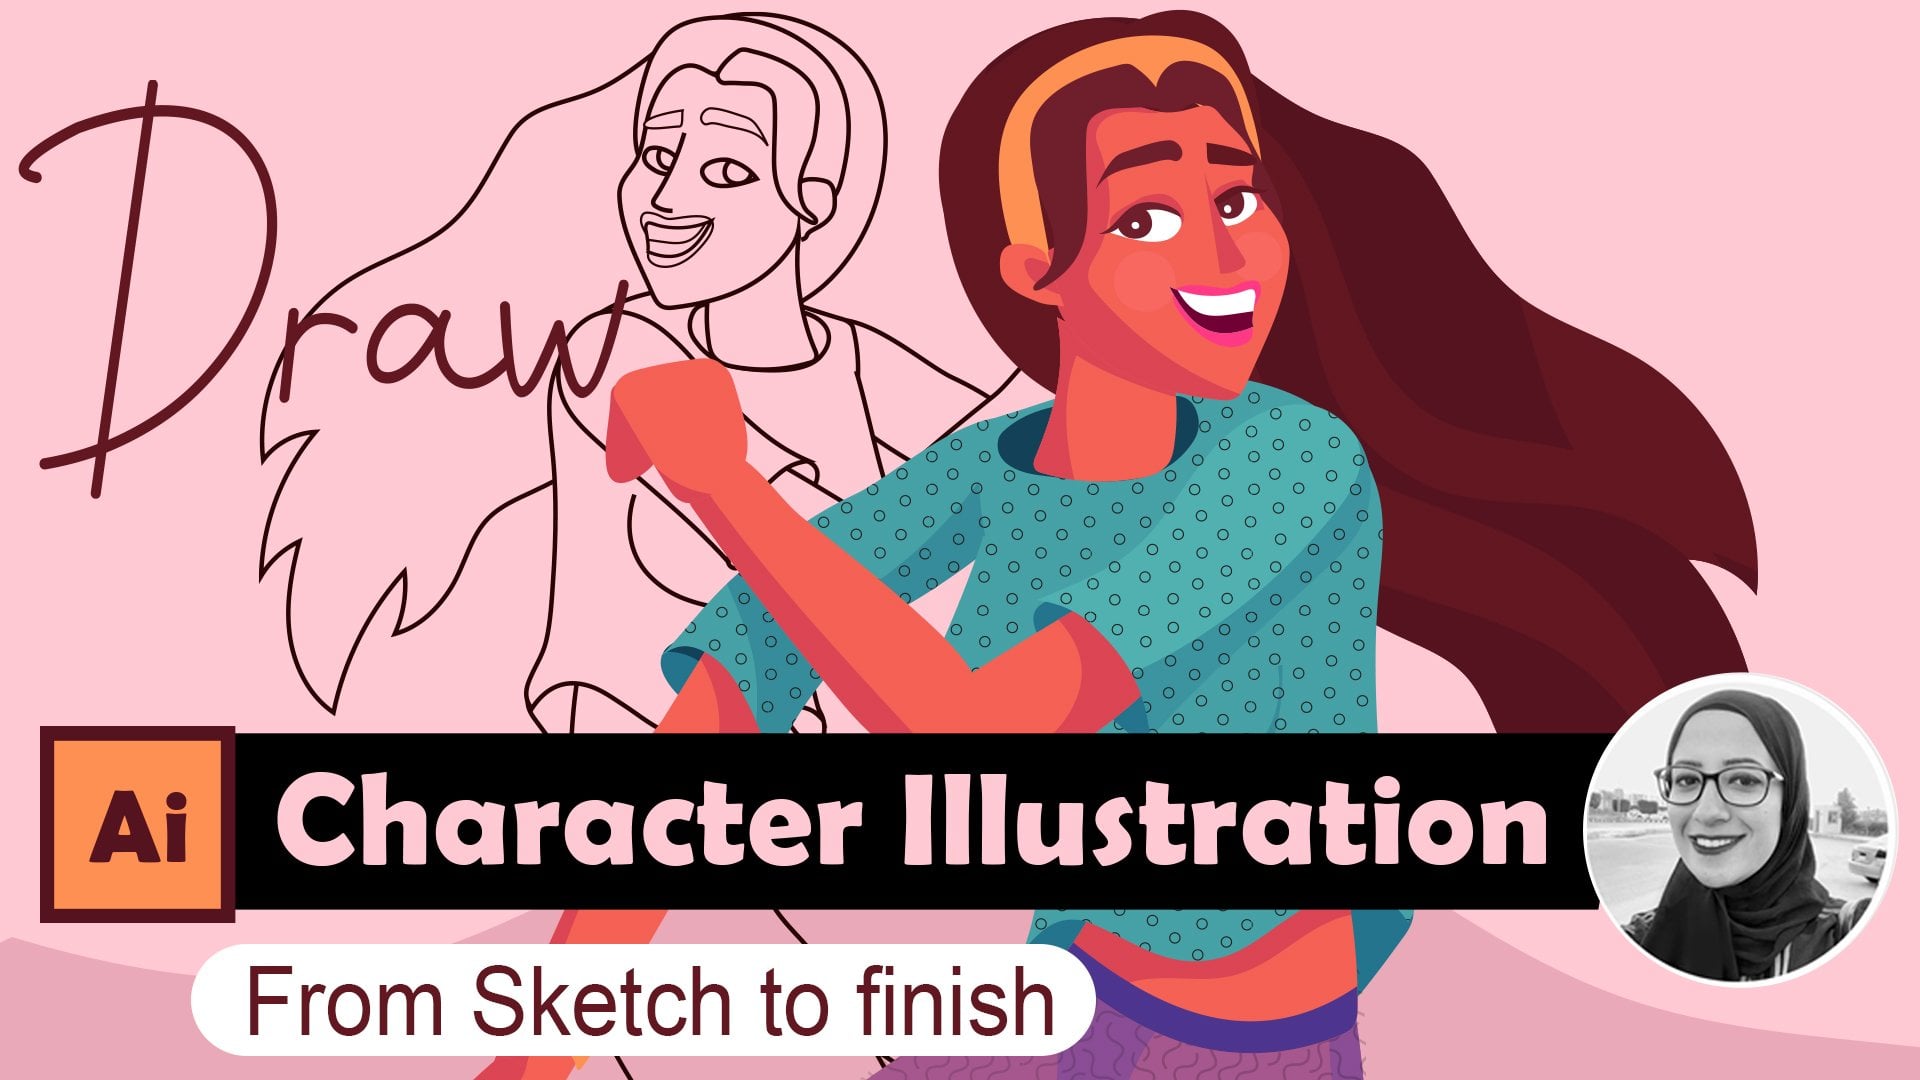
Transcripts
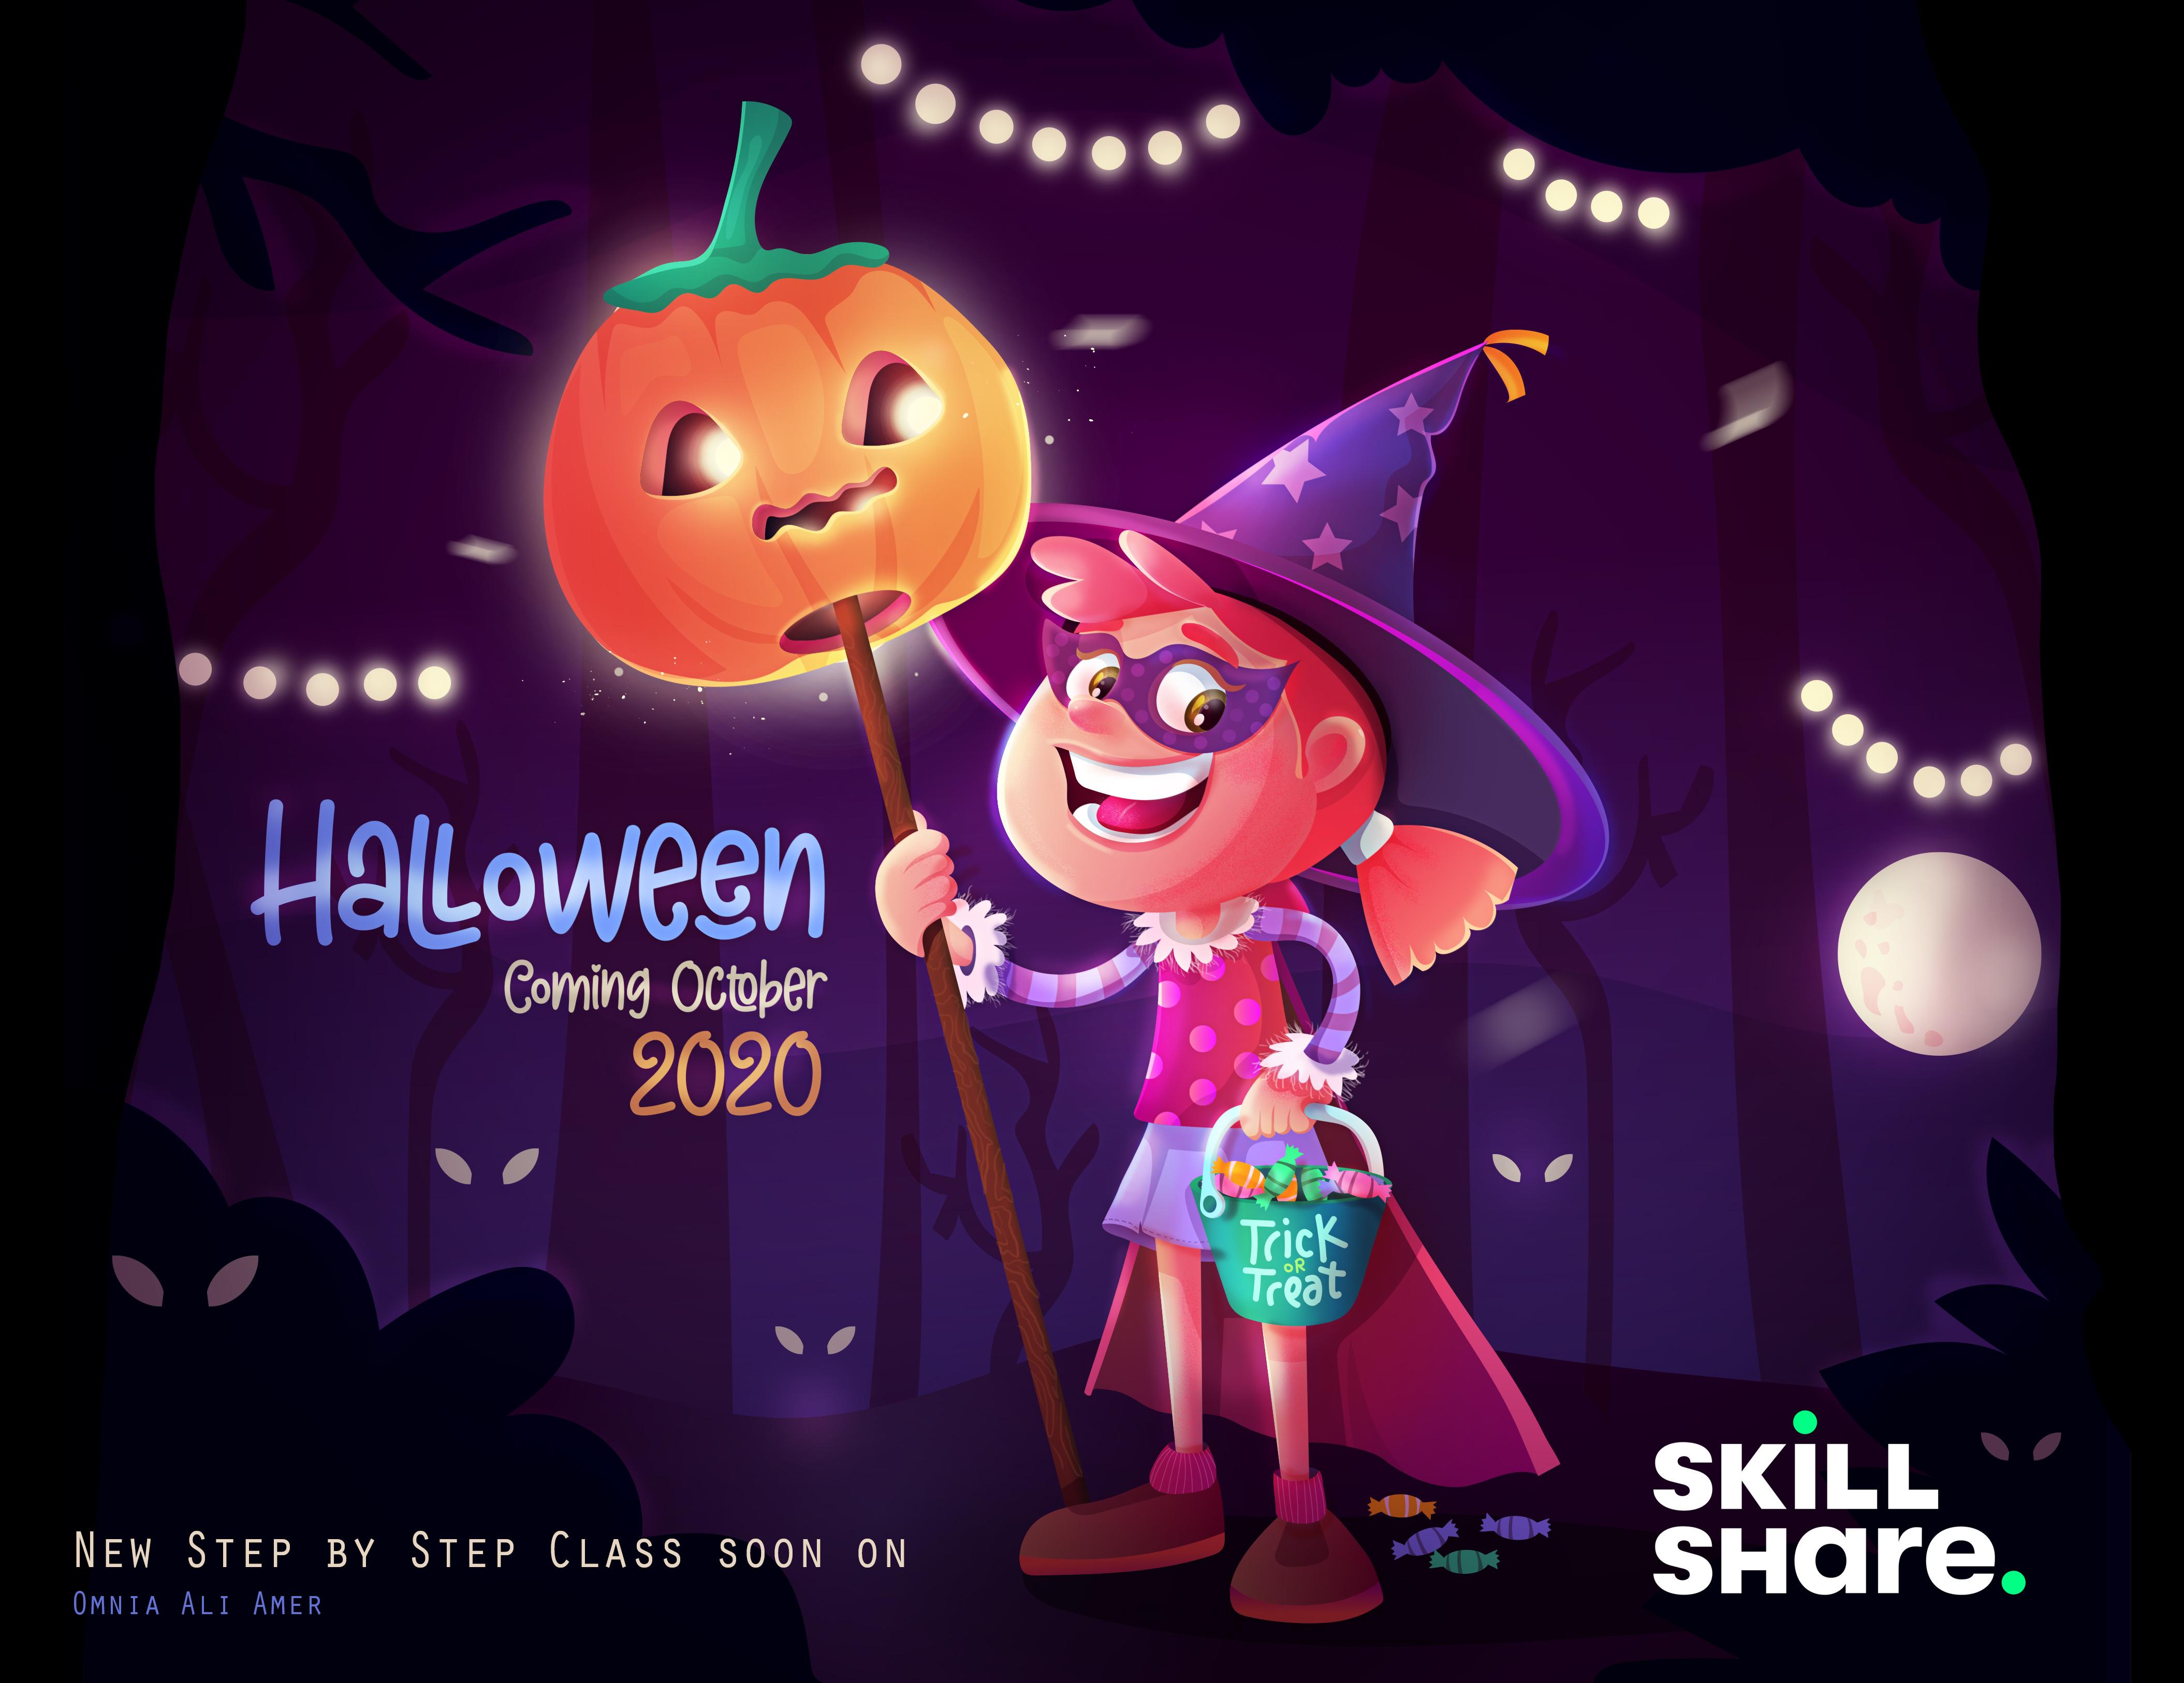
1. Introduction: Welcome thorns, ketchup, glass appearing, you hear it's new on the angry. A character artist and illustrator had been in this field for more than six years now. And a really enjoys high started architecture button really going to like it. So after uni, I decided to get back to my passionate advocate, which is drawing. I remember back then I used to draw almost anything it find I drew on the walls of my room. I drew in my school books and anything else. So actually that was one of the best decisions ever en, and really don't regret that. And as I grew up, I was always obsessed with cartoons and animation movies. So I just fell in love with character design. And that's why I specialize this. I would like to share my knowledge with you guys in my previous classes near my students create a lot of characters from start to finish. And as is the Halloween season, I'd like to create Darcy. So I just would like you to me Dorothy disc, little funny girl here with their bunk mystic. She's celebrating halloween on her own way. So we will create Dorsey from scratch. We will first make the mood board for her desk to answer any question around this character. And after that, we'll be sketching this with Adobe Photoshop. And then we've colored them, draw in vector in the Louis illustrator. After this, we will add some shading and living to add more depths to the character. And finally, you will take this to Adobe Photoshop to add some one scholar and magical tags to add Diffie Hellman, Dorothy. So thanks a lot for watching and hope to see you guys in the class. So let's get started.
2. Moodboard: Welcome to the glass. Now that you're here, that means that you're ready to start. Alright, so to start, we'll first make our mood board. What is the mood board? It's the answer to some questions. That's you decides who is the character that you're creating. What does he loved, how old she, what's unique about her and what's the mood they want to express with your character illustration. Also, what do ID elements, your illustrations that you will use to express that mood because he chose before. So for my character, I chose to name her Darcy. And I chose to make this little girl like a seven years old girl. She's happy and funny and adventurous. C looks a little skinny and cute. And I wanna make her with red hair and make eyes. Also, I think my girls will be liking Halloween purple color, pumpkin adventures and going on a walk in the forest. And so, so she's so adventurous girl. So that's how we mention this birth. Now it's your turn to decide your character and to answer these questions yourself. The next thing is what do you want to express? So my illustration, I want it to be about Halloween. I wanted to be spooky, funny, adventurous, and happy. All right, so all you need to do now is to open Pinterest or Google images and just start searching for keywords about these mood that's you liked to draw about and choose some elements that you want to include in your illustration. So that's my mood board is really simple and it's really nice. So I opened Pinterest and he kept searching for some key words to express the mood and the character Darcy that I chose Eric fewer. So I kept looking for some spooky pumpkins, 5'10 girls, you know, with which costumes ends, this, which hats, all that. So this is very simple. So as you can see, mood boards can be very easy and you can create your first one right now just by answering the questions that we mentioned and to have a clear image in your heads about the character that you're going to create. So hope you'll follow along with me through all the class lessons and let's head to the next lesson.
3. Let's Sketch !: So now that we decided which character are we designing now? So we will had to Photoshop and we'll create Darcy, this Halloween little girl who was celebrating with her Fontaine's tech. So let's get started. So we open up a blank document in Photoshop and we start sketching the items that we talked about, mistake and the girl. So let's get started. So with the standard brush on Photoshop, I start drawing and try to make this little girl's face as cute as possible just to fit the persona that we have made in that mood board before. And you're free to make the character as you want and decide the hairstyle and everything. So I just keep drawing here. And now we're making the hat, the switch Q hat that we talked about, right? And also as we decided before, we're gonna make her holding this level bucket, that record tree bucket with all the candy inside of it. And we just keep moving on, right? And maybe just a little bit. Now further refining, I'm taking the capacity of this layer a little bit down and creating a new one above that and adjust, keep refining. Always make sure to decide every little thing in your sketch in the refining process. Just not to leave anything for the guessing when we had to illustrate or to make this into vector. So as you can see, I'm just try to refine as much as possible and decide every little thing ahead before we go and execute this illustration. Just keep anything, deciding how everything will look like. And of course you can still edit that and keep what defying later. But it's better to decide everything here in the sketching step. Override and trick retreat on the bucket and her little cake. And now for the pumpkin industry, find these nines. As you can see. I think it looks cute now, somebody cheating in some Gandy here. It's the essence of how we empower kids. As you know, I maybe some grace is not sure about that, but let's decide later, and that's all for this sketch. I think we're ready to head to the next lesson. So let's head to illustrate your dr. Now to start drawing this character in vector lines.
4. Coloring Time !: And now that we've finished our sketch in Photoshop, let's head to Adobe Illustrator just to start coloring and working in vector. Okay, so let's start. First. I hit em in the keyboard, deselect this sketch over ride control C to copy it and control V to paste it in this Adobe Illustrator blank document, just like that. Alright, that's good. They didn't take the path d little bit down. And I just hit control or command to, to make this domain this locked. So I just can't move it. It will be easier for me to color this demo from the Layers panel. I create another layer below this, this sketch to start coloring. And as you can see to the left, you can find my favorite color palettes ever. You'll find this in the resources section below the class. Alright, so let's start coloring. There are a lot of drawing tools in Adobe Illustrator and just like the Pan tool, rushed a little curvature tool. But the favorite of them all is the pencil tool. You hit Enter or just choose it, the toolbox. And then I hit I and choose any of the colors. Now i hit to the Ellipse tool just to draw this base of the hat. And then hit, I bring the eye dropper tool to choose this color. And then I just sent it to the back Howard that I needed with Control or Command square brackets, right square bracket to take this layer of one step forward above the layers, that's your, your selected. And the left square bracket is, is just a ticket to the back, backward one step Control Command, Shift. Square brackets, takes it all the way to the back or all the way forward, above all the layers. Or I didn't, I drew the hat and now to the Pumpkin. Does with the pencil tool, you just go with it and try to enjoy. If you're just familiar with my classes, you will find that I enjoyed this pencil told a lot. All right? Okay. Because keep drawing. By the way, I used the rounded rectangle for this secondary hands. Okay. You just keep going with defensible and keep quantifying. It's really fun to see your character comes alive with using the colors that you valve. Right? So let's keep going and draw this hand, the bat, and select the same color for this candidate we're using. We've turned that. Lets continue. Who make this thing from Corinth in there? If one writes and then with the Ellipse tool, and then depend too. Okay. And now for her skirt, I have used the pencil tool again, my favorite tool. And maybe choose that color loop gain works. You can always change that later. It's okay. Alright, maybe for her next, I will use this rectangle tool and just take it all the way to the back. As we said before, Control or Command square brackets. Next mom to take it to the back. Okay, and then for shoes, let's keep going and we select this color. It's thinker, stick to the back. Just to the back, then that to the back. I use that a lot just to rearrange my layers and take proper ones forward or backward. Okay. Then just keep going. Well, no, I didn't. That's and that's for her. She was. Okay. Now I will be creating this with the curvature tool. It's really helpful when you are dealing with curves. And so, so for her paper, I'm using this curvature tool. And I think it's, it's nice. And then I will be sending it all the way to the back room, droll open land, a left square bracket. You could change that little bit. You just keep playing with your color palette. It's, it's really fun to experiment with the colors. All right. Now the Elks Tula making this part to the pumpkin. And then I chose the pencil again to make the eyes of the pumpkin. As you can see, I'm using this amazing tool which is below the colors to the left. It's, it's a mode that's called The told joined side mode. It's a really useful one. You will use it like a lot. It's an easy way to make masking inside of a layer. You just hit that joined side more than you keep drawing inside the layer that you are selected. It makes it much easier. Alright? Okay. Maybe that one bit. Okay. Then hit join sign again and again. Create this little iris inside of the ible. Meaning that color is good and for the other audience, Well, that's perfect. Join side and draw these little IV. That's nice. And then Harrington can take it to the bank. And then this hands off the buckets. O p. This part needs some arrangement and state bits to the front and then take this event and then Netsilik older face and take it all the way to the front control, Shift, Control or Command Shift writes square brackets. And now let's add the terror cape. Just keep enjoying, they'll just keep going with the flow. And as you can see, I'm just doing a straight or a lot of people are really finding it so hard to deal with. And they just can draw on the illustrator by, as you can see, I just try to avoid using the Pen tool, which is the essence of illustrator, but I really enjoyed the pencil tool so much. Phil, I use data logged and I just tried to make it easy for you guys as well. Okay. And then for the other part of this hand and that color. Okay. That's great. It's continued now for the eyebrows. Okay. And then the ionizations. I really love Darcy old idea. They hope you're enjoying her two, 2y looks cute and hair big smile. It's just amazing. We're right. I'm headed to the Object menu and then unlock the sketching and then deleted the sketching mayor and delete it. Now let's solve this debt problem. You know, it's like a problem. How to put this thing inside of this average two, just to give us the feeling of that it's inside of it. I hit g to edit the gradient that like okay. So I duplicated the SEC and I put it inside of the others, but just didn't work. So I need to do now is I duplicated the stick. And then I had Chef. And for the shape builder tool, I've talked about it in my previous class. And then I hit Alt to delete the forests that are intersecting with the apps. Now I'm just changing some colors. I hit D and go to the radiant panel and just the this, I keep that hair skin and just needs to be a little bit lighter and maybe to the beaks. Yeah, I think beings will fit her. Right? And now for this part of the hat, I just take Jake and keep quantifying, make it darker into whole other Newt. Knight. Communicate this a little bit on the work. And I feel that the heads just needed to be figured out and then control sequent OF to copy this. And that's that Alex here and make it darker. And just to make this bar, it's as if you're headed, is n, has the hats. Alright? This just in this little eyelash here with the pencil tool to modify the gradient on the nose. And then that's Joe inside the iris DO make some more details like that. I love adding the gates to the character is just takes it over live. It just pops inside the screen. And that's actually the best part for me when I see it, you know, alive. For the ears I just had G and the colors as well. Let's edit, modify this cape. Whites had G4, the hair and whatever colors, and also freed this bar. Yeah, I think it's better. So let's keep going. Keep quantifying the gradients. May be the head needs a level more purples. And this bar belongs to P. Yeah, needs some depth. I just love the gradients. It works wonders here. You just have G and keep working with the colors to leave till you get the right depth and the rights feeling for each bar, it's okay. And as you can see, him using.
5. Shading Darcy!: All right, so now that we've finished coloring, let's start shading. Okay? Fill by shading, I mean adding more in depth and some layers of chains inside each item so that select the face drones, make some random, you know, shadows. And then make it multiply. And think the opacity down just like that. And iterate the added some depth to the face. I am the rules for this step actually I just make it. I send said I sense that needs some shading here and I'm sure that there is some theory behind that, but it's you. But as you can see, I just enjoy the process. I just draw and make what I feel and what feels right for the drawing and for each character. And it works. Okay? And more in depth here. Alright. Okay, that's nice. I remember studying shadows and lights and how to add shadow to Amy objects. When I used to study perspective. And so in my early years in architecture in the uni and I never worried is an Arctic act. Clia just loved drawing and once they finish the UTI headed to the drawing field. Just a note, okay. Then let's keep adding the shading like that. All right. Wow, this spoken just turned out amazing. Let's keep going. Right. And the highlights, I loved, garden highlights just makes all the magic. And then take all these and take If I see down. Let's continue. So for this arm, I feel we need some stripes here. And for this arm as well. So you just draw inside and make stripes and just select this with the eye dropper tool or head i in the keyboard. And I draw inside paired top and draw these little yellow adults. And let's change the color of the colors and make them maybe something wider. And if she needs something you though just to pop up. So add some dark background here does to work at later in the next lessons. And I think it's already looks cute. Maybe change the color at GE and play with the gradient. And so colors are matching or two fields, the ice, that's me in the background of that group. For now. Maybe something like GATS. And change the color a little bit. You're free to choose any color you want, you just feel it too. Right? And that's nice. Okay, and that's all for this lesson. Let's keep going and head to the next lesson.
6. Let's Add some details : All right, so now that we have finished sound the shading and we added a little bit of a background that's Keep going. All right, so I've draw inside this background that we have drawn, I will may just random shapes as if she's seen alike and scary forests or something and the thing that passively down. So they can be like dispensaries. And let's just change. I'll, I think that add depth to that stick. Alright, that's continued. Now let's add more details to her skirt. Yes, I'm shading here. That's amazing. And to hear hair as well. Okay? Because keep playing with the pencil tool and add that to each layer you have. And you can just see how much difference each step we're making now is making to the final artwork. They really hope you guys enjoying right now. I think, yes, that's better. For this to be. Hairs, skin, it's much better. All right. As you can see, once we have changed the background color and it got darker, we took different decisions regarding her glow this and the color. So the whole character illustration. I really recommend that we add the background before we start. Just take these decisions ahead. And for the candy a use the Boolean join side to make these. And with the pencil tool, we just need some little candy wrap or something like that. And when you make an item with a lot of layers, you just select all of the Yours and control g to make it as one group. So that's what I did for each candy. And just keep duplicating this Alt, Drag and changing the colors, just make some variety. And now let's hit B for the brush and dried something, you know, hand drawing triggered Street on the bucket and select and change the colors. Just like that. Okay, that works. And then control G for this whole title to make it as one group. Now I just select this and join side to make maybe, maybe some shading and I feel it needs something more to pop up. So making some highlights here and there. That's actually my favorite part. I love shading. After coloring, I love coloring the analog shaping what the best of them all is. The little ambient lights that are coming. You know, these little strokes of light at the edges. At the edges of each layer, just like this one. See you this little stroke. It's amazing. And on the nose and hate aided they pissed away. Maybe add some little highlights in the eyes. And now make some lips. Does something like that. Let's add some depth to the eyes. Just some shading below the Aibo. Make some shading below the head. Sometime I got on the color. And maybe here as well, just to indicate that the hand is coming out of this sleeve. Just little details, but it makes all the difference for me. And my period Park again, the overlay. You just draw some highlights and you make it the blend mode to make it Overlay. Alright? Just keep going. Keeps electing the items and change the colors. Add some shading and some highlights by drawing inside each, each layer. And for this hats, I think it needs something to pop up. So I will be adding and drawing inside some stars, which had always has these little yellow stars on it. And just get this, which Halloween a mood. And now for the hands to make her pingers separate or make this trading and this Barth and as you can see, for hand just got better and better and make some shading for this top and sleeves and everything just adds a lot of depth. And the skirt is well, let's keep going. Okay. And now for the hair, we're adding this favorite part, don't overlay highlights Bart. And now for this pair as well. And then some more highlights. Right? Keeping changing this. No, I think her hair needs to be between red and orange and yellow highlights. All this. Okay? You just keep playing and keeping, deciding and choosing the colors and the moment that you want, that you want your character to say and to convey a right hip G, the change that color back there and then editing these by hitting a and selecting the anchor points and working. All right. Please. I'm shading here behind her ear. Ok. Let's continue. I was trying something here and the hat just didn't work. 19 my mind. And maybe some overlay and maybe some shading here. Okay, that's better. I just keep changing the colors in, going back and forth with the colors that I find something that really works. And then changing the colors for this bucket handles. Just move it a little bit here and work more on the shadows. Okay? Just keep changing. That's better. Employed this and are just worth more than the fingers. With the pencil tool, you just keep anything I'm gonna enjoy inside. After I finish. After an added the color is and I will make this shading. Think it looks better. Keep well-defined. That's better. Alright. And that's for this hand. Let's continue. Ok. So therefore the pumpkin, I feel that the EIS needs a little bit of this highlight layer around them. Just to pop up more. Really adds more to that spooky would abandoning. Okay, and this needs some depth. But this is not the right direction. I guess. Because we're looking from down from down there and we need to be to the other direction looping Tat. Ok, that's nice. And let's add more depth here. Ok, that's better. Each detail make a difference. So keep going. Keep modifying your illustration. Alright. Thank that. Her eyebrows looks better BY thing that colors needs a little bit of a twist. And the top needs this magical stroke of flight. And Megan here as well. That's better. Okay, and let's add some shading for these, for this bucket handle. Okay, just modifying these anchor points with a smoothing tool. And keep adding details as we said. And for this bar it's modifying the gradient. I had g and modify the gradient flow a little bit. Okay, and then I'll select these and drawing side, copy paste them as if BER inside the bucket and just make them randomly like that, that's better. And then I just copy and paste a little bit of them below her as if she is dropping some candy because she has a bucket full of Gandy. That's modify our Kp. Like that. That's much better. And here as well. While that made a difference, right? It's amazing. Okay. Keep working. Okay. Just adding this show sold here, Joe and signed and make this. And with a brush tool, use a light color and made this these little lines to strand the leaves, something like that. And I'm shading here and some highlights where her two links, okay? And for this bucket, I think needs some working on The color gradient. So I think I'll add another point. And that's, yeah, that's nice. And for the handles, I add more depth here. Just like that. Okay? First curve needs to be more more accurate. Leads that next layer back there with a darker color. Okay. Just like that. And for the shoes are drawn side again and make some details to say that. All right, let's add some, you know, back highlight layer to the head. That's better. Okay, now for the background, let's work more on the ground is choose standing on. Let's see what we can do with this. Okay, so I, g and choose the Background. Now we'll make something really good. We will draw redraw this little circle here and we will just Tet effect. And you just had effect, stylize and then outer low. You'll find this little screen common cell. You just chose the overlay mode and you will choose a bright color. And you make sure that you enable the preview so that you can see it in the scene when you're changing the capacity and the blur. And you just keep where again and keep trying with the blur in the capacity. So that this little circle here acts as if it's like a lamp or something inside the pumpkin. Okay. Just like that and it just control C, control X to take it and draw inside the iss domain gets inside just like that. And also inside in here. As if that this punk is all lighted from inside. Just an amazing little step, but it makes a huge difference as you can see. And I just like this circle, so I ve just repeating it over and over and over and over called drag. So make like this Halloween celebration. Okay, let's take a big one here. And a keep duplicate and add control C, control F behind this pumpkin to add more, more light. And now I'm creating a new layer and had G and select from the above tool I had around. And they're round gradient. And then I'll make the center part of the gradient to be opacity 0. Just to make the character appear from the center. And you keep working and playing with this gradient, round gradients. It's nice just trying to add some feeling, but still this is not a final one. So keep drying. Ok, so let's head to the next lesson.
7. A bit more!: Alright, now let's contain and just draw inside this head and have more shadows. And then work more on the gradient of the hat to add more evil magenta to the purple. Alright. You can see this up and just know, remember these lights and just distribute them around. Spread more light behind the pumpkin. And let's get back to the ground as to standing on it to English, the grievance. And maybe let's draw some random string shaped like that and give it a dark colored may be duplicative here. In transform. Very clean to be horizontally, to get to the other side. You just keep on eating these. And we'll take one of these lights that we made before. And we will take one of these lights that we made before and then make it bigger just to indicate the moon. Now, I had the background color the ground. Now let's draw inside that ground and make a shadow of a group. And now let's make these random little trees just with the pencil tool. And you can see already thinks huge difference. It just gave some layering and depth to this, to this illustration. And I make something speculate that, that, that was just an idea and I just loved it there as it. She's having a stroll in the forest and she has the spooky eyes around her. Let's just doesn't care. She has her a pumpkin. Now let's hit t and write the word Halloween, then choose any text you want. You keep searching for the right font. I thought that one. I love this one, so I used it with this color. All right, and now let's try something else. Hit D And just dry it. Coming October. The Halloween thing. Okay. 2020. That's very nice. Alright. That's both these lines. A little bit. Just like that. And I felt this already. Let's keep going. They would implicate this to be up here. That's better and changed the colors more. Alright. Let's add a mask that let's add a mask for her. At her wounds, a dark colored did the mask. And I hit E for the eraser and some of it. Just to solve this issue of having the mask below her hair. And so, so you can see this little part. And with the grades into I just edited this. So lets add more details to the moon by drawing side and making this little, you know, holes or from the surface of the moon. Looks better. So let's keep going and head to the next lesson.
8. Finally, Magical Touches :) : And now that we've finished with Adobe Illustrator, I just took all this illustration again in a new document to start editing and make all the magic that the V Photoshop. So let's continue. So in the Photoshop I create a new layer and make it multiply to add some, just to add some depth all around, make this vignette feeling. As you can see, I'm choosing, I'm using a purple color. And the modified just gives it that amazing feeling. All right, I make another layer and make it overlay to add some color dodge. Involved with boards. I just love that word that takes everything and just makes it awesome. Can you see these little touches here? Makes a huge difference. He does love it. I use a smaller brush. All right. And that's add more highlights. Does like that. Now. Okay. Just keep playing with your soft brush and this overlay layer. Well, can you see how awesome that is? Well, this is just adorable. Keep adding these touches to the whole illustration. And it will make a huge difference. And maybe through the ears as well. Wow, it's amazing with the heads. Just amazing. Okay. Just giving these in those strokes of lights. Okay. Let's continue. Now I will be creating a new layer above them and I will use this standard brush. It's extra brush and it's just perfect. I love to use some color. Let's try this overlay here and choose CSI lab, this color, this rent, touch of red on her cheeks, on her nose. You see that next year I just love it. Normally administrator Ululu, illustrations or characters just turned out so flat. Even if we used, even if we were using gradients, even if we're using shading lights, adding these textures. Thanks all the difference and just makes it real, you know, like with the real texture. That's why I love that. Now than other brush fits makes some email particles around. Wow, that's nice. Maybe you can give it. We'll double-click and we will make some Outer Glow for these. Just keep playing with the size and spread than everything. And it already makes difference. I'd like it. Okay. Now bigger particles. Okay. And as you can see with the same with a soft brush, I just keep drawing here and there. And the Outer Glow effect on the layer keeps going with us. For important thing we draw. Alright, so I created another layer and I made these little parts, how I made them, I choose. I drew with standard brush and I hit two filter, blur, Filter menu from above and then blur and then you can use the less blur or the motion blur. But I used the motion blur. Like some blurry particles hold around and you just drawing in and hit control or command F. Just duplicate this previous effect or filtered that she was just dead and just Dre Beats the blurred with the same settings that you just made. Okay. I got back to the overlay layer, the humane before, and I keep adding these magical touches. Guys, that makes all the difference. That's my theory port. See these edges wild. It's just perfect. It's clean and it turned out, you know, perfect with the contrast and everything. And that's over this class. I am just happy it turned out that way. I love Dorsey, I loved this Halloween ie modes that we just added with these little touches. I hope you were following along with me and just can't wait to see your projects guys in the project section below the glass. Also feel free to ask me anything of the discussions board below. I'd be so happy if you just check my previous classes. It will help you a lot if you are a beginner in the character illustration, it goes a meander with you. I'm so happy that you took this class and hope it helped. And I hope that you can use these little techniques that you had today in your next works, weak-form iconic classes. If I feel free to follow me on Instagram for more artworks, illustrations, and daily sketches. Thanks everyone, stay safe and see you in the coming classes.
 Omnia Ali amer, Character Artist, Illustrator