Transcripts
1. Oh, hi there!: We spend so much of our
lives inside rooms. They all have something
in common walls. So let's make a gallery wall. Whether it's your living
room or your bedroom, or a dorm room, or an office, or a classroom. Any room being more
intentional and mindful about what you put
in that environment really connects you to it. And that leads to happiness and coziness and just
a sense of belonging. And don't we all
want more of that? Hi there. I'm Laura Irrgang, an artist living in
Lone Oak, Texas. I spend my days in my
studio by the woods, painting and illustrating
and doing creative stuff. If it's a creative endeavor, I usually like it. Hi illustrating
books, paint murals, and have work in galleries. I created the comic strips
glitter, Bill and Greg. And I'm a member of
the Texas cartoonists. High co illustrated
the book net strip, the world's first comic
strip knitting book. I talk about Art on panels and work as a presenter
at literary festivals. And I also teach classes on
comics and graphic novels. In this class, I'll
show you how to make your own gallery wall will make a visual group of
your favorite pieces put together in a way
that is unique to you. There are many
different ways you can organize a gallery wall. You can do it by
color or subject, or theme or frame style, or just go for a delightful
mishmash of styles. I'll show you two
different methods for creating a gallery wall. With the Procreate technique. We'll photograph your
space and your Art, then arrange everything
digitally first. Then Method beef is a more
hands-on approach where we make Paper Templates and move
those around physically. With the second technique, we trace the actual Art on paper templates
and then put it on the wall using
painter's tape so it's movable and then you get
everything where you want it. And then hanging be Art. I'll also give you tips
and tricks on how to make hanging the Art
go more smoothly and also help you find
your own style and make it really unique and
fit your space. Are you ready to get started
on your gallery wall? I hope you'll join me.
In the next video, we'll discuss supplies
2. Supplies : This video, I'll talk about
the supplies you need. There are some supplies
you'll need for both methods. The first one is Art. You can use any form of Art. You can use Art, you already have Art you plan to purchase. You can use canvas's framed
photographs, posters. You can even use non-art
objects as long as they have a way on the
back that you can hang them like a
hangar or a hook. The other thing you need for both projects are Art
hanging supplies. These are things like hammers, nails, mounting,
petty, etcetera. For option a, you need the
Procreate app on an iPad. Any version of
Procreate will be fine. For option B, you need some
sort of the paper roll. You can use brown craft paper
like I use in this video or this is a great way
to use up some of that extra holiday
wrapping paper. You could even use
recycled newspapers, but they need to be large
enough to fit Your Art. If you need to, you could
take several pieces together. You need scissors and a pencil or marker or pen
or something to write with. Now, optional
supplies for both of these projects would include
a level for helping you get the items hung
straight on the wall and a measuring tape
or a yard stick. With the yardstick
for measuring stick. I like one that is shown in the picture that
is hard or rigid. You can use a measuring tape, but sometimes they're
a little trickier. They tend to want to retract. If you're measuring tape
doesn't have a lock function. If someone is helping
you with this project, make sure they can hold the measuring tape for
you in a way that you can see the numbers on the measuring tape when you're taking your reference photos. Next, we'll talk about how to select Your Art for
the gallery wall
3. Select Your Art : In this video, we'll go over selecting your art
for the gallery wall. And this part is really fun. First, let's look at a few different ways
to organize your art. You can arrange it by color. If you have a particularly
bright accent wall, this can be fun to set up
this gorgeous pink wall. I've chosen art in shades of bright yellow,
greens, and pinks. In the next example, notice that the art is all black and white and
relatively minimal. Another way to group
your art is by subject. You may collect a
certain type of art, like vintage oil
paintings of dogs or maybe watercolor
pictures of fruit. This is a good way to show off a collection you already have. In this example, I've arranged
images of cats and birds. You'll see that even though
the subjects are similar, we have a lot of
variety in size, orientation, and frame style. You can also have a mix of
subjects united by a theme. Here, everything is different, but it's all united
by the technique and whimsy of vintage paint
by number of paintings. You can also use a similar frame style
to unite your work. Here we have black
and white photos with similar sized mats in
identical square frames. Sometimes this can
look to Maggi, Maggi. But in this instance
it works okay, because it echoes
the square print on the fabric and the rooms clean, modern lines on this wall. All the art is
paper under glass. Notice that the frames are
all the same width type of material and only come
in three simple colors. And all of the pieces have
similarly sized white matter. A really fresh way to
arrange a gallery wall is to choose art
that fits a theme. Here we have an overall
ocean or beach theme. Let's zoom in a little bit. Every piece has something to do with the beach or
a seaside field, from sand castles to shifts
or sunsets at the shore. Your fit, your theme can fit anything you're
passionate about, from the circus to
a particular sport, to a favorite city. Here we have images
that all have to do with the city
of San Francisco. Your last option is
the easiest one. No theme at all. Just use whatever you like
and it's delightful mishmash. I think this one is
particularly fun because it has so
many objects in it. It kinda has a green
beau ** feel to it. And with the mix
of sculptures and plants and hanging
baskets and shelves, it all works really
well together. It's anchored very,
very large painting. And there are also several
elements of wicker around the room that play into the baskets that are there. This gallery wall
is pretty random, but it's all pulled together by colors found in the interior. This one is so much fun. I absolutely love this one. It's a riot of color and fun, and I just think
it all works well, even though, and nothing
particularly goes together. You can also display 3D objects, see if you can attach
your hanger in some way, or maybe even place an object in a shadow box to make your gallery wall
feel more personal. Choose things with
sentimental value. Photographs are an
obvious place to start, but try to branch out to. You can also use
non-art that is framed like concert or travel tickets. A flyer from a play as sentimental keep sake
like a fortune cookie, fortune or a piece
of vintage jewelry. Okay, next step, we'll discuss
how to arrange your art
4. Choose An Arrangement : In this video, we'll talk
about arranging your art. There are no right or
wrong answers here. If you want to hang your art in a perfect grid, that's fine. But you probably don't
need my help with that. I'm going to talk about ways
to hang your art that look balanced but still feel
fresh and interesting. I think it's helpful to
Hangu largest pieces first. That way you have some big bold structure to
your arrangement, and then you can fill in some of the remaining areas
with smaller art. Another thing to consider is the overall shape your
art will make. A lot of people like to
arrange their art in a shaped like a basic rectangle. Some of this can be determined
by looking at your space. For example, if you choose the spot above the
bed or a sofa, you typically have a
horizontal rectangle. If you choose a spot above
the desk or a chair, you might be working
with a square area. Here are some examples of
overall shapes you can consider rectangular,
triangular, circular. Another thing that will help
you visually is to leave an equal amount of whitespace
between your pieces. For example, don't crowd a few canvases
next to each other and leave a huge gap or have the edges too squeezed
up against each other. If you spread them out
a little bit more, it has more harmony and balance. Think about creating
a gallery wall and an unexpected spot. I bet you have lots of places
that aren't being used. Think about an underutilized
space like the side of a doorway or the
often overlooked spot in a bathroom wall. You could even make a whimsical gallery wall way
down low for you. Next, we'll get started with
method a using procreate
5. Method A: Use Procreate: Alright, in this video, I'll show you how to use
method a using Procreate. First, they'll want to
photograph your space using a yard stick or a
measuring tape in the image. This will help us match
up the scale later on. You can import any
of these images from your phone or a camera that
you want into Procreate. I like to photograph
the room using my iPad. Next, they'll want to photograph all of the art you'll be using include the same yardstick or measuring tape you used in
the picture of your room. You can do everything
at once in a group or take pictures of each
individual piece of art. I think it's easiest
to take a picture of everything on the floor or
a table or even your bed. You might stand up
on a step stool or a chair so that you're
not skewing the ankle. Now, open the picture of
your space within Photoshop. Next, make sure you can see your yard stick or
your measuring tape. I'm going to bring
in the picture of my art by using Insert photo. You can bring in any picture individually if you
did it that way, but I think it's best to do it with all the pictures at once. Now I'm going to
rename my layers. Living room, the
background, and all art. For the art layer. Make sure you're
clicking the art layer. Now. Once you're
on the art layer, take two fingers
and tap that layer. Now, slide your finger
to the left or right to bring the opacity to 50%. Now I'm going to
pinch it a little smaller just so you can
see what's going on. Choose the art layer.
Choose the arrow. Now pinch your fingers until that yardstick in
the art layer is the same size as the
yardstick in the room layer. There. Can you see
that little better? I'm trying to make sure
they're the same size and that gets us our art
at the correct scale. C, same size. Now, double finger tap on the art and slide the
opacity back to 100%. All right, I'm going
to click Select and the top toolbar and
then rectangle. Holding down my pencil, I'm going to draw a rectangle around the butterflies
and then lead up. I'm going to drag
three fingers down. Select cut. Then I'll do it again. Drag three fingers
down and select Paste. I'm going to go up to my layers toolbar and find the piece. There's
the butterflies. I'm going to click it once. Choose Rename and
type in butterflies. Now the butterfly art will be
on its own separate layer. Alright, Go back to
the all art layer and we'll choose another. There are plenty of layers
and if you click on the wrong one, you
won't get your art. So make sure you're on all art. Alright, I'm going to click
the Select tool again, and I want to show you
something real quick. Here's ellipse. If I
hold down my pencil, it'll draw a circle or an oval. If you have art that shape. There's another feature
that's free hand. And you hold down your Apple pencil and you
draw any kind of shape. And then when you let
go, it's selected. I'm going to double-tap
to undo that. Makes sure I'm on all art. Click, Select and rectangle. And I'm going to choose
this little friend there, three fingers down, choose cut, three fingers, swipe
down, choose Paste. Again, go up to the Layers
bar and find the yard, tap it once, click rename and I'm going to call
this one chihuahua. You're going to do this
to every piece of art. All right, I'm going to
have all of my art layers off and I'm going to start
with the largest one. Let's see, That's dream. It's this layer right here. And we have to click
that arrow to turn it on and also hit the
title to select it. Then I'm going to select the
arrow in the upper toolbar. It's the cursor or the mouse, whatever you want to call it. I'm going to click
outside of the box with my pencil or my finger
and move it around. You can move it from the inside, but look what you can
really easily do. You don't want that, you
can accidentally resize it. So I'm going to
double-tap my fingers to make sure it goes back
to the right size. And then I'm going to
click or tap outside of that box and move it around
just where I wanted. Okay. I think that's
pretty good on this. Zoom out a little, maybe get
a better view of the couch. All right, I'm going to
pick the next biggest one, which is, I think butterflies
is my next largest one. And select the layer. Go back to the arrow, touch outside of it
and move it around. I'm going for a general
rectangular composition here. So I'm trying to put both of these pieces
of art where they have about equal amounts of space on either
side of the couch. Little bit more
than a finger width on this side and a little bit of more than a finger
width on that side. Alright, I can just gonna
do this with everything. Whoops, forgot to
select the layer. Have to select the layer
to get it to move heat, moving them around
where you want them, you just drag and drop. The glory of this is you're not putting holes in your walls. You're not having to actually
move the art around. Once you get this setup, it's a very easy way to travel. A lot of different options. Okay. I think I'm happy with
this arrangement. Now. If I were doing
this art project, what I would do is
now go hang my art. You can use the yard stick in the picture as a guide
for an exact measurement, or you can just
eyeball it from here. The hardest part is
usually getting better. Once you're happy with the
gallery wall arrangement, you can start hanging your art. In the next video, there are a few tips and tricks you might
want to listen to. You don't have to,
you can eyeball everything at this point. But if you want to use this technique in conjunction
with a paper template, you can, but both will work
separately on their own. Method B uses Paper templates. We trace your actual art onto paper and then tape it to the wall to make
the arrangements
6. Method B: Use Paper Templates : Now I'm going to show
you how to do method be using paper templates. This is a more
hands-on technique that does not
require a computer. First, lay out your craft paper or wrapping paper
or old newspapers. Place your frame directly on the paper and trace it
with a pencil or a marker. Now, cut out the
silhouette of the frame. Do this for every piece of Art to determine where
the hanger will fall, measure the width of the Art. Now mark the center. So if my frame is 7 " wide and make a market
three-and-a-half inches. Then make a vertical
line down the middle. Now, mark from the top of the
frame down to the hanger. If there's a wire, pull it taut like
it would be if it was on a nail or a dry wall. And mark this spot
on your template, lining it up with
the center point. You have something that's not framed. Just trace around it. Next, take your paper
templates to your space. Using blue painters
tape or mounting putty. Place the Art on the wall. Move the templates around until you're happy with
their Arrangement. Once you are done, you can
start hanging the Art. Find the spot on
the template that marks where the
hanger or wire will be placed your nail
directly on that spot. If you are using a hook, make sure the lowest part of the hook lines of
what that mark. When you're done,
you can simply pull off the template in hanger Art. In the next video, I'll share a few tips
and tricks to help the Art installation
process go more smoothly.
7. Tips : Share if you tips
and tricks to help the Art installation
process go more smoothly. Use a level, the level on
the top edge at the frame and adjust the frame or the canvas until the
bubble is in the middle. Get an installation buddy. You can certainly do
this on your own, but it's really nice to
have an extra set of hands. If the Art area you selected as a tight fit or it gets
a lot of traffic, you might try to
find a better spot. For example, if someone
has to squeeze, pass the reach past a doorway or a shelf or
key hook or something. They may always be
knocking into it. And it would be annoying if the artist crooked from
getting bumped a lot. And it could be even dangerous, you don't want anything falling, particularly a frame with glass. Leave at least 6 " above the sofa or chair
where you'll be sitting. Consider the tallest person who uses the room and have them sit on the furniture and mark their head against
the top of the wall. That way they won't back
into it when they sit down. If your furniture
is flush against the wall, switch out the Art. This doesn't need
to be permanent. I like to change
my Art seasonally. If you're really attached
to the Arrangement, you can swap out sin
photographs within the same frame or replace the current Art with new
Art of the similar size. Using different Art didn't
different times of year is something I think is very
FUN to do with an interior. You don't necessarily have
to do it around holidays, but they do lend themselves really well to switching
out Art like this. You could also consider
changing things seasonally. If someone in your
home has a birthday, consider swapping out
some birthday Art or a photo of those people if
people are coming to visit, sometimes it's been
to put up an array of those people in your display. Just give it some
creative thought and I'm sure you'll come
up with something. Okay, here's a big one. Have you ever heard? Changeable frames? They are awesome. If you have artists in your
house or you're an artist yourself and you create
a high volume of Art. This is a great way
to swap them out. The front of it hinges, it opens up like a book or a door and you can
easily swap out the Art. There are a little
bands of elastic inside so you can even tidy
up the old Art. You don't have to do
anything with it right away. You can keep a lot of Art
in one of these frames. In the upcoming video, I'll show you what to do next.
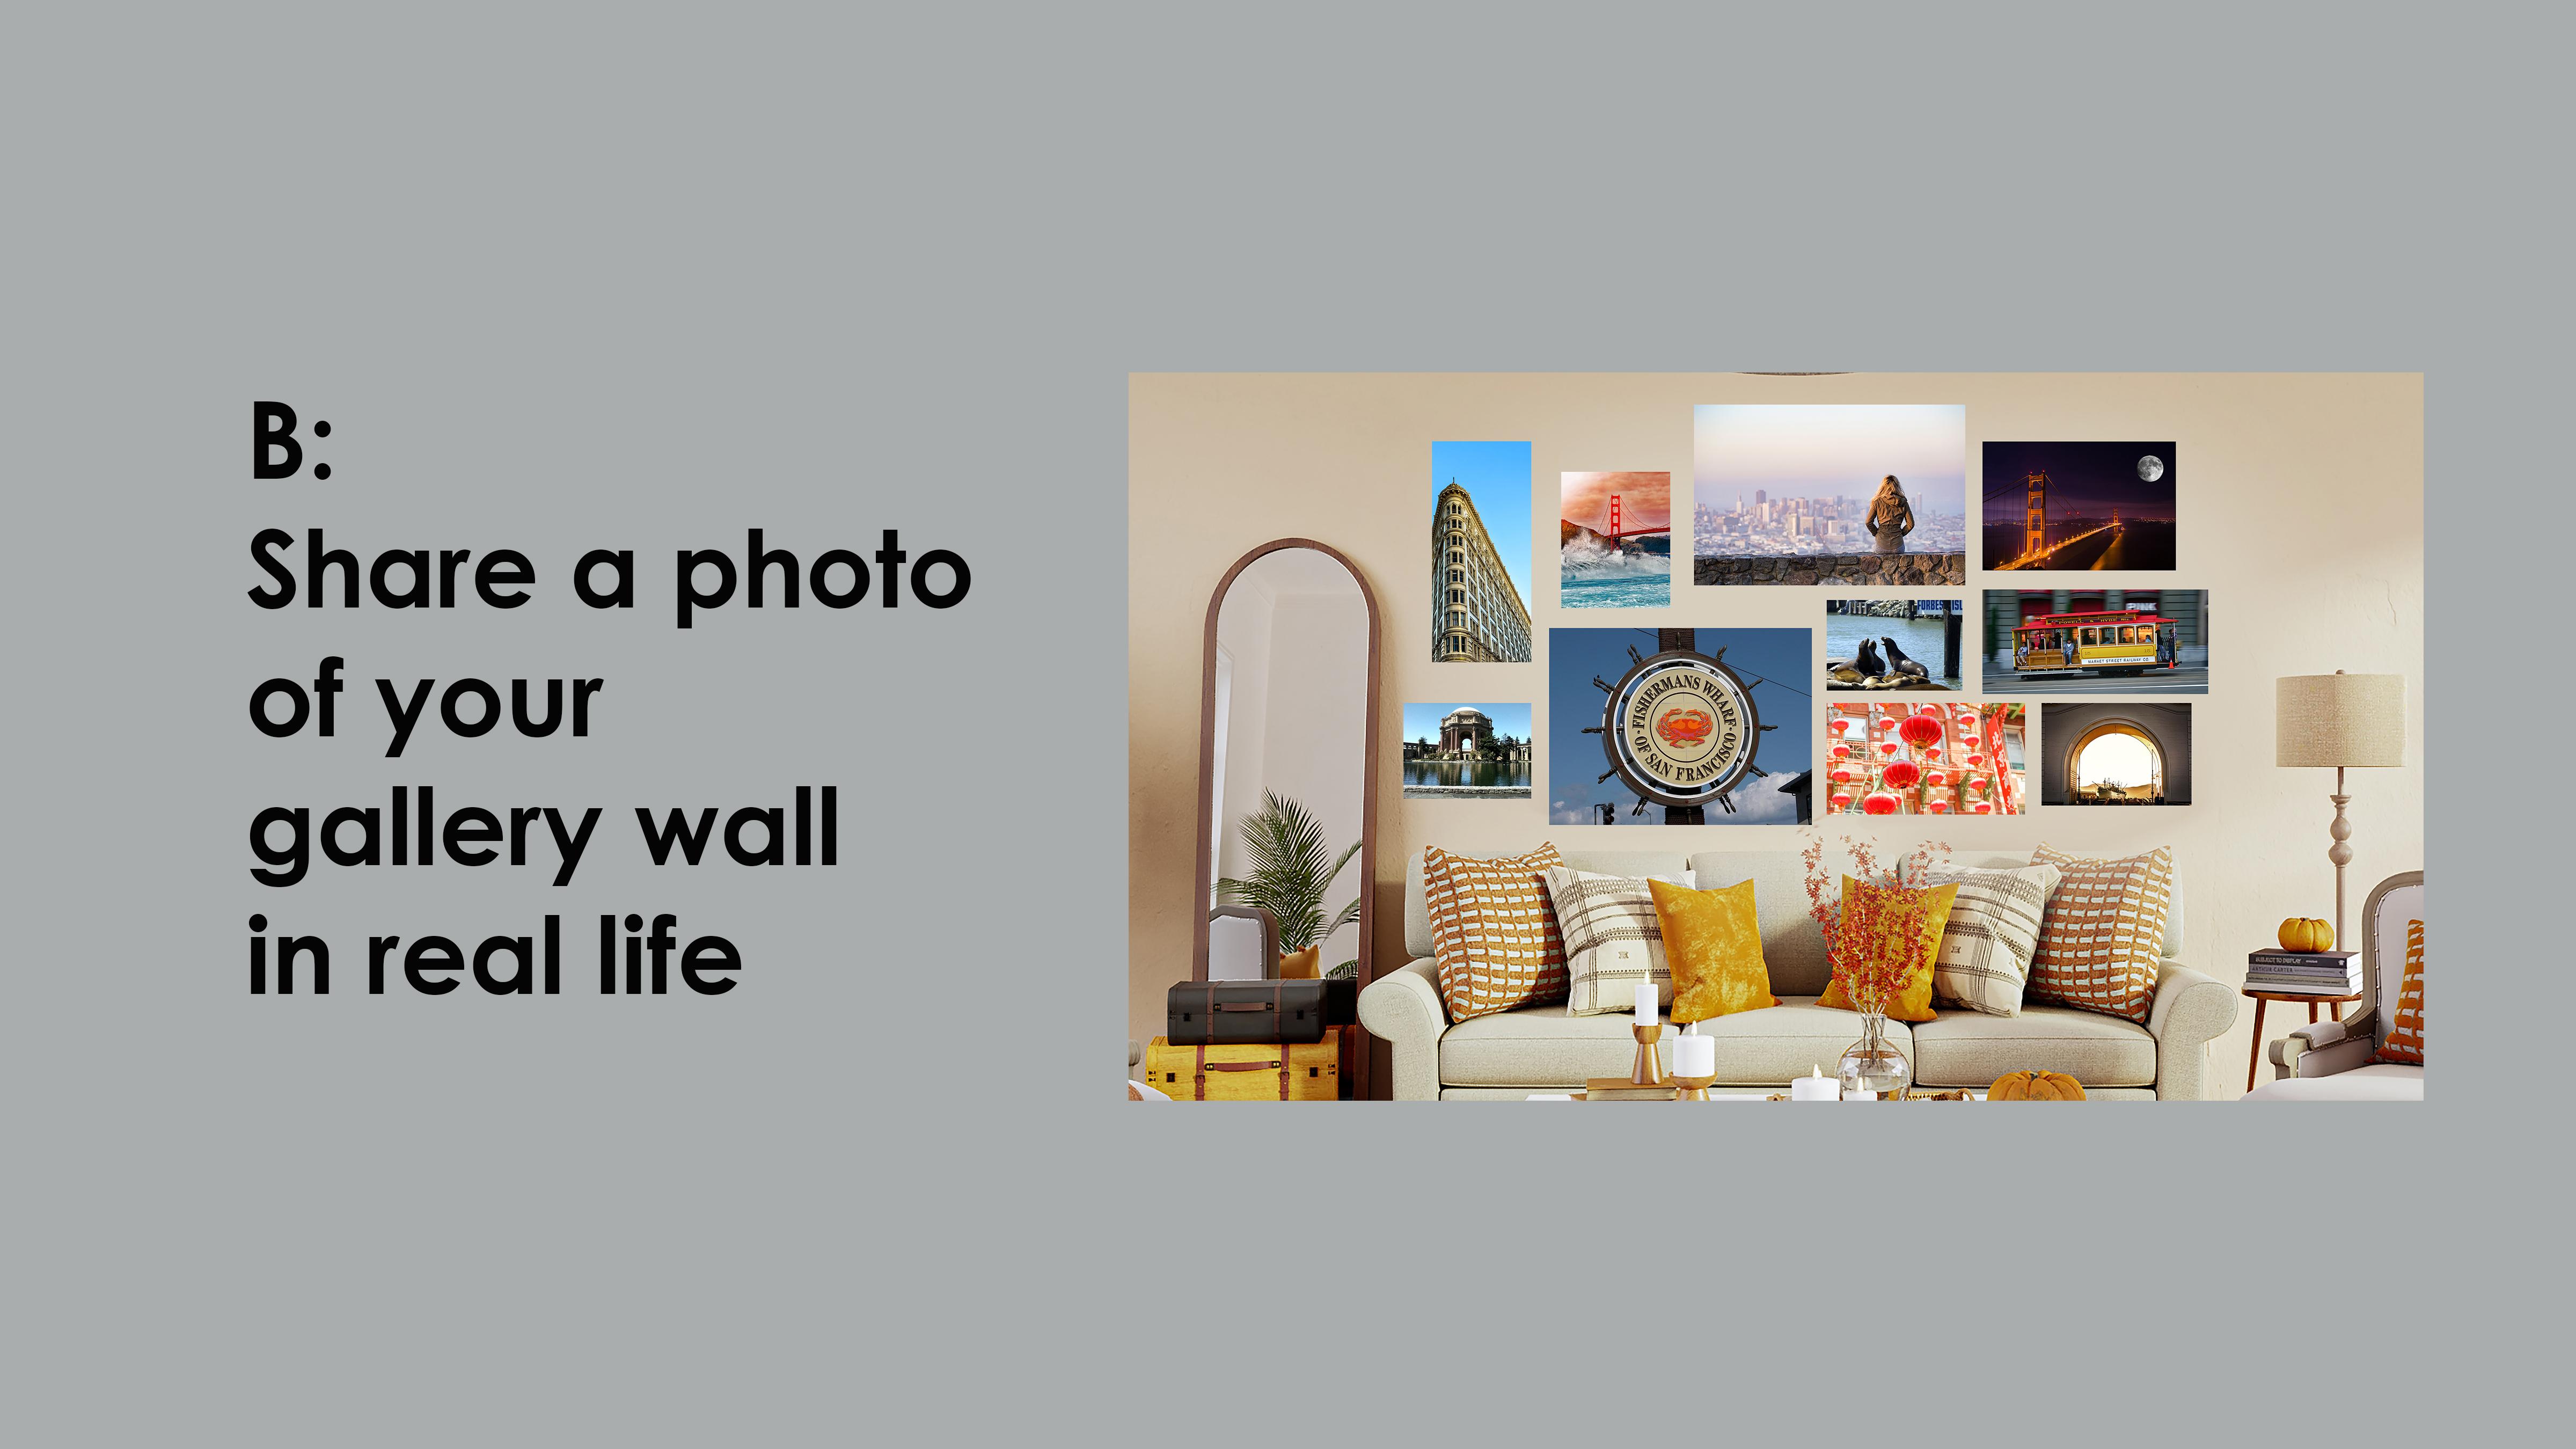
8. What To Do Next: Okay, Let's go over
what To Do Next. I hope your new
gallery wall makes your space feel more like yours. Wow, that you're done
with your gallery wall. It's time to share it. There are two ways to
share your class project. A, share your gallery wall
arranged inside Procreate. You can take a
screenshot or do a JPEG. It doesn't really matter. I'm just curious to
see what it looks like as you are actually
working on your iPad. The next option is to share a photo of your
gallery wall in real life, if you did the paper
template off fission, you might want to show me
what it actually looks like. You can Show me the
paper pieces up or my favorite would
be if you showed me the final photo of what
the wall looks like because they usually
look pretty awesome, or you could do both. Let me see those walls. Click on Projects and Resources within the
main class screen. It looks the same
for all the classes. Then click Create, Project, it's that green
button on the right. Then you have a
few things to fill out, upload your image. Then choose a title and you can write a project description. You can add more images
or video if you want. Then in the upper
right-hand corner, there's the green button called Publish clicking, clicking,
clicking, clicking. If you enjoyed the
class, it would help me. A lot of you left
me a review and follow me as a teacher
on Skillshare. By doing this, it helps
me be more visible to people searching and helps
people find my classes. To leave a review, click here, It's really easy. It really helps me, you
guys, to follow me. Look in the upper left-hand
corner of the class, you'll see my name and
the follow button. Just click it. That's
all you need to do. I'm so glad you joined
me for this class. I really want to see
your gallery wall. I hope it makes sure of
space feel warmer and friendlier and just
more like you in a place you want to be in. Now if you have any questions,
feel free to reach out. I'm always happy to help all
the students in my classes if there's any ideas you have for future classes, let me know. I'm always curious to
hear your suggestions. I hope it helps you feel more at home and happier in your space. Okay, everybody, thanks. I'll see you next time.
 Laura Irrgang, Artist, Author, Illustrator