Transcripts
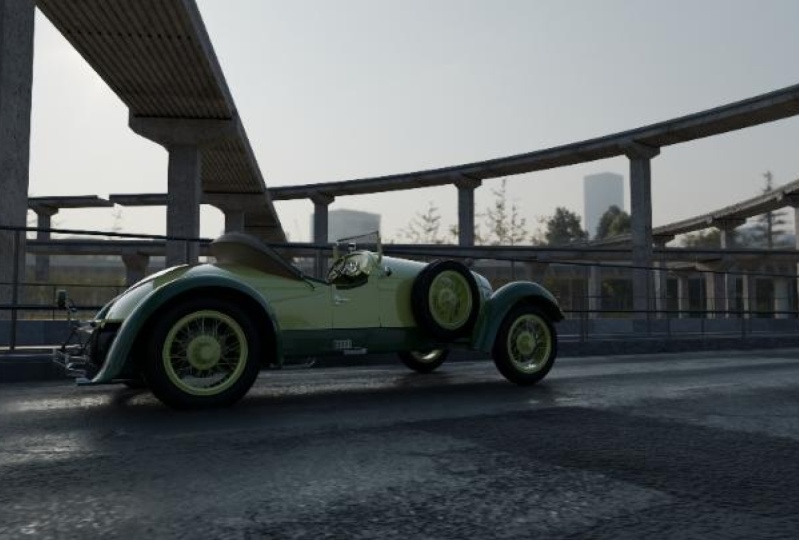
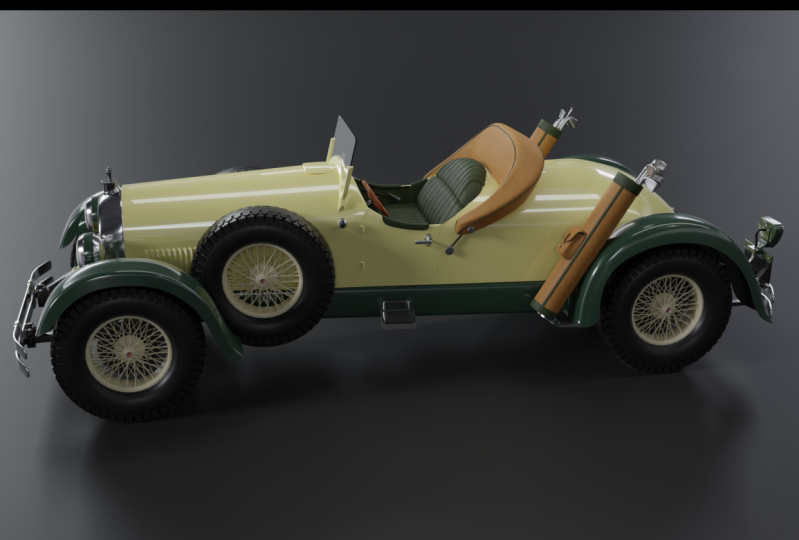
1. Introduction: Hi, I'm Darrin Lile. And this is a 1925 Kissel
Gold Bug Speedster. It was the luxury car of
the stars in its day, owned by Amelia Earhart, Greta Garbo, and Al Jolson. Of the 35,000 cars
that were produced, only 150 of them
are still around. But we're going to
make one more using only free open-source
software, Blender and Krita. We will begin with
the fundamental modeling tools of Blender, building up the basic
shapes of the Car. And as we progress, you'll be introduced
to more advanced tools and hard surface
modeling techniques. Once the modeling is complete, we will begin assigning
materials and adding textures to the leather seats and the woodgrain
steering wheel. And you'll learn how to
use Krita to add text to an object and even try out
Blender's 3D Text tool. Finally, we will set
up the lights for our scene and render
out our final images. If you're interested in creating
vehicles and would like a comprehensive project through
which to learn Blender. Then this course is for you. So let's get started. Join me as we Create a Classic
Speedster with Blender
2. Creating Background Images in Krita: Well, the first thing
let's do before we begin modeling or anything. Let's take a look at
our reference images. And what I've done is I've
gone out and I've found just quite a few images of the Kissel Gold Bug
across the Internet. Actually, you can tell that most of these images are coming from posting from a company
that's selling one. I think it was restored. But all of these images
are just wonderful. And they're really going to help create every piece
of the car here. So I don't want everything
to be exactly like this. I'm not a big fan of a
few of these things. And that's the great thing
about this is we can kind of combine different images
that we want to use. But these images,
I think are great. They're gonna be very helpful. In addition, I've
got a couple of images that I'm
going to use for the front and side and back that we're going to put
in the interface in Blender. So this is gonna
be our side view. And these up here like this is going to be the back view and this is gonna
be the front view. But the issue is we need to get them prepared in such
a way that when we bring them in their
relatively the same size and match up with each other so that we can use
them easily as reference. So let's work on that. Let's work on creating a few
of the reference images as background images here in blender that we can
bring in to the 3D view. To do that, I'm going to use
a free program called Krita. You can go to create a.org and download the
program for free. It's an open source
program just like Blender. So I'm gonna be using that to create the background
images here in Blender. So I'll open up Krita. And let's just go here
to open file and I'll open one of those
reference images that we just looked at. So I think the first one, let's go ahead and use this side view as
the beginning image. I'll click Open, and
let's just click. Okay, and here we go. Now let's bring in the others. I'm going to call this side
view over here in the layers. And now let's go to File Open and let's
grab those other two. So I believe they were
yeah, Here's one. I want it with the top down because I'm going to
create it like that. Let's bring in this one. And let's also
bring in that other one in the front view
with the top-down. Let's do that. Okay, so now we have
these images in. I'll begin with this front view, and I'll just press Control a to select everything and
then control C to copy. And I'll go over here
to that side view, and I'll press control V, and that will paste it in here. So let's give this a name, let's call this front. And I will take the opacity down quite a bit so we
can see through it. And what I wanna do is just line it up in the
center of this image. The tires are in a similar
place and it's about as tall as we see here
in the side view. So I'll come over here to
our Transform tool here. And I'll just click and drag. And let's just move
this out like this. Oh, I better hold down the Shift key to keep
it proportional. And maybe I'll move it down
like this, increase it here. So we're just trying
to figure out, I feel like that if
I bring this over here and line this up
with the tire like this, I'll bring the opacity
down a little bit more. I want to bring
this hood ornament down a bit about like that. So it's kind of similar to what we're seeing
in the side view. And this is really just
kind of eyeballing it. This is very much eyeballing it. It is not an exact
science by any means, but this is just to help
us in the modeling stage. This isn't, we're
not trying to get this to be an exact blueprint, engineering blueprint of the car because there really aren't any. I oftentimes go to a
website called the blueprints.com and they just don't have anything
regarding this car. So this is what we're doing. We're just trying
to get these to line up fairly well.
Something like this. Let's say if I bring this up, you can see we've got this
generally the same size. The fenders are kind
of in the right place. Well, they're not. Maybe I have it down
a little bit too far. Something like this. And then I'll bring it back up so the fenders are a little bit more in line.
Yeah, there we go. So something like that. It's not going to get It's
not going to be perfect. I'm gonna go ahead
and bring that up. And I'm going to press Control
S and let's save this. I better hit Cancel
and choose File Save As so we can choose
a Krita file here. And I will call this, I'll just call this gold
bug views. Let's do that. Okay, So we have the
front and the side. Let's bring in that back
view here, Control a, Control C, bring this in, Control V. I'll bring
the opacity down on it. And now we can just match this up with what we
have already here. Let's see if we can do that a little bit better like this. Alright, so now we've got the back view and let's do that. Now we need to export these out. So what I'll do is go ahead and I'll hide the front
and the back. And I'll just export
the side view here. File Export. And I'll create a
new folder for this. Let's call this views. And we will save them
as JPEGS right here. And I'll call this side view. We go and let's hide this, bring back the front. I'll call this front view. And let's hide the front, and let's export this
and call it back view. Alright, there we go. So in the next video, what Let's do is let's
bring these images into Blender so that we can use them as reference
while we're modeling
3. Setting Up Background Images in Blender: Alright, here in Blender, Let's go ahead and just
hit the a key to select everything and hit Delete
to get rid of all that. In addition, I'm gonna come
over here and just select this collection and
right-click and delete it. So we're just beginning
with a clean outliner here. And then let's bring
in our images. First of all, I think I'll
bring in the side image. So I'm gonna go
to the side view. To do that, you can
come over here and go to View viewpoint, right? Or numpad 32. I'm just going to hit numpad three to go to the side view, the right orthographic view. And from here let's bring
in one of those images. Let's press Shift
a image reference and let's go find one of
those images right in here. And let's bring in the
side view right here. Then we go. So now if we tumble around, we can see that here. Now from here I'll hit
the three key again. Let's move it into place. I'm gonna come over
here to the properties, the Object Data Properties
tab right here. And then here we can
Turn on opacity and then click and drag so we
can see through it a bit. And I wanna do this
to try and line up the tires with this axis, the Y or green axis here. I'm going to turn on the
move gizmo here so I can click and drag on the z-axis and just bring
this up like this. Now it's a little bit
tilted. It's true. I mean, we could get the archae and tilt it a bit to try and line up those tires if we
wanted to, something like that. But I don't think
I want to do that. I think I'm going to leave
it as is for now at least. So I think I want my tires
to sit right about there. Let's now bring up
the opacity here. And the reason why
I'm not rotating it, it actually looks like it's
rotated more in the z-axis, like the front of
the car is farther away from us than
the Rear of the car, because the bottom of the car is pretty well aligned
with the axis. It's the tires that because
of that twist in the z-axis, it looks a little off. So we're just going to have to kinda see what we
can do with that. I'm going to move
it in the y-axis, so it's in the center
here like that. Then I'll just take
it and move it in the x-axis this way some, so it sits right back here, maybe 2 m off from that. And if we hit the End key, we can see X is almost 2 m. So we could type in negative
two like that if we wanted. And then let's bring in the
Front and the Rear images. So let's go to the Front
view with the one key. And in here let's press
Shift a image and reference, and let's bring in
that front view. Here we go. Now once again, we'll go to
the Object Data Properties, Turn on the opacity and click and drag so we
can see through that. And that'll allow us to move
it up and sit those tires right on that x-axis and
even move this over. So it's right in the
center of the car here, just moving it over in the
x-axis, a bit like that. Let me go. Now we could take that
opacity and turn it back up and then we can
take this and drag it back. Now, when we look
at the front and we see through it will
be able to see the front of the car here. Now currently if
we tumble around, we can see the
Back of the images and I'd like to be able
to see through those. So what Let's do is
let's choose Front here, so we can only see
it from the Front. And the same with this one too. Let's select that and choose Front so that as we spin around behind these will be able to see through them to the 3D model. And while we're here,
let's go ahead and give them their proper names here. Let's call this side. Let's call this one
Front like that. And then let's bring in our image for the
Back of the car. So if I hit numpad one
to go to the Front view, I can hit Control numpad one
to go to the back view here. Alright, so now that
we've got that, let's press Shift
a image reference and let's bring
in the back view. And just like we did before, let's turn on the opacity. Let's bring it down
a bit so we can see through it some and then
let's bring up those tires, put them on the x-axis. Try and line it
up in the center. Here we go. Then I'll bring
the opacity backup and turn on Front so we can
only see it from the front. And then I'll bring
that up like this. Okay, so we've got this now we can take this in the y-axis. We can say maybe
this goes this way, negative three in the y-axis and maybe positive three here
on the y-axis, right? But the thing we
don't really know yet is this the right size? It would be nice to, as we're creating this, to know that were
actually creating it the right size to
real-world scale? So how do we do that? Well, we just google it. And in doing that, I've found that the reported
range of the wheel base of this car is from
112 " to 132 ". We've got 120 here, which is probably a good
average that we could use. So we don't have a whole
lot of information, but we're going to
maybe just try 120 ". And if we Google
120 " in meters, we get basically 3 m. So theoretically, the wheel base from
here to here is 3 m. So let's create a cube, Shift a Mesh cube, and let's say it's
3 m and the y-axis, Let's just come over here to the Y dimensions
and type in three. And there we go. So that's supposedly how
long the wheel base is. Let's take these
dimensions down to 1.1. So here we go. Here
is our wheel base. I'll hit the three key, press Shift Z so we
can see through it. So now we take this
image and we scale it down so the wheel
base fits in here. So I will take this and
just hit the S key, and let's just scale it down and hit the G key until
we can get it about. Maybe something about
like that, right? I've got the edge of this box
at the axles of each wheel. And that kinda puts
it in the center now of the 3D view here. Now, as we've seen, it's not exact, but I
think it's pretty good. So now what we can do
is take this image and we've scaled it down
to 0.879, right? So if we press Control
C and we copy that, now we come over here
to say the Front View. Click and drag these
and press Control V. That should shrink that
down to the proper amount. And this over here, click and drag in here and
Control V and hit Enter. And that should scale that
down the proper amount. So now I can probably
just delete this. Now if I hit the one key, Let's move this back into place. I'll select this
image, the Front View, and let's bring it down until the tires are on the x-axis. And let's bring it over until it's centered right there
along that blue z-axis. Alright, I'll press Control one. Let's do the same thing here. I'll bring it down. Control Z. Let me choose the back
first before I move it, I'll give it a new name
and let's bring it down so those tires sit on the x-axis and we're right
in the center there. Alright? So now theoretically, all of these images
are about as close to real-world scale is we're gonna get, and that's what we want. We want to begin the process as close to real-world
scale as we can. Mainly because as we
do our lighting and if we ever rigged the Car and
animated and things like that, all the systems will understand that this has
real-world scale and the lighting and
the physics will interact with it in
a realistic way. So alright, I think
we're ready to model. In the next video,
Let's begin that
4. Beginning to Block in Shapes: Alright, let's do a little
bit of cleanup here. Maybe I'll come over here and right-click and the outliner
and choose New Collection. And let's call this reference
so we know what that is. And I'll select all
of these images and drag them into there. And just in case we
accidentally select one of these and hit the G key
or drag it or something. Let's set up these images
so we can't do that, so we can't accidentally select them and
move them around. To do that, we can come
up here to this filter and add a restriction
toggle here. This one right here is
the selectable toggle. And now we have these here. We can take this
whole collection and just make it uncollectable. We click that, then everything
in here isn't selectable. I can try and click
and drag and select, and I just can't select these now in the 3D view at
all, which is good, which means I can't
accidentally select it and move it out of position. So that's good. Let's do that. The problem is gonna be
that as we Create things, as we add a cube or a
cylinder or whatever, it may accidentally
go into here. And then when it does, we won't be able to select it. So what I try and do is select this top Scene Collection here
before creating something, then it will come into the outliner outside
of this collection. I don't always remember
to do that, but I try. So let's maybe
begin with a Tire. Let's just create
some cylinders here. I'm going to press
Shift a Mesh cylinder. And I'm still in wireframe and I did that by
pressing Shift Z. So I'll just press Shift
Z again to turn that off. And those different
views or up here. So you can click here to
get the wireframe solid, the material view and
the rendered view here. Those can also be accessed
again with the Z key. Rendered wireframe
material and solid. Or as I said, you can just press Shift
Z to go to wireframe. Now I accidentally selected
the material preview, so I'm going to come back
over here to solid here. There we go. Alright, so let's turn this
in the y-axis, 90 degrees. To do that, we can press
the R key for rotate, press the Y key for
the y-axis and 904, 90 degrees and then hit Enter. And then let's go
to the side view with the three key
on the number pad. And also if you do not
have a number pad, you can also hit the Tilde key, which is the key below the
escape key on the keyboard. And that will give you a pie
menu of the different views, the front, back,
right, Et cetera. Also, you've got
the view selected, which is the period
key on the numpad. And that will just zoom in and Frame up whatever object
you have selected. So once again, that's the
period key on the numpad here. Or you can hit the Tilde
key to choose those there. Alright, so I'm going to press Shift Z to go back to wireframe. Let's hit the S key
to scale this down. And then I'm just going to hit
G and move this over here. And let's first kinda
get how big we want. See how much bigger this Tire is then this term because it's
turned in the z-axis a bit. So we're going to have to
kinda split the difference. I think I me take this and I'm just going to move it right
here, about like that. And then I'll duplicate it, Shift D and move it over here. Something like that. Let's try that. Okay,
so we've got these two. Now, let's go to the Front View. And we just need to
put these over here. So once again, I'm going to
take these cylinders here in the outliner and press Sx and scale them in so
they're quite a bit thinner. Then I'll move them over in
the x-axis. Kinda like that. Maybe kinda splitting
the difference between the angle here. Now, it can be kinda hard to see with the images this bright. So I think what Let's
do is let's turn down the opacity
for all of these. So I can come over and select
them here in the outliner. So I'll select the back view. And let's take this
down to like 0.25. And let's do that same
thing for this one here. Say, Oh, the side view 0.25
and the Front view 0.25. So they're not quite as
bright in our viewport. Alright, so now that we've
got this, these two, I'll go back to the Front
View and let's press Shift Dx and move these over. Okay, so now we have
an approximation of the size and dimensions of our vehicle that's going
to help us as we go here. And really the next step is
just to kinda begin blocking these things in the basic
shapes of these objects. So for instance,
maybe I could begin blocking in one of
the Fenders here. Let's, let's try that. Let's go to the side view. And what we can do is just begin by creating
a polygon plane, Shift a Mesh plane, and here it is, right here. Let's scale it down quite a bit. What I'll do is I'll
just hit the G key and move it over here
and set it on top. Of that Fender. And I'll hit the one
key and move it over. And our images are a little Off of course,
and that's okay. I'm just going to move this
up just a bit like this. Then we can just begin extruding this and get that basic shapes. So if I hit the Tab key, we go into edit mode where we can work with the actual
components of the polygon. We can work with
the vertices here. Individually. We can get the G key
and move that around. We can work with the
edges right here. Hit the G key and move
the edges around, or we can work with
it as a whole face, select that whole thing. So what I'll do is
I'll select an edge. And our shortcut keys for
these are just the one key, the two key and the three
key on the keyboard. So I can hit the two key
to go to Edge mode here. We can just begin extruding
these around the Tire. So maybe I'll go
to the side view. We're quite a ways up
from this image here. But if you take a look at this, I'm just going to
drag this over. We're actually doing pretty well for the Back vendor here. Once again, we're going
to have to eyeball things as we go here. But I'm going to
select this edge or these two vertices here so we can see them a
little bit better. And I'm just going to hit E for Extrude and began
pulling these out. In the side view. We kinda get a sense. We kinda get a basic shape like this on down into
here, let's say. And then I'll take
these two vertices here, it the three key. And let's do the
same thing here. Let's just hit E and begin kind of bringing
these back like this. And I'm trying to keep
the polygons fairly square and pretty
much the same size as each other, right? I'm just trying to do
that because it's going to smooth and Curve
a lot better. All of these are
about the same size. I'm just going to bring this
down like this. There we go. Now let's take a look at
it in the Front view. How would we do here? It looks pretty good.
It looks like it goes to about the Front
of the Fender. Now we can, if we want, add an edge loop here, I'll press Shift Z so we can
see it a little bit better. I'm going to press Control
R to add an edge loop. And then I'm just going to
hit the Enter key to times to ensure that that edge is
right down the center there. And from there what I can do is maybe pull
that up just a bit. So I'm going to
deselect this point, deselect this point, and maybe just take this
edge right here. Turn on the Move tool and just pull these up just a little bit. That's a little bit like that. Now from here we can
hold the Alt key and click this edge to
select that whole edge. And then we can
extrude this out. We can hit E and move
that out like this. Just a little bit like that. We could also alt click
this edge and just hit E and move this out just
a little bit like this. Right? So we're just beginning to get that basic shape and that's
all we're looking for. We're going to have to do
some adjusting here on the Front for the curves
and on the back here. But for right now, we're just looking to get
this very basic shape. Alright, so in the next video, we will continue with the
Fender and then will begin working on the Front of the
Car and work our way back.
5. Two Ways to Mirror Objects: So once again, before
we go any further, let's do a little cleanup
over here in the outliner. I think these cylinders are
all our tires are temp tires. So let's put those
in a collection. We can select them all here in the outliner or in a 3D view. And we can press
the M key to move these to a new collection
or create a new collection. Actually, we can just click new collection and create one. Let's just call this tires. And then let's click. Okay. And now all of those cylinders are in their own
collection called tires. And I'll twirl that down. So now we've got our two
collections there and our polygon plane that we began
with here for the Fender. Let's add a subdivision
surface modifier to kinda get this to curve
a little bit better. It's, we're seeing the polygons here and we could of course, come in here and right-click and choose something like
shade auto smooth. And that's going to
help smooth that out. But I really want to give it a little bit
more smoothness. Let's come over here to
the modifiers Panel. And under here let's choose
subdivision surface. And when we do that, you can see it really smooth that out. And if you tab into edit mode, we can see there's the
original placement of the vertices. And then you can also see the Subdivision Surface
Modifier attempting to smooth that out as best can. You can see it curve underneath
the actual vertices here. Now if we wanted to, we could view this
where the vertices are actually on that
sub-divided mesh. We could come over here
and turn on the cage here. And now the vertices dropped to where the subdivided meshes. So let's work with it like that and see what we
can do with that. Now, one thing I
did is I just kinda extruded off this way and
then extruded off this way. And that's good. It'll work. But it isn't really exact. Like what I did
over on this side isn't exactly what happened
over on this side. So let's use another modifier,
the mirror modifier, to ensure that whatever
we do on one side of the Fender also
happens on the other. So I'm going to press Shift
Z again to go to wireframe. And I'll hit the three
key to go to face mode. Now I'm just going to
click and drag, and drag, select these faces on this side. And I'm gonna delete
them. I'll hit delete and delete faces. Now we just have
this one side here. But keep in mind, you see that orange dot there. If I tap back into object mode, oh, I didn't get
these down here. I better come down
here and get these. Let's hit Delete
and delete faces. You see that orange dot there, that's the origin of the object. And when we use the
mirror modifier, it's going to Mirror around the origin of the object.
So let's give that a try. I'm going to come over here
to add modifier and Mirror. And now if we press Shift Z, you can see there it is. It's mirroring, but it's doing
it in a weird way, right? It's actually
subdividing the Mesh before it does the
mirror process. And that doesn't look very good. So what we can do is
we can actually change the order of the modifier
stack over here, we can click and drag here, drag the Mirror up
on top and drop it. And now that looks quite a
bit better because it's doing the Mirror first and then
applying the subdivision. And I just wanted
to show you that the order of the stack here, the order of the modifiers actually makes a
difference, right? It's Beginning on top and
then going toward the bottom. And what order these are in can actually affect how
your model looks. So I just wanted
to show you that. Alright, so now if
we select an edge, say I'll hit the two key to go to Edge mode and alt
click this edge. Now if we select an edge, you can see it's
being selected on both sides and they're moving in conjunction
with each other. So that's good,
that's what we want. Now we can get a very even
Curve there on our Fender. And whatever we do on this side over here is
going to happen over here. So if I Alt click
this edge, let's say. And we go back to the side view. And I hit the E key
to extrude this down. It's also going to happen on
that other side over there. So I'm going to move this down a bit and then I'm going
to scale this in the Y. I'll press S Y and bring these
in a bit like this, right? So now we've got, or we're beginning to get a more smooth surface
except for this right here. Something's happening
right here, right? So there are a couple of reasons why this kind
of thing can happen. First of all, maybe
it's the Smoothing. Maybe if I right-click, choose shade, auto smooth, I can come down into the Smoothing settings here
and increase the angle. And look at that, it's
beginning to smooth that up. So what that means is that this angle is a greater
angle than 30 degrees, the default angle here
in the auto smooth. So I can click and drag that up. And now we can see we've
got a more smooth edge. Now, in addition, what I
could have done is just move this out beyond the 30
degree angle, like this. And maybe I can move
it up a bit too. So let's see how that looks now. I think that's
looking pretty good, but we need to adjust What we have up here in front. So let's hit the one
key, press Shift Z. Let's tab into edit mode. And if I Alt click this edge, this edge right here. Now we can see that
we need to bring these down and Curve him a bit. So I think what I'll do is from this angle here so I
can maintain the Curve. I'm just going to hit G and move this down a bit like this. And I'll take this one and
move this out like this. Just trying it by hand here. See what I can do by hand. See if I can get it
close. Here we go. Let's see how that works. Yeah, see that's looking
a little bit better. And that's all
I've done is just, I'm just taking these
and pulling them down, just hitting the G key. Usually in an orthographic axis, like an orthographic view, like the Front or the side. So I can see the curve
a little bit better. That may need to come
out more, right? It may need to flare out a bit. We could do that. We can
Alt click this edge and the three key and kinda flare it out just a little bit like that. It's looking like it
could come forward a bit, maybe split the difference
over that Tire there. Now we could do that for the
Back of the Tire as well. This area right in here. And what we can also do is
bring in some other images in. One of the things I'd
like to do is just create a whole new
window over here. If we hover over a corner until the cursor
turns into a cross, we can click and drag down
and create a new window. And then I can just
pull this down and we can change it to
say, an image editor. Now we can go to image and open, go to our reference images here. And in here we can
find a view of say, that Fender from the back. Let's take a look
at this one here. Yeah, so we can see this here. We can also make this
full screen if we want by pressing
control and spacebar. We can zoom in a whole lot then, or Control Spacebar to bring it back to
its original size. But now we can take these
and we could begin moving these around to get
that basic shape again. So maybe I'll press Shift Z and we can kinda
see that here now. So maybe this can come back, some, maybe this can
come forward a bit. I'm just trying to get a
basic shape like this. Something like that. Maybe we see it there. Let's take a look at that. Yeah, we're getting there. I think it's maybe a
little bit more curved. So maybe I'll go back
to the side view here and hit G and move that
down just a little bit more. Maybe move this back, sound like this.
Now let's try that. Yeah, so we're getting there. Little adjustments can
do an amazing amount. And it looks to me like there's, this is a little bit flatter
than I have it here. So maybe this edge
does come down a little bit more like this. And maybe this edge
Alt click that. We can bring that
up a little bit more and get it a
little bit flatter. We could also add an
edge if you want to. I don't know that I
wanna do it quite yet, but you can add an edge, say press Control R, and click, and then
move this up some. And you can see how we're
making that edge a little sharper now the
farther we move it up. And maybe we could
put it like this. And now you've got more of that kind of flat
shape there now. So it just depends
on what you wanna do at what stage of the game. And let's take a look
at how wide it is. Be like it could be
a little bit wider. I'm just going to
press Sx and scale out from that center origin
about like that. Let's try that. Shift Z again. Yeah, Let's try that. Alright, so now that we've got a Fender about the
way we like it. And of course this can change. We're going to have to add thickness to it
as we go forward. But for now, let's just say we've got this pretty
much where we want it. We could take this piece and mirror it over
to the other side. Now, the issue we have here is that we've already got a
mirror modifier on here. If we add another one, it'll just Mirror around where the origin
of the object is. So we can use
another Mirror tool to get it over to
the other side. So now, instead of moving
the origin of this, let's change our pivot point from median point to 3D cursor. Now, temporarily, the
pivot point is here at the 3D cursor instead of at the origin of
that object, right? If we switch it back
to median point, that means it's at the
origin of the object. So if we go to 3D cursor, now we can duplicate this and mirror it over
around this point. So let's press
shift D and enter. And then we can
press Control M. Hit the X key to Mirror in the
x-axis, then press Enter. And now we've got that object
over on the other side. So we've got two
mirrored objects, objects that have
a mirror modifier mirrored over around
the center of the grid, the 3D cursor here. So that's just two different
ways to Mirror Objects. Alright, in the next video, let's work on beginning
maybe the front of the Car
6. Beginning the Front Grill: Now I do want to mention
that no piece that we Create is ever finalized
until it's all done, right, we're going to continue adjusting these things as we go. Well, you should because
when you're done working on a project for a day and you
come back the next day, you're going to see things
that you need to adjust. You're going to see issues that you didn't see at the time. And you'll always
be able to make adjustments and
we're gonna be doing that as we go just like this. So it looks to me
like if I press Alt click here and then
Alt Shift-click, I can select these
two or three edges. I should say. If I come back over
here to median point. Here, I could go to the Front View and I could
just hit G and begin moving this around and getting it a little bit more
the way I like it. So maybe I want more of
a curve here, right? Maybe I take this edge, I Alt, click this and hit G
and move it around so you can continue
making adjustments, rearranging like this here
I think I'm going to press G two times and slide it
along that edge there. You can continue
making adjustments all the way to the very
end. I will be doing that. You'll see me come back
and do things like hit G and readjust hit are maybe
turn it a bit like this. There's always going
to be adjustments that can be made and that's okay. I don't think anyone ever
gets anything perfect. The first time out, you need that adjustment
period that you can see it with fresh eyes from
one day to another. And now that I've
changed this one, this one is still the
way it, the way it was. So let's say I then delete this, move my pivot point back to 3D, cursor, Shift D, Enter
Control M and the X key, and then enter again. And now I have the modified Fender mirrored over here to the
other side again. So this is the process I'm gonna be adjusting and tweaking and re-mirroring and adjusting
some more until the very end. And only at the very end
will I begin applying the modifiers so that all
of these adjustments, all of the changes that the modifiers are making
are actually permanent. That won't be until
the very end. Alright, so let's say we want to deal with
the Front Grill. Let's take a look at how
we might want to do that. I think first of all, let's just get
that basic shapes. So if I hit the one key, let's come up here and maybe let's just create
a polygon plane, Shift a Mesh plane. Here it is here.
Let's turn it in the x-axis, are X9 zero. There it is. But it the one key. And let's scale it down. And I'll press once again Shift disease so we
can see through this, we can see it in wireframe. I think I will mirror
this over again. I've kept it in the
center of the grid, so the origins stays
in the center there. I'm going to tab into edit mode. And then I'll press Control R and drop an edge right
down the center. Now, you can of course, hover over these edges
to put it horizontal, but I want it vertical. And you can click, of course. And then click again and drop that edge right
down the center. I'm pretty sure
that's in the center, but I might have when I
clicked move the mouse a bit, so it isn't exactly
in the center. I'm going to press
Control Z here. So what I can do once
again is press Control R. And then I'll hit
Enter two times. And now that will drop that
exactly in the center. Alright, so I'll
hit the three key and select this face here. Hit Delete and delete faces. And now we just have the
polygon on this one side. I can take it and I can move it forward some here like this. Recall that our pivot point
is still at the 3D cursor. I'll change that
to medium point. Then if we go back
to the Front view, let's add a mirror
modifier here. There it is. Over here. We probably want the points in the middle to stay connected. Like if I take this and drag it, you can see that that
point spreads apart. So it isn't in the
center anymore. What we probably wanna do
is choose clipping here. And what that does is anytime a point comes into the
center of the grid, it will just clip to the other point and
lock in the center. So now I can't move
that point at all. It's going to stay
in the center. And that's, that's I
think what we want here. So maybe I will press Shift
Z tab into edit mode, and I can click and
drag these points. Let's turn on the cage. Recall that we can turn
on the cage and that allows us to see the points
on the mirrored side. Maybe I can take these
points and move them up Take these points and
move them to the side, Move them in a bit. Drugs like these points
to bring them down some. So I'm just trying to get
that basic shape here. And what I can do is
take these points right here and I can bevel them. Now, the Bevel tool is
up here under edges. We've got bevel edges,
which is Control B. And we'll be using
this quite a bit. But we also under
the vertex menu, we have bevel vertices and
that's Control Shift B. So I'm just going to
click here and then move the mouse out and you can see how that's kinda splitting that. If I scroll the mouse wheel now I can add new points to that. You can see how I can
drag the mouse out, scroll the mouse wheel, kind of a combination
of the two, and begin to get
that basic shape. Maybe something about like this. I don't want the points
to come together at the top yet. I don't want that. But if I get it fairly
close like this, what I can do now is
come over here to this Bevel settings
panel and try and adjust this so we
get it a little bit closer to the shape we're
seeing in the reference image. So maybe the width I can click and drag and the
width and you can see that Move that I can reduce the number of
segments or increase them. I can click and drag in the shape field and
that will adjust that. Yeah, that's looking
a little bit better like that, right? And then I can click and
drag on the width again. Here we go, something like that. I feel like these
could come out just a bit like this. There we go. So now if we take a look at it in solid mode with Shift Z, we've got a shape that's
pretty close to that Grill. So now what I could do is use this shape to begin getting
the Rim of that Grill. And I can do that by just
using this edge right here. So if I hit the two key, alt, click this edge, and then Shift-click this edge right here to
deselect that edge. Now I've just got the edge
around here selected. And what I can do is
just duplicate that and use that to
begin the Grill Rim. So Shift D, Enter, hit the S key and I'm
just going to scale out just a bit and maybe pull
out a little bit in the act. So there we've got the
beginning of that Rim. Now what Let's do
is let's create a, a whole new object from that, let's press the P key, and this brings up
the separate menu. And we can separate
by selection here. So that if we tap back
into object mode, now we have two objects, this polygon plane and
this edge right here. That's what we can use
to begin the Grill. Alright, so what I'm
gonna do is just maybe take this and move it forward just a bit, little
bit like this. Yeah, let's do that. And I'll also hit the S key and scale it
in a bit like this. And let's take a look at it now. How does it look? Well, it looks like we
could add a curve here, but we can do that later. Alright, so we're going
to use these points to extrude out to
create the Grill Rim. However, recall that we still have a mirror modifier on this. And I don't know that
I want to mirror modifier on this while
we're doing this. So I'm going to pull this
down and click Apply. Let's do that. And then
if I tab into edit mode, Let's hit the a key to
select all of those points and let's now extrude
and scale out. In addition, why don't we apply the scale and the rotation here to help us scale-out a little bit more evenly
in all directions. So I'm going to press Control a to bring up the apply menu and apply the rotation and
scale and watch what happens here in the transform
window when we do that. And click here. And
now that converts these two ones and this to zero. So basically it's
telling Blender, this is our default
position for this object. Now, the default
scale and rotation was the way it was back when we created in the
center of the grid. But now the default location
and rotation is here. So let's tab into edit mode. And with these selected,
we can hit the a key. Let's hit E and S and
scale out. Here we go. So I'm going to
now pull this up, some scale out in the X, just a little bit like that. Now let's take a look at it. Alright, I may pull this
back a bit because you can see how it kind of
angles Back some. So let's now find another image in here that we can use
for this about this, Let's try this, see
how this looks. Yeah, so this gives us a
pretty good view of it. So it does look like that
first part is fairly flat and then maybe the next
extrusion begins to angle. So let's maybe scale this
out a little bit more. Maybe scale it in Z. We can press Z and scale it
up a bit. A bit like that. I'm looking at the
combination or the comparison between
down here and up here. So now let's go
ahead and extrude this back and the y-axis, E, Y. Let's pull it straight back. Now, it looks to me like
down here is gonna go flat, is gonna go back flat. But up here it's
angling and curving up. So what we can do is move
our center of scale. So if we scale in the Z here, it's going to scale on
the top and the bottom. But if we move that point
of scale down to here, we can scale from this point. So let's do that. Let's
select this point. Let's move our cursor to it. Now, we've got our cursor
in the center of the grid. And if we press Shift S, we can move that cursor
to different locations. We can move it to the world
origin where it is now, or to the selected
component or object here. So Shift S and then
the two key here. We'll move that
cursor to that point. Now we can use this
up here to say only scale or move or
rotate from the 3D cursor. So we select that. Now, alt, click this
edge all the way around. And when we scale
up in the Z-axis, Z, we only scale
from that point. So the bottom stays flat
while the top goes up. And that's what
we're going to use to create this angle here. And the annual you can see over here while keeping
the bottom flat. And we'll continue doing
that in the next video.
7. Finishing the Grill: So as we said,
let's go ahead and scale this up in the z-axis, S, Z, and we'll
pull that up some. Alright, here we go. You can see that here. Now let's do that
again. Let's hit E, Y, and let's pull that back. Then let's scale in the Z-axis. Z. Pull that up some. Alright, it looks like we
need more, doesn't it? So it looks like it's a little bit thicker. Let's
do that again. E, Y, pull that back, SZ, pull that up. Let's see what we think here. It doesn't look like it's
widening out too much now, does it? Let's take a look. It really doesn't. It looks like it might
just a little bit, but not a lot. So it looks like we don't
need to go up as high here. So Shift Z, maybe I don't want
to go up quite that high. I can press Z and
bring that down a bit. I can Alt click this edge, press Z and bring
that down a bit. So maybe something
like this. Okay? And I do feel like we need to
widen this out just a bit. And to do that from one edge, we can use the
proportional editing tool that is right up here, this little guy right here. You can also press the 0
key for the shortcut key. And what this will
do, this we'll create an area of influence. So let's say I press S and
X to scale on the x-axis. And you can see this
circle that it's created. And if I scroll the mouse wheel, I can decrease or increase
the area of influence. So now let's say I
bring it down like this and I bring it out some. You can see that the area of
influence is pretty small, but if I drag it out, now it's going to influence
it more and more or less, and less the smaller it gets. So let's just say, I want to bring it
out about like this. Now I can scroll the
mouse wheel until it gets a fairly even distribution of that scale in the
X there like that. Let's take a look at that. Yeah. I've brought these out
just a little bit more, but it's brought them out
evenly all the way around. And that's good,
that's what we want. Now we could add a
subdivision surface modifier to it. Let's do that. Add modifier
subdivision surface. And we have some issues. First of all, we've got an
issue down here at the bottom. So how do we do this? Well, once again, what
we do on one side, we want the other
side to come along. So I think at this point, we need to re-introduce a
mirror modifier to this object. So what I'm going to do is press Shift Z again so
we can see through it. It the three key to
go to face mode. And let's click and drag and delete one-half of this object. I'll hit delete
and delete faces. Now let's add a mirror modifier and we can do that because we've got the origin of the
object in the center here. Alright, so let's come over
here, add modifier Mirror. Now once again, we have that same issue where the
Mirror has been added, but it's been added after the subdivision
surface modifier. Let's click and drag
and drop that up here. That looks a whole lot better. Now, let's also turn on the cage so we can see the
points on the other side. And let's turn on
clipping so we can't accidentally pull the points in the center away from each other. Alright, so that
looks pretty good. Let's in object mode. Right-click and
choose auto smooth. Let's click and drag up a bit so we get that
smooth edge there. We can also come over here to the subdivision surface
modifier and we can increase the viewport level. And what that will
do is just show us a higher subdivision
here in the render view. And yeah, I think
that's kinda what we want there, like that. So it's tab into edit mode. And now let's just add
a couple of edges here. And once again, that's gonna be the loop cut tool or Control R. You can see that over here. We can press Control R. And when we do, you can see that that is really more aligned with
the edge up here. So let me press Control Z and just move so
we can see these two edges. You can see this edge here, and this edge here is flat. But if we press Control
R, it's going to try. And I'll click one more time. It's going to try and kind of average between
these two edges. So as we get down here, it gets flat and
as we get up here, it begins to match the
shape of that edge there. Now, if you look in the upper left-hand
corner of the interface, you can see Number moving that edge,
slide, number, right? That's how far we're
bringing it up and down. Then you can see
something called even with the E in parentheses, and that even is off. What if we hit E in the
parentheses to turn that on, Let's hit E and we turn that on. Now look, it has locked that edge to the shape
of the top edge. No matter how far we
bring it down here, it won't change to the shape
of the edge on the bottom. But now look next to
even up in the top-left, we've got flipped and
the F is in parentheses. So if we hit the F key, look at this, it flips it. So it changes the shape between the edge on the bottom
and the edge on the top. So we can now hit the
F key and ensure that that edge is going to be the same shape as the
one on the bottom. And that's what we want. I'm just going to
click right here. Let's say. Alright, so
we've got that edge. Let's do the same
thing over here. Let's press Control R. Click, and now when we move it, it changes shape and that's
probably okay for this one. I don't think we need to
flip it or anything here. So let's try that. Is that about the same curve as we see in there?
Well, not really. So with this edge, let's hit G2 times and slide it. Oh, we've still got the proportional editing tool
on. Let me turn that off. There we go. I'm gonna hit G2 times. And when we do that, we slide that along the existing edges. I'm going to move
that like this alt, click this edge and
hit G2 times here. And now we can beginning to change the curvature
of that edge there. So that's maybe a
little bit more like what we're seeing in the
reference image there. Alright, so we've got that. That's pretty good. I think what I would like to do now is take this edge and
just extrude this in, in the y-axis just a little bit. So I'm gonna hit E, Y and pull in just a little. And then maybe one more
time EY and pull in again. So we get that kind
of curve there. So now that we have this, we've got a pretty good line of this right here of the Hood, right of the Front. So we could do a similar
thing here that we did. We could take this
line right here, maybe remove these edges. I'll hit the two key like this. And we could
duplicate these off, create a new object
and begin to extrude this back for this
part of the car. So in the next video, will begin doing that
8. Blocking in the Shapes of the Hood: Now so far I've been playing fast and loose with
where these objects are. A tab back into object mode. We can select these and I think they're a little
bit farther back. I don't think
they're this far up. So maybe something like this. We could open up another
image and see if we can find a little bit
more information about where that should be. Maybe let's take a
look at this one here. So maybe it's not
quite halfway back. So if this is halfway
back right here, maybe this is a little
bit farther forward. Once again, this
curve isn't exact, isn't perfect and we
will be adjusting those. But for right now, I think it's important to
keep moving forward and do your final adjustments
once everything's in. Once you have more objects
in the scene here, I'm thinking I'm
not pulling it back clear to hear
because once again, I feel that our perspective
is off here in this image. We've got quite a bit of, this is quite a wide angle lens. So I'm thinking about like this, let's say is maybe where that begins because
it looks like the front axle is just
behind where that is. If we take this, I'm just going to take
this cylinder and tab into edit mode and then press Shift S and Cursor Tool selected. So that tells us where
the axle is there. Then maybe I could bring this forward just beyond that axle. Alright, let's try that. Now. Let's come back and we can take this edge and we can duplicate this Shift D. And maybe I'll pull it back just
a smidge and the y-axis. And then let's split it
out as its own object, hit the P key, and
choose selection. Now if we tap back
into object mode, we can select just
that edge right there. Now, currently we have a
mirror modifier on this. And I think while we
extrude this back, I don't know that we
want that right now. We're probably going to
have to once again delete half and re-apply
the mirror modifier. But for now, let's
try it without, I'm gonna come over here and pull this down
and click Apply. And then I'm going to
move the origin of the object to the center
of this geometry. To do that, you can
right-click choose set origin and
origin to geometry. That's there now. So when we tab
into edit mode and I'll hit the one key
to go to vertex mode, we see our geometry here. Now, if we hit the
three key and we extrude back from here,
let's see what happens. I'm just going to hit the a
key to select all of these. Press EY and pull this
back to about right here. And in fact, we could turn off the Subdivision Surface
Modifier for now. Let's just turn that off. Okay, so now let's bring this back to about
right here, let's say. And it looks to me like if
we go to the Front View, we need to expand this. And it looks like
our front view and our side view maybe
a little bit off. But let's see if we can expand
and widen this piece out. To get this here. What I'm gonna do is
take these two points, let's say, or these two
points, either one. Let's move the cursor
to this pivot point. Shift S to, let's now change the pivot point
here to the 3D cursor. So we're going to
scale from that point. So now what Let's do is hit
Alt and click that edge. So we just select that edge. And then from the Front view, what we can do now is press
Sx and scale out a bit. Alright, so we're
going to bring those out about like this, I think out to this
width over here. You can see the width here. And then let's
scale in the Z, Z. And it will scale up from
that point, about like that. Let's test that out. Alright, so now what Let's do
is let's work on this Hood. You can see that it's got an
edge here, right in here. So I'm thinking that that's
going to be if I tab into edit mode and press
Control R and I click, I'm thinking that's going
to be about like this. Feels like that's about
the right distance. Then we've got this right here, this edge right here. That looks like it
might just go ahead and stand in for that edge at the bottom of the
Hood right here. So yeah, we could do that. We could take these
pieces here like this, and we could break these
off as their own object. And I think that there
is a line on the top. Let's see if we can take a look. If there's at all an image that gives us a view of the top here. Okay, it looks like it's a
single panel here on the top. And then these curves happen. And we've got a little flap
or Door on top here as well. Alright, That's good to know. So what we should
do then is really only have this be
its own object. And maybe this be
its own object. And maybe even these here feel like this
isn't wide enough. So maybe if we took this edge
and just hit G two times and moved it over a bit to give it a little
more room there. Then this side, once again, we could delete and
then Mirror over. So what Let's do is
let's take all of these and split these out
as its own object. Let's do that first. Let's press the P
key and selection. And now this piece
is its own object. And now that that is done, we can in wireframe here, select this side and
delete it, delete faces. And now we can add a
mirror modifier here. Turn on clipping,
Turn on the cage, and let's drag this
up to the top. Here we go. Now that we have, that, we've got a little more
space here between these. That's good. We can take these
and maybe break these out. So maybe I'll just take this here and break that
out as its own object. It'll hit the P key
and selection tab back into object mode
and just select that. Now I'm going to
apply the mirror. Here we go. So now we've got this object and this object that
we can work with. It looks like this
is two objects here. It looks like this
is all one object. So you can see that
seem right here. I'm gonna go ahead
and select this and split it out as its own object. And I do this just so
as we work on these and add edge loops
and make changes, those changes and edge
loops don't propagate out to other parts that
aren't the same object. So I'm going to press P
and separate this out by selection here to tab
back into object mode. And now we have this object, these objects, these
objects and this. So we're beginning
to split this area up as it is in the real object. Alright, in the next video will begin moving back toward
the rear of the Car.
9. Continuing the Line of the Body: To extend this to
the Back of the car, there are some things we need
to take into consideration. It looks to me like from
here all the way back to just kind of in the middle of the Rear Wheels or maybe just beginning at
the rear wheels. It looks like the Car
flares out, right? If we go to the Front View, you can see this part
right back here. That's the continuation
of this flaring out just a bit as it goes
back toward the rear wheels. So we need to be able to not only extend this out
and flare it out, but also get this curve
here for the cockpit. So how do we do that? Well, my thought is that we take this and they go
ahead and continue extending this the
way we just did here to get that
smooth transition, that smooth flair to the Back. Then we cut out the
middle because it looks to me like
if you look here, there's a scene here and
there's a seam here, and then there's the door. So it really looks to me
like this is one piece here. And then this is
another piece back here so that I
think can help us. Let's give that a try. So I'm going to tab into edit mode and I'll
alt click this. And we've still got
our pivot point down at the 3D
cursor here, right? So we can scale up from
there if we need to, but it doesn't really look like we're going to
need to scale up because this is actually
lower than this. So ultimately we will probably be scaling this down a bit. But for now, let's deal
with the width, right? So let's take this and
let's hit EY and move this straight back and then
maybe right about here. Once again, it's very hard
to tell and we'll know more as we get more
pieces on this, press Sx and scale this out
and try and get that flare to continue evenly from
the Front to the Back. Something like that. Alright,
so now that we've got that, Can we come in here and cut this so that, yeah,
right in here. Can we just take this and add an edge loop to this Control R? Click. And then I'm going to drag and add an edge loop right here, just in line with that
seem right there. Then what I wanna do is take all of these faces right here, right here, and just drag
select all of those. So we select that. And then I'm just
going to delete them. I'll hit delete
and delete faces. Now we've got these two pieces. What I wanna do now is get this part so it's
the proper height. So I'm gonna go Back to the
side view with the three key. And let's just
select all of this. I can hover over one of these components
and hit the L key. And that will select all linked
components of that piece. Because this is also
the same object, but I just want this. And since that 3D cursor is
still here at the bottom, I can scale this in the z-axis. I'll hit S, Z, and just scale this
down like this. We get down to about
right there, let's say, Well actually I think I need to be a little bit higher because this doesn't come all the
way down to the Hood here. So I just need to have
a similar offset. Okay, let's try that.
See what we think. We've continued that line here, but we've left the room
to create this opening. Let's now think about
connecting up the door. If I go to the side view, it actually looks to me
like these go too far down, right into this green area. I think I've got this
a little bit too low, so I'm just going to delete
those faces there and oh, the ones on the other side
as well. There we go. So it comes down to there. Now what I wanna do is with
say these two edges here, this edge and this edge. And these overhear two. Shift-click these two. Let's bridge edge loops
here connecting these two. So we continue that flare
that angle between these. So with these selected, you can go up to the edge menu and bridge edge loops here. Or a nice little shortcut
is for the vertex menu, edge menu and face menu. You can press Control. So here you see Control V, Control E or Control F. So control E to bring up the
edges and bridge edge loops. There we go. Now it connected these two here because I
had selected those, but let's just delete
that face there. I was confusing Blender there. So now we can arrange these and tweak these points up here
to get this curve here. In addition, we can also
do that back here as well. So let's begin in the back here, let's just hit the one key. And if we select that
point up in the top there, in the middle, Let's change
back to median points. So our 3D cursor or our 3D manipulator
there is at that point Let's turn on our
proportional editing tool. And from here let's
just hit G and Y. Now, as we move back, we can scroll the mouse wheel and move these back as well. Now they're not going to go. We don't want that, but
maybe I can get them about like this,
something like that. And from here let's turn off the proportional
editing tool and then continue pulling straight
back and the y-axis. So I'm just going to pull back
like this. And like this. Now the problem is we don't have the mirror
modifier turned on. So I think I'm going to
need to turn that on. Just like we've done before. Maybe what I'll do is I'll take these faces here
all the way around. I guess I can just
drag select them. Let's split this off
as its own object with the P key Separate by selection. Now if we tap into object mode, we see that that's its own
Object tab into edit mode. And once again, we remove these. Where is our object origin? It's here still in the
center along this y-axis. So I think this will work. Okay, Let's now add
a mirror modifier. Turn on clipping and
pull it up to the top. Alright, so now we've
got our points so we can drag them and they
will still stay together, mirrored on each side. So I'm just going to bring
them back like this kind of feels like that general curve
that we're seeing there. We don't have many points, so it's not going to be exact, but you can see we're getting that general Curve there
for the Back of the cap. So now let's go do that. For the frontier. For the Front. I think we could probably take
this edge right here and bring it up and align it up with that
seem in the car there. However, once
again, I don't have the mirror modifier
on this anymore. So Let's tab into edit mode. I'll hit the three key
to go to face mode. And I'll drag select
these, delete, delete faces, and we'll add
another mirror modifier. So you can see that
a lot of what we're doing is adding a Mirror, taking it away, or applying it, adding and again,
applying it again, etc. and as you've seen, we're
doing this a lot of times to continue that line. We want to be able to
continue that line smoothly and then come
back and work on these. So if I tab into edit mode now, now I can select this
edge and the other one on the other side will come
along like about like that. Then if I hit the one key
to go to vertex mode, Let's start working
on these here. I'll take that one
in the center again. And I'm going to bring this up, bring this forward a bit. And we're just going
to try and create that curve just
like we did before, by just taking these points and pulling them in the y-axis only. Kind of like this. And then take this and
bring that down like that. There we go. We're just beginning to
get that basic shape. Now, I think there's
more that we can do here from the top view. I don't think I did
that very well. We may be able to just
to kind of rework it here by pulling these a little bit like
that. There we go. That's a prettier
Curve, I think. Let's see if we can finish
off the top of the door. And to do that, I think what I'd like to do is split
this off here, hit the P key and
separate by selection. Now if I select this only in
select this edge right here, maybe I can extrude this up and then we begin
to create that curve. In fact, maybe we need to add a few edge loops in here so
that we can get that curve. Let's, let's do that. I'm press Control R, scroll the mouse wheel, and let's do that. Now let's take this edge and
just hit easy and pull up. Now we can use these points
that we get from those edges. Maybe bring this up, maybe we'll bring this up
in the Z, this up in the Z. We'll just begin moving
these straight up like this and see it we can get. So we're not yet getting
it exact of course. But we're beginning to just
create that basic shape. And of course we're
going to need more geometry to get these to connect up in a believable
way here with this curve. But that's what our subdivision surface modifier
is gonna be four. And in fact, we can now tab into edit mode here and go ahead and add an edge loop down here. And recall I can hit
the E key and then the F key and flip this
back and forth. Like this. I want this a little bit
flatter so I can scale an edge like this in its perpendicular
axis to flatten it. So I can press Z and then hit the zero key and that'll
flatten that up. Now we've got just
a basic shapes and some edges to help us Block
out future shapes here. Oh, we can take this and
get rid of these, right? Let's do that. Here we go. Alright, so we've got
that basic shape. Of course, it's
still very rough. But this is the general
shape that we want, that straight angled
flare out from the Front. That's, I think the
most difficult thing to get and I think
we've got that. Once that's done now, we can begin lining
these up and giving it more geometry to make the seams fit together
a little better. But before we do that, before we get too far into the weeds of any
particular Detail, let's keep going and see if
we can get some geometry down for the bottom of the
vehicle as well as the Back
10. Modeling the Trunk Area: Alright, let's work on
the back of the Car, the Trunk Area here. I've been adding images over here in this image editor
window that I created. And this is a good way to do it. You can also create new
windows over here and have a few images up
at the same time. But also I'm using a
program called pure ref. And it's a program
that allows you to compile all of
your images together. So let me bring it over here. Here's an example of it. You can basically drag and
drop your images into here. And then you can zoom
in and move around and have all your reference
images here in one place. It's a really nice way to keep an overview of all
your reference images. The interface is
a little strange. You can right-click and see the different shortcut
keys and how to do things. You can keep it always
on top if you want. And the way you move
it around is actually by right-clicking
and holding it. So I'm just going to
keep this over on my second monitor here just to see all the images that I have. And pure ref used to be free, I think now they have
a pay what you want. So maybe you can get it for
$1 or something like that. But I just wanted to point
out that I will have that pure ref board over on my other monitor
that I'll be looking at. But let's go ahead
and bring one up here in the image window, maybe something like this. So we can see the
Back of the car. And there are of course, several different
ways to do this. We could bring in a sphere
and try and squish it in, stretch it to fit this area and then try and
connect it up with this. We could also take
this and extended on back around and then attempt to take these up here
and bring them down to connect and have this curved
shape here on the back. I think that's the
way I'm gonna do it. I think I'm willing to maybe add an edge loop with
Control R down here. And then I'm going to
take this and extrude it out and try and get
that curved shape here. So let's give that a try. I'm going to maybe
select this edge, will hit the two key
and select this edge. And recall we have
a mirror modifier still on this object. So that's good. I'm going to press
the seven key on the numpad to go to the
top orthographic view. And recall you can also hit the Tilde key to
do that as well. But from here I think
I'm just going to try and eyeball a nice
curve around here. So I'm just going
to hit E and I'm gonna bring this right to
where I think it should end. I think it ends
right around here. And recall, I've got
clipping turned on. So when I brought
those two together, they clipped together there. And then what I'll do is just
begin adding edge loops. So let's see if we can
add an edge loop from the top view here I'll
press Control R and yeah, we can just click there
and then click again. And now that edge is selected. You can see it there. And then I'm just going
to hit G and move it out and just begin to
get that curve. So let's say we want something beginning
to look like that. So we take the Control R and add another one and hit G and
move that out like that. And I'm just kind
of splitting it up now with edges trying
to get this curve. Maybe something right in
here, maybe like that. And I can also hit
the one key so I can see those points
a little bit better. And maybe something up in here. Let me select these edges
or these points again. I think I will have to keep
it in edge mode though to be able to see my
inserted edge loops. Or we could go to wireframe, I suppose with Shift Z and see
those a little bit better. So let's try that Control R. And yet now we can see that
edge loop when we Create it. And so maybe
something like this. You can see I'm just trying to space things fairly evenly. Here we go. So let's take a look at that. Yeah, so that appears to be
a fairly nice curve there. Maybe we'll go
with that for now. Let me turn on the cage for the Mirror over here so we
can see all the points. And we could try and do a
similar thing again on the top, create connections
and then insert edge loops to begin to
bring up those curves. So let's see what we can do. Let's first count how
many edges we have here. If I select these,
let's go down. So we've got, well, we don't have this
statistics turned on yet. We can turn on
statistics over here. So we can see how
many components like edges that
we have selected. Let's come over here and
just choose Statistics. And now we have that
turned on and we can see we've got five edges selected, which is ten all the way across. Let's count these
down here, 12345. So we've got ten edges here
and ten edges up here. Can we connect these two? Begin to get this curve. Let's see if I take this. Let's just see
what happens here. I'm going to connect these two with my bridge
edge loops Tool. And once again, we can bring
up the edges menu with Control E and choose
bridge edge loops. And there we go. Now if we go to the side view here I'm
going to press Shift Z, press Control R.
There's our Edge Loop. Click the mouse twice and
then hit G and move this up. We can begin to get
a curve like this. So now that we've done that, Let's say we wanna
do that again here. Let's say we do this and this. So we're doing every
other one here now. Control E, ridge edge loops. Control R, click twice, and now let's bring it up. It begins to create
that curve both along here and along
the top there, right? So we're just beginning
to create that curve. And if we want to connect these, we can just select this, hit the F key to four, create face, and just
hit the F key twice, and that'll fill those. So now let's try that again. Let's say we want to
take this and this. Alright, Control E, bridge
edge loops, control our twice. Now, let's see if we can hear in the side view with the
three key on the numpad. Let's hit G and bring
this up like this. Right? So we're just
beginning to get that basic shape now
we can click this, it F twice and close those up. Now of course, you can
always come back and it, the G key points like this hit the G key and rearrange points. Kind of get them a
little bit smoother, so they're a smoother curve. You can also use the edit
tools to do a similar thing. So let's say you've got these
and you want them to get it a little bit more relaxed, a little bit more curved there. If you look over here, I've got a tab in Edit mode called Edit. And under here I've
got looped tools. And these editing tools
come with Blender. They're just not
enabled by default. So we can come over here
to Edit Preferences, go to Add-ons, and we
can search for OOP. And here they are,
the loop tools. Now, currently, I've
got these turned on or enabled with this
little checkbox here. Now if I take away the checkbox, you can see that this
little tab will go away. There it goes. And come back. There it is. So you just need to turn on that little checkbox
right there. And now you've got
access to these tools. One of the ones that I use
a lot is this relaxed Tool. So I can Alt click this edge
or Alt click this edge. I mean actually this is the
one I want to deal with. So let's select that
and then click relax. And I don't know if you can
see it, but it just relaxed and even those out
just a little bit. And you can hit it
again and again until you get it just the
way you like it and yeah, see those now are beginning
to be a little bit better, a little bit nicer curve. So now that we have these, we can go back and do a
similar thing that we did when we added edge loops to down here
to get that curve, we can just press Control R. Click twice, hit G,
and move it up a bit. Once again, Control
R click twice, hit G, and move that back a bit. So we're just beginning
to get that curve there. And then ultimately
we're going to add a subdivision surface
modifier to this. So if you look down here, I've got this disabled still. But if we turn this on, you can see where beginning
to get that nice curve. Now we can also turn on auto smooth here,
and there we go. So, yeah, that's
looking pretty good. I'm gonna go ahead and turn
this off for now so we can see the polygons
a little bit better. I'm gonna go back to
shade flat. There we go. Just, sometimes
it's easier to see the polygons as you're
creating the object. Alright, so I think we're coming along here in the next video. Let's go ahead and add
some edge loops and fill this in and then continue on with more
of the Back of the Car
11. Closing Off the Trunk Shape: Now as I look at this
a little bit closer, it appears that the
bottom of this part right here on the back is higher
than this part here. It goes up somewhere
behind that Fender. And I don't know
if it goes up as a smooth curve or a sharp edge. I'm guessing it would
be a smooth curve, but let's take a look at
something else and see if we can find any hint. Let's take a look at this here. And I'm going to press
Control and Spacebar. And it looks like we look
really close in here. It looks like
there's a curve from the area Front to the
Back here as it comes up. Right? It just looks like and who knows if that's
actually the case. I'm going to press Control
and Spacebar again. And I'm having trouble deciding whether we should take away this bottom row of faces here. We're just kinda move
things up a bit. I think what I wanna do, I think what I'm going to try is just to move things up a bit. I'm going to just take this
face here and for now, just delete it, hit the
Delete key and delete faces. And then I'm going to take this edge and I'm
going to move it up. So it's a little
bit higher here. And I want to take this edge. And I'm going to
hit the G key to times that will slide that edge along the
existing edges right there. And then I will take this one edge and just drag it up in the
z-axis here like this. So let's just see
what we have here. Maybe I'll tilt that in
just a bit like this. So now we've got a way that we can have this
be a little bit higher. And let's see how this works. So we do have to
connect these up. We're still going
to need to do that. And to do that, I
think we need to maybe add a couple of edges. So I'm going to take this edge here and
bring it down a bit. I'll hit G2 times to slide it. Now let's hide the
tires over here. Here's the tires collection. Let's just hide them here. Okay? And then maybe
what we can do is create some new edges here that'll allow us
to connect things up. So if we press
Control R, like this, now can we just take this and this press Control E
and bridge edge loops? I think we can. Okay, so that's
looking pretty good. Maybe we could take
this entire piece now or back here and just move
these up a little bit more. Actually, what I think
I'll do is select everything and
deselect these two. And then once again, let's use that flattening trick with the scale tool so I can press S, Z and zero and it will
flatten those edges up. Then I'll bring them up so
they all line up like that. And then we need to connect
these other things up. So we probably need an
edge right in here, right? To connect these up. So we could maybe take, say, this edge here, and we could maybe just
extrude this up now, easy, bring that up, push it in just a bit. And then we want
to connect these. So select this and
hit the F key. Select this, hit the F
key, and there we go. So now we're beginning
to get that. Once again. Always gotta do a
little tweaking whenever we do
anything like this. Now how are we going
to connect these up? It looks to me like we might be able to take
this edge and hit G two times and slide it this way a bit, maybe bring it out. So I'm just trying to keep that nice curve that
we had initially here. And maybe now we can have
these all connect, right? So if we once again
took this edge here, EY and pull this out like this. Let's take a look
at where it is. I think we need to bring it
in some, maybe even turn it. We could get the archae
and turn it a bit. And then we could
connect these up. So let's select this
edge at the F key, this edge at the F key, and we've closed those off. Alright, so how we look in here, yeah, we're getting there. So now maybe we could
take this edge, this edge, and this edge and just hit the F key to fill that. Now, what's interesting
is this isn't a triangle, it's actually a quad. You can see here, I'm gonna hit G two times
and move this back. We actually have four edges
there, which is good. But what makes it challenging
or what's going to make it challenging here is when
we connect these up, down here, this area. Because if we take
this whole area, say just some edges are around here like this
and hit the F key. We've got a face that
has 12345 sides to it. And we don't want
that usually because of our subdivision
surface modifier. It does better at Smoothing out polygons, quads,
four-sided polygons. And if we do something like add an edge from here to here,
Let's see what happens. So I can use the knife
tool with the K key, so I'll hit K on the keyboard. And let's just click here on that point and drag up to here. Click on that. And then
I'm gonna hit Enter. So now these are four-sided
polygons, right? But what about this here? This now is once again
a five-sided polygon. So we've got that problem. We could maybe add
an edge loop here. That to see what
we can get here. What we could do
here is actually add a point right in the center here to get these all to be four-sided polygons.
So let's try that. I'm going to, let's try
it with the knife tool. Let's hit K and click here, and then click here, and then click here,
and then Enter. And then let's hit K and
click here, and click here. And let's try that. So now we have all
four-sided polygons in here. And we've got a little
bit of a dimple here, but I think that's
just because we need to do a little bit of adjusting. Yeah, I think having those four-sided polygons
is going to help. Now, once again, we can Alt, click this whole edge
and click relax. We could click this edge here
and relax it. There we go. And we can also
take these in here. I'm going to select this one and control-click this point here. And that will select everything in-between and relax those. And maybe we can take this and this all the way around
and relax those. I think I'd like to
take this and this and hit the G key to times and
slide this down like that. We go. So we kinda space those
out a little bit better. Yeah. I think we're
getting there. I think we're getting
there and even here you're seeing
a little bit of a, of a corner on that too. But we can do some
adjusting here to get these in a little bit
more like this. Yeah. So we will continue
adjusting this. As I've said, we'll always keep adjusting at every
stage of the process. But I think for now this
is looking pretty good.
12. Beginning the Bumpers: Let's move on to Back here. I'm going to open another image here,
something like this. Let's take a look at this
control and Spacebar. And it's just this
kind of flat piece. And it's got these
braces underneath. So let's just
create this kind of flat piece with this curve here. And maybe that's just a cube. And let's scale that
to fit in there. So I've still got the
3D cursor over here. I can always buy one
and take this a, select a point over here
and move that cursor to it, Shift S to every go, and then press
Shift a Mesh cube. And with this cube, Let's just hit the S key
and scale it down a bit. I'll go to the side view. And let's scale it in the Z, Z and get it about the
right size we think. And what I'm wondering
is this right here. Is that this piece right here, or is that two different
things to little difficult to tell if
this is the same thing, but I think it is. So I'm going to bring
this up here and I'm going to turn off the
Subdivision Surface Modifier, or at least Turn off the
display of it, I should say. We go and let's see how far
we think we need to put this. Let's move it out a bit. Scale it in the X. Maybe I'll go to the back
view with control one. And let's press
Shift Z and C here. It's down here. So maybe I will bring
it to about right here. And it looks like that's
about how wide it is. You can see that here. Well, let's take a look. Okay. And then we bring
back the tires. Let's kind of get a sense of
how deep this needs to go. Maybe I select this face
here and pull it in some. We could take it all the
way to this turn that corner that we created
by deleting those faces. Shift Z. There we go. So yeah, let me take this face now
and bring it out just a bit. I'll scale it up in the
Z a little bit more. Then it's got these black braces here underneath with this curve. So maybe what I could do is
take this edge right here. And let's move this out. And then we take this
edge and maybe add a bevel to it to get that curve. To use the Bevel tool, we really need to
apply the scale. And what I mean by
that is if we tap into object mode and go up
here to the item tab, you can see that the scale
is non-uniform, right? These are all different values. And for many tools in Blender, it really helps to
Tool to know what to do and how to do
what it wants to do. To have these all
uniform, like all ones. And to do that, we
can of course press Control a and apply
the scale here. And now that's all ones. And to run the Bevel tool, you can see that up here
under the edge tool, bevel edges is controlled
BY or of course Control E, bevel edges, but we can of
course just press Control B. So let's do that and pull out. And then we can scroll
the mouse wheel to add new edges to that and get
ourselves a nice curve, like we're seeing here. Alright, now let's turn on auto smooth and take a look at it. Yeah, that's looking
pretty good. Let's expand this out just a bit so it's
a little bit wider, S X and pull that
out to about here. Let's say we go, alright, And at this point I think
let's go ahead and add that Rear Bumper back here. It looks like it's just
two metal strips really. They are a bit
curved on the edges, so we want to get that. But let's press Shift
a Mesh plane and let's turn it in the
x-axis, our x90 Enter. And I will move it
out to about where I think it should be Z. Let's scale it down quite a bit. There we go. And I'll go to the back view
control one Shift Z. Let's see if we can
put this in place. So let's say wants to
be about right here. Let's try that. I'll scale it down into
Z just a bit as we go. Let's go ahead and
split it. Let's split it and mirror it over. So in Edit mode, I'll press Control R. And with that edge dropped
right in the center, I'll hit Enter two times so I
don't accidentally move it. I'll hit the three key, select this and delete faces. Now, we can come over here
and add a mirror modifier. Turn on clipping. We can turn on the cage. And now whatever we do on one side will happen
on the other. So If we want control one, we can come here and maybe it
begins curving right here. So let's add an edge loop
and then drag it over here. We'll click once and then
drag it over here like this. There we go. And now if we take this
edge and just pull it back, then we take this
edge and once again, in object mode, take a look at our scale because I
want to add a bevel. Let's press Control a
and apply the scale. That's all one's good. Tab back into Edit
Mode Control B. And let's scroll this out to add a bit of a curve to that. Of course we can right-click, Shade auto smooth. There we go. And let's give it these
curves here on the end. So recall that if our bevel
edges tool is controlled BY, then our bevel vertices, it's Control Shift
B. So let's do that. Pull these out, scroll
the mouse wheel a bit. And there we've got the
rounded edges for that. And of course, since we
added a mirror modifier, it's happening on the
other side as well. And now we need to give it
a little bit of thickness. And that is just yet
another modifier called the solidify. So let's come over here and add modifier solidifies
right down here. Although I think I'm
going to have to move this over a bit. Let's do that. Here is solidify. Let's click that. And now we've got some
thickness on this, but I think that's a
little bit too much. I'm going to twirl
up the mirror here. And let's click and drag in the thickness or turn
on even thickness. Let's do that. And I will hold the Shift key and drag this. So it moves a little
bit slower until I think it's about the
right thickness. And I'm thinking,
maybe like this. Let's try that. Once we get that. Well, I'm going to bring it
back in just a little bit. Yeah, there we go. Once we have that, we can apply both the Mirror
and the modifier. Because if I try and apply the solidify modifier on
the bottom of the stack, let me show you what happens. So I'll just come down
here, click Apply. And now it says applied
modifier was not first. Result may not be as expected. So it really wants you to apply modifiers
from the top down. And since I didn't do that, Let's take a look here. If we tab into edit
mode and press Shift Z, it the three key. Look at this right in here. This is what happened because I applied that solidify from
the bottom of the stack. It added an extra face
here in the center, and that's one of
the things it means. That's what Blender means by
your results may not be as expected because
if we didn't have that Mirror on the top
and apply that solidify, we wouldn't have gotten that
face in the center there. We can just know that this
happens and delete it. Or we could have applied the mirror and then
apply the solidified. Let's try that real
quick Control Z when it go back a ways here until
we have the solidify. Now let's come up here, apply the mirror and
then apply the solidify. Now let's tab into edit mode. Hit the three key
and look at that. We do not have a
face in the center, and that's what we want. We do not want internal
faces on our objects that can cause problems with UV mapping and texturing
and Smoothing. And it can just be an issue. So we don't want that. So just know that if you apply a modifier that
isn't on the top, there may be an issue that
you've got to deal with. Once you've done that. Alright, let's now just take this control one,
I'll press Shift Z. Here we are in the
back view again. And I'm just going
to take this and press shift D to duplicate it, the Z key to stay in the z-axis and just bring
this down about like that. There we go, Shift Z to
go back to Solid View. And now we've got the
beginnings of the Bumpers
13. Adding Pieces to the Back of the Car: Let's now work on
these little things right on the Bumpers. I think we can probably just
create a polygon plane here, get it in the proper shape, and then use the
solidify modifier and the duplicate tool and get those where
we want them to be. So let's take a look at that. Let's go to the Rearview
with control one. And right here,
I'm going to press Shift and right-click and bring the 3D cursor
to that point. And then press
Shift a Mesh plane. Let's turn it in the
x-axis are X9 zero. And then I'll scale it
down with the S key. And let's scale
it down to we get it about the right height, at least, Something like that. Then I'll bring it in,
in the X Sx like this. And then let's, well, let's make sure it's
in the right place. I'm going to hit the seven key and just take
this and bring it forward here like
this period key on the numpad to zoom in. And then in the Rearview with
Control one on the numpad, let's add a couple
of edge loops here. So I'm gonna press the R key and drop an edge
right in the center. I'll just click two times. And then let's bevel
that edge here. I'm going to press
Shift Z so we can see that Let's beveled
edge with control, be pulled out a bit. Roll the mouse wheel so we don't have any edges in
the center there. And then let's click
right about there. Let me press Shift Z so
we can see that again. I want him to go
right about here. So let's press S, scale
those Annabel like that. So that with these edges here, I can take this edge, this edge, scale them in the X as X, and they will come in like that. So we get that basic shape. So let's now maybe scale
this up just a bit. Control one key. There we go. So it's a little bit bigger
than what we have here. And from here, I
think I will use the solidify modifier to give it some thickness back
into the Bumper there. Let's do that. Let's
come over here, add a modifier,
solidify right here. Let's choose even thickness. And let's also tab
into edit mode. And let's make sure
our scale is uniform. Again, control a,
apply the scale. There we go. So
now we're already getting some thickness
there from that. Let's press the Shift key and click and drag in the thickness Field and move it
back so it's a little bit thicker than
the Bumper itself. Okay, then from here, let's do that with
this one here too. So let's press shift
D, move that out. Let's scale it down
a bit like that. We'll move it back. And then I will use
the solidify again, Shift click and drag in here
like that, so we get that. And then kind of
where this point is, I'm going to move the cursor to this point with Shift S to. Let's then create a sphere, Shift a mesh UV sphere, and it's pretty big. So we can maybe take
this down to 0.1 m. So there we go. We could also maybe reduce
the number of segments here. So maybe I'll take
this down to 16.12. Let's try that. And
then I will turn it, I'll turn it in the
x-axis are X9 zero. I'll go to the
side view and with Shift Z and wireframe
and tab into edit mode. It the three key for face mode. And I'm just going
to drag select this half and delete
and delete faces. Alright, so now if
I scale in the Y, is why I can kinda
bring that in there. Maybe alt click this
edge right here and scale that in
some like that. Okay, now we could bring it
in and put it in place here. Let's do that. Let's bring it in,
kind of like that. Shift Z. Let's scale it down until
it's about the right size, maybe something like that. Let's try that. Alright, so now let's put all this together, clean it up, and then
add a few bevels to it. So for this, let's go ahead and add or apply the
solidify right here. Let's do the same thing here, and let's apply that one. Then let's combine
all of these here, here and that sphere. And to combine
objects or join them, we can press Control J. And I do want to point out
that in case you don't remember a particular shortcut
key or can't find it here. Like where is that join? Well, it is here, but if
you can't find something, there is a search
feature in Blender, and that's the F3 key. So if you press F3 It'll bring up a search window. And you can type in join
here and there it is, Object join and you
can just click it. And it will run that tool
on your selected objects. So we could have just done that instead of pressing Control J. So if you don't know that or don't remember
that shortcut key, you can always just hit F3
and search for it here. Alright, so now that
we've done that, we could now we can hit F3
and type in smooth, right? And we can choose
shade auto smooth. Here we go. And now we could maybe
apply the scale. We don't have uniform
scale over here, but I would like to add a
few bevels to the edges. So we could press Control
a and apply the scale. And then maybe I could
select these edges in here. I'll just go through, select all of these edges here, here, on around like this. On the Front. I've got
some selected on the back. Let's go ahead and select
a few on the back here as well, like that. And I'm pressing Alt and
Shift to select edge loops. And then it does kinda look
like we've got some edges here on the corners that could be beveled just
a little bit as well. Let's try that. So now let's say we don't remember what the shortcut
key is for bevel, so we can hit F3 type in Bevel, and here it is, bevel edges. And then we click and drag out, scroll the mouse
wheel just a bit, and maybe I put just
a few edges in there. Click. Now we can also add or
subtract the number of edges or segments
we have in there. But I think that's
looking pretty good. Let's go with that. Alright, so we've got
that now let's just press Control and the
one key on the numpad. And let's just duplicate that and move it over
to the other side. So Shift D and X and move that over
here. And there we go. I'm going to move
the cursor back to the center of the
grid with Shift S1. And then we go now
we've got our Bumper. Now we're going to need
to connect this, right? We've got this piece
that's coming down, this curved Brace piece
right here That's following the line of this curve on this
cube that we created. So what we could do actually is we could take this
edge right along here. I'm just going press Alt click. And well, we don't want that whole thing
all the way around. So maybe what we do is
we select this edge and then Control click this edge and that'll select
that whole thing there. Now what we could do
is we could duplicate that Shift D and enter, Move it just a hair, maybe move it down just a bit. And then I'm going to split
this out as its own object. You can see if I press Shift Z, it's in here as a separate edge from
the rest of the object. But I want this to
be its own object and not just a piece of
that existing objects. So to separate a piece out, a selected part out
from an object, we just press the P key, P to bring up the
separate menu and then separate by
selection right here. Now, if we tap back
into object mode, this is now its
own object, right? It's called cubed.001,
but it isn't cube. It is its own object right here. Now the cool thing about
this is we can take this, we can select it, we
can tab into edit mode, hit the a key to
select everything. You can see all
the points there. We can use this now
to create this piece. So I can press E and the X key to extrude only in
the x-axis like this. And then I can select
these two points, go to the side view and
extrude these out like this. Let's say it comes
down like this. And then this whole thing, I could solidify, I could use
the solidify modifier on. So I'll press Shift
Z so we can see this tab back into object mode. Let's come over
here, add, solidify. And now I can choose
even thickness. Our scale is almost uniform. We could go ahead
and press Control a and apply the scale. That doesn't do too much to it. And now we can hold
the Shift key click and the thickness Field
and bring that out. So we get that piece
that we're seeing here. We go that is in line with that curve of this
previous piece here. So that's just a good way
to create objects that need to be kind of inline or have the exact same shape
as another object. You just use that other Objects, say an edge or a face or something to then split off
and begin that new object. Alright, so let's keep moving
forward in the next video.
14. Organizing the Scene: Continuing with
blocking out the car. I think let's work on
this on the bottom, that Greenpeace right down here, the base of the car
right down there. Let's just with the cursor
in the center of the grid, Let's press Shift a Mesh and
we'll just create a cube. And let's scale it
down in the Z, Z. Let's place it where
we think it should go. Once again, I'll press Shift Z, hit the G key, and let's
move this up into here. Sz, bring it down some. So maybe something
about like this. And then we need to
scale it in the Y is why we don't really
know how far it goes, probably to the axles. If we go to the top
of the car here, we can scale this in, in the X until we get it, Maybe right there, the
proper width Back there, tab into edit mode. Drag, select these points, so we select all four of them
because we're in wireframe. If however we were in solid
mode and drag selected these, we'd only get the two. So because we're in wireframe, we can drag select and
get all of those points. Then let's just hit Sx
and scale these in so it kinda fits the shape
of the car there. Alright, let's take
a look at that. And then also we could work
on the Bumper in the Front, which I think is very similar
to the one in the back. Let's take a look here. Yeah. So it looks like
we could pretty much duplicate the one in the back and bring
it up to the Front. So let's just take all
of these pieces now. These pieces do not
have a modifier on them any longer and neither
do these, and that's good. So we can join all these
together now into one object. If there were modifiers
in the modifier stack, we would either need to apply them or ensure that they have the exact same modifiers
in the exact same order. Alright, let's go ahead and press Control J to
join those together. And then let's take this
and let's duplicate it. Shift D Y. Let's bring it on down here. And then we could
probably spin it in the x-axis, 180
degrees, right? We could go our X
one-eighth zero, and that'll spin it around. Now, how far from the Bumpers or from the Fenders is that when we can maybe take
a look at this one here. So it looks like it's
maybe more like this. Let's try that. Now. Am I wrong in thinking that this Here's a little bit narrower than
the one in the back. One of the things we could do is split it down
the middle again, which it is already, and then mirror it and
then move them in. So just as an exercise, let's go ahead and do that. I'm going to press Shift
Z, Hit the three key, and let's just select one
side here and delete faces. And then let's add a
mirror modifier here. It's currently mirroring around the center or the
origin of that Objects. So you can see it's all
mirroring around here. So what we can do is move
the origin of that object into the center of the grid and then it will
Mirror properly. So we could right-click, choose set origin to 3D cursor, since the 3D cursor is in
the center of the grid. And now we've got it
mirroring properly. So let's come over here, Turn on clipping, and we go. Now what we could do
is tab into edit mode. Select, say, I'll hit the one
key to choose the vertices. And now we could just move this in and the other side
will come along. So maybe this is a little bit narrower than
the one in the back. Well, let's take a look at that. I'm going to press
Control one Shift Z. And yeah, it's about what
we see here in the back. Let's press the one key. And it is, it's just a slight
bit narrower, isn't it? Yeah, you can see that there. So let's tab into edit
mode at the one key again. And I'll just drag, select these back out just a little
bit about like that. Alright, so we've
got our Bumpers in, in connecting the
Bumpers to the Car. I think we're going to need a little more information here. I'm not really able to see
what's happening here. It almost looks like this comes out and then it's
got this brace here. And there's this U-shaped coming out to the Bumper
right there. Right. It looks to me like there's a Brace and this
thing comes out and curves and connects
there to give it a little spring to it almost. If that's how it
works in the front. Is that how it
works in the back? I would say most likely. But I don't think we have
a better view of this. So let's use this information for the Back here.
Let's try that. And I want to do this
in such a way that we can mirror it over and
use it on the Front to. So let's go to
control one Shift Z. And I'm may be able to take
these pieces right here. And I'm going to move it
over just a little bit. Like this. It's just
slightly outside that. And this over here, I
should do the same, right? Let's do that. Move it so it's just
right about here. So that the relationship between this and this is similar as it is in
the reference images. Well, once again, it's
kinda difficult to see. So I'm going to create
a new window here by just hovering over a corner
and clicking and dragging. And I'm going to create a new
image window so I can bring in the image of that
Front that we just had. Alright, so I'm going
to move that up. And I want to create
this piece right here. I'm gonna do a little cleanup
in the outliner first. And since we don't
have much room here, I'm going to come up
here and right-click and choose duplicate area
into new window. And when I do that, I've got this new window I can
bring out and make a lot bigger so that I can see it and reorganize things here. So here's my tires and
the reference collection. Let's take the Bumpers,
let's do that. Let's select these two. Here they are here. Let's press M, new
collection Bumpers. And click Okay, so
those are the Bumpers. Then let's, I guess take all of this and let's call
this car body. I'll press M, new
collection Car Body. We go and let's come up
here and let's take this. And maybe this and
this can be our Grill. Let's do that. M, new collection Grill. Alright. And then what
are these things here? Well, that's the Rear platform that these are the
Fenders up here. And that Panel is so this Panel
can go into the car body. These two are the Fenders
press M new collection. Fenders. We go. Then these are the
pieces that we're working on back here
with the Bumper. Okay, so now let's go
ahead and close this. And now all of this has the
collections we've created. End it here. There we go. Alright, so let's go ahead and begin working on this
piece in the next video. This video was really
kind of figuring things out and getting straight in my head what
needed to be done. But in the next video, let's start working
on these pieces
15. Connection Pieces for the Bumpers: So now that we've organized everything here in the outliner, it's a whole lot easier to
just go through and click and drag and hide these
things like that. Now we can work just on this piece without anything
else in the viewport. Alright, so let's
press Shift a Mesh and let's just create
a polygon plane again. And this time, oh, and it looks like it came into
this reference collection. Right there it is. So I'm just going to take
that and drag it up here. And now it's down
here, there it is. So we should be
able to select it. Now. Let's turn it in the
x-axis, are X9 zero. Let's do that. And now let's maybe scale it. Well, I'll hit Control one. Let's do that. And I guess I don't
need to really scale it down while we
work on it here. In fact, I'll go ahead and hide the reference collection here. Alright, so now
we've just got this. Let's scale it in the
X, something like that. Let's once again add two edges, just like we did with
this piece on the Bumper. Let's press Control. R, hover over this
scroll, the mouse wheel. And maybe I'll scale it
in the Z with S and Z. And then once again
we can take these two and these two and let
to scale them in ESX, we go, so we're beginning
to get this shape here. And let's bevel these vertices. So let me tab back
into object mode. We need to apply our scale
control a, apply the scale. Now it's tab back
into edit mode. And with those selected, let's press Control Shift
B to bevel the vertices. And there we go, we can bring
those in about like that. Maybe. There we go. I feel like the whole
thing could be narrower. Let's do that. Maybe like this. Alright, so now with this plane, we can begin to maybe add
some thickness to this. We could use the
solidify modifier, but we can also just
tab into edit mode. Maybe go to face mode
with the three key, hit the a key and just
extrude in the y-axis. We could just hit B and
pull back some like this. Actually it looks like
it's a little bit thicker. And then there's a plate here, it almost looks like. So let's add another
edge right in here. And maybe we could bevel this. Let's press Control
be pulled out a bit, scroll the mouse
wheel so there's just one edge in
the middle there. Let's select that
edge, Alt, click it. And then let's hit the S
key and scale that in. So it just makes it look like there's a
bit of an edge there. And then let's smooth it. Right-click, Shade, auto smooth. Let's see how that's
going to work. Now this is gonna be very
small on this model. So let's just see how
this is going to work. I'm going to take this
and drag this down a bit. Down around 35 or so. I think that helps. And then let's bring everything
else back like this. Then let's put it in place. Let's bring it
back at the S key, scaled down quite a bit. Let's see what we have here. Control one. So this has gotta go
over here, right? Thank write down in here. And it looks as if kind
of connects in like this. Now it almost looks
like this piece comes down and then it goes back. It's hard to tell of course, but it looks like this
is all one piece here. So maybe we could extend that. Maybe we could take
this edge because recall this is just got to
solidify modifier on it. So if we extruded straight down, easy, we'd get that. See it actually turns it, which is kinda nice. Do we want to bring
it down a little bit farther and then take this back. If we pressed EY, we could go back like this. So maybe something like that, at least to begin with. And then it looks like we
need that curved piece here. So for that, I think we can
actually create a curve. Let's do that. To create a curve. It's going to come in
here at the 3D cursor. Anything we Create is, but let's press shift a curve and let's
try a Bezier curve. Let's do that. Let's take
that and move it back here. If we then tab into edit mode, we've got these pieces here, these two vertices or
points that we can rotate and scale to change the size and the
shape of the curve. So what do we want with this? We want it to come
in like this, right? Alright, so I'm going
to get the R key and turn it and maybe
bring it like this. I'll tab into edit mode, hit the a key to
select these two and scale everything
down quite a bit. And then let's just bring these back over into
here like this. So we take these two points and move them to where
we want them to be. So maybe I turn this like this And I turn these like this and then once we
get them in place, Let's scale them down. Maybe this, we scale up
something like this. Now let's take a
look at it Gear. Yeah, okay, so
I'll hit the a key and turn on our move
manipulator here. And let's bring
this up. I'll hit the period key on the numpad. And yes, so we've
got something here, I think that's going
to work for us. This can work for us. I think we may not need
these quite so big. I'll scale them in
a bit like this. Yeah, so let's say we
want something like this. So from here, we
need to convert that into an edge and then
extrude it down. So if we come over here to the object data properties
with this selected, the object data
properties will give us the settings for the Curve. And currently if we
converted this to a Mesh with vertices and edges, we would get quite a few
points because over here we've got 12 for the resolution.
So let's just test this. Let's come over here and right-click and choose
Convert to a Mesh. And when we do that and we tab into edit mode and
hit the one key, you can see all the edges. Those are the 12 points, right? If we hit a and come over here, you can see 12 edges. That's how much we had in
that resolution field. And that doesn't look too bad. I think that'll be okay. If we didn't like this, we can always hit Control Z, go back, change that resolution
and then converted again. But I think this is just fine. Let's now hit E and Z
and extrude this down. Now we've got this
and then we can come over into the modifiers panel and add that
solidify once again. There we go. Our scale is all
ones. That's good. Let's turn on even thickness. I'm going to hold
the Shift key and click and drag in
the thickness Field. And there we go. Let's try that. I will go ahead and smooth it. There we go. So now
that I've done this, I realized that I should
probably have this going in to here like this. Right? Which I guess means that
this could come back. So why don't we do that G and the Y key to move
that in the y-axis. So maybe we can move
this back to here we go. Alright, and now we
just need to put some Connecting Pieces on here, like these bolts here and other small Connecting
Pieces going around it. But that's not
something I don't think we need to do right now. I just wanted to get
these in place so we know generally how
they fit together. Let's now in the next video, work on what's underneath here. And I think what's underneath
here is the gas tank. You can see the gas cap here. I think we've got a cylindrical
gas can underneath here. So in the next video, Let's begin working on that.
16. Continuing the Back of the Car: Alright, let's continue
blocking things out here. I guess what we can
do is since we've got this pretty much blocked in, we could take this and we can Mirror these over
to the other side. And we can do that even with
multiple objects like this. We could use that Mirror tool, not the mirror modifier but
that tool so that control M. But we can do is we can change from median point to 3D cursor. We can ensure that
that 3D cursor is in the center of the
grid with Shift S one. And then we can Mirror
these in the x-axis. So we first need
to duplicate it. Let's press shift D and enter. Now let's press Control M. Hit the X key and
enter, and there we go. Alright, so now we've got
these on either side. Now I have not been able to
find any images anywhere of the under carriage of
a Kissel Gold Bug here. So we're gonna have to
kinda wing it, I'm afraid. So what I'm gonna
do is begin with, I'm gonna begin with a cube. I'm gonna go to
Shift a Mesh cube. And I will scale
this down and I'll bring it back and
let's try and get it about the right size. So let me change from 3D
cursor to median point. And to do that, we can
also use a shortcut key, the period key on the numpad. You can hit the period
key and change from 3D cursor to median point here. And the nice thing
about this is that these two menus here are the period key
and the comma key. They have them
right next to each other on the keyboard,
which is kinda nice. So you can hit the period key
to change the pivot point, and you can hit the Comma key to change the
transformation. So once again, this
transformation Orientation and this transform pivot point or
the comma and period keys. Alright, so let's take
this and move this up. I think I want to scale
it in the Z with S and Z. And I will scale this. I'm going to press Control
one to go to the back view. And maybe I will scale this up until it's
about like this. Jsx. Let's bring this out. Tell us about it needs
to be within these bars. I think they are on the
outside of that container. So let's say we want
something about like this, but I want it to be more curved. So there's a couple of
ways we can do this. We can one, use the subdivision surface
modifier for this, but we can also use
the Bevel tool. We can try that. So I will tab into edit mode and
maybe take this face. And I want to bring it
out like this, Let's say. And then let's ensure that
our scale is uniform. Remember here in our scale
we want these to all be ones for many of the
tools that Blender has, it's going to use that scale. So I'll press Control
a and apply the scale. So we have all ones here. And then if I tab
into edit mode, hit the two key for Edge mode
and select these two edges. Let's go ahead and bevel these control B and bring this out and
scroll the mouse wheel. We could also bevel the outside
edges. We can try that. So maybe alt click
this edge around here, and Alt Shift click
this edge around here. Do we want this edge back here? I don't think we
need it. I don't think we're going to see this. I mean, we could, I guess, go ahead and add bevels to this, but I don't plan
to see this from underneath very much, if at all. So let's just go
with these for now, control the and pull these out. I'll scroll the mouse wheel and reduce the number
of edges on that. There we go. Alright, I'm going
to right-click and choose, shade auto smooth. There we go. I
think really that's about all we need from that. We can, of course, scale then if we needed to be
any thicker in the z-axis, or maybe we need to scale
it out in the acts, but at least for now, and that's kinda what
I wanted from that. Alright, what about
that gas cap? Maybe we need to work on that. Let's just create
a cylinder here and take a look at
how we'd put this in. So I will take this over here. I'll select this
face right here. Move the 3D cursor
to it, Shift S to. Now when we Create
a new cylinder, it will pop in at that cursor. I'll create a cylinder. Couple of things here. We don't need it to be
quite this many vertices. So maybe let's bring this
down to say 24 vertices. We probably don't need a cap on the top or
the bottom here, so we could change this, the cat fill to nothing. And there we go. Then we could maybe take
the radius and the depth. We can take these down to
say like 0.1 and point to. And now we've got a
little bit smaller, so we can deal with it here. To make it a little smaller, we can tab into edit mode
and with all these selected, we could use our
shrink fat and Tool. I'll just bring this out
like this so we can see it. And that's over
here, right here. And you can see the
shortcut key is Alt S. So if we press Alt S and move that and you can see it
brings it in and out, shrinks it and fountains that without changing
the height of it, which interestingly
is the same as scaling the object in the X and the Y and
turning off the Z. And the way you do
that is you can press S and then Shift Z, and that will turn
off the z-axis. And you can scale in
just the X and Y. So this alt S over here does a very similar thing to just turning off one of the
axes while you're scaling. Very similar thing. So I'm going to press
S Shift Z again, bring this out a
little bit more. Maybe I will scale
in the Z for now. And let's just bring this
over and put it in here. I'm going to drag it up. Maybe it's a little
bit bigger like this. Maybe it's out here and
turn it in the x-axis. So RX and I'll just
turn it like this. Let's the way we
want it like that. Now, since I've been moving
this around in Edit mode, I've moved it away from
the object origin. And you can see
that origin here. If we want to put that origin back onto the geometry
for any reason, say we want to turn it or
scale it in object mode, we can always just right-click choose set origin and
an origin to geometry. There we go. Alright, so let's take
this edge right here, and let's slide it down along those edges to bring it
down a little bit more. And to do that once again, we can hit the G key to times and slide it
along these edges. So I'll hit G two times and slide it along
the edges like that. There we go. So what lists do in the next video is work on
building that gas cap. And maybe we'll put the
exhaust pipe in down here to try and get a sense of where that should go as well.
17. Global and Local and Object and Edit Modes: Now for the gas cap, I think what I'm gonna do
is create a new object and not use the edge or duplicate
an edge off of this. And I'll tell you why. Because as I was talking
in the last video, I tapped into edit
mode and I move this and turn this in Edit mode. And what happened
because of that, and I think this is a good
thing to be aware of, is when I changed from global
to local transformation, this Move Gizmo does
not change, right? You can see between global
and local, it stays the same. Now, let's just say
if I press Shift a Mesh cylinder and
create a new cylinder. And this time I moved this
and scale this and brought this over and turned
it RX like this, only in object mode. And let's say I did that. Now when I switch
from global to local, Look at that, the move
manipulator changes Orientation. If I hit that comma key
and go back to global, it's pointing straight up
and down in the global axes. If I hit the Comma
key and go to local, it's pointing in the direction
that the object is angled. So the problem
that I created for myself here is that I moved and rotated in Edit mode so
that I couldn't switch to Local Mode here for this object and have
it do me any good. So what's the difference?
Why do I care? Well, so if I use this one here, let's say in local mode, I'll hit the period
key and zoom in. What I can do is I can
tab into edit mode. I can take this edge. I can duplicate it, Shift D enter, maybe
I'll pull it up a bit. I can split this
out with the P key, Separate by selection right? Now, even though this
is its own object, when I tab into edit
mode and hit the achi, Local Mode is still pointing
in line with the Object. That's good because
I'm going to want to extrude that up to get that cap. Whereas over here let's
say I did the same thing. Let's say I took
this Shift D Enter, I'll hit the P key and separate
that out by selection. Let's tab back into
edit mode and I'll just select that edge
and look at this. If I tab into edit mode
and hit the a key, and even if I'm in object mode, that manipulator only
goes up and down. So now as I try
and extrude this, Let's say I go easy. It's going to have
an angle to it. Whereas over here, if I tab
into edit mode and hit easy, it comes up straight in line
with the original object. So that's something
to think about as you're creating objects
and moving them around. You can maintain the
ability to go from global to local while you're
moving it in object mode. And then once you get it
in place in object mode, then you can go into
edit mode and do your editing and
continue the modeling. So I am going to take these two and I'm going to
slyly delete them. And then I'll take these, move them back over here. Maybe I'll take this
edge down here. And since I have it in
local transformation, I can take this
and move it down. So we get that. Here we go. I can even move it
this way like that. So I just make my life a little bit easier by allowing myself to switch from global to
local in creating this. Alright, so now that
I've done that, I'm going to take this and I'm going to move the origin to it, set origin to geometry. There we go. Now I can scale this out a bit. I can move it down and I can
begin creating this gas cap. So let's say I tab into edit
mode and alt click this. I can move it down
in the local axis. That's kinda nice. So now let's just
begin working on this. So let's hit ES,
scale-out just a bit. Maybe pull up a smudge. Now we can extrude E, Z and pull that up. And then I will hit
E and the S key and scale analytic this and
maybe do that again, ES. And then I can collapse
all of these down by pressing the End key
for the merge menu. And then merge these
altogether into one point at the
center right there. But now we've got what's beginning to look
like a gas cap. I think it's a
little bit too thin. Let's press Z and
scale that up some, maybe about like this. Now it's got this
little bit on the top. Let's first create a sphere
for that little dome thing. Let's do that.
Select that point, move the cursor to
it with Shift S2. And then we'll press
Shift a mesh UV sphere. Now it's huge. So let's take this down to
16.12 and a radius of say, 0.1, that brings it down to a more reasonable level there. Let's remove the bottom of it. I'm going to press
the three key. Press Shift Z tab
into edit mode, hit the three key
for face mode and just drag select
these face here, hit Delete and delete faces And now I can maybe just hit
the S key and scale down. I'm still in that center, right? I haven't moved it yet, so we're still in
that center point. And from here, maybe I will hit the R key and turn it until it's
about right there. Bring that in. Let's now scale it in the
local Z as Z, like that. Alright, let's scale
it down a little more. Okay, Now let's get
that Rim around that. Now once again, we can use an edge or something
off of this, right? We can take this, let's say, and let's duplicate this. Shift D enter the S key
and scale that out a bit. And then we can extrude off
of this ES and pull that out. Then maybe we could hit easy and pull that
down like that. There we go. Now, they're
these little tiny things, but let's, let's not worry
about that quite yet. Let's just deal
with this for now. So now that we've got this, I think what I wanna do
is just kind of test the Smoothing and
beveling of this. So let's move the 3D cursor back to the center of the grid
to get it out of the way. I'll press Shift us one. Then let's select
this pipe right here. I'll right-click and
choose shade auto smooth. That looks pretty good. Let's do the same thing here. Shade auto smooth for that, and maybe for this to, let's try that. Okay? And then let's see if we
can add a bevel to this. I still feel like it's
not quite thick enough. So what I'm gonna do is take this edge and I'm going
to expand the selection with Control and the plus key on the numpad just to
bring those two there. And then in local mode, I'm going to pull down
some, something like that. I just want to bring it
out a little bit more. There we go. Okay, so now before I
use the Bevel tool, let's be sure and apply
the scale control a apply the scale tab
into edit mode. And let's select a couple of
edges that we want to bevel. Well, you know what? This edge could
probably come in, let's say E, S and
scale that in. There we go just
to close that off. And then let's maybe
take this edge, this edge, this
edge right up here. I'm gonna hit the two key. And I don't want
all of these edges. So let's do that
again in edge mode. Now that I've hit the
two key, click here, here, or Alt click and
then Shift-click these. There we go. And then
Control be dragged out. And let's try that.
How that works. Yeah, that's pretty good. Okay. And then this Up here, we could add a bevel to this, I think right here. Control be, pulled that out. Something's happening there. Now, do we have our
scale applied here? We do not. So let's try that. Let's press Control a
and apply the scale. Alright, going
back, let's select just this edge right here
and press Control B. And let's take a look
at what happens here. Still not doing
very well, is it? What do you think the
problem is there? Well, let's undo that and let's take a look at face Orientation. So I'm going to come up here and pull this menu down,
the viewports overlay. And I'm going to turn on face Orientation and look at this. We've got faces that
are blue and red. What does that mean? And why do we care? So in the next video, let's take a look at that.
18. Face Orientation and the Path Tool: Alright, so what
does all this mean? What is the blue and
the red mean here? Well, polygons by definition have a front and back to them. What this is telling
us is the blue is the Front of the polygon and the red is the Back
of the polygon. And this is defined by
the polygons normals. And a normal is just an imaginary
perpendicular line coming out of the
Front of the polygon. We can actually see
those if we pull this viewport overlays
down and come down here, two normals and turn
on face normals here. Now you can see
that these normals, these little perpendicular
lines on the blue ones, they're coming out, but on
the red ones they're not. And that's because
they're going in they're going on the
other side, right? The other side is blue and the normals are pointing
in that direction. The problem is, is when we
apply textures to polygons, they're only visible on the Front Side of the polygon where the
normals are coming out. So if we took this into a game engine or even to a Texturing program
like substance painter. In those engines, they only see the texture on the
Front of the polygon. So these red polygons in those systems
would be invisible. In fact, let's go over
to back face culling. Let's turn on back face
culling over here, I believe, here we
go, right here. Once we do that, now you can see those red
polygons are invisible. That's how we would see
those in a game engine. Let's turn that backoff. Now. The reason why we were
having difficulty beveling this edge right here is because the normals
of the polygons around it are not all facing
in the same direction. It was trying to do it in
two different directions. So we need to flip these, we need to turn these so they're pointing in
the proper direction. To do that, we can just hit the, a key to select all of these and come up to the Mesh menu. And here's the normals
menu right here. And we can flip them. We can recalculate outside,
recalculate inside. So since I've
selected all of them, I can re-calculate them outside
or I can just select one, say just select this face here. Go to Mesh normals and flip, and it will flip
that one, right? But it's just easier
to hit the a key. Go-to Mesh normals and
recalculate outside or shift in. And there we go. Now,
everything is blue. Everything's pointing in
the proper direction. That's what we want. Alright,
so let's come back up here. Turn off the normals. And we'll also uncheck
face Orientation. So we're not seeing that
color display anymore. Okay, now that we've gone
through all of that, Let's try the bevel
edges one more time. I'll Alt click this control
B and look at that. A nice clean bevel
for us, That's nice. Alright, so there
we've got our gas cap. Now let's also try and create that exhaust pipe down here. So just to try and get it in place to try and figure out
where it's supposed to be. Let's just create a cylinder and kinda place it in there just
to see where it looks good. I'll press Shift
a Mesh cylinder. We still have no cap
fills on this, right? And we've got 24 vertices. I think that should be
okay, Let's try that. I'm going to turn it in
the x-axis or X9 zero. And once again, I'm turning
it in object mode, right? We can come up here
and go to global. So we're moving everything
in the global axes. I'll click and drag
and the y-axis. And let's scale it
down quite a bit. So it's about the right size. I'll scale it in
the y-axis with SY, and let's do that. Maybe I'll make this
a little bit bigger. Alright, let's see where we
think this is supposed to go. I'm going to move this
over here like this. And you know what? Let's go to the Rearview with control one and press Shift Z. And there it is there. So let's just kinda
move it over here. Maybe scale it down a bit. Let's try this. It's kinda sticking
out a little too much. So let's go to the side view, press Shift Z and see if we
can even see it in here. I don't know. Is this it here? It's very hard to tell
from this side view. I feel like this is too far up here for at least our car here. So I'm just going to bring
it up into here like this. Let's try this. It's
kind of a similar place here based on these, right? And maybe a similar place
here based on this. Okay. So now what Let's
do is let's just take this edge back here. Just select this edge and
I'm going to extrude it in a bit because it looks
like it comes in sum there. So I will press E, S and scale in just a smudge
and then let's extrude back, EY pull back like that. Yeah, I think that's
kind of what we want. But I'd really like
that smooth curve here. And to get that smooth curve, I kinda feel like we may
need to use a path again, a Curve actually
here in Blender, kind of like we did for these. But instead of a Bezier curve, maybe we could use a
path. Let's try that. I will take this and let's just press Control
Z to go back a bit. There we go. I'm gonna
keep this butt from this. I'm going to extend a Path. Let's do that. I will move the 3D cursor
to this point with Shift S2 and then press
shift a curve and a path. Now we've got this path here. Let's turn it to be in
line with that cylinder. Let's press rz90 to spin at
90 degrees in the z-axis. Let's scale it down quite a bit. Let's move it back. And right about here is where I want to begin to curve up. So if we tab into edit mode, we have these points
on this curve. And these points
define the curves. So if I take this point here
and drag it straight up, you can see that
curve is beginning to bend like that. Alright? That black right there
is the actual curve. Maybe I'll take this and
move it back like this. Yeah, that's kinda what I want, but I want it to be a little bit tighter
of an angle here. It looks like it kinda curves
more of a 90 degrees there. So while we can do is move these points closer
to that bend. And the closer we
move the points, the tighter the curve will be. So if I move this in like this, and then maybe take
this and move this in, we're getting a
tighter curve there. That's kinda what I want,
something like this. And then I could just take
this and extrude it on up. So if we hit the E key and Z, we can just move that
on up into there. Okay? Now we've got a
fairly nice curve. I think that's pretty good. We just need to now convert
that into a cylinder. And recall, we've got our curve data
properties over here. Way down here, are
Object Data Properties. If we go to this tab here, now we can go to geometry
right down here. And in this depth field
I can click and drag and it will expand
tube out of here. So maybe about that thick. I like that. That's kinda nice. Alright, and now let's see
if we can adjust this a bit. If I take this edge, I want to move it
back some like this. And for this here, I want to take this and
let's extrude this end. Let's hit E S and scale that in. And maybe I'll pull
this out a bit. Let me hit the period key
on the numpad to zoom in. I'll pull this out. It EIS scale that in again. And then I'm going to hit EY
and move that in like this. Let's try that. Okay, That's also do a
similar thing back here. Looks like we've got a
smooth curve back here. I'll take this edge, it ES, bring it in, pull it out a bit in
the y-axis like this, and then hit E, S and
scale that in like that. Now let's smooth it. And maybe we could bevel
a couple of these edges. So let's see if we have
our scale applied. We do not, we have
non-uniform scale. So let's press Control
a and apply the scale. Let's then tab
into edit mode and maybe select this
edge right here. I think maybe this
one as well with Alt Shift Control B Up, we selected all
of those edges in the center as well
or in the middle. Let me press Control Z. I don't want that. Let me go to the edge mode
actually in press Alt, click and on-click this, so we only select those edges
and no edges in-between. So Control B, pull that out
as something like this. Let's select this
control be. Okay. That's kinda nice. And then let's
come back here and do a similar thing here. This edge Control B. And this edge and control
be just a little one there. Yeah, something like that. Let's see how that works. Now if we wanted,
we could of course, scale this up a bit in the
X and Z and turn off the Y. We could press the S key, Shift Y and just scale it out like this to make it a little
bit thicker if we wanted. We could also make that thicker or thinner
because we're still have control over the
depth here for the Path. You can adjust that
however we need it. Yeah, So I think
that's pretty good. I'm going to move the
cursor back with Shift S1. So once again, we're just
continuing to Block things in, get things in place, and allow ourselves to
continue to adjust. At every stage of the process.
19. Creating the Rear Fenders: Now one thing I'm
noticing once again, as we're putting
things together here, is that this piece isn't
just a flat piece. It kind of curves here on the underside following
the curve of the top. So we could do that. We could take this and let's isolate it first so
we can see it better. So we can see the
underneath side as well. To isolate it, you can press the division key
on the number pad, and that will take
us into local mode. Here in the viewport, you can hit that division key again and come out
of local mode. You can also select multiple objects and
hit the division key, and those will go into Local
Mode together as well. So let's just take this and hit that division
key on the numpad. And then what I'd
like to do is just take these faces here, maybe back here
and on the sides. And I just wanted
to delete these, hit Delete and delete faces. And now we just have this
single polygon plane. What we can do from here, let me hit the
division key again is we can use our
solidify modifier, just like we did on
this piece here, right? This is still just a
polygon plane here. For this, we can come over to the modifiers panel,
pull this down, choose solidify, and then
I'll choose even thickness. And I'll just click and drag
in the thickness field, maybe hold the Shift key down so it will move a little
slower and smoother. And then now it kind of
angles with that bend, right? You can see that here. So it may need a bevel there
at some point in time, but I think I'm just going to
leave it like that for now. So once again, as you're
blocking things out, you begin to see things. Things begin to click in
your head and you see how pieces fit together
a little bit better. Alright, now, also I want to mention that this piece
here is still a curve. If I tab into edit mode, you can see those
points still here. Ultimately, we're going to
need to convert that to a Mesh in the same way
we did this piece here. However, I'm gonna
leave it as a Curve for now in case we need
to make any adjustments, it's just easier to
make adjustments with it while it's
still a curve. But also, let's
see if we can use the Curve Tool to create
this Rear Fender. Now, we created the
Front Fender with just polygons and
extruding, and that's fine. But it's also used
the opportunity of the Rear Fender to just
try another Tool, right? So let's just press Shift a, go to Curve and Path. Here we go. Now you
can see it here. Once again, I think
we need to turn it. Let's press RZ 90. Let's do that. Let's go to the side view. I'll also press Shift
Z to go to wireframe. And let's just hit G
and move this up here. And then let's just scale
it down a bit like this. And now we can use the
points of the Path to define how this
is going to curve. So let's just select this point and hit G
and move this down. Maybe to here. Then let's select this
point and move it out. Hit G, move it out like this. Let's select this point
and move it down. I'll hit G. Move it down
to here, let's say. And then let's select this
point and hit G. And you can see that curve there
that were moving around. Kind of move this in like that, and just try and get
these as close to that curve as we can. There we go. So let's say that's our curve. Let's say that's what we
want from our Fender. We move this over. Now. That may not be exactly where we want it for our particular Tire. We may want it down
a little more, whatever, but as it is now, let's keep it on the
Fenders so we can use the image as a guide. Now from here, I'd
like to convert this to a Mesh and extrude it out, extruded in the x-axis to begin to get the
shape of the Fender. So let's do that. Let's go ahead and
right-click and convert to a Mesh here. And then if we tab
into edit mode, hit the one key, we can
see all the points there. But look how many
points it created. That's probably a little
bit too much, right? So let's press Control Z and go back to the point where
we're at a curve again. And let's come down here to that Object Data
Properties again. And let's see what we can do here to reduce the
number of points. So why don't we take this down? Let's take this down to maybe four in the resolution preview. And what that'll do,
you can begin to see the blocking
of it here, right? And as we turn this up, those segments become
a little smaller. So maybe let's take it to
six and see how that works. Alright, so we've reduced
the resolution by half. Let's try that. I'll right-click convert to
a Mesh tab into edit mode, hit the one key, and
there are points. Okay, So I think that
works pretty well. Let's now take this and
extrude this in the x-axis. Let's hit E and X and pull
this out some. Here we go. Now, as we do this, as we extrude this out, we also wanted to happen
on the other side. So let's add a
mirror modifier to this add modifier, Mirror. Now it's not going in
the proper direction. So why is that?
Let's take a look. Well, our scale isn't all ones, but it is uniform, right? It's all 0.336. So that should be okay. It's this right here. The 90 degree turn
in the z-axis. Well, Let's do is let's apply our rotation in the same way that we've been
applying the scale. Let's press Control a and apply the rotation. There we go. Now our Mirror is happening
the way we want it to. And let's turn on clipping. Good, Let's do that. Now if we tab into edit
mode and move this, we can see it's
happening on both sides. I'll go ahead and
turn on the cage so we can see the points
on the other side. And now we can begin extruding
this and bringing this down here on the side and
seeing how that works. Let's give that a try. I'll press EX bring that out some and then I'm going to
bring it down just a bit. And also I want to scale
a little bit in the Z, so I'll press S Z and
bring these up a bit. This, right, so we're getting just a
little bit of a curve there, and we're beginning to
get this curve here. We probably need
to scale in the Y, S, Y, and move those in a bit. Press Z again, bring
these in just a bit. But yeah, we're just
beginning to get that curve. Let's try again and maybe go one more and take it
almost straight down. So let's press E and I'm going to come out in
the x-axis like this. Then I'm gonna go
down like this. Maybe come back in just a bit. And then I'm going
to scale in the Z, Z like this and bring that up. And then I'm going to
scale on the Y SY, bring that in just a
little bit like that. Alright, let's see
how we're doing. I think that's pretty good. We could maybe bring
this up just a bit. I'll hit G2 times and bring
that up along that edge. So now we've got
that curve upfront. Do we even have a curve upfront? I should take a look. Well, it's hard to
see and in fact, it probably looks like
it's a little bit flat. I probably should
not have that that curved and do the Curve
more at the back, right? So for these then what
I could do is just take these and let's go take a
look from the side view. Yeah, I could maybe
scale these in the Z, Z to flatten them up a bit. Maybe turn them just
to smudge like that. And then extrude down and
flatten them up completely. So let's do that. Let's press E, bring
this down like this. And now let's just flatten
these up completely. S Z zero. There we go. Now the Back does
look like it's got a little bit of a
curve to it and it kinda angles up some. So let's maybe
select these here. Maybe I will hit E and extrude and then
rotate these a bit. Scale in the Y, S, Y like this. Then let's extrude one more time to get this little
area right down here. Let's hit E and bring these
down. I'm going to turn them. Then let's just
see what we can do by just moving some
points around. So if I take this that also
select that one over there, Let's hit G2 times and
move it along that edge. Same thing here, G2 times and we'll move
it along that edge. And this one here, same thing. We get just a little
bit of a curve there. And we got that little
flare there as well. Yeah. Maybe I'll take this
and move it up just a bit. Like this. We go. Alright, so now can
we take this and smooth it? Let's right-click and
shade auto smooth. We could increase
the degrees here. I click and drag up that hard edge should smooth out there a
bit. There we go. And in addition, we can also add a subdivision surface
modifier to this. Did we do that to this one? Yeah, we did that to that one. So we could do the same thing
to this one if we wanted, we could come down here, add a subdivision surface, and that really smooths
that out pretty nicely. If we wanted, we could take these edges and move them in and down a bit like we could
scale them in the Y. Move him down in the Z, scale them into Z a little bit. Just to get that a little
bit deeper. If we wanted. Here we go. Let's also go
to the back view and just take a look at the
width of this here. So it looks like it could
come out a little bit, be a little bit thicker.
So let's try that. Let's press Sx and
scale that out a bit, something like that. And then just for
viewing purposes, just to see how we're doing. If we wanted to mirror that
over to the other side, we could once again come up
here and change to 3D cursor. Now that pivot point is in
the center of the grid, we could then
duplicate this Shift, Enter and then mirror it over
in the x-axis by pressing Control M and X and
enter, and there we go. So now we've got it
over on the other side. Alright, looking pretty good, still continuing to
block things out, but I think we're coming along. In the next video. Let's see what we
can do by building out a little bit more of
the Front of the Car.
20. Modeling the Headlights: Well, backup here on the Front, I think the most
prominent things we can begin working on
or the Headlights here, Let's, let's do that. We can see the Headlights
from the front here, so we've got a way
to place them. We can kinda see maybe what the Back of the Headlights
look like here. And we can see them
here and here. So I think we've got
a pretty good idea. Let's go ahead and begin with a cylinder Shift,
a Mesh cylinder. Let's go ahead and keep
with 32 sides here. It's currently filling in
the caps with an end gun. That might work okay for now, let's go ahead and
just go with that. I'm going to press RX 90 to turn it 90
degrees in the x-axis. And let's bring it forward. Let's go to the Front
view with the one key on the numpad and then
I'll hit the S key, scale it down, Shift
Z for wireframe. And let's just bring one up here and kinda get it in place. So maybe I'd like to begin. Oh, and take a look at this. We are still in 3D cursor
for our pivot point. In other words, when
I hit the Esc key, it scales from that point.
We don't want that. We want to move Back to the
median point so I can press the period key and change from
3D cursor to median point. Here we go. Then let's go to the side view. Can we see them
from the side view? Not really. It's pretty well
hidden, isn't it? But we can at least
move it forward here. And it looks like it sticks out from the Front
just a little bit. So let's try it there. Yeah. It looks like it comes out. Well, it may sit right in
front of that Front and Grill. So let's see. I'll bring it out here. I'll scale it in the Y. Let's do that. Now I think I want to create these edges right in
here where the green is. I think we just need two edges. I'm going to press Control R and scroll the mouse wheel onetime, and then click twice. And now we've got
two edges there. And maybe I'll expand those out just a little bit SY and pull those out
just a bit like that. Then I want a bevel them just so we can get that edge there. So I'll press Control B
and pull out just a bit, scroll the mouse wheel, so we just have one
segment there, like that. Alright? Now I want to go to face
mode with the three key, and I want to
extrude these in and scale them in the Z and the X. Alright, so Let's try that. Let's press E, S, Turn off the y-axis, Shift Y. And let's bring those
in, some like that. Let's see how he did. Yeah, that's pretty good. Okay. In addition, I want
to take this edge and this edge and I want
to angle it down some. So once again, let's scale in
the X and Z without the Y. So I'll press S, Shift Y, and let's scale
this down, some like that. Write something about like this. Okay? Maybe bring them
in a little bit more, SY, something like that. Okay? Now we want to get
these edges in here, so I'll just select this
one face right here. And let's begin
getting knees so I can press E to extrude
and then scale in. Or I can also inset, which is really the same thing. It's just you only
have to hit one key. So to inset, I'll just press the I key and push in just a bit. And then I want to extrude
E and pull back with the icky and inset in it the E key and push
in just a bit like that. And now back here we can
do the same thing here. But as I said, you can also
press E and S and scale in, in the exact same way, which is also an inset. And then what I wanna do
is extrude out and scale. And so many hit E S, E, pull out S. And I'm just trying to get
this rudimentary Curve here. Like this. Maybe something like this. We go a bit of a
flat part there. Now, let's take a look at it, see if I've got a decent curve. Let me select this edge here. And I'll just hit the S key
and scale that out some, this one, scale that
out just a little bit. We get just a little tiny
Curve there. There we go. Okay. Now from this, we should
probably go ahead and smooth it. And we can go ahead and
begin our beveling though. We've still got all ones
in the scale, that's good. So if we tab into edit mode
and go to Edge mode here, Let's Alt click this. I'll Shift-click these. Maybe this and this, and this, and this and probably this one back here as
well, I would say. And then let's just
press Control B and pull out just a bit, scroll the mouse
wheel a few times. And maybe something. I'll hold the Shift key down to move the mouse a little
slower and smoother. And there we go. Let's see what we have here. Yeah, I think
that's pretty good. The only problem
I have with this is that these edges are, gaps are a little bit too wide. So to work on that, Let's just go to the top view. I will go to wireframe
with Shift Z. And maybe we could just select like this here and maybe move
it in just a little bit. Maybe we could select this here and move this in just
a little bit like that. Something like
that. There we go. Now we can take this and we could just mirror it
over to the other side. Once again, we can
hit the period key, go to 3D cursor, duplicate it with
Shift D and enter, and then Mirror along the
x-axis with Control M, the X key, and Enter. There we go. Now we've
got our Headlights. Alright, in the next video, we'll work on some of
these Connecting Pieces to kinda ground them and make sure they're not just
floating in the air
21. Working on the Front Details: Alright, now I would like to somehow attach these Headlights and I think they're attached to this part of the
Fender right here. You can see that right there. However, it looks like these
things come down to here, which is a connection between this yellowish piece and the Greenpeace at this
curved bar here. So it almost seems like to me, I need to come down here first, create this bar here, and this crossbar maybe. Then I need to create this
kind of scoop in here. And then I can go
ahead and go up and create that green
part of the Fender here. So there are times like this when you want to
create one thing, but you really need to get
all the Connecting Pieces Together before
you can attach it. So let's try this. I'm going to begin with
these things down here. And to do that, I
think I just want to cube Shift a Mesh cube. And let's scale this down. And I'm going to
bring it forward. And I want it to be, let's get it in and
write about in here. It looks like it goes right along the side of
the Chassis here, right beside the Grill. So let's just say it. If I press S Y, let's just say it goes
like this, back into here. So once we get it about where we think we wanted to be thin, we need to bend it. And to do that, maybe add an edge loop here, right in here, and
then pull this down. So let's do that. Let's press Control R and add
an edge loop right in here. Then I'm going to take this face right here and
just pull it down. And where should this go? Let me see. It looks like it
goes on the inside of these. Yeah. So that's kind of what
we want right here. Let me bring it back a bit. If I hit the one key
and press Shift Z. Here they are here. So now that we've got this, let's go ahead and apply the scale with Control a
and apply the scale here. And then to get that curve, I'm just going to
try a bevel here. Let's press Alt and click
Alt and click this edge. I'm not in edge mode.
Let's press the two key. Here we go. Alt, click that edge
all the way around. And now let's just
bevel it and see if we can get a curve like that. I'm going to press Control B. And let's pull out
and I'll scale or scroll the mouse wheel a bit to get a curve that
looks something like that. Yeah. Something like that. Okay. Feel like it's a
little too wide. I'm going to scale
it in the X with Sx. Bring that in just a bit. Let's now Mirror this over. I'll press the period key, go to 3D cursor, Shift D, Enter Control M and the
X key, and then Enter. Now that we have that, let's start creating this kind of scoop thing in the front. It looks like it's maybe
a polygon in the back. And then extrudes up
and up and up to these. So let's create a polygon plane. First of all, I'm going
to tab into edit mode and maybe just select this
one edge right here. Now I'm going to bring
the 3D cursor to it with Shift S to every go. And that means whatever we Create will come
in at that point. So let's press
Shift a Mesh plane, Turn it in the
x-axis, are X9 zero. And maybe move it up
a bit in the y-axis. Then I'll scale it down. I'll hit the Esc key
and scale it down. And let's get it about
the right width. So maybe I scale it out
to about right here. Now let's take this
edge down here, and let's move it up to
where we think it should be. Maybe up here. Oh, let me switch
back to median point. Here we go. Then let's take these three
edges right here and let's extrude these forward to about where we can
see that here. So Let's press E, Y and move these
forward to about here. These faces might need to come in just a little
bit like that. There we go. And these might need to come
up a little bit as well. So I'm just trying to get the
basic shape here like this. If we scroll in, it looks like there's a
plate on top of this. So it looks like it kind of goes out and there's a plate
on top to hold it. So maybe that's something
we could do ourselves. Maybe we could take these here, duplicate these off, and bring
them down to connect here. Let's see if we can do that. I will duplicate
this with Shift D. I'll press the Z key
and move it up a bit. Let's split it off as
its own object with the P key and choose selection. And then with this
edge selected here, I wonder if we can
connect it with this. So how many edges
do we have here? We've got 12345. Alright, so let's
come down here. Let's join this with this
piece here, Control J. And then let's add five edges
here, 12345, like that. Now can we take this edge here? Also Alt Shift, click
this edge here, and then press Control E
and bridge edge loops. That. Alright, so now actually
let's take this edge and this edge and move them
back up like this. We go. Alright, so now we have the
beginnings of that shape. What we can do now is split this in half and have
it mirrored over. Let's do that. I will press Control R and
drop an edge right here. Let's press Shift
Z and drag select this side, delete
this side delete faces and mirror this over. There we go. I'll go ahead and turn
on clipping here, and I'll turn on
the cage so we can see the points on
the other side. So now we're beginning
to get this basic shape. However, we need it to
be a little more curved. Now, don't we in here? So let's try our trick of adding a bevel to this
and see what happens. Do we have our scale applied? Let's tab into edit mode. It's uniform, it's
0.278 for everything. But let's go ahead and press Control a and apply the scale. Now with this edge selected, let's press Control B. And let's bring
this out like this. Alright, so we've got
the beginnings of this. I think there's still some
adjusting that we can do. But I like generally what
we're getting with this. We could also maybe
bevel this edge. We could try that control B and Bevel that edge back
here. Let's try that. Yeah, that's not bad. Alright,
so in the next video, we'll work on creating
one of these plates and beginning to connect this
up into the Fender here
22. Modeling More Front Details: Now it seems to me that this little scoop kind of
tilts up on the bottom. So let's see if we can do that. Oh, it looks like that two points here in the center didn't
get clipped together. So since I have
clipping turned on, I can change back
to median point. And if I pull these in and out and clip them
together like that, now it's all one
and I can't pull it apart as long as I have
clipping turned on here. Alright, so to tilt these up, I think I want to use the proportional
editing tool for this. So I'll come up here. Here it is, the
shortcut key is oh, so I can click on that. I want to turn on connected only ensure that
that is checked. And now when I hit Save G and Z, I'm going to press G
and move in the z-axis. You can see I've got the
area of influence here. I can scroll the mouse wheel. If I pull this up like that, I can scroll this
out until I get more of it being
influenced by that. Now, I'm not able to see this area up here
from that angle. So I think I want to be able to see because
I don't want to change this curve. So
let's try that again. I'm going to press G and
Z. I will pull up a bit. And then let's scroll out. And I just wanted to go
until I get see how I'm beginning to push these
up over on the sides. So I don't want to do that. Something like that. I could maybe take one
of these and hit G and Z and do a similar thing that's
begin to pull this up. Maybe like that. Then let's kinda bring them in. It looks like it
narrows some here too. So maybe I could take
something like this, press GX and begin pulling
these in and scroll out until they begin affecting
that up here on the top. And I don't want to do that. They'll begin to bring
these in as well. Alright, yeah, so now we've
got that a little bit tilted up and a
little bit angled in. I think that's going
to work pretty well. I might take this whole edge, deselect these points and
just bring these up a bit. You can see how
it's tilted down. So let me take this and just
bring this up like this. Maybe something like that. Maybe take this whole edge and bring this up a bit
and bring this down. So just to kinda clean it up. And we can also
use the Relax tool for this that might
help. We can try it. I'll Alt click this and maybe deselect these points up here and then hit relaxed
and see what happens. Yeah, so that might help. Now I can see I've
got this kind of edge right here and
right over here. And that kinda tells me
there's something going on there that maybe
shouldn't be. We could right-click and choose auto smooth and try and
adjust the smoothing angle, but that doesn't seem to do it. And if I wanted to say add a solidify modifier to
this, Let's try this. I'm going to come
over here because this does have a bit
of thickness to it. Let's go ahead and add a solidify here and
see what happens. Alright, look at it. Look at what's happening here. Kind of strangeness
is happening here. And if I choose even thickness, whoa, look at that. It's not exactly even is it? So there's something going on here that isn't quite right. Let me take away the solidify. And once again, I think it's maybe our face Orientation here. Sure enough, look at that. We've got red polygons
here in blue here. So as we mentioned before, blue is good, red is bad. You want the blue facing
out, facing forward. So what we can do is
with this selected here, Let's tab into edit mode. I'll hit the a key and
a recall that if we go to Mesh normals, recalculate outside is Shift N. That's what I'm gonna do them
and you can press shift in. And there we go. Now that's looking
quite a bit better. So if we come back here, turn off our face
Orientation colors. Look at that, that
crease is gone. And now, if we come in here
and add a solidify modifier, That's looking a
whole lot better. So let's choose even
thickness here. And I think I can bring
that thickness down a bit. I'll hold the Shift
key and just bring it down so it's just
right about there. Yeah. Yeah, that gives it a
little bit of thickness. Alright, so with that
fairly well in place, Let's take a look at adding
these plates up here. I think for these,
we could probably just take these faces and we could extrude or actually duplicate these
off and make this. So let's do that Let's press shift D, Z and I'll bring these
up just a little bit. Now, it's still got a
solidify modifier on it. We can still see that here
may not be a terrible thing. Let's split this out
as its own object. Let's press the P key and choose to separate by selection, tab back into object mode, and I will select
that new piece. So now what we could do is
maybe bevel these corners, these vertices here,
because you can see it's kind of curved there. Let's tab into edit
mode and make sure we've got all ones in
our scale and we do. So I'll go ahead and
select these points here. Then let's press
Control Shift B. Move the mouse out a bit, scroll the mouse wheel,
and there we go. So now we're beginning
to get that curve there. Alright, let's do that. And also we could
select this one and maybe add a bevel
to this as well. Control Shift B and add
a bit of a bevel to that right there we go. Alright. Now the next thing is we could
add a little half sphere here as if that's been bolted
down, we could do that. So let's tab into edit mode. Select that face, Shift us to, to move the cursor. Shift a mesh UV sphere. Let's change this
to maybe 16.12. And for the radius, Let's take it down to 0.1. We go so it's a little
more manageable. We could go to the Front view, Shift Z tab into edit mode and hit the three key
for Face Select. And we can select these
faces here, delete those. And then let's scale down and press S to Z and
scaling the CSI. Alright, so how small
do we need this? Maybe something like this. And then let's our X and
turn it in the x-axis. Then we could also
change from global to local and slide
it up like this. Oh, it's not that far, is it? Let me bring it back
down here like that. There we go. Okay. And we can smooth it. We go. And also we need to
put it right up here. So let's do that. Shift D Y, we can
move it up here, the period key to zoom
in and let's get it set. So I'll press RX, Turn it a bit, bring it down. See if we can get
this right on here. Our X. There we go. Alright, so we've
got those two now. We can take these and duplicate them over
to the other side. Why don't we press Shift S1 and move the cursor to
the center of the grid. And you know what? I want to move this just
a little bit more like this before I
duplicate them over. Yeah, there we go. And now let's just
Mirror these over. So once again, let's
press the period key, go to 3D cursor,
press Shift Enter. And then we Mirror in the
x-axis with Control M, X and Enter. There we go. Now they're over
on the other side. Alright, we've got
those pieces now. I kinda feel like these
could be thinner. So let's move the cursor
back to the median point or the pivot point back
to the median point. Let's tab into edit mode. Hit the a key and I
want to press S X. Just scale these in just
a little bit like that. Yeah, I think that's
a little bit better. Now that we've got these, I think it's time
for us to begin connecting these
up to the Fenders. So in the next video will
begin working on that.
23. Connecting the Fender to the Chassis: Alright, now we
can finally get to the part where we're going to
attach this onto something. But I'd like to do is create this strangely
shaped Fender piece. It really does look like they just kinda slapped it on there. But it's got a
very unique shape. And I think we want to maybe do this in
a fairly unique way. And what I'm thinking is that we take
something like this. I've already selected
these points. So maybe this point,
control-click this point. And maybe we want to take this piece and
move it back a bit. So let me just select this face and I want
to move it back. I'm just going to
move it straight into the car right about here. Then I think what I wanna
do is duplicate this off. And currently this
has eight edges to it and duplicate it and
put it down here, mold it to this thing, and then bridge those edge
loops if that makes any sense. In fact, what we could
even do is we could try and just take an edge off a here and make sure it has the same number of edges so that we can
bridge edge loops. However, before we get to that, the problem we're having here is that this is a mirrored object. So we kinda need to apply the Mirror to be able
to grab this one edge, then use it to bridge
edge loops because currently this is
a mirrored object. We want to apply that
mirror modifier. But before we do,
there's some things I want to tweak on this. I've been noticing that
there are these little, there's a kind of a dimple here. And if I go to the side view, I feel like it's
a little bit too thick here and not
thick enough here. So anyway, I think I'd like to maybe work on this
for just a moment. Yours may be fine, yours maybe just great,
and that's fine. But I need to do a
little work here. I'm going to turn on the proportional editing
tool and press Gy. And I'm just going to move
these back just a little bit like this,
something like that. Let me see how that works. Then I may just begin
pulling these out. I'm going to turn off the
proportional editing tool and just press GY and move
these out just a bit. Though, sometimes you just need to do a little
bit of tweaking. And I also want to get more
of a curve here on the Front. So let's go to the side view. Actually let me isolate this so I'm not seeing anything else. I'm gonna hit that division
key on the number pad, so we isolate this. And then I'll hit G
and pull this down. And as I said, yours
may be just fine. I just didn't quite
spend enough time getting it all the proper
shape at the beginning. Bring this down like that. Just trying to get a decent curve to it,
something like that. Maybe. Now in the back, it looks like it's pretty
straight because we've got a thing a a mud flap
hanging down from it. So I don't think
that's an issue. Alright, I'll hit the
division key again. Let's take away this
one because that was just a mirror of this. And let's take a look and
see what we think here. Yeah, I feel like
that's pretty good. So Let's go ahead and
apply the mirror. And if at some point
in time and we want to change this, modify it somehow, we can always
delete half and add another mirror
modifier onto it to make our lives a little easier
while we're adjusting it. But for now, let's go ahead and come over here
and click Apply. And now when we select
this side over here, we're not selecting
this as well. Okay? So I think once again, I'm gonna go from
here to about here. And that is once again
eight edges, alright? For this down here. Let's take this edge maybe
from here back to here. And let's duplicate
this and pull it off. I'll press shift
D X, move it out. Let's press the P key and
separate it as its own object. And then I'll tap into object
mode and select that again. So how many edges
do we have here? We've got seven edges, okay, we're pretty close
actually, that's not bad. Let's do that same
thing up here. I will take this
edge and let's press Shift Dx and bring it
off just a little bit. Then let's hit the P key
and separate by selection, back into object mode
and select that. Now we can select
these two pieces here and join them
together with Control J. Now, we have one object that we can bridge
edge loops between, but I think we need
to first of all, add an edge right here. I'll press Control R or at a vertex I should
say, and I'll hit Enter. Alright, so now I can press G2 times and slide this
back like that. And I just want to spread
these out a bit now and I'm just hitting G two times
to move them around. So they move along that Shape That now that we've got that we should be able to hit the a key and select everything, and then press Control E and bridge edge loops.
And let's take a look. Okay, So I think
that's pretty good. What we need to do now is add
a few edge loop so we can create this kind of strange
loop or arch there. So let's press Control R
and scroll the mouse wheel. And I'm adding, if
you look down in the bottom-left corner
of the interface, you can see the number of cuts down there and I'm
going to add eight, and I'll click and click again. Now we do have that here in the loop cut and
slide settings panel. We can changed the number
of cuts if we want here. But I think that's
probably pretty good. Let's go with that. And then what I'm gonna do is take say this point right here. Turn on proportional editing. And I want to bring
this up some, I'm just going to hit the G key, scroll the mouse down and I'm going to bring
this up like this. And maybe scroll out a bit. I kinda want it like that. Then maybe I'll take this one, hit G and bring it up some. And maybe I'll bring
this out as well. So maybe I'll turn off proportional editing
tool now and just hit G and bring this out. So it's kinda blocking now, I think I'm going to need to use a subdivision surface
modifier, which is fine. Alright, let's get
that like that. And then let's go
ahead and apply a subdivision surface modifier here or add one, I should say. And I'm going to
bring this up to, to turn on the cage here. And now we should
be able to take some of these and move them
around a little bit easier, like this, get a
little bit more of that curve in there like that. So it may just be a matter
of tweaking points. And we can of course Turn on the proportional editing
tool again if we want. But I'm just going to try it
like this for a little bit. Kind of point-by-point and
see what I can do with it. Alright, I think that's
actually pretty good. Let me go ahead
and auto smooth it there so we get more of
a smooth look to it. Let's reduce the view
port level here again, just to see how we're doing. From here, what I wanna
do is maybe just extrude this up to get this kind
of connecting part. Let me try that easy and I'm just going to
pull up a bit and then easy again and maybe push
it in just a bit like this. Don't wanna go too far. We go. And also maybe I'll add that auto smooth again and drag up in the angle degrees here just to give us a
little bit more smoothness. Then down here as well, I feel like I need to
somehow connect this. And I'm not seeing I think it goes down along
the side here. So let's do that. Let's pull this in just a bit and then let's extrude
straight down, easy. Pull it down a bit easy and pull it down some more.
And maybe one more. Let's bring it down like this. There we go. And I can hit G two times
to bring this up a bit. We go. Alright, so now let's add a
solidify modifier to this. Solidify here. Let's make sure our
scale is all ones. I'm going to press Control
a and apply the scale. Alright, that I think
helped with the solidify. Let's choose even thickness. And I will press the
Shift key and click and drag in this field and
bring this in and out. I think I wanted to
go down like this. Maybe the subdivisions do
need to be backup to two. Let's see. Yeah, that's smooths
it out pretty nicely. I feel like this needs
to come up a bit, right? This goes down too much, whereas this goes straight. So I may need to
adjust that a bit. But generally speaking, I think we're doing
pretty well here. Let me just take these
and move them just a bit. We get more of a
straight line here. Alright, so we finally now have a piece that we can begin
connecting the Headlights to. Maybe we'll get to that
in the next video.
24. Creating the Connecting Pieces for the Lights: Now for the Connecting
Pieces for the Headlights, there's some interesting
stuff going on in here. First of all, we've got this
horizontal bar going across. So let's first deal with that. I'll press the one key on
the numpad and then Shift Z. And here's that bar right there. So let's just press
Shift a Mesh cylinder. For this cylinder, we probably
don't need so many sides. I want to take it
down to 16 sides. Let's take it down
to 0.1 and 0.2. We don't need a
cat fill for now, so I'll just select nothing. And then let's bring it up. And here's that bar right there. I'll turn it R9 zero. Scale it down. Maybe I'll switch back
to global for now. Let's do that. And then let's just press Sx
and bring it out like this. Still needs to be a
little bit thinner now. So let's just hit the S
key and scale it down. And then Sx and bring
it out like that. Let's say it's
something like that. We do need to go find it. It's in the car, in the
middle of the car here. I'll bring this up. Here we go. And maybe I'll take
a look at it from the top view just to get
these right in the center. Because it looks like, well, it looks like the
connection is a little bit back from center
now, doesn't it? Because this piece
that the wire, the electrical wire comes up
and out of this into here. So we've got this cylindrical
piece coming down from the light that I think is
just for the electrical wire. And then we've got this piece that's actually holding it up. So let's just see, I'm going to scale this
down a little bit more. Scale it out again. I'll smooth it. There we go. Let's move it back just a bit. So it's kind of at the back like this of that middle
segment on the light. And then this piece. So we've got a bracket
going onto here. So what I'll do, let me select these points right here and press Shift S to, to move the cursor to it. Then I'm going to create a cube, Shift a Mesh cube. Let's take it down to 0.1 m
over here so we can see it. Let's scale it in the X
when scaled and a Y, S Y. Let's remove this based
on the back, like that. And then this, I think, will be this little Plate. I'm gonna move it straight
over here to this point and then press RY and turn it. Switch to local mode
with the comma key here. And now I can pull this up and still press RY and get
that kind of like that. So is that about right? It looks like it maybe
wants to come down a bit. This slide it down
just a bit like that. And maybe a little bit bigger. I'll press S Z. So now that we've
got that there, let's press Shift a
and apply the scale. And then let's select
these edges around, dominate the period key
on the numpad to zoom in. We go and then let's bevel these because it looks like these are kind of rounded. Control, be, scroll
the mouse wheel and we go and maybe
up here on top two. Let's try that. Okay? Alright, so
that's this here. I'll smooth it again
and there we go. Now it looks to me like
we've got this piece here that then kind of
tapers to this. So can we take this
inside face here, an inset it like this. Scale it in the Z. Z. Maybe scale it back out
and the Y a bit like this. Can we then take this
and extrude this? So I'll hit E and pull this out. I'm gonna hit G, Move this over, go back to global and
flatten it in the x-axis, Sx zero, like that. And then scale it in the Z. We go maybe scale it in the Y and try and get
it something like that. It looks like there's
a curve to it. So maybe we could add a
couple of edge loops in here. And in the Front View and
in wireframe with Shift Z, that's maybe drag select these and go to our
proportional editing tool, hit the G key. Maybe we could
bring this up a bit Scroll out just a smudge. Now we're getting
those on top as well. I don't really like that. So I wanted to just kinda
do these individually here. Like this. We've got that. It looks like I've still
curved that top area. Now, doesn't it? Let me just bring
these back down. Yeah, I kinda did. Now, it looks like there's
some Connecting Pieces in here that I
might want to add. So if I just select this
face and bring it back some, and then I'm going to add
some Connecting Pieces. So maybe just create
something off of here. Let's try that. Shift D X, scale this out, move it in, something like that. Then we can begin
extruding these out. Ex, pull that out. Maybe ES, and if I
bring this out like that, see how that works. Auto smooth that. Yeah, so I'm just trying to get something in there
that kinda works. Feel like I accidentally
been to these a bit. You can see there's just a
little bit of a bend here. So an idea is to take
these bases here. And in our Edit tools again, we've got a flattened Tool. So maybe we just click
flattened. And there we go. Now I'm just going to
come in here and select, say this edge right here and move the 3D
cursor to it with Shift test2 and press
Shift a Mesh cylinder. We can now take this
and scale it down. And I'm just trying to get
this little piece down here and maybe scale
it down like that. Move it forward a bit. Alright, so let's begin extruding and see
what we can do here. Maybe with this edge here, I will hit E and S
and scale in a bit, bring it up, a smudge. It easy, bring it up, but just a little bit more. Eis scale out and bring it up some and then easy and
bring this up like that. So you've got this little
piece right there. And then we've got a
little piece down here. Let's try that. Here, is bring that in, the Z, bring that
down like this. And then it looks like it
bulges out just a bit here. So let's get that
ES Gail it out, bring it in or bring
it down, I should say. And then let's do that again. E, S and bring it down. Easy. Yell out. Easy. That's not bad. Let's go easy again and scale in and do it again like that. Maybe one more, easy. And then ES, like that. We go, alright, let's move that. Move the cursor again. Yeah, So I think that's
pretty good for now. I feel like we need a
couple of bolts in here. And maybe another little
thing or two up in here. But I think generally
we're getting there. So in the next video, Let's continue of
finish up this and maybe we'll try and mirror everything over and
see how it looks.
25. Finishing the Headlight Hardware: Continuing with the
Headlight mounting hardware, let's come in here and we
want to add these bolts here. It also seems like there's
something going on in here. You know what we could do? Let me try something here. Let's just take
these faces here. And what happens
if we inset these? Then we extrude in, just hit E and push in
just a bit like that. That kinda gives it a
little bit of flair there. And then maybe let's
take this edge, this edge in here. And see is that all selected? No, not yet. Then let's bevel
this just a little bit. Control B, let's pull out a bit. Maybe scroll the mouse wheel
just a little bit like that. Let's see what
happened. Yeah, see, let's just, I don't know. It gives it a little
bit of flair. Why not? Let's add these bolts here. Maybe let's take this face right here and press Shift S to, to move the cursor to it. Let's press Shift
day Mesh cylinder, and let's make it
quite a bit smaller. Point 1.2, like that. Let's scale it down. But first let me yeah, I'll keep it within guns. And I also want to
change the number of vertices to maybe just six. Let's do that. Something really small. And then I will tab
into edit mode and just remove one based on
the bottom here. And then if we scale this down, and I'll go to the Front View and let's turn it like this. Maybe scale it down
a little more. I'll change to local
transformations so I can scale in the Z and make it a little bit smaller like that. Yeah, Something like that. Let me turn it RZ, Turn it a bit, then let's duplicate it and
move it down here. Shift Dx and I'll just
move it down here. Oh, I turned it into Z
before I moved it down here. So let me just do this and now I can move it over in
the Y like that. Let's do that. And then I'll once
again turn it into Z, our Z just to give it a
little bit of a twist. So everything isn't all
lined up in the exact way. So I'm not sure if I
want to add something, just some sort of like just a little
cube to connect that. So it just feels like it's somehow attached.
Maybe let's do it. I'll press Shift S to move
the cursor Shift a Mesh cube. Let's take it down to 0.1
and let's scale it down. And really all we need I think, is just something
like this in here. Just to give it
some sort of sense that yes, they are connected. That may be all we need because
this is just going to be such a small part of the larger piece
that I think all we need is just a
little cube in there. I will press Shift Z tab
into edit mode and take this face and this face here. We go, These two here
and delete these. In addition, I can take
this edge right here, E, S and scale that in
and connect that up. And also what might be
kinda FUN is let's use a Path and connect this up here with the
cursor is still here. Let's press shift a curve
and a path. Let's turn it. Ry 90 like that. Let's scale it down quite a bit. There we go. Let's move it down. Let me go back to global
for just a moment. And we go, and what we
need to do is just take these points here and
begin to move them around. And this needs to
go over this way. These need to come
back right about here. I'm going to hit E and extrude this and pull
it back like that. And try and have it go into
this strangely shaped to scoop thing E and pull
that into there like that. Yeah. Alright, let's move
these around a bit to get a smoother curve.
Well, that's not bad. Now let's take this and add a little bit
of thickness to it. So once again, down here in
the Object Data Properties, we can come down
here, go to this tab. Let's take the resolution. What this is going to do is add 12 points in-between each
vertex on the curve. So let's, let's try it. Let's take this down to four again and see how that looks. If it looks a little blocky, it looks a little
blocky but not bad. So let's come down here
and click and drag in the depth of Field and hold the Shift key down to
move a little slower. And let's bring
this out like this. Yeah, that's a little
blocky, isn't it? Let's come back up and see if we can maybe take it up to
six again, that's not bad. If we press Shift Z, we can kinda see how many polygons are gonna
be created from this. I'm going to move the
cursor to the center of the grid once again
with Shift S1. Let's now work on
mirroring everything over to the other side
just to see how it looks. So first of all, let's select this Fender. Let's switch to 3D cursor
here with the period key. Now we can duplicate
this Shift Enter and Mirror in the X
Control M, X and enter. Alright, let's do that
again with this same thing. Shift, Enter Control M X. There we go there. This piece here. We can mirror this over as
well as this, This, and this. Well, we could combine
these lists, do this, let's take this and Shift-click that main piece and
then press Control J. We go. So that's
just all one piece. That'll make our lives
a little easier there. And let's take this
and let's also try and mirror that
path over as well. So with these selected, let's press shift D, Enter Control M, the
X key, and enter. Alright, that brought
us over to that side. Now, this right here is
all part of this piece. So what we should probably do is add an edge right
down the center here, and then take away
these Pieces over here, these bases over here, delete and delete faces. And now we can just
mirror this over because the origin is still
in the center of that object, is still in the
center of the grid. So let's add a
modifier, a mirror. It's not looking
very good, is it? So it's probably because of this 90 degree turn
and the y-axis. So let's press Control a
and apply the rotation. And there we go. Now we've
got it on the other side. Let's turn on clipping. Now that we've got this looks like we need to raise smooth it so I'll right-click
and choose auto smooth. And that's not really
doing any good, is it? So why is that? And it's looking
a little strange. We've got this kind of
strange artifact here. So could this be face Orientation again,
let's take a look. Let's pull this down,
choose face Orientation. And no, it's not. We've got several other pieces
that need to be flipped, but that's fine.
We'll get to that. But for this, it looks okay. Me turn that back off. Another thing that we
can try is our scale. Look how far off our
scale is from uniform. Here. Let's try this. Let's press Control a
and apply the scale. And sure enough that cleans
that up quite a bit. And now our Smoothing
works just fine. Yeah, So once again, applying the scale is really an amazing thing for many of
the tools here in Blender, it uses that scale. So if you're getting
a strange artifact, if you're having trouble
beveling or scaling or whatever. Give that a try, apply the
scale and see what you get. Alright, in the next video, maybe let's see if
we can hook up or connect these braces
here to the Front Bumper
26. Connecting the Front Bumper to the Chassis: Now let's take a look
at connecting all this up with the Fender or the
Bumper, I should say. So we've got quite a
bit going on here. We've got this piece coming down and connecting to the Bumper. And then we've got
this piece going back. Of course, this is a
very similar setup to what we did in
the back because we use the image from the Front to create what we
have in the back. So ultimately, I think what
we can do is just duplicate this because that's really the only thing we have for this. So let's take this back here and duplicate it
and bring it up front. Let me first of all Switch to global mode with
the comma key here. Then I'll switch to median point with the period key here. Alright, so now if we go to the top view with the
seven key on the numpad, let's just take this and duplicate it and
move it down here. Shift D Y. Let's move it over here. It the period key to zoom in. Now, we're going to need
to flip this around. I think we need to flip
it around 180 degrees, so it's gonna pivot or
rotate around this point, but that's fine.
Let's just do that. R18 zero. There it is over there. Let's hit G and bring it
back over here like this. Now, if we tumble around, you can see we've
probably need to press GZ and bring this
down some like that. And how is that for the
distance from here to here, is that about right? But once again, is this where our Bumper
should be, right? If this is where this should be, then the Bumper nice
to come forward. Should we do that? Let's press GY and
just move this forward some until it connects
with this right up here. Gy like that. I think maybe I want to
split the difference. I don't want it maybe
quite this far. Maybe I want to bring
this back some. Alright, so let's press Shift Z, select this face here. I'll hit the three key on the numpad to go
to the side view. And let's hit G and just
move this up in line. And I'll just bring
it up halfway between here and
that edge there. Alright, Shift Z. Now we can take these two. Let's hit G, Y and
move them back. And maybe we need
to move them up. Now GZ, move them
up in the z-axis. And then let's take
the Bumper now and let's present GY
and move this back. So now it isn't
quite so far out. We've kinda split the
difference right? Now that we've done that, we might be able to get
this piece back here. So maybe we could just
do that off of here. Let's select this face. And I want to scale
this or excuse me, extrude this straight
down on the z-axis. If I extrude it currently, it's just gonna go at
an angle like that. And that's fine, but
let me press Control Z. So instead of just extruding it, I'm going to extrude
it and then hit the Z key for the z-axis. But I think I'm going
to have to do it twice. So let's hit E, Z. That turned it off completely. I'm going to hit Z
again. And there we go. Now we're extruding
in the global Z. So let's pull this down. Maybe I want to come
down to here like this. So I'm going to
extrude this out, but I don't think I need to
have this come down so far. So I'm going to
select this edge, hit the two key, select this edge and bring
this backup like that. And then I want to
select this face here. And let's just extrude
this straight back II and pull this back like that. So I guess let's go ahead and
add a few of these pieces. I'm going to begin
with this here. Let me auto smooth this. So we smoothed that out a bit. I'll maybe tab into edit mode
and select this face here. Let's move the 3D cursor
to that with Shift S2. And I'm just going to add
these bolts in here so we need to I'm going to press
Shift day Mesh cylinder. Let's take it down
to six sides and I'll take it down to
0.1 and point to. And then let's remove the
face from the bottom here, delete and delete faces. And then we can scale it down, spin it in the x-axis
here are X9 zero. And let's scale it down
a little bit more. Kinda put it where we
think it should be. Maybe I'll scale
it in the Y with X and Y and bring this
out just a bit. There we go. So what do you think? Is that about right here? Yeah, I think
that's pretty good. Let's now go to the Front
view Shift Z for wireframe. And let's duplicate
this Shift D and Z. And let's bring this
down here. There we go. Then let's just hit the archae, spent it just a little bit. So it isn't this perfectly
aligned 3D thing that we get sometimes when
we're dealing with 3d, oh, I accidentally
hit everything away. Let me press Control Z. There we go.
Sometimes I do that. From here. Let's
just take these and combine it with this control J. And let's now take this and add some bevels to these edges because it looks like
they're kinda Curve. Those are kinda nice. Let's apply the
rotation and the scale, control a rotation and scale. And then let's go
to Edge mode and select these edges all
the way around here. Alt, Shift-click that. I'll Shift click that and
maybe select this one and Alt Shift click that one. Here we go. Alright, so now that
we've got those selected, let's go ahead and
press Control, be pulled out a bit, scroll the mouse
wheel once or twice. And let's go with that. There we go. Let's go ahead and
mirror these overall. Take this and delete it. And then let's just
take all of these. This, this, and this. Oh, we've got some rotation
in the z-axis for this thing. So let's apply the
rotation there. Control a, apply
the rotation. Okay? And then what let's do now, we can Mirror these over. So if we select all
of these are 3D. Cursor is still in the
center of the grids. So we can, with the period
key change to 3D cursor, we can ensure that
global is selected. It is, That's good. Now we can do is just
duplicate, Shift, Enter and then Control M, the X key and enter. And let's see how we did. Yeah, I think
that's pretty good. And then in the next video, let's start working
on these pieces here. These Connecting Pieces. It looks like we've got
something going on in here. So we will work on that
in the next video.
27. Adding Detail to the Front Bumper: Continuing on the Front, let's begin by just adding
that cylinder here. So maybe if I take this
and tab into edit mode, grab that point and move the cursor to it
with Shift S to. I've got something that
I can work with here when I create that cylinder. And we go, Let's give
it say 16 sides. Let's try that. And let's take away
the cap fills. Let's turn it in the y-axis. Ry 90. Scale it down quite a bit and let's take a look at it
in the front here. Shift Z. And I'll move it up
to about right here. That looks about, oh, I'm still using the 3D
cursor as the pivot points. So I'll hit the period key
and go to median point. Then maybe scaled up just a bit and then scale
it out in the X. And then let's see
how it looks on ours. Okay, yeah, we do
need to move it up a bit and forward
a bit like this. Let's do that. There we go, alright, so we can smooth it. And then it looks to
me, it's got like a plate or something here. Well, here we go. This is pretty good. We can kinda see
that platform or that Plate there.
So let's do that. Let's press Shift a Mesh cube, take this down to 0.1. Bring this up. And you know what?
Let me do that again. I'm gonna delete this and move the 3D cursor to this point
Shift S to, let's do that. And now it's centers right on
their scale it down a bit. Let's move it over here. Scale it in the X. And I'll zoom in
with the period key. And then it looks like we
just need to angle it. So if I take this edge
and angle it down, this edge and angle it up, I guess we need to do a
similar thing up here, like this. Like this. Let's tab into
edit mode and grab this face here and move this in. And we'll do the
same thing here. And maybe move this up. Move it down. So I'm just trying to get it. So it looks like it's
supposed to be there. The 3D cursor should be in
the center of the grid. So I can switch to
that Shift D Enter Control M X and pop that
over to the other side. Then what are these things here? Looks like we've
got some cylinders here that we could work with. So for these, we can
see them here and here. Maybe we take, I don't know, maybe we take this edge
and move the cursor to it and then add a cylinder
Shift day Mesh cylinder. Maybe I'll take
this to 24 sides. Let's try that. About 24. There we go. And maybe Turn it in
the why or why 90. Let's scale it down a bit. Scale it in the X, and let's see where we think
this should go. I'm thinking it should
go right in here. So maybe we take this, this edge right here and
we hit E S and scale in. We hit EX and pull
out E S, E X again. And then one more,
Let's go in a bit. Then pull this out like this. X like that. Maybe that's that they're in almost looks like there's
a bolt at the end of it. So let's kinda close that for now and we'll put a bolt there. Let's smooth it, and then let's press Control
a and apply the scale. And now we should be
able to go in here and maybe add if you bevels here, get those to look a little
more curved. There we go. Then it looks like we
have a similar thing on the other side. We could maybe just duplicate this and
pull it over there, Shift DX, and then our z1 at. And bring that
over here for now, see how that works. So it looks like
over here it's got an extra silver piece. So maybe we take this edge
on this side right here. Scale that in a bit. Maybe we take this whole thing and move it in just
a bit like this. And then this edge
right here, EX, and then ES, then
EX, and then E, S. And maybe we could
close it off here. I'm not sure if anything
connects to it. It's hard to tell But at least for now,
we can close it off. We could press the M key
and merge at the center. There we go. Now over here, it
looks to me like we've got another bolt. So I'll just tab
into edit mode on this one and hit the L key
for linked components. And that just selects that
piece and press Shift DX, press the P key and separate
that out by selection. Now if we tap back into edit mode and select
just that piece, let's move our origin
into the geometry of it. I'll turn it in the z-axis, our Z zero, and we go, Let's just put it out on
the Front of this thing. Now if you're ever
having a hard time getting this centered on this, one thing you can do is use the 3D cursor for that as well. So you could select this, say, and select that edge
with Alt click. Move the cursor to
it with Shift S2. And now, since you've got the origin in the center
of this geometry, you can snap this
object to the cursor. Once again, that's the
snap menu with Shift S. And you can choose selection to cursor or the number eight. And that will pop that on there. So it's right in the center. And I'll just move that
out a bit like that. Maybe scale it in
the X like that. Maybe we put it
right about there. Let's try that. Shift us one to get the
cursor back to the center. Maybe I'll scale that
down just a little more. Alright, so we've got
those pieces on there. Before we end this video. I guess what we can do is
just maybe take all of this. We can take these two pieces and this and join them
together with Control J. First of all, let's
go back to object mode and apply the
scale and the rotation. Let's do that. Control a rotation and scale. There we go. Now if we tab into
edit mode and grab these edges on these lights
here, Let's do that. Shift D, and I want to
grab this edge right here. Then let's come over here and do the same thing over here. Now, let's just press
Control B, bevel these out. Kind of give those a
bit of a curve there. And maybe we could also
do it on the top here. Let's try that. Don't know if it'll work, but let's give it a try. Yeah, That's kinda nice. Let's now smooth it. Now also we can take these here. Let's, let's combine these
together with Control J. Then let's Mirror these over. We've got the 3D cursor in
the center of the grid. Let's press shift D, Enter
Control M and the X key. And we're not centering around or mirroring around the 3D cursor at
this point in time. So I'm going to hit
the Escape key. And then what Let's do is hit the period key and
go to 3D cursor. Now we can go ahead and
finish the process. We've duplicated it. So let's press Control M and
the X key and then Enter. And there we go. So now it's
over on the other side. Alright, We're getting there, it's beginning to come together. Let's maybe go focus on another part of the Car
beginning in the next video.
28. Modeling the Turn Signals and Vent: Now, moving down a bit to
the mid section of the Car, I noticed that this particular
model has these little, I would imagine they're
Turn Signals right here on either side and they look
remarkably like the Headlights. So I think we could
just duplicate this and move it down here
and set up these little guys. So let's go ahead and do that while we have
a chance here, I'm going to go to the
side view and Shift D. I'll just move this over here. And maybe I ought to
smooth this a bit. Let me go back to median
point and pull this out, scale it down a bit. But for this, I don't want these long thin
polygons for this, I think I need to add a few edge loops going
this way as well, and even a few
down here perhaps. But let's just go ahead and maybe add a few
here to make sure that these polygons
are more evenly sized and I'll do
the same thing here. Let's see if that helps
us going forward. I'm going to tab
into edit mode and right-click and choose
shade auto smooth. So that looks pretty good there. Now let's take this and let's go to the
side view Shift Z. Let's maybe move
this about here. Scale this up a bit. It looks like it's a
little bit thicker. So I'm going to press S, Y and scale and add a bit like that. Something like this. And then it looks
like it's about oh, about this far out, maybe. This little back part. I'm not sure what that is
and I'm really not sure I care or I want it. This is the Front here. It's got a few ridges on
this thing right here. We can maybe do that. Let's separate this
out as its own object. And do that. Let's,
let's press the P key and selection and then
go back and select that. And now if we just select
that in face mode, maybe I will make sure that the scale is uniform
and the rotation. I'll go ahead and apply
that rotation and scale. And then let's hit the icky
and pull this in a bit. And then let's hit E and pull
out I and II and pull out. So we're just going to do
this a couple times here. Maybe something like that
is all we really need. And maybe I'll
scale that in with the S key just a little bit. And then can we just grab these and maybe beveled these here? Let's try that control, be, pull out like that. Now for this cylinder, Let's go ahead and
press Shift S to, to bring the cursor to here. Shift day Mesh cylinder. We probably don't need 24 signs. Let's take it down to 16. Let's scale it down. And maybe we'll turn it a bit. Let's turn it into y-axis RY
and bring that in like this. Let's go to our
local transformation and just bring that out a bit. And then I think I'm
not seeing it here. But if we look at it
on another angle here, it looks like there's just
a little part in here before that yellow
tan part begin. So just going to scale
that down a bit like this. And then from here, I will select this edge, press E, S and scale-out. And maybe I'll even bring
it forward some like this. There we go. And then ES pull out a bit. And then I think we could go E. And then I'll just click
and then bring this down. Let's see how far we can go. Something like that. And then let's go
ahead and press E S and scale out and then E
Z and bring it in like that. Now, I think I need to tilt
it some let's press RY and tilt it a bit so
it's a little more in line with our car here. Alright? And then of course, we take the cursor, move it back to the
center of the grid. We period key and change to 3D cursor for our pivot point. Press shift D, Enter or
Control M X and enter in. That puts it over
on the other side. What else do we wanna do here? Well, we could also work on this little thing right up here. We could use the
existing geometry. Let me overhear with
the mirror modifier. I can turn on the cage
right here so we can see the polygons
on the other side. And we could take something like these polygons and
duplicate them off and then add a solidify modifier to
this. We could try that. So I will press
Shift D and enter I will press the period key
and go back to median point. I will press the comma key
and go back to global. And now we can just take that
and move it up like this. And then let's split it off as its own object P and
separate by selection, tab back into object
mode and select that. Now we've got a subdivision
surface modifier on here that were
not really using. But I think we might
want that here. Let's add our solidifying.
Let's do that. We do have all ones in the
scale, so that's good. Then let's turn on this subdivision surface
and see what we get. Alright, maybe I'll
scale it in some. Let me hit the a key and
scale it in the Y, S, Y. So it's a little bit
thinner and yeah, okay. Maybe I will bring
this up as well. Let's right-click and take the origin to the
center of the geometry. Oh, we don't want
to do that because we've got a mirror
modifier on here. Let's maybe take the edge down
the center or this point. We could take this
point right here and press Shift S to move the cursor there and
then move the origin of this object to
that 3D cursor. Now that origin is in the
center and we can see our manipulator and move
it up and down like this. Alright, let's go ahead
and apply that Mirror. Once again, I'm going to try and apply modifiers
from the top down. I'll click here and click Apply. Let's move this solidify up above the subdivision
and see what happens. Well, that's interesting. We are getting a little bit
more of that shape there. So maybe we go even
thickness here and increase the solidify a
little bit more like that. So it looks a little
bit more like we're seeing it in
the reference image. Let's go ahead and
auto smooth it. And then let's take this and
drag it up and maybe we can smooth out that crease
around the, around the side. That's kinda nice. Alright, and then let's apply
our solidify over here. There we go. And now we've got our
subdivisions still here. Now we can take this down to one and see what it looks like. Well, that edge turns really
sharp there now, doesn't it? So if we tab into edit mode, I wonder if we could add an edge loop or two along
here and see what happens. Yeah, That's kinda nice. And yeah, so maybe we
could add this here. Scale it in the Z just a little bit to make it
a little bit thinner. And then it looks like it's
just tilt it up, right? Let's, let's just tilt
it in the x-axis. Let's press RX and just tilt it back just a
little bit like that. Here we go. I'll move the cursor back to the center of the grid again. Yeah, So I think that's really all we need, at least for now. We may have to
create some sort of connecting piece or put
a hole in there, right? That we can't really see. But once we get this under the lights and have
all our materials and the lighting on it that
made just cast a shadow under there that we really
think might be just fine. So let's go with that
for now and wait until we get closer to
the end to adjust that. Alright, so we've put
a couple of things on here in the next video. Let's try and clean up these
pieces up here in the Front
29. Modeling the Engine Vents: Alright, let's take a look at these little Vents on the
side here in the Front. These could be
interesting to work on. Let me take this and I'll
go ahead and smooth this. We can go in and
smooth this for now. Just we're gonna need to
work on this more of course, but I can also
take all of these. Let me take this
and this and this and I'll tab into edit
mode for all of them. Then I'm going to select
all of these edges. Alt, Shift, right-click this
and these here as well. Let's try and get these. Yep, we got those and I'm just going to pull
them all forward. Yes. Two bit to get
them inside here. Like this. Where at least
connecting with that. And I'm not sure if
I want to tilt these down or I want to scale this up. We'll have to see what we think is the best
way to do this. But for now, I just wanted
that all the way to there so that we can align our edges a
little bit better here. So it looks to me like these Vents and I've
counted them as best I can. I think it's around 20. So and they seem to be
centered on this panel. I'm going to tab over
here into edit mode and select this and just
delete this one side. And also, I don't
know that we need a subdivision surface modifier currently for this right now. So now we've just
got this panel. The scale is all ones and
the rotation is zero. That's good. So now let's
just add an edge loop here. And it looks to me like
it kinda begins the Vents kinda begin somewhere around
in year and they end, I think somewhere
around in here, kind of centered in
that area there. If you wanted it
really centered, one thing you could
do is you could drop an edge right down
the center and hit Enter two times and then press
Control B, bevel that out. And now it's gonna be equidistant no matter
where you put it. So maybe something
like that, right? Okay, so now we have
our two edges here. We also want to define
where the top is. I think let's do that. Let's press Control R and
define the top of this. Let's say they come up to here. And once again, we could, if we wanted to press Control R, drop it in the center, and then press Control
B and bevel it out so that it's gonna be the
same width on each side. However, it looks like it's kind of angled here
now, doesn't it? So that may not be the
best way to do that. So if I drop an edge in here, I can bring it up
to about where I think the top of those
events are going to be. And then I'll do that
same thing down here. I think we need to probably
hold this as well. I'm going to add one
more up here, like this. One more up here. Because as we beveled these, I think we're going
to want that edge there to hold them down. Alright, so I'm going to press Control R and scroll
the mouse wheel. And I'm going to look down
in the bottom left of the interface and going to
scroll and the number of cuts, I'm going to take up to 20. But now that I think about it, I think we're going to need an extra edge for
each of these Vents, for each of these cuts. So really we probably
need something like 40. Because for each of these, I think we're going
to need two edges. So let's do that. I'm gonna hit Enter
two times now. And then I think I want
to take this edge, every other edge here. Continue selecting
on through here. Maybe to here. Let's say
how many do we have? We've got 20 edges. Okay, That's about right. And then let's bevel these controlled BY and
let's pull these out a bit. Maybe something like this. I don't want them to go all
the way up to that edge and that's why I had that
edge there to hold that. Then let's delete these faces. I'll hit delete
and delete faces. Okay? Now I want to select this edge, the left edge for each
one of these holes. And let's do that. And we're going to then pull these forward and then pull them out to get that kind of
pulled out Vent shape there. I'm going to select
all of these now. Then I'm going to bring
them forward in the y-axis. Or actually I better change from global to local
know-how about normal? Let's change to normal
so that the axis follows in line with
this angled piece here. And I'll bring those forward, kinda like this, so they're
almost close but not quite. I don't want them to
come all the way there. And then I want to pull them out like this. Let's try that. What we can do now is add
a subdivision surface. Well, actually what we
can do is let's just smooth it and see
what we think. Okay? And then let's add a subdivision surface and
modifiers subdivision surface. But instead of using
Catmull Clark, where it's going to try and
round out all the corners. Let's use simple here. And then maybe
take it up to two. Let's try that. Yeah, that
gives it a nice feel. I did that mainly because I want to add
extra geometry to it. But I didn't want
to Curve the edges. Alright, so there
we have our Vents. We're going to have to put
something in there to kinda give a hint that there's
an engine in there. And once again, once we begin lighting it and
rendering it all, this will fall into
shadow inside here. But I think that's a
pretty good start. We can think go with that. Let's mirror this over
to the other side. Let's press the period key
and change the 3D cursor. Let's press shift D, Enter, Control M, X and enter. And there we go. We've got our Vents. Now let's also take a look at it in the shiny mat cap over here. Yeah, there we go. Actually,
that's looking pretty good. Let's change that back. There we go. There. We've got
our Vents and keep in mind, we're going to have a
Tire over this like that, right? Something like this. They're not gonna be
really that visible. I'm gonna hit GZ and
move this in like this just so we can see kind of what that's gonna
be looking like. Yeah, I think that'll be fine. I'm going to hit Delete there. Alright, We're
moving right along
30. Connecting the Body Panels: Let's now see if we can seal these up a
little bit better. I just left them
unconnected here. But ultimately
we're going to need these to connect up
a little bit better. And also down here, I think, I think I want to take these
faces right down here for now and maybe just
split these off. I'm going to press the P key and separate by selection
and then an Object Mode. I'll just select that
again. And here we go. So this can maybe
come in a little bit. Let me switch to global and back to median point and I'll just maybe move that
in just a little bit. And this whole thing can maybe move out just a
little bit as well. I'm going to pull it
out just a smudge. You can see that in here. Let me bring up
another image here. You can see how the Door is kind of out front of
all the other Panels. Let me take a look at a
Door in here as well. We go, we do want
these to connect up. Let me press the three
key and Shift Z. And I think I want this to come down just a little
bit more like this. And maybe this one
here can come up to meet that a little
bit more like that. And this should probably come
out some to let's do that. I'll bring it out
a little bit more. And this one could maybe
come in a bit to meet it, although I don't want
it to go too far. Maybe something like that. Let's begin like that. This one, I feel like I'm going to need to
add an edge loop up in here to get
another point here. And maybe let's add some
edges down in here. So these polygons are a
little bit more evenly sized, so I'll do that
in addition here. Well, I think these polygons look pretty good
the way they are. Alright, so what Let's
do is let's begin to add a subdivision surface modifier to this and see how
it's going to work. So over here, I do have a subdivision surface
modifier on it. Let's go ahead and
enable that now. Okay, now we've got
a nice curve there. Let's take this point
and let's crease it. We can press Control V to go to the vertex menu and
this vertex crease, we can click this. And then if you
look in the upper left-hand corner
of the interface, you see that crease and
I can drag the mouse and increase that by
Take it up to one, it'll snap right to that point. So let's just try that
and see how that works. Okay, Let's now give this
a subdivision surface. Let's just enable it. Here we go. Now, let's see how these two are matching up
here in the side view, I'm going to hit G
and move this back. You can see we can begin
to match up these curves, which is what we want. And I'll take this point and
press control V and vertex crease and drag out
like this until we get maybe a point like that. Let's try that.
Alright, so we're beginning to get these to come together a little bit
better. That's good. Maybe I can bring
this back like this. Bring this point out
just a bit like this. Let's see how this works. We may need to come
through here and move some of these
back-and-forth. It's hard to tell it. I'm going to press
Control and click that one and bring that
back just a little bit. And then we need to deal
with these points down here. Let's go ahead and take
these and press control V. And once again, vertex crease, and let's bring
that out like that. So what that allows
us to do is to have smooth curves where
we want them here, but also have these points
be a little bit tighter. Control V vertex
crease and bring that up like that. Okay. Now let's take this here. I think we need to bring
this back just a bit. Let's do that. Let's take this and have it meet up a little bit
better with this. And when we do that, we get this hard crease here. Let's maybe take this
point and bring this out. And bring this out. Kind of bring these
out just a bit. And we're probably
going to want to use the subdivision surface
modifier for this one as well. We haven't turned off still. Let's add some more
edges in here. So once again, we have polygons that are
more evenly sized. I'll press Control R and scroll the mouse wheel and I've
got what, five cuts here. Let's go ahead and try that. All right, then I also
want to take this, control-click this and
let's move this down. So it's in the middle
of these two edges. I'll hit G two times
and slide these down so we get something a little more
evenly spaced here. G2 times and slide
that down as well. Alright. Why don't we
right-click and choose auto smooth and let's
drag this angle up and see if we can smooth
out that crease there. Yeah, bringing it up
to about 45 helps. And then we can also enable this subdivision
surface modifier here. Alright, That
really helps smooth out those curves there.
That's kinda nice. And then once again, we can take these points here, control V, vertex crease, and let's bring those to a point there a
little bit better. Okay, same with down here, we should do these, control the vertex
crease, bring these down. Something like that. Yeah, so that helps seal those up just a
little bit better. I feel like there's more we're going to need
to do in here. Let me turn on the cage here
and maybe bring this out. And let's take a look at this. Let's turn on the cage for that. So there's just more
that we can do to just kind of get these a
little bit closer. And I'll press the
three key and let's grab this point and bring it up a little bit more like this. So it just may take a little
bit of tweaking to get these kind of fitted
together the way you want. And it looks like we've
got some waviness in here. So what we could do is we
could try taking these points, control-click this
to select everything in-between and relax them. Try that. We could maybe take
these try relaxing these. Let's see how that DID. Yeah, I think that helped
quite a bit actually. Alright, so we've got those
a little bit tighter. That's good. We're
going to need to do that in a couple of
more places probably. But the main takeaway from this is just that we can
use that vertex crease. I think let's move this out. Let's try this. Yeah, I just wanted that a
little bit smoother now we go. So I think in the next video, what Let's do is let's work on the frame of
the front window. You can see that here. We've got this curve
going over here, and then these
coming up out of it. I think what Let's do is work
on those in the next video.
31. Beginning the Windshield Frame: I've brought up a few images over here that gives
us a couple of different views of the
frame of the Windshield. And it's really just this
curve on the bottom. And then D is extrusions up and it looks like it's
pretty flat. Right? It looks to me like the
Windshield is flat across. So let's see, we can do it this. I think we could use this piece
and this edge right here, right there to maybe
duplicate that off and get it in line and in place and then begin
extruding off of it. I don't know that we need to convert it to a
curve or anything, but I think we can
just use this. Well, let's try it. I'm going to go to the
side view here and I am going to press Shift Enter. And I'll move it up
just a little bit here I'm in global
transformations. And from here,
I'll split it off. It's its own object
with the P key and separate by selection. Tab back into object mode. Just select that edge and
tab back into edit mode. And now let's select it. And I want to flatten
it because as I said, I think this is just
flat straight across. And you can see how the curves here are the Curve
of the cockpit, kinda curves away
from it like that. So to flatten this, let's just scale
it in the y-axis. I'll press S Y and then hit the zero key and just
flatten that like that. Now it also looks
to me like it's tilted like it's tilted
back just a bit. So maybe we do need to press are here in the side view
and tilt it a bit like this. You can see how
it's kinda pointing to the little Turn signal here. So let's do that. Let's have it point
towards that. And it looks to me
like, Oh, yeah, I've got my Turn signal over here and the
complete wrong place, I must have had my pivot
point not quite in the center of the grid or
head rotation on this. So I'm going to delete
this real quick. Take this and let's apply the
scale and rotation control. A, apply the scale and rotation. And then I can mirror this over. I'll hit period 3D
cursor Shift D, Enter Control M X. And let's see how that DID. Yeah, so that put it
in the right place. I was seeing it in a different place when
we were in wireframe. So if we select this again, let's take this and move it up. I'll move the pivot
point Back to the median point with the
period key and median point. And where is it? Well,
it's way down here because the origin of this object
was still down there. So let's move it
to the geometry. I'll right-click choose Set, Origin and origin to geometry. There we go. Now when I do that, it throws off the mirror. It's just one thing
after another, isn't it? So I'm going to undo
this Control Z, at least for now, just to
keep that in the center. And then once we
apply the Mirror, I can move it back
to the geometry. But let's take this and
move it up just a bit. And I think I want to take these and begin to
Move them in a bit. I'm just going to take one
at a time and do this. I could just grab
these in the X and pull them in just a
little bit like this. You have that? Yeah. Okay. So it's currently writing a
little bit above this object. But one thing we could
do is maybe we could use a shrink wrap modifier to drop this down to the surface of this
object. Let's try that. I'm going to twirl this up
and then choose Add Modifier. And let's choose
shrink wrap here. And then I'm going to click
on the eyedropper and click on the object that we
want to shrink wrap it to. There we go. Now it just kinda drops
down to the surface there. And that's doing pretty well. Let's click and drag
and the offset ON. I'll hold the Shift key down so it moves a
little smoother. Let's just move it out, just
a smudge so we can see it. There we go. Alright, so what
I'm gonna do now is go ahead and try and
apply this shrink-wrap. I know it's on the bottom, but let's see if it
will do it in a way that we don't object to,
let's give it a try. I'm going to pull this
down and click apply. And what did it do? It pulled it down a bit because of the
subdivision surface. But that may not be
a terrible thing. I'm going to bring this
up just a bit. Yeah. And even though we
bring it up some, it's still conforming to the shape of that object
a little bit better. I think that works pretty well. Okay, so now that
we've done that, let's go back to the side view. And let's extrude this
out in the y-axis. Let's just hit E, Y, endless pull
straight out like this. We go now. I'm going to turn off the
Subdivision Surface Modifier for now. Let's do that. And maybe I'll pull
this up a bit. So now it just kinda rides a little bit above this object and And that's fine for now
as we're creating it. Once we get it created, I'm going to take that
and bring it down a bit. I will smooth this so we can
see the Smoothing there. And then let's hit
the three key. Go back to the side view here. Is that the proper thickness? Let me just bring it
back a little bit more. Then what I can do is
just hit the three key, hit the a key to
select everything. And then I'm going to
extrude all of this up. Now, I can also just use
a solidify modifier, but I think I'm going
to just try this. I'm going to hit E
and pull straight up until it's about
the right thickness. And then I'm going
to bring it forward like this. I don't like that. So at angles back a bit. And then can we take
this edge right here or this face and extrude this
up as well to get this, Let's give that a try. I'm going to hit E and
it's going to want to go up in the Z global. But that's okay. Let's just pull it back and see if we can get it in line. Here. We go. Let's try that. I'm gonna go to the Front View here and
let's take a look at it. I have it not quite as long as it looks
like it should be. So I'm going to Control Z back. And let's just take
this face here. Let's extrude this
out one more time. I'm gonna hit E and pull out
and hit G and move down. Let's see how that looks
from the side view. Yeah. Okay. We're getting yeah. I guess this is a
little bit closer to this piece here, isn't it? And maybe even we could move
this up, some like this. We go, alright,
let's try that. Now. Let's see if we can take
this face right here. I'll go to the Front view. This might be a
little bit better. So let's press Control
R and create this face. Select this face. Now, here. And let's extrude this out. I'll hit E and pull
out like this. Let's go to the side view. Bring it back some. Go to that front view. And I think I want to just
extrude up like this. I'm gonna hit E and Z
and just bring it up like this. And then turn it. Maybe scale it in the X. And let's go back to
the side view and get it in line here so
we can do with this. Also looks like I could
spin it in the z-axis, RZ, kinda like that. Ultimately, I think
this may have a subdivision surface
modifier on it. I'm going to take this face
here and just move it. Now that we've got that, Let's see if it's I'm
not sure that it's flat. Let's take a look. Let's just add a polygon plane
into the center of this, Shift, a Mesh plane. And let's press our X9 to zero. And let's scale it down a bit. Let's just move this in
here and see what we think. This is just a temporary
thing to see if we're getting close to
what we need here. I'm gonna go to local transform, press S Y and scale
this down a bit. Bring this up as X. Okay, that just might work. Ultimately, we're going to put a subdivision
surface modifier on this to try and get some
of those smooth curves. Let's see what we can do
with it in the next video.
32. Finishing the Windshield: Now let's turn on our
subdivision surface modifier and see how ugly this is. We may have to do
quite a bit of work to get it in the kind of
shape that we want here. But I'm gonna go ahead
and turn this on. And that's pretty ugly. So first things first, let's tab into edit mode
and I'm going to turn off the cage here so we can
see the original cage. And I'm going to try selecting
these edges down here. And just like we creased
the vertices of the doors, let's try increase these edges. I'm going to press Control E
to bring up the edge menu. Let's go down to edge
crease right here. I'm going to just
move the mouse out some Tell it gets maybe
something like that. Let's take a look. Alright. Let's also
go into our shade, auto smooth and drag that up a bit just to clean that up some. Let's add a few
edge loops to try and make these edges
a little bit cleaner. So maybe I could add
an edge loop in here. And one up here to kinda
pull this up like that. It feels like the tops
a little bit flatter. So let's maybe add an
edge loop like this. See how that works. We can also just take an edge down here maybe
and just slide it. Maybe do the same
thing out here. Okay. Feel like we need an edge right down the center
here. Let's try it. And maybe we need an
edge right in here to hold this angle a
little bit better. Yeah, that's looking
pretty good, but it's a little
bit blobby, right? It's a little too curved. It feels like these edges
are a little bit sharper. So what we could do also is use our edge crease Tool on all
of these if we wanted to. Alright, so I've selected
all of the edges on top, going all the way around. Let's see if we press Control
E and edge crease and then pull out just a little bit to bring those edges out
toward the original cage. Just a little bit more. Something like that. Yeah. I think that does pretty well. I feel like this here
is a little bit. I think it angles down. So let's take a look at this. Maybe we could take this
edge right here and press G two times
to slide it down. And then take this
edge right here, G, and slide it down. And then this edge right here. If I hit G2 times, it'll go either this
way or this way. So I'm going to need to bring
it down like this myself. There. I just wanted to angle
that just a bit. Alright, there's a lot
more to do in terms of these little bolts and
screws and things on here. But at least for now, I think this is a pretty
good Frame for this. And perhaps I will take this whole thing and just move
it straight down in the Z. Let's try that. I'm
going to hit G and Z and pull down like this. And let's see how that works. It's still sticking
up a bit down here. Everything else seems to
be pretty well in line. So maybe from the Front, I could take these and just
bring them down a bit. G. It does look like I need
to bring the backside up. So I'll select these
points here again. And maybe bring these up
chest a little bit like that. Maybe bring this one up
just a little bit too. Let's give that a try for now. Once again, maybe more
tweaking we need to do. But I don't wanna
get too far into it until we have other
things in place. Now, while we're here, we could take a look at
this and see if we could get something like
this for the glass. It looks like it
curves out to it. I'm not sure exactly
how that works. Let's see what we can do. I'm going to press Sx and
scale this and a bit. And then maybe I will insert
an edge loop right Here, let's say, and then
select this edge and just hit EX
and pull that out. So we have this little
bit of a curve here or a little bit of a bend there. If we add a subdivision
surface modifier, that's terrible, but I will increase that were
beginning to get that curve. Now, you notice that I don't
have a Mirror on here. So both sides aren't
doing the same thing. I should probably go
ahead and add an edge right down the center
here. Let's do that. I'm gonna click and then move it over a bit because
it isn't quite in the center because I've got more geometry on one side
than I do the other. But we can go ahead
and delete these. Add a mirror, bring
it up to the top. Choose clipping,
Turn on the cage. And then we could take
these points here and slam them together. Like this. Let's do one more down here. Slam them together. There we go. Now that's
looking a little bit better. And then in here, let's add an edge
loop right in here. And yet we're just
beginning to get that curve now, right? We go. And then up
here we could do our vertex crease trick to
reduce the curve on this. So let's press Control
V vertex crease. And then I'm going to
bring this up like this. We get a little bit
of a been there. It's kinda blocky. So we could turn up the
subdivisions here if we wanted. Like that. Yes, there were beginning to get that shape and that's,
that's kinda nice. And ultimately what
we'll probably do is just add a solidify to this. Let me press Control a
and apply the scale here. I'll smooth it with auto smooth. And then with a solidify, let's choose even thickness, Shift and click in the thickness Field and get it about the
thickness that we want. Something like that we have
at cutting through into here. And that's fine because
we're going to put the Dashboard in
there at some point. Alright, let's go to the Front
View and just see what we think in terms of the
size and the shape. Not bad, actually, it comes up to the proper place on top. These things are a
little bit shorter, but I think they're pretty good. Alright, then in the next video, Let's begin thinking about blocking in the
interior of the Car
33. Organizing the Scene and Beginning the Interior: Well, before we jump right
into working on the Interior, let's organize our
scene a little bit. Clean up the outliner, and maybe that'll help
us as we go forward. So if we scroll down here, you can see I've got a lot of just random objects
in our outliner. I'm going to right-click here, choose duplicate
area to new window. So I can move this out
and take a look at it. A little bit bigger here. Now, everything's
twirl down here. I could twirl each one up or
I could just come over here, hover over the outliner
and press the minus key on the numpad and that'll
twirl everything up. Now I've got all of
these objects that, I don't know if we're
gonna get every single one of these into a collection, but we can at least try. I think I'm going to take all of these and make sure they're in the car body and it looks
like they are, That's good. I could also take this thing and I think that's in there too. Yeah. That's in there too. Okay. I've got the Fenders here. We've got Fenders that aren't
in the Fenders collections. So I'm going to select those, press M and put those in
the Fenders right there. Now, up here, I think a lot of these are objects that
we created up here. Let's take our Headlights and let's make a new collection. I'm going to press M, new
collection, call it Headlights. And I'll also put a lot of these other things in here too. I'm gonna hit the period key on the numpad Frame these up. And let's just go through
and select all of these things that should
go in there as well. I'll press M Headlights. So there we go. Now we've
got all of those in there. That's good. These could go in the
Fenders, couldn't name. Let's press M Fenders. All of this stuff. Let's see, we've
got Bumpers here. We've just got the two Bumpers, but should we put all
of these things in the Bumpers collection
or should we create something called a Chassis
collection that we could house all of these?
Maybe let's do that. Let's create a
Chassis collection. I'm going to grab all of these. Maybe I'll go ahead
and grab this too or is that car body? It's It's hard to know. I'm going to press M
new collection Chassis and put those in there. And this, I'll go ahead
and add to car body. And your Outliner and collections may look different
than mine and that's fine. It's just about getting things in a place that's
relatively organized. I'm gonna put these
what can we call these? I guess this is part
of the car body. I'll just put those
in there for now. As I said, your collections may look different
and that's fine. I'm gonna grab these
things back here. All these Car Chassis. I'll press M, put these
in the Chassis here. And this is the exhaust pipe. I guess maybe we
could put it with the gas tank and
the gas cap here. And we can call these well, I don't really know
what to call them. I'll just call them are there underneath so I'll call them under carriage for now.
Let's just do that. M new collection undercarriage. It's really not exactly that, but I'm not coming up with a better name for it currently. And this part is probably
the Body. Let's do that. And then what are
all these things? Let me hit the period key. Or these are all these
little tiny things. We should put those in the
Chassis as well. What is this? Oh, that's the front window. Okay, so we can do this. I'm going to put this
in a collection, call it Windshield
because they're gonna be other things we're
going to add to this. I want to move this into the
Windshield to M Windshield. There we go. Then
these little things are probably part
of the Chassis. Yeah. All of these are just
part of the Chassis. Let me hit the peaky. Oh, this is part of the gas tank and it looks like I moved it
out of the center, will need to work on that. I must have moved the gas
cap without moving this. But let's put this in
width, the under carriage. And then everything else I think can go in the
Chassis, M Chassis. Okay, there we go. I'll close this and now you can see we've got all of these. I'll hit the Minus key, and there they are here. I'll select the Scene
Collection, and there we go. Alright, so every once
in awhile it's good to just take a few minutes and reorganize a bit and
clean up your Outliner Just to get things
straightened up so we don't get confused
as we go forward. Alright, so I think what I'm
gonna do is first of all, just put in this
floor. Let's do that. I'm going to take this
and press Shift S to, to move the cursor there, Shift day Mesh plane. And then I'm just
going to move this up until it's right in here. It looks like it comes down
below where the Door in, so I'm just going to
bring it up so it's just barely below there. Okay. I'll hit the seven key on the numpad to go
to the top view. And I'm going to scale
in the X and maybe scale in the Y. Bring that in here. We're going to have
this seats in here, so we don't need to take
that floor too far. Maybe I will scale it in
the X a little bit more. Maybe take this edge
here and scale it. And in the acts that, alright. And then kind of around in here, I think it looks like
this begins to curve up. So maybe I'll just
take this and press easy and pull up and
then bring it back, scaling the X, maybe,
something like that. And then I'll press easy and take it straight up just
to kinda close that off. We're going to have
some thickness on these walls that'll help
close that up, I think. But I can scale it out. It's a little bit
more like that. Yeah, it's still inside there. Then let's press Control
a in object mode and apply the scale. And then I'll take this
one edge right here, and let's press Control B, bevel that out, and maybe add a few edges to bin
that up a bit. And right-click and
shade auto smooth. Yeah, so I just want
that right there. Maybe we could take this
face and move it in some curves up a
little bit more. Alright, there's the floor. We could also begin to Block
in the Seats. Let's do that. I'm going to find another
shot of the Seats. So something like this. Let's take a look at
this. I think this helps. Let's see if we can
find another one. Yeah, this is kinda
nice right here. This is helpful just so
we can block this in. Let's take this object here, the doors, and I'm going
to change the name of it. And instead of trying
to hunt for it in here or even
search for it here, we can just press F2
to change the name. So I'm going to call this doors. We go. Now for the time being, I'm going to pull this out of whatever group
we have that in, probably the car body
I would imagine, but I'm gonna pull it out. I'm going to press M and put it in these
Scene Collection. So it kinda pops out here outside of all
those collections. And then I can hide it. I can hit the H key here or I can click on the eye icon here. And then because it's
outside of the collections, I can easily re-enable
this or unhide it. Let's see if we can
just create a cube, Shift day Mesh cube, scale it down quite a bit. And let's put this in here as just the beginning
of this object here. It looks like it
comes forward quite a bit into the door here. And if I hit the seven
key on the numpad, I can press Sx and
scale that out a bit. Now for this one on the back, I'm just going to press Shift
D and Z and move this up, press RX and turn it a bit. And I'm in local transformation. So I'm going to change that
to global and move this back. Move it up a bit dumb, just trying to get this
basic shape in here. It does look like it kind of angles down right about there. Are X. I'm going to turn
it a bit like this. I think the way we're
going to work this is use our subdivision surface
modifier on each of these cubes to get that
kind of curvy shape here and fit it in
into the cockpit, into that curved
area along there. And get that curve
shape up here too. Alright, so we will work
on that in the next video.
34. Blocking in the Seats: Before we begin adding a subdivision surface
modifier to these things, Let's go ahead and
split them down the middle like
we've done before. Let's tab into edit mode. And here in the top
view I'll press Control R and hit
Enter two times, or go to face mode Shift Z. Let's drag select this
side and delete this side. And then let's add
a mirror here. And we'll turn on clipping. Let's now add that subdivision
surface modifier here. And there we go. Now we can see it with the Subdivision Surface
Modifier on and the cage, I guess let's go
ahead and turn on the cage for the Mirror. And let's begin adding edge loops to try and
get this basic shapes. So I think maybe if we add an edge loop right
down the center here, that'll help give it
a bit of thickness. We could also take this and
move it down like this. Maybe add another
one right in here. And I think we need some
edges across here too, so I'll add an edge here. Maybe get it. So it's about like that. Let's add another one back
here and pull that back. Maybe we could press
Shift Z and drag select these points up here and maybe
move these forward a bit. I think there's just a
bit of a curve there. Now it almost looks like these points on the
bottom angle back some. So let's take a look
at that Shift Z, grab these and maybe
moving back a bit. We could even hit the
archae and turn them some. Maybe like that.
Alright, but I think it needs to curve up
just a bit as well. Maybe we just take this edge right here or these
edges right here. Shift Z. So just those top edges and maybe bring them up a bit. And then maybe this edge right here and we bring in
and we bring down. But just as I said, trying to get that basic shape, I'll go ahead and smooth it. And then we can maybe take
this now and scale out in the X like this. Let's try that. Alright, so now that
we've got this, Let's start working
on this up here. Let's do a similar thing. I'll go to the top
view and tab into edit mode and press Control R. And I'll hit Enter two
times to drop that there. Let's go to wireframe
and delete one side. And then let's add a mirror. Here. Turn on clipping
and turn on the cage. Then let's add a subdivision
surface modifier. We go, Let's see
what we can do here. So if we tab into edit
mode, this is what we have. Once again, I think
we're going to need to add a few envelopes. Maybe I'll go ahead and add
to ride off the bat here and feel like we need one down the center so we can maybe take this edge
and pull it out a bit. Let me go back to
global and see, maybe kinda pull that
out, some like that. Maybe we take this edge
and pull it down and out. We might need to add an
edge loop here like this. I will take these points here. And let's just bring
these up in the Z. Maybe move them back a bit. I'm just trying to
conform them a little bit better to that curve
of the cockpit. Let's take these and
bring these in. Mpi down. Maybe I will go back to
local transformation. Now, let's do that. And these right here, we're going to need
to deal with these. So let's take these and hit G. And I'm going to
move these down like this. Maybe take these and move them. We can take these
and move them out. I think. Let's take all of them like this and bring
those out some. Yeah, so just beginning to
conform it to this curve here. And to see through this
a little bit better, but I don't want to see
through it completely. You can also press Alt
Z instead of Shift Z. And Z will give
you an x-ray view. So you can still
see the geometry, but you can actually
click through it and drag and select things. Alt Z again. Yeah, We're getting there. It does look like it needs to puff out a little
bit more here. So maybe we could
add another edge in here and then begin to take these points and
move them out some. Let's try that. Yeah, I think that's
looking pretty good now, we're not going to deal with the actual indentations and
textures of this quite yet. Once again, we're just
trying to block things out. And then we could
come in and add an extra viewport level here just to see how
it's going to look. If we wanted to, I'll
select this one and bring that viewport level up. I think those are good
basic shapes to begin with. So in the next video, what Let's do is
begin building in the Dashboard and the walls
of the Interior as well.
35. Beginning the Dashboard: Now for this Dashboard
type console here, Let's maybe begin with the Curve on the top
because once again, when we've got one piece
fitting up against another one, why not use an edge off of the existing piece
to create that curve? So let's go ahead and select
this edge right up here. Maybe I'll Control click this. And we've got this edge crease
in here, but that's okay. We can get rid of
that if we want. I'm going to press Shift D and Z and bring this down a bit. Then let's push this
back into here a bit. Now let's split this off
into its own Object, press P and separate by
selection will tab back into object mode and select just that one piece right there. Tab into edit mode, hit the a key. And we probably need to take
this and move it in a bit. Maybe move it in like that. Maybe move these down a bit like this so they don't intersect. There we go. And then we're going to want
to get this basic shape. It looks as if this is a
little bit angled here. I'm gonna pull this
back so it's a little bit straighter like that. Okay, Then let's extrude this
down and pull it out a bit. I'm going to hit easy
and pull this down. And maybe we then pull it back forward like
this just a bit. Let me go to the
side view Shift D. And let's see what
we think here. Maybe if we pull
it out like this, we could flatten it in the Y S, Y zero like that and then hit the archae
and turn it a bit. We could also flatten
these up here. In fact, why don't we just
do it for the whole thing. Let's just hit a SY zero. Then let's just hit R and
turn it again like this. So it's kind of inline
with this edge here. Alright, let's take
a look at that. Yeah, I think
that's pretty good. We could tab back into edit
mode and move this forward a bit up some. We could take some
of these points and move them in
if we wanted to. We go. Alright, so we have that shape. Now it's not quite
the way we want it. I want to remove the edge crease for
these things over here. So we can select these
and come back over here. And if we select
just one of them, we can see we've got
this vertex crease. I can take this to zero. Here we go. We can
do the same here. Take this to zero there. So now we've got
smoother curves. Let's begin bringing these up. Now let's see if we can
change these to normal. And if we select this edge, that y-axis is then in
line with that edge. And we could press S Y and
begin going like that. Alright, so we're getting, I'm trying to get this
right down here. So maybe SY again and try
that again like that. Okay? And I'll move it up in the Y. There we go. So is that about
how deep that is? It kinda looks like
it, doesn't it? That's not bad. Alright,
So then let's see, we can push a couple of these
Up to get that Turn there. So I feel like it
goes up like this. Maybe. And let's try that over here. We can maybe move this
one in like that. What do you think is that about? Right? Should we take these
and move them in some? Maybe I'll take these
and move them out some. You may just need to do
a little point polling and rearranging to get
it the way you want. Alright, let's try that. I may also take this and
select these and face mode and come over here
to the Edit tab and just click on flattened
and see what happens. Did that make any
changes at all? Hard to tell, but I don't
think it hurt, which is good. Alright, so now that
we've gotten that, let's maybe add just
some basic shapes for the console here. Maybe this oval in these
two circles for now, just to get these in, I'll select this edge
and press Shift S to, to move the cursor there. And then I'll press
Shift a Mesh circle. And it's kinda big. But we can scale that down. And then maybe Turn it a bit. I'll press R X and Turn it. But it's kind of in line with
this object right there. And if we change to local transformation are
Move Gizmo has angled. With that. Let's scale that down. And I feel like should
we set these up first? Maybe less press Shift Dx and bring this over
here like this. Maybe we get that in here first. And then for this Let's bring this down. Scale it out a bit. And then maybe scale on the X, Sx, something like that. Yeah, that's pretty good. Okay. And I'm not going to put
it over on the other side quite yet until we get
it the way we want it. And then I'll mirror it over. For this, we can tab into edit mode and see
the points there. And let's just
begin extruding out to get that little Rim there. Easy. Bring it out. S, bring that in. Then let's hit easy and bring
that in again like that. So I'm just going to leave
the glass part out right now. And with this selected, let's add a subdivision
surface modifier, smooth it and see what we think. Yeah, So I feel like this outer
edge or this outer layer. I'm going to Alt click this
to select these faces. Let's press S Y and
scale out a bit so it's a little more evenly
spaced all the way around. Then let's do a similar
thing over here. And it's once again
tab into edit mode. There's our points. And for this same kind of thing, but we can continue
up into here. Let's do that. Let's press easy, and
let's bring these out. E S scale a man. There's a little bit
of a ridge there, so I think I will press
easy, push that in. Then easy Back again. Let's bring it out. And
now ES, bring it in. Let's raise it up just a bit. It looks like it kinda
tilts up some I'm not sure. Now let's bring it down
to about right here. And for this piece, we may want to split it
off as its own object. So what I can do is
once again take this, duplicate it, hit Enter, scale it out a bit, so it's a little bit different. Let's hit the P key
Separate by selection. Select that one piece, come back to it, and here we go. Now we can continue on so easy. Bring that out a bit. Easy again, bring that
out and scale it in some. And then let's hit ES, bring it in a bit. And I think this
whole piece could be a little bit smaller S and
just scale it down some. And then this whole
thing should come in a little bit more like that. Let's try that. Bring it back. Alright, I'm gonna go ahead
and smooth that as well. Then let's give this a subdivision surface modifier
and see how it looks. Alright, and I'll smooth it. Yeah, I kinda like that. I kinda like that little Rim
that we're getting there. Now over here, we've
got the similar thing, but it's just closed
off so we could take this and we can mirror it
over to the other side. So I'll switch back to global
with the comma key, global. And then I'll switch
to 3D cursor with the period key 3D cursor. Now let's mirror
this over Shift, Enter Control M, X. And there we go. Now this here, we can hit
E and S and scale this in. We're still at 3D cursor. So let me undo that period
median point. There we go. Now, I think I'm going to
scale this out actually just a bit and then hit E
S and scale it in. Press the N key and merge
these at the center. And let's see how that looks. Yeah, That's kinda nice. Alright, so we've got
the beginnings of our dashboard or that console. We could of course add a
solidify modifier to this. Let's do that real quick. Solidify and I'll smooth it. And then we can choose even
thickness and give this a bit more like that just in case
we see it from this angle. Ultimately, once we apply
the solidify modifier, we may want to add a bevel to that edge so
it isn't quite so sharp. But for now, I think once again, we're just trying to block
the basic things in. And I think we're
coming right along
36. Beginning the Steering Wheel: Well, I've opened up a
couple of images that have the Steering Wheel here, and let's work on this. There's this strange
piece right here, right? This kind of triangular
tubular piece. And it looks like it connects to the Steering Column
and this cylinder. I think before we
try and do that, let's get the Steering Column
and Steering Wheel in, and then let's see what
we can do with that. I'm not really sure exactly
how we're gonna do that. So let's work on the Steering Wheel and ruminate
on it for a little bit. Let's first establish
the Steering Column. I'll press Shift
a Mesh cylinder. I'm going to take away the cap fills and we'd probably
don't need this many sides. I'll take it down to maybe 24. Let's do that. Alright, so I'll scale it down. Let's go to the side view. I'll scaled in the Z a bit, maybe scale it down
a little bit more. And let's turn it. And I'll press Shift
Z to go to wireframe. And let's kinda get
it right in here. See what we can get with this. I'll scale it down
a little bit more. Maybe about like this. I'm going to change
from global to local so I can move
it up and down in the local axes and then turn it, move, try and get it in
a similar angle there. Let's see how we're doing. Okay, maybe I'll smooth that. Let's move it over. And where should this be? I guess it should
be at the peak of this little curve
that we've created. And then I think it
goes up into here. I will take this edge right
down here, alt click that. And let's just drag
it down until it goes through the floor there. I feel like there's
a smaller tube here and a larger one down here. So maybe this is the larger one. And we can drag
this down to just inside the Dash like this. And then maybe I'll hit
the period key to zoom in. Looks like we've got two ridges. And then the smaller piece, it's probably two pieces, but I'm just going to go
ahead and do it as one. Let's hit E S and pull out. There we go and then easy and
pull forward some and then ES go in and then hit
the Z and pull this up. And then ES bring that in. And then we can
maybe take this up to where the Steering Wheel
would be, at least about. Let's hit E and pull in the Z. There we go. Maybe I'll bring it to
about right here for now. Let's see how that works. Okay? And it looks like
this cylinder sits just almost in front
of this piece here. Okay, So I'm gonna give
this a quick bevel. Let's press Control a
and apply the scale. And then I will
select this edge, this edge and this edge. Let's bevel those in. You don't need quite
that many edges. Maybe something like that. Oh, I see. I selected
the wrong ones. Let me press Alt, click this one, this
one and this one. That's why he was
looking kind of strange. Let's do that again. Here we go. Yeah, that looks
a little better. Okay. We could, while we're here, if we wanted to go
ahead and create this, we could take say
this edge here, duplicate it, Shift
D Z, bring it up. And we could extrude it. Easy. Bring that out like this. Maybe let's just select
this right here. I'm going to hover
over it and press the L key to select
link components. And then maybe we scale out in the X and
the Y, but not the Z. Or we could use our shrink
fat and Tool again, we can press Alt S and then push that
out a bit like that. Pretty much the same thing as scaling it and
turning off the z-axis. Let's split it out into
its own object with the P key and separate
by selection. Selected again in object
mode, I'll smooth it. And maybe we could give it a
little bit of thickness with the solidify modifier
here, even thickness. And I'm going to hold the
Shift key and click and drag and maybe bring it out just a little or we
could take it in like that. Well, I'm gonna bring
it out like this. Then maybe I will
select these in here. Maybe press Alt S again, hold the Shift key
and bring that in. Some we go, maybe I'll
bring the origin into the geometry here by right-clicking set origin,
origin to geometry. And then maybe pull it back
just a little bit like that. There we go. Okay, so we've got
that piece in there. And once again, we could
apply the solidify Then come in and
select these edges. Oh, let's ensure that we have our scale
applied and we do. And then let's press
Control B and Bevel those a bit so we can just get a little bit of
a curve on those. Alright, and for
the Steering Wheel, I think we need to maybe work on that in isolation
to everything else. So maybe what I'll do once again is right-click on
this duplicate area. Let's bring this out
so you can see it. I'll hit the Minus
key on the numpad. I have to hover over it first. There we go. And all
of this stuff Here. Yeah, this is all Interior, So I'm just going to hit
the M key new collection and we'll call it Interior. We may split it up into different
collections beyond that, within that Interior collection. But let's at least do that, which allows us a lot
easier to come over here now and just click and drag on these icons
and hide everything. Alright, so now I want to work on just the Steering Wheel, see what we can do with this. So this is really a torus. Let's go ahead and
just add a torus, Shift a Mesh tourists. And it's not quite
the way we want it. We need to have these be
thinner all the way around. So we could come into the minor radius here and
click and drag in here. I'm going to hold the Shift key now to move it a
little bit slower. So maybe, looks like maybe
something about like that. Then we've got four pieces
going into the center. But I'm thinking of actually
creating an object and bring those out from the center instead of going in
from the center. I think that might be
a little bit easier. So let's press Shift a Mesh. Let's use a cylinder. And this time I'll take
this back up to 32. I will add a cap fill for this. Let's give it a triangle fan. Here. I will scale it
down quite a bit. Maybe. Maybe about like this. And then let's scale
it in the Z like that. And it looks like it's farther in and
then these come out. Maybe even Curve a bit. But for now, I'm
going to extrude these out as it is here. So what we wanna do maybe is, so we had 32 sides and we
want four of these things. So maybe what Let's do is
let's alt click between two of the face is here to
select that whole base ring. And then I will
deselect every 61. So in other words, I'll have six and
then an empty one. And then, well, that's not
going to work as it Let's see. Let's try this. Maybe I'll need to yeah. Let's try this. There we go. So I needed six and then
to in-between each. So now I think we
could come up here to our transform pivot points and choose individual origin. Then I'm also going
to choose global. So now when we hit E and
extrude, Let's try it. I'm hit E and pull out
just a bit like this. And now because we're
pulling them out, each one individually,
they're coming out like this, like that. Okay. So it looks like they becomes smaller and thinner
as they go out. So I'm just going
to hit the S key and scale all of them in a bit. It doesn't look like they
are all scaling equally. Which tells me that we may
have non-uniform scale. So let's go ahead and press Control a and apply the scale. Alright, so now let's
try that again. Let's hit the S key. And are they all
scaling pretty equally? Yes, Now they are good. Let's also scale them in the Z. Z I'm going to bring them in so they're a little
bit thinner there. And then what we could do, I guess we could go ahead
and just delete those faces. We don't need those
Interior faces there, so I'll hit delete
and delete faces. Now, we need to
select this cylinder. I'm just going to hit the C key. And we can use our circle
select Tool to click and drag and select
these faces here. And that will also select
the ones on the bottom. And then we just need
to go through and select each one
of these as well. Let's do that and then let's just pull it down and
see what happens. Let's just pull it
down like that. Alright, and then
it looks like we've got a bend and bend, kind of almost like
an S curve it seems. So let's press Control R and scroll the mouse wheel
until we get three edges. I'm going to do that for each one and hit the
Enter key to times. To drop those on. From here, we may be able
to just to take this edge right here and pull it up. And then maybe we
can take this edge, all of these edges up. Let me grab this
one again, okay? And bring this down
like that as well. Now, in the next video, let's see if we're going
to use the Bevel tool or a subdivision surface
modifier to get this smooth curves of that piece
37. Finishing the Steering Wheel: Continuing with a
steering wheel, Let's go ahead and
smooth that part. And I guess it's smooth
this part as well. And let's try and figure
out what we wanna do in terms of these
nice smooth edges. And because of this
curve right here, I think I'm going to try a
subdivision surface modifier. Let's do that. There we go. Now,
it's not playing really well with this cylinder, but we can maybe come in here and add two
edge loops here. That helps. Let's do the same
thing all the way around. Two edge loops here. To here. We do have some pulling in
here and we might be able to fix that by selecting
these faces here. I'm gonna go over and turn on the cage right here
so we can see that. And we may be able
to insert this and add an extra edge
there. So let's try that. Let's just hit the icky. We go and inset this. So now we get a
little bit cleaner. Turns there, right in there. We could increase the number
of Viewport levels to two. Yeah, that's beginning to
look a little bit better. And what let's also
do is take this piece and add it or join it
to the centerpiece. And the subdivision
surface modifier for this will then
be applied to that. So let's take this piece here. Shift click this control J. And now we've got all one piece and that subdivision surface
has been applied here. Alright, let's take
this in and put it in place before we begin creating
this part right here. So what I will do is come back to our outliner and click
and drag on all the icons. There we go. And I will
go to the side view, press the R key, and let's just scale
this down and get it in here and get it the right
size and the right angle. Let's turn into a bit. Maybe scale it up some. Let's see how that works. Oh, we need to move
it over a bit. Let me press Shift Z so we
can see the center here. And one thing we can
do once again is use our snap tool to
get this in here. Let me go to our local Orientation
and pull this up a bit. Let's take this edge right here and move the 3D
cursor to it, Shift S2. And now we can take this and
snap it to the 3D cursor. So Shift S and the number eight. Here we go. Now it's
been snapped to that. It isn't the right angle yet. We can go ahead and do that. And then pull it out. There we go. Let's try that. See
how that looks. I think it's too big. Let's pull it down a bit so it stays within the
confines of the car there. And if we wanted, we
can move it over. We can take all of these
pieces and move it over a bit. Let me just see. I
moved it this way. What do you think? Let's go with it for now. We'll keep it as its
own object so we can scale it up or
down however we want. In addition, if we need to, we can always come
back and just select, say this piece and use that
shrink fat and Tool Alt S. And now we can shrink it and
enlarge it if we need to. As we begin to put
more things in here. Alright, let's begin working
with this right here. I'm going to move the cursor
to this point and press Shift a Mesh cylinder. And I will take this
down to maybe, well, these are pretty smooth pieces, so I may keep it at 32 sides. I'll take these down
here to 0.1 endpoint to, and I'll leave a cat
fill on as an end gun. Let's do that for now. I'll remove it off the
bottom here and let's select that one face and hit
delete and delete faces. But then this I think I want
to keep for now on the top. So let's turn it and get it
pretty much in line here. Then I'll scale it down,
bring it out a bit. The reason why I'm keeping this face on it is
because with that face, we have a direction
for it to extrude in. If we only had an edge, we'd have to press a key to tell Blender what access
to extrude in. But with this face on it, it automatically knows which direction it needs to extrude. But it looks like it's
not quite aligned yet. I'm going to press RX and
just tilted a little bit. Alright, with this in place, now let's begin extruding
up to get all these edges. And it looks like
we've got, well, there's the first 12345. It looks like
they're five of them So let's give this a try. I'm going to take this and
I'm going to just inset this. And once again, because
we have a face on this, I can just hit one
key and inset it instead of E and S, two keys. Let me ensure that
we have our scale apply and I'll press Control
a and apply the scale. Alright, so now let's hit the I key and insert just a bit. And then I'll hit E
and we can pull out in the Z-axis just one key
extrude their one key inset. Then I will extrude out again. Well, I said five, but 1234, is it five or is it, or I think it's four. So I'm going to move this. I've just expanded
my selection by pressing control and the
plus key on the numpad. And then I'm just
going to pull this up. Let me do one more. There we go. And pull that up just a little
bit like that. Okay, so we've got that. The next thing we need is
this little black thing. To do that. I think I will inset
first, let's do that. And then I'll hit the E
key and pull out to here. I'll hit the I key. And then let's get this
little piece here. Not sure what that's
supposed to be, but let's go ahead and
try and replicate it. We go. Alright, let's
take a look at that. Now. Let's go ahead and add a subdivision surface
modifier to this right here. Let's go up to two
viewport levels. I will right-click and
choose shade, auto smooth. Alright, so now I
think I'm going to need to add a few
edge loops here. I'm going to turn
on the cage here. And yeah, we're going to need a few edge loops to
tighten these up some, so I'm going to add
one here like that. One in here. Well, maybe we don't
need this one. Let me get rid of
this. There we go. Yeah, okay, so now
let's try one here. I will add an edge here. And up here. And here we go. It looks like we could
add something in here. So let me select this
face right here. And I'm going to
inset this again. And maybe here let's press M and merge these at the center. And let's see how that looks. Well, we still got
some pulling in here. Let me add another edge loop and select these faces here and
set these one more time. Here we go. That cleaned it up quite a bit. Now I feel like it's a
little bit taller than this. Press Alt Z and tab
into edit mode. And let's select
this bottom edge and let's move the cursor to it, Shift us to, now press Alt Z. And let's switch to 3D
cursor, period, 3D cursor. And let's scale up from here. Maybe let's bring
it up like this. I feel like I could bring
this out as well to here. Let's see if I can
kinda scale that out. Oh, I'm still at 3D cursor
Soviet period median point. Now let's scale that out a
little bit more like this. There we go. Yeah,
let's give that a try now we could also take
this and just turn it to, we don't need it to be
straight up and down because people don't leave things
perfectly aligned. Alright? Alright, in the next video, maybe let's start working on this strange little piece here that seems to hold the
Steering Column up here.
38. Modeling the Steering Column Brace: I've brought up what I think
are the two best pictures of this little thing in
here on the Dash. Let's see if we can
get this created. I'm going to select this and just hide everything over here. And let's just
begin with a cube. I'm going to hit the
seven key and go to the top view and press
Shift day Mesh cube. And maybe I'll scale
it down a bit. And this will maybe
be the top of it. Let's press S and Z and, and then let's
bring it up just a little bit here and okay, so let's go to the top view. And maybe if we press Shift Z and then
tab into edit mode. Now, let's drag select this
grouping of points here. And I'm thinking that this here on top is this
piece right here on top. So maybe it doesn't need to
go that high up like that. Maybe right about
there, right here. So now what we can do is
just extrude this up again. I'll hit E and pull up, and let's scale in the X and
bring these in like this. Now, I feel like we could
maybe add an edge here. Let's try this. And these faces here
could be extruded out. So if I hit the seven key again, I'll hit E and maybe scaling the X and maybe then pull
straight up like this. Yeah, so maybe
something like this. We could also press Control R and drop an edge
right down the center. We could take those two points
and drag them up a bit. We can maybe take
these points here and Shift click and
these points here. Maybe we could scale those out. Sx that. And you know, maybe it's easier to just delete half and add a mirror
modifier here. Let's do that. Turn on clipping
tab back into edit mode, and I will turn
on the cage here. So now when we grab these two, we hit G, diesel
move around as well. Alright, so let's just add a subdivision surface modifier
and see what happens. I'm just hoping we
get lucky here. Let's click add modifier
subdivision surface. I'll take this up to. Let's smooth it. Yeah, actually
that's not too bad. Let's press the seven key and I'm going to
tab into edit mode and press Control R and
bring this down like that. These do look like they're
a little bit farther out. Let me press Shift
Z and grab these. I could kinda move these
out a little bit and then press Control R
and add an edge there. We could grab these and
pull these up a little bit and maybe these and
pull them in some. Let's try this. Take all of these
points and I'm going to bring them up some like that. And we can smooth it. We've already done
that. Let's take this and drag it up so we
clean that up a bit. I think I would like to add
one more edge down here, get that a little bit flatter
on the bottom like that. Let's bring everything
back here and here. And let's take this, I'm going to bring it up here. And let's turn it in
the z-axis, RZ, one at. There we go. And then Shift Z, scale it down. Let's turn it. Let's bring it down here and see if we can kinda
get it in place. And maybe I want to move the cursor to this point in the
center of this object. And then I'll press Shift as eight to get that right
in the center there, I'll press R X, Turn it a bit. And let's get it lined up with the Steering Column here. And I'm going
to bring it up. Here we go. Now we can maybe bring
this up and out a bit. Now, I'm going to
need to rotate it a bit for the Dashboard here. So let's do that our X and
bring that out like that. Then we're going to
need something to join it together with
this piece as well. So maybe let's just
extrude something off of this. Let's try that. I will take this, maybe grab these faces here, and I'm just going to
hit E and pull up. I want to flatten
it in the y-axis. So S, Y zero. There we go. And maybe I can This out just a bit like this. So can I grab these and move
them down here like that? And then put some sort
of a screw or bolt in there to kinda give it the sense that it's being
connected on there. So let's create one
of those things. Let me press Control S
to save our scene and then I will once again hide
everything here like this. Press Shift S one to move the cursor to the
center of the grid. And then I'm going to
create a UV sphere. I'm going to take
the segments down to maybe 18 and the
rings down to 12. I will split it in half, tab into edit mode. Shift Z, Hit the three key and I'm going to drag
select all of this. It delete and delete faces. Now let's scale it in the
Z to flatten it up some. What we need to do is actually create this little
slot in there. So to do that, I'm
going to create a cube, scale it down and put
that right in here. I'll scale it out just a
bit like that. There we go. So now I want to cut
this with the cube. So I'm going to
select the sphere, add a Boolean modifier, use the eyedropper
to select cube. I'm going to apply it. Move
the cube, and there we go. Alright, so I will smooth it. Alright, so now I
can delete this, take this, bring
everything else back. I will spin this in
the y-axis, RY 90. We go, Let's scale it down. I will change to global. And let's see if we
can put this in place. And all I want is just
a hint that there is something here,
something like this. I will take this and move
it to the other side. Shift DX. I'll spin it in
the Z or Z one at. And let's put this right here. I'll spin it in
the X just a bit. Alright, there we go.
So I'm hoping with some chrome material
that's going to look okay. I may push that in just a bit. Let me go back to Local, and I'll push this
in a bit like this, and then bring these
in a bit as well. Let's go back to global. Okay? Now, ultimately we're
going to need to add, I think, some screws
up here as well. And those can be these. I think we can maybe take these, spin them in the Z 90 degrees, scale them way down
and get them in here. Alright, and then
we could maybe do the same thing over
here, Shift D, Why? Because like will need
to move that up a bit. Shift D, move that up here, and then we'll just have to
go through and adjust these. Alright, so we've got
something there now. Hopefully with the
proper materials that'll blend right in
there and won't stand out too much is
something that isn't quite the same as what
we're seeing here. But it's pretty close, I think, and it just might work
39. Modeling the Interior Door Panels: Now as I'm looking more
at the Interior here and the thickness of the
Door in the frame here, I realized that I didn't leave much room above the Dashboard
here for thickness, right? This has thickness here. And so this whole
thing is going to have to move down some. So we need to keep that in mind. But I think what I'd like
to do is begin maybe working on one of these doors and see what we can
come up with here. So we've got a pretty good view of adhere and how thick it is. I'm planning on not having
these doors open at all. So I'm not going to worry
about this part in here, but I think we do need to add a solidify modifier to this and see how
that's going to look. So let's do that.
Let's come over here. Add a solidify, choose
even thickness. Our scale is all one. So that's good, that's
going to help out. And then I'm going to
hold the Shift key and click and drag in
the thickness Field. And let's pull this
out until we get it about the right thickness here, maybe something like that. And we could also do that with this just to see
what it looks like, how it's going to connect up. So let's come over
here, add a solidify. And this is all ones as well. Let's choose even thickness and then increase the
thickness here like this. See how this works.
Something like that. And we can also do
that over here. I guess let's do that here
and see what we can get. I will add a solidify here. We've got all once in
a scale that's good. Even thickness and let's
increase this a bit. I'm just trying to
look at all of them, compare them with each other and see what we can get here. And maybe I'll bring this
down just a bit like this. There we go. And then it feels
like we need to bring all of this
down just a bit. So all of these things in here, and the Steering Wheel, this piece, all the
little screws in here, the Steering Column. This piece. I'm just trying to grab
everything in here just to see if we can move
this down just a bit. So you can see there's the
thickness right there. Maybe I'm just going to take
this whole thing and pull it down just a little bit and
maybe pull it forward. Just a hair like that. Let's see what happens there. Yeah. I think that works
out pretty well. Oh, it looks like we need
thickness right in here too. Let's do that. I'm gonna come
over here, add a solidify. Here we go, and then
even thickness. And let's pull this
out just a little bit. Tell it lines up with that
on the bottom. There we go. Yeah, I think that
works pretty well now, ultimately we're
going to need to see how they connect up. So maybe this, let's
take a look at this, see how it connects. So maybe we could
take this point here, crease it just a bit more with Control V and vertex crease. And I'll pull out
just a little bit. So it kinda closes
that up. There we go. And let's see. Maybe I'll take it and move
it up just a little bit. Maybe like that. Now to work on the
interior of this Door, I think what I wanna do is just duplicate this plane
right out here, bring that in and get rid of the solidify and the subdivision just for now, let's try this. I'm going to press a
to select everything, and then I'm going to press Shift D and X and bring this
onto the inside like this. Then I'm going to split
this out as its own object, hit the P key and
separate by selection. Tab back into object mode. Select that new Object
tab back into edit mode. And then I'm gonna
go ahead and remove the subdivision and the
solidified by clicking on the X. And what we are left with is this interior piece now
that is its own object. And let's see if we can maybe
move this in just a bit. It isn't overlapping. There we go. Maybe move this down. Yeah, We're just want
a piece of geometry in there that we can use for
this now, is it flipped? Since we've pulled this from the inside and we want
this to be the outside. Now, let's see if it's flipped. Let's come over here and
pull down our view port overlays and turn on
face Orientation. And sure enough it is. So let's hit the a key to
select everything and then recall we can go to
Mesh normals and flip. There we go. So now those are pointing
in the proper direction. Let's come back up
here, Turn that off. There we go. Now, maybe we can extrude this
out just a bit. I'm going to ensure that
all of these are selected. And then I'm just
going to hit E and X and pull out a
little bit like that. Now, I may have flipped
the faces again there. Let's take a look at
that here in a minute. But from here, I just want to inset these in
just a little bit. I'm going to hit, I inset like
this to get this Rim here. And then I want to extrude in, EX, push in just a bit. There we go. Now, let's add a subdivision
surface modifier and see what we need to do. Okay, there we go. So I've still got
these points over here creased and I don't
think I want these creased. So maybe let's take this mean increased weight and take those
all the way down to zero. So we get rid of that. Oh, there's one more that
I think I may have missed. Yeah, right in here. Let's press Shift Z and
I'm going to select that. Turned down the vertex
crease. There we go. I think that helps there. Let's come over here and press Shift Z and select
all of these right here. Take that mean vertex
crease all the way down. We go so that gets rid of that. Was there any down here? Tab into edit mode. Sure enough, Let's grab all of these and drag
this down as well. There we go. Okay. So now we know we've got
all of those taken care of. Maybe I will go ahead and smooth this with auto smooth,
drag it up a bit. We go. Now let's see if we can get these edges a
little bit tighter. There's a couple of
ways to do it we could, of course, and some edge loops, we can just click
here at an edge loop, Control R, click here
and add an edge loop. So that kinda helps those there. And down here we could
do a similar thing. Here. And here. We've got those in place. Maybe we could press Shift Z and just maybe move some
of these around a bit. Move them in some
things like this, till we get the kind
of curve that we want. Something like that. We could also turn
up the levels here. That looks kinda nice. And then I think
in the next video, what Let's do is
work on creating this inner pocket and maybe this little Door Handle as well.
40. Creating the Interior Door Pockets and Handles: Now for this interior piece, Let's see if we can't do is similar thing by just
grabbing a few of these, I'll hit the three
key and select these. And maybe all of these. Let's do that. Then once again, we could duplicate these off, Shift D and X and
pull out a bit. Let's hit the P key
Separate by selection. And now if we tap
back into edit mode, maybe we can select a point
here and just drag it down. Let me just select
that one object there. There we go. Let's drag this down and see if we can maybe
angle this a bit. Maybe pull this one up. Just trying to get
this basic shape. Once again. There we go. Let's try that. It looks like maybe we could take this whole
edge and move it up. And maybe we could
grab this edge and hit G2 times and slide it over. Now, if I just
grabbed it in the Y, you can see it would
stretch this out. And that's why we're
hitting G two times to slide it along the
existing edge. Same with this one here. There we go. Then we can select everything. It, pull it out just
a bit like this. And maybe In set this now we could hit I and
instead it just a bit. And then we can
hit E and push it back in just a little
bit like that. Let's see what we think here. And maybe one more, maybe I'll hit I one more
time just to make that edge, it's a little bit sharper. We go. Maybe that's even too sharp. I'll scale it in just a
little bit more like that. And to get these corners
a little tighter up top, maybe we could add an edge
up here and pull this up. And I feel like the
whole thing could maybe Curve out just a bit. Let me add an edge in here. Just pull it out just
a little bit as if it is a kind of a, kind of a pocket there. And then this piece right here, I think let's hide
everything and create it just on its own. Let's do that. So once again, I think I will
duplicate this area. I'll hover over it and hit the Minus key to
collapse everything. And then let's see, we have here, let's
just hide everything. I'll just click and
drag on the icons. There we go. And this thing right here, so maybe that's just a cylinder with an extrusion out of it. Let's try that shift
day Mesh cylinder. Maybe we don't need
quite so many. I'll take it down to 16. Let's tab into edit mode. And this face could come down
a bit scale in some, maybe. Take these faces up here. Let's just take these
and let's extrude these out and narrow them
down at the end. So let's just hit BY and pull them straight
forward like this. Maybe scale them down in the X Sx and scale
it down like this. So it's pretty thin. And then we need to
extrude this up. So let's add an edge loop here. I'll bring that up
to about right here. Maybe we can take these
and bring them back a bit. Let's hit G2 times. Maybe grab this point and
hit G2 times. There we go. Then let's just take these and extrude them up
for this, Let's try that. E, pull up. There we go. Okay, now let's add a subdivision surface
modifier and see what we get. Well, that's pretty ugly
to be expected, I guess. And then let's add an
edge loop along here. One on the bottom, one out here, and maybe
one up here like this. See how that works. It's not too bad. Although I feel like this area
doesn't work really well. We may need to
bring this in some, maybe we could grab this
and just bring this up G2 times like this. And that will maybe get us that curve a
little bit better. And maybe this part down
here is a little bit taller. Let's take these here and
scale these up in the Z. And let's see what happens here. Like that. Then we want to
add one of those. So we have one of those already created on the car itself. So let me bring back
this window again. It, the minus key, and I'll bring all these
things back here and here. Then think I'll put it in place and then
put the screw on. So let's bring this over here. Let's turn it in
the y-axis, RY 90. It's turning the wrong way. So let's hit the negative
key and then enter. Now let's bring this in, scale it down quite a bit
and try and get it in place. So it looks like it needs to go 180 degrees in the x-axis. Scale it down. I'll click on this red
square root of slided in the Y and Z, but not the X. And then move it back in the X. Looks like we need
to turn it in the X. Bring it down, and let's
get it right in here. I'm going to bring it in so it connects there and
then we're going to have to angle it a bit. Maybe let's turn
it in the z-axis, our Z, and bring that out
just a hair like this. And maybe this could
go right in here. Let's try that. Alright, so now let's
grab one of these here and duplicate
it and move it out. We will need to spin it
in the z-axis, RZ one at. And let's put it right in here. So right here, we've
got the origins, so we can press Shift S to, to bring that to the origin. Then we can take this
and press Shift S eight to snap the selected
object to the 3D cursor. Now, it looks like this
edge is a little bit rough. Let's see what
happens if we take this edge right here or
this face right here. And let's just inset this
actually before I do, I'm going to apply the scale
control a apply the scale. And then with this selected, I'll hit the I key and just
inset in just a little bit. Yeah, that cleans
that up quite a bit. Let's do that. Shift S1 to move
the cursor again. There we go. So now we've
got that on this side. We probably need
to take these and mirror them over
just to make sure they're in the proper
place. Let's do that. Let's take this and
this, these two objects. Let's move the pivot point to the 3D cursor,
period, 3D cursor. And then let's duplicate
and mirror them over. Shift, Enter, Control
M, X and enter. And there we go. We've got
them over on the other side. Alright, we're moving
along in the next video. Let's work on some of the
Interior inside here, and maybe that Gear Shift
41. Continuing the Interior Panels: For the Interior up in here, these Panels up in here. We could probably
do a similar thing by pressing Alt Z and then
tapping into edit mode. And then we could select, maybe on this side, yeah, we can see what faces we need to select to get
this pattern right here. You can see that we need
to get these in here, right in there now
maybe we ought to go ahead and grab these as well. And that's basically that
pattern right in there. Should we get these up
here? Sure, why not? Let's do that. Alright, so if we
press Alt Z again, now we can take these and duplicate them and
move them inside. So let's press shift D X and let's bring them on
the inside like this. Let's then split them
off as their own Object, it P and separate by selection. I'll tap back into object mode and select just that piece. Now, let's get rid
of our solidify. And then we can tab into edit mode and take a look at
what we need to do in here. So we've got it pretty
well aligned here. Maybe I could take this one
and bring it down like this. Then let's also take
any points that we have vertex crease on. Let's take these two and let's reduce the crease all the
way down to zero here. We need to probably
go all the way down to zero individually. Let me select each one of these. There we go. And then let's select
everything and let's try an inset this again
the way we did before. Let's hit I and
inset in just a bit. And then let's just
select these faces here. And let's see if we can
extrude these out E and pull them out just a
bit to get that ridge, just like these here. So let's take the Door and
maybe tab into edit mode here. And let's take these
faces right here. And you will use
these to begin this. So let's press Shift Dx and
move them out just to pit. Let's split them off as their own object P
and selection here. Let's remove the solidify. Let's just select
that object on its own and remove the solidify. And then let's tab
into edit mode and just select these
edges right here. And maybe we could just
hit the Z and pull up a bit and then maybe hit the
X and pullover EX again. Then maybe easy, Let's try this. And then easy again like that. Alright, I'm gonna press
Control and the plus key and expand the selection and
kinda move this back, take this edge and
move this back a hair. We could probably take
all of these now. Control plus and move
these in just a bit. And maybe we could take these
and move them down some. And these, and maybe I could even just take
away these edges. I'm going to hit Delete and dissolve edges and then add an edge right
down the center. So we just have one. We get more of a curve there. And then this one now
can come back out. Then let's add a solidified
to this and see what happens. So come over here, add
modifiers, solidify. Let's take this and choose even thickness and
click and drag in the thickness fields. So maybe we bring
it down like this. Can we maybe move this
solidify up like this? Then maybe if we applied this, pull this down and click Apply. Now we can tab into edit mode
and add some edges in here. And that may give us a little
bit more to work with here. Now I feel like
it's coming down a little bit farther
on the door here. So maybe we could just drag select these points
and pull them down a bit. There we go. I think that's a good beginning. We may want to tweak
those a little bit more and make them
a little bit puffier. And we will need to put a little edge on them
right in here too. So let's work on adding that
Trim in the next video.
42. Creating Trim with the Curve Tool: So adding Trim to this
particular type of piece can pose a real
problem in that. If we tab into edit mode
and I'll go ahead and turn on the cage for the
subdivision surface. We can't really select like this selection of faces
and extruded out. If we hit E and try
and extrude it out, it just kinda comes out like an edge because
really it is, it's just two very
close edges being pulled apart by the
subdivision surface modifier. If we turn it off, you can
see here they are here. This is actually the
Row of faces here. It's pointing perpendicular
to the way we want it to go. So adding a bit of Trim on this, like we did here
really isn't possible. So another way to do it is
to actually select an edge, break that off as
its own object, and then convert it to a
curve. So let's try that. Let's tab into edit mode here. And we want to select an edge, maybe right along here. Let's try this. Let me press Alt Z and make sure we've got an
edge all the way around. Yeah, so let's, let's take that and let's try and
duplicate this off. In fact, you can
know what let's do. Let's isolate this
piece of geometry. I'll tab into object mode. And to isolate this, you can press the division
key on the numpad or the division key on the keyboard underneath
the question mark. You can do that too. So either division key. So now that we have this
isolated, let's work on this. I'm going to tab into edit mode. We have this edge selected. So now let's duplicate it, Shift D and enter. And then let's split it off as its own object, P selection. Now we tap back into
object mode and just select that
object right there. Right? Now let's take this
and convert it to a curve. I'll right-click
convert to a curve. Alright. Now that
we've done that, we can come over
here and we have this Curve properties panel. Let's then select this. We can probably take our resolution preview
down pretty far. Maybe let's take it down to six. Let's try that. And then here in the
depth field under bevel, we can hold the Shift key and
click and drag and drag out just a little bit so we get something that
looks like that Trim. Does it need to be a
little bit bigger? Maybe if we take
it up like that. Yeah, that's not bad. And then since this
is still a curve, we can now convert it back to polygons and join it
with this Objects. So let's now right-click
convert to a Mesh. And then we can take this
Shift-click this Control J. And now we've brought it
back into this object. Alright, now let's hit the
division key and bring everything else
Back. There we go. So now we've got that piece
with that Trim around it. So that's a good way to
add this kind of Trim. And we may be doing that
here with this as well. And let's take these
faces in here. I'm gonna press the
C key and just come in here and select
these faces on the top. In here, the C key, and select these as well. I'm going to use that
shrink fat and Tool, the Alt S shortcut key to
try and puff this out a bit. So let's press Alt
S. And then I'm just going to move this out
just a little bit like this. Puff that out just a
little bit like that. So there we go. We've got our little padded
Pieces on the doors. In the next video, I think I'd like
to try and work on the Gear Shift here on the
floor of the car as well?
43. Modeling the Gear Shift: I've brought in the
two best images I can find of this Gear Shift, and frankly, it's not doing
me a whole lot of good. Let me press Control
and Spacebar. And there's this thing here. And I'm not sure if
it's something that goes all the way up or
if it just goes to here, it's very hard to tell. So I'm not sure what this is. It looks to me like
there's this cylinder and this piece and
then the Gear Shift. I think what I'm gonna
do is hide everything and then work on it on its own here in the
center of the grid. So once again, I will duplicate this window out into this area and open it up the minus key on the
numpad to collapse things. And then let's
just see if we can get some of these
in collections. So we've got the Interior here. This is Interior, but it's
really steering wheel. Maybe let's put these things in a steering wheel collection. So let me just select
these things in the 3D view like this. And maybe these as well. And let's just put
all of these in a steering wheel
collection here. I'm going to press the M key, new collection steering wheel. And this steering wheel can go into the Interior
collection here. Let's do that. Yeah, so let's just take all of these and put them in
a doors collection. Let's do that. Am new collection doors. We go. So now we've
got those in there. So we have everything
in collections. Now we can just click and drag and hide everything
pretty easily. Now that we've done
that, let's start this. I think I'm gonna
begin with this down here with the cylinder. And I don't know that we
need this many sides. I'll take it down to 24. Let's maybe scale it down. And I can tab into edit mode and delete this face down here. And then I'm going
to keep the one on the top to make it
easier to extrude. And I'll bring this up and let's just begin
right down here, this little ridge
right down there. With this selected, I will
hit I and extrude in E, pull up maybe about this
high scale in a bit. And now we're here. It almost looks like
this thing sits on in or around the tubing
of the Gear Shift? I don't really know
that for sure, but we can try it. I'm gonna hit I and instead
in and then E and pull up. And then I'm going to
work on this silver part. Let's bring this out
a bit like that. Maybe that's too much. How about like that and this
little piece right here, pull up like that. And then I'm going to inset in quite a bit like this to get
the width of this piece. And then I'm going to add
this piece on the outside. So from here, I think
what I wanted to do is use a path to create
this curve here. So I'm just going to
delete this for now. And then I will take this
edge and press Shift S to, to move the cursor to it. And let's go to the side
view and let's create a path shifted curve path. And I will turn it
into y-axis RY 90. And I'll go ahead and
tab into edit mode. And let's go back
to the side view. And I'll switch back to global
here for our transforms. And now let's just see if we
can get this basic shapes. So maybe I take these two up here and pull
them over like this. Maybe something like this. We need to maybe pull
the whole thing down. It isn't very tall here. I'll bring this down
here like this. And then I think we
just need to add more points to get a
tighter curve here. So maybe I'll just take this
and move it straight up. And then I'll take these two and right-click and sub-divide and then grab that point
and move this, this way. We get a little bit
sharper Turn there. Then we can do the
same thing here. Subdivide this and hit G and
move this forward like this. And maybe these two at a
point here and go like this. Alright, let's take a look. Is that about what we need? If I feel like that maybe
these need to come up a little bit like this. Now. Now I feel like the whole
thing should be bigger. I'm going to scale it up and
bring this backup like this. You like now this is too big, so I'm going to
scale it down a bit. Yeah, there needs to be room
for this piece in here, so I'll bring that up some. Alright, let's try that. Maybe I want to lean knees
forward just a bit like this. So now we can make this a tube. We can come down here to the object data
properties for the Path. Let's change our
resolution to six. And down here in the
depth under bevel, Let's click and
drag and I'll hold the Shift key and let's bring this out to a tube like this. Maybe I will select this and press Shift S to,
to move the cursor. And let's add a UV
sphere up here. I will scale it
down quite a bit. Then it looks like
it's kinda flattened. It looks like it's a
little squished in the Z. So I will press Z and
kinda squish it a bit. Maybe bring it back up. Something like this. Alright, let's smooth it. Maybe I will smooth
this down here. And then as I said, I wanted
to get this piece down here. So what I'm going to do, maybe grab this edge right here, Shift D Z and bring this up. Maybe to about right
here, let's say. And then I'm going to
press easy to scale it down or to extrude
it down, I should say. I'll hover over it and press
the L key like hover over a point and press the L key
to select link components. And then I'll press Alt S
to shrink it down a bit. Now we can extrude it and
then fat and it up a bit. So I'll hit Enter Alt S and
let's pull it out some. And there we go. And then it looks like we could take few of these
faces up front here, say, I go here. Let's select these upfront. And we'll extrude these out. Ey. Let's flatten it. S Y zero. I almost think it's
tilted back a bit. But before we do that, let's just add two
edge loops here, scale them up in the Z. And then let's just take these faces in the
center, maybe like this. And let's extrude these Back. Then Control and plus and
let's expand this out. Go to the side view. On it's facing the wrong way. We will have to spin
that around a bit, but let's just hit the R key, tilt that back a bit, and then let's spin it around. I'll select this
edge right here. Shift S to switch
to the 3D cursor. It the L key, and now press
RZ 180 to spin it around, around the 3D cursor. Alright, so I think
what I'll do is now take this edge right
here and just bring it up. Let me hit the period key, go back to median point.
Let's bring that up. And let's scale this one in
and bring it up as well. So let's now smoothies. And we could probably add a
subdivision surface modifier. Let's do that and
see how it looks. Subdivision surface. Let's now turn on
the cage and add a few edge loops here to
tighten up these edges here. Maybe this one here, maybe this, like this. And we could do the
same thing over here. So maybe if we added
an edge loop in here, G2 times and slide that up. And one in here. We go. We could add another
level of subdivision two that I might try and
add one right in here. That kinda helps. And it looks like
we're going to need one in here as well. Let's do that. Alright, let's put it in
place and see how it looks. I'm going to hit the a key and I'll bring everything
else back over here. I'll hit the negative key on the numpad and just
drag and move these up. Alright, so now I'm just
going to scale down. Let's move these over and
try and get them in place. And I want to keep the Path here until we get
it the way we want it because that'll allow us
to adjust this as needed. I'll select that floor
and hit the period key on the numpad,
frame that up. And then let's take
all of this again. And let's move
this down until it intersects at about there. Then let's move it
back until it hits that curve of the floor. But yeah, I think now
we need to work on adjusting the Path here.
But let's do that. Tab into edit mode. And I'm just going
to take all of this, Move it up a bit, take all of this, move it back some. So that's why I wanted to keep that as a path is just to be able to adjust
that as we needed. Feel like all of this can
be a little bit bigger. And this can come
up a little more. And this needs to fit on
the top of this again. So I'm going to take this one once again
and press Shift S to select this now and press
Shift to snap that at the top. Once again as we go, We'll do more adjusting. But I think for now
that's pretty good. And we'll keep working on
other parts of the Car.
44. Adding Details to the Dashboard: Continuing with the Interior, let's maybe finish up
this little piece. We can start working on this little thing which
maybe it's the Headlights. We can also work on
the Rearview Mirror. I've got a front
view here that we can see the other side
of the Rearview Mirror. So let's just start working
on all of these things. I'm gonna hit the period key to zoom into this little guy. Let's grab this edge
and scalar then a bit. And I think I just want
to grab a few edges, a few faces, I should say, and just extrude down. Let's well, maybe it's
only two. Let's try this. I will hit the E key and
let's just extrude this out. And does it flare out a bit? Now? I don't think so. It's hard to tell,
but maybe let me go to normal to move in line
with the faces here. Let's just go with that. Oh, it looks like I do
need to pull that down. It hit extrude it out in
line with those faces. So let's just bring this down. And maybe we could
turn it in the X. Let's see how that works. We probably need one of
these to put right in here. Alright, so let's try that. Let's switch to
global for a moment. Shift dX. Let's turn it in
the Z or Z nonzero. And let's going the wrong way. So let's hit the Minus
key and then Enter. And let's bring this up and
put this right on here. I'll move it into place. And it looks like we're going
to need to tilt this a bit. I'm going to take
the rotation and just zero it out completely. Zero like that. And now we can turn it a
little easier in the X RX and just turn it like this until we get it just
the way we wanted. We go. Yeah,
something like that. And then let's switch to local transformation so we can press RZ and spin it
in the Z just a bit. And it doesn't look like it's
quite in the center yet. Let me select this
edge right here. Press Shift S to, then select this
and press Shift S eight to get that in the center. Since it's so small
in the Scene, Let's probably just add bevels. Let's press Control
a, apply the scale. I'll just select these
edges all the way around. Maybe these upfront. And let's go ahead and
do these down here. Yeah, Let's try all of these. Control be pullout
and I don't want to crossover. There we go. Yeah, I think that's good. Alright, this little
thing right here. I think I'd like to
create this once again in isolation and then bring it
in and place it on the car. So let me press Control S. I will hide everything here. And then let's just work
on this piece right here. So once again, a cylinder
Shift day Mesh cylinder. This time I think I'll
take it down to 16 sides. I don't think we need
to much more than that. I'll select this
face and delete it. And then let's begin with this little piece
right down here. So I will scale in the
Z and bring it down. We begin here. And then with this face, Let's just hit E and pull up. And then S and scale in. So we're here. I'll hit IV, push in, hit the I key to inset, and let's insert this
in about like that. And then we can hit
E and pull this out. Then this part in here, maybe we bring this out like ES, about like this, bring it up, some hit E, bring that up, and then we'll hit E, bring
it up again and hit S. Kinda bring that in like that. Now I think I do want to add a subdivision surface
modifier to this one. I'll go ahead and do
that and I'll smooth it. Okay, it's ugly, but I think
we can make this work. Let's first of all, add an edge loop out here. And then I'll add an
edge loop up in here. One in here, maybe one in here. We've got some really ugly
things going on here. So I'm going to add an
edge loop right here. Then I'm going to take this
face here and just merge everything into the center with the M key and merge at center. And that cleans that up a bit. But I think I'd like to select these faces here with
the circle select tool, I'll press the C key and
then click and drag here. And then right-click to get
out of the tool and hit I and inset this
a bit like this. And maybe this one
can come down. I'll bring this down like this. Alright, let's see how it looks. Once we get it into place, it looks like the origin is
pretty close to the center. I'll just right-click
and choose Set Origin, origin to 3D cursor. And then let's bring
everything back and put it in place
and see how it looks. I'll grab all of this. This. And I will turn it, are X9 zero, hit the negative key, enter, and let's scale it down. I will switch to global
Orientation and bring this, and let's get it chest in here between that piece that
we were just working on. The Steering Wheel. Bring that in. I'm going to go to the side
view and press Shift Z. And let's turn this in
line with everything else. Maybe get that in
there like that. Let's see where we are. Now. We're getting
there. Maybe I will go to local transformation now. And let's bring it up. Alright, we've got
those pretty much in. Let's, in the next video. Concentrate on the Rearview
Mirror right here.
45. Modeling the Rearview Mirror: So this image here is
a little bit grainy, but I think we can get a sense
of maybe what's going on. Let's first of all, once again, hide things and hide this. And we will come into the
center of the grid here. And I guess first
let's just make this rectangular
shape for the Mirror. Let's just do that. Create a cube. I'll
scale it down a bit, and let's just scale it. Maybe I'll scale
it in the Y here, like this, and then
scale it in the X. Next, let's get this little
Brace on the bottom. For this, we can create a
polygon plane, Mesh plane here. And maybe I will scale
it down until it's about the right thickness here and it looks like
it's in the back. So I'm going to
hit the three key and move it behind it like that. I think we could probably
split this and Mirror it. Let's go ahead and do that. I'll drop in edge here,
delete this face, and then let's mirror this
over with a mirror modifier. I'll turn on clipping and
turn on the cage so that we can see the edge on the other
side when we select it. Let's now go to the
Front View here. And I guess what we could do
is just come over here like this and then extrude
up easy like this. Now for these, we
can just select that edge and a tab
into edit mode, make sure our scale is uniform. And then with this edge, press Control B and maybe bevel that just a
little bit like that. Now it looks like back here, well, we've got a cylinder. We know that we've
got this Plate. So let's begin with the Plate. Shift us to move the
cursor to that point. And then I'll press Shift
day Mesh plane once again. And let's turn it RX 90. And I'll pull it out
some Gail it down. Looks like it can go
out to here maybe. And then scale in the Y to here. We're in local transformation. That's why that was the
Y instead of the Z. And maybe let's bring it
down a little bit in the Z. Again like that. Maybe scale it in the X back
and I feel like we could maybe add an edge here and
scale this out like this. Because it looks like it
goes out a bit like that. And then we could maybe
add two edges in here. Scale these out,
then add two more. And then scale these out. And these that could
then be the edges for the clips that looks like they come out over the
top and the bottom. So let's now just press E, S, Z, Extrude and then scale
in the Z like that. Maybe we can press EY and
take these forward like that. And then maybe we want
that cylinder now. So let's press Shift
day Mesh cylinder. 16 sides is probably fine. I'll turn it in the Y RY 90. Let's scale it way down. Bring it back. And then
let's scale it in the X. Looks like this was
off just a bit. Let me snap it back
to the 3D cursor. I'm going to press
Shift S one and then shift us eight and snap that. So it's in the center here. And then let's bring it
up and put it in here. Now I feel like we
need one more thing connecting this to this plate. So let's press Shift
S, Mesh plane. Scale this down quite a bit. Let's turn to in the Y RY 90. And then let's bring
this up like this. Gail it in the Z maybe. And let's move this
back here like this. Alright, so we've got the
very basic shapes now. Of course, I'm going
to need to add a solidify modifier
for much of this. But I just wanted to get
things in place first. So let's first of
all take this and we'll add a solidify here. And we'll choose even thickness and bring this out
a bit like that. We could then take this and
let's add a solidify to this. I'm going to apply
the scale here, control a, apply the
scale there we go. Even thickness and let's
give this some thickness. Maybe I'll bring it in. That This thing over here, I think what I want to do with this is not only give
it some thickness, but maybe I'm going
to apply the scale. I'm going to take
these points here. And I want a bevel these, so I'll press Control
Shift be embeddable the, so we get a nice curve on that. And then we add a solidify. I think for this to, I will take these
two points here. And let's bevel these, let's ensure we've got
all ones and we do. So Control Shift B. Let's bevel these. Alright. And I think I'd
like to do that to the top and the bottom tabs
of these things as well. So maybe these could come
out a little bit more. Let's make sure we've got
all ones in the scale. We do Control Shift be
pulled these out like that. There we go. Alright, so I think we're
getting close here. Let's press Z to bring
this down a little bit. Oh, analysts mirror this over, so I'll hit the period key. Go to 3D cursor, Shift, Enter Control M X, and that pops out over there. I'll press the period key
and go back to median point. And I guess lastly, I'll press Control a
and apply the scale. I'll just select
these edges over here or hit the two key to select
edges. Let's do that. And I will maybe move these in MSX and then bevel
these control B. And let's bevel those just
a little bit like that. Alright, so now let's smooth this and this and all of these. We could also add a few bevels
to these two, couldn't we? And with all those selected, will press Control Shift B and pull those out a bit like that. Alright, so now we can
join all these together, but we can't do
that until we get our modifier stack the same. So I can't just join
one object that has no modifiers to an object
that has modifiers. And I don't even want to add, join one object to another
that has different modifiers. They really need to have similar modifiers
or no modifier. So I'm just going to go
through and apply all of this. Apply this solidify here. We don't have oh, we have
a solidify for this one. And this one, right. Okay. And what about this? We have a Mirror. Let's apply that and a solidify. So now we've got all our
objects with no modifiers. I think that's good. Now let's join
them all together. Let's take this and this, this, this and this. Let's join these
together, Control J. We happen to have our origin
down here on the bottom. That's good, just because
of the order I join things. So now if we bring
everything else back, we can put this up
on the Dashboard so I will spin this around, are the one at. I'll scale it down quite a bit. Let's bring it over and
put it on the Dash here. It, the period key on
the numpad, zoom in. It does look like this
Pieces a little bent to follow the curve
of the Dashboard. And it looks like it's
a little bit taller. So maybe I bring this down like this until it's about that size. And then I want to
bring these down. So I'm going to tab
into edit mode. And let's press Shift Z. Well, how about alt Z? Let's do that. It's a little easier to see. And then Alt Z again, let's bring this down
to about right ear. Let's bend this just a bit. Let's take this edge right here. And let's pull it up. And then let's
bevel it Control B. Let's pull that out. Now that we get just a little
bit of a bend there. Kinda feel like this piece
could be a little bit wider. Let me try that as X. And lastly, we could put a
couple of screws right there. That would be maybe grab one of these Shift DX, bring it up. And I'm going to take
away all of the rotation. Here we go. Then let's put this in place. Maybe I will take
this piece here. Select this Shift S to. Now I'll take this and
press Shift S eight. And that puts it right
on the center there. Alright, so now what
I'm gonna do is take this face over here, Shift S to select this, duplicate it with Shift
D, Shift S eight. And then we go, maybe
I'll spin it RZ. So it isn't exactly the same. Shift us one to move the cursor. There we go. I think we've got
our Rearview Mirror
46. Creating the Interior Door Straps: In doing a little
bit of Googling, it seems to me that
these things right here, these Light fixtures
that are drilled into the Windshield are
a pretty rare thing. I don't see too many, if any other Kissel Gold
bugs that have those. So I don't think I want
to add those to mine. But one little detail
I do like in here is this little thing
right down here that holds the door from
swinging too far open. This little strap. I think I want to add that. I know it's small and I know probably no one
will ever see it, but I think it's kinda cool, so I think I'll try
and work on that. Now, these things here are
all part of the Interior. So I think I will
go ahead and just drag these into the Interior
container right there. And then let's just
hide everything. And then now here, let's see if we can
figure this out. So it looks like it's just maybe a cylinder
with a screw on it. And then this little piece here. Then it looks like a
cylinder, two cylinders, one over each of these pieces, and then the strap
connecting it. So not exactly sure
how we could do this. I think I'll just
begin with a cylinder and we'll turn it
into why RY 90. I'm going to scale it way down. And I will take this face away because I'm going to
have this be the Back. And then I'll scale this
in the acts like this. So maybe that's this
piece right here. So Shift D Z to pull
that down like that, and maybe that's this. Okay, Then it looks like we've got a cylinder
between the two. Shift S to here, and then Shift a
Mesh cylinder again. I will take away the cat
fills here, scale this down. Let's put this
in-between these two. And then we scale this up. And then how do
we connect those? Well, it could be
something where we use a path and create that outline, pull it out into a tube. So why don't we try that? Why don't we hit the Delete
key Shift a mesh curve, excuse me, shift a curve
path. There we go. We'll spin it in the Y RY
90 tab into edit mode. I'll scale it down quite a bit. Let's move it out to
here. Scale it up. Let's just take these two points and pull them in like this. And then take these
two points and scale them in the Z like that. Now we can just
take all three of these points and right-click
and choose sub-divide. And now that gives
us zero points here that we can
scale up like this. Alright, let's see
how that works. Okay, that might work
SZ and I'll bring this and then maybe we take
these and extrude them in, scale them in the Z, E, S, Z, and bringing them up
like that. Let's try that. Okay, let's try that. So we take this now and go to
our Object Data Properties. Take this down to maybe six. Click and drag in the
depth field under bevel. So I think that's what we want. I'm going to leave it as a path for now until we get
these other things in. Let's now create a
cylinder around this. So I will take this point Shift S2 to move
the cursor to it. So when we create a cylinder, it wraps around this. And then we'll
scale it in the Z. Now, maybe let's take all of these pieces and we'll
duplicate these. I'm going to pass Shift
D and move this over. Now we need to create
this piece here. Maybe a path or a Bezier
curve might be the best bet. Again, let's give it a try. I'm gonna go to the top view
now and press shift a curve. Let's go with a path again. Are 90. I'm going to move
it into the center here. Bring it out some
tab into edit mode, scale it down quite a bit. Then let's just take these
two points and pull him back toward our cylinders here. And see if we think here. I think we need more Curve, so I'll bring these
out like this. Maybe scale them in the Y, and I'll bring
this up like that. Alright, so with that, maybe I will duplicate this Shift D Z and
bring it down here. And then let's use that Bevel tool again
to expand these out. So I'll select this, take it down to six, take this one down
to six as well. And then I will click
and drag in the depth. Let's bring it out. Maybe to 0.015 is
what I've got here. I'll just Copy and paste that into here. From here, then I
think I need to convert these to a Mesh. Let's see what it
looks like when we convert it to a
Mesh. There it is. Okay, let's just do that. Convert to a Mesh
and then I'll take these two and join
them together. Control J. Now if we
take a Row of faces, say this row here and this
row and this, and this. Now let's try and bridge edge loops to
connect these together. So I'll go to the
edges menu with Control E and then
bridge edge loops. And then we go, let's now take these and give these a
little bit of thickness. I will add a solidify here. Let's press Control a and
apply the scale. Here we go. Let's do the same
thing over here. Control a, apply the scale
and then add a solidify. Alright, let's smooth these
just to see how they look. Let's combine all
these together. Control J or Control
a, apply the scale. And then I want to just select these edges here and
bevel these control be. Let's do that. And then we can smooth them. Let's then work on
combining it all together and taking
it back into the car. And then we'll grab one of those screws and put it on here. So let's see. We don't have any
modifiers here. This is a path. We have a solidify here
and a solidify here. So let's apply these
because we don't want to join any objects that
have different modifiers. So we can take this and join
them with these control J. Here we go. And then we can take these and let's convert
these to a Mesh. And this to a Mesh. There we go. Now we can take this and join them with these
and these Control J. We go, Let's go
ahead and smooth it. I'm going to drag this down, so it's down to about 40, so we get more of an edge there. Alright, let's now
put the origin of this object on the back here. Let's tab into edit mode and
just select these edges, Alt Shift, click
all of these that we've got our pivot point
in the center at the Back. And then let's press Shift
S2 to move the cursor. And then we will set the
origin to the 3D cursor. Now we're going to scale
and rotate from that point. Alright, so let's bring
everything else back. And let's try and
put this in place. I'll bring it over
here, scale it down. So we need to put it so it straddles the door and
the Interior Panel here. Scale it down a bit
more, pull it out. So how high off
the ground is it? I think that's about as
far down as I can go here. Then let's just see if
we can turn it into Z. And in the why. And maybe I could
take this piece here. I'm going to tab into
edit mode, alt Z. I'm going to select
these pieces here, alt Z again and move these out. So they sit right about here. Then I'm going to
take this over here, alt click and edge right here and move the
cursor to it, Shift S2. And then if I hit
the L key to select linked components and
only this and these. Now I'm going to move my pivot point to the 3D
cursor with the period key. Now I can turn this
in the z-axis. Let's try this, our Z, and I'll turn it out like this. Like that. Then let's hit L. And let's press
Period median point. And let's move this
over like that. There we go. Alright. I think that's about, I feel like it could be a
little bit bigger actually. Now that I look at it, let's scale it up a little
bit more like that. Then let's add a screw to it. Let's take one of these
once again right here. Shift D Z, move that down. I'm going to take away all
the rotation, zero those out. And then let's turn
it into why RY 90 hit the negative
key to flip it around. And let's just move
this over here. Now what I can do once again is take this face here and
move the cursor to it. Take this and snap this object to the cursor
with Shift S eight. Now we can hit the period
key on the numpad. And let's, well, we can
press Z and turn it a bit and then put the S key and
scale that in. Here we go. Let's move it down
to the other one. Shift D, and pull
this one in here. And then let's take these
and move them over here. Shift D, why? We're gonna have to do some
rearranging here as well. Well, that actually
worked out pretty well. Now let's go to local
transform Orientation. And I just want to spin these
a bit because once again, we don't want them all
perfectly the same. Alright, Shift desk,
one, move that cursor. Let's take a look. Yeah,
that's kinda what I wanted. Let's combine everything here, Control J, and then let's mirror it
over to the other side. So back to global. Move our cursor to the center
of the grid was Shift S1. Switch to 3D cursor, Shift Enter Control M, X and enter in there it
is on the other side. Well, that was just a
little too much FUN for how small that was, but I do like those
small details.
47. Modeling the Interior Panel of the Rear Seat: Let's now start working
on this piece right here. You can see it on the inside here and it kinda curls over. So let's see what we
can do with this. I think maybe the
easiest way to do that is to just begin with an edge here and then
work our way back. So if I select this piece
and tab into edit mode, Let's just select maybe
these points here. And then let's just duplicate
them and move them in. So Shift Dx and I'll
move them into here. And then let's split this off as its own object.
Let's do that. Let's hit the P key and
then separate as selection. Select that edge. Let's get rid of the solidify. Let's get rid of the
subdivision surface. If we tab into edit
mode, we have this. Now we can take this little guy and get rid of the crease. So let's just click
here and drag down to zero so we don't have
that crease there. And then if we hit the a key, we can just begin duplicating
this and moving it back. So I'm gonna hit Shift D Y
and move it back to here. And I'll bring it in some. I'm going to press Alt Z, select this and bring it back. Let me grab that x-axis. There we go. Bring it back into there. Maybe bring it up some. And then let's do that again. I'm going to hover over
this and press the L key. And then I'll press shift D Y
and move it back like this. Alt Z. I'll bring it in some,
select that point. And let's bring it up. There we go. And maybe I'll take
this and bring it in and bring it up to that edge. And then I want to
extrude out over this. So let's do that. I'm going to hit EX
and bring this over. Maybe like this.
Same thing here. Ex, bring that over. Let's bring it up. I'm just using these
edges at the beginning to try and get the shape fairly correct before
we connect everything. Because I think
it's a little bit easier sometimes to do it with edges like this just
to get that basic shape. So maybe I'll bring this
in some and bring it up. Alright, Alt Z again. So now let's try this. I'm going to press the
L key to select this, and the L key to select this. And then I'll press Control
E and bridge edge loops. So there we go. Now we've got that connected. We do need to extrude
this over and I don't we, so let's hit Bx and
bring this over. Bring it up. So it conforms to the shape of that
a little bit better. And then I'll press
Alt click for this edge and Alt
Shift-click for this edge, and then Control E and
bridge edge loops here. So we've just created this very basic shape to
mold to what we have here. Now we can make any adjustments we want
in here to get it a little bit more aligned to
this interior part here. And then let's just add a subdivision surface modifier
and see what we have. I'm gonna come over here, add a subdivision
surface, and there we go. So now we've got some
work to do, right? We can maybe take this
and add an edge in here, and maybe move that up. We could add an
edge down in here. Maybe move that in. We could take this edge right
here and move it out Some. Maybe I can add an edge
here and pull it up some. Alright, let's take a look. I'll right-click auto smooth. And yeah, we're
beginning to get that. It does look like it puffs up a little bit
more now, doesn't it? So let's get that. I'll Alt click these edges here between two edges
to bring this up. And maybe take this edge here and this edge
and bring it over. We're getting more
of a curve there. We could also add
an edge over here. And maybe I'll drag
this down a bit. I think we're getting to the
point where we can maybe add that little rim here, we can try that. So for that, what Let's do is
take this entire edge here. Alt click this Shift-click here. I'll Shift click here. And then with these
edges selected, let's press shift D
Enter to duplicate. Let's split it out
as its own object. Let's hit P and
separate by selection. And then when we tap
into object mode, we can just select that
one edge right there. Now with this,
let's convert it to a curve and then come over here to our Object
Data Properties. Maybe I'll change
this to six again. In our depth field,
Let's click and drag, and let's create a
bit of a ridge there. And then while this is a curve, while we have a little
more control over it, Let's take this and
see if we can move these down just a bit
on the ends like this. And let's try and get these If we go to Edit Mode here, let's try and pull
these down as well. There we go. So it conforms to that
a little bit better. And let's then convert
this back to a Mesh. And we're going to need to join this back to this piece as well. However, let's take a look at our modifiers
before we do that, because once again,
we don't want to join objects that have different
modifier stacks here. So we see this one has a mirror modifier
and a subdivision. And this one doesn't
have anything, but it's over here on
the other side as well. So if we mirrored this, it would mirror back over here again and we
don't want that. So what I'll do is I'll tab
into edit mode, press Alt Z, and I'll just get rid
of these Delete and delete faces here and
then Alt Z again. Now, when we add
this to this object, it will add a mirror modifier on it and mirror it over again. So that'll be okay. Let's press Control J. Now we've got it over here, I think. Let's make sure. Yeah, we've got it there. Okay. And then let's go
ahead and smooth everything. Yeah, and we go. And now that this
is all one piece, we can come in here and begin moving these around
a little bit more. Like say if I grabbed
this edge here, we could move this up. We could begin rearranging
the shape a bit if we wanted. Yeah, there we go. And maybe, maybe I'll take these down here and move them up
and forward like this. And then there's just a
little strap right here. So I'm wondering if we
could take 0 an edge like this and duplicate it
and create that strap. I'm going to turn on the
cage for the subdivision. And I'm going to
press shift D Enter. And I'm gonna drag
this over like this. And I'm going to
bring it down a bit. This scale it in the X. Maybe we go. Maybe I'll split this out as its own object for
now, let's try that. P, split it out by selection. Select that again,
right here we go. And let's press Alt Z
and take a look at it. Does it go all the way down? It? It does. So let's go and
bring this out like that. And let's hide it away
in here like this. Then let's just hit the a key. Press Shift D Y, move that over. Move it down. Let's grab that point again
and bring it out a bit. Maybe do a little bit of
adjusting if we want. And then let's get the a key and press Control
E and bridge edge loops. Let's smooth it. I'm going to press Control
R here to Latin that a bit. Because we've got a
subdivision surface on it. It's tending to want to
curl on the edges here. Alright, let's do
that and then let's add a solidify to this. Let's choose even thickness and drag this down quite a bit. In fact, I'm going to push
it toward the inside, just a bit like that. Then we can make a
few adjustments. If we wanted here. Bring this in some. And let's press Alt Z and grab these two points down here. And I'm just going to move
them out just a bit like that. Let's just see how that works. I'm not going to apply
the modifiers quite yet. I'm not sure if that's
exactly what we want, but I think that's
looking okay for now. I'm going to press Control
S to save the scene. But that's generally what
I wanted is some sort of padding there with
that Trim on it. So let's see how that works.
48. Beginning the Convertible Top: Since it's Car is a Convertible, I'd like to create it
with the top down. And we've got a pretty good
image of it here in the Back and a few here that I was able to find in
our reference images. So let's start working on this. I think what we could
do is maybe just create a cube up here Behind the Seat, split it in half, Mirror it, and then add a subdivision surface
modifier and see if we can just extrude down into here. So let's give that a try. I'm going to select this and tab into edit mode and just maybe select one
point right here. Maybe, maybe here. And I'll press Shift S to move
the cursor to that point. Now let's press
Shift day Mesh cube, and a very large cube
will pop into that point. And let's move it
up and back a bit. And then let's just
split it in half. Let's press Control R and
hit the Enter key to times. I'll go to face mode and press Shift Z and just drag
select this side here. And let's delete
that, delete faces. And then let's add
a mirror modifier. Here. We go, turn on clipping, and I'll go ahead and
turn on the cage here, which means we'll be able to see the points on
the other side. Now let's also add a subdivision
surface modifier here. So before we begin, it does look like it has
a bit of a tilt to it, like it kind of angles Back. So I'll press RX and tilt
it here in object mode, which means if we're in our local transformation
Orientation, our axes will tilt
with it as well so that if we tab into
edit mode and select, say these face is here and we dragged down that's going to
go in line with that angle. So let's take these and
maybe move them up out. Go to the back view
with control one. And let's press Shift Z. And it looks like
it doesn't need to go up quite that high. Maybe something like this. Shift Z again. And then let's just take this whole thing and maybe scale it in the Y just
a bit like this. And I'll move it up some, maybe I will bring it up
some a little bit like this. I'm going to pull
it out just a bit. And maybe if I go
to the top view, Let's pull this out and begin extruding this over like this. I'm going to turn it, hit the S key, kind of bring it forward a bit. Maybe bring it down,
some like this. Then once again,
in the top view, I'm going to hit E
and pull it out, Turn it a bit, scale it down it, the G key and move
it in like this. And then of course we
need to bring that down. I can hit the two key
for Edge mode and alt. Click this edge. Maybe we don't want it
to turn quite yet here. Then maybe let's
turn this again. I'll kinda come over
here and hit the R key. Maybe let's extrude this
one more time like this. Bring it in, scale it in some. Let's take a look. Alright, so we need
to get it more into this shape that
we're seeing here. A couple of things I
think we can do is maybe add an edge
loop back here. And I'll kinda flatten
that same with upfront. We could maybe do
that here, right? So that gives us a little
bit more of that shape. In addition, it seems
to go straighter. The way I have it here
is kind of curving. It seems to go more straight. So maybe if we
select these here, I've just Alt clicked
between two of the faces. And maybe we turn it a bit and lean it back a little
bit more like this. Now we might be
able to come in and do some adjusting
with the edges. So Alt click these edges here. Maybe scale them up a bit, Move them a hair. I want to hit the one key
and select these faces here. Move them down a bit. Alt, click this
edge, move it down. Some suggest using our
subdivision surfaces to kind of move things around, try and get things in
the right shape here. I'm going to alt click this
edge and move it out a bit. Maybe alt click this edge here. We could probably
turn that like this. I think that might help
some. There we go. Okay, so now let's take
these faces down here, and let's kinda pull these back. I think these can
come back like this. Maybe Turn it. Let's also add an edge loop
right down the center here. And that'll give us the
opportunity to grab this. And I'm gonna go back
to global transform and just pull up in the z-axis. Try that. And down here we could maybe take this edge down here, alt Z. Take these edges here, pull these up a bit. Alright, let's smooth it
now and see what we have. We've got quite a
sharp edge down here. Maybe we can try an
auto smooth again. Drag that up a bit so
we don't have that. They're feel like we could take these points here and
move them back and down. Alright, I think
we're getting there. It's just gonna be a matter
of pushing and pulling and trying different things to get it into the
shape that you want. But I think generally
speaking, we're getting there. The only thing I can
see here is that I think this curves too much here. I feel like it needs
a sharper corner. So I'm going to add an
edge loop right in here. I think maybe alt, click this edge and
move it in a bit. Maybe take this edge
and scale it out. And then just move it like this. I'll take this edge and
move them forward a bit. So it curves a
little more there. The subdivision surface modifier can be really good for this
kind of thing when you just need to pull and push a relatively curved
surface like this, it's actually kinda
nice to play with. I'm going to take some
of these points here, grab this one here, maybe moving forward and down. Then I'll just take
the whole thing and Object Mode and drag
it forward just a bit. Alright, I think that's a
good beginning for that. I'm going to press
Shift S1 to move the cursor back to the
center of the grid. The next thing I think
we need to do is maybe add this little Trim along here. We could select edges
and add that Trim. So let's do that
in the next video.
49. Continuing the Convertible Top: To add the trim to this, let's just go into
edit mode here. And we're just going to
duplicate some edges, convert them to a path
just like we've done, and add that Trim. So I think I'm going
to Alt click this. And it looks like this is
kinda up a little higher. So I'm gonna hit G two times
and slide this up, right? So we kinda have
that angle there. And maybe I'll take this and
hit G and move it in a bit. And then I'll Alt
click this one, hit G2 times and kinda pull
this in just a bit as well. So I'm thinking maybe this edge and this edge could
have the Trim on it. And then it looks like
we could Alt click here and have that
continue on around. And then we'll pull it into
place around the edge. So let's try that. Let's just press Shift, Enter. Let's press P and
separate by selection. And then let's tab
into object mode. Select that edge right there. And now let's tap
back into edit mode. Okay, I might select this and
let's scale in just a bit. I'll hit the S key and just
scale in just a little. Yeah, Now let's give it a try. I could also pull these
down a little bit. I think let me go to
the side view and just G and pull these down. I feel like we ought to have
them down there like that. Alright, and then let's
convert this to a curve. And then if we tab
into edit mode, we can see the points there. Now let's come over here to our Object Data Properties
again, right down here. And then let's hold the Shift key and click and drag and bring these
out like that. Maybe a little bit too
much, bring it back in. Maybe something like that. It looks like it's
a little bit off. We can try arranging the points here to get them more in line. Or we could arrange the
points within the Curve to, but there are fewer points here. So maybe I'll just move
this out to that curve. Instead of trying to move
all of these points around. Let's take a look down here. We see any openings
there, anything here? No, Not bad. So I'll go convert to a Mesh
and here's what we have. Oh, it looks like there's a
little bit of a gap here. So maybe I'll grab
this edge right here. And let's just pull this out, just a smudge like that. Now we can take this and join it together
with this object. And since this doesn't have
any modifiers honored here, I think it's gonna be fine because we'll be
adding it to this. However, this does
have a mirror. So I don't think we want
to Mirror this twice. I better just apply
this mirror here. Let's go ahead and
try joining this. I've got that selected, I'll shift select this
and let's join these. This will give it a subdivision surface
modifier here, the Trim. So I'll press Control J. Let's see how that worked. That actually worked. Okay, I think down here, we could maybe move this out
to fill in that hole there. Alright, that's
looking pretty good. I think if we need to, we can always split this
piece back off of that, but I think that's
going to work out. Okay. Now, the next thing
we need to do is add this little thing, this little post here. So we've got the post coming
out just behind the door. And then we've also got
a handle on the door. So let's begin with that post. I'm going to go to the side
view with the three key. And it looks like it's
right around here. So I'll just take this edge right here
and push Shift S to, to get us close. I'll press Shift a Mesh cylinder and let's take it down quite
a bit so it's smaller. I'll type 0.1 here
and point to here. Let's scale it way down. And it looks like, well, this is the
Door Handle here. Okay. So this right here, it just looks like it
comes straight out of the Body of the car without
a little Plate or anything. So let's turn it RY 90. Let's scale it down, move it up. Kinda get it in place here
like this. Here we go. Then I think we just
need to extrude this out and get this flat piece
on the top, here and here. Alright, so if I
bring this up here, maybe I'll get it
right about like this. And then hit E, S, E
and X, and then ES. And now I'll just
hit the End key and merge those
points at the center. And there we go.
We've got that smooth that I feel like now that
we're looking at this, this whole area
needs to come up. This whole bit right in here. We go, needs to come up. So I'm going to turn on the
proportional editing tool, hit the G key. And let's bring
this up like this. Then I'm going to turn
it a bit like this so that we can add
another one in here. Let's actually take
this cylinder and just try and move it up and
see what we can do. I'll press Shift D and
move this up into here. It looks like it comes
through right about here. And then I want to take this edge right here
and bring this in Up. I still have the proportional
editing tool on. Let's turn that off. And I'll bring that
into here like this. This seems thinner,
so I'm going to select this part, Alt, click between two of the faces
and then press Alt and S and shrink that
down a bit. We go. This looks a little
smaller as well, so maybe I'll just do
it for the whole thing. Let's press the S key and then Shift X and scale that
whole thing in a bit. There we go. And then it looks like we've got a
little piece that comes across and
loops around this. And is that a flat? I
feel like that's flat. Then it goes to a cylinder. So let's use that here. I'll press Control R and scroll the mouse wheel and click and
then scale in the X here. Move this forward some. Let's select these faces by
clicking between two of them. Shift D Enter, and
I'll press E enter and Alt S. Kind of bring that
out a bit like that. And then I feel
like we should just take a couple of
faces like this. It E, enter and then G and just bring these
straight out here. Let's try that. Alright, I think it's generally
what we're looking for, but I am going to have to redo this area so it comes
out a little straighter, goes a little higher. So we can get that connection a little bit closer
to the rim here. But as I said, one thing at a time, I'd like to get
the main Pieces in first and then do the adjusting
50. Creating the Exterior Door Handle: Alright, let's see if
we can raise this up. I'm going to go to the side view tab into edit
mode. Let's hit Shift Z. And actually instead of Shift C, I'm gonna press Alt Z so I can see this a
little bit better. And now I'm gonna
come over here and go to the Lasso Select. And I just want to select all
of these in here like this. Let's try this. I'll hit G and bring
this up to about here. Let's turn off
proportional editing. Hit G and bring
this up like this. And scroll the mouse wheel
and bring that out Some. Now I'm going to hit R
and turn this a bit. There we go. Shrink
that influence up some, maybe about like this. And then let's see
how that looks. I'll press Alt Z,
go back and okay, we've got it a
little bit higher. We could take this and
move it up some like this. Still needs to go a little
more now, doesn't it? Well, actually now
that I look at it, maybe it isn't connected to
maybe this is just a joint. I think that's all it is. And it isn't connected
to the actual car. So I may have a little more
leeway still where I put it. So maybe if I put it right here. And then let's hit the
period key to zoom in. I'm going to Alt click this, and let's just bring it back. I'll go to the Move tool here. I need to turn off
proportional editing tool. Let's do that. I will take these and hit S, and then I'll press the M key and merge those at the center. And then I want to press Control R and bring
these back here. I'm going to move this
back a little bit more and then select these faces here, hit Enter and then Alt S. And let's scale that
out a bit Like that. Yeah, So it's more of a
joint than being connected. And then maybe we could take this and turn it so it
points straight at that. Oh, it looks like I need
to pull it out some more. Let's do that. Grab these points here. I'm going to switch
back to select box. And then let's take
these and just move them up toward here like that. Yeah, I think that's
more of a joint. Then it is a connection. That's why it's hanging
out right there. Okay. I think maybe we
can go with that. I'm gonna pull this out some, scale it in the Acts. There we go. Now, it looks like I
need to do a little work over here to get
these back in shape. Let me just select these and G. Well, I'll turn off proportional editing
tool and then make sure connected
only is selected. So I don't accidentally move any points along the
main part of this. Just these here. And I'll just move
these down a bit, kind of straighten them
up just a little bit. Let's try that. Alt Z to go back. Yeah, that gets it just a
little bit straighter there. We can also do that up here, I guess, x0 and maybe
grab these here. Yeah, okay. I think that's
a little bit straighter. Now let's see what
we can do with the handle on the door here. Let's see if we can find
another image for that. The only one that's even
close is this right here. You can see it just
a little bit there. And a little bit here. Not a lot to go on. But I think we can come
up with something. Let's break out the
outliner window again. And once again, try and
do a little clean up. I'll hit the Minus
key on the numpad and these are all the rag top roof. So I'll take all of these, press the M key, new collection, let's
call this rag top. I'll do that. Now I can
hide all of these here, and let's work on the handles. So I think I will begin
with that bottom plate. I'll just begin with a plane. And if I hit the seven key, let's scale it in,
scale it in the X. Let's add an edge right down the center here and
scale that in the X. So we get this kind
of a shape and then let's apply our scale
control a, apply the scale. And then I'll select all
of these points here. And with these we'll just
press Control Shift, be, bevel these out. So they Curve a bit. Feel like these up on top
are a little bit narrower. Let's take these
and knees and scale these in the X to bring them in a little bit more like that. Then we can select all of the points
Control Shift B, again And go like that. Yeah, that's a little bit better I think. Alright, and then let's
tab into edit mode. Hit easy and pull
down like this. So let's hit Z one more time. There we go. Then I'll select this collection of
faces down here. Delete this, delete these faces. I'll smooth this. Then let's get
this writing here. So Shift a Mesh cylinder.
Let's bring this up. Feel like I want
something a little bit smaller to begin
with, like down here. Oh, let's turn off that
proportional editing tool. And then let's take
this and hit ES. Maybe pull it up a bit. And then let's just E
and Z and bring this up. Now, it's so hard to know exactly what this
is because we don't have really any
information about it. I'm just going to
press Shift S to, to put the cursor here. And I'm going to create a
cube and scale it down. And I'm just gonna
put a flat piece on the top of this,
kind of like this. And then it looks
like it should be SY, I'm going to bring
that down like this. Select this face here, just pull this out like this. Then I'll also press
Control R and put this there and extrude a
little piece out down here. Now, I have no idea
if this is even close to what's on there. And we we really don't
need to put it here because there is none on
some of the other images. But from here, I'm
going to try and just add a subdivision surface modifier and
see what happens. I'm going to take this up
to, to turn on the cage. Now, I'll turn off the cage. Here we go. Let's bring this in like this. I'll bring this in like this. I'm going to add an edge
through here and then maybe two in here. Like this. Let's smooth it. I'm going to add
an edge down here. We could take these down
here and extrude those down. That grab another edge or add another edge
and put that there. I'm going to press Alt
S to bring this in just a bit and maybe
scale that in a hair. Alright, now, I just don't know, I don't know if
that's even close. I'm gonna go ahead and apply this subdivision
surface modifier. And then I'm going to connect
all of these like this. Move the origin
to the 3D cursor. So I'm gonna take this and press F2 and call this Door
handles so I know what it is. Then let's bring
everything else back. Here we go. Now let's try and
put it on here. I'm going to bring it out. I'll turn it in the X. I'll turn it into
Z or Z nonzero. And it looks to me like, yeah, it's pointing forward, right. Okay. And it's in line with
that little thing there. And it looks like I
could tilted in the Z. There we go. I mean, that really doesn't look too bad and it's fairly in
line with that thing. Let me take a look at it. Yeah. It's pretty
well aligned to this because that would be the
other side of it. Alright. Alright, well, I'm not sure
if we want to keep it or not, since many of these other
images don't have this, but This I believe
is a newer model. This is a 25 or 26 and
these may be older. So there we have a Door Handle, whether we want it or not.
51. Using Booleans to Create the Trunk: Let's now start
thinking about how we want to create this Trunk. And it isn't just the
shape of the Trunk, but it's also the cutout of the Rear part
of the car here. So it's really this shape
inside a cutout of that shape. So we're going to have to
figure out how to do both of those and maybe we can do
them at the same time. So let's first of all
isolate this piece out. It's not outside of
these collections yet. Let's go ahead and do
that. I'm going to press M and bring it out to
the Scene Collection. And let's also give it a name. Let's call it Body back. Let's do that just for now, just to, so we
know what that is. Then let's take all of this and drag that and hide
everything else. Then what I'd like to
do is duplicate this. So we don't ruin this just in
case we do something wrong, we still have this as a backup. So I'm just going
to press Shift D and enter and then I'll take this and drop it back into
the car body collection. So we have this on its own just in case we
need that backup. I think what we'll need to do
is use a Boolean modifier. So we'll create this shape, use that to cut a
hole and then also use it as the Trunk itself. So let's begin by trying
to create this shape. I'm going to press Shift day Mesh cube and let's
bring it back. I'm going to scale it down. And we need this to
be a solid objects. So I'll leave it as is, but let's maybe go to the top view and try and get
it in basically this shapes. So I'll tab into edit mode, press Shift Z, and maybe let's take this
and move it back. Scale it in the ACS,
something like this. Maybe we could scale the
whole thing down and kinda get a sense of how
it's going to look in here. Hit the seven key again. So how far you like, it's maybe about this
far back, like this. And then maybe we could take
all of these edges here. I'll hit the period
key to frame it up. But then take these edges here. This one, this, and
this, and this. And let's try and bevel these. I will tab back into
object mode and press Control a and
apply the scale. So we have all ones here. Then let's go to the
top view, control B. And let's pull these out. We get something
about like this. Let's see how that looks. That's generally about
the right shape. We can smooth it to
see how that looks. So let's just say that that's
the right shape for now. I'm going to put
this right in here. And I'm going to try a
Boolean modifier here. I'm going to select
the car body. Let's come down here and add
a new modifier, a Boolean. And then let's tell Blender what we want to be the cutter object. Let's come down here and
click on the eyedropper and then click on this
object right here. Now you can see it's
cutting through there. Let's switch this to union and
intersect and see what we. So let's begin with difference and I'm going to take
this object here, come over to the object
properties and scroll down. And under view-port display, we can change displayed
as from textured to wire. And now we can see through
it and we can get a sense now of what this is
going to look like. We can even come over here
to the outliner and hide it. You get a sense of
how that looks there. Well, let's go back
to the modifiers Panel and click on the car body. And let's try and change our
Boolean from different to union and see what that that
just combines everything. So I don't think we want that. What about intersect? Look at that. Now that's really what we want for
the Trunk, isn't it? So generally speaking,
we want two things. We want, first of all, to use this to cut a hole
in it using difference. And then we want to use
this with intersect to get the Hood and then those
two should fit together. So let's get the
hole in the object. First. Let's come over
here to difference, and let's pull this
down and click Apply. Now, it doesn't look
very good, right? It's got these artifacts. But I think one of the
problems that we're having is that we're trying to
do a subdivision here. So let's press Control
Z to remove that. And let's begin applying
a few of these modifiers. So I'll pull down the
Mirror and click Apply. Then I'll pull this down. Let's see what kind of
subdivisions we've got. Well, we've got a
viewport level of one. Let's try that. Let's pull this down
and click on Apply. All right. The solidify. Let's go ahead and
apply that to. Now we've got this
whole object that's got dimension to it and
is all one piece. That's good. Now let's try the Boolean again. I'll pull this
down, click Apply. And there we go. That's a
whole lot cleaner, isn't it? Alright, so we have an object here for the
whole of the Trunk. Let's rename this to
melt Trunk whole. Let's just do that.
Then let's hide it. Let's go back to
the car body here. Remember, I put this back
in here, this Body back. Let's select it here
and then move it out with the M key out
into the Scene Collection. Let me scroll down
here. Here it is here. I'm going to duplicate it. Shift D Enter. And then this one we
want to call will put it we want to call it we want
to call this Trunk Door. I'll just call that Trunk Door. Then once again, I can
move this back into the car bodies so we don't accidentally do
anything to that one. And now we've got this. Let's take this and
apply the Mirror, apply the subdivisions
and apply the solidify. Then we'll add a Boolean. Click on the eyedropper and
click on the cutter Object. There's our difference. Let's switch over to intersect. And now if we pull
this down and click Apply, we should have this. Alright, so now if we
hide our cutter object, bring back the Trunk here. Now we have the Door
and the Trunk whole the cutout in the car body now I could take this and maybe
scale it in just a bit. Let me move the origin of
this object to the geometry. Let's take this and scale it
in just a smudge like that. Now we have our Trunk. Now I do have this original
one still in here, so I'll hide that. I feel like it may need
to be a little bit farther up in the car and maybe
even a little bit bigger. Right? Because if we go to the
Rearview and press Shift Z, here's the actual Trunk here, and it really doesn't
look too far off. So I think before we
finish up the Car, I will go through and redo this process because I've
got this backup object here. But I think for
now, let's go ahead and keep moving forward. I may even add a little cylinder right
there just for that piece. But as I said, let's go ahead and continue
moving forward. And maybe in the
next few videos, let's work on dealing with the tires and the
Wheels and the Spokes
52. Beginning a Tire and Rim: For the tires, Let's begin with save this Tire right here. Once again, I'll pull it
out of our collections. I'll hit M and bring it out
into the Scene Collection. And that means that
everything else I can hide, I'll just click and drag
all in the outliner. And then we just have this
isolated so we can work on it. I'll hit the period
key and the one key. Oh, and actually I
do want to bring back the reference
images here for a bit. Let's do that. I'll also press Shift Z. I'd like to add an edge
down the center here. So whatever we do on one
side happens on the other. Let's tab into edit
mode and press Control R. I'll hit the
Enter key to times, and then I'll go to face mode, hit the B key and border, select these delete, delete
faces, and there we go. So now we can come over
here, add a mirror. We're not seeing it here. Mainly because it
looks like we've got a 90-degree turn in the y-axis. So let's go ahead and apply
our scale and rotation. I'll press Control a
rotation and scale. There we go. And then let's turn on clipping. I'll turn on the cage. There we go. So now what we can
do is maybe take this face right here
and let's pull it in. And then I think I'll delete it. I don't think we need that as we're working on a Tire here. So I'll just hit Delete
and delete faces. Select this edge here. And then let's begin extruding out and trying to get
this basic shapes. So maybe I pull this
in about like this. And let's just hit
EX, bring this out. Maybe scale it in just
a smudge and like that. Then let's hit E X
just a little bit, pull that out a little, scale that in a bit more. So you can see we're
just beginning to get a Tire shape here. Let's go to the side view now. And you know what, we're really not able to
see a whole lot here. I should work on it
back here, shouldn't I? So maybe let's do that. I'll tab into edit mode and
let's bring this back here. Maybe this will be a little
bit better to work on. I'm going to bring it up a bit. Do we need to scale it out
some to fit this Tire? Kind of seems like we do. I'll hit the S key and scale it out at least while
we're creating it. It would be good to
have it a little bit more in line with
the image here. Or you know what? Maybe we should just
bring in this image into the side view
here and use this. This looks like it's a whole lot better aligned than this image. So maybe we should do that. I'm going to press Control
Z and move it back to here. Then we can come into a reference image and let's
hide the side view here. Then let's bring in
a new and I'm in the right orthographic
view owner press Shift a image reference, and let's find that
image of the Tire here. That's a pretty good
one. Right here. Load reference image. Yeah, that's,
that's pretty good. Let's now take it and move it. So it's about the same size as the geometry that
we want to use. Maybe I will come down here into the Object
Data Properties. Click on opacity
and drag that down so it isn't quite as bright. Maybe I can take this here
and move the 3D cursor to it, Shift S to, then take this object and move
that to the 3D cursor. So let's press Shift S eight. There we go. So now it's right in the center. Let's hit the Esc
key scale that down. Let's move it around a
bit because it two isn't exactly an orthographic view. So I'm going to try
and line it up. So this center wheel is right in the center
of our geometry. Maybe something like this. I'm looking at this here. I'm not looking at the center, I'm looking at just
the Rim and how far away it is
from our geometry. Let's try that. I'm also going to take
it and move it back maybe to here,
let's say, alright, I think this will help us
as we try and create this, because what we wanna
do is select this. Oh, I better take
this and let's move this image into the
reference images collection. I'll hit M and select reference.
And here it is. Here. I'll call this Tire side. And now I can't select
it and move it around. So I think that'll be good. Let's now select the
geometry tab into edit mode. And let's just select
this edge here. And recall we're here, let's say I'm going to
press Control and plus, and maybe move this
in a little bit. Select that edge. And let's then
scale this in E S, bring it in, may want to
pull it out just a smudge. And let's see where
we are on the side. Okay, so we want to
continue into here. I think I want to hit E S and scale this into about like here And then it looks like it
kind of turns in a bit. So let me hit E S, bring it in and push it in
just a little like that. And let's see how we're
doing from the side. Okay, let's scale it in
a little bit more here. So that gets us generally
to the right place I think, and gives us a pretty
good shape for this. Maybe I could pull this
edge out just a bit. Something like this. Alright, so beginning
from this right here, I'm just gonna go ahead and
start creating the Wheel, will then split it out as its own object maybe
after we're done here. So let's take this
edge and press and pull out in the X just a little
bit ES to scale it down. Then maybe let's go out again, let's press EX and
push out just a bit. Es, bring that in. And then it looks
like we go in again. Push in like this. Es, bring that in. Feel like it angles
down just a bit. So if I are in a bit, so if I take that decks and x-axis and move
it in like that. Now let's take a look at
it from the side view. Yeah, I think
that's about right. And then we just move this in. So EX and move that in. So it connects like that. I feel like that's a little
too wide though, isn't it? So maybe we could
press Control and plus and bring these out. I'm going to move all of these. I'm going to press Control
and plus one more time. There we go. Move
all of these in until they're about the
right size, maybe like this. And now that's how far we
have to come in for our Tire. Alright, so let's then
take this edge here. And now we need to move
that in this edge. Do we need to move
this? And once again, it's getting all
the pieces in so we can begin to see them in
proportion to each other. I think we're getting there. Let me take this now and
I'm going to scale it in, bring it in a hair,
and then let's add another edge loop in here. Get that basic shape like that. But I think that's okay. Let's bring everything else
back and just take a look. Just drag and select
all of these. And let's see what we think. Yeah, I feel like
that's pretty good. The width of it on the
inside is pretty good. We might be able to just
take this edge right here and bring it in
a little bit more. And maybe bring this edge
and just a little bit more. Kind of like this. Lean that in a bit. Yeah, I think
that's about right. So from here will begin
cleaning it up a bit. And we'll also begin creating this Interior base
of the wheel so that we can then connect up all the Spokes That's
coming up next.
54. Creating the First Row of Spokes: Now let's work on the Spokes and I think we can maybe just create one and then duplicate
it on around. And it looks like it's got a little cylinder
on the bottom here. And then a bend here on what
I'm going to call the top. So let's use our
Curve Tool for that. I'm gonna take these and
let's give these names. This is just the Tire here. This is the Wheel outer. And this can be the
Wheel inner for now. Let's hide these. I'll hide the reference
images as well. And to do that, the cursor back to the center of the
grid with Shift us one. And then let's just go to the top view
with the seven key. And let's press shift
a curve and a path. So for this, I think we really just need to bend it a bit. Let's bring this in
and bend it like this. We can take this and move it forward and maybe
move this one up to, so we're getting a little
bit tighter of a curve. Let's take this and
move it in like this. And then maybe take
this and hit E and extrude out here like this. Let's try that. So that I think generally
has the right Shape. We will need to come down here to the properties
Panels right here, the Object Data Properties. And let's, well, let's
take this down to three. Let's see how that works. And let's scroll down to the bevel section and click
and drag in the depth, hold the Shift key down
to move a little slower. That we can press Shift
Z and see what it's going to look like when we
convert it to a polygon. See what the polygons are
going to look like here. And that's probably
okay, I think. So let's right-click on it and choose Convert and
convert to a Mesh. There we go. Now we've got Bat. Let's come down here
to the other end. And let's add an
edge with Control R. And with that edge there, Let's hit the three key alt. Click these faces right here. And then let's hit the E
key and press Enter and then press Alt S to pull these
out just a bit like that. There we go. So now we've
got this kind of shape. Let's smooth it. That cleans that
up a little bit. And then I think
I'm going to move the origin of the object
to this point up here. Let's select these edges right here and
press shift us to. And then let's right-click, go to set origin and
origin to 3D cursor. Now we can turn and scale
and rotate from that point, I think that'll be
helpful as we try and put this in the Wheel here. Alright, so let's now
bring back our Wheel, inner, outer and Tire. And let's see if we
can get this in place. So I'll go to the side view
again and hit the G key. And let's move this over
it down quite a bit. I guess we need to
rotate it in the Z. Let's do that. Our Z zero. That brings it out like that. And then we could
rotate it around the Y RY 90. And there we go. Alright, so let's begin. Where should we begin?
I guess let's begin in here on this piece in here. And while we're here, let's just scale
this down like that. Let's then hit the period
key and move this into here. Go back to the side view and then we're going to
need to tilt it. So let's hit our tilt it. Let's move in with
the G key like that. And then let's scale this up. So it connects like that. Now I feel like that's
too thin, right? I feel like these have a little bit more
thickness to them. So let's tab into edit mode, hit that a key and
let's use Alt S again. See if we can bring these
out so they're a little bit bad or like this.
Let's try that. Were not really going to know. I don't think until we get at
least one row around here. So I guess let's start
working on that. And it looks like
we're going to need one row with it bent this way, and another row with
it bent the other way. And the same thing up here. We're going to need a fewer
number of them up in front, but one row is bent one way and the other has
bent the other way. So it looks like for different rows bent
in different ways. Alright, let's find the center of this piece here. There it is. And let's move the cursor
to it, Shift S two. Then let's take this object
now and move that origin into the 3D cursor so we can right-click
choose Set Origin, origin to 3D cursor. Now when we turn
it, we can hit RX. It's going to rotate around
that point in the center Now we need to add an
array modifier to this. But before we do, let's apply the scale, control a, apply the
scale and the rotation. Let's do that. Control
a apply the rotation. Now we need something
to spin this around. We need to be able to have an object in the
center that we can spin to pull the arrayed
spoke around the wheel. So I think all we
need is an empty. Just, an empty is just an
object that has no polygon, that has no Mesh to it. It's just a point in space. So let's press Shift a empty and I'm going to
use plain axes here. There we go. So that's, that's our
empty here it is here. Alright, so now
let's come down here and add an array modifier
will pull this down, add an array here. Let me join this. I'm going to right-click
between two windows, choose join Area and
bring this up like that. So we have a little
more room now. So now if we take a look
at this object here, we can see we've
got to Spokes here, one right after the other, and we've got a count
of two over here. If we increase the count, it'll just keep
moving out like that. We want it to spin around
that point in the center. So instead of a relative
offset from that first one, we want an Object Offset. Know twirl this down from an object that we choose and we're going to
want that empty. So I'm going to click
on the eyedropper, click on the empty. Now we don't see
anything happening. And we've got 13 here, we should see more
Spokes than that. But if we take this empty here and we spin
it in the x-axis, let's see what happens our X. Now as we spin it around, we can see those are moving
around that center point. Now, how many do we need? This is a good question. Let's go to the side view and maybe up here will turn
on the reference images. And let's see how many we need. I'm gonna go back to that Modifier by
clicking on the Spokes. And let's click on this
count here. And let's see. Does that look about right? We can of course,
click on the empty and rotated in the X and more. But if we go too far, it will begin
overlapping itself. Let's select the Spokes again, and we've got a count of 24, and that looks pretty good. So if we flipped these
with another 24, would that fill that in
the way we're seeing here? Well, we can try it and going
in the other direction. Let's duplicate
this Shift Enter. I'm going to pull back in the
x-axis just a bit like this and it's going to do weird
things and that's okay. Just going to bring that
back like this and then take away the array modifier on this. There we go. So here's that one that
we just duplicate it off. Let's take this and spin
it around in the y-axis. Let's try this. Let's press R, Y one at. And now we've got
it going this way. So if we take this now and
hit the archae and rotate it, can we get it to a place
that we're seeing this? Yeah, let's try that. So I'm going to bring this in here a little bit
tighter in there. Alright, so now we've got it
going the other direction. Now we just need to
do the same thing. Again, adding an array modifier and spinning it around
based on an empty. But the problem is, is we don't want
to use this empty because we're using
it to spend these. We're going to need
another empty. So in the next video, let's work on creating
this other Row of Spokes
55. Continuing with the Spokes: So now we need something for this new spoke to spin around. We just need a new empty. Let's press Shift a
empty Plain Axes again. And this one's called 0.001. So let's select this new Spokes That's turning the other way. Let's come over here and
add an array modifier. There we go. And instead of relative offset, let's of course come down
here to Object Offset. We'll choose that empty 001. Click on it up here in
the Outliner, right here. Now it's flipped around
in the other direction, probably because we don't
have a rotation applied here. So let's try that control
a, apply the rotation. And now if we select
that empty 001, Turn it in the x-axis, RX, we can begin
to see it there. Okay, so now how
many did we have? We had 24, I think. Let's select the
Spokes and let's just type in 24 over
here in the count, and then rotate this in the
x-axis to about right here. Let's try that. Now. Look at this. It's coming out from the Back. And I think that's
probably because I didn't move the origin of this new
object to the 3D cursor. So let's do that. Let's right-click
choose Set Origin, origin to 3D cursor. There we go. That lines them up pretty nicely there. Yeah, okay. Now, for these others, these others up here, I may have to create
a new curve for this. I feel like they're a slightly
different shape in that. I think they come out
straight and then angle BAC more than these two, these are pretty
much straight in line with the center of
this object, I think. But these are a
little bit different. Let's see what we
can do with this. Let's press shift
a curve and Path. And I'm going to scale
this down quite a bit. Tab into edit mode, and I'm going to move this out. Let's turn it in
the z-axis, our Z. Let's scale this in some, again. We'll slide this out like this. Our Z. So I'm just
trying to get it in place here where I
think maybe it'll work. Yeah, so let's try this. I've got it going
straight back like that. Now let's try and get
this Turn, this curves. So maybe if I take this and pull this
back a bit in the Y, Curve it a bit. Yeah, so I'll need to bring
them all out and then take this and just hit E Y
and extrude this way. Will that get us a curve? So I feel like I need to bring
this up like this a bit. We could add a new one in here, right-click and sub-divide to make that turn a
little bit sharper. So let's see how this works. Maybe something like this. So it hasn't been to going in the x-axis as well as
a bend here in the Z. Let's try that. I'm
going to come down here to the Object
Data Properties. Maybe take this down to, take it down to three here. And I'm going to click and
drag in the depth field. Our scale is uniform, but let's go ahead and press Control a and apply the scale. Here we go. What do we think? Is that about what
we're looking for? Maybe I'll put the
origin Back in the geometry so we can spin it just a little
bit more like this. Alright, let me see
how this will work. Let's see what happens if I rotate it around
this center point. Can I get it lined up so it's in-between these
existing ones here. We can try that. Well, let's see how this works. If we use an array modifier
again to take this around, let's create a whole new
empty, yet another one, shift day, empty plane axes, this is 00 to, let's select our new spoke and apply an array
modifier to it. Let's turn off relative offset. Turn on Object Offset. Let's select that 002 empty. I'm not sure how many
we should put in here. Let's go back to
that other image. It looks like 12 all the
way around for this one. So let's increase the count
and it's Off once again. So let's apply this
scale and the rotation. There we go. Now let's choose
this 002 and hit RX. And let's turn this way. Okay, and let's see how many we need. How many more do we need? We've got eight. Let's do 12. Let's try this. Then we just need to
flip this around. But that's gonna
be a little more challenging since
they're at an angle. I will take one of these, I will take this
and press shift D X and I'm going to
move it out a bit. I'm going to take away
the array modifier. Then we need to spin it around. So maybe I'll tab into edit
mode and let's spin it in the Y RY one at. See if that works at all. Doesn't really seem
to be working, but let's turn it into Z. Let's move it. And we could rotate
it down like this. Now we could take this, add an array modifier and
have yet another empty here. So let's press Shift
a empty plane axes. And now this one is 003. Alright, so in the next video, Let's continue on with this last spoke and see if we can get it spun around and
see how it looks.
56. Finishing the Spokes: Alright, Last one. Let's see if we can
make this one work. So we've got these,
there's this. Let's make sure that the
origin is at the center of the grid or at the 3D
cursor, I should say. I'll right-click to set origin, origin to 3D cursor. We've got a fourth
empty created, so we're going to use that. So with the Spokes selected, let's add an array modifier. Let's turn off relative, Turn off Object Offset. Let's click on the eyedropper
and select that 003 empty. I'm going to change
the count to 12. Then let's go to the
side view and select that empty the R key. And let's hold the Shift key
down and let's see if we can get them into
about right here. I think let's see. Yeah, I think
that's pretty good. Let's hide the MTS real quick. Just to see, I'm going
to move that 3D cursor. Let's hide the reference images so we can kinda
see it on its own. Yeah, I think that
looks pretty good. The last thing I need
to do is convert these Spokes to polygons and add that little bit at the end because
I didn't do that. I wanted to keep
this a path as long as possible in case I needed
to tweak the shape of it. But now that we've done this, let me just turn
this off right here. Just turn off the display
in the Viewport here. So we only see the one. And then in the Object
Data Properties, I've got this down to
three, that's good. I'm going to press
Shift Z so we can kinda see what the polygons
are going to be like. I could take this down
to two maybe let's see what that looks like. That may be a little blocky, so maybe I'll take
it back up to three. Yeah. I think I'll go with that. And then let's just right-click convert to a Mesh.
And there we go. And then down here
I feel like I could just alt click between
two of the faces here. Hit E and enter and
then Alt S. And kind of puff that out just a little bit to get that piece
down there at the bottom. I'll smooth it with auto smooth. Let me try that again. Oh, and it looks like I may
need to drag that up a bit. Yep. To about 38. I did. Okay. Oh, and it looks like when
we converted it to a Mesh, it blew away the modifier. So let's add that again. Object. Let's select
that empty to, I believe we go. Then take this to 12. And let's do the same
thing to this one, but this time I will
just go ahead and remove the array modifier for now. Let's then select this
will convert to a Mesh, and then we'll take this E, enter alt S, and we'll
move that out a bit. There we go. Let's smooth it. Then Let's re-add
our array modifier. Let's do that. Turn off
relative, Turn on object. This is the last one
or 003 for the empty. So I'll click on that here. Then let's just enter
12 into the count. And that should get us
back to where we were. But with polygons. Okay, so now I think we could apply a few of these modifiers. This has got a Mirror on it. Let's go ahead and apply this. This also has a mirror. Let's do that. This in
here has no modifiers. This has an array. So let's go ahead
and apply this. I think this looks pretty
good the way we have it. Let's go ahead and do that. Apply this. Let's apply this. Let's apply this one. And let's apply this one. Okay? But I don't think
I'm going to join everything together quite yet. I want to come up
here and pull this down and go to face Orientation. Just see what we think here. I think everything's okay there. I don't see any red. Maybe we could now just
take all of these. All of the Spokes and the
center, and then the Wheel. And let's join
everything to the Wheel. Control J. What do we think? Well, it's not too bad. Let me hide the empties. Yeah, Look at that. I think that's pretty good. Let's now take this, bring everything else back. I'm just going to
call the Wheel outer. Now I'm just going
to call that Wheel. And let's see how it
looks on the car itself. I'll look at that. That
looks pretty good. So let's just take this
now and delete that. Oh, we don't need
this image in here, but I can't select it. So let's just turn on
the select ability. Grab this Tire side, Let's just hide this
and bring this side Back and then turn off
the collectability there. Alright, now let's take
the wheel and the Tire. Let's switch to 3D cursor
for our pivot point. Let's press Shift Enter Control
M and X, and then Enter. And let's take a look over here. Yeah, that's looking
pretty good. We can take these two now. Select the Tire and the Wheel. And let's bring them back here. So let's take this and this
and then all of these. And let's bring these back here. I'll go back to median point
with the period key Shift D. Why? Bring it back here?
Hey, look there. We've got Wheels and Spokes. And lastly, just to
see how it looks, Let's take one of these
and put it up here. Shift D, put it
right about here. Then I think it
must tilt in a bit. Tilt that in just a little bit, and then bring it in like that. And then it kinda looks like it needs to slide
up a little bit. It looks like it's farther
up on this Vent here. So maybe I'll take all of this, Switch to local
transformation and then maybe just bring this
up a little bit like this. Let's see how that works. Yeah, I'm thinking
something like that. And then just for funding, we could take this again, switch to the 3D cursor, go back to global, Shift D, Enter or
Control X and Enter. There we go. Look at that. Are Car has Wheels
57. Cleaning up the Body Panels: As I'm looking at the
reference images, I'm noticing that here on
the interior of the body, it looks like that all
these corners are, all these edges are
rounded on the top of the doors and up here
along the top of the Dash. So let's see what we can do
to get that kind of shape. If we select the doors, we can see that we've
got a lot going on here. We've got a mirror, a subdivision, a
solidify modifier. So we're going to need
to deal with those, I think, to be able
to get these curves. First of all, maybe let's take
away the mirror modifier. I don't need that right now, once we're done with this, then we can mirror
it over again. So I'll take that away. The Subdivision Surface
Modifier is really being held in place by the solidify, right? Because currently this is really just only a polygon
plane on the Front here. Everything else, all
the thickness is being created by that solidify. So if we swap these, if we took this up to the top, this is what we'd get. And that's not exactly what
we want either, is it? If we turn off the subdivision,
this is what we have. That shape is
holding pretty well. And maybe we could go ahead
and apply the solidify. Let's try this. I'll pull this down. Click Apply. Now we're just
to the point where it is an object with thickness
that we can then apply the Subdivision
Surface Modifier to. Well, let's try this.
I'll turn this back on. And we've got once again some
strangeness happening here. But I think that's because we've got vertex
crease turned on here. If we took those away and
let me select these and drag these down and remove
the vertex crease here. Let's try this. Maybe I'll grab this
and drag it down, this and drag it down. Now let's increase
our viewport level here in the Subdivision
Surface Modifier. And we're beginning to
get this curve that I think we want here on the top. Now we can tab into object
mode and smooth this. So that's a smoother curve. It looks like we've
got points down here that we can increase as well. Let's try this. Because I think what we
wanna do is now that we have this with thickness, instead of using vertex crease, I think we now want
to use edge crease. Let's take a look. So we've got a fairly
good Curve here on top. Let's take all of these edges here and all of these
edges on the inside. Maybe I better isolate this. I'll hit the division key. There we go. Now we can see it a
little bit better. I'll also alt, Shift-click these edges all the
way around here. Alright, with these
edges selected. Now let's press Control E
and go to edge crease here. Then let's drag out like that. Alright, so we're getting solid edges here
with a curve on top, but I feel like we need
something a little more here. Let's try adding these edges
to that crease as well. And recall we can press Shift E as well to go
directly to that tool, Shift E. Let's pull this
out and yeah, Look at that, were getting that
curve now right there. And it looks like
we should come down here and get these as well. Let's do that. Shift E and pull
out. There we go. Alright, let's bring
everything else back. I'll hit the division key. And that's looking pretty good. I feel like I don't have
as much crease on this, these corners here
as I would like to. Let's try that again. Shift E, bring those
up all the way. There we go. Those are a
little bit tighter now. Now it looks like I should have, instead of ending here, I should have extended it on up. So let's hit the
division key again. Now that I see that we can
select this and remove, decrease, select these and this, and let's see how this works. Shift E and bring this out. There we go. I think that's
the shape that we want. Yeah. Okay. Hit the division key and yes, Now that's a little bit better. Okay? Alright, I think that's more
the shape that we want. Let's now take a look at
this and do a similar thing. I'll hit the division key. And let's go through and
apply the modifiers here. I'll apply the Mirror. Let's remove the subdivision. For now. Let's do that. Let's
apply the solidify, and then let's bring the
subdivision back here. And once again, I think we can remove the vertex
creases from this. So let's just try hitting the a key and
selecting everything. And then we can take this
mean vertex crease down. But I don't know that
that's going to take away all of these. Yep, It actually did.
That looks good. Now let's select edges where
we want our creases to be. So I think we want
them down here. We want them along
here. And here. I think we will want them
here on this corner to here, but we will not want
them here now, will we? So I'm going to press the C
key and middle mouse button, click and drag to
deselect these in here. Let's do that. See, I think I de-selected
some Back there. Let's take a look. Here we go. I've got those now. Alright, so with all
of these selected, let's press Shift E, pull out until we get the
crease all the way to one. And let's take a look at this. Let's turn up the
viewport level to two, and let's auto smooth
it. There we go. I think that's
looking pretty good. Let's then bring
everything back. Let's hit the division key and take a look at the
connection here. Yeah, I think we can
do a little bit better by just taking these and moving them around a bit
until we get them a little more the
way we want them. Yeah, so that's giving us a
little bit of a curve there. Let me smooth this
again. There we go. We could try a similar thing
with this piece back here. Now, the issue we have is that we've created this
Boolean already. The good thing is, is we
still have the backup, right? We've still got the
original piece. So I think what I'm gonna do is wait to work on these
curves to do what we just did for this until we
get the final Trunk in. Because I don't think
this is quite high enough resolution yet in comparison
to the rest of the vehicle. So I think I'll wait on that. And let's move on to another part of the
car. In the next video.
58. Beginning the Tire Treads: Well, I think now
might be a good time to begin working on
the Tire Treads. I've pulled up an
image over here and we don't really have a
straight on view of this, but it looks to
me like we've got these little pieces that
are alternating here. And then we've got what looks to be three strips down the middle. So I think I'm just
gonna kinda go with that and see what
we can come up with. So first of all,
do we need to do any cleanup here?
Well, we kinda do. Let me take these empties
and delete these. We don't need those. Then we've got tires and Wheels here. Let's create a new collection and we'll call it tires and
wheels or press the M key. New collection,
tires and wheels. And then let's put the tires and all of these Wheel
Objects in there as well. Okay. Now, oh, we did have a Tire
is collection up here. Oh, well, that's empty now, so I'll just hit the Delete key and we'll just get rid of that. And then maybe I'll
take this Tire here and just move it back out. I'll hit em, move it back out here into
the Scene Collection. And then I'll click
and drag on all of these icons and hide everything. Alright, so now what
we should do, I think, is create just one of
these pieces right here. And then we can duplicate
and a range and even use the array modifier to get all
of these around the Tire. First of all, let's
just hide this and will begin creating
one of these. So here in the
center of the grid, I've got the cursor here. Let's press shift
to a Mesh cube. I will bring this
down to maybe 0.1. Let's do that. It's gonna be pretty
small here. There we go. Well, let's see. I'll go to the top view and maybe we'll scale
it in the X a bit. Well, while we're here, I'll go ahead and press
Control and apply the scale now and
tab into edit mode. And we've got a
point here, right? And then we've got a curve in and then a curve kind of out. So I think what we'll need
to do is create three edges. I'll scroll the mouse wheel
and then hit Enter twice. And now we've got
three edges here. I'll take one edge, the center edge, and let's
pull this out like this. Let's take this
edge and this edge, and let's bevel this control B. And I'll pull out and scroll
the mouse wheel a bit. And then let's
take this edge and this edge and let's try
and bevel this control B. And that will go in
something like that. That, okay, now we've got
those bending in and out. Maybe I could move this
in a bit like this. And this side could probably come in some it isn't
quite this thick, maybe something like that. And in addition, it looks like it needs to
be a little bit longer. So let's go to the Front
View tab into edit mode, Shift Z, one key
for vertex mode. And I'm just going to
drag this down like this. Okay? So maybe that's just the
basic shape that we need. I'll smooth it as well. Now let's see if we can
place it on the Tire. So let's bring back
that Tire here. And maybe I'll go
to the side view. Let's hit G and move this
right up to the top here. Something like that. In fact, you know,
what Let's do is let's move the cursor to this
point here, Shift S2. And then I'm going to
move this to the cursor Shift S and eight.
Let's do that. And then It's right in the
center here as we drag it up. And let's go to the top view here and move it
to the side a bit. And now we can try and
get it about this size. I'll press the S key and
scaled that down a bit. See, so yeah, maybe
it's about this size. It looks like it
sticks out a bit, so I'm going to pull it
out about like that. Feel like it's a little smaller. I'm going to scale it in and then also maybe
bring that down. I feel like that's
smaller but taller. With these selected, I'll
bring these down like this. It feels like it's looks
like there's a ridge there, so I don't wanna go too far. We want to put that ridge and maybe something
about like this. However, it looks like it
may lean in and tilta bit. But before we do that,
Let's duplicate this. We want to duplicate
it and flip it around. So Shift DX with spin it around our one at
here in the z-axis. And then let's move it like
this and get that point lined up with the edge. Well, something like this, maybe Alright, so it kinda fits
together a little bit. Let's try that. Let me
bring that up like this. Then here's where
those curves will be. Is that about the right size? Feel like they may be
a little bit small, so I'm just going
to scale them up. Well, I'll begin with this one. Let me scale this up just so I can keep it in
the center here. And then I'll
duplicate that again, Shift D X, and let's
move it our z1 at. And then I'll move it back
over here again like this. Okay, so let's just say that that's about how big
we want these things. The issue I think is gonna
be how are they tilting? So it almost looks
like these pieces tilt down along the
slope of the Tire. So let's select both of
these in tab into edit mode. And maybe I'll select this
one and hit the, Our key. And as we do that, if we hit the Archean
kind of collapses. So we don't want that. We can use the shear tool
which will rotate that edge, that surface without
collapsing the Shapes. So let's just click here. Then I'm going to
click on this and drag and you can see I can rotate it, but it maintains
that that shape. Let's do that. And then I'm going to
drag select these. And let's turn these in a
similar angle about like that. Okay, Now I'm gonna
come over here and click on the Move tool again. And let's see what
we think of this. Alright? Those now, maybe a
little bit high, but we can move them down a bit. And also I feel like this now is a little too high, so
I'm going to bring that up. So maybe this edge
right here is gonna be that little Rim so we can
bring that up like that. Alright. And then does it
also tilt in a bit? Let's maybe try that. So I just wanted to take these
and angle them this way. I'm going to just take them
and move them like this. Just a little bit like that. Let's see how that works. Yeah, I feel like
that's pretty good. Alright, so now that we've
got all of this done, we need to combine
these together, maybe even duplicate them and flip them over
to the other side and then add an array
modifier to this, the way we did the Spokes. So let's first of all combine
these together, Control J. Then I'm going to move
the pivot point with the period key down to
the 3D cursor here. And then let's duplicate
and mirror these over. So Shift Enter, Control, Enter. How did they do over here? Yeah, that looks pretty good. Okay, so now let's
take this and this, join them together, Control J. And then let's move the
origin to 3D cursor. So I'll right-click set
origin to 3D cursor. Okay, Let's also apply the rotation and the
scale over here, control a rotation and scale. Alright? And then here in the center, Let's create another
empty Shift, a empty plane axes. There we go. Now let's take this,
come over here. Let's add an array
modifier. Here we go. It's coming out this way. So let's turn off
relative offset. Turn on Object Offset, and we'll click on the eyedropper
and click on the empty. Now if we take that empty
and hit our X and turn it, you can see we're just beginning to get those Treads
around the Tire. Now. Let's see. One thing I wonder
here is it also, it seems like they
might angle in a bit, so they're parallel,
even though they're going around a circle. You can see here that they're
not going to be parallel. I'll hit R and turn
this like let's see, we may need to
adjust these a bit RX and if I move
them out to here, well that's not bad. But these aren't
parallel, right? So let's take these and let's grab these
points right here. And let's scale them in. I'm going to change
to medium point. Then let's scale in the Y, S Y, and scale these in until we
get them somewhat parallel. Right here. Alright, let's do that. Okay, so now we've got
an angled in, tilted, scaled in the bottom
here to keep them parallel as they go around. So now, how many do we need? By just click on the count. Let's just see what happens. We go on around and
when you get to here, well, we're at about 20. So when we get to
here we're at 23. Let's keep going on around and see how many we think we need. What if we have 44? I think we need to
maybe turn this. Let's press RX. Turn it a bit like this. See what we think of that. Is that close enough together? I don't know if it is. I feel like those may be a little closer together
than I have here. So what we would need to do
is change them here, right? So I think first of all, maybe I'm going to
take these away here, delete this side here, so we do not have any
over there for now. And then take this and
just move it in a bit. And then let's take our
empty and let's press RX. Let me bring them back here. Our X. I want to bring them back until they're
about the right place. This way. How do they look here, our X? Here we go. But I think that's a
little bit closer. So now we would just bring
this up a little bit more. But there's 51. Can I do 52? And then bring these back some RX and then bring them back to about let's see,
does that work? Is that fairly even
all the way around? Yeah, I think
that's pretty good. So then the trick is, is to get the Objects back
over to the other side. So what we could do for that is select this and tab
back into edit mode. Let's select these two. Now. I will move the pivot
point to the 3D cursor. Once again, I'm just going to duplicate and mirror over to the other side and see if the array modifier will
just follow along. Let's give it a try. Shift. Enter,
Control M, X, Enter. Sure enough. Look
at that. Alright. So in the next video, I think let's work on getting
the strips down the center
59. Finishing the Tire Treads: For the center part
of the Treads here, this, these strips
here in the center. Think I'm just going
to do three strips. It looks like well,
it's hard to tell. I think I'm just gonna
do three strips and think we can just build them
off of the existing Tire. So maybe if I took
these faces here, alt click and Alt Shift click
between two of the bases. Let's then duplicate
this Shift, Enter. And let's scale this out. Maybe I'll just hit the S
key and scale it out a bit. Hold the Shift key down. Let's get it out to
about right there. And then let's split it
out as its own object, hit the P key and separate by selection tab
into object mode. And let's select that. And then let's scale out in the X like this till we get it about two
right here, let's say. Then we tab into edit mode. Can we take this
edge right here? And let's press Control
B. Bevel that out. And we really, I
think just need to, let's go like this,
maybe like that. Then we can take these
two edges again, like this and this and
bevel these control B. Let's pulled these out. Then switch to face mode
with the three key. And let's extrude these m's. So I will press E S Shift
X to turn off the x-axis, hold the Shift key, and let's just bring these in. Actually others bring them
all the way in so they intersect with the
Tire there, like that. Then we can take
these edges here. And let's scale those
in a bit so we get kind of turn or Curve there. So with this, Let's press Shift X again to
hold the Shift key. And let's scale this in until it aligns with the Curve
of the Tire there. And then we can
extrude these ends. So let's press E, S Shift X. And let's bring
these in as well. And I'll bring them
until they intersect into the Tire as well. Alright, and then lastly, let's get this ridge right here. Let's select the inner Tire and just this edge right
here, alt click this. And Let's all Shift-click this. So we have these two. And then let's bevel
this control B. And I'll pull out just
a little bit like that. Then let's switch
to face mode again. And now let's extrude out
and scale in the x-axis. So let's press E, S, X. Hold the Shift key down, and let's pull out. We get it about the way
we want it like that. Feel like that maybe a
little bit too much though. Let me tab back into edit mode and Sx bring these in
just a little bit. That may be just be a
little bit too much. There we go. I
think that'll work. Now, let's take all of this. Let's apply any
of the modifiers. So we've got an
array modifier here. Let's apply that. We've got this object, that object and the inner Tire. Let's select that as well. And then let's press Control J. And there we go. And then let's smooth
it with auto smooth. Alright, and then I think we
can just delete this empty. We don't need this anymore. Let's delete that. Then let's bring everything
back and see how we did. So I'll just click
and drag in here, drag all those back. Yeah, I think that
looks pretty good. Okay. So to replace
all of these now, we can use our pivot point to make this a
little bit easier. We can select this object here, let's say and press Shift S to, to move the cursor
to their hit Delete, select the new Tire, Shift D Enter and
then Shift S eight, and then Enter to move
that to the origin there. Let's now do the same
thing over here. Since we put that
ridge on both sides, we should be able to
just duplicate it over without mirroring
it, I think. So. Let's take this Tire now, Shift S to, let's delete it. Select this Tire, Shift Enter, and then Shift S eight. There we go. Alright,
let's do that over here. Same thing, Shift S to delete, select this Shift,
Enter, Shift S eight. Enter. Now with these up here, since I've angled them, I think I'm going to just
begin completely new. I will select this
and press Shift S to, to move the cursor there. But this time I'm
going to select both the wheel and the
Tire and delete that. Then let's take this and
this duplicated Shift Enter, and then press Shift eight, and that'll move that up. But it still needs to be turned. And that's why I wanted to do this with a Tire and the Wheels, so I don't have to try and align the Tire and the Wheel
of the same time. So let me turn this
just a bit like that. Inline with the Body of the car. Then we can just
Mirror this one over. So I'll select this
one and delete it. And then we need to move the cursor to the center of
the grid, shift this one. And let's also make sure our pivot point is at
the 3D cursor it is, and we're also in
global transformation. Alright, so now we can
select these two objects, duplicate them, and then
press Control M, X and enter. Let's see how we did. Yeah, that looks pretty good
like they're in place there. Alright. So now
we've got both are Spokes and our Tire Treads
60. Adding Detail to the Seats: Alright, now let's
try and work on these ridges on the Seats. It isn't gonna be
exactly like this, but if we can just
get it enough to hint at that so that it feels
like that's what we've got. I think that'll be good. So let's take these and
I'm gonna duplicate these Shift Enter and
then I'm going to press M and move them to
the Scene Collection here. And I'm just doing that
in case I screw it up in case I don't do a very
good job the first time. At least we still have the
originals getting away here. So if we take a look at these, we've got modifiers on these that we've got a mirror
and a subdivision. So I think if we press Shift Z and come down here
and turn off optimal display, we can see how
many polygons will have if we apply the
Subdivision Surface Modifier. And with these here, I don't think this is
enough to get these ridges. And I don't think this
is enough even to get not as many as these. So I think we're
going to need to increase the subdivisions
a bit on this. So I'm going to turn
this up to three, and I'll hit the one key. And I think this will
allow us to at least get enough ridges on here
that it looks like that. That's what we're
going for here. With this amount of polygons, I think we can get
pretty close here. Alright, so I will press Shift Z to go back to Solid mode. And let's go ahead and apply the Mirror and apply the
subdivision surface. And if we tab into edit
mode, this is what we have. So we need to choose the
edges that are gonna be the indentations and
the ones that are gonna be the raised parts. And as we do this, I
think it'll be good to have some curvature on this. So I'm going to add a subdivision surface
modifier one more time. Just keep it at
viewport level one. And I'll turn on the cage here. Alright, so now, where should
this edge be right here? I'm going to hit the two
key and maybe we want it to be right here. Maybe right here. Let's try this. So if we want this
edge to be right here, I think what I wanna do is, first of all select a point on the back and move
the cursor to it. And then I want the
pivot point to be at the 3D cursor and it
looks like it already is. Yep. So we've got 3D cursor
selected there. I'm going to Alt
click this edge. I'll hit the two key to
go to Edge mode again. And then let's also change from global to local transformation. And you can see now, because I turned this
object in object mode, our local axes are in
line with the object. From here I think I want to scale in a bit
in the Z and the X. Let's try this. I'm going to press S, Shift Y to turn off the y-axis. And I'm going to bring this in just a little bit like that. Okay? Now that we've got that, let's add a couple
of edge loops, maybe one right here and
maybe one right here. And then I'm going to
bring these down a bit. And bring this up a bit and
let's see how those look. Let's see if maybe
I can hit G two times and slide this
one down a bit. Same with this one here. Alright? And then maybe
I want to bring these down a little bit
more into here. Into here. Let's try that. Alright, so we've got
that basic edge there. Let's now try and get the
vertical pieces here. So if we go to the Front View, you can see that this
is the center line. If we go every other edge out, what do we get here? I'm going to go out. And I'm using every other
edge because we're going to need an edge in the middle of each of these to pull out
some to for that curvature. So we've got
1-234-567-8910 ridges. That's probably enough
because once we get out here, they get kinda small and
there's an open space there. So, okay, so let's say we're
going to bring these in. Let's say from this
point back here, we bring these in, in the Z and the
y-axis, but not the X. Let's try this. So let's press the
Esc key and Shift X, and let's see how this works. I'm going to bring these in
just a little bit like this. Let's now take these edges
that have remained on top. And between the ones
we just scaled in. And let's bevel these. I'll press Control B and pull these out to
flatten them a bit. Kind of like that. Yeah. Okay. But I want them to come out a little bit more. So let's scale in
the Z and the Y out. So S Shift X. And I'm going to hold
the Shift key down and let's bring those out just a
little bit more like that. How that works, yeah, and it looks like we might
be able to smooth that. Let's try auto smooth
and bring that up a bit. Okay, Yeah, I brought it
up to about 75 or so. Alright, so let's
say we've got that. Let's bring back the car body and the doors and take a look. I feel like though I could take this center edge
and scale it out a bit in the X so it isn't
quite as sharp out there. And once again, I'll bring back the car body and the doors. Yeah. That's kinda what
I'm looking for. Okay. So now let's do that
for the bottom Seat. Let's come down here
and we want to, well, once again, I'll press Shift Z and turn off
the optimal display. And in here, Let's go ahead
and increase this to three. Yeah, I think that might give us enough geometry to do
this for the bottom. So let's now apply the Mirror
and apply the subdivisions. And then let's add
another subdivision with only one on here, and I'll turn on the cage. Now let's find an
edge back here. Something like this that
we can bring in like this. So let's find our
center point down here. Maybe right here, Shift S T2. And then with this
edge selected, Let's then scale this in
the Z and the X, right? Which means we turn off the why. So S Shift Y, old that Shift key down. And let's bring this
in a bit like this. And then let's add some
edges just like we did on the other one. Like this. You have
that goes, okay. Now let's work on these here. So do we have the
edges that we need? So we've got this one here. Well, we've got a center
one here, an edge. It looks like we're
going to have to do some rearranging a little bit. And I'd like these
to be more straight. So, alright, so let's go ahead
and select all of these. How far out do we want to go? I guess I'll go. Let's go on out to here. And this edge doesn't continue. So we'll have to add these
with all Click here. So what I wanna do now is get these more
straight on the ends. And to do that, we're going
to need to scale in the X. But we don't want Blender to
see this all as one unit. We want to see it as
each individual edge. So I'm gonna go back to global. And then instead of 3D cursor, I'm going to change this
to individual origins. So it's going to see each one of these as having
its own origin. So now I can press X and as I scale in its gonna begin
to flatten these a bit. The ones on the end, I
don't want to push too far, so I'm going to deselect
these now, like this. Then I'm going to take
these out a little bit more like that. So they're just a
little bit straighter. Okay. So now I need to get these
in line with everything. So this looks like it's
okay here. This one. I could move out like this. And this could be the middle one here and
therefore have an edge here. So you see I'm trying
to get an edge at each crease here on the top one to kind of
match like this. Then this one can be this outside edge
and this outside edge. And then if we add one in
the middle, we get that. Then we can move these
around to match those up. So that's what I'm
going to try and do is just get each one of these matched up pretty well. And it looks like now this one
could maybe come this way. This one could be here in the center and this
one would need an edge. Then in there. I'm just
trying to match them up. Now. The way we have them on the top, I'm going to come out here
now and match these up. This looks pretty good. This should be like this. Maybe here, I'll add an edge in here to get that matched up. Let's say that this one needs
to come over like this. We probably need one in here. This one could come
over like this. And we'd need one
in here like this. Alright, so do we have
all the same edges now? I think we do. So if
we took this edge, this edge, every
other one along here, but note like this. There we go like that. Now we could add our
edges in here as well. Let me go back to 3D cursor. So we've got our pivot
point down here. Once again, let's scale
in the Z and the Y. So press Shift X, and let's bring these in a bit. Okay, and then all of
these in the middle, just like we did before, we're going to give
these a bevel year year. And so we'll press Control
B and bring these out. That yep. And then maybe we smooth
it again. There we go. Is that about what
we're looking for? For that? Yeah. I
think they're not as they don't seem
to come out as much. So let me scale them
out in the Z and the Y. So S Shift X. Let's bring them out just a
little bit more like that. Alright, let's see
how this works now, I'm going to bring
back the car body. Well, let's just bring
back everything, I guess. Bring it all back. And except for those seats
that we want to hidden, let me select those
and hide those. There we go. Yeah, that's
actually pretty good. The only thing I'm not real fond of are these
little puckers. I think we might be able to fix that with our
Smoothing tool, with the smoothing brush
in the sculpt tools. We will work on that
coming up next.
61. Adjusting the Seats and Creating the Door Hinges: I can see here that I've got a little bit of adjusting to do. You can see the
Seat doesn't quite conform to that curve there and it's got a little pinching
there on the corners too. So to do this part up here, I'm going to need this
as well as the Seats. So maybe I'll take
this and move it out into the main Scene
Collection here as well with these other
objects and then just hide everything like that. So I don't have to do extra work on one side
and then the other. I'm gonna go ahead
and split this down the center. Let's do that. So once again, Shift
Z in face mode and I'll drag select and
select just this area. I'll press Shift Z.
I'll click between two phases and
then it looks like maybe I could just expand this. I'll press Control and plus to expand that into the center. Yeah, I think that's
going to work. And then let's hit the
X key and delete faces. I think I will want to select this edge
here in the middle. And maybe press Sx zero
to straighten that up. And then let's mirror this
over and see how it looks. I'll come over here, add a
mirror modifier and then I want to take the mirror
modifier and put it on top. And then I'll turn on clipping. And let's see how
we're doing here. With that selected. Yeah, it looks like I can't
move that center edge at all, so I think it's in place. And then to adjust this area, Let's just grab, say, a point over here. Turn on the proportional
editing tool and see what we can do here. I'm going to hit the G key, scroll in a bit and
then just move. How would a bit like this? That maybe they connect
up with the back? Like this. Oh, and look at this. We've got a problem with
this center line now. Yeah, it looks like it's
collapsing in here, so we don't want that. Drag these out. No, I really can't. So I'm gonna turn off clipping and then see if I
can bring these out. Let me turn off the
proportional editing tool. There we go. So yeah, I was selecting
that wrong edge. So let me select this edge
and bring it into the center. Turn Clipping back on. So it will clip together. There we go. Alright, and then down here, once again, I'm going
to split this off. And another way to do that is just to alt click
that center edge. And with all of these
points selected, I can go to vertex and rip
vertices or the V key. So I'll just hit
V and then Enter. Then that should
split those two up. I'll press Alt a to
deselect and then hover over this side
and press the L key. It'll select all
linked components and the two sides are
no longer linked. So we can just delete these
faces and then add a mirror, bring it up to the top. Turn on clipping. Let's
see, we've got here, so maybe I'll just select an edge right down
the center here like this. There we go. Better turn off proportional
editing tool to do this. There we go. Now
they're clipped. And so now that we
have them mirrored, I could take this
and it looks like I could just maybe do a
little point pulling. It just looks like we've got points just a little
too close together. And maybe move them
out like this. Alright, That helps
a little bit. Alright, so now let's bring
everything back here. While we're here in this area, we could add the Door Hinges. We can see those over here. And let's see if we
can find them in here. I'll open a new image and
there's not a real close ones. So let's take a look at this. And it's really hard to
tell exactly what they are, but let's go ahead
and give it a try. If we look at these over here, let me turn on select ability, select that, hit
the period key to. So I can zoom into it. So it looks like it may be
a Panel and a cylinder. Whereas over here, it's hard to tell exactly
what is going on here. That just looks more
like a cylinder. So I will select the door. Oh, let me turn off select ability for
our reference images. And I will hit period
to zoom into the Door. Let's put one right up here, Shift us to, to move
the cursor there. And then we'll just
add a cylinder. And we probably
don't need 32 sides. I'll take it down to 16,
type in 0.1 and point to, to bring it down a little bit, we can change, our cat
fails to triangle fan. Let's try that. Then I'll scale down and let's
bring it out a bit. Maybe scale it in the Z, some yes, Shift Z it and
make it a little bit bigger. So let's try this. I'm going to smooth it.
It's very hard to tell, but it looks like maybe
it has some ridges on it. So we could maybe add six edges, which will allow us to grab
these three rows of faces. And maybe we could
press E, enter Alt, S, and shrink these in
just a bit like this. Then maybe we could hit
the C key to go to circle, select and select these. Oh, let me press
Alt a and then do that like that, like this. Then maybe let's hit
I and inset these. And then E, Z, bring them out a bit like that. And I feel like those
are too big now. And let's just take this down. Shift D, Z and put that down there to feel like we
could angle this a hair. Alright, well we've got those. Let's see how they look
on the other side, I'll change the pivot
point to the 3D cursor. Shift D, Enter,
Control M X and Enter. Now we've got them over
here on the other side. I will take these and
let's put them in the Door collection for now. M doors. And there we go.
62. Modeling the Hood Ornament: This Hood Ornament
looks kinda FUN. I've noticed that in
other Kissel images, it doesn't have a Light here. I think this one is a little
more of a high-end model. So I'm going to do the
Hood Ornament as is, but I'm not going
to make it a Light. I won't put that chord on and make it quite so thick
in the center there. But let's go ahead
and give this a try. I'm going to hide everything. And then let's just
begin with a cylinder. So if that's the beginnings, let's use auto smooth and Take
it down to about 30 there. Then this piece here, Let's just duplicate this Shift D. And I'm going to
scale it in the Z. And what I'm gonna do is just select every other edge here. Actually, I'm going to
scale it out just a little bit so it hangs over. And then I will select
every other edge here. Let's see if this
is enough edges, maybe it needs more. But let's give it a try. And from here I
will just scale in, in the X and the Y. So I'll press S,
Shift Z to turn off the z-axis and push
that in just a bit. Then let's try and give it a subdivision surface modifier
and see how that works. Not real well. So let's add a couple of edges here and scale it out
in the Z like this. And maybe I will select these faces up here
with the C key. And I can select these and the bottom maybe
with the beak here. Let me try that. There we go. Then I'm gonna hit I and
inset in just a bit. And then these edges here, the ones I just
tried to bring in, I think we're going to
need to bring them in more or maybe bring
these out more. Let's try that. Just going to select every other edge here, all the way around like that. And then let's scale these out
in the X and Y, S Shift Z. And let's just push
these out like this. There we go. So we're getting something that looks
kinda like that, scaled up in the Z a bit. Alright, with that done, let's begin working on this. Now. We've got a cylinder going this way and as cylinder
going this way. So I'm not sure
if we should have them actually blend together. It kinda looks like they do. So if that's molded piece, well we can do is
create a cylinder here. I'll bring this up
and let's spin it in. The acts are X9 zero, and I'll scale it
in the Y a bit. Let's kinda get this the right size that we
think it should be. And then we can add a cylinder down here
and connect it up. But we're going to need
a couple of edges here. We're going to need at least
an edge down the center. And now we've got an outline here that
has eight edges on it. So I think I want
this cylinder on the bottom to be a
little bit smaller. So let's begin with. A cylinder has more sides to it, so we don't have to have
that opening be so big. We could begin with a higher
resolution cylinder here. Let's do that. I'll press Shift
day Mesh cylinder, and let's begin with
32 instead of 16. And that'll give us
more to work with. So I'll turn it once
again and scale in. And let's begin like this. So now what I meant
by an opening is that this right down here. We could delete this, hit the X key and delete faces. Now we've got an opening
with eight sides. And then we could
select this, Let's say, maybe select this point
right here and bring the cursor to that and
create a new cylinder. Let's give it eight sides. Let's take away the cat fills. And then let's scale this down. Now we've got a cylinder that will match up with the
signs that we have here. So I'll scale this out
a little bit more. Bring this down. Alright, so now let's see if we can
bridge these edge loops. So I'll select this and this, press Control J to
join those together. And then let's
select this edge and this edge and press Control
E and bridge edge loops. There we go. Now we can take this and
extrude it out here. So E S scale it out of it. Bring it down some, and E Z and bring
that straight down. Okay, so we've got something
that looks like this. We're going to want
it to be smooth. Or of course, let's try a subdivision surface modifier
and see if that helps. So I'll come over here, add a subdivision surface. It's going to look kinda yucky. Maybe I'll leave that cage off so that we can see it
a little bit better. I will select these faces, and I'll select these
faces with the C key Let's inset these. And there we go. Maybe inset them one more time. And at this point,
let's press S Y and scale these out just
a bit like this. So they come out some SY. Then let's hit I and go in
a bit to about right here. Now, I don't have much
information for the Back of this. So I'm just gonna go
with the Front for now. Let's select these. And I'll hit E Y, push in just a bit. And let's move this and bring up the Smoothing
angle. There we go. Now let's work on
this interior part. I think I'll do this separately from the
smooth part here. Maybe we could add an
edge loop in here. Maybe another one right
here and bring that up. And maybe one right
in here. There we go. Now with the center
points selected, let's press Shift S to press
Shift a Mesh cylinder. Let's give this well, let's go ahead and give
this 32 sides and I'll spin it in the
x-axis or X9 zero. Let's scale it down. Put it right about in here. Let's take this
edge, bring it back. It looks like it tilts in
just a bit right there. And then I'll press
EY, move this out. Once again, scale it in
a bit, bring this in. Ey, push it in just a bit. For this, we could do things like we could take this edge, press Control B and bevel
this out just a bit. Hit the three key to go to
face mode and then press E, S, Shift Y to bring that in just a little bit
because there's kind of an, kind of an edge there. We could apply the scale with
control a, apply the scale, select this edge and scroll
the mouse wheel so we have more of a curve
there. Smooth it. Then this piece right here
looks kinda like a sphere. So let's just create a UV
sphere with scale it way down. And just see how
it looks in there. Alright, something like that. Let's go ahead and
go to the side view. Selected Shift Z
tab into edit mode. And we should probably
spin it so we can select faces
a little easier. Let's press are 90. Here we go. Then let's just select these faces
here, delete them. And then smooth this. I feel like we can
take this piece and this and maybe
scale it up a bit. But in the next video, let's work on using the Boolean modifier to get this inset into the
rim of the Grill
63. Finishing the Hood Ornament and Cleaning Up the Hood: I realize if we're going to
use this piece as a Boolean, we should probably have
more geometry to it. It's kinda blocky. So let's create a new cylinder
and maybe use 32 sides. I'm going to press Shift day
Mesh cylinder and we got 32. Yeah, let's go with this. I'm going to scale that
down just a little bit. And it should probably
have cap fills as well if we're going to
use it as a Boolean cutter. So when I press Shift
a Mesh cylinder and then I'm going to choose a cat fill and it can
really be anything, as long as the object is
airtight, it'll work. So I will just bring
that in like that. And let's smooth it
again. There we go. So we've got just a little
bit more geometry now that will hopefully make
that Boolean hole a little bit smoother. So let's bring
everything back here. Unhide everything
here in the outliner. And then I'll select
everything here. And let's move this forward
and move it up and maybe scale it down to about the size that we
think it should be. Kinda get it in place like this. Let's see what we think here. Feel like that's
still a little big. Let me find another image here. Let's go with this
one here and zoom in. Well, it's really not
that far off actually. Maybe it could be a
little bit smaller. I'm going to select
everything and scale it down just a little bit. And then we could bring it down. Maybe move it forward
a little bit. Something like this. Alright, from here, let's
go back to that close-up. And now that I look at this, we may not need a
Boolean hole in this. We might just be able to
get away with creating this little Trim and placing it there without having to
actually cut a hole in this. So how would we do that? Well, we could maybe
insert an edge loop here. And then maybe we could
go to the side view Shift Z so we can see through it and use this shear tool again. Remember that one, and
then we can angle it. Here we go and then hit G2
times and slide that down. Angle it again like this. And we go so it follows the
angle of the Grill there. And let's take a look
at what we have here. Yeah, so what if
we took this and we duplicated it Shift D Enter and we scaled it out in
the X and Y S Shift Z, pulled it out some. Let's split it off as its
own object with the P key. Now let's in object mode. Select that again. Now can we just take this and
extrude it out E S Shift Z, and then press E Z and
pull it down like this. Alright, now let's add a subdivision surface
modifier to it. And maybe we could add an
edge loop right through here. Maybe add an edge writing here. Let's move it. What do we think? Well actually that
might just work. We could scale it down just a little bit so it fits around. They're a little bit better. And we could also bring it up some let's see how that looks. Yeah, I think that's I think
that'll work pretty well. Just we don't need
to cut a hole, we just needed this little Trim. Now while we're here, let's also take a
look at connecting up this area right
up at the front. So since this is the Hood, it looks like it has an edge
or it should have an edge. Right here. Before this part goes
underneath the Grill. Alright, you can
kinda see that here. But before I do that, let's get all of these
tucked in under the Grill. So maybe this could
just go down like this. Let's try that. Because like we need
a little bit more. And then this one could
come down as well. Let's just take
this straight down. We go. Then this in here
could come in as well. So this is not mirrored, It's just a single object, but we can mirror it over
once we get it done. So maybe we could
select an edge in the back here and move the
cursor to it, Shift S2. And then we select everything and rotate it at that
point where the cursor is. So let's press the period
key and go to 3D cursor. And now Let's turn it in the z-axis. Let's press R is Z and hold the Shift key down
and let's just rotate it. So it moves in like that. And we go. Now it looks like this last point needs
to be moved in. But let's do that. Alright. Now that
we've done that, we can take this
and move this and maybe add an edge right in here. Bevel that just a little bit, scroll the, the mouse wheel. So it's just got
one segment there. Go to face mode. And let's just extrude this in just a little bit like that. Yes. So that just takes all
of this and gets it inside that Grill Trim, except we still need to do
that same thing over here. So let's delete this and let's take this and
move it over there. So Shift S1 to move it into
the center of the grid. Period. Choose the 3D cursor, Shift D, Enter Control M, X, and there we go. So now it should be over there, kind of tucked in
underneath the Grill Trim. And then we could, I suppose take this, we've got a subdivision
surface modifier on this. So we could take this and bring our Move Gizmo back to the median point here
and maybe move these in. Let's try it. Let's hit E, and I'm gonna hit the S key and scale in just a little bit. And then let's do
that one more time. E, S scale. And again, now this
is kind of blocky, but this is very smooth. So we could also, Oh, well, I've got the
subdivisions turned off here. Let me turn that on. And we don't really want
these long stretch polygons. We want our polygons
a little bit more evenly sized and space. So if I go like this, I think that's going
to help some of this. Maybe I'll add one
more edge in here. And also we could
take these edges all the way around. Like this. We could use edge crease. We can press Shift E and pull edge crease
out to one point. Oh, there we go. Now the crease down here. Think I need another
edge right down here because of this indentation
that we have here. And I probably need to do
that same thing up here. Yep. Let's do that. Then let's select
these two points up here and maybe bring
them up just a hair. Let's try that. Yes. So I'm not sure if this is
actually going to work, but this is why we try it. We go. Then I'm going to smooth this. That might help. Yeah, so I just wanted to seal those up a
little bit better. This I can probably turn
on subdivisions here. And once again, we need to
add a few more edges in here. But we can also
select all the way around and use our
edge crease as well, Shift E and pull that out. We're seeing some
openings in here. We could try adding a
solidified to this here. Even thickness. Looks like we need to
bring that in some. So I'll click and
drag in here and bring that in so we can still see through our Vents. The last thing I think
we could do here is just add a solidified this just to see how that looks with a little bit
of thickness to it. Let's just take a look at that. Yeah, I think that closes
up some openings in here. Alright, We're nearing
completion on the modeling. I think there's a few more
things we need to clean up, but I think we're getting close
64. Creating a Side Step: To work on these
Side Steps here and this little Vent thing
is that what that is? I think first of all, I need to finish off
this piece down here. It looks like it's
got some bevels on it to make it appear curved. First of all, I'm going to maybe into edit mode and
just bring these up. That's closest I can, well
that's pretty good there. I think. I've got these pretty close. The next thing I could
do is I'm going to press Control and the seven
key on the numpad, and that'll go to the
bottom orthographic view. And then if I go to
wireframe was Shift Z, and I'm just going to
select these points here. Well, these look pretty good. I think it's these that maybe
need to come out a bit. You can see that here. I'm going to press Sx and
kinda bring these out. Maybe. So it's in line a little bit better with the Body of the car. Let's see how that works. Let's take this face and
pull this out in the x-axis. Maybe like that. So I'm just trying to
get it so it's pretty well aligned with
the Body of the car. Then let's go ahead and press Control a and apply the scale. And let's try a
couple of bevels. Now, before I do that though, maybe I should just split
this down the middle so that whatever we do on one side happens on the other,
let's do that. I'm going to press Control R, hit the Enter key to times, and then I'm going to
remove this side over here. So Shift Z, three
key for face mode, and then I'll just take this
right here, delete these. And let's now add a
mirror modifier here. Turn on clipping, go ahead
and turn on the cage. So now whatever we do on one
side happens on the other. Alright, so let's
take this edge right here and let's give
it a bit of a bevel, scroll the mouse
wheel and give it. Let's try something like that. I'll smooth it with auto smooth. Okay, that's kinda what
we're seeing here. And then is there
one on the bottom? Maybe just a little. Let's try it. I will press Control B
and just bring it out a little bit less than the top. Now, I think for this piece
right here, this step, let's, I think it goes in line with the Front
of the Door here. Right. And then over. So let's put that in here. I want to press
Shift day Mesh cube. And let's just get this
to an approximate size. And I'll go to this side view. So it looks like, oh, it looks like that these are going up a little
higher now, doesn't it? So I may need to
come in here and adjust these bits in here. Yeah, it looks like this
angle's up where it shouldn't. Let me just while we're here, let me just take this and
press S Z zero and try that. See what happens
when we do that. That's a little better there. What about this? Let's maybe do the
same thing here. Take this Z zero, Enter. Then let's see what we have
here. It's a little better. Feel like this whole thing
could come down just a bit. Maybe something like this. And maybe this as well. Let's go ahead and work on this. Now. I'll go to the side view
G and move this up. And it looks like
it's right down on the bottom in line with
the Front of the Door. So this way and let's see, is that I'm just going
to push it in for now. Is that about what we're
looking for and is it angled with the Line of the
car or is it straight out? It looks like it's straight, but it's hard to tell. Alright, let's see if
we can work with this now and figure out how
we can create this here. I'm gonna go ahead
and apply the scale. And it looks to me like they're these two little
ridges on either side. So control our scroll,
the mouse wheel. And let's press S Y
and scale this out. Then I'm going to take
these faces here. And let's extrude these up. Maybe just like that
is all we need. And then it seems like
there's a rubber pad here. So let's maybe tab
into edit mode, select this face, move
the cursor to it. And then let's create
another cube here. Let's scale it way down with 0.1 Here we go. Scale it into Z. And then let's just scale
it out like this. How big does this look? Okay, so it looks like
it's a little bit wider and maybe closer
to the edge like that, maybe something like that. So once again, I'm
just trying to get the basic shape and the
size, proportion, etcetera. So I feel like this is
a little too big here because this doesn't go all the way to the
Handle, but mine does. So let me scale this down a bit. I'll select these
two pieces here. This one in this one. And let's scale this
down just a little bit. And then move it into
place over here like that. So now it comes around
to hear from the Handle. And that seems like about
what that's doing there. Okay. I will move this in
a bit like that. Then this little grid thing. Let's see what that is. I'm going to take
this press shift D X, pull this back,
turn it into why RY 90z to scale them like this. Bring it up a bit.
Alright, before I kind of angle it to this, I'm going to get all
the little pieces in. So it looks like we've
got 4812 pieces in there. And you know what? I really think it
would be easier to do this if this were
just a polygon plane. So I think what I'm
gonna do is just select this plane,
press Control. I just liked everything else. Delete and delete faces. And now we've just
got a polygon plane here that we can work with. I think that'll be easier. I'll press Control
and apply the scale. Let's add a couple of edge loops on the
top and the bottom here like this to control
where those holes are there. And then I think we may
need 24 of these 24 cuts. Let's see. I'm going to scroll the mouse wheel and I'm
gonna click and click again. And then I'm going to
come down here and use the loop cut settings here. And let's increase this to 24. So now I'll press S Y and just scale these
in just a little bit. That then let's select
every other one here. Well, one thing we can do
to let me show you this. You can select all
of these, let's say. And then you could
come up here to select and choose
Checker Deselect. And that'll deselect
every other one. Alright, so now let's just hit Delete and delete faces. We go. So now everything is
kind of curved here. Instead of using the Subdivision Surface Modifier for curves, I may just use that vertex bevel and see
what we can do with that. So if I just select these points here and
press Control Shift B, we can pull that out and give that a bit
of a curve there. And then we can also select these and select
these down here. And we could try and bevel
all of these points. So let's press Control Shift
B and pull out like this. And I don't want them to
come together like that. It'll just keep them apart
a little bit like this. There we go. Let's see how
that works. Yeah. Okay. And then let's give it a little thickness with
the solidify modifier. I'll choose even thickness. Click and drag in this thickness field
until we get it about the way we want
it, something like that. I'll smooth it with,
with auto smooth. And then let's go
ahead and apply this because I would like
to take this edge all the way around
now like this. I'd like to try and bevel this, see if this'll work here. I'm going to select all of this. We go then control. Be pulled these out
just a little bit. See what happens here. Alright, yeah, okay. Then are there screws on here? I think there are little
tiny things like that. Do we want to grab one
of those from here? We could do that. Let's tab into edit mode and
grab one of these Shift DX, spring it out,
Let's hit the P key and separate it as
its own object. Let's then take it G, move it down here. Zoom in a bit. Let's move the origin
to the geometry. There we go. That makes
things a little easier. Bring it back into here. I'll move it to
their let's say and then is that too big to
small? What do we think? Maybe a little too big. Let me bring that down some. And there we go. Then let's press shift D Y, and then Shift D, C. These two. Maybe I'll take these and
move them over a little more. Okay, now we could
turn these just a bit. They're not all
exactly the same. We go and then
let's combine them all into this Control J. And now we should be
able to move this back and fit it right on here. I'm going to move it into here, Turn it in the Z now our CSI. Alright, I think
that's pretty good. I feel like I need
to do a little bit more with this piece. But in the next video, let's also take a look at
creating the one in the back.
65. Finishing the Side Steps: Well, that's, I look
at this a little more. It looks like this black
piece is more in line with the bottom of the Grill
here, then mine is. So it looks like
it may be turned in line with the Car a little bit more than
what I have here. So I'm gonna go
ahead and press our Z. I'll select them both
and turn this a bit. And then let's go to local
transform Orientation. And let's just move
this in a bit. It may need to actually
shrink down some, let's try that and
bring it in some, let's see how this works. Alright, I think
we're getting there. Yeah, let's go with that
and then now let's work on, well, I don't want to spend
too many polygons on this, but it does look like we could press Control a
and apply the scale here and then take
this face right here and maybe inset it
just a bit like that. And let's extrude
down like this. Then what do we wanna
do about these ridges? Well, we could go ahead
and try and model them. I suppose we could just press Control R and let's see
what we can do with this. I've got 14 cuts. Maybe I'll take it up to well, how about 24 again, let's do that. Let's just do 24. And then maybe I will
put two edge loops this way and scale them in the Y recall worry and Local
transform Orientation here. And then let's select these with the circle
select tool with the C key. And we could try using
our checker select again, let's come up here. Checker deselect. And it says Mesh Objects have
no active vertex edge face. Okay, well, let's just go through and do the hard work of just selecting
every other one. There we go. Then I will just hit E
and Z and pull up a bit. Let me hit Z again. I turned off Z when I get Z, and then I want to scale in. So I'll change this
to individual origin. And then when I scale in the X, they will scale
individually like this. So we can try something
like that and also maybe just select the edge all the way around and give
that a Bevel. Smooth it. That's probably plenty. Then for the bottom piece, we could take, it
looks like we could take these edges here
and scale them out. It looks like they
lean out of it, S Y, and we're still on individual origins has
changed to median point. There we go. Sy, move those
out just a bit like that. We could maybe take the back
of this and move it up. So it's in line with the width, the Side of the car. Let's see if we can do that. If we pull this out
about right here. Can we then tilt that
a bit in the y-axis? Try it. I'm going to press
RY and tilt it, smudge. And was is that
even going to work? They're not really it looks
like it's more tilted here. But I don't know if that's
really going to be necessary. We could try that. But then it's kinda hanging
off the side there. And I don't know that
we wanna do that. We could bring it
down a bit maybe, and then bring it back. Bring this down. We can try that. Okay, now, for this
piece over here, let's take a look
at this back here that says a little
bit more complicated, I think then what we're
seeing on the side here, Let's come over here. Let's take a point
here and press Shift S to and move our
cursor to that point. I think we can once
again begin with a cube, Shift day Mesh cube. And I will scale it in the Z
and maybe scale it in the X. And it looks like it just
kind of leans up a bit, alright, kind of
kind of angles up. And then we've got
what appears to be a cylinder kind of attached
to this area like that. So let's, let's try that. Let's take this face here
and move the cursor to it. Let's create a new cylinder. Actually, let me just
create a circle. Let's try and work
with a circle. We're going to need to take
this down quite a bit. I want to take it
down to say 16 sides. And we can see it out here now. I'll take it down to say 0.1. So it's pretty small. Then let's see if we can angle this to about the right place. I'll press RX and it looks
like it's kind of like this And I will tab
into edit mode and move these out as well
and move this in. Now I think on mine, I'm gonna go ahead and
remove these edges here. I'm going to delete edges. There we go. Then these we can tab into edit mode and select
these two points. Let's try that and scale them out in the ACS and line
them up like this. Now I feel like I
could take this scale, this in, hit BS scale
it in a bit like this. Maybe bring them down a
little bit like this. So they're more evenly spaced. We go and then I'll take them and hit E and bring
them down like this. Let's just try this. And now is there a way
for us to connect these? So if we took this and
maybe connected these, let's try this though. I think I'd like to take
this edge and this edge over here and move these down
to get in line with this. Alright, so you can
see I'm lining up that bottom edge
there, here and here. And then let's
combine these two. I'll select this and this
and press Control J. Now if we tab into edit mode, we can see them both
at the same time. And I feel like we should be able to then bridge
edge loops here. Let me scale these out just
a little bit more here. So if we take two edges
here and scale them out, so they line up with this part. So now is it possible to take this face and this face and
delete these delete faces. And I'll also do that
for this and this. Let's try this delete bases. Now can we take this edge, this edge, this edge, and this edge over here? And can we bridge edge
loops now to connect these? Well, let's see, let's try it. Let's press Control E
and bridge edge loops. Now the problem
that we've got is it bridge these across here
so we don't want that. Let's see, we can do
these one at a time. Let's just select these two
control E bridge edge loops. There we go. And then Alt click, Alt Shift, click these two control
E and bridge edge loops. So now let's take a look. Let's try and smooth it. Alright, It didn't quite get it. Let's drag this up a bit. Now. We're still not getting
those really very clean. But we could adjust a
few of these edges. Then let's try this edge here
and bring it down a bit. Move it back some
same with these, I think moving down a bit. So we just maybe need to do a little bit of adjusting here, but kind of looks
like this might work. Then I think I'll put a
little pad back here, something like we did
over on the other one, shift day Mesh cube, gala, way down with this
one out like this. And I may go ahead and kind
of get a similar shape, even though the one in the reference images
may not do this. I'm gonna go ahead and get
that similar shape like that. Yeah, I think I will
go with that for now. We may be able to add a
bevel or two to that, but I think that's about
all I want from that. Feel like the whole thing
may be a little bit too big. I'm going to scale
down just a bit. Maybe even scale in the Y. Let's see if I can
get away with that. Yeah, I think that
just might work. Now. I am seeing from this angle, we can see through here,
right through there. And I think we may
need to add of part of the Fender the
way we did in the front. Let's go ahead and work on
that in the next video.
66. Tweaking a Steps and Closing the Rear Fender: Okay, Before we go to
the Back Fender here, I have an idea I had an idea on this little thing because
as I look underneath it, it looks like it's
got some things going on underneath there, so I kinda wanna do that. But first of all, I want to get these in
line a little bit better. You see how it's kind of
angled in on the sides there. I want to try and get
that a little bit better. So I'm gonna go to the bottom
view with Control seven. And let's see what
we can do here. I feel like by take
these points here. On the top, maybe I'll go
to the top view first. Here we go. Then let's go to
median point, Sx. And I will just
wanted to scale this out to get these kind of in line with that curve there. And then once I do that, if I go to the bottom, you can see we've got
a couple here that aren't in line anymore. So maybe we need to take these and press Sx
and bring these out. And then these, they're in line. And maybe these here, Let's try that. Okay? Now hopefully that is a
little bit smoother there. Yeah, that works. Okay. And then for
these little things, what if we came in here and we selected
something like this and this. And then we went to individual origins and
we extruded these m's. So we hit E and
push in like this. Once we get to about right here. Let's then bridge edge loops control E, bridge edge loops. Alright. Now with this piece selected, this whole piece selected. Let's go to the side view, and let's bring this down. I'll hit G and bring
it down until it is in line with the rest of the piece here like
this. There we go. Alright, so now that
we've got that, let's take this face here and let's just hit
E and extrude this. Now it goes straight
back like that. But I think I wanted
to angle down. I think I want it to go
down here like this. And then let's bring
this up. Here we go. And then let's hit E and extrude this in and
bring that up a hair. So let's see how this looks. Just an idea I had here. Yeah, so now we've got that basic shape that we're
seeing underneath there. And then maybe if we
take this and move it back in line with this here. Let's try that.
What do you think? Yeah, I mean, I think that's
I think that kinda works. And then maybe let's
take this thing and make sure we've got
our scale applied. And let's just grab
the edges here. And bevel these in a little bit. Control, be, just feel like that curves just
a little bit there. And maybe this edge up here too. Let's do that. So now let me grab this
over here and delete it. And then with the cursor in the center of the
grid with Shift S1. Let's select these two objects. Make sure we're in global, makes sure we're using the 3D
cursor as the pivot point, Shift, Enter, Control
M, X and enter. And that should put that
over on the other side. Now let's take a look
at this area back here. And I feel like we just
need to close this up. And I'm not sure. Here. Let's take a look at this. Yeah. So it's just it's just a Panel almost
straight up and down here. So I think all we need is to
grab a few edges along here, along the top edge here. So maybe we grab these
edges all along here. And I guess maybe
on down to here. Alright, and then, oh, this is a mirrored
object, isn't it? So we really just need to take this edge and press Shift
Dx and move it out a bit. Then we need to split it
out as its own object, but it's to that with the P key. Let's select it in object mode. Let's get rid of the
mirror modifier. And then we can take this whole
thing tab into edit mode. And let's hit the period key, go to median point. And let's bring this over here. So it fits right
up against here. Then we need to
duplicate it, shrink it, and flatten it so it fits
along this piece here. Let's try that. Shift D Enter. I'm going to scale it in a bit. Then I'm going to
flatten it, S Z zero. We go flatten it and
move it down to here. I'll move it in a bit so
it's right up against there. I could take this
and press E S and scale it out a bit,
kind of like that. And then maybe press
EX and move it in like that so we get a
bit of a ridge there. And then this, then
I'm gonna come down here and with the L
key, select this. Now, these should be the same number of
edges and vertices. So we should be able to press Control E and bridge edge loops. And there we go. Now we've got a subdivision surface
modifier on here. Do we really need that? Let's remove that. Let's smooth it. Yeah, I think that's
pretty good except for, Let's take this edge, this edge, and
let's move them up. Because I don't think we need
them to be quite that low. I can move them
up to about here. And maybe we could take these. Yeah, these are kinda
sticking out a bit. We could take these and
move them in a bit. So that closes that off. I'm going to press Control
a and apply the scale. Then I will try and select
this edge and press Control B and Bevel
that just a little bit. Kind of like that. We go. Alright, so that just closes that off so you can't
see through there. Now we've got a couple of things poking through the Fenders here. And ultimately
we're going to add a solidify modifier to this so it will have thickness
to the Fender itself. And then we'll know how
much we can bring these in. Because ultimately, I think
I'll probably want to take these and move
them in like this. Alright, so we could do that
a little bit now I guess. But we won't really know
how much we need to do that until we add a solidify
to these Fenders, but I'm waiting on that
until we get near the end. Alright, so with this created, Let's mirrored over to
the other side by going to the period key and
3D cursor or in global. Let's press Shift, Enter, Control, Enter, and there we go. We've got it over
on the other side. So as I said, that's just so
we can't see through there. And speaking of seeing through, we can see through the tires or the Wheels here to the Car. So I think we're going
to need to create something in here like this. We've got like a disc brake or something here that we
can see through there. So in the next video, Let's go ahead and
work on those.
67. Filling in Behind the Wheels: For the disc brake and
the struts in here. It's really just
a lot of stuff in here that I'm not able to
tell exactly what's going on. So we're gonna have to
wing it a bit and get just enough in there to make it look like it's
supposed to be there. I mean, currently
it's just empty here, so we do need something. So let's begin with this
cylinder here, the disc brake. Maybe I'll come back here, select this face and
press Shift S to, to move the cursor there. Then I will add a cylinder. I'll go ahead and
keep it at 32 sides. I'll use a triangle fan. And let's take this down
to 0.1 and point to, and I'll turn it
into y-axis RY 90. Let's scale it in
the X quite a bit. Move it out so it's
just about there. So now, how big
should we make this? Let's come back here
and let's just get a sense of how big
this should be. So it looks like it goes about
halfway to the Rim there, so something like that. And it looks like there's a
little bit of a ridge out. I'm going to scale it back in. And I will move it out until it's touching
this right here. And let's tab into edit mode, go-to face mode
with the three key. And then I'll hit the C key
for circle select and just click and drag these bases here. And I will just take this back. And I just want
that ridge there. So what I'm gonna do is
just hit E S and scale out and then hit E and
push out like that. So we get that little
bit of a Rim there. I think what I'm
going to do is take this and duplicate
it and move it in, scale it in a bit. Just kinda put it right in here. Let's say we could maybe
scaled in the X just a bit, pull that out of some. Alright, and then this
thing right here. Let's create that. I'm going to go to the Front
view with the one key. And I will press Shift
day Mesh cube once again. And let's scale this down. And for this, I
wanted to come out, I'm going to scale it
down about like this. I wanted to come out
in here somewhere. Well, let's see. Let's see. So I'm going to take this
and in the Front view, maybe I'll hide the Bumper here. I'm just going to
select the Bumper and hit the H key to hide it. And then I'll move
this down a bit. I want to take this face right
here and I want to have it come up and go into the middle of this Tire
where that 3D cursor is. I think what I'm do is just
hit G and move this up, like this, kind of
into this area here. Then I'm going to scale it
down in the Z, Z like that. I will take edge and
put it right here. And I'll press Control R and put this edge maybe
right about here. Now with this edge, I'm
going to bring it down, though it's in line with that. And for this edge, I'll click,
I'm going to bring it up. It's kinda inline there. Then let's press Control
a and apply the scale. First, I'm going to select these two edges and
press Control B and Bevel them so that we get a curve like that.
Something like that. I will scale in the Y, so it's a little bit thinner. And then I'm going to
add two edge loops. Well, I'll just
add one actually. I'll add one and
bring it up here. And I'll add the other and
bring it down like that. Then let's take all of
these and all of these. We've got bases there. I don't need them on the end. So maybe I will deselect
them here on the ends. Like this. Then I want to
scale out in the Y. I'll hit ESY and bring
them out like this. So we have something like that. Then it looks like we've got the actual break over
the disk up on top. And then is that the Back of the vendor or is that
something else in there? I think that's the Back of the Fender that we're
seeing here, right in here. Let's just try it.
I'm going to press Shift day Mesh cube, scale that way down. Just make something that fills the space that kind
of looks like this. I'll tab into edit mode and
add an edge right up in here. I'll take this and extrude
it out in the X like this. So it kinda covers that
ridge right in there. It almost looks like there's
a hose going in here. Maybe we could do
something like that. When you don't have
enough information for things like this, you kinda have to work
on just building it out so that it looks like there's at least something
going on in there. Even if you don't know
exactly what Shift S to, I'm going to bring
a cylinder in here. Let me tap into Object
Mode to do that first. This don't need that many sides. Let's bring that in like this. I just feel like there's
something cylindrical in here. That's all. I'm just trying
to get it to work here. In here, I could
maybe add two edges and maybe in another
edge in here. Take these two,
extrude these up, and then take this
and extrude this up. You can see I'm just
trying to fill in space and then I'm
going to smooth it, add some beveling to it, and hopefully we'll get
something that just kinda fills the space in there. I'm going to take these down
here and extrude these down. Shift D, move it down. Our X9 zero scale this down, put it in here. Scale it out like this. It looks like we've got
a couple of pieces in here that could
come out of this. So let's put something in there. Shift day Mesh, cube, way down. I feel like it's right
in here somewhere. Then I will do another
one back here. Maybe tilt this one as
well with our annex. Like that. Yeah. So we're kinda filling
the space here. Then I feel like I want
a bolt or something sticking out so we could create a couple
of bolts in here. I'm going to take this and
extrude this out and hit I and insert it
in and extrude it out again just so there's
something happening there. And there's a hose going
across here into something. So I will take these
and extrude these out. Then let's take a hose, I guess from in-between
these around and in here. Let's do that. You want to take
these two Shift S to two cursor in-between them. Shift a curve path. Let's scale that
down quite a bit. Tab into edit mode. Bring it over a
bit, and then we'll just take these and
bring them over. Maybe I'll take
this and extrude it in the X to bring
it in like that. So now we could take
these and bring them in. So it goes into there. It looks like it goes up some. So I'm going to bring
it up like this. Well, I'm looking at
this. It kinda goes down a look, a little bit too. So maybe down like that. Alright, I'm gonna
come down here and go to the Path Tool, change this down to four, and click and drag in the
depth under the bevel. Do that like that. Then we'll add
something on there, some sort of connection
piece it looks like. Then I'm going to
press Control a and apply the scale
to this and do a little bit of beveling
around in here like this. And maybe back in here as well. Let's try that. Control. Be, bring that out. Roll the mouse wheel
so we don't have quite so many edges. There we go. And then let's smooth it. Still, we're beginning to get something I think that
we can work with. My hope is that when we just put a black metal and
black plastic etc. in here, it's just going to look like there's things going on that we don't
fully understand. And I can tell you
that I certainly don't fully understand
what's going on here either. I will continue working on this, I'm going to continue
working on this. And then in the next video, I'll show you what I've come
up with because clearly, this is not something
you have to do exactly the way I'm doing. This is just filling in
the space as best we can. So in the next video, I'll show you what
I've come up with. Will then mirror it
to the other side and take what we can and put
it in the back as well. So that's coming up next.
68. Placing the Objects Behind the Wheels: Alright, well I've
finished this. I think at least for now. Hopefully this will be enough. Things just in there
and this will probably be in shadow once we
light it and render it. But I just wanted something
in there to make it feel like it wasn't just an empty area
like this over here. So let me show you what I did. It's pretty much what
you already saw, but let me press shift D X and just duplicate this out here. So it's got the disks
that we created Behind the Wheels here and
that kinda Block in here. Let me tab into edit mode. And that cylinder up in here, I've extruded off a
couple of pieces here, pulled some edges
down like here and here I just pull those
down a bit like that, kind of covered that. I converted the Path
to a Mesh and then use the shrink fat and
Tool with Alt S to extrude and then fatten this out and then extrude and
shrink these N. I added these little
bolt type things here and then just duplicated them and put them
in various places. And then I gave a few things, a bevel here in there, and then smooth it and joined them all
together into one object. That's about it,
That's all I did. It isn't a whole lot. But hopefully that will just be enough right underneath here. Hopefully that'll be in shadow. And we'll just get a sense that there's things under their will, make them black metal
and plastic and hopefully that'll,
hopefully that'll work. I'm going to delete
this and let's go ahead and put this on the other side. So let's ensure that the cursor is in the
center of the grid, the Shift S one. I'm going to change to 3D
cursor for my pivot point. And then let's just
press shift D, Enter Control M X and
put that over here. So hopefully, as I said, hopefully that'll just
give enough information to trick the eye into thinking
there's things there. Let's also take this
and duplicate it and merit and put it over
here on the other side. I've got the pivot point at the center of one
of these cylinders. So I think I can
use that to place it fairly accurately Back here. So let's try that. What I'm gonna do is mirror it. So the part with the tube here is facing the back just
in case through there. So I will press Shift, Enter Control M and the Y key
to Mirror it in the y-axis. And so now hopefully that
to be is facing the back, but we need it a little bit more in line with the
Tire or the wheel here. So I'm going to take this
and press Shift S to, to move the cursor to it, and then select
that object here. Let's snap that to the cursor. So I'll press Shift S eight. And now that's aligned
with the cursor there. And then I will just take
this and move it back. So it's just touching the
back of the wheel there. Alright, so now we've got
things going on in there. It's kinda cutting
through, but that's okay. Once again, I think it'll
be in shadow and black, so I don't think we will
have too much of a problem. So now let's select that. Let's press Shift us one to
move the cursor back there. The transform pivot is
still at the 3D cursor. So let's press Shift Enter, Control M and the X
key and then Enter. And now we've got
that over there. Alright, so in the next video, Let's come around back and we'll work on that license
plate holder. Let's take a look at that. Where is that? Here we go. Here's a good view
of that. Here. We can work on this. Let me see if there's
another angle. I thought I saw one here. Yeah, like this. We
can work on this and also we can finalize
our Trunk here. It's still a little
bit low poly. I'd like to redo this, put more edges on the bevel
so it isn't quite as choppy. So we'll work on
that coming up next.
69. Modeling the Rear Light: Well, I've brought
up as many images as I can find that gives us any information at all about this license plate
holder Rear Light? I don't think these
two are the same. It really looks to me like these are two different things. Like these two are the same
but this one is different. The cable is a different
thing coming off the back. It looks like it isn't as tall, although this is that
very wide angle lens, so it could be giving us
some distortion there. Also, this piece here, I cannot find that in
any image over here. So I feel like we
have a bit of leeway. I think if we get
this fairly correct, then everything behind
it is icing on the cake. So let's begin with
this and then try and connect it to this
piece because it looks like it's connecting
to the side here. I think what let's do
first of all is organized the outliner and get everything in collections
so we can hide things. I'm gonna duplicate this, bring it out again, and then hit the Minus
key on the numpad. And then let's see what
all of these things are. Again, these are the Side Steps here and the little Vents. Okay, so those we could probably put in a collection
all by themselves. Let's press M new collection. Side Steps is what
I will call them. I'm not sure exactly
what you call them, but then these these are our hunks of objects to try
and fill in this space there. So what do we want
to call these? How about just disc brakes? I'll do that. I'll press the M key. New collection disc
brakes. There we go. Alright, so now that
we've got all of that, let's just hide everything. Close this. Now we can begin working on
this little guy right here. So it looks like we could maybe begin with a polygon
plane and extrude back. Or we could begin
with a cube as well. Let's begin with a cube. Let's try that. Scale it down quite a bit. Let's get it about the
thickness of that green part. Let's say, Oh, let me change my pivot point from
3D cursor to median. I think what I will do is go ahead and split it
down the middle again, put an edge down the center. Then I'll press Shift Z and drag select this side and
delete all of this side. Then let's add a mirror. Turn on clipping, I'll
turn on the cage. And from here, I think maybe we can take
this edge and move it down. Take these edges here
and move them out. We go, it looks like maybe these could come up
a little bit more. I'll move them out like this. And then we just need to
maybe give it a bevel. Let's try that. I'll
tab into edit mode, press Control a,
apply the scale. And then let's select all
of these edges like this. And let's press Control B
and pull these out some, well, and because it's mirrored, I can't bevel this because doesn't really
exist on this side. It's a virtual side, so I'll need to apply
the mirror to get that. Let's go ahead and do that. I guess. Come down here. Oh, and I can't apply and
tell him in object mode. So let's do that. Apply. Now with this selected, let's press Control
B and pull this out. We go, Let's try that. I feel like these signs are
a little bit too far out. I want to bring these in. So once again, what we can
do is just delete half. Again. We go and then add that Mirror
again, clipping and cage. And now if I go into edit mode, I can take these and
move them in a bit. Let me go to vertex
mode and just select these vertices and bring them in just a bit like this. And I will take these faces here with the C key in circles, select those, maybe
move them back a bit. And then I want to get
this metal plates. So for this, once again, I'm going to press Control
and apply the scale. And for this I'm going to
press E S and scale out just a bit and then E
and pull forward some. We get a little bit
of a ridge like that. And then we could add a
couple of bevels to this. Let's add one upfront and
then maybe one in the Back. Now let's bevel this control. Be pull that out a bit. Yeah, there we go. Feel like the whole
thing needs to be a little bit thicker. Now. We've got a bit of an artifact
down the center here. We could maybe work with
that by applying the Mirror. And once again, we've got
to be an Object Mode. Let's do that. Let's
apply them Mirror. And then we could
take all of these Face is in here and let's try inserting them and see if that
helps with that artifact. I'll hit I and pull in a bit. And yeah, that flatten
that up pretty well. Alright, so now we need to
add these pieces on here. And I think what I'm gonna
do is just add these on top, these rings here. I'm not going to try and
do this indentation. I'm just going to add rims
for each of these and this, and then looks like we've got
a couple of screws there. So I will press Shift S to, let's bring in a circle. Let's do that. I'll turn it in the
x-axis are X9 zero. I'll scale it down quite a bit. Let's bring it out some. Then we want it to
be right in here. I'm going to scale this down, keep it in the center. Maybe about like this, I think, maybe a little bit further down,
something like that. And then from this, we can extrude this out. So I'm going to tab
into edit mode. Here's our points. I'm just going to hit
E, Y and pull this out. Es, then EY and
push that in some. And we will bevel that or add a subdivision surface
will have to see. And then let's take
this and press Shift X. And let's move this here. Scale it down. So it's sitting right
around in here. And then same thing
over on the other side. I'm gonna press
Shift Z so I can see through it in line it up. About like that. Now we could do a
similar thing up here. We could once again
create a circle, spin it in the X or X9 zero. And this time I want
to split it in half. So why don't wanna do, Let's go ahead and scale
it down and bring it out. So it sits outside here. Let's bring that center
point up into here. And let's select this side here and just hit Delete
and delete vertices. And now let's take these and let's move them over to where we think one side should
be, something like that. Now we could add a
mirror modifier, but that over there, Turn on clipping,
Turn on the cage. Now we can take these two
points and hit E and X, drag them in until they
clip. There we go. Now we've got that shape. Alright, Let's then
take all of this. Well, I'll go ahead and
apply the mirror now. And once again, I've
gotta be an Object Mode. Here we go. Let's hit EY, bring this out. And I'll press S, scale it in. And let's press easy and
scale it in like this too. There we go. Then EY and bring that in. Okay? So what happens if we add a subdivision surface
modifier to this? Does it just collapse
on us to totally? Well, not too bad. Actually. What if I smooth that? That actually doesn't
look too bad? What about down here? What if we do that same thing down here? And smooth it? Okay? Yeah, I think on all of these, although these are so small, we probably don't need
to do it for those. But for these just a
viewport level of one is probably good enough and let's
just apply this as well. There we go. So in the next
video, well, Let's do, is work on filling these in with UV spheres and connecting it
up to the rest of the Car
70. Using Blender's Text Tool: Now I'm noticing that in creating this piece,
look at this. It's got some strangeness happening here at
the connections, which tells me that maybe the polygons
are flipped because I used just an edge and
then mirrored it over. Perhaps we've got some
flipped polygons here. Let's take a look. I'm gonna pull this down, Turn on face Orientation. And sure enough, look at that. We've got flipped polygons
every place that we extruded out from that
circle, from that edge. So let's just select
everything with the a key tab into edit mode. Select everything
again with the a key. And then recall that
we can go to Mesh normals and choose recalculate
outside or shift in. So I'm going to press
shift in and then we go. So now we've got
everything back blue, all the polygons turning
in the correct direction, but we've still got this little
problem area that wasn't affected by the Subdivision
Surface Modifier when we had it on there. So what we can do is, I think if we just
select this edge, we can come up to our Edit
tools here and click relax. There we go. And once again, we could
select these and relax. I think that's going
to be pretty good. Now, we could of course come in and do just a little bit of, you can press Z and
scale these down a bit and move them around a bit just to get it more
in line if we wanted. Maybe I will do that. Now that we've got this before
I put on the spheres here, let's try and deal
with the text. Blender has a Text tool that we could give
a try for that, let's press Shift a and
Text. And there it is there. So that's our text object. We can tab into
edit mode and hit the backspace and Kissel. Let's do that. And then
tab back into object mode. And we can come down here. And under Object
Data Properties, we could change the
settings for our texts. So maybe if we scroll down
here and for the alignment, I'm going to change
this to center, middle. And so that'll center
that around the origin. And then let's
press our X9 zero. We could then move it out and get it in place
here. Let's do that. And oh, I better
bring it out some. Here we go. Then maybe we could change the font to something
a little bit better. Maybe we could find a font that works a
little better here. I mean, this isn't bad. But let's see what we can find. We can scroll back up. Where's the font
here? Here it is. We could twirl this
down and under regular, we could just click the
Open Font button here. And this will just
take us directly to the fonts folder in Windows. And these are just all the fonts I happen to have on my computer. If we scroll down
here and I'll see if we can find anything
that looks good. We could scroll through here for hours trying
to find something, but let me try this titanium. Let me try this one. And I'll click Open. And yeah, that gives us the S's are a little bit
closer to that, I guess. So let's just scale this up. And I'll kinda put it
in the center here. I'm going to scale it in the Z. Maybe something like this. Yeah, Okay, Let's try this. I'm going to bring
this out some. And actually maybe
I'll take this enzyme, let me bring this in a bit. Then we've got this sitting
outside that like that. And then if we want to actually extrude or modify
this in any way, we're going to need
to convert it to a mesh so it's still
a text object. Once again, if we
tab into edit mode, it's still available for us
to change any of the letters. So let's right-click
on this and choose Convert and convert to a Mesh. And now I'm going to apply the scale control and
apply the scale there. And then if we tab into edit
mode and hit the a key, we can select all of
these polygons and we hit the three key
to go into face mode. And what I'm going to try
and do here is inset this. So we get this little
bit in the center. I don't know that it will be
able to get it that thin. But let me see if
we can do that. With all of this selected. I'm gonna hit the
I key to inset and then just bring it in
just a little bit. I don't want to take it in
too far because it's gonna begin to overlap itself. But maybe if we go in just
a little bit like this, Let's try that, see if we have any overlapping anything here. And then I'm going to
extrude in and the Y, so E and just push in
like this. There we go. Okay, so now if we
go to Edge mode and Alt click the edges
all the way around. Now maybe we can
extrude these back. Let's try this Press E, Y and then
take them back into the object like that. We can, if we want come
over here to cavity for the viewport shading
menu down and go to cavity and we can see
that a little bit better. Yeah, I think that'll work. And then let me turn
that off again. Now let's work on these
little sphere-like things. So maybe we'll take this
and press Shift S to and then Shift a mesh UV sphere. Let's take this
down to maybe 0.1. And let's turn it in
the x-axis or X9 zero. Pull it out a bit and
go to the side view. And let's then grab one side of this and delete
it and delete faces. Now if we scale this in the Y, we can kinda flatten
it like this. Alright, and then why
don't we snap this to the 3D cursor with Shift
S eight. There we go. Now let's scale this up. Fit it in here like that. Yeah, and then maybe
we could smooth it. Let's do that. There we go. Okay, so now let's do that
same thing over here. Let's press Shift S to, to move the cursor there. Let's duplicate this. And then let's press Shift us eight to snap it over there, scale it down to the
appropriate size. Let's see how that works. Yeah, I think that's okay. Maybe I'll pull it out just
a little bit like that. Then what we could
do is take this one, move the cursor to it with
Shift S to take this, duplicate it, and then Shift S eight to move
that over there. Now let's see if we can just
join all of these together. I don't think we have any
modifiers on any of these. Now I think we're okay, so I'm just going to take all of these OH, and you know what? There's one more thing
I want to do since this interior part inside
this Rim is gonna be black, I think we need
another object in there to give it that material. So what Let's do is let's
tab into edit mode. And I want to take just an edge, just say this edge right here. And I want to duplicate it, Shift D and enter. I'm going to move it out
just a bit so we can see it separated as its own
object with the P key. And then let's select it
again in object mode. Now I'm gonna go into edit
mode, select everything, and I'm just going
to hit the F key to fill that with a face. And now we could take
this and move it back and maybe put it
right in here like that. So we can just select that object and give it
that black material. And then we'll be
done with that. Alright, I feel like
maybe these can come down just a little more. There we go. Alright, so now that
we have all of that, let's take all of these pieces. Just going to select
them all here. Actually, I could just
hit the eight key. And then let's press Control J. And I think I want to move the origin to save
this back edge here, Shift F2 and
right-click Set Origin, origin to 3D cursor. Alright, so now that
we've gotten that, our next task is going to be to connect it up to the
rest of the Car somehow. So we will work on that
in the next video.
71. Connecting the Rear Light to the Car: To connect this to the Car, I think really this is
the only image I've got. It can help us with this. So I think what
I'll do is create a polygon plane and shape
it into this shape here. And then use the Path
Tool to connect it up or create this tube to
connect it to the Car. And then it looks like
we've got some leeway in terms of how it connects up. Like, do we want this kind of cable or this kind, etcetera? So let's begin, as I said,
with a polygon plane. I'm going to take this
and press Shift S to, to move the cursor to it. Let's create a plane. I'll turn it in the x-axis. Let's do that. I'll scale it down quite a bit. Maybe we could scale it in
the X. Move it up a bit. Maybe I'll take this edge and bring it down to about here. Then if I go to this side view, I'll press the one key so I
can see these points here. Now let's just extrude out
to get this basic shapes. So maybe something like this. And then we go down
in the Z a bit here, extrude out on either side. So maybe we take this, I'm gonna go ahead and
split it down the middle, Repeat this side, and
then add a mirror. Let's do that. So that now when I
take this edge here, it'll select over
on the other side. And I can then extrude out. Ex, Yeah, it looks like
it goes out beyond there. Okay. And then add
an edge loop here, take this and extrude this
straight down like this. So we're just getting this
little piece right there. Alright, it looks
like maybe I could take this and bring it down. And so from here I think
maybe let's apply the Mirror. Then we could, well, we could extrude this out or add a solidify however
we wanted to do it. Why don't we add a solidify
to this and then apply that before we do any
beveling, let's try that. I'll come over here
and add a solidify. Let's choose even thickness. I'll drag this out just
a little bit more. So it's kinda like that I think. Alright, then let's apply this. We go, now we can
come in and maybe try and Bevel a few
of these edges. So let's try this. And these over here. Let's do these. Maybe these. So just a few edges where
you think that it might be nice to have a
few bevels to it. Maybe in here. Let's
try this right in here. Alright, let's press Control B and bring these out
just a little bit. Scroll the mouse wheel
at a few more edges. There we go. That's kinda nice. We've got this strangeness
happening here. We can try and smooth that
and I think that helps a bit. Alright, so now let's see if
we can get this part done. If we take a couple of
these faces in here, Let's see what happens if we
take these and extrude them out and just hit E
and pull it out. Some like this. What do we get? Well, that's a nice little
shape there, I think. Alright, so now that
we've got all this, let's take all of this and let's combine
everything together. So I'll take this and
select this control J. And that, smooth this out. Let me Reese mood this. See what we think here. I may want to bring
that up a little bit, four in front here. And that smooths and add
a little bit in here. Okay, that's pretty good. So now let's take all of this. Maybe I will use this down
here as the pivot point. I'll select this now
and press Shift S to move the origin to this. Now that's gonna be the origin where we scale and
rotate with this object. Okay, So now let's
bring everything back. Let me move these down. And I will bring
all of these Back. And this we go, okay, now, let's find
a good place for this. I'm going to press
Control one and Shift Z. And I think if I
bring this down, we need to spin it around. Let's do that. Rz one at we go. Let's bring this
toward the back. Maybe I will bring it
right up into here. I'll put it right about here. I'm looking at ours and not
just the reference image. And I'm going to take
this and bring it over and scale it down until
it's about the right size. I'll just put it right over
it. Something like that. Okay. And then maybe we
move it back and up a bit. It looks like it, well, it looks like it goes over
this curve right here. Like that maybe. Okay, then, so now how do we connect
it to this piece? Well, I think it
probably just as, as, as I said, going to be a path. Let's try it. I'm going to take this and press shift us to, to move the cursor to it. And then let's press
shift a curve path. I'll turn it into Z, 90 degrees. I guess I'll turn it in the
X as well. Let's do that. Are X9 zero. Let's scale it down.
And here we go. So let's tab into edit mode now. And so maybe if
we took these and began moving them back and up, then can we just take
this and move it in EX and bring that
in like that back. Maybe this whole thing could
come to the side just a bit. I've got that kind of in
the shape that I want. Let's now try and use our object data
properties down here. And I'll take the
resolution down to maybe, let's try three at the
beginning and then under bevel and depth, I'll click and drag on this
and let's see how this looks. So I feel like maybe
a little bit bigger. Maybe I can take
this and move it in just a bit so it
bends just a little more there and maybe
bring it out a hair. Then I guess all we
need is just a plate on here that's going to
be the license plate. So I will move the cursor here, Shift a Mesh plane once again, let's scale it down. Turn it in the X. And then
let's try and get this in place in the
proper Shape here. Alright, so I think that's
the basic shape of it. In the next video, let's just kinda clean
up all the connections. Let's add little bolts
and screws to it. Let's maybe add a little kind of a coupling thing to
connect onto here. And then let's also add our cable or wire or tubing
that goes to the back of it. So we'll work on
that coming up next.
72. Finishing the Rear Light: Alright, so now what I wanna do is take this and maybe just duplicate it and
move it up here. And I wanted just,
I'll take away, save these three points. Let's delete those. And then I can just take these now and kinda create
this piece here. So I'll just move
these down here. And maybe we could take
this up like this. Let me bring the bevel
down a bit here, or the depth, I should
say, like this. And maybe just take
this and hit E and E and one more and
bring that into there. Alright, and then
what we can do is convert these to a Mesh. I will take this and right-click
and convert to a Mesh. And there it is. Same thing
with this. There that is. Now I'm going to take
these and just add a bit of a Connecting
Pieces on here. So let's say just take this and press Control and plus on the numpad and let's
bring this out like this. Or actually maybe
just like this. I think I'll press the E key and enter and then Alt
S for shrink that. And then I'm just going to
bring this out like this. Let's do one more like that. I'm just going to bring it in. So E enter alt S and then
bring that in, some like that. And we could take this
edge right here and just scale it out a bit
and bring it in like this. So it's just
something like that. On we've got all of
this on the inside. We can get rid of all of this. So maybe drag,
select this control plus and delete faces there. I'm down here. We could maybe just
take this edge here, duplicate, scale it out a bit, bring it down, hit E and S, and scale this out, and then E and Z and bring that down just so we have a
connecting piece there. Okay? For this, I'm going to
press Control a and apply the scale and then I will
grab that edge right here. Bevel that just a bit. We don't need that many and look at what's
happening here. Does that mean we've got flipped
polygons? Probably does. Let me well, because I brought
that out an edge, right? Let's give it a check. Sure enough. Tab into edit
mode at the, a key shift. In. There we go. Alright, so let's
try that again. There we go. That looks
a little bit better. Then for this down here, I'll just kinda create
a connecting piece right down here. So let's once again take
an edge, Shift D Enter. I'm going to scale it out a bit. I'm going to scale it in the
X to flatten it Sx zero. And then let's bring it in. It is scaled out, the tax extruded N. Let's select all of the
polygons of that object. And let's go ahead and just pass shift in just in case, right? Just in case we've
got flipped polygons. Grab that edge, controlled, be, there we go. Yeah, let's smooth it. We go. Then I think I just want to grab a few screws from
somewhere else on here. Let's come over here
and grab one here. It the L key, Shift D
Y and move it back. Let's split it out
as its own object. We go, Let's select it. Move the origin to it, set origin to geometry. I want to spin that
90 degrees, our z90. Here we go. The other way. Let's press RZ one
at there we go. Wanted to go the other way. And now let's just put these on the Back
in various places. So around in here, let's say we can maybe
put this in the center, kinda make it a
little bit bigger. We go. And we could duplicate
it and put one over here, RY and spin it a bit. And then we probably
want to put a few, I think, up in here. Well, maybe we can
put a couple up here. Let's try that Shift DZ, move this over,
scale it down a bit. Maybe let's take, well, we could grab this
edge right here. Well, I'll have that
this point right here. Let's press Shift S to, to bring the cursor
to that Shift S eight to snap the
object to there, pull it out, bring
it down a bit. What do we think? Yeah,
I kinda believe that. Let's press Shift Z and
bring it down here, Move it over to this
side, spin it in the Y. And let's bring it
over here like this, and spin that in the Y. And lastly, I think I want to
try and Bevel an edge here. This edge right around here. I feel like I want a bevel. This all the way around. So I just felt like I wanted to bevel this all
the way around. So Control B, bring
that out as smudge. Alright, in the next video, Let's go ahead and
rework our Trunk here. And then we'll be getting pretty close to the end of
the modeling stage. Will just need to go through and do things like add a bit of thickness and then go through and apply our
modifiers, right? We've got a lot of modifiers in here that
would probably be good to go through and apply our modifiers to
make those permanent
73. Redoing the Trunk with a Smoothing Mesh: Well, I've been thinking
about this Trunk and I don't think adding more resolution now is really going to be the
solution to our problem. So initially I thought, well, the problem is we've
got these kind of blocky polygons here. And if I just redo this with a bevel that
has more segments, then we'll be okay. However, if we go over to our Viewport Shading and
switch over to the mat cap. And I'm going to
choose this shiny car paint material here. You can see that we've artifacts here where
the Boolean happened. And that's because they're these points that are
very close together. And it's because we're doing
this on a curved surface. If we were doing this
on a flat surface, this would probably
work just fine. We could add more segments to our bevel and be good to go. But I'm afraid that just adding more segments to the bevels here is just going to
increase the artifacts. That's all it's going to do. And we can maybe come
in here and like take this point in this
point and merge it together and kinda clean
that up a little bit. But the problem is, is it's still going to be blocky, right? And if we just add
more segments, we're just gonna go
through and have so many little points to
try and merge together. And I'm afraid we're just
going to be swallowed by a pit of despair
trying to do that. So my thought is we take a different tack and we use
what I call a Smoothing Mesh. We're going to use the shrink wrap modifier
to try and hold the shape while we pull points and get this shape
here for the Trunk. So what I'm gonna do is take
this object right here. Recall that this is the Rear of the car without the Trunk. I'm going to move this out. Let me select it. Here we go. I'm gonna move this out to
the Scene Collection here. And then if we scroll down, we've got Trunk
Door, Trunk whole. So let's move these out
to the Scene Collection. Okay. Now if we go down, we've got these outside and we still got that Qatar
object if we want it. Let me hide this for a moment and also let me
figure out what these are. Oh, these are the license
plate holder Objects. So do we have
anything like that? Doesn't appear, so I will
just press the N key and new collection and call it
license plate. There we go. We have those in there as well. Alright. So what I'm thinking, I'm gonna hide these, bring this back and I'm
going to duplicate this. We're going to press
Shift D. And I'm going to call this Smoothing Mesh. And this is what we're going to shrink wrap our object onto. So let's take a look
at first this piece. We've got a Mirror on it and
subdivisions and a solidify. I think for now, I'm
going to take the solidify off. Let's do that. Then what I wanna
do is take this and shrink wrap it to
the Smoothing Mesh. So let's come over here, go to shrink wrap. And I will click on the eyedropper and then
click on the Smoothing Mesh. Now, it doesn't look like
a whole lot has happened. But if we come over here and we tab into edit mode and we
select a point, let's say. And we hit the G key
and pull it out. You can see it isn't
doing anything, right? We turn on the subdivision. That's all it's doing. It's just pulling this out. But the shrink wrap is keeping the Mesh on the surface there. That's what we want. So
now that we've got that, let's come over
here to this whole, yeah, let's use this one. And what we need to
do now is remove the faces that we don't
need inside here. So let's just take
these faces here, let's say, and let's hit
Delete and delete faces. Okay, now it's kind of ugly. I get that, but what we can do now is begin to
take these and move them out and get them in line with the whole
for the Trunk. So that's what I'm
gonna do. I'm just gonna kinda move these around. I'll go to the, I'll go
to the top view here. And let's just grab these
and begin moving them around till we get them so
they're kind of lined up. And I don't want the points. I realize I don't
want the points. I want the actual Mesh to
line up with the hole here. And we've got a bit
of Z fighting here. We could, if we wanted
to bring this up. So you can do an offset here. You can click and drag
and bring this up a bit But I'll keep it at zero and try and ignore
the artifacts here because those aren't going to be part of our Mesh when
we're done here. I'm going to take
the subdivisions and bring it up by one. So we have a little
bit more to work with that makes it a little bit
uglier with the artifacts. But actually let's see if I
can bring it out just a bit. There we go. That
helps a little bit. So I've brought them
up a little too much. Let me bring this back
down to zero. There we go. And I'm going to turn on
the cage here so we drop the points down to the
shrink wrapped Mesh. Alright, let's see
how we're doing. I'm gonna hide this Trunk
hole here. There we go. So now we've got that sub-divided mesh creating
the hole for the Trunk. And now that's going to
be a whole lot smoother. Right? Now we need to do a
similar thing for the Door. So I'm going to bring
that back end for this, I think I'm just going to
begin with a polygon plane. So I'm just going to move
the cursor to this point and then press
Shift a Mesh plane. And let's bring it up a bit. I'm going to tilt it and
I'm going to scale it down. Maybe I'll go to the top view. And I want to expand it so it's about the right size here. And I will split it in half. Delete one side, mirror it over, Turn on the cage and clipping. And then I'm going to
just add some edge loops here to kind of match the loops that
we're seeing in here. So maybe I wanna do, let's say three here. And maybe three here,
something like that. Going to add a subdivision
surface modifier. Turn it up to two, I guess. Let's add a shrink wrap here and we'll click
on the eyedropper, and this time we'll click
on the door. There we go. Now what Let's do is
tab into edit mode and I better turn on the cage for the shrink wrap and
for the subdivision. And will begin moving
this around until we get the Trunk points in
the proper location. So maybe I begin moving
these out like this. Now that I have this shape, I think maybe let's go
ahead and apply this. I'll come over here and click
apply for the shrink wrap. And I need to apply
the Mirror first. Now, don't I? So let's do that. Let's pull this down
and click Apply. Now let's see if we can
apply the shrink wrap. Okay, Then let's see if we
can then hide the Trunk. And let's try and
add a shrink wrap and shrink wrap it to
the Smoothing Mesh. So let's select that
Trunk object at a shrink wrap and then go to the Smoothing
Mesh. There we go. Now I've taken away the
mirror modifier on this. We could try and select
these faces here, delete them, and
add a new Mirror, pull it up to the top. Turn on clipping, and then
try and clip these together. Let's see if we can do that. Select that whole edge and
then drag it together. Now those should be
clipped and we should be able then to grab these now and move them around to fit that hole
a little bit better. Let's see how close
we can get it. It looks like mine is a little
bit off with the mirror. So if I get it in line
over on this side, it isn't quite in line
over on this side. But that's something
we can work on once we apply all of our modifiers here. So what I will do is apply the mirror modifier and then
just come in here and make minor adjustments along here to get it so it fits just right. Alright, I think
that's gonna be a lot cleaner than
we had it before. So in the next video, we're going to apply
all the modifiers and finalize the Trunk
74. Finishing the Trunk and Rear of Car: To finalize the Trunk,
I think first of all, we had to come back to
our Smoothing Mesh. This thing right here, and take a look at
our subdivisions. Are, subdivisions
are only at one. And we're already getting
a better finish here, I think, around the edges. But if we take this up to two, up to three, this begins to really smooth
out pretty nicely. Now, we could also
come over here to the mat caps and choose
that paint again. And now if we select, say the Trunk, or let's
deal with the Body first. Let's take this up
to three and then the Trunk up to three
on the subdivisions. And now we're getting a
pretty smooth and Mesh there. Now from here we could of
course do more tweaking. We could move these around
and get them in place. So feel free to go through and tweak to
your heart's delight. There's always more
that can be done. Alright, I think I've got that pretty much
the way I want it. And as you can see,
we don't really have any artifacts here,
which is pretty nice. I'm going to switch back over to the studio lighting
for just a moment. And now I'm going to
take this and let's try and apply everything
that we have here. I'm going to apply the
Mirror and the subdivisions. Now. I've got them at three. Can I take it down to two
because that's an awful lot. Yeah. I'm gonna take it
down to two just to see if I can get away with
it. Apply that. Yeah, because that's quite
small polygons there. And then let's apply
the shrink wrap there. So now that's not using
that Smoothing Mesh at all. Let's do the same thing here. I'm going to take
the subdivisions down to two and let's see. Yeah, I think I'm gonna
go with that just because having three would
be so many polygons. I'll click Apply here, then I'll apply the
shrink wrap. There we go. I'm going to take all
of these I think, and see if I can move them
into a new collection. Call them old Objects,
I'll just do that. So we get those out of
the way and I'll hide it away and hide them
in the render to, so we don't see them
if we render an image. And now I think I want to do a similar thing that I did
with these up in the Front, is add a solidify, apply it, and then add a subdivision
to get this rounded. Let me come up here to get
this rounded curve here. Let's first of all, give these a solidify modifier. And I'll do this one
as well. Solidify. There we go. I'm going to
apply the scale on this one. Control a, apply the
scale for this though. Let's see how thick
we want this to be. I'm gonna select that point and hit the period key to zoom in. And I'm gonna take our solidify and bring it out
kind of like this, I think. And then let's see if we can get that curve there that'll
kind of match this. Recall that the way we did that was selecting all
of these edges, increasing them with
Shift E. So this isn't going to curve as
much as it would have had. We not had so many
polygons in here, but let's give it a try to isolate this so we can
view it on its own. I'm just going to hit the
division key on the numpad. And then let's apply
our solidify here. And then let's add a
subdivision surface. And that gives us a
bit of a curve there. Okay, so what I'll do is select edges all the
way around here. I'll go ahead and select these
along the Trunk outline. So here's what we have so far on the inside
and the outside. I don't think we need
these up on the top. So I'm going to
hit the C key and middle mouse click and drag
to deselect these up here. And I think I'll do the same
thing on each side to here. Lastly, let's select this edge and this edge right over here. Alright. Now let's
try increase this, Shift E and pull out like this. And I'll go ahead
and do all the way. And now, beginning to
get that curve there, Let's add some Smoothing here. I can drag that up
a bit. There we go. We've got that curve there. Let's see how that looks. I'm going to bring
everything back with the division key on the numpad. Yeah, I think that'll work out. Okay. I may want to take these points here and
just pull them out. Since we've still got a subdivision surface
modifier here on the door, we could align that
a little bit better. I'm going to turn
on the cage here. And maybe I'll take this and this and
bring these up a bit. And maybe bring this in. So just play with it
a bit until it gets a little more aligned there. And I think that's
pretty good right there. Let me take a look at it
with the, the mat cap. That connection's not
too bad through there. I might wanna do a little
bit more tweaking, but I think that'll work. I think we're pretty much
done with the modeling now. The main things now
we're gonna be to go through and maybe add solidify modifiers to
things like the Fenders. Remember, we will have to press Control a and apply the scale. Before we do that, I'll go ahead and
do this one here. Even thickness, Turn
on the cage and then we can maybe drag
this down a bit like that. Right? So I want to go through and do that for all of these. I could just delete this
and mirror it over, right? Same thing back here. Then I want to go through
and just fix up some things. I think right down here, I've got bolts on these, but I don't have them back here. So I want to add those, maybe add a bevel or two
to these sharp angles. So I'm just gonna go through and kinda do
a little clean up, add small things, bolts and things like that
where I think they're needed. And I'd suggest you go
through and do that as well. So that in the next video, we can take a look at what
we've done and begin moving on to set up our materials
and our textures.
75. Beginning to Assign Materials: Well, it turns out I didn't do a whole lot since
the last video. I did add some bolts to the Rear Bumper back
here, right here. I added this thing
from the Front. I took this and gave
it a little thickness and use the Bevel tool
to round off the edges. I added a solidified
to all of the Fenders. I added an extra Panel on
the inside right here. And oh, and I added these little bolts and screws on the frame for
the Windshield here. And I took this thing. So this, all I did is I took
this tab into edit mode and select this
with the L key and then duplicated it
and put it here. I think that's about it. I may be added to bevel to
this thing yep, to these. And they're gonna be other things that
we may need to add, bevel, apply modifiers, etc. as we go through and begin
adding the materials, we're going to discover
those things as we go. So I think ultimately, I'm going to render
out my final images of the Car using the
Cycles Render Engine. And I've got a pretty
fast GPU in my computer. So I'm going to switch
this to GPU compute. And it should know what you
have in here under system. It shouldn't know
what you have for the cycles rendered devices. It should detect it and give you some options that you
can use for that card. I've got an NVIDIA, so I'm choosing optics. Otherwise, you'll see something different here
depending on your GPU. Now as I work with
the Materials, I'm going to want to see it in rendered view in the viewport. So I want to take my
samples down quite a bit. I'm going to take them
down to say eight or 16, and I'll begin with eight
just to see how it goes. And for the Mac samples,
for the render, I don't need a whole lot for
here, at least currently. I'm gonna set that at 01:28 and I'm going to
keep de-noise on. You can put this a lot lower now with the D noise function here. So I'm going to
try it like that. What that'll allow me to
do is to come up here and turn on the rendered
viewport shading. And when I do, this
is what I get. So you can see as
I Tumblr around, it'll try and render the scene here using those eight samples. I could take this up to 32. And then when I, you can see it going through 32 here as well. So it looks like 32 is
moving pretty quickly. So I'll just go ahead
and go with that. Now, we need some sort of
ambient light in here. And for that I'm
going to use an HDRI, a high dynamic range image. And I've got a few of
them that I've put in the project files
of this course. You can also go to a
website called poly haven.com and you can get
free HDR is there as well. But what I'm gonna
do is come over here to the world Properties. And under color, I'm just
going to click here. And I will choose an
environment Texture. And when I do that, we
get this ugly pink. And that's just Blender telling us that something is missing. That's what that pink means. And then I'm gonna click
Open and I will browse to the HDRI folder in our
project files here, we have a couple that
we can choose from. So I will, let's
try this field one, I'm going to click
Open, and there we go. So now we've got a nice field of flowers and a cloudy sky. So this may be a
good one to work with as we begin to
apply our Materials. I don't want to see
this in the background, but I want it to
supply the lighting. So I'm gonna come up here to
our Render properties and scroll down to film and
choose transparent. There we go. So now we can see the lighting in here
without the background. And in addition, I think
I'll add one more light. I'm going to press Shift a Light and I'm going to add
a sunlight to this. I'll bring it up, maybe
bring it over to the side, and I'll angle it
down in the y-axis. Let's press RY, kinda
tilted down like that. So you can see from
this how we're casting shadows from the
sunlight and from the HDRI. And you can see like in here, this part that we created, it's falling off into
shadow in there. And that's, that's kinda
what I was hoping for. Let's come back to the
world properties and maybe I'll take the strength
of this down to maybe 0.6. We go. Let's give that a try. Let's see how that looks as we begin to apply our materials. And you know, what we
should do is let's go over to the shading tab here. Then I'm going to click over to our rendered
viewport shading. And here we have that same
view in this interface now. And what I will do
is begin creating our materials here and see
how they look up here. So first of all, let's select, say
this object here. Oh, and I want to pull in One of my images, we're going to need an
image to see our colors. So maybe what one did I
have out here before? I think I had this
one. Let's try that. Yeah, so that gives us a good sense of
some of the colors. Because as we Create these, I can go over to the
Materials panel here. And this new button here is the same as
this one over here. It's adding new material so
we can do it either way. But if I create a
new material here, and in the base color, if we click here, I can come over here
to the eyedropper. Click on the eyedropper, and then click on a
color here in the image. There we go. Now we've
got that color in there. It's not quite the same. We may need to do
a little tweaking, but we kinda want it to
look more like car paint. And one of the ways to
do that is right down here with this clear
coat setting here. Now it's also here.
You can see this. So this is the same
as this node here. But if we took this clear coat and drag it all the way up, it doesn't really
do a whole lot. That's a little bit, you can see a little bit of a
reflection there. What we need to do
is overdrive it. We need to click in here
and say type in six. And now you can see that a little bit better. In
fact, you know what? Kinda want something more
to reflect from overhead. Let's see if we can come over
here and try another HDRI. I'm going to click Open here. Let's try this one
here, see what happens. Yeah, I think we've
got a little bit more in there to reflect now. And then I'm going to
come in here and click on the base color and maybe drag that towards the
yellow a little bit. Maybe something
like that for now. And then what we can
do is we can select other objects that is going
to have that color here. Maybe I'll select these. And what Oh, we went
the Trunk, this thing. So just whatever you think needs that color and
then select Shift, select that object that
we put the color on, the material on and press
Control L and link Materials. And that'll just add
that to everything else. Now we need to give this a name, let's call this car Body. When we go, you can see some reflections
happening in here. We could also pull up the
metallic here if we want, it. Could try that and
see how that works. But at least for now, I'll
just leave that down. And this is looking pretty good. We could take the
roughness down some. And as we do, we're going to see the reflections a little
bit more in there. You can see that in here. Maybe I'll bring that back up. Let's maybe type in 0.3. I'll do that. Alright,
so with that end, let's move on to another color. I'll come back here to the Layout tab and let's
take a look at it. Yeah, Okay, That
looks pretty good. We can come down here
to the Materials and begin using the Materials
panel here as well. Either way is fine. So let's say we want to add
some green to our Fenders. Let's select the Fender. Let's click the New
Material button. Let's call this Fenders. And I'll click in
the base color, click on the eyedropper,
click on offender. And here we go, we're
beginning to get that color, but it's still, we got
some work to do, right? Let's bring this
moreover into the green. Let's bring this down some. We just want to kinda play with our colors here until we begin to get something
that we like. Let's also come down
to our clear coat here and type in six
for that as well. And that gives us quite a
bit of reflection there. Maybe we don't want that
much for the Fenders. Let's type in three, house that. Alright, and then maybe we drag this down a little more so
it's a little bit darker. The color in the green. A little bit more. Yeah. So let's go with something
like that for now. We're just going
to try and get in very basic colors at
the beginning here. I'm going to get
these three Fenders here and then select this
control L and link Materials. Alright, looks like
we can do this one, select that, and then
one with the material and Control L link Materials. And alright, we're
beginning to add our Materials in the next video, Let's go ahead and
work on things like the Headlights that have
Multiple Materials in one object
77. Continuing the Materials for the Exterior: Let's now come around to the Back of the car and
let's work on some of this. Looks like we could
grab these here. And then the Fenders and Control L and link
Materials for those. This, I think let's
get a back view here. Let's take a look. Yeah, that's the same
black materials. So let's come up here, select this control L and
link Materials for that. Now we've got that back here and we can use that for these. So we can select these and that Control L
and link materials. We could do these
down here like this. And these. Let's also do these over here. And it looks like I've got
the same problem with that and bolt on both of these. So I'm gonna need to grab a new bolt to put
on these back here. I'll do that between videos. You don't need to
see me do that. Let's grab this
here. What is this? This is oh, this is Chrome, so we could well, and also we've got the
Bumper and the tailpipe, so we're going to need
some Chrome back here. Let me, It's been
around over here. Select this Grill Control
L link Materials. So now we've got this
with Chrome on it. We can now take say this and this and then select this
control L and link materials. Because like we need to get
this little guy right here. Let's link to that. And this looks like it's
that black down here. So let's select that and
link the material to that. I think down here
we can probably go ahead and just give this
that black material. I wonder if these Bumpers should have a bevel on them on the
edges because you can see, we're not seeing a whole
lot here on the edges. I feel like maybe if
we, let's try this. Selected these edges
all the way around. Let's now just press Control B and bevel these
out a bit like that. Let's see how that looks. Yeah, I feel like that's a
little bit better because we have those curves on those
on the edges like that. I guess I should
do that upfront. He, let's do that up here. I will tab into edit mode, and here we've got a
Mirror still on these. So I will apply this. And I will select all of these
edges all the way around again and give these a little
bit of a bevel as well. Let's take a look
at the Wheels here. I think the Wheels are a
similar color to the car body. So what we could do is we
could select one of these and Shift-click the car body
Control L and link materials. But I don't think it's
quite as shiny as that. So what Let's do is let's duplicate this material
and then modify it a bit. So I'll come over here and click this little icon which will
duplicate that material. Put a 001 on it, and then we can
call this Wheels. Now, I think maybe I will come down here and turn
the clear coat down. Let's turn it down
to three, let's say. And also maybe bring the
roughness backup to save five. Let's try that. Feel like we could maybe change the saturation
a bit as well. So it's just a little bit
different from the car body. Alright, then we go through
select all the other Wheels. Oh, we've got a Tire that
needs to be done there. Then select the one
with the material and let's link the
Materials Control L. There we go. Yeah, Let's take this, select a Tire with the
material on it and link that. Alright. This little thing back here. Let's take a look at this. I will open up a new
image over here. Here we go. Here's
one that has that. So it looks like, well, it's hard to tell here, but I think the way it is is there's green on the back and
Chrome on the Front. Also. I think there's green back here. Let me drag down and
open up a new window here so we can get
another view of this. Let's try this one here. Yeah, I think that's helpful. Okay, So maybe let's go
ahead and add a green. I'm going to bring this up. And bring this up so we
can see our material here. Let's pull this down and
add that green Fenders. There we go. That adds it to that. Then let's tab into
edit mode and select, say this face and this face. And then Control and plus on
the numpad and expand this out to about right here. There we go. Then let's add a
new material slot. Pull this down and select
our Chrome, click Assign. There's our Chrome. We also need to do that
with these rims here, this, this, and this. This one right
here. There we go. Then we need to assign those. There's the Chrome for those. We need to assign
this one as well, right at the L key. Click Assign for
the Chrome there. Let's go ahead and assign the Chrome to D is I'm just hovering over these
and hitting the L key, Assign the Chrome to that. And this thing right here, I think we wanted that
black, didn't we? So let's add a new
material slot, pull this down and choose that black metal there
and click Assign. And we go. Now, we've got that black
line in the center. Like it the way it is though. I mean, we could try
it. Yeah, Let's try it. I will tab into edit mode. And the way we
could do this now, we can select edges around here. I don't think we can select
the ones on the very inside. Yeah, that doesn't help us because it only
selects those two edges. But if we selected the one on the outside like this,
I'll click that. That'll give us that whole edge. Then what we can do, let's just try this. I'm going to add a seem to this. We can go to the edges
menu once again, we can do it here or
we can press Control E. And I'm going to
mark as seen here. So now we have a seam
there and that's just a division point for
that object, for that Mesh. And we can use that to just
select this interior part. So if I hover over this
and press the L key, it selects the whole thing, but it brings up this
little settings panel. And we can click Scene. So it limits it to
that seem in there. So then what we could do is we could assign that
black metal to it. We could try that like that. There we go. So that's not bad. It really depends
on what you want. If you want that black to be in there
like that, that's fine. If you don't want
to press Control Z. I kinda like it like that. So it's however
you want to do it, of course, it is up to you. So back here, I think we need the Chrome on
these things here. I'm just going to
grab all of these. And then I can't Shift-click
this because if I did, let me just show you,
I'm going to click this. The main color here
is the Fenders. Alright. So I need to select, like the Bumper Shift-click
that and Control L, a material that has the
Chrome as the main material. And then all we can select
this and Shift-click this control L link Materials
for this down here. And I forget what
we were gonna do, if anything, for this. I think maybe just
a black rubber, maybe the rubber from the tires. Let's try that. I will pull this
down, choose rubber. And then, well, and then we could take this
here at the L key, give it a new material slot
and put Chrome on that. And click Assign. And then we go. And then up here for
this little piece. Well, we could give
it the black metal. See what happens like that. Now let's try it. I will
tab into edit mode. Let's hit the L key. Now, that's going to
select everything. If we wanted to, we could
just select that edge. That's Control E, Marcus seem, and then hit the L key here. And since we have
seemed still selected, it will just select that piece. Now you can deselect this
by pressing the Shift key and then clicking in that will deselect your
selection here, but I'll choose seem. And now let's add a
new material slot, pull this down, choose the
black metal and click Assign. And so that just gives us that not a big difference
there is it. But what we could
do is we can select this edge and Bevel that
a bit might help some. Now, the Materials
for the Lights Here, we will take care of
those at some point. I'm going to just
select these to remind myself and create a new material and
assign that just to remind myself that we still
have something to do there. And for this, I'll
just temporarily at least add that black
material to that. Alright, in the next video, Let's begin working on
some of the Interior
78. Finishing the Exterior and Beginning the Interior: Before we begin on the Interior, I realize I haven't done this
little Hood Ornament here. Let's just put the
basic materials on it that we need here. So this little piece
is Chrome like this. So I'll just link that. We go and this, and this, and it
looks like this. Let's try that black, although this is
probably plastic. Let's just try that black
metal on here real quick. Let's try that, see
how that looks. Once again, we can
duplicate this and change the look
of it as we need. But I think for now
that's going to work out. And then this is
Chrome again, right? Let's do that. This piece in here. I'm not going to worry
about quite yet. I'll work on that when
we do the other Lights. This ornamental part in here, feel like maybe I
could just take these faces here and give
these the chrome material. So let's add a new material slot and then pull this down
and choose Chrome, and then click Assign. Let's go with that for now. And then on the Interior, well, there are a
couple of things here. One is this here, so I think maybe I will put what we have on for the
Wheels onto this piece. So I'm going to pull
this down and just choose Wheels for that. These I think can be
the car paint material. And I wonder if I
could take these in here and give these a chrome
material. Let's try that. I'm going to pull this down, choose Chrome and click Assign. Take a look at that.
How does that look? Yeah, that looks
kind of interesting. Alright, let's try that. I'm not sure that's
the way it is, but I kinda had an idea and
I just thought I'd try it. Let's do that here as well. Oh, I forgot to click Assign. Let me do that to Assign those polygons to
that material group. I guess while we're
dealing with Chrome, we might as well just pull this down and add chrome to that. We could take all of these then. And then select this control L and link Materials.
There we go. Do I want this? This
appears very flat. I wonder if I should press Control a applying
the scale and just give this a little bit
of a bevel like that. Let's try that and
then smooth it. Yeah, that gives it a
little bit of interest. I think there Here's more, Here's another Chrome
we could do that. Link that material there. And well, before
we even go inside, Let's work on this thing. Let me switch to something that gives us some
information about that. Let's see about this here. Yes. So it looks like we've
got a chrome piece, a car Body piece or Materials and Chrome up here and
then black on the inside. Okay, so we've got
several Materials here. I think what I'll
do is go ahead and just begin with the black metal. Let's do that. I
guess what we could do is just take an edge here, add an edge right here, select these E, enter alt, S, and puff these out a bit. And then I will press
control and the plus key to select all of that. And then let's just add
a new material slot and choose the car body and
assign that, right? So we've got that there and
then I feel like we should of course give it a little
bevel. Let's do that. Yeah, that just always
looks better, I think. And then this part here
should be the Chrome, I think let's do that. With that selected, I'll
add a new material slot, pull this down, choose Chrome and click
Assign. There we go. Alright, and then
I think up here, well, what's on the other side? Let me take a look. This one here. Let's
take a look here, see if we can see
anything in here. This all looks black, so I think just
that NPS is Chrome. Alright? So I will select
these faces Control plus, and then let's assign those
to the Chrome there. Alright? And of course, once again Let's press Control a
and apply the scale. And I will select these
edges here and here, Control B, pull them
out just a bit. There we go. I just
feel like that gives it a little bit more
interests there. Alright, what about this
little guy right here? What do we have for this? Let's find something. Oh, we've got oh, it's a light. That's right. And it looks very similar
to the Headlights. So I think what Let's do is first of
all give it a Chrome. Let's just do that. I'll pull this down,
give it a Chrome. And then let's select
these faces here. Control and plus and move
these out like this. Move that back. Okay, let's
add a new material slot. And let's give it the green
Fenders and click Assign. Here we go. It looks like back in here. This part back in
here is the car body. So let's add a
material slot here. Choose Car Body, click
Assign, and there we go. That. And of course
this, just like before. Let's just select this and
give it its own material. Just to remind me that
I need to do something with that at some
point in the future. Let's just give it a new
material slot, click New. And then we go, oh, I forgot to Assign. Here we go. So for the Interior, let's, I'm gonna hit the
period key to zoom in. Let's take a look. Let me
find another image here. We've got this. We could take a look at this. So it looks like it's very
similar to the car paint. But once again, is
it quite the same? So let's select the Dash. And with this selected, let's duplicate
this material here, and we'll call it Dash. And then let's go down
to the clear coat. I had raised this up to ten. I thought it looked pretty
good on the car body, but that's quite a lot for
something like the Dash. Let's take that down to well, let's go down to one. Yeah. So I feel like
something like that. Maybe a little bit better. I'll try to yeah. Okay. And I still have to deal with what's going to
happen inside here. But for these things, we could work on knees. I think we could pull this down and choose the Chrome here. And then we could
select maybe this here, Control plus and
bring this out a bit. And then we can add a new
material slot, pull this down, add the black metal, Assign that there. Yeah. Okay. I think that's going to
work there. Over here. We need to do a similar thing. So let's just take
this and well, let's give it Chrome. And then once again, we select all of this. Bring that out a bit to
maybe right about there. And then once again
new material, slot black metal,
Assign. There's that. We could take this
and give it Chrome. And then just select all
of these things here. And then this and give
it Chrome there as well. It looks like these are a little bit off and
that doesn't it. I'm going to have to come
back and realign these, so I will do that when
we're in-between videos. Once again, you don't need
to see me do that here. Let's select these control L. There we go. And then this in here. I think this could
be the black metal. Let's try that. Yeah. Okay. And this what is this? Well, let's see if I can
find an image of that. Yeah, Here we go. So it looks like it's mainly Chrome with a little bit
of this black on it. So let's go ahead and
give it to Chrome. And then up here, let's select these faces here. And let's press Control plus until we get it down to about where we
think it should be. And now new material, slot, black metal, Assign, Let's
try that. See what we think. Yeah, okay. I think we're getting there. So in the next video, what I'd like to do
is talk a little bit about using textures from poly haven and how
we can add those to say, the leather of the Seats and the rag top and the wood
of the Steering Wheel?
79. Assigning Textures with the Node Wrangler: So I have gone out to poly
haven.com and I've created this Textures folder and I downloaded to textures
from poly haven. One is a brown leather and
one is a wood table texture. So I figured we're
going to try these for the Steering Wheel and the
seat, and the rag top. So if you go in here, you can see that it's just for images and we can add these
to the material in Blender. So let's go into Blender here. And maybe let's begin
with this right here. We could give this
a new material. I'm just going to click
New and call it rag Top. Then let's go over to
our shading tab here. And here is a rag top material. Now, what I'd like to do
is use the Node Wrangler. Now, I already have it
installed or enabled. I should say if I
hit the End key here in the shader editor, you can see that in this panel we've got
the Node Wrangler tab. And you just go to
Edit Preferences, Add-ons and type in node, and you just add a
checkmark to this here. It's already
installed in Blender. You just need to enable it. Once you have that, you can see this ad principles
Setup button here is Shift Control T. So I can
select the principle be SDF, so I have a white
outline around it. And then press Control Shift T. And now let's go into that Textures folder that
we were just in here. Go into the brown
leather Textures. And here we go, Let's
just select all of these and click on
principled Texture setup. And when we do, it just connects them all the way
they need to be connected. And it's kinda nice. So there it is, on or object, but it's
looking pretty bad, isn't it? It's really stretched. And the problem is, is
we haven't UV mapped. This UV mapping is
just basically making a two-dimensional
representation of the 3D object so that we can
put 2D Textures on here, 2D images, and we
haven't done that yet. So let's just go over
to the UV Editing tab. And here is all of the polygons
of our rag top object. What I'd like to do is just
do it quickly and easily. So what I'm going to do
with all of this selected, hit the a key, so everything selected in Edit mode,
I'll just hit you. And smart UV project. And I want an island
margin of probably 0.001. So the UV islands have just a little bit of
space between them. And then I'm going
to click Okay. And then we go. Now, if we
come back to our shading tab, it's looking a
little bit better. It's still not good because
it's very big, right? So we need to adjust the scale. And to do that, we can
come over here into this mapping Node and we could
just change all of these. We can click and drag on all
three of these fields and say type in three and enter. And that shrinks it
down quite a bit. Now, if we didn't want
to keep doing that, we could create a value Node. So I'm going to press Shift
a search and type in value. Here we go. I'm going to drop that here. And then I'm going to connect
the value to the scale. And I'll type in one. And that's the way it
was when we first began. Now I can just click and drag in here and make it smaller. So it kinda looks a little
more like leather might look. So I'm going to type in six
and let's see how that works. Yeah, I think
that's pretty good. Now we've got this green
stripe around here, but let's wait on that. Let's wait for just a minute
until we deal with these. So here we've got green leather on the Seats and on this and on the Interior. So let's see if we can use
the exact same collection of image maps to create the
textures for this object. So I'll click on New. We'll call this Interior green. And I don't see a node here, so I'm just going to
hit the Home key. And that will bring
everything into frame here. And then let's once again click on the principled BSD F shader. Let's press Control Shift T. And let's go to
our brown leather again here and bring these in. Okay, that's pretty good. But once again, we've
got a problem there. We can create another value Node here so that we
can adjust the scale. Let's do that and
maybe type in six. Let's how does that look?
Yeah, that looks pretty good. We can maybe bring
it up a little more so it's smaller and
finer than the top. But keep in mind, we haven't done a UV
map for this, have we? Let's go over the
UV Editing Tab. Yeah, we need to do that here. With this selected
and Edit mode. I'll just press U smart UV
project and click Okay, and now let's go back
and take a look at it. Yeah, that looks pretty good. So now you may
wonder that's great, but this is brown, green. So let's go back
to the shading tab In-between the base color here
and the principles be STF. I want to put an
RGB curves Node. So I'm going to press
Shift a search RGB, and let's choose RGB curves. And when I drop that in, now I can click here and drag this node down
and make it brighter, make it darker, but that's
not what I wanna do here. I'm going to hit the
X and delete that. I'm gonna go into the red. And let's do that here. Let's click to drop
a point in there and then I'm going
to take the red out. And let's see, as we do that, looking at it becomes green. So Let's move this around until we get a
color that we kinda like. Maybe I'll go back to this
and bring it up a bit. Let me see what happens if I work with the blue
here a little bit. Maybe up here. We can add a little bit of blue to
it and maybe, alright, so there we go, there we've got a leather texture with a
green color for our material. Let's now take, well, let's take this, Let's
tab into edit mode. Hit the, a key, hit you
and smart UV project. And then once we have that, let's just select this
control L link Materials. And there we go. Alright, let's do that for these outside pieces
as well here let's take this and I will UV
map that real quick. Let's do this one as well. Oh, we've got a mirror modifier on this and we did
over there too. Okay, well let's just try
this and see how it works. You smart UV project and also
this thing right in here, that's a whole other object. Let's try this. Smart UV, protect that as well. So now let's select all of these and then one with
the material on it, Control L link Materials. Here we go. Now let's see if we can drag the specular up
just a little bit. Make these a little
bit shiny or yeah. Something like that. The leather on the top is a
little bit too dark, but well, let's first of
all deal with this here. So let's select this and just with the L key hover over the
Trim there and select that. Now in our Materials panel, Let's add a new material slot. Let's pull this down and choose
our Interior green here, and then click Assign. Let's see what happened. Yeah, That's kinda
nice to get that. Then let's select the
rag top brown here, and let's use an RGB curves Node to try and make it
a little bit lighter. Let's do that. Shift a search RGB
curves, drop that here. Then I'm going to
take this and just bring it up a little
bit like this. Yeah, something like that. Let's see what we
think about that. So now that we've got that, let's end the next video. Deal with the Wood Texture
and the Steering Wheel
80. Adding Wood Texture to the Steering Wheel: Now let's work on applying that Wood Texture to
the Steering Wheel. We can come over here to
the shading tab again. And let's just click New, and we'll call this
steering wheel. And once again, let's just take our principal BSD F and
press Control Shift T. And let's go back
to the wood here into the Textures and then
just select all of these here. And that should apply the Wood. Now it does. But we also need to UV map this. So let's just tab
into edit mode, hit the a key to
select everything you. And let's just go with
smart UV project. And now let's see how
we did. That's okay. But I kinda want
the woodgrain to go around the steering wheel. So let's think about
how we would do that. Let's go over to
the UV Editing Tab. And I'm going to get the
period key to zoom in here. So this is currently what
our UV map looks like. And I want the Steering Wheel
to be straight like these, following the line
of the woodgrain. So what we can do is
use our seams Again, I used seems for
that Kissel Logo, but the seams can really come in handy here in UV mapping. So what Let's do is
let's find an edge that we think we could
cut this open width. I'm going to press U
and Marcus scene there. And then let's also mark as
scene somewhere in the back. So I'll press U and
Marcus scene there. Alright, now with
these selected, we could once again
and press the L key. And when we hit U, instead
of using smart UV project, which is basically Blender, deciding where the
seams are going to go. Let's use unwrapped
because this tells Blender we want to decide where the seams
are going to go. So let's click this,
and there we go. So now we've got a single long strip from
here all the way around. Let's scroll the mouse
wheel to move this over. And I'm going to click on
the rendered view here. Now, if we take this, I'm going to hover over the
UV editor and hit the a key. And let's hit R and
turn this like this. And I'll scale it
down some like this. There we go. Now
that woodgrain goes around following the line
of the UV island here. Alright, now let's
take this here. What do we want
to do with these? I feel like this isn't bad. I feel like I just
want to kinda spin it. Let's come up here. Choose you the
islands select mode. And then if I click
on one of these, it'll select the whole island. And let's see if this is the
one that we're dealing with. No, that's not it. I'll click on this one. Now let's hit the R
key and turn this. Yeah, that's, that's
the one we want. So I'm going to
rotate this around. So it's going across on one side and down along
there on the other. Let me see. Let me move
this to one side like that. Then I can grab all of these. And this, I'll just grab all of these here and move these over. And now this can
come up into here. Alright, let's take a look. Now once again, the color
of this isn't quite right. Let's go back to
our shading tab. And I'll change the image here so we can see what color it is. Where's a good image
of the Steering Wheel? How about this? Let's see if we can get it a little bit
closer to that color. I will press Shift a and
search and type in RGB. So we can bring in
an RGB curves Node. And let's just click
here in the combined. And let's just bring this up. See if we can make it a
little bit lighter here. Yeah, let's just go with
something like that. That's not bad. Now, while we're here, we could go ahead and do
more on the Interior. Let's select these panels here. And then select our Seat
Control L link Materials. And then down here, or we got that, okay, this, yet we need this
and let's do that. And while we're here, we could get the Chrome, we could get the Chrome
for this and this. But let's do this and this and just select
this control L. And for this are Gear Shift. It looks like I could
bring all of this down. First of all, I'm going to
press the T key to open up my Panel over here and
choose the move manipulator. And then let's just
bring this down some see how that works. Yeah, okay. And then I think we could
put black metal on this. We can put chrome on this. We could put black
metal on this. And oh, actually I think this is supposed
to be Chrome in here. Right here, this
piece right here. Let's add a material slot
and give that Chrome, and then click Assign. And then inside here, if I recall, I think this
needs to be black in here. Is it already? Know it isn't. I can see it there. Okay, so let's give
these a black metal. So we'll just choose that
here and click Assign. Here we go. And it looks like we're a little off
here and now, doesn't it? Probably need to fix that? Well, let's just take
this whole thing I see. Yeah, that's a problem. Let's move that there. Let's go back. And now.
Yeah, there we go. Then all of these things over here that we've added Materials
to on the other side, we can just duplicate
these over. So let's just take, I'm gonna go to the layout. And let's just spin around here. And let's just
take all of these. When you can just we don't want the car we don't
want the car body. Let's take all of these. And even this, this, and this, all of these. And let's just delete these. And then we'll go through and just Mirror
all of these over. So all the things we've
already done here, have we done this one yet? Yeah, we've done this. I could add a bevel to this just to help this
out a little bit. We go, let's now take all of these that we've
given a material to all these small pieces over here in these down here, right? Okay, Now let's hit
period, go to 3D, cursor, comma, go to global. And here we go. Let's press Shift,
Enter, Control, Enter. And now everything should be over here with
materials on it. Alright, looking good
81. Texturing the Headlights: For the glass here, at least for now, temporarily, let's just add a material with this selected. I'll come over here
and click New. And we'll call this glass. And for this, let's
just scroll down to Transmission and click and
drag and take that up to one. And then let's go
over to the roughness and just take that all
the way down to zero. And so now you've
got kind of glass. We're reflecting the HDRI, but we can see through
the object to the model. And as I said, this is
just a temporary thing. I will click and drag up on
the roughness just a bit, so it isn't quite
so shiny there. And then while we're here, let's work on the
Rearview Mirror. Let me see. So we've got it's basically Chrome except for
the Front is Mirror. Let's see, we can do with that. I'll just pull down
and choose Chrome. And then let's just select
this one face right here. And I'll add a new
Materials smart. Click on New and I'll
just call this Mirror. Then let's come down here
and turn the metallic all the way up and the
roughness all the way down. Oh, and then click on Assign. Let's see how that works. Yeah, so there's a Mirror. Alright, now, I'll come back for the Carpet
here on the Interior, but let's take a look
at the Headlights now. I think what I'm
gonna do is actually used the Headlights from one
of these pictures in here. And I think I want
to replace this. I think I'm going to change
to median point here for now. And I'm going to move the
cursor to it right here. And I'm gonna delete
this and then add a UV sphere so that it curves
out just a little bit. Let me see. Let me take a look at this. That's not the one I wanted. Here it is. Let me
look at this one. Yeah, So I'm thinking
I would use one or both of these images here
for the Lights in here. So let's see, I'm going to
press Shift a mesh UV sphere. I'm going to take it
down to maybe 0.1. And then I'm going to
turn it in the X or x90. I want to hit the division key
to isolate that three key, I'll go back to Solid
mode. Let's hit Shift Z. And I just want to
remove this part, I think let me make sure. Let's hit the division
key here again. No, I wanted to do
the other side. So I want to with this half
selected press Control, I and then delete that side. Yeah, Let's do that. Delete bases and then
I will scale in, in the Y, S, Y, like this. So it's just bulging
out just a little bit. That's all I need.
And I'll smooth it. Alright, so now that
I've got it like that, Let's give it a material. I'll click New and we'll
call this Headlight. Then let's go over to
the UV Editing tab here. I will create a new window. Over here. We'll click and drag
and drag this down. So this will be the UV editor. This will be the
shader editor here. I'll press the N key
to close that panel. And what I want to do
is bring in that image. Let me see if I can find it now. If I hit the End key again
and go to Node Wrangler, you can see of course that add principled setup is
Shift Control T, but add texture setup is
Control T. So let's do that. I'm going to select
the principle of BSD F and then press Control T. And now we can bring
in that image. And once again, we're
getting that pink color, meaning it's missing something. But let's click Open. And let's go to our
reference images. And let's find that image
that we just had here. Let's open this up. We go. Now we've got it here in our
UV editor with this here. Now let's take this
and UV map it. And this time I'm going to
use UV unwrap instead of smart UV project because it's a flat object and we don't really need to add any
seams to it at all. So I'll press U and unwrap. And now we've got a UV map
here that if you notice, is bringing through
the image here, right? We can go to UV islands. Select, click on that island. We can hit R and turn
it and you can see the image turning
in the Headlight. So what that means is we
could scale this down, hit the G key,
move it over here. And Actually use this image to
get our Headlight in here. So let me scale it down
a little bit more. So that doesn't look great. Let me scale it
out a little bit. There we go and tell we can
kinda see it all in here. I'm going to use this area
to get it in place now. Let's see how that looks. Yeah, that's a
little bit better. I could turn it, hit the R key and
turn it a bit to get that word at the bottom here. Alright, so now that we've
got the image in there, There's a couple of things
that I'd like to do with it. First of all, I want to make
it a little bit brighter. I'm going to use that RGB
curves node here and here. And then in the
combined at a point and drag that up a bit,
kinda like that. Then I want to come over here to the material and maybe
I'll reduce the roughness. Maybe we can add some
clear coat to it. Let's try. Let's type in four. And do we get any
reflection off of that? Maybe increase the specularity. We could even play
with the metallic two if we wanted to and get a little more reflections in
there, something like that. Okay, now let's bring
it up a bit here. Make it a little bit brighter. Alright, We're getting there. And then another
thing we could do is add some bump
information to it so we could press
Shift a search and type in bump and
drop that in here. And notice this node
has a normal socket, which we'll go into
the normals here. And then we need to convert
this color image into a black and white image because a bump map is a grayscale image, just black and white. So let's press Shift a
and I will search for RGB to black and white here. So we take this color,
drag it in there, take the value, take
it into the height, and then normal, into the
normal, and there we go. Now, it's a little too much. Yes, let's take this down
to 0.1. Let's try it. Let's try point. To feel like getting up past
three is a little too much. Let's try 0.25. Let's try that. Yeah, I think that's
looking pretty good. Feel like we can maybe take
the metallic up a little bit more and maybe take
the roughness down. Let's try that. I'll go back to the Layout View, go to render mode. And we could now just take this, move the cursor
to it, delete it, delete that face, and
then take this Object, press shift D Enter, and then snap it to
that cursor Shift. And Enter. There we go. Alright, so now we've got
some Headlights in there. Let's use these images some
more to deal with the Grill. And also these little pieces on the side of the
wheel right here. Maybe we could use
this image to get that little piece in the center
of each of these Wheels. So let's work on
that coming up next.
82. Creating the Wheel Logo Plate: To create this for the wheel, Let's first model
the geometry there. I will select this
and frame it up. And let's just select this
face and shift us to, to move the cursor there. Now let's create a new cylinder. I'll go back to solid
viewport shading for now. And then let's
give it six sides. And I've got a
triangle fan here. I think that's fine. I don't
need anything on the bottom. So I will select all of
these and get rid of these. We go. Then let's turn it in the Y. Scale it down, zoom in
with the period key, and then scale on the X. And let's see how big this is. It's probably about feel
like it's about like that. Right? Okay. And then I'll press Control
a and apply the scale. Let's then take
these faces here. Let's inset them. And then extrude them in, hit E and push in. And I'll be sure it doesn't go through there or
something like this. And I feel like that's a little
bit wider around the rim. So I'm just going
to select those and scale in just a bit
to get that a little bit. There we go. And
then let's go ahead and bevel these edges here. Just to get a little bit
of something on there. There we go. And then
let's smooth it. We go. Okay? So now that
we've got this, let's take this into the
UV Editing tab here. I'll hit the period
key to zoom in. There it is. And let's
give it a material. Let's give it the Chrome first. Let's do that. Let me
bring in that picture while we're here in
this viewport image, open reference, and here it is. Okay, Let's bring that in. Now. I want to select just
these faces in here. And let's add a
new material slot. Let's call this,
well, I'll click new. Let's call this Wheel Logo. And for the Wheel Logo, let's bring in this image. It's 61 2016. So I'll just pull this
down and go to 61 2016. And there it is, there. Alright. And then with this selected, I'm just going to UV map it out, hit you and unwrap. There it is. Now
it's kinda wonky, so we were gonna need
to select it and scale it in and get it fairly
close to this size here. So maybe I will
turn it a bit and then I'll begin moving
the points to fit this. But let's come up here and select the
principles of BSD F and press Control T to add our texture node setup and then we can take this
and bring that in. So that was 61 2016. There it is. And we still don't
see it because I haven't assigned the
selected faces yet, so I'll click Assign
and there it is. Now, what we need to do is take these points and begin
moving them around. Let me go to vertex select or UV select and begin
moving these around. So let's take these and move
each one into the corner, the respective corner here. Then I'll take that
center one and move it more into the center
there like that. Okay, now we can take this
and we could turn it. But I think every wheel is
going to be a little different because each one is going
to be turned just a, alright, so we can maybe take that Wheel Logo and give it, maybe reduce the
roughness a bit. We go so it's a
little bit shinier. We could play with
the color here. We could once again create an RGB curves Node and
drop it right in here. And then we can make
it darker or lighter. Maybe we bring it down
a little bit like this. Maybe something like that. Yeah, let me go back to the layout and let's go to
rendered viewport shading. There we go, There it is there. So I think that'll work. That's not too bad, really. Kinda works. Let's put them on
the other Tire. So let's take this
tab into edit mode. Select that shift us to, then take this duplicated
enter, Shift S eight. There we go. Let's
see how that works. Oh, that's right. This this
one is tilted, isn't it? So let's press RZ
and tilt that a bit. I forgot about that, that we had a tilt to that one since it's on
the side like that. And then this one back here, Let's do the same thing. Let's select this face
right here. Shift S2. Now let's take this, the one that isn't angled. Shift, Enter, Shift S eight. Now let's zoom into here
with the period key. And we could probably
take all of these and duplicate them and mirror
them over to the other side. Of course. We go. Let's move the cursor to
the center of the grid was Shift S1, period 3D cursor. We are in global, that's good. So let's press shift D, Enter or Control M, X and enter. And let's see, we have over
here and there they are. In the next video,
let's work on seeing if we can come up with something
for the Grill here. I'm not sure if any of the images that we have
are really going to work. Mainly because we've got that bar going
right across there. And these other images
are at an angle here. So I'm not sure if we'll be able to find
one that we can use, but we will try coming up next.
83. Texturing the Grill and Front Logo: To create the texture
for the Grill, I've gone out and found
an image of a metal mesh. And let's see if that'll work. I'm gonna come over
here to, well, let's go to the UV Editing
area first because we've got a Node Editor or
a shader editor here. I will get rid of this
image right here. And let's then come around
here and select the Grill. And I will tab into edit mode, and it looks like we've got
a mirror modifier on this. So let's pull that
down and click Apply. There we go. Okay, now let's just ensure that we've got this all ones
in the scale and we do not. So let's press Control
a and apply the scale. And then let's close
that tab into edit mode, select everything you and
I'll just go ahead and use unwrapped because it's
just a flat plane. So now that we've got that, let's create our material. I'm going to come
up here to New. Let's call this Grill Mesh. Then I will come in here, select the principal
BSD F and press Control T. Recall that is
our Texture setup and that gives us our texture
coordinates mapping Node an image texture and in the image texture,
Let's click Open. And I've put in the Textures
folder here a Mesh image. And let's see how
this will work. I'll click Open. And then let's go
ahead and go to the rendered preview here. And yeah, actually that's
not looking too bad. So let's come over
here to the scale. Let's once again add a value Node so we can just click
and drag on one thing, connect that up to the scale. And of course we've got nothing there because
it's at zero, so we'll put in one. Now we're back to
where we started. And let me bring in
that image over here. Here's one here. Let's just bring that in. There we go. Let's take the value
here and just drag it up until we get it down
pretty small like this. That's not bad. Maybe I'll just type in three. I typed in 30. Let's type
in three. There we go. And now let's use
that RGB curves note again to change our color because I want it
to be more black. So I'll press Shift day, RGB, RGB curves, drop that in and
let's just in the combined, let's just take it and
drag it down a bit till we get it to be
a little bit darker, maybe something like that.
Yeah, that's not bad. Let me bring it
down a little more. Maybe I could take the green
out of it, let me try that. And then actually maybe now that I've got it
a little bit darker, maybe I feel like that's
a little too small. So let's go back to
to yeah, there we go. Alright, so now we've got something resembling
our Grill here. Now, this little guy right here, I'll have to see if
I can find a logo. I think this is pretty
small and low resolution to use in here. I mean, we can try
it if we want. Why not? Let's just select this
and press Shift S to. And I will just create
just a circle here. And here it is, here. Let's turn it in the Y, excuse me, the
x-axis or X9 zero. I will scale it
down quite a bit. And let's put it in here as if it's this little
thing right here. Let's just move
it right up here. Oh, I'm in the 3D
cursor pivot point. So let's hit period and go back to median
point. There we go. And maybe we could scale this down a little
bit more like this. I could maybe bring it out
outside the Grill here. We could tab into edit mode. We can hit E, S and
to scale this N and then press M and
merge at center. So we can close that off. We can select all of these and I'll turn it on the move
manipulator and I'll press E Y and bring that back into the Grill there just so we can see how
this is going to look. Let's, I think I'm going
to take this edge right down here and this edge
all the way around. And let's hit you and Mark seem. Let's also apply
the scale control a applying the scale there. Alright, now let's UV map it. I'll tab into edit mode, a key you and let's use unwrapped since we
created our own seams. I'll go to UV islands, select, grab this and I'm just
going to move it out. I'm just going to
move it out here. And let's take
this and use this. And let's see if there's any other image that is any bigger for with this
little logo on it, I'm going to first
create the material. Let's call this, what should
we call it Grill Logo. Let's try that. Control T. Let's click Open and
go to our references. And is there any larger Image of this. There might be something online. But for our purposes
just right now, to even test this out, this looks like it
maybe the closest one. Let's take a look at this. We're already getting
an image through here. This is if we scroll in
here, this is 612014. So I'm going to pull down here, choose that. There it is. It's a rectangular image, so it stretches our UVs. I'm just going to pull
these back a bit. Let's hit G, move this in, and let's scale this down
and just see how it looks. If it looks just
absolutely terrible, or if it's just something that we might be able to work with. Alright, let's turn it at the archae and it's flipped,
right? It's backwards. So we could flip our
UVs and the x-axis. If you press S and X
and begin to scale in, you can see in the upper
left-hand corner of this window it says
0.4, 0.3, 0.2. And then if you
keep going beyond, it'll go into negative numbers. So to flip this, one way to do that would be
depressed S X negative one. And then Enter. There we go. So I'm going to hit the R key and rotate this just
a bit like this, so it's fairly straight. And let's see what we think. Now I've got it smeared
along the back here. That's probably not real good. We could take where is it? We could take that
strip there it is. And we could maybe
bring it in and lay it right over this
little guy into a Gold area. It's going to be really small. Something like that, right? So what is the
same color on the, on the sides there? Alright, so what do we think? Is that crazy? We could try it. I'll select this
and I'm just going to scale it down
just a little more. Move it up a bit. Maybe
scale it in the X a little. Now I feel like we need to
make it a little bit brighter. It's a little bit too dark. Here. Although we could spend
the light around, we could take the Light
and spin it in the z-axis, our Z and kinda
turn it like this. Yeah, it's still a
little bit too dark. So let's select it. And what we can do is
add an RGB curves Node, Shift a search RGB curves, drop it in there. We can drop a point here and
bring it up some so it's a little bit brighter like this. And we could also do a
couple of other things. We could reduce the
roughness here perhaps let's see if we can get that to
work out a little bit better. There we go. We could increase
the specularity or we could even
try the metallic, we could bring that up. Maybe like that. Then let's do one more thing. Let's add a bump node. Let's we could bring it
off this texture node. Let's press Shift a search
and bring in a bump node. We also want to convert
it to black and white, so RGB to black and white. And then let's take this color. Connected up here. Value the height
normal to normal. And then let's zoom in here
a little too much though. Let's take this down. Maybe 0.5. Take the distance down 0.5, maybe, well, let's take
the distance down to 0.1. And how about 0.1
here? Let's see. Yeah, let's go with that. Yeah, Actually
crazy as it sounds, that might actually
work. Let's see. I'll bring this
up a little more. The metallic. And yeah, I guess we should smooth
this, so let's do that. And with the texture on, I don't even think we
need a bevel there that, that looks kinda nice. So in the next video, what Let's do is let's work
on creating some sort of a Carpet Texture for the
floor on the Interior.
84. Texturing the Interior Carpet: Alright, well for
the Carpet here, Let's tumble around in here and we're going to
need more light in here. And maybe I will
take this sunlight. And I'm just going
to spin it around. The interesting thing
about a sunlight is it really doesn't matter
where you put it, because it's just an
infinite array of parallel light rays coming from an infinite distance so
you can put it anywhere. All that matters
is the rotation. So I'm just going to press RZ, spin this around like this. We get some light down in here. Okay, So this, let's first
of all select that floor. And I guess let's go into
the shading tab first here. Let's do that. We could UV map this. It's just a flat plane, right? There's no thickness to it. So we could use our UV
unwrap tool pretty easily. Let's press the N key, makes sure we have all ones
in our scale and we do. Let's tab into edit mode, hit the a key you, and unwrap. Now we could change
this down here from an image editor to a UV
editor so we can see it. So there's our UV map there. I think that'll be fine. Let's just click New
here. Click New. And we'll call this Carpet. Let's do that. Okay,
So first of all, we're going to need something
to give this more texture, more small little
differentiation. This, it's got light
and dark in here. So to do that, I
think we're going to, first of all, well, let's try a noise texture. I'm going to press
Shift a search noise. Let's give this a Texture setup. Let's press Control T. There we go. Let's change this
from generated to UV since we've created a UV map. To see how this
is going to look. Let's take the color
here and drag it into the base color there. Now you can see
something's happening. We've got a little
bit of color here. Let's do our trick with
the value node over here. So we can drop it straight into the scale and have
one thing to drag. So let's take this
up to say five. And you can kinda see
where beginning to get little globules
of color in there. And we can also use the scale
and detail in here too. We could take these up to say ten and maybe ten,
something like this. Let's try and see if we can make them a little more defined. I'm going to use
another texture node. Let's press Shift a search and
I'm going to type Voronoi. There it is, voronoi Texture. Let's take that and let's
drop it right in there. Now let's also change
this from F1 to smooth. Let's try this and see. Yeah, I think that might
help us a little bit better. And you can try other ones
in here. You can try F2. That's not bad. Distance to edge
doesn't really do much. So let's just go back
to smooth F1 here. And once again, we can
adjust the scale here. I'll take this to ten. Perhaps we can ingest
the randomness, maybe I'll bring that down. Let's just maybe
type 0.5 in here. Alright, so let's say we've
got something like this. And also I'm going
to take the value, maybe a little bit more. I'm going to take it up to 15. Yeah. So now we're getting just a jumble of color
and texture and shape. And I think that's
kind of what we need, but we just need to
give it a color. So I'm going to take these
and move them to the side. And for this, I'm going
use a color ramp. So let's press Shift a search
color and use a color ramp. And if we drop that in here, now we've got the black
and white color in here, which means we can control the
color a little bit better. So maybe for this side, this one is selected
currently you can see if we select this color
swatch changes, but I'll select this one. Click on the color swatch, click on the eye
dropper and come over here and choose a dark color. Let's try that. And
then over here, let's click on this and
try a lighter color. Let's try this. Okay, so now we're
getting something that's beginning to be a little
bit better. Maybe. Let's try it. Let's take this and I'm
going to drag it up a little bit so it
isn't quite so dark. There we go. And then maybe this one, if I select this over
here and maybe I could take it down
a little bit more, a little bit darker. Now, maybe we could begin taking the scale
again, taking it down. So let's try 20 here. Now we're getting something that maybe might begin to work. So let's take away the
specularity. We don't want that. We could increase
the roughness a bit. Try that and the specular. I mean, we could bring
it up a little bit, I guess sometimes fabric can have a little
bit of a shine. Alright, I think I want to take the light and bring it
up a little bit more. And then we could also adjust over here
in the color ramp. We can actually
crush these a little bit by bringing them
in together like that. So it just depends
on what you think. How many shades of these
browns you want in there? I'll bring them back
about like this. Alright, Let's say we've
got something like that. And then let's
give it some bump. Let's come down here
and once again, Shift a search bump here. And I think I'm going to take
it out of the color ramp. Let's try that. I'm going to move these over and I will bring this up a bit. And let's then add an RGB
to black and white here. And let's take the color out
of the color ramp this time, into the height here, into the normal here. Then we've got way too much. Okay, so let's bring
this down a bit. I'm gonna go down to 0.1. Let's see what we do now. We want a little bit
more than that. I think. I'll bring this up. I'm gonna
bring this up to about 0.7. Bring the distance down a
little bit, but not a lot. Well, maybe something like that. And then let's go back and
play with color a bit. So maybe I bring this back out. Yeah, I'm gonna kinda spread
these out a little bit more. Also. I think I want to make
them generally brighter. So let's take this and I'll just move the value
up a bit here. And this, let's see if
I want to take this. Does it help if I move
the value up a bit here? Yeah, kinda helps a little bit. If feel like that
from a distance, we may need the scale to
be a little bit smaller. So let me take this
back down to 15. And let's try ten from
here and let's do that. Yeah, that may be a little bit. Now let's go back to 15. We go, Let's see how that works. Let me go back to the layout. And once again, I won't may want it to be a
little bit brighter, a little bit lighter
in the light areas. Let me go back to the
shading and maybe I wonder if we could add a new node in here
if that would help. I'm gonna click the plus
right here to add a new node. And if I drag it
toward Here, we go. If I take it down
toward the black, that'll extend the
light part. Here we go. Then I'm going to take this
and drag it down little more, make it a little bit darker. Let's see if that
helps a little bit. Yeah, I feel like
something about like that isn't too bad. Let's go back to the layout. And maybe I will
actually increase the specular highlights
just a little bit and bring the
roughness down just a bit. So now I'm kinda back
where I started. I'm going to just type
in 0.5 and 0.5 here. That's where we began. But I think that's okay. I think that'll work. Yeah. Alright, I think the
last couple of things I wanna do are these little
bits here on the Dash. I want to maybe
put a few words in here and find something. With this. I'm still not sure exactly
what I'm gonna do with this. If I can maybe find
an image or if I've got to model it
and place it in there, I'm not quite sure,
but at the very least, let's work on these
little words here, on these parts of the Dash
85. Adding Text to the Dash (process 1): Now let's try and put
these little words. This one has fuses on
these black circles here. And this one must be the light switches because
it's Rear them off and on. So let's try and
add these words. And I think we're going
to need to do them. Or let me put it this way. I think we can do them
in two different ways. So let's begin with
the fuses here. And this is kind of, well, maybe the easier way. I'm not sure, but I
just wanted to show you two different
processes for this. So first of all,
we need to create that fuses word and I'm
gonna do that in Krita Gear. Once again, you can go to
krita.org to download Krita. It's free. I'm going to click on New. And in here in the
Texture templates, I'm going to choose
1024 by 1024. That's probably as
big as we need this since it's on a pretty
small object in the scene. And here we are. Here's
that 1024 by 1024 document. So the first thing
Let's do is just, well, let's create the text. I'm going to come over here
to the Text tool here. I'm going to click and drag, and this little window pops up. It popped up into
my other screen, but this pops up here. And we can adjust the text here. And I don't know that this
is the right font for this. I think I've found this
aerial rounded MT Bold that I think is closer to the font that's in
the reference images. So I'm just going to type in
fuses here and click Save, and then close this. I'll go ahead and
call this fuses Over here in the layers. Let's come over to
our Transform tool. And I'm going to hold
the Shift key and click and drag this out just to
make it a little bit bigger. And move it over into, around the center
of the image there. Alright, so over here, I can remove this gray layer, and now we've just
got that white on an alpha or
transparent background. I'll save this first
with Control S. And let's save it as accretive
file in our Textures. And I'll just call this
fuses and save this. And so saving this
as a KR is just saving it so that we can open it again and edit it here in Krita. But then I also want to export, I'm going to use
export advanced. I also want to export
this out as a PNG file, because a PNG file has an
Alpha channel that will allow the background of the
image to be transparent. And we'll just call
this fuses PNG. And there we go. Now I chose advanced because
you can come over here to the re-size tab and
change the size if you want, but it's at 10:24. I think that'll be good
and we'll just click OK. And there we go. So I will minimize this
and let's give this a try. Let's first of all UV map this. I'll go over to the
Materials actually, before I go over to the
Materials in the modifier, I'm going to turn on the
cage and then go over to the Materials
tab into edit mode. And let's unselect
everything with Alt a. And then with this
black metal selected, I'm going to choose Select
and that will only select the polygons that are in
that black metal material. Let's make sure that we've got our scale at all
ones, we do not. So let's press
Control a and apply the scale that will help
even with UV mapping. And let's hit you and unwrap. There we go. So now from here, let's select our principle of BSD F and 0. You know what we should
do to, here's an idea. We don't want our fuses, Text Go on everything with
a black material, right? Then we'd have the word fuses on these pieces up here and everything
with a blank material, we'd have the word fuses
on and we don't want that. So we need to duplicate
or copy this material. So we have one just
for our fuses. So to do that, I can
select the black metal here with this particular
object selected. And let's duplicate it here. And now this material
is here just on this object in
no other place. So let's call this fuses. Let's just do that. Well, I've still got
my caps lock on. Let's There we go. I don't know why
I dislike things in lowercase here in Blender. So now with this material, we can take this principle be SDF here in our fuses material. And let's press Control T to
create a texture node setup. And then let's go
open that new image. Let's go into our Textures. And here is our fuses
PNG. Let's open that up. Here we go. Now we can see
it here on our object. Let's come over here
and pull this down. And we can type in
the search field, we can type fuses. And there's our fuses, PNG. Alright, now it's
okay over here, but here it's spun around. So let's select everything here in our UV editor and press R. And let's just spin this around. And not only is it
the wrong angle, but it's completely flipped. So once again, to flip this, let's press S X negative one. Flip that around. There we go. And it looks like it's
quite a bit smaller. So here in the UV editor I'll hit the Esc key and
scale this up a bit. And as we go bigger
here in the UV editor, we can see it's
beginning to repeat. So we can come over
here to this field, changed from Repeat to clip. And that'll take care of that. Now we can scale it until
it's about the right size. And we can move it around until it's in the center or
wherever we want it. Maybe I will move it
right about here. Let's try that. Alright,
so in the next video, let's work on this. Over here. The Rear dim off and on. And we'll use a slightly
different process for that.
86. Adding Text to the Light Switch (process 2): Now for this piece over here, I think we may need to
use a different tactic because we may need to adjust
the words individually. Whereas with this other one, we just had one word. We could move the UV map around
until we got it in place. This one I think we may need to move the words
around in relation to each other based on the size and the
curvature of this object. So what Let's do is
take that UV map into Krita and then place
the words on top of it, kind of as a template. So let's first of all copied the black metal material
will select this object, copy this material, and
we'll call this Light. Switch. About that. Then let's, I'm going to turn on the cage here just so we can see the polygons a little bit better when we tab
into edit mode. And I will select
the Light Switch. Click Select here to select
just those polygons. And then let's UV map this. Oh, I should tab into edit mode and make sure our
scale is uniform. It is uniform, but I'm
gonna go ahead and press Control and apply the scale just so it's all ones as well. Then let's hit you and unwrap. So there is our UV map now, I feel like to place these. I may want another edge in here. I'm gonna press Control R and just add an edge right in there. Then click Select
again over here. Just so we have an edge in here. Let me press U and unwrap again. Okay, so now I feel like this will give me
the opportunity to place those letters kind of
on that curve right there. So we'll try that to get
this UV map out to Krita. Let's come up here to UV. Scroll down here all the way to export UV layout right here. We'll take this into the
Textures folder here. And maybe let's call
this Light Switch UVs. Let's do that. We currently have this setup as a
PNG, That's good. And we have the
capacity at 0.25, which means when we
take it into Krita will be able to kinda
see through it. So let's click export UV layout. And now let's go over
to Krita here in Krita, or close particular one here, and come over to our open file. And here is our Light Switch, UVs PNG will click Open. And here it is. Let's call this UV's over here in the layers so
we know what that is. I'm also going to click
on the lock just to lock it so we can't
accidentally move it around. And then I'll
create a new layer. Let's come over here and
click on the Text Tool. And I'll click and drag. And here's our text editor. Now what did we use? We use this aerial
rounded MT Bold. I'm going to delete this and
let's just type in Off here. Let's make the size. Let's go ahead and use 72 and click Save.
And there we go. Now, I think I will
add a new layer and put that gray
background again. Let's do that. I'll
take this paint layer, drag it down to the bottom. Let's come over here
to our fill tool. We'll click on that,
will change our color up here to maybe a medium
gray and click in here. Okay, so that just allows us
to see that a little easier. This is going to be off. That's the Off layer. Let's come over here, go
to the Transform tool and click and drag and we'll
see if we can place this. I'll hold Shift and click on a corner and make it
a little bit bigger. Maybe something like that. Now let's duplicate this. We can come over
here and right-click and go to Duplicate
Layer or Control J. And now this one,
let's change this. This is gonna be on. And we can click over here, drag that over like this, and let's change this. So I'll go to the Text tool
and double-click on that. Let's change this to on. Save. Close that back
to our Transform tool. And I just want to
turn it just a bit. Drag and maybe
something like this. Alright, now let's
duplicate this again. Duplicate layer. We'll call this DEM, right? That is what we need over here. I'm going to go back to Blender real quick
and just take a look. Yes, dim and Rear. Okay, so we've got dim here. Let's select it, Move it
over here. We can turn it. And let's also go
to the Text tool. Double-click this and
we'll call this DEM. Save. Close this
back the transform. And let's just make sure
this is in the right place. Maybe something like this. One more, Let's duplicate this. Select it and move it out. Rotate it and we'll
call this Rear. Something like this. I'll go to the Text tool
and double-click Rear. I'll call this Rear
here and then let's just move this down a bit. Alright, let's see
how this will work. These may not be exactly
placed and you can take a little more time and
rearranging these if you like. But I think we'll go ahead
and use this for now. So let's then hide the
paint layer, hide the UVs. And now we've got a
transparent image with just those letters on them. Now we can come up
here to File save, As we want to save
this as a Krita file right here I create a document and I'll call this Light Switch. Here we go. And then let's export it
also export advanced. We want a PNG and I'll just call this Light Switch P
and G. There we go. Alright, let's go
back to Blender. Here in Blender, let's choose
our principled be SDF, press Control T. And let's open up that image that
we just created in Krita. Here it is here.
Let's click Open. And hey, we can see it there. Alright, let's come over here. I'll search for Light
Switch. There it is. And we can see it here now. We can select everything
and just rotate it. And let's see if we can get
it about in the right place. Something like this. There we go. Now, these
may be a little bit bigger than we have them
here and that's fine. We can adjust them in Krita. We can maybe scale
them down a bit here. If we want. Something like that. Let me move the light so we don't have that
shadow on there. I'll just hit RZ and kinda move this over
a bit like that. There we go. Yeah, So
in the next video now, let's see if we can figure
out what we're gonna do with the dials in
the center of the Dash
87. Modeling the Gauges Panel: Well, I have looked and
looked and look to find some sort of image that we
could use from the internet. But there just isn't anything like this that straight
on that we could then just use as an image texture like we did
with the letters on these. So I'm afraid we're just
going to have to build it. And sometimes that happens. But to do that, let's, I think first of all,
use this as a guide. Let's duplicate this off. I'll go back to solid viewport shading and I'm going to press
shift D Z and just move this out and then press the M key and move it into the Scene Collection
so it's out here. So we can then just hide everything in our
collections here. Alright, so now that
we've got that, let's take it down to the
zero point in our grid. We can click and drag in
these fields and type in zero and Enter and that'll drop it down to the
center of the grid. Or I just want to show you, I'll press Control Z to go back. You can also just press Alt G and that will clear
the location. And also if you want
to clear the rotation, you can press Alt R. If you want to clear the
scale, you press Alt S. I don't want to do
that right now, but those can be
helpful shortcuts. So let's hit the seven key
to go to the top view. And I'm going to
create the outside of this black panel with
the Gauges in it. So let's press Shift
a Mesh circle. And for this I think I want
64 and I'll type in 0.1. Here we go. And let's scale this in. I'm going to press Shift Z. Let's scale this in, so it's just barely
inside this piece here. And then let's
press S scale that. And so it's just barely
inside there like that. Alright, so that's about how big we want it in that shape. So I will take this
now and delete it. We don't need it anymore. So let's now create these circles on the inside
Shift day Mesh circle. Let's take it back
down to 32 sides. Let's do that. Scale it down
and let's get it in a bout the right size here that we
think it should be like this, maybe, something like that. Let's say we want to create
these around the top. So let's press shift D, and I'm going to
move this over here, scale it down a bit. And let's put it right in here. It looks like this one's
right along that curve. So maybe something like this. And then let's press shift D
and move this up into here. Alright, let's try that. And I feel like this could
be a little bit smaller now. Alright, so we could
then take these two, once again at the period key, go to 3D cursor,
we're in global, Shift D Enter or Control M, X and Mirror those over there. Alright, so now that's
the basic design of that. Now we need to figure out how to get these little indentations. So I think what I will
do is first of all, I'll take these and I'll move
them up a bit like that. And this, I will take
and tab into edit mode. And I'm just going
to hit the F key to fill it with a face. Let me go back to solid
Modes so we can see that I press Shift Z to go
back to Solid mode, and then I'm just going
to hit the F key. And then we are now going
to extrude this down. I'll hit E and just pull
that down like that. Okay? Now for these up here, we're actually going
to use these to create a Boolean cutter to cut out
these circular indentations. So let's join these together. Control J. Let's tab into edit mode. And here let's hit the F
key to fill all the faces. And then let's extrude
down from here, I'll hit E and let's
pull down into here. I'll press Shift Z
and let's just see how far we should
go down into here. Maybe. I'll go down about
this far like that. Alright, so now we've got this that we're going
to cut into with this. But let's take a look at
our face Orientation first. And oh, that's gonna
be a problem, right? So we want to select
everything tab into edit mode, hit the a key and select
everything in Edit mode. And then let's press Shift N, and that will flip
everything to the outside. There we go. Now we've got all of our polygons facing in
the correct direction. Now we can take this
and a Boolean modifier. Then we can take this here. Click on the eyedropper, click on this object here. And to see if we've actually
done anything here, Let's select this object. Come over here to our
object properties. Scroll down and change
from Texture to wire. And now as we pull
these up and down, you can see how
deep that cut goes. So I'm thinking maybe
about like this, right? Let's try that. Once we get it the way
we want it, let's take And go back to our modifiers panel and let's
apply that Boolean here. Now we can take these and
move them out of the way and take a look at it like this. There we go. And we could smooth it. Let's do that. And if we tab into edit mode, we can try and select these
edges and give them a bevel. However, let me first of
all apply the scale here. But because of these
things right here, you recall that when
we do a Boolean, it'll add these extra little
points in here like this. And those aren't
good for beveling. So we need to kinda give it
some room for the bevel. I'm going to take
these and hide them. I'll just hit the H key. We need to give it some
room for the bevel. So I'll hit the
three key and select this face and this face. And now I'm just going
to inset this, right? I have applied the scale
here, so that's good. Let's just hit the icky and
inset this just a little bit. So we have some space. Now I don't want to go
over things like that, but we just want a little bit of space for a bevel
around each of these. And we do here. Alright, so let's now select this edge here. Select this edge, this one, this one, and this one. And now we can use
our Bevel tool, I think without the problems of the Boolean
extra points there. So let's press Control
B and pull out, scroll the mouse wheel. And yeah, let's get our bevel about like that. There we go. Now, let's take this
back up into the car. So I'll bring this down. And let's enable or
unhide all of these. Let's now take this
and bring it up. And let's put it right in here. So I'm going to take this and I'll go back to
median point here. Let's press Shift S2 to
move the cursor there, take this Shift S eight
and snap it in there. Now we can rotate it
around the X, our X. And let's rotate it until
it's pretty evenly. I'm going to hold
the Shift key down. We can kinda see
everything like that. It looks like we're going
to have to spin it. Let's go to local
transformation enlists, press RZ one at and spin
that around like that. And then we need
to once again use our Boolean modifier to
cut a hole into here so it won't disappear into the
Dash when we put it in here. So I'm going to bring these
out just to about here. Now let's take the Dash, let's apply all of
our modifiers here. From the top-down. We go. Then let's add a Boolean. Select our cutter object here. And let's click Apply
and see what happens. Now if we push this back in. We've got a hole there. So now we don't
have to worry about that going too far in. So I do think I want to bring
it back about like this. So I will take this edge here. Just extrude this back in the Z, so easy and back
a little further. Alright, well we've
got our Gauges now. In the next video, let's create the
actual images to put in each of these and see
if we can finish this up.
88. Adding Textures to the Gauges Panel: Alright, let's see if
we can put some images on these holes here on
these indentations. So we're going to
need to UV map this. So let's select it and
tab into edit mode. And maybe I'll go to face mode and just select
these faces here. Then I'll press
Control and plus on the numpad and expand this
selection out like that. Now we could, well, we don't really need all of
these polygons back here. So let's press
Control I to invert the selection and then hit
Delete and delete faces. There we go. So now we've
just got this piece here. And that's really all we need. Okay, so let's go to our
UV editor over here. I'll switch over to
solid viewport shading. And then with all
of this selected, let's just try this. Let's ensure that we've
got all ones here. We do not let me press Control
a and apply the scale. Alright, so now with
all of these selected, I'll press U and unwrap. And there we go. So it looks to me
like if I take this, Let's hit R and, and it around like this. There we go. And let's scale it down a bit. Alright, so now these
inside here like this, those are what we want to
put the images in, in Krita. So let's give that a try
with this selected here. And we'll go ahead and click UV and export UV layout here. Let's go into our Textures. And in here, I've added a few images that I've
found for different Gauges. They're not quite as an Tiki, but I think they'll do alright. So here I will put Gauges, UVs. Let's do that. Once again, we've got a
PNG with 1024 resolution. So let's click export,
and there it goes. Alright, so let's
go over to Krita. Here in Krita, I
will click Open and let's bring in the
Gauges UV map. I'll click Open.
And there it is. Let's call this UVs. And I'll turn it on
the lock just so we don't accidentally
change anything. And now let's come up
here to File Open. And let's just select
all of our Gauges here and click Open.
And here we go. Now let's just take
each individual one in and put it over the UV map
where it's supposed to be. So for this, the miles per hour, I think this should be
that large center one. Let's come over here to the
circle selection tool here. And I will click and
drag and then hold the Shift key down
so it's a circle. I'll then come up here
to edit selection. And now I can take this
and move it around until we get the selection just
about the way we want it. Press the arrow key a few times
to move it over this way. And I'm going to press Control Shift Alt to scale
it down from the center. Oh, I need to click first and then press
Control Shift Alt, Enter we go so it scales from the center and
I'll bring it out. Let's just about maybe
right there, let's say. Alright, so now I'll go over to the image layer and you can see that selection
all the way around. Now let's press Control C.
Go to the Gauges Control V. Here it is. Let's go to our Transform tool. We can move it, hold the Shift key
and scale it down. So I just want to put
it right in here. Then once again, Control
Shift Alt and scale it up from the center until it
gets right about in here, I'll hit the Arrow key. Let's try that again. Here we go. So it's right in there. If the Enter key
and there we go. So now we've got one. And let's call this MPH. We go. So this is the MPH. I'm gonna go ahead
and close this. No, I don't need to save it. Let's see what we have here. How about water? Wow, oil, fuel, and bolts. Well, let's go back to
Blender real quick. Let's see what we have here. We've got the oil, we've got a clock here. You've got a couple
of different things. So maybe I'll put oil and water up here and then fuel
and the other one over here. So let's see, this
is water and oil. So I'll put these two on top. Put the fuel on the left
and the volts on the right. Okay, so I'm going to click here for our
circle selection. Click drag, hold the Shift key. There we go. Edit selection. Let's move it around
until it's about in the center. And click Control Shift Alt, printing it out from
the center like this. Move it a bit with
the arrow keys maybe. Alright, that'll
probably work there. So I'm going to press Control
C and then Control V. We'll call this water. And we could put this
either one on the top. So I'm going to press
Control Shift Alt and drag. So it goes down into the center like that and
then put it right over here. And once again, Control
Shift Alt and drag it out. Let's about in the center here. There we go. Alright. Now let's go get what was
that? That was water. Don't want to save that. Let's now work on the oil here. So once again, our
circle selection, click drag, hold the Shift key. Let's go to edit selection. Bring this into the center, ish. And then once again, click Control Shift Alt
and drag out a bit. Okay, that'll work. Let's press Control C. And let's put that in this one. I'll call this when oil
over here in the layers. And then let's scale it down and drop this
in the center here. Alright, and then
what do we have next? So that was the oil. We've got the fuel, we could do that. Edit selection. And let's find where
we want this to go. Expand it out. There we go. Let's take
a look at it here. I think that's good. Control C, Let's call this fuel. And we'll bring it
into the center. Here we go, and
then expanded out. Alright, one more. Let's go get this one. Volts at its selection. Let's expand this one out. There we go. Let's grab this. Bringing it into here. We could call this volts
and then scale it down, put it in the center, and then
bring this one up as well. Now we've got our images
and let's turn off the UVs. And now we can export this out. I'm going to go to File Save As and save it as a Krita document. Let's do that and I'll
just call it Gauges. And then let's
Export File Export. And we want a PNG and 1024
is just fine. Let's do that. Alright, let's go
back to Blender. Here in Blender, let's create
a new material for this. Let's go to rendered
viewport shading. And I guess we need a
chrome material for this. Let's do that. Control L link Materials. There we go. And maybe we should use
the black material and then just kind of altered a bit because it doesn't appear
to be quite as dark. But then again, it
is under glass, so maybe it is. Well, let's just pull this down and choose the
black metal here. Now I want to pause
here real quick. This is future Darrin. And I just want to
say that I didn't duplicate the black material
here in this video, but I did afterwards. So be sure to duplicate
the black material, give it a new name before
you make any alterations or the Gauges images
will end up being on all the other objects that have the black
material on it. Okay, Back to the video. And then in our
principled be SDF, let's press Control T. Let's find our new
image that we created. Textures. Here it is here. Open that. And then we go Look at that. Now
looks pretty good. We could pull this down and type in Gauges here so we can see it. And if we tab into edit mode, you can see how it's
overlaid in there. But that looks pretty good. Let's now put a piece
of glass over this. I guess a good way to
do that would be we could select an edge
here on this piece. Press shift D, Enter, Let's hit the F key. And then let's press P and
separate that by selection. And now it's got a chrome material on it and
we really don't want that. So what I'm gonna do is
just remove that here. Then let's add a
new material to, and I'll just click
New and we'll call this a Gauges glass. We go and I'll take this
back in just a bit. There it is right there, so we get it over that. Now, if we wanted to, we could just take the
transmission and drag that up, take the roughness
and drag it down. But it's very reflective, even with the specular
all the way down. That's really a little
too reflective I think, and it's hard to control. So what I'm gonna do is just something a
little bit different. I'm going to take this
principled be SDF, and I'll hit the Delete key. And let's create a
transparent BSD F here. And let's also create a glossy. So type in gloss. And we want a glossy be SDF. Now, there's also a glass, but I'm gonna do
it this way just because I think there's
more control in it. I'm going to press Shift a
and bring in a mix shader. Here we go. Now I'm gonna put this into the surface of the
material output. Take the glossy into here
and a transparent into here. Now, if we take this factor slider and drag it all the way, one way, and we drag it
all the way the other way. And we can't really
see it at all. So what we need is something
kind of in-between. I'm going to take the
roughness and drag it down so we get a little
bit of a reflection here. Then as I drag this up, you can see we get a little bit more transparency and we may only
need it to be like, let's try 0.9. Let's try that. When we think they
are compared to what we're seeing over
in the image here. And that's not bad. Let's take the roughness
down to 0.1, let's say. Yeah, So, well, let's try 0.8. Let's try that. Now. How about 0.95? Yeah, that's not bad. Alright, well, I think that may actually be everything we
need to do for the car. In the next section
will begin working on setting up the scene for it
and doing a few test renders.
89. Applying Textures to the Turn Signals: Let's now work on some of
these small reflectors, lights, whatever they
are on the side, on the Front and on the back. And for all of them, I've
just gone out and tried to find a few textures that
might work for this. I'm going to zoom in
here pretty tight. And what I wanna do is just take this part
of the object right here and UV map it so we
can apply a texture to it. Now I've got a material for it, so let's rename it. I'll call this side reflector. Although it's probably a
turn signal, isn't it? Yeah, let me call it that Side turn signal.
And here we go. Let's go ahead and UV map this, you unwrap, and here it is. And then let's select
our principal, BSD F. And I am here in
the UV Editing tab. So once again, I've just gone into this interface and created a new window here for
the shader editor. So I'm gonna take this and press Control T to add
a new texture setup. And let's click Open. And I've got a few textures. I've put in our Textures
folder under reflectors. And I'm thinking
about this one right here. Let's try this. Let's bring that in. Let's turn it from
Repeat to clip. I want to well, there it is, right there. We already have it in
there. Pretty good. Let's pull this down. I haven't given this a
very good name at all, so it's gonna be
difficult to find. I can maybe search for one
one-to-one. Let's try that. There it is right there. Okay. So with this, I'm
just going to hit the a key and scale it down Some until it fills that
whole UV island here. Something like that. And that's all I really
wanted is just something very small that dole off-white color. But what we could also do is add a little bit of
specularity to it. I can take the roughness down. We could even try that
clear coat if we wanted and we can overdrive
it like type in four, see if that will do anything. Yeah, so that's
really all I wanted. We could of course, do that over here. Or we could just duplicate it and bring it over
to the other side. So why don't we do that. Let's just delete this, select this shift S1, period, 3D cursor, or in global. So let's press shift D
enter controlling them X. Then we go. So now it's over
on the other side. There it is. We can also
let me try the metallic, see what that will do if that
will do anything for us. Well, it kind of does. We could do something
like that, I guess. Alright. Maybe with that, I will
take the clear coat off and we'll just
leave it like that. Alright, so let's go back
and work on one of these. Let's hit the period key. And for this, recall that I've got this
material on these. We're probably going to need
two different materials. Let me just find an image
of that. Here we go. We've got one right
here, so yeah, we've got a red
something which may be a brake light and then
these two little things, maybe those are
also Turn Signals. I'm not sure, but for this, we've got our
materials selected. Let's give it a name. Let's call it red brake light. And I'll close this. And let's now select
this principle of the SDF Control T. Click Open, and let's find our
Textures folder. So here's a red one. I'm just going to try this. We have some issues. So let's tab into edit mode and just select
this one with the L key. And let's press U and unwrap. And that's already helping. Let's bring this one in. Let me see what we have here. The end of it is 833. So I could pull this down. And in the search
field type 833. And here we go. We go and then we can hit the achy and scale
this down a bit until it fits inside
here, like this. And we could also hit the R key with it in Edit Mode
here and spin that around. So maybe that's going
straight up and down. And what else do we wanna do? I know it's not exact, but it's the thing I
could find at the time, so I think that'll work. Okay, Let's take
down the roughness, Let's bring up the specularity, see what we can do there. Once again, we could
use clear coat, we could use metallic, but is that enough right there? That may be enough. And then I think what I'll
do is add an RGB curves. Let's do that. Drop that in there, and in the combined, I'll just add a point
and drag it down a bit. So it gets quite a bit darker. So it's reddish but
still pretty dark. Alright, and so these
other pieces here, I think what we should
do is select these two. Create a whole new
material slot here. Let's give it a new
material and let's call this back Turn Signals. And then let's
click Assign there. Okay, so now that's
our new material. Let's get rid of this here. And our new material over here, let's select the principle
be SDF, press Control T. And let's go find, I think I had a
green thing in here. Yeah, these things, I
thought I'd try this. Let's see how this works. What do we have? This is 1,600. Let me pull this down. Type in 1,600. Here we go. Then with these selected, let's press U and unwrap. And for these, I will go ahead and scroll the mouse
wheel to move over here. Go to UV islands select. I'm going to bring this in
and take it down quite a bit. So it fits in here. Like this. And this one too, I'll scale in the exit bit, Gail it down, and put
this one right in here. Let's see what we
have there. Okay? So That's a little bit different than we're
seeing there of course, but let me take the
roughness down quite a bit, the metallic up some. And then once again, I'm going to put an
RGB curves in here, Shift day search RGB curves. And then I will drop a
point in the combined and drag it down and get it
pretty dark here, like that. Yeah, there we go.
Alright, then lastly, we've got this thing up here
and I'm not sure I really have a good texture for that. But I mean, I guess I could
actually try using this. We could try it. So what is this? This is 61 2017. Okay, well, let's try this. I'm going to select
this and zoom in here of this is that piece. It does not yet have
a material on it, so let's just create
a new material. Let's call this
Front blue light. Let's create a texture
setup with Control T. I'm going to find this one. Click open, browse to
my references folder. And let's just find this and see if we can actually use it. So for this, I will go ahead
and press U and unwrap. And there we go. I'm going to select
it and press S Y. And then let's pull this down. Search for 61,
2017, There it is. Okay. So let's scale it
in Gaillard in like this. Oh, let's be sure we change
this from Repeat to clip. And then let's move
this right over here. And let's just see if it works. And we could scale it in
the Y just a bit like that, kinda get it the same size. Let's just see why not. Well, I'll be darned. That might just work. Okay, let's take
the roughness down. Maybe the metallic up. Let's see. Maybe a little. And let's try that clear coat. Let's overdrive it,
let's call it five. And that's too much about too. That might work. Yeah. Let's maybe take the metallic down since we have
the clear coat. Yeah. Okay. Let's go ahead
and go with that.
90. Appending and Setting Up the Golf Bag: Now the last little thing
I'd like to add for the Car is something
for the Golf clubs. Now, I don't need them
to be real detailed. And frankly, since they weren't
part of the car itself, I went ahead and created
a Golf Bag off camera. So if you want to use it, I'm including it here
and you can just append it into your scene with the car. So the way you do that is you come over
here and you go to File append and go to the
Blender's scene files. In there you should see
a golf clubs dot blend. Now, if you double-click that, you can then see the different
parts of the Blender file. And within the object folder, you can then find the Golf Bag in there
if you select that, and then just click Append, you should see it come into your scene and
I'm just going to pull it out here
so we can see it. Now, the problem you're
going to have is that the materials aren't gonna be the same materials
as you're using. So let's just go over real
quick how you can match up your Materials or add your
materials to the Golf Bag. I'm going to press the period
key go-to median point. And I've got the
origin of this object down at the bottom of
the Golf Bag there. And what I'm gonna do is
go to the bottom view with control and
seven on the numpad. And then I'm just going
to hit G and move this over so it sits in here. I'll go to the side view. Let's bring this up. And I can take it
and I can turn it with the R key G and move it up. So it just kinda sits in here. You may have to do a little
playing with the angle of it. So now that it's in
there, I'm just going to take it and rotate it up. So it kinda sits like that. Now, it's got materials on it. Let me actually, I'm just going
to join these areas here. It has materials on it, but it's materials from my
scene files and not yours. So I have a very similar
problem here because this material set isn't the material set
for the Golf clubs. So let's just go
over, as I said, changing or updating
the materials on this. So what I can do is
change this color. So I've called it tan leather in the Golf Club blend file. But here we need to switch it to the rag top because I
think these seem to have come with the car and
they match up pretty well with the leather of the top and
the Trim and everything. So I'm gonna change
this to the rag top. Here it is, material
I have in here. And there you can see it there. Now, I need to UV map this. So I'm going to tab into
edit mode, go to face mode, and I'm going to hover
over just the parts I want and press the L key. So just these 22 parts
is really all I need. And then I'm going to press
you smart UV project. I'm going to add an
island margin of 0.001. And then I'm gonna click Okay. So that is given us a UV maps so we can see that material on there and that
looks pretty good. But I'd like it to be a
little bit different. Maybe maybe I'd like
the leather grain to be a little bit bigger. So if I came over here and adjusted in this material here, it would change it for all the other instances of
this material in the Scene. And I don't want to do that. So what I'm gonna do is just
duplicate this material. Click here. Now we've got a whole new material
for the bag, and I will call this Golf Bag. Now I can go into that
material and adjust it. So if we come over here
to the shading panel, I will go back to
the Golf Bag here. Let's switch over to
our rendered preview. And now I'm going
to zoom in here. We can come over
here to the scale for the Golf Bag material and maybe I take
this down to two. Let's see how that as well.
That's a little too big. How about three? Yeah, maybe
three is pretty good here. Alright, so let's do a
similar thing for this green. Once again, here's the green
leather for the Golf Bag, and I want mine to
be Interior green. Alright, so I take
this material, pull it down, find
my Interior green. Here, it is, switched to that. Now, once again, I don't
want to change this because that's on other
parts of the car. I'll duplicate it. And let's call this
Golf Bag green. Right? There we go. So now also, this is very tiny and I also need
to UV map this. So I'm going to tab into edit mode and just
select this and this. This Trim here Right there. Down here. I think there's
a couple of others here. Yeah, this one. This one here. So I'm just hitting the
L key to select all of those things that have that
Golf Bag green material. I'm going to hit you
smart UV project. I've still got 0.001
for the island margin, which is good. I'll click Okay. And there we go. So now we've got that leather texture on there as its own material
for this object. Now once again, my
Golf Bag green, the scale on this
is pretty small. I'm going to try
like for about five. Yeah, so let's try that. In addition, this
face right down here, I think I'm just going to
select this face right here and add that to the Golf
Bag green and click Assign. We go. And what about this
little thing right here? I've got this as black cloth. I don't think that
looks very good. Why don't we change
that to black leather? In other words, will use that material that we did for
these two on this as well. But we'll change
the color a bit. So for this black cloth here, instead of this,
let's pull it down and choose that rag top. I'm just going to type in rag. There it is. And
there it is changed. Let's click on this
to duplicate it. Let's then change the
name two black leather. About that. Let's tab into edit mode. Select this with the L key. Let's hit you and
smart UV project. You can see that here. Then let's adjust our settings
here in this new material. So maybe I'll take the
scale down to three. How about one? Yeah,
let's do that. Then let's change the color. So over here in the RGB curves, instead of having it
pulled away up here, let's pull it way
down like that. Should be a little bit
bigger. I don't know. Let's try it. 0.5, 0.75. Yeah, maybe something like that. And lastly, I just want to mention that the Golf
clubs here are just all the same Golf Club
duplicated and I didn't worry about creating a
driver or anything for it. But the way I did
this texture here, let's go ahead and select
this and go to club face. So this is the club face PNG. I will pull this
down typing club. Let's go take a look at this. So this is the image that I used and applied it
to that material. I UV mapped. Just this piece right here. So I'm gonna come over here and click Select with the
club face selected. I'm going to click select. And you can see I just
selected these faces off of the club and then UV mapped
it with you and unwrap. And then I arranged it on this image and plugged it into the base color
here of the material. And I also added a bump map
as well, very low strength. Just to get the sense that those are have grooves to them. They're right there. Let me just select
this real quick. Hit the period key
and I just want to zoom in. Here we go. So you can see it just has a little bit of a sense
that there's a bump to it. And that's all I did for that. Then once you get
this all set up, of course you can duplicate
it to the other side. So if we come over here
to the Layout tab, we could change from
median point to 3D cursor. We could ensure that
were in global here and press Shift Enter Control M and put that over
at the other side. Actually, if you
mirror it like this, there'll be two different
kinds of clubs. One will be a
left-handed said and the other one will be
a right-handed set. If you don't want that, then you should just duplicate it and move it over manually. There you go. There's the Golf Clubs
91. Creating a Test Render: Alright, let's see if we can set this scene up for a few renders. I think I'm gonna do a
studio lighting setups. So all I really want
is just a floor and a wall that just kinda
gradually goes away back. And oftentimes what
I'll do is I'll just create a circle here. And then I will fill it
with like triangle fans. And then from here, I just want to go into edge mode and select that
edge all the way around. Then I can just press E and
S and scale out and just begin to build this
out like this. Then once we get out
to a certain point, I'm going to hit
the period key and change this to median point now. But let's say once I get
out to about right here, I'm gonna begin moving these up. So it's like it's gonna
be in a big bowl. I'm going to hit E
and S and bringing that out again like that. And just keep doing
this until we get it so we can frame up the car without seeing outside
the bowl here. Let me move this. I don't like this and I'll
bring it up one more time. And yeah, let's try this. Let's see how this works. I'll right-click and
choose Auto Smooth. And then we're going to need
a camera in here, aren't we? We're gonna need to press
Shift a and create a camera. And the cameras in the scene, right here, you can
see it right here. We can shrink it
down a bit if we want by just hitting the S
key and scaling it down, it doesn't change or hurt
the camera any to do that, It's just how it's
viewed in the scene, in the 3D view port here, we can set the camera in
a particular place by, let's say just framing
up our scene like this. And then we can
move the camera to this point by pressing
Control Alt and zero. And that will bring the
camera to this point so it frames up what
we're looking at. Now. We can then tumble around and
tumble out of the camera. Or we can hit the zero key and look through
the camera again. Now, in addition,
if we want to move the camera around while
we're looking through it, you can hit the End key. Come over here to view. And there's this
lock camera to view, so we can turn that on. And then we get this
little red dashed line around the camera that tells
us when we tumble around, we're going to tumble, fall still looking
through the camera. So let's say I want to get it
about like this. Let's say. Now, in addition, we can also change the focal
length of the cameras. So with the cameras selected, we can come down here to the Object Data
Properties and now has a little camera icon there. And we can change the
focal length from 50 mm. Let's try 30. I like a little bit of a wider angle when I
do a render like this. So maybe something like that. And you can see what
I mean by I've made this tall enough so
we'd have to tilt up pretty high before we go beyond the top
of the bowl there. So now let's turn off
the camera to view. And if I tumble around, now the cameras stays put. But what we also need, I think, is to change the color
of the floor here. So I'm going to
select the floor. I'm going to change the name
of the object to floor. And then let's go to
the Materials panel and just click New here. And in this, we can
change the name. We could call this floor
as well for the material. And then I'm just going to take the base color and just drag it down in value and see
what we can do here. Yeah, so maybe
something like that. I'll hit the zero key to go
back to the camera view, I'll hit the end key
to close that tab. And so we're getting there, but I think there's still more
I'd like to do with this. I don't think this is
quite what I want. Now, I went out to
poly haven.com and I downloaded one of their
age DRIs and you can to they're all free to
download, free to use. But I'm going to change
the HDRI in the Scene. And recall to do that,
we can come up here to the environment or the world
properties I should say, and then change our
environment texture. I can just hit the X here
and then click Open. And let's go find our HDRI. I've put it in the HDRI folder and it's this studio small 08, and it's a four K image. So let's just click Open. And here we go. And so this gives us, if we tumble up here, Let's tumble up here
and let's come back over to the render properties. And I just want to show you
what this HDRI looks like. So it's just basically
a room with lights. That's all. It is. Just a black and
white room with lights. So I'm going to select the
floor again and hit the Key, there it is. And then I will hit to zero
key to go back to the camera. So that's changed
our lighting setup and that's kinda nice. But let's go back over to
our world properties here. And we don't really
have a way to turn this in this panel. So let's go over to
the shading panel. And I will hit zero to go to the camera view and I'll switch
to the rendered preview. And instead of looking at
the material for our object, Let's pull this down and
look at it for the world. And in here we can see our small studio
environment Texture. And what I wanna do is just use our Node Wrangler to create
a texture setup for this. So with that selected, I'll just press
Control T and N here. We want to rotate in the z-axis
here under the rotation. So we can click and
drag and the z-axis. You can see that a whole HDRI turns as we move this around. So I'm just looking for a nice placement of the lighting and the
shadows, etcetera. I like this. Let's take a look at this. That's not bad. Let me go back to
about 30 degrees. I think I saw that around
in here was kinda nice. Maybe something like
that's not bad. So anyway, you can rotate
the HDRI however you like it to get it into a lighting setup
that works for you. Yeah, I'm gonna set it
up, kinda like that. Alright, and then I'm
going to come back to the Layout tab and let's
take a look at it. Alright, now, in addition, I want a couple more highlights here on
the top of the Hood. I think. So maybe let's create
another Light for that. I want to press Shift a and
go to Light and Area Light. Then I'm just going to
move this up and you can see we're getting
a reflection here. So I'm going to scale
it in the X like this, and then scale it
in the Y like this. Let's see what we can do. I'll hit the zero key again. And so now we're getting
a highlight here. That might work.
Let me change this. I'm going to hover over this and create a new window up here. And down here, I will
change to my solid view. Up here. I will go ahead and go back to the rendered
preview. There we go. So I just want to
move this around. So if I go too far
down, it's in frame. But I can bring this. And you can see how if I
move it in the x-axis, it moves it along the
top of that Hood. I kinda want something,
maybe like this. Then it might not be bad to have one Back on the Trunk as well. I'll press shift D Y and
move that back here. And let's see what we can
get by Move it all the way back here. Let's try that. Yeah, So now we're getting
one back there as well. Although now I'm
in the frame here, I better pull this up. That we've got this
line of highlight, which is kinda nice. Once again, it's totally
up to you how you want to set up the lights and
scene for your renders. I'm going to take this and duplicate it and move
it in the X so we get a little bit of another
one up on top like that. Let's see how that looks. Alright, and then
I'm going to save my scene and I'm gonna
do a Test Render. For now, I'm going to come up to the output properties
and I'm going to change the resolution here from 100% down to say like 25%. And so when I hit F12 or come up here to Render Render Image, it'll only be a quarter of
the size as our full render, but I just want to
do a test like this. So it's small and goes quickly. So now I can maybe make this a little bit
bigger and scroll in. Oh yeah, it's getting
a little choppy there. Let me change it to 50%. Let's try that. And then I'm going to hit F2. There we go. That's a pretty good size. Yes. So now we're getting these
highlights along here. I might want to
move this one back. Oh, and look at this. We're getting Seat here to recall those old Seats
that we did originally. Those are still in there and they're coming through
in the Render. Let's go see if we
can find those. I'm gonna go into the Interior and search for something
that is hidden in. Here we go, these are
those two objects. If we turn these off in the
render here and then hit F2, again, those would be gone. So they were hidden
in the Viewport here, but not in the render. And in fact, we don't
even need those at all. We could just take those
and delete them completely. So I'm gonna try taking this and moving it over a bit like this. Now let's try that. I'm gonna hit F12. Then we go. Yeah, So I think that's
looking pretty good. There are a couple
of tweaks I want to try in the next video. Maybe let's see if we can
alter the glass material. And maybe I'd like
to try and darken up the floor and the background
a little more as well. So that's coming up next.
92. Depth of Field and Final Render: Continuing with
setting up the render, I'm going to join this
area back like this. So it's all one window here. And I think the next
thing I wanted to try is darkening up
the background a bit. I think maybe this
sunlight here, if we hide this. Yeah, Look at that. I kinda like a little bit more contrast
there if I turn that off. So I'm going to turn
it off and turn it off in the render like that. And then let's hit F2
just to test this. That's kinda nice. So as I'm rendering here, I just want to point out that
in the render properties, I've got the max samples at 128 and I'm using
de-noising here. With de-noising, you can
lower your samples a bit so you don't have to
wait as long on renders. And recall, we've got cycles chosen here as
our Render Engine, and I'm using GPU
compute so that my graphics processor is the thing that's doing
the rendering here. It goes a little faster
when you do that. In addition, I will select
a floor and go back to the Materials panel
and maybe with this, Can I take this
down any farther? Well, that's fully black. I don't want it fully black. I'm going to bring it back
up just a little bit. And I think that's okay. I'm gonna hit F12 again and
just see how that looks. Yeah, I kinda like that
Background going a little darker. However, I might want to take the specularity
down, just a smudge. Let me do that. Let me try it and
then hit F2 again. Yeah, I think we're
getting there. Okay. And also I wanted to tweak
this glass material. I think I do want to actually try a glass shader with that, I'm going to click on shading, and I'm going to
select the glass. And in here Let's change
from world to Objects. So here is our glass texture. And recall what we did is just dragged up the transmission
in this principled be SDF. That I think was just
a temporary thing. It's working pretty well, but I'd like to try and
just the glass shader here. Let's try that. Shift a search glass. Here we go. Then I'll just drag
this and connect it to the surface there. Let's take a look at that. I'm going to tumble around. What do we have here? Well, it's pretty good. It's fairly reflective, but I kinda like what we're
getting around the edges too. We're really getting
a glass feel around the edges like that. Maybe we'd really don't
need to do too much this. We could try increasing the roughness like this
and that spreads that out. But I don't know that we really want that
spread out too much. I liked that
reflection in there. Yeah, So I think that's fine. Alright, so let's go with that. Let's try that. I'm going to hit F2 again
and let's see how it looks. That's kinda nice. And we're getting a
little reflection from the Steering Wheel
as well up in here. Alright, and also what I'm
gonna do is maybe come back to this View tab and turn on camera to view and maybe rotate this just
a little bit so we can. Let's try that. And then, alright, I'll turn this
off to, let's try that. And also I'm going to come
back to the world properties. And we've got the
strength here at 0.5. I'm going to take
this up to maybe 0.7 and let's see
how that looks. Alright, what I'm gonna
do now is come back to my output properties
and I'm going to take this backup to 100%. I also want to come
down here and have, I, have I adjusted the
performance now, I'm going to turn
on persistent data. And that will allow us to, as we do multiple renderers, it's going to cache all those
images and materials into memory so that
subsequent renders shouldn't take quite as long. So I'm going to press Control S and save that, then hit F12. And let's see what we have here. You can see the samples
going up here to 128. Then it's going to denoise it. There we go. Yeah, So that's kinda nice. And once you're all done or once you get a render
that you like, what you can do is come
up here and go to Image, Save As, and you can
save your render out. I've got a renders folder here. I'm going to name this
Kissel Render 01. There we go. There's our first
rendered image and you can then come
into this tab again, turn on camera to view. And you can zoom
around and change the view and get multiple renders from
different points of view. Now, in addition, I want to show you one thing you
can also do here. I'm going to turn
this camera view off at the end key
to close that. You can also set up a
shallow depth of field, just like you'd get
on a real cameras. So if we select the camera here, come over here to the
camera properties. You can turn on the
depth of Field and then you can choose what object you want
to have in-focus. So I'm just going to click
on the eyedropper and then maybe click on the Hood
Ornament right here, or maybe this
little emblem here. And that puts it in this field. And now it's going to give you a depth of
field as if you've got an f-stop of 2.8 on your
lens and you can of course, change this to F4, F8 or F1, or whatever you want. But I'm going to keep it at 2.8 and let's see how it looks. So with this now, I'll hit F12. And let's take a look. There we go. This now is in focus
and you can see how as we go back toward
the rear of the Car, it falls further and
further out-of-focus. So this is kinda nice when
you're doing renders of, say, I'm going to turn this on. Let's say like the Interior or something like that,
something closer. Like see how this is blurry. I can come over here, hit the X here, then the eyedropper, click on the steering wheel and
now that's in focus. And like the area or the seat back here
is all out-of-focus. So we can then hit F2 here
and take a look at that. Yeah, that's nice there. You've got this
area out-of-focus and then the Steering
Wheel in crisp focus. And then we go, now we've got our 1925 Kissel
Gold Bug Roadster
93. Conclusion: Well, thank you for joining
me on this journey to create a Kissel
Gold Bug Speedster. I hope it's been useful for you. I've certainly had a
blast creating it. If you're interested
in continuing to learn Blender and you've enjoyed
this type of project, I'd suggest finding
your own vehicle and going back through
the class with that, find or take your
own reference photos and begin the process again. I really do think that's when everything will begin to
click into place for you. Blender is an amazing program and there's so much
you can do with it. Please check out my other
courses as well and see if there's another project
that catches your interest. Well, thank you again. And I hope to see your
work out there soon. Take care
 Darrin Lile, Blender Foundation Certified Instructor