Transcripts
1. Welcome!: Tea. Loved the world over. And especially in the UK, we get through 100 million
cups of tea a day. Welcome to the first of
hopefully many crafter nouns. During lockdown, in a bid
to keep everybody happy, I came up with a
term crafter nouns, though I'm sure I'm not
the only one in the world. Where we would engage
with different hobbies. We didn't actually do it as
much as I would have liked. So I was really thrilled
when it occurred to me that I could use the term for a series of classes for you. It's made me super happy, and I already have quite a few ideas for
this proposed series. In this initial class, we'll be embarking on a really
cute mini collage project. Those little tags which
usually end up in the compost, along with the tea bags. Well, we're going
to elevate them to sweet little bunting. This is the most relaxing, easy and effective
zero stress class. Just a quick and easy and very pretty mini collage
bunting project. What's even better
is we can enjoy a cup of tea or three
whilst we work together. I've prepared two
projects for you. One, I've named Melrose
and the other Compass. This is a good opportunity to
have a good rummage through your arts and craft supplies and get all your
bits and bobs out. We'll be covering
a lot in class, including pressed flowers, ripping up of paper,
rip top maps. Mark making with pens of
your choice and seals. We'll also be touching on a lovely technique called
asmic or angel writing. It's such an individual
and intuitive thing to do. To keep them from wear and tear, you could always choose to seal them with a little
bit of map medium. I used them for a
birthday present, and I gave another to my daughter to hang
on her Noiceboard. You could also drape
them over Wal art or keep them as a beautiful
secret in a book, handmade journal or
Letter fold purse. And just to remind
you, subtitles are available in English, French, German,
Portuguese and Spanish. If there is anything I can help with to make my classes
more accessible, please do let me know. I always ensure that my
classes are in real time, and I focus on a very
gentle teaching style. Recently, you've given
me feedback about how you feel you sat next to me whilst we're
doing these classes. And I really feel that's the best compliment any
teacher sharer can get. So thanks so much for that. Don't forget if you like, you can always share your
project with the class. You can do this under
projects and resources, and on the right, you'll see my project and submit project. It can be a little
isolating sometimes, all creating in our
respective workplaces. So do reach out and
share your experience with us if that feels like
something you'd like to do. So when you're ready, let's move on with our T bag tag bunting.
2. Materials: So let's run through materials. And, of course, we
have tea bags because the whole class centers
around the tags. So we're just going
to be snipping off the cotton at the
top of the tea bag. And I only design one side, but you can, of course, do
a collage on both sides. I treated myself to a green hole punch and
stapler for this class. I'm bringing some liquitex
Acrylic markers in, as well, and I've got a pink and green and
the gray there. May not use them all, but I want to have them handy. Your favorite pen or marker would be great
for this class. So please don't feel you
have to buy in new things. And I've also got
pencil and a pen. I usually have both handy
when I'm doing classes, and again, may not
use both of them. The pigma micron
is 005 in sepia. Now, for pieces that
we're going to wrap up, I've got little
scraps of maps here, and this is a map of further north than the
Highlands of Scotland. And I've also got
some old designs. I've chosen ones in
the palette of green, kind of an ochery
colour and pink. I've also got some
color swatches, which I think I might
punch some holes in. And I treated myself to
these pretty scissors. I bought these last year, and I've been waiting for an opportunity to use
them, so I'm really happy. Got a little pair there as well. We're just going to use those
to trim around the bunting. As to other elements, I'm going to bring in some
press flowers and leaves, and we've got some daisies, and it looks like
maybe wild carrot. So I may bring in some
of those, as well. I've just picked this up. It is one of those star punches. I know I have others somewhere in the house, but
I'm not sure where, so I thought I would use
that on the map, and, of course, going to create some circles with
the whole punch. I've got some washy tape. This is actually going to
be useful and decorative. We're going to be
using it to secure the strings in place
whilst we staple, but also as a
decorative feature. I've also got some seals. These are not made out of wax. I think they're acrylic, but I thought they were
really pretty. I've just got some
basic PVA glue here and some pritstick. You can use either or both. I use a cocktail stick a
lot to help me stick down fiddly bits and pieces that
or the end of a skewer. It allows you to lift
up maybe a petal or a leaf and then just allow the glue to be
spread underneath. So let's move on to
preparing our elements.
3. Project 1 | Melrose | Preparing Elements: So let's start by
preparing some elements. I've got old maps here. I've got some designs. I've got a hole punch and one of those
little star punches. I've got a dock
background here so I can see all the
smaller elements, and they don't get lost. So I'm going to start by using
the star punch on the map. We probably won't need
too many of these. So I have some press leaves, which I think would be lovely. And I've also got
some little tweezers, which actually came
with the leaves, which might come in handy. I've got some swatches here, which I think would
look really nice. I love the color of them. And I'm going to
use my whole punch. I'm just tearing it down so I can get in there
and do a few more. I love this magenta color. So I've got my
little dots there, emptying those out
to join the stars. And these are really sweet
little circles of paper. And I've also ripped
out around the holes, as well, because I think
they look quite cute. So now I'm just adding to
that with some pink paper, going back to the magenta. So it's amazing
what you can find. I actually haven't
got my bits and pieces in neat folders, but I think after this exercise,
I'll be doing that more. You can always store
them in colors. So I might cut out a leaf here. I'm not the most
patient person when it comes to cutting out elements. And the thing is, we may not
use all of these elements, but all adds to the collection
that we can select from. So how about cutting out
one of the flowers as well? I do quite like this
palette of pinks, greens and ochre yellow. It's quite time consuming, but it would be nice to have
a few of these almost there. So this is an old design
of watercolor leaves. So I think I'm going
to rip some of the pieces out just
to add that green. So tearing towards
you, of course, gives you that rough edge. Here's another one, and this is actually on recycled paper. So it has a very different
texture to the watercolor one. And quite like
that peachy color. So we've got green, pink, peach, and ochre. So just as we would,
if we were painting, we've created a
lovely palette here. Here's another wee flower. And actually, the card
stock that we're using as the background there in itself is a
really lovely color, so I'm going to add
some of that too. This is actually from a set
of blank greetings cards. So it's quite nice
to add some of this blocky green as well, leaning towards a cooler green. So I think that's a nice set of elements there to
get started with. I was just about to
tidy those away, but I can see a few little
colors here that I like. So this is like a dark ochre, kind of a dark orange. So tidy in the way and ready
for our class project.
4. Melrose | Part 1 | Torn Paper: So let's get our tea bag
tags ready for our project. You could either obviously
have your tea and save the tags or do it
the other way around, which is what I'm doing. By the tea, take the tags off and have my tea bags
stored for later. So just trimming the strings off as close to the
tea bag as possible. So just popping my tea
bags there into a basket. Got my Pritt stick, and I found this easier bringing the little pieces to the glue rather than
the other way round. And I'm going to start off
by placing dark green. I find it easier to put a little piece of paper on
each one across the board, but you can do one at a time. Placing them at jaunty angles and not worrying
and actually aiming for them to go over the edges of the tag because we're
going to trim them. And now let's move on
to a different color. And I have some of these
magenta color swatches. Trying to get a little orderly here because the tags do get
in a mess quite quickly. So I'm going to put them all in a row just while I get the
initial pieces of paper down. So sticking with the magenta, getting my PVA glue out, putting a tiny dot of
that down, actually, and just going under the edges of the paper where
it's not fully sealed. This is why cocktail
sticks are so handy. A little bit of a
peachy color there. This is the recycled sketchbook paper. It all adds to the texture. No right or wrong. I encourage you just to put these down
with very little thought. And at all angles a little bit of a flower
here in that oak yellow. A little bit of glue and just rolling the cocktail
stick under the edge. So I think now it's time to put this flour down
on one of them. Of course, I'm going over
things now, and that's okay. A little more.
Magenta. Just slowing down a little bit now and considering where I
would like things. So I've got a theme
going there now. We've got this green
magenta and ochre So now I'm picking
up one of the stars. I find licking my
finger and picking up the stars or the press flowers is a really good technique. I really love those
little map stars. So let's have a quick
look at where we're at. I'm not keen on the
blue of the tag, so I'm going to try and cover
every little millimeter.
5. Melrose | Part 2 | Pressed Flowers & Leaves: So moving over to the press
flowers now and the leaves. And I used to make
press flower cards, so I'm using methods
that I devised then putting down some PVA glue. And picking up our
little cocktail stick and then just running it
over the back of the leaves. It's also where tweezers
come in handy as well. Then still holding that, just turning it over
and placing it down. Just looking at
the other flowers. I quite like this
little flower head. It's quite delicate, so I know some of it's
probably going to break off, but I'm gonna do my best. It's gone down quite well. And, of course, we're
going to seal these later, so we don't need
to worry too much. They will be protected. I love this delicate
white flour. This is paper thin, so I'm being super careful. And I think another leaf would be really sweet
on top of that pink. I love that. It's so effective. Oops. There, it's fine. We got there and some
gypsopil baby's breath. This presses beautifully. I normally do press
my own flowers, but I am low on those. So I treated myself to these press flowers
and some press leaves. Yeah, that looks pretty. So I think that's it
for the press flowers. So I've got another packet here, which is all leaves. So I thought I
might have a look. There's a lovely selection
of ferns, silver weed. I'm gonna go with
this packet because it has smaller leaves. So I'm just going to
break off the top part. It looks quite fragile, so Ek. Oh, dear. I lost one of the
leaves already, never mind. Let's get that down quickly. So what next? Be nice to have some fern. So, again, just going
to break that down. So it will fit on the tag. And I think I'll put this
over that white flower. That's looking nice.
It's tying them all up nicely in terms of their
little compositions. So let me line them up
and let's have a look. Very, very sweet.
6. Melrose | Part 3 | Hole Punch Circles & Mark-making: So they're almost done, really, but I just want to add
a few more features. So I'm going back to the
whole punch circles. Bit fiddly. I'm deploying the wet finger technique and just dipping it into the PVA. There, I got there. So I think I'll go back
to my original technique. Get the handy
cocktail stick out. Just gonna tap it into place. They're a bit fiddly to do, but I do really like how they add something
to the collage. Makes it much more interesting. Trying it the
difficult way there. Just going to slide in a
little bit of glue underneath. And I'm just going
to carry on adding these where I feel
there's space. Using the dry end of the cocktail stick just
to tap it in place. So I think this is the
method I'm going to use. From now on, seems to
be the easiest way. Don't they add a difference? Just little circles. By now, you'll be able to see yours developing their
own little character. Can't wait to see them. So I'm getting out my
Liquitex acrylic marker and just do some
little dots in gray. I'll leave all the
details as usual in the about section
underneath the class. And adding these
little touches of pen is another detail which will
bring them all together. I love finishing touches. So because there's still a little bit of the
blue showing through, I really want to kind
of try to cover that. So I've decided to
place this leaf there, and it will go over the circle, but sometimes you got
to lose something. Yeah, that looks good. And I'm just adding a
tiny touch of glue around the remaining tag and just putting down a tiny
little scrap of paper there. So there's just this
edge here of blue, and I've torn some
of that magenta. That looks nice. So I'm just going to make my way through and check a
tiny bit of blue there. I'm just gonna grab that, put a bit of glue down. Oops. That's my magic trick. I'm going to secure
that in place. And I just wanted to
add a little detail to this one because the flower
takes up most of the tag. So they all have similar
elements going on, but differently manifested,
so they're all unique. And just looking
at this last one, noticing this tiny bit here. And I'm adding a
couple of circles.
7. Melrose | Part 4 | Angel Writing: So I'm going to get
my pigma micron out. And I want to demo
angel writing. So angel writing is something I saw an artist do
years and years ago, and I can't remember
her name now, which is really awful, but she used to write angel
writing over her artwork. And it's just symbols and maybe some letters
poking through, but just intuitive writing. You're not aiming to make any
sense or to form any words. It's just right from the heart, and everybody's angel
writing is different. And I love doing it because you never really
know what kind of shapes you're going to get because you're doing
it without thought. It's technically referred
to as aemic writing. And I'll leave a link
for you to have a look. You may have come across this
or even tried it yourself, or you're already
incorporating it into your art, but
I really like it. And I know some artists
that start off with assemic writing on a collage say and then cover
up the writing, but just having it there hidden is really important to them. While I'm here,
I'm just going to outline this little flower. And although it's not writing, it's still the pigma micron, and that links it to
all of the other ones. And I'm going over some
of the gray marker, just adding little lines on
one side, like a shadow. I'm really pleased with that.
8. Melrose | Trimming: So we've come to a part of the
class that I really enjoy, and that is trimming
our little collages. So we're just turning them over and following the
edges of the tag. And I think because it is
a repetitive movement, we're not feeling like we
have to create something. It's actually deeply restful. Especially for someone who
likes cutting up paper. Makes a huge
difference, doesn't it? How they look once
they're trimmed down. So that's number one. And these scissors, by
the way, are gorgeous. I saw them and had to buy them. And I've been sharing some
posts online on Instagram, and I got a few
comments about them. The trouble is, I can't
remember where I bought them, but I am going to track them
down and leave you a link. They look gorgeous in photos, but they actually do
work well, as well. H That's number two with our baby's breath. And all you need to be
careful about really is not cutting the string. So hold that back and try to kind of go around the top there without
causing any damage. The next one is where I
used the white flour. Not much to trim on that one. Very easily done. And they really
start to come alive. I love this bit. Just trying to stay neat. Doesn't come naturally. Now we're to our final one. We're just pulling the
string out of the way. And we have all our
pieces finished. And they're like little siblings
all sharing certain DNA, but having their own
individuality, as well. So I'm just going to
neaten up the strings before we move on
to the stapling. So the string is already
well attached to the tag. It's just to add a little
bit more strength. There's a little tear
in this white flour, so I'm just going to
add a tiny touch of glue and put one of the map stars
just to cover it up. So all's good. Ready now for our stapling.
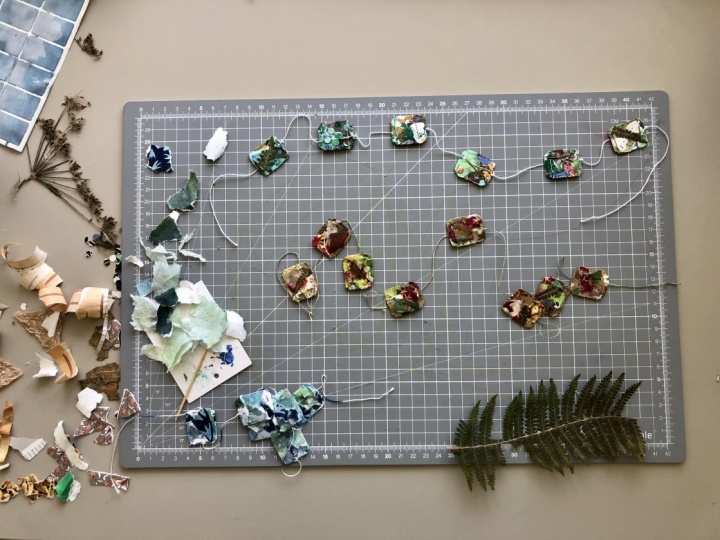
9. Melrose | Stapling: So now let's put them together. So I am doing it this way so that all the tags are
heading in one direction and then securing it with washy tape and
stapling it in place. Then we can trim this edge here. So what we're doing is
cutting the piece of string which is underneath
the washy tape. So on this one,
I've got my string that I'm keeping on
the right of each tag. Facing another one down. So all you need to
decide really is which direction you're
going to secure these. I we get in as close
to the edge as possible and secure them. So cutting this extra
bit of string again, this is the bit that is not
at the top of the label. So it's going in
the same direction. Sliding it underneath. Securing it with washy tape. Trimming the excess string. So you can decide
which way you staple. You could have the silver
bar at the front like this. On the other ones, I stapled
it the other way round so you get the underside
of the staple. And I put these together
the other way round, I think, in our second project. So whichever works for
you and secure that. You really don't
notice the staples. I thought I wouldn't like it, but I just don't find that I notice them
once they're done. So here's our final
one. We've got the tag. A bit of washy tape. Trim the string. And we
have a string on the right, but we won't have
one on the left. So if you're wanting
to hang it up, we can just add a
piece of string. So here I am just adding the string to the other
side of the bunting. And there we have it. Y. I'm just showing you quickly here how you
can color the string. It wasn't the best way, so maybe painting or using a
Posca pen might be easier. Get all of the string covered. I'm using my pull
through method there. Which kind of worked
kind of didn't. But it just shows
you what you can do if you wanted to
change the color. They look gorgeous altogether. I think you'll
find it addictive. I'm sure you'll
do more than one.
10. Melrose | Sealing: [No Speech]
11. Compass | Preparing Our Elements: Now, moving on to
our second project. And I've got these wax seals, which are actually
made of acrylic, and I still have a
few elements from our previous project and some press flowers
there on the left. I actually did buy
the wildflowers because I'm a little low. I normally do my own, but we are winter in the northern
hemisphere at the moment. So I'm getting my whole punch. I've got some old paintings
there on the side. So I encourage you to
have a look through those little piles of paper or designs that you
have put to one side, and let's get those out
and put them to use. We probably don't need
too many of these, but I'm just going to build up a little selection of colors. I quite like this
set of leaves here. So I'm just going to empty out the little circles onto
a dark piece of paper. And I have this map or
further north from here, which includes Kinusi, I think. I have lots of lovely
Gallic names on here. We won't need too
much of this map. So I'm just tearing off the
pieces that I really like, and I love these
little green areas. I don't know the correct term, but I love the lines which
denote the mountains. And, of course, the
forests in green. So I'm just going to add to
my little collection there. If you don't have maps, you probably have other things that you've collected
that you really like, even if it's just a color
and has no detail on it. You could always add
details with pen. And I quite like this area here, which is a river or
it could be a log. And also some of the writing
and the names of the places. I got these maps from our
local zero waste shop, so there's always
something on offer. You probably have a
favorite shop near you. If not, of course, you can
always download a map, print it off yourself. I've always loved maps, and I used to really
enjoy going on business trips with my
dad in Scandinavia, and I would be the navigator. So since then, I've
always loved maps. I became quite good at it, but I think I've
lost the knack now. So yeah, I think it'd
be nice to have some of these lines to kind of
bring a pinky feel to it. So we've got a bit
of pink and green. And also, I might bring
in kind of a yellow. I'm not sure yet. So yeah, here's one with a name on it. A little bit of a lock in. And I think that's enough. With the map, we can always rip some more pieces if we
need them as we go along. So to add more pink, I've got this old design, which I was probably
just experimenting with a new brush or paints, and I'm just going to add
little pops of pink, as well. I'm going for quite a
gentle design for this one. So a few pink elements and maybe just a few
more pink strips from this old design. And why not some of
that kind of peachy, brown and yellow, as well.
So I think we're ready. Let's move on to the first
part of our class project, which I've called compass.
12. Compass | Part 1 | Torn Paper & Maps: So I'm doing this the
opposite way round, because I don't normally
use tea with tags. So I'm going to be
putting these to one side ready for
my tea breaks. So all we're going to do is just snip off the string and the tag. So as close to the
tea bag as possible. H a final one. And oops, the string wasn't attached
properly to this one, so I'm just going
to staple that. There we are as good as new and snip off the string as
we did with the others. So I've got my six tea tags now. Got my cup of tea on the go. So I've decided to
use a Pritt stick And at first, I'm just going to glue some of the
pink paper down. So now that I've
started with the pink, I'm just going to
carry on and just put a few pieces of that
through all six. And I'm just slowly
building up these layers. Little bit of map now. And I'm hoping as with
some of my other classes that because we're doing a
kind of repetitive movement, it becomes very relaxing. So I'm really hoping
that you find this class very low stress. And, of course, in
arts and crafts, there are no mistakes. And I'm loving this soft pink
and pale green together. And I'm laying down the pieces
in different directions. And I'm also laying them
down so that they run outside of the edges of the
tags because in this way, we can trim them afterwards. So don't worry about
your pieces of paper going beyond the edge. We're really wanting
that. I've got this lovely little flower here, so I'm just going to put that as a little surprise on a
back of one of the tags. And I'm doing this in real time. But I do like offering you the opportunity just
to go at your pace. I'm just resticking that. I feel like it's
useful elsewhere. So can you see, even
when we're doing crafts, we can choose a palette. And I'm sticking here with
pastel green and pastel pink. And there's one
with a name on it. So I want that to be
visible somewhere. And remembering that
our tags are going to be landscape all looking good. And now I'm just going round and ensuring that there's none
of the tag peeping through. Of course, if you love
the color of the tag, you can incorporate that
into your mini collage. So I just need a longer strip here to cover the
edge of this one.
13. Compass | Part 2 | Pressed Flowers & Leaves: So I'm now just putting down some PVA glue and picking
up my cocktail stick. And I'm just putting a little
circle of the glue down. Then I thought it
might be nice just to add some of these
pressed flower heads. Maybe the same here. So just preparing
the surface and then looking for a suitable
press flower for this area. I've got that tiny little
flower there. That's so cute. Wet the end of your finger and then transfer it onto the page. So I'm doing the same here, but I've chosen a larger flour. And I'm going off
the edges because otherwise it would take
over the whole tag, and of course, we can trim it. So another tiny
bit of glue here. And I'm going to add one of the wee flowers and
maybe another one. So I'm just checking
through my other tags now. And I'm just wanting to add
some tiny details to them. So I just need to pop
down a bit more glue. And I'm just applying piv glue onto the
back of this leaf.
14. Compass | Part 3 | Seals, Mark-making & Circles: So moving on to part three. And I thought it
would be nice to add some pressed flowers. So I've got this little sprig of dipsophala or baby's breath. And I'm using the PVA glue and the cocktail stick just to make sure everything's covered. And just adding another
little head of baby's breath. So this time, I'm wanting
to use one of these seals. I like that it's transparent so that you can see the maps. However, it's not really
showing up the motif. So I think what I'm
going to do is put some darker paper down and
then stick that on top. I think it will
show up a lot more, so I'm just going to
rip a little piece off here so that when I
put the seal down, you'll be able to
see the flour on it. All right. And then, because I think the other motif has probably lost its tackiness, I'm going to add
this little one. I'm really happy
with that. So sweet. So picking up another tag and just wanting to add a few
more details to this one. So I'm going to add
a bit more pink. And then another seal. And I'm choosing
another transparent one because with that pink behind, I think it will show up nicely. I'm not going to do
any more with seals. I just wanted to do a couple
of the bunting elements. So I've got my pigma
micron and a liquitex, acrylic marker, and
its Hookers green. I thought it might be nice
just to add some pen details. And this is gray. Adding a few little
circles there. I think the gray really helps to bring all the
colors together. I like a bit of gray. So I've got an area there
that's not covered, and I'm just thinking
maybe I could add some of the green just to tie
up with the other bunting. I'm just trying out
the pink that I have in the liquitex a credit
markers over the green. I'm not sure this is working, but I'm going to just show the whole process because
if I do change that, that's all part of
it, really, isn't it? I don't want to show
absolute perfection. So back to my little
gypsophil bunting. And I just want to cover
up those turquoise edges. And I'm just adding pink, and it's leaning
over quite a lot, but we're going to trim it down, so all will be well. I've got a dot on
my cocktail stick, so I'm going to use
it. I might as well. Oops. Oh, dear. I managed to fish it
out, and there we go. I use the dry side of the cocktail stick to
tap the circle in place. Might be nice to have three and quite like a white one here. I think those three
colors look lovely together. Quite like that one.
15. Compass | Part 4 | Mark-making, Flowers & Angel Writing: I decided just to make that a pastel pink instead of white. So by now, you'll be able to see the little
characters forming, and I'm just laying them out so that I can
see where I'm up to. So that's five, and
here's the last one. Taking time just
for a quick ponder, I think is always a good idea. I've picked up my pigma micron, and this is 005 in sepia and I'm just going to add some pen details
to this press leaf. Oh some little marks
around those circles. Still not sure about them. Just adding some
dotty elements there. And where I've put
these gray dots, I'm going to go round
them in a sepia. So this time I've picked up the hooker's green
acrylic pen, mark making. Putting a shadow on one
side of those marks, make them pop a little
bit. Now, what to do. I'm really not sure. I
don't like the pen dots, so I think I might try
adding some of the circles. A bit fiddly, but
they're so sweet. And I'm also thinking I could add some of
those small flowers. So dotting some glue down again, picking up the flower. Getting it in place. Maybe one of our whole punch
dots. Like that color. And then another flower. We'll see how that goes. Adding some little
mocks in gray. Trying to tidy up as I go along. Really want to do another one because I really want
to use that daisy. So I'm going to speed through doing a background on this one. And I'm going for the
overall pritstick technique. Slap that all over the
tag, and off I go. Just get some paper down
there, quick holly, and just gonna tear off
a little bit of map, get that down in that corner. Get some glue down,
slide it underneath. So that's it. I record speed. And now I really want to
get that daisy on there, so I'm going to do a
little circle of glue. Looking my finger,
and on it goes. And I'm really happy that
I've chosen to do that. Just using the dry side of the cocktail stick
to tap it into place. And a quick trim,
I think is needed. Making sure I'm holding
that flower in the middle. And now we have it. So the
last of the glue there, and I'm just going to
balance it a little bit. I wanted the flour kind
of off kilter a bit, didn't want it stuck
right in the middle. So I'm just going to
balance it out with a couple of whole punch circles. Type it into place. Super
happy I did that one. Now let's have a look
at where we're up to. Adding some pen detail. I'm looking over
each individual tag and just seeing if there are
any last minute changes. So I saw this little
star on my desk. I thought I'd put that down and do a little bit
of angel writing.
16. Compass | Trimming: So now we get to a really
relaxing part of the class. We're just going to
trim our bunting, so it's fairly simple just turning it round and
following the tag. I think this is one of the most restful things
a person can do. I really like cutting up paper. It is one of my stems, as well, this and
wrapping up paper. So this class is one
of my favorites. I could honestly do
that all day long. And onto this lovely green one. Wait till you see this after you've cut it out
because it really transforms them
and they suddenly get this really well
rounded character. And each one is very different. Trying to be delicate there with the pressed flowers until
we get to seal them. And also being careful there
not to cut the string. This press flower is very delicate. The petals kind of
fall off very easily, so I'm holding it on the other side in the
middle of the flower. And hoping I can. Oops, I cut the string
off. Never mind. To worried about my flower. And I'm going to
use the technique of washy taping it
in place first. It's so much easier this way. And then a quick staple. I can imagine you doing this
on a Saturday afternoon. So a little bit of
angel writing here, gobbledegook, and I just
don't think about it. I'll just allow the
pen to take me away. Could, of course, write names or little
statements on yours. Trying to keep a bit tidy here. So, what are we up to?
Oh we've done them all? That's number five. And here's number six, looking very pretty. I'm really pleased with these.
17. Compass | Sealing: Before we move on
to stapling these together, let's seal them. And you can use mod podge
or water down PVA glue. I find sometimes they
stay a little bit tacky, so I use matte medium. It's easy to apply. It dries really clear, and it's never really sticky. When you use mac
medium, of course, it's really easy to
destroy your brushes. So I actually buy
some makeup brushes, and this has very soft bristles, so it's perfect for the job. I usually wet the
brush and dry off the excess and then dip
it into the mat medium. I'm just going to go round
the edges on this one, just to make sure
that they don't lift. On the daisy, I'm going to start from the middle outwards, just to go in the
direction of the petals, which will hold them in place. I'm just going to
use my tweezers here so I can get round
all the edges. I think that's my
favorite one now. I'm so glad I did that. The umbilia here
is very delicate. I find going in with a lot
of Mc medium also helps the application when you're dealing with delicate
press flowers. This flower, which I think is delphinium looks
absolutely gorgeous once it's got the
mac medium on it. So I'll remember that
because I really love the way it behaves
once it's glazed. We've got some baby's breath
on this one and the circles. So I'm really putting quite
a lot of medium around the circles and the flower heads and just smoothing it out. So quick rece of everything. It can get a little
bit fiddly with all the strings and
the mac medium. But there we have it. Finished. Let's move on to stapling now.
18. Compass | Stapling : So just as we did in
our first project, we're going to line
up the string, get some washy tape
down and move along. So all you need to think
about is the positioning and also how far apart
you want each tag to be. So that's about right. So trimming the string, and all you need to
remember really is it's the string that is
attached to the washi tape. I'm Just thinking
about the writing and which way that will be. M. And the final one in place with our secret little flour and snip the last
bit of string off. Just trimming off that
last piece of string. And then, of course,
you'll be left with one side which has string, and the other won't have. So you can either add your own string as I
did in my template one. Or if you've kept some of your cotton string
from the tea bags, you could always use
a little bit of that. So I'm just going to
put this in place now. So there we go.
It's all in place. And now all we need
to do is staple it. You can always use hot glue
or any form of a deserve that you have hanging around just to make sure that
it's structurally sound. So just to show you
where we're up to, we have Melrose at the top. We have our compass project, and then a very stringy
haphazard practice one. So let's staple these together. You can either have it the
wrong way round and staple it. In which case, you'll have the two little smaller
tabs or on the right side, and you'll have
the bar of silver. We're just trying
to get the staples as close to the
edge as possible. So it's all now really secure, ready to be hung up or
given away as a present. And don't they look
lovely altogether. Now, I remember on this one
that I missed stapling one. I only saw when I was
looking back on the video, so I'm just trying to
find out which one it is. And it's there. So just gonna catch that one with a
staple and then all done. So don't they look
gorgeous together. A little template, compass, and melrose at the bottom.
19. Thank You!: Thanks so much for joining
me in this Krafton project. I set out with this class to focus really on
relaxation and fun, and I hope I've achieved that. It's a project you can come
back to time and time again. And the finished bunting
can be used in journals for making personalized cards or
to hang in your art area. I can't wait to see what you do and how you
decide to use them. Don't forget you can share your project with the
rest of the class. It's a really fun way of
feeling more involved. So thanks again,
and I will see you over in discussions
and on Instagram. Take care. Bye bye for now. Oh
 Holly Tomas Art, Watercolour | Gouache | Mixed Media