Transcripts
1. Cowabunga! Advanced 3D Sculpting with Drugfreedave Nomad Sculpt: In a world beneath the streets a legend among legends
that is reborn. Right. C. What's up, guys? Welcome to my advanced three D sculpting
class with Nomad sculpt. I'm Drug Freda, the
three D artists and content creator living
in Brooklyn, New York. And this project is near
and dear to my heart. You have to create art and
sculpt things that you love, that you're passionate about,
that you're nstalgic about. And this one is all
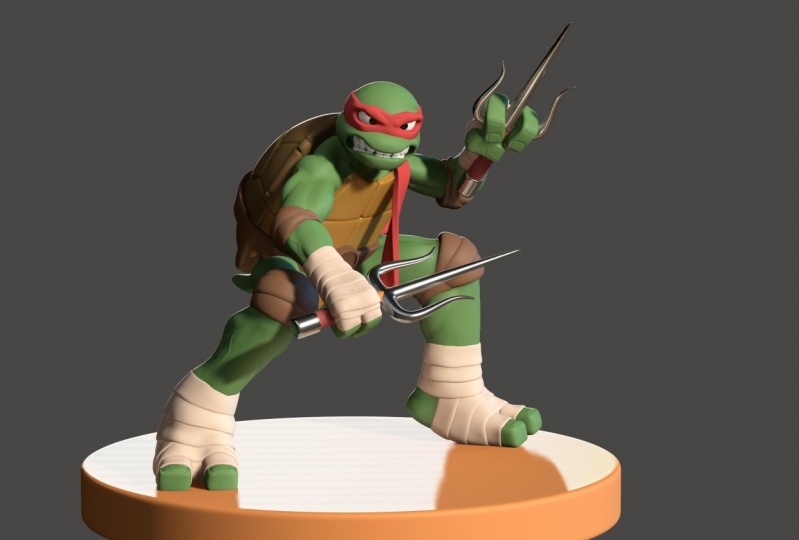
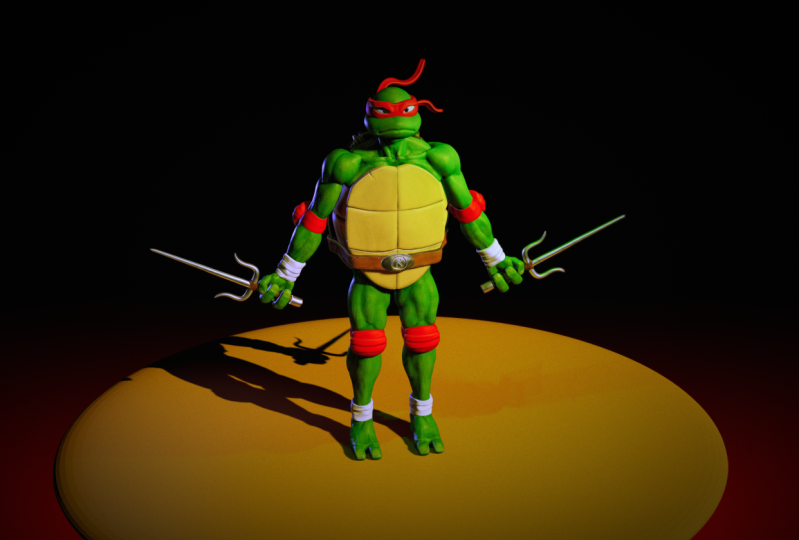
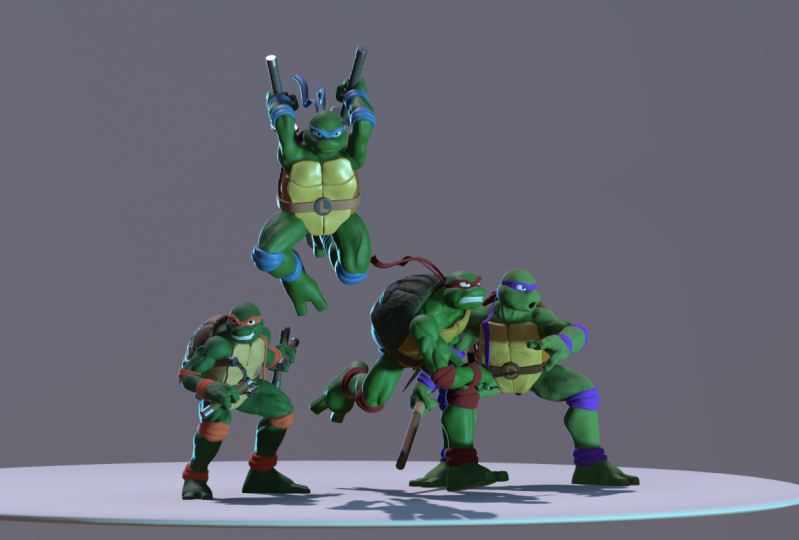
of that for me. We're going to sculpt Raphael, the bad boy of the
teenage Man Turtles. They were the first
characters that really made me fall
in love with drawing. Art and creating. They just had a huge impact on me
when I was a kid. So being able to pay tribute and recreate them in three D and sculpt them in three D so
much fun on so many levels. I'll be sculpting on
my iPad Pro 2022, but Nomad sculpt also
works on Android tablets. I love creating ce characters, creepy characters,
simple characters, and also complex
characters like this one. I also love creating sculpts
for resin three D printing. This advanced class will cover
all of the tedious details that go into making a complex
character like a Ninja tur. This is what you'll
learn in class. Basic head to toe blocking,
stylized anatomy, and using hierarchy for posing Vauxhal remeshing
and quad remeshing and or decimation to help
keep our sculpt as efficient as possible
without sacrificing quality. We'll add tons of
detail, skin texture, accessories, coloring,
lighting, turntable, and of course, final rendering. You'll want to be familiar
with no mesco for this one. And just fair warning,
it is a long class. So make sure you have plenty
of snacks, full battery, maybe watch the
original 1990 movie just to get you in the movie. As always, keep drawing, keep sculpting, and I look forward to seeing
you on skill share.
2. Class Project: Alright, welcome to
the class project. So there's just a few
things I want to mention. Obviously, the class
project is Raphael, but you don't have
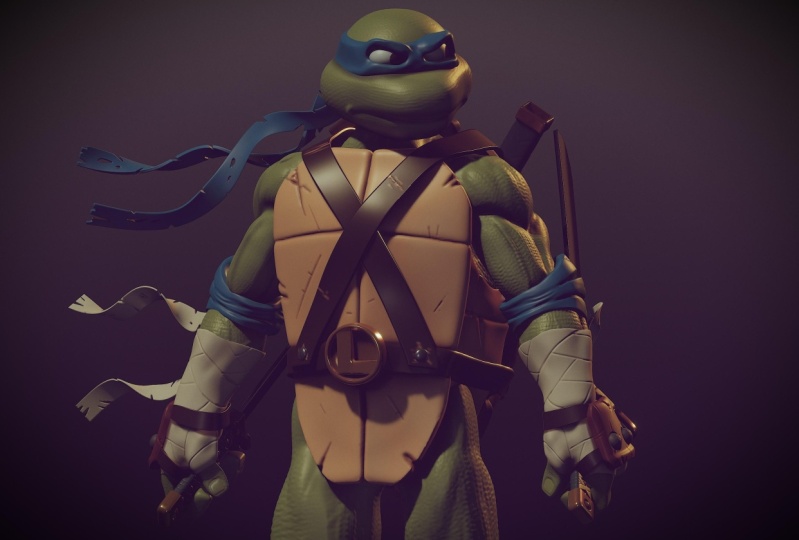
to make Raphael. You can make a different turtle. Essentially, it's
just the weapons and the color of the headband. If you want to change things,
if you want to add things, if you want to experiment.
That's how you learn. I am off for experimenting. And, you know, just
trying to make it yours as much as you want. Also, that being said, there are a lot of things that
won't match one to one. So there's some things
that I'll be doing that they're not going
to match yours exactly. So, for example, he has like wraps around his feet and
hands and things like that. I'm going to show you how
to do a few of those wraps, and then I'm just
going to let you go ahead and make as many
as you want on the feet. On his wrists, on his fingers,
whatever you might want. It's like I'm talking, and
there's just like a horn. So, yeah, there are some
spots that are sped up, but I will show you
what I'm doing, and then you can take
it from there and do it as much of it as you want or
as little of it as you want. There are a few things
that I've included. So there's an eye glare backdrop or environment, eye
glare environment. So that's the environment
that I always use. That's included. I'll include my nomad files, and I'll include the
reference image, which is I just
download from online. If there's any other few things, just make sure you
download everything to your iPad or table so that when we're ready
for it, you can get it. Also, the texture for the skin, as well, I'm going to include. So make sure to download those from downloads and resources. One thing that I'm
not sure that I mentioned in the next
video, but just in case, I always sculpted in
orthographic, not perspective. And I also change
from lit PBR to MTCp. So that's why it's
like that sort of reddish brownish color. So that's just a MTCp. Feel free to switch to a MDCap if that works for you, if not, then, you know, just do whatever you've been doing that
makes you comfortable. Okay, so I think
that's about it. Again, characters like this, like organic characters,
like they're so detailed and so specific. I'm gonna speak my
thought process. But if you have a
different idea, and if you want to
experiment, please do that. Don't feel like
you have to follow me to the T because
at some points, it might not be possible or
it might not be as efficient. You might just have to take your own road for this or that. Other than that, it
should be pretty straightforward.
It's a long class. So Buck Ln, let's
get right to it. The head. We're going
to start with the head.
3. Planning Ahead: Okay, let's get started. So you don't need the
grid for this one. Well, we'll line them up with the floor
and stuff later on. This will be the head.
This is going to be the easiest way to make an
gratertal head I promise. Okay, let's clone this. This will be head, we'll
just rename it head. One, we'll just leave
it a sphere for now. Let's take head Gizmo. We'll move it up. Then we'll take the bottom one, make it bigger, and
then flatten it. Let's look at the side view now. We'll move it up a
little bit, maybe just stretch it a
little bit like this, move it up a little bit more. I think that looks pretty good. Now let's take the bottom
part of this head, and we'll just use trim
and we'll trim it. If we look at x ray, you can see the whole
bottom part of the sphere, we'll use trim and a rectangle,
and we can just trim it. Now we'll take this part. Let's use split. Split
is the same as trim, except with split,
it keeps both parts. Now we're going to split
the top part of the head. We'll just make a
rectangle here. Maybe something like
this. It's pretty good. We'll turn x ray off, so we
have something like this. Let's take this first one
and let's Vox remesh it, maybe around 150 or so. See how it's a
little bit jagged. If I slo it, you can see
it's a little bit jagged. We'll do Voxle, and
we'll remesh around 150. We'll do the same thing I'll. We'll do the same
thing with this. So around 150 is good. We'll take smooth. I guess we don't really need
to smooth the top out. I'm just going to
smooth this part out. That's the top of
the middle piece, which is obviously
going to be our Mask. Symmetry is on
during everything, everything is
symmetrical for now. Let's take this piece, Gizmo, will shrink it, maybe make
it a tall and put it down. St, let's make it a
little bit bigger here. That looks pretty
good. Take in shape. Obviously, you can see
the nose is quite big. If we do x ray, you can see the sphere. Let's move. Let's
make it a little bit bigger just so that it makes
more smooth movements. We're just going to going
to push this down a bit. That's pretty good. We'll
turn that x ray off. There we go, coming together. You can adjust this a
little bit if you want to get rid of those jagged
edges a little bit. And you can adjust the
shape a bit as you need. Good. Now let's add
to the ie mask. Let's label this i mask. Otherwise, we'll forget.
Let's three dots. I mask. Have the top part of the head. Let's go ahead and
label this head top. You have the head top,
sandwiched is the eye mask, and then we have the sphere, which is the head jaw. We'll do a little quick save. So now let's add the
pieces of the i mask. Let's use inflate. Make
it a little bit bigger. So make sure you're
on the i mask. Now you can just make some
curves like this and this will be the Well, you it'll make sense. Once you do it, it
completely makes sense. I think that actually
looks pretty good. Now underneath that,
we're going to use layer. Layer is a great tool. You can see I already have it on Sb. If you don't have
it on Sub, it adds. If you have it on
Sub, it takes away. I'll make it a
little bit bigger. Now we're going to
make the eye sockets where the eyes are
going to be inside. We want to just do the
contour that we just made, and maybe a straight
on the bottom. When you're doing
layer, you just want to make sure that you
scribble everything out before you lift off the screen
because once you lift off, and then you try to do it again, it's going to go it's
going to do another layer. I think three layers
is probably good. It's probably deep
enough for ye sockets. Now that we have that,
let's make it a little stronger and Vox remish this. Also, I'm always using a
shortcut down here, but. It's the same as if
I go here, Voxel. If I do this, you can
see it's the same. Maybe we'll do around
one, 60 or so. And then we'll take smooth
and just smooth out our little eye
sockets. Looks good. Another thing I like to do is if I want him to be
a little more angry, you can take move, make
it a little bit smaller, and this is where you
can add some expression. The straighter this line is, the more intense or
angry it'll look. For example, if I
take it and I make this nice and
straight like that, you can see that he
looks more intense. Of course, if you do that,
you might have to pull the bottom part of
this up a little bit or push this down. Maybe we can just bring
it down a little bit. And then move the sides up. Something like that.
You might have to adjust the shapes a bit. If you look on the top
to, this looks silly. There you go, it looks better. There's a few things that
I do just stylistically. One of them is flatten. I like to flatten
pieces like this. I'm going to take the flatten
tool and just flatten. I actually flattened a little more than I would have wanted, but it still looks good
so I'm going to leave it. Now for the mouth, we'll
keep that really simple. Let's go ahead and use mask, and first, let me show you how to do
a really simple mouth. If you don't want to
do the mouth open, you can just take crease, make sure that you're on
this part of the face. You can take it off symmetry, although you can keep it on
symmetry if you want to just do something really simple. But what I would
do for this is I would make the corners
a little deeper. Maybe smooth it. And then
maybe do a crease again. But you want to make the
corners a little bit deeper because that's just
how cheeks work. Also, his nose looks
a little flat, so you can always pull
the middle as well. Just make your move
tool a little bit bigger and you can pull it. Let's say you wanted to
have the mouth open. I'm going to go ahead and
pull this out a little bit. Better. So if you want to make the mouth open. Let's use mask. Let's do the classic classic ninja turtle look. If you do it this way, you
want to make sure that you have enough
of the nose here. You want to keep
everything clean. I'm going to take erase. I'm just going to erase a
little bit more of the top. We make sure we have
that big nose here. I'm going to trim a
little bit off the sides to and maybe a little bit
off the bottom, like so. Obviously, you can do the mouth open any
way that you want, but let's try this for now. Now we'll go to we're on mask. Let's go ahead and invert, so that just inverts the mask. Then when you use Gizmo, you can move just this part
in. We'll move that in. Maybe make it a little
bit thinner that way. This isn't so thin, the
edges of the mouth. I'm just going like this
and shrinking it inside. You can do the same
thing like this. But I think that's pretty good. It seems deep enough. We'll go back to mask and then clear. Now that we've done that, again, what I like to do is Vox will re Vox remesh it around 175, that seems to be my go to. Now that that's remeshed, we'll just use smooth and
just smooth out our mouth. Looks pretty good. Another stylistic thing I
like to do is use flatten. I'm going to flatten right underneath the
inside of the mouth. I'm going to start
here. Flatten that out. Maybe add a little smooth, just to get rid of any
of those wrinkles. Make sure the inside of the
mouth is smoothed out nicely. You can also do the bottom part. Just gives it a
nice finished look, but I think that
looks pretty good. Let's say you want to make you want to put this ale
closer to the top. If you use move, one problem
that you might have have is it'll move the bottom and
the top. That's really easy. Just use select mask with a rectangle and you can
just mask off the top. Now you can use
and you can adjust this bottom part to go up a
little higher if you want. So it has that
more classic look. I also want to make
sure things are around, so I'm just going to
pull this out a little bit just so it's a
little more round. And flowy. We'll smooth this up
ale bit in case I made some little wrinkles. We'll take mask, clear it. Anytime you do that, you just want to make
sure that you're smoothing any creases that
it might make like this. Inside the mouth, it just
makes some little creases. Just make sure you
smooth those out. Nice. Also, you can
add some teeth. Turtles don't really have teeth, but teenage manage
turtles do have teeth. But this is obviously
very stylized. You can do what you'd like. Essentially, I'm just
adding a sphere. I'm going to name it teeth. Put it on top so
I don't lose it. Essentially, we're just adding a sphere and then
we're shrinking it the same way I usually do in my teeth, and
then you just bring it in. Hit mirror. Now you have two. You want to make sure that
you're maintaining that semicircle with
the line of teeth. That actually looks pretty good. I don't know how big you
want his teeth to be. But you can actually
validate these. Now it's in a mirror.
Let's go ahead and name the mirror teeth as well. We go back to the teeth. Now you can just clone and
make your other teeth. You can make them perfectly
round if you want, or you can you can be as
stylistic as you want with them. Just make sure you
maintain that nice curve. You can clone again. You can take drag. If you really want to give them some little canines, make
it really interesting. There's tons of
different ways that you can make the teeth. If you want to make
the bottom ones, all you have to do is
let's say we start with these. You can just clone. Name them something
different. I'll do L one. And then just use your gizmo and then
just bring them down. Now there's some
teeth down here. Obviously, they're not
going to be perfect. I'm going to make
them quite small, and I'll sit them right
below the other ones. It doesn't have to be
technically correct. It has to look right.
Even something like that, I think looks good. Obviously, we'll have to trim the bottoms, but you can clone, and then you can bring your
other teeth over and you can also make sure you
maintain that semicircle. And so on and so forth. You can continue
to make the teeth, however you want,
make them big, small. You know me. I
love making teeth. So I no matter what
the character is, I'm always adding some fun teeth to it just because you can. I'm going to t here and,
and we can use Las. Notice I'm turning
it on an angle so that when I trim these, it's just going to
trim the bottom part. Okay, let's add some
spheres for eyes. So add sphere. Go ahead and mirror it. Pretty simple, we can stretch
it and then just rotate it. They're buggy. They're bug eyed, so
you can flatten them to by just flattening
the sphere. I'm going to validate and
then just to fill the space. A Looks pretty good. Let's add some other. Let's add some more spheres for the pupils. These are the s. I call these whites. That's how I keep track of them. And you know, let's
add another sphere. And we can use the Gizmo. I'm going to flatten this a
little bit more, get smaller. I'm going to validate
these and use move and put a bend in it. I'm just going to use
move and push one side. Actually, if we want to be
a little bit more precise, press symmetry, show line. You don't see it
now because your on on world and not local. Local would be this pupil. Let's switch to local. Let's add z and y. We Let's take away z.
We just need x and y. Now you see the
green line red line. Essentially, when I
push on the back, it's just going to be an
equal push all around, essentially, if
that makes sense. I'm going to put it to
world and just put it back to where it was just so I
don't get confused later. I'm going to hit the gizmo and then we'll move
this to the eyes. Looks like they can
be a little bit er. I'm going to try to rotate it so that it goes right
on the surface. This can be a bit tricky.
Another thing I do is I'll go to the eye
and just smooth. Then I'll just smooth the eye because sometimes it's
just too annoying. I'll smooth the eye that way. This can be nice and spherical. Make it a little smaller again. There we go. It's not bad. I don't know why it
looks so Here we go. Just want them to be a bit
more around. Another trick. If you're making eyes,
if you make the pupils, you want them close together. So it's like it's a bit tricky. You don't want to put
them in the middle. You don't want to put
them in the middle like this because then it looks like a doll just doesn't look like
it's looking at anything. You want to put them towards
the middle until they look like they're
looking right at you. Protip right there. I'm so a bit more on these. So the eyes can be a bit. It takes a little tricky
to get it perfect, but just get it so it
looks right. I like this. There's a little bit
of eye white there. I might get rid of it later, but I think it looks good. Last but not least, let's
add a little n to the back. We'll keep this super simple. This at sphere. Shrink it. We'll flatten it a little bit. I'll make it around
the same size. So that looks
pretty good. So I'm going to go ahead
and validate that. And then I'm going to Vox
maybe around 130 or so. Then I'll take. I'll turn symmetry and I'm just going to
make a crease in it. Something like that. Maybe
even another one over here. Se how I'm just
bringing it over. I just want to create the effect that it looks like a knot. Just make some lines in it, make it look like it's a no, and then you're good to go. I think that looks
good. I'm going to go ahead and box remesh
the not again, maybe around 150, and
then just smooth it out. And I might take move and
just drag it over the edges. It looks a little bit more real. There we go. That's a good. P. There we go. I think
the head is good. I think next we'll block in the body and then
we'll just keep going. We'll just keep trucking along, good job so far,
make sure you save.
4. Body Blocking: Okay, now let's
do some blocking. We're just going to add
all the different shapes that we're going to
use for his body. So we'll make it really simple. Once you think of
things in blocking, then everything just
becomes so much easier. For the neck, let's
just use a cylinder. We'll add a cylinder, and let's just bring it up
here so we don't lose it. I'll just rename it neck. We can switch to the gizmo,
and we'll move it down. Shrink it till it's
about neck size. I think that is pretty good. That's going to be the neck. We'll worry about
positioning them. I think a little bit later on. That's the neck. Next
will be the body, which I usually use
a box for that. We can go ahead and
validate this neck. Let's add a box. Let's rename it body. We'll switch to our
gizmo, which is hidden. I don't like how this is
hidden. I'm not sure why. It's so dark. But anyway, so we'll move this box down. We'll make it a
little bit bigger. And let's squeeze it,
obviously, so it's not a box. That's too boxy. Okay. So we'll make it
pretty thin for now. We can always make it we can always adjust it
a little bit later. So take his body is
going to be around here. I don't want him
to be that thick. I want him to be a
little more stylized. I'm going to make the
neck a little bit longer. Okay, so that's a
pretty good body. Now let's add a sphere, and this is going
to be the shoulder, so we'll just move it down and over, and then
we'll shrink it. We're not going to worry
about mirroring them now. Let's just do one
half of the limbs, like arms, legs, and
things like that. Then eventually we
can just mirror them. Let's rename this shoulder. We can go ahead and validate
it. The body as well. Now let's add another cylinder
for the upper arm area. That looks pretty good. Now let's add, there's
a few different ways to add like the elbow area. For now, let's just start
with the forearm and then we can make another sphere
for the elbow pad. Let's just take this
cylinder and clone it, and we'll name one of them, and we'll name one
of them lower. I still spell it wrong. So I'll take arm lower, and obviously, that's
going to be the lower arm. I'm going to move it out
a little bit like this. Make it a little bit thicker. Let's make this a
little bit longer. So Let's add another sphere, and this will be the elbow pad. We use our gizmo, and then we'll just move it to
that general position. Maybe we'll just make
it a little bit longer, it makes a little
bit more sense. Let's add a cylinder and
this can be wrist band. Actually, one thing that is just generally good to do is
put things together. For example, I'm going
to switch this to pad. Elbow. I'll switch
this to pad wrist. This way, if we ever need to or when we want
to color them all, they're easily
identifiable because they'll all have pad
in the beginning. So, we'll just
leave them for now, so that looks pretty good. Pad wrists, Gizmo, Okay. Let's add a box. This will be for the hand, the palm, I should say. One thing about palms, I
think the hands are going to be easier to do alone. I'm just going to
put this up here. Let's go ahead and
just rename this p. And Let's add some
tubes or just one tube. We'll use path. We're
using path and snap. I'm going to do that again
because I did it a bit fast. We use. I does't matter if we have. It's not really going
to snap to anything. You can turn that off.
We'll just use path. You have to tap and then
hold and make the first and last I want to
make a point here. I'd like to make
another little point here so I can make the
fingers like this. I think that's pretty good. Now we have one of the fingers. When we work on the hands, we'll just be able to clone this one, and that'll make
it a lot easier. Let's finish with the
rest of the body first, and then we'll
come back and work on the hands and fingers. Let's see what just
call this finger. I'm going to take this
one and I'm going to nestle it under the palm. Okay. Let's add a cylinder, and this will serve as his belt. Although we might
change it later on. Let's add cylinder. Let's be sure to bring
it out of this group. Let's just label
it belt for now. We use our gizmo.
We'll make it bigger. And we'll just make it the
size of this square for now, even though we're going to
change the size of the square. Now let's add a sphere
for his pelvic region. It's a bit smaller than the sphere bit more
narrow than the body, and we'll just
squeeze it like this. Maybe we can move it
up a little bit act. This will be pelvic
region waist area. Let's add another cylinder. We move it down to the left, we'll make it a bit smaller. A lot of this is going to be
based on his arms as well. I still want him
to be fairly thin. I don't want to be one of
the really thick turtles. That looks pretty good. This
will be the to a quick s. Then we'll add a cylinder and
this will be the pad knee. We could possibly changes
to a sphere later on. There's always that possibility. L et's take this thigh and
now we'll just clone it. This will be low leg. Actually it's
smarter to this leg and this leg low. Again, what I was saying,
it's just easier to keep them keep them straight. Did I do the same thing with
this arm upper arm lower, I did. Put them
close to each other. Leg low, palm is good. I'm just going to move the palm under there and you
can do anything that you need to to keep
things more in order. But again, it's not
really that big a deal. But one rule of thumb
that I like to do, so we have the head, which I think the head is like
all of these things. I'm not even going to
worry about putting them in order right now. But I know we have the shoulder, which I'll put up there. The neck can go
above the shoulder. Then we have the shoulder.
We have the body. Let's put the body here. But the shoulder we
want the arm up. We have arm up per arm lower, but we have the elbow pad
pad elbow in between. And then pad wrists. Body, pelvic leg up, leg low, we'll put
pad knee in between. Let's go to leg,
which was a copy, and we'll bring that down. Here. We'll make it a
bit and we back some. Make his thigh a
little bit smaller. We can take this one
and clone it, Pad knee, we can clone and make pad ankle. Flow I'm putting a capital. I guess it feels thorough. Now we can take this copy and
bring it down and that can be the pad for his ankle. For the foot, let's
add a sphere. We'll move the foot do
or the sphere down. We'll just leave
it here for now. I think we're going to come
back and do the hands and the feet separately.
He needs a shell. Let's make sure we name
this foot foot base. Let's Let's go back to the body. Let's add a sphere gizmo. This will be our
shell. We'll make it big. Squash it a bit. You just have to imagine
how big it would be. Let's take a look in the front. Probably something like that. That looks pretty good. We'll
just leave it here for now. It looks decent from the front. Now he's also going to
have his front pads, which there's a
few ways to do it. You can either
make one shape and then shape those front pads, but I think I might want to
do it let's do a sphere. Okay. So for the front plates, I think I like there's a
certain style that I like. So I'm going to add a box I think we'll do it the same way we're doing the limbs
and things like that. We'll just make one half of it, and then we can
just add a mirror. We'll do something
like this, a thinner box, make it a little smaller. I'm going to place it in the position that I
think I want the first. It's essentially going to
be something like this. Let's tap these three dots and let's just make it a
little more around. We will turn down
the box topology. Let's try ten, and then we'll turn up the post subdivision. We can turn this down
a little bit more. Then we have
something like this, where it's a little
more rounded on the edges. I like this. But just in case I'm going to clone it before I validate it. I'll just hide this and go
back to the original box. I do that sometimes just
so it saves me time later if I need to
change something quickly. Let's
validate this one. I think I want to
make it curved. There's a few ways to do it. We can use trim and lasso, but that might not
look that clean. It looks okay, but I think we can get it a little
bit better than that. Let's use the polygon tool. Same as line, we're
just going to put both sides or both edges. We'll add one in the middle, we'll add one here, whatever is white is what's going to be cut. Now it's just a matter
of making this, making this edge round. So I'm thinking
something like this. Let's see how it goes. We tap the green and we
should be able to tap Gizmo, and then we have that nice trimmed first part of the shell. Actually, it's a good thing
that I copied this box here because now
we can bring this down and make this
the second one. I'll clone this again, hide
it. These look pretty good. I want to smooth this out. But I'm not sure how
intense the smooth is going to Let's Vox remesh it. Anytime I'm smoothing something
and it's a bit too soft, I just hit it with a Vox, probably around 160 or so. And then I'll try
to smooth this. I think that looks good. I want to take all
three of these, even the hidden
one, and I'll just use the gizmo and I want to make them a little bit bigger. We'll move it down some because
it'd be probably around here. Something like this. Instead of having
this square here, let's do something a little
bit smarter. Let's delete it. Let's add a cylinder. We'll grab our gizmo, we'll move the cylinder
down. Let's tap snap. It's at 90. Now we know it's facing us. We just turned it 90 degrees. We can turn snap off. There we go. M it around the same width as the other pieces. Actually
doesn't need to be. We can make all of these
a little bit thicker. But for now, I think
this is good idea. Let's go ahead and make it just like we did the other ones, I think we had it around ten, and then we raise the
post subdivision. That looks pretty
good. I'm going to go ahead and validate this, and then I'm going to
take trim with rectangle. And we'll trim off that
half. We'll stretch this. We'll move it up, we'll make the whole
thing a bit bigger. We can move it up again. M the whole thing a bit
bigger. That looks good. Now I want to trim half of it. We'll take our rectangle. I'm going to turn symmetry
off just so we can trim half. There we go. Looks like it needs
to be a little less thick so we can match
the other pieces. Vox will remish it
like I always do, around 150 or so, and then we'll take smooth
and we'll smooth it. Now that we've
smoothed it, we can just use our gizmo
whoops and just make it a bit more
even with the others. I think that looks good. Let's just take the sphere
and just adjust some of this stuff so that it's behind
this part of the shell. I think that looks
good. The leg, we can move up a bit and
maybe over a little bit. All of these pieces, the other part of the
whole leg low foot base. We'll just move that up as well.
5. Hands & Feet : And All. Let's do these hands. We're going to make
them very simple. We already added the box, the palm and the finger. Let's tap on the finger
and tap on profile. I like when into turtles have those thick square
squash fingers. Of course, if you
want to make them round, you can make them round, but I like them squash. Let's tap the three dots. We'll do the same
thing we always do. We'll turn this
down maybe to ten, and we'll pump up the
post subdivision. Maybe we'll do three. Let's
twist it a little bit. Let's tap twist, and
then we'll twist it. It's pretty much lined
up with the hand. Pretty much like that. We can use this to make it a
little bit bigger, still. Something like this I
think looks pretty good. I do want to stretch it. We can just use the
gizmo for that. I'm tapping a line so that it's just going to align
with the finger. If I had a valid, I think we'd be
able to use bake, but we don't have bake
because it's not validated, so I'll just use a line and
then I'll just stretch. All right. So that's one finger, and it looks pretty good. I don't think there's anything else I really need
to do with it. I want to keep it simple because these fingers
we're going to eventually if they're wrapped around a weapon or something. So we'll just leave
it like this for now. But let's clone it
and move one over. So then we have two For this, let's go ahead and make
it a little more round. Put the division x down. Maybe we'll make
it a little bit. The reason why everything
was moving is because I have the fingers
nestled in the palm. If you don't want
to unstle them, you can go to group and
then just go to vertex, and then you can just
move, maybe not. Object. Is it object?
There you go. Object. That looks pretty good.
I'm going to change it back to regular for now, so I don't forget later
on. Let's validate this. This is going to be our palm. Let's take clay,
and we just want to make the little round part here. So I'd like to just takes. Let's turn symmetry off and just make this part
nice and round. You can even see it just start
to look more like a hand. There we go, looks good. We can actually take
this. Let's clone it. Let's name this one thumb. I'm going to do a
quick save as well. Now let's move it
to that position. One thing I always
do with hands. I always put a little bit
of a bend in the palm. I'm just going to do that now. I'm just going to
press a little bit on the middle just so there's a little bit of a
bend in the palm. It's another stylistic thing, but I think it's more of a just a anatomy thing
that I always do. Obviously, the anatomy
doesn't have to be perfect. It is a turtle with standing
upright and with teeth, but how it goes. Now we still have a line. I'm going to turn
this off to see if that's easier to
manipulate this piece. Manipulating these
pieces sometimes can be quite difficult and annoying. Let's take pivot and
I want to rotate this pivot so that that arrow
is pointing towards me. The reason why I want
to do that is it's just easier to move this around
with this pointed towards me. I also want to move it down, Let's hit pivot again
and move it down. This is where the thumb
would meet the palm. That just makes it a
lot easier as well. Now, it's easier for me to figure out where
this thumb should be. I think this actually
looks pretty good. The only other thing I want
to do is take move and just move this part of the hand
out towards the thumb. I think that's pretty good. Now let's go to the thumb
and let's see if we can Sometimes tapping on that makes the thumb a little
bit more look like a thumb. And also, the sizes are a
little bit different in thumbs. If you look at your thumb
like this pad part, let's see if I can
do the silhouette. The pad part is sort
of thicker than this area. I like
to include that. Little things like
that, I like to include in whatever I'm doing, I try to bring it back
to the anatomy I know. It's just natural. Let's hit radius again. That way we can adjust
each of these points. We can maybe make this
one a little smaller. And actually where it
goes into the thumb, usually that's a
little bit bigger. These two can be
fairly small here, but maybe this last
one gets a bit bigger, as it expands into, that was weird. We'll
leave that there. I think that looks pretty
good for an int turtle hand. I think it looks pretty
good. I'm going to use the gizmo and
Unfortunately, the gizmo, you can see it's reset to where I had it,
which is annoying. I think it might just need to
come out a little bit more. And let's see if I have
my thumb like this, this part is really
kind of flat. Right now if we're
looking at this, the thumb is turned the way that the
finger pads are going. So the thumb see how my
fingers are pointing this way, but my thumb is
pointing this way. That probably doesn't make
sense. Let me demonstrate. The only thing
that I'm seeing is his hand would be
like this if he was placing it
down on something. But even so, I'm going to
turn this a bit more Yeah. I think that's a bit better. I think that feels a bit better. I like this. I think it works. I'm not going to validate
the fingers and things yet because we're going to
have to adjust them. Pivot. I'm going to bring
these pivot marks down. I'll take this pivot
and move it down. That way we need to just
adjust them a bit, use a line. I can make them a thicker. I like it. I think
it looks good. Let's do a quick save. Let's make sure everything is. Palm, finger finger, thumb, everything is put
together nicely. What is the cylinder? Let's just make sure that
everything is labeled. This is the bottom
part of the shell. This is the front B,
since that's the. This can be the shell front A. This is shell front C, which is the lower piece. Good. Now onto the feet. Okay, now onto feet, which can be a bit tricky, but we're going to
use some tricks. No tricks, but let's
add a cylinder. We use our chismo and bring
it down over to the fi area. Let's it. I think this will
work as a foot. What I want to do is first, I'm going to stretch
it a bit, move it up. That's actually not too bad. We can stretch it a little
bit more and move it up. Looking at the
bottom of the foot, This can easily be like we can just mold this
into a foot shape. I think that's the
easiest thing to do. So the easiest my cats making
weird noises out there. Okay, so we'll validate
it. That's fine. Let's X is here, and the reason why the x is off center is because
this is in world, but if we put it to local, it's going to be in the
middle of the local shape. So that's good. But it's not we need right now. We need y for sure. I don't think we need no.
We don't really need z. We just need y and
local for the symmetry. Let's look at the bottom. When we look at
feet, they're like, I'm just going to demonstrate because I guess it's easier. Make sure you have symmetry on. The big toe would be here. Then it usually has
a little bit of a slope and usually
goes like this. If you can imagine
imprint of a foot, it's usually
something like this. Pretty simple. Obviously,
it's a Ninja Turtle. The feet can be a bit wider, I think, that might be a little bit more fun to make them a little
bit more wide. This part is supposed to be the leg connecting to the foot. We can need to do it that way. Some of the cartoons, this cylinder is actually
wide at the bottom, and it connects to the foot. So it's really a
preference thing. I might make all of these
a little bit wider. Of course, like always, there's
1 million ways to do it. It's really just comes
down to your style. I'm going to stick to
the sphere for now. I'm going to validate it
and then just use move. I'm going to turn symmetry off. Actually, let's leave it on. Let's put it to local.
We'll do symmetry. Let's just put it
to local for now, and we'll just do some
general shape changes. We'll just pull up on it. Essentially, we just want to
match it up with the back of this not the back,
but the whole foot. Say this part, I'm
going to drag down. Et squish this in a little bit. At some point in time,
I'm going to turn off symmetry so that I can
adjust it to the foot. This side looks good. This side should follow
this little dip here. Maybe I'll spread
it out on the top. It's pretty good. Maybe we'll move this slightly
over a bit more. Turn symmetry off. I'm using
move now instead of drag. Actually, no, I was
on the wrong thing. Let's go back here and use. I'm just trying to
match those two up, so it looks more like a foot, and I think that
looks pretty good. Later on, we can add we can
make it more of a slope. But for now, let's
just add the toes. I think I'm going
to use this finger. I'll clone it, and
I'll move it up. Let's find where the sole is. Let's name this 1 ft sole. I always want to spell
it the other way. This will be fo toe. Let's use our gizmo
and bring down our newly copied foot toe. Of course, it doesn't
have to be this long, so we can just make it short. You can also press this ttle
squiggly to get these back. I might want to add
another one in there. I think that looks pretty good. Now I just added another so
that it's a little flatter, but there is a divot here. That looks weird.
Actually, it looks okay. You can decide if you want
to make that a bit of a hard angle edge for the toe. Let's place it in, it might
be a easier to picture. We'll twist it. Let's go ahead and clone it, and
then we'll move it over. Now we have both, and then we can just have an idea of what our
foot looks like. It's quite big, which I
don't really mind that much. Take both of these toes
and move them back. I want to see how it
looks without this. That might look better. I think that looks pretty good
for an into turtle foot. Again, we can
adjust it as we go. We're just going to
block it for now. I think we'll come back and once we start box will re Missing
everything together. Actually, since we're here, let's go ahead and
take this palm, this will be t see, if this is down, like so. That means this is going
to be his left hand. I think, right? Yeah, that looks right.
So that's going to be, his right, his right. O left. So that
looks pretty good. And another little cheat. I was playing around
with this, and just this sphere looked better if I stretched it all
the way to the front. So I'm just going to show
you guys exactly what I did. So we'll just stretch
that to the front. It just kind of makes the foot
look a little bit better. I don't want to hide anything. This would have to
be bigger foot base. Let's bring that
back to down here. We'll take all of these.
There's a lot of this. There's a lot of problem solving and trying
to figure out what looks best, absolutely normal. Always keep checking to make sure what you're
doing you actually like. It's very important to
keep checking that. I think we'll leave it for now. I think we'll leave it for now. So we have our hands,
we have our foot. Later on, obviously, we'll switch everything over
to the other side. But for now, we're in
a really good spot. Make sure you save, and I
think when we come back, we'll do the shell.
6. Turtle Shell: Okay, so let's deal with the
front part of the shell. So actually, you can
join the shell together. We'll join these three pieces, and when you join, you
can still use drag. So we're going to take
advantage of that. So let's select
these three pieces of the shell. So
here's the middle one. We can go ahead
and validate that. So we have these
three pieces, A, B and C. So those are the
front parts of the shell. So let's go ahead and join them. So now we have shell front.
And I think it's drag. It's either drag or
move. Let's see. Yeah, drag drags everything. So we want to keep. We don't really want to
move front and back, so we want to keep the I
believe it's going to be z. So let's hit symmetry,
Z, local, oh. I don't see it Maybe y. Y. So we want to use y. You can see that nice
separation there. And then we'll use drag. I just want to make it a
little bit more round, especially here in the middle. Let's make drag a
little bit smaller. Let's keep the symmetry
on. Let's turn off Z. We only want y and
we want local. Now let's just drag
that out a little bit. I like that. I just want
to pay attention to the different parts
to make sure that nothing gets out of whack or some way that
doesn't look good. I think that looks good.
It's nice and round. I think that's perfect. Now we can just name this shell front. And now I think we can go
ahead and add a mirror. So I'm going to add a mirror. Now the problem
when this happens when something
mirrors on itself, it's because we chose
local instead of world. So if you choose local, then it's mirroring
in the same space. If you choose world, then it
mirrors on the other side. So let's just undo that. Make sure we have that selected. We go to symmetry, world. And now let's do x, get rid of y, because x is always just
straight up and down. So it'll flip it over here. Now let's do the same
thing, shell front, a mirror, so that's much better. I'm going to make sure I select this one because it's
only one shell front. You just want to make sure
that we select the one on the left because that just
feels easier to edit to me. I think I wanted a
little bit like this. Just like a tad bit bent
like that feels right to me. You can also move it over or
closer, whatever looks good. Also, don't forget
that you can still use drag if there's different things you want to experiment with. Maybe you want this to be
like that or something. You can do a lot to the shell. Maybe I want a little bit of a Little things
like that are cool. They make it a bit
more interesting. I'm not sure exactly
what I want to do, but, I like that. That feels nice. I want to do the same thing
to this one down here. That just feels nice. Maybe we'll add a little bit
of a hike here. I like that. Boom, that's that's a great
front part of the shell. I might want to make
everything ale bit smaller. Let's see. Hopefully it doesn't to move it
back into itself. It still looks pretty good. Let's turn it over. Now we have the back of the shelf.
We look at the front. It's clearly too big. Let's shrink it. Maybe somewhere around there. I
think looks good. It still looks a
little bit too wide. Let's move it in a bit
closer and just take a look. That's a good size. Yeah, that's a pretty good size, Let's go ahead and let's turn up the post subdivision
and then validate it. Same thing as if I was to
remesh it or something. I just changed their
resolution, so it's higher. Firstly, we're going to
have to cut it in half. I'm going to take
trim with rectangle and let's just cut it in
half right about there. So far so good. It's looking
quite turtle shellish. Let me actually turn
it the other way. For some consistency. I also want to take split. I want to take split.
I use rectangle, and I think I want to just split another piece of the shell. Right about here. Now this, I'm going
to go ahead and oxo remesh, probably run. I'll do around 200. This one I'll do about the same. All right. Let's s. This is the inner part of the shell or the
bottom part of the shell. I don't know what
you want to call it. But I think we're going
to it's like the shell and then there's that little
outer bit of the shell. Yeah, I don't know the
actual terminology. You'll have to bear with me. I'm just smoothing this
out. Smooth it out. We can it. We can take this one and just smooth
this out as well. I might shrink a little bit. That's okay. I think
that looks pretty good. I want to take this
and make it a little bigger. Let's push it back. So It's looking quite shellih. Let's just get refreshed on a turtle shell before
we start this bit. Let's just look at Okay. We have these simple
turtle shells, realistic turtle shells. They're a little bit
different on the top. But these are your
standard turtle shells. It's one, two, so it's
three lines going across. They look like they're
all pretty straight, and then we just
connect the edges. Let's make sure that
we're using crease. What happens if we do
100? Let's stick to 100. It's easy for me to do it if
I have turned a little bit, so I'm just going to turn it, but we want to do
three lines across. We'll start with one here. On here. Let's try
that one again. And one here. It
looks pretty good. Now we want to make
that diamond shape, so we'll start here, one, two. It looks good so far. Let's do the same thing. O. Two. Now we'll just
fan off from here. Fan off from there.
There. I really should leave it
straight. And there. That's a really nice,
simple turtle shell. Remember, one, two, three, connect, and then we can
just fan out from there. But I think that's pretty good. Let's practice some lines
on this part of the shell. What did I just do? How
did I just hide it? Anyway, let's use
crease on here, and I think we want
to have, it's tricky. Let's go ahead and select both of these and then slo them. It is a bit tricky because
Well, that looks okay. Okay. Let's try this out. So we're just doing a crease. The only problem is
it doesn't go all the way through with the crease. How do we think that looks? It's actually it's
actually not bad. It's honestly not too bad, but I'm not 100% sure on it. I think that feels
more traditional. Obviously, make sure
you have symmetry on. I think that looks the, but I think I might like
the first one we did. There's something about
that one that I like. Whenever I run into this issue, here's another thing you can do. We can take both of these. And nomad. Got to be careful, just the
selected two export nomad, save to files. This is going to be
T and T shell A. Now I've saved this whole shell. I can undo, and then I can go back because
I can't make up my mind, and I can do the shell
the way we had it before. But do I want to do
it in the front? I think I do like that. I never really done
a shell like this before. I think I do like it. Now we can do them.
I shifted it, so hopefully, they all
don't fall on the lines. I don't really like when
they fall on the lines. What I mean by fall on the
lines is they fall right here. Okay. Now let's do what I was
going to do before, we'll join them, and let's
just say shell rear. Now we can take
drag and if we want to adjust the shell a
bit, we can do that. For example, if we
want to make this side a b and maybe this side is a like that. I dig that. I do like a straight shell, but I want to use
move, and in this, I want to push it. O. Let's see. I want to give it a bit
of a bend like this. I'm going to do it with that
part and then I'm going to take the actual shell
and do the same thing. All I did was push it to
give it a little bit of a concave ness like that. Everything looks
good. Let's slow it and see how it looks. I think that looks
great. It's a big. But that's okay.
We can shrink it. Maybe something like that.
I think that looks great. It's nice and
sandwiched in between. Perfect. He's going to
have muscles here as well, so you're not going to see too much of that underneath part, but that doesn't mean
that it's not important. So, there's another thing
that we have to do as well, which I almost forgot. There's also another
part of the shell, which is the connecting
part that connects both. This is actually a little wide. I'm going to make it
a little bit thinner. For the connective parts, I think I want to use. We can probably just use boxes. Let's use our gizmo and
since the arm is over here, we'll just do it on this side. Okay. Let's go squeeze it
together, like so. Let's make it a
little bit smaller. Let's go ahead and
make the edges a little bit rounder,
like I always do. We'll put the division x down to two post subdivision
up to two as well. We can validate. We can name this shell side. We'll
make this one A. We'll clone it, and
we'll make this one B. All we did was add two
hops, what I just did. Two pieces here. Let's make this a
little bit thicker. Let's move it in a
bit, Let's twist it a little bit.
And we'll use move. Now we can see we
need to make it, we need to make it flush and needs to feel
like it's round. Let's take and pull this part. We they are pulling apart a bit. That's okay. Actually
still looks all right. That actually isn't too bad. We want to pull this side down. Well pull this side up a bit. I'm going to push in and
I'm going but actually now, I want to, I want to use, but the x is messed
up, isn't it? I guess we won't be using x. Let's use drag. I want to make these size a
little bit bigger, but I don't want
them to do this. I want them to be
more like that. I'm going to have to do a lot of stretching and then a lot of pushing so that it's like this. That side looks pretty good. This side looks
pretty good also. To be honest, Let's use move. Let's push this a little
bit more underneath that. Now the box is
getting in the way, so I'm going to make it thinner. But I think it's good. Let's go ahead and box remesh
this together. I'm going to do it around 200 because I just
need to smooth it. I need to smooth
the whole thing. It needs to be very smooth. It was too lumpy before. I'm sacrificing that
crease in the middle. Because it was just
didn't look the best. Anyway. Oh, and there's not enough here
for the shoulder. I didn't think about that. Let's see if we can
just move this down. Let's turn the symmetry off. Let's just move this down
and tilt it a little bit. I think right now, I think
that looks pretty good. Let's use crease. I
think one is good. I think that works. I'm
very happy with this. I'm going to add a mirror.
Let's make sure we go back. Let's go back to world.
Let's go back to x. Now we do shell side, we'll add a mirror, and now it's on the
other side as well. I'm going to name the
mirror shell side. Good. Now we can add a little bit
more detail if we want. Let's try pinch. Pinch
might be better. We can pinch these edges, or you can use crease
and invert and you can really make that
edge pop like that. Maybe that looks a bit n.
Let's do them both that way. We'll do one there.
We'll do one down here. Looks beautiful, and I'll just smooth a little
bit underneath this. Feel free to manipulate
that if you need, change it around, but we just want to flush nice and round. It looks like it fits nicely
with the rest of the shell. Actually, another
thing I'm going to do is take these lines. I'm going to slo this. I want
to take all these lines. I'm just going to use
the regular crease and just pull them down
a little bit more. Solo again. I think this show looks great. Just do as much
adjusting as you need, and just get it to a point where you like it. I'm
happy with this. I think we can move on to we'll just do
little adjustments. He looks more like a character. We have to position the head, position the neck,
things like that. But for now, really good job. Let's go ahead and save and
we can hop to the next video.
7. Dialing In: All right. So let's clean
this guy up and start adding some details and just
dialing in our characters. The first thing I want to
do is adjust these legs. This one, I'm going to make this leg a little bit shorter. And I want to bring
this this whole piece, this whole leg and foot. I want to make it all a bit
smaller and then bring it up. Then take off the knee pads because I want this
to be smaller. Then I think I want
just the foot to be bigger. Maybe we'll
move this up. Feels a bit better,
and then we can take the ankle and also move it up. I think I want to do that
whole foot wrap thing. That's just so cool, so I might want to
do that as well. But this looks even
better just as is. All right. We need to
work on these pads. Okay. For the knee pads, I think I
want to use three cylinders. We'll make them a bit softer and we'll put them on the front. Before we validate this,
let's just clone it. I'm just going to name
this one P K for Pad ke, but these are going to
be the smaller ones. I want to move it up, shrink it, so we'll put one
right in the middle. Then we can make it
a little bit more round using the tools here, so we'll bring this down to 18. Put this to two. That's
pretty good, actually. Let's see if we can
make it rounder. We move this down to
six. But that's a four. I think that looks great. Let's make it a
little bit wider. I think it looks fantastic. We have something like this, which I think looks great. Now, this one,
Let's validate it. I like everything about
it, so we'll clone it, and this can be the one up top, which I'll bring up and
then I'll put on an angle. We'll clone pK one,
we'll move it down, and then we'll just
rotate it. Perfect. Let's take the
middle one and move this out and make it wider. There we go. That looks. I think that looks good. Now we have all of
these. I'm just going to join them together. The only other thing
that I was thinking, let's go ahead and validate
this piece and smooth it. It'll be nice if I
could smooth it. Let's turn on the local,
there we go, that's better. We'll use local in x. Although it still appears that it's not smoothing
at the same rate. If we sol it, then we
can see that it is. I'm going to smooth this,
I'll smooth the top. That looks great. I'll
move it out a little bit. Or at we can just stretch
it with the Gizmo. That's probably better. We'll stretch it with the
Gizmo, and then also, I think we need a nice
crease to go right across. It might look ugly
now because it isn't a The resolution
isn't very high. Actually that looks fine. Let's do the same
thing with this. Let's go ahead and do
the post subdivision. I think we brought
this down to 12. And this to two. Let's do two. I'm going to
validate it. I think they usually have
two on their wrists, two little plump things. We'll clone this, we'll bring it down. I think that'll be good. So pad wrist. I'm just
going to join them for now. I think it might be
worth it to move this whole thing to
the elbow pad as well. PK two. What if we clone this and bring it
up to the elbow? We just use this
for our elbow pad. Let's take it off of a line. Okay. Let's move this in. I feel like this is a good spot. But the sphere is quite large. Let's make that a bit small. Let's un nestle them, so they don't move together. Now we'll shrink the sphere. Essentially, we just need to do the same thing that we
did with the other. Let's make it a little wider. Same thing we did to the
knee but to the elbow. I think that's what
we want. Feel so I feel like a little
bit bigger to me. I don't want it to be that big. Okay. That's a
pretty good start. I'm going to nestle them
again because I think we can adjust that as we go along. But I think that's good
for now. All right. We have that. We have that. Let's take this
one and just give this one the same works. So we'll tap the three dots. We'll put this down to 12. Put this post
subdivision to two. Validate, make it bigger. Clone. We'll make that bigger as well. Looks like we'll have to
make them both bigger. You know what I should
have done though. That was dumb of me. I'm going to go back and I wasn't paying
attention to the shapes. Now we've made everything. But the only difference
is validated it yet so I can make
this bigger here. And that we can clone. And we can kind of
just use these to make it make it bigger. Okay. Not that much. But maybe
something like that works. Validate, validate. Now these are
looking pretty good. I'm going to go ahead
and nestle them. Pad knee. I'm going
to nestle under here. Leg low. I'm going to put pad
ankle underneath leg low. This is the shell. Where's
the other part of the shell? Let's move the shell up. I don't even know what this is. This is the shell ops front. I always have to try to keep everything together
as much as possible. Otherwise, I just get messed up. Okay. You know what? I
actually want to do a little bit more. I'm going
to unstle this. I'm going to take the pad elbow, and I think I want to
just slim it up a bit. And I want to add a crease. Maybe we can do
symmetry in local. Solo it. We'll just do the
crease all the way around. Now I want to do the belt. Let's hide all the parts of the. So we'll hide the shoulder, all this stuff, get it out of the way. We
can keep the body. Get all that stuff
out of the way. This is not going
to be the belt. Originally, I would
have just made it bigger and then adjusted it. But maybe if we decide to let's hit Snap 90 and do it like this. Eventually, if we want
to do the medallion, we can just keep this
for the medallion. But I don't know if
I want to do that. We'll just rename
this medallion. It's do a quick save. And
we'll hide this as well. Let's do the belt. I think we want to use the tube. We'll use path, we'll use snap. I'm just going to tap this so it has something to snap to. We'll just start
by making one line like this. It's mirrored. Let's take it out of
whatever mirror this is, and we can give it its
own mirror actually. We'll give it its own mirror,
we'll take it out for now, but then when we
need it, we'll just nestle it back
within the mirror. This is going to obviously
wrap all around. Let's add some points. We'll bring this here about the middle part,
the middle section. Well the mid section of
the back of the shell. When we do mirror, it'll just
meet up on the other side. Let's just nestle it in
the mirror and you'll see a little bit
better what I mean. Okay Let's try to keep
this fairly straight. The more points you add,
the more it'll stay on the outside of the surfaces. It's always annoying that
it goes into the surfaces. Let's try to keep
the front straight. Just be careful not to
bring these together. Oh, good, they
won't go together. That's the back node. Just try to get these as
straight as possible. That looks pretty good. I'm going to hit snap. So now we're not worried about
it going into the shell, and we might be able to get
rid of some of these points. That's essentially
what we want. We just want it going around the outside of the shell. That looks great. Let's go ahead and hit profile
and let's make it wider. Let's just use our gizmo
and we can make it wider. A a funny, but we
might be able to fix that with the
nodes hopefully. Yeah, it was just
because some of the nodes were not lined up. Little tedious, but we
do what has to be done. That looks good. I might
want want it a little thicker. I like that. Pretty nice. You can see it's still going into
the model a bit, but I think that's okay for now. What I want to do is make the
belt a little bit thinner. We can try to get some of this doesn't look like the shell is going
through the belt. Let's do we do one radius. Let's tattle squiggly. Let's see if we can make it. I might make it smaller,
but that's okay. I think something like
that is pretty good. Now we just have to make it
taller again with the gizmo. So we can maintain
that thickness. Well back to the squiggly. I'm just going to try to adjust this Something like that looks a little bit
better even here. It might actually be better
to do that manually. It looks pretty good. It looks like it's
wrapped around him. Let's pull this bit out a bit, maybe this out a bit.
That looks good. The bottom is still there's
a little bit of space there, but I think we might have
to do that manually. I'm going to go ahead
and I'm going to raise the post subdivision to
one and then validate. Let's do save. Okay. Now, I think we want to do let's try drag and just see
if we can drag these parts. For example, this
needs to be closer. Let's turn on symmetry so the other side will
do the same thing. This needs to be
closer while this needs to be pulled away more. Let's just so we can try to
get a smoother movement. I think that looks a bit better. That looks pretty
good. This looks. This looks nice and tight,
so we'll leave that. Now there is a lot
of space here, this might be a little tricky. Hopefully we can move the bottom without too much being
moved on the top. We just want it nice and snug. Everything looks
pretty good, still. See, I don't want
this space here. That's what we're just
trying to get rid of. We want to make this nice and
flush up against the shell. I think I want to Vox remesh
these parts together. Let's take these mirrors. We'll Vox remesh. We'll name this belt. I want to remesh
the belt abnormally high because I don't want
the edges to be crazy. For some reason, when I'm
trying to remesh around 200, the edges get really crazy
and soft and I don't like it. Let's Vox remesh around
hundred. It looks good. Now we can smooth this and we should be able to
get it nice and smooth. L make sure you
have symmetry on. We'll smooth out our belt,
but it's not really taking too much mass away
from the belt. It looks pretty good. Feel free to do any other
little adjustments you need to do as well. I don't like how much it
kind of goes in here. So that kind of bugs me. Feel free to box
remesh up and down, higher and lower, depending
on what you need. You can always just
decimate or you could do quadri Mesh again and
should look fine. Especially if you're
worried about your machine and you don't want things to be so high res, then you can decimate
or x Vom lower, decimate, or do qua. The only thing I
see is What is up with this line? Okay. Good. Our belt is
pretty much done. Belts are always tough. Good job, make sure you save. I think when we come
back, we'll do hierarchy. We'll move the head a little bit because the head is out
of place in the neck, and we'll do some
hierarchy stuff.
8. The Hierarchy: Here's how the higher key works. We have arm upper. We have shoulder, arm upper, pad elbow, P K. Forearm, arm low. We have the wrist, and
then we have the hand. Let's just bring the
hand up or the palm. Here's the palm, and we'll bring the palm up
underneath the wrist. Here's all the parts
of our hierarchy. The shoulder is going to
connect to everything below it, everything is going to move once we rotate or move the shoulder. We have the shoulder,
we're going to nestle the arm upper. Then for the pad elbow, we can nestle that to upper, and these are both
parts of the pads, so we can just nestle
those together. Arm low, that's going to be
nestled to the pad elbow. And then the wrist, that
can be nestled to the arm, and then we have the palm
and that can be nestled to the pad wrist. Here's
the hierarchy. Let's see how I did. If I take the shoulder, use the gizmo,
everything should move. If I take the pad, everything below it should move, almost like an elbow joint, and the wrist, everything
below it should move. That just makes it
easier to pose. That's the proper hierarchy. We have shoulder the upper arm, the pad, PK, this part of the pad is
connected to the pad, even though we could
join those or whatever. Then we have the forearm and then the wrist
and then the palm. That's that's how the
hierarchy is going to work. It'll be the same
thing for the leg, the knee, and this piece. But I had to re
record this because when I first did it,
it was very confusing. We'll do the leg
in the next video. Everything should move with it. This looks pretty good.
Now we still need to adjust this sphere and
just the shoulder alone. Just go to group and
just hit object. If you hit object, then
you'll just be able to move just that object, like so. Maybe here is a
better spot for it, which is good. We'll go here. We can go ahead and
validate this piece. We're still an object
so we can move it. I think it needs
to be around here. Let's take this and
move this out some. Everything looks good. This can probably go down, and then both of these, let's see if they're connected. Nope. Let's take that
pad elbow and PK. And Let's just twist it a bit. We just want to twist
it. So the back of the pad is on the
back of the arm. See right now it's on
the side of the arm. Let's take pivot and let's adjust the pivot that
will allow us to do that. We hit pivot again,
now we can just twist and we can just move it into a
place where we need it. This part is still quite big. I'm going to shrink that, maybe move it out and shrink
it this way for sure. That looks much better. That hierarchy looks great. Let's figure out
where the head goes, I don't think any of
these are connected. We have head top, We
have the eye mask. I'm going to nestle
that under head top. We're probably not going
to move any of these, but it's just better to
know where everything is. I whites, I'm going
to also nestle there. I don't know what
this sphere is, or this is the head band naught. The head band n can be
connected to the eye mask. Teeth can also be
connected to this. This mirror is the
pupils P one for pupils. We'll connect that also to this. Had jaw, that's the
lower part of the head. Now where is the neck? The next up there.
You know what? Let's bring all of this up top. That makes more sense. The neck will connect to that. We're still in object,
so we can still move all these things
around separately. Let's take all of these
except for the neck. Hopefully, that's everything. Yeah. For now, let's just figure out a
good place for the head. I'm thinking his
head is going to be a little bit more forward. Maybe down a bit. It feels a bit better. I don't think it
needs to be more forward. I think
that looks good. Let's take the neck and move and now we
just need to make it a little bit more ish. We'll take the bottom of
it and spread it out. I think we want to move it back. I want to put some bend in it, but I'm not sure if we
want to do a front bend. Maybe something
like that. It might be a little too thick. I always do this. I
always take crease and just make a
nice Adam's apple. At loose. Let's Vox remesh
it around 120 or so. We can smooth it out we want. And then crease, and just make a nice Adam's apple type thing. I can smooth that out too. Looks a little too thick
down here. That looks good. It might be a It all
might be a little too high. Let's lower it. That looks too short. Okay.
Anyway, this looks good. Let's instead of this, I think I might want to
use Let's take move, and let's just stretch this out. This is his body like
inside the shell. Let's go to symmetry,
let's do local, and let's do Z for
sure and also x. This way we can evenly spread out the top
part of his body. I think that looks good. I'm Let's put it back. So two. Let's turn off z. We can just pull the back
part to go into the shell. I like that. Also, maybe
drag might be easier. We want to drag up
and give him traps. I think that's the
correct muscle for there. Now we have something like this. With symmetry, all we did was now we're not
doing front and back, just the left and
right is symmetrical. This looks good. I want
to make sure that the back That looks pretty good. I might need to Let's
move it up a little bit. We might need to
adjust the shell in the belt to make it
a little bigger now, actually. Which is fine. It's not difficult. Let's take smooth whoops and smooth
out the front part of this. Maybe the back a little bit. That looks good. Let's
put the shoulder. Let's select everything
because we're still an object, so I'm just selecting
everything and put the shoulder a little bit
in a better position. I think that looks a bit better as to where the
shoulder would be. I think that looks. I'm going to subdivide
the body part, so it's a little more solid. I'll just subdivide it. That way I can
smooth it, drag it. So it's not so soft. I think that looks better. If you want, we can
add some crease. We'll add some crease action
there. Smooth it out. N. Look at that. It's coming. It's coming in nicely. Want to take the neck
and just use drag and make the base of
it a little thicker. Like that. All right. Let's take this bicep, and let's just
bicep it up a bit. We can take inflate
and just inflate on the front of it. A little bit. We can take the back with clay, and we can add some triceps. Just a little bit of clay. Unless, of course,
you want them to be super muscular, that's fine too. In my studies, I believe that
actually we can use drag. This piece would come
down a little bit like be the trap and the bicep. That part comes down and we can use that for like the
shoulder muscles. Like this. We'll just smooth
this out. Now it has a little bit of
a shoulder muscle, but it's not too crazy. Also, the bicep muscle goes you can see my
anatomies a little bit off. Let's take the shoulder. I always turns into
an anatomy on, bro science anatomy lesson. I'm going to turn
this back into auto. L et's take this part of the shoulder and
hike it up a bit. Then let's take this part of the arm and we'll
bring that over as well. That's a little bit better. The shoulder will glide into the pectoral muscle
and the Bectoral muscle. It actually goes
under your armpit. That works a little bit better. This bicep, I might
be able to take move and just pull
it out a little bit. And we can take the body part and just smooth that
down a little bit. That feels a lot more natural. We can eventually
mesh these together once we figure out the pose. But right now, we just want to get a little bit of
details on the arms. Let's go back here and we'll do a little crease maybe
even on both sides. A little crease will make
that bicep look a lot better. I can smooth it out. I just want to imply that it's there. Now we have this.
I think I want to make this part a little smaller. I actually want to do that?
Maybe we'll leave it. We'll leave it at thicker, but I want to validate it, and now we have
to do the muscles for this part of the arm. Let's see. Let's take clay. We want to build up this
inner part of the arm here. Okay We build up that little
part and then we smooth it. The bicep comes down
and there's a v here. Let's make a little bit
of oops, tool am I using? Let's use crease
and we'll make that little V just to
indent that there. Now this part of the arm, there's a muscle that comes down and goes towards the palm. Let's start with the palm, and we'll make that
muscle like that. We have a bit of a dip there
where the bicep would go in, and then where this thumb is, just make a line that comes up, but have it swirl back. The back part of the arm, with the hand is like.
We're going to do this. Let's move the arm the hand into place.
Will it move? Yes. Essentially the back
part of the hand. There's a muscle here that comes down to the back
part of the hand. Then there's all these muscles. Ale bit hard to describe. But hopefully, looking
at the back side, it'll make it easier. From the back part of the elbow, there's one line
that almost goes out to this little bone here. This little bone, which
lines up with the pinky. This line is going
towards that bone, which would be about right here. That's that line. This line, this line curves up
towards the thumb. Just make a nice sorely
line towards the thumb. Then all these areas, we can just add a little bit
of clay to them as needed. To make them pop a little bit. Then we'll just take smooth. Actually, let's remesh it. Let's remesh it around 150, just so everything is
a little stronger. We don't lose the detail. That looks pretty good.
The only thing is this V is sticking out a little bit and I want to do
something like that. Let's make drag smaller.
I want to bring that in. Maybe we'll do a little crease
a little bit further down. And then smooth it. Okay. That feels better. Se there's the V, that's
where the palm is, and then you have the
subsequent muscles after that. This muscle actually here, the elbow would attach
and go straight down. That's what this is. I think we can do the
leg hierarchy as well. That'll be a little bit
easier. We'll just go here. We have the leg up,
which is the thigh. We have the pad knee. We're going to nestle that. Pad knee nestles into leg low, nestles into pad knee. Like so. The lower leg nestles
into pad knee ankle, nestles into low leg, foot base, nestles
into pad ankle. There we go. Then foot
sole can nestle into foot base and the toes can nestle right into foot
sole. They can just nestle. They can both nestle
into foot sole. Same thing, The toes are
nestled into the base. The base is nestled into
the little ankle thing, which is all nestled into
the bottom part of the leg, which is nestled into the knee, which is nestled into the thigh. Very easy. And we go to the leg and everything
should move. The only thing else we
need to do is take pivot. We'll move the pivot up to
where the hip joint would be, and now it's a
little bit better. Then if you wanted
to bend the knee, you can bend, that'll make
it really cool to pose. Let's also nestle the shell. We have the shell front here. We have the shell rear, which is obviously the back
part of the shell. I'm going to put the shell rear. I'm going to take
the shell front. And nestle it. I'm going to nestle
that mirror under shell rear. And then shell side. I'm just going to nestle that
the same under shell rear. Now I can choose the
shell. Oh, also the belt. Let's take the belt
and also nestle that in here so that if I wanted
to make this bigger, I could just tap the shell and then make everything
bigger as needed. Next up, I think all we need to do is come up with a pose, so then we can start solidifying
some of these shapes. Let's make sure we save, and let's hop to the next video.
9. Turtle Pose: All right, so it's time
to figure out a pose. So, let's not just guess. Let's look at some poses. So these are all kind of cool. We might to have to redo
some teeth like that. Do some research, figure
out what you like, and just have those in your mind for when you
do the other turtles. I'm just going to do one.
These are kind of cool. They're actually pretty cool.
These are actually great. So the most important
thing you want to do at this point in time is
clone your project. So we're going to go here to the little folder to save as, I have another one here
that I've been working back and forth on, so
we're going to say yes. Now we have an we have
two of the same projects. I can open up this one,
and it's the same. That's very important because when you want to do
the other turtles, you don't want to have to
do a lot of the work again. You don't have to do a lot
of the same work again. Now you can go back and we
can pose it some other pose. If we completely mess it up, then you have a backup. That's one important
thing that you should do. Let's turn the grid back on. And there's a ground now, so we're going to
use this red line as you know what I mean. Let's add a cylinder. We'll name this the ground. We'll make it bigger than
him. We'll flatten it. That's my ice. It's my ice. Boom. Nice. Let's go
ahead and put this down to ten, not 110, ten. Then we'll do the
post subdivision. Let's make it a little more. Yeah, something like that works. We'll validate. Again,
you can go here and miscellaneous and decimate in order to get this size down, but it doesn't need to
be 24.1 k. That's crazy. We'll just put it too. I didn't mean it to symmetry. I'll just re with
so it's smaller. I can probably go lower
than that, but that's okay. 25. And that's fine. I'll turn the wire frame
off. Now we have a floor. Notice that the top edge is right on that
red horizon line, so I can turn off the
grid. I hate the grid. Let's take everything
above the ground, which is the turtle, even the hidden layers
or anything like that. Everything, we just
want to bring it up. Maybe we'll even make
it a little bigger. This was actually a
mistake that I made. When I make the turtle bigger, you notice that this arrow
is not in the center of him. Then when I make him
bigger, later on, I realized that he's
not symmetrical, he's not in the
middle of the frame. I think it's because I
selected everything and it's enlarging from a point
that's not in the center. So just note if you can, if you want to make
it bigger or smaller, you want the gizmo
to be in the center. You want this point
to be in the center, not on the side,
because later on, that's how your character
will get out of whack and things won't
be exactly symmetric. Maybe we'll even make
it a little bigger. Then now he's on some ground. Let's take all of
this, the shoulder. I'm going to rename this.
This is his right arm. Rm A. Let's take all of this clone. Now we have the same,
everything is the same. Unfortunately, you can't grab
all these and flip them, that would make life
so much easier. At least I don't think you can. What if I do object? No, you still can't. Group? I'd be so nice if you
could just flip it all so easily, but you can't. So we'll go back to auto. So this is the copy. So what we want to do is do symmetry and flip x. Make
sure you're in the world. Flip X. Boom. So now you see
the other shoulder there. Wait a minute. The
shoulder isn't quite. Sometimes it's not. It
doesn't mirror exactly. I'm not sure why, but the arms aren't going to be in the same exact position anyway, so it's not that big of a deal. So we can just go ahead and take all the other pieces
and do the same thing. They should at least
match up with each other. Ops. I'm going to do that
because that one was local. I want to make
sure I'm on world. Each piece, I want to
make sure I'm on world. And then you just go through and switch everything. Mm. Okay. So first issue is these fingers because they're not validated. Let's clone. We're going to bring this out on its own, we'll take
the middle one, clone, bring it out on its own, thumb, clone, and then
move it out on its own. Let's add a mirror. Now they're on the correct side. And unfortunately, we're
just going to have to hide them for now. These we don't need. We'll take these three and
we'll add that to the palm. They're here, but they're
also going to be here. We just have to remember
when we do these fingers that we're going to have some phantom fingers on the
other side. But that's okay. The fingers are here and this arm this arm
is now good to go. Let's start from the shoulder and let's actually move
it out a little bit. I don't know why it
should be around here. Would be like a good match for the other side,
but who knows why? Some small shift could cause
that. But that's all right. You can see the
phantom fingers here. You know what come to
think of it. I just noticed that my
model is off center. I think what happened was when I moved it
and I resized it, that's when I probably moved
it off of the center line. I'm actually just going
to select everything. Except for the ground and
try to move it back onto the center line. We'll see. Obviously, we need to
put the other leg. But we need to make this
leg a little more leggy. Firstly, you make
the big muscle here. I'm just going to use clay and we'll make big muscle here. I'll make another muscle here. Make sure this muscle
is nice and round. There's also a glute muscle. We might not even have to
do too much more than that. It's only 5,000, so I'm going
to go ahead and box remiss. Maybe around 150 or so. Actually, let's subdivide it. Get rid of those things. We'll multi subdivide, I
might actually be fine. Let's smooth. There we go. Looks like a nice turtle leg. We can use crease if we want to carve these muscles out some. And then obviously
smooth them out, so the looks a little
bit more natural. I don't like to do
too much muscles. I mean, the muscles
are pretty big, but I don't like to go too crazy with the leg muscles,
things like that. Let's do another
crease down the back. We'll this into
looking like a muscle. We could add a little
bit of clay back here as well, and just
smooth that out. Why not? That looks good. For the back of the
lower part of the leg, obviously, we want to
make a calf muscle. We're going to do this the
same way that I do trips. Just a nice little v. Beautiful. I'll take and just
make that a bit more I'm going to vox remesh
this 150. Smooth it out. Probably should just
vox remesh the top two. But that's okay. I not the
smartest tool in the shed. But it looks good. Looks like a big, nice,
strong turtle calf. I wish I had big calf muscles, but unfortunately, I have the calf muscles of
a 13-year-old girl. Who is not a gymnast. Because I think I think my wife had bigger calfs than
me at 13 most likely. Okay. So this looks good. All right. So we might
need to do some work with connecting the
toes with the foot. But it's kind of silly that the foot and the sole
aren't connected, so let's just connect those two. So this part and this
part, so let's take those. Well Vox will remiss them
together around 160 or so. You like the arbitrary
numbers that I Vox remiss it. I just do whatever
feels good at the time. But usually if it's just like a normal like something
I just want softened, then I'll do 140 to 160. If it's like my just basic
generic is 175 lately. Little bit higher is 200 and
then if I'm getting crazy, then I'll do f hundred
or something like that. But usually it doesn't
need to go that high at certain points
until it's done. Let me see what this looks like. Et me do X ray. I
not too bad. Okay. Okay, so now we have the base of the foot as well. Looks good. A looks good in the world. So let's concentrate on flipping the foot
now through the leg. Oh, so this. Let's take drag. Out. I also wanted to do the foot wraps too.
T will be fun. Let's save this and let's flip this leg. We have these toes. These toes. You know what? I'm just going to I think I'm
going to validate the toes. Now let's take all the pieces
of the leg, Let's clone. Then let's start from
the bottom symmetry and we can make our moves. And it's still in world.
I might have undid. Hard to know. It's always something, Boom. Now we have two legs. They are looking great. Now I'm going to save and
replace this one because now I'm going to save as the one we just left because I forgot to save first. Now we're back to good and
we have the other leg, so I don't have to do
that again in the future. Let's go ahead and bend the leg. Let's go back to the thigh. Let's just use a line and
rotate it out up a bit. I love. P is so fun. Let's take this one and we'll
do much the same thing. It's going to be something
like that. You know what? We have the shell, I want to move all of this
stuff at once because he's going to have
to lean forward. Let's take the arms. All of this in the shell, the body, the shell, the belt, and the
medallion, and the pelvic. Let's put it forward. I looks crazy, but I like it. Let's take a look at
our reference again. Looks good. I want to
take everything now, and I want to base
it on the ground. I want to make sure I'm
keeping a base on the ground. Now if we look, he's
a little bit more bent in the reference,
actually not. The leg is a bit more bent. I just like moving
stuff around sometimes. So let's take the knee and
we'll rotate it a little bit. I looks better.
Let's put a line, Let's rotate this out. Let's take the knee. Let's take it off of a line. And we can actually
just position this and then find it
with the other leg. That might be the
smart thing to do. If we look if we look at this, this knee is facing down. Let's just bring
in the reference. We'll go here, where
do we go actually. The little picture,
reference image, import, photos, boom. Then we'll do transform, and we'll put it here for now. Actually, that's probably
not a great spot because all my
information is up there, so we'll transform,
we'll just put it. We'll put it down. Yeah, we'll
just put it here for now. Okay, this knee is
going to be facing this way, more rotated. Like this. This part of the leg is going
to be bent back more. This foot is going to be, I notice the toes
aren't connected. The toes should be connected to the foot base so that
they move with the foot. The foot should be flat,
let's look a crazy. We have that. Let's
look at this, and his position is going to be he's going to
be more like this. Let's take our
camera and let's add this view. We'll di name it one. The's in a decent spot, but the whole torso
has to come down. Let's take everything
from the torso up, and bring that down. Maybe something
like that. Now I'm just going to try and position the legs so they can meet
let's switch this to object, so I can not adjusting? We'll select both of these. So we can adjust them, take the thigh and then we can try to marry those two together. Looks like all of this
needs to be twisted. Let's change to auto. All of this needs to be twisted. To a there. It's bent. It's rotated out a
bit it looks like. All of this is bent
a little bit more, as you can see, so we're
going to bend this back. It's a fair bit behind this leg as well, so
let's move it back. Can I move the toes separately? Let's take the toes the toes need to be flat on the ground. Move them out a little
bit. That looks good. I want to get rid of the arms because they're just in the way. We'll take the knee pads, and we'll try to position
them so that they make sense. Then we'll take the thigh, and we'll try to position
that so that it makes sense. You know what
this needs to be. Let's take it off of a line, just needs to be up higher. And we'll rotate it into the knee pan a
little bit better. Posing is tricky. Posing
is very difficult. This isn't the easiest pose, but just use the reference, use the reference
as much as you can. I might need to even make him closer to the ground, I think. I don't feel that
he's sitting enough. Also he's falling forward. So I think that's an
important thing to do. I'm going to take
everything above Again, I'm going to use a line
and I'm going to move him back and down. Then I'll take these thighs and I'll have to
just adjust them. Same thing with this
one. A little trick because you can use a little
circle in the middle to just move the whole piece. Sometimes it's helpful.
Just the pads, Let's adjust them a little bit. Not bad. We have a little. We obviously have
some work to do, but it's not terrible.
10. Pose II : So now it's just a
matter of adjusting everything until it's close. Isn't to be perfect right now, but it should be pretty good. All right, let's take the head. Let's go to auto and Aline. The neck is attached, so let's remove the neck. I can actually just remove
the neck. It might be easier. We'll look at our view. Then we'll rotate the head. I want to put the head lower, I think. We look at our view. Let's make his head
a little bit bigger. Now let's take the neck
and We can twist it a bit. Maybe we'll twist it a bit. Let's take it off of a line. We'll twist it a bit this way. Just to point towards the
way his head is showing. A lot of times it's
really just looking and seeing what's wrong, what need. Sometimes it's the micro things
that really make it good. The little micro movements. I'm trying to just
really take it in and work on all that stuff. I want to put it
straight. I think I want to twist his whole body. Since it's not
symmetrical anymore. I think I just want to
twist everything so that I don't have to keep
going to that view again. We don't need the ground. I'm going to twist
the whole thing, how I want the pose to
be, which is like this. Eventually it'll be like this. Take the knee pads and
twist them a little bit. One thing I notice is I don't
see a shell in this image, even if I switched to perspective,
I don't see the shell. I'm going to switch
back to orthographic. I was just messing
around before. But I think the torso
is turned a little bit. So I'm going to go to Gizmo, put this back to Auto.
I'll take the shell. All the shell
stuff, but also the body and I don't
want it to be on. Looks like this ist, I was
hoping that this would not be the gizmo
wouldn't be straight. Let's see if I get
rid of the body. I still is, the belt. Anyway, I want to turn all this. That's actually good. So I'm going to angle it
down a little bit more. I'm going to look
at the side too. That looks good, and I want to turn it a
little bit more this way. To be able to see a little
bit more of that shell. I think that looks pretty good. Now that I've done
that, I want to adjust the head and neck. He can also be writing
a skateboard like this, too, or a surfboard. I hope someone does that
makes him on a surfboard. I might have to do that as well. Let's do the head is the neck
of the necks not attached. It looks like it looks
like the neck forward, it may be turned a
little bit more. It's a little bit tricky. Let's go to the front to get
the head in the right spot. But I'm feeling like
that looks pretty good. That looks good. The neck actually looks
like it's in a good spot. Maybe just twist it a
little more this way. Let's just take move and
morph it into the body. But I think that
looks pretty good. Let's see which arm do we
want to miss with first? Looks like it's going
to be this one. Let's unhide all of that arm. We'll take the shoulder.
We should be able to move everything
from the shoulder. I'm going to turn show line off. So we'll twist it.
We'll take this piece. We'll turn it a
little bit like this. The wrist, we're going
to turn a little bit more looks like the
wrist is just turning. The palm should be attached to the wrist that way
when I grab the wrist, the palm turns to. That
looks pretty good. Now this part of the hand
is going to be bent. Let's just take a
look at it here. I think there needs to be
more of a bend in the elbow. We'll push this
back a little bit. I'll take this and
go back to objects. So essentially, let's do
this one in arm upper. That looks a little bit better. It's a bit hard to keep
adjusting all of these things. You have to, it's tricky, but it can be a bit difficult
to adjust all of these. But you get used to it, but that's the tough
part about it is you have to do so small adjusting and it all makes such
a big difference. That looks good. I think the arm needs
to be up a bit more. These need to be I don't know how my hierarchy got so far off. All the things that should
be connected aren't anymore. There's no really easy way
to do these adjustments. You just have to get it right. You just have to figure
out where the right place is for them and what looks good. It's a lot of going back
and forth and adjusting. Obviously, you see that I'm
doing a lot of adjusting. You know what? This needs
to come out a bit more. I'm going to take
the body inside there and stretch it
a little bit more. I'm going to take
the shoulder and also stretch it this
way a little bit more. Let's take it off symmetry. That looks pretty good. Now
we can get to these hands, which is what I've
been waiting for. This thumb, we'll use our gizmo. Gizmo is not making it easy. Let's take the pivot, and
let's adjust the gizmo, so it's easy to
manipulate the finger. That's a little bit better.
I can rotate it this way. Let's go on to the other arm only because I don't
have the weapons made, so we'll make the other arm and then we'll make the weapons. Let's go to this arm. We have the phantom fingers over there. Don't
worry about those. This arm is out. It's rotated a bit. Something like this. But it's actually
not rotated out. I'm going to adjust this pivot. So I can rotate it in. That looks pretty
good. I want to take the bicep and
rotate it a bit more. Then I want to take the fore
arm, hopefully, my hierky. No. I got to fix my hierarchy. The pads and things
should be er. This palm sh be pad. Now we can go back to this arm. And we should be able to rotate it, but I want to rotate it. I need to change the pivot. The pivot should be
where the elbow is. We'll tap pivot. We want to bring the pivot up
to where the elbow is. I would be around there. Let's go back to the front. And we shod be to wrong. We should be able to rotate this let's move it out some. We need to rotate it more. We'll take the
palm, rotate that. Then we just need
to add the weapon. That's not bad. This needs
a lot of work though. Actually, this might be a
little bit more helpful if we adjust elbow pad, because we know the elbow pad
has to go over the elbow. Let's just make it easy
for us and hide this arm. I know this is It's so tricky. But hopefully I've gone through all these
little parts slow enough that you can figure
out what my aim is. Let's take these
two. Actually, let's start with the bicep area. The pivots are always all rotated a little bit this way,
a little bit this way. Okay, that's pretty
good, actually. That's pretty good. Now
let's adjust these two. H. Let's change the pivot. I could stretch it a little bit, actually I might
be easier to just. Even on all of these, use
move and we can make it work. Elbow of the arm and move
it in there. Not bad. Let's take the leg and we
need to move this leg. I'm going to adjust the pivot so I can move it straight down. And I want to take
move and we need to drag it into the body
a little bit better. It's so fun posing these guys. Let's take this leg.
Let's just take move and we'll just make sure that it's nice and Need in. I don't want to
sacrifice the shape. Everything looks really
good. Let's take drag. They need like butts. I'm definitely going to
give them a little tail. I think I need to
make a line here. Here. Is that the same
or did I do that wrong? Oh, I think the
line would be here. I think it would come off
this muscle and go like that. Let's smooth it and make
sure that it makes sense. This looks good, but
it's a little flat. The back of this leg
feels a little flat here. I'm going to take
clay and I'm going to add some muscle here. That looks better. This, but it just looks silly, so I'm going to add more clay
here going up to the butt. Let me get rid of
the ground again. We'll just add more of that
muscle underneath the leg. I think that should look fine. The only thing if
I had my one wish, let's see if it's like this
is to move this piece out. A group is good
actually for this. Let me figure out where
I actually want it. I think something like that
feels a bit better to me. I think I'll just take move,
slide this underneath. I take this and slide
it down a pinch. Nice. That looks good. I want to open them
up a little bit. Let's do a line. I want his toes to be very
grippy on the ground. I think I'm going to have
to put a disclaimer on this that you can skip it. Let's take this part of the
foot and actually pull it. I think that looks pretty good. Pretty happy with that.
I'm gonna give it to save Whoops 27 minutes. That's okay.
11. The Tail & the Sai: All right, so you know I got to give my guy a little tail. Can't just have his
little butt just out. I could give him some cheeks,
but that might be too much. So let's go ahead and add. Here's the body. Let's go
ahead and add a sphere. We move it up, and let's look at the t's
first hide the ground. The ground is the pain in
my existence, apparently. Let's look at the front. So we're still on this
sphere, we move it back. And Let's move it right
to his butt area. We'll wedge it in there.
We'll validate it, and let's take maybe
drag might work. Let's put it on local.
Let's put the symmetry on. Actually, Yeah. Yeah, that's fine. I
think. It's a big. But just some little like
just a cute little tail. Why not? He's a
turtle after all. You can have a cute little tail. Maybe that's still too big. Maybe that's a bit better.
It's a bit more flat. We'll decrease int
and maybe we can add You can also use flatten and maybe
flatten the sides. We'll smooth it out a bit.
I think that's pretty good. I'm going to adjust the pivot so I can move it
a little easier. I think it might be
still a bit pro. Also, I feel as it needs to be, and this part needs to curl up. Something like that.
But we zoom out, and it looks too small. So I don't really know I don't really know where
to go with this tail. I like it. But I don't know
where to go with it. Obviously, you can
choose whether or not you want to put a tail. I'm definitely keeping the tail. Even if it looks funny, I'm just a tail guy. That was weird to say.
He's got his little tail. That's good. It just rounds
out his little backside. I think that's perfect.
Let's make the size. Let me do a quick save. For the size, I want to
hide everything. Ch. I want to hide everything. Maybe we'll keep a hand. Maybe we'll keep a
hand there just so we can use that to make
sure the size is good. Let's add cylinder for the base. We have the front. We'll
move it up a little bit. Okay. That will be the base. Let's take it out of here. We have the cylinder. I
didn't mean to do that. Let's clone it. Let's
name one handle. This will be the handle cap. This will just be a bigger
piece on the bottom. That looks good. It doesn't look like
there's any cap on the top, it just turns right
into the side. So Tube could work. There's a few di
Let me just think. For the top part of the pi, maybe we can clone this. We can clone the handle and
make this blade middle. We'll move this up. If we tap on these caps, we can make this end smaller, which is exactly what we need. We'll make it a little taller. I think It looks like the blade is about
half and then su. That's about half and then
some, so it's about there. We'll go ahead and
tap our three dots. We'll make this
round at the end. Let's bring this down.
Bring our subdivision, post subdivision up
until it's round. Five seems like it's good, and post subdivision we'll
put at three for now. I think that makes it
sufficiently round. Now, I think we
want to use Tube. Tube is a bit annoying because it's hard to
get things straight, but I might have a trick. Let's add a plane. Let's use the gizmo,
can't even see it. We'll make it bigger. Snap
90, we'll snap it this way. I should go right
through that top half. Now we should be able
to take path and snap. We should be able
to snap it to this. Let's just hit front, and we need to make
the design of the sig, which I think is like, first, let's just do this since I forgot you have to
do it this way now. We'll make one
here and one here. That looks good. Now this looks very small. Let's make the blade
first. We made the blade. Now you can see that
it's in the middle, which is exactly what we wanted. It should stay in the middle.
Let's make it smaller. Let's do radius and
make this end smaller. Now it's a matter of just
trying to match it up to this. It looks like that actually
looks pretty good. That looks pretty good. I feel like this should
be a little bit bigger. I can use the Gizmo
make it bigger. Let's take this and
do our three thing. We'll put this topology to six
and then post subdivision. A I think five is
the money spot, and we can actually mirror this, then we have it on both sides. Now we can just look
and make sure that our design is making sense. Let's do the little squigglies. Let's make this a
little bigger here. That looks pretty good. Although there's
something that I'm feeling is off with it. I might have been that. I think that looks pretty close. Yeah, I think that
looks pretty good. I want to make these
a little bigger. Okay. I like it. I think that's a good
psi. I'm happy with it. This cap in the artwork
looks a little bit bigger, so I'm inclined to make
this a little bigger. I can't help it
with the details. I really can't help
it. I go crazy. Okay, let's get rid of this. We don't need this
plane. So looks good. I think we can
actually valid thee. They're a little bit off.
They're just a little bit off. Come on, help me out.
Let's take it off of snap. And try to straighten
them out. There we go. I think we can validate those. I think we can take these, the two little pieces. There we go, validate
those blade middle. Let's go ahead and subdivide. Let's take the mirror
and subdivide. Let's do a quick save. Now we'll go back and take
the blade in the middle and Vox will remesh them
together. 75 is good. I might be more than we need. Hopefully, we can smooth this into a nice smooth one piece pi. I think that looks amazing. We'll take this pi and
the cap we can validate. This part, I think
we can validate. Handle blade middle. I'm just going to
nestle all of these, so that we can grab them, and make them the correct
size for the hand. They're actually
quite big as well. Another smart thing
would be to save them to save the individual si. I'm going to save it real quick. No, selected, export, save the files, Save. Okay. Let's clone this hide this one. I want to bring everything back. Okay. Let's go back to the side. So I'll make it a
little smaller. I think that looks
like a good size. Now I'm going to be more
concerned, take it off snap. I'm more concerned on this
is going to be and where it's going to be pointing rather than trying to put
it in the hand. Let's take a look.
That's pretty good. But we might want
it near his head. But not super close
to his head. Right? I think that's a
good spot for it. Now the question is, that
is a good spot for it, but maybe I'll bend it
down and put it up higher. That looks good, too.
Okay, the hand is there. Now let's take the other one. F. Actually, let's delete this one. Let's take this one and clone it because we change
the size of them. We'll take all of
these and clone it. Then we can figure out
where the bottom one is. Oh, I looks so small. Are they really the same
size? I guess they are. That looks pretty good, though. Okay, I'm still part of me thinks that this arm still
needs to be back more. Let's move this back. Let make it a little bit. Maybe I'll make
this one a b as we. I think his head
needs to be a bit, right? I really can't tell. It's hard to gauge, but
I think that looks good. Oh, there's a medallion here. There's a medallion
here, too. Cool. Might as well place it. I don't know if I'm
going to keep it, but we'll place it for now. Just do a quick save.
12. Dynamic Digits: Alright, so now it's
time to solidify these hands around the weapons. Let's take the hand. Let's go to Gizmo and make
sure we're on group here. The hand should be probably
around here. It seems like. Which means we need
to take the pi, and we can move it
up to the hand that shouldn't change it too much.
That still looks great. That's a great spot for the pi. I think we just have the
hand go around that. Let's twist it a little bit. So the thumb is going to
wrap around this side of it. This is going all
get a bit tricky because you have all this
other stuff floating around, but we'll work it out. Actually, that hands
in a good spot. Let's work on this other hand so we can solidify it and we can get rid of these phantom fingers because they really annoy me. I can't move one without
moving the other. Let's figure this out first. This hand is in the great spot. Let's slide this si
back a little bit, and maybe over a little bit. And that should be good
enough. Let's take the wrist. We'll just rotate it so he
can easily grab the side. It looks like right about there. We'll have to move the side
take the handle and move it, right about there.
I think is perfect. Let's take a look at our view. Maybe we want to it looks pretty good that close to his head. What do we think? It looks pretty good,
that close to his head. I'm going to adjust
it a little bit so it's not as close to his head. I think that works. I could probably even move the
whole arm up a little bit. And we'll point the
side up a little bit. That feels a bit better. It's a little bit further
away from his forehead. So it doesn't look like
he's going to hurt himself. Let's bring the palm. We can take these fingers, we can use the squigglies. And we're going to have
to wrap these around. So let's just bring
this here, twist it. So that's kind of
the end position. Something like this,
maybe not as long. This is just going
to take a lot of trial and error and
getting it right. It's not the easiest thing to do when you're
working with fingers. They can just be a tricky. Just take time and
you'll get it. Let's been this one down. It would actually be cool. I kind of like the idea that one of his fingers is grasping
it and the other one. I guess they both have to be. I kind of like that. It feels pretty good. So I want to take
this and the side. And I want to move them down a little bit. Now, this thumb. Let's take the gizmo
and I just want to first just try to
rotate it to get it in the position I
want, more or less. I rotate it, so now I
can just rotate it in. Actually, let's just
use the squiggly. Let's get rid of this floor, which is getting
in my way again, the bin in my existence. He's got to really be looking
like he's holding it. Has to be believable. These are the hardest parts about things like this
for me is because I pride myself on on having it so that he looks like he's
actually holding it. And sometimes that can have me sculpting for a very long time. I like that bend
in the thumb, too. I always add that
into my thumbs. Let's take a look
on the other side and see how it was looking. I'm not bad. I don't mind that. It looks like he has
enough real estate. Do I want to twist? Kind of like the twist. That looks pretty
good, actually. I'd like to twist this th. Let's see if I can
twist each one. Actually, I just want to
twist that thumb a bit more. I think that actually
looks pretty good. I want to take the palm,
which is already validated, and I want to make this round
piece that should help also to to make it look like his hand is actually making
contact with the pi. Something like that. I'm
going to do some round over here just to
fill in that hand. I think that looks great. Now I want to take
this and also smooth. Let's see if it
smooths actually. It doesn't really
smooth, that's fine. We'll take move and now we
just need to move this hand. Hand is actually quite big. Compared to the wristband. I'm going to go ahead and
validate this thumb. I like it. I think it's good.
The rest of the hand, I'm going to box a remesh
low, like maybe 115. And see if that'll help me
be able to smooth it out. I can smooth it a bit
more and flatten. Essentially, I'm just doing
anything I can to get it back into a manageable shape. Oops. I've been a little
too aggressive there. The reason why box re mess it down is so I can
smooth it, smooth it, smooth it so that
it looks nice and smooth. All of these edges. I don't want to have
such sharp edges. I'm just using flatten
to flatten them all out. Thumb. I'm going to use drag and we'll just drag
it some there. We'll take clay and sub. Clay and sub is great for pieces like this if I just
want to get rid of them. It's a great tool for that. Okay. The only thing is I might want to now that
I've done all that, I might want to pull
this down a little bit and pull this finger. Got these like little details. I do apologize for all of
my little tiny details. Okay, good, good,
good, good. I love it. All right. We just need
to start validating the. Otherwise, I'll just
keep going on forever. Let's start with the we'll take this where are the fingers? This is the whole
hand. Oh no, there. The thumb, let's get
rid of all these. The palm, I want to oxal remesh. Let's do a quick save. The thumb and the
palm, I want to ox remesh together
around 150 or so. Great. We'll just
validate the whole thing. And then we'll take the
palm and the thumb, we'll take both of those
and box will remissed them together at 160. Oop. That didn't look great.
Let's do it at 2:50. Better. But this hand
is still not connected. I thought we connected them. 250. Now everything is connected
that I wanted to be, so this hand is connected. Now it's just a
matter of smoothing. Nice and smooth. It
looks like one hand. I'm. Everything
is looking great. We can take flatten and we can flatten out the underside
of these fingers. I usually have the top
be nice and square, but the bottom, I like
to be smooth and round. Everything is getting in my way. We go back here, we'll flatten out the bottom of this finger. We'll smooth it very gently. I think we need to box
remise this again. We'll do 300 this time. Let's see if it's
still super soft. It is st soft, but that's okay. Let's do the th. Right. Perfect. Looks good. If you want for now, if
you want to be fancy, you can take crease and invert. And you can do a
little thumbnail. Oh, man, not getting
any detail on that. Let's subdivide it. We get a little more detail. But not that much. Let's smooth out the inside of that palm. So it's 133 k. Let's bring
it down to a normal. Size. We'll leave it there
for now. Still looks good. Si looks good and looks like
he could be holding it. I think That looks a little bit more
of a tight grip. All right. So now
with the bottom one,
13. Hand Holding: Now for the bottom one, it's
the exact same thing except he's holding it more
just by the handle. So let's turn this a bit more. Move the roundness of his. Let's see if we can
smooth this out. I'm not too worried
about how this is going to look because once we box
or remeshed it together, it's going to look
quite different anyway. Let's use the squigglies and Okay, that's a bit better. Little twist might not hurt. Although I think it
would be more like this. Atom is the hardest part. Do I want the thumb? Let's adjust these phalanges. Let's move the pivot down here so I can just
easily rotate them. Okay, Let's go to
the squig lees. How does it looks weird. I think the thumb, You know
what I think is weird. I think the thumb would be
on top of the other fingers. If I was holding a ah, the thumb would be on top. We need to move this
thumb out and get these fingers situ
snugly ad this. That actually looks good. These are the only
times that I really use the black because they look
really good with fingers. Instead of doing this again, I think I'm just going
to delete this and clone this one and
then move it over. I want them to be This
is a tiny detail, but I want the fingers to
be going in a little bit. The tiniest bit. Just
the tiniest bit. Now they're obviously
holding different parts. This finger should be a bit
of a different spot as well. I think that looks good. It could also be
slightly smaller since it would
technically be his pinky. It doesn't have to be, but that's something
that I always do. Let's take flatten and just get rid of some of
these hard edges. It's more like a hand. Also, we need to add
with clay, hoops. Let's take it off sub.
That same round bit, that's just going
to add some mass. It's a little bit hard to see. But let's do x ray. If we do ray, we can
see what we're doing. We want to add a bit
of that mass there. And then we can
we can smooth it, but we can smooth it when
we put them all together. Okay, so now, so the
thumb would be on top. Let's see how it looks. Okay, I think it
looks pretty good. I think the thumb
looks pretty good. It's not over the fingers, but I think it sufficiently
looks like it's grasping it. You might have to
move this around a little bit to whoops. Let's make sure this is on auto. Just to make it perfectly fit in his hand
where he's holding. But I think that's good. A lot of adjusting with fingers, take advantage of the tube tool and using the black the black little nose,
and the white nodes. But I think that's pretty good. You just want these
nice boxy fingers. The tricky part is just
merging this all together. I'm going to validate the thumb. These aren't validated. I think I'm want to
take this and move it up and try to do the thumb
and the palm again together. Let's Vox remesh
that Let's try 215. Good. Let's do a quick save. Let's smooth out the thumb and let's Vox remi
a little bit lower. Let's make it a bit
easier to smooth. We can actually smooth
all this as well. I think that looks
good. We don't have to worry too much about that yet. Now it gets a little tricky because the fingers
they're touching. It can get a little tricky. There's a few ways we
can work this out. The first one is to take move and actually
move the thumb away. You have to be pretty careful. You just want to
move the thumb away. Like so. We'll take
these fingers. Let's validate. Both of
them, they look good. And actually just
maybe with move. We'll just move them
away from each other, and maybe this a little
bit away from the thumb. Hopefully, they don't
merge together. That's what we
don't want. We just don't want them to
merge together. Let's see. We'll take both
these fingers and the palm. Vox we'll do around 215
or maybe we'll do a 250. I want to add some clay a little bit of
clay here as well. Now let's just
smooth all this out. It all looks pretty good. We can take select
mask with the Lasso. Let's say we take this finger, and then we and we move this
back over to where it was. We move that back
over to where it was. Let's do select mask again. Let's clear it. Then let's
select both of these fingers. We'll select all of that. We probably don't
need this though. Let's erase that underneath. Now, we'll take
move and we'll move this thumb back to where it was. You just go to be a bit gentle. Try to keep the shape
and size the way it was. Good. Now you have the finger pressed pressed up
against the thumb, which is what we want. We'll clear. That
will leave people wondering how you Vox remeshed
these things together, touching, but they're
not connected. That's one of my
favorite things to do. Because sometimes you just
need things to be touching, but they can't you can't
Vox will remiss them. Because if you vox
o remiss them, then they just get
like, you know, good. The only thing I want
to do now is ten. Let's. I want to flatten the fingers
the bottom parts. T. We're going to smooth this out. We might need to do select mask on some of these other
fingers as well. Just mask off anything you
don't want to be affected. Let's flatten. Flatten this finger out. A little smoothie pooh. Let's clear this mask. I think that's good. I
think it looks great. Move this hand out
as much as we can. I think I want to have
a little more contact. So I'm just going to use move, and I'm just going to force it. So nothing but the move tool. Do I even want a gap there? Maybe I don't. No gap. There's a big knuckle here. You can also add clay to. Let me flatten out
the whole thing. Okay. Let's use some clay. I'm just trying to
fix this up so it looks better than it does. We'll smooth that out. Let's use pinch and let's
reclaim some of these edges. Let's take crease. We'll add some of that there.
I actually looks like. Finger. Smooth that out a bit. Yeah, that looks
good. Looks good. A lot of work, but
that's what it takes. Let's smooth this a little bit. I should have flattened
all of this out a bit more before I box. But I was just so excited to do the other thing that I didn't. So that's okay. Okay, good. So I think this is
the k, that's that. So the only thing I want to do with this this piece. Do I want to think I'm just going to box so
we miss them together. Either that or I'll just
move them separately, which is a little more annoying, but that's actually okay. I actually don't
need symmetry on. Okay. That looks good. Now, this part, this one has
been kind of killing me. Just looks so odd. I think I just want I just
want to add a cylinder. If we add a cylinder, I think that'll be a lot
more clean, a lot cleaner. It's kind of annoying to
have to you and put it in, but I think it'll be a lot. We can just go ahead
and bring this down. And then just move it. Yeah, I think that
looks a lot better. Let's take this and make
sure that a in there. This part seems a bit weird, so I'll open that up a
bit. Maybe just smooth it. I just want every nook
and cranny to look the best that it can look
honestly. That's my thing. I want it to be as
infallible as I can get it. That's why I apologize for
some of these being so long, but hopefully in seeing some of the things I'm doing and knowing why I'm doing them, that makes it worth it. I like that. Let's just crease in
a little bit more of these lines. We'll do one there. D one here. I think this
is good for the arm. I think I'm happy
with it enough to Vox remesh the arm and
the shoulder together. Let's do a quick save. Let's Vox remesh them together. We'll do it around 250. We don't want to
lose any details. Looks great. I probably
should have ox missed the body too. I
didn't think about that. Put the traps up a make them
a little bigger, perhaps. Do a nice little crease here. There's no way I can't see it. I just want a little
space for the trap. Let's bust in our crease. I don't know what
happened to our triceps. But we'll put one down there. We'll put a little crease
here because remember I said I might not have said,
I might have edited out. The chest muscle goes
under the armpit. So that would make sense there. Let's just do these
two. Let's just box remesh these two at 2:50. Then let's just smooth this out. It's nice when I can start
box and solidifying things. Let's bring back the ground. And trim the foot. Let's use rectangle. Make sure we're on
the foot. You can use x ray if that helps. Let's just trim this
foot underneath. I guess we can trim
this one as well. A little bit below the floor
line for an x ray off. I think we can trim
these fingers too. We'll finish up with the feet
and then we'll just finish oxal things together.
Let's save.
14. Footwork: All right, so I want to jump
into the feet and the legs, but there's something that's
just been bugging me. So I'm going to
assume that I want to eventually print this
character or someone will. So if I look at it from
the front, it looks good. If I look at it from the
left, it looks good. But there's just something that feels slightly like he
would be falling forward. So I want to try to fix that. And this is another thing
that I'm always looking at. A lot of people ask me about my prints and how do they stand? And essentially, I just have to think about the
center of gravity. So his feet are here,
so the center of gravity is probably right here, and he looks a little front heavy, like he would be falling. So we're just going
to try something. That might seem a bit
outlandish, but maybe not. But just another thing
that is great to think about when
you're sculpting. Select everything,
Gizmo, and I want to want to adjust my
pivot, so I'll adjust it. I think that's fine
actually. I just want to adjust it so I can lean him straight backwards. Essentially, it's like
if I was lining it up with his center mass. Take it off pivot. Maybe
we'll look at the side. I just want to tilt him back. It. Let's just see how that feels. I feel like he feels
a bit sturdier. He still might be front heavy. But I think that
feels a bit sturdier. I think too far back, it might look a little funny. Let's see. Or maybe not. Actually, I think that
looks pretty good. So he doesn't feel
as off balance now because the shell is
back a little bit more. So I think I'm pretty
happy with that. Okay, let's just start
adjusting these feet. So this foot now
looks a bit low, so I'm using Gizmo
and I'm using a line. So I can maybe just move it
up a s and the toes as well. These toes They should
just be together. I'm just going to join those
and just rename them toes. We'll bring them
up a little bit. I like the way that looks. This foot. For this
back part of the foot, I think I'm going to vox
will remesh it lower. Maybe we on one or so. I just want to be able
to smooth this out. Because it looks a bit crazy. Try to get this
underneath the ankle. That feels a bit better. I'll use flatten. I
think I just want to flatten out this he a bit. Just so it doesn't look like
the bottom of a cylinder. Our heels are usually round. I think that looks pretty
good. Toes look good. I'm just going to use drag and I just want ale
bit more support. Let's just grab the foot
and the toes and so them. I just want to add a
bit more support for these toes. So
going to use drag. And just drag the
foot onto the toes. Maybe even this part or the
toes, put them together. While we're here, let's
flatten off the bottom. We'll smooth that out a bit. We can uns them.
That looks good. I think it's time
to ox remash it. I'm going to do a quick
save and then let's just Vox both of those together. Let's make sure they're
the right meshes. Vox maybe around 200.
Let's see how it looks. So then we just smooth. Smooth this little tosies.
And it looks great. Okay, let's take a look
at the other foot. There is something
to be said about. Maybe this foot is turned a bit more. Let's do the same thing. Let's put the toes. Let's
join the toes together. Let's select both of them. I think I might want this
turned out a bit more. And maybe just move
the whole thing. Do I still have
them both selected? No. The whole thing over Actually, I'm going to
push up on move here. I want to even trim
this a little bit. I don't know if this foot would
be so flat on the ground. So I think that's what
I'm struggling with. Let's move it up a bit. Let's just try move. Let's make it a little
bit more Mal and bendy. It is organic, so that's okay. Let's use x ray. So I can see what's
underneath the floor here. I'm going to take trim and I'm going to trim off
the bottom part of this. Foot and the toes as well. Then I want to take flattened. I'm going to look
at x ray again. I just feel like I want to flatten the bottom of this heel. Well, you know
what? Let's fox h. Let's fox remesh these together. I think these look good. The only thing that
I didn't do was those connective tissues that I think actually looked
really good on the other. I'll take this and
move it up a bit. Make sure these are together. You can bring this out and
flatten his foot a bit. Anytime there's like
impact with the ground. Like if you watch your foot, if you're walking, your
foot actually flattens out. You've probably seen
it with animals. You're stepping your
foot flattens out. I don't mind widening
his foot like that. Let's take a look at O Let's
fox remiss them together. We have these two
still a quick save, and we oxo remiss them
together around 200. I think that's what I
did with the other one. I can't quite remember. Smooth out in the middle there. Heels nice and organic. We'll solo and
we'll just flatten out the bottom of
these heels or toes. Find out this heal. Okay Okay. I think that looks good. I actually don't mind if this is coming up off the
ground a little bit. Not that I don't feel that
I feel like that's okay. I feel like it makes sense. These, I just want to
tighten to the legs. Looks like this one,
I need to move over. We're still an object,
so I should be able to just move this one over. Let's take the leg
and just see it, squeeze it in there as well. Okay, that looks pretty good. I can even pull this
out a little bit. Okay. Nice. I feel
good about that. This actually looks good. Except for this bit. Maybe drag. I'm going to smooth it. And that actually doesn't really bother me that much because
things are going to be tight and they're
going to be squeezed. His muscle, squeezing
behind that, makes sense because his
leg is bent so much. I don't mind that at all. L et's take a look at the other
knee pad that looks good. These side parts of the shell,
they look a little tight. See how tight that is.
Not really huge fan of how tight that
is under his arm. I think I'm going to use move. Maybe even let's just move. And maybe try to bring it down. I don't want to
that looks better. I just want to be careful. I don't want to really mess with the crease because it looks like we also need to
bring the bottom part up. Maybe not. Maybe that's
not a possibility. Let's just tick to
This one looks weird. I wonder if I accidentally, I was moving the other one too. I'm going to undo
because I don't like when I'm trying to move something and it's still
connected to the other side. That's because it's
still in this mirror. We'll take that
validate shell side, which I should have
done to begin with. Now we'll take and move in e. We'll pull this shell down. That looks good. You know what? I might I might just take trim. Let's see how it looks
if I take Lasso and just cut it and then
just smooth it out. It just feels like that's
the better way to handle it. They don't quite
match up anymore. But I don't think that
you can really tell that much. We'll
bring that down. Yeah, I don't think
you noticed that. So I kind of pulled this
one down a little bit, so I don't think you really
noticed the difference. Okay, so that looks good.
15. Detailing: I wanted to set a little details
in the neck with crease. I want to bring this up. Make that nice and wide, so it looks like his neck is turned. This one will be a
little more squished. But I think that looks legit. We'll smooth it. I think that looks good. Also. There's a part
in our shoulder. This part would actually come
down and that goes into it. I don't know if the
anatomy is exact, but I know it's
something like that, which is really what you need. Needs to look believable enough. Mostly because
anatomy is insanely difficult to get 100% right, 100% at the time. Especially when you're
dealing with creatures, don't actually exist in nature. Appreciate the cat doing her scratch thing
while I'm trying to while I'm trying to teach. Love it. Love it. Let's take this and we want to do
a similar thing here. Then we can take this trap. We can make sure it's nice and
looking nice and muscular. I think that looks good. Let's just take a look,
make sure it's not too big. There's a few technical
things that I see that I feel like
need addressing. One is, if I look
from the center, so just going by the
center of a shell, the Adam's apple should be
going right into the center. I'm just going to e, and I'm going to push this
back so I'm on the neck, and I'm just going to pull this so it's like in the center. The next to looks pretty good. But I also feel like I
need to pull this part out so you can see it. You got to be careful with Drag too because you don't want to You don't want these
lines to get wobbly. But I think that looks good. The only other thing is
since it's the Adam's apple, it would really I would widen
at the top of the head. It's a bit hard. Let's turn on x ray and just take a look. That's really big
actually there. I can probably use
move and move this. Maybe that'll make more sense
of what I'm talking about. Yeah. As Adam's apple should
be a bit more like that. I'm just going to widen
the neck a little bit, so it doesn't look like he's
strangling himself too much. This bit. I can't pull it
up too much more. Otherwise it'll look funny. There's a little
depression if you feel between your trap
and your clavicle, then this actually goes down. There's a depression there. On both sides. That looks
a bit better technically. Because now Adam's apple
is going to the center, which looks good, and the two straight
clavicles would be like the top of the chest. That makes a bit
more sense to me. I like that. I'm going
to do a quick save. Here's another technical
detail that I noticed. The way that he's holding this, there's something to me
that doesn't feel strong. I'm going to move this
and let me know if this feels a little bit
more comfortable. I've just grabbed
the py and his hand. They're all together
as an object. And I'm going to adjust
the pivot a bit more. Tell me if this
feels a little more That's it. That's the end. I just felt like it should be
lined up a little bit more. Because all these
mechanical bits like see this muscle here, this muscle usually
opens up to the wrist. No feels a bit more natural. I think. But anatomy is always
the trickiest bit. Also, do I want to
put a crease on this? I as well just do it now. While you guys are here with me. Let's subdivide it. Try to get a better crease. That's better. Let's do a quick save. At this point, I'm going
to do a quick save on the other one. Let's
just save new. Now let's just start Vox
remishing things together. We don't need to
do certain things. There's no reason to Vox remi like the forearms and the hands, but we need to vox remish these two the body and the neck. Let's take the neck. The body. Let's just move them
closer to each other. So I don't lose them, which, of course, I lost the neck. Oh, here's the
neck. Okay. What is this? This is the tail. Shell, that's the pelvic
region. Forgot about that. We can validate that. The legs. Should we box remesh the
legs or should we not? Handle handle. I'm going to take
these off of the arm, so we just have the arm because I believe that's
the upper part of the arms. I'm going to disconnect. Let's not let me disconnect. Bro. Maybe if it's like this, it'll let me
disconnect them all. Here we go. We have arm and arm. We definitely need to
axle remesh the arms, the neck, the body,
the pelvic region. I think that's it. The other
ones are okay separate. There is the head too. That's bold, and you know what? We're just going
to do it, I think. But I think it's time
to separate a lot of these. Let's take head jaw. Let's just separate
all of these. We take the head top and
head j. Those are both. Let's just join them together. That's the head and the
neck. We'll join them. Let's take the arms, the tail, the body, pelvic. I don't think we need
to do the thighs, but I think I want to
do the thighs as well. All of these, I'm just
going to join for now, and name it body. Then the legs, I'm going
to separate like we did. The legs, I'm going to
join or the thighs. The body, we're going
to join that together. These need to be vox rem. Actually the head, I
probably didn't need to vox being honest. But let's and let's
just go for it. We oxther like 500. And see what happens. Everything looks
good, everything looks remesh. The
face looks good. It's half 1 million,
which is a lot, but I think I want to
add some texture too, so I'm not tripping. I just think it's
so beautiful when you can put a model together. Once you, it's just so satisfying because you've
done so much work. I probably should
have not included the tail. But that's okay. We'll keep it. But I probably could have
not included the tail. That's all right.
Everything looked great. I'd be so upset if I forgot
to lock in the focus. I actually had to record
the whole first video because I forgot to lock in
the focus multiple times. It's very, very odd. Now if we want, we can
take these creases and we can build up some of
these if you need. If you want to make
them more bold. Oh, yes. It's also head. We'll smooth some
of this out. Great. Mostly we can smooth
this part out. Nice. Let's do this
over here as well. I want to use case, and I want to I always talk
about the bicep. T. And this bit going underneath. Now I can just make it a little bit smoother and a
little bit more deliberate. I really looks like those
muscles are together. Honestly, he would have there'd be some muscles on the pecks, even though they're
behind the shell. I don't know if I
want to do that. But it actually looks okay. I actually looks okay. Let me add another one here too. And really allude to muscles without having to make
this thing crazy. You can feel free to elaborate on a lot of these
details depending on how muscular you
want your rascals. Teenage rascals. Okay looks good. I'm just seeing so
many little details, but I'll go on forever
unless unless I stop, so I need to chill. Put some veins on there as well. It's going to look
so nice. Case. I a little crease here. This is very much like
skin getting pinched, so I might take inflate. And and this is just to give the
impression of skin, you know, being
pulled and folded. This is a lot of the stuff
that I wouldn't normally do. I wouldn't normally record
because it feels so redundant, but I feel like I
feel like that's the whole point is to show
you exactly what I'm doing. Because again, it's like
these little miro details. Okay. Okay, so I want
to take some of these and it's time to just
really join them together. Yeah. So let's just
separate all of this. So we have the foot.
Let's separate the foot and all these pieces. We have that separated. Let's separate the shell and
the belt and everything. Oh, this is a mirror. I need to keep that together. I think I'm happy with this. I'm going to take
this and validate shell re body. Let's just name this p. Si lo. You know what? These
are all the same. I'm thinking that it's
time to take these, join them, take the blades. Both blades, join them, and both handles and join them. Okay. I'm just separating all of these because they have to be separated
at some point in time. I think we need to try and lower the resolution of this
because it's a bit high. The eyes are okay. The P one, but we can
join them together. At. Let's leave them separate. Teeth look good. O, there was something
that I wanted to do with the teeth actually. Let's take the teeth,
validate them. Join children. I was thinking that I might want to move the teeth up a little bit. So that you could
see them a bit more. I whites, can go ahead and join. Had been not mask.
Good. Let's save.
16. Headband : All right, Let's figure out how the rest of his head
band is going to fall. Let's use tube, path. I guess we'll keep snap for now. I think I wanted to fall
down in the front. This is. This is going to be trial
and error. I have no idea. I guess the whole
thing, I really have no idea what I'm
going to be doing, but I think we need to let go of the
snap now, turn that off. The most important thing here
is just regular gravity. It can rest on his shell, body, whatever, gravity has
to be a major player. I look at the front, you
can see that it's not, and it's going to be
a bit difficult in three D to just have
something hang straight down. Because each way you turn it, it's not going to
appear straight down. There can be maybe
a little wind. There's usually two.
I kind of like that. Let's take a look at at the front and see
what it looks like. I think it looks
better, straighter. It maybe a little shorter. I like that. Move this up smidge. Now it's just if we want the
other one to go around here. We don't really want to
block the neck too much. I'm thinking maybe
it comes around here and goes over the shoulder. That will be baller. I don't know why
I just said that. Let's clone this one.
Let's just adjust it. Let me get rid of
this ground again. I'm thinking. Let's just get
rid of all these for now. So, I'm just thinking
something like this, maybe. I like that. I think
they look good. With both of these, we're
going to utilize the profile. With both of these, we're
going to utilize the profile. Let's start with this one
and we use profile here. You can see that it's square. What we need to
do is flatten it, so it would be like
a proper head band. First, I'm just going to
figure out which side it is. Let's make widen these out. I think that actually
works. We made it thinner. Maybe maybe a little bit thicker actually. That looks good. It actually twists pretty
good, but we can twist it. We can control how it's twisted. Maybe we'll do Let's try two, so we have one at both ends. Let's try twisting this. No, still a little bit too much, so let's take each individual
one and try twisting. We also, of course, have
to keep it on the surface. I remember the old days. This was harder to do before we had
utilization of these tools. That looks pretty good. So twist this, lift it up a bit. We wanted over that muscle. That's looking good. Let's twist this a
bit more. Looks like. That looks great. Let's go
back to these original nodes, and I think I want to adjust each one individually because only these two would
start getting smaller. R only this one
would start getting smaller as it goes into the no. We'll just move it. Maybe we'll even twist it a little bit. As it goes into the not. Let's add another node here. That looks a little bit better. Now we'll do the same
with this profile. We know what looks good. We can do the same thing. Maybe one less. Like so. Then we can use twist to twist
each of these as we need. Don't forget you can always
add nodes if you need. Like if we need a little bit more L's say we add one here, twist it a little bit. It's all right if it cuts
through a bit because we can always we can also adjust it. Remember, this has
to be straight up and down. I want
to make sure that. That looks good. Now, if I did have one wish, I wish I could make them
a little bit wider. You know what? I can do that for this one. How much better. I think that looks good. This one actually, I can make
a little bit wider as well. I didn't realize
that it focuses out. When you get closer to the
edges, I didn't realize that. Let's take the end
of this one with the radius and let's make this smaller like
it's going into the not. And then it probably
needs a good twist. Something like that,
I think works well. To make sure. I think
that looks pretty good. All the other pieces. Let me just think this
need to be longer. I'm trying to think
if this was straight, if it would be the same length. I think this might need to
come down, just a smidge. So twisted. Okay. So I like those. Let's do a quick save. Now we want to strengthen
these up so that we can smooth them and maybe
do some details on them. Let's tap the three dots and put the
subdivision up to two. Then we'll go ahead
and validate. We can do the same to
this one, three dots, post subdivision two. And
then we can validate. What that allows
us to do, let's go back to the first one is
that we can smooth it out. We just look just
ridiculously square. We smooth it out. Now you notice that also it's
melted back into the shell, so we can lift it up a bit. So that it's just
sitting on the shell. Great. There's a few details
I want to do. I'm going to try to
not go too crazy, but one of them is using clay. This obviously gets smaller, but it's not like the
material diminishes, it's just because
it's going into a no. Let's bunch the material up
by adding some clay here. We're going to add it to
the other side as well. Then we can add a
crease down the middle. And then smooth. Nice. There would be some
bunching here. You can also add some clay or actually maybe inflate
might be better. You can inflate some
areas and then smooth. That will also make it
look like it's turning, and it's got some creases
and things like that. You can add creases, but don't go too crazy
with the creases. Sometimes they can
look a bit funny. Just make sure you
smooth them out. Maybe I'll add some
more inflation here. Let's try clay again. And maybe a little just to
give it a little bit of life. Another thing I want to do
is flatten the corners. I don't want them
to be so square. Flatten that out a bit and then give it a nice
little smooth. You can also use inflate and
sub as well if you want to, for example, add ale
depression in the middle. You can do that as well.
Smooth it out a little bit. Just to give some things
for the light to catch on, so it looks more like fabric. Let's go ahead and do the
same thing with this. But it's the exact same process, so I'm going to speed
this up a little bit and you can work on yours. Of course, we want
to make it look like it's coming out of
this knot here. I might actually just
rotate it a bit. Then just move this. You
want it to look like they both coming
from underneath, I think is probably the
most visually forging. I'm going to rotate
a little bit more. That still looks fine. Maybe I'll just try
to open this up, so it looks like there. Let's crease this
a little bit more. Let's take this little bit
and let's try to open it up. And then we'll just take these
and stretch them so they look a little bit more natural. I think that looks good.
I would believe that. We'll smooth that off a bit. Smooth the a bit. But I think that's. I don't I need to go too
crazy with that, except for maybe
this rogue crease. Maybe another crease here. Okay, it looks good. I'm happy. Here's
another little detail. I just want to throw in. I'm using fairly small, and I'm just going to drag
up in the middle of these. I don't know why I just feels
a little bit more natural.
17. Spitting Wraps: So I really like the hand wraps, so I'll show you
how to do those, and then I'm going
to do a bunch of them on the feet and the wrists. But once I show you how to do one, you'll know how to do it. So I'll probably speed up my process so that you
can see what I'm doing. But it's going to be it's
going to be a while. And this is totally if
you decide to do this. So I'm going to use Let's
start with the foot. I'm going to use a
cylinder to start with. Use the gizmo, or bring
it in the general area. And I literally just kind of place it where
I wanted to go. And then I essentially
just turn this into we validate it, and I turn this into the p. I just stretch it.
Actually smarter thing to do will be to clone this and rotate because
it's on the foot, then the most prominent ones are going to be across
the body of the foot. I'll put one here. Let's
hide the previous one. Then I just make this the. I'll just pull it,
maybe use drag, drag it where it
needs to be dragged. Again, this is very
soft like cloth. You don't have to worry
about messing up too much because it doesn't have
to be that technical. All it is is a rap. It just has to be a little
bit over the surface. That's essentially how I
make these sort of wraps. Let me turn symmetry
off. Why is symmetry on? You can make it as thin or
as thick as you'd like. You can also see it takes a
long time to get it, right? I just switch to drag and
move depending on how. If I'm moving something
big and I want it to be fairly
smooth, I'll use drag. I'll use move for larger
smoother movements, and then I drag for
more acute movements. That looks good. You
can also smooth to take away some of that mass. That looks good.
You can clone it. And then you can move
it down a little bit, shrink it, and then
repeat the process. Okay. And then I'll
just just repeat the process for this
leg, for the hands. The hands, I might do one of those old school like au pads. I might try to do
that for the hands. So yeah, I might try to add something like this
for the hands. Those are always just
kind of old school, kind of cool, so we'll see
if I wind up using it. I think the last thing I'd heard is when they
found the bodies. And later on, I had gotten a jury summons and
wasn't even clicking. When I got there, when I
walked into the lobby, and I saw all of
the people, there must have been
hundreds of people. And it was like, What's
going on? This is crazy. And then we got into
this court room, and then I remember
Scott Peterson stood up and then I
was just like, Oh, my. I promised myself one thing
that I would do everything I could to assure you that this
gentleman got a good trial. I mean, I'm looking at
this young man and I'm saying I've got a
set about his age. I looked at this guy
and I said, No, what. Show me what you
have. Convince me. That this young man did what
you're accused him of doing. He's a t. He cheated
on his wife. We? Yeah, that and dollar won't buy a cup
of coffee at Starbucks. It's just that simple it doesn't matter.
It's not relevant. What's relevant is, show me what would lead me to
conclude he was guilty. If you don't have
that, have a nice day. It's been nice talking to you. More than a year after
Scott Peterson's arrest, he is finally getting
his day in court. Let's get right
for our top story. It is here in California
this morning. O opening statements begin today in the double murder
trial of Scott Peterson. Now, they are expected to be 100 witnesses or more over
the next five months or so, a marathon case that
has just begun. Every every day. Police weren't telling us
anything because they couldn't. That's why I desperately wanted
to be in that court room. I found out more
information during the trial than even existed. I I could not not be there. I absolutely felt helpless. And that's why I wanted to
get on a plane and be there. And I didn't want to go
through that experience, but I knew I wanted
to be in the part. In opening statements,
Mark arago said the case against Peterson was
flimsy and circumstantial, adding his client was,
Stone Cold, innocent. There was no direct evidence connecting Scott to
these smugglers. The government, essentially relied on circumstantial
evidence. The prosecutor is not able to prove where the
crime occurred, how the crime occurred, and when the crime
occurred. Criminalized. It was like a real
life soap opera happening in your living room. It was always being compared
to OJ Simpson, right? Well, Scott Peterson
became the new OJ Simpson. The only difference was that
this case was not televised. This was basically left up for journalists to tell the story based on what they observed. And I was there every day for the trial to find the
hook for the day, find the headline of the day. Sources tell us during the
course of the hearing, prosecutors are likely to call close to 30 witnesses prosecutors laid out their circumstantial case for jurors. To her. Between I can get it. And that's the I wasn't quite this. I. I I just about. Similar. St as follows. Her cycle.
18. Fine Details & Texture: All right. Let's do
some fine detail. We have all these
pieces of cloth, they're supposed to be wraps. One thing you can
do to make them a little more interesting is take crease and you can just
make creases in them. Now, they might be to small, and it's going to take a lot of space if you box
remesh them together. It is a bit tricky, but you can box rem
maybe some of them together or just maybe
even single ones. Smooth them out, and
then you can add crease. But again, this is going
to be like this out. This is going to be
something that's going to be very
time consuming and it's going to take a while to get right and you
might have to fix things. Just keep that in mind when you're doing
that and if you want to add these details. But it's something
that I'll probably do. I love adding little
details like this. I'll probably do
that to all of them. But actually, they
don't look too bad. It might be a smart thing to
try and select all of these. Actually, I don't even
know where those are. But I think I want to
select all of these. I probably should have done
it before and just join them together because otherwise, it's just going to
get a little bit too unruly. All of these
I'm going to join. Let's see if we're missing any. I'm missing some from the toes. Probably should just take
all these cylinders. All these cylinders, I'm
going to join together. Now we should have the
ones from the hand as well. H and tube. I'll put the tubes together. I'll join the cylinders.
These are the head bands. T. At ban A. At ban D. Okay. All of these are together. That way, if you
want to, you can take those and maybe even multis Right now it's 58
k, if you subdivide it. It's a. It is a lot, but then you should be
able to add those details. If you want. As you see,
I'm going to add them. Okay. That's another
option for details. You can feel free to
do that if you want. The other detail I want
to add is on the skin. So we're going to use brush. We're going to make
a new brush tool. Take brush, tap on
it, and hit clone. This is going to be brush TM and T. It's going to
show up down here. Down here, let's
go to the options. So we have stroke here. I'm going to go to roll. Alpha. Tap on here. Then if you have the image
that I included in this, it'll probably be at the bottom. There's going to be
an image. Just bring that in, don't hit invert. Let's check out the
scaling. Scaling is fine. That looks good. For fall off, it should
look pretty much like this. If you tap, I'm
using out Pa three. Sure. That's the
one that I'm using, and everything should
look like this. Filter, leaving it, pressure, should look something like this. The Alpha is what's going
to be the skin tone. If we're using that on,
let's say this body, I'm going to put the
intensity down to 25, I'll put the size up to 100 and let's just see how it looks. L et's make it bigger
and put the intensity down lower to maybe like eight. That's a
little bit better. The intensity is at eight, this is at 100 and also notice the size it is on
the screen because I'm pretty sure that makes
a difference as well. The size that this
is on the screen, if I bring it closer, it's a
little bit more difficult. What I would do is
just do light strokes and just go up and down, and just try to cover
all of the skin. That's just a really
easy way to do texture. I think it looks great. There's one more thing
I wanted to show you. Before you do that,
if you have the body, go here and add a layer. You can add a layer and
you can call it texture. And do it on that layer that
way you can do the texture, but then you can see what it looks like without it as well. As you can see in that example, you have to be really careful. You have to be really
careful when you're adding the textures because
they can warp. Se they can really
warp the shapes. You have to be really
careful with the texture to them very light, especially on the face. You want to do very lightly, try not to go around the edges. Just very lightly so that
his face has some texture, but that you don't compromise the the integrity of the
shapes and things like that. Okay. That's another option that I think I'm going to do as well. I might as well do
it. Let's just do it. Let's start with I was contemplating also
lowering the resolution of the body because
it looks pretty good. But I don't think Quadri measure
will quite work on this. It's 527 now. Let's say we did 250 k. We said, yes. Let's
just see how it looks. Probably
should have saved it. It looks pretty good,
actually. Looks pretty good. Let's go back and see. I don't see any difference. I'm going to keep it
because it's half. Also, the good thing
about that is you can also just go here, and deci. You can also decimate your body and that will cut
it down in half as well. Now we have the these legs, I don't think are connected. I'm going to leave them as I'm going to take both
of those and join them. Then we have the
body which is here, I'm going to take that
and join as well. Now the body is altogether, except for the four arms, which I just noticed, arm
low, is the other arm. We'll join and then we'll add it to the
body if I can find it. There we go. We will join. This is now the body. Now we have the
body. All the parts are together, not the feet. Foot base as well. Let's
where is the other foot base. So let's just go ahead and
Let's join these two foot toe. Then how big is it 144? Let's do 70 k. Still looks good. I probably could have done that
with the legs too, but that's all right. Let's add this to the body. We'll join that. I think that's all of his skin.
Except for the hands. The hands, the hands are huge. I'm going to definitely
cut the hands down. I'm going to save this. I'm
going to take quadri measure, but again, you can use decimate. And this hand is 275. Let's bring it down to. Okay. Perfect. Still looks good. This this hand is only
6,000. That's crazy. Let's I'm actually going
to and subdivide it. It's a bit. We have the. Let's just put these together. P palm. I can find
the body, join. Now the body is altogether, you can see that he's green. Now let's go ahead
and add the texture, so we'll use our brush tool. The settings are still the same. We're going to do
it on a new layer now because we added all
those things together. Now let's go ahead
and add our texture. Let's take symmetry off. I'm just trying not to press too hard because then it just won't look good if
you press too hard on it. It looks good. Maybe I need
to come a little closer. No. Some parts just
take the texture a little bit better than
others than other parts. I see some issues
down here, too. So we'll have to deal with that. O I guess I'll have
to deal with that. Okay. Beautiful. We'll put a little
bit on the hands as well. And the tail, of course. Texture is a little
tricky to figure out, but you can't really
get it too perfect. But you can get it pretty good, but I've never been able to get it as
perfect as I want it. Depending on what it
is. But something like this is kind of organic. I mean, I can't really get
any texture for some reason. But some texture is
better than no texture. I am worried about the face because that's one thing
that I really don't want to. I don't know why the face
won't take the texture. That is annoying. What if
I erase the intensity? No. I can try to do dynamic topology
if I turn that on. I'm not sure how it'll definitely something
we don't want. Not quite useful. I don't know what
that first thing was. It is a little bit
better. Let's turn it off and see what happens. With dynamic topology. It has a little texture. It's not really raising
the the size that much. Let's turn it off
and see if we can get some free
textures down here. And by free, I just mean like
not using dynamic topology. Okay, I mean, pretty good. I wish that I could
get more texture on the skin up there,
but who knows? I'm not sure why it's not giving me too much texture up here. There we go. We'll
do one of those. Press harder. It's pretty good. That's good enough. I'm going
to turn dynamic topology off so hopefully I can get
some free texture here. Fingers. Fingers don't really
need that much texture. I think that's pretty
good for texture. I don't want to do
anything to too crazy because I just don't
feel like it needs too. I don't need to go
crazy with the texture. Let's turn dynamic topology. Now L has a little
bit of texture.
19. Grippy Grips: So another detail I want
to show you is veins. So Let's take layer and we'll make the radius
really small, maybe around ten. Let's add another layer
and call it veins. I think that's how
you spell veins. Now you can actually just see
how the veins would work. Actually, I think layer might
be a little too aggressive. Maybe clay is better. Yeah. This just put some
layer, some veins. Always a very always a
very cool thing to do. I love adding veins. They just give you
that extra little bit of this creature looks real. It might be a little too much. There are certain spots
where I can see that I don't have enough texture. I'll just add some more in. I thought on the shoulder too, I could use some more. I might have to turn
dynamic topology back on. Only because that shoulder
is very prominent, so I wanted to just really
point that one out. Let's go back to clay. Let's add some more veins. Okay, that looks good. Can add some on the legs. Man even back here. I have one here on the back of the I I had a big one
across the bicep. In my younger days, I used to have used to have one there. I my young days when I had
when you can see my veins. We got some veins. Let's add one to the neck. How often do you see the veins? You got to add those
little details. I love adding those
little details like that. I still don't know if I want to keep this medallion there, but let's validate it. Then just make it so it's a
looks like it's a part of it. Maybe we'll shrink
it a little bit. Let me make it a
little thinner, too. So we have that there. I also like to add some little clips
and things to the belt. Here's the belt. Let's add a What do I usually use
for this? Let's add a box. We'll move the box up. Of course, we have to
line it up with the belt. It is going to be super simple. Do I I can't remember if I use a box or sometimes
there's other shapes that unknowingly work better
than others randomly. We'll just shrink it. You can see where I'm going with this. We'll shrink it like that. You want to see the back
side of it too a bit. I think that's good for now. I'm just going to go ahead
and validate it and then take smooth and smooth it out. It looks more like a
just like some piece on the belt. That's
what we're going for. I want to move it over. I clone it. There's two here. Okay. Cat came in and Okay, so these are going to
be we can join them, and then we can use
the quad measure or decimate to bring them down. I think it's, they're
still pretty small, but let's just make
them like even smaller. Okay. Let's name
the belt eclipse. K, nice. The shell sides are 91. I'm going to bring this
down to 20 k. Again, you can just use decimate. I'm just trying to get rid of some things that
definitely don't need to be that big so we can get
some of this size down. But I'm probably going to do a little bit more of that later. I should try to think about any more details that we need. But I think the details
are good. For now. Next is just going to be coloring lighting and then coloring because he's
looking pretty good. I think we can I think we're pretty much
on the home stretch. Oh, there's another little
detail I wanted to do as well. This is the handle. I wanted to see if I can separate these. We'll take this handle
piece, clone it, and we'll just name this y.
I actually don't know why. But I wanted to make this
more of like a cloth, like the handle is
more of a cloth. I'm just making a
bunch like that. It's probably better
to decimate this. Miscellaneous, de decimate. It doesn't need to be too crazy. Oh, that looks so bad though. L et's undo it and
then let's smooth it. Let's smooth the whole thing, and then let's decimate
it and see if we can get anything better. Oh,
that's much better. Now that we have
this, we can clone, we can make a bunch of
them different lengths. But essentially, it's just
making this more of a cloth. Clo, move. I'm going to
make a ton of these. I think can rotate them, so they're a little
bit different as well. I don't know why I
made them so small? Makes my job so
much more difficult times the gizmojs
won't play nice. Nice. Now we have all of these. I'm going to join
them all together. I don't know if I want
to box remiss them, but let's just see
what happens if I do. We box rems them together, what does that look like?
It's actually not bad. I can probably rem it
down to three than. I lose a lot of the
detail, unfortunately. But you know what, we'll
leave it at 24 for now. We'll take this little cap. Who. Oh, it's not
perfect, is it? It's not exactly perfect. Let's make sure
that it's lined up. That's not helpful at all. It does make things a
little more difficult, but I think we can fix it. Now I have the stem
straight up and down, so I'm going to a
line doesn't help. I'm going to move the pivot so that they go
straight up and down. I think that's straight up and down. Okay. I'll move the pivot,
it looks like I need to move it
over a little bit. Hopefully, that is enough. I'll smooth this. The only other option
would be to take this and put creases all. Oh, maybe that's better. That might be
smarter and better. Just put creases all around it. If we solo it. The
creases aren't as pretty, but I think that
might save me a lot of space and a lot of time. So I'm going to leave this sod. And I'm just going to
make a bunch of lines, and I'm just going to
bring them around. It's a cheaper method for sure, but I want to see how
it'll look because I feel as though if it
looks just as good, then it's going to save me
some Let's see how that looks, and now we can see
which one looks better. Let's hide this for now. That looks fine.
That looks good. Now the big question is, do I want to keep this one, which is an extra 24 or do I just want to
do the other thing? I have an idea. Let's
just leave this. We'll put a few of
them on the bottom, and then we'll just call it. We'll just leave
it. I do like this. I do think that looks good. I think I'm just
going to leave it. But come to think
of it, do I even need the one underneath though? Here's one handle. It's hard to know which handles though. Because I can't see them both. Let's hide this. Oh, so this is that. Will
I even miss it? I'm going to be
missing that handle. So I'm going to take
that and delete it. Boom, get rid of it. Boom, gone. I I don't know. I don't know why I'm
doing that. Okay. I think we're good for details for now. How did this open back up? This piece sometimes opens
up and it's opened up again. I'm noticing. Let's use drag. Can we put no, we can't put it to local. The symmetry is gone. I don't know how
that opened back up. I didn't notice it
opening back up. But that's okay. I can't
worry about it now. That is a bit strange, but
I don't know what happened. So. Maybe I can squeeze it
together from the back. Looks like I can still
drag each piece. No. Move. Oh, move. Let's sit and then just do a little move action
and close these up. That's so strange. I
don't know how they got so open like that
with so much space. Very odd. Anyway, safe.
20. Lighting & Bonus Pouch: I'm also going to
put a little pouch on the back of his belt. No good reason to do it. This is just for fun. I'm going to add a box. Actually, you know what, it's probably easier to make the box. Let's do it below. I go
to get rid of the grid. I brought the ground
back, as you can see. Let's look at the front. We have our little box here. Let's just sol it. It's just going to
be a very small box. I'll validate it and smooth it. If you have round edge,
you can use that. Round edge is the same. If you've seen in my
other tutorials and you probably see it the same as smooth, it just
smoothes all around. But if you don't just use smooth and just smooth the
whole thing up, and you'll be just fine. Okay. So I'm going to take
this box and clone it, and hopefully this
moves the clone. I think something like this. Although it might look
better if I trim the sides. If I go like this. That might
look a little more pchish. Or does that look
a little too male? My look a little
bit like a male. I don't want him
to look it's male. I think that would
be silly. Let's see. I think it would look good. If I take split, split and rectangle
and I split the top. Then I took the
top and the front and I xmied them together. This is all just
completely improving. I don't think improv
is the right word. That looks good. I don't know
what happened to the top. I'm going to trim the top, so that looks a bit better. I'm going to oxo remesh this
a little bit lower at 1:20. We're going to get both of
these and slo them again. We'll give them a nice smooth. I think that looks good.
Now let's go ahead and add I think I want
to You know what? We can probably use this box. Let's clone this box. We move it forward,
we'll shrink it. Maybe snap 90 degrees, maybe we'll flip it this way. Squeeze it together. Maybe we'll just
leave it like that. It needs to be thinner, I think. Do we want two or
do we want one? Oh, 22 is nice though, right? Join these two together. We'll take these
two. Maybe we'll give them a nice little smooth. We'll decimate these down. These don't need to
be anything crazy. We'll put 1,200.
We'll remesh them. This we Let's keep it at 1,200. Let's see what happens.
Good. This 1,200 as well. Beautiful. Now we'll take all of
these. We'll un solo. We'll hunt solo, move it up and we'll move it
to the belt ish area. I love making little pouches. You can just do them so simple. Literally, it's just
boxes and cut up boxes. But on a belt, they
just look cool. It smaller. Now I just want
to line it up with the belt. I have to figure
out where exactly I want it. I think
I want it here. That looks good. It's a little
tilted. That looks good. Put it right into
the belt, I think. Yeah, I think that I
think that makes sense. I don't know how far I
want it on the belt. Nice. I love little
details like that. Why not? I get so
excited about it. I wonder if I can quad
remiss this even lower. I can probably all
of these lower. Let's take this one.
Let's clone it. We'll just turn it
into like a piece, so it looks like it's
connected to the Actually, you know
what I like it. I was weird. I'll just clone and I'll put w
over here as well. I'm not really sure what they're for, but
that doesn't matter. It doesn't matter
what they're for. As long as they look cool. Come on, and find them. Please. Pouch clips, and where's the pouch Pouch M buckles. Pouch top. Save save, save, save. Nice. All right. I think I'm officially
happy with this. I'm officially
ready to light it. Here's another quick detail
that I just was working out with Crease on these pads. These would be
pressing into this. I'm just going to use Case, and I'm going to, I
already do it? I did. And I'm just going
to make a line right underneath. The edge. So it'll look like these
are pressing in because I really want to show that
there's some pressure there. I'm just using
crease to do that. See that how it looks
like there's pressure. This I can actually bring down So hard to stop. It's so hard to stop
with the details. I love it so much. I love adding details so much. Anyway, I really need to stop. Okay. Okay, first, before we light it, let's make sure that we have our pose the way that we want it. I think I like him turned
a little bit more this way and maybe a little bit down. I think I like this pose the mot. I'm going
to put it here. I'm going to go to the
little camera and add view, and this is going to be two. Looks like we
already have a one. This is going to be two. Maybe this is three. Maybe we'll make a four as well.
We call it rear. Now we can start lighting. The first thing we want to do is change from Mt cap to lit
PBR in this little sun, so we'll go to lit
PBR. It's all white. We're going to have to select
everything. Not the camera. I'll select everything. We'll go into our color here, and I have a color
that I always use. It's like a beige ish color,
and we'll just paint all. Perfect. Actually, it
looks a little bit. Looks a little bit funny. Make it a little bit darker. Now we have it painted. Let's turn the environment off. Everything should be black, and then we add our first light. We have our first light here. Let's change the
intensity to two. Maybe even a little
bit brighter. Maybe 2.5 and maybe a
little bit brighter even. Let's keep it a 2.5. Let's
turn on post process. Now we can get a better
estimate of what it looks like. I'm going to save this.
We can turn it off. Actually, let's adjust this
light with post process, so at least we can
see how bright it is. Looks like we wanted
to about four. That looks good. I'm going to put
it to my preset. My preset is essentially just
what you're seeing here, what you're seeing here, so
you can pause it if you need. Nothing too crazy.
Also, the quality, I'll put it up, but you
don't have to put it up yet. I just want to be able to see everything that looks so great. I'm going to leave mine on.
I might turn it off later, but you can turn it
off to do the lights. I'm going to leave mine
on just so it looks good. Let's now go back to the lights. This will be our key,
so let's rename it key. And then we can clone
it and we can mess. We'll name this one rim. Okay. Where is the rim? I'm going to put on a line so I can just move it
straight this way. We can actually turn off
the reference image. The first light might be a little bit too bright actually. Let's spin it. Oh, that's
why we had both lights on. Now we want this to be the rim. Essentially we just want that really thin pop of
light, that looks beautiful. I'm going to change
this to Let's go eight. Let's go 15. I just want it really
bright. That looks great. I'm going to save this as well, because that's
looking fantastic. Okay. Let's go back to the lights. Let's add a new light. We'll call this one R one, let's call it R one. We'll move it over. This one is going to point like the rim, but it's going to point on
the opposite direction. We just want some light here. It doesn't have to be a rim. Doesn't have to be like that. It can be a little bit
more on him like this. This one I'm going to make cool. I'm going to t here. I'm going to bring it to a
more cool color. More bluish. We'll bring that to be a little
bit more bluish. That's R one. All right. Let's clone this one. Let's just call it r two. I keep pressing the wrong
button to rename it. R two. This one, what do I want
to do with this one? Usually, what I do
is I have a light. Let's change it from
a sun to a spotlight. Ops. And I want to point this
one above his head. Pointing down at
his head. I want to make this white though, and the intensity can be four. I got to figure out
where his head is. I'll take it off of a line. I think a line makes
it a little bit harder with the spotlight. We'll put the
spotlight around 15. That'll light up his face
a little bit better. Let's go back to our
view, that looks great. But where did that
come from? Let's see. Oh, You know what I need to do? I need to get rid of
this, and then I need to where is it? I need to resave too, so I'll press thistle arrow
down and then I'll update it. What is causing that really
bright? Oh, it's the rim. Why didn't I see it before? I feel like something changed. I'll have to check the tapes. I feel like it was like this. Yeah. I feel like
it was like that. Not sure what happened,
but that's okay. Let's Let's turn our
environment back on. Now, this is my layer
environment, which is included. If you tap here, you can tap import and import this image. Otherwise, you have some other images
that you can also use. Let's bring the exposure down. We like those wonderful
dark shadows. We'll just use it to
fill them a little bit. I think that's good. Post processes. Everything
looks pretty good. I don't think I need anything
to be darker in there. A looks very nice. Bloom is probably going
to just like I thought, cause it to be a little
bit too blown out, even if I raised the threshold. Sometimes bloom is just a
little bit too much for me. Although that looks okay. I can raise the threshold a bit more and see what it
looks like without. Then with the globe is
nice. Let's take the light. The glow is coming from the rim. Let's take the light and
make it a little warmer. We can make it like a sunlight, give it a glow that
looks really good. We can change it
if we want later. The only other details
that I would do is make the body so go into the material
and make it subsurface. Now, I want to go here to
depth and turn that down. So he's not super super see through because that's just
weird if he's super through. Okay. Nice. So that's pretty
much the lighting. The next is just coloring.
21. Painted Turtle: Okay, so once you have your
post process and stuff on, you can do your coloring. I'm going to go
through it quickly. We're pretty much done with him. I'll show you how to export him, but let's just do a quick color. But you can have fun
with this and color him anything you
want. So go here. Well actually, we don't
have to tap that. Let's just figure out what
color we actually want him. So definitely you don't want
him to like too bright. Oh, I'm thinking something
like that is perfect. So I'm going to do paint
all in this color. We, here's the color there. 9e9f4 That's the
color I'm using. You can use something
close if you like. Now, we don't have
all these together, which we actually should. But the only thing is, I think I want to go through and try to quad remesh all
of these pieces. That's the only thing that's
keeping me Let me save this. Let's save as and we'll
save as this one. Let's save a We'll say this one. What was I saying? Oh, these, I think I want
to quad remesh them. This one is 18 k, and I feel like it can be 25. Puts them together ale bit, but I think that's all
right. How big is this? I should have just done
them both together. I think. Actually, I should
just do them all together. I'm going to go through and join all of the elbow pads,
all of these pads. It's going to take me a
moment to find them all. But each of these pads, I want to link together. This one, PK one, Pk. There's that cylinder.
I'm going to join them together, and then the wrist. Pad wrists. There should
be another pad wrist. But the pad wrist is
so small, though. These, I think I want to
do a quadri meesh on. Maybe at 5,000. Let's see if I can
get away with that. I just don't know if I'm going to get away with it, if
it's going to ruin it. I think it looks good. Okay. What about
these knee pads? How are these knee pads looking? If I take these knee
pads and join them, or are these the ankles? Bad ankle, bad ankle, bad knee, bad knee. They're all widely
different sizes, though. That's the only problem. P K that's 235 K.
That's so huge. This whole thing is 235 k. Let's see if we
can get it down to 20 k and see if it
looks any different. I mean, it looks a little
bit different, but not much. The only thing that I
saw was these fixes. I'm going to turn post process off so I can make
these little fixes. I think I saw another little
mistake. Oh, right here. That's probably because
of the texture. But that's all right. We have all these wraps up here as well. Join. Anyway, you get the idea. Essentially, I'm just
going to continue to try to quad me thing. I'm going to try
to save some space and I'm going to connect all of his colors like the colored bands or
what would be colored. These are already connected. I want to connect these
because they're all the same color along with his elbow pads,
they're all the same color. But, I'm just going to try
to get the sizes down. But that's probably going to be super boring to try to
watch me figure this out. Since I'm already struggling. Quadri mesh. Ooh, did I
already bring these down? Let's I want to connect
the back parts, though. That's the only thing. These are pretty small, so
I'm going to join those. Let's see what happens
if let's take a look at the wire frame and remiss at 20 k. That's why you don't
want to have symmetry on. Of course, it's
always on by default. That looks great. I'm
going to keep it. I'm going to join these. The ankles, they're so small, I'm just going to join them, and I'll join them with pad knee. These are the ankle
wraps. What are these? What are these? Knee pads. What do just call it knee pads? These are the ankle
wraps. Lead ankle. We'll join. We'll join
these with the knee pads. Ankle wraps ground. Had band, A, headband, B. These are huge as well. I might just try
to decimate them. Where's the head band? Had band A. Hit band B. Okay, so head band
A, these are so big. I feel like is going to I feel like I'm going to
lose a lot of that detail. No, I feel like I didn't
really lose much. I feel like this
can be like ten K. Also not the grid. I want to see the wire frames. This still looks so
Let's make it 4,000. This, let's make this ten. Turn off symmetry. Let's see what we lose. I think we do lose
a little detail. Okay. We do lose
a little detail, so I'm going to
change it to 40 k. Okay. I like that. Wait, what happened to the Michael crazy? When did the color actually
go away? I'm so confused. Okay, so we're we're back at it. I don't know what
happened to the color. That was really weird, but it looks like it seems
like it's fine now. The teeth also don't
need to be that huge. We'll go real close, we'll look at the wire frame. Even that as we
that's the lighting. We'll look at the wire
frame of the teeth. We'll do quad meesh. I think these can
be let's try 15 k. Turn symmetry off. Turn
the wire frame on. They still look great. This thing. This is 237 that's re Donkus. So let's quad remesh
this down to 25 k. Let's just see what happens. The only thing about this is different doesn't
need to be that big. We can keep it. We
can keep it here. That's fine. These are fine. Although that's still a
little bit too big for me, so I'm going to
just decimate it. Belt is 17 k. It's
still not as perfect. I'm going to leave it.
Since I'm not really worried about the size, I'm
just going to leave it.
22. Last Looks!: Okay. Let's color in the
rest of this rascal. Oh, I wanted to
these both sides. Both the sides are together. It's actually not bad. Size for those isn't too bad. I'm
just going to leave it. Let's color them
a metalih color. If I type here, we have
some metal colors. Maybe we want to make them
a little bit rougher. I find size to be a bit difficult to really get that sweet spot where
they look metallic, but not like not crazy. All right. Let's go
with this color. This and the side,
the shell side. I want to join them?
I'm going to join them. And all these pieces. I don't even know
what these pieces are, but I'm going to join them. T handle handle. A these the handle,
what are these? These are the caps. I think
these are the py ends. I think they would be
the same color actually. Let's take this and this
has to be the nice warm. Let's get rid of the midness. Yeah, I think we want
something around there. So that's d79 d39. But I might come back and change these colors. You never know. The shell, we can either sometimes it's like
that dark green. Sometimes it's like bro. I think I'm a fan
of the brown shell. This light is way too bright, so I'm going to turn it off for now and maybe just raise the environment so I
can see a little better. That's not bad. We'll
start with this color. Teeth, we're going to
make those early white. We can turn the roughness down, and we can use the same
with the eye whites. These can be black. Well paint those
nice shiny black. Now the belt should be
some leatherih color, but preferably not so, not so dark as to
match the shell. I don't want it to be glossy. I want to be a little roughness. It's tricky to get
the right color. I think that works. I think that works.
That's that color for the belt, AC 60 80d. This, I don't know what
I'm going to do with, so I'm just going to paint
it the same color for now. I'll make it a little darker. I don't know what I'm
going to do with that, or even if I am going to
do something with it. These are going to be red, they're going to be R red. I'm thinking something
around there for now. Might change, but for now, we're going to use this color. C 62, c2c. We'll go ahead and do that. We'll make the the same. Where all these pad
risks coming from? Pad risks? Of course, I
can't find the other one. This is the same. These
are going to be the same. Head band head band. I'll just join those
and paint them. These can be the
same color as this, maybe a little bit
darker for fun. He's got a little
pouch, too, doesn't he? I'll make this p cod. Maybe we'll make these lighter. These will make dark. I want to make those the
same color as the belt. All right. Let's grab
the color of this. Boom. I don't even
have all these things. Do we want to paint
them red for now? That might look silly. I'm always covering what I want to
paint with this thing. Maybe we want to make it like
a lighter color to match the all these tubes and stuff I have
to put together. F. I don't even know
what this stuff is. Okay. I'll tell you
what. I'm going to put all of these
things together. And I guess I guess I probably
should just record it anyway, What is this? This tube I'm just going to join all
them. Blade middle. We'll make that color. We'll make this also that color. All these will make
this random color. I just want to
connect it to this, but I can't tell what
it is. It is bad. Oh, well, I'll just
call it for now. Pain Paint. It a. Oh, I love it. I think that's everything.
I think that's everything. We changed some things, so
we'll turn the rim back on. We'll turn the
environment. P process. Let's take a look at our view. I looks fantastic. I love it. Let's do a quick turntable if
you want to do a turntable. I'll show you exactly
how exactly what I do. I go here. Once this
screen comes up, if you're using an iPad, at
least, you can hit record. Then I go here, turntable. I'll make it bigger.
It's a fast turntable. Then you can do
your turn this way. Actually, what I'd rather
do, let me stop this. Firstly, I think I want
to turn bloom off. Let's go to our view again. Some of these lights are
too bright, I can tell. I do like that there, though. That actually looks pretty
good there as well. It's always good to
experiment with your lights. Make sure you have everything
is where you want it to be. What was I going to do?
Oh, yes, the lights. If you go into the
lights and you can put attached to camera, Oh, that's the
environment, isn't it? Is there a separate
one for the lights? Oh attachment. Oh, I don't think
r two I can do. That's okay. Let's
turn this down. Let's try it again. Let's turn the speed down a little bit. Turn table speed. Okay. You don't need
to be that slow. Come on. All right, looking great. Okay, so now we have
that looks great. And if you want to export,
let's turn him around. L et's save. When you're ready to export, let's say we want
to export him with no background.
We'll just go here. Make sure you save first. Let's go down to render. You can do transparent
background, screen, and then export. Then you're pretty
much all done. The only thing that
I would say at this point in time is go through and connect
all these things so that let's send this
to my computer. Go through and just try to make it as
efficient as possible. That's what I always
do when I'm finished. I'm going to go through and all of these things I
might go through and do the Qatari
measure or decimate. All of these pieces. I also want all these pieces
to be together. I'm just going to
connect all of them. That way, if I want to quickly change the color of all
of everything that's red, I can just tap just
like the body. Just connect
everything, experiment, and go back and do
the other turtles. You have the base, so
you might as well just go back and do the
other turtles. It takes a while, but man, is it worth it when it gets to the point where it's done.
What I'm going to do. The only extras that I might
do is when I paint this, I'll add another layer, and then I'll just paint things. I'll take this green, and I'll
paint it a little darker, and make it a
little bit rougher. I'll do that and then
I'll go underneath here. Turn post process off. Underneath here, I might paint underneath the
head, things like that. Then I'll use smoothie pu, which is smooth with
zero intensity, zero intensity, so it won't change it won't change
the topology or anything. But this is just another
detail that I do. I go through and
all the places that are darker or touching
something else. Then I just color them. I paint them. Do and then I use smooth and I smooth
it, so it looks natural. This is almost like
an ambient occlusion. A good example of that
is like underneath these where the skin comes in contact with with the pads. These are a spot where
I pretty much do all of this where it
comes into contact. Maybe even like the
muscles and stuff like this and all back here, and then use smoothie poo and
just smooth out this color. It's smoothing out great too. Those are the only
details I would do. That's to add like a
manual ambient occlusion. I might do that with
all of these things. I would just paint the edges and stuff a little bit darker. Also go through and add some
notches to this as well. You can add a new layer if
you want to test it out. Do the same thing, just grab
this color, make it darker. And then use
something like crease and see how you can make
and if it's real ugly, just go in here and
use dynamic topology, turn it on, and you should
be able to get clean cuts. For example, even in his shell, you want to put like
dense and stuff. Always going to
look really good. Definitely do that. I want to smudge it a bit
less actually. But yeah, that looks great. But maybe I'll make it
a little bit smaller. But that's how you do
dents and things like that. Have fun with it. Do the other turtles, tag me, can't wait to see
what you guys create. Thanks for hanging
with me so long. Let's come to the
next and final video.
23. T 23 Outro: All right, welcome
back. It's been a long time since
I've seen you guys. I hope that you had a
good time. I hope that you learned a lot
creating Raphael, and I hope that
you'll continue to make the other Ninja Turtles. Once you have your base, we
saved the separate base, so now you can go back
and you can adjust them. You can adjust the legs, the arms, you can
adjust the colors. Now you have all the tools,
the skills, the tricks, to be able to handle
other characters and other really
complex characters. You know, everything in three
D is going to be complex. So it's just knowing
how to get from point A to point z and knowing the most efficient ways
to get them in between. Of course, my cat has
no litter box again. This was super fun to me again. I love the Ninja Turtles. I love creating this sculpt. I created cha turtles a few years ago. I
think during COVID. I think I had COVID
actually when I first tried to
create the turtles, but there were 6
million vertices. I just as you grow, you get better, you learn how
to make it more efficient. Although I didn't
into turtles before, I knew that if I did it now, I would just do them
better, you know? And as nomad gets better, as the remeasures and
things get better, everything just gets better,
and we all get better, and we all grow as artists.
So this isn't the end of it. I'm going to send
him over to Blender, so that's going to
be on my YouTube. Make sure to go there
if you are thinking about exporting to Blender, it's just like it's
just a different world. So if you're ready for
that next step up, I definitely encourage
downloading blender. So make sure to rate and
review makes me look good. So as long as you had a good time and you sculpted it and you're happy and you
think I did a good job, then please rate and review and let me
know what you think. I post videos all
the time on YouTube, Make sure to check me out there. Make sure to follow
me on Instagram. I'm trying to get to I don't
think I'll get to 100 K, but I would love to get
to 100 K this year. Um, I never thought
I'd be to that point. Oh, also, if you post on
Instagram or TikTok or anywhere, tag me, I try to get through
as much of those as I can. I try to see as much as I can. I would love
to see your work. Posted in projects
and resources. I want to see your projects. I can't wait to
see your projects. I can't wait to see you do. I can't wait to see
your Ninja Turtles. I think that's about it. I've
taken so much of your time. Once again, keep
drawing, keep sculpting, and I'll see you all
in the next video. O.
 Dave Reed, 2D & 3D Illustrator - Brooklyn, NY