Transcripts
1. Introduction: Composition. It's a word
we've all heard before, but potentially not since
high school art class. We have a tendency
to skip over and misunderstand the importance of composition within our artwork. Join me Natalie Martin, a professional watercolour
artist on this fun and playful deep dive into an extraordinary and
undervalued topic. Let's diffuse the ambiguity
around composition. I'll present it to you in
an easy to digest way with all the necessary
theory wrapped in creative and
challenging projects. At the completion of the course, I want you to feel confident and inspired to create
more of your own work. Welcome to Compose,
Paint. Create.
2. Let's Talk Materials: Let's talk materials. Now we all know I love art materials and can talk
about them all day long. So I'm going to try and
keep this short and sharp. But there's a couple of
significant differences I really want to talk about today that I'm going to be working with compared
to my previous courses. So, I'm going to be painting with my professional quality
watercolour tube paints, as opposed to the Micador discs that I've painted with
in previous classes. Also, I'll be painting with cotton paper as opposed
to cellulose paper. I'm going to talk you through the two significant differences through with that in a minute. But first I'll run through everything that we're
going to need for today. So, I've got my
cotton paper here. I've got a few different sizes. I use these little scraps to
do little test colours on. And then I've got at
least five sheets for the five projects for the
course of this cotton paper. I've torn that down from a large sheet of
watercolour paper, but you can also buy a pad of cotton watercolour
paper for that purpose. I also have some just plain printer paper to do
some sketching on. If you have a sketchbook or just whatever average cartridge paper, that's totally fine. I've provided you
these two printouts. There's two there. I should show you, Tada. They are going to be
very handy and used in our first project that
we'll be working with today. So you will need
to trim those out. All ready to go. I have got here my
selection of paint brushes. You'll notice I've got
some different ones to what I had last time. These four here by
Polina Bright. They are ones that
I had just arrived. I'd ordered them just
before I filmed 'Lessons in Layering' and I was
so excited to try them. They are really beautiful. They hold an incredible line because the bristles are much, much longer than your typical
synthetic round brush, and they hold a phenomenal
amount of water. So I've really been enjoying
painting with those and that's basically what I largely
paint with all the time now. I've got two additional
little ones here. I've got a liner or a rigger. That's a very fine little brush, great for holding a
really thin line. You don't have to have to
have to have this brush, but if you have a nice
little synthetic round that will also come in handy. This one's a six, but it's the Princeton velvet touch so it has an incredibly fine point. And if you ever bought brushes from a number
of different brands, you'll notice that the profile
of each of the brushes, even between the
different styles of brushes within the one brand, they all have a different
profile on the tip. So this one is
incredibly pointy. I like it for that purpose, but it also has a
downside that sometimes it's just too sharp the
marks that it's making. So I love it for that
fine, fine point. I've got a four B pencil. This is so that you can see very clearly what
I'm sketching with an HB or a two B is going to be plenty enough for you guys. Along with that, you'll need
an eraser and a sharpener. Oops, putting scraps everywhere. I just have a little bowl here that I keep my sharpener in, so that the crumbles
don't go everywhere. What else have I got here? We have some salt. Just
table salt is fine. You're going to use that in
one of the exercises today. Flaked salt, rock salt, any kind of salt is fine. They all have a slightly
different effect, but just even just your
basic table salt is ideal. We're going to use our
painter's tape again. So this is from the hardware
store, not the art store. It is a low tack painter's tape. It means that it doesn't
bond with the paper as much and it does a beautiful, crisp line when we mask with it. So that one's definitely
going to be needed. At some point today,
I use a metal ruler. It tears the paper
much more beautifully than a plastic ruler when
I'm tearing down my paper. But we're also going
to need that for one of our exercises today. And then what else?
Some scissors. They might come in handy at
some point, our jar of water. And I've got these paints here to show you a few examples. So I won't be
painting with these, but I'm just going to demonstrate a couple
of things for you. So, let me just grab
some paper here. I'll get this paper out
of the way and not ruin that and just grab
a fresh sheet. What I want to show
you is a lot of people ask me what the
difference is between say, student level paints or
professional quality paints. It's the amount of pigment
that's used within the binder and all
the other things that are inside
that tube of paint. What I've done here is this is my working set of paints
that I have all the time. I've hand selected
each of these colours. They're all tubes of
paint that I squeeze out and allow to dry
inside my palette. So I'm not stuck with like the fussy little set that you
can get from the art store. They're often quite
limited with their colours. They focus more on your
traditional landscape painter, so they're very earthy
and flat colours. I've specifically
spent years and years working out exactly what colours I like working with
on a regular basis. So I'm not actually
going to tell you specific colours
to work with. I'd rather you choose
that on your own. But I do want to
demonstrate the difference between your student and
professional quality. And sometimes even between two brands of your
professional level paints. There's an enormous
difference there as well For student quality I'm going to show you
these black ones which I advised against in
'Welcome to Water colour'. What colour should I paint with? I might do a green. And then I'm going
to use these. They're stuck. Start hurling stuff everywhere. All right. There's
some greens there. Now, I'm just going
to wet my brush. I'm going to pick
up a green here. And this is the
student quality paint, so this one is very,
very low saturation. You can see how
difficult that is for me to get a lot of
colour onto the brush, and it still looks so
washy because there's just a very distinct lack
of pigment in that colour. Then I'm going to go over
to my, the brilliant set. So this is the slightly more expensive can be tempting to get these because
they're like 12 bucks. These are now like 40 bucks. But the colour and the value is so much greater. So, in comparison, there's your different colours. You got much, much more
pigment to work with. And you're going to
get that vibrancy and excitement with your work. You'll find that you
just get frustrated if you end up with your
student quality paints. This is true for
tube paints as well. And it can be tempting
because there's such an enormous
cost difference. But your professional quality is going to last you
a whole lot longer. So I highly recommend, just if you're wanting
to up your game from these guys up
to your tube paints. I would skip student
quality altogether and just go straight to your professional quality
watercolour paints. The bang for buck is much greater. In saying that not all tube paints are
created equal either. Here, these are two
examples that I've found distinct for me. My palette is largely
Daniel Smith paints. I really enjoy their colours, but there's two colours that I just was completely
dissatisfied with. I'm just going to
squeeze a little bit of the Daniel Smith Ultramarine
Blue in that one there. And I'm going to paint out a
little bit of that. Like so, but a little bit more. Now that's the Daniel Smith
and then this is Holbein. This one Holbein, tend to do their vibrant colours
really, really well. I've ended up switching to a Holbein and there's just so much more
pigment in there for me, I really, really enjoy
that a little bit more. And then my other example
is the Opera pink. Opera pink is incredibly
saturated, vibrant pink. Not many people gravitate
towards it, actually, but I quite like it for
creating my floral works. I'll do the same. Here is our Opera pink
from Daniel Smith. So I'll do that on the
Daniel Smith level. Like so, and then I'll go to my Holbein in which I actually don't
have any more tube of, but it is in my palette here. It's just going to
swoosh that around and get that going. Again, for me, the saturation, although as subtle
when you're in the flow and painting, makes
an enormous difference. So you're not having to spend so much time collecting paint, that the intensity
and the richness of the pigment is just
better for me personally. I encourage
you to explore it yourself and work out
what brands, what paints. I'm definitely not going to just go and brag Daniel Smith. It's not be all and end all. I've got Schmincke I'vet Daniel
Smith, I've got Holbein. They're the ones I
tend to gravitate towards and are easily
available to me. Every brand is different though, so I'm not going to
specify each colour. And I definitely
don't need to specify brand either because it's
so much of a feel thing. It's so important for you
to experiment yourself and work out what colours you like working with
on a regular basis, as well as what brands
really gel with your style, because that's
important as well. Now, paper is the other
thing I was going to touch on. Watercolour paper, in past courses, we've
worked with cellulose paper. It's made from trees. The optimal paper to work with when we're talking
watercolour is cotton. It is far superior
to your cellulose based paper because
of the way that it absorbs and
distributes the pigment. It does it far more
evenly and gracefully. It's so beautiful to
paint on, so I highly, highly recommend
stepping up your game from your cellulose
pad of paper, which is easy to also grab because it's like half
the price of your cotton. But to get the results, and we're working
on finished results in our projects today, to get a beautiful result, it's worth going the extra mile and getting
some great paper. Highly, highly recommend.
But from here, I think that's everything
we need to go through. So let's get into it. We are going to
first learn about what actually is
composition better. Get into that first, before
we get into our projects.
3. What is Composition?: So, what even is composition? I know we've got to this
point and we're like, okay, I understand
it's important, but why? Composition is, the way that our elements
come together on the page? Simply put, it is
the arranging of our elements of art on the page. But what's often misunderstood is the way in which we do that, and the methods in
which we do that determines how we
experience the work, how our eye is led around it, how it generates
emotion or mood. All of these things all
come down to composition. Composition is in no way
limited to just watercolour. It can be applied across
all the visual arts, floristry, architecture,
photography, everything. It all comes down to
the same similar, these principles of art. They can be applied
across them all. What is interesting
is today is we're going to build upon our
understanding of each one. And as we learn each principle, they'll feedback on
the previous ones and you'll come out
at the other end having this great understanding of how to move things
forward with your work. Because that's another
really significant part of composition is having an understanding of it
is going to help you assess your work and work
out where's gone wrong. We can go back to that
pile of artwork that we have that's not quite right
and finally work out. Okay, so maybe my
balance is just out, or maybe it doesn't
feel quite unified. These are all things that we're going to be out to resolve by the end of this course.
Our elements of art. If you're unfamiliar,
line, shape, colour, form, value, texture and space, all of these things
are really important. What I might do is I'll quickly
demonstrate them for you. So we've got Line, super easy. Line line is a really powerful
tool within our elements. And then we've got Shape. That is a square or a flat things that we work with
can be quite organic, can be quite structural, just depending on how you do it. Then we have Form. Form
is when we're talking, creating a 3D
impression on a 2D space. I'm just going to shade in a
little sphere there for us. Then we have Value. Value is the lightness or
darkness of a colour. So we can have really dark
and we can have really light. Think of value if you were to photocopy it on an old
fashioned photocopier. Some colours are very high value, like a red or a blue
is always going to come up quite dark
when you photocopy it. But when you say
photocopy yellow, that's a light value colour. And this happens within
your tonal range as well. You can have a very dark blue, or you could dilute it with water and end up with
a very light blue. Then we have Colour. Well, I can't possibly
demonstrate that with a pencil. So let's just get
some colour from here. Let's put my fabulous
Opera Pink there. But that refers to all
colour within your work. Texture, texture is famous
for, can't even spell. Texture is famous for being a little bit difficult to
generate with watercolour, but it is just creating
a visual surface, something that generates and
gives a sense of texture. Let's just do a little bit
of some jagged lines there. Space, space is one of my
favourite things to play with. You might have
heard me talk about negative space a lot in
the 'Lessons in Layering'. It is my fave. So, we can either have like let's draw or flower
because that's my thing. This is a positive
shaped flower, it's going to fill it in. Then we can have a
negative space flower. That's when the white
is doing the talking or that area around it
determines the space. Let's just get
that one in there. It's so nice drawing
with a pencil. All right, so there's
my negative space. Both super powerful
and good things to use within our watercolour. All right, so they are our elements of art. We are familiar with those. We've been painting before. These are all things, our building blocks,
our ingredients. When it comes to our artworks, what we're mainly going to focus on today is the
principles of art. They're our methods. They are the means of organising our
elements on the page. And they're the things
that are going to help place things well. They're going to help generate those compelling
compositions we've been talking about
so much. Today, we're going to look at
balance, proportion, emphasis, unity, and
variety as our first five. And in the second course, we're going to look at contrast, movement, rhythm,
pattern, and repetition. What the most interesting thing is with composition is that it's actually difficult to sum up and easily
present in one way. What can be misconstrued
is that none of these things and none
of our principles are mutually exclusive and they
can be all interrelated. That's just something you
should get a grasp of early on, just roll with it, rather than trying to put
everything neatly in a box, because it's just not
going to work that way. This is art not science. So that is what we'll
be working with today. This is what we're talking
about with composition. And composition is one of my favourite things
to teach people because you just see
the lights go on. And when they have even the
most basic grasp of it, their artwork improves
out of sight. So I cannot wait to share this fascinating
subject with you. From here, we're going to
get into the rule of Thirds, another word we may
have heard before, but we're going to go into depth and find out what
it's all about.
4. The Rule of Thirds (and other compositional structures): Now, the rule of thirds. It's a term we've all
heard before and it might be our full experience of what we understand of
composition right now. And it's so important, it's so important to understand. What I've done is I've
actually created to demonstrate a little
rule of thirds grid. And all it is, is the space
that I'm working with, divided equally into three parts both ways, horizontally
and vertically. It can work landscape. It can also work square. No matter what your
canvas or paper size is, you can divide that area into thirds and you're going to get a
successful composition. And I'll show you how. I've
got some examples to show us. This is from my 'Year in
Bloom' series, and I really, really use the rule of thirds as the predominant linking
thing between each work. So if I was to put this little
guy over the top there, you can see that I've got my most crucial part of this and most in focus subject
is right here, sitting exactly on
that intersection. And these intersections are the powerhouses on
the rule of thirds. Put your key elements here
rather than the centre. And you're going to
have a work that's got a bit more of a
story to tell and it's more interesting
to look at. You can see here as well that my supporting elements
glance the other thirds. This bottom one down here hits the bottom
third intersection, and then everything else is weighted on that top third line. There's a number of
ways to use this. You can align things to the line or you can
sit them on top. But working with those thirds as opposed to just free flowing, dumping things all over
the page is going to make your work look
more sophisticated and like it's been well
thought out and planned because that's what we're
going for with composition. All right, so
there's example one. Now here's another one
from the same series, although it looks
quite different. I'm still working with the rule of thirds because it's one of those things that you can use
in so many different ways, but it really, really
helps generate a good piece of work
on this instance. My key flower is sitting on the bottom right hand third and its support guy is sitting
alongside the left hand third. You can see that
I've got a third one because our eye loves, things in odds, not evens,
really important to remember. Two is awkward. We don't know where to
look, put a third in, and it will generate a
hierarchy almost instantly. Our third one is
sitting up here, off to the side a little bit, but it's still hitting
on that third. So I'll pop that one there. I've got a couple more to show you
from this little series. Now, you can see here, I've done the same thing again, put two main figures
in and a little mini one making it three. This time I'm working off
the sides of the third. It also still works, plus the brunt of the
weight of the work. All of this business of where the painting lies hits
that central third. Another way of generating some
really interesting works. Now final one from
this little series is this one up here. Now I've got two up here, but because they're
either side of the third, they kind of counterbalance one another and they become one
unit sitting on the third. And then everything
else tumbles down here, and a few key ones are all
still hitting on those thirds. So it's just something
to bear in mind. I don't pencil in thirds
every single one, and you certainly
don't have to make one of these for
every single one. I'm just doing this for
demonstration purposes, but whilst you're learning, this thing is really handy. You can make one
at home if you're in the US and you need to
make a letter shaped one. I've included a four and letter printouts
in the downloads, but you can also just make
one on baking paper or if you happen to have transparency film or
anything like that, anything that's
slightly transparent is going to help
you line those up. Now, got one final
example of the third. I've got a couple more
here. This one here is a large work that
I don't have with me because it's
just recently sold. But I wanted to show you
in a landscape sense, how this could work as well
without the rule of thirds. As a guide, I'm going to see how the visual line carries up on that
right hand third. Then the weight of the work sits in the top,
sits in the top third. So it's just another
way of thinking about it working with the lines, but also put weight
within the thirds rather than hovering
awkwardly between thirds. Now get rid of that one. This is another little
landscape example where the apex of the mountain is sitting
exactly on the third. Plus I've used extra marks and interest here to drive that energy up sitting
on that third, plus the horizon line
sits on the third. No matter what the thirds
work for portraiture, they work for landscape, they work for florals
and still lives. It's something
that you can apply to everything that
you're learning. Let's slide that one there. These are a couple more here. Here's another tree,
one that I based here. And this one has one driving force centrally,
right up that third. And that's what makes
that a strong work. If it was central, our eye gets a little awkward,
It goes, oh, that's. It's there, but it's not
telling me much and it's not got much thought or
planning going into it. And then this
negative space shape here is what's sitting
on the bottom most third. And that's what makes
that combination of working with multiple thirds, not just one central
one is going to counteract that strength
going up there. All right, so get
rid of that one. Here's another couple
of little landscape. So this is a little
series that I did recently on holiday when I was
up in the Northern Rivers. I did all of these
waterfalls on third up here. The waterfall sits
directly on a third here, although the weight I've got
a line through the centre. This one up here helps
counteract that. And it evens out around there. Plus there's lots of information and details
sitting on this third here. And then on this example, I've done it the
other way around. The waterfall sits mainly
on the third there, and the interest in detail
sits across the top. It's really just putting those
really important things, the things you want the eye
to go to first, on one of those intersections or working the full length of the third. And that's really going
to enhance that work and take it to a place where it's feeling a lot more cohesive. All right, so that's the third, the rule of thirds you might be like. Okay, I've
heard of that, but what about the golden mean? The golden mean is
kind of a beast. I can flesh out the arithmetic that it takes to
generate a golden mean. And that's automatically,
for some people, just going to go
too hard basket, although it is a really
significant structure, not just in art, but in building, all throughout nature, it's really important in science too. It's actually represented all
the way through our world. It's quite difficult to
use in the purpose of art, especially in the 2D form. So I suggest going
to the rule of thirds as a simplified
version of it. I think that's really important. You can get really hung up on the mean and it actually
looks quite similar. It is the divine proportion. It is the most perfect
version of that. But ultimately, the thirds
does a brilliant job as well. So it's a much simpler way of
applying a similar concept. I honestly don't use
the mean very much. I do understand the
importance of it in history, but that's like another
whole course in itself. It is big and deep, and there's a lot to
learn about that one. The Rule of Thirds is probably the structure that I most predominantly use
in all of my work. And this may look a
little familiar to you, because if you pull
up your iPhone or your phone, a grid comes up. And you will find that
it's actually the rule of thirds sitting there
right on your phone. So you can compose your reference images or
whatever through your phone and have
that as a bit of a step towards creating a
better composition as well. So that's a really handy
tool to have up your sleeve. Besides the thirds,
there's actually some other structures
that people work with. They've actually been fancied
in different areas in time, like a triangle shape was really popular in the
Renaissance period. So I'm just going to run quickly through some other
structures besides the thirds that really work
for creating some artworks. All right, first up, we have a triangle. I feel like the blackboard
upside down, upside down. This one here, it's a triangle. Obviously can be
great for portraiture because of the structure of us with shoulders and
heads and things, but also great for mountains. In this example, you can see
the apex of the mountain is quite centralised and the
general shape is a triangle. I've also used an
example here where I've arranged the three flowers in a triangular shape centrally, which also can be determined
as a triangular composition. Where am I going to slide you? You can go up there.
Now, next shape. Circle. Circles are really nice ways
of leading the eye around. And they feel feminine, and soft and round. Whereas a triangle has
a grounding effect, a circle has quite a different
way you travel the work. In this particular piece, I've got you traveling around
in a nice circular way, and it keeps you
entranced in the image, as opposed to leading you out. A circle is a really nice
way to use an image. An S is one of my other favourite
ones that I like to work with. It can be the reversed S. It doesn't necessarily
have to be correctly the right way around. In this example here, you can see I start down here, wander up this
way, and that way, it's a nice way to keep that
eye moving through the work, and it doesn't
stagnate anywhere. I really love an S, and
it has a really lovely, feminine feel to it, which I really enjoy,
including in my work. Here's another
couple of examples. In this one here we start here, travel around and up and out. You get to take in
the whole work, but keep moving at the same
time. Next we have a cross. So in this example, I've actually included it
because interestingly, I've used negative space as the horizontal cross and the vertical is the main
predominant trunk. In theory, what we were
just talking about before, putting something
centrally is not ideal. But in the instance where you're working with a cross shape, it can actually
work because you've got arms coming off to the
side helping balance it. Same with this one here. In this image here, I've
got the central shape with the arms coming off to the side creating that cross effect. Next up is a V. You may have seen they look a little bit like hieroglyphs in the end of all these different
compositional shapes. But I promise you,
they're actually really fun to explore. Here we've got a V in
the valley here, we've got a V and they
keep generating the V. Repeating those shapes is a really interesting
thing to explore as well, is that one next up we've got an X which is working from the outer corners
in this instance, which was too big
for me to show you because it is quite
a large work, probably nearly the size
of the wall behind me. I've worked everything
into the central point, making it an X shape
through the composition. Then we have an L shape, which you can work into
the thirds as well. In this instance,
I've pretty much put the tree here on the third and then
the horizontal here. It's really great for
a landscape tool. You put one vertical
in which makes it dynamic and then all
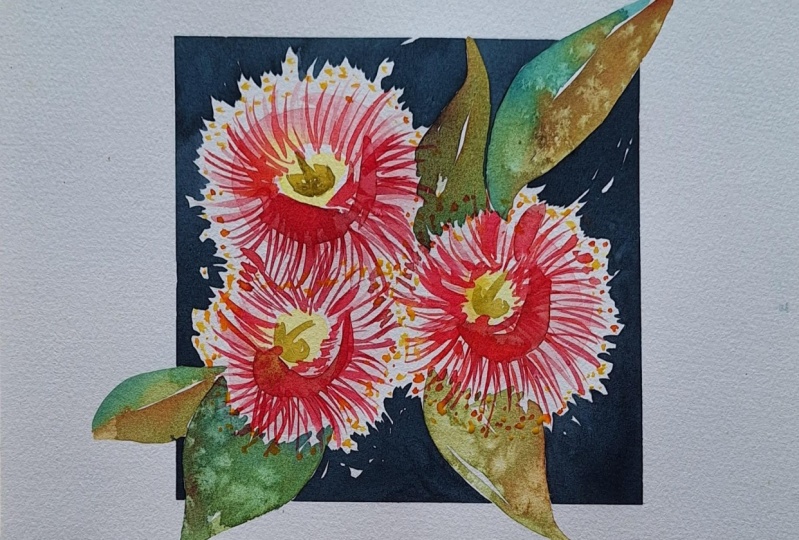
these horizontals gives it a good L shape. I've also included this one here which is the
Gilberts Banksia. This is an example of
the L working backwards. On the right hand side is the vertical and on
the bottom is the left. It's just another
way to think of it. You don't have to literally
be spelling correctly L, It can be the reverse as well. A C shape is one that I
don't work with that often, to be honest, because I find
it difficult to work with. But I found a couple
of examples in here. I've just got a great big C
taking you through there. It's a little bit
like the S shape, but it's just one
curve instead of the double curve. And
in this one here, which again, is another one
of these really big ones. I've actually got the C working the bottom half of the work. It's down around the
bottom and it takes you in from the left and actually in from the right
and down up and around. So it's just another way
of generating that work. Again, probably best for a
landscape situation where you've got like an
overarching branch coming from the top or
something like that. All right, so there are other compositional structures
apart from the thirds. I might just put the
thirds in there as well because that's the one
that I love the most. I find that that's gets me the most successful
outcomes all the time. What I thought I'd show you
now though is times that have absolutely bombed and
failed my compositions. And it can still happen
whilst you're working. So you might be all in the stores of painting
and then realise that you've just like misplaced something or it's just
not quite working. So I just wanted to show
you that we all do this. It's not something that is
just for the beginners. So you would have seen my
finished piece of one of these. This was a trial example of me trying to get
this concept down. And I was agonising over
getting these negative shapes. And I was focusing more on
that than the composition. And you can see
that I accidentally placed my two flowers
pretty much centrally, which put a really awkward
spin on this work. It made everything feel
very centralised and too perfectly balanced
where I wanted it to feel. If it was over on
this third here, it would have a much
more cohesive feel and easier for the eye to read. So that was one of my fails. And then this one here, I
just stuffed up my S shape. So it kind of went into
like a fat C or like a fat S, I don't know, but
it didn't work. I needed to complete the S or this brunt of this
weight sits centrally, which really awkward
for the eye. So that's something
to just bear in mind, is like once you're in
the throes of work, you've got to pay attention to what you're doing at
the same time as well. I just got carried
away with getting into the details and stuffed up. I've got one further example of, well, where I've miss
weighted the work. This is a bigger one
that I've stuffed up. So in this one, I put all these huge, heavy flowers over to
the right hand side, but didn't leave any room to counterbalance them anywhere
throughout the work. So these ones, huge and heavy. But then if I was to fill
out the rest of that, it's just going to
always feel like it's dropping off this
side over here. It's not working as a piece. So that one's in my pile of incomplete that I have a
hanging out in my studio. So I hope that gives you a
great understanding of how, the basic premise of how to place your
things on the page, there's so many ways to do it, but I'm going to pretty
much roll with the thirds through the rest of my
explanations today. But enough talk. Let's
get into some painting. The next project is all about balance and I can't wait
to share it with you.
5. Principle of Art: Balance: Okay, we've just taken a look at our compositional structures. Now to get into our
principles of art. The first one we're going
to explore is balance. Balance is probably one of
the most fundamental and one you're aiming for within
most of your artworks, your artwork with a sense of
balance has an equilibrium. It is going to make it feel grounded and it makes
it easy for us to read. An unbalanced work
can be feeling discordant or makes us
literally feel unbalanced, and it makes us engage
with the work less. Trying to achieve balance is
a really important thing. Within balance, there's a number of ways to generate that. I want to explore each
of those with you. We're going to need our cutouts. I've got all my cutouts here. Make sure we got those
trimmed out and ready to go. The first of our
balances that I want us to explore is symmetry. Symmetry is, if we have an A4 piece of paper and we have an
axis down the middle, this acts like a seesaw. And we want to have equal
weight either side, and that generates a
sense of symmetry. Say for this example, I've
got the three flowers, there's a centralised 1, and 1 either side of that
vertical axis axis. Therefore, that has a
nice sense of symmetry. Another example is this Waratah, where the stem goes straight up vertically through the
centre and weighted either side of that
vertical axis is equal. Then we have asymmetry. Oops, can't spell. It's going to be a
constant problem today. Alright asymmetry. I really wanted to
show you this example because asymmetry is working with not the exact weights
either side of the axis, but starting to understand
that each of the elements or subjects on the page holds a visual weight and it's
getting a great balance. Is distributing
that weight evenly and in a way that is
pleasing for the eye. In this example,
I've actually used the negative space as a
weight within the work. And it's so important
to understand that negative space holds weight
as well as the positive. So you can see here, I've got the tree trunks
working through, and then negative space down here and negative
space down here, making the work
feel asymmetrical but also balanced
at the same time. Here's another example, which when I'm working with flowers, this is one of the
most important things, is not always putting
them in the centre, because we have a tendency
to want to do that. It feels comfortable.
We know where the centre of the page is and we're not playing
any risks there. But as soon as we start
entertaining those thirds and this Banksia happens to be sitting on that
left hand third, that's when we start to have a bit more impact on what
we're saying on the page. So although it is
not in the centre, which makes it a
symmetrical painting, this makes it asymmetrical by having more busyness
and energy here, counteracted by things that are further away from
the subject here. And all the while,
the negative space always has a weight as well. Let's slide that one away. All right, then we
have radial balance. This one might sound
pretty straightforward, and I have a pretty basic
example for this one because it's not one that I
work with in a regular basis. But basically it's a balance working from a centralised
point working outwards. Think of sun rays,
think of mandalas. These are all radial
balanced works. It can be a really beautiful way to draw attention
to things as well. Then the final one is a
crystallographic balance, which is a long word,
and it actually just means there is no one
thing drawing attention. It is an all over balance. Think of Jackson
Pollock and his, paint splattered
absolutely everywhere. And his abstract expressionism, there's no central place to focus the eye. So here's an example from
my 'Magic of Colour Mixing'. I've been digging them around. So there's nowhere that
the eye singularly lands. It's evenly spread and it
feels balanced either side. Here's another one where I've
just put gum leaves over the entire picture plane. But again, no singular
point is drawing attention, but it still feels balanced. Here's another little one, it's a fun one to play with. Almost feels like a
pattern when we're working with a
crystallographic balance. And here's some Wattle as well. There are the different kinds of balance that we're working with. And what we're going to
do our project around balance is we're going to work with these little
cutouts we have here. And we're going to
work with our thirds. And we're going to work on a few different compositions
and come up with a successful formula
that we then paint. Get rid of that one too. We don't need that
anymore. I'm going to grab my piece of paper here. Actually, you know
what, I want. I want to do it on a piece of sketch paper so that I can push that to the side and work
from that, from the picture. So, I've given you
all these elements. They are whole
things ready to go, little subjects that we're going to arrange into compositions, but they all hold
different visual weight. So this is something to really
important to bear in mind. I've also given you a
bit of a bum steer. I'm going to actually
just pencil these rules in because I've given
you two Protea heads. I love working with Proteas. You can see I've
got a couple here. These flowers here are
from my front garden. And they are the
flowers that got me into painting flowers
in the first place. Because I was really
stuck in my practice, I was really not enjoying
painting at all. And one day I just
went, you know what, Just pick these flowers, paint them, start over. And that was the beginning
of it all for me. So sometimes it's just the littlest little
switch and thinking. So I've always held a bit of a little love heart
eyes for my Protea, that's what inspired
this work today. And everyone seems to love them. So I've got two with us. You can either do one or
two totally up to you. I want you to keep playing with these elements and try to
come up with something that feels balanced that you would then generate
into a painting. We've got two little
Leucadendrons there too, some sprigs of Blue Gum, some little bits
of Geraldton wax, and some Gum Leaves. And each of these holds
different weight. The lighter coloured leaves are lighter in weight than these
bigger, heavier leaves. The little fussy details hold a different weight to these
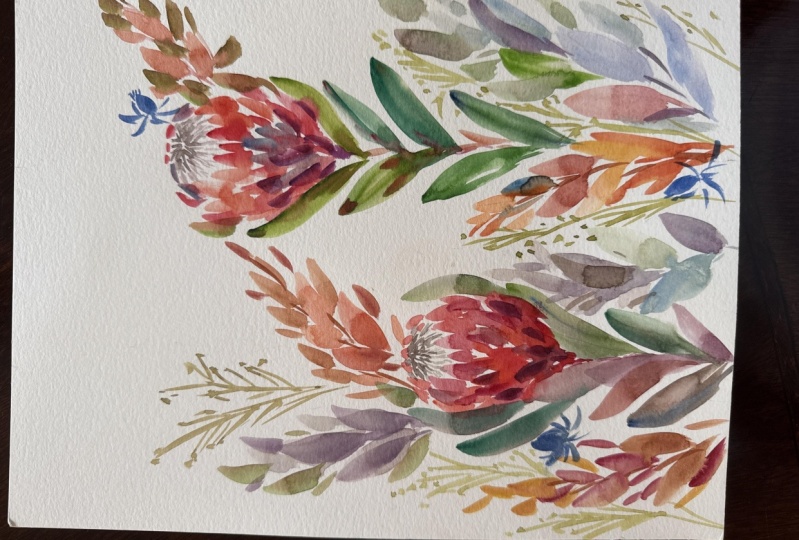
heavy little Sea Hollies. These are going to be our little support at to our Protea. I've roughly penciled
in the thirds here and I'm going to start
placing things around. Typically, if we wanted to do
a symmetrical composition, we could go something like this. Very roughly, that is a
symmetrical composition, but it's not really
doing much for me, it's not really fluid
or feeling like a great use of all
these elements. I'd think I'm going to go for an asymmetrical composition
for this example. So I'm going to start
placing things around. Maybe I might put
it down there even. And then I'm going to try and get
that nice and even feeling and you'll have
a sense for it as well. You'll come to it and
go that feels nice. And what I want you to do when you come to one that
you really love, take a little snap, take
a photo with your phone. And what you'll do is I want you to accumulate a few rather than just go with the
first one you like. Because often the first one you like is the most obvious choice. But pushing yourself and generating that little
bit more creative energy around that is actually
going to help you come up with a more interesting
composition. So I would love
for you to aim for four to five that you really
liked putting together. And then we're going to
pick your most successful, which does not necessarily
have to replicate my one. Your eye is going to see
different things to me, which is different things
to the next person. I really want you to find
one that you really love. The look of that feels balanced. The balance is the
absolute essence of what we're working with here. So I'm just going to keep
fussing along here and trying to come up with a
composition I like to look of. And I'll keep playing
around until I land on something that
feels right, maybe not that one, it's feeling a
bit too busy up there. Do you want a sense of busyness? Do you want a sense of calm? All of these things
come down to balance. Busyness is going to
make it feel too much. Maybe a few more Sea Hollies. I'm going to put one over there to counterbalance that one. And then with this visual
weight sitting on, this third is going to make
it feel a bit different. Now I want to make
sure I don't use just one of everything or all of everything because that's the other thing I might have given you
all of these elements, but you most certainly
don't have to use them all because
I've given you too many so that you've got stretch there to play with
different things. It's working, but I'm not excited to paint this one yet, so I might give it one more. Go start from the
start. All right. Maybe I'll start over
on this third now. Then put in some gum leaves. Bring that over to
this third here. I don't want that shooting out of the
top of the Protea because that always looks
a little bit strange. Make sure it's
offset a little bit, then maybe I'll go for a C shape or an S shape whilst working with the thirds a little bit too. I don't know if I'm going to
use any of the blue gum this time, I might
skip that one. And I'll do a
little bit of this. I'm trying for that balance. All about finding that balance. I need to get that further
down on that third, I think. And then this one. All
right, getting there. It's a lot of pushing, pulling. I really love this
exercise because it takes the pressure off and it gives you
a chance to actually have a play around and work with these elements whilst not
having to paint them. So you get to really have a play with what balance feels like. For me that's feeling
a little bottom heavy. Maybe that one's got to go, or maybe I should have it run
off the edge of the page. It could go up here potentially. No, I don't know if I like that. And your taste is going to be entirely different to my taste, so definitely roll with
whatever's feeling good for you, good without being great. Got to keep working
here, I think, push it a little bit harder. That's going to shoot
me out of the frame, which is less than ideal, because you don't want to look at the focal point
and go straight out. That's a bit of a no, no when it comes to composition. And those lines were
just leading me out. So I want to have
the lines leading me up this way. All
the visual lines. Okay, I'm back here again. Alright, I think I'm getting closer and what I'm going
to do is just adapt a little bit while I'm painting to try and make sure that
it all syncs up together. I need just that little bit of something in there, I think. And maybe that one
sitting on a third, sitting on a third
sitting on a third. That one should probably
be going there. And maybe that one in there. Yeah, I think I'm going to
go with that. All right. So enough fussing around. But I do want you to
take the time with this. This is something you can
always come back to as well. And I encourage you to, once you've gotten through
this first exercise, it's definitely
worthwhile painting some of your own flowers, cutting them out, and
trying this exercise again. Because it's going to help you practice those compositions. Work out what feels
really nicely balanced. And sometimes it can be the simplest thing that like a little trap you
keep falling in, that I keep leading people out, or these lines aren't
following one another or something that I often
see is like a visual hole. So there'll just be like an awkward gap somewhere and it's just like
a stopping point. We just like that didn't
flow very nicely. I'm always trying to seek flow and balance within my work, so I'll just stick that
one back in again. You also don't have to represent these little cutouts exactly
as I've painted them. You're more than welcome to just if there's a leaf in
the way or whatever, you don't have to re paint
them all identically. Maybe go and go down there. All right? So that's
feeling pretty balanced. Pretty balanced to me. Get rid of these ones, not
using them anymore. I'm going to slide this off to the side and I'm going to dive into
giving it a go painting. What I'm going to suggest here, and you're not going to
be comfortable with it, but you know we're here to
learn is to pause the video now and have a go painting it yourself before you
watch me paint it. Because then you're going to put your creative license in there rather than
mimic what I do. You're going to see
how I paint it. Anyway. So you know that
that's there as your comfort. But I would love
for you to give it a crack first before
you watch me do it. And it will mean that you're creating your own composition as opposed to working with the
one that I've provided you. All right, so pause.
All right, I'm back. Come on, let's get
painting. Where do I start? I usually start at the
top of the Protea flower, the crown with the petals. I'm just going to mix up
some colours here. All right. And I'm not going to
pencil in my thirds. I've got my thirds and my composition lying
here ready to go. I've got my reference point, so I don't even need to sketch here because sketching
is going to make us tight and it's going
to make us a bit pedantic about getting
everything right. So I'm going to mostly focus
on getting these in here. Now that I've got
this as a reference, one thing that I am
going to do is trying to twist that flower head pointing upwards a
little bit more. That give it a bit
of flow down here. So I've got that S shape going. So I'm just going to change the angle of it slightly
because at the moment, think of a flower
head like a face, and your eye automatically looks at where that
other person is looking. So that flower is looking
directly out of frame. So basically, I want to try and encourage it to flow
back up that way again, just something
to consider. So I'm going to paint in these, I'm going to keep those
colours mixing all the time. You know, I love unexpected
and vibrant colours, so let's keep that going. I'm working with Polina's
size one brush, and you'll see me alternate
between a few of them here. She's got a different
sizing to what normal synthetic rounds are. This one's more like
maybe an eight or ten. When I'm talking about my Princeton brushes or
something like that, it's quite a good chunky brush. Make sure I spin that around, make sure it's sitting
on that third as well. Always important. So I'm really thinking about
where I'm putting my things because that's what tends to happen is
we get comfortable. And we stop paying
attention to this. And what happens is
that we'll place things in there and they're
not quite in the right spot. And then we're like,
oh, how do I fix this? So troubleshooting on the fly is actually really
important as well. I'm going to put a leaf
in. You'll be like, why is she going to leaves when she hasn't finished
the flower yet? Actually I'm going to switch
brushes up a size because I want to work into
the wettest areas at all times and I
want that leaf to bleed. So I'm just going to
paint that one in there, let that beautifully
bleed into that one. It's nice and warm in this room, so it's going to
dry quite quickly. If I had done that
in a cold studio, it would have just
gone and bled out. So timing is pretty crucial when we're
painting these things. All right, now, more leaves. I'm going to use
that colour theory to get some nice greens. Still have not decided
on my greens in my palette because I usually just
mix them all. I find I like working with
those a bit better. Get some purple
in there as well. Tuck that one in there behind.
Now, the thing that I get asked a lot is when and where to
overlap things. This is entirely up to you. I'm going to start painting
in the Leucadendron next, so that the leaves, or maybe
I might do one more leaf, but see how I've got
this one sort of alongside this driving
this upward energy. I could sit it behind the leaves or I could sit in front
of the leaves. It's entirely up to you, so it's just something to
have a little play with. I think I want to have it sort of sitting out to the side
there a little bit. So I need one more
leaf in there. This is all troubleshooting. I'm sort of just giving my inner monologue as I'm painting, so you can kind of go, oh, she's just really
chatty in her own head. Okay, little bits of
planning all the way along. Switch back down,
finish off this guy. I'm doing this in
one foul swoop. I'm not going to
do it in layers, therefore you're going to see a lot of bleeding and a lot of negative
space so that I can have plenty of room to so that I'm not going to allow everything to bleed into one big puddle. I love working in
this really swift way that's basically trying to create an essence of the thing
rather than paint it so literally, 'cause you can
see from the flower itself, it's actually quite
complex in its structure. The leaves all overlap,
you're more than welcome, if that leaves in the
way to rip it off, just get it out of
the way you want to see the flower more
than anything. So if the leaves are in the
way, just take them off. Okay. You can see I mix
almost all of my colours. If colours are something that
you're unfamiliar with, I would highly recommend trying out my 'Magic of
Colour Mixing' course. Because it really, this
composition course and the colour
course are probably sort of the ones that people
have not avoid doing, but the ones that they
don't think are important. And these ones are
the ones that are going to make all
the difference. So the colour course, I can't even tell you how much that's going to affect and change the way you look at
colour and mixed colour. It's just awesome how it
can shift your thinking. So highly recommend that
one if you're just going. But how is she making
all these greens? Add a little bit of a
stem in al, right now. I'm going to stick that
Leucadendron down the side there. You may also notice as well that my palette is hugely messy. All of this, once dry
can be reconstituted, so I never wash it down. Really important way of just keeping all your colours looking harmonious between your
works because if you're always picking up the same
few colours and mixing them, then you're going to have a cohesiveness in it altogether. All right bit more browny in there. I don't want everything so saturated that it's
hard to look at. That can be a bit much and it can be really upsetting
to your balance. You can see I've kind of curved that one in a little bit more, and I might just do one
additional leaf in there a bit. A bit lighter. I'm constantly analysing what's
going down on the page, making sure that everything's talking the way I want it to. Making sure it's sort of
holding true to this. But if it's not, it's not
the end of the world. I can keep troubleshooting
as I'm painting as well because sometimes when you translate this to this, it just doesn't
really go to plan. And then you've got
to go and rather than holding onto this
like the Holy Grail, look at this and try
and make this work, rethink the balance or
rejig this even and try and troubleshoot it here
before you take it to here. Another really good way of just working through those things
that come up while we're painting. Get this
little sprig in here. Ad libbing a little bit there if you're also
welcome to do that. Okay. I'm going to wait to
paint the crown of the Protea until it's all dry because otherwise
it'll run into one another and I'm not sure
I'll want that to happen. So I'm going to move
keep moving and go to go up and paint in this second
Leucadendron up here. All right. I want to have it a
little bit more yellow because there's so many
different ways to use balance. You can balance with colour, you can balance with value, you can balance with texture. Think of all of your elements, and there's a way
to balance those. It's something to bear in mind
If you're going too heavy with the colour and it's
all the one tone overall, that's going to feel
potentially unbalanced as well. Because there's a
lack of balance. There's not enough
range there to play with to visually digest. Counteracting those colours. All right, now for
those gum leaves, I'm going to pop them in. Go back to some of the light colours that I'd
mix for the Protea leaves, but then introduce maybe a
little bit more Ultramarine I think for those, the beautiful gum
leaves up there. I get a bit more grey in there because it can look
too saturated. Sometimes I just go for too much colour. A
little bit of purple. Now, a little bit
more here to do, now that I've got
the brunt of it in, I'm starting to think, okay, balance, balance,
balance, balance. How am I going to generate this C curve into a really
nice formed piece? So I'm going to need
to put something in this visual hole here because this hole is bugging me bad. Here, I've got this little bit of
Geraldton wax or like, you know, loose spriggy
thing that I've put in. So I'm just going to paint
that in to fill in the gap. And I'm going to go for a bit more texture and that will
be a nice stop gap in there. Take that little drop off there, always standing back to
check what I'm doing, make sure I'm not
going too heavy or if you're fussing things, definitely just put the paint
brush down and step away. And it can be just having that
bit of clear eyes go off. Make yourself a cup of tea, and that's going to help
you see things with a fresh perspective.
Alright, Sea Hollies. I've got to put you in now, grab some of this Ultra. If you're someone
that really loves detail, you could always do this in
a whole lot more detail. I'm not telling you
how to paint these so much as I'd love you to
see how you approach it. Do another one here,
because these are heavy. They're little,
but they're heavy. They hold more visual weight
than you might realise. I'm going to have to be really careful with the placement of these little Sea Hollies. Not native to Australia, but we tend to throw them
in a lot of our native bouquets. If you find yourself at the florist wanting
to get a native bouquet. And now I think I
want to put one here, maybe a little bit
overlapped on that leaf, and maybe another one here. They're floating in thin
air right now, I know that. But I'll throw in a little
idea of a stem I think too much and that might counteract that balance that
we were just talking about. Sync those in a
little bit though, so they don't feel
so floaty like so, Now, getting closer, you can see the finish line. Don't get too excited
that you muck it up. This is what happens as
we get to this point. And we can see the finish line. And we go, I'm just
going to do this. And then you'll be
so disappointed, I've done that so
many times or you get so hung up about finishing it that you
never actually do. That's the other thing, I really want you to get
to a point through this course that you don't feel like you have
to do that anymore. You learn how to
finish the work 'cause that's a big step in
your creative process, learning how to
successfully do that. All right. Painting in this
crown of the Protea. I've still got quite
a large brush in my hand. It's got to be a six
or eight really. But it has the most
beautiful fine tip. So I'm just going
to keep working with that and drag
these little lines down. That's going to balance some of this other fine detail
that we have around here. All right now it's get a
little bit more paint here, a little bit of details here, a little bit of a second layer. All right, what are we missing? I need to add in a few more
leaves and then I think I'm really close to
finishing. At this point you might have noticed I'm
not really looking at this anymore because this
one's down it's job. I've got the brunt of it
in, I've blocked it all in. And I just want to try and make this work as a
successful painting now. For me, I need to add in a
bit more foliage, fill it out a little bit, and I think that's
feeling really good. I jump up to a
bigger brush again. I think, I love these little soft peaches and how they play off the blues. And there's enough dark values, there's enough light values, there's enough colour range. All these things come
into consideration for sure. All right. Sometimes I don't
even putting shapes in, I just know that I need to
counterbalance that with like a tiniest little dob is going to make that feel better
or more successful. So just bear that
in mind as well, like it doesn't have
to be a literal shape every single time. Just a little blob can be
enough of a shift. All right. Starting to feel nearly there before I overdo it and
might have to stop soon. I'm just going to
put a little bit more of this little
limey stuff up here, because I've got a lot of the rich
pink colour here and it's got the complimentary
greens all around it I'm just going to counterbalance
a lot of that and place A little blob of pink up there, don't even know what it is, but it is just going to
help follow that around. I might need another
one down here. It's going to help that eye lead through that C curve a little bit more successfully. A little bit of blue. Just gonna keep fussing
here for a moment. A bit dark there. Because we've got
four Sea Hollies, which again are odd numbers, much better than even numbers. I'm just going to do like
a little fake pretend one that's kind of in here to help balance that out because
now we've got five. My eye is a lot happier. It was kind of wigging
out for a bit there. And it's because we don't
know where to look and our brain picks up patterns
in an incredible way. And it just, it's like
disarming having even numbers. We like the odd
numbers to make it feel happier. So there's my little composition of balance focusing entirely
on balance at this point. So I'm really just
trying to make sure that that's not feeling
too left weighted, right, weighted top and bottom. I can't wait to see
what you come up with because I really
hope what ends up being shared is
this huge array of the thing with these things
is it's totally limitless. Although you've got a handful
of things to play with, every single person is going to approach them differently. So I cannot wait to see what
everyone comes up with. From here, we're going to jump into our next
principle of art, which is proportion, another
really big, crucial one. And I can't wait to
share that with you.
6. Principle of Art: Proportion: I hope you enjoyed
that first exploration into our first principle
of art balance, and it's given you a
greater understanding of what that can
contribute to an artwork. Our second principle
is called proportion. This one is really crucial to understand because
as when we're learning, we tend to have things
that are out of proportion, but
not intentionally. So understanding what proportion contributes to your painting
is super important. Essentially, it creates a
hierarchy within your work. And it talks about the size differentiation between the different elements
within your work. So you can either make things feel quite regular and standard, or by creating an
exaggerated idea of it, it's going to really
tell a different story. So that's what we're
going to explore today. Another thing to bear in
mind with proportion is it's not just what's happening
within our picture plane, it is also about the
painting in context. So if you were to have
a really small painting on a huge white wall, it's going to feel
strange in proportion. But say if you had
a large painting that fills the wall perfectly, then that's going to tell
a different story as well and it's how it's going
to experience that work. Just something to bear in mind. I've got some reference photos. I've got them printed out here. You don't have to
have them printed. I've got them all supplied for you in the downloads files. I just wanted to have these
in front of me so I can talk to them whilst
we're painting, the first thing we're
going to do is go through the different ways of generating hierarchy within your work. The very first one is
standard as you would expect. The proportion feels familiar, it feels like nothing's
too out of the blue. And it's something
that you can see. I've got this one
here as an example, which is my work
'Waratah's Standing Tall'. The vase is in proportion
to the flowers. The leaves are in proportion
to the flowers as well. So everything is as expected, which is what we're
talking about when we're talking about
standard proportion. If I was to sketch
this out in standard, I'm going to do a thumbnail. Actually, there's a few
things to cover here actually, let's go here.
Here's all my photos. I'm going to do a
little thumbnail. Thumbnails are such
an amazing tool to explore your compositions. It's pretty much how
I start most works. Sometimes I want to launch
it and just get on with it. But because I have all
that composition knowledge ingrained, I can trust that. But when you're learning,
it's such an excellent way to explore your various
opportunities and things to play with. Oops, that was not a good
third. That one's there. So we've got a
standard proportion. If I was looking at
these photos here, I love working with
reference photos, but what tends to happen is they're not
often composed well. So if I was to just go and
paint that exact thing, it may not turn out to be
the greatest composition. So I want you to treat
your reference photos a little bit differently
in this course, I want you to look at them
but not replicate them. So if I'm looking here and the way that this one overlaps
here, that's not ideal. And then just the little
bits here and there. So that's not, I wouldn't want to replicate this painting exactly is what
I'm trying to say. What I want you to
do is think about how we're using our photos
to generate that shape, but we might use elements from here and
elements from there. And maybe I like
those colors there, but I want it in that
kind of arrangement. So I'm picking and choosing
different parts of it to assemble into an
idea of my own painting. All those decisions
that I make along the way are going
to help me get to my endpoint. For a
standard thumbnail you might expect
to see Hydrangea, I'm going to work with
the thirds here. Might just do a few
little ones here. And then I'll do some leaves. It's as expected
you're doing it to a scale in proportion
that is familiar. I'm getting a few in there. I'm just going to
make them a bit more jaggedy so you can tell
that they're the flowers. Now I'm putting quite a few in. That's our standard
proportion, familiar, expected everything relative
scale to one another. The ratios are all correct. If we were to do a
dominant proportion. I'm just going to draw
up my grid again. Of course, you don't
even have to do this. I'm doing my
thumbnails portrait, if you would prefer to do them. Landscape the reference photos, a landscape, you're more
than welcome to do that too. If I was to do dominant, I'm going to draw
those thirds in again. This is probably a good example
of dominant in there. I've got one flower quite large, and then I might do a few
in the distance over here. A dominant proportion
is going to draw attention to our main
key player here, with these guys as a little support act in the background. It's a really good
way of generating an emphasis on a certain thing. I've got that in
an example here. So in this sunflower piece, my focal point, my largest area, the emphasis is drawn to
the largest flower because we've got these repeated
flowers all over your eye. Singles out the one that holds the most dominant position
and the dominant size. Really something
to bear in mind, because what I find is we can accidentally
make a flower too big or in a funny relationship to the other sizes
in the painting, and that makes it
awkward for the eye. You want to do these
things with intention. So I'm just going to put a
few more leaves in there. And these are the
little flowers. They're all Hydranges, but
they're all just little. All right, and the final one
that I want to show you is exaggerated or
altered proportion. So go like this. This is my favorite one
to work with because I really like playing
up proportion. And I chose the Hydrangea for this example because they're
such big, lush, full shapes. And it's a fun thing
to exaggerate In this example here
that I've got for you, I've really exaggerated. These Silver Princess blossoms, they are, in reality, tiny, not as small, way
smaller than my fist. Really small size
of the salt shaker. Really small. But I've blown them up here to really enhance all their beautiful detail and make them feel big and bold. That's what I want you to
think about when we're talking about our proportion
in exaggerated. When we're doing exaggerated, I'm going to draw
these thirds in again. I'm going to go really
big and bold with my shape. I might go one huge one here
and a secondary one here. But I'll try and make
sure that this guy, even though I've only got two, I love putting a little
challenge to myself. Two objects always more
difficult to work with, but two I'm going to work
with here because that's all I'm going to have room
for on my piece of paper. And then I might do a leaf and maybe another one in there. Potentially one over here too. And then I'll do some
more flowers over here. So I've gotten really big and exaggerated with my shapes and the proportions of these flowers to make them feel really big
and bold, and beautiful. So we've got standard, very familiar, probably as you would expect to paint
it directly from a photo. Dominant is when you've
got one that carrying a lot more weight than your other supporting
actors in there and then you're exaggerated is like playing into those shapes
within the flower. My challenge to you is to pick either standard dominant
or exaggerated. And working with these
photos that I've provided, generate a composition and
then a painting from that. So from here I'm going to
grab an extra piece of paper. Because I don't just
want to land on this first example of a
thumbnail that I've done. I'm just going to
push these up here. Need a bit more room,
always need a lot of space. Thumbnails are such a
brilliant way to explore everything within
composition because we're just going to
quickly sketch things out. Definitely don't get bogged
down in the details. I've got some examples of previous thumbnails that
I've done in the past. Sometimes I put the thirds
in, sometimes I don't. But I do generally like to
throw in a bit of color for something that
I'm working on that's a bit more significant. These are often for commissions, so people need to understand what I'm thinking with color, space, size, all
of these things. Sometimes I even list the
flowers that are in there. This was a few
different examples. Got it around the wrong way. Yeah, A few different examples of how an olive branch
might fall on a page. This one was quite
a complicated one where I needed to work in quite a number of
different plants all into one assortment. But they wanted to feel
quite naturalistic, so I needed to explore these
things with thumbnails. If I was to dive straight into a finished piece and
just hope for the best, the chances of all that
working out is not great, but with a little
bit of planning and consideration into where certain things are
going on the page, especially when it
comes to balance and proportion, it's
really important. Here's another one.
So this family wanted an idea of the colours that I was going to use and then how that might flow
into the work. And if you look at the thirds, all of these things fall
directly on the thirds. I just wanted to show
you those because I do thumbnails to this isn't
just for beginners. It is definitely part of
the process that's worth holding on to. For this particular exercise, I'm really leaning towards
exaggerated because I want to paint these Hydrangea's
in a big, bold way. I'm going to now have just a
little bit more of a play. I'm just going to write
this up exaggerated. I'm just going to play
with a couple more thumbnails because if I land
on the first thumbnail, and that'll do, then I really haven't put that
much thought into it. I really want to
try and make sure I explore a few different avenues. Maybe horizontal,
landscape shaped artwork. Maybe I want to go square. Maybe I want to try
three in the picture. So I'm just going to
have a little play. Let's go horizontal and maybe I'll put the
main guy over here. I can put it over on the edge. What you don't want
to do is just have it just just glance and
edge of the page. That's going to be really
awkward for the eye and it can be difficult for us to read. I want to have it
chopped over at the edge a bit more significantly and
then we'll put these flowers in, do you
like my petals. The other thing that I often
see is when people get into their
painting without their planning, they'll put in their
first flower and they go, oh, I should put a
second flower in. And they just go on
plunk it somewhere. You really want to think about
what that's going to do. Leave an awkward space
in the middle there. If I was just to put
a flower in there, although it might feel
a little bit balanced, I guess you're going
to have this great, big trench through the
middle of your work, which is going to make it less engaging for people to follow. I want to make sure that it's nice and easy for
everyone to read. For the landscape option,
I might put three in. I might put a little
bit of a version of dominant and exaggerated
big guy there, a little bit smaller. And then maybe another
one over there. Again, if you're going to have two shapes just touching
together like that. A blunder when it comes to that, because it's going to create an awkward point in the artwork. I want you to try and think
about overlapping them more significantly than
maybe what you realise then. That way this one sits behind getting very scribbly over here. That one might have to be a bit darker
to set it behind there. Then if I'm looking here, I can sort of see how the flower heads are
falling on the bush. They are usually upright. The leaves fall behind
underneath them. So I might put some
leaves in there. I don't really see too
many leaves popping out up the top might put one in, that's why I've got my
reference photos there. I love this one for colour, so I think I'm going
to use this one mainly for my colour reference. The detail in this
one is awesome. This one I'm using
more for like how the bush sits in nature because I think if we don't
understand that sometimes we put the leaves and the flowers in all
the wrong places. This one's really nice for
colour as well, actually. And then this one's
good just to see the variety of different
things you can use. So I'm going to paint into this, light mauves and blues. But say you might let the pink one more go for the pink I'd rather you do rather than
exactly follow what I do. There's three
Hydrangea altogether, exaggerated plus
dominant kind of way. I might go back to
my portrait one, then I've got that one there. How else could I do this? Let's maybe put one more centrally and then
chopped off to the side, and maybe a hint of one there. So I've got three in there
again, and do that again. Maybe a leaf up there
and a leaf down there. Hydrangea is so fun
to paint as well. I can't wait to show you
how fun they are to paint. Most people freak out
and they're like, no, we're not painting those because they're way too much detail. I just cannot fathom how I'm ever going to get to that
point where I can paint one. He's got to think
light and bright with your brush. All right. And there's three
there, so hang on, I better do something about
this little space here. Let's go for one more. Make sure I've
explored every avenue. I always say at least three
thumbnails is going to get you the best
possible outcome for your direction in your painting. Let's go for a bit
more dominant again. So I'm going to go big one up here with some littler
ones maybe like there. We need a fifth one in.
Yeah, let's go like that. So I've got a diagonal line going through there,
which I like to look of. Some people do
value studies when they do their compositions, which is adding in
your darks and lights. I think that can be a really
valuable tool as well. I tend to get the scribble
down just to get the idea out. And then I want to get
into the painting part and I'll trust that I'll
put enough value in. But if you find that you're
working a little bit 2D, this is an opportunity
to kind of sketch in. It's got to be dark underneath
the bottom of those, so it feels like
they're 3D. So go a little bit
dark underneath. Think about your forms as
well as your composition. Okay, and then we'll do
some nice big leaves. And these guys would have litter leaves because they're little. Alright, so which one am I going to go for, I'm
going to flick through, I'm maybe this one I'm
leaning towards this one, so that's what I'm
going to go for. I'm going to grab
my piece of paper. I'm going to keep these close by so I'm not forgetting
about what I was doing. I want to try and hold onto
this as much as I can, but if it goes awol on the page, that's totally fine as well. We can troubleshoot on the fly, which is always an important
thing to remember. Now, here we go again. I want you to pause so
we've got our thumbnails. We know the direction
we're going. But I would love for
you to give it a go first before you watch
me paint the flowers. I want to see how you paint a Hydrangea as opposed to
just mimicking what I do. I think that's challenging
yourself to just give it a go is such an interesting way to explore your creativity. Even if you think that's
just so phenomenally hard, it is going to get you a more deserved result and it's going to
feel really good. So pause and I'll
join you in a moment. Okay, welcome back. I
hope you had a good go. And now I'm going to show
you how I would approach it. I love painting Hydrangea
because you can get so light and bright with your brush and have
a really good time. I think when things get
overwhelming on the detail front, which clearly there's a lot of information in a Hydranger, I tend to like to simplify it all down and keep it
a little bit more, not as intense in
the painting detail. So I'm just mixing up some
colours to get started. Now I'm going to get into, I think I'm going to do
my key flower first, which is actually this front one in the centre
here on this third. So I'm going to, it's literally just a series
of marks for me, make sure I've got that
colour shifting all the time. Then sometimes I like to
work with the pigment on the page as opposed to
always picking up more paint. It'll mean that you're actually
work into a little bit more of those lighter
values before you muddy everything up
with too much pigment, because that can
happen pretty quickly. Lots of dark values and you can see I'm doing
little marks. Big marks. I've not got my fingers
on the page too much. I'm working everything
in wet on wet. Looking at my photo
every now and again to try and get
some colour reference, we might end up doing
two layers here. Sometimes I do that with
this one just because if you keep working in
on top of all of it, it's just going to all
turn into a puddle, which we definitely don't want. Basically simplifying
these shapes down for our Hydrangea rather than trying to get too bogged down
in all the minute detail. I'm just trying to have
some fun with it and create this beautiful ball
shape that they have. Make sure it's got some
loose fun edges because that is going to give it that sort of raggedy look
that I love so much. They're definitely not a tidy, neat edge, that's for sure. A bit more dark in there. You'll be surprised at how much, a little bit more darker than you're more
comfortable with can really change the way the work is looking and feeling
a little bit more contrast, contrast we
go into in part two. All right, that's roughly my
first one in as it dries. I might add a little bit more, but now I'm going
to move over to the next one that
sits behind it. But to generate that look, I'm going to have to
create a darker edge to make sure that
I've enhanced that. Make that first one stand out, so I'm going to go fraction
darker for this back one. Brown's a bit of an
unsung hero for me. I always forget to put it
in there because I get far too excited to
include all the colours. But then as soon as you add
that little bit of brown, to drag the
saturation out of it, you just get this
really nice effect. Now I can lighten it off a little bit because
now of course you can see I've got an
imperfect line here, but it's going to really
make that edge pop. All right. Now keep referencing
my little photo there. My photo photo
reference my thumbnail. Now I just want to add, well, you know what,
I need to make this go down a little bit lower. I'm going to add a little bit more to the lower part here. Just looking at my reference that really sat on
the bottom third, and I've kind of
misjudged that a little bit and I've
placed it too high. I'm just going to add in
a little bit more dark in there to help bring
that down a little bit. Then I have to rethink about
where I'm going to put that third shape because it's only the littlest
portion of it. But I need to make sure
that it doesn't sit too high because otherwise it's
going to upset my thirds. I have to think about that a
little bit more carefully. I think it might actually
need to go a little bit higher than what
I first thought, or potentially it
could go down lower. This is one of the
things you've just got to troubleshoot on the fly. Because as much as we want
to mimic exactly this, it's just possibly not going to. Happen. Make that one
a little bit bigger. Okay. So I'm going to get, I've got a very big swamp happening of dark
blue down there. I'm going to, I think I'm
going to pop it in sort of kind of where I originally wanted to do a slightly
different spot. I'm going to go dark again
to try and pop that right out with a fair bit
of blue I'd say. Okay, and just a little guy, I think, now that's kind of the brunt of the first layer I'd like to do with
these Hydrangea. My next step is I'm going
to put these leaves in, grab some of this green. I actually really don't
like this green at all, but I really find it
useful for mixing. I never use it
straight because it looks like lolly green. But add lots of different
things, purple, blue, brown, anything to it, and you get nice colour mixes. Even a little bit of
red can be really nice. I want to make sure go good
green in there right now. Leaf placement, looking
back here again, I'm pretty happy with those
where those are gonna lie. So I think I'll
stick with the plan. I'm gonna flip my page
around, actually, because that's gonna help me place this leaf a bit better. And then leaf number one, might just need a little
bit more depth in there. And then we need to
do another leaf. But because it's sitting
up a bit higher, I'm going to make
it a bit brighter, so it would be where the
sun's kind of catching it. I'm always thinking about
how these things sit in nature and where the sun
would be hitting it. What would be giving it life? Just take that big drop off. Now that one actually
came over to that third. Now it's going to sit in a
bit more shadow down there. Maybe down there,
let it bleed a bit. You can see how beautifully the cotton absorbs and
distributes the pigment. It just does it so
differently to cellulose. I really recommend cellulose
for playing and getting over that roadblock of being worried about ruining
the good paper. But when you get moving
with the cotton, it feels good, it's
just so different. Add a little bit
more there again. Now I think I need to add a little bit more
leaf foliage in here, dark in there, then needs to just be like the
littlest hint in my mind. You might see it differently
to me because we all see things uniquely when it
comes to composition. But I'm just now
thinking about balance. How can I balance this work using these exaggerated
proportions? I want to make
sure it feels nice and harmonious with everything. All right. Pretty close. Let's bring that out
a little bit more. Maybe I need another
hole leaf in there. Just a little hint of one that's starting to
feel pretty good. All right. I'm just going
to pause for a minute. I'm going to dry this off so I can get a second layer in there. 'cause I'm keen to just add a little tiny bit more detail and then I'm going to come
back and finish it off. Okay. I've just given
that a quick once over with the hair dryer to speed
up the drying process. But let's get back into it. So this area through
the flowers, you can see that the leaves
are a little bit wet, but I'm not going to
touch them again. I'm just going to add a
little bit more detail into these just to
really just amp up that effect of creating
lots of dimension. So I'm going to make up
a nice dark rich colour. And then it's just
these dark shapes to break up this massive, big dark area that I was
working with in here. Just lots of thin
as well as thick. Because you're kind
of painting the shadows in at this point. Which is hard to wrap your
brain around a little bit. But if you don't think
about it too much, then a few touches of blobs
will actually do the job. So we might just make that
a bit more blue again. And then I'm going to add
some of that same idea into this main flower just to make that all feel
like it's sinking up. Painting shadows can
be really tricky. I just try not to think
about it too much. Just as long as it's feeling
like a bowl shape still. I'm good. Finally, just over into this area here where he's sitting
kind in the background, I just need a little bit
more. Yummy, purple. Break up that edge. All
right, there we go. Oh, maybe just a
little bit more there. Darken that off in that corner. All right. I'm pretty
happy with that. That is our exploration
of proportion. I hope you've got
a better idea of how the size of the shapes within your
composition has a huge impact. Say if you had that
entirely wrong, you might get an accidental
like ants point of view. Or you've got to be careful
about where you're placing those shapes in the size
relationships to one another. As an extension project, you could go back to
our original set of three thumbnails and maybe
explore another one further. So that one I did entirely
about exaggerated proportion. You could go back and learn about dominant
proportions through that same thumbnail exercise and producing an artwork from here, we're going to go into one of my most favourite ones, emphasis. Emphasis is a big
key one for me, so I can't wait to run
that through with you.
7. Principle of Art: Emphasis: So we've just
covered proportion. Our next principle of art we're going to
explore is emphasis. This is a big one for me
because it is kind of the driving force that attracts a person into a painting
in the first place. It is where you're
going to look first. It's where all the energy and the rest of the
painting leads to. So it's something to really consider when you're placing it, especially when we've
got our thirds in mind. Now you know where to put them. It's like how do
you make sure that that's the greatest emphasis
within the painting? So there's a few
ways to create this. The first one is
called contrast. I'm going to do my
little thumbnails. Again, contrast, I mean, there's so many
different ways to generate contrasts
within a painting. I've got a few examples here, so this one is more
like a value contrast. I've got the really,
really striking dark background against some lighter brighter colors
that's making that figure. I mean, it's the only
thing on the page as well, but it really draws
the emphasis in on that one particular
bird of paradise. Then I've got this example
here, which is actually, it's got a value contrast as
well as a texture contrast. The background is
very flat and plain, and then the blossoms
themselves are full of energy and lots and lots
of texture in activity, which makes them the central
point to look at as well. Then in a different,
more subtle way. This is a painting I'm not quite finished yet, but I
wanted to show you. Anyway, the emphasis here. I start here, the
way that my eye enters the painting and
I land there first, which is the, it's creating contrast because
it's against here. But it's in contrast to the
rest of the flowers as well. The rest of the
flowers are yellow. And this one's purple. Therefore, that's the
opposite to yellow, which makes it stand out more. There's so many different
ways you can use contrast, and it's probably
my favourite way to generate emphasis
within a painting. You can also use isolation. Isolation. In this
particular example, I've got that singular
branch slow down, and that is what's isolated, and it's where your eyes drawn
to first before you absorb the rest of the painting.
We have convergence. Convergence was a
tricky one for me to find an example for,
but it's basically, it's more of a key
one in landscapes where all the lines in the painting lead to an
invisible vanishing point. So this is an example of one
that I did a little while ago of tree trunks and they
all go up into the sky. And the central point
in the middle there, which isn't really a thing, but it's where all the lines
are pointing to converging. That's the emphasis point. So that's a really
interesting one to explore, but you need a very strong
line work within that. One anomaly is you can have subtle anomalies or you can have really
strong anomalies, but basically it's something that doesn't fit in sync with everything else or it isn't within the same theme
as everything else. In this example, I've got
the New Holland Honey Eater. And that is the anomaly in that painting because
everything else is flora and foliage so your eye
first goes there. When we're looking at paintings, faces and eyes are
things that we naturally are drawn to much
faster than anything else. We particularly look at
where they're looking to. Not only is it the first
place that we look, but we look to where
they're looking as well. So it's a very important
directional tool. So this one, looking
around helps you follow around in that painting
and lead your eye around. We talked about proportion
in the previous one, but it also falls into
emphasis as well, because using proportion
can create emphasis. So here's another example here, where the emphasis
is where the larger, more dominant Banksia's are
within this painting, and then these other little
ones are more receding. So therefore they don't
grab as much attention. The last one is positional, which I had to paint up a little example
because I couldn't find one in my bag of tricks. But I did this little
daffodil painting and basically by putting something in a position that
makes it stand out. It's another way of
generating emphasis. You can do this in a
lot of different ways, but just by literally
moving its position within the assortment of subjects on the page can really
help draw emphasis. I mean, all the flowers are the same size, they're
all the same colour. But your eye goes here first. So it's just
something to bear in mind when you're
working like this. So that's our examples
that we've worked through. I'm just going to quickly
sketch out some thumbnails for us, so we can get into our
next project. All right. So for this project I've chosen Poppies,
Icelandic Poppies actually, again, I've given you all
these reference photos, but I'm just going to
have these out in front of me so I've got
something to work with. I love the way that poppies have these like really irregular
shapes in their stems. I think that's just a
fascinating part of them and they're just so beautiful and crinkly and they've
got so much character. So I'm going to have all
these out in front of me. If you've got an
iPad or something like that, you can just
pop them up there. It's just the easiest
way to do it. Now, if I'm talking about
contrast using our Poppies, there's lots of ways
I could do this. I could just simply do. Say maybe I'll do a
nice big Poppy up here. I'm going to do really
simplified ones for the part of my thumbnails that might be
red or something like that. And then I'm just going to
do some other ones around it that are different colours. That is going to create
a very strong contrast. Do some blooms in there. Just to drive the point home, I'm just going to paint
in some red on that one. Just really roughly. The
next one was isolation. Even just having a solo
flower is going to be a composition
worth exploring. And that's going to be isolated. So it is going to generate a really nice sense of
composition there too. It's more about all the other
elements at that point, the details and
that kind of thing. All right, I've just isolated
that flower and that makes the emphasis point because that's the central
point of the flower. That's where our eye
is going to go first. If you work your stem in here, it will then, because it
attaches into the back of that. And then think of
this like a face. And that eye I was
mentioning about how our eye likes to look
where they're looking. Our eye looks up like that way. So we've actually got a bit of a C shaped curve in our
composition shape there. That's a nice one to explore. The next one is convergence, really difficult to
demonstrate with Poppies. But we're going to try anyway. I'm going to imagine that
we're doing an ant's eye view. So I'm a little
ant on the ground, and I'm looking up at
all these Poppies. I've got these long, long stems and flowers
attached to the end. It's the stems themselves. The lines that they're creating. These are called leading lines. They're going to lead our eye, and this area in here is, in fact, what ends up
becoming the emphasis. I'm going to talk a
little bit more about leading lines in
part two as well. Because it really falls into
rhythm and movement as well. Really important part of it
is being conscious of where you're putting your
lines though it does go hand in
hand with emphasis. We're going to talk a little
bit about it today too. The next one is anomaly. You can go subtle
with your anomaly or you can go really strong. I might do one that is the only one
facing the right way, then the rest are facing
outwards or they're still in half bud form, or buds. That being the only open flower, is going to be the
anomaly there and automatically become
the point of emphasis. Then we have proportional because poppies are so large
and vivacious as well, I think that'd be a
fun one to explore. You could literally
just go really massive with your poppies. Like what we did with
the Hydrangeas, just in proportion, that can be a really
nice one to explore. Go massive, and then
we have positional. And of course I feel like this, naturally. Position leads to a tall Poppy because we all know about
tall Poppy syndrome. Okay. If we put that up there and do some
more flowers here. I'm just really rough
sketching these flowers because I'm going to do similar to what we did
with the Daffodil. And they're all going
to be down here and the emphasis is going to
be up here with this guy. Now, that's just me
really quickly, roughly, sketching in all these
different ideas and different ways of generating
emphasis. From here, I want to take my
reference photos and I want to take my
preferred one of these. And I'm going to explore
them just a little bit further so I can come up
with an idea for a painting. So I'm going to grab
one more piece of sketch paper and do
some more thumbnails. I think I want to go down, I think I kind of
want to do a bit of a combination of
contrast and anomaly. So I want to have one
strongly coloured flower, but then also have a mixture of partially open and
bud form flowers as well as fully open. And that's going to
have that little bit of a dance and drama
around that as well. It's going to create a bit
more tension than just doing one singularly. Just do a couple more just
because I want to put those two ideas
together. I might do. Put those thirds in. What flower am I going to follow. It's kind of like this one. Oh, there we go. That one. I'll try and
do that one in there. He's going to be my
hero. The big Gun, the one that you want
to look at first. Then I'm going to
do maybe some of these cup ones and
half shaped ones here. And then he can be like that, and then there might
be a little bud. Bud there, and maybe like half a pedal there and
maybe another bud there, because three is always nice. 123, 123. And then
the thing that I want to sort of draw attention to as well is when I
put those stems in, that's pretty critical work. Getting them in, in a fluid way. I love how like jaunty
they are and they're quite organic and kind
of lopsided and quirky. So I want to try
and make sure that I embrace that in the painting, but also wherever I put
these is going to help lead your eye to those
emphasised points. So it's really important to think about where
you're going to do that. I'm going to make
sure that everything falls together. I'm going to work with
those thirds and try and get them. So planning your stems is actually a really important part because I think that's where I mostly see painting going wrong. Because we focus all our energy getting the flower
and I'm like, oh, we'll just quickly throw in the stem and then it
ends up being like a disaster and ruining the
painting because we go too heavy or they are
in the wrong spot. That one is mimicking that
shape a little too much. I want to just try and
change that a little bit. There we go. That's
feeling pretty good. I've got this nice
open space here, so it has almost
circular feeling to it. I can circle around. And for me, my eye goes up here,
lands on here. And then I check out
all of this, and then exit again, and
then I go up again. So that's good. I'll
just do one more. I think. I'll just explore, maybe working on the
bottom third a little bit more and trying to draw
the attention down there. I'm trying to think of all these flowers here and I've got these as my references. So I want to make sure that I'm using these so
I've got somewhere to look when I need to get these shapes
right on the page. Maybe that way, that way all coming up there. That's the main one, the big dog. And then I think
I need something else to balance that out. Now we're thinking
about proportion, and balance and emphasis, all in one work starting
to build upon itself. Okay. I think I'm feeling
more towards this one. That's the one I'm going to try and achieve in a painting. I'll just park that
one over there for a mo, and grab my paper. Now, again, I'm not going to do any pencil work in here because I have this as my
reference point. Actually, I'm not going
to confuse myself, I'm just going to fold
it in half so I've got that clearly identified
which one I'm working on. Now, Poppies, these
are fun ones to paint, but they can be
overly complicated, so I don't want to get
too hung up on that. Of course, I encourage you to stop right here and
have it go yourself, see what comes of it, and then you can take a look
at how I approach it. Because how I paint it is not necessarily
how you paint it. And it really does really reinforce everything
is when you're troubleshooting on
the fly yourself. So give it a pause and I'll
meet you back in a moment. All right, welcome back. Had
to go, I'm dying to see. Please share it with me. I'm now going to start
painting my Poppies. Let's see how we go. It'll be really interesting to see
where everyone started because I'd like to start at
the centre of the flower, and getting that positioning
right is so crucial, mine is basically sitting
exactly right on that third. So I'm going to
start on that third and painting these the
centre of the flower. Make sure my angles all right. If you're probably like,
what is she even doing? I would not have started
it like this at all, but that's just
the way this goes. I've had a few cracks of
painting poppies in my time, and I love painting
them so much. You might have noticed
this one over here. I've got a few of them. Okay. Be amazed at how quickly they come
together as well. I like to go into my light greens. I'm really trying to focus on my objective of
contrast and anomaly. I've mixed the two together because I think I like
that combination. My contrast is
going to be colour, I'm going to go really
strong with my red, beautiful, big red poppy
and then I'm going to follow that one as my bit
of guiding reference. Even painting a red Poppy. I'm not just going to
use solely red paint the entire time because I think that just flattens the
life out of your painting. So I'm going to try
and make sure I do lots of different colours to help hyper generate that
impression of the Poppy. Tonal range, tonal range,
tonal, range, tonal range. So the power of light
pigment is so wild. I just love all those, the crinkly parts
of the Poppies. I'm trying to harness
that in there. A little bit of purple just
enhance that even further. And then I'm going to do
a nice shadow in there. This hand never knows what to do when I'm trying
to mix my colours. It's like I want to jump into, but you can't. Okay. Fine lines to help generate those crinkles. And then
I need to shadow again. Oh, that was a lot of paint. It's kind of as a quick impression
of a Poppy. It's certainly not a
perfect impression. A perfect depiction. But I love just
emphasising its qualities as opposed to mimicking it exactly. Dark in the. Did I go off the
edge, not really. I think I will now, I've gone
bigger than I anticipated. All right, while that's drying, actually I might just
add a little bit more contrast into
the centre here. Just by adding a little bit of dark can really
enhance that centre. Pop it right out and then I'm going to add some
more detail once it's all wet. Because at the minute,
if I was to do it or run into another and
turn into a mess. All right, So now I'm
going to go over here, but I can't do a
red Poppy again, because that would
draw emphasis away. I'm going to draw maybe a drawing painting,
a pale pink Poppy. And that's going to talk to
the previous one but not be it be the big guy
wanting all the attention. I'm just going to hunt
through my reference photos, try and work out. I think I was going for something like a
little cupped one. Let's have a little look here. I think it's this guy here. I think I'll
go with something. I'll just put that in the wrong colour with
something like that. He's got a little bit, I got a little bit of
the stamen showing. So I'm painting them in first. And that was more
down the bottom third here. So let's
paint them in. All right. Now into
painting these pink, I want to go quite pale pink so that it doesn't detract
from my other one. Now for the shadows, I'm going to know it needs
to go a bit stronger. Really want to really,
really, really like this bit. Okay. I can see that I'm disappearing into the zone as I'm painting and I
keep forgetting to talk, but that's just the
most natural way to be while painting quiet. All right. Let that one drift
off I think to the side. This one might need to
go like that a bit. That's starting to
feel pretty good now. I've got my two key Poppies in, but I want to do one more. I've just got a side of
one happening over here. So I'm just going to imply that there, like,
it's not a big deal, it's just kind of there in
the wings, even that's enough. Then the last thing
I want to do is painting some of
these beautiful buds, because I just love their like
crazy little alien forms. So I'm going to
grab some of these bright green which is
going to contrast, which is going to make
that red pop again. Because red is the opposite to green going to contrast
where we've been so far. And I'm not going to draw
stem painting stems just yet. Always shifting my colours. My favourite thing, I'm very rarely selecting
colour directly off the palette, always mixing. I shouldn't say never,
that's incorrect, but all right, I didn't leave room for my other little
bud just up there. So I might actually try and complement these
two with one lower. So I've had to troubleshoot
this one again as well. But I might even go this way. And now the crucial part are those leading
lines, those stems. So I'm going to
paint them all in. I often don't even encourage anyone to paint in stems because they're so problematic and your eye can often make
up the difference. But I think in this instance
it's going to be pretty crucial and you
just got to go way, way lighter and thinner
than you might think. Might go a bit stronger
for that one up there. Because otherwise
they just that's all your eye is going to see
because they're so dominant strong lines that your eyes
are going to go, whoa. I don't even see
anything else there. I just want to follow
those beautiful lines. I just need to put in one
more for the main flower, which I haven't touched on yet, which I might do. Just do a bit more
dark in there. I've got a bit of a hole there. I've got two buds and two
stems, but a flower as well. So I need a third one here too. I might try and just
do a real light one. There we go. And I just want to add a little bit more detail into that flower, and I think we're pretty
close to finished. I've got a bit more yellow too. Make that nice and
full and central. I just wiped out
all that colour of accident there we go. And maybe just a tiny couple of details. Adding in
some extra layers or just because it's still damp, it's going to just
spread that little bit, but it might just give
it that little bit of softness around these outer edges and need to fill that little hole
there that was bugging me. I think we're pretty much there. All right. There you go. That's how I approach
my Poppy example for your extension project. I mean, you could do
similar to what we did in the proportion exercise and revisit your thumbnails and
explore another one further. I think this is the
best way to cement in that and not get stuck
in too many traps. As you develop as an artist, you'll find that you lean on certain ones and
forget about others. But if you keep
revisiting the ones that you're less
inclined to use, I think that's one
of the strongest ways to keep improving. So my challenge to you for this one is to go
back to this example, to this array of thumbnails, and work with the one that
you least connected with. Because that's going to probably contribute the most
to your experience. All right, from here we're
going to park everything that we've just learned
about emphasis and move into our next one,
which is Unity.
8. Principle of Art: Unity: All right, we just
explored emphasis, one of my most
favourites with one of my most favourite
flowers, the Poppy, but we've now got flowering Gum and we're going
to explore unity. Unity is the overall
cohesiveness of the artwork as well as the relating parts
within the artwork. There's so much to explore within Unity and it's
something we're definitely gunning for because
a unified artwork is going to be easier
to engage with, easier to read, and it's going to
feel whole and finished. That is one of the key
things I think we struggle with is getting to that
unified point of our artwork. And that's when we put it in that pile and we don't want
to deal with it anymore. So let's talk about
unity as a whole. There's a number of
ways to generate unity. What I've done with my
pencil, oh, there it is. It's hiding from me. Okay. So we can do, I've got
to draw up my thumbnails. Let's do four, because
we've got four to explore. I even recommend doing these
thumbnails yourself as well. Like these ones that
are rough out here. This is making your
hand do the work, connects to your brain, and it all seems to seep in
a whole lot better. All right, here's my four. The first one is Proximal. That literally means things in close proximity
are going to feel unified. I've got some examples for
us to help reiterate that. Here's one here. The theme of this one is our
Australian native flora. And they're unified because of the way that they've
been brought together. Their proximity is
going to make them feel really unified and feel
like a whole complete work. This is another example here which actually employs a few. This one is proximity. These peonies are
really close together. But they're also similar because they're
not all identical, but they're related to a theme, they're repeated because they are the same kind of flower. So there's three things in one, in this one which these other ones are about
to talk about. In similar, it's all of the things within the paintings that relate to one another. So there's two birds,
they become similar, the flowers become similar. And these marks and
colours that are used, it can go right down to the nitty gritty
of your elements. The colours and these
lines are what makes things this feel unified. Repetition is a really
good one to unify things. When we're talking in the
natural world with flowers, when we're working
with clustered things, it's definitely best to focus on that cluster because that's
going to unify that, as well as in this case,
draw a focal point. So that's a really
crucial one to play with. Here's another example of repetition that I've
recently just painted. And these repeated
negative spaced lines is what gives this
one a unified feel, totally different
to the other one. But you get it makes the
painting have a wholeness. Simplification is probably one that people may not
land on straightaway, but when you simplify
your shapes, your colours, your marks in a painting, that's going to make it
feel unified as well. I think that's really handy in the abstract world and as
well as our botanicals, because in this instance, I've simplified it down
to just two colours. And painting that way makes the whole thing feel cohesive, which is so important when we're talking about a
good composition. The final example is one
of my favourites because it's the flower distilled
to its most basic shape. It's simplification again, but it's simplification of shape, which is something I think
people can skip over, especially when we're
talking about in our floral world where there's just a lot of detail and we want to try and
capture all of it. But simplifying can actually help the whole feel
more cohesive. So I hope that gives
you a good gist of what I'm talking
about, about Unity. When we're coming
to our references, I've got a whole bunch of
photos for you to work with. This one I've chosen
Flowering Gum, but there's actually quite
a few different species of Flowering Gum
in these photos. So you're more than welcome
to choose whatever you like. I put a bunch in there because
I just like I literally scope the streets and stop and take photos of all
these all the time. So these ones are
Silver Princess, there's these big, big bells. And this is a Bell Fruited Mallee. So that's like a Mallee, that one. And these are all Flowering Gum, all flowery little tutus, which I just love painting. If we're talking
about proximity, even just putting them all
together like a cluster, like what we have
in these photos is going to give that
sense of unity. Like what I had with
my example here, that is actually one
of these flowers here, the Bell Fruited Mallee. But just bringing them together in proximity and repeating them can unify these altogether. I'm going to make
a little cluster, so I'm going to maybe
do a big ball of them. Hard to draw fast, the
old Flowering Gum, but you're going
to get the gist. And then I want to
make sure I have some leaves or something to make that feel like it's a part
of the natural world. Might have something over here. But basically
putting them all in proximity is going to
make them feel unified. Then we have similar. Similar is a little bit
different to proximity because your eye will pick
up similarities from different groupings
within the one artwork. I might have a little bit of
the Flowering Gum over here. Then I might have a little
bit more over here, a little bit over here, and then maybe some more over here. And then it's linked
together with some leaves, but your eye is going
to go bang, bang, bang. Because it's going
to pick up and unify that work by the similar
elements throughout. Because we're working
with one flower, they're all using the idea
of repetition as well. The next one is repetition, which we explored here, but we'll give another
example anyway, because then we can just get
straight into the painting. I'm going to do a bit more
stylised one, let's do, say, three little ones
together in the centre, just something
completely different. The two on the right there actually hanging
out on the third. And then I'm going to put a
leaf onto that third there. And then maybe a little one over there just to keep
it all in balance. Then that will actually
look good with a mask around it, potentially. Then the final one
is simplification. We can easily get bogged down in an enormous
amount of detail because look how much fussy
detail there can be on these. Maybe it's we just go a
bit bigger and bolder with it and do less detail. Let's see So it's a little, we're playing with proportion to simplify it. So then we could get
less detail in there. All right, well, I think I'm leaning towards repetition
to explore with this one, but within that we're
kind of getting similar end proximity
all in one. So it's like a three, it's like a hat-trick,
basically, three in one. We're going to do that.
So, to get myself set up. You can follow
along for this part because it's actually a
little bit complicated, the order of things that
I'm going to do here. And I really want to
show you this technique because I stumbled upon it myself and I thought
this one is so much fun. And if you've done
'Lessons in Layering' and it's an extension upon that, I'm just going to sharpen
my pencil here too. It's a little bit similar to the negative space exercise where we're going to
mask out an area, but we do it in a
different order. So first of all, I'm going
to mark up my paper. So I've got a nice pencil, a blue mark somewhere there. I'm on A4. So I'll give you dimensions in the downloads if you're
working on a letter as well, so you can get a
nice outcome too. I'm going to mark 4.5
centimetres either side. Here, I'm, making a mess. What about doing. Then I'm going to 8.5 centimetres
down, rule across there. But with the lightest, lightest
touch with your pencil, we don't want any
indentations on the page. Light, light, light. Then I'm going to rule it another
further, 12 centimetres down. Rule that across there. Then I'm going to go
the 4.5 and 4.5. I will give you a diagram of
this in the ebook too, so you don't have
to try and follow along word for word and
try and keep up with me. I'm just going to
rule that square out. Finish that one
off. Down here too. That square that I've centred off in the middle
there is going to be my masked area and I'm
going to paint into that. But what I'm going to do is have parts of the flowers
and the leaves bursting out of that frame. You're going to not have
that perfect boundary, but have it literally
exploding out of that frame. Which I can't wait to
show you how to do. First thing I'm going to do is just dull off that
pencil even further. So even just like
dabbing an eraser over the top is going to take
the brunt of that off. Because as soon as
you paint over it, it's going to be
extraordinarily hard to get rid of once it's under paint,
you can't really erase it. Get rid of a little bit, more. So basically only I can see it, or if it goes under paint, it's going to go invisible like so now I like to paint these
flowers with a few layers. So we're going to go
with the first layer, but not have taped it yet because we're going to
get these into position. All right, I'm going
to grab some yellow for the centres of the flowers. How am I going to do this? One here, here, and one here. Then I'm going to
grab some pink. Pink. Way too pink. I want to go nice and soft for
this initial layer. When we work with watercolour, we work from light to dark, opposite to what you do
with oil and acrylic. I know that's
really confusing. And then I'm going to
do some basic shapes to block in these flowers for us a little bit more. There's really, really rough
at this stage. Then I'm going to
do some leaves. Need to get the leaves
in at this stage too. The other little thing I want to do is put some salt
on the leaves. I don't know if
you've worked with watercolour and salt before, but you get some magical results that gives it these beautiful, crinkly, organic little marks. Going to paint in
some of these. But I have to bear
in mind that I want those beautiful tutu fronds to not get into too
much trouble there. A little pink in there. And I'm going to
lighten that right off. I'm going to do a
bit more down here. And then whilst
that's all very wet, actually I want to just drop in a little bit more colour,
a bit more goldy. Whilst that's all wet, don't just shake the salt all over it. Shake a little bit
into your hand. First, less is always more. Just the tiniest little bit. Just drop it in there. If it's too wet, it'll just
dissolve into the water, but the right
balance and it's not much and that will just
dry really beautifully. And what happens with
salt is it absorbs up all the water around it and
then leaves the pigment behind so you get this
beautiful crystalised look. Now I'm now going to grab
a little bit more colour. We'll do another leaf here. So I'm bearing in mind
these boundaries. I've got this
square here and I'm going almost for a
symmetrical balance. I'm ignoring my rule of thirds, which I know I've said is like the main thing
that I like to use. But in this instance,
I really wanted to use the masked effect. And I think this is going
to work really nice with a symmetrical kind of look being down the
middle of the page. I'm going to throw one
more leaf in, over here. And you're probably like, what on earth are we doing here? She's got us on a
magical mystery tour again. Now a bit more salt. I worked very wet
just over there, so that may not be ideal
to put salt on just yet. I might need to block
some of that out actually. Just gone a bit too heavy with
the water. Now, salt again, if you were to use rock salt or flaked
salt or anything like that, you do get a different result. So it's worth exploring now, that looks like an
absolute shemozzle, but I'm going to dry
it off and then get my masking tape on to complete
the rest of the work. Bear with me whilst I give
that a little blow dry, and then I'll come back
to you in a moment. This one's all dry now. I'm ready to apply the
masking tape First though, I'm just going to
brush off that salt. Don't do that
unless it's totally dry. You'll smear it everywhere. But literally, once it's dry, you can just brush it off
lightly with your finger. Get rid of that. And
now I'm going to grab this masking tape and
like in 'Lessons in Layering'. Just quickly show you
how to pop this on. I'm going to go, I'm just going to
cover that pencil line just by the fractions
of a millimetre. Gently place that down and
then you want to burnish that edge on so you don't accidentally bleed
underneath that tape. I'm just using the
back of my thumb now and I'm just going
to burnish that on. And then I'm going to take
that around to the next side, just gently over that
pencil. There we go. There we go, one more bit here. Oh, that's just shy.
What am I doing? The corners especially need
an extra little burnish 'cause that's the place they're most likely
going to leak. And the last one there, you probably like, what
on earth is she doing? But I promise you this one is a very cool result that
you will want to do again. So I'm
ready to paint now. This is my little
canvas right here. I'm going to complete a few
more layers on these flowers. I'm probably going
to get into using this little liner for all those really, really
fine stamens. So if you don't
have one of those, jump down to a much
smaller brush. Between a 2-4 is going to be ideal to
get those really fine lines. You can manage it
with a bigger brush. It's just that the control
it takes is a lot more. I'm going to actually start
with this one though, and then that's my littlest one there,
it just rolled away. That's the little one. I'm going to start adding
a little bit more detail. I'm going to add in
these little little guys there and then you'll
see them come together. And I don't want them all pointing
in crazy directions, but that's probably
pretty close. All right. Now from here I'm going to start adding in that
information to, to build up that density of all the stamens
and everything. I don't want it to be. If you have too much detail, it's going to look a
little bit strange. We're actually
employing a little bit of simplification here too. I'm going with strong colour at this stage. It's basically a building
up process from here. I don't try and do it all in one perfect round each time because it'll
look too perfect. They sit out in all these
jaunty little angles and all look, you want them to all
look quite unique, even though they're
the same flower. At some stage here, I'll
adding all the yellow as well. With a light pink here. You can see that I'm really quickly moving my paper
all the time as well. Really, just carefully with
the edge of my fingers. This means that I'm not buckling over myself trying
to get an angle. I can just work into the best angle for
my hand as opposed to making life more
difficult for myself. So starting to build up that it's gonna take a
little bit to get all singing together. I think that painting,
the order of things is one of the biggest stumbling
blocks from my students. But it's so much a
feel thing because you could paint the
yellow in first. I sometimes do that even with these and then other times I'll, sometimes I just
want to get into painting the
blossoms themselves. It truly isn't the
right or wrong. It'll come more naturally when
you get more familiar with your elements and principles
and know what generates, look what effects you can create a little bit more
busyness in there. Whilst that's all drying, I'm going to start painting
in the background too. So I'm going to use a really, really rich blend of paints, grey and like a
turquoise to create a really deep dark background
and that contrasts. And the ground itself is actually going to help
create unity as well. So we have unity working
in a whole bunch of different ways for
this particular exercise. So make sure that
tape is on, nice and firm. And then I'm going to work around some of these
little shapes and make sure I'll
leave a little bit of negative space around there. And I want to work really
dark with my paint. You don't want any resistance when you're mixing your paint, but I want to try and get
the richest mix I can possibly get to get nice,
strong, dark colour. And if it's not quite
dark enough enough, you can always add a
second layer as opposed to work into a
thicker mix of paint. You don't want it too thick And a bit more
richness in there. And you can see how
the negative space really helps those little
edges pop as well. I just love
this effect that it gets. Go up here now. I'm definitely not going too sharp a line
on these outer edges. I just want to nice
and loose up here too. While that's been doing that and the rest of
it's been drying, I'm going to go back and add
in a little bit more detail. I might actually even grab
my slightly smaller brush. This is that Opera
Pink that I mentioned in the materials video. I just love this pink so
much, it's so vibrant. All add in some
more layers again, right where they're too touched, they can get a bit
more congested. And in the centre here is
going to help make them pop a bit more, up there. Sometimes you can get
so macro and focus on so many details that you forget to step back and
look at the whole. I got to make sure I
pull myself out of it and have a look at what I've
actually been working on. Because sometimes I
think that's one of my biggest issues is that I get too one eyed and get really focused on
one little thing, and then when I
pull back and have a look at the picture as
a whole, I'm like, oh, I've been putting all my
energy into the wrong area and creating emphasis or
unity in the wrong place, or it becomes unbalanced. A little bit more here and there. Now that's getting closer. Now I'm going to do something
that I really don't recommend is I'm going to pull the tape off now while it's wet. I would suggest for you, when you've got a bit
more time and you can pause and come back to it, I would do this when it's dry, but just for the sake
of keeping us moving, I'm going to pull this off. Well, hang on. I haven't
even hit the edge there. I haven't covered it properly.
Let me get in there properly. There we go. Doing this, when it's dry,
there's a lot less risk. If that wet paint gets anywhere, that's going to
ruin your painting. Now get that beautiful,
satisfying edge though. I just love this technique carefully peeling away
because the wet paint could go anywhere. The final steps that
we're going to do is just add a few more little
details outside of this box. It really feels like
it's bursting out. All right. You can see where
the edges are clipped off. I just want to add in a bit
more information there. And that's just going to
really bring that one home. A little few more
details in there, a little few more details
in there and in here. Grab a bit more yellow
to create some more of those little yellow guys. There you go. I just love
that effect so much and I think it's a brilliant way to
explore this idea of unity. And of course, you can always go back to the thumbnails
and explore some of the other ideas of ways of generating
simplicity and, or proximity,
similarity, repetition, any of those things
that generate unity. But something else
to consider is that if you start working
across a body of work, you want some harmonising and unifying aspects
to that as well. So my challenge to you,
my extension project to you for this
section of the course, is to start thinking in
multiples and how you could possibly generate the idea of Unity across multiple works. To make sure that
everyone's unique, you want to do a little
thumbnail to plant out each one. And that way you could
have a beautiful trio. Or have a whole series that you could do a different
flower for each one. It's really up to you, but
I think thinking across a series is a really nice way to bring things to a
wholeness as well. So that's my challenge to you. From here, we've got
our final principle of art for this part
one of the course. It's variety. How fun. I cannot wait to share
this one with you. And I'll see you
in the next video.
9. Principle of Art: Variety: Having just explored unity, we now go to the opposite end of a sliding scale and
explore variety. Think of them as the
contradictory things. And you don't want to work
that's entirely unified. And you also don't want to work that's fully verified because you too much variety is going
to create an uncomfortable, unplanned looking work, but too much unity is going to
feel monotonous and safe. So we're going to try and find a happy point
between the two. There's a number of ways
to generate variety. It's basically all the elements that are dissimilar
to one another. In Unity, we're looking at all the similarities and things that bring things
together in variety. We're looking at all the things
that make them different. Got a few examples as I do. The very first one is
positional variety. And I'm going to use this
example on the easel because although they
are all the same flower and it makes it feel unified because I haven't
just stamped them out all the same way and all the top view down or the same angle. Having them, each one a little bit different is
giving it a sense of variety. It's just a low level sense of variety at all the
little parts and pieces, different angles that's
going to make it feel like it's got
plenty of variety. Then I'm going to go
back to this one again, which I showed you in unity. This one I'm going to talk
about in variety as well. Because although
it feels unified, there is an enormous amount
of variety within this work. There's plenty of contrast. There's different
shapes, bigger shapes, littler shapes, fine shapes, lines, bold shapes,
thick shapes, and a whole range of colours. So there's an enormous amount
of variety in this piece, as well as giving it a sense of unity because of the way that
they're placed together. So they kind of
work hand in hand. And you want to find
that tension point to make sure you've got a little bit of
both in your work. Then we have
dissimilarities in variety. And this example
here, basically, it's similar to the
other previous one where none of the flowers
are the same in here, they're all a little
bit different in all different angles and there's a number of different species in the vase that's going
to make that far more various looking than if it was all the one
species in the vase. Creating a lot of variety with your subject can be a really
interesting way to do it. And this can also dissimilarity can come down to using
irregular mark making. So you could have big big blobs as well as fine little marks. That is another way
of creating variety. It doesn't have to be all
the same shape all the time. Now, La Nina is a work that I did
that's really quite large. You may be able to see it in the corner of the
picture up there, but it's behind
me on a big wall, so I can't show it
to you in person. This is a piece that I love to explore with variety
through contrast. So contrast is, you think
of all your elements. Line, shape, form, colour
value, texture, space. All of these have a way
of generating contrast, and we go into contrast in
more depth in part two. It's actually the first
principle we explore. But when we're talking
about variety, if you have extremes
of contrast, that's going to feel like
there's a lot of variety. And if we have not much of
a range in our contrast, then it's going to create
much less sense of variety. Probably more like
on the unified, potentially monotonous stage. So in La Nina, we have really dark big blobs as well
as big broad light shapes. And there's a huge variety
of mark making creating a really interesting
sense of contrast between shape as well
as colour and value. So that was always one that I wanted to
show you for that. And then anomaly, we kind of went into a
little bit in emphasis. And I'm going to bring
up this same work again, but like when you're
using, in this instance, just one singular anomaly that's going to create
the emphasis there, but it also creates a
variety within the work. It means that, well, we
weren't just thinking, oh, I could just put
another flower there. We're starting to
think a little bit more about the message
we're telling. So by putting an
anomaly in there, you can actually really
shift the story and have a different idea
imbued into the work. Now the final one is conceptual, and I'm almost embarrassed to
show you this one because I had to create it to
demonstrate this example. But conceptual is just not something that I really,
particularly work with. It's when you pull a huge
variety of different things together all have
different meanings and they come together and
they create their own story. So if I was to present you this here and there's
a Tiger Lily and a smiley face and a drink and a butterfly and
all of these things. It's left to the viewer
to work out the story. The variety becomes
part of the message. It's not something
I lean towards. I sort of imagine more like
your Salvador Dali with the melting clocks and
all the unusual things happening in your surrealism. That's what I think of
as a strong varietal. Conceptual idea. It's not something that I really work in towards at all myself. But anyway, I've done it. We're there. It's all good. Now for this project so far, I've provided you three
lots of reference photos. For this one, I
want you to start thinking about sourcing
your own reference photos. My suggestion to you is, and I'm going to use this
for myself in the exercise, is we're going to
Google varieties of Daisies or Daisies species. If you Google either of
those and look up images, find a selection of images
that appeal to you. And we want an enormous variety of different kinds of
Daisies to work with. And that's what I
really want you to do. I'm not providing you
the images in that way. You can come up with
your own painting based on the images
that you source. I've specifically
chosen Daisies because they have an enormous
range of variety. But they also are all
from the one species. So we've got that tension
of unified and variety. So we want to bring both of those ideas together and then, we're going to piece together, it's a
little bit different. This piece, we're
going to go quite loose and it's going
to be all over coverage and it's going to paint as many different
Daisies as possible. Our first thing we're going to do, just to save ourselves, I'm actually going to go down to a square shape for
the final piece here. Because I think that would be
a nice different challenge. Because if we're always
working on the A4, either way we can get boxed in and not think
outside the square, but this time we're
actually thinking in the square because I'm
giving you a square. You just have to stretch that muscle
a little bit again. So you can fall in the trap of always working on
the same size paper. And you get really familiar with your formulas when it comes to your compositional recipes. In your mind, you always
have ones that you prefer. So this is just a challenge to you is change the
shape of your paper. And you're going
to have to change your formats a little bit. Now I'm going to paint a
series of daisies out, and they're going to
be my building blocks to generate something
about this. But then also, once I've
got my building blocks, I need to think
about composition. So I'll have to do
thumbnails based off my building blocks and then
work into a final piece. So I'm doing things a
little bit backwards. We're doing the practice work first and then doing
our thumbnails. So I'm just going
to get started. I'm going to do my favourite
first, the Paper Daisy. I can do Paper Daisy two
different ways actually, so I might do that as well. I kind of always got a
donut in the middle, which I like to. Do nice hot pink Paper Daisy, these nice easy little dab marks to get those petals going. And then to generate
that little bit of form, I'm just going to go and add
some extra ones underneath. Got a serious swamp happening
here from my Hydrangea. My Hydrangeas got very excited about mixing
all those blues. There's one Paper Daisy and
then I'm going to go and do like a more closed version. Of course, they come in all
kinds of colours as well, so he could just do one with all different colours of
different Paper Daisies. But I'm going to go for the
whole kit and caboodle here, and that's a nice closed one. And then I'm going to do
a little Cut Leaf Daisy, which is another little
Australian native, which is a really, really
fine leafed little Daisy. I might actually go down
to my mini brush for this one running out of room because of my
swamp in the corner there. I don't normally let
it get that swampy, but I think it's because
I've been painting back to back. So they've got
really, really fine little leaves and then I might, do you like your classic sort
of big old classic Daisy. Which white is
always very hard to paint if you've got a
white paper background. So I'm going to generate
that sort of form with a little bit of light green to give it that feel might need a little bit
more grunt to that. What else can I think of? I don't have Google
in front of me, so I'm having to make
this up in my mind, Sometimes even just drawing out the pigment from
the centre can be nice. All right, And then say like
a big African style Daisy, which is like big, beautiful
purple, colourful ones. They come in all
kinds of colours, make up a good colour there. And then I think I'll go a bit
more orange in the centre. And I want to make sure
I've got lots of balancing things like in the think back
to the balancing exercise. And we have large
shapes, little shapes, fine shapes, thick shapes, and we want to make
sure we have lots of variety in our shapes. I'm getting raggedy ends there. There's a nice little
African Daisy. Now, what else can we do? Or we can do some little tiny
miniature Paper Daisies. I'm really trying to come up with some smaller
forms as well, so we don't get too stuck. Just with all big shapes, I need a bit more. Way too much. Way too much. I might do them up, right, So they feel a
little bit different. Like a little tiny
Alpine Paper Daisy. I love those ones.
And they could even have a little stems
if we wanted. Then we can do like
a Calendula thing. I might do an orangey
centre for that one, All these different shapes, and they might be yellow. Let's just go with yellow. Got a lot of yellow
going on my palette. So you can see just even
exploring one species, how much variety
you can generate. Definitely worthwhile
thinking about, especially if you're doing
like themed works or coming out with a series,
it's worthwhile exploring. I do a little one of that too. What else am I missing? I might just do some little Everlastings. They
might be nice too. Now, at any moment, you're also welcome
to pause and go and search your own photos and come up with
you might be like, I'm missing a lot of green
here or I really favour blue. Go and find those images
and factor that in at this point because
these are going to be our little ingredients
to the larger piece. This is what we'll
be working with. You want to make sure
you're working with things that you enjoy
painting as well. I'm just going to
throw in a few, I love these little Everlastings, really, really fine
forms this time. And then I'm going to
grab like a nice green, and they might be
on stems as well. All these are going
to come together as little bite sized pieces. And we're going to then
do a finished work with them all congested and creating a huge
sense of variety. I'm going to do this here and
then I'm just going to grab my piece of just printer paper so I can do some thumbnails. And I've got this shape here. When I do my thumbnails, I want to make sure that I have a more squarish shape
with my thumbnails, and I'll pencil in those thirds. Then with my biggest shapes, I want to make sure
that they become the focal points and I put
them on the key thirds. So I might put like the
African Daisy up here, and then I might do a couple of big Everlasting
Paper Daisies here. But then, because we're going
for that sense of variety, I don't want to repeat
them all too much. So I want to make
sure that I fill all the gaps in between with these other
little parts and pieces. And then when you
get to when you pull it all together and you're like, oh, that's feeling good. Or you might go, oh, it
actually feels out of balance. Like I don't have enough
large shapes in there. I don't have enough
small shapes in there. This is what the brilliance
of thumbnails is for. Because if you get
halfway through your work on your
beautiful cotton paper, then you've wasted your
time and energy because you're not going
to finish it and you're not going to be
happy with the result. This is, it might be called delayed satisfaction where we do the work first, work out our planning,
bring it all together, and then go with
our cotton paper with confidence so
we never waste it. Let's do some
Everlastings up there. Maybe a few more there
and then some Calendula. Then what should
I put down here? Maybe the big Daisy, maybe a closed
Paper Daisy there, and another one there, Cut Leafs and some more
Everlasting, something like this. This is making sense to me. What are my little scribbles? I'm sort of looking at
these and going, okay, don't forget to put include all these little marks will
come together into a hole. What else are we going
to do there? I think I might just fill that
space with those. Therefore, I've got a couple of key players here
and another one here. Maybe one of those
is the wrong answer, but I'll try and make it work. See how we go. I mean, I could keep
producing these as well. Because similar to our cutouts, and think of these
like our cutouts, in the first exercise, you can, these are your little ingredients
to make these things. So there's limitless
combinations and this is half the hiccup
with composition is like, I just, I don't know where to put things and
where to start. Start with your big objects, put them on the key thirds and fill out around
the rest of them. And that's going to feel a lot
more comfortable and you won't feel as lost as
you're putting it together. Okay, So I'm going to get
into painting, I think. Yeah. I'm going to leave these
two up here for me. As my reference, I got
a lot of pink and red. So I want to make sure
I have a little bit of green in there to balance. I want to make sure I've got
lots of nice dark tones, as well as some nice beautiful
light tones in there too. And that's going to give it
a sense of variety as well. Okay, so putting, I'm going to place my Paper Daisies in first. I'm going to grab some yellow. Now that was on the third, I want to make sure I
place them correctly on the third whilst I'm painting. And then grab that
lovely green. I've really swamped
out my pink there now. This one went right to the edge, and I want to leave a
little white border because that's actually going to
help harmonise it as well. If I went right
over to the edge, it's going to feel more like a pattern than a finished work. The pattern is
something we explore in the next one, in part two. Very loose and simplified
little Paper Daisy there. Then I might do
another one here. We get that gold
yellow in here too. What's better. Green. And go some more of
the same pinkies. Maybe a tiny touch
of red in there. Get some darker tones in
the back there. Then again. Let's get that lightened right off, get some really light tones. Okay. And then what was I saying that I put down the
bottom in this corner? I think it was Everlasting. So I'm going to do this
little golden ball and they're part of
the Daisy family. They're Australian
natives. Okay. If you're always painting into the wettest part
of the painting. I like the way that when
the bleeding happens with watercolour and has a unique
quality of watercolour. But when you allow the
paint to bleed together, it does have a unifying
effect as well. Okay. Need a bit more blue
in there. There's our little
Paper Daisies. And then we're going
to grab the Calendula. I think I'll put in here just
one little random one fit. It's like making
a little puzzle. I need to fit one more in there. There we go. Now moving along,
critical mistake I often see people make is they'll get started here and
they'll go right. I've got to start on my
next big thing over here. But then connecting the
two is really difficult. So you want to be
able to build from your initial starting point
and then work everything in. Like I was just saying about allowing the paint to
mingle while it's wet, Always work into the wettest
areas of the painting. So that's going to help
build you up to this point. So I'm not as much as I want to, I'm not going to dash up and paint my next biggest object. I'm going to build my way to it knowing that it's going to sit fairly harmoniously
on that top right third, I've got to
make sure that I get to there and
it will integrate a whole lot better
if I was just to blob it there and hope for
the best filling the gaps. It's when we tend to trip
ourselves up and we'll get a big old visual hole
somewhere where we just tumble down and it's going to absorb a lot of
energy in the work. So just something to bear in mind, What are we doing here? We're going to do a few of these little Alpine Everlastings, the mini Paper
Daisies over here. Maybe you like, even when you
work in this kind of scale, your eye still picks up
patterns of odds and evens. If I've got four there, I really should
make it five maybe. Where am I going to
put you? Over here. Your eye just naturally does this and it's really
hard to avoid. Some people love
working in evens, But it really is quite
difficult for our eye to digest sometimes because we get lost in trying to work out
where the pattern starts, where a pattern stops, and we just innately are
counting the whole time. I need to have my
little bit of grey here that's not too blue. And let's do a little
samples still not quite right. A little bit of blue in there,
but not too much. I know some people
will be having a heart attack about
this palette right now. I'm having a bit of a heart
attack about this pond, but I love utilising all these in between
colours that just happen to naturally occur
when things mingle. Or if you need to make
space, you often have a happy accident finding what
you are after all along. Adding in
these little details a little bit more. They're looking cute. Now, next in my plan was another little couple of
Calendula's, I believe. So I'll paint these in here. And then we use up
some of this yellow, this massive amount of yellow that I've got going on here. You can start to see how variety and unity really
do work hand in hand. What do we want there?
Now we're going to do some Cut Leaves, more yellow. Yellow is going to be one of the unifying parts of all of this. And then all the different kinds of flowers are going
to be the variety. They're going to
be all Cut, Leaf flowers, Cut Leaf Daisies. Make up my purple. Or probably don't want it to be all exactly the same purple, but I'm going to start
here and these ones are like really fine little petals. Just keep shaking up that purple purples are
opposite to yellow. So that's going to naturally
give it a sense of variety because it gives
it a whole lot of energy. Variety drives energy,
humidity drives calmness. Wash that off and get a bit of a lighter version. Might do some filler. Do you need a darker
one in there now? Pull up some of these
little gaps, perfect. There's my Cut Leaf Daisies. Going back to my
plan, I think I can almost connect in my big
African Daisy in there now, which is exciting because
that means we're on the cusp of getting it all,
bringing it all together. Now I'm going for this guy, so I'm going to go
into this colour. I'm going to go a bit
stronger I think, than what I originally
had planned. And he's going to go
right on that third. And then let's use up
some of this soup. He's going to be quite
a dominant force in this little painting. Make sure I get a nice little bit of bright in
there too, beautiful. Might just do a little bit
of the dark detail in one of those just for fun. Now back to incorporating
a little bit more of this Everlasting to sync that up
there and keep it balanced, which I think is that
complete corner. So let's just fill that right
up with all those guys. Get back to, what colour did I have
there, about that colour. That one swallowed it nearly whole. Perfect. All these
painting techniques come with sound effects,
just so you know. Now I'm
going to incorporate, I think I hadn't nominated a colour in my mind for
the two at the top there. So I'm actually going to go
for quite a neutrally green, almost like it's going to
be representing white. I need to just get the right
colour on my brush here. Is that going to be about
right? Nearly right. Not dark enough. It's amazing what colours
you need to use to generate a sense of a white flower. It's more difficult
than you would imagine. That was too much. Mop that up. I need to add more of those white ones. Might put down here though, I wasn't intentionally
going to do that, but I think it's going to
work out better that way. And then what did I
have in mind for here? I think I had some more of these orange guys,
so I get them in. Paint them up. I'm stretch here. Oh, yellow. Yeah,
that's what I want. Okay. Might just do a little bit more of these little fillers because
I thought they looked good. I got to make sure that I
continue that somewhere. Because if you only
have one area of it, I feel like that
sometimes can be a little bit visually distracting. I'm going to fill out
that little area over here with a few more of
those Cut Leaf little Daisies. And put one in there. And these are a nice way of generating a little
bit of interest. Something completely different, Get that in more of those. It's like implying that
there's more behind there. I guess now I'm going to put two more of those up
there and the rest is going to be the Everlasting.
And they we're done. I'm constantly troubleshooting
along the way. I'm like, is this balancing
what's happening here? Is there enough strong colour? Is there enough light colour? Have I represented all my forms? Is there enough? And that's going to create that sense
of variety in the work. What did I say? I was
going, oh, you know what? I might flip it, I
might put it over here and put those two there. And then I'm going to do lots of the little guys here
and do a little bit more of the Everlasting. I need to balance that
little hole there as well. Final touches before
I put in these. A little bit
darker than up there. We are on the home stretch, I'm just going to put a
couple of leaves there. Just like I always like to
just pull myself out of it for a moment and
go, okay, fresh eyes. What's missing? What needs doing? Does it feel balanced? I need a little bit of
extra leaf down here, maybe over there. Just a quick analysis of how it's all. How's
it come together? How do we feel? I think that's
looking pretty good now. A few little touches, and
that's brought it all together. Now for an extension project, I would love you to
try this exercise with a flower of your choice. You're better off
choosing a species with a bit of range in it. I would definitely
recommend something with a few different sizes
in forms as well. But by selecting your own flower and
having a play with it, you're going to have
your own ownership over the whole outcome. And I think that's where
you start to take off all on your own. That is our first five of
the ten principles of art, and now for the final project.
10. The Final Project: Okay, there you have it. That's our five
principles of art that we're going to visit in part one of Compose, Paint, Create. My challenge to you for
the final project is to go back and have a look through the work
that you've created so far, the projects themselves
and the extension work. And have a think about what
you would tweak or rework. And my challenge to you
is to rework the pieces. Two, there's two
I want you to do. The one you loved the most and the one you struggled
with the most. This is just going to reinforce
everything that we've covered today because you may have noticed how we've built upon. We were started off
with balance and then went into proportion.
That built on balance. And they all start
to interrelate and there's commonalities
between them all. So now knowing what you know, I want you to take all of that knowledge and improve
what you've worked on so far. Can't wait to see what
you come up with.
11. The Wrap Up: Thank you for joining me for Composed Paint, Create part one, and I really hope to see
you in part two where we cover a whole other
array of things that is just going to
button everything up and you're going to be
experts in composition. I hope you treat
this course like a treasure trove that
you keep dipping back into because there's
just so much to learn and absorb when it
comes to composition. You can pause, rewatch, revisit anytime that you like. And each time you will
pick up something new and it's only going to contribute to the greater whole. If you've purchased the course through teachable or my website, your enrolment includes
my comprehensive eBook. This is your companion
guide side kick amazing little resource where it has all your course notes. Everything is housed
in one place and you can refer back to it as you
move through the course. It has the extension
projects in detail, as well as a whole array of tips and tricks links
that you might need. Everything. From here, keep an eye out for part two. Part two, we're going
to cover contrast, movement, rhythm,
pattern, and repetition. The further five principles
we didn't cover today. As well as how to
analyse your work and all important
breaking of the rules because that's the most
favourite thing to teach. Really crucial part
about composition. I can't wait to see
you in part two. You may have heard me
mention throughout this course some of my
other available courses. 'Welcome to Watercolour' is all about the fundamentals
of watercolour. And we visit all the skills.
In 'Magic of Colour Mixing' we learn how to add spice
to our watercolour works. It's my most favourite of subjects and we go all through the colour theory and then learn how to apply it in context. And then 'Lessons in Layering', we look how to create depth interest in detail
in our watercolour works. Each of these now
includes an eBook as well. If you haven't already
go and download those. They are fantastic
resources too. Your feedback means the world, so please honestly, your reviews help me
shape all future content. And I really do take it onboard. And I want to create the
best possible things for you and we want to share in
this experience together. And I've also got a beautiful
Facebook community, a private group where you're
most welcome to join. Now you're one of my students. It's a very encouraging
place and I give you monthly creative challenges
to keep you working. You're also welcome to
find me on socials. I'm on Instagram, Pinterest, and Facebook where you'll
see all my latest updates. Thank you for joining me for Composed Paint, Create Part One. I hope to see you in part two.
 Natalie Martin, Australian Watercolour Artist