Transcripts
1. Introduction: Hello, I'm any yesterday's neck, an artist and illustrator
living in France. In this course,
you will see how I combine my love for
art with self-care. This helps create an outlet
to express my feelings, which can be a useful tool to face the challenges
of daily lives. We all need an outlet. The pains, fears, humiliations and
disappointments that come into our lives. I know that I do. And for
me I've found that art relaxes me and brings me a
sense of calm and peace. My hope is that this
course can help get you started on this artistic
method of self-care. And you can even invite your child per
friend to join you. In this course, we
will be exploring for different aspects of self-care
on different topics. Creating a collage page as a way to be reminded
of what we are learning and experiencing and cultivating
self-care habits. These four topics can help
get you started towards your own personalized pages
on whatever topic you wish. Creating kind of a treasure map on your self-care journey. One of the benefits I've experienced from
combining art with self-care is that I can better identify the issues
I'm working through. Visualizing them helps to
clarify my priorities. Another benefit is that I get to spend a little more
time with my daughter. And this practice
is a step towards helping her better express
her feelings and thoughts. And it's such a wonderful
bonding moment together. I'm inviting you today
to come and join us as we create
these craft pages, as you personalize them to
you and your situation. This might be
something perfect for your self-care and perfect
for your well-being. I'm looking forward to
exploring this journey of mindful artistic
wellbeing together. I'll see you very soon in class.
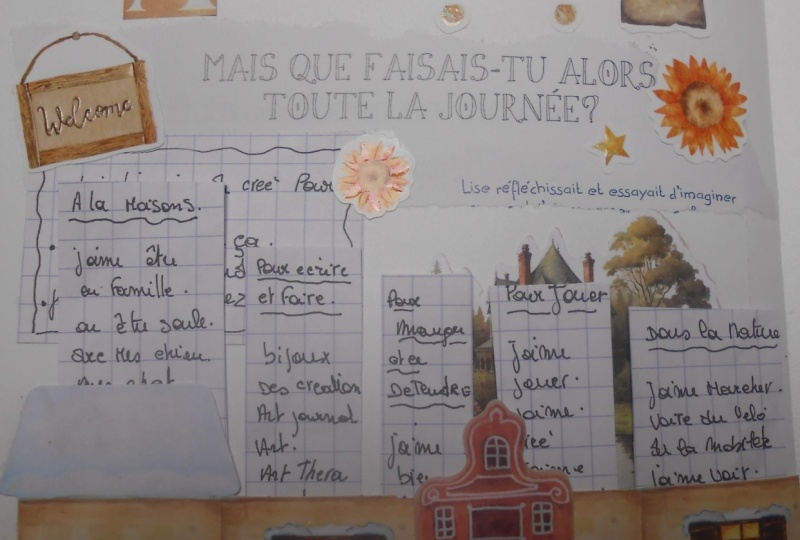
2. Centered Flower - Overview: So today we're going to
be creating this page. It's called the centered. And I used a little flower because it was the
first thing that came to mind when I saw
it as centered. Kind of like my place
that I can always go back to four priorities for the y for the reason of why I'm
doing something in here are different little
examples of things that I do or that I want to
do that I want to make progress in for feeling
more centered in my life.
3. Centered Flower: Today we are going
to be creating together this being
centered, little flower. We're going to go step-by-step, learning how to create a little, what makes me feel
most centered? Flower. And then we fold it
into the center. And we did all different ways, different feedings
about our emotions related to feeding centered. I'm going to start out here with my watercolor paper and some
color, some watercolors. So I have here the color
red and a little bit of white because I'm going
to go for the color pink, kind of different
shades of pink. I'm going to add in
plenty of water. I'm just going to
go ahead and paint just little dabs of
paint and dabs of Otter. Ai can even make some
other pink shades. Not really doing
any shape or form, just I want some pink
petals for my flower. We're creating the
centered flowers. I'm going to use
flower petals as my little design for this
self-care craft page. Being centered
means that we have a reference point to go back
to a place to go back to when life's challenges
and emotions push us off balance switch happens
so often these days, so much going on in the media, in our lives and
our families lives. I find this little
activity to be so helpful and something
that I've been using. So I wanted to
share it with you. And as you know, I love mixing some sort of art project with the mindfulness project
with a mindfulness. It'll go little habit, little routine that I
would like to grow into. And the feeding center, it is so important for these days. The center is always, it's the place where
you can get back to. And by doing this
little project, we're going to find
out what it is that makes us feel
truly centered. And for each of us
It's different things. So that's what's wonderful
about this little project because you get to
personalize it for yourself. I might share with you some of the ways that make me
feel most centered, but then it's up to you to
make it their own assets. The goal of this project, it's taking time for
you can't get to any other events or can't be talking on the
phone at the same time, you're reminding yourself that you're important your value, then by creating these
visual pages for ourselves, visual activities is not
only a relaxing thing, but it helps us to imagine, to look ahead into
our future goals, into what we really want
for ourselves personally. Alright, so I think
I'm finished here. I'm going to put that
aside and let it dry. Next, you will take your
scrapbook or craft book, and you'll take your piece
of old writing paper. You can use a newspaper or
you can use an old book. I have here an old newspaper. I'm just going to rip
part of it out because I want to decorate
my paper with it. I like that organic kind
of ripped look as well. I might put this
on this side here. Disappear. I've just cut a little
bit on this part. You can rip it. If you prefer to cut
it and make it really tidy and neat that it's fine to just going to go ahead
and glue that down. Next I have my little
black piece of paper. I'm going to go ahead
and make a circle. I have that little
sharpener here, so I'm just going to use my
pencil to draw a circle. You go ahead and cut that. This will be our center. This is the most
important part of this activity because it's
all about feeling centered. I went with a flower
because I thought that that reminds me of always coming back
towards the center. All the little petals,
they all lean. They all come from the center. I'm going to see
what other designs I would like for my page. I'm thinking maybe adding
a little bit of white. I'm taking my white paper. A little lag. You can use a ruler or you just do it roughly
with a pencil. I'm not so into perfecting
it with a ruler. Corners like a little flag. Anything that I can be a
little bit more artsy. Going to go with my
little scrap page. Designs and stickers or papers. If you don't have any of this, that's totally fine because you can just go ahead and
print something from online or you can even create
and make them yourself. But because I have this, I figured, well why not use it? So I might choose some flowers, something to go along with. What I'm working on today was even some cute
little pictures here. For example, I might
use this flower is that these are pop-out shapes. Maybe this way. And there we go. Here we go. I have one more here. I like this color
because it's going to match my my paint. The same pink and I really
like these flowers as well. Might even go ahead
and cut this one out just towards the bottom
and maybe even this leaf. If you have magazine pictures
or even shop magazines, you can go ahead and use that. And if not, just draw your own or print them
out and cover them. So there are options that fit. Anybody, any situation. You can just choose what is
perfect and right for you. I just leave a little white, kind of like the
little sticker look. Even though it's paper. I'm going to even use these
little corner pieces. As you're doing this, as
you're creating your flower, then it's a good time to think about those things
that center you. What are those things?
Interview. So that's our big question for today. And what we're going to
add to our craft page. Next, you can just kind of
play around with your look, whatever looks the most
appealing for you. I'm going to put my
flower right here. So deciding how I want the
rest of my page to look like this on top and
play round how fun. This is really the fun part. Alright, I'm going to check
in with my paint again. It looks like it good. So I'm going to go ahead and
cut out some petal shapes. I can take my pencil. I'm going to take
the circle just so I know how big I want
my petals to be. I'm just starting from
the center of my circle and just fine like that and adding a little piece which I will glue on the bottom. And I like taking it from all different parts
of the painting. Some will be lighter, some will be darker. I think that's the
beautiful thing about it. 12345, I have five. Maybe I'll make a
sixth one case. And then you can go
ahead and cut them. For my shapes, I did
very random shapes, kind of like with three. We did or curved lines
and some have doubles of cutting it out and seeing how each one books because they, each, the, each kind of come out very different and unique. And that's what's,
makes it so beautiful. There we have our petals. Now you don't have
to do this part, but if you want, you can go ahead and give
them even a little bit more, little bit more shading or
a little bit of texture. I'm taking my dark
pink color and just putting a little bit more
paint onto the middle. I have here some metallic paint. I'm just adding a
little bit of water. I'm going to add just a
tiny little metallic look on the top of my petals. I can't see it right now. But at the end it will. When it dries, it gives
it a little shine. We'll see how this goes. This is my first time trying out these metal, metallic paints. And now we can let
them dry again. Now that all our petals are dry, we can go ahead and
put them on her book. Here's going to be my circle. I'm just going to
play around and see how I would like
to lay them out. This is going to take basically my full page which is okay, I'm going to just prepare my petal here and then I
can put it in my book. What I would like to do is actually fold mine
towards the center. Just as a little reminder again, since this activities
all about centeredness, I'm going to go with
the first my top petal, which is probably this one. So if you do it this way, you would need to do
one after the other. Flower would look
something like this. And then as you open it, you would find out the ways
that help you feel centered. Because we're going to write
down in journal our answers. By first of all,
checking in, of course, if you take your folded version and just place it on your book, you can kind of see. It gives you an idea of how
it would look. That way. We still get to enjoy
everything that's around. We're just going to put
a little dab of glue. The painted part. You just need to make sure
that your petals have enough space to open a close. Here. You can kind of play
around with how it looks. She wanted to move something. You push from the down, maybe give that a
little chance to dry. And during that time
you can go ahead and glue everything else that
you prepared and cut out. I'm just going to place it on top one at a time very gently as you
hold onto the bottom. That's what's good
about this glue. You can move things around just slightly if you need
to adjust them. And I think I'm going to make a black circle
little bit bigger. Something like that. That's
what worry now it's all still a little bit loose because the glue
that we're using, I haven't even glue this down. I'm going to go ahead and
use a little bit thicker, stronger glue just to
keep these in place. Once you have your
center in place, your petals will stay in place. So don't worry about that. Started from the top. So this 1 first, the next 11 after the other, that you know how to open it
and close it the next time. Now we're going to go
ahead and take our pen and just write down a few things because this
is my favorite part. Well, actually know each
part is my favorite part. We're enjoying each,
each journey of this. I've creating this
little craft page. I love doing the artsy part, the little mental work that
reflection work because that's what helps me
in my creativity. I'm opening myself to
my creativity and at the same time to my
deeper feelings. I also love making things more concrete by using some words. Now we're going to
add our little title. First. I'd like to do it
with pencil to make sure that I have the right amount
of space to fit it all in. I'm going to call
this being centered. And go ahead and take your
pen and trace over it. Then I just erase my
pencil being centered. Now I'm going to
carefully open my petal. I'm going to add
in a text as well. And the title here, something like what makes
me feel most centered? You can use your white gel pen, which makes me feel
more centered. I might even add a
little a flower for fun. Then I'm gonna take
my pen again and just go round and
list some ideas. What makes me feel most
centered things that I do, things that I want to feel. Just going to go ahead and just write a few little
things that come to mind are that I
want to be reminded of about feeling centered. I like to sort of turn my
book around and write in all different parts of my
book, all different ways. I think it's so important
to include some feelings. How do I feel when I'm centered? Now go ahead and jot them
around, around my flower. Again. When you do this, take the time to personalize
it for yourself. I hope that this was also
an enjoyable time for you, both relaxing and creative. I'll see you next time.
4. Steering Wheel - Overview: Today we're going to be creating my steering wheel of self-care. So I've chosen a wheel because it's kind of like something
that you can steer. I feel that I can
decide and choose and make decisions
regarding my self-care, as well as journal
different expressions and feelings all
about our self-care.
5. Steering Wheel: Today we're going to be creating a little steering wheel
for our self-care. And just diving very generally into the different
aspects of self-care. And with a little artsy look. So if you're ready to join me, then get your supplies, which are listed below. And let's get started. So we're gonna start with
our blank sheet of paper. What we're going to
focus on today is steering our way to self-care. You can go ahead and take
your little printout. If you don't have a printer or if you didn't download
the printout, you can go ahead and
draw this or maybe you could find went online
and print it out. That works great too. And to start with,
we're just going to go ahead and cut it out. Every day. We have
middle opportunities to change the way we
approach our day. By trying out some simple
self-care habits and rituals. We can focus on what we can control and take better
care of ourselves. Which is the reason we
have decided together to create a little steering
wheel for this craft page. Not more to-dos overwhelm us. Putting self-care into
little bite sizes where we can just stop and focus on one different
aspect each day. We get to decide which aspects to focus on
and delve deeper into. By taking care of our self-care. We will be steering our ship
in the right direction. Even doing one little thing each day to grow
in our self-care. We're doing our part
to stay healthy, both in body and spirit. Simple examples like practicing more gratitude or maybe
learning to say no, going for a walk in nature. I just said ideas of setting simple little self-care goals
for ourselves by imagining our self-care as a
wheel that we can steer and control in
the direction we want to go can also help us subconsciously choose to pay
more attention to ourselves. What our inner self
is trying to tell us, thus will help us have an even
greater impact on others. Self-care is one aspect
of our life that we can learn to
control to ensure that we are at our
very best as we respond to life's challenges
in a healthy way. Next, I'm going to cut out
this little black title. I wanted to kind of like
a little piece of tape. Nope, I didn't have black tape, so I just went ahead
and printed it out and use the white font here. I'm just going to rough it up for look of a little
ripped piece of tape. Jagged. Just go zig-zag. We have our little
title which is chosen to title my steering
wheel of self-care. Because we all need
a little boost and it'll boost into our self-care. And I have a little picture also that I've just
downloaded of an anchor. It kind of goes with
the look of my wheel, steering wheel of a ship. For me, it helps visualize
things into pictures. Which is why I've chosen to use a wheel to
help steer my ship, my body, my mind, my soul, and at the same time, being a reminder of my anchor, my anchor would be why
I'm choosing to do this. So I think that's
so important for me when starting any new habit. And he knew little routine
is to ask myself why. That's my anchor. Again, putting it
into a picture form. Now that we have
our little cutouts, we can start designing our page. So you can kind of figure out what would
work best for you, how you want to
organize your page, what are you going for? I'm going to probably take my fold magazine paper and
rip something happens. I love going for
the Old Rip look. And I kind of want to
make it a little bit like water or light waves. Just going to go ahead and
measure with my pencil. I make the sides straight. Do this and put my
title down here. Now comes the fun part, gathering some pictures
or extra materials or cutouts to somehow bring a little bit more color
and decor to your page and see if anything
sparks some inspiration. Something that goes along with my theme of what I'm working on. I'm wondering if these little
roses would look nice too, or maybe even just
this one rows. Just like to add a
little bit of color to my page and it kind of matches
the old fashioned book. I'm also going with a
little circle shape. Maybe here. I could
put the anchor. Up there. If you want to use your net. I'm just going to go
ahead and cut a piece. I sort of like the boat to
just gives a little texture. Try them. I put this way on each side. I'm going to try and glue it. But if it doesn't glue, I'm going to tape it
to the other side of my page, something like that. For creating the wheel, I'm going to take my piece
of cardboard and I'm going to go ahead and cut
a small circle. I'm just using a sharpener. I'm going to cut that out and put it under my
wheel just so it has a little extra turning
space like this. Next, you will need your
little paper fast dinner. I'm going to poke a
hole in my paper first. Then into the middle
of my circle shape. Doesn't really have to be totally in the center
because we're not going to even see it if you need
something else to poke into it. If you have a sharp
scissors or even a cutter, just to make the initial
tiny little hole. Watch your fingers. So I'm
putting my fingers like this so they don't poke through. There we go, just to have a little I don't bend
my paper fastener. And then you'll go
ahead and push them down flat as possible since it's gonna go
inside our book. We have our little wheel. There we go. So it's paper, but hopefully it
should be strong enough because of the piece
of cardboard in the back. Next, you can go ahead and
take your extra piece of paper leftover from
what we cut out. I'm going to rip box. Now. I'm going to rip a
second little piece of paper. For down below. I just like having extra
little white spaces where I can doodle and write some of the ways that
I'm feeling or some questions that I went
to ask myself later on. I think that's really a
big part of checking in. And it's a big part of this little craft project
that we're doing. Because by checking in, by asking more
questions we asked, the more we can learn and grow, the more wisdom we gain. Maybe I'll put it
here on this side. Okay, so, so far we have
our looked like this. I think we're about ready
to put it altogether. So you take your glue stick. I'm going to start with the
things that are underneath. For example, up here. For the wheel, I'm going to use my white glue because it's
a little bit stronger. I'm going to put glue in the middle on the
piece of cardboard. Make sure it's placed
where you want it. It may need a little
bit of time to dry. So make sure not to bump it. As we move on to clue
the other things. The rest, you just
use your glue stick. Now if you wanted even
more of an old Look, you can take a black pencil. You draw the edges, color a little bit
towards the edges. Kind of do that, that will
burn to look much to me. And so old-fashioned. Know. This part. I use this circle just I wanted to include a
little bit of color. Not sure if I'll put it up here. Again, it's a little real
shape, little circle shape. Like to add these
little boxes as well. So I can add in a
little bit of texts. Here. I might just add a little
text about, about the. An anchor of my self-care. Why it's important to me. Flower here, and I'll go ahead and add whatever else you want. Maybe you'll draw some things or I also have my
markers so I could go ahead and doodle a little bit. I might just add a little bit of a pink color as well on the edges of my paper. Again, non perfect though. It again, go ahead going
with the organic look. Maybe a little
shadow, big shadow. I'm going to trace over
it with my black pen. Is now we can, this works well. I'm going to take
my black pen now. Inside the wheel I'm going to
write the days of the week. Just the abbreviations. Monday, Tuesday, Wednesday, Thursday, Friday, Saturday, Sunday. I have an extra one. I'm just going to
write self-care. Now I'm going to go
ahead and write down here the different
aspects of self-care that I want to pay
attention to or focus on. I'm starting here with
emotional, practical, mental, physical, spiritual, social. Lastly, professional. These are the, some of
the different categories in my self-care. But you could go ahead
and personalize it to your personal
life or situation, whatever would fit you best. That way each day of the week, I am reminded to
focus on something. It's not a rule, it's
not a fast rule. It's not a half to, it's not a should do or Musk. But it's more like just a
little reminder, loving women, reminder of what I can focus
on if I only have time to focus on one aspect of
my self-care each day. Then I can go back
to my wheel and find out which one I can focus
on for the day. Every week. I can go ahead and
switch it out if I want, just for variety. That way. Not every day of the week, maybe not every
Wednesdays the same. I'd like to move
things about and just have that variety because
that's what really helps me just checking in
and going with the flow following my heart at the time and what
it needs the most. Here we have this extra space because we have an
extra one here. So this one could be
focusing on anything that my heart leads or
is calling out for, or you can choose another one. Maybe you have another aspect of self-care that you would like
to include there instead. So please feel free to do that. Here I invite you
to write something meaningful for you related
to your self-care. So I might right here. For me, self-care means you can go ahead and
personalize it for you. I'm going to do that
tomorrow morning during my little journal time that
we have some reflecting time, after some quiet
moments, pause time. I really want to write something meaningful that I can
hold onto in REM, remember to remind myself how important it is to pay
attention to my self-care. Well, I might write, why. Why self-care is important. To me. Again, if we're very
clear on our why it's so much easier to follow through on some of the good
habits that we want to focus on and start
doing for ourselves. Here I might just add a
little quote about self-care. I found went on Google that
I'm going to include here. Just as a little reminder, self-care is giving
the world the best of you instead of
what's leftover you. Because so often I
feel that self-care is indulging myself or
it's being selfish, thinking only about myself, but it helps me remember that
I'm worthy, unimportant. And actually by
taking this time, I'm able to give
much more to others. Now for the final little
touches of decor, I'd like to add
this pretty little netting this side of my page. I'm going to straighten it out here so that it doesn't show
with the gold shiny Glue. Oliver just going to tape
it to the back of my paper. Since I'm not going to be
using the other side anyways. Then I'll do the same
on the other side. Now it needs to attach
more dabs of glue here. Just to keep it flat. At the points where
there's glue, just keep it for a few seconds. Also, go ahead and
turn my book page. Tape this side. Just to keep it in place. You can go ahead and
close your book as well, or even just play something heavy on top for a little bit. There we have our little
steering wheel of self-care. I hope you enjoyed
this little project together in that it
will really help you pay attention and think about the different
aspects of your self-care. This is just very general. I'm just listing the
different aspects, but we'll go further and
dive into each one of these. Another little session. Here's my very final page of my steering
wheel of self-care. I've decided to add one middle, one more little flower just for some more prettiness
and a little more pink. And then I've gone
ahead and also taken time to journal my
little questions. What does self-care mean for me? I've listed a few little things that that I could
fit into this page, taking time alone for me, reflecting, pausing, accepting
myself where I'm now. Checking in often. Compassion for mistakes
or imperfections, paying attention to
my health and body. Dot, dot, dot because there's always so much more I can add. I can even update
this or include more than little portions
on the blanks of my page. Why is self-care
important to me? It has made me a
different person. More joyful, caring,
grateful, complete, calm, confident, and 11, passionate and excited
about the future projects. It gives me time
to dream and play. Reminder of my y is so powerful to help me stay
true to my little habits. So much more. You can personalize it, of course, and include
whatever else you want. If you feel you need more
place for texts and you can go ahead and add
another little box anyway. I hope that this was a special meaningful project
and that it can take you even further in your growth and
experience of self-care.
6. Unplug - Overview: Here's kind of a fun, artsy, colorful craft page that we're going to create
together today. I'll share with you how I've made this and how you can
join me and make your own. This one is all
about unplugging. We all need a little break from technology once in awhile. So I felt this one useful for me and I thought it would be
a really fun activity. Also a gentle reminder
of what I want to do in my little growth
for myself care.
7. Unplug: Welcome to another
little time of crafting with me
for our self-care. Some of materials that you
will need, your craft book. Next, you will need just
a page of lined paper. You will need the
little download. Print it out. You can also find
your own pictures or even draw them yourself
if you prefer. I just printed mine
out to save some time. I chose a cell phone, an old-fashioned
phone, and a computer, and a pink paper. This one is see-through. It doesn't have to
be see-through. I just thought it was a
little fun twist to it. You will need a
piece of cardboard, so this one is extra sturdy. You will also need
a little ribbon, a piece of yarn or some string. Any one of those will do. You don't need all of them, just one for a
little extra decor. You can grab some stickers. I'm going to maybe
use a flower or two, or a little circle like that. Whenever you want to use or something that
you have on hand. You could even cut
out some flowers from magazines if that's all you have for some other cutouts. I just this from
an old newspaper. If you find any little pictures related to our topic of today, then go ahead and use that. I also have some
little circles that I might want to use as decor. I have a little speech
bubble with the xyz and I have the letters
that spell unplug. Because as you know, that's
our theme for today. I just pick random letters. I tried to use variety. If you don't have this, you can also go ahead and use
the download and print it out because I've included these letters for you
if you want them. We start out by taking a
page from our craft book. I'm going to take
my little cutouts, my little picture
and my letters. And I'm just going to
go ahead and cut them out a little better. I like to collect pictures from magazines and old
newspapers as I find them. Knowing that one day
they'll come to good use. As of today, for
example, for this one, this is from a very old
newspaper from the sixties. I just think that's
extra special. I wanted to keep it somehow. This is a great opportunity to use it for something useful, something that I'll refer
back to and use for my my own self-care. As we know. This is a huge topic and I
included it in this book because for me it's
something that I wanted to work on to
improve myself care. I know that because of my
work often I need to be connected, connected
to internet, to social media,
available at all times, answering emails
as they come in. There's just no ending to it. So I've decided to
create for myself a little space where I unplug. This, gave me the inspiration
to create this page. So I decided to
share it with you. Maybe it will help
some of you to find your own little unplugged space and take some time to reflect on the benefits and
how you can unplug. That's the wonderful thing
about this little project together because
you're really going to personalize it for yourself. You don't have to do it exactly the way
that I'm doing it. You just do what
is right for you. What fits your personality, your mood, your character. I'm going ahead and just cutting my letters a little
bit straighter. Since I had done
them very rough. I'm going to sort of lay
them out how I would like. I kind of like that
at recolor, every, every letter is a
different size, even a different font. It's not always easy
to find big letters, bold letters like that. Then you go ahead and get your
little printed out sheet. And you can also go
ahead and cut them out. Leaving a little white. Just to simplify it for me, I don't mind the
little white logo kind of makes it look
like little sticker. You can even curve
as NAEP at the ends. I wanted to draw these out, but I just figured out
it will save me a bit of time using somebody else's art. It was free to use any ways. Some of you might be
very artsy and creative, yet maybe not an artist. So I wanted you to see that. Realize that this is a
project for anybody. It doesn't require
any special skill. Probably just the desire
to work on your self-care, to take the time for you. Using your creative side. That's what sparks joy for me. Somehow using my creativity
for something useful. And that's the wonderful
thing about this project. You'll be able to go
back to it as often, as many times as
you want and need. We're not going to do
everything perfect right now. I'm just doing a
little roughly out. Look of how I could be. I want something like this, all my little
electronics over here. Then I'm going to add
a little plug shapes. So I'm thinking of
doing little plug here, which is what's your
cardboard is four, and you take your pencil and pen and you can draw
this part with me. I'm going to make
a square shape. Maybe it's a little bit to being because I'm going to need my cardboard for other
parts of the plunk. We can go ahead and draw
both at the same time. Now, to draw this part, then you can just give it
a little bit more shape. Make it look a little
bit more like a plug. Also. Picking the circles here, trying to match the same size. Sometimes they even have a circle goes in
and a little screw. Try to make it look like a
plug as much as you can. Here too, I might add a little maybe there's
a little shape here. You can go ahead and just trace. It. Doesn't have to be perfect. It's why I'm not
even using a ruler. Mind the jagged lines I
like the hand written. Here. You can even leave a few spaces because
it's not as Bolden, it's on the inside your circle. But do is you feel then
just go with the flow. I'm going to make these every country has different
shape of their plugs. So this is what we
have in Europe, in France, but yours might
look very different. So go ahead and do the
plugs that you have. Sometimes these are
aware or rectangles. Then you go ahead
and cut it out. I'm going to erase the
lines, the pencil lines, but I want to make sure that
they're really dry before I do so I'm going to wait
just a little bit. As you can tell, this
cardboard is quite firm because you wanted to be
a little bit more durable. Cannot be just paper. Well, it can be, but you want it to
last a little longer. I'm just enjoying every
process of this project, the cutting, the drawing, putting together, realizing that it all
takes patience and time. That's what I'm here for. I'm giving myself
this special time. In dry. You can have your clean lines. Going back to our book just
to put things in place. Here's our plug. You can decide where you
want to put your club, you can put it here, or you could put it up here. Feel free to move things around. You're not in a rush. You take your string, yarn, all your piece of ribbon, and we're going
to tie this side. We're going to tie it to
our electronic somehow. The goal of this
little page is just to visualize exactly what
we're doing when we unplug. So we're going to put this here, which means we're going to
cut little slips as well. Into R. You take your
exact or knife course, makes sure that you have a
surface that you can cut on. Just two, protect your table. I'm going to just cut little slits in the
middle of my circles. A little bit further as well. Make sure that it's
cut on both sides. I'm doing a double cut
just so that I can actually take out
a little piece. The way is it a tight you do just like
as if it was a die cut. You pull them out
on the other side. Of course we could try it out. So there are my plug
fits in. So much fun. I feel like a child again. Then for this part we're going to use a little
piece of tape. I find that's the
easiest to work with. You just maybe give it enough. Okay. If it doesn't look
great on the back, this we're probably just
going to keep it on the back. It's going to cut
out the excess tape. You can twirl your
little ribbon or you can just keep it
straight, It's up to you. You can also see where it where it leads when
your book closes. Me, I don't mind if
it wrinkles out. If K2 and I'm going to take it and bring it to all
these electronics. Now is the time when we can
start gluing things down. Start by gluing this girl. You don't have to
have a person there. You don't have a
picture like this. You can also find me
the magazines you can find bigger photographs
of of these items. Maybe even from your
shop shop magazines. I just liked this one because she's actually looks
like she's even turning off her TV,
her radio, sorry. For TV. To something that I didn't include in here
was a TV actually. For these ones. I'm going to join them together. Before I cut them down,
include them down. Just so that they are one piece. I may put it behind there. The reason for that is because I want to create a little
pocket out of them. I'm just putting glue on the bottom part
on the very ends, edges on both sides, making sure not to put
any more than that. That way I have a little pocket. At the same time, you can go ahead and glue
your letters down. Make them however you want. I like mine kind of
random, not too straight. Kind of go a little bit zigzag. Now for your little plug, you can also confirm where you want it. I'll put mine here. I'm going to cut my ribbon. And again, I'm going
to use a piece of tape to tape down the ribbon. Here I wanted ribbon
behind the electronics. Oops, which is something
I should have done first. Thankfully, it's a stick glue
so he can come off easily. I'm going to put a
little bit more glue again on this side here. We have low piece of
tape coming out here, but it's not too bad because
we're going to cover that. Moving on to our little
reflection time. On this little pink paper, I'm just using the
lines underneath to be able to write straight. I'm just going to journal
this little prompt question. Ways. I can unplug. Going to list a few things
that come to mind as I stop and pause and
reflect on that question. Turn off the phone
for the evening. Emit social media. Read a paperback book. To me that so much
more relaxing. I tried to get the
paperback when I can. Because that way
it also keeps me away from the phone
and the blue light, which is not so healthy. There's always the temptation
to look elsewhere. Once in awhile, I
turn off nobody kate notifications as always,
it's very frustrating. Tech fast. Once in a while, I like to take a
little faster benefits for for one day of the weekend, just give it a break. Another thing that we
sometimes do is no phone zone. Like mealtimes as a family, There's no phones allowed
to set helps us anyway. Those are just a probably
have notes more, but I'll start with that. So I use just the pink
paper just to give it a little bit of color to
my to my page insurer. And I'm going to place
my paper. The pockets. I can also fold it. That way I have more
for another time. Then we can go ahead and
glue our little plug. Now for this, I'm going
to use my glue that's a little bit stronger
because it's cardboard. Needs to be a little
bit sturdier. Kind of straighten out your
ribbon as much as possible. It won't be totally straight. Little bit more tricky
when it's glued in a little tighter. You can still, you
get the general idea. You get the point of
unplugging. There we go. I'm going to actually
literally unplugged just a little mine picture like this word picture my picture. Creative picture for me
makes a big difference. Somehow it's concrete. Sit in my mind a
little bit better. Now I'm going to go ahead and just doodle some
other things here. Something that I want
to be reminded of is benefits that I get from
unplugging from technology. I'm going to try my, my pencil. I love to be reminded of. Some of the benefits, it helps to keep me motivated and on track
with my little goals. These are not hard
and fast rules. Of course these the
ways I can plug, they're just like
little suggestions or little reminders for myself. That's what I love
about this book. It's just gentle reminders, not putting any pressure. But by reminding myself
of the benefits. Remember that it's for my good
and it's for myself care. So some of the ways I can think of provides more time for simple pleasures. Especially with technology. Everything is so fast moving, so we expect everything ink
to happen right away and it's a good reminder that it doesn't happen like
that in real life. Definitely helps reduce
stress in my life. I don't have to answer. Every e-mail immediately. Gives me the opportunity
to instead focus on the things I appreciate
that I'm grateful for. It gives me more time with family and friends because I'm not always on my screen now. Helps me to connect
with the natural world, whether it'd be out in nature. And lastly, because that's
all the space I have for it allows me to be present, to live the moment. I have a little bit more space. I can always add
to them as well. I'm sure you can
think of more ideas to personalize it for yourself. The last and my very
favorite part is just to add a
little extra color. Whether it be with little
pictures are a little shapes. I have little
circles or flowers. Maybe I'm going to
put my little kind of wanted to put these to sleep. That work. Which means I'm taking
a break as well. Technology is going
to sleep. I can't do. I'm going to go ahead and see if there's anything
that I can match with my with my page. So kind of match the
pink or the yellow. We'd go more with
this flower here. Or I could go ahead and use my little circles
throughout the page. See how that would do. It just gives a
little bit of color. Maybe you have some
flowers or something, use whatever you have. Just go ahead and have fun, fun with your decor. And adding these last
finishing touches to your craft page. Now that you're done, you can just come back to it later or maybe you'll enjoy
it down the line. Maybe you'll then you'll
enjoy it in a week or in a day's time and
just go back to it. Review your little benefits. Remind yourself of the
few ways you can unplug. You can even personalize
things for you here. Something doodle something. Whether it's emails,
work, YouTube. Here would be calls,
constantly connected. Instagram. Facebook. Maybe put writing
down those things that you're addicted to. That's not too strong
a word to use. I know I sometimes get
addicted to those things every day I have to do
my streak or whatever. Streaks are post or I can do posting on and on. If you want to add a
little more color, just feel free to maybe add a
little color to your phone. Just enjoy. Well, I might go ahead
and do little polka dots, since I have little dots
already are on my page, even though we don't
see dots on our phones. I'm feeling bad to do that, so I'm just allowing it
and going with the flow. That's why I call
it creative play. I just enjoy wherever
it takes me. Even cover in one of these. Here we go. I hope that you can find
little ways that you can plug as well because the
benefits are amazing. I've seen a difference
in my self-care, in my well-being emotionally
and even physically. Take care and enjoy
your craft page. Enjoy unplugging, enjoying that time for you because you are
worthy, you are important.
8. My Favorite Place - Overview: Today we're going to
be creating this page. It's called My favorite place. I think that our
surroundings, our place, our home, maybe where we work, where we relax,
where we have fun. It's also important and a
big part of our self-care. So this is why I've
created this one. It's very colorful and artsy. And also a reminder that my surroundings are
important to my well-being, to my health, to my
mental self care. I invite you to come and
join me as we create and journal and decorate this
beautiful favorite place page.
9. My Favorite Place: What you will need today
for this little activity or project is your craft book. I have here a 20 by
20 with brown paper, but you can use any
color that you wish, white, as long as it's
a little bit thicker. So this is either 180 grams, 200, a black piece of paper. You will need a white
piece of paper. And if you have somewhere
on hand either a picture of some houses or
maybe cutouts from a magazine or an old
book or newspaper. If you don't, you can go ahead
and use my download file, which is some houses
already drawn, as well as a little title. And then you can collect some little flower
cutouts, stickers, as well as some
new old newspaper or text from an old book. You will also need your glue. Whichever type you want, you will need a pencil, a black ink pen, gel pen, some scissors, and a marker, or to any shade that you would like that goes
along with your picture. And we're ready to begin. And go ahead and place
your little houses or you can go ahead and
cut out your printout. I made it already as a printout
just to save some time. But if you're artsy and
have a little extra time, then feel free to
draw your very own. I could go ahead and use this, but since I had this one already from a little sticker page, pop out page, I decided to use that just for
some extra color. This one would work
just fine too. As long as you have five houses. I've chosen five
different places today that we were
going to work on. Our little title is
my favorite place. I think part of self-care is noticing some of our
favorite things. So that's why today
we're going to focus on favorite place. Because self-care is
really checking in, tuning in and asking ourselves these fun questions
that we sometimes overlook. That's the goal of this project. There's so many things we can learn from just checking in, seeing how we feel, we coping, and what do we enjoy? Whatever we focus on, we end up enjoying so much more. If you have your print out, you could go ahead
and place it here, which we'll look just
beautiful as it is. You can add a little bit
of color to your ruse, to the window's
going to go ahead and place mine over here. So I have 12345, mine kind of joined together, which is okay too. I think our surroundings are so important for our well-being. That's why I included in
this self-care project. Then you take your old
piece of newspaper. I sort of liked to
rip my now to a bit. I like that. Ripped look, the kind of natural organic
look, not super perfect. This paper has some
amazing history. This is from a house
that we bought, a house that is 400 years old. We found these in old
newspapers stuck in the attic. They're very easy to riff. That's a good side of it. I wanted to somehow
keep this antique so I'm including it in
my little craft book. For these craft projects. I might go ahead and
cut the right size. Just like the look of it
and adds a little bit of texture to my
picture, to my page. So you kind of just
play around and decide what looks right for you, how you want to
place your things. You get your blank piece
of paper with my pencil. I'm just going to kind of draw the size that I want to cut it. I kind of wanted to
go here, up to here. Like that. This is just where I'm going to do
a little bit of journaling, little bit of checking in. I love asking myself
these questions because that's the fun of
going back to this book. Kind of notice all the
different feelings and emotions that you had
that tied along with it. And I think that's an important
part of our self-care, not just doing it
one and that's it, but continually
going back to it. Remind ourselves and putting
it down on paper like this. This is sort of like a visual, visual aid for us,
at least for me. Maybe it's us creatives who just like things beautiful on paper, in picture and in words. Here up I'm going to write
a few little questions. Then I'm going to write
a few little points. Where do I feel at peace? These little questions help to prompt some of the
answers for me, or do I feel most maybe
I'll add most calmed. Where do I feel
most comfortable? Where do I feel? Really happy? It? Do I feel where I can be myself? Where do I feel at my best? So you can think
of other questions you can keep going on. You can have a bigger this, but these are just
a few that I wanted to remind myself of that way
when I go back to this page. Do it question mark here and
then you can go keep going. At least I have some
little prompts. How are we going to go
ahead and ink that? Then you go ahead and erase
the extra pencil lines. You can go ahead and make
a little dot, a pointer. You can add some little lines to your text if you want to
get a little bit more fancy, place it a little bit on top
for a little bit underneath. It's up to you. I like mixing of a variety of
different shapes and sizes and colors and patterns. We already have a lot
going on with the houses, but I'm going to add
in a little bit of pink on the top two. So I have some of
these little flowers. If you don't have this kind
of came with the same set. But if you don't have,
you can even just draw some of your own
or print them out. Just like to bring a little bit more color
to the top of my page. I even have a little paper that went along again
with the same set. You can find some times
booklets where they have all these little
cut-out pictures or predict cuts already. There loads of fun. And I found that for this project, for
something like that, often just a little picture like this gives me an
inspiration for what I want to focus on for my self-care and for
my little craft page. So treat yourself to a
little gift like that. I did for so many months
and then findings like, Okay, I'm going to get it. And I'm so happy I
did because I've been using it for my
whole craft book. Thanks. You will continue
with your white paper. And we're going to divide it into small pieces.
You don't have to. You can use a ruler
if you want to, but you don't have to
make it totally perfect. Exactly the same size. I'm going to say some can be
bigger, wider, that's okay. Maybe my fifth will be
like this over here. So you'll need for each
of your little house, you'll need five little
pieces of paper. So I'm going to go ahead
and put them, make them. If you want to make them
all the same size, you can. Now that you have the rough cut, you can go ahead and cut them. I need to sort of check
in with my size of the houses because they're
going to go behind. As you can see, this one is, I'm going to need
one very thin one for this one over here. You just sort of match
it to each house. Because what we're going
to do is just have a little slit behind
the house like this. And each one is going
to have another one. I might go ahead and
just make them make them all kind of thin. Even if they're not exactly
the same size of the house. Each house is a
little different. That's okay. You have your
five little papers already, which is going to slip them
behind each house like this. So our house is going to
be like little pocket for five different little
journal prompts. So now it's already in set. I'll see you in the next class. To put it all together. I'm going to start out by gluing some of the
things that are behind. I think each part
of the process is so relaxing and enjoyable. Let yourself just enjoy it. I love it when everything
starts coming together. Just remember that this is your special little
self-care time. Not time wasted because you're
feeding your creativity. At the same time. You're
feeding your self-care, you're feeding yourself
mentally, physically as well. Then for the houses,
I'm just going to go ahead and put glue on bottom part and a
little bit on the sides. But the rest of it, you want
to keep it without glue. You can put it as far
down as you want. Just make sure to keep
the sides down as best as possible. I'll put it there. I think all these
little finishing touches, it's my favorite. I love collecting. That'll pictures,
little flowers, even cutouts from magazines. I faithfully go through magazines are some of
my friends give them to me and just collecting them for a later
date for my journal, a journal, my craft
book is so much fun. Now we're going to go
into a little bit more of the reflecting process
of this project. Because each of
these five houses, I'm going to create five different favorite places to go ahead and
write them on here. Because since this
is a bit textured, I'm going to just make a
list of my favorite places. At home. These are like the
little titles. You can even make a
little line underneath. Or to my favorite places. In nature, my favorite places to play. This is a place where my
inner child comes out. Actually, you know
what, I'm going to I'm changing my mind. It's okay to do that. When you feel led to. I'm going to write and make little lists of my favorite
places to do different. It's my favorite places
in nature to play, to eat, to relax, to explore. Then I'm just going to
write down a few of those ideas and things, places that I like
just to give me a little reminder
or as a souvenir. And each of those places, to explore new museums. I love going to
cute little towns. Any new different place? Ne, pretty place. Anyway, I can
continue on by this. These are just a
few of the things. I'm going to write.
Some of the things. My favorite places to relax. A comfy couch, my
living room to relax. Little corner. I have a little corner in
my office or in my closet. Just to take a
little quiet moments during the day when I went to pause and reflect or relax. I also love being out in
nature in the garden. I love being in
bed. The evening. Before my husband gets to bed. I just have my little
quiet time in the evening, so relaxing for me. My favorite places to play. I love going to friends,
friends or family. I loved going to the library. That's sort of like
my playtime. Going. Close shops are
closed boutiques. Me, that's so much fun
and so relaxing. Also. Secondhand stores. And another one is
decor, decoration. Shops. That's where I have some of my playtime and these
different places. Favorite places to eat. Probably my very
favorite place is at home because I know what I want to eat and how to
make it healthy and tasty. And I also love going to a coffee shop or to the bakery. Especially here where
I live in France, it's full of bakeries. Love restaurants, salad bars. Those are some of
their favorite places to eat or out in nature. In our barn. Have a nice little dining rooms, summer dining room setup there. So much fun, we eat
there as a family. Now in nature, what are my
favorite places in nature? That's not so difficult? Forest. I loved the
forest, so peaceful. I love being by a naked. I'm not so into
swimming in the lake, but I love just relaxing by
a lake or walking by a lake. Mountains. I love mountain hikes. I love being out in the garden just on the
outskirts of our town. We have a little airport
and I love walking around there because it's
a little bit high. You can see beautiful
view and everything is so big and spacious. See all the countries
site from there. Anyways, some of, I'm sure
some more will come to mind, but I have a little
idea here with all my little favorite places. Now the last thing we're
going to do is you just put them in the little houses so you can choose which
then it'll house. You would like. I loved the fact that
I can go back to this, be reminded of all
my special places. Then even add to my
special places when I ec2 a little bit of space so you can fill it up
or you can leave it blank. I always like filling it
up with little quotes or maybe some other feelings
or reminders for myself. I love this little quote. It's not specifically
about a place, but I think it's so true
for me and my family. Says together, my
favorite place to be. I'm just going to write it here. Not sure who wrote it. You want to extra little. Sure, It'll Condor or if you want to make this a
little bit bolder, you can go ahead and
take your marker. Just so it stands out over the gold texts together is
my favorite place to be. I love this other one too. Related to, to my
place, to surroundings. Or our perceptions are
influenced by our surroundings. That stands as a
little reminder, how important is it is to make our spaces, our favorite places, comfortable com,
where we feel happy, where I can be myself
and at my very best. Feel free to journal. Some of these are just to think about them
in imagine them. That's it for our little, my favorite place craft page. I hope you enjoyed this
process and that it was very relaxing and
meaningful for you. What I love about these
little papers is that I can continue to add to them
whenever I feel like it. Whenever I go and explore
or try out something new. And if one paper fills up, well, I can just add in
a second or third. This is a wonderful way
to personalize it to your present situation and to continue to live
in the moment, to enjoy the here and now, and stay with the flow. What a gift you can
give yourself of loving and enjoying
everything that you're doing. Wherever it may be.
10. Bonus: Gratitude Crafts Page: Welcome to a brand new day, a brand new empty page
ready to be filled by you. I'm inviting you
to come and join me as we craft together. I'm using different supplies. For example, some old
newspapers, some colored papers, maybe some cut out pictures from magazines or old books
or even stickers. You can grab along
whatever you have on hand. I'm here cutting up, ripping up a piece of old
newspaper because I like to add that kind of part
of my base of my page. I have here another pretty
colorful picture of flowers, which I would like to include on my page because it's some of the colors that I love
that I enjoyed the moment. I'm cutting it to
the right size. Actually this one, I'm going
to be ripping it as well. Just for the old Look. I have here some cut-out
letters from again, old magazines or newspapers. I've chosen the letters
that spell gratitude. Since that's the one that
we're focusing on today. I'm going to cut them
to the right size. I prepared some of this material beforehand just to save
a little bit of time. But then the rest of my page, I just go with the flow. I stay sensitive to the
things that I love. Shapes and layout design. I have here some other
cutouts from magazines and newspapers that I've just been collecting since a little while. So I wanted to choose a picture that kind of resembles
gratitude for me. So I have here some
smiling faces. I like this one. I think
I'm gonna go with this one. I loved the old fashioned book. I'm thinking of where to put it and I'll cut it to
the right size. I think maybe
square-shaped will do. Because I have a few things
in mind already that I want to include on my
paper in my page. Just to encourage you to find something that
sparks inspiration, sparks joy for you. And that is also meaningful, related to the topic of the
page you're working on. I'm going to use
this black piece of cardboard just to help
it stand out a little bit more to create
some contrast. Between my page. The picture. I'm just screwing it on top
and then cutting it to size. Still, choosing where
I want everything. I have here, the words
written out self-care. Since this is parts
in conjunction with our series of self-care
and well-being. So I'm definitely going to
include that on my page. Like cutting it in different
shape just for variety. I'm going to switch out this
T because it's green and I don't have the color
green. On my page. Though. Before I
forget, I'm going to use this little notebook paper. Place it somewhere around here. Because I love to include
any little faces. Notepaper, writing paper
for some journal prompts. That's really the meaningful
part of these pages for me. I'm going to include
another one behind here. So I'm just measuring it. Makes sure I get
to the right size. Because I'm going to be
placing it behind it. I'm going to use the
picture as a little pocket. That's what I love
about these pages because I can always change out the papers if I want to journal some different questions or
if I have different answers. Going to start
gluing it in place. Since I have the general idea of where I want most things. I'm being very careful with this newspaper because
it's quite old. It's very easy to rip. And yes, it's got
some stains and from US or storage. But that's okay. That's kind of like the
look of the journal. I'm going to glue this one
as well, these flowers. So I'm not going to
glue the ripped part. I'm just going to put
glue on the three sides, the two sides and the bottom. Because I'm also using
this as a pocket, this picture as well. So again, I'm just going to put glue on three of the sides. I think I'll place it here. I'm not going to formal. Yes, I'm making sure that
my paper fits in there. I use the ruler to
kind of loosen it up a little bit and make sure my paper fits in well without any glue spread out
on the wrong part. For my letters, for the
letter T that I took out, I'm going to use
this pink paper. It matches my flowers. I'm just going to write out the letter T in a
big bold letter. I'll cut that out. I love it, that it matches
the pink of the flowers. So it's kind of bringing the pink and different
parts of my pages. I'm just delicately cutting it. This takes lots of patients making sure we get
all these little details. I couldn't find
another letter T's, so I had to make my own. So feel free to create whatever you have to when you
don't find what you need, you can make it yourself. Now I'm going to glue
this little letter writing piece of paper. I liked the little
ribs look as well. Next I'm going to add
my title, self-care. Maybe I'll glue the letters down first actually to make sure that I know where I want to
put the self-care title. Let me take all these
off and I'm again putting glue very
carefully down, preferably onto my book rather than on the
letters themselves. Because they're very delicate. Now, igloo my little flag title. Again, not totally straight. I like the look of and formal. I have this paper with
beautiful flowers, kind of like a background paper and there's Catherine's
on both sides. So I'm going to take
advantage of that. Even use some of the text. Because some of the
text I feel can even fit in with my
page quite nicely. I'm looking which ones spark
some gratitude for me. Time of your life. That's quite nice. I think goes along
with feeling grateful. Some other words here. I'm, I won't use but I like, wow, celebrate, wonderful party. Some of those made me feel grateful and are
funded or reminders. Being happy and joyful, bringing some of that
positivity into my life. See if there's any others
that I could choose. I find here a thank you. That one is for this page. Don't worry if you don't have these exact papers to cut out, really use what you have on hand and you don't have to
even go and buy anything. Because you could tighten up. You could print them out, you can find them online. You could write them
yourself as well. For these flowers. I had this paper, so I wanted to use it. I figured it would save
me a little bit of time from drawing them myself. I think you could even check out some magazines from the
sharps or maybe from. The four stores or
other magazines. It's not complicated these days to find beautiful
things like this. And even in dollars stores or there's so many arts
and crafts supplies. Very reasonable price as well. So treat yourself to
something fun like this. That's also part of self-care. I'm choosing a few
flowers here just to bring a little bit
more color and fun. And again, to include
the pink that I love to different parts
of my paper, of my page. I'm including a little
bit of leaves for some greenery. Maybe here. I have this black piece of cardboard which I'm
going to use as well to add to my
pockets, flower pocket. And I'll again continue
the ribbed look. It fits real nicely
and snug in here. One more place that I can add some journaling
prompts, reflection. Now to glue my flowers in place. Last but not least, I'm going to do a
little reflection time, so I'm just going to write
in the titles for now. And then later on
I'm going to take my little private quiet time to really think about and answer
these questions for myself. What am I grateful for? That one also
changes continually, so I'm going to
fill up the page. Then when there's no more room, I can always switch
it out or I can add to it because the
pocket can fit in. Lots of rural lots of papers. Yes, I don't want to
forget to glue these in so that they don't get lost. My finger is getting
a little bit sticky after all this gluing. Really this is the fun part. We're working real textile here, cutting and gluing and
ribbing and writing. Just missing the drawing part. But that can come in
anytime you like. You can add little
doodles to your pages. Here I'm going to include a few little words
around my page, but feel free to add whatever your heart longs for whatever would make
you really happy. And filled with gratitude. We want our cups
to overflow with gratitudes that we can share it with others and
overflow on others in our work through our art, in our interactions with
others throughout the day. So my next prompt is how
does it make me feel? And I have lots of
room to fill that up. My last one here is benefits. Benefits for my self-care. I think I'm going to write. That kind of helps remind
me why I'm doing it. I can jump down in
my answers here. I love to add a few little
keywords around my page. Again, that's the fun
journaling, look. Happy, joy. I kind of asked myself what words come to mind
when I think of gratitude. What ties in with gratitude? Maybe how do I feel? Great to include Thank you here, because that's really
what it comes down to. Being grateful is saying
thank you, gladness. I'm going to use my
white pen as well. So I'd like to switch
out black and white. Just for fun and variety. Smile. Kia. Put in as much as
you want into this page. You can fill it up
or you can make it as simple and
minimalistic as you like. Whatever suits your style. There we have it. Our simple but
beautiful gratitude for my self-care craft page. And I'm really looking
forward to seeing you in some more craft
pages for our self-care.
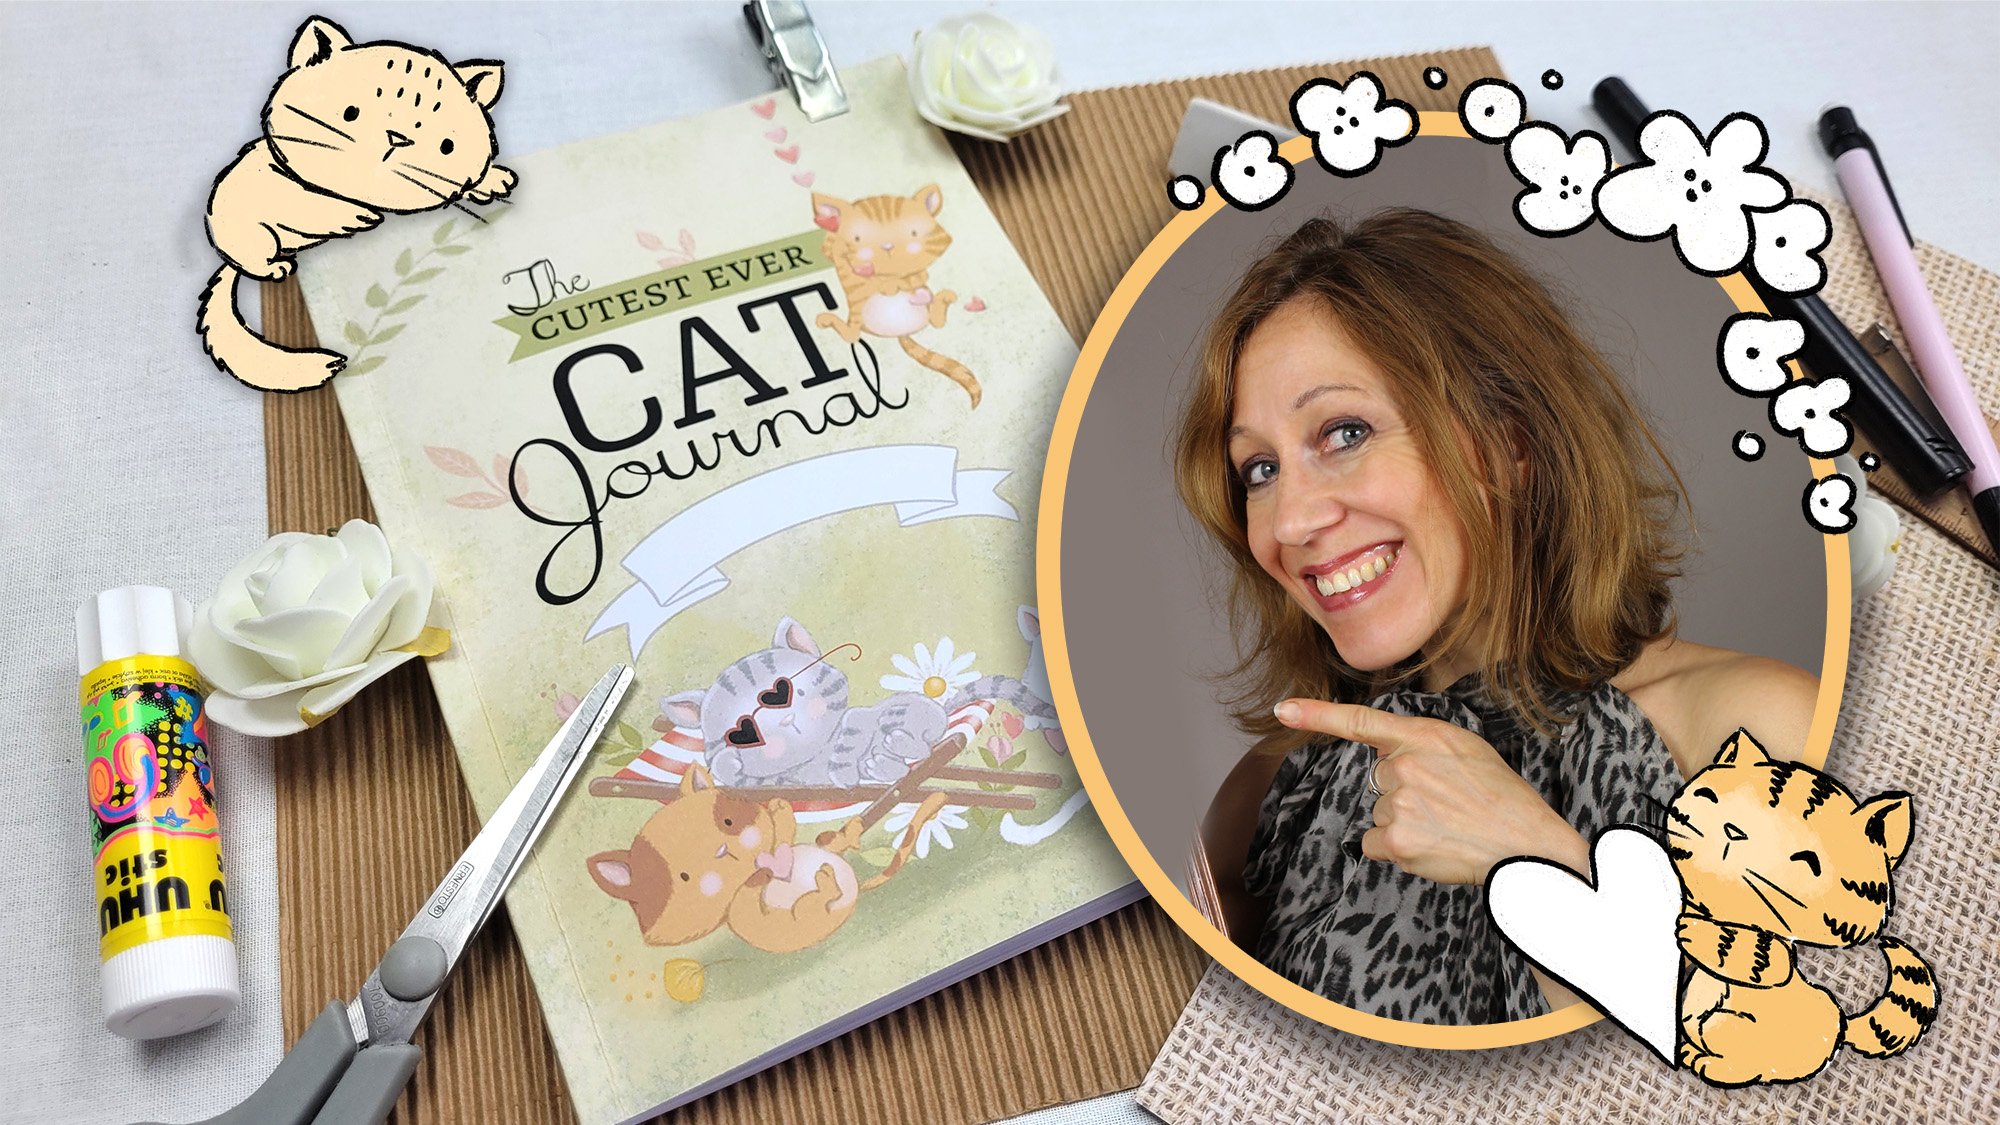
 Agnes De Bezenac, Designer of Tools for Wellbeing