Transcripts
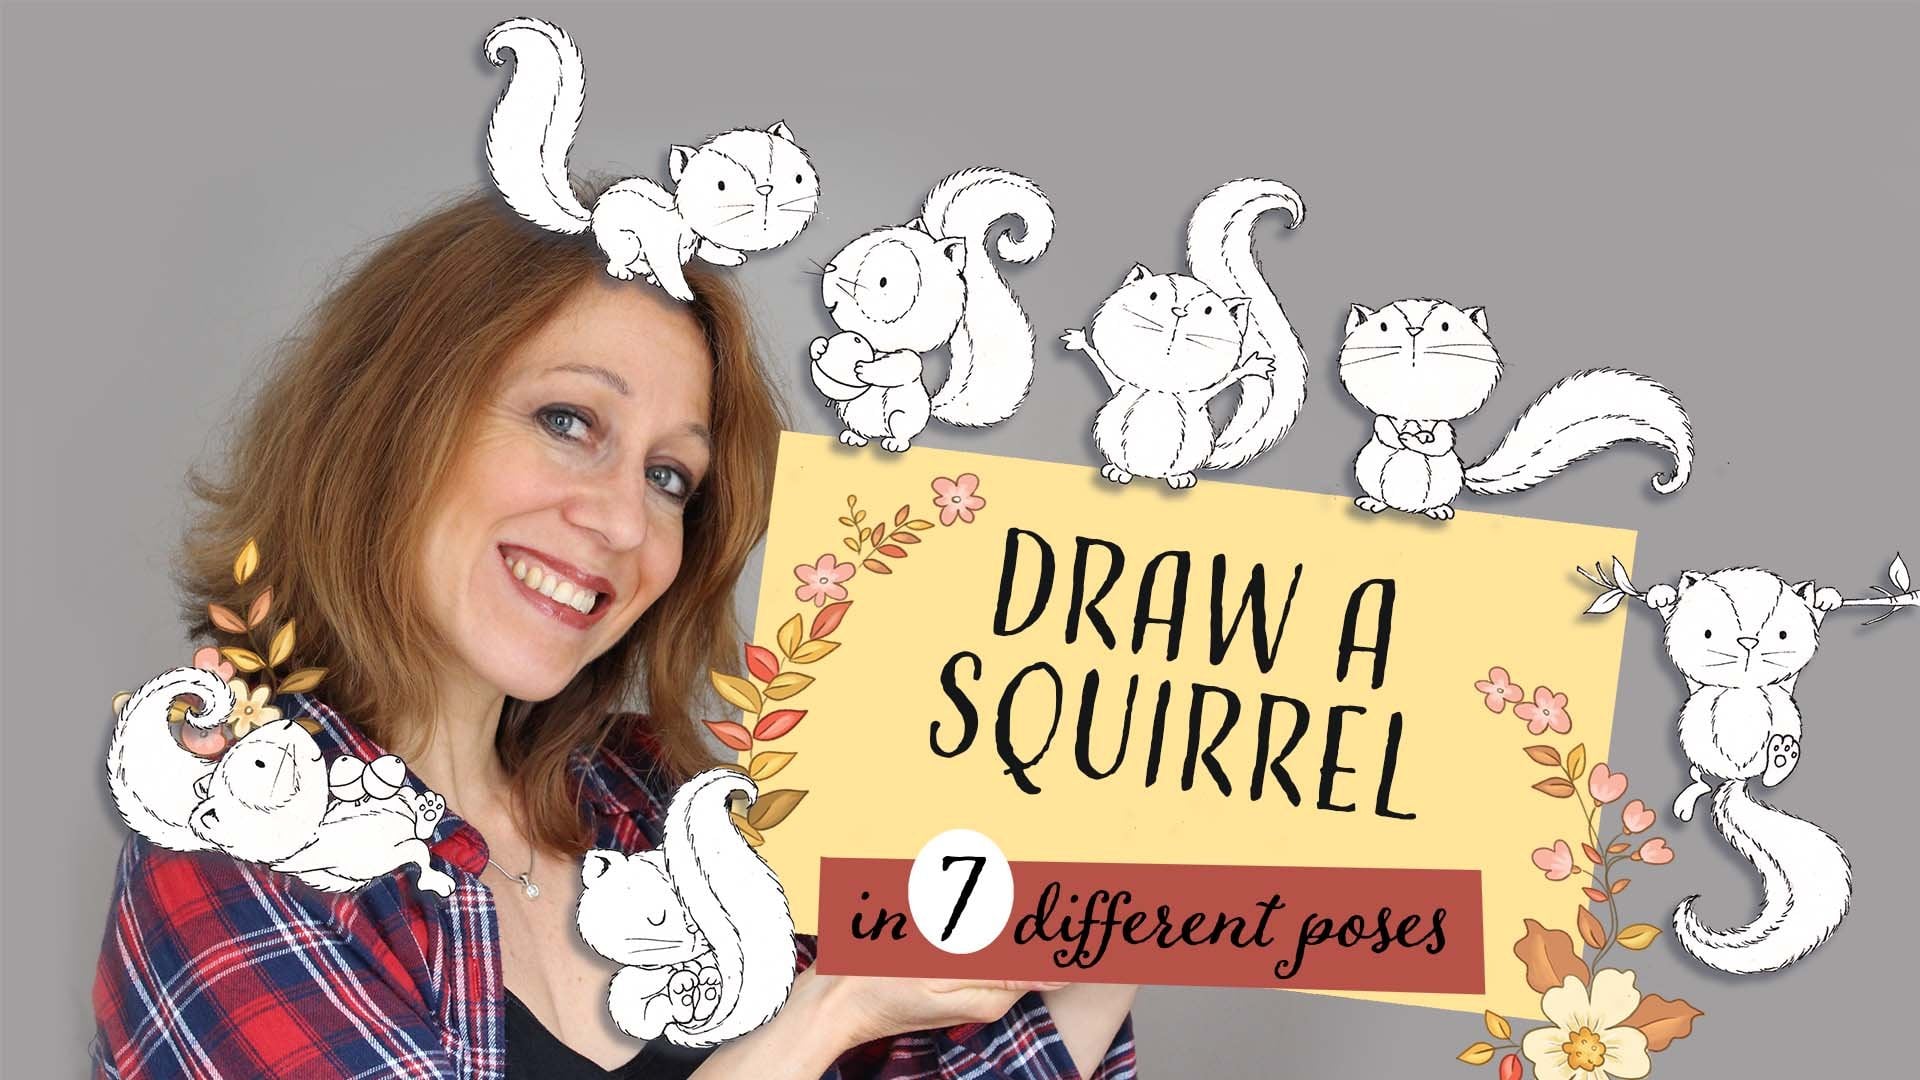
1. Bear Poses Introduction: And welcome to this course of drawing bears. Today, we're going to draw bears in seven different poses and adding a cute and whimsical style to them. So as you can see, I love teddy bears and any little bears. I had them all over my bed and scattered around my house. And that's why I'd love to draw them. I'm an artist from France, and I've had many years of experience illustrating children's books as well as teaching. So today I'm so happy to be able to teach you this course and sharing with you some of the techniques that I use for coloring and very simple shading. And at the end, as a special bonus, taking your piece of art and creating something out of it. It will be fun. And you'll get to use your own unique personal style. But wonderful thing about creating art is that we can share it with others. So without further ado, I'll see you in class.
2. Materials needed: I'm going to be starting off by showing you some of the materials that we'll use in this project. Today. I have here 190 grams paper. And this is what I like to use best because it's a little bit thicker and sturdier. You will need some little pieces of paper like this. So I've cut mine in half. I would say the minimum thickness of paper should be 120 grams. Next, you will need a pencil or mechanical pencil, which is what I'm using. An eraser, you will need a fine point ink pen. This one is size zero-point for, but you can use any that you have on hand or even a very thin marker. You will need a ruler, some scissors, some glue. You will also need a set of color pencils and a piece of card paper. Any color that you wish. I'm going to be using light-blue today. But whatever is your favorite color or something that suits the project that you like. So I'll see you in class.
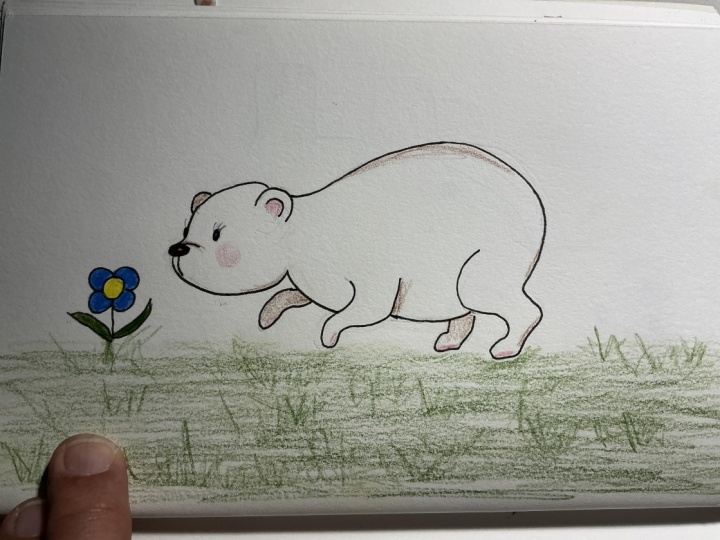
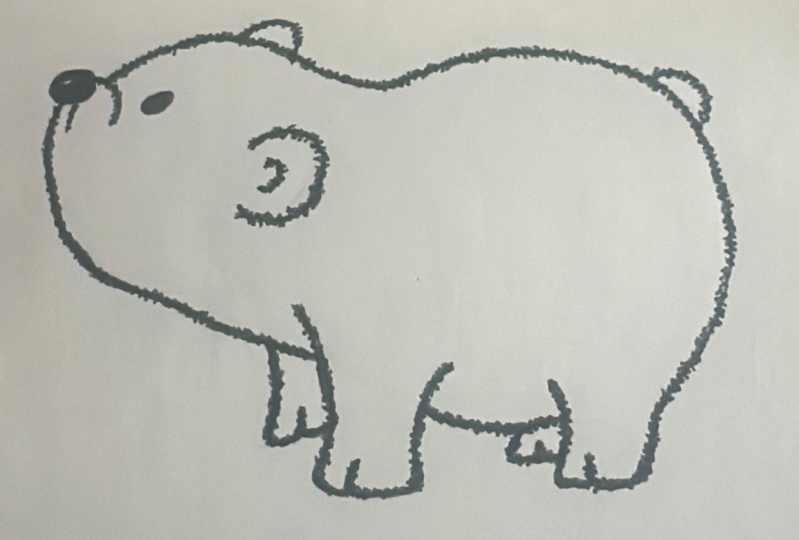
3. Class 01 - Sitting front pose: To start off, I have here my seven little pieces of paper for the seven poses of the bear that we will draw. So I'll start by taking the first one. This will be posed number 1. So I'm going to place a little one here so that I remember which one I started out with. And we're going to do a sit front pose. So for our bare, we're going to start out by drawing a little circle for the head right on the top middle of your paper. Next, we're going to do a little oval to the side here. And two little circles on the front, little bit bigger than one in the back, a little bit smaller. So as you can see, this is for our ears and his little nose and mouth. Then we will go ahead and move to the body. So the body will also be a big circle. This one will be a little bit bigger than the head. I'd like to start off with some basic shapes because it kind of gives you the skeleton of your picture. And then we're going to draw two little ovals to the side, one here for the legs. And when over here, Something like that. So that's our general shape. Our general shapes for our little bear, for the CIT pose. Now we're going to follow along on the sides and kind of drawing the shapes together to make our little there. I'm going to erase as I go just to have some mine's a little clearer. So for this ear, we're going to raise the inside and we're going to just draw a C-shape. Then I'm going to continue with my circle for the head. I'm going to erase that line from the body. Here. I'm going to also, he raised this part and just go with half a circle for the year in the back. Then for here the nose, I'm going to kind of curl it a little bit to the oval. You can go ahead and erase it lightly. And then I'm still following the oval shape. And for the bottom, I'm just going to join them together. So for the top, I kind of curl in and out. And the bottom I'm just joining them. And there we have our little nose. You can go ahead and add a little oval shape for the nose, another little oval inside and then color in the rest. And that's it for now. Let's move on to the body. Going to just follow my circle shape. Here. I'm going to make another curved line for his front little pie, for his front little arm, pause limbs, whatever you wanna call it. Falling the circle shape and kind of parallel. And now we'll do the next one. Swan. So he has a cute, I think, bears the most fluffy and fat you can make them the cuter they are. First, this arm is a little bit bigger, so I kind of do little pause. One that's going behind the other. So I'm going to erase that to show you though. This one is going into that one. There is one little Paul holding onto it and the other one can just go like that. And then you follow the other one to continue your circle. So he's kind of holding hands, I guess you could say. And so that would be his that'll open arm is a little bit bigger than the other, so let's see if we can. So I'm going to try to even that mount like fat. And the rest is just as little Tommy. Now, these ovals here are his legs. So I'm going to follow along as well. Just the top part. And for the bottom part I'm going to add another oval. This will be for his little foot is it'll pause. And we'll have them sticking out like this. And this is his other name. Maybe it was a little bit too big. We'll go with something like that. And for the PaaS, just going to follow the oval and do three little curved lines, 1, 2, 3, 4 the top. And make little circle in each one. And then a bigger one for the middle will be his little. Pop rinse. Again. Here's our oval shape and I'll make 123 curved lines for the top. And in each one a little circle shape and a bigger one for the middle. So now you can see he's facing the front while he's kind of looking sideways, but his body is facing the front. His little legs or an acute sitting position. We can go ahead and do a little bit more detail to the head. So for his ear going to make another curve line, the smaller curve this time for the front ear and then a little one in the back as well. I'm going to make his eyes just above his nose. So this will be a little circle or little oval. I'm going to put just a little line on the top like this. So we kind of know where his noses and you can make a little line going down. I'm not going to give him any expression, but you can, if you want to, maybe make this a little bit further in like this. And this part. I'm going to make it come out a little bit more. Here we go. I'm not even going to close it that way it shows it's his body joined with his head. So we have our cute little bear that you've sketched it out. We have lots of little strokes all over, so we're going to use our ink pen to trace over. That way we have a clean cut line. And I'm just going to go from the top and lifting my pen here and there as I go. Maybe some lines. I'm a I want to open space to make the nose I can color it in and I like to leave a little bit white. Turn your page as you need to for more of a comfortable feel to your drawing. Little bit of shadow for the year. So this is kind of cute, realistic look of the bear. I've looked through a lot of little pictures of bears because I like the cuteness of it. They have their big heads. Course. All bears, I think are like little baby bears because their heads are bigger bodies too. But it's just that sense of cuteness. And that's sort of the style that we're going for today. And what I do, what helps me learn to draw a new animal is to take some photographs and then sort of trace over them a few times, as many times as I am comfortable to then draw them myself. And that's what I did here. And I kind of also, that's when I figured out, okay, what shapes, what are the main shapes that I'm working with for this little bear? And that really helps to get your proportions right. And now you can go ahead and erase very gently your pencil lines. That way you can see exactly what you've drawn. Maybe you've missed something. There. We have our first little pose. I hope that you enjoyed this and I'll see you in the next class for the next bare post.
4. Class 02 - Front, standing pose: Here's our next pose for our little there. And this time he's going to be standing a little there will be standing. I'm going to place my paper this way horizontally, so I have a little bit more width for my bed. I'm going to start off with the basic shapes. So we will have our Bears head circle shape right here towards the side. Worry if it's not a perfect circle, if you want it perfect, you just keep adding lines to where you're happy with the results. And I'm going to make a bigger circle, starting a little bit higher, bigger circle for the body. And as you see there a kind of joined together. Again, even me, I haven't made a perfect circle so you can see all my strokes and that's okay. I'm going to make a circle for the front ear over here because this is the head and the little one back here. And I'm going to make the oval for his nose and mouth area right here and for his legs. I'm kind of I'm just going to do a quick positioning. See where I might like his legs to be. Maybe one here. One in the back here. Something microbes may be more joined to the back here. Something like that. Okay, now that we have our basic shapes, we can start rounding them up and joining them together. So I'm starting with the head for this part. I'm going to curve in a little bit and then out and follow the circle shape. So again, feel free to erase a few of your lines because now you know where they will be placed. At the same time, I'm going to go ahead with this line, even though it's curved like this and the back. Because we still want to see where his head is starting and ending for the year. You don't have to close up the circle. You just make a half circle like a C-shape and another C-shape in the middle, on the top. And here little line and then again here. So I'm going to take the body circle and curve it to the head. So this part will not have any line differentiating the head and the body. Again, this one, I'm also going to join the app. So you can kind of see the bear taking a little shape. Now, this one we can close because this year will be in behind. So I'm going to race. And you can make little curved line inside. Now, let's put his nose another little oval with a little circle inside and I'm going to color it in. And a tiny little D9, so we don't see his full mouth. And for his eyes, I'm going to kind of imagine that the nose would be right in the middle. So I'm going to put one here and the other one over here. So it's centered with the nose. If you want, you can have a little line on the top. Now that we have his little body, we can work on his legs. You would think some of my lines for the legs, I'm just going to follow my rough and maybe add a little too little curved lines for his paws. I'm not going to give him so much details. I kind of like the fat big leg and a tiny little feet pause, look. We'll just have very small, minimal little details on his feet. Again here, 12. And then we'll go in. And you can continue the circle and leave a little space. Leave a little space. Or you can draw the full thing there because this one will be in the back and he has another one in the back here if you want. Now you can see his forelimbs. We won't be drawing his tail because it will be facing the back. He's sort of we're not seeing his tail. It would be right here. I would think. If you want, you could do just a little thing like that, but you don't have to. Anyway. So there is our number two posts now we're ready to ink it. I'm going to start from the head over here. Feel free to go at your own pace. Follow the lines. Maybe it might be a little tricky to know what lines to follow. So take your time to choose and decide on all the stroke lines that you've made. If you need to give a pause on Sunday, wow, lift up your hand. Don't need a stress out over it. It's a relaxing activity. Maybe you're here to relax, maybe you're here to learn how to draw a bear. Maybe you want to improve your skills. There's some animals that I'm that I loved drawing and others that I'm still learning and practicing with. So today I'm showing you the ones that I'm most comfortable with that I love. And as you know, I love little teddy bears around my house. Even have some in my office. Sitting right at my desk that are holding up my digital papers and reminders. I often do the big objects first, like the body. That's kind of one step out of the way you feel a little bit more. Okay. I can do the little details. Now. I can work on little feet. Or sometimes I just work my way around the picture. It's really up to you. So I'll just go ahead and do his military. We have our little bear pose number 2. Now. Gently erase your pencil. And then we have our post number two.
5. Class 03 - Walking pose: This time we're going to make a walking pose. So we're starting off with our shapes. First shape will be the head. How was I to start with the head? And kind of know what direction he's facing. This time he will be looking to the left side. And then I'm going to do the body which is circled as well, but bigger circle. Actually this time, our body will be a little bit more oval because he's kind of moving horizontally for his walking position. Something like that. We will go ahead and make his ears one here, one over here. And his little, the oval for his nose and mouth. His feet will be a little bit more complicated. So you can just follow along with me. I'm just going to make two lines going down here. Just for the basic area where I want his his limbs. And then go like this. Thanks, one will go here. Next one, we'll do something like this. Going a little bit back over here. So it's not looking fully correct yet. Don't worry. Hopefully it will take shape in a little bit. This is just a very rough, okay, now we're ready to put it all together. We have our circles and ovals and just the rough lines for the legs and feet. So starting from the top, we're going to join these lines, the head and the body together. So you just follow the head and will curve it into the body circle. Which means you can sort of erase a little bit here. The head and a body is probably the most complicated where to join. But we'll get there. This time. You follow the circle line for the head and we can erase half of the circle from the back ears, ears facing the back. We're going to again, Joel, that little with a curved line, join the top of the oval. And the bottom one we're just going to continue it. So the top one you curve in and out. And the bottom one you just curve right to the circle. We can erase it a little bit as well. And you can add your oval shape for the nose. And we can do the ear, which will be curved towards is no. So this is where we leave it open. And another C curve shape in the middle. On the top. Here, I'm going to erase it just so I have a clearer idea of where I'm putting everything. So there's some kind of following and kind of just leaving it open like that. And then adding the Tommy. Following my oval shape. I'm going to go ahead and add my I, which is just over the nose. This time, maybe a little line for the nose. You can add a little line like this is other, I would be right behind. You can draw little bit if you want. You don't have to do a curved line for the ear. Now we're moving on to is little limbs, walking limbs. So this is whenever it shows action, it's a little bit more tricky. He's not just staying put. For this is part of the challenge of drawing a bear. And all you have to remember, I think the biggest thing to remember is just to make him fat and fluffy and there's not really, you can't really go wrong. So I'd like to have is the bigger part of his limbs really big? And then it thins out, it gets smaller and smaller for his little pause, which is kind of what we've done here. I kind of want this pod kind of go behind. I'm just going to do this and here, this one's going behind, kind of curving, curling it in cursors, some space for his belly. This one to make it as big as possible. And then this one will be going back and then back out. And then back out. It's almost like an S-shape. And with the rest of his body. And I'm kind of following that too in and out and can even go down a little bit further and make his feet were these small and cute. There's his belly. One in the back has just a little curved line like this. And the one in the friend kind of curves in and then it goes straight. So you can see some sort of action. This one is in front and back. Front and back. Just try to imagine a little better or a little cat walking. And also into this part, maybe it's straight. So we wanted why? Because he's kind of stretching his body as he's walking. Alright, so something like that. Not sure I have a feeling that his head is a little bit too far out here, so I'm going to make it go in a little bit more. Yeah, I think that's his body can be long but his head is not to I don't want his head to be stretched out. So i'm I should have placed the oval little bit closer. So let's see how his nose looks now. I move it forward as well. Handled little line in the middle. Maybe make this line straight away. You kind of play around, see what works. I think every bear I've never drawn to bears exactly the same. But that's okay. That's part of the excitement of art, would be boring if every picture we drew is the same as the other one. Kind of like every recipe I make is never the same because I don't follow recipes. All right, so here's our little walking pose. We get. Now we can ink it. And if you're happy with the result, I'm going to start at the top. I can start with the bigger details. Like the general shape of his body. This is sort of relaxing time. You already had your basic shapes, you have your sketch. Now you have to do is follow the sketch mindset you want. Now you can do your little details. Sometimes I do couple lines for the years. Now's the time you can also let yourself be creative in case you want to add a little shading. And there we have our little bear walking pose. Feel free to erase your lines gently. So as you're drawing. Just enjoy the process. Imagine a little, imagined a little cuddly animal. I hope that you enjoyed it. I'll see you in the next class for the next bare pose.
6. Class 04 - Side, looking up pose: Here we are. We've posed number four, and this one will be our stand to the side pose. Maybe he'll be looking towards the right. So I'll start off with my two circle shapes, which is the basic shapes of the little there that we're drawing. Circles and ovals along the way too. Sometimes I make an oval depending on what position he isn't. So actually, he will be facing this way and I might make him facing this time. I'm going to add the oval for his nose up here. And for his body. I'm going to start it right here. And I will, I think, add an oval. So it's going to go a little bit higher than the head. Has. His body is always way bigger. Most of my animals I like having big heads. And these ones too, it's probably already proportional, the very big for a bear. But it's still smaller than the body. I think the bigger the head, the cuter than the look. And for the legs, I'm going to start here maybe. And just adding the basic outline for one too. I'm kind of following the the oval shape here. And maybe one starting here and the other one in the back like that, something like that. We need to do our ears. So here is will be one here and back here for the other. Our little circle shapes for the ears. And there we have our basic shapes for the bear. Once you're done that, you're ready to put it all together. I'm going to start this time with a little nose. I like his little nose up in the corner here. Kind of even making it a little bit trying angular, curvy, triangular. And then I'm going to follow the shape of the oval and joining it with the head circle. Just like that, just a straight line. And for the top I'm going in and then out to the circle, all the way around. And then you can go ahead and erase erasing that line too, because this ear is in the back, so we'll just see one curve line. You can add another little curved line in there for more detail. For the nose if you want, you can follow the oval shape and just go down a little bit. I'm going to add his eye right here, kind of parallel with the nose and the other one is behind so we won't draw it or see it now. For his ear, I erase it, but I know where it is and that way I can just draw half the circle. And again, have inside here, looks like it's not totally joined. So I'm going to join it straight line. Sometimes my pencil makes all these sketch lines. So I need to erase a little bit as I go so I know which one is the correct one that I want to use. For this head. We're going to follow all the way to this point and then we're going to curve it to the body overall shape. Something like that, or maybe even a little bit more. I'm just going to perform a little bit straighter. And for this part of the head, I'm going to go down all the way straight and soon be straight or down to the bottom of his belly, something like that. So he's he's kind of looking up. I like doing different poses. The other one was a little bit more down. This one is facing up. And then we will do our leg. So I'm going to erase the tummy part and just follow the basic shapes that I went with. Maybe go out a little bit for its paws. Can hear a little bit out for his paws and make another curve line like that. And then taking it back all the way to complete the old shape, kind of point a little bit and then out, which gives them a big, but we can go ahead and continue the belly and then add a tiny little curved line in the back for his back. And this one here too, I'm going to just follow the front one, parallel, but smaller and shorter to show that it's in the back. There we have our little stance pose that you can ink. I'm going to start with a little nose. I do a little dot in the middle, circle in the middle, and then color around that circle. I'd like to give a tiny little bit of highlight with that dot. We're not adding any expression for now to our pictures, but that's something that you can add if you would like. To add a little smiting, feel, a little sad face or anxious expression. And it will sleepy expression with his eyes closed if he's taking a nap. So I hope that with each pose you get a little bit more comfortable. Anyway, and then you follow. You can do either one smooth line. Do a little sketch strokes like that, that's totally fine too. I can't forget his eye. And there we have it. Our little bear. Oops, I forgot to. Middle line here. You'll know eventually had a position them together to make your own bear and your own poses. So there is posed number four.
7. Class 05 - Back view: Moving on to pose number 5, the backside of the bear. Alright, so for this one
we're going to start with the body and just go ahead and make one be grounds to recall. Almost in the middle
of your page, a little bit more facing
towards the left. Like so. And for the head, we will kind of half
a little bit higher. I want to make it a
little bit higher. Almost to the top, halfway into the
body and halfway. So they kinda join
almost halfway. Try to make my circle
then specify can. That's not so important
right now I'm going to make one other circle
for his ear here. And the other ear
will be on this side, kind of in the corner
there for his legs. So I'm just going to place them, start placing them very roughly. Maybe make a line little
bit out of the circle, out a little bit and down, and then a little
curve all the way up. Next one, taking it
from the circle, going down on both sides. And again go inside
and out curved a bit. And the other back
limb will be here. You go. Just follow the circle, down, curve again to the side and
Curved, Something like that. Okay, now that we have
our basic shapes, we can join them together. Going to start with the head. So this ear race it slightly. I'm just going to to the outside of it a little bit like that,
like a backwards. And follow my circle shape. Here, I'm going to
erase the rest of his head because
we won't see it. Here's where the circle was. And here is where I had
drawn a front Paul, which is now behind. So we kind of
continue that line. The head is in the back so
we won't see more of it. Here's this ear is
also in the back, so we'll follow that line. Erase this half circle, and just keep the
half circle on top. Here. I'm going to just keep
part of it and the rest, I'm going to trace it. The kind of meet together. I think something like that. So the pause in front and
the little circle for the body is there kind of crisscrossing
together like that? Here I'm just going to
follow my circle shape. Not complicated to do. And instead of continuing here, I'm just going to laugh. She, I'm going to
continue it a little bit. We're going to continue it
all the way to this leg here. And erase a little bit because I have a
lot of lines there. So I see one clear strokes. Here. I'm going to race the circle shape and go
out of it with my leg. Or N a bit, sorry. Here I'm going in and
following the circled again. Here are going down a little bit more flux you have follow the
shape quite okay. Curve just I'm adding
this little line here for the front paw. Went okay, I'm just gonna go in a little bit to the
side and curve. It has to show this one's curved end to show
that it's going in front. And here his leg is in the back and his paws
are in the front. For this back one. A little bit more competent. It's going to follow
the mine I did. You can even go in
a little bit more. So here you have this
nice kind of bent. So here like this and a little
curved line like that and the rest is in the front and
we won't really notice it. He's kind of bending his
foot a little bit and then bending his knees forward here. Or you can show part of the circle shape and I'm just not going
to close it all the way. I'm going to add a
little U-shape for his tail right in the
center of the circle. Then we have our little air. So there's, this one
doesn't have many details, but it just took a
little while to get everything proportionally
and in place. And you can go
ahead and gets now. My digital story
for this bear would be he's walking
through the forest, looking for a snack, looking for some honey. Art is just loaded with story. That's what makes us want to create art in the first place. We either want to
illustrate a story. While we want to tell a story, and we don't know how
to put it into words. So we put it into art form. So you're probably getting
more used to drawing your bare now a little bit more
comfortable with your lines, your strokes, your
shapes, your poses. Here we have our
post number five.
8. Class 06 - Standing, side pose: Welcome to pose number 6 of drawing bears. So we're going to draw our bear standing up facing the side. I'll have here my little circle shape for his head. By now you probably know all the shapes that you need for your bear and a circle shape for the body. So I'm going to make him start with the same cases because you'll be bigger or he'll go back a little bit. Circle shape for the year, maybe they're just doing little shape. They're not forgetting the nose and mouth. Something like that. And maybe a little circle for the tail. So that's our general shapes. Now to put it together, go ahead and erase some of the lines so I can see today it'll be clearer. For the year as you know that frontier, we will just draw it halfway along with another half circle. We can do the same. The Bacchae are at the same time, since it's just a little curved line, will follow the circle shape for the back of his head. I'll go a little bit in bye. For the top. I'm also following the circle. And then I'm going to join it. Like the top where we will have his nose, again a little oval shape. And I'm going to follow the oval. And this time just go straight in, straight down to the circle to continue the circle shape. Not sure if it's a bit too far out. See? If I had it a little bit smaller. So feel free to play around and decide what looks better. It's okay to make mistakes. Yeah. Maybe like that he's not his head is not too long. Maybe this one needs to be out a little bit. Switch your eraser is four, so don't feel bad to use it. That's why we work with a pencil, kind of gives us that liberty to erase as we need to. I'm going to make his nose a little bit more, little flatter. I think He's facing he's definitely facing towards the side, so he doesn't even need a beak. Oval knows because most of it is going sideways. Most the other half is on the other side where we don't see. And here you can go ahead and we'll go ahead here. Kind of strange. And here we're going to go ahead and join it to the tummy. And because of that, we might go even in a little bit more and see what it looks like when we put the eye. Maybe a little line for the nose. All right. And we have his big belly which will just follow all the way to his leg. Can erase some of the lines here. Now that we know where we're placing everything. I'm going to make a little bit in front of the lake. The lake will go down and out in little bits with a little curved line for Paul. And straight back out. The second one in the back, the same little curved line there for his arms. Upper legs, upper limbs were just going front limbs. I mean, I'm just going to make he might just be folding his hands in the back. So I'll just kind of curve 1 his arm there. This one has kind of out like that. And to the back. There'll be where it ends and his other arm could be even folded in front. Something like that folded 1, 2, 3 is kind of folding his arms. And front end. You can add as little tail on this side. Then we have our little bear. I might even add some little further on the front. You could do on the front of his belly, you could do even on the front of his head like that, I think makes it extra key. And we're ready to ink. Now you're a pro at this pipette. You can draw any little bear in any position and be so curious to see some of your works after doing this course. So feel free to send them to me with love to see. And don't forget that are big project. And one reason why we made all these poses is to be able to make something useful out of it. You don't always have to do that in your art. Sometimes it can just be for fun. But I'm giving you an example of a project that you can make with the art that you've learned to draw today. So once this is finished, I'm eager to see you in our last session of this class. After our erasing Wednesday and cleaning up our picker. Here we go. I'll see you in next class.
9. Class 07 - Rest, relaxing pose: And this one will be a laying down pose. I'm going to start with my circle for the head right here. And I will add another circle for the body over here. So it's kind of overlapping with the head. And it's way bigger. But still following an imaginary line here because he'll be laying down either on a bed of, on a bed of leaves, on a blanket on the ground. Alright. Now we can add our other shapes are smaller shapes for the year. Circle for the ears, both sides. And we'll do a little circle here for his leg. And a little ovals here. And an oval here for his front here, another oval for his foot. Something like that. Oh, and we cannot forget that oval for his nose and mouth. And there's our basic shapes. Now let's put it all together and join them. So for the top, I'm just going to take my circle shape and join it directly to the head like that. But I'm still going to use this line here. This one, I'm going to erase the back, I mean the front. This one scope it to bake. I'm going to erase some of my lines here for the for the head. As I know where they are placed now, for this ear, I'm just going to keep the curve on the outside. And this one as well. This one I'm going to bringing bringing it in somewhat inside because it will be more in front. And I'll add another C-shape in the middle is out. Here. I'm just going to follow our circle shape all the way down, all the way around. And here we have our oval. I'm just going to go ahead and keep that and draw our oval for the nose and draw it up there. I can go even a little bit lower. I draw another little oval in the middle and then color it in. And I add a little line towards his mouth. But we won't be adding any expression again this time. That's left to your own imagination, your own creative desires. So I like to teach you that basic little techniques that I use for drawing. But then some parts I leave to your imagination. Because that's what makes art special. You add in your own little twist, your personality, your character into the picture. So he will be seeping. So we're going to make his little eyes closed this time. Just say parallel with his nose. And for his legs, I'm going to follow this circle. Starting halfway. The rest I will erase all the way to the middle of that. And then we'll go in with his little pause, this little foot. I'll follow the body. I need to do some erasing here because it's not very clear. So I'm gonna go follow the body and go down a little bit. Here. I follow and then I go out to bid. And a curved line in the middle. For this one, I have my two ovals, but instead I'm going to widen it up and do my two little curved lines. Let's see how that goes wide and follow it from the bottom dirty little curved line, another little curved line. Like so and maybe towards his head. And I'm going to make another little line like this for where his body Okay. Let's see that in his poor his body continues. Maybe I don't even need this line. I might even flatten his head out a little bit. You could also make a little Pinto if you wanted to, something cute if you wanted to add to the picture. But for now I will just keep with the teddy bear. The bear. Erase this part. And we can add his little tail in the back here. That'll tell me, continue with a circle of his tummy. Something like that or if you want, you can also add other part. Right there. He's kind of leaning on his path. You wanted taking it from behind, something like that. So I go curved, curved, and again, and there we have our little sleeping position for our bear, so Q now you're ready to ink it, doing all my outer lines first, if you wanted to, you could even in call the outer lines with a thicker pen or marker. And then all the other ones could be with this thin pen here. Kind of like doing that sometimes helps your picture to stand out even more. Now we go with the little details, even little shadows. Sleepy. There we have it. Now it's time for some gentle erasing. Some pens, you have to be careful. Some pens smudge a little bit. So that's why I start off very slow. Case. You've missed something, you can see little clearer as well, and you can go ahead and fix that with the pen. We're nearly there were nearly to the end. So I'm so excited to be able to see you in the next one.
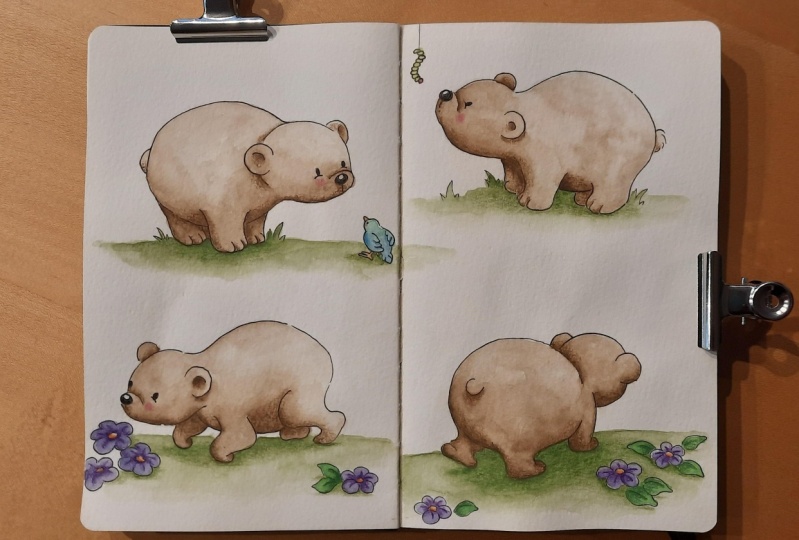
10. Class 08 - Coloring and shading: So welcome to this part of the class where we'll be doing a little coloring and shading. So here's what you will need to. One of your pictures that you've drawn. And choose one your favorites that you would like to incorporate into this class. I think I'm going to go with this one. And you will also need a set of colored pencils. Just be sure that they include some dark colors like blacks, browns, and grays. So in addition to my coloring set, I have these ones because that way I have full range and can choose a variety of colors. And now we're ready to begin. So I've already kind of did a very quick little example. I'm going to take start out by taking my black coloring pencil and just starting from the corner, from a corner of the bear. So I'm doing starting from under the ear and I just gently color. You don't have to push hard because this is black. And I'm going to make this a polar bear. So I'm not going to be coloring in his full body because it will just be white. Now if you wanted to go ahead and do a brown bear, all you'd have to do is color your bare fully in brown. Whatever brown you would have. So light brown or dark brown. And then you would follow the same shading techniques as I'm doing here. So take a moment, you can pause the video, just color it fully and brown, and then come and join me for the shading afterwards. So first of all, for the shading, I'm going to choose my light source, so I want my source to come from the right side. So that means most of my shadows and shading will be on the left side or underneath something. So I'm going here with the left side of the bear's head. Little bit of the left part of the ear. Definitely on the inside. But very gently again, because he's supposed to be white. If you have a gray, you can also go ahead and try that. I'm going to do that after I'm just starting with the darkest color. There's other ways to do it. You can also start with a lighter color and then go from light to dark. This time I'm going from dark to light. So again, here under his head. I think the shading is really what helps your little character to stand out and to help bring him to life. Brings a little more realism to your picture. Not just to cartoonish. And I like the aspect of the color pencil because it gives a little bit of a texture as well. As you've seen in some of my other courses. I use watercolor to begin with. But this time I just decided I'm gonna go with pencil. I went to encourage you to just use what inspires you in the moment. Here a little bit of this side as well for his arm. I'm just following my curved line with little little strokes. Maybe towards the edge I go a little bit darker. And I will do this part here because it's behind his arm. So the further I go into his body that lighter as it gets and then I make it a little bit darker. Right at the edge. Here again, it's underneath, it's behind his foot. And here the light is facing here. So I will put a little bit of shadow on this side of the leg. For the foot, you can go ahead and do the same thing. Just a little bit on the left side and following your curves. So that's all it is. All there is to this simple little shading technique. Choose your light source and then put your shading on the opposite side, following your lines. I can even add a little bit on this part of the nose. You're going a little bit under the nose if I want to. All right. Now, you can go ahead and take your gray, your lighter color. And we'll do the same thing. But just a little bit further out. And that way it sort of blends in with the y to little bit better than the black does. If you don't have a gray, don't worry about it. You can just continue with your black colored pencil and just go even a little extra lighter. Some parts that I want a little lighter, I can even add the gray without the black, for example, under the head here. I don't know if you can tell on video. It's a very gradual, very light difference. You know how digital gray because his arm is in front. So if its belly can be a little bit darker, this leg, I might make it fully gray all the way in the back. Even this foot wanted to hear for the arm, I'm going to give him a little gray on the left side. I didn't want to make it black because I wanted to I wanted to keep the very dark black color for underneath. Here is when you can bring in some of the gray, little extra shadow. Here, I will put a little bit more gray as well. So again, with your pencil you can make little strokes or little circles. Even sometimes I do stroke, sometimes I do circles, especially on the curvy parts and wholes circles I find work well. So by doing it very gently, you kind of making a nice pattern for your shading without seeing all the lines. Then I just go over and over again. It takes patients too. And I turn, my little bear has smoked for what is most comfortable for my hands. And I go over and over again. So I think that's pretty good. Now the last thing I'd like to do is add in a little shade of blue because that helps the white to come out. So pull the bears are beautiful white colors. And by adding just a little touch of blue, makes that stand out to even more. Not too much. And some came out, I don't have a super light blue. So if you don't, then just make sure to do it very lightly like this. And I just follow over my other shaded colors. It will stand out because it's a different color. So it's sort of the same when you draw something, either a white flower, you can often use a blue to bring out the white even more. Or sometimes when you draw something, something see-through to meet that just makes the bear look even more white. Tiny bit on this side very, very lightly. It has nice even where there was no black. And that's, that's the basic general techniques of shading. We're not going into delving so much into all the shading rules. I'm sure you can find another class on that. Wherever you're watching this class. This one is more just the very basic techniques of draw. I've coloring and shading are middle there. And also I find that because it's a little cute, cartoonish style. Sometimes you can go by the rules and sometimes you can feel free to what looks good to you. So don't be afraid to do that and accept except yourself, except your feelings of satisfaction for how you make it. Alright, I think this is cute. I love to end with a cute little cheek color. You can use either pink or red or both together. It's a little bit too dark. What I do is I just start by coloring it and then I gently erase it. Just like me, like this in a circle of ways. So it's, it kind of follows the shape of the cheek. A little bit more red and pink. So just a slight color. You can also try your finger for a little smudging. So this paper is not really great for smudging because it has some texture to it. Anyway, there we have it, our finished colored product. So let's move on to the next part of the class. See you there.
11. Class 09 - Project. Creating a bookmark: For this class project, I will take you through the process of using the cute bear arms just drew to creating a perfect gift for a friend or loved one, or even just for yourself. Together, we will make this useful corner bookmark from one of our drawings. That's what makes this the perfect drawing course. You growing your skills. And you get to share it with others in a creative way. Let's get started. You will need the rest of your materials. So you probably have your piece of cardboard, your scissors, and your glue. And you will again need your pencil, eraser and fine point pen. And of course, don't forget your acute little bear picture that you just finished coloring and shading. And we're ready to begin. So start out by taking your piece of cardboard, your ruler, and pencil. I'm going to choose the corner of my cardboard. And I'm going to measure from the top to the bottom, I'm going to measure. So I've already done a rough pencil. If you can see, I'm going to measure 12.512, basically 12.5. So from the top to the bottom you measure 12.5. And from this point to this side, you also measure 12.5 or so. And then you join those two lines, those two dots, straight line with your pins. So and then I'm going to find the middle of the two. So it's 18. Exactly a teen. And half of 18, it would be nine. So I take my little pencil, put a dot, and then I'm going to make a line from my dot to the corner of my paper. Just draw a line right across. From that point. I'm going to make a little line going down a little bit towards the left side. And here again going down a little bit towards the right side. And then I'm going to draw a parallel line by this to join the two. And there we have our little triangle shape for our project, which is going to be a triangular bookmark. Now you take your scissors and you just follow the lines that you've created. So make sure to keep this little flap here because that's very important. That's the part that will help us to put it all together. I love to use your little works of art and make it into a fun little project. It's going to go ahead and make this cut very slightly because here my edges not super smooth doesn't really make much difference in the measurements. So this one is our little bookmark. Now I'm going to take my ruler and I'm going to hold it from the end of this line to the center of my point. And I'm going to flip it over, make sure that it's in line with this line. So this point should. And at that point, because it's, it's a cardboard, It's a little bit you have to have it firm hand, a firm grip. You can even use your ruler or the end of your ruler for your fold. Something my fat. And you can open it, you can even do it the other way around. And then you do the same with this fold. So the first time around, I, I do the fold like this over. And then I do three like this with my ruler. Can do it on both sides. If you want to go. Now, you choose the better side. So if this one has pencil, has all my markings, so I'm going to fold that in so that I don't see it. And this one, your flap, you will fold it in as well. She filled that in. And then you fold this on top. And then you go ahead with your scissors and cut any extra lines that are sticking out of your fold, fold the triangle. So I had the little end here as well as a little bit of extra paper on this side. That way, it's perfectly in sync. Now you can go ahead and use your glue stick. Or if you prefer a heart stronger glue. I'm just using a glue stick and then. Folding this over like this, and then I'm going to put it under a pile of books. So while you are working on the next part of the project, you can let it dry under a pile of books. Moving on, you will need your little bear picture. And because this is a bookmark, I'm going to add something to the picture. So get your pencil and eraser and your pen ready. So this is all about art and drawing. So, and it's for little book, the bookmarks you can use for favorite book. You can use it to gift somebody for their favorite book. So I'm just going to draw underneath our cute bear and little book. So he'll be sitting on a book. Of course, that's not something that we do or want our kids to do. But little bears have a right to it. I don't know about you, but I have a little bear sitting on a pile of books just for fun and cuteness. Okay, So I made three parallel lines, 123, and then I'm going to join it with a middle curve. And then a curve down. Again, curve and curve down to my lines. Here, I just closed it like this. Then on the bottom I make a little mountain curve. And then I'm going to just make a straight line, the side and a straight line to that side. Underneath that, I'm going to make a little curve line, very little. And I'm going to again straight line here and just do a very thin parallel line. Now for this side of the book, I'm going to go make a line down, a little bit curved down and hear a little bit curved down this way, and this one a little bit curve that way. And again, I'm going to join these two together. Go out a little bit and make a parallel thin line. This will be the cover of our book. And again, this side just curve it goes out to little bit here as well, make the cover of our book. And inside I'm just going to make a C-shape backwards, C-shape and color that in. For extra little details, you can just make some little strokes coming out of the center of your book. And at each end as well, each corner of your book you make just make 34 depending on how much space I have. Something like that. If you want to add to your book some texts, you can just make little lines and you just make sure that you follow the curve of your book. So here the book is going this way. Here the book is going that way. You can even add a little picture to your book. Just following the lines. Here again, I'm going to add a little picture to the top. And here are some more texts. And another little picture there. Something like that. Now you're ready to ink it. Just like we did with our teddy bears. Are did a little cute bears. You can take your pen and you follow your sketch lines as best as possible. You can even put your hand up a little bit, a little space between your lines. Here I'm leaving a little bit of open space because it's still part of the book, part of the pages. And sometimes you don't see all those little details. If you had a different color, different size pen, you could go ahead and make all those little details. A thinner with a thinner stroke, a thinner size pen. Since I just have one, I'm just paying attention to make my strokes very small, quick and light. And for the thicker outlines, I just go a little slower. And I push a little harder on my pen. For this here the part, especially the lines, it can be very light because it's not very important detail of our picture. And there we have it. So now gently erase. And you don't want to erase over your Bears coloring. And you can go ahead and take your color pencils again. And we're just going to do a little bit of colors. Just add very little bit of colors again because our book is white, I'm just going to add a little bit of blue to the edges of the pages like this. Yes, this picture has a lot of white, doesn't end. And a little bit to the middle. With our polar bear, with our book. We have quite a lot of white color there, but you can bring out some extra color and I'm going to make Maybe a green cover. So here's when your color comes in. You can choose red, blue, green, whatever you want. To add a little bit of green for the book cover. And then you take your black and you add a little bit of shading the edges of the book, especially here in the middle. Just a little bit and you can color this little circle in one, just like to edit a little bit so it looks like a dark color there. And if you want, you can also go ahead and add a little shading under your bear. Oh, that looks like he's not just sitting in the air. He's actually sitting on the book. To give him a little bit. I shouldn't have added shading here because our light sources coming from here. So pay attention to putting your shading behind the light source. Behind his foot. Had a little bit under because his arms are taking up the lighting space. There. We have it. And you can even put I don't think it's necessary to put shading under the book because we're going to be cutting it out. So that will be our next step in our project. You take your scissors and you just cut around your picture. You can either cut it out exactly to the lines. I'm just leaving a little white because it makes it easier that way. And I know for sure that I won't be cutting into my picture. But you do as you wish to be called the time that you lead. Okay. We have our little bear and I'm going to take from under the pile of books my little triangle. So now you decide if you would like your bear up here or further down. Further down could look cute. So I'm just going to show you how it would look. Like I have a book here and basically, I need to make sure that I do it the right way. Be this way. Don't do don't make the same mistake as me. So it always needs to go this way to follow the corner of your book. Unless of course you're putting it from the other side, but it makes more sense that we have our bookmark on this side. And now it has an opening and it's glued in nicely. So you would just put in your paper, the papers of the book. So now you can decide where you would like your little there. If you put it down here, you can have his little head sticking out. Just kind of nice and convenient because it's not his full body or you can have just the whole bear sticking out in the book on the bookmark, which is also cute, even cuter, but it depends on your bookshelves. If they are a bit high, then you would kind of choose to make your bookmark and your bare St. peekaboo with his head like this. So I think that's what I'm going to go four. That means I'm going to glue and R, You can take it out of your book. I'm going to glue it around here. So you take your clue again, your glue stick. And you put new all over. And then you have his head peeking out. Can even have a little part of the book picking peeking out here. It doesn't really have to be fully in the triangle. I like the little look of it sticking out on all the different corners. Here I have this paper from the bear, which I might add to the back of it. It's going to strengthen and make it even sturdier. So glue that. And then you can go ahead and cut it. And there we have our little bookmark that you can give to a friend that you can use in your own book. Let's see how the final result looks like. Look how cute that is. I little bear st peekaboo. Now, we can so easily find our little place in our book where we've left off. So now that you've created this amazing project from your art, you can get some ideas from my other courses for even more projects and gives to make from your dental Animal Art. Good luck and have fun on this art journey.
 Agnes De Bezenac, Designer of Tools for Wellbeing