Transcripts
1. Bird Poses - Introduction: Hello, and welcome to this course of drawing little birdies in a cute and fun whimsical way. My name is Anne, Yes. And I'm a French artists. I net them friends. I've had many years of experience teaching and illustrating children's books. So in today's course, you'll learn how to draw birds sitting down, standing up, maybe flying using their wings in different ways, which can sometimes seem a little bit overwhelming. So I hope this little cores will be helpful to you, or even just for fun and recreation. I hope that's using some of these little tips and techniques. You'll be able to take it further and create some of your own little creatures. In our last class of this course, I welcome you to come and experience our little project together, where we'll take one of your drawing and we will go a step further and create something out of it. And that will be loads of fun though. I can't wait to see you there. Let's get started.
2. Materials needed: So here's the material that we will use for this course. First of all, you will need some paper. I have some here that's A5 size and it's quite thick. For extra durability. It's 190 grams, but feel free to use whatever you have. I would say 120 and above would work just great for this project. Then you will need your pencil or mechanical pencil, which is what I'm using today. Your eraser. You will need a fine point ink pen. So this is 0.4 sides zero-point for, but you can use something a little bigger if you have or even a very thin marker. You will need a ruler and some scissors. You will need seven of these papers for the seven poses of our little animals. So I'll see you in the next class with all your materials ready.
3. Class 01 - Side, standing pose: Welcome to our very first class of drawing birds. For today, I have my paper ready, so one of the sheets of paper that you cut will prepare it. So our very first one is going to be assigned stat. So far, a little bird, I like to start off with some basic shapes. I think that's the best way to start at 20 learning to draw. I've played around. I found some birds photographs, and I just took the photograph and I kind of did my imaginary shape lines. So that's the way that we're working with today. So our basic shapes for a bird will be an oval for the head. Even though we're not going to follow this to a T. And then we're going to do kind of like a leaf shape. So it starts out like an oval. And depending on the position of the bird, will be the point t part of. So a leaf, a normal leaf would have two sides pointed or kind of like an I. Instead we're going to have one curved and one more pointy. Now I'm going to follow. So I have my eraser right beside me. So I can kind of already raised some of the middle lines here. And I'm going to kind of join my shapes together. So on this side, I'm going to totally join them with a curved line. This one, I'm going to also join it with a curved line, but the other way kind of like that, which weighs a little bit of my lines because they're a little thick. So now you can see the bird slowly taking shape. I'm going to add the tail so the shape, if you want the shape, it would be kind of like a cone or triangle shape. And I'm going to go ahead and already draw little tail feathers, of course. So I've just make three different little. I'm not going for any specific bird here. So you could kind of alter it to the bird that you would like. For now, we're just doing a very general bird. And one other shape that we're going to work with is the same as the body, but this time smaller, which is going to be the wings. So again, a curved and point-of-view. So I'm facing it a little bit towards the left, bottom side, whereas my other one was very horizontal like this. Now that I know where my basic shape is, I'm going to slide the eraser so I can see my lines a little bit better case. I'm following the same curve here. And for the wings, I like to go out on the top one like this. Again for the bottom one. And the third one, I kind of bring a and just like the third, fourth little feathers. Because we're doing like a cute cartoon style. We're not going to go so detailed. Which is why there's not too many feathers involved. Okay, I'm going to just erase this and put it online. So we have our general shape. I'm going to make a cute little oval here and a little triangle for the beak. And some little additions. We can add a little feather to the top of the head or two. And of course we won't forget his feet. So I'm kind of going with a middle of the head or the body where his feet will be. And I'm going back a little bit. So there's different ways to do it as you'll notice, this one, I'm just going to do a little bit back like that, a little bit back. And as he's standing up, I'm going to make him and I kind of just do a curve, long curved line like so. And the same with the back one. So we don't see this one as much. Maybe barely in the back, depends on the position that you want for your bird. Alright, and that's very much the general thing. And we can even add some little lines like this for some extra tech texture and cuteness. And even little curved lines like this where the wing has feathers. Now we have our little bird. So as you saw, we had, it worked well within our shapes, our oval and our leaf and our second leaf shape. And that was our bird side stand. And basically we're just going to follow the lines that we worked on. I start from the top and then I will usually work my way down. Sometimes I make straight strokes all the way to the end and sometimes I just do little ones like this. If I'm not so sure of myself. And I also like little open spaces. And I think it kind of makes it look cute. And also on perfect pitch is kind of cartoonish style. I find that this line art part is so relaxing. That's the time that I usually like to listen to music. While I do my line art. Most of the time my thinking process is at work. So focused on sketching that I don't listen to anything. At this part. You just following your lines that you worked on. It can be fun. Choose your favorite music. You don't always have to ink these little details, but I'm just doing it for the sake of the course because I usually like to use color or pattern. Pattern when I color. That's okay. And I'm going to gently start from where I started my inking. Erase all my pencil lines. We have our final little side pose.
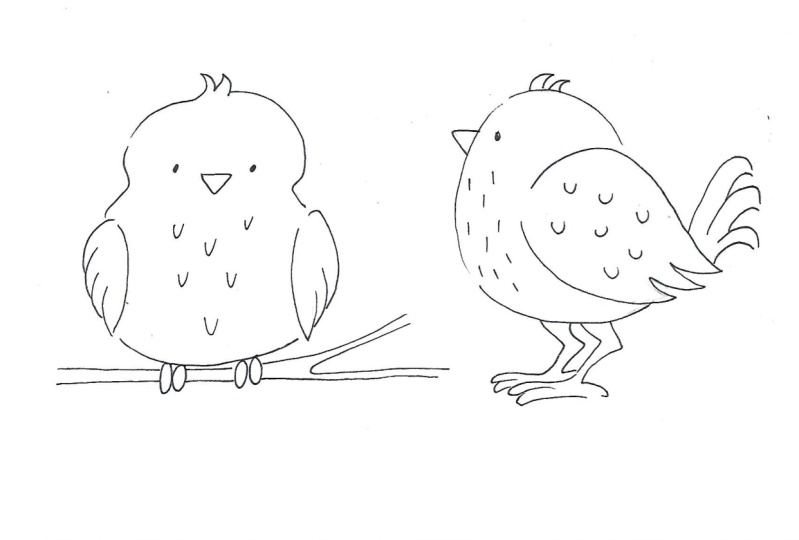
4. Class 02 - Front sitting pose: Welcome to Class 2 of drawing birds. You can imagine this bird sitting in a store, sitting on a branch. And we're going to start again with our basic shapes. The oval for the head. So as you remember from the first class, it's not exactly the perfect way to do a bird. If you know all the scientific aspects of it or all the bone structure and all that. I'm just following this rule, this general rule for drawing my cue to Windsor Colbert's. So for this one, this pose, we're going to have two ovals. So one smaller one for the head and a bigger line underneath for the body. And of course they meet in the middle. And I'm going to add little curved line on each side. For the wing. I'm going to add, I might to go halfway, almost a little bit lower than half. An imaginary line for the bird's eye. And I will draw them like this. Cross. Think if you leave lots of space in between, that makes it a key. And we will go with our beak little triangle. Right in the middle of that. Next we'll add a little more detail too. Our body shape. Can I'm going to slightly just so my lines are not so dark. I can still see the general outline. And I'm going to kind of curve these shapes together. Put them together with my curve so we can still see the head slightly like so. I can go ahead and erase my little imaginary lines for the eyes. I don't always draw it, but it helps. I'm drawing it to help show you. I'm going to give a little more detail to my wings. So the first one will be a little bit bigger and then it will get smaller and smaller. So we're kind of going in the back. We see little more front one and then a fold fold out towards the back. Something like that. For the little head, I like to add an ETL crown. To just for fun. I'm going to add some little texture of little U shapes for more feathered look. And if you want, you can even go ahead and add more details to your bird. So this bird, we're going to give him a little and little hat type thing. And this you wouldn't really draw, but it's more like the different colors you would use. So I would use maybe a darker color here and then another color for the rest of the body. But he kind of adds a little something to our bird. And again, this is a very general bird shape. So you can go ahead and add a different B Corps, different wings and definitely different colors depending on what bird who would like to draw for your project. This time, because he'll be either holding on to a little branch or sitting in an S. So either you would see his his little feet or not. So this time they will be like that. They're kind of curved onto a branch and imaginary branch. And that I will leave to your imagination. Now we're ready to move on to the king. So I'm taking my fine point pen. Basically you just follow the lines. You'd have lots of lines like I do. You have to kind of choose here which ones you're going for? But you can probably see which ones are the best or which ones you prefer which one spoke the most fitting to your picture. And as you can see, I leave a little blank spaces too much by now. You probably know why. As I mentioned in the first class, you have two different sizes of pens. Or if you have a marker and a pen, and you can go ahead and do your outline with a thicker pen, thinker size or the marker. And then the inner objects like this, for example, you could go ahead and use thinner point. I'm trying to be very gentle, barely pushing on my pen. I find that it's really nice when you can have the different thicknesses. And that was really quick and easy. Now we're going for a very gentle erasing. We're all done. Our little pose number two.
5. Class 03 - Flying: We're going to be doing bird flying. We're going to go ahead with our shapes that we've learned from class 12. For the head, we will do an oval. This time. You will make your oval on the bottom side of your paper. Let's kind of like a longish oval. And then we will do our leaf shape again, this time on the top. So one side is curved and one side is pointing. I'm pointing it not totally to the top and maybe a little bit to the side. We're going to go ahead and erase it very slightly, but still able to see my sheet maybe one stroke this time. So as you can see, don't feel bad to use as many strokes as you need to make your shape. Once you'd like the position that it's in, then you can go ahead and erase it and just make one smooth very light stroke. And then for our wings I'm going to do another leaf shape on this side. So here is towards the top or the bottom of our bird. Same here, but this one is going to be in the back. Again, kind of facing the same way as the other one, but opposite. So something like that. And we can make our little cone shape for the tail. So that's the general shape of our bird. Now are going to go ahead and just very gently erase so we can the clear idea of where our detailed lines will go. I'm going to start by the head and kind of joining my oval shape to the leaf shapes. So this one here, I'm just going straight. This one, I'm going to go slightly in that way we see a little bit of the head. And I'm going to make the eyes all the way to the bottom. Because he is facing, our little bird is facing down and the beak right in the middle. That changes everything. And what I'm going to make my leaf shape a little bit smaller. Because I love my birds looking really cute and chubby and like little baby birds. That adds to the cuteness. So go ahead and you can leave yours a little longer if you wanted a little bit more realistic. I just made my little bit shorter. While, while we're at the tail, we can go ahead and add our little lines, going to make lots of little curved lines again. So I made for you, you don't need this middle line anymore. Takes shape all on its own. And we can put a little more detail to our wings. Fight even little space just to show that it's starting with the top one is always easier. When I make a little bit curved like this. The next one as well, kind of leave some space between. And then the next one, I kind of join them like this. And it gets smaller and smaller. And same for the other side. This one will go curve, little bit curved and then out. Just for variety. I always do the second, I'm not sure why, but the second wing, the second feather a little bit further out. And then you joined the next ones. So that looks about right. That's our general shape. Now if you want to add little bit more detail, you can go ahead and either add him little, little shape like this or maybe Another one. There are so many different kinds of birds. So I think the best thing would be to just go and look in nature or internet and find some birds, some shapes, some colors and patterns on the birds that you like and enjoy. And I'm going to add a few little lines on the back, something like that. So there's our needle moving bird, flying bird. If you want to make him look like he's flying, you can make little lines like this that shows movement to show where he would be flying from. But that depends on your picture and what you would like surrounding your little bird. Or you can draw a little clouds. Anyway, we're not going to go too deep into that because we're just focusing on our bird flying. Now we're ready to do some king. So take your fine point pen or your marker and just follow the lines that you've drawn. So I can see that I have my darker lines. Course. There's quite a few of them, but I'm just going to go with whichever ones I like which one suits me. And sometimes I just stephen some blanks as well. So turn your little papers very easy to turn because it's a small piece of paper. Turn it as you need to for whatever is the most comfortable. Because for the inking part you want to have a very steady hand. It's not like the sketching or you can add as many lines as you want to get until you get the right one. This one we will not be able to get rid of. But of course, if it's not perfect, probably nobody else will notice. But to you, it's going to go with the flow. I'm adding that little lines like this, but you can also add a different pattern if you want. You can add different colors. I really encourage you to go ahead and follow your own style, your own unique wishes. As we do this course. Because that's so important to put a little bit of you into this. This is self-expression. This is sharing about you sharing your voice, sharing what you love. And I'm leaving out the little details for now until I know for sure what I'm going to use this little bird for. Right? We're done with our number 3 pose, flying pose. I'll see you in next class.
6. Class 04 - Singing: So for our class number 4, we're going to be doing a little Coase of our bird flying, singing. Again. Now you know pretty well we're going to do our basic shapes, which is an oval for the head. So this time I'm doing it right in the middle of my page. Facing, facing sideways. This would be a perfect front oval. But we're making it go a little bit sideways because that's where I would like my bird to face. And for our leaf shape, for his body. We're going to make it really, really sideways. Something like this. Next, our little cone shape for his tail and the wings, we will make two little ovals again leaf, curved leaf shapes. This one, this one will be a little bit bigger. Something like that. So that will be the general shapes. I'm going to at least start erasing the middle lines there that I won't need at all. Go ahead. And if you have too many little sketch lines, you can also erase some of those. Now we're going to be joining our lines. So for the head I start, I always start at the top and join the head to the body. So I kinda go in and then out, follow the curve. And on this side, I come in and out as well following the curve. Sometimes I will leave a little line, but not on this side. So I'm going to erase already what I don't need it here. And then we can go ahead and start with our leaf shape for our wings, cyber its wings. So the first one is going to be bigger and even go in a little bit like this. Next one out, next 12. And then the last one, I kind of drawing that for this front wing, I'm going to leave a little bit of blank, show that they're joined. I might have two little lines rather than a full line. And he's going to have his bigger wings and front top one quite a bit bigger as well. The third, and as you see, I'm following the shape of the leaf. And each time making it a little bit smaller than the first. And there we have it. And now we're going to go for the tail. So either you could do them a little bit pointy. And this one I might make a little bit pointy or even kind of square shape. There's not really a specific theme or a specific bird I'm going for. So if you are going for a specific bird, then you could go ahead and follow exactly from nature or from a photograph. Notice if you're bird's talons more curved or more square, more straight. Because that can really alter. All right, and now for the face and going to have our imaginary line here, and I'll make my bird facing this way, which is why is the oval was like this. There'll be facing side down, I guess. He's flying, but he's also singing. So pay close attention to the beak. This time we're making a little mountain like that, two little lines for that triangle. But instead we're going to curve it. Instead of closing it like previously, we're going to close it and then make a smaller one, and then a larger one underneath. And I'm going to go ahead and color in. You can even add little lines if you want to like this. So you can really tell that his mouth is open. And if you want him to show that he's singing, you can of course, add some little use in clumps. Which is what I will do here. If you want to show that he's flapping its wings, you can add some little strokes like this to show movement. So not sure I under fee should be a little bit more like this. I'm not always totally happy with the result, but it's our little bird and he can move around as he wishes. So I think it's okay. You can go ahead and add other little details if you want. I might add a little curved lines like this. I might make this a different color. We can also add little strokes again to his belly to show some fluff and feathers. You could even do that on the wings if you would like. And we have our middle pose for our bird, singing and flying. Now we're ready to use our ink pen to trace over it. So basically we're just going to draw over the lines that we sketched. This gives it a way more clearer, clear look to it. Also cleaner course. And I can also choose the lines that I trace over. So here I'm not going to go perfectly and draw each line perfectly. I kind of like the organic. Sometimes I skip the middle parts. I think. Cuteness to that. Then the way I do that is I just hold my pen up once in awhile. I go really quickly. And if there's something that you want to change now would be the time to do it. I don't always have to do these little lines with the pen because I would kind of show them more with color, which is what I prefer to do. But for the sake of this class, just go ahead and do it. And I could add a little moving strokes and the music notes for fun. So I'm choosing not to at the feathers for now. And then I'm going to very gently erase my pencil lines. We go our cute little flying and singing bird.
7. Class 05 - Lean forward: So for this next class, are little birdie pose will be leaning forward. We're starting with our head, which as you know, is a little oval shape to sideways, just almost straight like this. Now our leaf shape, I'd like to point up there. And I'm going to my curved line over here. So as you notice, they all are oval-shaped and the leaf shape, they join quite a lot. And this one, you can see a lot. I'm going to do my wing shape like this here. And in our little tail cone shape over here, we will only have one wing because he's facing one side, the other side, we don't see it. So I think that's a general shapes that we're going to work with. I'm going to start to place my eyes because it will help me to know exactly where my oval or how my oval should go. So if I want him to be facing this corner, I would. And it makes the ies exactly proportionate with that so that he is facing in the middle. And then the beak, I'm going to make a little curved line and then our triangle. So I think this is good, which means I'm going to follow or oval kind of like that. Now I can go ahead and fill out, join them together so I'm curving it in a little bit like this. So we have a little curve from the head to the body. And this one, I'm going to just go straight. Like so. So now we can get rid of our lines a little bit that we don't need anymore. I will just stay my feathers. I'm going bigger feather up here. And then as it goes smaller they join. And then I will go ahead into the tail. So this time instead of curve, you can also make little curved, but they are little bit more squarish. Depending on the type of verb that you have. You know what, maybe Something doesn't look quite right. This I would be there maybe, Maybe that's what it was. He was told in proportion. I could add a little line like that if I wanted to. I'll say hi, do when was when I add in the ink. I could add a few little lines to the top of his head. Maybe a few little curved lines for the wings to show feathers. And then I can go ahead and color it however I want. Also add a few lines are some pattern and we will not forget his feet. So it's feet. I'm going to start here. I'm going to do one like that. One. You will have to. We don't see it very clearly, but that way it shows that he's facing down. His body is leaning forward, which is this pose of our bird leaning forward. Okay, I think we're okay, I'm ready to start inking. So you take your pen. You can start wherever you lie. You can add any little extra lines that you would like as well. You can make all these little strokes if you want. It doesn't look too perfect. And most of all really enjoy this process. You're learning something new or maybe you're, you're practicing. Maybe birds is something that you were a little bit uncomfortable to draw. Or you didn't know exactly how to draw. Or maybe you're doing this just for fun relaxation. Then let's not forget his little feet. So here he could be pecking on some C's are picking a leaf. And we're done. Our number five posts leaning forward.
8. Class 06 - Back, side view: For this next third pose, we're going to be facing the back. So we will start by doing is head shape. And the body will be joining the head. Of course. We will have our leaf shape that the leaf kinda facing back here. Sometimes I make mine a little bit longer. This one will be kind of very white and fluffy for Q. So many lines, I'm just going to erase. Wonder if my oval is a little, my head oval is a little too big. And the bag like this, something like this, k will see as we go if we need to alter this. I kind of just played by ear, but I tried to imagine the bird as I do my shapes. Here we will have our cone shape for the tail. Will be a little bit bigger because it's facing is right in front of us. We all have his little feet. And we will have the wings, which are also leaf shapes. All the way to the back. Side. One plus one will have a very small one, will be bigger because it's facing us. So this will be your general shapes, I think for this pose, can go ahead and erase them slightly. That way we can add in some details. So just following our head here and joining our lines, joining our shapes. So this one I'm joining it curved as usual here with a little belly. This one, I'm going to join it as well, but To down for the wings. Start with this one is the biggest one. So the wings when he's not flying there'll be folded. So I like folding the leaves, but not totally, exactly one from another. I like to symmetrical objects. They fit nicely into each other. We're going to make our beak over here. So he's facing the right side. And our little, little eye over here for his tail. I'm making some curved lines. Again, not to not to say. And I can go ahead and do his feet. So it's a little bit rough. There's lots of lines, so don't let that overwhelm you don't worry, we're going to use our ink pen after because I'm probably not so sure of myself and that's okay. I'm kind of trying it out as I go. And I might even add a little pattern to our bird. For his little head, for his little face. That's our rough sketch for our back pose. Now you can take your pen, start wherever you are most comfortable with. So I think this time I'm going to start with my wings. The birds means I am more picky with them with his body and the head, especially how they meet and make sure that that is lined up nicely. So I move my paper, however, would be most comfortable for my hand to draw. Not perfect. So go ahead and make your lines over if you need to. Again, if you want to make a specific type of bird and check online for the shape of his beak there. You could have maybe some current chief site. Or if you want his beak open, you could do all types of different ways to draw beaks. But that is for you to personalize because once you know the general position and pose of your bird, you can follow that technique for drawing any birds. K, We're ready for a little tail. We think birds are so fun to draw. And they're very, that they somehow translate for me. And there we have our little side.
9. Class 07 - Walking confidently: For the last pose in our course, we are going to be drawing a bird walking tall. We're going to do our basic shapes again. Our head, our body. So the body will be facing something like this. So the, the leaf shape, so your curves side would be like here and the pointy side there. I'm going to gently erase them. Maybe draw one little lines that I don't have so many lines in the way. Hey, I'm already going to start by drawing the eyes so I know how to position my feet and the wings and the tail. She everything kind of goes along with the eyes and the beak. So if I have him facing here, I'll have the beak in the middle. So maybe this will be a little bit longer. You can make a shorter beak depending on the type of bird you'd like to draw. I'm going to add a little bit of the wing here. Here's the back wing. We're not going to see the following. So that's why I'm not going to draw it fully. The shape just part of the curve, part of the leaf. And our other shapes are other leaf. Or the wing will be over here. And I'm going to make his tail this time and also a little bit longer, just to show you that you can play around with a few things and it will totally change our lookup. The bird, whether you add a long beak or point t1, a curved one. All those little things are important to each species of bird. So remember, our little bird is walking. He made a flying bird, we made sitting birds standing bird, sand. I thought the next fun one would be. So this one is just a standing foot, just normal. And for this one, I'm going to look something like this. This kind of gives a fun at all to erase a few more lines and join my, join my shapes. So for this part I'm just going to go straight down. This part. I like to kind of curve it a little bit. Not so clear. Like something like this. So we have are for the beak. I might go for a normal that'll short beak. Then I'll let you personalize it or make it the type that you want. For the wings. Here will be our longest swing over here. And it will get shorter and kind of fold into each other, something like that. For his body, I'm going to curve it in a little bit like this. And let's see how the tail, the tail kind of go for it, I guess. Something like that. Well, I think the feet are pretty pretty okay already ready for them? Ready for the inking? I can add a little texture. You can add feathered low, whatever you want. You can even add Again pattern to his head. There we have our little walking, walking tall, I call it. And I'm ready to do. The king. Can add a little crown if you just leave it playing. I think it's cute to add little dots, little, little shapes like that can even make a difference in your picture. So take your time. If I'm going too fast, feel free to pause the video. And you'll notice that after you draw something. So helpful to practice with it, so don't stop drawing it dry at least once a day for a week or two weeks. You draw one bird a day. You'll feel so comfortable that the end drawing your own birds. So really practice makes perfect. Anyway, that was our last little bird that we learned to draw together. I really hope that you enjoyed these little class since and that they were a big help to you. I'll see you in the next class.
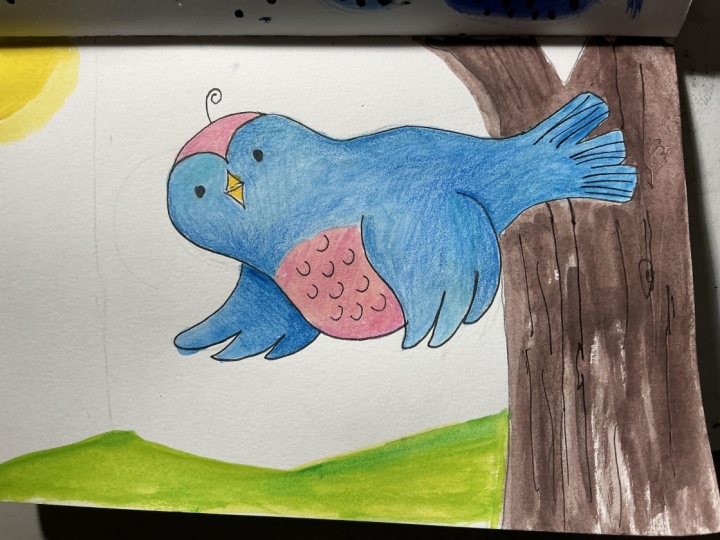
10. Class 08 - Coloring and shading: So now we're moving on to coloring and shading. So for this part of the class, you will need some watercolors, some color pencils. And of course, one of your pictures like that for two of your picture. So I've chosen number one and number five, but you can choose whichever one you would like to add a little bit of color too. I'm going to go with very mild colors. So might be mixing a little bit of yellows and browns for my burn. So if you need help with it, a little painting palette, you can, if you want to mix your colors a little bit. I'm going with this light brown here. I might add some little, a little darker brown as well. So as you can see, I'm mixing and it's fairly watery. So you can add in as much or as little water as you would like. So I'm going to go ahead and start painting one of five. So I'm going to start at the edges. In a corner like behind the, behind the wings. A little bit of brown color. And go towards sin following, sort of following the contour of the burn and leaving the white, the AI part cleared. It looks like I need to add more paint. Handle on too much water because there's not exactly water. Paper. And just remember too that it always dries a little bit lighter than it looks like at the beginning. There's too much water. You can even pad it with another patron. Just a piece of paper here. I'm going to just gently pick up some of the water. All right. Go and add a little bit too much. So I went a little bit more. And I'm going to go ahead and do a little bit and the bottom as well. And a little bit on the tail with this brown, dark brown color. So this is sort of like coloring and shading we will be doing together. And I don't have any particular bird in mind for right now. But there are many brown birds, different sorts of grounds. But if you would like a specific bird and I would encourage you to go ahead and copy this specific photograph or even from real life. I'm going to go ahead with my lighter brown with that color on the belly of the bird. So I kind of like a lighter color on a valley and still keeping the eye clear. And moving on to the, we're also adding some of that color. This time I'm going to add some to the top and then leave some white and some little bit more towards the bottom and not Tony all the way down either. That way we can see a difference in feathers, which is what many birds have different colored feathers. We're going to give our bird little bit of a colorful twist. And I'm moving on to the tail. I'm going to do the full part of the tail. Again, I have quite a little bit of water almost too much. I'm sort of spreading it around. And I'm kind of blending the two browns to get it that light brown and the dark brown and index. Really nice way to do it. Here again with the valley. Also, I'm kind of blending in the two browns. Can see my pen is not. Best one either because it's sort of smudging with the colors. So I wasn't the best. So next time I would advise you to leave out the little lines till the very end, which is what I thought of doing. But then I kind of got carried away. I will pick orange color to be lighter. And then to two different oranges. If you have a light one or dark one, you could, you could choose whichever one you want it. I'm going for the light for now. My legs of my burner. That's what helps. That's when the very thin paint brush comes in handy. And also for this part, you don't want too much water. I have too much water. So it would have been helpful to have a little tissue to dab or pick it up with your paintbrush. I'm also going to do that the same orange color. And that's it for now. I'm going to move it to the side to have a dry to take some time to dry while I color my second bird. So this one, I'm still going to go with the same colors as the first one. Because I kind of like want them as a little pair. At this one is facing the back. So I might, I use the same colors, but I might just give it a different pattern. For example, I'm going to start with light brown for the head of Peter. All the way to the beaker. Kind of a yellowish brown or that's what you have. You can even mix brown and yellow. If you don't have a light brown color. Pen, I sort of like just a little bit of color, not even too much to fill the whole thing out. And you see whether it's the middle behind minds. I'd like to add little more darker shade of it. And I will put in some of the dark brown and the other parts. So you can start off, this is the best way to do it with not much water, so it's almost dry. And then you sort of add the water once the paint is on to kind of blend two colors together. So that's the trick to get your colors nice, really nice. Blend. Start with a dark, dry or colors and then you just add water to blend it to need. And you can add a little bit more other side. Move your paper as you need to. Have sort of a little glare. I'm not sure if you can see the glare on your end. If not, that's good for you. So again, here I have a try more of a dry brush to start with my color. I'll put it on both sides of the wing. This is just to show you that little ways that I do the coloring for my birth, but there are many different ways to do it. Do what works for you and what you prefer as well. I'd like to leave a little white because I'm going to add a lighter color there. So now that I'm done the body, we can do the tail. Again. I'm going to blend color. And then if I need to add some water, oops, not enough to blend it into the top. That was a little too much water. As you can see, it kind of blends nicely together. Just maybe use less water than I did. I'm spreading it around that way. It kind of picks up some of the water. And then I'm going to have it a little bit of that same yellow color in the middle of my weight. But this birdy, as you can see, it's using the same colors as the previous one because I want them to be like a little set their family at birds, but they each have their unique pattern and even though they have the same colors and add a little more yellow to this part. You'll see that when it dries, it will also change slightly. It will have its own at all pattern. It will be a little bit lighter. Now I'm ready to pick the orange color again for my feet, the feet. And so I'm making sure that it's not just enough to be able to fill up this space. It's okay if you leave a little bit of Y2 when it dries and we'll sort of land in place. And there we have it that you're 230 pictures dry. And I'll see you in a few minutes. So this is the shading part to IA like to use the color pencils because I have more grip on them. The watercolor is kinda of smudges and spreads everywhere, whereas the pencils, I can guide it a little bit more. So that's what we'll use. So I'm picking a dark brown and where I kind of left a little bit of a darker color here. I'm going to go ahead and take my dark brown. I'm not sure if this is dark enough yet. I might have to play around with a few rounds. You can see it's kind of taking a little shape. I feel that the shading part is really what brings your little bird to life. Colors one thing, but then adding a little more color and contrast to certain areas. And it helps your bird to stand out even more. Upset, be more 3D or written realistic. So I'm not going to delve into the exact rules of shading here. I'm just going to go with what I feel looks good. For now. I'm doing the back here behind the wing and the back here behind the wing as well. Imagining that the light is coming from the left side. So basically that's the general rule that you want to go with when you do your shadings. Side where the light is coming from, and then where, what would be obstructing that byte? So for example, this swing would be abstracting the light on this part of the tail. So I'm doing a darker shade of brown. I like the pencil as well because it kind of gets, if you look very closely, it gets a little texture to to my coloring as well. All right, I'm going to change color and maybe go for yellow, trying to find a dark yellow, but this is the darkest I have. It's kind of even lighter. Choose, okay, I'm kinda given it's giving it a highlight. So the highlight would be where the light is hitting your object or character. So it's hitting the sides. And this part here of the heck, she seems to come out better on top of the painting. And I will even use the same color a little bit on his legs, just on the outer parts like fats for the highlight and on the top of the beak. I'm not sure if you can see it. Can probably see it better on yours. And I like leaving a little white space on my picture somewhere. So this part white. I'll take an orange now. Or you can use a light brown as well. And I'll do the wings, the parts that already yellow, I'm kinda a little bit and not the part of the science that I've done my highlights with. But the other side of things a little bit too dark. It's not exactly the color I'm hoping for. Even add a little bit. So this part is well, a little bit there. Kind of blended in together. So it takes just trying out, going slow and seeing what works and what doesn't. What's good with pencil is that you can always erase a little bit. You can also, depending on how hard you push or how soft to push. And I'll go a little bit darker to add just a little bit of shading to his feet as well, to one side. Okay. I think this is good for the civil burden, even under the beak tiny little bit. And you could probably keep going and going, but you have to decide at 1 when to stop. So if I keep coloring, I'm not going to see the original colors. So I think this is good. And if you have your other little birdie, you can check, make sure it's dry. Then you can go ahead and shade it as well. So I'm going to pick the yellow to start with for this one. Again, during my highlights. This time the light is coming from the right side. So maybe integral part of the wing here though we've got a little bit dark because of too much water going on. Fully yours went. And now I'll take the darker brown and do some of the shading there. So again, the parts that I feel would be behind something or obstructing the light source in some way. That's what I'm going for here. So some parts of the wings and definitely underneath as well. Given a little bit under these little lines, try that little feather. You can see much difference in now and here, little bit behind here. It kind of curves in a bit. The head goes a little bit over. This is when you give it shape. So if you have a rounded shape, you have to follow the outline as well. And it helps to cut it the same direction at treeline is going. So I wouldn't be coloring like this. I'm kinda following the curved line. That's important trick when you color or shade. Okay, moving on to the tail, going to add just a little bit on certain areas where it might be behind. Some might be behind the other one. If you have an even darker color, you can go ahead and use that. So this is kinda like a sika purplish, reddish brown launcher can see, kinda gives it a tiny little pink. It's like a pink, brown or dark. So don't worry, don't feel bad to explore some new colors. For your birds. Adventitious, adding one little twist color to the lighting, to your shading is quite beautiful. Because if you do look out there all the different bird species, you'll find so many different colors, shapes, patterns. So this one has kinda like a pink twist to it compared to my other one. We tried a little bit of an orange shine to go ahead and use that same one for a natal shading of the feet just to see what that would look like. All right, I think our little birds are quite nicely colored and shade it in.
11. Class Project - "Home sweet home" sign: Now we're moving on to our little project time. So we're going to make a natal home, sweet home poster. You'll need a pair of scissors, some glue, either some wood glue, white glue are a glue stick. You will need your pencil and eraser and your ink pen that you've used previously. And also two pieces of cardboard as you use your paints. And if you still have them on hand, you will need your paints again for this project. Going to measure the width of my cardboard. So minus 16 and a half centimeters. So I'll put this one to the side. I'm going to measure 16.5 centimeters on one piece of cardboard. Plus I'm going to add 1.5 centimeters to each side. So here's my line. And for the width, I think I'm going to make it to centimeters and tear for nitrile might ions. And I'm going to go ahead and paint that. If you don't want to mess your paper or table, then just put something underneath. I'm going to choose the color brown and just paint. So this is not exactly watercolor paper, but that's okay. Because I kind of want to have a rough look for this project. Kind of like a would look. So I don't mind some of the strokes making sure to add enough water to begin with. And then I can always add some lines without water, just the paint. It kind of gives that Would I can even choose a darker brown. What I'm going to do. And because it's still way to kind of men's in together nicely without you even trying so hard to make it look like what just happened. Some little dots around. Okay, so for now it's really rough because we'll have to see how it dries. You'll never know exactly how it will look until it's dry. So I'm going to just put this to the side for my name. And I'm going to take my other cardboard and I'm going to measure out 20 centimeters line and I will cuts there. So I'm going to go ahead and cut out my birds. You can cut them all the way to the edge. Or you can leave a little white as I'm doing. My favorite way to use my art is actually to gift it to somebody, make somebody else happy with it. I think that's the most wonderful thing about being able to share your art. Okay, so we have our little birds cut up and I have my piece of cardboard. And going back to my paper with the wisdom, as you can see, it's dry. So I'll go ahead and cut it out. So I'm going to go ahead and color just a little bit of the edges. Not really any rhyme or reason. I'm even just going in a little bit. Because wood is not really perfect. Anyways, I'm going to find some other browns as well, kind of both. This is kinda like a pinkish brown that we use for the burn. And making some lines here and there. See if I have another brown. This might be black. So if it's black, I'm going to make a few little holes in the wind, which is also helps. Give it that rustic old would look. Much black is a good color to use. Kind of going to play along with the patterns that I've already made or that the paint dried. Even draw your little lines. And curves. Here. The little holes in the wood can make them a little darker, add a little shade. Sometimes the ends of the word are a little more rough as well. So you can really get into it. You can get into it as much as you'd like or as little as you like. And even add a little yellow. Quick. Just to brighten up her wit a little bit. Here we go. So you can see a little bit of the difference. To go ahead and do that one as well. We have some lines and curves or all around a variety. I think it looks the best that way. Mixture of lights and darks and I don't have beige, so I went to head into the yellow. Doesn't quite give the same logo, but it's okay. Kind of accentuates those highlights in the width. Right? So we have our wood, I'm kind of curving it. Inside. We have our birds, we have our piece of wood. I'm going to curve it again. And this is what we're going to do. How are we going to put it together? Something like this. Looks like a little poster. And I can decide where I want to place my birds and I'm going to write here, home, sweet home. So that will be like a little welcome sign. So I'm going to take my pencil and eraser. If you have a ruler, if you feel uncomfortable using a ruler, you can just make a line where you would like to place your texts. So in light of where my birds are standing, I think I'm going to make home here, home. Sweet. Something like that. So I use my lines with you kind of have to play around home, sweet home. So there he's sitting on the ass and something is a little bit blank here. But what you could do is add the family name of the person that you're making it for. So I'll probably go ahead and do that. And before we put it all together, I'm just going to ink this with my pen. So once you're happy with your texts where it's placed, you can go ahead and ink it. Going to go ahead and erase it. So I'm doing all this part before gluing everything together because for example, when I erase all the little erasing get caught under the glue and I don't like that. I'm just going to be like that. So again, curving my little pieces of wood here because they keep coming the other way. Because now we're going to glue them and put them together. Glue is a little bit stronger. As I place these evenly. The center. And I push a little bit and wait a little bit. I'm moving to the bottom. Okay, I think it should be okay. And now we're ready to play some little birds. Birds. I'm just putting a little dab all over because I don't mind sort of popping outlook. I'll just put it in the center like that. And I like the little birdie that's kind of has a little pop Outlook. I kept it same with this one. So if you wanted to add your family name, what I would do is take some of my cardboard and kind of add a little border to it, like even a rough little border as if it were another piece of wood. Something like this. You can even add a few lines if you want. And then you cut that. That way it fills out our little empty space there. And you can even put it on top here. And you write the family name. Let's call it the Johnson's family. You can put it here or I might even put it little bit on the wood like this. And just to finish off and tie it all together, I'm going to take some twine. So you measure kind of where you want to show it. Here, of course, leaving some room. We're going to turn it around. And in the back. I think this is cute. To add the little country. We have the woodblock going on. I think a piece of twine is perfect, so make sure that it's really sealed well in between. So I hope you enjoyed this little project and that it will make a really cute and wonderful gift for one of your friends.
 Agnes De Bezenac, Designer of Tools for Wellbeing