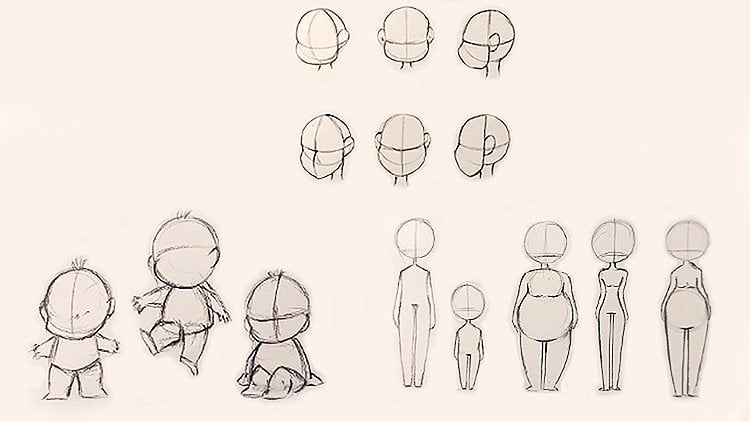
Transcripts
1. Introduction: Are you ready to embark on an artistic adventure
with your little ones. Welcome to our
exciting kids painting course where creativity
knows no bounds. In this course, we
kick at the journey by delving into the wonderful
word of paper cutting? Through engaging exercises with Cesar's and colorful paper, children not only refine
their motor skills, but also unleash
their imagination. Well, that's just the beginning. Next up, we dive into the
realm of geometrical shapes from squares to triangles,
circles to rectangles. Children will learn to
recognize and utilize these fundamental shapes to
create mesmerizing artwork, whether it's crafting
a playful dog, building a majestic castle or jogging along with
a vibrant train. The possibilities are endless. But, wait, there's more. Our course also introduces body artists to the
joys of coloring with simple yet captivating designs featuring adorable birds and
other delightful subjects. Children will explore
the magical words of colors and express their
creativity in vibrant hues. What's truly special about our course is its accessibility. So join us on this
colorful journey and watches your trial's
imagination takes the flight. Enroll now and let
the magical wars ignite their creativity
like never before.
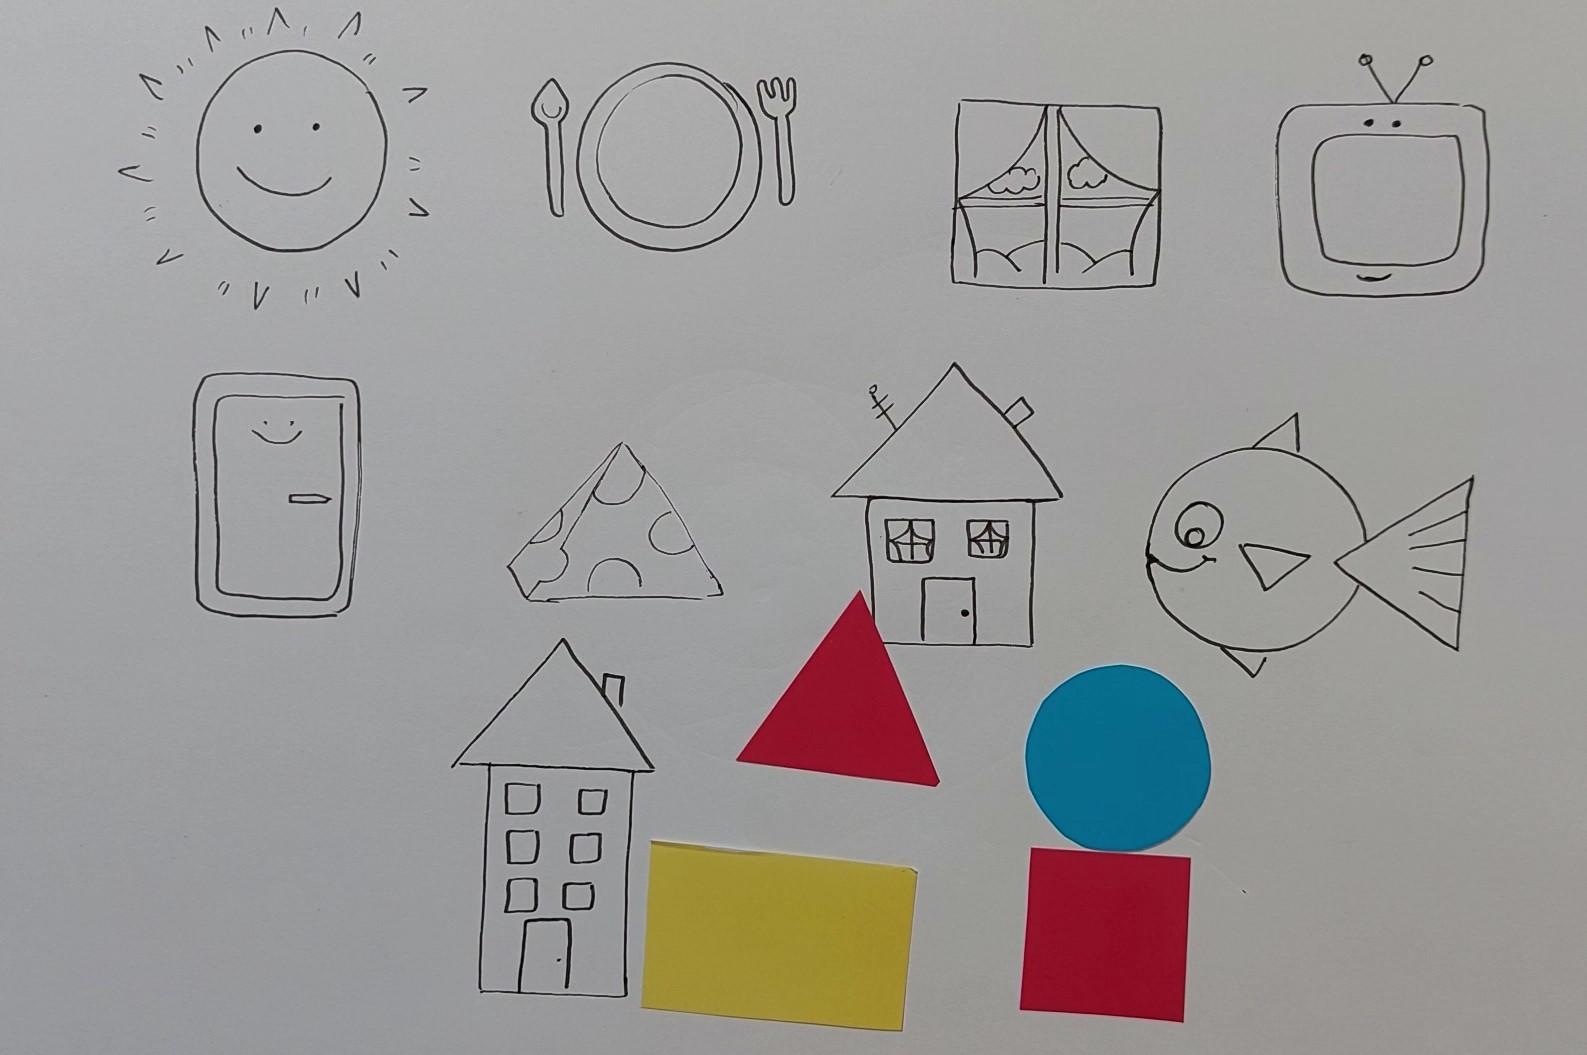
2. Scissor cutting exercises for preschoolers- part1: Hello, little ones. How are you? I hope you've started
a great d. All right. Now, Together, we are going to create so many
beautiful paintings. But before we start that, we want to play a
little game together. Now, how's our game? Let's see. My dear friends, right
here, red colored papers, we've got different shapes
like rectangles, circle. Even a heart. That's a heart
shape or even a square. The last one would
be a triangle. Now, each one of these shapes, as I told you, have a name. See, for example, We call this shape that
has four corners square. We call this one that has
three corners, a triangle. See? Say it again. We call
this one a triangle. Triangle it has corners, and from each side, you keep this shape. It's the same shape. How is that? You see. Even if I rotate it, it would be a triangle again. All right. The next one is a circle, S. It's totally round and it
doesn't have any corner. The shape that doesn't
have any corner, any sharp corners,
we call it a circle. Now, repeat after me. We call it a circle. All right. We went through a triangle, a circle, do you remember this one with
titogy in the beginning? We've said that it
has four corners, and the one that has four
corners is a square, S? The name of this is square. You repeat that? That's
right. It's a square. All right. Now, except
all these three, we've got another one. This one is a rectangle. It also has four corners, but it's a bit longer or small
stretch than the square. This is called a rectangle. Do you repeat after me? It's a rectangle. That's right. Now, with these
different shapes, we want to play a
little cute game. First of all, you should
ask your parents or your siblings that they take out these shapes out
of color papers. After that, we are going
to start our game. I'm going to start
from the rectangle. Well, again, you can get help
from your mommy or daddy. Then ask them to create
a direction for you, a direction for you like this that you should
start from here. Then you start creating rectangles inside of your
rectangle, one after another. Inside of your big
rectangle. See? I'm creating small
ones and I'm repeating that over and over again
inside of my big one. You can get help from
your mommy and daddy. They can easily
help you in this. Then the next step will be
your doing, don't worry. I continue this
as much as I can. Until I get to the
smallest rectangle, I can create here would
be the ending part, is it looks like
in of amaze. I'll Work as started there. I'm just creating
some cuss for you. So you would not lose the
direction or can now. We get the scissors. And then from the
beginning of our path with our cisa lot of cautious,
we start cutting. Be very careful. And my deference, do
not quote your hearts. So, pay attention that you should work on you should
cut straight on the line. If it's hot for you, you should do it
little by little. Okay, or get help
from your parents, but be very careful
with the scissors. All right. Well, keep
going on the same path. And on the path
that you're going, do not get out of the line. What Don't worry,
even if your hard just slipped away and
it got out of the line. Don't worry, there
is no problem. You can start over again, or you can edit your work
and continue on your path. So do not get mart or s. We are doing this
for you to have fun. That's the main
point of this game. So don't get any A more upset, you know, Just keep
going my darlings. All right, it's
better for you to be careful to move your scissor
specifically on the line, wherever our scissor
is moving on the line, we are having a perfect shape. But you see, you can even
create a game on this. If you get out of the
line, you make a beep. It's like, if I go
out of line here, We Get back in the line,
that would be fun. So very slowly, you move on your work on the line,
stay in the path. So I just continue
that when I get to these parts,
which are smaller, you shod move your
hand really slower and turn it a little bit slow, I'm moving my paper more than my scissors because these parts are really small and tiny. But that depends on you, even if you are
more comfortable, you can turn your
scissor or your paper. Just in any case, try not to get out of the line till you get
to the end of the line. Now you can clap for yourself. Yeah, cheer up. See? Now, this is your square. Now we want to move
on the next shape. Which one do you guess it is?
3. Scissor cutting exercises for preschoolers- part2: Which one of the
shapes that I've told you is the next one to go? Well, just guess a little. Yeah, that's right. We are going to work
in a circle this time. All right. For the circle, first of all, again, just determine a path. I'm going to start here. Then again, and this is step, you can get help from
your mommy or daddy. Now, very slowly,
I try to follow the same shape by
correcting these circles, it's like I'm going round and round till I get to
the center of it. When I get to here, that will be the ending point. And this is the
way my path goes. Again, let's start together. So I get my scissors again. And again, I'd be very careful. You should be very
careful either. You should be very
careful as well. It was easier when
it was a rectangle, and I was going to quit
on a straight line. But this time, as
I told you before, you should just go
round and round. That's how we get circles. So go on your path, try to stay on the line, but be very careful, so you should move
your scissor and quit the paper with
so much caution. Again, if it's hard for you to try to quit it little by little. If it's not, you can cut
it in bigger pieces, as long as you stay on
the line, you go around. These are very important ideas. What again, I say, even if you got out of the line, it's not that important, my dear friends, you should just be careful to
get back again. All right. Then I very
slowly go through this. And I'm getting here. So as it gets smaller, I should go more carefully. So it doesn't your hand and it doesn't get
out of the line. That's why I told you you should get help from
your parents at first. Sircles a spring there. Okay. All right. Then it goes to our rectangle, and then we've got to move
on to the next shape, which one we're
going to do next. Well, this time, it
has four corners. So have you guessed what is
it that has four corners? Do you remember? Think very
carefully. That's correct. That's a square. It's got
four corners. All right. Now for my square again, I'll do the exact same thing. I determine a path with a arrow
So I create my path here, and then I go round and round until I get to the
center of the square. As you can see, I'm getting into smaller and smaller squares. This is the ending point and these arrows are actually
showing me the path. Now, Again, I start with my scissor. That's so for ain't it. So with that, I
start cutting again, exactly on the
path I've created. When I got to the
top corner, I stop. Then I turn my square again, and then I continue. That's the easiest way possible. All right. Then
we turn it again. We go up. Stop and turn. It's just so much fun. Try to do it with me. Go, stop, we turn. Up, stop and turn. Just be careful. Stay on the line.
Now, why doing this? You can think of that. What things or square? What are the square
things around you? Have you ever thought of that? So let's take a look around and see what shapes you've
got around your house? Is it sure a rectangle,
or a circle? What things are like that. That's correct.
You are so smart, so never give up on things. Just try it over and
over again, right? So if you just stay in line
and don't get out of it, your square would
just look like this. See, so cute and beautiful. All right. We're finished to
square as well. Now, Who turn is it? Do you remember the only
shape that had three corners, only three. Do you remember? Can you guess?
Well, you're right. It's a triangle. A triangle has only
three corners. What was it name again? A triangle, a triangle. That's so easy. Triangle. That's right. Okay, then. Now I start again. And again, I start
going inside of my big triangle and
create small ones to it. See, I go in and inner. I hope you can pass
next, what's easier. If you do this, you will. It will be easier for
you to draw later. Then I get to this
ending point here. S, there we are. All right. Then I also
determine our path with arrows. Then I go to my scissors. Then from the
beginning of my path, I start I cut and cut
and cut, stop here. Then right here, I
should turn my paper. We we cut and move on till
I get to the second corner. Again on turn. Then again, the same thing. I move on and I
stop on the corner. That's the way it works. That's the way it is. I go stop and turn. I go stop and turn. Here we go, my Little ones. It's just so delightful
to do it, ain't it? Just so fun. Say, we've
got our triangle as well. I continue that. The last one, the little one,
and we are there. Here we go. It's done. It's like a triangle spring now. Have you ever had that? I'm sure not, but
now you've got it, you made it yourself. All right, the last shape
standing is the hard shape. So the hard shape, of course, is a symbol of love. Love and But, after you made it, you can give it to
someone you really love. Is it your parents, your siblings or even
one of your friends? So I'll do the same thing I
did for my previous shapes. I create a path creating
hearts inside of each other. You can have two spring hearts. You can give one of them to your mother to Mommy and
the other one, to Daddy. So you can have as many
of them as you want. All right. Now we move and we
use our scissor start from the beginning of our work very slowly
and carefully. I'm going to cut this shape. Just be very careful
because it's not a corner shape or
a circular shapes. It's quite a
combination of shapes. So be careful that you move on the line and
don't get out of it. I'm sure it might be a
bit challenging for you, my dear friends
at the beginning, but don't worry
and don't give up. Never. Just continue doing
it until you get it. That's how you do it. Be very careful with the
line and with your hand. You see, we are getting heart shape spring and it's
getting bigger and bigger. Actually, it's getting
smaller while we're, but our spring is getting
bigger and bigger, see? But as much as it gets smaller, you should be more
careful with it. While cutting it. So be really careful on it. See? We do it again, my friends. This is the ending part. It just rumped out of my hard. That's what the
spring does totally. Just dumped a bit early, and I finished it, S? We've got a hard to spring. See how cute is it. All right, my little ones, I hope you've enjoyed
it as much as I did. We've got several
different springs. What several different shapes. How fun is that? So please start practicing
with different shapes, my dear, and let's do
the next pot together.
4. Introducing geometric shapes: Hello there you little ones. How are you today? Well, I'm back again and again, we are going to create
great drawings here. The I want to teach you
that you can create these geometrical
shapes that I've told you and I've taught you
in the previous session. So let's first say if you can remember the
names of these shapes. We worked on them in
our last session. Can you tell me what's
the name of this? It had four corners. Do you remember?
What was it name? Square That's right. Very well. It was square. It had four corners, and it's called the square. Now, how about this one? Do you remember it? Well, that's correct. It is a circle. So it doesn't have any corners, and it's a circle. So here we go. All right then. Very well. You're so smart. Now, how about this one? It looks like a square. Well, it's a bit stretched out. Do you remember its name? Well, that's correct. It's a rectangle. It's called a rectangle. Pretty well. Now, how
about the last one? Do you remember this one? It only three corners. Only three. What was that
name there? Can you help me? Well, you're getting there. That's right. It's a triangle. Very well. Well done. All right. Now that you've remembered
all of the names, let's get help from these shapes and see what
can we create with them? For example, what do you think that you can create
with a circle shape. What does it look like? I guess the first thing that
comes to mind is the sun. That's right. The sun is shaped as a circle.
That's correct. So I create a circle and
I turn it into a B sun. See? So as cool like the shiny sun, it's smiling on us, S? It circles around the sky and it gives us warmth
and light, of course. See, it's the shape of a circle. Well done, my dear. What else we can create
with a circle there? Let's see. Let's
all think together. Well, that's right. We can create a plate or a dish. Every day we eat in them. So the circle is like a dish. I can even create a spoon and a forkxth it just to
make it more fun. So circle a dish. Weldon, my friends, Weldon. Now, what do you think
a square looks like? So this is a square, and we want to see
what it looks like. For example, It's like the
windows in our houses. That's correct. You see? It's a square, and
it's a window. It's even go curtains. See that? That's so sweet there. We can even see
clouds out of it, the hills out of it,
or anything else. All right. Let's
think a bit more what square looks like
other than windows. Well, that's right. It looks like a TV. Yep. I turn this square
into an odd TV. It's an odd one, my dear. The ones that you can
see antique shops. At cartoons. All right. We've done with square and
circle, we're done with them. Now it's time to work
on our rectangle. What do you think
rectangles are look like? What are made of rectangles? For example, it looks like
something we open it, we get snacks out of it. What does it look like that
we get snacks out of it? That's correct. We've got a fridge there. Our fridges look
like rectangles. If you haven't noticed, well, take a look at them now. That's correct. That's a fridge. Now, what things are
made of triangles. Well, can you guess that? That is correct? Yeah. What else? What else can you guess, which is made from a
triangle? That's correct. All of them are correct. So I'd say the triangle actually looks like
a piece of cheese. Have you seen the cheese in
cartoons like Tom and Jerry? It totally looks like
a piece of cheese. That's what we can
create with a triangle. In the next step, we are going to combine
these shapes together and see what can we create with them when we mix them together. For example, if I want to mix this square and triangle,
what can I have? See? What does it look like? It looks like a house. See, it's just a very
cute and beautiful house. Therefore, first of all, I create a squather
then on top of it, I draw my triangle. See. Now I've got a
beautiful house there. Okay. What else I can use my square
for in my house? That's correct.
We've said before, I can have a square windows. So I've got a house
and a square windows. That's right, my dear friends. Now, what do you think can
be the shape of the door. It can be a square. It can be a triangle, a circle or this one. Do you remember its
name? That's correct. A rectangle. Yep. Which one of these do you think is
going to be the door? Is it a square or
it's a stretch to square, a rectangle. Yep. I'm going to use
the rectangle as the door of my square house? Thanks for guiding me here. So we've got the
rectangle, the door. Now, I want to combine
a mix to other shapes. For example, what can I create with a circle
and a triangle. What can I create with them? Well, let me just
put them together. Yep. That is correct. I can create a fish with it. You see? First of all, I create a triangle there. Just like that. Then after that, I create a big circle
in front of it. Now I've got my fish there. This is my fish's
tail that will be my fish again as a circle, S? Then these parts are going to be triangles,
even over here. Now, I've got a very
smiley noise fish here. You see my little ones? My dear friends. All right. Now let's see what else
we can create with them. What else do you think
I can mix together. Imagine think a. What do you say that I mix my triangle with
this rectangle here. Like this. What
does it look like? Yep. That's correct. We can create a flat this way. It's not a house anymore. It's a flat there. Then I've got a rectangle here. And then I create a
triangle above it. Now I've got my flat and I can create a square windows
on each ground. On each floor, I've
got square windows. Of course, I need a front door there goes
the rectangle again. As the front door, all right. Do not forget about the chimney. I'm just kidding you can
create whatever you want. Now, with all these
only four shapes, you see how many
beautiful drawings we can create. All right. Now, you can just mix them
and match them together to create newer shapes and just create them with
your own creativity. Let's see how many
you can create the. Take care, practice, and I'll
see you in the next part.
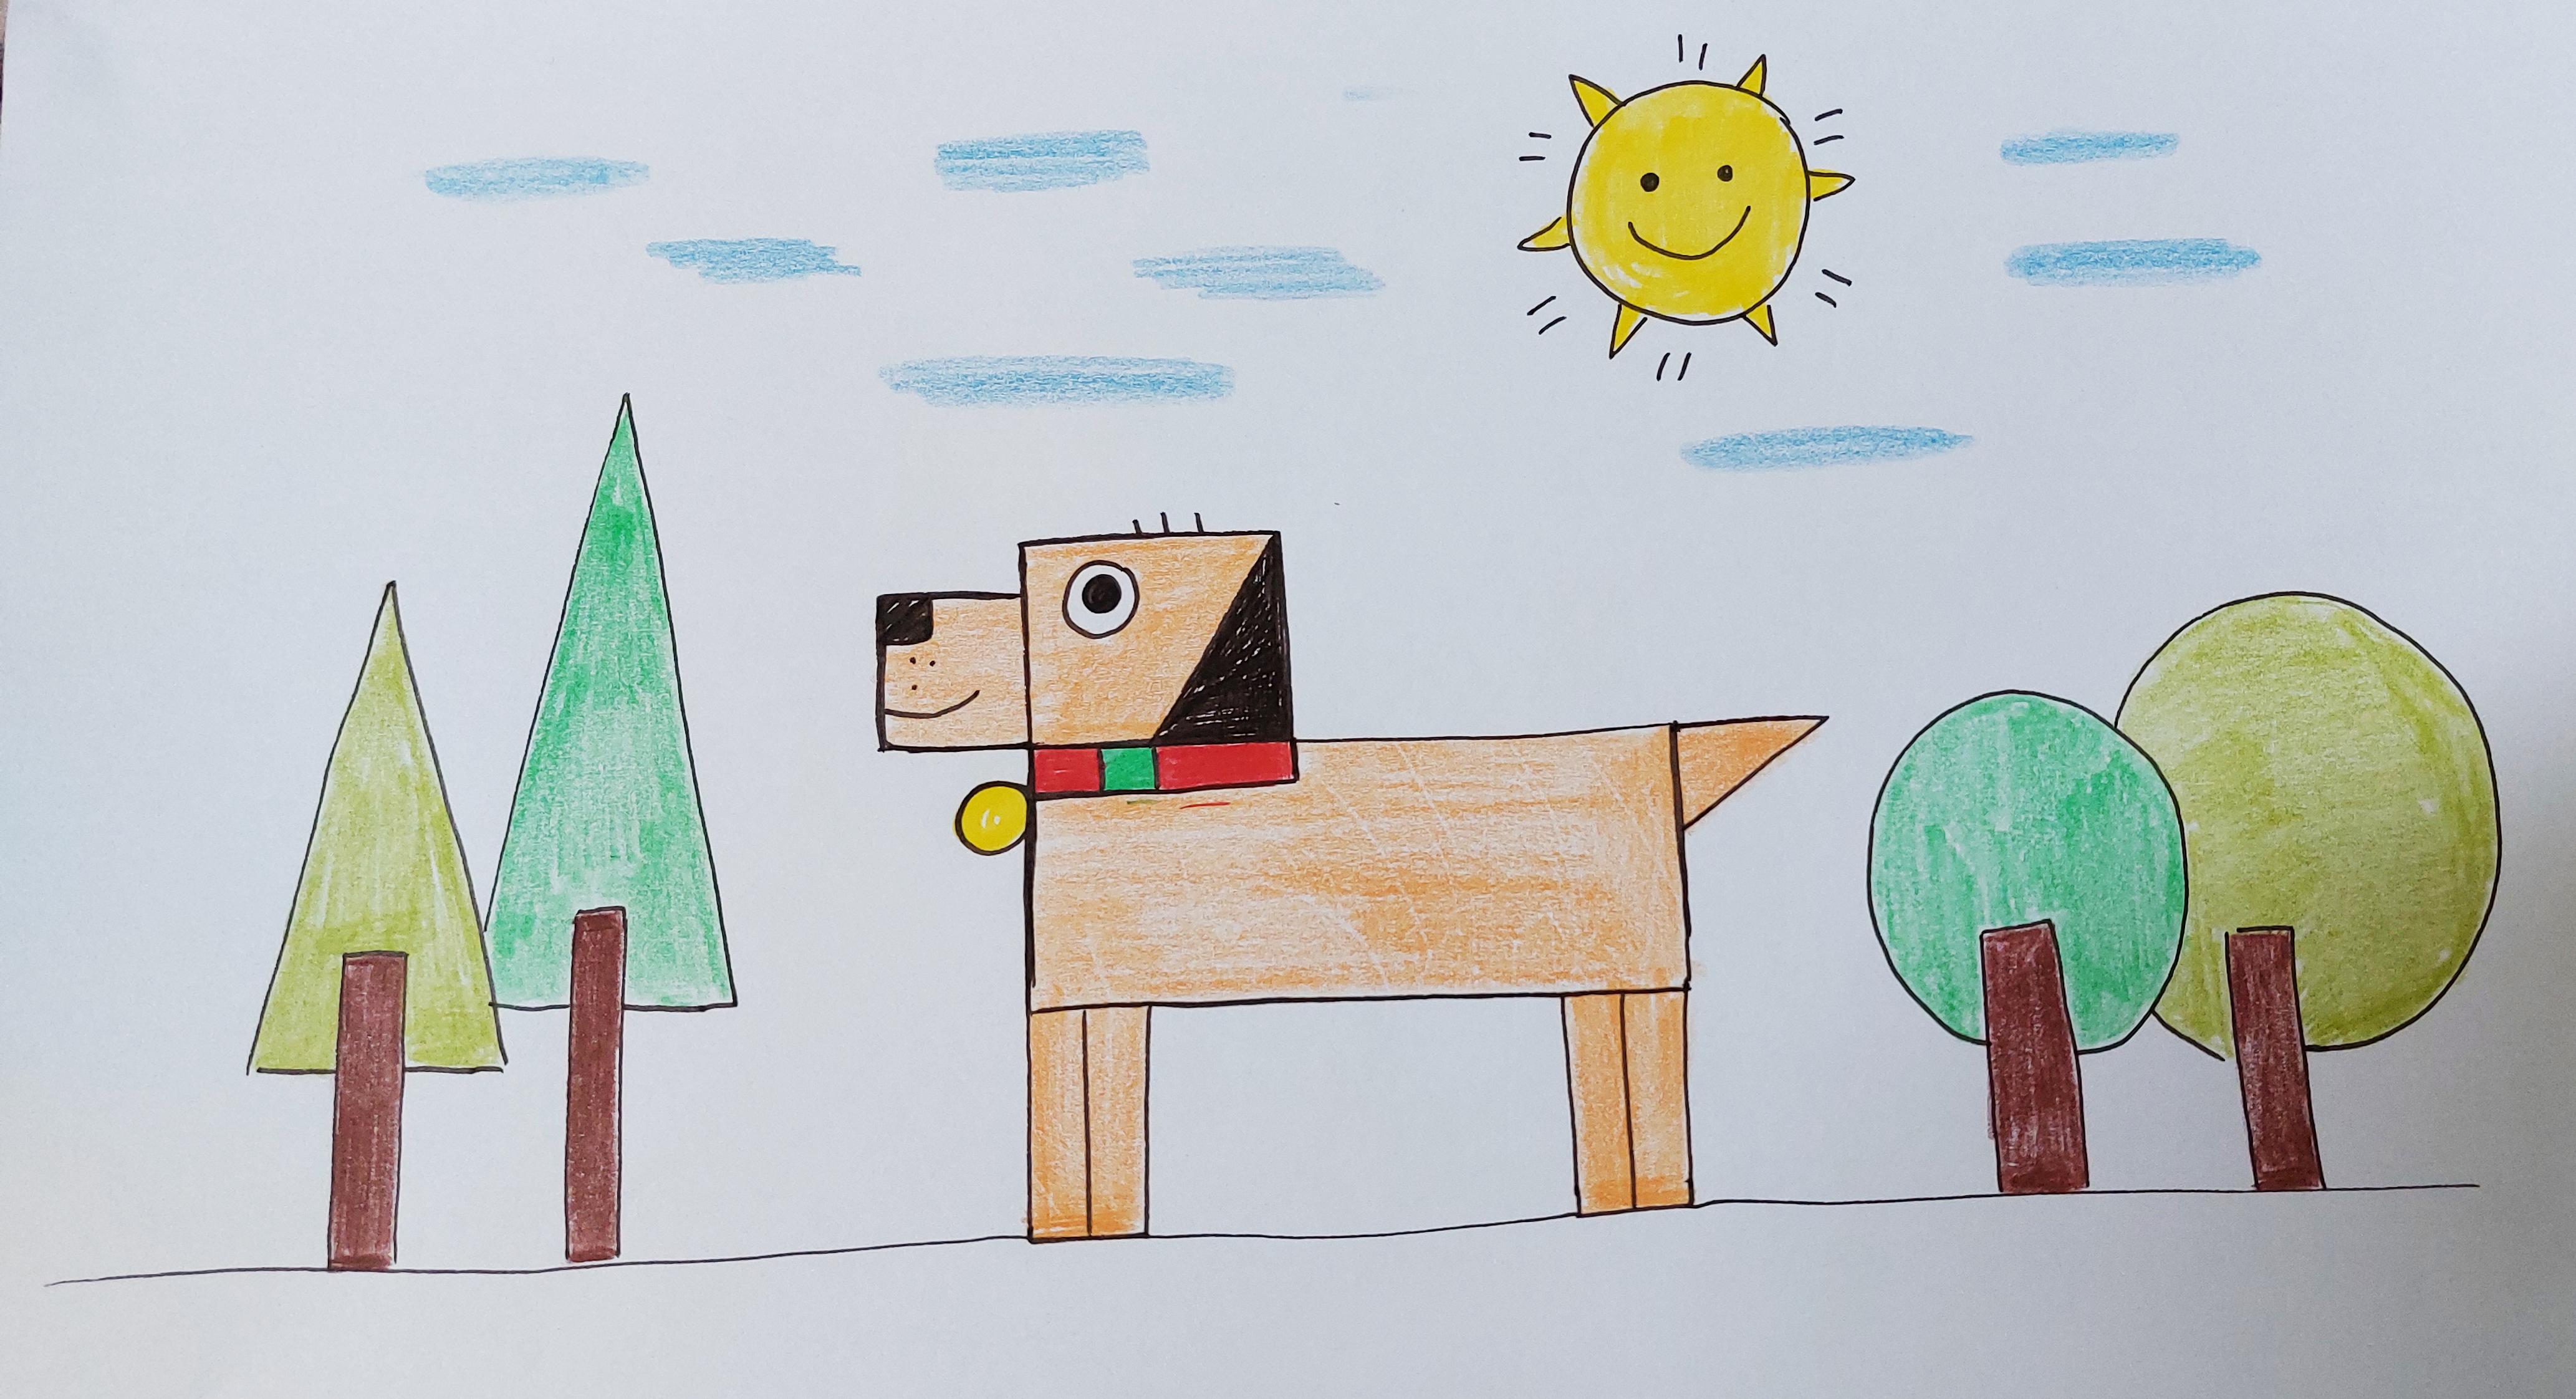
5. Drawing of a dog with geometric shapes: Hello there again, my
friends. How are you? I really hope that you are
perfect today. All right. Let's do some drawings together, see what we can create today. Well, with the help of these two shapes, these
geometrical shapes. Do you remember the names? Yep. This long yellow
one is a rectangle, and this cute little
one is p square. All right. Now, with
the help of these two, we are going to create a cute beautiful dog
or poppy together. All right. So let's start it
and do it together. Okay. First of all, I start
with a big rectangle. I start with a big
rectangle here. Then after that, after I've
completed my rectangle here, We can create a square
over here on top of it, but on one side, on one corner. See? Do whatever I do here, do the same thing as
I'm doing here. Okay. So we've put a square on
top of the rectangle here. Now, I want to create a smaller square right
next to this one, see? It's right next to it, but it's a smaller. I'll later let you
know what is it for. You'll be surprised. Just follow me and do not rush through
it, my dear friends. Just take it a slow. Now, I want to create
some legs for our dogs. Obviously, you
need four of them. Well, I create a
rectangle here in front and another
one in the back. I just get it to be leveled. Now, I divide each one of my
rectangles into two parts. I just create a straight line in the middle of my rectangle. That makes it into two of them, and that makes my four legs. This is dog, and
we've created it, where only squares
and rectangles. Now, four ears. I want to use a triangle. Do you remember this. We
called it a triangle. I use it for its ears. So my dog's ear is black,
therefore, aerate black. But as you can see, it's in the shape of a triangle there how cute it's going to be. All right. Where else do you think
I need a triangle. Of course, I'm going to use my triangle for my dog's tail. Yep. There goes the tail. There goes the triangle. Then I use a circle
for our dog's eye. We also create the eye. My dog's nose is a very
tiny, tiny, tiny square. And then he is smiling there. See what did we need it
for his mouth, his draw. No. Of course, our
dark needs a leash. So it wouldn't just run off. Therefore, I also create a leash with another
rectangle there. See how it's done. So cute and maybe even a
circle in front of the leash. Carrying his name
maybe. All right. Now, we can coolor this cute nice doggie with our cooled
pencils or our marker. I'm going to use my cot pencils and I've chosen the orange. I want the doggie to be orange. You can choose any
collor that you want. Either it's a real color for
doggies or even if it's not, even if it's only in
your own imagination. So take it easy and do whatever you like
to do my friends. So I do it slowly slowly from the side of the body to the side
of the body, se? Just be careful my difference. Do not get out of the
lines while coloring. Try to stay in the square boxes or any
shape that you've got there. See? If you stay in the lines, you beautiful drawing
will get even prettier. And At the same time, I'm trying to not leave any whitter spots
in my doggies body. I have to cover all the parts and make sure that I've
colored everywhere. Don't even leave a spot there. And don't come out of the line. Neither is good. All right. I'm going to choose another
color for the leash. To make it more interesting.
What did you say? I've got my red. You can choose any
coolor that you like. Maybe even you have a doggie. So you can coolor him
based on your own. That would be cute, wouldn't it? Do you look to color
your puppy and created your own?
There's the point. I also use my green
color for the rings in the circles I've got in my
leach and also a yellow color. All right, then. Now I've got a very
cute beautiful, Poppy. All right. You say, we're just these simple shapes. What can I create? What else can I
create with them? Well, let's think a little. Let's use our
creativity together. And see what can I create. Well, first of all, let's make this
drawing more complete. I create a line here, so I can show the ground
underneath his feet and legs. Then with the use
of these shapes, I can create a
tree or even more. First, I create a
very thin rectangle. Then above it, I
create a triangle. You see. Now, it looks
like a tree there. Then I'll create a taller tree. Then again, with a triangle, I create the top part of
the tree, the leaves. All right. I've created two trees. W two rectangles
and two triangles. On this side, I want
to create trees with rectangles and
circles as see. It's also possible. One of them is smaller, and the other one is bigger. The big. That's
right. All right. Let's see what else I can
create with a circle there. Do you remember our
second session? We can create a shiny sun. Which is, of course, smiling, and it's so kind and
beautiful just like you. All right. So there goes
my sn with a circle. Now, let's color them
together, my dear friends. I start with my green at first, Coloring the leaves, of
course, Coloring the trees. Again, I say, my dear friends, you can even color it with your magic markers or
your usual markers. So just to be careful
not to get out of the line and color it
beautifully and neatly. You can also color
it on the side. I start coloring in
one direction there. I try not to get out of delines
and I'd be very careful. And if I can't, I try to do it slower. You don't need to do
it as fast as I do. I'm just doing it faster
to show you more. All right. Now I can get
another green, a darker green. So I can color my trees
in different colors. Even if you imagine it's four or even if you
imagine it's autumn, you can even use red and orange
and yellow in your trees. I'm imagining that
it's a spring though. So they are green. It's just some of
them are lighten, the other ones are darker. That's the whole point. Well, if it's autumn
in your drawings, You can just color them
even more differently. Just be careful whatever
color you're using. You stay inside of the lines. All right. I cover all the white pots, and I coolor all the empty pots. And here we go. It's done with the leaves. But of course, I need the
trunks to be colored as well. I get my brown, obviously, in order to
color the tree trunks. S? The wooden part of them
or definitely brown. Okay, so I'm just coloring these wooden
parts of the trees. So Walden, my friends, Walden. Here we go. That's a rectangle. All right. We'll just
continue this way. I call her this area too. See? Here we go. So that look like this. Now, there is something
left, I guess. That's correct. Don't leave your son uncolored. Obviously, I get my yellow, and I start colooring my son, so it would be energetic and it will always shine for us and make our days shy,
lighter and warmer. So let's just color
it beautifully. That will show how
much we love it. Then you can also get to
your cool that pencil. Just like that place, small shapes of blue color. These would be the
clouds in your sky. See how cute it got. So we could just create a beautiful drawing only with four simple
shapes. See you.
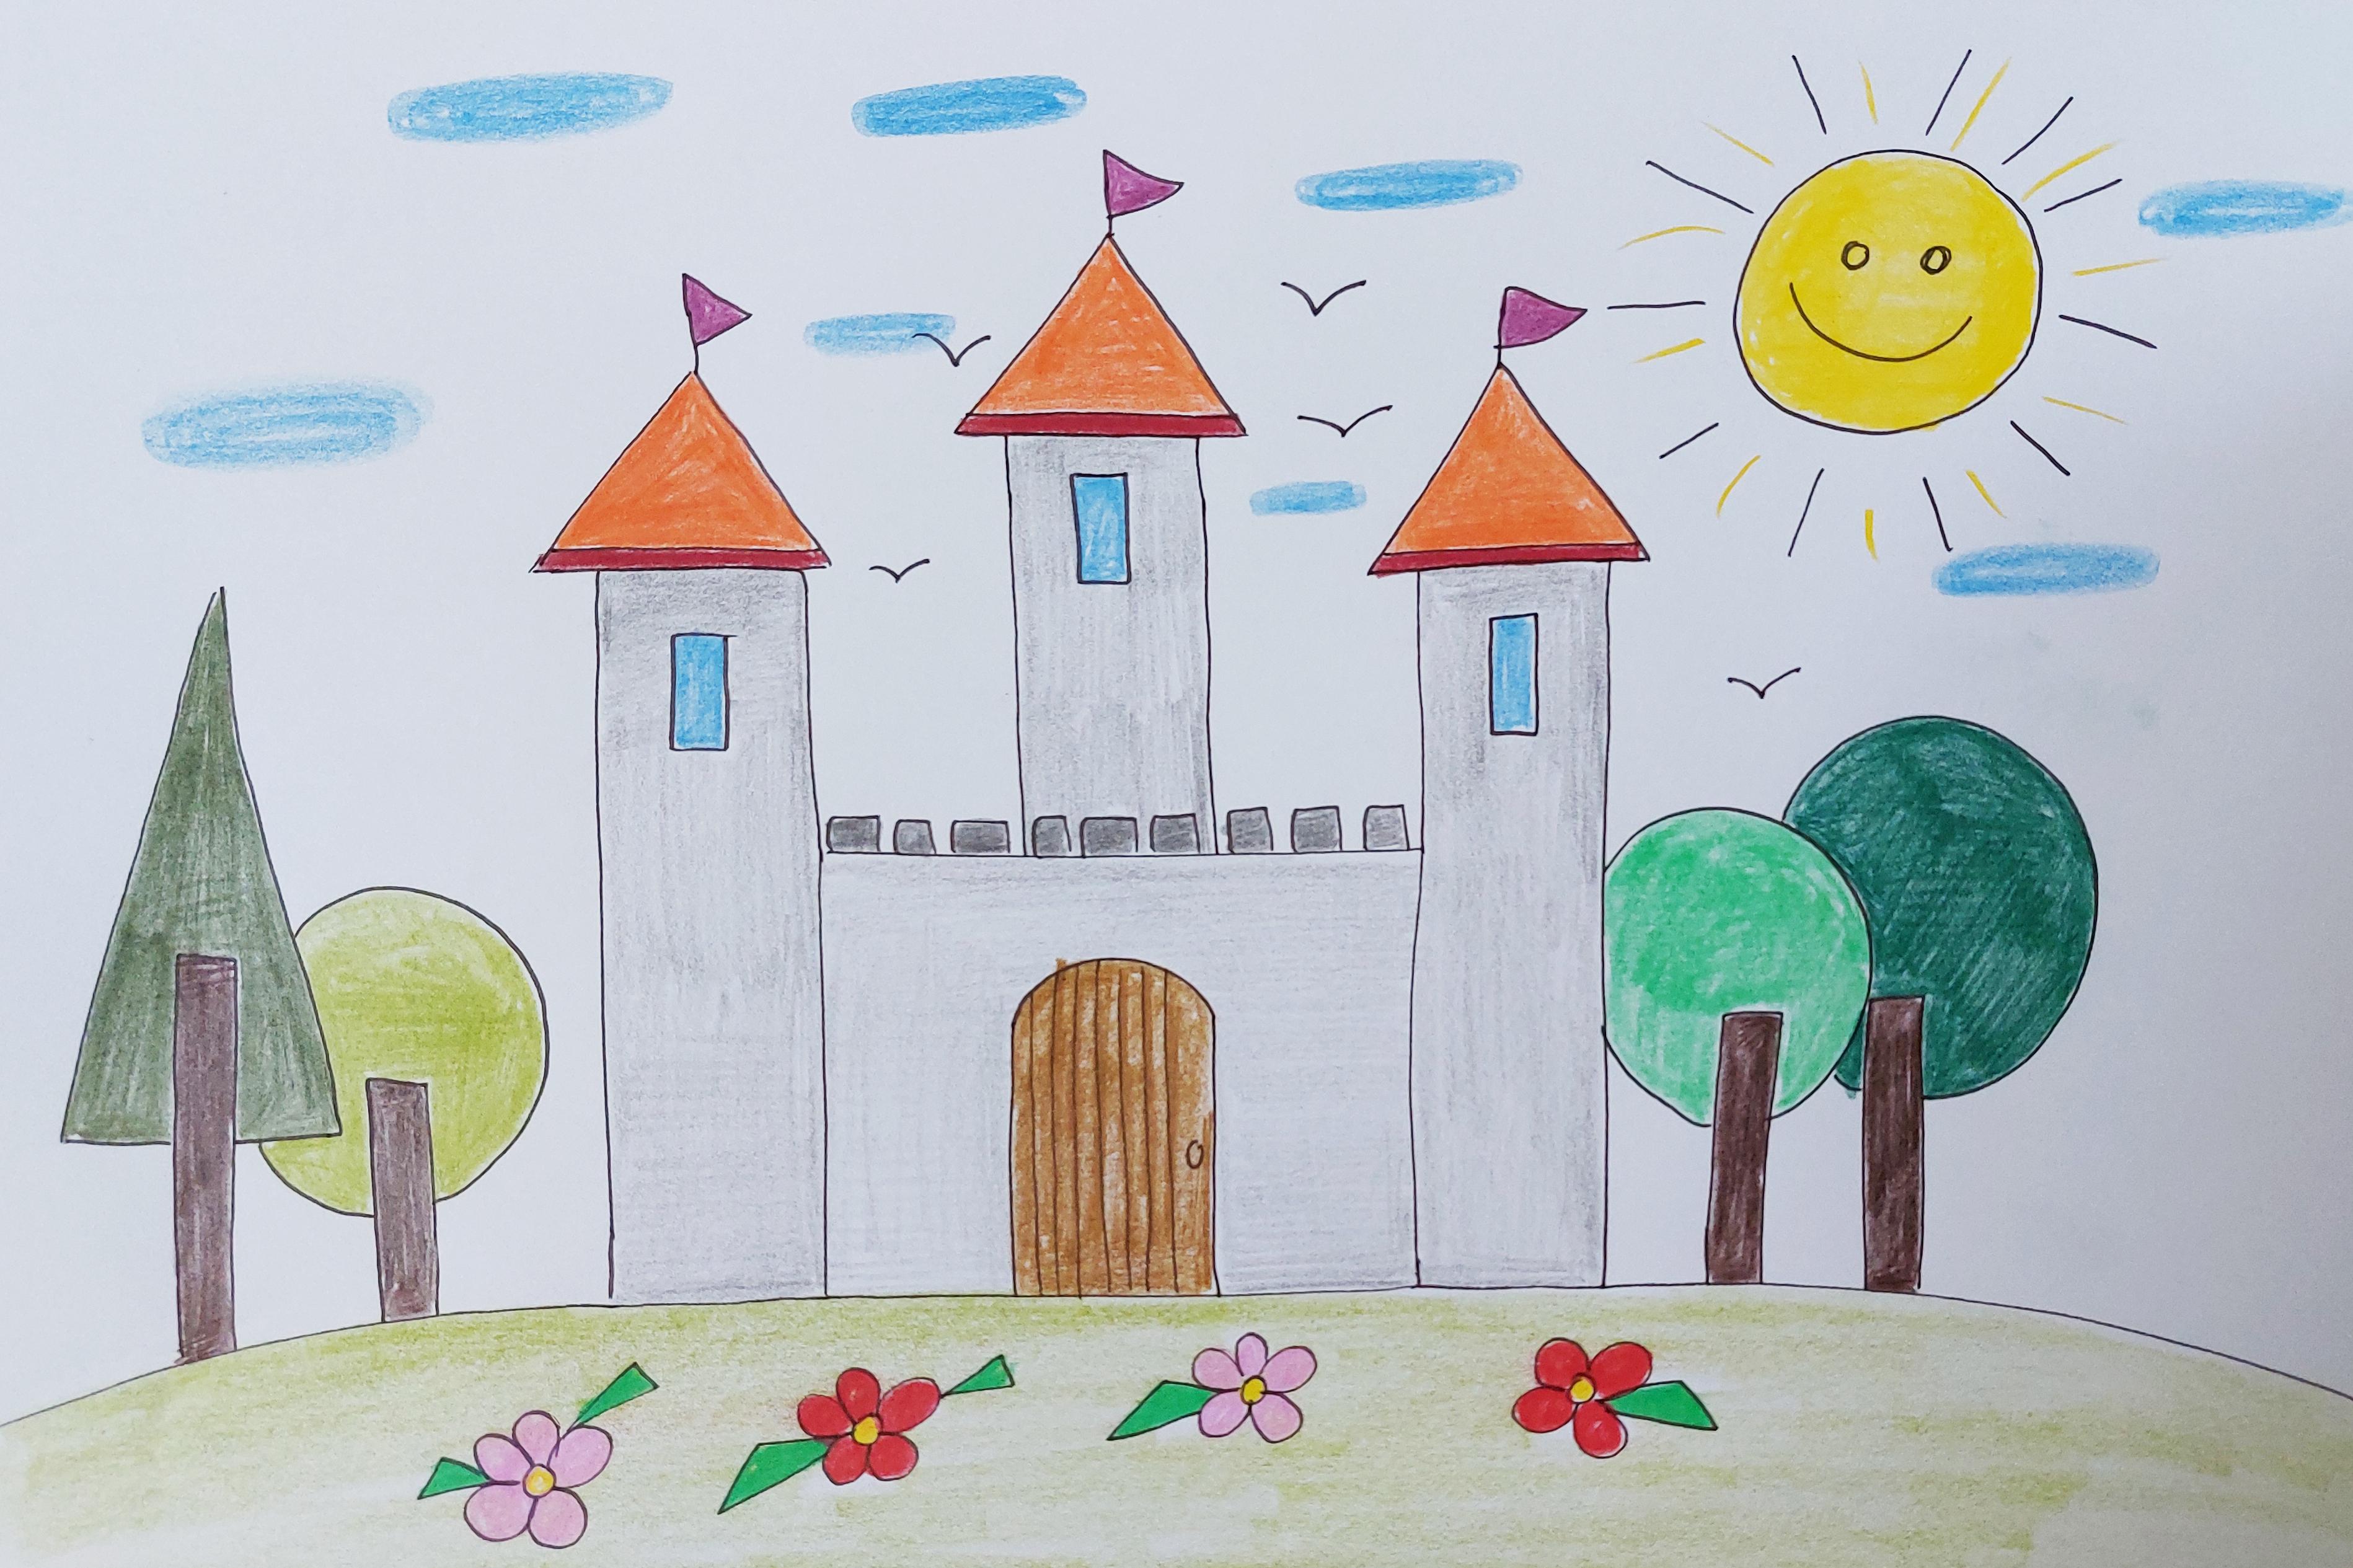
6. Drawing a castle with geometric shapes: Hello, my little friends. How are you today? I hope you're perfect. Just like always. We are back again to create a beautiful painting together
with our simple shapes. This time we want to use the
triangle on the rectangle. Well, I'm sure you remember the names
before I even say them. Yep. Again, I say a triangle
and a rectangle. All right. Now, let's work our way with
this rectangle and triangle. First of all, I just
put them aside, but I keep it inside to
remember the shapes. First, I create a very
big rectangle there. I'll create this one as well. So I complete my
rectangle. It's a big one. Then. On each side, on each corner, I create two longer
and rectangles. These two on the
side are bigger. We create this one. As long as we did the other one. My long rectangles or
almost the same size. Troy to make them
almost the same. I also create another rectangle, a little bit higher
than the side ones. But this one is in
the middle here. It's a bit longer than
the corner and side ones. No. What am I going to do? Well, I want to create a triangle on top of each
one of my tall rectangles. See? We've got triangles. I've got three of them on my
three long rectangles here. Now, can you guess what
I'm trying to create here? Yep. That's correct. I'm creating a castle here. How cute is that
beautiful is it? You can later create your own
prince or princess in it. So I even place a smaller
squares on top of that. On the door of my castle is a big rectangle
with a round up. With the round top. So very carefully, I
create straight lines. Vertical straight lines. I mean, they come from top
to the bottom. And of course, my
castle needs windows. The windows of my castle
are going to be rectangles, say they shod be a bit more stretch compared
to a normal house. So the birds can fly
in or the princes, princesses kings and
queens can look outside. All right on top of each part, I'm going to place a flag. That's right the flags or also in the shape
of the triangle. See how cute they are. Now, also create a
line on each one of these watch towers
or basically towers. And then I create a ground or the hill that my castle
has placed on it. What do you think
we can place next to our castle? Of course. I've told one of you in our previous drawing.
That's true. We can create
beautiful trees there. I create my tree
here in a triangle, or you can create
it in a circle. Both are possible. So I create both of them. Again, I can have a
circle for my tree. And another taller one with
another bigger circle here. So we've got only
one triangle tree and three circle trees. See? I can even create flowers
on the hill on this hill. All right. I've got
beautiful flowers here. See? What am I using to
create my flowers? What shape? That's right. I'm just creating circles to create my
beautiful flowers. And then I just try
to change it a bit. It's something between a
triangle and a circle or a baby even only triangles to create
leaves for my flowers. Now, what do we miss in our sky? What other than just the sun? M's correct. Do not forget
about the sun in your sky. B you to feel pretty
warm and kind? The sunny.
7. Start coloring the castle: Okay. Now, let's start coloring together,
what do you say. So for my castle, I get a gray collar. I choose my gray collar. And I start lloring here from
my left tower very slowly. So I do not rush through it. I don't rush through
any part of it. So my work get ruined.
I don't want that. So I just take it a slow And I'm not just pressuring my
hard into the paper. Why? Of course, 'cause
my hand gets hurt. You know, you shouldn't just press or push into your pencil, push your pencil into the paper. Because first your hard
might get hurt on second, Your work can be ruined us maybe even your
paper gets torn up. So very slowly and with a very low hard
pressure stood coolery. Don't worry, you'll get
the color that you want. Even if you didn't do a do. It can cool again. So don't worry and don't
pressure too much. I'm just completing the color
of my beautiful castle. See. I've got my gray color, and I'm just coloring my towers. I've got all three of them, and I've cooled them. All right. You should
be very careful. You should color your
towers very slowly, and just to say a
line as I said. I also want to color
this spot gray. The main part of the castle between the towers,
the Castle wall. So don't worry about these. And again, my dear friends, as I've always told you, you can use any different
color that you like. I liked gray. You may like
purple or blue or pink or red, or maybe you even want to
have a color for castle. You want to color each
part in a different color. You can definitely do that. It makes it your own. So do not worry
and use any color that you want in any
place that you want. Okay. I choose another color. So for the roofs of my tower, I want to use the red color. See what colors it. That's true. It's red. So here we go. Coloring the roofs
of my towers red. I'm coloring, I'm
having fun lots of it. I hope you're enjoying it, too. I am Here we go. We've got it here. And the last one, the last roof top is
also colored red. Here we go. Here we go. We're almost done with
it. There we are. How I get a darker
red this time, and I color this lower area? See, 'cause I've used different color tones
like gray and red. They just pop out. They look so. What color is yours? Tell me later. Okay. All right. Now,
what do you think if I want to color
the flag in purple. It's getting more
interesting, ain't it? So I'm coloring purple. So just like that. I color all three
flax in purple. You can even create some
shapes on it if you like. Let's start the windows in blue. So we make it pretty. Then we've got the blue
color on all of the windows. Again, I get my gray color, and I feel in these
squares here. The squares or colors in gray. Here we go. Here they are. All right. What about the door
or the cattle? It can be brown. So I used my brown color
to make the door and. It's like it's got
a wooden door. Or better say a wooden gate. So here it goes. Then I also move one more time on the lines
I've created on the door, wet my color pencil in order
to make them dark brown.
8. Finishing the castle coloring: All right. Now, let's color
the background of our castle. Obviously, I'm going to use
my green color for the trees. That was really obvious. But anyway, take your green in your hands and start
coloring the trees. It's just going to be
so easy and so fun. I'm coloring little by little, so I do not get out of the line. And I won't create new
smudges here as well. So I get another green. That's another a darker
green, as you can see. And I color the other tree
with the other green. Because my dear friends,
the little ones. When you place different colors next to each other,
they look better. If I colored both of my
trees in the same green, they wouldn't just show themselves this much
would them pop out. But now, they both do because there is a
difference in their colors. You see? So all
of the tree would be grey or basically all of the leaves in these
trees are green. So here we go. There we are. You are just coloring here. So we've got it here. If you have even and green
in your color pencils. Again, you can change it, so you color the other
parts with your oder green. For example, I've chosen dderGreen to color
this tree on the side. As I said before, it's better to use different
colors in your painting, but if you like, you can also use the same
color for all of these places. That totally depends on
you, my dear friends. So, don't worry. You can always do what you
want and color what you want. Again, I switch
to another green. I've got four greens. I've used them all. You can also color them in one green on in one
color that you like. All right. So I just
continue the same way. Here we go. Now,
my dear friends. The trunks of my trees
should be brown, obviously. Yes. I use my brown color to
color this area in brown. It's so easy and so fun. Again, you can use only one brown in all
of your tree trunks in the wood of the trees or you can again switch to different
browns for your trunks. This time, I decided to use the same brown for
all of my tree trunks. All the wood look the same. But you can make them different So just like that, we are almost finishing
our painting and drawing. See how great they are. All right. Then I want
to use my pink color. I create two of my
flowers in pink. Pinky flowers, they look. Then I used for two
of my other flowers. So two pink ones, two red ones. There go my flowers. See how cute and pretty Dave? Again, I say, I can use so many different colors
even for your flowers. You can make the purple pink, yellow, blue, or any
color that you like. Then I get my yellow color, and then I color the
center of my flowers. And as long as I'm holding
yellow in my hands, of course, I'm going to move
to color the sun, as long as it's yellow. So I'm just getting it. The little by little. I've actually colored my sun
and made it even happier. I can even create lines between the black ones with yellow, making the sun more
of the sun right. Then I choose one
of my green and I color the leaves of my flowers. See how beautiful
they're getting. That's what we want here. All right, my dear friends, then choose another green in order to cool the whole hell. So apply your green color very
adlylightly on your heel. Do not pressure it too much and do not get
into the flowers. Just very lightly without
any hand pressure on it. Cool your heels. Just like that,
very beautifully. You've got your heels
colored. How cute it is. All right. Then take your blue again and
create some clouds. Inside of your
drawings, the sky. There come the clouds
in different places. Even around the sun,
they are clouds. They're not covering her. But they are near her. All right, then you can even get your black pencil and create
some bodies like these. They just look like. So here is our drawing. I hope you liked it
as much as I did. See in the next one.
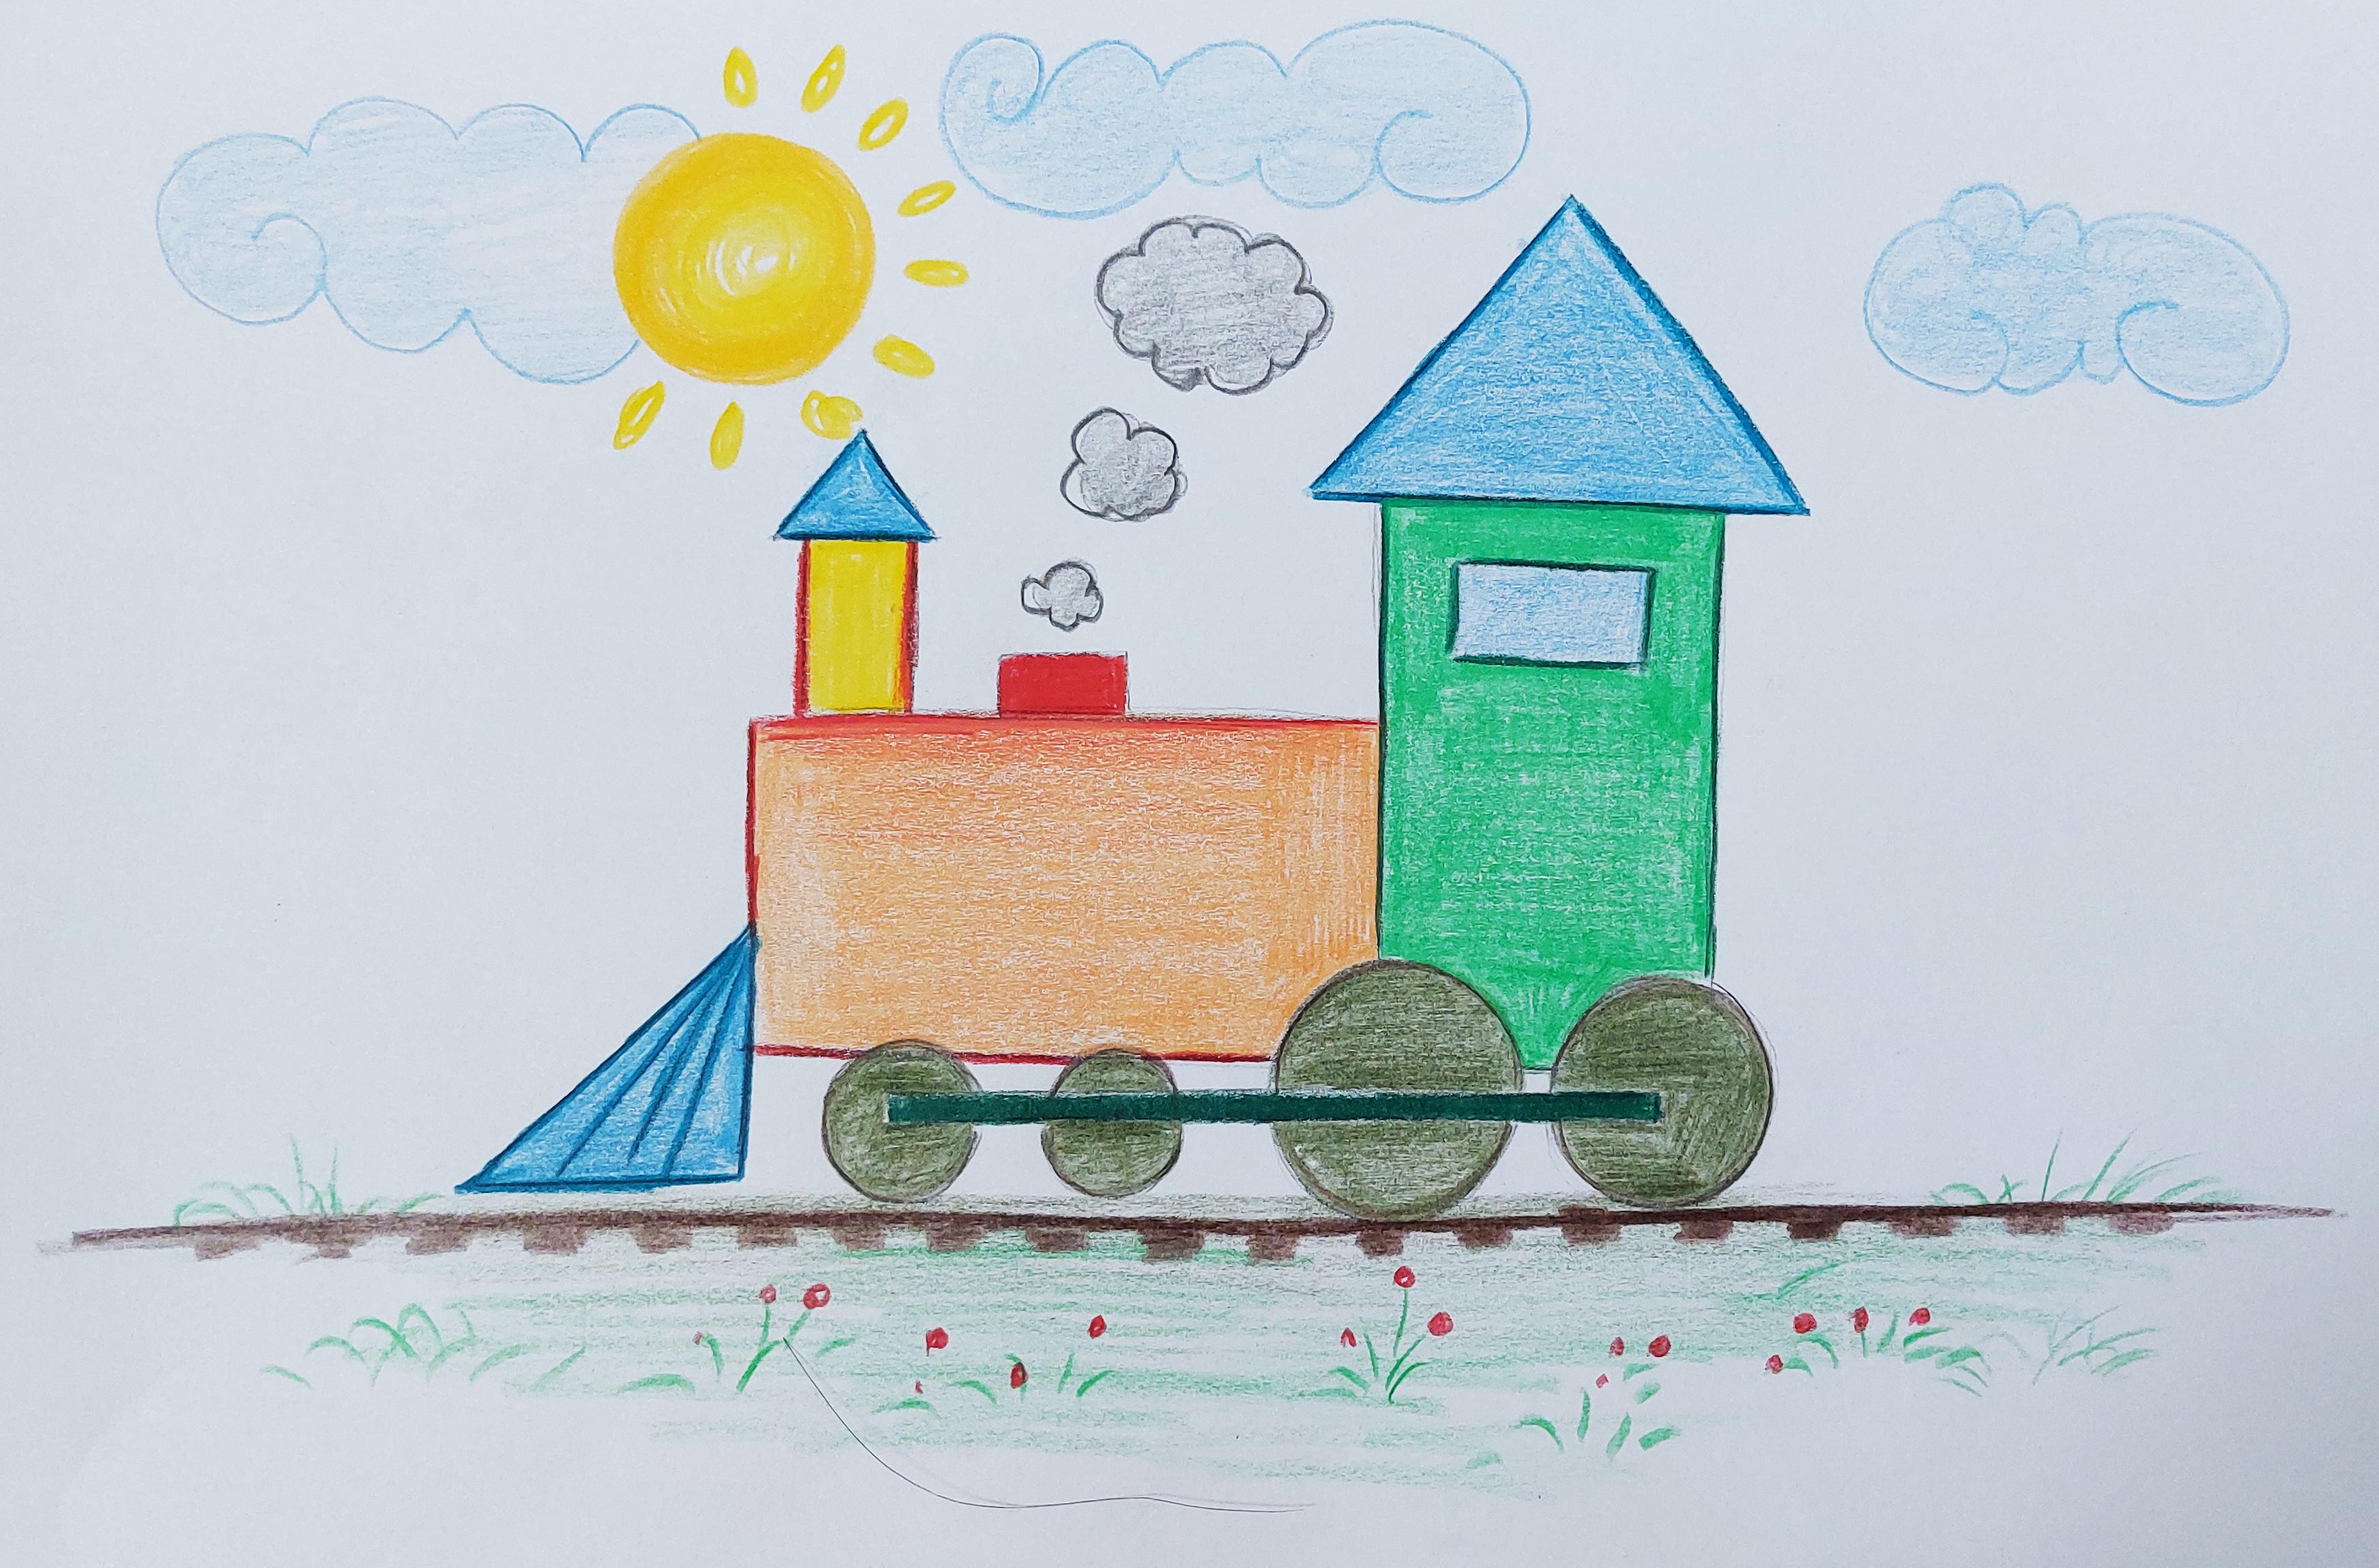
9. Drawing a train with geometric shapes: Hello, my beautiful little ones. Welcome to another
beautiful drawing with me. In this part, we are going to create a cute and
pretty train together. First of all, I'm going to create a very big
rectangle again. Looking like this. See what I'm doing here. It's a big rectangle
there, all right. Then I create the
exact same rectangle, what I'm going to create
vertically right next to my horizontal one So it's like there are
two rectangles here. One of them is a standing. They are the one is a
sleeping there. See there. Then on top of my
standing rectangle, I place a triangle. Then for its window, I'll create another
sleeping rectangle. Okay. What's here? That's the chimney. Where the train goes, the smoke is coming out of it. It got another big one over
here that we're creating. Both of them were rectangles. Just the smokes were in
the shape of circles. Then on top of my rectangle, I do not forget about
the triangle there. What's left out? That's right, creating nice wheels for it. I create one of them here. And as you can see in
what shape or the wheels? Yes, they are in the
shape of circles. I should place two of them
here right over here. Okay? Just like that. And I would also have to create two small ones over
here in front. Another one. Here.
All right. Now. We should connect these
wheels of train together. So how do we do that? How do we connect them
together? What shape? What do you guess? Well, I'm just going to connect these with a
very long and stretch, yet a thin rectangle. See. This way, my wheels of
the train are moving together and they would
not just get separated. They're always together, no. Here we go. Here we
are. Train goes. Woo. And we are
making it. All right. Then my train also
needs the front part. Don't forget about that. All of the train half them. If you have a toy train, you can just place it
in front of you and try to create that
with your shapes.
10. Start coloring the train: All right. Now, let's start
coloring our train together. For the top triangle, I've considered my blue. I just love this. So very slowly. And very quid smoothly. I'm moving my blue pencil here, and I'm coloring
this triangle blue. I do not press my hand here. You don't want to your
hard to get hurt. My dear friends. I also this small triangle the same way with my
blue. There it goes. All right. I also call this triangle, the front part of my train. Blue. The blue ones
are cute, aren't they? Now, I want to choose a color
which is so much different. That's right. It's my orange. I got my orange. I've chosen my orange to color this big sleeping
rectangle there. I wanted it to be different
from my triangles. They were blue, and
these are orange. Just like that. Here we go there. All right. Then I get a green caller. And I call the standing
rectangle green. It looks just so livingly. See how lives. It just a toy train
I when I was age. Trains are ain't they? So I continue coloring until I've got all of my
rectangle grain. All right. Here it goes. Aren't we are there?
We've cold it? Green. Then I get my color going for the chimneys for the small
rectgles on the hood. Did they call it a
hood? I don't know. Soever you call it. I can even bring some of my
red color into my orange. Just a bit to mix the colors. Then for over here, I'm going to use
my yellow color. Oh, my God, what a
colorful train it is. I am falling in love with it. How about you? So excited. It looks so pretty
and so colorful. Then I stretch to my darker
green for the wheels. So while coloring the wheels, I'm coloring the circle
parts dark green. Okay. I do not go
into the rectangle, which connects
them all together. I only coloring
the circle whales here with my dark green there. So I'll continue my coloring till I've got all my ws colored. The same color. Here we go. Please get on board. You don't want to
miss the train. It's going to Wonderland. So let's complete it
allogether Here we go. Then we move to our last
circle last but not least. Here we go. The last
wheel is almost there. I'm still thinking, what am
I going to call after that. What do you think gull I'm
finished, which I am now. Now, I get even a darker
green for this part. That's right. The very thin, tall rectangle I used for
connecting the wheels together. So they would never be
separated from each other. They are friends. I call this connector part. I also move around my green rectangle
with my darker green. You see it just shows
it a bit better. Do I also separate this
rectangle from the rest of it? Then my darker blue. I want to go around my triangle. It's just like I'm creating
a framework for each shape. I'm putting them in a frame
with the darker color. So I'm using my darker blue. Just to go around
my triangle shapes, make them show butter. How is it there for you? You're doing the same thing. Of course you want.
I'm sure of it. I also get a darker red, and I go around my sleeping big rectangle
and even this chimney here. Say it's just looking
much more better. We forgo around the wheels. Don't forget about them. So I get my brown color, and I'll go around my wheels. I'm making my circles
darker on the edges.
11. Finishing coloring the train: All right. Then my dear friends, I get my gray color in hand and I try to
color the smokes. Because you do. If you've seen the smokes, you know that they look gray. As our smoke is going higher and it's going
up, it's getting bigger. See? The first one is small, but the last one is bigger. So I'll go around them making
the frame and I color them. I do not forget about
the sun. Never. I forget about the
sun in my drawings. So I create it with
my yellow color, and on the round on the edges, I go darker with the yellow. But when I get to the center, I use a lighter yellow. Well, of course, the train
should be moving somewhere. So I create here. The place that it's
going to move on. It cannot just move on the air. It's not an airball train. So I placed my train over here. Ooh I forgot about the window. I used my light
blue to color this. Very lightly. I just want
to show that it's glass. So just as easy as that. What else my dear friends do you think we can add
to this painting? Your drawing can have much more, as I told you, the train
should move on something. But it doesn't move
on the ground. It moves on train tracks. So I use my brown color and I create a very dark line
here, a thick line. Then I create small shapes like this in order to
show the train tracks. See how it's on here. Now it looks much more better. Can you make a train
sound for me now? That's right. That's
the sound of a train. That's correct. So you should really get aboard.
It's going to move. Then with a very light green, I start coloring here to show that my train
track is up on a hill. All right. Then I also
create some more grass here. Then you can even use your recolor to create
some pretty flowers here. We just place them
here. All right. Now, in the sky of our drawing and painting,
what do we miss? Of course, we miss clouds. Fluffy, big, cute clouds. One of them is going
behind my son, Another one is above my smoke. Another is behind our train. See, T looks so floffy
and in different shapes. Then we should also
color inside of our clouds with our light blue. There we go. Little by
little very slowly. I color my clouds. My dear litter, friends. Do not press or push your
pencil into the paper at all. Do not use a lot of pressure. See how lightly I'm coll. That's what you That's
what you should do. That's what you're gonna do. So here we go. It's so exciting, isn't it? Right. We even create
some sunshine, so it would look prettier. Then my green, I can add some
more grass to it or not. It's your own choice. Anyways, please
travelers get on board. Our train is going to move
because it's complete now. I hope you've
enjoyed it and have fun each time you draw
something like it. See you in the next part.
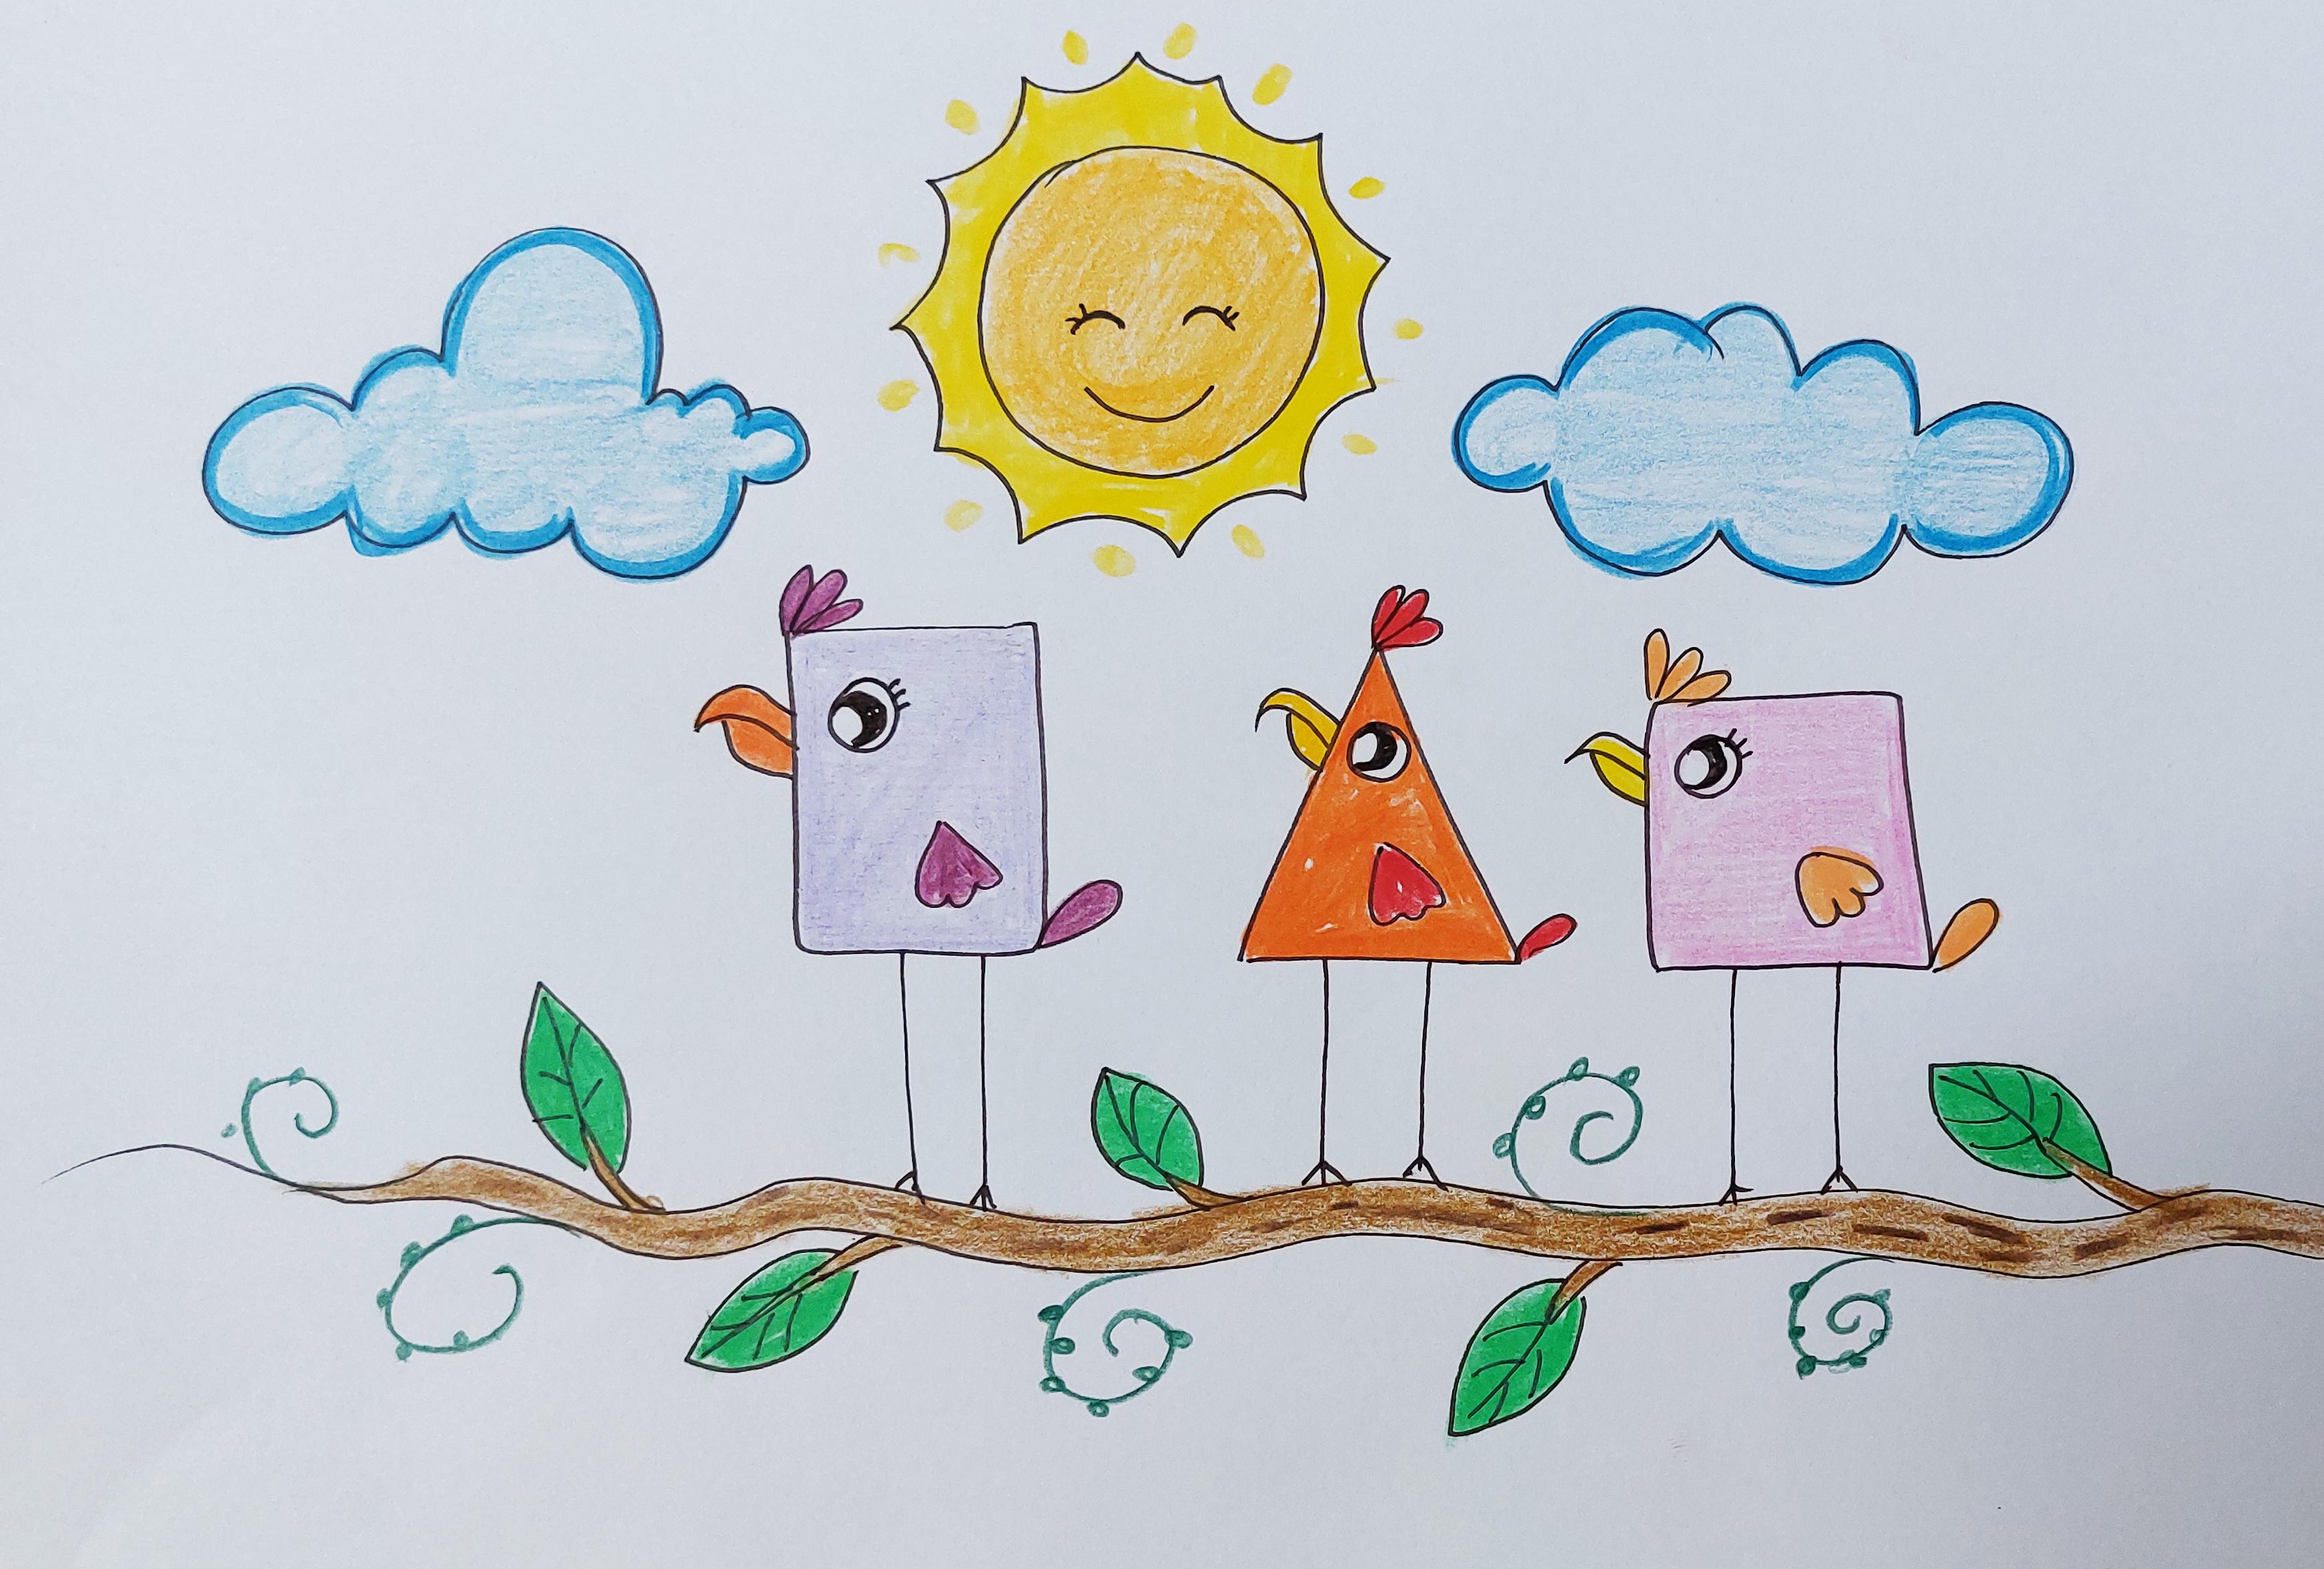
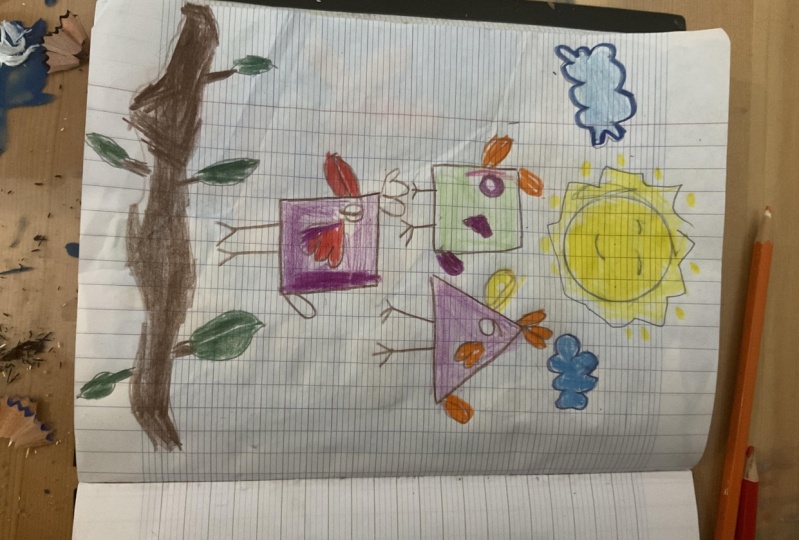
12. Cute birds drawing with geometric shapes: Hello, everyone, and welcome to a new episode of
drawing with me. Well, this time, we are going to create a very cute drawing. Again, I'm going to use
the simple shapes of a square triangle and
rectangle and even a circle. First of all, I start creating
three of my simple shapes. Rectangle. Then the triangle. And then of course, the square. So what do you think they
are going to turn into. Well, they are next
to each other. But let me just create
them one b one, one by one, and then I'll
tell you about them. On the top of my square, I create three
shapes like that and a very a shape like this. That will be another one
on the other corner. Over here, I place a circle. And I think by now, you've got what it is. That's correct. I'm creating a bird or better say a chick. We've also got the beak. Can I have another birdie
at my triangle? Why not? Again, I create the
eye with the circle. I create the top of
the hair like that, then the beak then the wings. And of course the tail. Then again, the hair over here, the eye over here, they look like angry birds, but do not angry. They are actually
very kind and cute. So the wings are the tail, do not forget about them, and of course, the beak. Okay? Now, what do our birds miss? Of course, they need
something to stand on. So first of all, I am going to create
a branch here. It's like sitting on
a branch together. That would be the branch. Then I create their legs here. They've got cut long legs which helps them to stand
on the branch here. Then I've got them all. T for each one. You see
how cute they've got. I should also create some
leaves on this branch to show that it's a branch
a wire or something. So they are sitting on a tree. So, Joe, forget
about the leaves. All right. Let me just decorate
the leaves here. So they really look real. They look real. All right. Now we've got a beautiful sun
over here, as usual. But this time, I'm going to show the sunshine in this shape. See. And again, she's smiling. But this time, her
eyes are closed. She's laughing. What else do we need? Next to our sunny sun. We need cloudy clouds. Of course we need them. All right. Let's
just create them. You see, how beautiful
and cute they've got. It's a great drawing. Now we've got to do what? The coloring, of course.
13. Coloring cute birds: First, I'm going to
start with my son, using the yellow
color on her face. See? She's got a
yellow face here. Then I want to use another a lighter yellow
for around the sunny sun. Basically the sunshine. We are coloring here with a light yellow for the sunshine. The beautiful sunshine. All we are done
with the sunny sun. Okay. So, what else I
need to create for her. Some circles to
decorate her sunshine. Just makes it look
much prettier. Then I want to use my blue
color to color the clouds. Very slowly and circularly
I try to color. My clouds, you see, I'm moving my hard
round and round. I'm creating circles or sometimes I just move my
hard to create lines. I'll do the exact same
thing for this der cloud. See, I play a very
light blue here. All right. Here we go. Then with the same blue, I'm going to go around
my clouds here. My kingdom look
better. I'm pretty. Of course, creating
a frame for them with my blue by preting
it a bit harder. I'm creating darker
lines. Not too hard. So you want you know
pinch all tear paper. Be careful. Now we are going
to color our cute birdies. So I color it pink. The very slowly, I start
coloring it with my pink. Then with my orange
color. I color. It's it's wing on its tail. But then I use
yellow for its beak. What about our triangle
Bardi What call this one sho I use
my orange color. Y So I'd be really careful. Go all around it. I'd be really, really careful. Just like that. Then again, with my yellow eye
color. It's bk. Then again, with my red
eye color, it's her. It's wing, and of course, it's teeny, tiny tail. We've got another bird here. We do not forget about that one. I want to color it
purple the side. So. We my purple very slowly,
little by little. I color my birdy
right over here. See that. All right. Okay. Then I pick another
purple, a lighter on. I better say a darker on. And then I use it on the hair, the wing on the tail. And then I use a
different color. I use my orange for the beak. Now, the only thing left
here is the branch. So we should work on the
branch itself on the leaves. What color is the branch? Well, let me think, that should be brown. So very carefully. I use my brown color. I go really slowly because it's a very small area and I do not want to get
out of the lines. Do I know? You should
be careful as well, not to get out of
the lines, my dear. Okay. I'll just continue with the same color until I cover all of this
cute little branch. Okay. Here we go. The branch is done. I can also move on the leaves. Beginning parts, the stems
a bit, not too much. Then I'm almost done
with the branch. So after we finish the branch, it's time for the leaves
and they are green. So I use my green color to go over all of my
leaves on my branch. O make them look pretty again. Okay. All right. So just like that. After that, you should
get a darker green. Let me just find one here. And then you can create
some green branch coming out of your brown one
makes it more alive and. You see how good it turned out. You can even create
shapes like this on them. Maybe they've got some thorns
or some things on them. We didn't know.
I'm just trying to make them different.
And it's working. I hope you like them as well. Okay. I need a darker brown as well. To create several lines
on the branch of my tree. Okay. So this one
is done as well. I hope you've enjoyed it
and see you next time.
 Mila Keller, Drawing Artist and Cartoonist