Transcripts
1. Introduction: Welcome to the magical word
of Colors and creativity. Hey, kids and parents. Are you ready to embark
on a colorful adventure? Join my fun and exciting drawing
and Coloring class designed, especially for kids. Here, imagination
comes to life as we draw and paint the cutest and
most charming characters. In my class, you'll
learn to draw enchanting mermaids,
adorable mushroom houses. Cool vehicles,
playful sea gulls, amazing came Lons and acute and clever fox.
But that's not all. Quooring is not just fun. It's an important
way for children to express themselves and
develop their creativity. It helps enhancing motor skills, improving hand eye coordination, boosting al recognition, stimulating imagination,
and storytelling. So come along, and let's create some magical
art together. My class is the perfect
place for kids to explore their artistic
talents and make new friends. See you in class
little artists. Okay.
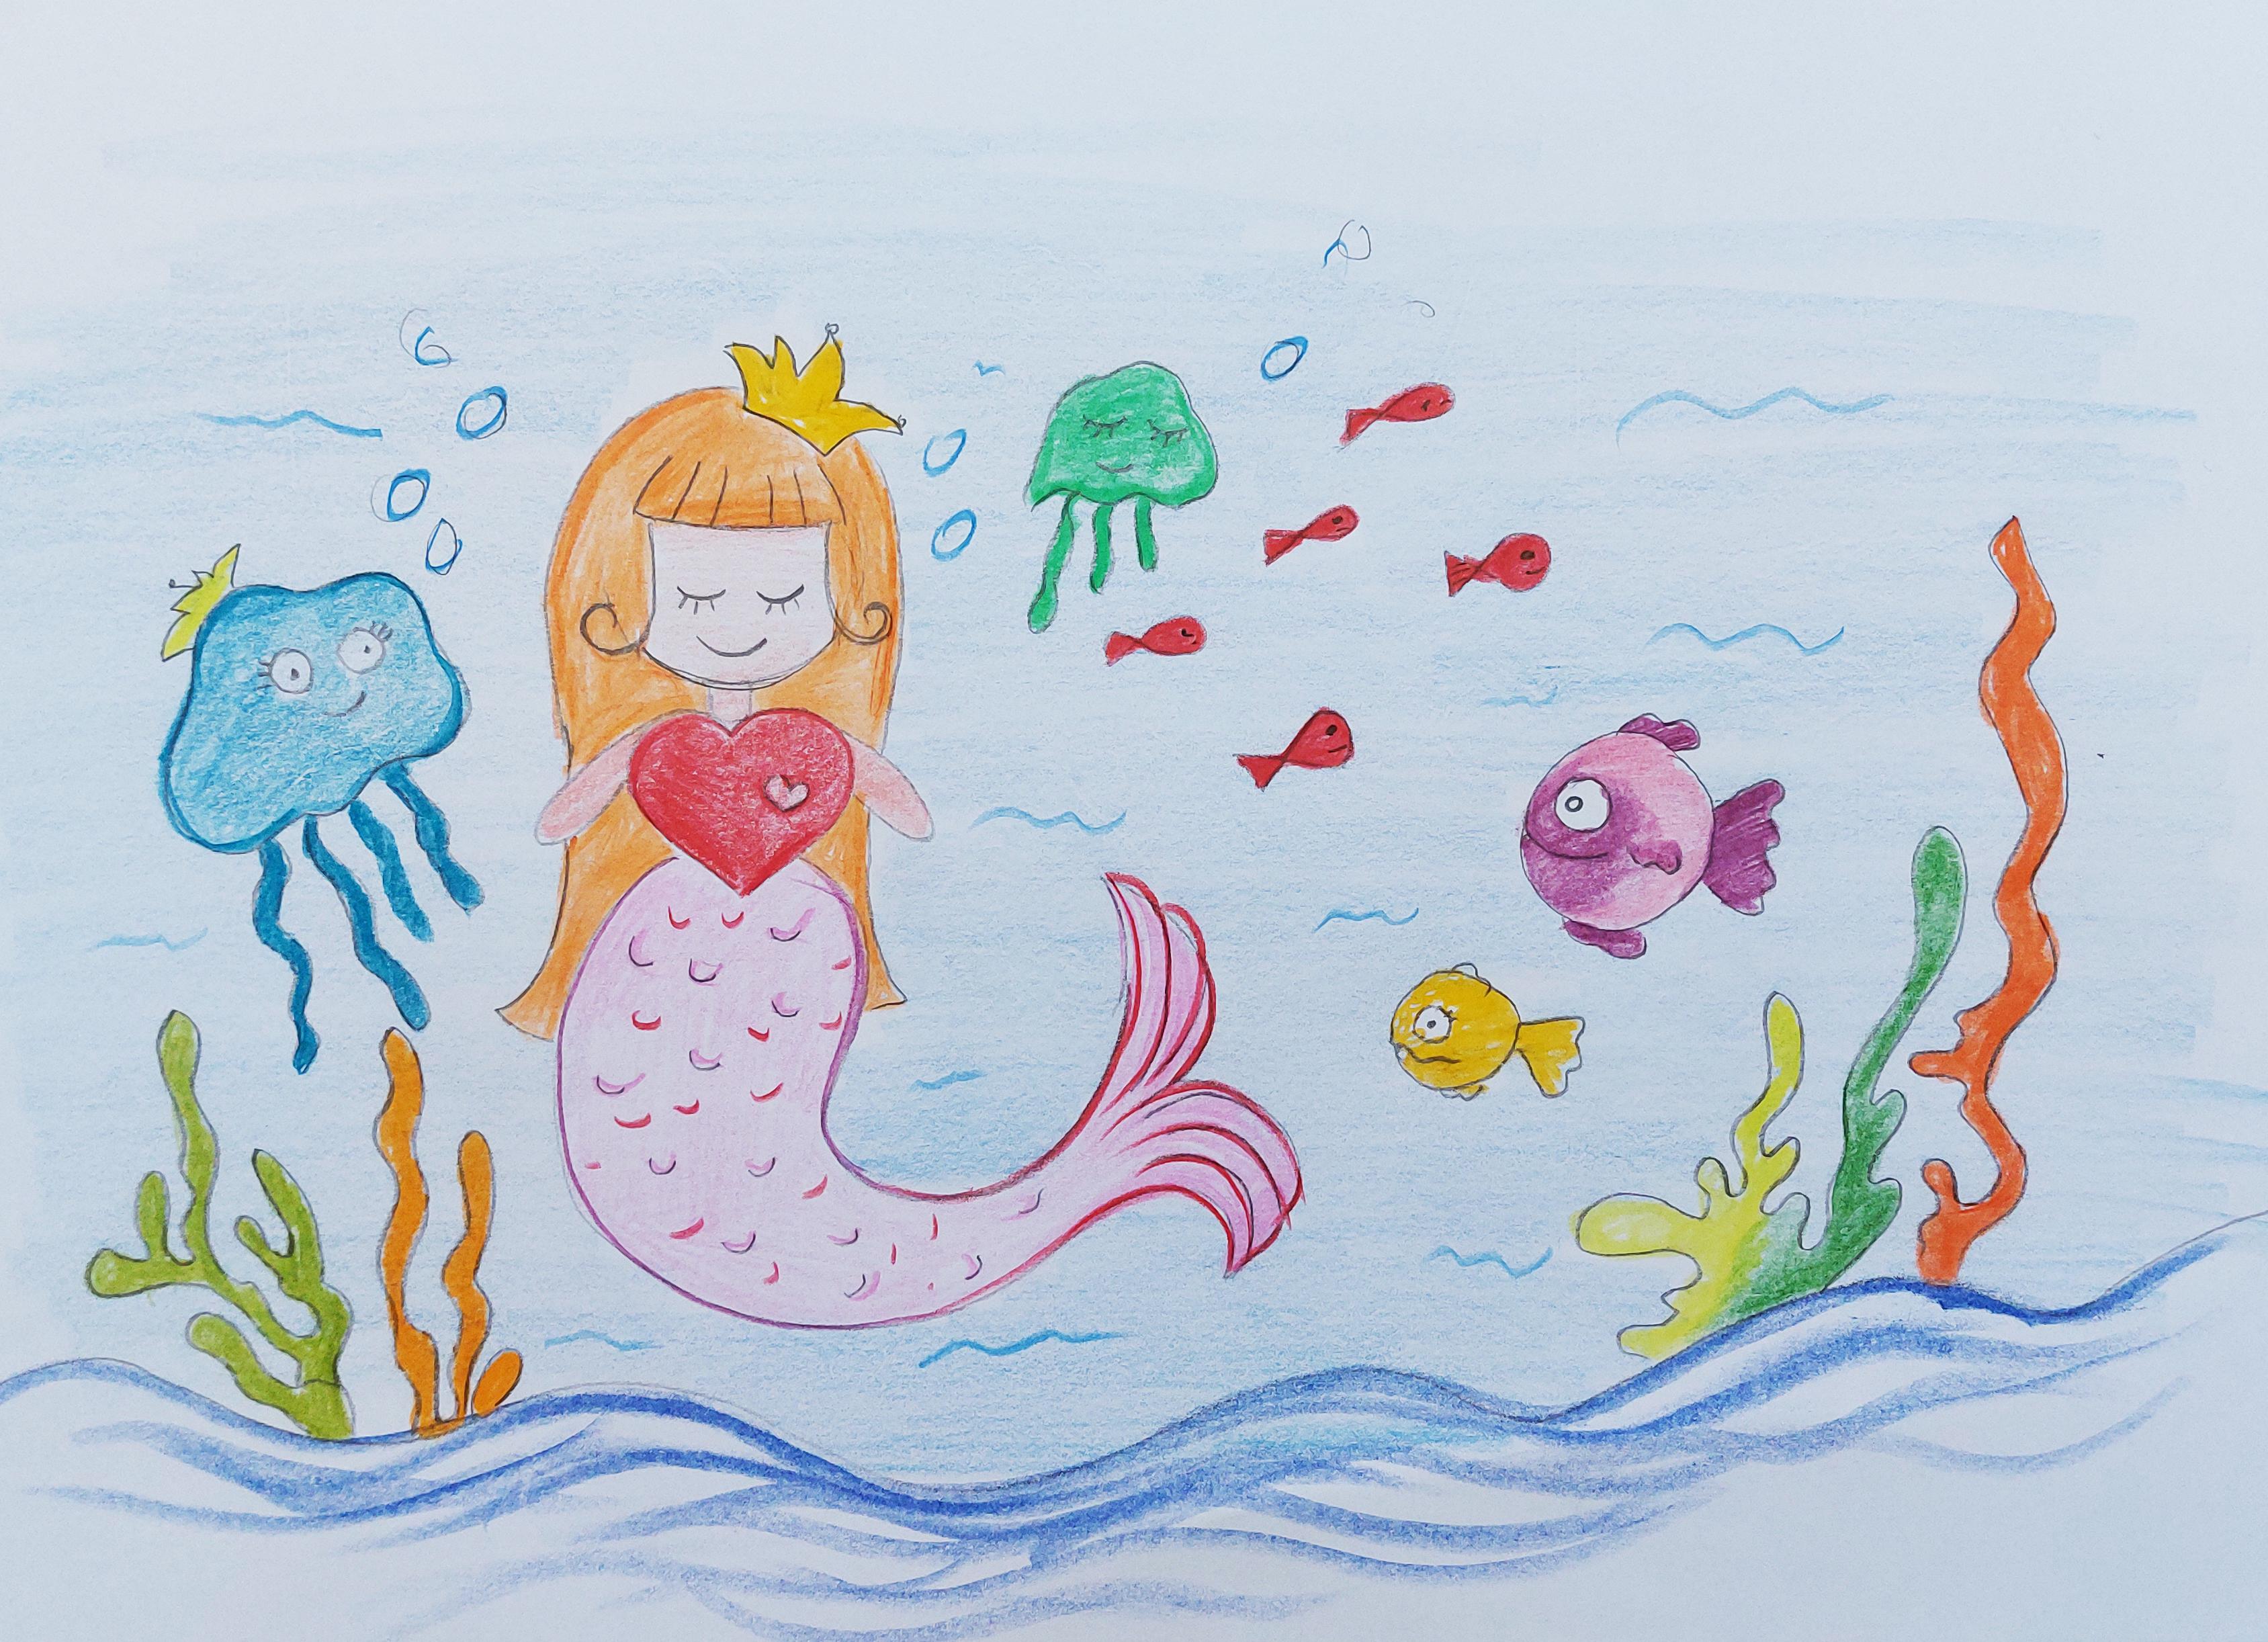
2. Drawing a cute Mermaid: Hello, my dear friends. Welcome to our new
part of drawing. In this part, I'm
going to tell you how easily you can
create a mermaid. I'm sure so many of you want to learn how to
create a mermaid. So you should listen
to me on step by step, move put forward to create this beautiful mermaid
the little mermaid. First of all, I'm going
to use a circle for that. I just make it a bit smaller. Then after that. Let
me just erase it. Then after that, I
have a rectangle, a small one for
my mermaids neck, then a big heart
shape for her body. Then I create her
tail like this. So she's got a pretty tail. Have you seen a little mermaid? Well, it can be her. I also create tail arms for her. Okay. Now that we've done the body, I want to start
working on the face. She's got bangs on her face. So cute, ain't it? So I just shape the
hair like this. Then She's got long hair, so it comes all the way down. See, my dear friends. We've got a little mermaid. All right. Let's just erase the place. This part of the circle because the rest of it is
covered by her hair. Then I create yes for her. A kind one and she's smiling. Also create her banks better. This is the part of her hair. Look how cute and pretty she is. All right. I also want to create
a crown for her. There goes the crown for
our mermaid princess. She's got a tiara or a
crown. It doesn't matter. She's a princess. Also,
I design her tail. She's got to have
a beautiful one. I also place a Okay. No. My little mat is not alone
in hold in the whole sea. Of course, they are all over
different fish with her. So we've got so many
different fishes living with her in the sea. You should just create a cross, and then you should
make one end of them round and another
one just straight. So you close them
and you've got fish. Then I also want to create a balloon fish like they
go ballooned puffy fish. So see? I can create so many
other fishes inside of the sea in different shapes
and different colors. So try to create different
fishes with different shapes. They also got jellyfishes. A little mermaid has a jellyfish friend
right next to her. Even some small ones, little ones like she
is the little mermaid. There it goes. They also
got eyes, of course. Under mouth. Look how cute they are. All of them are so
cute. All right. I'll create another tiura
for the Jellyfish as well. They're really friends. And this would be the bottom
of the ocean or the sea. So at the bottom of the ocean, got to be some
food for the fish. These are going to
be these plants. So do you know what they called the plants which are at the bottom of the
sea or the ocean. They called all deeds or see weeds in another words. Okay. Now, let's move on to have
different callers in them.
3. Coloring cute Mermaid: The fish on the seaweeds, the bottom of the
ocean, and of course, our little mermaid the
So I start with my pink, and I want to color My memtstail My mermaids
tail, pink the hallway. So she's got a
beautiful pink tail. It's so cute, so
princess like It's so p So I'm just continuing lloring all
the way down her tail. Why, dear friends, again, I just say, do not
rush through it, do not get out of the line. So your work would be much more prettier and you
enjoy it even more. So the ending part of the
tail would be darker. That's what I'm doing
here with my being color. I'm coloring the ending
darker than the rest of it. See? How it's done. I also go over these lines I've created on her
tail, making them. Better and more specific. Now they show more. Then I switch to my red color for coloring
this heart shape. See, I color this
heart perfectly red. Totally and perfectly
red here. All right. Then I color the
little heart shape. Okay. A light red. It should be a little not too much as much
as the bigger hot. We also place some red dots on her tail just to
design it a bit, or even I can go on these lines. You see, it's making it
cutter and prettier. That's what we're looking for. Now for the rest of our mermaid, I have to color her
face and her arms. I use this color. It's a skin tone or a pink light one for her face
and for her arms. Now, what could I
use for her hair? I've chosen orange. That would be just perfect for our qualm mermaid Princess. She is the little mermaid. I've got the warm
princess mermaid. We'll do the same thing
for all of her hair. Oh, my gosh, she is just getting more and more
gorgeous by the second. You can also name her
the way you want. For example, she could
be I don't know. Sally, Sarah, or any
name that you like. So there we go. We've got all of her hair. Oh, for her tiara or crown. We've got yellow color, so it's shining
through the whole sea. And it is actually
making her the best and beautiful
princess in the whole sea. They go to know that. It's going to show it. I want to color the small fishes with my red
color, making them cuter. And it can also show that
they are from the same heart. So, I color them in red. Small ones are in red. I also play some eyes for them. Not so much of lips, but a little lip is
enough for them. All right. Now we're
done with them, and we've got to move on to
the big fishes like this one. I want to color this
one with my pink. In the mermaids tail. All right. So we color one part of it with our pink and another
part with our purple. See, even just like
that so easily, they've got fishes
with two colors. How great that can be. How much more exciting
it could get. See. It also has hands. Also the tail and the
other parts are purple. Just do it with me. It's just so easy and fun to do combining different colors,
mixing them together. Just let your hard
go free and let your creativity. Just come out. I use my yellow on
this one. A yellow. Now let's move on to
our jelly fishes. I want to color this one green. That's crazy, ain't it? But I want to color my
jellyfish in green. That's what we do here. The little one would
be colored green. Only do a frame for it. I can get put more. Now, what color are used
for the other jellyfish. The bigger one with
the tiara or it soon. Well, let me think what
color can be good on it? Well, I'm going
to use my blue on ha I use my blue color to
color the second jellyfish, the big one with the tiara. There it goes. I'm also careful not to go
inside of the jellyfishs eyes. I shouldn't get blue. So I'm just moving around
it. Round and round. I just go around the jellyfish, making the lines darker. And I also call her arms, all legs, whatever they are. I just call her them
with a darker blue. It's just easier to
do. So here we go. Should also color
her Tiara in yellow. Now we've got to move on
to color the seaweeds. For example, I want to
color the seaweed in green. A typical seaweed.
My dear friends, seaweeds exist in so
many different colors. There's a variety of colors at the bottom of
the seas so beautiful. So I just do a part of it, a typical seaweed that
you've all seen in green. But I'll do this part
of it with my yellow. This can make your seeds
even more interesting. See? What should I do
for the other part then? Or use a dog or j on it. See? It's just all
coming together. Here we go. All the way down,
stay the lines. Just enjoy and have
fun with your drawing. You are creating an artwork. And it's so pretty. I mean, just look at it. Even now it's gorgeous. So the only part left is
this seaweed on this side. Again, I use my orange, but the lighter one here. So even it would be a bit different from the
other seaweed. It looks more similar to
my mermaids hair. See. Or for example, I work my
green again on this one. What you can see, again, it's another different grain. I'll just continue the
same way all the way up. And I color all these
parts pretty carefully. Do not get out of lines. You don't want that. Then I
want to get a very dark blue. Let me just find it there it is. Then with my dark blue. I go over this line to show the bottom of the
ocean or the sea. I just create some waves in it. To show the ocean
or the sea better. See how it's working out. It's just amazing and gorgeous. Just like you are. So this will be the bottom. You see? So cute. The little mermaid is
having a party with he frinfish The
bottom of the ocean. Then with my light
blue, very slowly. I color the whole background. So I can show that they
are inside of the water. The water is blue, so I'm using my light blue to show the water
in the background. All through the background
should be colored. Blue. A light blue, but still it's blue. See, I'm just using the side of my pencil here to
get a lighter color. And it would just color
faster, you know. I also got some bubbles
here for some of them, especially for my may maid. My mermaid is just like talking, so it's got bubbles coming out. I should emphasize on the water. So I create more waves. So it is gorgeous
as much as you are. My dear friends, I hope
you've enjoyed it. We aren't done with
the little mermaid. Just go to let her get to
her party and see you later.
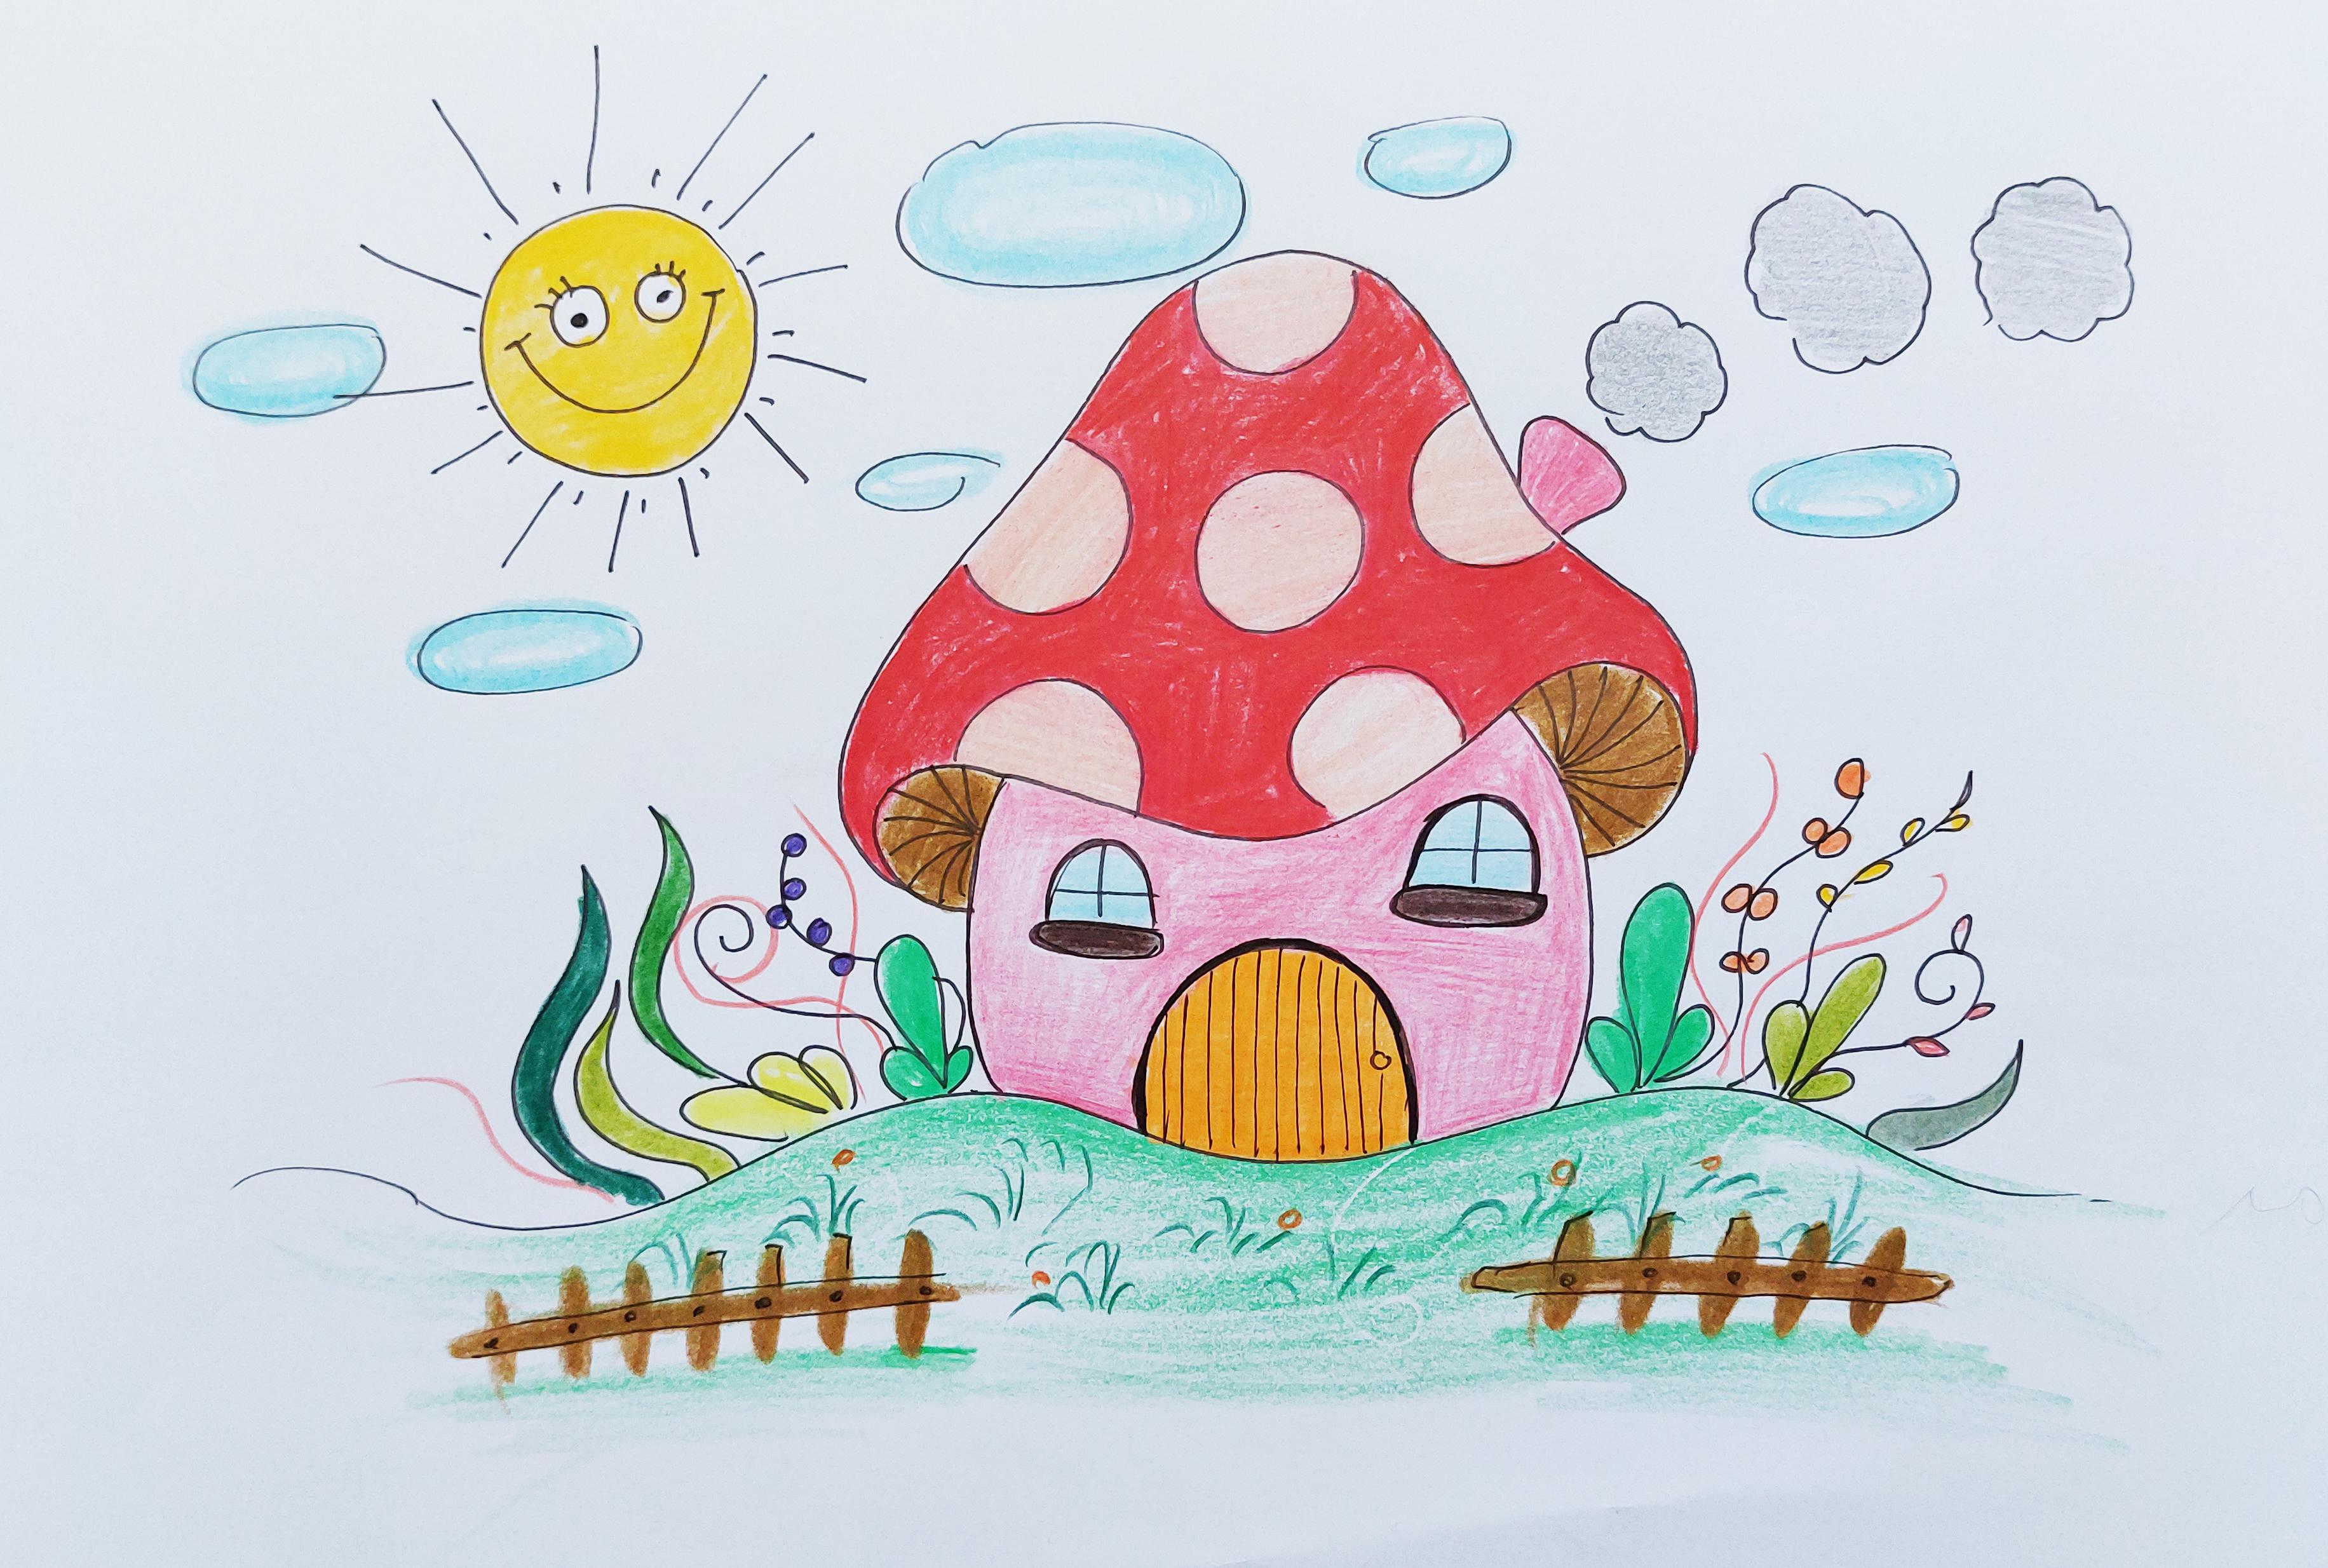
4. Drawing a cute mushroom house: Hello, my little friends. How are you today? Well, welcome to another
part about drawing together. Well, I'm sure that you
will all love this drawing. Let's start together. First of all, I create a shape
like that for the ground. Then from here, where a
curved line I come up. On both sides, then
from this back, I attach it to here. Then you should come down
and connect it to this line. Again, continue and get to
the back of your shape. So what do you guess
I'm creating for you? From here, I go up
again and I come down. Look. It's a mushroom. What is not going
to say a mushroom. When I add a door
to my mushroom, it would be a mushroom house. I also create beautiful
windows for it. Of course, on the
cap of the mushroom. We've got a spot. So we cannot have a mushroom
with our spots here. That's why I'm creating these. I also create lines for
inside of my mushroom. It's a mushroom house. How cut can it get? All right. There we go. We also make the windows
more better and beautiful. Next to our mushroom house, we can have lots and
lots of flowers. Baiful flowers in all
different shapes and kinds. They just look so cute. They are surrounding
our mushroom house with all of these
flowers and plants. Our house will get more
beautiful and gorgeous. Or do the same thing
on the other side. See that? I've got
it right here. So I add even more plants. Some of them are long, some of them are short. They are in different
shapes. Again, I say. We also need a chimney on
the top of our mushroom, which also, we've got a
smoke coming out of it. Oh, my God. Maybe it'll making marshmallows inside.
That would be fun. Well, as usual, we
do not forget about our happy cozy and warm sun. Sonny sun is shining on
the mushroom house with a big smither That's
how pretty it is. All right. We can also create several clouds all around
our mushroom house. And we are done with the
base of our drawing. I know it's time for
cooling and painting. My favorite part.
5. Drawing a cute mushroom house: Is it your favorite part too? Let's do it together. Be careful not to go inside of the spots
with your red collar. What you should call the
rest of your mushroom cup. Or basically the
roof of your house. How fun is that? Just don't go into
the sports or into the chimney and don't
get out of the lines. That would create a
perfect re roof for you. The roof top is right here. And I try not to
leave any white. A lighter spots empty and
cool spots in my painting. That wouldn't make it
so cool, would it? So I'd be coloring here. And I'd be moving on coloring all this
area, the whole area. Okay. I just continue all the way
up onto the right side. I do not forget any part. I'm sure you're having fun
cooling as I am having. Honestly, the cooring
part is my favorite part. It's so exciting, working
with different sharp colors. Here we go almost moving on even these
parts should be done. So just as pretty as this. Say that. I've got it. Now, at last, I feel all the
empty parts with my collar. Then I get my pink collar. Then I color the
chimney with pink. Okay. Okay. I also color the
rest of the house in pink. The main part of the house, the walls, or the body of
your mushroom should be pink. Well, and mine should be pink. Yours can be in any
different color. Do not be scared of choosing different colors than
the ones that I'm using. Maybe you like your mushroom
to be in blue and green, yellow and purple or any
color that you like. It's your mushroom. It's your painting, so don't let anyone else
say what you should do. You can do this, or you can do whatever
you want with the colors. All right. Let's
get them together. All right. We almost there. We've almost. Got the whole thing done. Well, then with my brown color, I call it inside of my mushroom. It's got to be brown. Then I get another brown for coloring this area just
below the windows. I cannot leave them. If you look at your washroom, it's like it's a smiling too. Then I get my blue coloring the windows blue, making them. Then for the door, maybe I use an orange
orange color for the door. It's going to be fun. Should also cover
the whole area. So I'll go this way too. I'll be careful
around the edges. But they look so cute right now. All right deep. Again, I start like this. Now, sin ford the plants beautiful flowers next
to my mushroom house. I use different greens
for them at first. Maybe this s would just
be this color, gray. But again, I say you can
use your different kind of greens in order to create
your beautiful plants. Or you can color all
of them in one green. It depends on you my darlings. I'm just using different
greens on different plants. Because in my opinion,
as more colorful, you make your painting, it's going to be more
interesting and more gorgeous. So this way. You paintings are going to
be so happy and lively. You see what I mean? It's already getting
there, ain't it? I've just got to use different colors on each
side for each plant. That's how we do it. Then I get my red color
coloring the flowers. Maybe this flower would
be purple, not red. Even for the flowers, you can use same color
or different ones. As I'm doing, these ones
might be even yellow. And the last ones can be pink. And also the line, I can even create more of
these with my pink color. It can also match
my pink mushroom. Then I get my lightest green. With that, I start coloring the whole hill because I want to show that it's full
of grass and plants. I'm using my light green
on the surface of my hill. How great is that one? See that. All right. Then with a darker green. I start creating some
grasses like these. Just to show that there
are grasses here. See that. It's fun. Well, we've got them all. I can also use my orange red.
6. Start coloring the cute mushroom house: Okay. Then I've got
to color the sun. Just as I always do. Let's color it. Let's color
the sun with our yellow. So we've got the yellow
sun smiling at us. Then with my blue, I am coloring beautiful
clouds all over my sky. I call the edges of
the clouds darker, but as I get to the center
of them, they get lighter. Just to make them
looking better. Then I should also
call the smokes, as always, gray for the smokes. As we did before, no surprise there
can all see them. All right. Then, I choose
a very very lot pink. At me just find it here. This is a very lot pink. And with that, I'm going
to color these spots on my rooftop or the spots
of my mushroom cup. These are going to be worked
on with my very light pink. I'm just doing it very slowly. So I wouldn't get
messed up. Be careful. You don't want to do something
wrong over here right now. From here, I'll do
the same thing. I've got all the
spots covered here. Then with a brown color. Let me find one. I'm going to create these
shapes over here. While you're wondering
what are they? Aren't you? I'm going to do the
same on this side. Then later, I'll let
you know what are they? What is your guess? What am I creating here? So when I create this line
connecting them together. Now you know, these are the fences of our
cute mushroom house. These are wooden fences there. Then I also use my
green again underneath them to show that they're
also on the hill. Okay. Now again, get
your black color pencil. And then you should create the nails with
your black pencil. So for my door, I also create some
lines over here. So the door would
be pretty as well. I also go around it, making it, showing it more. Just in this way. Okay. Now, this painting is also over. I hope you've liked it. You created, enjoy it. I'll learn a lot from it, fun and see you in the next
painting, my dear friends. Take care and practice. Okay.
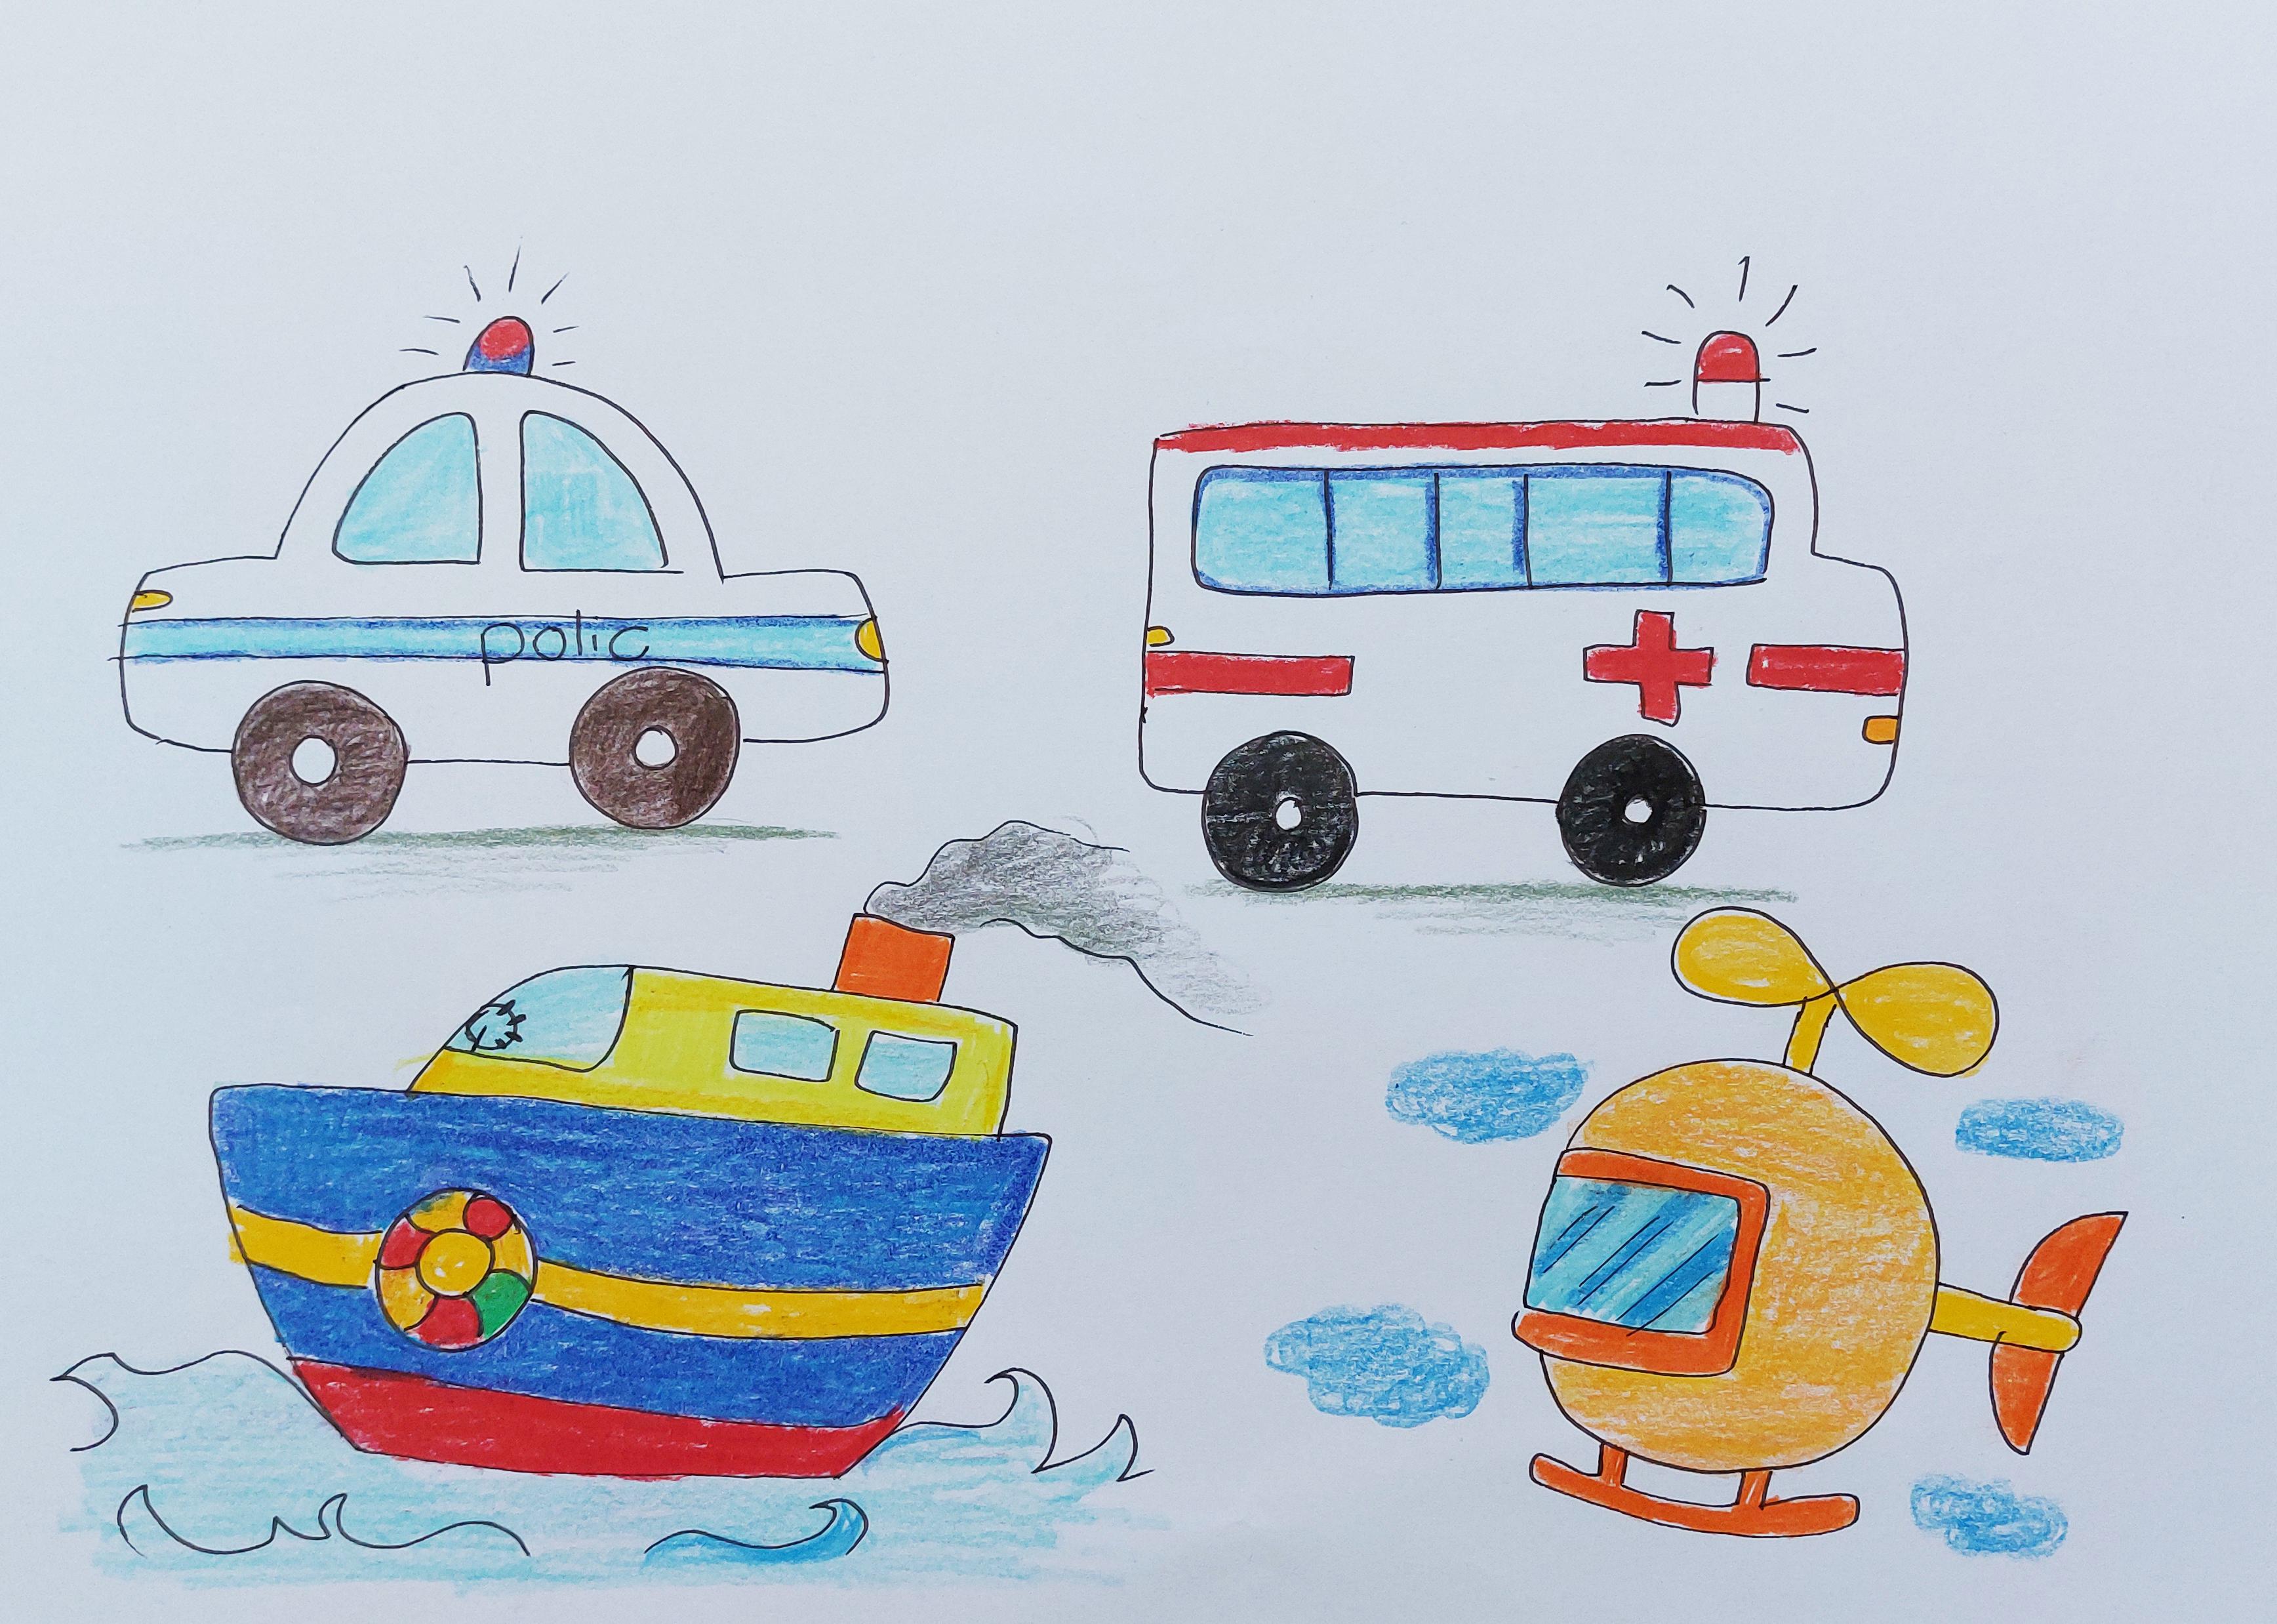
7. Drawing cute vehicles: Hello to all of my
dear little friends. How are you? Okay. This time, I want to tell you how you can create different
kinds of vehicles. Well, first of all, I want to teach you how
to draw a police car. I'm short. Most of you want
to know how we can do that. It's really amazing
to see a police car. Now imagine drawing one. First, I start with the circle, but I don't finish it then. I'll continue on both
sides and over here, I have one big wheel and
another in the back. Okay. Then I connect
these two together. And then I complete the front on the back
of the police car. Okay. Of course, my police
car needs two windows. So that's what I'm going to do. And there goes the siren on top of the c that
when it starts going, It actually saying,
Please move away. I want to get through.
I'm the police. So I should also write
police on the car, and it would have two lights
in front, warning back. The police car also
has a line on it. And it's usually blue. So this is our police car. You see how fun it was? Okay. Let's move on and
see what else we can have. We are going to have an
ambulance this time. Okay. First of all, for that, I work and I draw a rectangle, then I bring it down a
little and up to here. There goes the wheel and continue that and here
is another wheel. The is my ambulance there. Okay. Let's do the details. First, it's beautiful windows. So I'm placing windows here. Then again, over here, it's got a siren. This s it says, Move. I've got people to save. Okay. It also has another line. And over here, we've got a
shape like a cross or a plus. Okay. Then do not forget
about the lights. We need lights for
the cars. Okay. What else do we need to learn? Well, Maybe we can create
a helicopter or a chopper. So first, I draw a rectangle. Then I'll go around
it like this. Now, my helicopter is
circulary do the circles, then I create another
rectangle on top of it, and then I create an infinity shape for the
tropers of the troper. Just kidding. Also for its tail, I use a rectangle in two shapes. We should also have some parts like this from the
bottom of our helicopter. It's like the wheels, but it is something that the helicopter stands on
when it's on the ground. Let me add one more thing so
you see how we can do it. That is what goes on the water. Yeah, I'm going to
create a ship for you. So it moves on the sea. I create and I draw
a shape like this. It looks like a ball. But from here, I draw
another one above it. Then I add the
windows of the ship. And over here is the
place for the captain. So captain would go there. And there goes steam port. The captain also had something to control the ship with it. Do you know what
it's called maybe? This could be the new
thing you learned today. Over here, we've got
even some tubes. If anyone thrown in the sea, they could save them. It's moving on the sea. So we also create some
water waves around it. There we go. Then from here, there
goes the smoke. Okay, now all that's together. Call these cute things.
8. Coloring cute vehicles: So our police car
is white and blue. So first, I use a very
light blue for the windows. But I feel the whole window. I feel it all. I should
do it for both windows. I don't want to folk get one. Okay. Then I also color
this line here blue. I do not go into the lights. Be careful because the
lights should be yellow. That's it. One in the
front, one in the back. Of course, the
siren is and blue. That's the siren
for the police car. It's red and blue. That's the police car. Okay. I use a darker blue to on
this line to frame it a bit. Then we get our
brown color pencil, and then we can
color our wheels. But I'm going to leave
the wheels white. I see at the car is white
and blue, not the wheels. So I'm just going to
color the wheels brown. It's a dark brown as well. Okay. Here Rick
goes. Here we are. Now, we are done
with our police car. I hope you know where needed. So the next one
is the ambulance. The top of my ambulance
should be red. So equal it red. You do it with my right. The siren is also red. The lines the cross
are also red. So here they are. Do not forget about this cross. Should also color it red. See, it looks so cute. Then again, for the
windows of my ambulance, I should use my blue color. Yes. Again, we are
going to use it. Okay. So, we start
with a dark blue, frameworing it, doing a frame, then with a light blue. I just beautifully all Okay. See how fun it is. And how fun it's getting? No, the only thing
left are the wheels. This time, I want to work on the wheels
with my black pencil. Doesn't matter? You can use brown or black or odder colors for your wills or
even your cars. I wanted to show you the
real color of the cars, but you can use anything else. Okay? So I use yellow
orange for my lights. Now, let's work on
our helicopter. Okay. So first of all, I want to color the whole
helicopter with my orange. The orange looks good on it. We don't want to rupture. Just don't do it then
after that or use yellow. See? I'm using yellow on
top of my orange. You see, my dearest friends. Sometimes you can just mix your colors together
to get a new color. Don't be afraid of it. If you like, just mix
your colors to get a new one that always
makes me feel good. All right. Then I get a orange. And then I start coloring this area right
around the window. Okay. Just see it. So I complete the window frame, and then I want to color the same thing for the
tail of my helicopter. I'm just going to
call it the tail for the helicopter or the topper. Using all the words so all
of you can understand me. Okay. So I create several lines
with my darker blue, and some of them with the blue. Okay, but not is our
ship cute big ship. So first of all, I'm going to use my dark blue to color the body of the ship. Have you ever been on a
ship, my dear friends? It is just so fun. Okay. I moving going All right then. After that, I just leave
it right there for now, and then I color the rest
of my ship blue as well. So I just leave a line
white for in the middle. Here we go. Color blue. Again, my dear friends, I always tell you, you can use any
color that you want. I'm using these ones
because I just like them. You can use different ones. So don't be weary,
my dear friends. Let's just do it. Okay. There we go. It's
how it looks like. I've included the orange on the red to make it look
so different and fun. For the chimney, again, I use the orange. Then for the captain's
area, I use yellow. But this is a lighter yellow. Right. Here we go. We've call the whole ship. Well, how be beautiful it got? Do not forget about the
windows, my dear friends. I'm sure you won't. All right. We also call her the sea. We should show that our
ship is in the sea. Okay. It's maybe
moving through all of these oceans and seas
and whatever we like it. If it's going all
around the world, then I get my gray color, and as usual, I
work on the smoke. Smoke is always gray.
Sure you know it. Then with a light blue. Again, I move on my
dark blue on the ship. As I told you before,
my little friends, it's just fun to mix and match
your colors for some time. Sometimes it just feels good. Okay. Here we go. All right. Now we shall all
also call this tube. Do not forget about it. Then Use green for one and maybe even
yellow for another one, so red, green and yellow. See, my dear friends. You can use these
beautiful vehicles in your own drawings now. I mean, just make it beautiful. And then our chopper is
also flowing in the sky. So definitely needs clouds. If we are showing our ship
in the sea and ocean, why shouldn't we show
our chopper in the sky? Of course, shouldn't we show the police cars and
ambulance on the ground. They are moving in the street. Okay, my dear friends. This one is done as well. I hope you've enjoyed it. You should use them
in the rest of your drawings. See you later. Okay.
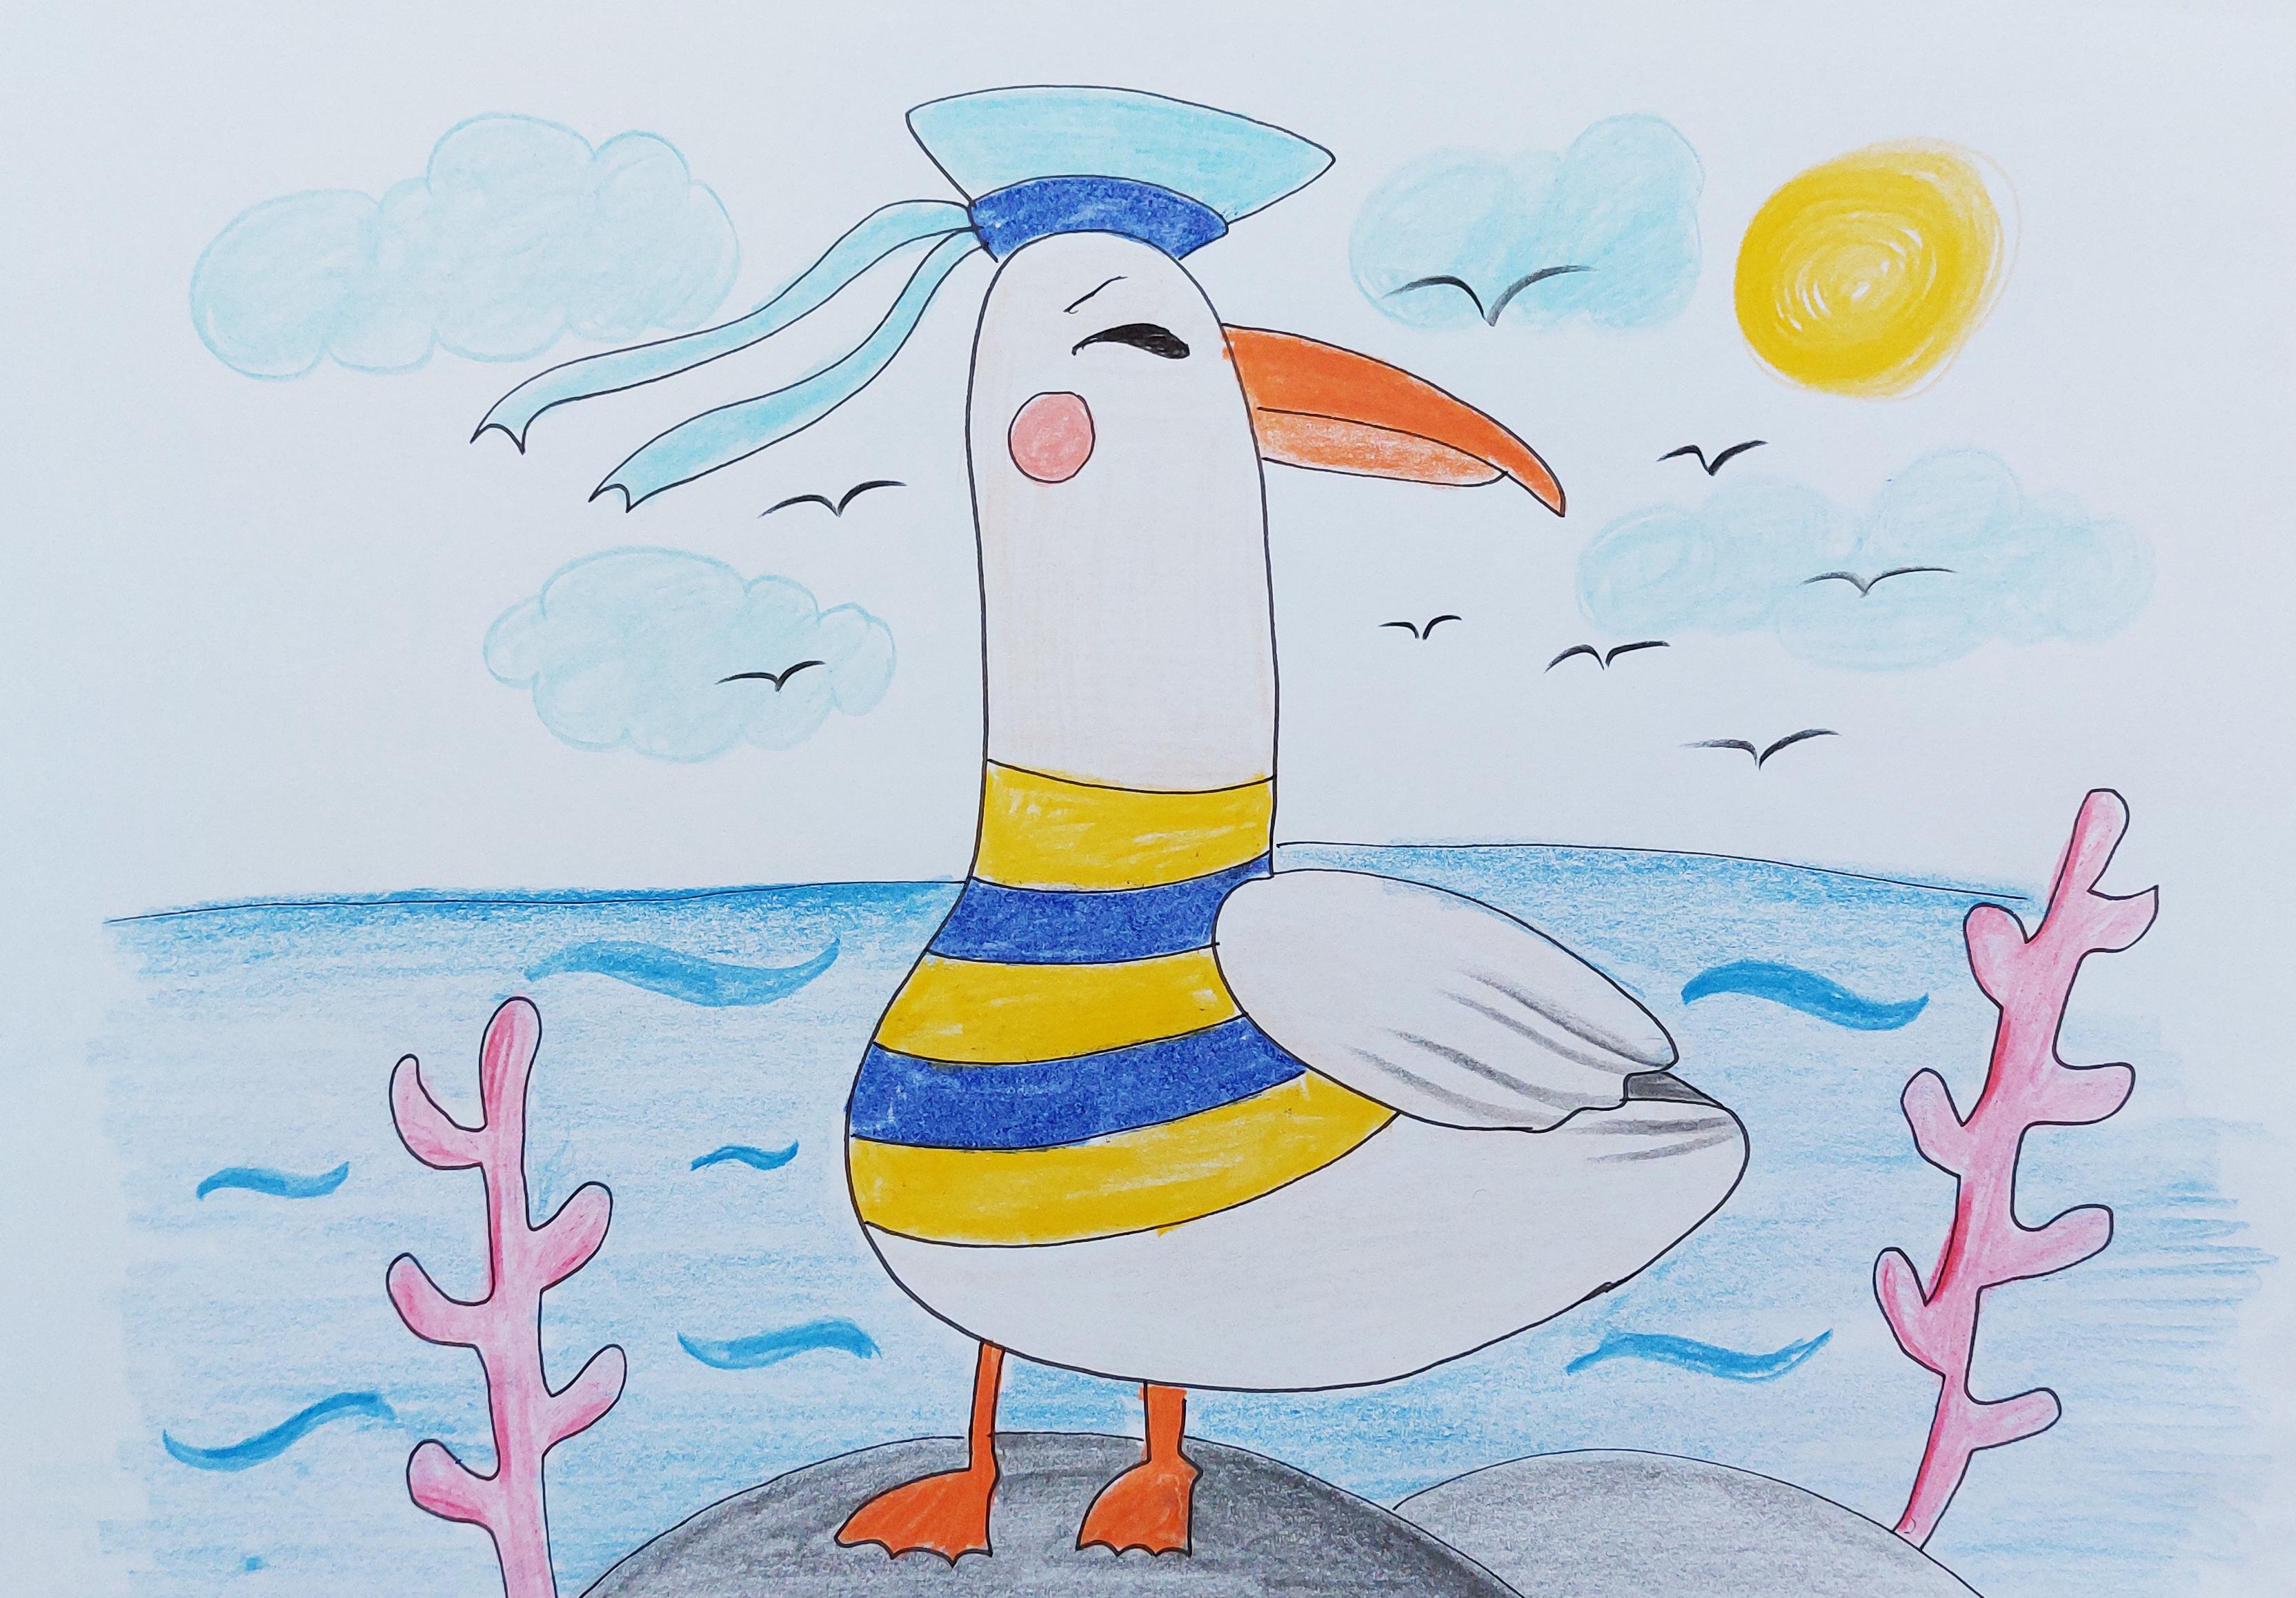
9. Drawing a cute seagull: Y my little dear friends. Welcome to another
tutorial. Of course, M. This time, we are going to
create sea gulls together. Have you ever seen sea gulls? They fly over the sea
and they eat fish. That's what we call se goals. So first of all, I create and I draw
a shape like this, and I come down, and I move toward the
left side of my paper. Okay. Now from here, like that. I just make it complete. So when my sea girl's
body is finished, I want to create some
clothes for it as well. See, I move it. I create some stripes on it. So my dear friends, my sea girl also
has feet and legs. It is a bird, but it has them, you know. All right. No. My seagull is looking this way, so this will be its big. If you haven't seen
any sea gulls, you should go to the
scene and see them. That's a lot of ain't it? Right, there goes the cheek. Okay, my dear friend. My seagull also has
a heart on his head. Okay, so. It's like it's a
Captain Seagull. Where is the seagull standing? Well, on a stone, maybe, or next to the sea. So it's like it's
standing on a rock in the middle of the sea and it's watching the
sea or the ocean. It's a sea. So definitely. It's near the sea. So I also create
some seaweeds here. And it looks so good. Okay. Now to these parts
is going to be the s. Then from here above, it's going to be the sky. Now we are done with the
general idea with the drawing, and now we get to
the front part.
10. Coloring cute seagull: Yeah. I know what you mean. It's coloring time. So I I mean just do it. I'm just using a creme
color on all of its body. Then also, I use
it for its head. Only just color it with
my very light pink, which is almost the cream. Okay. I also work on its wings. Just like that. Now, I get a very dark blue. Then I start coloring
its clothes. It's got a striped clothes, so I do it. Only one line at a time. So I do one of them. I don't do one of them. Then again, I do another
one. How's that sound? No one like this. So here it goes. And then I use my yellow
color between them. Because you know blue and
yellow always go good together. It looks better. So in this way, I've got a two color clothes
for my it's all dressed up. So one of the lines yellow. They are the one blue. All right. Now I'll
make its cheek pink. This time, really pink. Then I use my orange
color for its peak. The part where it has its food. Now, what color is going to
be for the legs? That's true. They should be orange. So I use my orange color. Then I get this gray color. Then I create its wings. See, I'm just using the
gray to draw wings for it. Then I also color its captain t. The captain t is
going to be blue. Okay. And then the top part of it
would be in a light blue. But again, I say that's
only my color ring. You can use it differently. Okay. So I also color these ribbons. Okay. No. Let's just do some coloring
on the background. So first, with a
very light pink. I work on this one
on the seaweed here. Because it's standing on a
rock in the middle of the sea. That's why we can see
a part of the sea. I'm just loving playing
with these words here. Then from here or
do the same thing. Okay. It's all going to be done. Okay. I just try to remove all
the wide parts in my work. I want to cover the whole
area, my dear friends. It's just not looking
good if you one part, but forget about
the other parts. Okay. Now they are
looking much better. So I get my gray color. Then I shall also color this rock which my
seagull is standing on. So don't forget about this. This rock also be colored. I'm using gray for it. So just like that. Easily easy. I just get it. Now, this rock. I just like to be lighter
than this first one. No specific reasons. I just like it that way. Then I get a blue color. And then very slowly, I call. Okay. I should call the whole C. Okay. Just like that. And moving Okay. Now my dear friends after
you call it the whole s. What it's time for? I'm sure you know it. So it's time for what,
my dear friends. Just think a bit. Well, it's time for waves. I should create waves
inside of the sea. It always works. I mean, it always makes your
drawing more pretty. Because it's showing the sea. It's just lovely. Okay. What are we forgetting? Of course the sun, as I always say. So don't forget about the sky. So first, call the sun. And then call it all inside it. Then come here. I create very beautiful clouds. Just like these ones. Then I start pretty clouds. Okay. Here we go. Okay. So over here, I've got another
cloud, which I'm going to. You can even create more
of them if you like. O of them. I'm just showing you in
my mind, Mart friends. I should get my black color. And then I should create
the rest of the crew. The rest of the sea
gulls. Where are they? Of course, they are just
flying in the sky. Okay. So I just using a bit
more blue over here. Okay. And that's it. I hope you've enjoyed it as much as the others and
as much as I did. So my dear friends, have fun, practice
and have fun again. So see you next time.
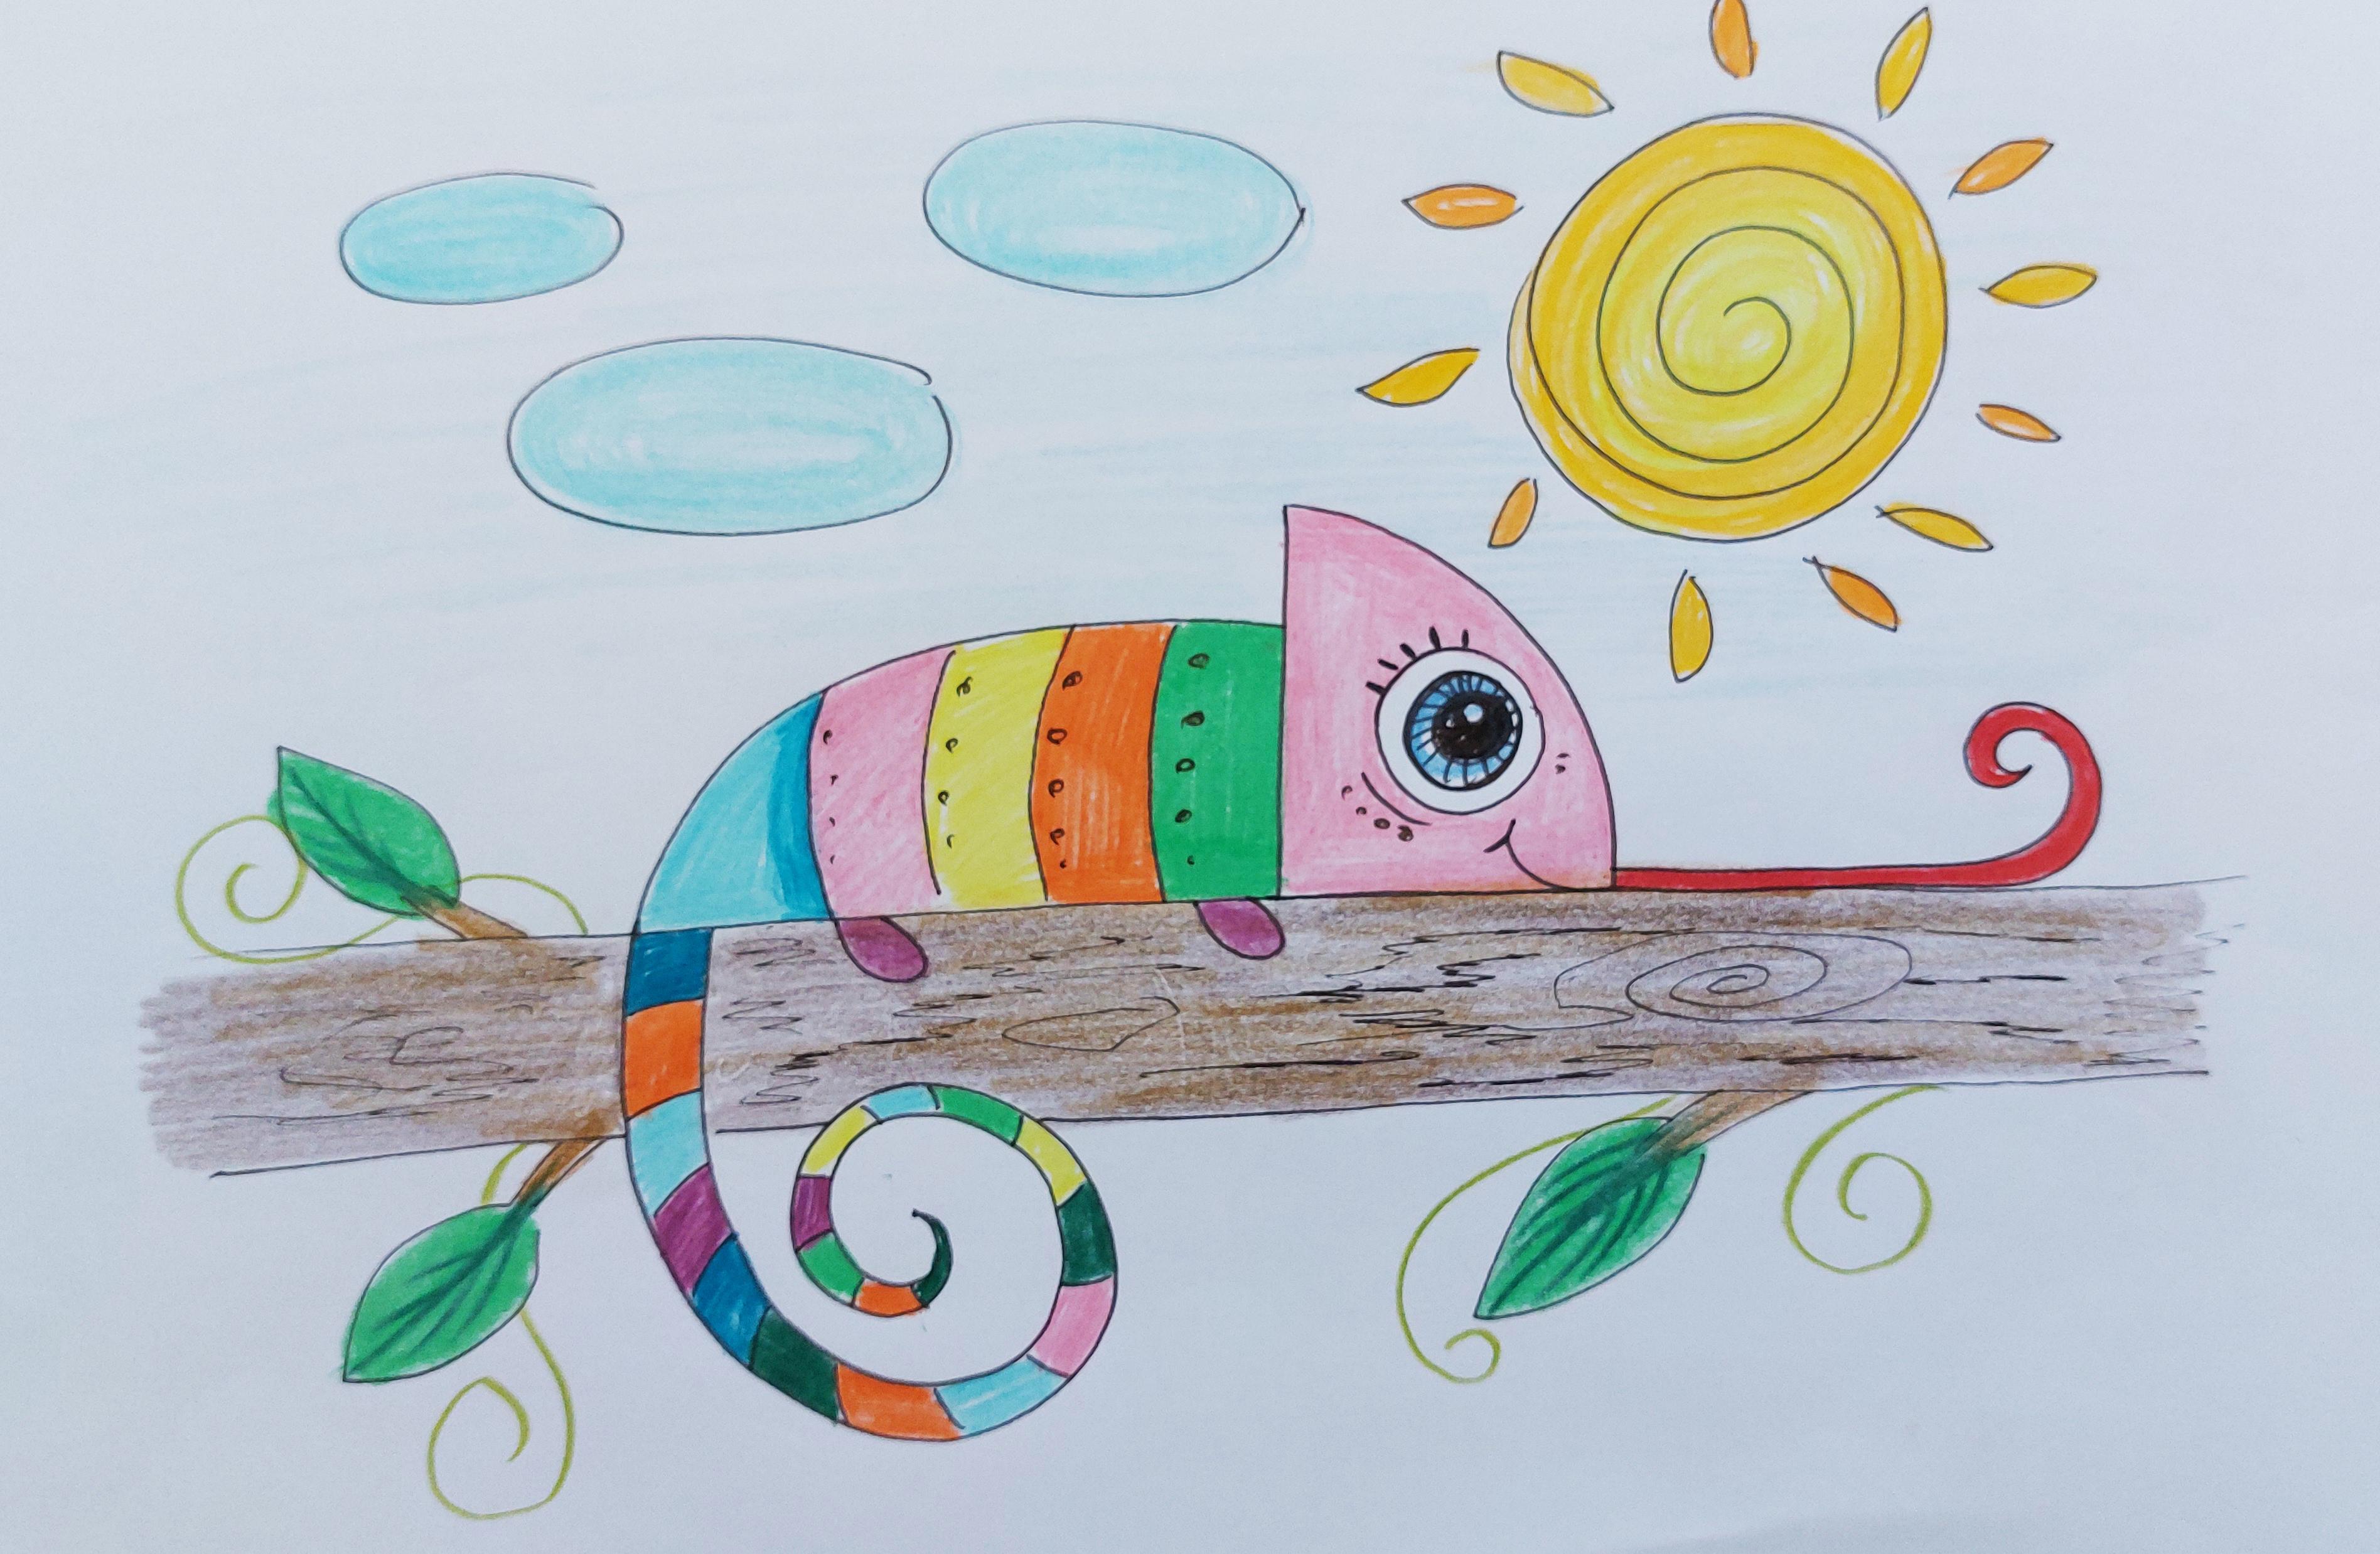
11. Drawing a cute Chameleon: Hello, my dear friends, how are you today? Well, we are back with
another tutorial? Well, let's see what we're
going to do this time. Well, this time, we are going to create something very
special and fun. Let's see if you can guess. So it's the one
that's played rango. Do you remember
what was its name? Yeah. It's a CamoonFirst of all, I created two straight lines, one sleeping, one standing. Then I just attach them
together with curved lines. So this is my Camoon. Hello, Rango. Moons have very big eyes. So that's why I'm going to create big
eyes for him as well, so they can see better
and they can hunt better. On the tongs or just like that. Very screw, very
twisted on very long. The moons are so kind. Okay. Okay. I want to create a beautiful
tail for my came. It's tail, it's very
similar to its tongue. It's round and round
swirly At very long. So I dropped the tail
down the branch. Okay. I'm going to continue
the branch of my tree. Okay, my Cameleon is definitely standing
on a tree branch. Then I just create some
lines on its body. Did you know that Camoons
can actually turn the color into the color
of their background. They can become yellow, they can become red, green, or any color
that they like. An crazy. But that's
Camoons They can just change themselves whenever they wanted and wherever
they wanted as well. Okay. We are done with the eyes. Big cute beautiful eyes. So there we go. Now,
let's color it together. What do you see? Let me
just add some more details. Yeah. That would be more fun. For example, let's just create some lines on the
branch so I can show that. It's actually on a tree. And that's a branch. So it's all going
to be the same way. And if our Cameron
is under the sun, we should create the sun too. I'm sure it will have
more fun as well. It would have so much more
fun underneath the sun. Trust me, it's going to have it. Okay here. Now, let's cover it together.
12. Coloring the Chameleon: As I told you, moons can turn into
different colors. So they can be so much colorful. That actually makes
your work easier. I'm just going to create my beautiful moon in so
many different colors. First, I'm going
to use my orange. I call it all these
parts orange here. And here it goes all the way to the
last part of the tail. I like the next
color to be yellow. It can get a color from the sun. So I color it yellow, and again, all the
way down to the tail. For example, I can
even use some blue. I can color a part of it with my blue. Okay. Let's use the blue. It's going to look so pretty. Oh, my God. Look
how colorful it is. I can also use my purple.
That would be fun. Even it's fat. It's tiny little
fake can be purple. What else I can use? What are the color I can use? Well, well, I can use the pink. For example, the pink
would look good here. All the way to the tail, and also this time, I want to use the pink
for its face tube. It's just making it cutter
that it already is. So try to do it with me. Do not go inside of the eye, my de do not forget about it. Okay, then I get my blue
again to color the eye. It's got blue eyes. Cute. So cute. Okay, what do you think
I'm going to use my red? What part of it I'm
going to color red? If I find my red, I'm going to color
the tongue red. Of The tongue shod be red. So there goes the tongue. Okay. Then I also want to use this dark blue
for some parts of it. I think it's just going to
make it more interesting. Maybe even a bit over here. And maybe this area. You can go really wild
with your colors. My dear friends, because
this one has no limits. And the last leaves to green. You see, oh, my God, how gorgeous they got. So I apply the rest of my
green everywhere else. I can also use a darker green
for some other two pots. These two smaller pots. It is so colorful, so gorgeous. Okay. I just so cute. I cannot resist it. I'm sorry. Okay, now it's time
for the background. So let's do it together. First of all, I should
call the branch, and what color is better
for that than the brown. So I'm just using my brown
moving on the branch. So I just got a little bit
out of the line there. You don't do that. So I'm cooling it all the way through the branch
with my brown color. Also from here. Okay. I color it beautifully. I'm also going to use a bit
of my light brown on it. Okay. So it would look
prettier. There we go. Okay. Then I'm going to
use my dark green and then very I'm going to color my leaves. There they go. Then with my lo grain. I color the rest of the leaves, wherever I left on
cool What did you say? I think it's just great. Now, what is left. Of course, the sun. So as usual, I'm
using my yellow, but look at how I'm coloring it. I'm coloring inside of the
maze, the life created. It's just like it's
going to hypnotize you. So as I move toward
the center of the sun, I'll make it lighter, and then I switch to a
lighter yellow completely. To keep the center
of the sun lighter, just makes it more beautiful. Here it is. Okay, then I get my orange
color to color the sun shines. So as you can see, I'm only coloring
them over each other. So I will have one orange
sunshine and one yellow. One orange, one yellow. You see, cuter this way. It looks more
beautiful admit it. And the last part is the clouds. So of course, I'm
taking my blue, and I'm moving my clouds
just to color them blue. Here we go. The clouds are blue. Then after that, I
call the horse sky. But as you can see, I'm doing it very lightly, do not press or push your
pencil into the paper, my dear. Do not forget about that. Color it lightly
and without any. Slowly and for some lasts Just to make it even
more interesting. I'm going to use my
green color to create some plants or green things just coming out of the branch. Just to make it look more real. The branches are real this time because you see all of these green plants
coming out of them. Again, at last, take
your black pencil and move over these parts to create some shapes
on the branch. So this was beautiful Cameron, would it be beautiful
background? I hope you've liked it. Maybe this can be misses Rango. Am I right. So I hope
you've just enjoyed it. On these dots are the last one. Have fun and see you later.
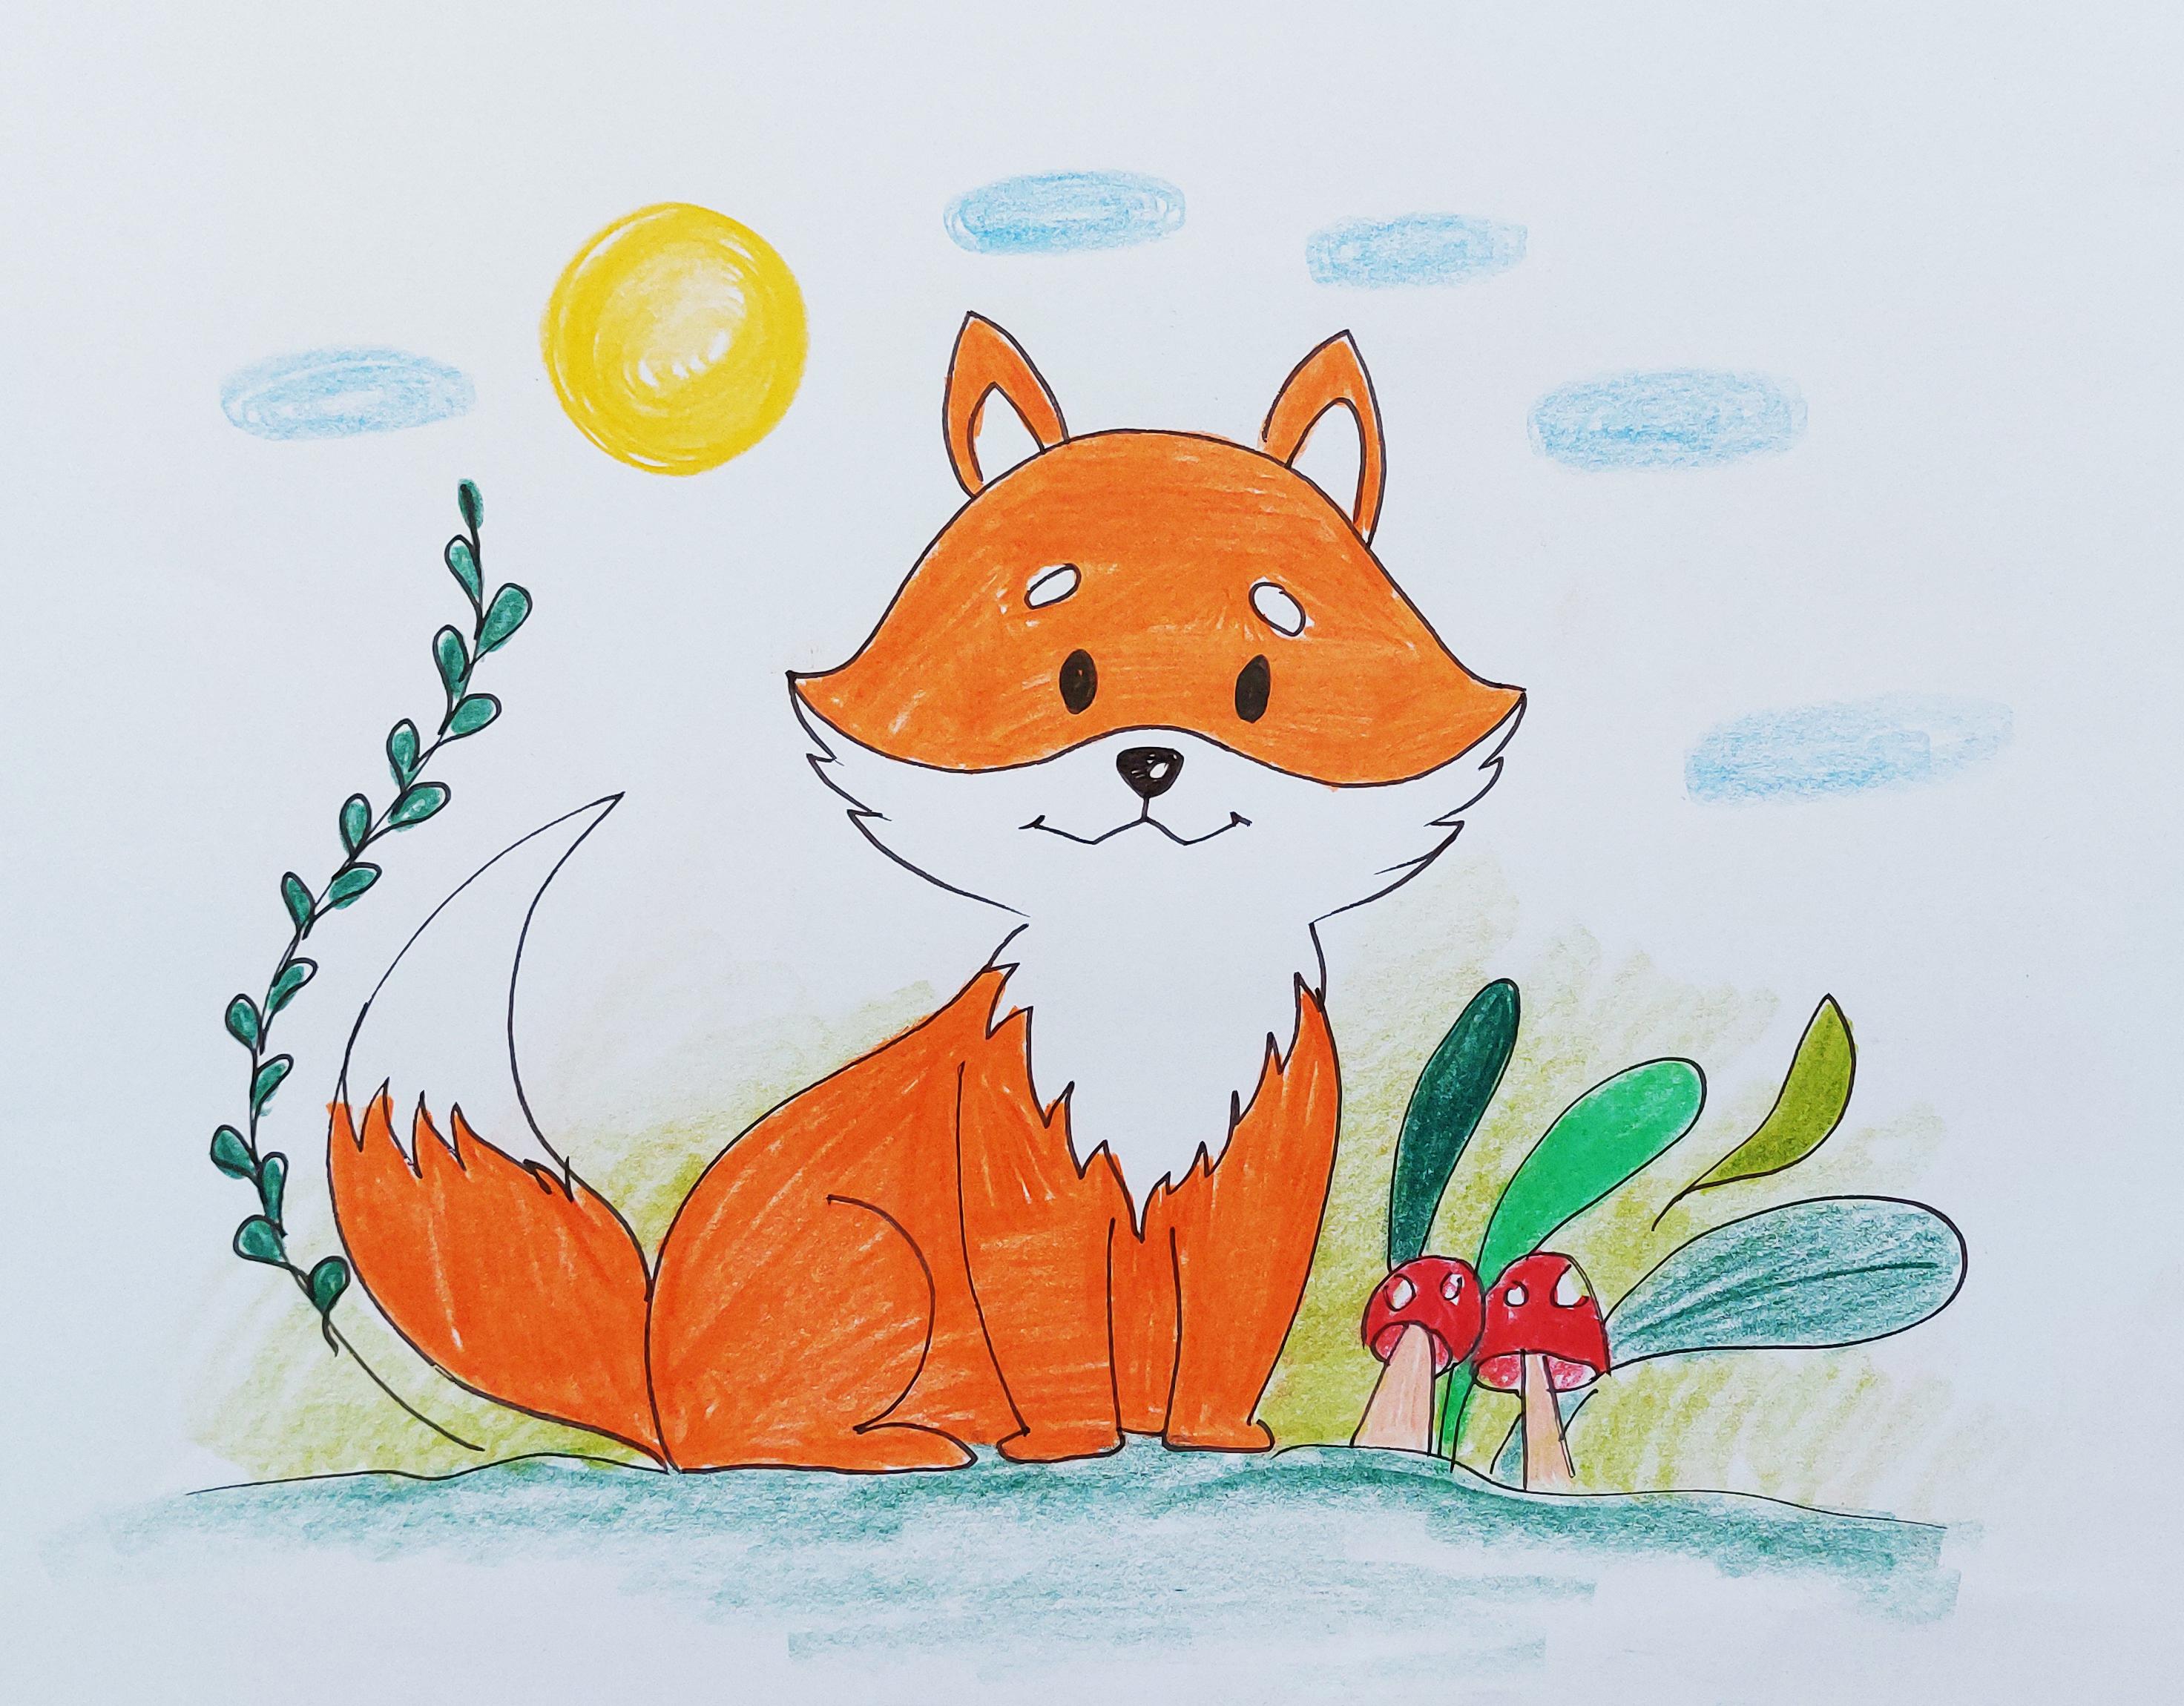
13. Drawing a cute fox: Hello, my little friends. Welcome to another
tutorial with me. Okay. So let's see this sign, we are going to create a beautiful fox
together, Foxy fox. So first of all, start
drawing with me. We are going to start
with a shape like this. From the top, we come down, again, we go up and
down and up again. Then again, our hands go
up and comes down again. Now, from here,
one, two and three. From here, one, two and three. Count it with me, when you
create a shape like this, again do it several
times and close it here. Okay. Over there, I need
two eyes for my fox. Then we've got the
eyebrows and of course, the ears of the fog one of
its most important parts. Then over here, I create
the nose and looks like a triangle's still
using the shapes. Then it has a beautiful smile. Okay. Now, from here, I come
down on both sides. Just follow my leading lines. Then a straight line in the middle in order to
create its arms or legs. A both. And then, This would be
the most part of it, so the rest of the legs. Well, the most famous thing
about the foxes are the tail. Have you heard
about the foxtail? So I create the fox as well. Over here, we've got
some ground and grass, maybe some washrooms
coming out of it. So we want to show
that the fox is also underground in the nature with
its beautiful famous tail. Okay. Then over here next
to the mushrooms, I just create some
beautiful leaves. They are going to be nits. From here, I create
a plant coming out of the ground in the shape of
the tail or similar to it. All the way down. All right. Now that we've got it, it's time for my favorite
part too to coloring.
14. Coloring cute fox: What color of the foxes? I'm sure you know.
Yes. They are orange. They've got other colors too. That's right. But the main part of them, the mainland foxes are orange. So I want to use my orange color to color this
beautiful, cute little fox. I try not to leave
any whitter smarts. And I try not to get out of the lines the same
way, the same time. So my drawing will actually turn into a beautiful
painting a neat one. Okay? I'll just continue. Don't go into the
eyebrows as well. So I just call that its
whole face in orange. Okay. Then after I finish this part, I should also call
it its body orange. I start with its arms or legs. I've got four legs, but I just count the two
front ones as the arms. So I just call this whole area. It should have an orange body. So I also cover its legs too. Just be very careful around these edges because they
are in different shapes, and there are a lot
of them and they have small distances
and parts between them. Be very careful. So after that, I also
color the back of my fogs. And then when I'm going after
that, I'm sure you know. As I told you, the
most famous part of the fox's the tail it's
also a part of its body. So it should be also orange. No. While I'm
completing the tail. You're just think guess. Aren't we forgetting something? Mm. Maybe. We'll
figure out later. Yeah, you're right. We're forgotten about the ears. The ears are left out.
Don't forget them. Okay. Now, I want to pick up my red color and my mushrooms. Very beautifully without going into the mushrooms or sports. I color both of them red. Okay. Here we are. Then I use my very light pink for the bottom part
of our mushrooms. Then after that, I switch to my green to color these
plants coming out of here. Choose another green
for this other one. This part should be this color. And of course, another
grain for the last one. So I've got four
different grains in four different plants. Okay. Now, let's move on to this one. This is another
plant coming out. So one by one, I make each part of it green. I just like this green, so I'm going to use the
same one for this plant. No very easily. I use another green and just underneath
my fox's and legs. I start coloring green. Showing the hill or the ground, it's a standing or
sitting on mostly. I'm sorry. It's not a
standing, it's sitting. And of course, as always, I do not forget about the
sun the whole sky so. First, there goes the sun and there to be beautiful
clouds there. So nice, so cute, and we've got a very
little cute foxy fog. At last we just this green, I also call this area in the background to show that
maybe it's in a jungle. The rest of the
area is also green. So as I move up to the sky, I make it lighter. So don't just call your
sky green by accident. Be careful about that. So I hope you have
enjoyed all of these beautiful
drawings as I did. Take care, my dear friends
and see you later.
 Mila Keller, Drawing Artist and Cartoonist