Transcripts
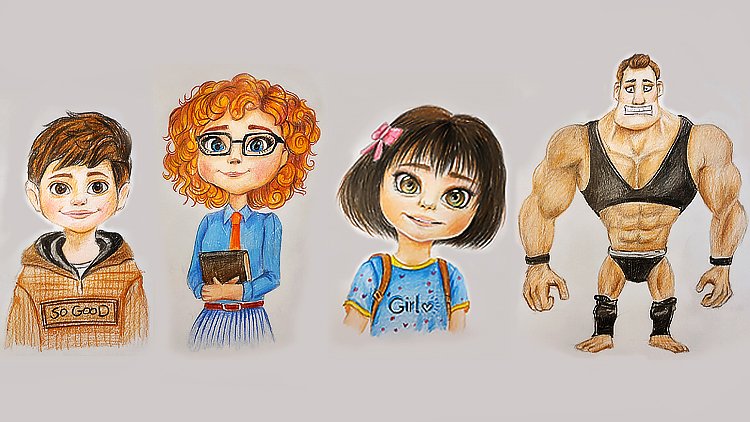
1. Introduction: Have you ever wanted to create a wonderful word of characters
with your own hands? With the basic character
design course, you will learn the art of
human character sketching from a beginner level
using pencil and paper. You will learn the
basic principles of creating a character, including drawing the
general state of the head, drawing a character using
geometrical shapes, facial pots, and drawing
different figures. Of course, drawing several
complete characters. At the end of this course, you'll not only get the basic principles of
creating characters, but you will also
be able to create attractive characters by
your own imagination. Hello everyone and welcome to a new chapter of
Tutorial with me. This series of tutorials, we are going to know how we can create characters together. Before we started,
I'm going to tell you what tools you need
for this tutorial. You need a normal pencil. It can be, it can be a
normal pencil that's on you. It can be like that. You've got to have a Normal
rubber or an Ted rubber. These are the tools that
you need for this course.
2. Eye drawing in three ways: So hello again and welcome to a first episode of
this Tutorial with me. It's character
sketching with me. All right, the first tutorial that we have in the
first episode is about creating and
drawing one of the most important
features of the face, which can actually tell you the different shapes and
emotions in a character. Well, I'm going to
teach you how to create eyes in the characters. It also depends on the character
that you want to create. It would be different, but I'm going to teach you
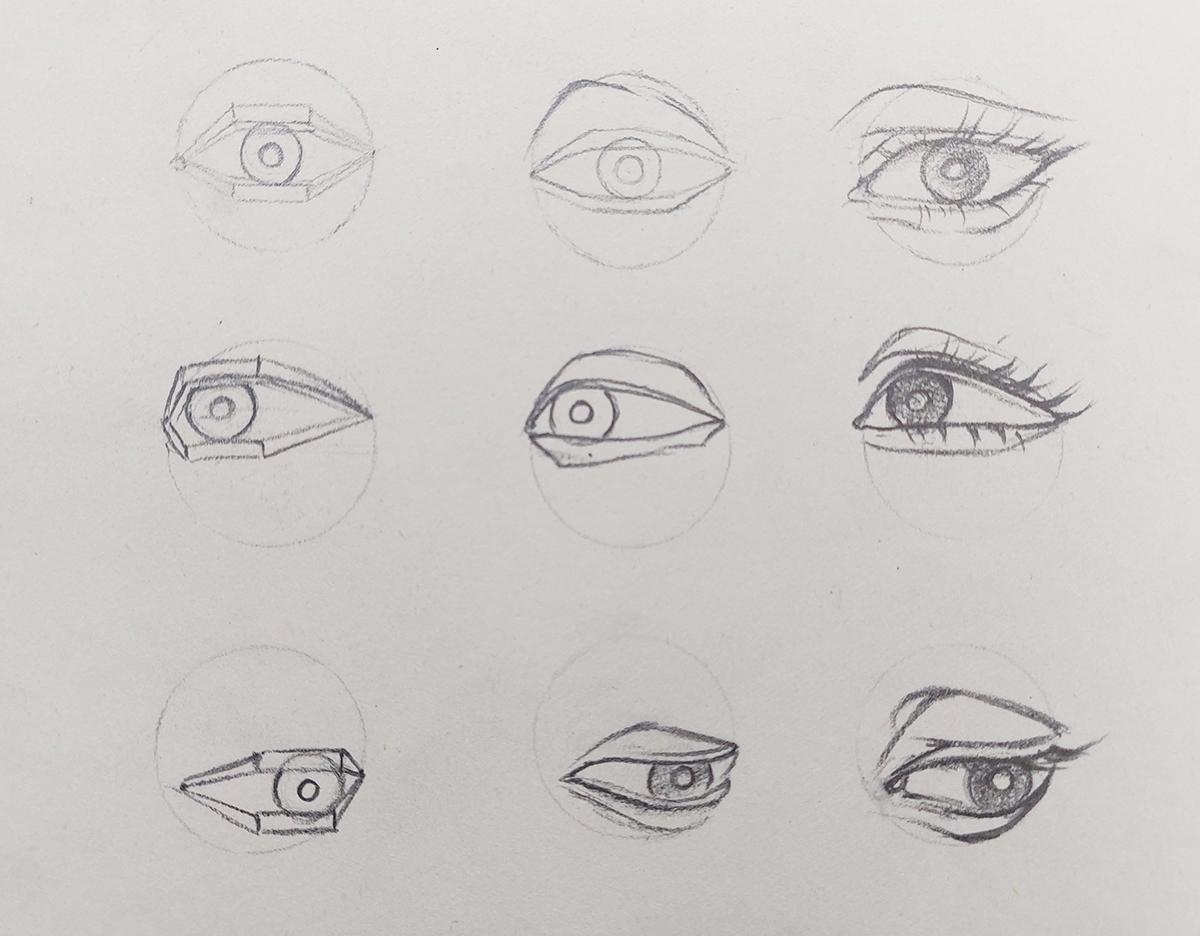
several different shapes. You see in the first part, we're going to do our drawing in these nine circles
that we have here. We're going to start
with the first one. Each three circles are for one shape of eyes in three
different directions. That will be in three
different directions. In the first one, this would
be the iris in the pupil. The first circle
would be the pupil. And the second one goes
over it and around it. Then I start creating a
framework for my eye. At first, I'm going to create it simply simply with
geometrical shapes. That would be the inner corner, this would be the inner
corner of the eye, and that would be
the outer corner. Now exactly like a
framework of the real, I'll create it, See, got the E. This would be the
place for the eyelashes, the upper eyelashes and
the lower eyelashes, you can see the
position of my eye, the pupil of the eye
in this character. Now we want to
create this Linary. Again the iris. And the pupil would be in
the center of the eye. Just as easy as that. Easy. Then again, I want to create this shape
with only one line. I consider the inner corner of the eye and the outer corner. Then I am just going to draw one line to connect
them together from the top and another line to connect
them from the bottom. Then the lower eyelid
should be created as well. Also the upper eyelid, basically, it has the
same geometrical shape, but I've just sorted
smoother with lines, not with crooket lines,
with curved ones. Then over here, I can even
complete the upper eyelid. You can see how it's
done, It's pretty easy. Now, I've got to create
this with more details. In my third circle, again, I'm going to consider more pupil Iris in the
center of my circle. And then of course, considering the inner corner and the outer corner of the eye. Then again with a line, I'm going to create
the upper eyelid, considering I am going to create a more beautiful
shape for my eye here. Want to make it prettier? So I just give it more shape, more detail as you could
see on the outer corner. Just track a bit more too. I'll consider the
details here more. I create the inner corner better and the outer
corner better. She's got makeup or that
would be the eyelash. Create the placement for
the eyelashes and then even a bit of shade
inside of the pupil. Here we go. Don't worry mates, It's just
very easy. You just have to. Got to actually try it over and over again to forget
about the practice. We also consider the
upper eyelid as well. I continue on the upper part. On the top part, I create the
same shape for completing the upper eyelid is started. Very simple. Now, we've
had lots of details. I'll make it more beautiful. At last, I'm going to
create the eyelashes, also the ones on the bottom. The lower eyelashes,
just as easy as that. I've created one eye in
three different ways, which was the geometrical way, a far better one
with curved lines. And the last one,
as you can see, a more detailed one on the
second pair of circles. I want to create my eye
in the three faces view. It's like the eye is looking up. This time my iris in my pupa
would be placed over here. Basically, it's on the
second half of my circle. On top, it's on the
left hand corner, left up hand corner. If I want to be more specific, I create the geometrical shapes. Again, this can clearly teach you to develop your walk. That would be the outer
corner of my eye on a parallel line on the same
level of my iris and pupil. Over here I've got the
inner corner smaller because this eye is in
a three faces view. All right. The placement of the eyelashes for the upper eyelid,
also the iris. All right, so that would be enough for step for the
geometrical shapes. Now I want to walk on the second way with the curved
lines of the linear way, or the linear
technique in shape, the placement of the pupil
would not be changed. The left upper hand
corner, all right, and then very comfortably I consider the outer and
inner corner of the eye. From here I come to the
top part of the iris in the pupil then come from
the outer corner as well. Consider here, then
with a small space, I create the shape
for the upper eyelid. Here we go. It's pretty easy. You've just got
to pay attention. And as I've told you before, you've got to practice
on a daily basis. Here we go. Now we can move forward to
create our eye with details. Now again I apply
my Eris over here. The pupil, the inner
corner of the eye, the outer coa, and now I'm going to connect them
together very carefully. Here we go. Got this. You can see more bit of here. I try to create the eye
in a more beautiful way. All right. Could also walk on the
iris if and better, shading it a little, giving it some color in. Here we go. All right, the upper eyelid
should be created as well. Also, I would want to
work on the lower eyelid. Now we've got to create
the eyelashes as well. We don't want to miss them in the details got both upper
eyelashes and lower eyelashes. All right, then here we go. Now we are working on the
third pair of circles. This time I want to do it the opposite of
my previous pair. I want this eye
to look downward. Therefore, it would be
incomplete opposite placement. My iris and my pupil
would be placed the, positioned on the bottom
right hand corner over here. That would be in
the outer corner. The inner corner
would be placed here. This time inside of the circle. Be very careful about it. I would want to create the eyelids shape on the
top and on the bottom. Then I've got to connect them to these dots representing
the corners of the ice. Here it goes. The pupil, of course, should be placed. All right, now we want
to do it in a liner way. Again, the placement of the
iris will not be changed. Here it is. The outer and the inner corner of the eye would be placed. In this time, I've got to connect them with a curved line. As you can see, the curve
is a bit different. Here. Toward the left, it's got a bit prominent
area, the upper eyelid. And then I've got to work
on the eyeball a little. And again, the lower eyelid, the white part of the eye
which would be the eyeball. Then the lower eyelid can be created shape of the eye. Maybe even shaded a little. This time I work on
the lower eyelid a bit more. Here we go. Now we've got to the last part, the third shape of
the third pair. Again of I start from placing
the iris and the pupil. Therefore again I start
and I work over here. Shape of the eye, that would be the upper eyelid of these shapes that I am
creating can be different. They can be different in different characters that
you would want to create. They are different
on each character. Just the shape and
the direction, the general shape and
the direction of them, all the same the way
they are looking. But basically you can make them different from
character to character. Here we go, sweep
the lower eyelid. I would also work on
the eyelashes as well, showing they are coming
down shading here. This was the more detailed one. See, we've got this mates and we've created three
different shapes of eyes. Looking forward, up and down with three
different methods. We're going to work
on the rest of it. Just notify that
we can create yes in so many different ways
in different characters. Follow us in the next episode.
3. Continue drawing the eyes: Hello mates. Welcome
to a new part of our character
drawing with me. All right, in this episode we are going to create
different eyeballs. The first eyeball that I want to create is a bony eyeball. I create two different,
two small circles. Sorry about different
and not different. They've got to be the same, but they are small circles. As you can see, though, I consider them in this way. Then in the center, I determined the direction, direction of the sit with creating the
pupil and the iris. All right, Then I go
making it darker. Some parts I create
some crook lines. Afterwards, I am going to
consider an area around. This is actually a space or a
deep cavity around the eye. See, these eyes are suitable for skeleton characters that you want to walk in,
your whole design. Got it? See with some
shadings and darkness. I can even emphasize on this
cavity around the eyes. There is a space
and deep area here. It's good for skeletons
or zombies, for example. Anything that looks
a bit tad dead. Then with a fader, I actually fades darkness. The surrounding of my eyes. See. No, I haven't
specified the fader in the tools that you might
need, but it's optional. You can use it or you can use even a tissue to do
your fadings with it. A fader is just easier. I'll do the same thing
on the other eye. All right. Now, with the help
of my etched again, I start darkening some parts. All right, here we go. Over here I do darkness so I can get
a volume out of this. Also, when you want to have variety in your character
drawing and design, you've got to learn how to
create different kinds of is. Therefore you can
create different ways of the eyes and
different characters representing their
personalities. All right, I would also apply the darkness in
the center of the eye, the iris and the pupil, though as you can see, as you can observe, I
work on the other side. The same way. Also on this lower part of this area, just below the eyeball,
create a shade. Therefore, I can show the
eyeball is actually coming out. It's like the eyeball is popping out it's cavity around it. Though this is one
of the types of eyes you can walk
in your characters. Another one that I want to
tell you is a cartoony shape. I can work with an oval or
a bitter stretch circle, or even a round one. I'm going to start with an oval, then another one inside of it, smaller one inside of it, then another smaller,
even smaller inside, and another one here. Well, as much layers as
you have in your iris. It looks to your
character over here. I've got to apply the
darkness for a pupil, that would be the iris, that would be the eyeball. You can create it
as one, as a pair. This, because this is a
cartoon phase, cartoony eyes. I can create the next exactly
next to it and stuck to it. Or I can even use a bit
of space between them. But not too much. Not usually. Now in characterizing something
which is really important is you can actually focus on the shapes and the forms
that you're creating. As much as you are
creative there, as much as you get
creative there, you can create
different characters in your work would
look much better. All right, here it goes. Cartoony eyes. Now I can also consider more
details for these eyes. For example, considering
lower eyelids or eyelashes over here
looks like a frog area. But that depends, again, on your own creativity of the character that you are
designing and drawing. I'd like to walk on
another eyeball as well. I want to create an eyeball
which has popped out, and it's like the veins
are really visible. This kind of eyeball is suitable for ill characters
or angry ones. The matt ones, because
you can see the veins. You should either
be sick or angry. Too angry, frustrated.
All right. I create the iris in the pupil because I want to give some
volume to this eyeball. I should consider some
shading on its surroundings. And toward inside I
will fade my shadings. I've got my fader. I'll go around it round and
round at the same time. Just simultaneously, I'll
create some lines around it. Now I've got to
create the veins. I am going to specify
on some lines in order to show the veins
right around the eye. The best way for characterizing
is that you just create different kinds of eyes as a catalog later when you want
to create your character, you can choose which one
would you want in yours. That's just a suggestion. You can eliminate it
or you can do it. It's just easier if you want
to start your work and you haven't worked on these
types of things before. All right, in
character designing, you can even create
eyes asymmetrical. You can create one bigger than
the other or one smaller, or one in a different
direction that totally depends on the
character you want to design and create
it also from here, try to create this shape. You can see it. I work on
the framework of the eye. Then over here I will
continue the eye. In this type of the eye, you cannot see any Eris and
all of my eyeball white. There is no is when you want
to create a scary character, you can use this type of ice. They neither have, they have a pupil Nis also shape behind the eyes
make it more frightening. It is terrifying. All right, then also considering a
shade or the lower part, then I've got my Eta eraser. And then I can even create
some lights in my work, applying some lights over here. Here we go. Then again, I will darken around these lights so I can keep
the shine of the eyes. See, it looks a bit scary, ain't it? Hits to frightening. You can use it for scary
characters like when you are working on a Halloween
design. How's that? Okay, then I think
we are done here. You can consider
even more details for them or even
make it simpler. Let's continue for other shapes.
4. Continue drawing different eyes: Hello again mates, and welcome to the next part of
this tutorial with me. In this part, we
actually were working on different types of eyes
and creating them. Now in this episode, I want to teach you
another kind of eyes. For instance, for some
characters that are a bit tired or even ill or they've
been crying a lot, we are going to create
some puffy or tired eyes. Again, I say it
would be based on the characters that you
are designing on your own. Then based on that, you can choose which eyes
you want to use. Though first of all, I create a framework for my
eyes based on my own taste. It can have so many
different shapes. I chose this one, then in the corner of the eye I wanted to place
my iris in pupil. You can put it in another
place, in another direction. I've chose it to be here. Then over here I emphasize on the pupil working all
around it, make it dark. I try to work on the
details some more. Therefore, it would
look more natural. After that, for
the lower eyelid, I want to create a puffy shape. Though I create a puffy
area for the lower eyelid. And from the bottom,
I start shading. Then after that, I use my fader to work on it
and spread my shading. After that, I would go
over some places making some parts so I can actually emphasize on the
puffy shape of the eye. I want to get a better
volume right then. The upper eyelid should
be worked on as well. Here we go. All right, now I want to work on another shape,
a cartoony one. Again, I want to create another one similar
to the one above it. This time I will create two
ovals with a bit of space. This time, as you can see, I am creating them lightly. Then from inside of them, I would create an oval smolder which are also more
stretched out. They are longer, you
can see that over here, I put two circles as the
light inside of the eye, because I want to show
that area as a light. I will darken the rest of
the pupil completely go totally dark on the
surroundings of this light here in the pupil. All right? It moves like that. You can see scot
into shape though. Now I do want to create the frame K of my eye
completely in this model. You can see a working
on some parts of it. I only darken it up to
here. I'm not going to. Create it completely. And even with a bit of space, I create the bottom, you see it's like
it's not in one line, they are caught in the middle. Then I can shade a little
in the negative space of my work in order to
get a better volume. The volume here can be detected by these shades
that I'm applying. Now, also over here, I'll do the same thing. I shade it here, all around the ice. All right, then I guess
we are done with it. As I told you, don't forget to create the line for
the framework of the eye. Partly wanted, the rest is
done by the shading here. Well then another
I want to create, we call them eyes. Therefore, they
look like circles, but they are not
completely circles, right? Then over here I create another circle and another one over here to create the pupil. And the iris going like that, then from one side of the iris, I add more darkness to it. Here it goes. And also from the left
side of the eyeball, I add more darkness again. See on the left side
of the eyeball, I've got some more darkness
then I shade them. I would fade all of these areas very slowly
except this area. See, I fade all of this area except apart on the
left corner also, I emphasize on the
darkness on the edge of the eyeball and fade the darkness toward
inside a litter. Therefore, I can
get the volume of the iris and the eyeball
the way I want it, as I told you before in
our previous models. Then I clean my work
on its surroundings. And that's it then. Well, now we can work
on the next model. There, in the next model, I want to show you
how you can work. More stretched eyes. They look like almond. For creating almond eyes. First I should create the
framework of the eyes. Say mats are in characterizing, especially on the ones that we want to create
almond eyes for them. The distance between
two eyes or very little basically the fact
and the rule is that the distance between
the two eyes should be as the
amount of one eye. But when we want to
do characterizing, especially when we want
to create almond eyes, we should actually create the
eyes closer to each other. Therefore, they look
prettier and better. As you can say, I've
created them like this. It can also be called cat eyes. Look like the eyes
of cats or almonds, if you want to look
at that this way. Another fact about
this kind of eyes is How big the iris
and the pupils are. Two very big and pretty iris and pupils are being made here. Then I also work under top of the eyelid
making it thicker. The eyes would look prettier. The center of the eye
should be darkened of two lighter spots should
be placed as well in order to make it more
cato and better looking. Then I shade the
rest of the pupil. Of course, with
adding the eyelashes, you can make them even more prettier if you want to work on the eyelashes or for
even an eye liner for it. It depends totally
on your own taste. You can do it based on yours. All right, the next model
we want to create and discuss is a white
eyes in this model. Therefore, I create the
same kind of circles. The distance between the
eyes depend on you again. But because I want these
eyes to be closed, I want them to be
closer to each other. As you can see, I have divided
these two circles into 13. The upper eyelid
containing the third fourth or the second
third of my whole circle. See, the upper eyelid
is definitely bigger than I create some
lines beneath it. I also consider a shading
behind the eyelids, basically. But as you can see now, I can show that my
eyes are closed. I can also have some for the
lower eyelid. All right. If you want to add
even more details, you can add some
eyelashes on it that will make it more
specific and better. Of course, creating the eyebrows over here as well. Here we go. This was the tutorial of
different kinds of eyes. I hope you've enjoyed it. We are done with
this in next part, be with us with the rest
of the amazing tutorials.
5. Drawing cartoon eyes: Hello there. Welcome
to a new episode of Tutorial and Sketching
Character with Me. Now in this episode, we are going to create
different kinds of eyes, but as circles. So we are going to
create them as pairs, but with circles, only circles. I start from here. First of all, I start
with that's right, circles it is here. It goes exactly on
the same level, with the same size, I create another
eye, another circle. Okay. Now I want to create
twisted eyes. One of the eyebrows is going up, another one is down on the eye. Basically, I consider that would be the direction
of the eyebrow, but this would be the
shape of the eyebrow. One of them is literally stuck
the eye on top of the eye. The other one will be, as I told you, the
eyes are twisted. I consider the
eyelids symmetrical, then I work on the upper eyelid, making it more complete. Then I would work on the eyeball itself and
of course the pupils, which I've promised, so. Got you there. Okay. I didn't
mean actually twisted eyes. They are rolling their eyes. It's like our character is
rolling his or her eyes. All right. In the next one, again, I'll be
drawing two circles. Should be a bit bigger, they should be the same size. This time I want to create
my character in a way that it's like frowning and rolling
the eyes at the same time. In these types of the eyes,
the eyebrows actually, they've got a key role in
creating the shape of our eye. They can actually
express more emotions. The eyebrows have a key role, express it this time the eyelids are not
actually symmetrical. You can see that we've
created the eyebrows. The best way of practicing
is that you try to create different kinds of eyes with that any reference. It's better if they come
from your own mind. You can create different
shapes and different types. We're just playing with the
position of the eyelids, the pupils, the eyebrows
and their directions. The shape, the position, just we're playing
with all of them. You can create so
many different shapes and you've done them
without any reference. All right, we are going
to go to the next one. Again, it's going to be similar to the
first pair of eyes, but this time it's looking. One eyebrow would be, the other one would be
almost on top of the eye, or on the eye, better say. But this time it's
going to look downward. I create one of my eyebrows like this,
the previous model. And the other one
would be higher. Like the first model, It's like it's
observing something. It looks a bit suspicious maybe. Anyways, it's an observer. Look, see the eyebrows are on the same line and
on the same direction. Just be careful on that
because you should create eyebrows in connection
to each other. They shouldn't be too separated. They are part of the same face. They should be connected
and relatable, but they can be in
different shapes. All right, I've created the eye lids and now
the pupils to you, observing something
looking downward. All right, then we can move
forward to the fourth model. This time the eyes are looking more suspicious and
they are looking to what it is you're looking
at a more curious look. It's like it's paying
so much attention. Now in this model, I'm going to create a
flat line for the bottom because it's like our eyes are a bit squeezed in order
to focus on something. Figure out what it is. There goes the eyebrow, here goes another
one. All right? Then looking very carefully at something, figuring it out. The other eyebrows
closer to this one, but it's a bit higher. I also create some rinkers
between the two eyebrows. Therefore, I can emphasize
on the fact that it's been squeezing the
eyes in the eyebrows. You've got some
wrinkles there. Okay. Then for the next one, the next model I'm going to
create, poker face eyes. See, it's called a poker face. It means that you've
got no sense, no emotions in it. Just a poker face. Very normal eyes
without any emotions, feelings, not
expressing anything. So I create the eyes, that would be the upper eyelid. And now I complete it with a semicircle
for the bottom line. All right, then I've got the pupils and
also the eyebrows. This one's got short and
small eyebrows. See that? A poker face. All right. In the next way I
want to create eyes, it's like our character is nausea and it's
going to vomit. Maybe they are sick,
they are nauseous. Again, I've got two circles. It's like one side of the
che has came up to the eye. This would look like this. It's like the chin over here. We've got normal eye, but it looks a bit sad. It's a bit angular. That would be the pupil. One of them is bigger, the other one can be smaller. It would be asymmetrical. It shows more nauseous. The eyebrows looked, They have
a big strong curve in it. You can clearly see. It's worried, it's mouthful. Even very visible without
creating the mouth. All right, the next model, I want to create an
angry character, frustrated, and might
say two circles again. Now it's a frustrated character which have squeezed
the eyes again. Basically I've got a
small part of the eye, I can see a small part of them due to the fact that they
are very hardly squeezed. You can only see here, it's like it's
really going to blow up some more wrinkles over here. Show the squeeze more
and make it more prominent pupils
looking the other way on the person or the thing
that make them angry, the eyebrows again, or
playing a key role here, especially when we want
to create angry eyes, the eyebrows should actually get tangled into one another. They are frowning all the way. Frown eyebrows with some
wrinkles in the middle. You can see how much it's
effective on the eyes. The eyebrows effective
on the eyes. All right, we're going
to the next model again. Start with two secs. This time the eyes are worried. In a worried shape. The eyelids look
like an upside down V. You see on both sides, they are going down. They look like if you
connect them to each other, they should look
like an upside down. It's a nervous and
a worried person worried the pupils
some lines below. Again, the most important
part, the eyebrows. The eyebrow also should
look like an upside down v. One of them over here stock to this eye and another
one on the other eye. See if you connect them. You've got definitely
an upside down V. These are worried eyes. Here we go. All right. We worked on six
different types of eyes together with Ole Hope. You've enjoyed it but
we're not done yet. So follows the next episode.
6. Continue drawing the eyes in a linear way: Hello, welcome to the rest of this tutorial
with me. All right. We are going to create
different models together. This time I want to work more. Linar means I want to
create the eyes with lines, not secas too much. For example, in the first model I want to start with
a line like this. See, I want this curve
to create my eye. This would be my
curve on one side. I make my curve
darker and thicker. Then on the bottom of it, for two eyes, I'm going to
create two curved lines. Again, these look like
some semi circles, but they are curved
lines, lines below them. For the eyelids, I've
got to create the eyes, the pupils, and I've
already got the eyebrows. Just some shapes fall
between them. Some rinkers. Actually, this is an
easier way to create eyes. Okay, next part. I want to create excited eyes. First of all, I'm going to
create a very easy circle. It doesn't matter if the
circle is symmetrical. Doesn't matter. I consider
a lot shape for it, something for the lower eyelid. Then I want the other
eye to be squeezed. I want to create a
line from over here. I can go with a curve
and talk it to the end. You can see this other
eye is squeezed. One eyebrow should
go up like this, and the other one is a bit
more normal on the other eye. Here we go. It's very
easy again. So easy. All right then. Pretty easy it. Next model I want to create into a mysterious way,
a mysterious model. How can I do that? I'm going
to show you right away. Firstly, I create two lines. One like this in the other one would be exactly in front of it, or better say opposite
of it, the same shape. Now for the upper part of the I, I create a curved line. Basically 21 for each I. It's an angular triangle. If you can see, that would
be the lower part of the E pills are created as well and some lines
to show the lower eyelid. Then again, in this model, the eyebrows are very important. Not in this model,
but in all models. In this one more see, you cannot see any
symmetry in my work. No symmetry. This time, I want to create fairly
a board character. It's again, maybe frustrated. First I consider the eyebrows. Of course, the
eyebrows are going down because it's
not feeling well. Make them a bit thicker, some wrinkles in between them. Then I've got to
worried, or bald eyes. I want to create one
eye more visible than the other one of them
should be seen more. Here it goes. The upper eyelid
with several lines, it can emphasize
on the fact that this character is more
worried or bored. Okay, Okay, then
in the next model, I want to create a
very happy character, or even a joyful one. This time I want to create
the eyebrows towards, it doesn't go down anymore. When it was sad or
worried it will go up. First, I start with the eyes. The eyes have been closed up because it's been
laughing so hard, it's like a hilarious character. It's been laughing so hard that the eyes are totally closed. The stronger and the thicker
line is for the eye. The lines above and below
them are for the eyelids. As I told you, the
eyebrows have gone up, they're not facing down anymore. See, my character is laughing. Even without any mouth or
any other parts of the face, you can see the emotions or the personality of your
character just with the eyes. These are very important. Next one, I want to create a character which is
looking very suspiciously. It's observing or
focusing too much on something I consider
very sharp edges on both inner and outer
corner of the eye. They should have sharp
corners and sharp edges. It can also look a bit violent, may be a tad of violence in it is also spice of the character. The pupils have been made
again with some lines. Make sure that the
eyes are squeezed, which is because they are
focusing on something. The wrinkles in between
them show that. And the eyebrows
which are faded, the not too stressed on. Another thing that I want
to consider is the one that I want to create with thicker and more
visible eyebrows. First of all, I
consider two eyes without paying any
attention to the symmetry. See, I didn't even
close them up. They are not symmetrical. They are looking this way. Just some lines to
show the lower eyelid. Then I can create
eyebrows for it. It's very thick eyebrows. It's not like that. All
of our characters should have very thin and
tiny eyebrows. Sometimes you can get them
with thick ones like this. All right, then here we go. Now another model that
I want to work for you, which is also very popular, is of course, in
a winking style, one of the eyes is
totally closed. That would be the direction and line that I would
work my eyes on. It's very important. Direction and placement of
your eyes are very important. I create one of them like this, bring it to the
side in the corner. Because when we are
creating the winking shape, the eyes are actually
placed on the same level, but one of them is
completely closed and the other one is semi closed
like it's white shot. I also create this other one completely closed,
as I told you. Create some lines for
the eyelids and then I clear the line in
between them. Erase it. All right. The eye which is open. The eyebrow of that
eye should go higher. The eyebrow would be higher over here on top of the
eye which is open. The other eyebrow in the
same line on the other one, the same direction
would be lower and with more curved downwards,
it's winking. I can even consider this eyelid for it to just give
it more details. Of course, you can add so
much more details to them, more than even I'm doing. But I just want to
finish it right now. The next one, I want to create a character
which is a bit tired. Exhausted maybe might
have ran a very long way, it might have worked a lot. When the tired
character is getting created the eyebrows and the
eyes are facing downwards, I create upside down
vs. On the same level. Then I create a curved line on the bottom so I can
complete the eyes. See the top part was like an upside down V facing
down. All right. I even work on this
area a bit more. I want to extend
the upper eyelid, making it longer so I can show that my character is definitely
tired and exhausted. Now, over here in the middle, it's bigger and on the
corners it's a bit sharper. On the corner of the eye, it looks sharp, but in
the middle it's bigger. I'll do the same
thing for both eyes. Just do it the same. I place the eyes on the top area so I can
definitely show it's exhausted. You can already see
it in the eyes. They look a bit sleepy too. I consider the eyebrows thin, but again they are
facing downwards, some wrinkles in between them. And the other one
goes the same way. See, it's been great. I also add some more lines
to the bottom of the eye. I can show the eyes are
dropping literally in our character is totally
going to fall asleep. All right? You can clearly
catch the emotions on these just as easy as this one. Easy. We've got this
all different eyes. I hope you've enjoyed it. In next part, we are going to work on different face parts.
7. lip drawing: Hello and welcome to a new part of our character
designing together. All right, in this episode we
are going to work on lips, such an attractive part, but the most important thing is that in most of characters, the lips are not created
actually very clearly. It means that they only been created by lines
going up or down. Therefore, I'm going to
first create some models of complete lips and complete mouth. You
would learn them. Therefore, in creating
simpler lips, you would not face any problems. The first model is a very
normal shape of lips. First I'm going to create
a simple flat line. Let me just bring it higher so it will be more
visible for you. Then in the lower area, I'm going to consider an oval. In the upper area, two circles. This is the very
basis of the lips. Now, in between
these two circles, we have a V shape for
the upper lip over here. On the bottom of the
circles, I have a curve. In between the lips
from right here, I go up and I'll do the same thing with the same
amount on the other side. All right, now, which I'm
going to do right from here, I come down and I connect this
top area to these corners. Very easily. Pretty easy. Then I consider over here, right below this oval, I come up also, I'll do the same thing
on the other side. This would be the simplest
way of creating lips, or better say mouth also a curve over here on
the top of the upper lip. I've got some shades over here to give my lips some
prominent shape. We'll do the same thing on the lower lip so I can
show it also is prominent, especially in the middle area. All right, then in
the second model, I'm going to create the lips. I'm going to create the
lips in a way that there is a small space in the gap
between the two lips. I come from the top of the line, see I bring this line right over here from above my
horizontal flat line. Then I bring it down because
my lips are a bit open. They are also a bit squeezed and it's not as wide as before. Then I'll do the same
shape on the top, and then I'll connect
it to the corners. The rest is the same. All right, then focus
about the teeth, because if the lips are open, you can clearly see some
teeth there they are going on the lower lip here we have lips again, of course, I'm going to apply some shades over these
areas in order to show. My lip is also prominent
in this model as well. There is no difference, just the shape is different. It's also prominent
in its volume. I can show that
easily by shading, even place a line below it. Now we are moving
to the third model. In the third model, I want to create the lips. In the mouth, on the side view, how is it going to happen? Again, I'm going to create
the same horizontal line. Then I've got one circle on the top and another
circle on the bottom. But as you can see, my circles are a bit angular and they're not
completely circles. This would be the upper lip. I bring it slightly down
toward the line over here. It goes up and comes down
again on the line here. I'll create another line. I've got it pretty easily. I worked on lips on the
side view, could see it. Totally easy. You just have to follow the
instructions. Here we go. All right, then the next
model I want to teach you are the lips which are
smiling, or even nothing. This time, the smile that we create in our paintings
looks like this. Because it is mostly
for characters. It doesn't have to look like
totally on normal lips that we've got in our portrait
drawings and sketching. It can also be a
little bit deformed. This would be the upper lip. Then I'm going to create a
very big lower lip for it. Stretched out can usually see these kind of smiles in
animes or in cartoons. Here we go also create
some lines over here, that would be the chin. It's like smiling and laughing. Totally easy. Again, I emphasize on the fact that you
should practice them. You will get them now. The next model would be
the lips three faces view. I want to teach you all possible
things as far as I can. I'll create a circle
here, right from here. From the bottom of this circle, I come down, then move toward
the corner of the lip. Then I create a round area here, exactly as the
shape I've got over here with a bit of
space on the corner. I come up until I reach the
top of the circle over here. I create the V shape
on the top of the lip. Then from the top area, I come down to get to this
corner right over here. See, then I would also create the lower lip
on the three faces view. I would just drag it a bit down or continue that
with a bit of curve. I moved toward the corner again, just as easy as that
you could have created your beautiful lips
in three faces view. You should also show
this curved area. This curved area on the
top of the upper lip, which leads to the nose. Well then, all right. All right. All right. The next
lip that I'm going to teach you is a bit wide shot, but not like our second model. It's a bit different again, or create a flat line, but it's a bit steeped. As you can see, it's
not totally horizontal. I start from the
top of the lips. I come all the way down or do the same
thing on the other side. Now with a bit of
space and distance, I'll start creating
a curve on here. This would be my upper lip. I come over here, that will
be the corner of the lips, which I try to make round then from here,
right from here. Or create another
curve in this way. As you can see, I've
got a bump on one side. I also in their own placement and I've got the darkness
for inside of the mouth. Don't forget about that. Then I'm going to work
on the lower lip. Very generally, I'll
create the lower lip. It's going to look
fun, you help me, you just follow my procedure, my steps, and you'll get here as well as I
did. All right. The next one I'm going to create a kissing shape again in
the three faces view. This time our lips actually look like they
are kissing something. Again. I stop from the V, then again with a
beautiful shape and form. I bring it down to the corner. But as you can see, it's on the three face. Therefore, the other
side would be seen smaller because of
the perspectives. Then all make it
round on the corner, come up and down again, creating a curve above the line. Then the teeth would
also be created, also apply a very small darkness on the corner of the lips. It's a beautiful shape of the lips of the lower lip will
be seen more on this side, exactly like the upper lip if we've got it, of course. This curved area on the
top of the upper lip. See how easy it was? You just got to work with me. In so many of characters we only use Lina mouths like this. You see that would be smile, this would be smirk. Or even if you want
to create lips, we just create a line and then very easily we
create a curve above it. It totally depends on
your character and which lips you want to use and how much detail you
want to give it. I hope you've enjoyed
this episode as well. See you on the next one.
8. Drawing the head in different directions: Hello there again. Welcome to a new part of this character designing,
sketching with Me. In this episode, we are
going to learn how we can create the head in
four different directions. So each of these four would
be in a different shape. The first pair of four
is for secular faces. In the second pair of my four, or for the faces which
are a bit more long. The first one is a head
in a three faces view. All right, in the
three faces view, I start my head from here, this would be the
direction of my face. I actually divide my
circle into one third. Then right from here again, I'll do the exact same. I'll divide it into one
third the same horizontally. Of course, here would be the
general part of my face. As long as this I come
to this site here would be the basic of
my character's face. All right, then over here, the part that I've got here, I'll try to stop working. Let me just edit it
a bit from here. That will be my character's ear. See over here? That would be the jaw, the lower jaw of my character. Or try to create
it on both sides. And then, or connect
them together, this would be my
character's jaw. It shapes like this. Because I set, it's a
secular face in general. That will be a top of
my character's head, and of course the face. Okay, Over here I've got my
character's neck as well. Here would be the
back of the head or basically the skull or my
character in the second part. In the second model I have
the same circulary head, but this time I've
got a front view. In the front view, again, I'm going to divide the circle horizontally
into one third. But when I want to
do it vertically, I'm going to just divide it
into half in the center. And this would be the
face of my character. The ears will be
placed over here. We cannot see them completely unless you want
to create the type of actor that has the ears
coming out and forward. Then I want to walk
on the drawer. Very easy, because it's
the shape of a circle. Easy. Pz. Got it? Then of course the neck
would be placed here. Now I'm going to do the same
thing on the third model, but this time it would
be on the side view. How are we going to do that? Again, divided one third horizontally and also all
divided into half vertically. But this would be the
front part of my score that contains the
face over here. I'll create my draw from here. I come down a bit from here. I make it round to
connect to my other line. Creating the draw here would
be the placement of the ear. We can only see one of them. The placement of the eyes. Or on this horizontal line, that would be the
back of the head. Or better say score. Or better say score,
back of the score. And here I've got the neck. I want to keep the same
circular shape of the head, but this time I'm going to work on it from the three faces
view, but from behind. In the first model it
was in three faces, but we could see
more of the face. In this model, it's in
the three faces view. But on the other side
sign we could see more. The back of the
head, not the face. It's like looking at
someone from behind. Yet in a three faces view, not completely 13.12 would be divided because it's in a three faces view
facing backwards. This would be the
center of the head with a bit of curve over here. Here, here would be
the circular shape. From the head over
here on the bottom, I will get it. And that would be the
back of the head. The eyes will be exactly
over here after this line. See, that would be the draw. And the ears here would be
the placement of the neck. See, you can see
more of the back of the head and a bit of the face. Now in the second pair
of my four circles, I'm going to create
the same directions and the same views, but with a longer face. How am I going to do that? For example, here on
the three faces view, first I divide one
third horizontally. I'm going to divide one
third vertically as well. That I choose the
center of my face here would be my character's
face right over here. From here, see for example here, my jaw was very
circular and round. Over here, it would be a
bit more sharp and angular. I come down, I stretch it a bit, or make a curve but make it more so I can create an
angular angular jaw. I consider the whole
face that from here it comes to this area
and it would be connected. This would be my ear, Here would be my
character's neck. You see this is a
longer face over here. I've got the back of the head, the rest is the same. We just had some difference
on the jaw area. We made it more angular
and we stretched it a bit. How is it going to look in
the front view then again, I divided 13 horizontally and 12 vertically because
it's the front view. This would be the
head of my cat, the top of the head coming
down right from here, it starts coming out a bit. I'll make it more angular. And all connected to this point, I've dragged my
vertical line a bit more so I can stretch the draw
and make it more angular. The ears in the neck are also
placed in their positions. That would be the
placement of the eyes that we don't want to
work on right now. The third way is
on the side view. Again, of course, I
divide it into half vertically and of course,
one third horizontally. Right over here I place
my character's here. Right from here I have
my character's face. And exactly in this point
I start creating the nose. And over here on the
back starts the, say I stretch the raw and
made it sharp on the corners. Not very round anymore of the back of the
skull is the same. The neck would be
placed like this. Now I'm going to do the
other three face view, the one which was
opposite from behind. Therefore, again, I'll
do the same process, one third horizontally,
one third vertically. This sign, my 13 would
be on the other side. Over here I place the ear. Then from here I can have
the whole skull front. And here in the
back, from the back, I extended a bit more, bringing it down over here. From this line, I'll try to extend this line in order
to create a bigger jaw, a longer one, to show a
longer face of the neck. Because most of it can
be seen from behind. Here it is. All right, Now that I've created my heads in two very
general shapes, in different directions, my main goal was actually
for you to see how you can create the heads and the faces in all these different
directions and directions. Three faces view front inside
because most of the times, even our characters
heads are not always like circles or
orvals or a bit long. They can even be in other
geometrical shapes, like triangles, squares, or
any other different shape. We should be able
to create the face and the head as the shape of
a circle in all directions. But we could be also able to create heads in other
different shapes. This was so general
and this was a basic. I hope you've enjoyed it. In next steps, I'm going
to teach you other ways.
9. Draw the character's head with a circle: Hello, welcome to a new part
of this tutorial with me. As I told you in
the previous part, creating the heads of my characters cannot
only be made by circles. We can see our characters in different shapes for
the heads for example, or walls, rectangles, or
squares, even triangles. Anyways, this is the
first time that we are going to create characters
overall and complete head, Basically the eyes, the nose, lips, and the main
features of the head. First I want to start
with circulary heads, but as I move forward
in the next characters, I will also use different
geometrical shapes. The first character,
as I told you, so it would be a
circle as the head. First of all, I should
create my circle to consider as the head. All right, after creating that, I am going to fix it
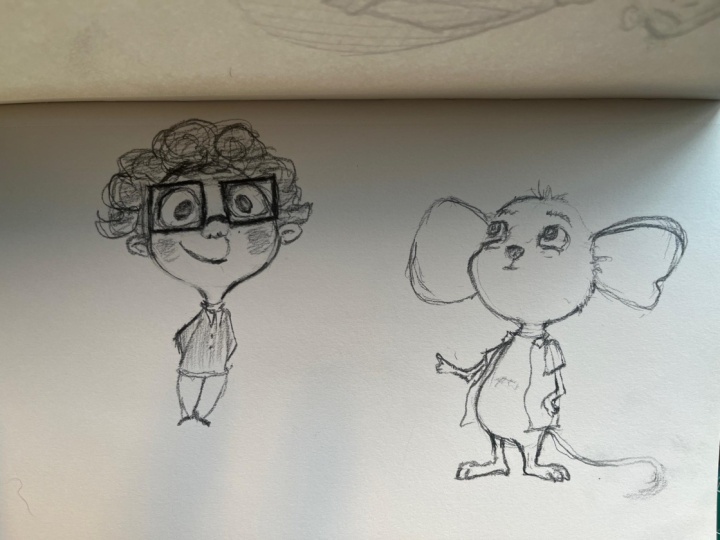
up a little, right? I easily draw a circle, then I start characterizing
it. All right. First, before I want to
characterize a character, I want to draw my character. First of all, I should consider the features that I want
for that character. For example, I want this
character to have a face which is a bit bored and it's not
very excited or interesting. I want it to have a big
nose, a small chin, or maybe even a tad
of mustache or beard are some features that I consider for my own
character in my head. Then one by one, I apply these
features in my work. For example, as I told you, my character's eyes
would be much more smaller comparing to
its nose and lips. I want to create
the eyes over here. I start sketching and
drawing the eyes. Well, I will create the
eyes as you can see, very small, there
are tiny, tiny eyes. It already looks funny and
it has got some character. The other eye'll
do the same thing, but as I told you, it's bored. Therefore, the eyebrow
is going up and the eye lids are
actually half shot. I have already taught
you how to create that in the eyes episodes. I also create the eyebrows, one of them would go
higher because one of the eyes has been higher and the other one of
course would be lower. Also some wrinkles
for below his eyes. As I told you, I
want to consider a very big nose for him
and it's very easy. I just want to create
a nose like this. It just looks like a Opgen. See very big nose there because he is
not in the mood. He's got some attitude, so he's also have his
lips and mouth going sideways and be in this
p face shape Also, I've created a chin for him. Now I want to add
some more details to my work to make a
unique and pretty, I want a very small hat for him. I want the had to be very small, small to make it look more fun. Give it some some hair, even coming out from
underneath the hat. That's how it's done. Then from here I
create some more hair. I can actually make a twist
on the end of the hair. As you can see, I bring it down, I twisted a bit upwards. That would look fun. Again, I emphasize that totally depends on the
character that you are designing considering in your
head or basically creating. I also consider some
shade for his hat. Tiny, it's a Betsy hat. All right. Then I should
also create some ears. I would create big ears like this on both sides of his head. As I told you before, I also want him to have a
tad of mustache or beard. I don't want him to have
any beard on the chin. I just want to
have some beard on the sides and also some
mustache above his lips. First, I've created
the mustache very easily above the lips. Then from here, I consider some beard
for him on the sides. Again, I told you not
to go under chin, but this is my character. You can do it if you want. I also go a little
bit under chin on it. We go under it and that will
be the basis of his face. We also create some frackers
on his nose just to give it even more
character, more back story. You can actually give your character some
back story as well based on the details
you add to him or her work on the eyes more. I make the beards more neat, then I move on to
create the neck. I want him to have
a closed collar, as you can see it very thick. It very thick in the
beginning, very wide. But as it comes down, it gets thinner and less wide. I can consider a jacket
for him over here. I think even if I
had a bow tie here, that would look so cool. Therefore, I also consider a bow tie for the
sport of his collar. That's how I created
the character that I wanted for his cheeks. I can even consider
some more shape. That's it. I just work on some last minute touches and
just working under a bit. And that's the basis of a character. See though. All right, this was the
first character that I have created totally
with the head. And then I want to create
another character which is a bit of a gangs or he's
not a really gentleman. Again, I start with a circle. After that I want
to create his eyes. I want to create kind of closed eyes but one eyebrow
higher than the other. I want my character's eyes to
be in this place this time. First, I should consider
the placement of the eyes and then I can
do the rest of the work. One of them would be
here and the other, this one, as I told you, I want his eyes to be closed, so I'll just script
some lines for it because one of them is, one of them is higher the
other because it's closed, so they don't have
to be symmetrical. Then after creating the
eyebrows the same way, one higher or lower, I create a big nose. Making it even some sharp
on the tip of the nose. Now I also created some
lines below the eyes. Now one of the most
significant things about this character that I want to
emphasize is the mustache. He's got a big, big mustache. All right, right from here, like the other side, or do this, okay. I would also consider my character's chin
very sharp and long. Here it goes. Then for his head, I am creating curly because I think that just
suits the character. The overall shape of the
character is being made, also creating big ears for him. I bring the hair out a
letter taking the curly hair out, here it goes. Also bring some of it
in onto his forehead. I can also consider
another hat for him too. He's got a hat too. It can be some of the
essence of my characters. The augured hats, I
shaded it, of course. Then after that I would actually darken the mustache completely. I'll go all the way inside
it making get totally dark. Okay, then I work on
the face as well. Now, inside of his beard. For his beard, actually, I am going to just create
some spots and arts, it looks like some stubble. I will also consider a neck and shoulders for him as well.
That would be a neck. Then after that, he
would be wearing a top. Say the arms are extending
and he is wearing a top. I also curly hair for his body. That will actually
be interesting, I got to call it that. I also got some design
for his clothes, making it strips and
that would be it. So pretty. That's it. I hope
we've enjoyed it. We are going to continue in the next episode with
some more characters.
10. Drawing the character's head with a circle, part two: Hello mates. Welcome to another part of this
character designing with me. In this episode, again, we are going to create
another character and again with a circulary head. Therefore, first of all, I create my circle shape. I want this character
to have some features. For example, I want
him to be bald. I want him to have mustache, and I want him to have
some cheeks and bow tie. He's a bit chubby. Then first of all, I should determine where
I want my cat's eyes. I want it to be in the
top half of my head. I want it to be really close
to the top of the head. Therefore, I place the
eyes over here first. I create the eyebrows, one of them more curved
and the other one is basically flat And strike. I want to create two eyes. One of them, the right one is obviously bigger
than the other one. Very simple eyes have
been created here. I also create the iris and some lines for the upper
eyelid and the lower eyelid, which goes above
and below the eye. I also want to consider this curved area
in order to show there is some cavity
below his eyes. There is a deep area below them. Now I create a V shape
instead of the nostrils. Then from above them, I create a very chubby nose. Basically, it's V
shape as the nostrils, and then I connect them from
the top, from above them. Now I can create a
cute chubby nose. Then I also want to create
a stylish mustache for him. He's got his own
stythen over here. I've got the chin, and as I took big saggy cheek, they are dropping down. As you can see, as I told you, one of its features
was that he was actually balled No further. I also create a
very small hat for him just to give it some
more characteristics. I will also create
the ears a bit higher. Here it goes. I want to work a bit more
on the details of his face. For example, don't forget to darken inside of
the mustache area. Do not forget that, so you can get a full character. I can also create several
fracks on his chin and on cheeks also be stubbles. Also, I want to create
another part below the chin based on his features. I want to consider a style, a clothing style
for him as well. First, I want a white color, beautiful white color, and
a bowtie on top of it. Then I continue to create
a jackets collar here, like his wearing a suit, it looks more like a suit. I also consider a shade
for his jacket there, here it goes, and so on. Then, for this part of
his coat, for his jacket, I even create some lines in other directions to make
it more interesting. A lighter shade would
be placed here on the second part of
his jacket there. All right, so this is a bald character that
we've created together, which I hope you've enjoyed.
11. Draw the character's head with a triangle: Hello again. Welcome
to a new episode of character drawing
with me in this one, in the contrary of the
rest of the previous, actually characters that
we've worked with circles. I want my character's face
to be a triangle though, as I used to create
the circle in my three previous models
this time first I'm going to consider a triangle for my
character measurements and the size of your triangles sides totally depends
on your own character. I'm just creating
them by my own. You can change it due to yours, if that would be my chats phase. I want it to have big mustache. I want him to have big eyes comparing to other
parts of the face. Also, I want him to have big
ears and stretched ears. I want to place his
eyes over here. I want to create
some suspicious, mysterious look on his face. As I told you before, one eyebrow goes high and up and the other eyebrow
looks like it's angry. Therefore, I've taught
this to you before. I just create the
eyes like this. The circle for this
eye would be bigger. The iris would be exactly on
the center of the circle. This step, it actually
looks like a pizza, but it's going to work up to it and it will be created
in a whole character. I also want to consider
a hat for him, but because it goes
behind the ears, I want to create the big ear, stretched, big ear that I
wanted to create for him. Then I can work on the hat. I create very stretched
ears on both sides. Now I want to put
the hat on his head. I'll go up here or bring it
down over here on the side. It goes behind the ear and also a semicircle on the
top of the hat. All right. I'm just going to work on
the eyebrows a bit more, developing them some
wrinkles below the eye so I can show he is focusing on something he looks
special, Mysterious. Your choice. I want to
consider a thin nose for him, a bony and those then I'm going to create the big mustache
that I've just told you. I want to shape it like this. You see the achi, long that it comes
out of the face and just turns
around and swirls. Therefore, it looks like this. I also feel this area between the two lines
of the mustache. All right? That was easy to do. He already looks funny
and fun, actually. Then I also create the
mouth in this shape. He is really thinking
about something that looks like a detective. I also work on his chin, which would be the
bottom of the triangle. I just make it round, it wouldn't be too angular. A very thin neck would
be considered for him. I want to consider a
big bow tie for him. Something that actually makes
your work, your sketch. So attractive in your characterizing in your
work is deforming different parts of
the face components and make them bigger or
smaller than they should be. For example, the big mustache or the big ears are actually on the contrast of the
rest of the face, which are small, this
can actually help you to create a very
special character, Therefore one of the most Important things that you should take into
consideration is that you should not be afraid of deforming
your character. You should do them. You should
create them as you please, as you want to do them. For example, even I dislocated
one of his shoulders, taking one higher
than the other. For example, I want to even place his chick bones over here. All of these very small
details are what make my character unique and for
me and also very attractive. Then I can also shape his hat, making it out of its very
uncolored and pale shape, That would be it. I can also consider a shade for his suit, for his also ears, brows. I go over all of them. I work on the, on
the eyes a bit more, making my work more neat
and clear as I told you. So I want to create some
straps on his suit, specifically on the jackets. Also, placing buttons on the shirt he's wearing
underneath the jacket. This is a characterizing with different
geometrical shapes. This one was created
by a triangle. Now this time I want to create one with an
upside down triangle. I mean that I want the top of
the triangle to be on top. Or a triangle like this. Actually the previous
one was an upside down. This one is a normal triangle. Again, I emphasize
on the fact that the sizes totally
depend on your self. I want to create the eyes of my character in a shocked shape. It's like he's been
shocked and surprised. In this shape, both of the eyebrows are
actually going up. If you remember, after creating very wide eyes
and eyebrows facing up, I create a small nose on the contrary of the
previous characters. I want the nose of this
one to be smaller. He's been shocked,
as you can see. Then I want to work
on his mustache. Now I want to create
a mustache like this. Say it's in a different shape. I don't want it
to be very thick. I just want the
mustache to be as linen as this one that
I've just created. He's got a certain character
to it and you can see it. That would be the chin
and also a very thin lip. All right. I'm going to complete the face from the cheeks. I try to create a
very prominent area, making the chicks
very prominent. He's got lots of them. I come down to here. From here I come down
to create the neck. See, I also consider a color for him, this shape. All right. Then for the head, I also create hair and a small hat on
one side of his head. It's very small. You see? That's what I mean. Deforming and creating different
sizes in one character. That is actually
makes your character fun and very interesting. I want to create
the ears on here, on the same level on the eyes. I make the cheeks
a bit more round. Then I want to create
the rest of the body. Or they're here again. And not a beautiful bow
tie, but of course, bigger, as I told you, I'm showing lots
of contrasts here. Small heart, big bow,
big, small eyes. That's what makes
a character unique and attractive. Makes it yours. Actually, I'll come down, I'll bring the collar down. Working on the shirt,
the suit here, we just start with the shoulders that I also give a very
light shade to it. Also some buttons for the
shirts wearing underneath. My work would
actually look better. Okay, I just want to work on the details of my
character a bit more. For example, shaping the
mustache a bit more. Or even a got on the chin
right below the lip. I can also walk on
the hair a bit more. Just any detail that you
want to add is fine. Also, I consider
a smaller shades. For some parts of my work, developing and completing it, my work is actually showing
itself pretty well. Also, I can emphasize
the cheekbones a bit, making them more prominent. Here it goes. Basically, this was how we were creating
different kinds of characters, even with one geometrical shape. This one was with triangles
in two different shapes. I hope you've enjoyed
it as much as the previous ones and we're going to continue with
the rest of the shapes.
12. Continued Drawing the character's head with a triangle: Hello again. Welcome to the next part of the
tutorial. We may. In this one I'm going to change a different geometrical
shape and I want to square. This time I want to use a square for the hit
from the beginning. Right from the beginning, I'll work on a square. Then I want to determine the placement of the
eyes, which would be here. I also want to
consider the features. It's a very normal face. Right from the beginning, I start creating eyes. I want the eyes to be
distant from each other. That's one of the differences from the previous characters. I place the eyes in
their own placement. One of the eyebrows go higher, the other one would come lower, closer to the eye,
because I like it, the nose, a normal nose. Here we go with the pupils. Don't forget about them. It's like it's looking
down on something. Some lines fall
behind the eyelids, or better say above
the eyelids here. As we can see it,
there is a V shape here connecting the area
R to the top of the head. I want to work on the hair here. We've got some hair, bringing
it down on the sides, making the corners a bit around, but still in a square shape. They are around, but
in a square shape. Although here I should
work on the mustache then this time the
mustache is a complete. Got a mustache and beard. As I told you before, you should create your
character the way you like it. Just see which way you enjoy. Just don't scared to
deforming your characters. As even in this lower part, I can create more beard. See what I've done there? Also in this area, I want to create the ears. I also want to create
a hat for him, a very small artistic hat. See how this character
it's shaping. Maybe I just want to
create some lower eye lid for his eyes and it would
be more attractive. You see, even sometimes as
I'm developing the character, I decide to do something different with
it or add something or maybe even relocate
shape or deform something. A closed also I'm going
for the shoulders, not very high, shading
this area as it moves on. And also on the neck, I'm just adding some more
details. Here it goes. And this would be my characters shape and my
character with a square shape. I want to work another one
with a rectangle here. This time I want to
use a rectangle. I'm just going crazy with all different kinds of
geometrical shapes. I want to create one of the eyes bigger and the other
one is smaller. I want to shape it from the top. Give it some eyelids
with some lines. And also I'll work
on the other one, the same way, creating
some lines as the eyelids. I place the eyelids and I place
the eyebrows in this way. Clearly see them
right over here. I want to create
some hair for him. Creating the, creating
a curve of the ear. But this curve is actually
the placement of the hat. Want to shape like this. Looks going to look boot here. I'm not going to be dishonest, but they are fun characters. They come from your
own imagination. You can change whatever
you want in it. I get his cheeks out of this
rectangle shape a bit more, just to make them more round. And Uber over here, I create a chin like this. A chin which is coming down, you see it's very
stretched, it's deformed. As you can see, my actor's
face is very long. Therefore we need a very
big nose for our character. We can actually place
the nose like this. Also working on the mustache, bringing it all the way
down on both sides. It's got big mustache. I just don't forget
to feel inside of it. Here we go, filling
inside this mustache. Alright, this would be the mouth and also consider
a very thick neck for him. He's got a thick neck exactly on the contrary of
all my previous characters. They've all got thin legs. This one has a thick one. I also consider a
very small boat tie. This time again, the contrast that you create is
all that matters. I also walk on the shoulders. The jacket I want to create also maybe showing
off some of the bones. The ears would be fairly long. Of course, I don't forget
about shading the hat, it can actually
show itself better. We are done with this
character. All right. Again, I say that you can just
change anything you want, Even in any of my own
designs and sketches, Just to make it yours. There is no boundaries here. Do not be scared of deforming
or shaping anything. I'm going to walk on the
last character here. This time I want to create a
diamond shape for the head. As the last model, again, I consider a beautiful acute hat for him on the top of his head, it's a bit rounded. I'll just make its
hat. Or taller? Almost taller. That would be the cheeks. And this would be the chin. He's got big cheeks
and the long chin. Now, I would want
to create the eyes, I'm going to create
them right next to each other, stuck
to each other. Then I am going to create a bit, looking a bit weird, honestly. I'm just moving with the flow. Whatever my hand gives
me, I'm working on it. Some hair on his forehead, long ears on the
sides, on both sides. Of course, a fairly big nose, Don't forget about the
nostrils right from below it. I'm going to create a weird, even weirder than his look. I'm going to create his
mustache look really weird. Just go down and just
wavy. Here we go. Again, just smooth it, the flu. Don't be too concerned about it. Let your creation and
creativity kicks in. It hit kick in as I want to create his mouth
just Lina like this, creating a thin neck
for him in general. Here's a very long person. Longa long neck and maybe
some angular shoulders. Just doing it very simple. I can even create some
shapes on the shoulder. Some design for his clothes. I just add some more details
in the sketch itself. You can see at any
time you can even, it can edit your work,
make more details. Just like that, I have created my beautiful and
unique characters in different shapes and
different styles. It's not a necessity
that you would work your characters with
geometrical shapes like circle square. But the geometrical shapes are actually going to help you when you are
starting from basics. But again, I say you can use
a lot of different forms, very deformed shapes which are not circle square
or anything like them. That depends on your
own creativity. I hope you've enjoyed
this episode as well. I've loved it. Wish you did
to see you in next episodes.
13. Figure drawing: Hello there and
welcome to a new part of figure sketching with me. So why did I say
figure sketching? It's as obviously character
as sketching case, but as we have worked on
different types of eyes, nose, even faces and heads. Now we are going to work on
the bodies and the figures. The characters can
have fat bodies. They can be overweight, fat, slim, thin, short, tall, and any coins of
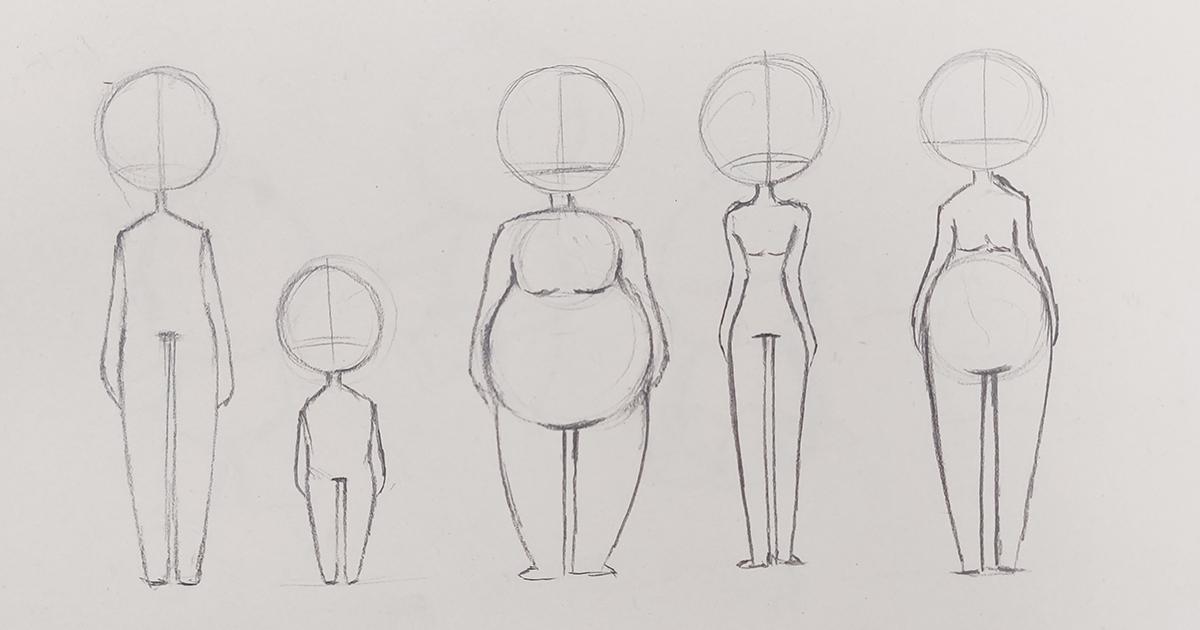
shapes that you can imagine. The first figure I want to work with is a very tall character. The tall character
would be created here. First of all, we
start with a circle. One of the most useful shapes
in all kinds of drawings. Trust me, that circle, this is basically my
character's head. Just the paper for
you to see better. This would be my
character's head. Then I also consider
a neck for him. That depends on your own taste. You want to consider
a tall neck, long neck, or a shot one. Then I bring out the
shoulders out of the neck, I can create his body in
different figures and shapes. I just want this one to be very simple as the first
figure that we create. Now, in characters figures, you do not need actually any symmetrical things or
anything that just go together. Character designing,
we actually, we genuinely need exaggerations. We need exaggerations
to create characters. It doesn't only end in the face, should also be
extended in the body. I place it up to here, and then from here that would be the legs in most
of the characters, when we want to create
a tall character, we can see that they
would have long legs. Means that usually won't see
any characters who are tall, but they have a long or
a stretched upper body. They usually have a
stretched and long legs. The arms can also be extended. They can be deformed. They can be too
short or too long. That depends again on the character that
you are designing. That will be based on that, I want to create
the next character. Shorter a shoes character here. Therefore, I place
its head over here. Basically have my
first character. I consider the neck over here. Again, I bring to the shoulders, I create an upper body. I want them to stand
on the same floor. Therefore, you can see the
difference in the height. I create the legs as well. The arms can go here too. You don't have to have specific measurements
and characters. Again, I say for example, even you can create
one arm bigger or longer than the other that can create a
character as well. After we've worked different
figures of short and tall, we want to create fat
and thin characters. Or better to say, overweight and slim ones. Anyways, I start
with a big head, There I go with a neck this time. As you can see, when we want
to create a fat character, you can also get help
of the circle again, for the upper body part
and the middle body part. The stomach is usually and
mostly shown by a circle. We can extend it or make it as big as want our character to be fat or overweight.
There is a fatty. I complete my cat's body. As you could see, even
for the shoulders, I've created a curved
line on the top. Also for the legs, they should be big
in the continuous of the circle that we had
for the middle body part. This would be my fat
character. All right. Better to say overweight, but this is a character, it should be funny. All right, considering
some lines over here. Because he's overweight
and he probably, even if it's a man, it got big breasts there. Now we want to work under
thin or slim character. Again, I consider a
circle for the head, the neck, and of
course the shoulders. This time, as you can see, I am creating it very slim. And I am considering to look like a glass watch or a
sandglass as you say. It's very thin and it also has very long legs to emphasize on the thin
feature of the character. See also for the arms, I want to extend them, showing that they are also thin. Here it goes, we are done
with this one as well. I also want to work another
figure for you which is not overweight or not very slim. It's an average weight figure. Again, of course, I
start with the head, the neck going to the shoulders. I can consider the shape
of the body like this. A bit chubby on
the stomach area, just a bit too, as much as my overweight person. Just like that. I consider
the placement of the legs. I can continue it downwards, but anyways, that also depends
on your own character. But you can create
different body shapes based on different figures and different body forms that
you consider in your head. Use your imagination the, that we have the most. Here goes our last figure. I just taught you five
different figures of character which are
pretty normal and basic. I hope you've learned them. And let's continue
in next episodes.
14. Drawing a child's figure: Hello there. Welcome
to a new part of character drawings with me. In this episode, we are going
to see how we can create children characters
when we want to create baby characters
or children characters. Basically, they create the
size of the body smaller, therefore, they can
actually have a cuter face. First, I start with a head, which is obviously a circle, especially for babies and kids. After we worked on the circle, I'm going to shake this
part of the face like this. Where goes the draw
the ears would be placed there. All right. Then I want to work on the body. You see basically
creating the figures or not very complicated
or puzzling mostly, I just can't create the
figures of a baby or a kid. It's very simple lines. See how they've done it. Very simply, just
creating some lines. It's not complicated at all. The arms are not too important. Here it goes. See
the measurements. The head will be definitely bigger comparing
to the body parts. All right, now I want to
create the same baby, the kid which is jumping up. We want to see how is
jumping together again. Of course, first I
create the head, the face, the ears
placement would be there. I just create some half on the
top of the head so you can clearly under snap
the top of the head. I simply create the upper body. But for the legs, I create one of the
legs in this way. Again, as you can see, creating it totally lar, one of them is actually
coming to the side and the other one is
also not straight. It's like it's going to jump. The, the arms are
also created the same way as my previous model. We go mates, we've done it. Another figure that I want to create is the baby
sitting there. Therefore, first again,
we've restored with the head to draw the ears. Those would be the basics. Then again, I consider the shape of the
upper body before, but this time, as I told you, the baby is sitting, the knees are bend here. That's why though it
looked like this, the second leg would be
placed right next to it, that bending in the
knees should be visible. All right, And the arms
can also go underground. Therefore, just as easy
as that as you can see, you can create a kid in all different figures and also in all different
directions. The basis of the
body is like this. If you have this as the basis
of the body of the kid, then you can easily create
the rest of the body in its details based on this
body shape, the basis. You can create the kid in all different
shapes and figures.
15. Old character drawing: All right, then now
we want to work on the body figure of old people, The elderly and an old woman. You want to create
some grandparents. First of all, I want to
start with our old man. I want to start with his head. I create a circle. First, I consider two eyes for him with some distance
there, Here it goes. There, just getting it. Also, some wrinkles fall below his eyes to also show
the deep area below it. A big nose can be good for him. And also some beard
and mustache. It can look like this can
cover the whole mouth. It's normal in old paper. All right, so first we've
got the face there. I also can consider some very hairy eyebrows for
him and also big ears there. It's just a typical old man. But of course, as a
character now if I want to continue on and work on his
body as I told you before, for his stomach, I consider a bigger circle comparing
to his face and his head. Then from here, without wanting to separate
the neck from the upper body, I just connect the
head to this circle. I do not want to have a separate upper
body part or a neck. I just want him to
wear overalls there. This would be the bottom
part of my middle body. I don't want him
to be very tall, average height, and he's
a bit overweight there. I also work on his pats
and the shoes there, which look like this. Then I would clean all the
extra lines of my work. Here it goes. And then for here's stomach, I consider a shape over here. And right from here I bring down to stripes in order to get the buttons and
complete his overall. Then very simply, I bring
his hands to the sides, his arms are to his sides. All right. I can also consider two
pockets for his overalls. Just as easy as that, I could actually
sketch an old man. Now I want to create the same
old man on the side view. The same shape, the
same body shape, and the same features based on my previous features
of the face. I've got to shape his head
like this with a big nose, considering that is the
side view so we can actually see the
nose pretty clear. That would be the mouth. I consider a very
thin neck for him. This would be the placement of my opens beard and mustache, of course, the eyes. Side view would look like this. And of course we can
only see one of them. The hairy eyebrows
should also be created, do not forget about them. Of course, this
would be the other. All right, then again, I should create the same circle for his body with the
same measurements. All right, then from over here
as I did on my front view, I come all the way from the neck and I connected
to the circle. And completely and continuously I come down to reach
the legs and the foot. I'll do the same
thing on the back. Right from the neck, I connected to the
back of the circle. And I come all the way down
without any stops there, until I get to the
leg on the shoe. And of course, pants
are coming as up as the other view as the front view,
completing his overalls. And he's got a very normal arm, that's how we do it. I complete his overalls
with these stripes. Also a bow tie. In this front view, you cannot see the
bow tie because it's basically
underneath the beard. But on the side view
you can clearly see it. See how easily we have
created this old man in a different angle that was pretty easy and
enjoyable for me. Now we are going to continue, but this time I want to work on the figure
of an old woman. On the contrary that
I worked for my old, that I worked with a circle, I want my old woman to be
created with a diamond shape. But it's a diamond shape
which is flat on top. See, we are going to create
a beautiful old woman. It would be so cute. All right. I want to consider her
eyes high up in her head. I also consider some cheeks
for her and no small nose. I create her cheeks. I come all the way down to the sharp edges of the diamond. She's got a beautiful smither. I want to separate her chin, but I want her to
a very long chin. I can also consider
some glasses for her which basically make
her so much more cut. She looks so cute
with the glasses, she looks so much cutter. I create very simple
hair for her. Do not forget about
her ears, again, prominent, which is normal
in most old people. All right, Then I
go for her neck. I create a beautiful
color for her. Then I want my old
woman to be short. I don't want her
to be tall there. I can very easily create her body with the
shape of a triangle. See, from here, I bring it down, then I round it up, up again. Also from here, she's
wearing something. Usually old women have the skirts up to almost
below the breast area. The chest, right from here, that would be the scat, because I want her
to be very short. Then I create very
tiny legs for her. The shoes would be created. Also the hands. I can also consider some
designs for her clothes. These are mostly your
creativities there, but the basics are like this. She got very short high skirts, if one cute shape. Now if I want to
create this grandma, this granny in the side
view, what should I do? Well, I create the
same diamond shape which is flat on top. Then again, from
here I come down, I consider a very
small sharp high tip, knows she's got a pretty smile
that would be continued up to here and this would
be her long chin. Only consider my
granny's eyes over here, I've got an eyebrow
and her glasses there. Her ear would be placed
here and don't forget about the handles
of the glasses. Those are important as well. All right. Then I create her beautiful hair,
continuing her neck. This would be her hair. Only just shade over here on the spot of the head
to create the hair. I could also create a
bomb behind her head. She is tied up her
hair. All right. Then very similar to here, I want to create the same
shape for my gran color. I create her breast
aerial are so on the back from here I
consider her a scat. Then I've got her
hands, her arms, then some designs, polka
dots for her dress. Then as easy as that, I've also finished
the figures of my old men and my old woman, different types of eyes, different types of figures. I've basically combined them to create beautiful characters. Beautiful old characters. I hope you've enjoyed
it as much as I did. See you next one.
16. Chef character drawing: Hello there. Welcome to a new part of this
drawings with me. All right, in this episode
we want to create a bit, not harder, but I want to create a more challenging
character there, as I told you in
previous episodes. First of all, we should consider the characteristics
of your character or the features of
your character. I want my character to be
an overweight chef who is, he's got mustache
which are twisted us. These are key features. We can add even
more features and details while we
are working on it. It may come to me these are the basic features
and the key ones. First of all, I create
a circle as the head. Then afterwards, I wanted
to have a, an angular face. I also consider an oval
for the lower part of, the lower part of the head. Later I tell you why. Then I divide my face into half, both vertically
and horizontally. Then, for creating the
basis of his head, I stop from the top. I want the top of his to be like this because basically
he's wearing a hat. I want my character to
have very big cheeks. That's why I've considered this area as the
shape of an oval. It also got some chubby chin. Then in the same
place, a bit higher, I consider a wide nose for him. The nose should
also be fat above. It knows I'm going to work on the eyes very easily
with an easy shape. I want the eyes to
look like this. They are looking
toward each other. He's got twisted eyes. Then I work on his eye browser, he looks a bit confused, but here's a good cook. Already complete his forehead. The V shapes were
for the eyebrows. I consider some more
details for his eyes, then also work on the mustache. As I told you, I
want him to have big twisted upwards mustache. Therefore, I created and then
I would shade inside of it. In some parts, you should
emphasize on some of your lines in order to make your
shapes be more visible. Do not forget about the ears
just above the cheek area on both sides. All right. That would be my character's
mouth. Very normally. Of course, as I told you, he is a chef, therefore
he needs chef hut. So I can basically show
his characteristic and also his job in one to sketch, I create his chef's hut
very easily and very big, though I also consider some more shades for him. That it would look like this. We've got a puffy
shape for his hat, therefore I've got to
shade it from below so I can show that the
top of the hat is puffy. All right, Then we
come to the bottom of the work below head, I've got the collar. I want the hands to go on
toward the side, toward right. Therefore, I create
the collar and then I create a back circle
for his upper body part. I want to show him he's
very overweight because he's a bit tilted and
turned toward right side. I get my circle
more toward right. This would be
basically behind him. I work on the rest of his dress with a bit
of distance there. I designed the coat
in the clothes and I move up now I want
to create his arms, which are placed here. I want to take the arms
right through here. The body is in the side view and the head is in
the front view. As I told you, he has
turned to the right side. I've got some sleeves there
and of course his hands, it's like he's got something. He's pointing there. Then I clean erase the
extra lines of my work. My basic sketch
would look better. I will create the other hand, the other arm in the same
direction, In the same way. Of course, it's
like he's welcoming you or showing you something. Picking on the hands. The fingers, here it goes. You can also create some dish
in his hands that again, totally depends on your own
imagination and creativity. Therefore, I use them, but be so cooler for you to
have your own character. I also create some scarf round his neck is totally got it. Now I also want to continue
his stomach a bit, even below his jacket. I want to start his
legs from here. You square big
legs and big feet. The shoe is also. Do I want to place the other leg a bit out of a normal position? Say it's a bit higher
comparing to the other one. We're almost done here. But again, I say you can add some more details into your character to
make them yourselves. Also a button, for
example, on his jacket, shading underneath his shoes, some straps for his pants, his trousers, better say. Trying to use some words which
can be known to everyone. Trousers or stripes. Here we go. There Just as easy you can say. We have created and sketched another
character who was a chef. I hope you've enjoyed it
as usual because I did. And I'll see you
in the next part.
17. Musician character drawing: Hello the mates. Welcome to another episode of
character creation with me. In this part we are going to
create another character. This time our character
is a musician. We're going to
start, first of all, I'm going to start with
my character's head. I want some features for him. I want his eyes to be closed. I just want to show that he
is very kind and very happy. At the same time, I
want to show that he's also sitting
for my character's. I want to use a rectangle. Therefore, right
from the beginning I start creating the rectangle. Therefore, just like that, I create an angular rectangle. It's like my character
is looking up. I want to place the eyes
over here in this area. From here I want to
consider the nose, that would be the
mouth. And here we go. Also my character's
neck can be here, see. Now I'm going to complete
my character's face. As I told you before, I want my character's
face to be happy. It's like he's in his own world and he's enjoying his music. Therefore, I am working my
character's eyes closed, which would be like
this would be here. Yep. It's just going
to be like that. Then again, I'll do the same for this side with the eye and
of course the eyebrow. All right. Then now I can create his nose. I should create a
nose for him that actually fit his face there. I want to continue his nose
up to this higher level. See, I would also
consider a nostril here. All right, then and here I want to create my
character's laughter. Or better say he has a smile. That I would also have to
work on his hair style. I want to bring it down, but before I finish it, I've got to create
my character's ear. See my dear friends, when you decide that in
your character hairstyle, which features that
you want to use, totally depends on your
exercise and practice. If you practice a lot, you can choose that. Ok, I want my character
to have these features. Therefore, if you want to be a good painter, a good designer, you should actually pay so much attention
to your practices, you should really
take it seriously. Otherwise, you ought not be
as good as you want to be. Now, I am styling his
hair with some lines. I just spoke it that way. All right. Then for his face, I also want to create
some mustache. That also it gives my
work a better touch. Say how much I am paying
attention to the details. As, as you do that, your work will actually
get much more interesting. It will get much more
background story and everything you
want in a character. All right, I've completed the mustache and a bit of beard. Now I want to
complete his clothes. Starting with his color. I want his color to
be really sharp. He is dressed smart,
really smart. All right. I also want to
consider necklace here. As I told you before, I want his figure to be sitting. Therefore, very
easily just create his back from here
with a curved line. I want him to be
sited in this shape. That would be my figure. It should be that much curved. Therefore, I have to create
all of his body parts. In this circle, I want to place a guitar in his hand,
a musical instrument. First of all, I actually want to create the guitar over
here that based on that, I can work on the
other body parts. First, I'm going to
create the guitar, then based on it, I can easier create the rest
of the body parts. That's enough. Up to here, I just want to know that I should
create a shape like this. Then I want to work on his hand, on this side, if that
would be the shoulder. I start from here
and there I've got my character's elbow that I
just showed with a circle. I even want to work on my characters slaves
which are tied up, they've been folded and want to give him
more style there. As I told you here, I would have my character's
elbow, then his forearm. I want to work on his
hand in a way that he is actually playing
the instrument. For example, I want his whole
hand to be in this shape. Therefore, first I'll
create his thumb here. Then the rest of the fingers, let us erase these extra lines. All right. Now we've
got it over here. First of all, I'm
going to work on the other fingers as it goes. Then after the thumb, I create the rest of the
fingers just as easy as that. You see, he is just playing
the strings with his finger. Don't forget about
the letter finger. All right. Now I can work on here making this area better. Of course now the other hand would be left here. All right. So on the same way I am
considering the other, the other arm in
the elbow would be on the same level
from this side also. The wrist would be on the same level over
here on my guitar. I try to work the other hand, keeping and playing the
strings from the top Again, some of the fingers or bent
in the others or straight. Some of you may have
some problems perhaps, for creating fingers, but
don't worry about that. You are creating characters. It doesn't matter if
you just create them even a bit deformed
or with a bad shape. It's not a real work.
It's a character. Therefore, it's not
very important if you create them to exact there. All right. I bring it down here. I can also create the
thumb in this area. Therefore, he is holding the
guitar from the top as well. We are not going to work on some details of the
work right now. I'm not placing too much
details for my characters yet. I just want a general shape. Then I would go into details. I start from here. Right from here, I'm going
to complete his clothes and that will be the end of
his shirt on the stomach. From here, I create his legs. See, I consider this
shape for his Lex, for example, I can put
some shots on him. This would be his
knee over here. The knee has bent and
it goes back again. Over here, I create a bump in shape in order to show his calf. The other leg should be
placed exactly over this one. And of course the next
knee would be here. All right, so it would
look like this here. From here, I go back again to complete the legs there. I have my shots over here,
completing the shorts. The legs in the
overall look there. Right? The sneakers could be placed
here, just like that. Also over here would be the
rest of the other sneakers. See, right from the
beginning I've created a general figure of a
circle, not a complete one. I've created my whole body in my whole figure
in that circle. That easily you can create your own character only
with some simple shapes. Now I want to work on
my character's details. This is one of the fun parts
of the whole painting. All right, that will
go there. I can also Work more on his clothes, giving it a shade. All right, then I also consider a very slight shade
for his own shirt, for the rest of
the shirt to mean. There we go, completing
the shades on his shirt. Don't forget about this pot or this sleeve
behind the guitar. We can still see a part of it. Now I've got to give the
shared some designs. I want it to be checkers. I want his shirt to be
with a checkers design. Just to get more
details into my work. Here it goes. Then again, I'm going to
work on it horizontally, this way to create the checkers. Here we go. There I'm completing the
checkers on his shirt. Say we are done here. I also shade this area below the arm a little so I can make it separated
from the rest of the body. Do the same thing on the
call the way it's been folded back so I can
show the volume as well. Then for his shorts, I consider a darker shade that would be under
contrast of his shirt. All right, Mates, see
how beautiful it got, but just really working on it, I genuinely like it. All right. I also work, I want
to work on the hair, then we will finish this
beautiful, happy character. Okay, just detailing
the hair bit, just giving the last touches. That's it. I hope you've enjoyed this character as
well as the others. I'll see you in the next one.
18. Drawing the character of a smart boy: Hello there. Welcome to a new episode of Character
Designing with Me. In this episode, we want
to work on a very simple, but a very cute character. I want to create nerd character. Of course, when you
think about a nerd, the first thing
you think about is that he obviously
has a big glass. He's got to have big glasses. One of the most
significant features of a nerd character is
that he's got glasses. First of all, I create a circle. Then I want to have his face
out of this circle there. Here we go. I want my character's face will be much bigger
than his body. I want his head to be bigger than his body because
basically say, genius people have
got bigger brains. Therefore, in characters
and in cartoons, you always see that the brainy people have
got bigger heads. That's why I'm creating his head bigger comparing to
the other body parts. All right, I want to
create big eyes for him, but first I have to
work on his glasses. I know where everything goes. That would be my
character's glasses. I want my character to have
square shaped glasses. All right, here we go This way. First of all, I
complete his glasses. All right. Now I want
to work for his eyes. I want his eyes. I'd like his eyes
to be big as well. So big, big glasses
and big eyes. Right here it goes. And I would do it the
same way on this side, that would be my
character's glasses. He would be its
nose that a part of it is actually
placed on the nose. I consider a cute nose for
him right below the glasses, middle part, also for his mouth. I don't want to be too
strict or too complicated. I want to create a happy kid. Brainy kid. He's just smiling and his cheeks would be
cute and big too. I create his ears as well. They are a bit more prominent
and turned out I do them so now I can work
on my character's hair. I want his hair to be curly. I honestly think that the curly hair suits this
character better. You can clearly see that it
looks much better on him. I create some curly
hair for him. I develop it as you can see. Well, then I want to work
on my character's body. As I told you right
from the beginning, I don't want it to be too big. First, I consider
two pots of color for him, tidy brainy. Then I consider a very
normal body for him. I also bring his hands, bring his arms toward his back. It's like he's
placed his arms on. And for his legs, I would walk like this. See that? It really looks like
school uniform. See very easily. Now for his hair, I consider another shade that very simply I can
shade it very lightly. He is looking nice. I love it. I hope you learn it well and you learn it
as well as you want it. Just don't forget about
practicing over and over again. I've already told you. Then I add some
details to my work. I just make some parts and
the other parts lighter. Here it goes there Mates, you've got to get a bit. Now, it's very simple, you just have to pay
attention. Practice on it. I work on his glasses frame, making it more visible and darker as it goes. Now, I can also create
circles on his cheek. It's like our boy, smart brainy boy is blushing. Then I've got to erase my
extra lines in my work. Look better. And overall for I
consider some stripes, thin stripes, small ones. Of course. White trousers. I hope you enjoyed it as well. So, till the next
one. Say mates.
19. Mouse character drawing: Hello again and welcome
to a new chapter of our beautiful sketching
of the characters. All right, we are going to sketch a beautiful
mouse together. First of all, I'm going to consider my
character's features. My character is a baby mouse, which is a boy, and it's
like wearing cute clothes. I'm going to create that and
draw that so you can see. All right, here we go. First I want to start
with my mouse's head. I want to consider it bigger because I want
to show it's a smart. Then I want to consider the direction of the
face in this way, in the three faces view. All right? First of all, I'm going
to draw its face. It's very easy. That would be the
nose, the mouth. I want my mouth
to have big eyes. Therefore, I'm going to
draw them on both sides. I have told you
before that as much as you make these
circling eyes bigger, the pupils would be bigger. Therefore, it would look cuter. Okay, then I'll continue
and it would be like this. Then I'll try to work on
the eyebrows very minimal. I also draws for him, I try to create a by face. We're creating a small chick, also some hair for the top
of his head over here, I want him to have very big ear. As you know, the
ears of the mouse, or better say the ears
of mice in general, they are like a triangle. I created the same
way with a bit of hole in different
parts on the bottom. The other ear would be smaller because we can only
see half of it. We walk on it this way. See how cute it looks, even though we
haven't started yet. Looks so cute and pretty. Then I start drawing
the, the mouse's body. See, I want to
create it this way. It looks like an egg from the left side. I come down and I create
a shape like this. Here we have a collar, a shirt he's wearing also. It's a sleeve, looks at it. I've got to create the
other side as well, the shirt, the half of the
shirt should be drawn in here. All right. Then we've completed the shed. I should erase this
area because I want to create his hands. It's like he's putting
his hand on his waist. I'll do the same thing
on the other side, creating and drawing his hand. See, it's like he's explaining something
to us, looking cute. Do the same thing for here. For the lower part, I complete this shape. I create the legs and
the feet very easily. I've got this, okay. Of course we cannot
forget about the tail. That's one of the main
features of the mouse. I'm just going to draw over and create this beautiful
curved tail. All of these, my dear friends,
need your creativity. The first thing in the basic need for you is to be creative
as much as possible. All right, then I'll
clear this area. I'll erase it with my
rubber. Here we go. I try to make it clean, neat. Here we go. I'll also
create some lines below its eyes to make it
even look more cute. Darkening the nose and
working on the eyebrows. All of these would help me
to have a better character. That was our mouse character. I hope you've enjoyed it enough. I can even create some
flowers on its shirt just to give it cute
last minute top, it would look nice just having
some designs on his shirt. If you want to be a good
character designer and sketcher, you have to see
lots of references and practice Over
and over again. You can get your references
from tutors, from Internet. You should just
get so many ideas. For example, I got the idea of this cute mouse
from human person, but I've turned it into a mouse that's all about
your creativity in getting lots and lots of
deals and references Look good and double
your practices, make them more and more. I'm sure after that you
would be perfect in it. I hope you've enjoyed it
a lot and see you later.
 Mila Keller, Drawing Artist and Cartoonist