Transcripts
1. Introduction: The right color in the right place can really make a drawing come alive. But when you're working from your own wild imagination, you know where anything can happen. It gets really hard to find that right color and that right place. Whether you want to express an emotion or describe something you have no words for, you're going to need a plan if you want to navigate the world of color. Hey I'm Ira Marcks, I'm a cartoonist and illustrator and color has always been a big part of how I tell a story. I spend a lot of time thinking and reading about why and how color works and way more time sitting in Photoshop, mixing and matching swatches. Every color-based project is a search for that special combination of hue, saturation, and value. This class is my own special blend of theory and practice. Meaning, I'm going to share some stories and pictures to get your mind gears moving and follow that with a character- based project that'll have you mixing and matching colors in Photoshop better than ever before. At the end of it all, you'll be working smarter and faster and most importantly, your drawings will feel more alive. It's time to stop feeling lost in your swatches. Let me help you find your way through that crazy mixed up world of color, painting, palettes and Photoshop.
2. Class Overview: You're sitting there in front of your screen with your drawing tools close by. Now before we get to it, let me tell you what to expect from this class. It's really two distinct halves. During the first half, I've planned a lesson to get you thinking in new and exciting ways about color. We'll begin with a look at how artists through history have influenced the core of how we relate to color. Then, we'll jump to the contemporary world of our InDesign to look at some of my favorite non-painterly inspirations. That'll lead us to the class' main art form, cartooning. I'll share the unique ways cartooning uses the language of color, and then we'll look at how modern cartoonists stylize color for a specific project. Then we get to the second half of the course, the class project. The assignment I'll be guiding you through is the design creation and coloring of a character known as an elemental guardian, more on that later. We'll be working in Photoshop CS, a program you only need to be slightly familiar with to do this project. I'll show you how to set up your file and then we'll look at the necessary tools you'll need for drawing and coloring, as well as some super time-saving shortcuts that will keep your creative process flowing smoothly. Then I'll lead you through the conceptual stage of designing your character, which includes finding inspiration and amazing three-stage sketching process and a quick look at inking a cartoon. Then comes coloring. During the coloring process, we'll review industry-inspired techniques for color blocking, refining the use of your design, and most importantly, utilizing saturation and value. Then, I've got a bonus chapter on two cool coloring techniques, line color, and rim light. I worked really hard to give you the right balance of mind expanding art theory, technical tips, and practical steps to help you become a better colorist, illustrator, and storyteller. Without further delay, let's go.
3. Lesson: Story of Color pt. 1: Color has always had a knack for peeking human curiosity. When we encounter a color, we actually expect to find a mystery in it, and in turn, a meaning. We can't help it. It's in our nature to explore colors. Through our experiences, we develop relationships with them. Color teaches us how to live in the visual world. Does that sound crazy? I don't think so. The world is full of colors. To deal with them all, our brains need to recognize their distinctions. Through this need, we sharpen our perception of colors main elements, it's use, its values and saturation, and we begin to associate the characteristics of color with our experiences. Our brains sort these notions of color experience. Some are characterized as utilitarian, like when we recognize the color of a stop sign. Some notions are characterized as natural observation, like recognizing the color of the sky before a thunderstorm, and some notions are emotional, like seeing a color that reminds us of a jacket we had as a child. As we gather experiences, our unique relationships with color deepen. The psychology of color as a conversation is old as art itself. There are countless theories to explore. But for me, I've always connected with the notions of Johannes Itten, a Swiss expressionist and maybe the most famous color theorist of the 20th century. Itten saw a vast difference between color as utility and color as a gateway to a hidden meaning. You could guess his theory goes a little deeper than memorizing the color wheel. Itten believed in artists, color aesthetic is informed through some combination of three types of intention. Impression, meaning, visual observation, expression, an the artist's emotional representation and description, color's potential for symbolic amplification. This theory really strengthened my relationship with color and it gave me a much deeper appreciation for colors role in art history. I think there's a lot to learn from seeing the world of color in this way. Now, I'm going to share that view with you.
4. Lesson: Story of Color pt. 2: Painters in ancient China were cultivating a relationship with color long before most civilizations. As their color palate expanded so did the meaning behind its use. They found inspiration in the world around them, particularly in the yellow soil of the lowest plateau, the origin of Chinese civilization. From impressions of the natural world came an expression of cultural symbolism. The ancient Chinese painters used color to represent the energies of nature. At the center of this theory was yellow, a color exclusively reserved for their emperor. The mosaic art of the Byzantine Empire was intended to preserve the stories of their sacred saints. This responsibility placed high demand on these Roman artists and their colors. Imagine the sophistication of their creative process, look at the way they create subtle variations in color, light, and shadow. The preservation of this work through the centuries assured its influence over future generations of artists, especially those employed by the church. This style of blending imagination, impressionistic observation, and symbolic meaning through color is at the root of so much Western art. By the 15th century, the Italian Renaissance Painters had mastered tonality and color modulation. They were painting massive and epic images at insane levels of realism. While symbolism was still at the root of their compositions, the images were stripped of decorative elements seen in earlier religious artworks. To me, the paintings of the Renaissance have the weight and drama of a scene from a movie, but this wasn't the apex of realistic painting. That didn't come until artists like Titian in the mid 16th century started to really focus their use of color. Titian was using color to give character and virtue to the main subjects of his compositions. Look at the two figures posed in this crowd of twisting bodies, localizing and focusing color was a brilliant way of bringing symbolism to a realistic style of painting. The Renaissance's theory of color embedded itself so deep in the collective consciousness of the art world. For hundreds of years, this aesthetic is what people pictured when they thought about art and color. But by the 1800s, the culture of art was ready for a whole new perspective. In 1810, Johann Wolfgang von Goethe published the book Theory of Colors. Goethe was an author of emotional literature, but he also had an equal interest in visual art and its relationship with science. This new book was intended to change the world's perception of color. Goethe's theory sought to validate the scientific function of human imagination in response to the phenomenon of light and color. The warmth of the setting sun and the coolness of the Earth's rising shadow to him were evidence of not just the fracturing of white light, but of humanity's poetic intuition. Goethe's theory is wrapped up in his version of the color wheel. On first glance it doesn't seem to be unlike the rational framework of earlier color theories. But here Goethe has assigned allegorical qualities to each field of color. Red is beauty, orange is nobility, yellow is good, green is usefulness, blue is commonality and violet is the unnecessary or spiritual. Needless to say, the scientific world found no academic value in his research into optics, but his studies of color remain influential to this very day. It's not just artists who connected with Goethe's theory of color. All kinds of people were into it. I think technologists, John Gage put it best when he said, "Goethe argued there is no color in the physical world. There are only patterns of light and dark, and these patterns are a sensation produced by our very souls."
5. Lesson: Story of Color pt. 3: The connection between poetic intuition and color science is a major aspect of every modern art movement. By the 1880s, about 70 years after [inaudible] book was released, the art world had arrived at Neo-Impressionism. The artists of this movement, like Henri Edmond Cross, had a deep appreciation for the emotive power of color, as well as a deep understanding of optical science. In a way, Cross' paintings of urban life are experiments in human response to color. His work proved that the notions of color were so strong in the human imagination that meaning could be communicated through simplified arrangements of colorful dots. Soon after Cross, Monet and the other impressionists were riffing off the Neo-Impressionistic theories. Monet considered himself more if a student of light than a student of color. His paintings sought to study the way sunlight alters the local tones of natural objects. Like the Neo-Impressionists, Monet believed that mixing pigments breaks the power of peer color and that the eyes urge for visual closure will lead a viewer to meaningful scenes in a deeper sense of the role of light in the world. French artist Paul Cézanne, expanded the Renaissance ideal of color modulation by blending it with influence from the impressionists. The result was paintings of representational scenes that glowed with exaggerated color effects. Cezanne layered subtle rhythms of cool and warm colors to heighten the reality in his images. The turn of the century brought on the full Expressionist Movement. It's originators, like Norwegian painter Edvard Munch, saw color as a way to represent internal psychology. The expressionists were turning away from the outside world and began searching the inner nature of humans to expose the often unrepresented emotions of natural existence. Here's a quote from Munch that summarizes the Expressionist Movement pretty well. ''Nature is not only all that is visible to the eye. It also includes the inner pictures of the soul.'' Hilma af Klint was one of the earliest painters to break out from a long-standing tradition of representational color. She said, ''Light was the first phenomena of the world and it shares the true nature of the living world through its color.'' Klint spent a lifetime designing her language of color, distinguishing masculine energy with a golden yellow and feminine energy with an eggshell blue. Her deep understanding of color theory allowed her to explore the relationships of human energies with the harmony of nature. Like af Klint, Piet Mondrian saw the potential of color to connect humanity with a higher plane of awareness. Mondrian once said, ''I wish to approach truth as closely as possible and therefore, I abstract everything until I arrive at the fundamental quality of objects.'' Mondrian was described as a theoretician as much as he was a painter. His work exposed the basic framework of visual art, stripping it down to primary colors, intentionally arranged on a canvas. By removing the familiar aesthetics of art, he was able to connect with a deeper part of humans' relationship with form and color. The story of color is really the story of creative intention. In any color image, you're going to find impressions, expressions in symbolism that reflect the relationship of an artist with the nature of their world. It's just a matter of looking deeper. Theory is fun and all but it's time to get practical. Let's look at ways modern artists use color to get the job done.
6. Lesson: Communicating with Color: To really communicate with color, it's important to me to understand how artists working outside my field of illustration get the job done. Here are the lessons I've learned from a graphic designer, photographer and film production designer. Paul Bacon used color to communicate mood. Graphic designer Paul Bacon was a big fan of jazz and built his career around his love of music. He created iconic album art for Blue Note Records and other jazz focused imprints. As a kid, I'd see his work constantly pop-up in my dad's old record collection and I'd run into it browsing through record stores. For a whole generation, Paul Bacon's color palette of pale hues and cool colors became the visual representation of the invisible sounds of musicians like John Lee Hooker, Abby Lincoln and Thelonious Monk. Paul Bacon showed me at a very young age to look beyond the happy colors of my Eric carle books and see colors that stood for darker in complex moods. Vivian Maier used color to communicate story. For nearly 60 years, Vivian Maier quietly walked around the streets of Chicago with her camera snapping color photographs. She used color to create vivid little poms. She was particularly drawn to yellow and the way it evoked a story, three strangers with the same sense of fashion. A street peddlers who finds himself staged by a backdrop of mustard curtains, a discarded bouquet slumped like a drunk against a lamppost, a one-eyed beetle in the early winter, a field of spring pedals catching the eye of a mysterious artist. I don't spend a lot of time looking at photography, but when I see something I like, I feel an instant connection. Vivian Maier tells the kinds of stories I connect with and her use of color will always have a special place in my heart. George Conture uses color to communicate theme. Contour role in the movie industry is not as celebrated as that of an actor or director. His job is to design a world for a character to existing. Not only that, but to make sure when a character isn't talking, the world around them is communicating the story and theme of the film. Right now you're looking at the final footage from the 2007 film, "No Country for Old Men." This movie won contour and academy award. Here's the story that got him to the stage. When he was put in charge of production design for the film adaptation of author Cormac McCarthy's Modern Western. Conture had to find a way to visually express the dark tone of McCarthy's writing style. "No Country for Old Man" is set in 1980s Texas, along the US Mexico border. Conture had to design a color palette that conveyed the harshness, the heat and the thirst of the open desert, as well as framed the setting as a place at the edge of civilization. His solution was brilliant and like all brilliant ideas, the resolution was strikingly simple. Conture made a small painting in the style of expressionist painter Mark Rothko, a few shades of brown, a shade of rest, a shade of concrete and a splatter of blood. This painting established the theme and set a tone for the actors and directors to follow. Now try to watch this movie and not feel this painting's influence on every frame. George Conture, Vivian Maier and Paul Bacon are only a few of the artists that make me feel like it's possible to do something new and exciting with color. Take some time to look at your inspirations and try to see what impressions they've left on your own creative process.
7. Lesson: Color and Cartoons: When I'm working on a project, I'm always trying to balance those three intentions of color. Remember from earlier: visual observation, emotional representation and symbolic amplification. These are the elements that make color powerful, but in my world of cartooning, I find the art form has its own set of unique strengths, that make it my favorite way to tell a story. Here are what I call the four strengths of cartoon color. Cartoons use color to broaden appeal. I spent the second half of the 1980s watching a lot of cartoons, '80s cartoons were, for the most part, marketing for toys. Each character had a simple and vivid color scheme, which made it easy for kids to identify, and of course, point out in the toy store. It's an effective strategy that really changed the way the industry utilized color, to broaden the appeal of their characters. You can see this color strategy at work in the Teenage Mutant Ninja Turtle franchise. The Ninja Turtles actually began as a dark and brooding underground indie comic, by Kevin Eastman and Peter Laird. But when the property was turned into a kid's franchise, the characters were given a makeover. Notice the skin tones became a friendlier shade of green, and more importantly, the establishing of their iconic color bandannas. The color choices were not unlike how a marketing team employs color psychology, to connect with consumers. Leonardo, the team's leader, gets a shade of blue, a calming color personality, standing for loyalty and respect. Michelangelo, the team's fun loving, party guy, is orange, a warm and personable color with an adventurous tone. Donatello, the team's inventor, is purple, the color personality of imagination. Raphael, the team's hothead, is of course red, a color associated with power and passion, a color that can be at once bold and angry. Cartoons use color to evoke fantastic settings. European cartoonist, Moebius, used color to evoke fantastic worlds and mysterious characters. It's always a good idea to review an established artist, to find patterns in their approach, and understand what makes their use of color work. Moebius, to me, plays the distinct characteristics of warm and cool hues, against each other. He takes familiar aspects of our reality, and juxtaposes them in ways that make them feel otherworldly. The color in his backgrounds, is often hues of purple, blue, and green. His characters embody orange, yellows and shades of red. Cartoons use color to represent individuality. Cartooning as an art form, has come a long way since the 1980s. The comic series Lumberjanes, has kid friendly appeal, but it makes big efforts to ground its characters, in real and distinct personalities. The story of Jo, April, Molly, Mal, and Ripley, is filled with fantastic elements in cartoon tropes, but at its core, the book is a coming of age story about five young women. They're people with families and histories, people you can actually relate to. Cartoons use color to create narrative contrast. Batman and Joker, are probably the most recognizable hero-villain pairing in modern culture. It's no coincidence there connection is so powerful, consider their color palette. Batman's costume is designed to intimidate criminals. It creates a strong silhouette by using black and shades of gray or sometimes blue. Usually, his costume has a yellow accent in the middle of his chest, in the tradition of the classic primary color heroes, like Superman. Batman's a symbol of dark justice. The Joker's costume is pretty much the opposite, it's much busier and theatrical. By using a combination of the three secondary colors, green, purple, and orange, the Joker is a visual opposite of the typical primary colored hero, and a disruptive force when crossing Batman's stark silhouette. Narratively, Batman and Joker are two sides of the same coin, and they're ongoing conflict gives each character a bolder presence on the page. When it comes to storytelling, color is a powerful narrative tool. We can identify a story's personality, by its color palette alone. Now, let's dig a little deeper into how color evokes our imagination.
8. Lesson: Hues of a Story: Color is a dynamic aspect of visual storytelling. It grows and changes with the story's characters, and their engagement with their environment. We're watching an animated short about a traveling sketchbook being passed from character to character. I chose this short film as an example for a few reasons. One reason is this painterly style the artist is working and really highlights the film's color palette. The second reason is the film doesn't use dialogue or narration. Without this common storytelling tool, the viewer has to piece together the story from the images alone. Watch the way color is constantly changing the scenes mood as the book travels through the world. You can evoke the narrative power of color by using it to serve these three distinct tasks. Use color to support the story. Use color to describe a character's personality. Use color to make a character stand out from the background. Looking at examples of long form cartoons storytelling really helps me understand how much a role color plays in the narrative arts. I find a great way to study cartoon coloring is through an animated film's color script. A color script is a way for a production artists to create a preliminary map of the color, lighting and emotional beats of an animated film script. A color script is made long before the film goes into any final production and it looks a little like a long, wordless comic strip. A color script can convey external story beats like the distinction between two scenes. It also conveys internal story beats like the emotional arc of a character. Behind every great cartoon is a great color script. It's one of those crucial stages of the creative process. The lesson artist focus on the impact and consequences of their color choices. In the next video, I'm going to review Lu Ramano's color script for Pixar's animated film app. Fair warning, I'll be going over every plot point of the films. So if you haven't seen it yet, you may want to jump to the next chapter.
9. Lesson: Color Script for Pixar's Up: As I talk you through the plot outline of up, try to keep your eyes on the colors Lu Romano uses to communicate the story. Young Carl Fredricksen is in a movie theater watching some old tiny newsreel footage about his hero, famous explorer Charles Muntz. On a trip to South America, Muntz discovered a rare bird and with the help of his trustee pack of talking dogs, the explorer plans to return to the uncharted region of Paradise Falls to bring back proof of the animal. On his way home, young Carl meets Ellie, a plucky young girl with a taste for adventure. They become fast friends and Carl promises to fly her way to Paradise Falls someday. We see Carl and Ellie grow up and get married. We see their life story unfold as they fix up their home picnic on a hill and try and fail to have a baby of their own. Life keeps getting in the way of their journey to Paradise Falls. Eventually, Ellie dies and an elderly Carl is left alone in their house. Cut to the present day and we meet Carl again. This time is a lonely, old grump. His house sits alone in the midst of a construction zone, Carl refusing to lose his last connection to Ellie. A wilderness scout named Russell shows up offering to help Carl. Carl slams the door in Russell's face. When the court demands Carl give up his house and move into a retirement home, Carl escapes his fate by attaching thousands of helium balloons to his home and taking off for Paradise Falls alone, or so he thinks. It turns out Russell was standing on the porch. The unlikely pair float through a nasty thunderstorm and land on a cliff, opposite Paradise Falls. As Carl drags the house towards the falls two more characters join their unlikely crew. Kevin, a huge exotic bird, and Doug a talking dog. It turns out Doug is part of a pack of dogs that are hunting Kevin. Carl and the gang are caught by the hunting dogs, which of course, belong to Carl's lost hero Charles Muntz. Muntz has gone a little mad after years away from civilization and he's more desperate than ever to get his hands on Kevin, that rare bird. Muntz captures Kevin and Carl and Russell run for it. They make it to Paradise Falls, but Russell is pretty mad that Carl let Muntz capture Kevin. Russell decides to go back and save the bird. Carl is alone again. He finds Ellie's childhood adventure book and a note inside encouraging him to go on a new adventure now that she's gone. Taking her advice, Carl gets in his house and goes after Russell. Carl and Muntz fight it out on Muntz's cool, steampunk airship. Carl is able to rescue Russell, Kevin, and Doug. But unfortunately Carl's house is cut loose in the struggle and drifts away. Muntz plummets to his deaths. As Carl and Russell return home, we see one last shot of Carl and Ellie's house arriving at Paradise Falls. It's easy to take good storytelling for granted. You probably noticed that emotional resonance are really baked into the color palette and the color script is the first step in making that connection.
10. Lesson: Style and Character: Here's a quote from our old pal Goethe, that sums up this next topic. For the rest of the class, we're really going to focus on color styling. Color style is a set of guidelines that distinguish the look and feel of a visual narrative. These are some panels from one of my comics called, The Exploit. It's a story set in the not-so-distant future about a young hacker named Lang who's trying to escape the clutches of her troubled past. I spent a lot of time thinking about the color style for this story. It's about a world split between the messy complexity of reality and the data-driven indifference of the digital landscape. I'm using color to not only set the tone for a time and place, but also to set the tone for the character Lang's emotional journey. Color style should always play to the themes of the project. As we prepare to get into our class project, we'll focus more and more on how color makes a character feel like an individual. Let's look at some cartoon shows that have influenced my work through their unique approach to color, style and character. We'll start off with the main characters from Rebecca Sugar's fantastic cartoon, Steven Universe. Garnet, Amethyst and Pearl are guardians of the Earth. Each character's personality in physical form is projected from a colorful gemstone embedded somewhere in their body. Pearl is a graceful spear wielding warrior. Her pale colors have a noble look, but they also hint at the struggles she has with her self-esteem. Amethyst is the fun, loving whip swinging guardian. Her outfit hints at her past as a rough and tumble wrestler, and Garnet the team's leader is dressed in high contrast blockings of red and black, accented with the yellow stars on her powerful gauntlets. The color schemes of each of these gems has an appealing surface level aesthetic, but their purpose goes much deeper. Color is a fundamental aspect of Steven Universe's visual narrative as well as its characters journeys over the course of many seasons and episodes. Over the course of the show, we learn the gems can be fused with each other to create new characters. Look again at the gems leader Garnet. Her look is perfect for an extra terrestrial warrior. She projects a real sense of individuality. Later in the series, you learn Garnet is the fusion of two other characters: the courageous and intensely focused soldier, Ruby and the level headed aristocrat, Sapphire. The merging of these two personalities shows why Garnet is so well positioned to lead the team of heroes. Through this backstory, we learn that Garnet's color scheme reflects the balance of her personality traits. The ever deepening story of the gems, their history and their relationships is a big part of Steven Universe's appeal and massive fandom. The show fits in well with the long tradition of kid friendly, heroic cartoon tropes but it really stands out for its well-planned color styling that allows it to convey a coming of age story that's rich with world-building, emotional complexity and lots of appeal for a young audience. Next, we're going to look at the character designs of Lisa Hanawalt. She's a production designer on the Netflix show BoJack Horseman. First off, Lisa Hanawalt is an amazing illustrator. She's got a real knack for mashing up colorful animal patterns and fashion in a really unique way. This attention to the details of color style and pattern style is really fundamental to her shows world-building. Bojack Horseman is a story of a washed up 90s sitcoms star living in Hollywood with his human and anthropomorphic friends. The story jumps back and forth through time and Lisa Hanawalt's use of color and style is really essential to how this narrative flows and works. Unlike a lot of cartoons, the characters in BoJack age and their look reflects the American culture and style of the time. When we encounter a character like the troubled pop star Sarah Lynn, her look is distinct to the era we're seeing her in. 2016 Sarah Lynn looks different than early 2000 Sarah Lynn and totally different from mid 90s Sarah Lynn. It's not just the main cast that has a fashion sense. Every character, including all the background characters in this show, are distinctly iconic. You can turn this show on at any scene and see all characters living out their own little weird lives. I'm going to read some quotes from Ms Hanawalt as we breeze through the show's character model sheets. From an interview with Beach Media, Hanawalt says, "I really want everything to look very specific. I just want things to look unique and I want to think about particular people I know. When I'm drawing a character, I want to base it on a dress I saw, that I can't get out of my head or often when I'm asking Raphael, the show's creator, what did you have in mind for this particular character? He'll be like Julia Roberts as a kangaroo. That's such a good jumping off point for me." This next quote is from an interview on peoplemagazine.com. Hanawalt describes choosing a character's outfit. "First, I read the script. Then I jot down notes on the main characters. I always start from the ones that seem most fun to draw. Then I pull images from fashion blogs, runway photos and my pile of Japanese fashion magazines. I love matching different looks and colors to the characters' personalities". Then she's asked, "Why do you think fashion is an important element of your work?" Hanawalt says, "Fashion is for everyone. It's not just about overpriced clothing and models on the runway. We all choose what we wear every day and I'm interested in those choices. Even if you wear the same boring hoodie sweatshirt every day, that's a decision that tells a story about you." I love that because there's a cartoonist and illustrator, I'm constantly looking for ways to make my drawings feel real without sacrificing that surreal vibrancy of a cartoon world. For me, BoJack proves how fashion, particularly patterns, can make a world feel real. Hanawalt's use of pattern, color and style is something that makes BoJack really unique. Somewhere out there there's a little big headed boy who's like," Hey, I've been a cartoon fashion icon since the 1950s." and to that I'd like to say, "Go fly a kite, Charlie Brown."
11. Project : Settings, Tools, Short Cuts: It's time to move into the class project section of the course. You're going to want to start by opening Adobe Photoshop. At the time of this recording, I'm working in the Creative Cloud version 2019. It's late December 2018. If you've done an update recently, this is the same version you're working with. In this chapter. We'll prepare our Photoshop file, review some tools, and they're shortcuts. Let's start by opening a new document. I am going to work in a specific format, that's set up for my Skillshare class. I'm using 1920 by 1080 HD 300 pixels per inch. 1920 by 1080 is resolution with 16-9 aspect ratio. It's equivalent to HD TV formats. You can use the same format as me or you could revise your ratio. But I recommend, keeping the pixels per inch at at least 300 for print quality. Before we get into tools, let me describe how, I'm sitting at my workspace. I have my drawing tablet setup right in front of me. It's a second monitor connected to my iMac. I'm right handed, I keep my keyboard just to the left within a comfortable reach of my left-hand because there's keyboard shortcuts, I'm constantly using while I'm drawing with my right. The first step of our process, will be to do a quick sketch to be inked and then later colored. I'm going to switch to a pencil tool. I'm most comfortable with a non photo blue pencil. You could sketch with the usual gray or black graphite. But I like the blue because there's a nice contrast between the blue and the black of my final line work. I'm using Kyle T Webster's art brushes. You could really use any default brushes. In fact, I think a lot of Kyle's are now built into the Creative Cloud. When you download Photoshop, you're probably getting Kyle Webster's set of inking, drawing, painting brushes. If you want to browse the Kyle Webster brushes, you can go to the, Get more brushes menu and download other sets while I'm sketching, and again, there's a few basic keyboard shortcuts I keep on hand, to streamline my process. One is the B key, which is the brush shortcut on the keyboard. The EK is the shortcut for the Eraser tool. You can toggle back and forth easily between the B and E. I would suggest not obsessing overerasing. Erasing switches gears and my creative process while I'm drawing. I'd suggest avoiding the eraser, as much as possible. I also find it really helpful to be able to adjust the brush size as I work. The left bracket key, on your keyboard will shrink your brush size and the right bracket key will scale up your brush size. Another shortcut that's going to help us, especially when we get into color, is to hold down the Alt or Option key on our keyboard. This switches your pointer to the color sampler. If you need to make a quick change, to your brush color, select your brush tool and look up at the active toolbar, you'll see a slider labeled smoothing. This feature helps you smooth out any jitters in your line as you draw. In the slider, you can enter a value from 1-100. The higher value, means more smoothing, applied to your gesture. The settings of the smoothing tool, right now, are set to default. If you open up that little gear menu, you'll see you have stroke ketchup, and adjust for zoom. Stroke ketchup means the line will continue to complete its path, even after you stop drawing, you probably want to keep this on. Adjust for zoom, will turn down your smoothing as you zoom in on your artwork. This will preserve the overall gesture of your line art. I definitely recommend keeping this on. The other settings under the gear are a topic for another class, but there's a lot of potential in them, and if you want to explore that further, I recommend googling, brush strokes smoothing in Photoshop CC to learn more. Smoothing can be a little distracting while you're sketching, you probably want it set pretty low. You can adjust smoothing on the fly with the keyboard shortcut, hold the Option or Alt key and press a numeric key. Holding option and pressing the one key will set your smoothing to 10 percent option, and the two key will say you're smoothing to 20 percent and so on. Those are the basic tools and shortcuts that will help us sketch in ink our illustration. Now let's talk about finding inspiration for that first sketch.
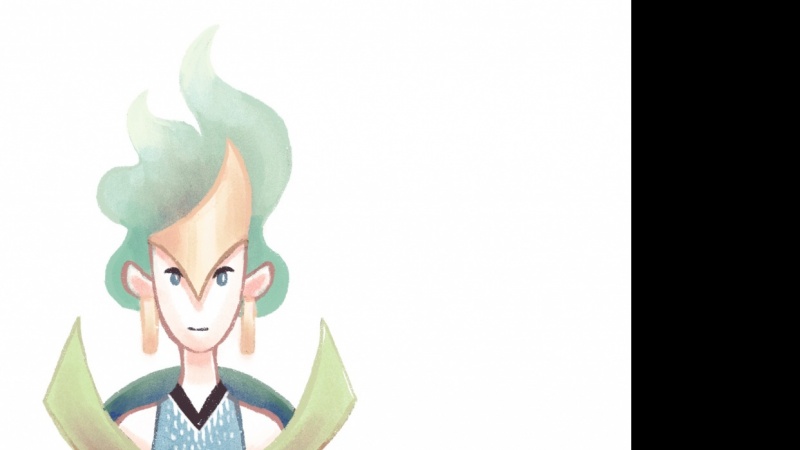
12. Project: Inspiration and Guidelines: Here's a quick look at my fully colored class project. The illustration was inspired by the Steven Universe and Bojack Horsemen references. We looked at in the style in character Chapter of this class. Before we get into color specifically, we need to sketch an ink design that's going to challenge us to utilize the color theory in professional practice that I talked about in the earlier parts of this course. The theme of my class project is elemental guardian. You'll be drawing, inking, and coloring a humanoid character whose personality and style is emphasized by natural elements. First off, we need some reference images to inspire our character design. To connect my project to the quote that inspired this whole class to begin with, I'm suggesting we all reference work by Georgia O'Keeffe. Why O'Keefe? Well, for one, she's an artist with an extensive body of work that's well-documented. You have a lot to choose from. The other reason is her work covers a really broad range of natural color, forms and emotional energy. Odds are you're going to find something that inspires you. I think she's a perfect fit for the class and the topics that I address in it. But if you have a favorite artist that works with nature and color in similar ways, by all means, use them as your reference. In fact, bonus points if you use an awesome artists that I've never heard of before. After browsing O'Keeffe's work on Pinterest for a while, I settled on this painting called blue flower. I like the shapes, the forms, and the balance of light and dark in this image. It's got a vibrancy, but it's also got a darkness at its center, literally. I really want to make this class project accessible to all levels of drawing abilities. Before I share my process of sketching that final character design, let me review some guidelines that will help even a beginner artists create something cool. First rule of the class project is to keep the proportions human. Start with a circle for the head, then add a rectangle for the torso that's roughly the same height as the head, but slightly wider. Now add a rectangle about the size of three torsos stacked on top of each other. This represents the dimensions of the legs. Now add too long rectangles on each side to represent the dimensions of the arm. Separate out the ends of the rectangle into blocks where the hands will be. Now separate the legs, feet, and the pelvic area. Now you've basically blocked out the proportions of a person and it's ready to build a design inside of. On this basic form, you can start to add simple design elements inspired by your reference painting. Experiment breaking up the form with a few lines, but don't over-complicate the design, especially if you're new to Photoshop, you want to give yourself time to master the tools on a simple project before you get into something more ambitious. Using your shortcuts for the B for brush and E for Erase, work your way through the sketch, bringing out the personality of the character by adding flourishes and a point of emphasis. We'll need these distinct characteristics of the design to think about when we go to add color. Once you've got a sketch, you're pretty happy with, consider blocking out parts of the design to get an idea of the potential for contrast and the final stage of coloring. At this point, we've got a decent sketch that could really work. If you're new to drawing, feel free to keep your design simple and facing forward. But if you want a bit of a challenge, sketch your character at a three quarter turn, it's the most popular way to illustrate a cartoon character. This angle creates more opportunity for us to use light sources in a later stage of our color design. We've got some simple and strong guidelines for our elemental guardian project. You don't need to push yourself to create an amazing sketch and illustration, keep it simple. In the next Chapter, we're going to move into a process I call three-stage sketching. I'll be working on my own skill level. I just ask that you find a place that you're comfortable to draw in and begin from there.
13. Project: Three Stage Sketching: Three-stage sketching is the idea that three iterations of a character design will result in the strongest balance of illustrative appeal and design clarity. In one of my other classes called Illustration By Design, I talk about how the principles of graphic arts can elevate design clarity in an illustration. Three-stage sketching is a similar approach to art. Really, it's about being in the right mindset at crucial stages of your creative process. The first iteration of your sketch should reveal the character's physical type. The artist should be focusing on proportion and the general form of their design choices. Are the shapes of your characters soft and heavy? Are they light and sharp? For me, I want my elemental guardian to be a high-ranking figure, someone with authority. While keeping human proportions in mind, I'm sketching shapes that feel tall and stable. This character isn't a warrior, she doesn't have any apparent physical strengths or athletic costuming. She's designed to be a figure of respect. Standing and speaking are her roles in her culture. Her costumes should feel graceful and balanced. Like the O'Keeffe flower forms that inspire it. When I've successfully established the proportions pose in general form of this character, I lower the opacity of the first sketch layer using the opacity slider in the layer tab. In this case, I'm going to change the color of my sketch pencil to red, to help it show up better in the video. Keep it blue if you want but sometimes it's helpful to have a bit of contrast as you layer up you're sketching. Iteration 2 is about refining the characters physical traits and bringing out the design elements. I usually start with the face and headwear because they're the most closely linked to the character's personality. You can see the crown on this character is inspired by the central forms of the O'Keeffe painting. My character's face is going to be long and narrow and I can emphasize this idea by giving her a longer nose and raised eyebrows and tall ears. I want the cost humane to be layered. I'm separating her skirt from her top and placing a royal stone at her center. This resembles the little yellow form in the painting, probably the stigma, that pollen attracting part of the flower. Does this point of emphasis represent her femininity? I guess that's a topic for another class, so we'll move on. Her lower half, which means anything that's below the waist, including the hands in this case, is going to splay out to enhance the sense of stability. It's like she's growing up out of the ground. You'll notice here that I've got a vertical line that runs through the center of the figure, this helps me establish that three-quarter turn of the character's pose. Now I'm starting to give more form and flourish to the characters gown. Let's try representing the petals from the painting in the back part of the gown. This gives the character a bit more of a fantastic presence. Now I'm going to switch off that first blue sketch and take a moment to assess the second sketch. Without the distraction of that first iteration, I can refine some of the details of my character. I'm going to return to the face and give her some more personality. I want to push the authorial side of her personality and give her a slightly angular innermost gaunt facial structure. I want the character to feel a little beyond human. I'm doing what I refer to as pushing the forms of the sketch, this means stretching them out and distinguishing them. I'm also going to try turn in the petals behind the head into something of a royal color, something that frames her face and feels totally impractical. Next, I'm bringing a little more form to the gowns petals. Iteration 2 is finished. Only when I feel that I've really lost my way in my design, do I return to that first iteration. In this case, I think my design is true to my original intent. I'm going to move on to the third iteration without looking back. Again, I lower the opacity of the layer and I'm going to return to that blue pencil with a slightly larger brush size, so I can get more weight variation in my line work. This begins my final sketch. Now this time, my goal is to streamline this design for maximum readability. The third iteration is not about adding more details, if anything, it's about taking them away. It's about simplification and emphasis of the character's personality and physical presence. Personality for my character comes from the forms of the face. Heightened features imply a sense of other worldly knowledge. The hair behind your crown gives a little hint at a true self and maybe almost implies her age. Let's call that her humanity, for a lack of a better alien term. In the third iteration, once I move away from the face, I try to sketch in broad, confident shapes and thinking about the overall silhouette my forms create and less about any specific details of a singular shape. You notice I'm adding a few loose lines on the gown, torso, and color to bring some roundness and depth to the sketch. Now, depending on the inking style, those lines may or may not get used. Right now, they're just notes to consider in my next phase of inking. There we go. That's my finished sketch. So three-stage sketching, it's more of a philosophy than a practice. You may be more of a two-stage sketcher or a four-stage sketcher or a thirty-stage sketcher. It doesn't really matter how many sketches you actually make, as long as, within that process, you're creating time to fully clarify the design elements of your character and use them to enforce the drawings personality.
14. Project: Inking: As I get ready to ink my sketch, I'm going to adjust a few of my brush settings in Photoshop to accommodate my own style of inking. These settings of course are going to be a little varied for every one of you. For this project, I'm working with a brush from the general brushes folder labeled hard round, and I'm using a tip size of 10. Now if you look in your settings bar over next to the smoothing slider, you'll see an icon for brush pressure. Looks like a little bulls-eye, turned that on if you want to use your tablet brushes pressure sensitivity. Since my brush tip is set to a fairly small size, you're not going to see a lot of variation in my line weight, it's going to be subtle changes. If inking is a new concept to you and you have yet to develop a confident inking gesture, you want to do the same thing, keep your brush size small. If you have a big brush size and a lot of variation in your hand pressure, you're going to get a really inconsistent line weight. For this project we want clean, smooth, and even lines. Trust me, it's going to make coloring a whole lot easier. As someone who has been inking for a long time, I've a pretty confident line gesture, so I don't need a whole lot of smoothing. Often my smoothing is set to around 10 percent, but with this specific design, I also know that I've got some massive curves in it, and I don't want them to be all jittery, so I'm going to set my smoothing up higher than usual and I'm going to go with about 20 percent. Remember, you can adjust smoothing on the fly by holding the option Alt key and pressing a number on the numeric pad. My goals with inking are to create simple, clean lines and be sparing with texture. You can see that the character's hair and aspect I described as the humanity of the character, is really the only place, I'm adding extra details to my inking. It's just my little way of bringing a little mystery and some extra depth to this character's design. Cartoon style again is one of the more sparse inking styles out there. Due to the fact that you're likely to be designing a character that will need to be sketched and inked over and over again. Whether it's a character for a multiple panel comic strip or a big animation project, the challenge of designing a cartoon character is to be eccentric and exciting in concept, but reserved in execution. Consider the role of every line you ink, is it making your design better? If not, maybe save yourself the effort and decide that it doesn't need to be there. Once I've inked all my important lines, I'm ready to get on to the main event, 3D modeling. No, I'm just kidding, obviously it's color. Just wanted to make sure you're still paying attention.
15. Project: Color Blocking: Color blocking is where you're going to establish the base color palette of your design. Before we start blocking though, let's talk about using the color wheel. After deciding who my character is, the color wheel becomes my next stage of creative development. At color.adobe.com, you can find this handy dandy tool for designing color harmonies. You can use this drop-down menu here to select a style of harmony. Analogous colors are those found in a narrow wedge of the color wheel. A monochromatic color harmony uses a single hue through a range of values of light and dark. Complimentary colors are polar opposites that create an appealing contrast and you've got a few other options as well. I'm a big fan of color triads. Why? Well, let me show you. Here's a quick little drawing of an elf in Explorer. Now let's bring up the color wheel. A triadic color scheme is made up of three evenly spaced points on a color wheel. This formula is a great shortcut to creating vibrant and harmonious color schemes; which is perfect for my cartoonish style. You can see my color selections bend the rules of an evenly balanced triangle, but I still try to stay true to the color hues once I start to paint. I'm only using variations of light and dark values to break up the high contrast areas. Now the general rule with cartoon color is that a restricted color palette has more potential for narrative clarity and emotional connection. Now that you know where I'm going with my color theory, let's jump back over to our elemental guardian character and build a color palette using the triad and O'Keeffe's painting. Look at this. Is it just a coincidence that her main color harmonies are triadic? I don't think so, but let's set these color options aside for a moment and set up our workspace for quick and efficient color blocking. First, I set a folder with my ink layer and sketch layers. It's very smart to get organized at this point; our layering system is about to get much more complicated with the addition of color. Now that I'm organized, I select my ink layer and I grab the magic wand tool, which is also the shortcut W on the keyboard. I click in the white background of my page. Next, I go to the selection menu and select ''Inverse" or use the shortcut Ctrl Shift I. Now I've got my character caught in a big lasso. But I've got a little problem: If I zoom in on the line art, you can see my selection includes some gray pixels around the edges. I don't want my color blocking to bleed outside of my character design, so I need to modify this selection. I go back to the Select menu at the top and scroll halfway down to 'Modify'. I select 'Contract', and I get a new pop-up. In this menu, I can reduce my current selection by a range of pixels. For the thickness of my line art, I'm going to try contracting by three pixels; this puts my selection right in the middle of the line art. Well, for the most part. But it looks like here in the narrow line of the character's pinky finger, my selection falls inside the line art. If a selection isn't working for you, you can also go back into 'Selection' and 'Modify' and choose 'Expand'. I'll expand by one pixel and I think that's as close to perfect of a selection as I'm going to get. Now that I've got my selection, I make a new folder for my color layers. On this new layer, I'm going to create a white silhouette behind my character; that way, later when I'm blending layers together, I never have to worry about my colors interacting with background elements. There's always going to be a white buffer between the character and the background. I'll select "White" from my color wheel and tap the "G Key" on the keyboard to select the paint bucket tool. I also want to look up in my 'Options' menu here and make sure 'All Layers' is turned off so my line art doesn't affect my fill. Next, I fill my selection. I'm going to turn off the paper so you can see what I've done. Now, I'm going to release my selection by going to select 'Deselect', or holding Command D on the keyboard. I'll be using Expand and Contract pretty frequently as I move through my color blocking stage so I'm going to assign both functions some keyboard shortcuts. All the way down at the bottom of the Edit menu, you'll find the Shortcut menu. Command L is going to be my Expand shortcut. It seems to override a Levels menu shortcut, but that's not something I need on hand, so I don't mind; and I'm setting selection Contract to Command K on the keyboard. Now I'm going to bring back up my color triad and start blocking. I create a new layer on top of the white silhouette layer, I tap W on the keyboard to select the magic wand tool, and I click inside the gown. Now I hold Command K to bring up my Expand selection menu and expand my selection by one pixel. Then I tap G for my paint tool and fill the selection. As I talked about in an earlier chapter on cartoon coloring, color should tell the story of a character; so with my range of options here, I'm going to use the blue in my triad as the gown color. The blue has a regal dignity to it. I use Command D to deselect my selection. Now, I move on to the skin. I tap W on the keyboard to select the magic wand tool, and I click inside a region of the skin. Then I hold "Shift" to add to the selection and click inside the other regions of skin. Once I've selected all the skin areas, I hold "Command K" to bring up my Expand selection menu and expand my selection by one pixel. Then I tap "G" for my paint bucket tool and fill the selection. Now the photo of the painting I have isn't as vibrant as I want for my cartoonish design, so you'll notice I'm not using the delish tones of the sample triad, but I'm staying true to the form of the triad. I'll fill the remainder of the costume with the green, and I'll make her elemental stone match her skin. I'm also going to fill the hair in white for now which you can't really see but, just believe me, it's there. Now I've completed my basic color blocking. You can see how following the basic guidelines of the color triad can really get you to a decent color scheme with lots of vibrancy and contrast without a whole lot of effort. You'll also notice that I did all my color blocking on a single layer; this makes it so much easier to make adjustments, which is exactly what we're going talk about in the next chapter.
16. Project: Refining The Hues: I've established a decent harmony of base colors, but let's call this my roughed draft color scheme. I still want some freedom to make changes and to do that, I need to be able to adjust my color harmony all at once. I'm going to go up to the Image menu, and select, Adjustments, and select, Hue/Saturation. This is where the party starts. With the hue slider, I can maintain the balance of my color triad while browsing different color schemes. It's a chaotic moment for sure. But after all this planning and theory, a little chaos is a good thing for your art. How I do this as I just flashed through some options until something catches my eye. I'm really drawn to this deep red for the characters gown. It's got that regal field that I liked in the blue, but red is a more powerful color which suits my description of the character, is a high-ranking aristocrat. At this point, I want you to understand that using color is all about context. It's not about a single color choice. It's about how they all work together. With this arrangement of colors, I feel I'm really able to hone in on the characters' individuality.
17. Project: Saturation and Value: The human eye is very sensitive to colors. When an artist goes to use color in a composition, the contrast between colors can either make or break a relationship with an image. Right now, I'd say this image has a high tension color scheme. Yeah, it's harmonious as we talked about earlier but it's a little hard on the eyes. It's all peaks and no valleys. Now we know there are more aspects to color than the hue. In fact, I really think the human response to color is a lot more about the contrast of the image than the colors used. Contrast levels come from two distinguishing characteristics of color: saturation and value. Let's talk saturation first. To me, saturation is like the inner life force of your color. High levels of saturation get your heart racing. A lot of saturation definitely draws the attention of a viewer but can really quickly exhaust the eye. In cartooning, there's two sides to saturation, it can be used to create a happy kid-friendly appeal and exaggerate a reality. Lower levels of saturation can bring out a somber mood and can make a story or character feel a little more mature or grounded. You'll notice right below the saturation slider is the light slider which is technically the value slider. I'm playing with this but we'll talk more about value in a minute. Just like with the hue, I move these around until I'm happy. My final settings are just really subtle changes. I've only reduced the saturation by 13 percent and the lightness by seven. It might not seem like a big deal, but it's just enough to give my image a slightly moodier edge. So now that I've tampered the energy of the colors, let's bring some reality and visual depth to the character by playing with value. For the most part, value is the environmental impact of your color. That means the shadows in your design. I like to color my shadows and highlights using layers setup with clipping masks. You can apply a clipping mask to a layer by right-clicking and selecting "Create clipping mask" from the middle of the layer options menu. When a clipping mask is applied to a layer, you've told it that it's visual boundaries are defined by a base layer which is the one below it. I know that's confusing but you can see that while I'm painting shadows on this new layer with a clipping mask applied, no color seeps out from the boundaries of the black color layer. This can really save me some time because now I don't have to worry about paint going outside the edges of my character's silhouette. You can stack multiple layers with clipping masks, one on top of another and they'll always reference that base layer. You could even use the white silhouette layer we created as your base layer to avoid any spillover from any of your color layers. Let me point out some other settings of my shadow layer. "Style of shadow work" is a really personal artistic choice, and this is just how I do it. I set the blending of a layer to "Color Burn" and I lower the opacity to 30 percent. I try to do all my shadows for a project with the same deep purple color. For one reason, I like the way this deep purple responds to most other colors on the color wheel and even more importantly, it helps me keep my shadows consistent over the course of a project like a comic book. My highlights are done in basically the same way. But instead of setting a layer to "Color Burn" I set it to 'Color Dodge. ' When creating highlights and shadow, I try to keep in mind a scene's source of light. If you don't know where your source of light is coming from, the default position is going to be the upper right-hand corner, angled down at the character's face. Imagine a stage light pointing at an actor. My approach to value has two sides. I use value practically. I want to show the depth of objects and I want to conceal and highlight important aspects of a character design but I also use value narratively. In this case, the shadows change the way we respond to this character's face. Look, I've added a dark shadow under the eyebrow to give this guardian a bit more intensity and almost a menacing feel. When it comes to hand gesture and brush settings, my style of shading is basically the same as my inking style. I use the same brush and various levels of smoothing to create soft and bubbly shapes of shadow and light. If this shiny cartoon look doesn't really appeal to you, try switching to a more textured brush, like a watercolor or pastel brush. Texture is going to bring out a more impressionistic sense of color in your work, but it's also going to add a lot more character. So experiment and see what works for you. At this point, we've finished coloring our character design. But stick around I've got one more bonus chapter on extra color effects, like changing a scene from day to night and coloring your line work.
18. Bonus! Line Color and Rim Light: I'm calling this a bonus chapter, because line coloring and rim light are not necessary to know to complete the project. They're just some extra fun stylistic techniques. Will start with line color. It's a pretty cool, stylish way to break up the contrast of an illustration. You begin by cloning your ink layer, drag it down to the new layer button and you'll get a fresh copy. Then click the "Lock Alpha Channel" button right here. This will preserve every pixels level of transparency on a given layer. I'm going to try a few different colors for my line art to see what best suits this project. Holding "Alt" option to switch to the eyedropper, I'll start by sampling the deep shadow color here in the gown. That looks pretty good, it's really similar to the black I was already using. Let's move on and try a different color. How about this lighter red in the upper part of the gown? Remember, it's all personal preference for me, this doesn't work. I love the contrast of black line art and if I get too far away from that feeling, it seems to dilute or obscure the details of the illustration. Let's try a totally different color, how about this dark bluish-purple under the arm? That's starting to change the mood of the overall piece. Personally, I have just a single rule when it comes to color in line art. It needs to match the arts darkest value. You can see with this dark blue, when you put it against the deep reds, it seems lighter and that's a strange tension. You don't want your outlines to feel lighter than your darkest shadows. Personally, if I'm going to color the line art in this work, I'm going to use this deep red. You can have all kinds of fun with color in line art. I'm going to grab my brush tool and I like to use a softer rounder brush when coloring line. Let's say I want to make some highlights on the ends of the robe. I'm going to lighten my read a bit and paint over that. Thanks to the Alpha channel, it doesn't go outside the line. We can bring a bit more detail to the illustration by zooming in and changing the eye color of the character. Notice, I'm not strain for my color triad. I'm using the deep red on the eye, if I decide I want to add multiple colors to my line art, I'm only going to do it in places that push the forms and the personality of the character. Let's say this crown is a real point of emphasis with nice clean lines. I could go in there and use the darkest-blue and change the line color to match. I'm going to go through and grab a dark-gray to give a bit more character to the hair. I think that looks pretty cool. Now let's give this whole rim lighting thing a shot. Imagine our elemental guardian his wandered into a mysterious space cave and it has encountered a radioactive rock boy, it's just hypothetical. The lighting in a scene like this has two things we have to deal with. First, is the darkness. I'm going to turn off my old highlight and shadow layers because they no longer apply here. Next, I make a new layer and create a clipping mask. I'll name this layer night. Then I fill it with a deep-blue and move it to the top of my clipping mask list. Remember it's still below the line art layers, so the colored patches on those remain visible, I'll deal with those soon, but first, I'm going to erase the blue where the eyes are. In cartoon worlds, eyes always glow in the dark. Next, I reduced the night layer to 75 percent Opacity. This is one way to do it, other artists like to switch the blending layer to multiply instead of lowering the Opacity, it's really up to you. I'm going to change the hairs liner back to deep red, I want the textures of the hair to pop in this dark scene. Rim light is a color stylish term, as well as a photography term for dramatic lighting that's restrained to the thinnest edges of a subject, but it's not just a line, rim lighting needs to represent the subjects form. First step is to create a new layer and create a clipping mask. Now I set my foreground color to the color of the Cave boys glow, now I grabbed my Lasso tool, take a deep breath and swing it around a region of the character where the Cave boys glow would be reflecting off of. Now I use the keyboard shortcut Alt, Option, Delete to fill this selection with the foreground color Command D to deselect. Now I just worked my way around the design. I also like to think about what the surface is made of when I plan my rim lighting. For example, the stone in my guardians chest is going to reflect light differently than the fabric of the gown. I don't want to overdo it, it's called rim lighting of course. Isn't rim lighting cool? Aren't you glad you stuck with it and watch this bonus chapter? Sad to say we're reaching the end of the class, it is time to wrap it up.
19. Wrap It Up: Thanks for watching World of Color. I hope you have a better understanding of color theory now, ways you can apply it to your own illustration and narrative art, and of course, some great tips and techniques for improving your workflow in Photoshop. When you create an elemental guardian of your own, inspired by this class, of course, please share it in the class project section. Sharing your work and contributing to the class helps other students discover it, helps the class trend, which inspires me to make more classes, and it really helps build the community around my Skillshare channel. Before you go away, I got a couple of things I'd like to share with you. If you enjoyed World of Color, you might enjoy some of my other classes. I have one on concept art, Drawing Imaginary Worlds, a creative illustration class, focusing on sea monster design and creating rich creatures. Illustration by Design is a pretty unique class. I look at the art Nouveau movement and how visual artists were embracing graphic design skills. I made this class as a way to help illustrators think more about their composition and design skills. I've got some basic cartooning classes. One that focuses on faces and expressions, another that deals with bodies and poses, and a class I call Ink and Illustration, an overview of some of my favorite children's books, illustrators and how they influence my style. Make sure you're following my Skillshare channel. I'm doing this thing called Class Parents, where I send out basically a newsletter, where I talk about some work of my own and artists and illustrators, and creative projects that are inspiring me. Last but not least, I have a website where you can read a bunch of my books for free. I've got a sci-fi thriller called The Exploit, a pirate sea monster adventure story called the Aquarium Drift, a creepy supernatural tale called Witch Knots, and all kinds of other things I hope you might enjoy. Thanks for sticking around and I'll see you next time.