Transcripts
1. Welcome: Introduction to this class: Collage art has always
been a great way for me to explore my creativity
and get some inspiration. Creating new images allows
me to tell stories, create content, and connect with people through a
simple fun practice. Hi, I am ia Llamozas. I collage artists
and journalist from Venezuela leaving
iin Tenerife on Spain. I started exhibiting
my works in 2014. And this slowly opened the
doors to start working. Brands and companies
and even the magazines. I also really enjoy teaching and sharing all of
my collage tips. Whether you already do collage or if you're
new to this practice, this class is for everyone. Collage can be
an amazing tool for everything from journaling, vision boards,
creating fun cars, clothing, or even an
editorial illustration. It not only helps
me to be creative, but also it's a great
practice to help me relax and unwind
from screen time. In this class, I
will share with you how I create a handmade collage. We will get inspired
you how to use different cutting techniques and different ways to
combine your images. We will focus on layers for
your class final project. I would love to
see your creations and give you some feedback, so please share them in
the project gallery. That's also going to be a
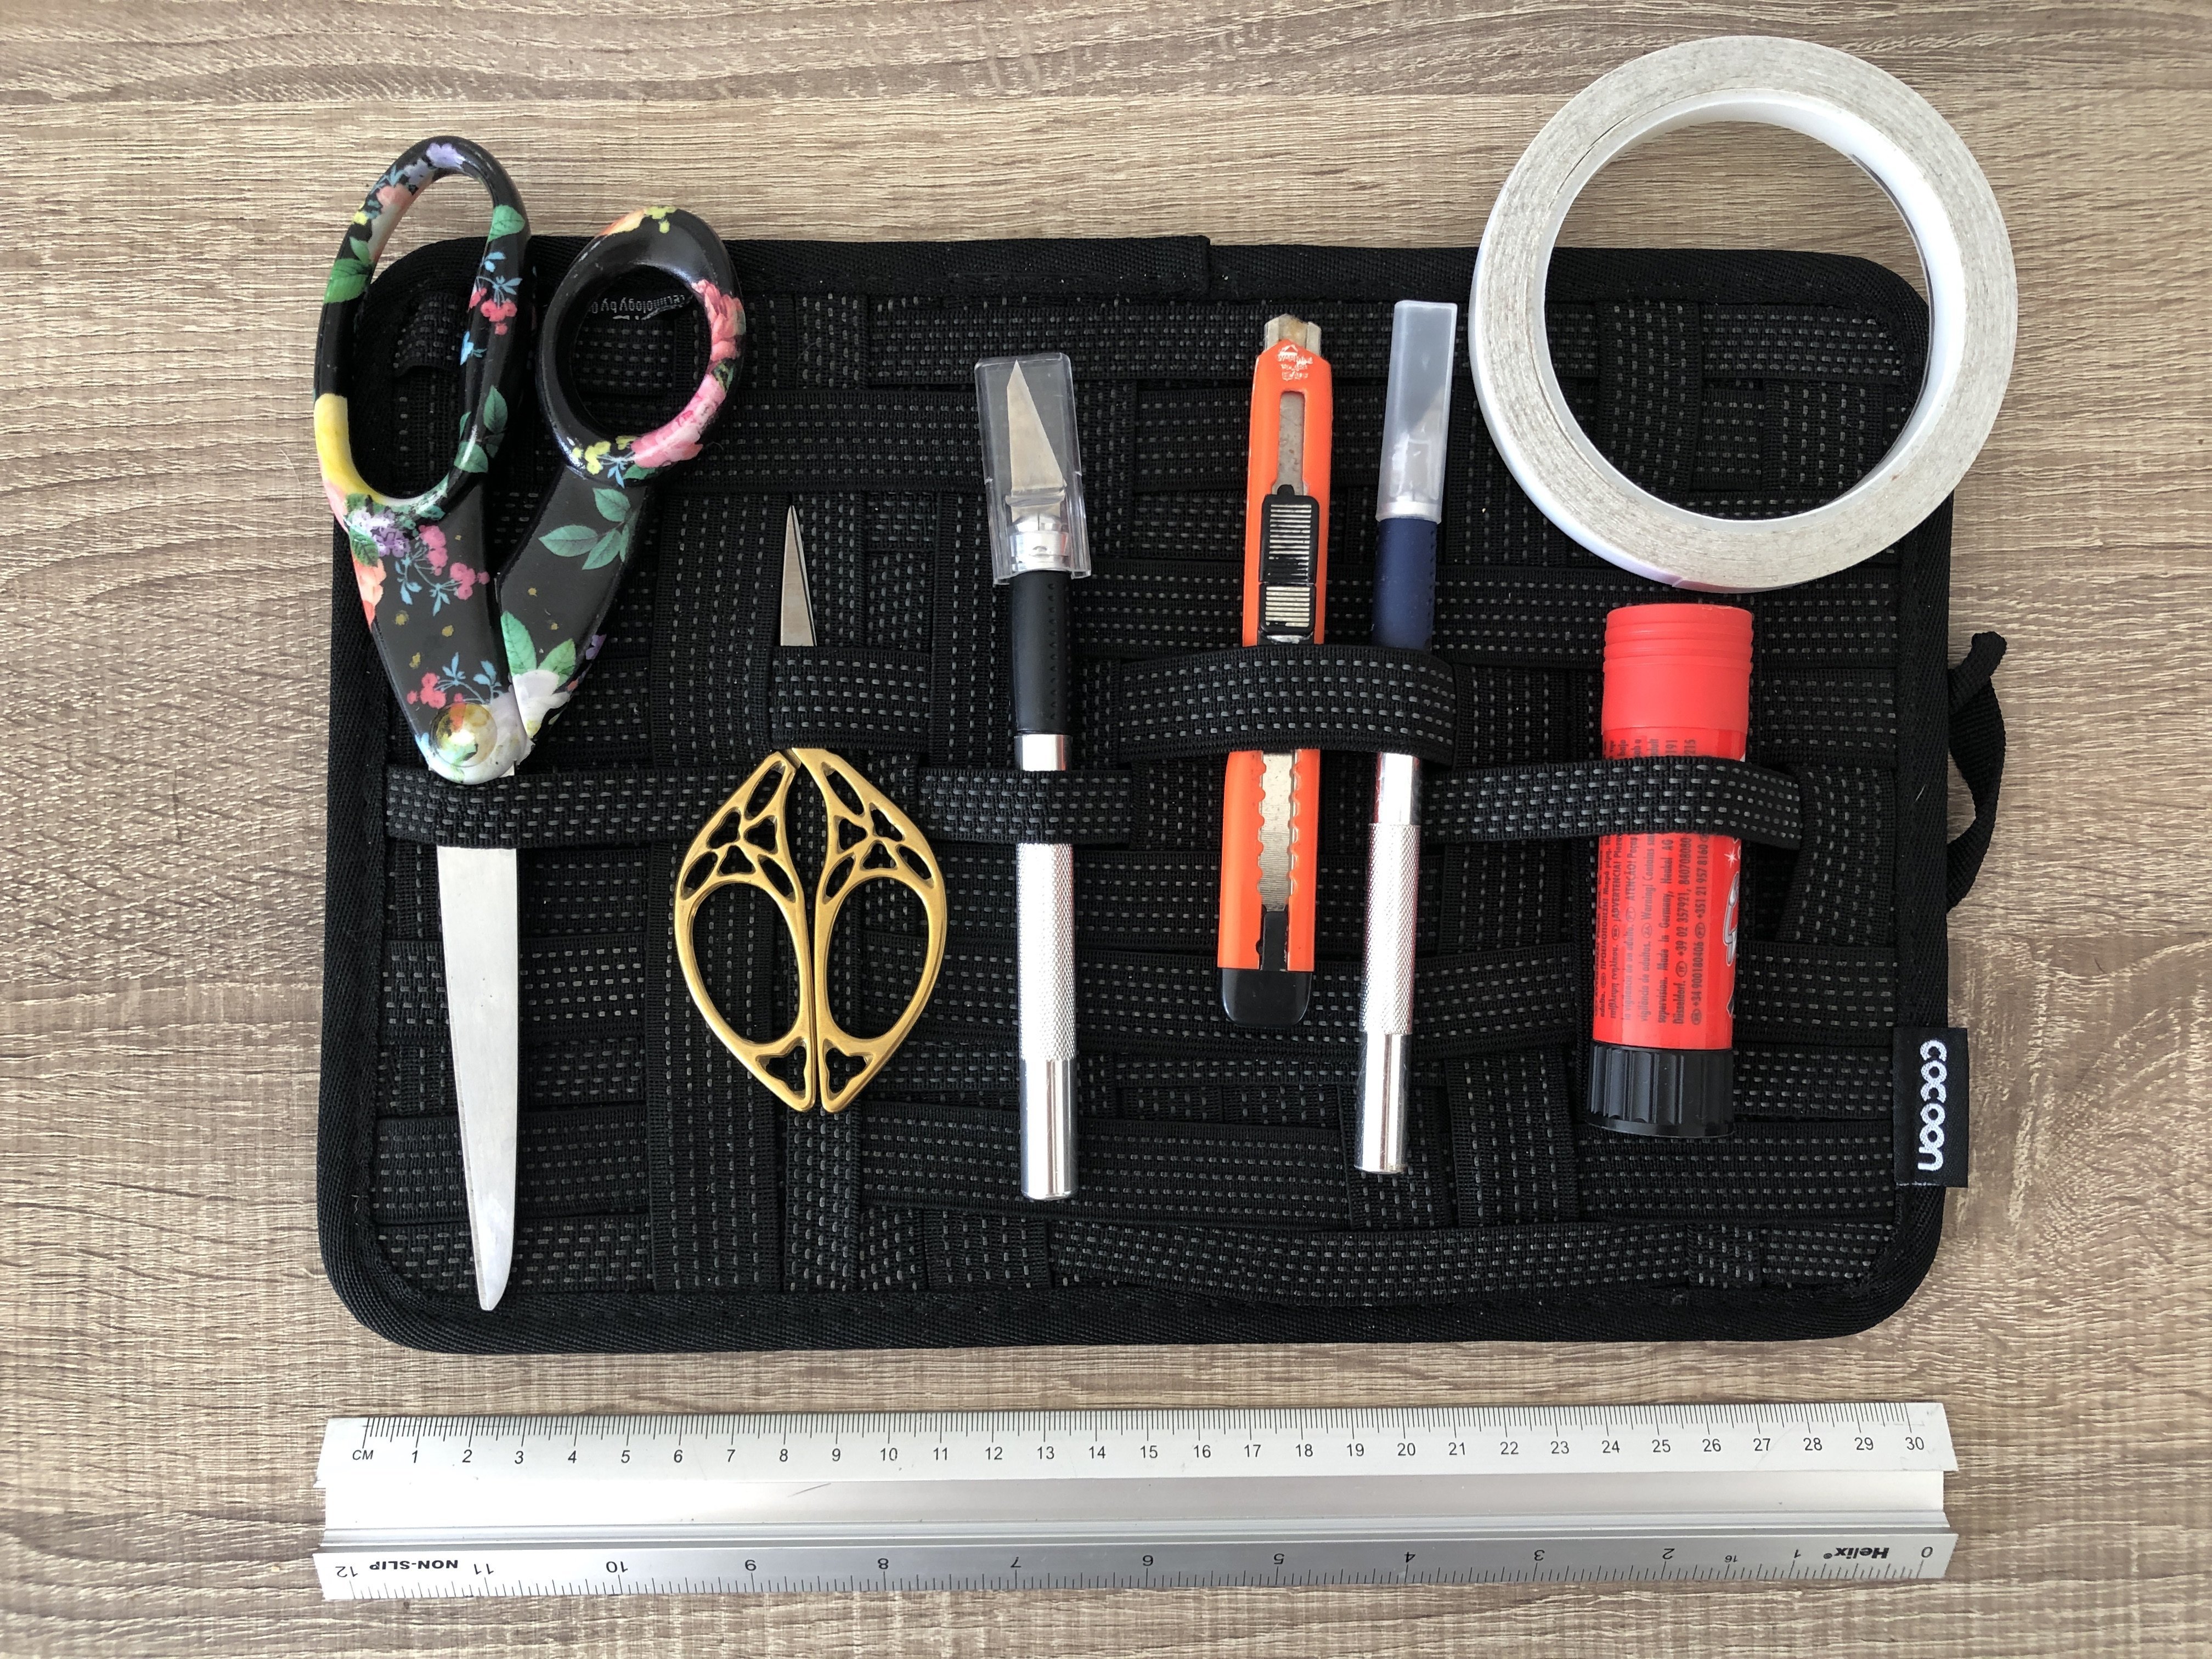
great place to get inspired. See other collages. For materials
you will need magazines. And for this fashion
design technology, almost any magazine will help. You could also use your
own printed photos or even colored
paper or card stock. And you will need
sisters and glue. It can be a glue stick, spray glue, or even
double-sided tape. You can also use
an Exacto knife, although it's not necessary. But if you do use one, remember to use the cutting mat for a surface to
protect your table. By the end of this class, you'll know the process, tips and have tons of inspiration to create your own
handmade collage for the class project. Remember, be sure
to share it and I'm really excited to
make collage with you. So let's begin to cut and paste.
2. Inspiration: One thing that I
love about collages, that there are no rules, so everything is allowed. When I show you examples, please feel free to explore and try out different
possibilities. Also remember that seeing. Other artwork is a great
source of inspiration. It helps you to discover the things that
you like and don't like to get ideas for
your own artworks. Nowadays, this step is even more simple because you
don't have to leave the comfort of your home to see art with tools like
Pinterest and Instagram. Inspiration has
never been easier. You can create boards and collections with
things that you like. So you always know
what to try out next. On the project and
resources tab. Below this video, you
will find a document with a list of some of
my favorite artists and collectives on Instagram. So you can get inspired. Today, I'm going to work
with these magazines. I will start looking at the
pages and selecting all of the images that
I like, keep in mind that you might also need
backgrounds you can use for this any normal
paper or card stock. But if you don't have any, you can also use images
from the magazine, like text or landscapes or abstract images
will work the best. So when selecting
from the magazine Like I said, remember, just work with the images
that you really like. For example, I really
like this font, but could maybe work for, or even this one
for a background. So just to take it off,
you can do anything. You can use an Exacto knife to easily
help you cut it out. Or you could also
just tear it out if you're afraid to make a mess when
you're tearing it out. Something you could also
do is work with a ruler. So that way you can kind of mark until how far you
want it to go. So for example here, I know I can do the the ripping in little
bit more organized way. So now that I have my selection, Let's go over to the
next lesson where we'll start learning
about cutting techniques.
3. Cutting: In this lesson, we'll be
talking about cutting. A collage is all
about telling a story. Something you want
to share or talk about something
you even made up, feelings or concepts,
or even abstract art. But all collages start
the moment that we change something to the
image that we already had. And that usually
involves some cutting. Let's start talking
about the tools. Scissors are indeed the
best tool for collage. Of course, you can also
use an exacto knife, which can give you
tons of possibilities. But on this class we're
going to focus on scissors. Small scissors can
also be very helpful, especially for small details. But in general, any normal
paper scissor will do the job. So let's start going over
the different types of cut. The first one is the normal cut. Let's say for example, we want to cut
this bag so we can just place it
somewhere different. And we all know how to cut, but something to keep in mind is move the paper to make it
more comfortable. Sometimes we forget and we end up putting our wrist in
a really complicated angle, when actually moving the paper as you're
cutting makes it easier for you to actually cut
in a more simple way. So I'm doing it a
little bit fast. But just to show you this would be pretty much the normal cut. And then you can do
something a little bit different that I like
to call a rough cut. And this is when
you leave kind of a little of like an outline, keeping a little bit of the
background in the image. And this works great when
you have details like fingers or hair strands that
can actually make it hard. So instead of cutting
right at the very edge, what I like to do is leave
that little bit of background, almost like creating an outline. And that way you don't have to worry so much about the details. It's not about being perfect. It is actually about making
it look like it's handmade. And also just giving it
a fun little contrast with whatever you're going
to be placing afterwards. So with this, overall
would be the rough cut. Then keep in mind that you
can always have paper torns paper torns can be
great because they can add a lot of texture. Like here. If you want
to do a paper torn, but you're afraid to get
too much into an image. You can always use something
like, for example, a ruler just to
make sure exactly the tear goes where you
want it to be and doesnt get any closer to
your actual image. The next type of cut, that we are going to talk about
is the cutouts. This was actually a
technique that Matisse used to do for making
his creations. And he used to call it
also drawing with scissors. So it's pretty much
about creating a shape. And you can make it random. You can draw it if
it's easier for you. For example, I'm going
to make a plant. And something to keep in mind. And I'll show you in a little bit, is whenever you're cutting
some things that actually, when making the cutouts, it works in really handy. If you actually keep the rest of the material or not throw it away immediately. That way you can also have like the negative
of whatever you're cutting that can be pretty cool to include in some details. Let's make one more
leaf here, for example. And then finish the stem. So like I was saying before, even though we might only
use the cutoff that we made, always keep this
until the very end. Because sometimes
it comes in really handy to have just to make the composition or just as an abstract element to
add to your creation. Off next, we're going to
have the negative space. This is one of my
favorite techniques because it's just
like adding layers, but instead of
adding them on top, you actually can also
add them in the back. Whenever you have that
space in the middle, you can add the layers behind to also create
a cool effect. So here for example, let's say that she has this
beautiful face and maybe we wanna take the lips out to play a little
bit with that. So with an exacto knife, you can very easily
access the lips and pretty much cut directly
into that without a problem. When you're using the scissors, it usually happens
that what you want to remove is in the
middle of the image. So it's sometimes complicated because you don't want to
have a cut through one of the sides or edges to
actually access that part. So I'm going to show you
a really simple trick that I do for making an empty space. Let's say here I want
to take out the lips. I go like I'm going
to fold the page, but I don't fold it entirely. You can see here
there's a little loop. Cuz I actually want to make a cut exactly in the place
where I want to remove. So in this case the lips. Then when I open
the page back up, that cut that I made is
actually going to grant, grant me access so I can cut in the middle of
the image perfectly. And don't worry if
it's not perfect, you can always go back and
then cut a little bit more. You can see, for example here, I'm actually going
to cut a little bit more to make this detail better. And even also here
on the upper lip. So now that I like how that
is actually looking, I could have some fun
and actually start adding some layers in the back just to show
you how it looks. So just to summarize, you're going to have
the normal cut. Then you can also have the cut where the rough cut of where you leave a little bit
of an outline. You can also do cut out, and then you could also
cut into the middle of the images, making
negative spaces. All right, so now
that we've covered some styles and
techniques for cutting, we can get started in
making our collage. So the next step we'll
be talking all about layers and learning how to combine them to make her image.
4. Layers: Layers are what makes
your collage come to life. A collage can be as
simple as just adding one layer or you
can add many. This is completely
a personal choice. Remember there are no rules, so there isn't a right or wrong. I will now show you how
I make some collages. So we can go over some tips and ideas of what makes
a great collage. So let's start looking into some examples of simple layers. We have this image which I
actually loved for its colors. And then, for example, as different fun
elements that I found. I found this television, which I can easily just add
to cover her face and to create kinda cool looking image. And then I actually
like the details on her shirt because they
also can look like eyes. So if I put some lips there, that could already be a great collage or
very fun one with just two elements
or layers that I've added to the image that I had. Let's see another one. Here. I found this very cool ad that looks very
vintage of 7-Up. And I like that it has like the sportswear of the decades, maybe the 70s and kind
of that vintage vibe. And here for the layer
that I'm going to add, I found this very
beautiful kind of zest of an orange and pretty much
the soda coming out. And I cut up pretty much
all of the details. And something I can do
is pretty much line up that spray of liquid to make it look like it's
coming out of the can. So we're going to
start noticing, as I show you examples, how making the lines continue, or how combining
the images so that the angles work together
is really important. So here making sure
that pretty much the liquid feels like it looks like it's
coming out of the can, is what does the magic. Also, you can have
some fun because you have that corner here. And the moment that
you line it up, since it gets covered
by the orange, it actually looks
really, really cool. Another example, and to now emphasize a little bit
more on the lines. We have this really
beautiful image of a model wearing a really cool
kind of ¨Matrix" outfit. And then I found these beautiful costumes that look like they belong to pretty much the
court of the king, or even like to a modern harlequin. And like I said, before, sometimes it's also cool to play with the elements
that you have and make them work together
so that they line up and they look like they could actually
belong together. The same as with the skirt. I could easily place it
here and it looks great. But I can also, for example, make use of that belt
that I already have. And if I place it here, I still have that awesome slit, that makes it work, so you can see two legs and it makes the
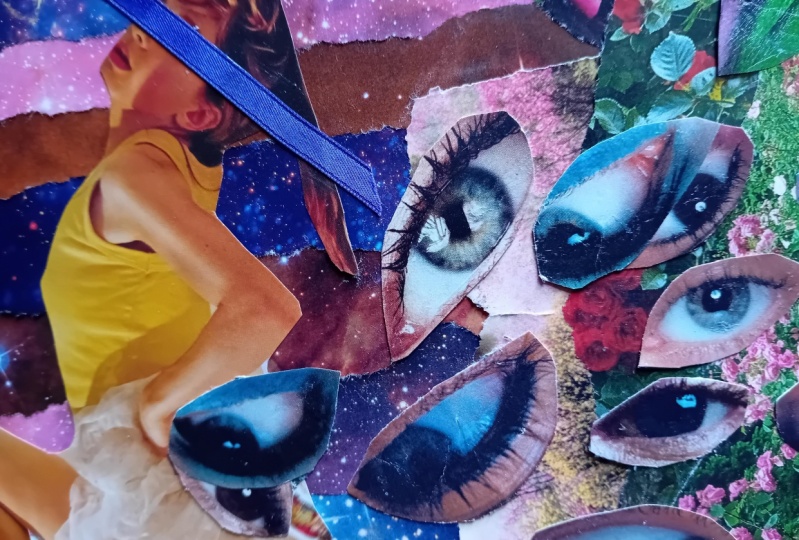
collage look great. You can also use this on faces. We have this beautiful eyes and we have this
image of a face. And something that
looks great is that you can also make
the lines follow, like I was saying before
just continuing the lines to make it easier for the viewer
to connect with that image. So here, for example, we can make sure
that the edge of the face lines up
with that new image. And then just set the nose
pretty much continuous. And this could be
a wonderful image. I could just add a big
background to center it in. And this could be
a great collage, so just make sure that when
you're adding the layers, you keep the intention of what you want it to be and also of the lines flowing from one
image to the other. Here we have two very
different images. We have pretty much
a religious image. And then a person in a suit, like pretty much
an office person just offering some sweets. And here what I loved
about this too, is that I noticed right away that I could pretty much play with the placement so that the
edges look like it continues. I also love that that
tie could pretty much continue with that line that the shirt pretty
much has here. And you can have some fun because you can even
see, for example, here the text says,
"Artist's superstar". You could even cross that out
and write Jesus superstar. And this would be
an amazing collage with a lot of sense of humor. Like I mentioned before, sometimes you want to build a background and
for the background, you can really use anything. In this case, I'm just
going to show you because I have this pretty abstract
images on the magazine, that I actually like. So I'm going to arrange them
a little bit randomly here. And these ones, I could just glue together
just by using regular tape. And I could just glue
them together on the back to make
it look squared. But like I said, it
can be anything. You can also use color cardstock, or even paper. The reason for me to create this background
is that I have this two images that look
pretty amazing together. So we have this woman
and we have this legs. And what I want to make sure is that they combine together. And you can see
how I'm playing pretty much with the effect
of the alignment. And I actually love
how this looks because it still
looks very sexy, like she would have the
sock and everything. But the images are
lined up in a way that it looks like it's her legs and with
a bold background, for example, this could also
be a great compositions. And finally, when doing layers, I also want you to keep
in mind that you can combine them in a fun way
to also tell stories. So here for example, I have this beautiful letter "O" that I've found on
one of the magazines. And I think it can be
beautiful for a background. I have this black
and white photo of this person here that I
actually love because it also, it almost looks like
a time-traveling scene. See, just adding this here in the middle, it
already looks great. But then I found these hands. And it could be amazing. If once again, we could
play with how the image is cut and maybe line
here, the bases. We could put that hand there. And I actually
really love how it bleeds and actually
touches the background. And then you can reuse, if you notice here you
actually have some of the details of the
bottoms of the jacket, so you can take use of that
and place this right over. So it looks like it's the jacket, and this can also be a
fantastic collage, for example. So I'm going to show
you some examples using the cut-out technique. For example, this beautiful
image that we have here. And even using the cutout
that I showed you before, you could just maybe place this so it looks like
it's on her hands and that could already
be a great collage. Remember, you can combine the images in any
way that you want, even combine different
techniques altogether. Also here we're going to
be using some cutouts that I already had made
to combine with this beautiful photograph
by Peter Lindbergh. So here for example, I have this cutout of a plant and I could try it out to see just to emphasize
her on the frame. It could be
something like this. I don't actually like that these lines are
actually covering her. So let's try on other angle. Actually like this one way
better because nothing is touching her and she's perfectly framed
there in the middle. And I love this
teared edge here, but I want to emphasize it. So here for example, I'm going to show you I did a
cut out of this plant. And like I mentioned before, I kept pretty much the empty space just
in case I needed it. So I'm actually
going to use this one, maybe this
one behind the tear. So it just brings it
to life a little bit. We can add the leaf there. And this one we could even use here to emphasize the
name of the photographer. So just remember when
playing with paper cuts, always use all of the parts, not just the positive, but also the negative
space as well. When creating empty
spaces, like for example, here we have this beautiful
living room or office. And I cut out the windows. And remember to do this, It's really simple. You go like you're
folding the page, make a cut and then open
it to access that area. And then I guess just add
something on the back. Like for example,
this marvelous face looking in to create
a really cool space. And also something that
looks very interesting. Here, for example. And I'll show you
this one just to show you some possibilities. So this one I did do
was an X-Acto knife. And you can see I made a cut
here just to cut this face. And with that empty space, I could use, for example,
this other image. And that could be a
beautiful collage, pretty much talking about a
friend, views or identities. Or I could just use this one and maybe use that
faith that I had cut out. I actually like
how it looks here. And then you could
just have some fun and add some elements like
I actually loved. For example, how these
remains of hole punches that I had could
actually looked like tears and maybe some red
ones for sorrow tears, for example, making a very
beautiful and powerful collage. And then finally, I want
to show you this one. This is a photo of a person. This is where the person was
and using the exacto knife, I was able to cut
that person out. I did keep the socks and shoes because I think they
look pretty cool. And I could just add
something on the back. Maybe some eyes and maybe think, talk about, for example, this could be a great
collage to talk about how when we were growing up, we feel that society always is pretty much
looking at what we do and pretty much
focusing on who we are. So this could be, for example, a great collage to
illustrate that. By now hopefully you have
some ideas to how to combine the images that you've selected to create your collage. On the next video, we'll go over how to
glue your creation.
5. Gluing: You've already done
the hard part, finding the images,
combining them, choosing what you like. Now, all we need to
do is gluing them. The first thing I recommend is arranging your composition
so that you know exactly how you
like it and taking a photo for this your
phone camera can be great. The moment we start moving the pieces to
actually, glue them, we might forget how
we wanted it to look or even the alignment we
wanted to images to have. So taking a photo can be great for you to
have as a reference. Once they've taken the
photo, it's time to glue. There are many types of glue
and finding the right of one will depend on the materials that you're using
for the collage. When working with magazines, they glue that I've found
that works actually the best is a simple glue stick. Most magazines don't
have great papers. It's actually quite thin paper, which makes it very
fragile as well. Of course, there are also magazines that have
amazing paper, but you'll recognize
them right away for the price and also for the
the thickness of the paper. When working with a glue stick, it comes in handy to have
a spare paper prepared where you're going to be
doing all the gluing. That way. You can make
sure that you don't add glue by accident to any other
paper or even your table. Let's face it, collage is usually messy. But that's also part of
the fun of being created. So if you have a paper where you're gonna be
doing all that gluing, it can actually help
you to avoid accidents like applying glue
in unexpected places. You can also use spray glue, which comes in handy, especially for those
images that you're working with with empty spaces. Just make sure that you
don't add too much or too close to prevent the paper
from getting too soaked. You can also use
double-sided tape. But what I found what works best is actually the glue stick. So here's my spare paper
where I'm going to have my gluing station
and, for example. Let's actually do this collage. So I'm using a Pritt glue stick, which is a very good brand. You can use any brand that you know or that you've
worked with in the past. So when adding the glue
something also to keep in mind is to be doing it kind of soft. So the paper we know
it's not very strong. So what I like to
do is hold it with my non-dominant hand and
made kind of simple strokes. So that way the paper
doesn't wrinkle. Especially here
when you have like really thin details that
could easily rip, it really helps that you're holding it with
your non-dominant hand. And remember you don't
have to be hard or just add glue all
over the piece. You need to make sure
that it has glue on most part of it, and especially on the edges. So now, in this case, I didn't take a photo
because it was pretty easy for me to
know what I wanted. But remember the photo
can be, are great, tool to have as a reference so you can
remember the details. In this case, I only wanted
to make sure that I had this lined up and also that this
part was covering this. Okay, so now if I wanted
to add something else, I would use the same paper. If it's sticky and you think
your image can get dirty, you can always fold it,
or turn around or just keep adding
papers on top of it. Once you're completely finished
and you like the result, something you can do is actually add some
weight, to your collage, adding magazines or heavy goods
and just keeping it there for maybe an hour or even,
even, even overnight. And this will help to flatten it it and also for it to glue well, and not to have any air bubbles. Once your collage is
neatly glued and press down. One thing I like to add is
actually a final layer. And this works great
because it makes it look a little bit nicer
and more professional. Also, it gives it a
little bit more of weight since it's
no longer going to be just the magazine paper. So for this I like
to use card stock. You can use it in any color. I usually like to use
black, craft or even white, or sometimes even colored ones. And you can also have some fun. This, for example, is
a watercolor paper. So for this one, I'm going to use a
black card stock. And you can just cut it exactly to the size
that you want it to be. But I usually like
to work with A3, which is I think it's
"Tabloid size" in the US. And this size works really
great for most magazines. But remember if not, you can always cut it. I like to make
sure that I have at least two fingers around
the paper and then you can center it in this case
because I have this I would actually
maybe add it this way. And then I would just have to
glue it here in the center. And you also have space to sign your work
and you're done. Up next, we'll see some finishing details to
complete your artwork.
6. Final Details: The finishing details
are meant to give a nicer finish and a more professional look
to your creations. So now that your
handmade collage using magazines is over, please remember to share in
the project gallery also to have a great inspiration mood
board for everyone as well. I wanted to add some final
tips for you to keep in mind. Remember, there isn't
a right or wrong. If you've got
get blocked, just stop. Maybe go outside and take
a walk or even start a new collage, taking
a break and seeing everything again then with fresh eyes can really help you. Working with magazines
is great because in most cases we're not
emotionally attached to them. But in any case, if you're afraid to
cut into an image, there's always ways
to go around it. You can make a
photocopy or even scan that image and print it so you can have a spare
one to practice on, which will make it easier. Mistakes are bound to happen, and it's part of working with your hands and don't
be discouraged. Sometimes mistakes can be a wonderful opportunity
for us to be even more creative in finding a solution to help solve it. So just be open to
that possibility. Then the more you practice, the better you
will get at ideas, concepts, and even cutting. You can also use a notebook to make collage in
for you to practice. I hope that you liked
this class and got inspired to making your own collages. Thank you so much for
being here with me. And remember to post any questions or comments
on the project tab. See you soon with
more creative classes and have some fun cutting
and pasting. Byeee
 Ia Llamozas, Collage Artist