Transcripts
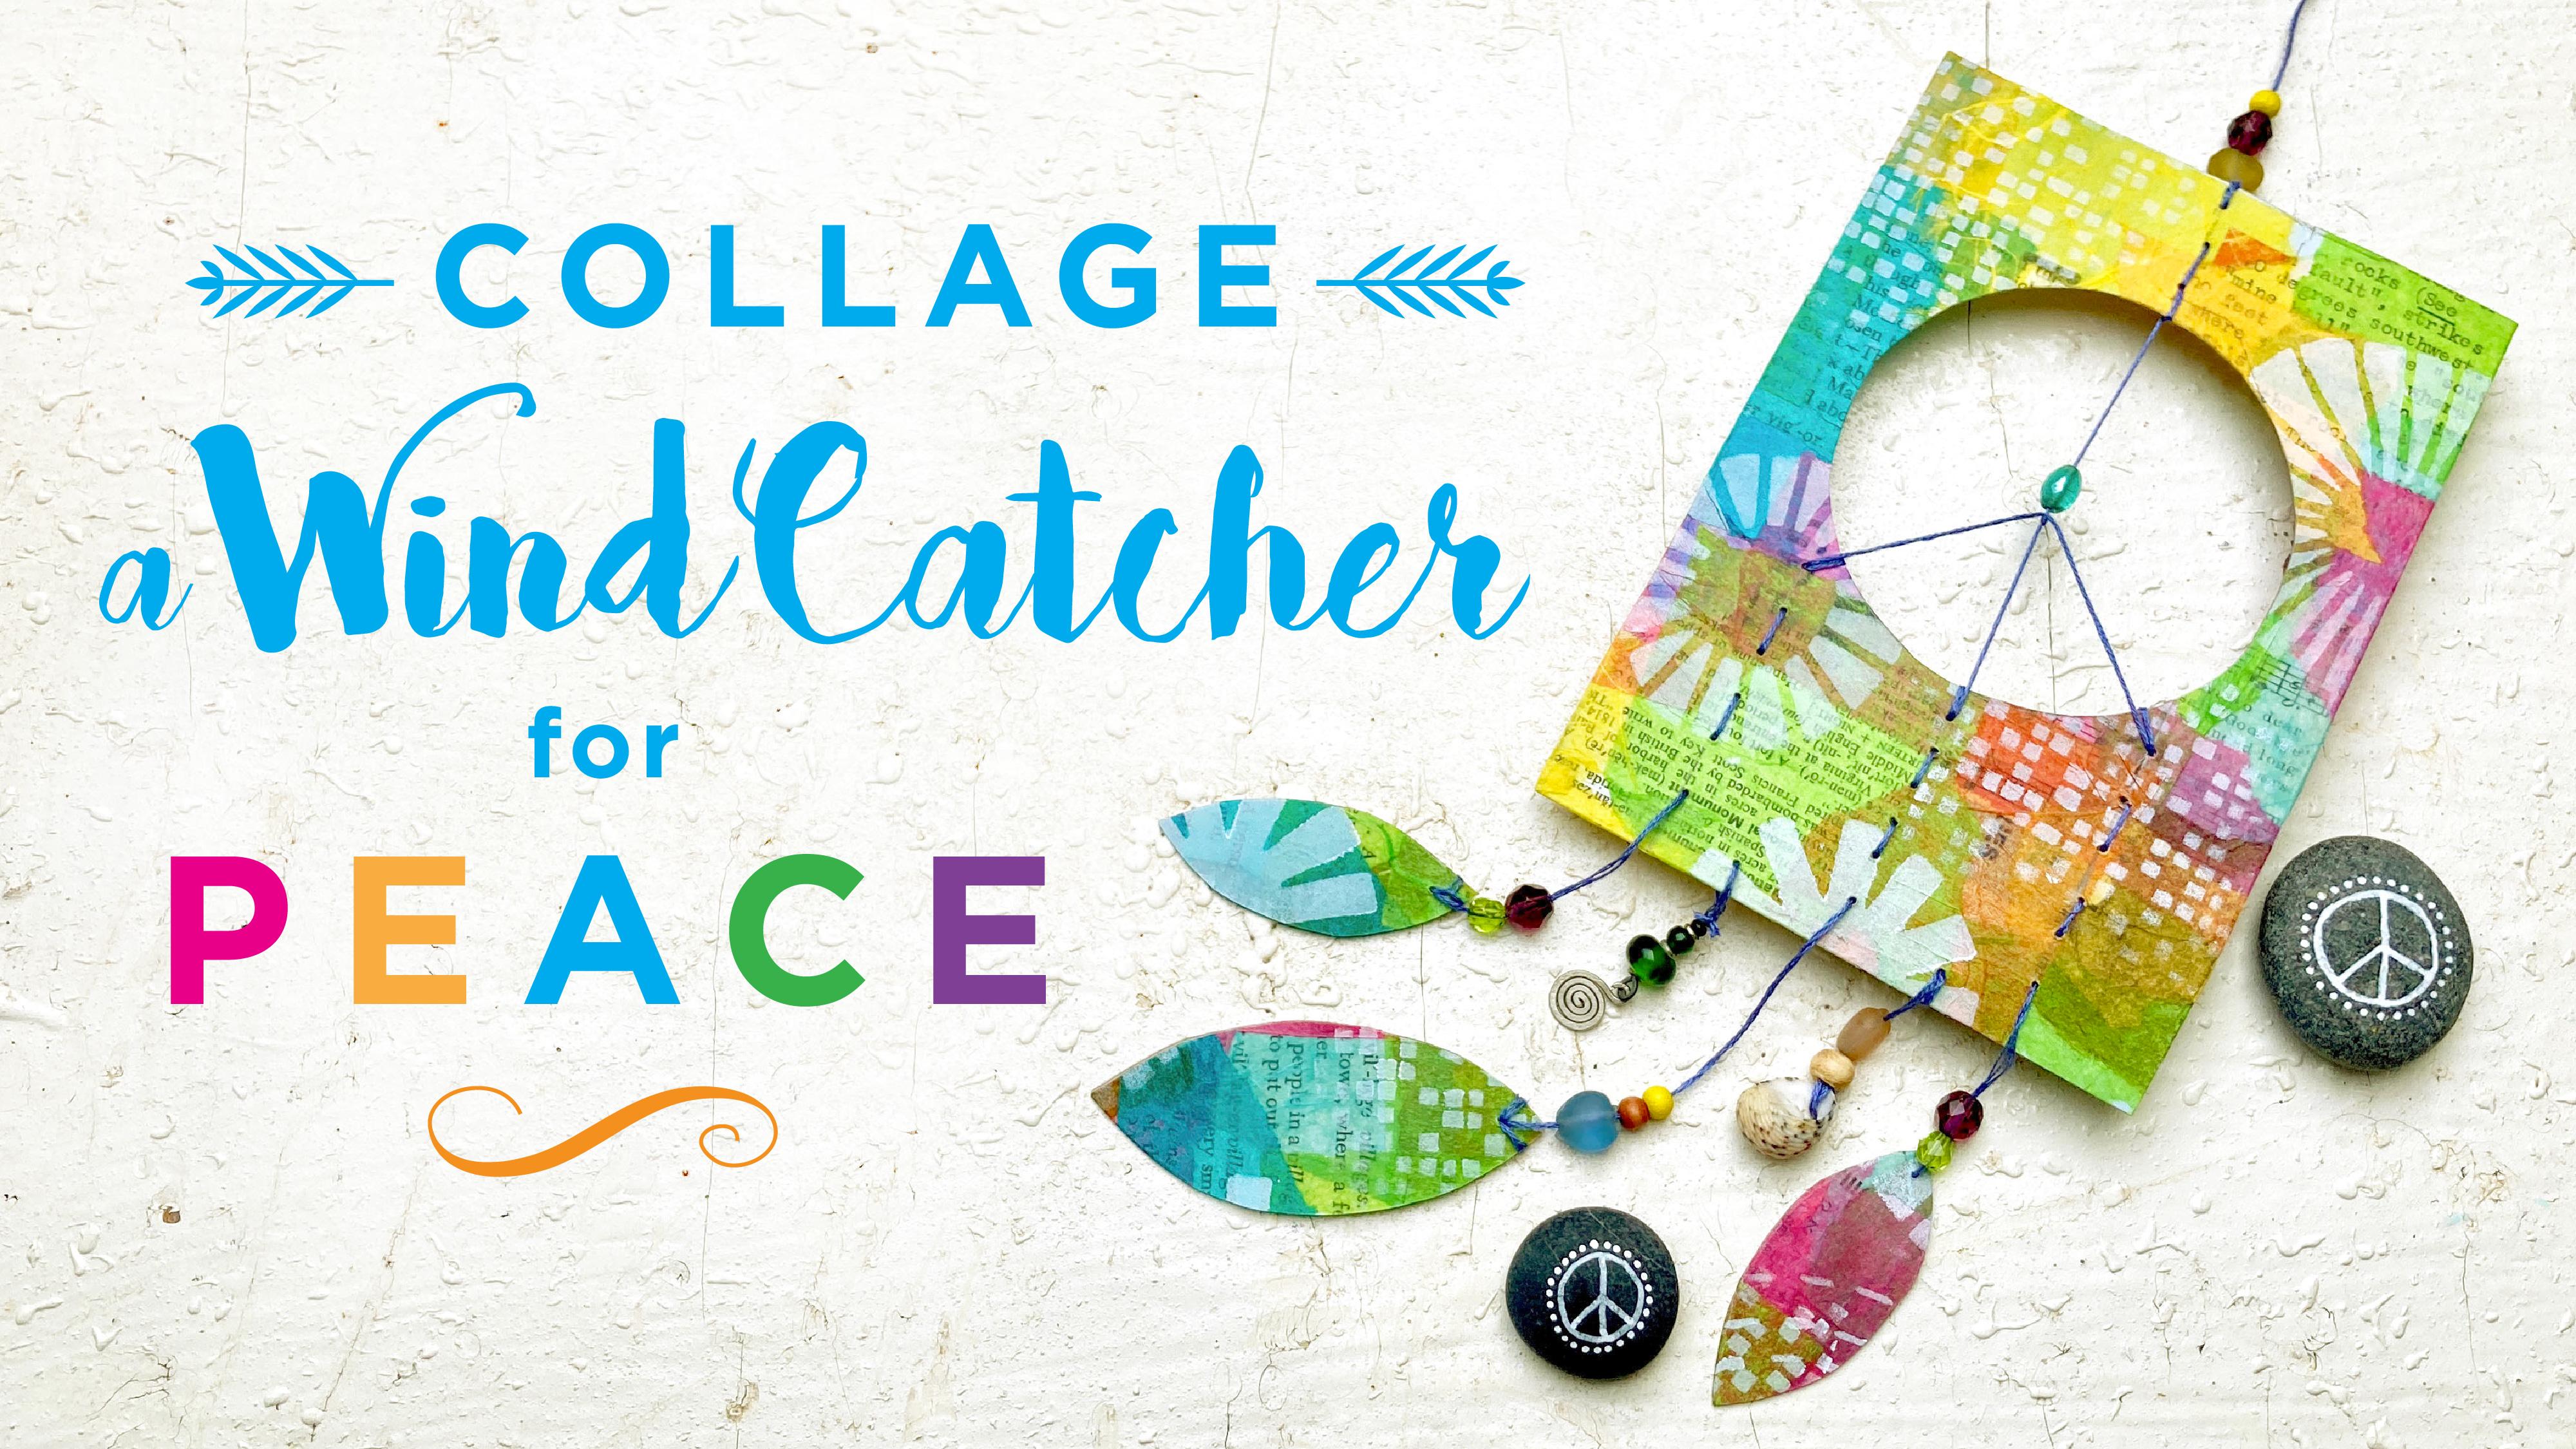
1. Introduction: Hello. My name is Lucy Duclos, and I'm a graphic designer and mixed media artist living in
Victoria, British Columbia. I want to share a
project with you today. It's a project that
I did in 2022, it was for a year long
program called Father School. And the Tutorial was
part of a challenge, and it was offered free to
everybody around the world. And the response
was overwhelming. Everybody was posting these little wind catchers
around the world, and it was really an
amazing experience. I thought it would
be a great idea to bring it back here to Skillshare and maybe to add a
little something a little more bling to it. So I'm going to show you this
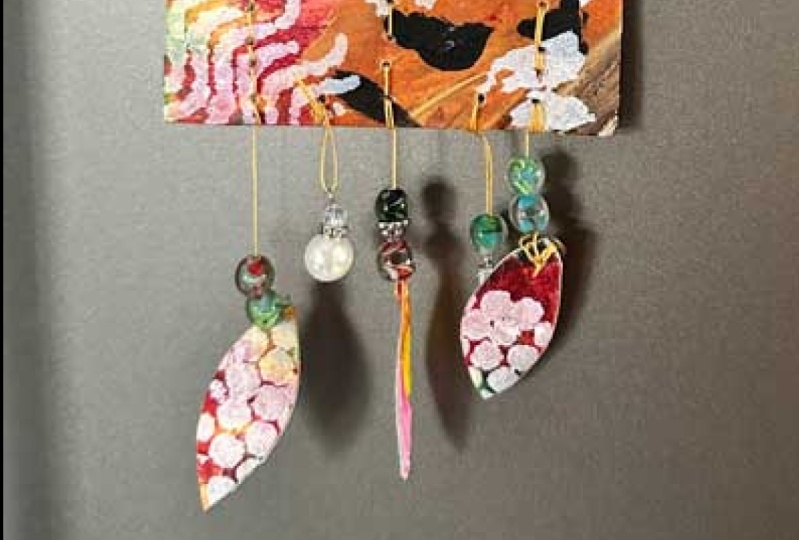
was the original project, the little wind catcher here. The new project that
I'm sharing today is this one here that has a
little bit more blink to it. And you can add all
kinds of things to it, like beads and broken
jewelry, shells. Anything you can find
in your junk drawer, really keys and
bells and feathers. Anyway, you can just
go crazy with it. We're going to start
by collaging right on top of a piece of
recycled cardboard, and then we'll add some
stencil right on top of it. And then we'll add
our stitching and beads and a little bit
of bling and voila. You have a nice
little wind catcher that you can hang in your
house or your garden. So I hope you'll join me
and create a bunch of wind catchers and help me spread a message of
peace around the world. So I can't wait to
see what you make, and I will see you soon. Abe. H
2. Materials: Okay, so what do you need to make our little wind catcher? First, you're going to
need a piece of cardboard and I cut mine about four
and a quarter by six. I use recycled cardboard. This is an old pizza box. This is just packaging
whatever you have. I always cut my old boxes just
to make postcards anyway. Then you can actually use
what's on there already. Sometimes it's interesting. I wouldn't worry
about what's on it. You need one of
those. Then you'll need some paper to
collage on top. You'll need some tissue paper, and I use tissue paper and I
also need to use rice paper, which is a little more opaque. I really like it. You can use, again, you know, recycle paper. Then I use book pages, music, she sheet music, any kind of dictionary
pages or anything, just to had some collage
background to your piece. Then you'll need
something to hang from your from your wind catchers. It's a perfect time to use all the broken
jewelry that you have that you don't
know what to do with and take it apart. You can also add feathers. You can add I don't know, buttons, you can add shells. I have this old little
bracelet that I had when I was little
and obviously, I can't wear it
anymore, but there's all these shells that I can
hang that I can take apart. So look in you, I'm sure you can find something. This is an old earrings that
I'm not wearing anymore. It's like the single earrings, I'm sure everybody
has one of those. Then you'll need something to trace the circle on your card. This is I use that. It's like a solo cup, but you can use a
jar or something. It's about 3 " in diameter. The glue would be either
going to use matte medium, which I really like this brand, or you can use water and glue. You can use this with glue, you can use any white
glue and mix it with water and use it to
collage your stuff. I usually just mix it in a little cup like
that and I brush it because I like to use
a brush to apply my glue. Like any cheap brush
that you have, that's flat and just
use it for glue because you can't really use
it for other things after you use it for glue. Then we're going to
do stenciling on top. So what we're going to
do is use stencils. These are my stencils that
I do for stencil girl. I sell those through
stencil girl. But you can make your own, you can use whatever
you have already. You can just punch hole in a piece of plastic or
something and use that. As your stencil, you can
do anything you want. You don't have to use
the specific stencil, but these are the one
I'm going to use. In this demo, you'll need an exacto knife
and a cutting mat. And then you need some scissors, a pencil, at a ruler, doesn't need to
be a metal ruler. For your stencil for
applying the stencil, we're going to use
white acrylic paint. I like to use the mat
acrylic by flick, but that's a cheap one.
A brand will work. I use a makeup sponge to apply it and I just use I recycle these old tray just use to
apply my stencil paint. And then you'll need an and some embroidery needles
and some thread. I'm going to use this
embroidery thread, and then you want to
make sure when you pick your needle that it fits through your beads. Whatever needle you
pick or beads you have, make sure that it goes through before you start
stitching with it. I think that's it.
We're ready to go.
3. Collaging: I. The first thing we need to
do is starting to collage our cardboard and I'm going to use my MT medium or your
glue and water solution. I'm going to start by
just putting some pieces of book pages or dictionary
pages or anything you want, just to make my little
background here. I put MT medium at the bottom
or glue and on the top. You don't have to
cover the whole thing. But it's nice to cover some of it and I
wouldn't worry about the direction because we're going to collage with tissue
paper on top of that. I would let my end
just hang like this. Don't have to put a lot of it. I'm just going to do
maybe one more here. Maybe one more piece here. Actually, I'm going
to put some music. Let's do that. Piece
of sheet music. That's always fun. Okay. Oops. Okay. What we're
going to do is let this dry and then we'll
do the other side. This is pretty dry. Let's do the back
now. Same thing. What I'm going to do
is I'm going to bring these pieces over that. I got this one. And here, You can put some underneath here, then put enough here,
probably a good idea to put some under and over not
just on the cardboard. And then I'm going
to add a few more. Okay. Maybe some music. Oh, died of love.
That's too much. That's just to love. That's too dramatic. Can't deal with that. Allright. Let this dry and then let's start to add the tissue
paper on top of that. Now we're going
to add the tissue paper and we actually don't need to let it dry because we can go
right on top of this. We're going to stay
on this side here. I'm just going to
start and bring in a range of different colors. I'm going to mix rice paper, which is this one here
with regular tissue paper. If you have your own handmade, colored tissue paper, you can
use that. Same thing here. I'm just going to go
right on top of this without thinking
about it too much and let it hang to the side here. That's rice paper. I see here that it's a
little bit too dark for me. I could add some paper
tissue paper on top of that, or I can just leave it and
we're going to do something. I can maybe add something to
lighten it up a little bit. Yeah, I think I
like this better. I usually do a mix of torn
edges and straight edges. Okay. So that's one side. Now we have to let this dry. Actually, I'm going to add
a little bit more here. We're going to let this dry, and we're going to
do the other side. Let's work on the other
side now. Same thing. What we're going to do is
just fold in these pieces. You can put matte medium
on there if you want. You'll see how
different it is when we go over these
different colors. Because it's cool to be able to see what's
underneath there. Okay. I think I'm going to stop here and let this dry and I
will go to the next steps, which is adding a stencil.
4. Stenciling: Our background is now done. What we're going
to do is just trim our edges here, and here we're going to start to
stencil on top of this. I have a whole bunch
of stencil that I designed for stencil girl. I use them I use a lot of different ones and one of my favorite is actually
just this one here. It's called random pixels
and it's really great just to add a little bit of detail on top of
something like that. Let's start with that one and then we'll see what
we want to add. Because sometimes I like to add a larger shape like this here. You can also stamp thing. If you have some stamps,
you can use stamps. You can create
your own stencils. I really like this shape here. I might use some of that. So maybe we do that. Maybe we start with this one. This one is called
shape collection, I think, and we're just going
to use some white paint. I used the Matt
acrylic from Blick, but you can use any kind
of paint that you want. You just want something that has enough pigment that will be able to read on top of
the postcard here. It's not a postcard, but
it's like a postcard. Okay, so let me start with
maybe when you do stencil, you want to make sure
that it's pretty dry. If it's too wet, there's
too much paint in it, it's going to smudge
all over the place. So it's better to start too dry and too much paint because you can always go
over with your stencil. Do you see that? Cool. Otherwise, if you
have too much paint, then it's hard to
remove the paint. But you can always go over.
Let's put this one here. I like this. Okay. All
right. Let's do that. When you do stencil like that, since your sponge
is so dry already, it dries really fast. We'll be able to do
those two sizes pretty quickly without having
to wait to dry. Look like it's already so cute. You could just send this
postcard to somebody, but now we have
another idea in mind. We can't do that.
But it's tempting. It's very tempting. Let's use my favorite stencil. Random pixel. Look at that. It's so simple, honestly, but it just really adds
really a nice touch. Okay. Do we need to add something else to this?
That's pretty good? Maybe we do add
maybe another shape. Maybe disc shape
here. Let's do that. Okay, so now we do
the back, same thing. Here it's a little bit darker because we're started
on craft paper. Let's do I'm going to do another one of these guys
because I really like them. Then since it's dark, it's nice to bring in
some of that white paint. It also shows really well because it contrasts
with the darker color. Look at that. Isn't that great? Yeah, this shape dencil. You get so many shapes
there. It's really awesome. You can also make
this dencil yourself. If you're really good
with an exemple knife, you could do that. So I'm looking where
there's a lot of darker area and just
to lighten them up. Yeah. Okay. Well, should we try this one. I also have this one I
love. It's like stitching. It's called Sahico I could actually maybe do a little bit of that in the corner here. Let's try that. Instead of having
to stitch yourself. That's pretty cool. Then
I'm going to add all more of the random pixel thing
here or maybe one more shape. Let's do one more shape,
maybe this shape. This shape. Let's do this one. Very fun. Very festive. Let's add some of my
little random pixel. It's like salt and
pepper, I feel. I always add some to
everything that I do. I really like it. It's my
little salt and pepper. Okay. I think we're good. I think we're going to
leave it like that and start on the next part
of our wind catcher.
5. Cutting: Now that our card is done, we're going to do
the middle part. We're going to cut our
circle in the middle. You need your cutting mat
and anything to trace, I'm going to use
this and you want to go an inch down from the top. I'm going to loosely measure it. You don't have to measure
it super accurate. What I'm going to do is just
going to trace my circle. Okay. And I'm going to use a sharp blade with an exacto knife and I'm
going to cut my circle. Be careful when you do that
because it's very sharp. Make sure you go
through all the layers. Okay. All right. I have my pieces. Now what I need to do is make the inside of a my
hanging leaves. So what I'm going to do is maybe I'll go on this side.
Doesn't really matter. I want to shape my
first leaf like this. What I'll do is I'll cut this. I'm cutting my leaves. You can use scissors
for this if you want. Some people will
want to just have one leaf and two
moons, two crescents. You totally do that if you want. What I'm going to do
here is I'm going to cut another two leaves out of these. But you can just keep one and then just do the
other one as a leaf. It's really up to you. What
I'm going to do though is going I'm going to trace
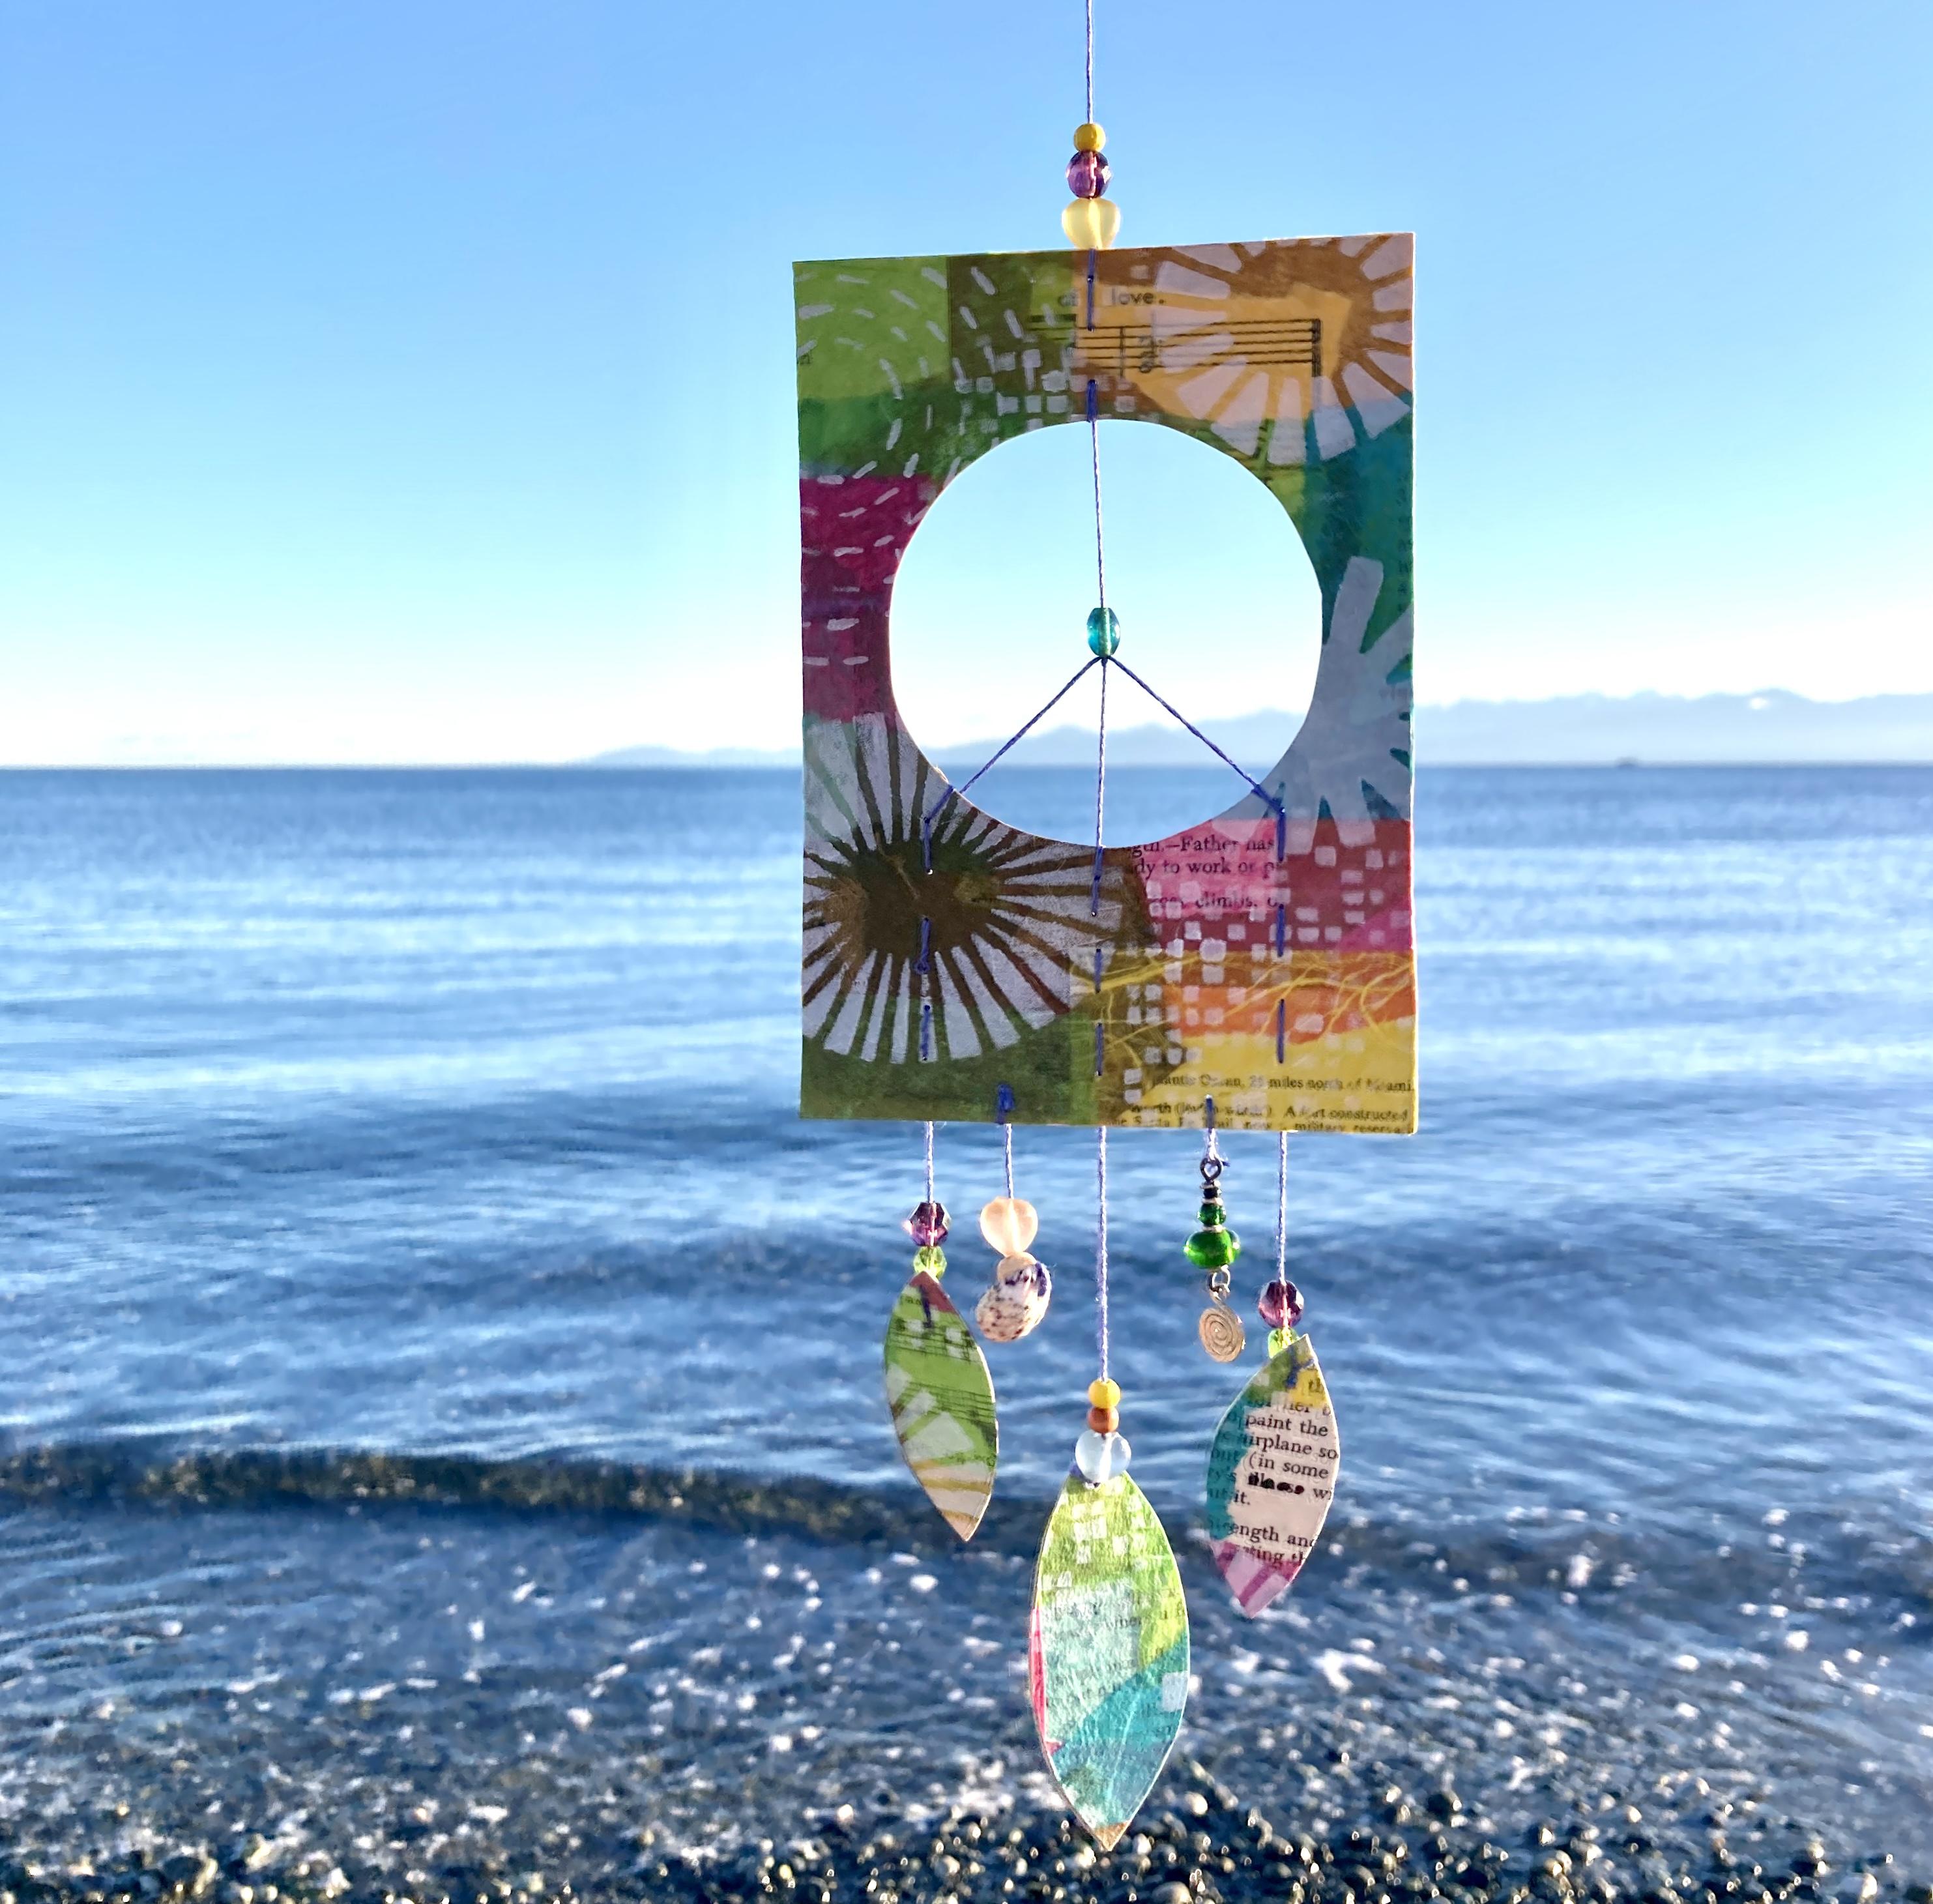
another leaf in this part. And cut it. So now I have my three leaves. And I can turn them around. I can mix a match. It's going to twirl in the wind so you don't really
have to worry too much. Maybe I show you here on a white background just to show you what it's going
to look like. We're getting close. This is how it's going to be hanging from our wind catcher. That's what it's looking like. Pretty cool? Let's get
some stitching done.
6. Punching: First thing that we
need to do before stitching our lines here
for our piece sign, we're going to have to
punch our holes first. I usually I would like
to measure halfway. My postcard is four
and a quarter. I'm going to do it like this. If it's four and a quarter, then it would be two and 18. I'm going to put this
in here, two and 18. Whatever size you have, just
just go in a half, right? Yes. 18b here, right? Now I'm going to
put my line here. I don't see where I
put my mark. Take it. Then I'm going to do about
the same on each side. So I'm going to go in between. This is hard to see, maybe. I'm going to go. It's at two and one eighth, so I'm going to go about an
inch an inch and a quarter maybe because then you want to have your peace sign like that. What you want to
do is figure out where far from your
middle line you want to be I'm thinking that I probably want to go to about
one and a quarter. That's what I'm going to
do. One and a quarter and then same from
the other side, I'm going to do one and a
quarter from my middle line. Okay? And then I'm going
to trace my lines dark enough so that I can see
it when I punch my holes. Okay. Now it's time to punch my holes. I'm going to do at the top, I'm going to do
three holes with my. Take your cutting
mat and then do one. Two, and three. Then on this middle line
here, I'm going to do six. Let's see. One, two, three, four, five, six, and same with these two. Six. Maybe you have more
space on these one. Six. If you want to measure, you can, I usually just eyeball everything because it
doesn't need to be perfect Ditk The other thing I'm going to do is I'm going to maybe want to hang
things in between here. I'm going to just punch
a couple holes here. One here and one here. I have that option. Now
I'm ready to stitch.
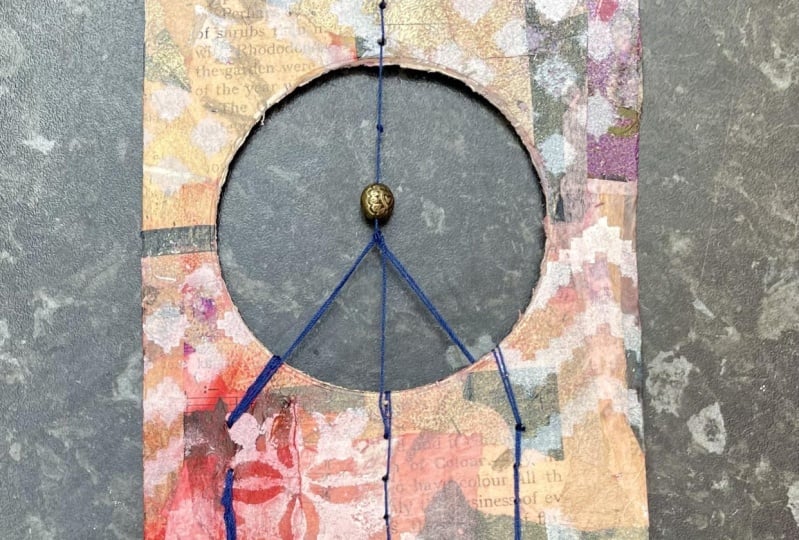
7. Stitching: Before I put my thread in, what I'm going to want to do is figure out where I'm
going to put my beads. You want to plan this ahead
of time a little bit, what I'm going to do is
look at my pieces here. I'm going to plan ahead
and I'm going to do. Like I said, if you have
jewelry, this is great. I'm going to try
to take this apart here and maybe use some of that. I like this color scheme. So I did plan here how I
want these beads to go. Before I start stitching, I want to make sure that
whichever needle that I picked goes through the
whole of all my beads here. That's important. I'm going to start here at the top
with this line here. I just put a knot at the end of my thread
here and I'm going to start beating the top Oops. You decide how long you want to have this part here to hang? I'm going to give it
a little bit of space here and I'm going
to start stitching. I just go in basically. Like I said, you want to leave yourself enough room
so you can hang this. Then I'm going to tack it. Go in the same hole here. Then you just stitch like that. I'm going to go in and
I'm going to go this way. Then I'm going to tack
it again right here. This is the middle of
my piece sign here, I'm going to go and put a knot right in the
middle right there. Or in the middle like that. Then I'm going to
put that bead I had for the middle here and I'm going to put my bead here. I'm going to put this
bead and leave it right at the top of
this little knot. Then I'm going to go in to do the first part of my piece sign, and you want this
to be pretty tight. Again, I'm going to tack it. That and do the stitching
through your holes. That's why we do our
holes ahead of time. Otherwise, it would be hard to know where you
need to stitch. Now to finish this,
I'm going to go, I had my beads here. I want this. I'm going to put my
beads first, one, two, and three and
decide where I want it. Do I want this one longer? Maybe. Then I'm just
going to go in and you could use your all if you
want to put all in here. What I'm going to do is
probably just leave it like that and not tie it yet
because I want to figure out, I want to decide how I'm
going to adjust this. Okay? Now I'm going to do the other part
of my piece sign, and I'm going to start
this time with the leaf. One of the leaf. I'm going
to do my little knot again and I'm going to go in, I put a little hole with my all whoops I'm
going to tack it. Okay. Then I'm going to put my needle, my little beads in here. I have my beads, and then I'm going to go in. I'm going to come in here with my first hole decide
where I want it. I think that's pretty good. Then I'm going to stitch it. Now I'm going to tack it again. Basically, I'm going to
go in twice in this hole. Then to do my piece sign
here, I'm going to go in. I'm going to go right
on top of the knot here in between the layers. Okay. Oops. And come in
on the other side here. Like that. Pretty cool. Then I'm going to tack it again. And then go in and out
and finish my stitching. All right, so I'm going
to put my beat here. I have my three hanging leaves. Then I can decide how short
do I want to have this here? I think I'm okay having
them the same size. I can have them this one being
maybe a little bit longer. That could be good.
I'm going to do that. Oops. I'm going to tack it I'm just going to put a knot in here or you
can glue it if you want. You can put some glue. If
you want to glue it down, I'm just going to put a
little bit of a knot. Let me put that. I was going to decide, but
I decided to actually tack it while I was working on it because it was
always coming out. What I'm going to do is I'm
going to do the same thing. I'm just going to
do a knot in here, pull it all the way
down, and then just cut. Here is my little wind catcher.
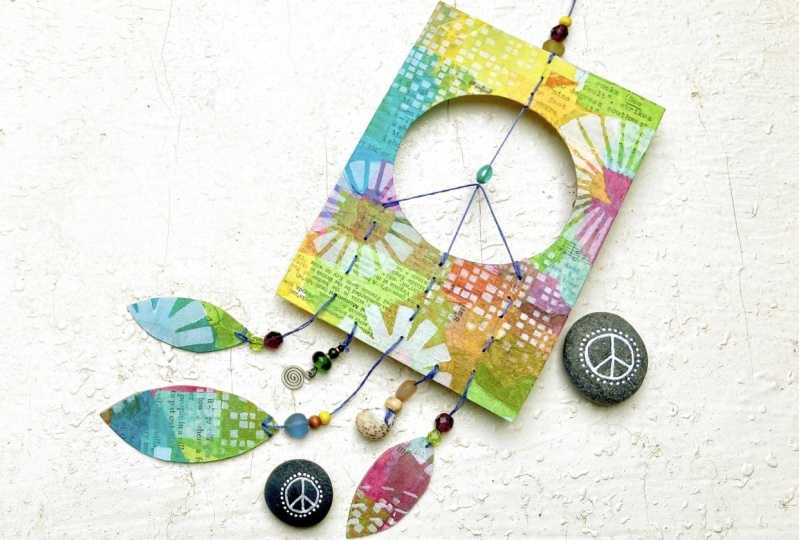
8. Add bling: The last thing that I
want to add to this is maybe two little things hanging here and I have
these old earrings that I think would be
cool to hang here. I'm just going to go ahead
and take this earring apart. It's actually pretty easy
to take jewelry apart. You just need to
have some of these. Or maybe I'll just put one
of them and had some shells. I mean, this is where you can
just do whatever you want. You can just add any
kind of, you know, do I want to do this one like a shell hanging and this
one just hanging like that, just to have a little bling. So I think I'm going to do that.
9. Thank you!: Thank you so much
for taking my class. I can't wait to
see what you make. I find it so inspiring to see all the different
takes on this tutorial. I'm very excited to see
what you're going to do with it and I hope that you share your project in
the project section below and also that
you're going to follow me on Instagram or
follow me here on Skillshare and that I will
see you in my next class. I PTO, piece out
 Lucie Duclos, Design + Mixed Media