Transcripts
1. Introduction: Hi, I'm Jake. And in this class, we
are going to create this popular social
media affect. The best part of this class
is that you don't need to have any experience
in VFX or filming, or even using any editing apps, I'll provide you all
needed knowledge on how to film your own video. If you don't want to
record your own videos, then you can download already recorded to raw footage from the resource tab to this class so you can start
practicing right now. I'll teach you all needed
skills to complete this effect. You can just download the
free trial version of Adobe After Effects if you
don't have the software yet. And we will start right away. I'm excited to see your projects after
completing this class. I'll be happy to see
you in my class as also your result after
following all the steps. So let's get started.
2. How to Film Your Own Footage: So I'm using Adobe
After Effects 2021, but you can use any version
of Adobe After Effects. For this effect,
it will work fine. Also, I am using
standard layout. And if for some reason
you cannot see some of the panels which you
can see on my screen. You can refer to them by
their name, e.g. a. Line. You can go to Window
and click here align to enable any panel which
you can see on my screen. So first of all, we need
to import our footage. To import our footage, you can go to file, import file, or just
simply in project panel, left-most double-click
on this screen area. Left mouse double-click. And this prudish
will be available in resource tab to this class. So let's select this
first and second look, background footage and background image,
and click Import. So let's create a
new composition. To create new composition,
we can click on this big button,
new composition. Now let's set it maybe a lake
to 10 s. Here at duration, we can change it to 10 s. Zero frames. We're going to call it this
composition as main effect, 30 frames per second
and click Okay, let's take a look
how we need to shoot our footage with the
different looks. So e.g. I. Have this kind of look
and as you can see, I forgot that we make in
this composition vertical. So let's change this
width to height 90, 20. So it will be a vertical
video for social media. So as you can see, I've shot
my looks on a blue screen. For background, we
are going to use a simple image which you can take a photo in your apartment. So what we need to have, we need to have this kind
of image of the background. We need to have all looks
which we want to use in the video in different
kinds of outfits. And also this beginning kind of polish where you
opened your door. Here are some letters
will come out, then closing door, zoom out. And we will see this kind
of background image. And then we are going to
animate ourselves on top of it. So let's quickly take
a look how it looks. We have some letters. Then zoom out animation which
we are going to create. Then work chunky or any kind of word which
you want to use. And then we are going
to make this kind of effect where it switches
to our outfits. I don't want to
create too long less. So I'm going to show you all the first two outfits
because basically this same technique
repeats as you can see throughout all
of this effect. Should this video from tripod, because it would be much easier to play some
letters inside of here. And it's a good idea to
have one of the doors completely shut
and other moving. It will be easier to cover our letters as you saw
here in the final effect. And then just closing doors. Also from tripod, your
cameras should not move. And finally, you need
to shoot your outlet. Basically you don't need even full range of motion.
Like you're walking. We've shut just one move
of the hand because we can just simply loopOut and get this kind of
work in movement. So few frames of the video, like this is completely fine. My case, I've used blue screen, but if you don't have blue
screen or green screen, I'm going to show you
how you can run a stop yourself out of the image. So basically, you don't
even need to have a green screen for any fancy equipment
to make this effect. Just basically a shoot
yourself out of the tripod or a bookshelf so your camera will not move at all,
like you're walking. Okay, So next video, I'm going to show you how you
can cut out yourself out. So you would have this kind of polish to use later
in this effect. See you in the next video.
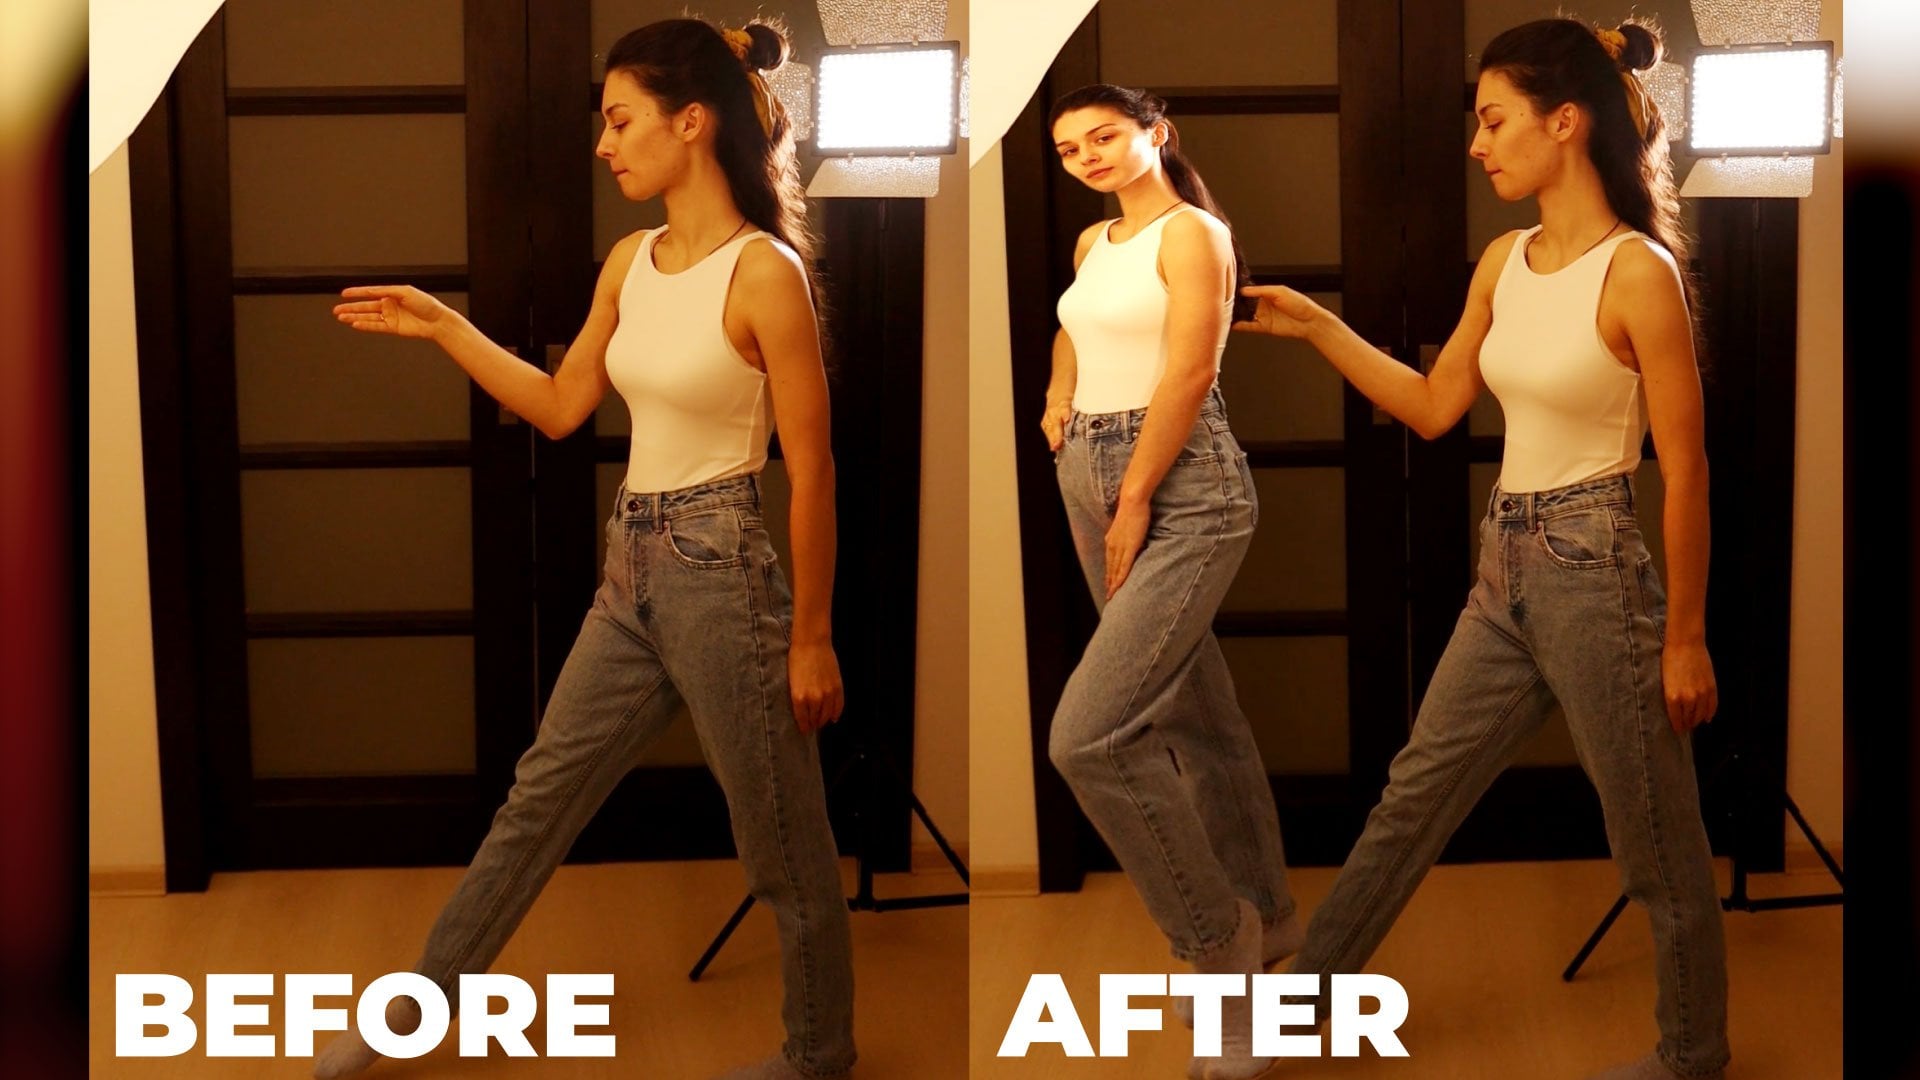
3. Using Chroma Key: So in this video, we
are going to learn how to cut out ourselves and how to make this
looping animation that we have this
pretty slow rhythm. And I'm going to
show you how you can make it look even
more interesting. But first of all, let's
save our project. And because After Effects
can crash from time to time, go to File, Save, save As, and save it wherever you want on your
computer. And click Save. Again, you have your
own footage or you can use mine from resource
tab to this class. And let's see The easiest way. E.g. you also have the green
screen or a blue screen. In this case, you just need
to select this pen tool and basically just cut
out like this. So we would have only inside
of this green screen, orbital screen, make
sure that you didn't cut out your hand
just like this. And then simply
here and effects in presets waited for
it to load up. Just type key. Here, an animation presets. You can just simply
select this third preset. Just let more slick and
drop it on your footage. Here we can just simply
choose this color, which is blue in our case. Then change this to status. In this case,
you'll see how much you get out and make sure to have only black and white
part of your image. On my case, something
like this works fine. This value i of increased to get only black polish
where we want to get out. And this second
one, I decreased. So we would not lose any
image inside of ourselves. So something like this
should work fine. You can also go to screen
met and also change these two values to get even
more clean mat if you need. And then simply just change
from status TO final result. So this pretty much how
you can get clean result. And sometimes you need to use this Advanced Spill Suppressor, which is by clicking here, you can remove unwanted color
spill from your chroma key. So just make sure to click and see a result matters to you. In our case, you can just simply switched off or
delete this effect.
4. Using Rotoscoping: Now I'm going to
show you how you can write as copy or porridge if you didn't have this blue
screen or green screen. So to not repeat this step, I'm going to duplicate this foolish and remove
all of these effects. As also, I'm going
to remove this mask. I'm not deleting this
effect below because we are going to use blue
screen for this class. And I just don't want to
repeat those steps again. But in case if you
don't have blue screen, we can just simply take this flourish
without blue screen. Let's place it in the middle. By the way, it's a really
good shortcut Control, Alt F, it will place
inside of this screen. Let's disable this flourish
and work on this one. So basically we want to use a rotoscoping to carve
out ourselves and get pretty much the same result as we did with the blue screen. So you need to select
this polish black mask, double-click on it, and choose
this rather brush tool. And then just zoom in. If you will, hold
Control on keyboard and left mouse click hold and drag to the left
or to the right. You can change the size
of this roto Brush tool. So in our case, something
like this should work fine. Then you just simply, you want to paint
over yourself to show the software what
you want to keep. With this green outline, you want to show the software. What do we want to keep? If you will hold Alt key on keyboard, you're going to remove what
you don't want to have. Once again, I'm holding
control to make this rather brush smaller than
using wheel on the mouse. You can zoom in and
then holding Alt, remove unwanted parts,
just like here. And in this way, you
can just continue ad or removing parts
which you want to have, Oracle it out from your image. Let's add this hand here. And once we are happy
with our image, we can just simply go to Preview panel and skip
one frame at a time. We can just expand this
panel to see more. By the way, I'm
holding spacebar, left mouse click and
holding it to move around to see if our
data scraping goes well. Then skip another frame, made sure that it still keeps your shape, which
you've selected. Skipping few frames. See if it's still
keeps on our shape. As you can see, it's
pretty fast process. Once you are happy
with your rotoscoping, you can simply click
on this freeze button. It will freeze all the process. And then we can
apply some changes to write our brush
effect itself. Okay, so now we have this
rudder scalp polish. We can go back to our composition,
main composition here. You can just let mostly
here and here as well. And as you can see,
we've pretty much got the same result without using any blue screen
or green screen. But it takes a bit more time. So if you are happy with this, you can leave it as it is. But in some cases you want to
shift the edge if you feel like you're carried out
too much or too little, is you can see I'm
expanding or decreasing the H. So make sure to play around with this value of shift edge. So you can change
a bit of feather, lower the contrast if you want
to have more smooth edge. And also use motion blur and decontaminate colors and
click on this checkbox here. As you can see, we have
this really clean shot and you can press a zero
numpad to see the preview. Okay, so we're happy
with our rotoscoping. At both cases. You can just simply
pre-compose your result.
5. Creating Looping Rhythm: Whichever technique
you've chose, you'll need to
pre-compose your layer. So let's select our
layers and precomposed. Let's call it forced look. And let's call it
cut out because we already carried
out our background. Now click Okay, and from this moment It's
pretty much the same. Okay, so now we have
this kind of animation. And let's open this composition. And I'm going to
enable this footage which uses only blue screen. I'm going to use this
forage just because it renders faster than this
rod has kept footage. But basically this
effect will work the same and it will look the same, whichever method you will use. And in case if you feel like your computer works too slow, you can basically render
this forage out and use it separately with rendered
for each of your cell. You need to go to Composition, add to Render Queue
here and lossless, change it to Quick Time. And here a channel change
to RGB plus Alpha, which means that you'll get
exactly the same footage, but without any effect. You're after effects software will handle this
effect a lot easier. Click Okay, and
specify where we want to save your video
and click Render. After this, you will get only this footage
without any effects. And you can continue
with this effect. In my case, laptop handles this effect pretty well
with this key light effect. So I will leave it as it is. Now let's go back to main composition and let
me show you how you can just loop this
animation infinitely. Basically, you need to select this precomposed boorish
and right mouse. Click on it and go to time,
enable time remapping. Our footage is represented
by these two keyframes, which is started, this video
ended and basically froze. In our case, we want to set this time coarser
just before it, not gross but disappeared. Here where we can
still see ourselves. We need to create
another keyframe. This keyframe we want to delete. So basically we have this
V0 and here it just froze. Now we know that this
video takes 18 frames. Basically, we can skip
eight frames more. You can just hold Control, Shift and click on right arrow. It will skip exact ten frames. Let's keep another
attempt frames. So hold Control Shift and
click right arrow on keyboard. And we skipped ten more. And as you remember, it takes 18 frames to get this animation. So let's go back two frames. We can hear in preview, click previous frame
button once and twice. So basically now
we can just simply select this keyframe
at the beginning. Let me just click and
drag and select it. Press control C to copy. And here, 18 frames
later from this moment, press Control V to paste. So if we will zoom out
from this timeline, we have this kind of motion. Let's press the row number
to see what we got. As you can see, now we
have this walking motion. And if you'll notice
here, it's still prose. So to get this infinite loop, you need to hold Alt
key on keyboard. As you can see, I'm
holding Alt and left mouse click on this time
remapping stopwatch. It will allow us to
write expressions. In our case, we want to use expression which
called loop out. So let's type loopOut. You can even select it
here from drop-down menu. Double-click on it,
click anywhere. Here. It will apply this
expression on this time remap. Basically it will loop
this animation infinitely. If I'm going to
press zero numpad, we have this animation
infinitely looping. Next step which we
can do is to select these key frames and press F9. It will make more interesting
kind of animation. If we will go to graph editor, you can see that we have
this kind of curve, which means that it
starts slow than faster, than slow, faster and slow. And if I'm going to
press zero numpad, you can see that we have kind of more
interesting animation. We can exaggerate
this animation even more by selecting this keyframe. Leftmost click on
this handle and drag it to the right until
you will see Influence. Got to 75 per cent. Something like this. As you can see, we
get in this kind of curve and here we can
also drag it to the left. You can see speed and
influence and change it to 75. Suddenly this looks good. And here as well, Let's change it to set it five. And here also, it
should not be perfect. 75, 75, end point. Something is okay. And if I'm going to
press zero numpad, you'll see that our
animation, more exaggerated. Which will go with the beat
of the music a lot better. Let's go out from
this graph editor. And we can select all
of these keyframes, hold Alt key on keyboard, and select this last one, leftmost click on it and
drag it to the left. As you can see in this way, we can shrink this animation. So it will go faster if you
will shrink to the left, or slower if you will
shrink to the right. In our case, we want to
make this a bit faster, so it will get the same
rhythm as our song. Let's press zero numbered
and see how it looks. You can see it's
much faster now. So this is basically
how you can manipulate this rhythm to any
song which you prefer. So once again, you need to
select all of these keyframes. Hold Alt key on a keyboard, left mouse click on the
last keyframe and expand or degrees this animation
speed to match with your song. So the same thing you want
to do with the second look. You can just left-click
and drag it to this composition button to
create new composition. Once again, rather scalp, if you need to write
ascap or just use this mask to create a
mask around it like this. I'll do this a lot faster
to not waste any time. But basically we are copying same technique which I've
showed in this video. So once again, key light effect. We can even copy this
key light effect from this look and
place it here. It works fine. So let's delete this
preset and leave this one. Basically we have the same look. We can also drop this new composition
which we've created, and let's call it cut out. To rename your compositions, you need to select them and
press Enter on the keyboard. Once you rename it, just
click anywhere here. So basically now we
have this second one. Once again, right mouse
click enable time remapping. Go to the very last frame. Let's solo this layer to see only this layer on which
we are working on. Let's create a keyframe here. Before this one, we will delete. This animation takes 16 frames, so let's skip ten frames
and then six frames. More. Select and copy this one. To get this kind of loop. Hold Alt, leftmost click on this stopwatch and
type loop out. Expression, click anywhere. Now we have the
same kind of thing. So let's also press F9, go to graph editor, select each of them, set it to about 75% if you want to make on
every of your looks. So now as you can
see, if I'm going to go out from Solo Mode, we have these two looks. You can see this look
is a bit higher. Press S on keyboard
to make it smaller. So basically you
would want to have your old looks at the same
height and same size. So let's make it smaller. And let's say height. Let's expand this layer
and see how it looks. Also, we want to
match our rhythm. So let's select both
of these layers. Press U, and once again, select these
keyframes, hold Alt, and shrink this animation. So now, as you can see, it matches perfectly safe thing you need to do with every n, each of your looks. So this is how you
need to cut out all of your logs and prepare to
make the final effect. So in the next video, I'm
going to show you how to make this part where these
letters come out. This Zomato animation to get
to this point of the effect. See you in the next video.
6. Camera Animation: So let's do this part of
the effect where we are opening our doors and
some letters come out. And the zoom-out animation here and composition,
main composition. This looks, I can just close. And let's move it
out of the way. So we would work on the
first part of this effect. So let's drag into our main effect, this
background foliage. And let's see what
we can do here. So basically we want to manipulate this
animation as well. Because we want to have
this a bit faster. And if you want to
use the same song, which I've used in preview, you can just simply
drag and drop this final effect into
your composition. You can make it a lot smaller. Press S on keyboard
and change the scale to maybe 30 per cent
and place it here. So you would see that the
dynamic of this video, Let's try to match
it to our example. It's pretty easy to do. Just select your background
footage or unpolished, which you have shut for yourself with your own person
on the video. And let's time remap your polish so it will
match with our song. Let's right mouse
click on it and go to time, enable time remapping. Now let's see the
moment where we open our doors and we are
going to look inside. So about here, we want to create another key
frame by clicking here. Then we will see
this performance. You can also smile to the camera and then
create a keyframe. We would separate this part
where we closing the doors. So in this case, when we created this kind of main
performance part, we can just simply select
it and move it to the left, which basically means that
this part will be speed up. And as you can see in
my original example, I speed up pretty fast. So now it matches
better enclosing part. I also speed up pretty fast. So we can just move this
keyframe and as you can see, it's speedups, this animation. We can even split up more. So this is how
easily you can speed up your animation to
fit your music better. So I'm going to press zero numbered so you can
see this final result. Okay, so now we have
this kind of part. We can disable our
reference video. Let's also add a
zoom-out animation. So for this, we want to place
our image of our apartment. Press S on keyboard. And basically you would want
to press T on keyboards and make this opacity maybe
like 50 per cent. So we would see
the original video and also photo of our apartment. Basically, we would want
to align these footages. So if I'm going to press S on keyboard and make it bigger, you can see how I'm aligning these lines so it
will fit pretty well. So make sure to spend a bit more time and align
your photo with your video. So my keys, I need to
make it a bit bigger. Basically, I'm using
the arrow keys on the keyboard to move my image. So now it's aligned pretty well. And now I can just
simply select our video, this one, and pick
you up to our image. Which basically means
that if I'm going to change the scale of this image, it also will change the scale of my video,
as you can see. In our case, we want to change
also this anchor point. And to change this anchor point, we need to select
this pen behind tool, place it in the center to see
the center of the screen. You need to click here and click this tidal action safe and
move it to the center. Then we can just disable it. And now we can make this zoom-out animation to see the speed of this
zoom-out animation, we can also enable this
reference footage. So it seems like it
will start from here. So select your background image. Read a scale keyframe. And later we want to
change the skill. Lot smaller,
something like this. As you can see, we
also want to change the position so it
will be a bit higher. But before we will
change the position, let answer the question,
what is key-frame? So what is key-frame? Key-frame is a point in
time which remember, is the value of sodium
property in our case, this keyframe remembers this
point in time which is 2 s. It remembers this value of 45 per cent of the
property scale. And in this point in time, we also have a keyframe. We've changed our value to
149 of probability scale. And basically now After
Effects will try to go from 149 to this value of 45. And this what gives this
animation of scaling down. This is basically how animation works inside of After Effects. We just read in these keyframes. And After Effects is
trying to go from one value to other and gives
this kind of animation. We can also expand this video. So it will not
disappear so quickly. And now let's add animation
not only to scale, but two position as well. So let's set this time cursor
to this first keyframe. So it will be on top of it. When our play head on
top of the keyframe, this lights up blue. So as you can see,
it doesn't let up. And now it lights up. So to see position, we need to select this
image layer and hold Shift. As you can see, I'm
holding Shift and press P. Now we can see
position property. We also want to create
a keyframe. Here later. At this keyframe, we want
to change the position. Let's also use this
hand tool to move this. So we will see all the screen. Let's tweak this
position value so it will match the one that we
can see in our preview. Something like this
should work fine. Basically here you can change to any kind of size you want, so it would look better
on your boorish. My case, I want to see a bit of L4 and all the doors
and a bit of wall. So you can use it
as a reference. Now as you can see, it
repeats this motion. We can even select all of
these keyframes, press F9. And once again go to graph editor and select
these both keyframes. With this Zoom button,
we can zoom in. In our graph. The rightmost click on this handle and drag
it to the right. This motion will start best
and slower towards the end. Go out from this graph editor. Now we have this really
cool and best transition. To complete this transition, we want to press T on keyboard, and let's make it 100
per cent and place it below our video. Now as you can see, it
matches pretty well, but we need to add some fading animation and
also some kind of blur. So it would not be as a square. So let's select this video
Polish, which we have. Then click here on toggle
switches and modes, and click here on motion blur. And make sure that it's
enabled here as well. So as you can see, it doesn't really look like
a square anymore. It has this kind of motion
blur, which looks nice. And also here at the beginning, we can press T to create
a opacity keyframe. Here we want to see our
video at full opacity. Once it goes to smaller
zoom out animation, you will want to change
this opacity to zero. So it will just fade out. And as you can see at this
speed, it just changes. And we can cut out this
layer to this moment. And now we can zoom
out in our timeline. So we would see all
of our timeline. We can change our work
area by this handle. Click and drag to the left. Now let's disable our reference
and see how it looks. To see the preview, we
need to press on number. At full speed. This transition happens so fast that we don't really see
this transition moment. It looks pretty cool. In the next video, we're
going to add this playing out letters of the word.
See you next video.
7. Letter Animation: So now we have this
kind of transition. And let's add some words which
play out from other room. Once again, to not waste
any time of the class, I'll add only two letters. But basically the same
principle you can add to create even more letters
if you want to use any other word or
to complete this, awards chunky if you want. So let's add a letter. You just need to use this
horizontal type tool. Click on it, then leftmost
click inside of our window. And let's type C. Then select this text layer which we just created here and
Character panel. You can change the size. Let's make it a lot bigger. If you cannot see
this character panel, you need to go to Window and enable it from here character. And at this point, you
can just select and change the font of your letter. You can use pretty much
any font which you like. I'm going to change
to bevels font. It's free font which you
can download from the web. But basically you can change to any other point which you like. I'm going to make it thicker, as well as change the stroke
and color of the stroke. I'm going to make also
white as also fill color. I'm going to change it to white. So I would have these
kind of thick letters. Once we got this, we can press Control Alt Home. It will place this anchor
point to the center. Which means that if
I'm going to use rotation by pressing
R on keyboard, it will rotate from the center. And basically we can just add some animation like this
letter will be somewhere here. Create a keyframe for rotation and hold Shift and
press P to C position. Create a keyframe for
position and rotate it a bit. Place it about here. Basically, this is
how you can get this animation of laying out. By shrinking this distance
between these key frames. You can speed up the animation of laying out just like this. You can also place your time coarser on one of the
position keyframes. Select all of the keyframes
of the position and move up. In this case, you'll move entire position animation up and get this kind of animation.
Let's press Enter on that. But to see how it looks,
it looks pretty good. We can also select
all the keyframes. Press F9. So it will start slower than, go faster and slower
towards the end. So it will look
more interesting. Also, we can add motion
blur by clicking here. Now it looks more realistic. And finally, what we want to
add is met or this letter. So it would not be
visible behind this door. We can also cut this
layer to this moment. So we would know
that this animation starts here and ends here. Then close it here. And let's create a new layer. Go to layer, new solid. Let's call it met, maybe a door and click. Okay, so now we can
just disable it, but make sure to select it. So we would apply our
mask on top of this door. So select this pen tool, select your layer, and just simply create a mask
along this door. Just like this, then
we can just enable it. If I'm going to press
Control Shift H, we will get rid of any outlines. And we can just simply
select this c letter. Click on this
toggle switches and modes and change
this to Alpha Matte, which basically means that it
will be visible only here. And as you can guess, we
need opposite of that. So let's change it to
Alpha Inverted Matte. Now it looks like it
playing out from that room. Also, you can see that
this edge is too sharp. So we can just select this mat, press F on keyboard and
change mask feather. Let's change it to Lake Pi. Feather the edge looks
a bit more realistic. And basically this
is how you can add these letters
behind the doors. We can also cut
this matte layer. We can even duplicate these layers by
selecting one of them, hold Shift, select another one. Press Control D to duplicate, move in space like this in time. And select your second
layer of the letter, press P. Makes sure that your time cursor on top
of the position keyframe, select the position property. And now we can just
move it lower. See what we are doing. We need to press
Control Shift H. Now, if I'm going to
change this position, you can see that we are lowering our animation of op
second letter below. So nice. You can see it later, most here. And to not have the same
animation of rotation, we can just simply press R on the keyboard
to see rotation. Select these key-frames,
right mouse click on it, and go to key frame assistant, time-reverse keyframes,
which basically means that it will rotate in
different direction. It rotates clockwise and this
rotates counterclockwise. This is how you can
add some variation. As also you need to let
mouse double-click on this C letter and change to
other layer which you need. In our case, it
was word, chunky. So next letter will be h, n, exactly the same technique
you'll use to add other letters as I did
in my previous here. As you can see, we have
these letters come out. We have the zoom-out animation. In the next video,
I'm going to show you how to add these
letters one by one in each of them and flip to our Looks. See
you in the next video.
8. Word to the Rhythm: So now we want to add
this animation of the word itself
and then flipping each character's to our logs. So let's create exactly this. Go to main effect composition. Let's see what we already have. We have the studying
part of the effect. And here we can also enable
our reference video. So we would know where to
start to show in our world. So it looks like about here, it will start to show up. So let's type each
letter of a word. So once again, you
need to select this horizontal type tool. Click Create. First letter, which is C, make it a lot bigger. You can also press
Control Alt Home. So this anchor point
will be at the center. It's important because
we are going to rotate from the center
of each letter. So make sure to
select this c letter, press Control Alt Home to have anchor point
exactly at the center. Then select the selection tool and move it to the
center of our screen. You can also use
align panel here. So it will be exactly
at the center, or just move it by eye. So it would look
right on your screen. Then we can just press
S on keyboard if you want to make it a lot bigger. In our case, it takes up a
large portion of our video. So let's make sure
to do exactly this. Once we have, our first layer
is, becomes much easier. We can just move it here. So it will appear just here. Then we can just simply
duplicate this letter. So let's press Control D to duplicate and then
move it to the right, just like it's touching
this previous letter, double-click and press
H for the next letter. And to move all of the letters
which we are going to use, we need to create a null object. So go to layer, new null object. We can rename it. Right mouse click on it, and let's call it a mover. And just select both
of these letters. And with this pick whip
connected to this mover, which allows us
to control all of these letters by one mover. Let's press P on the keyboard. And if we will change
this position, you can see that we move
all of the letters. And this is how we are going to move all of these
letters at once. So let's also move
it to the right. So it will start here. And basically we can move now all the letters
out of the screen, read a position keyframe. And as you can see, I'm looking at this
reference video and see that it ends right here. So I'm going to, at this moment in time, I'm going to move it to the left to fit all of
the word like this. And as you can guess, we could just simply
duplicate and other letter. Just select it and press
Control D to duplicate. You can hold Shift to move all the n horizontal space
and not just like this, and move it to the
right, like this. And type next character. Basically you can just even
select all of these letters. Click on Toggle Switches, apply this motion blur. So it will have this
kind of motion blur. And we can even make it 3D because we are going to
flip each of these letters, as you remember, in our
effect in 3D like this. So we want to switch
them all in 3D space. So then you can just
duplicate, move it, and double-click to
change the letter, letter N. Then duplicate. And using the selection tool, move it the left double
mouse-click on this letter type k. We can even move it a bit
to the left. Then duplicate. Move the slider to the right and type on the last
letter, which is why, as you can see now,
I can just freely change the position of
each of the letters. But we still have this
kind of animation because all animation is
connected to this mover. And we can basically make any
changes to these letters. And it will not mess
up our main animation, which is really handy. I'm going to press Control Z to make sure that it
will place it in the right spot as it was and
change disposition of mover. So we will fit this last letter. So this is basically how
we can make this animation of running across
all of our word. And then we are going
back to our first word. So from this moment,
we can press, Shift and hold and press S on keyboard to see
also the scale. And let's create a keyframe
for the scale as well. Then, as you can see
in my reference video, we need to go to
the first letter. So let's move it
in position two. The first letter makes sure that it's in the center
of our screen. This, we can even
scale up a bit. So it would look a bit more interesting and maybe
move it a bit down. So now we have this moving animation and basically we will have
this animation for C. Then we have this path moment. Then we can create a
keyframe for position. Once again, I'm looking at this reference video
and seeing that we move the camera to the
next letter and it stops. So now we can move to the next
letter like this and stop. Then once again, here
we have a pause moment, create a keyframe, then it
moves to the next letter. We also move to the next letter, one to each of the letters
to get this animation. If we will select this part, our work area and
press zero numpad, you can see that we have
this ball animation, but it's pretty linear motion. Now we are going to fix
this problem because now, as you can see,
it doesn't really feels like it has some rhythm. And also I see that it
doesn't look really nice. So we can just simply where we moved our texts a bit lower. We can just simply
select these keyframes which follows after them. Sure that your play head
on this keyframe and using the arrow keys on my
keyboard, just bring up. So it will look more
uniformly and nicer. And by the way, you can just select all of these key-frames. Right mouse click
on them and go to Keyframe Interpolation
and change from auto bezier to linear motion. It would be a lot cleaner
kind of animation. Then what we want to do is to select all of these
keyframes, press F9. So as you remember, we have pretty linear motion
and with these kind of a smoothing of the keyframes, which we've applied
by clicking F9. We're getting a bit more
interesting animation. Let's preview. As you can see, it got a bit better. But to exaggerate this field, we need to select one of the keyframes and
go to graph editor. And here, as we did
with our video footage, we just need to move these
handles and to the left, which means that this
motion will start fast and slow it
down at the end. Here, once again, best to the next letter
and slow it down. Then once again Fast
and Slow it down. So now if I'm going
to press zero numpad, you'll see that we
have this kind of more interesting switching
from letter to letter, vague way these handles
to the left, like this. It will give this kind
of cool animation. Let's go out from
this graph editor. And as you can see here, this next letter is
touching too close. You can add any moment, just simply select one of
the letters and morph. It would be at right place. So now it looks better.
9. Letter To Outfit Animation: Once again, to not waste
any time of this tutorial, I'm going to show this technique only on force two letters. And then you can
just basically apply the same technique on
the rest of the video. So we have this cool
animation of the letters. Basically we want to
use one of our looks. Let's place this look just below our letter and measured here. And it's really important to make them start
at the same place. Because as you remember, if I'm going to solo, all of this looks better if they are starting
at the same place. It will have this same rhythm. If you will change like
this and move to the right, you will have this kind of
out of rhythm animation. And it's not exactly what we
want in this kind of effect. So make sure that they
start at same place. Then we can just simply
go out from this mode. And what we're going to do is just find the place
where it will start. Now, as you can guess, I'm watching at this reference
video and I'm seeing that we are going to see ourselves at this
moment in time. So I'm going to move. This looks to write to
this moment in time. Because from this next frame, we are going to see ourselves. What do we want to do? We want to place ourselves on top of the
ladder, more of it. So our look would
be in the center. This look, we can just disable. And let's make this
layer also 3D layer. And it also should
have motion blur. Then we need to connect this
look to each of the letter. So let's select m
connect to this letter, which means that we can just
simply select this letter and press R on keyboard
and basically rotated. And now as you can
see, we are rotating this letter and
our look as well. So basically we can just simply create a key-frame about here. Because I can see in my
reference video it doesn't flip. And here it fully flipped. So let's flip to 180
degrees to -180 degrees. So it will flip to
the right like this. You can see it also flipped our look and it's easy to fix. You just select your look
and right mouse click on it and go transform,
flip horizontal. And you can also
move it to the left. So it will be in
center of our screen. What you love to do is just simply cut out this
layer of your letter. At the moment, where it flips. Here. Exactly this moment. We can just cut this layer, just select it and hold
alt key on the keyboard. And then closing square bracket. You can see here what I'm
clicking on, like this. Once again, Alt and
closing square bracket. It will cut to this moment. Then from this moment
will appear are low. And this is how we can get
this flipping animation. So let's make sure that we
don't see our look Here. Let's get it a bit later. And it will switch from
letter to our look. Also, we want to
select our letter, press U on the keyboard
to see these key-frames. Once again, select them, press F9 and go to graph editor. And also, let's zoom in and
make this kind of animation, which means that it will start slow and then
fast, like this. And just make sure
that it will leap from letter to look at right place. So we would not have
something like this where it flips too
soon or too late. Also, we can add a camera. Let's go to layer new camera. And here we can set focal length to
something like 18 or 15, which will make our camera like a fisheye lens.
Let's click Okay. And as you can see, it will
stretch our letter even more. And this transition will
happen even more interesting. This is a cool little
thing which will make this look even more interesting
at the transition point, because without this camera, we can see that it's pretty flat and not that interesting. Let's enable this camera. Can see it takes most of our screen and it
looks a lot cooler. And basically the same thing we want to do with the next letter. So it moves to the next layer. Once again, we will take
our footage of ourselves, place it on top, our next letter, and
look at reference. Select our letter, press R
on keyboard to see rotation. Create a keyframe for rotation. And then let's flip it is in
our reference about here. We need to flip to -180 degrees. And then let's enable
our second look. Make sure that it's
in the center of our screen, something like this. And just connect to our letter. And it makes sure
that it's also in 3D and also has
this motion blur. Here. After this rotation animation, we can just simply select
it and connect it with this pick whip to our letter
N. As you can see, it flips. Once again. Here. At
the flipping point, we need to make sure that
this letter disappears. This page letter. I'm going to press Alt and closing square bracket
to cut to this moment. And from this moment will
appear our second look. Once again, I'm not moving
this layer and just cutting. As you can see, I
have this coarser. I'm cut into this moment. Make sure that you're not moving because it will
mess up the rhythm. Just cut this layer
are basically going. Just also use Alt
key on keyboard, pop it in a square bracket. It will cut to this moment. And now we can get this
kind of transition. And once again,
select your letter, press U on the keyboard
to see these keyframes. Press F9. Go to graph editor. And also make sure
that this animation starts slow and goes fast. Just make sure that this
peak, this animation, if I'm going to go out
from graph editor, should go at this
moment where it flips. It's really important
because as you can see, if I'm going to move
this pig out of the way. The changing of the letter
can be at nuts, right place. So just make sure that this
peak will be at this moment. Basically the same
technique you'll need to make two other letters
in your video. So let's zoom out and see
what we have at this moment. I'm going to disable
our reference so it will not distract us. Also, we can press
Control Shift H to see only the result and press
zero number to preview. So as you can see,
this is how you can get this kind of effect.
10. Finalizing VFX: If you pay attention here, this hand goes behind. And then on top, it's
pretty easy to fix. Just create a new layer, go to layer, new
adjustment layer. And it should separate these
layers one from another. We can even press Enter on keyboard to rename it as a line. So we would know that this is just a layer to
separate these looks. So basically all of this looks should be separated
with adjustment layer. And this is fixed as this issue. So if I'm going to
press zero numpad, you can see that now. We are going to fix this issue with the
hand. As you can see. Also, if you want to have all of your logs on top of the letters, just make sure after you've
done all of the letters, move them below of the logs, will be always on
top of the letters. Something like this. Very less thing which
you would want to do is to take the sum over
n, place it below. And let's press U
on the keyboard to see this position animation. So what we can do
here, basically, you can just simply create a position animation
to this background. So here it will
be at the center, and then it goes to
the left of the word. We can also move position
of the background. And also we'll kinda copy this animation
of moving camera. So we will have this kind of deal of depth of this animation. Let's press zero numpad. Our background also moves. This is how you can
get this kind of a parallax move and
kind of 3D animation. Just make sure to animate
your background as well. And this same technique you'll
need to apply to rest of the letters and apply all of your logs to
get all the effect. Feel free to follow me
here on Skillshare. I post classes every week. I have a lot of
classes on VFX using Adobe After Effects is also am creating classes on
motion design texts, animation, basics of animation. From time-to-time, I'm posting more complex classes of creating sparks and 3D animation
and also logo animation. I recommend you to
watch this 12 min class if you want to try
some VFX stuff, this one, don't hesitate
to create projects. After watching my classes, I always check your work and give you some comments
if you need help. Also feel free to ask questions
below any of my classes. And you can also suggest
what you want to learn next. So once again, feel free to
follow me here on Skillshare, and I'll be happy to see
you in my next class. Thank you for watching.
 M Jake, Lets Create VFX & Cool Stuff Together