Transcripts
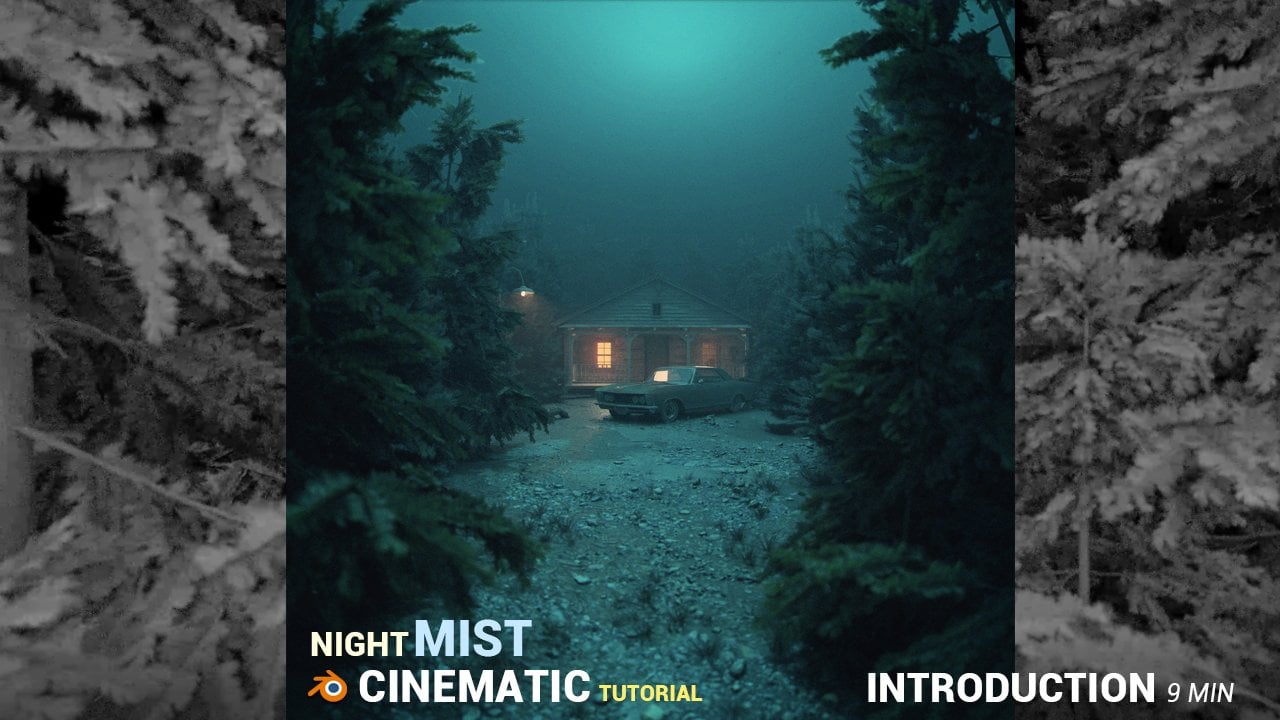
1. 00 INTRODUCTION TO CLASS: Hello and welcome
to the tutorial. In this tutorial, we
will create scenes from the introduction in
the pre-program blender. Step-by-step. The entire process of creating scenes is recorded. So the tutorial is easy to
follow even for beginners. That's Turiel is
separated into 15 parts. We turn every duration of 10 min to make it
easier to follow. If you are a blender beginner
in the first 10 min, I will introduce you to
the basic of the blender. After that, we will
download the car and he proved the
materials and anemic. We will talk about camera
settings and camera animation. Lubricate lighting
using volumetric and increase the illusion of the speed with the help of emission particles and
dolly zoom effect. We will also talk
about modelling, post-processing, video editing,
sound effects and more. All of the sources and links
are included in the store.
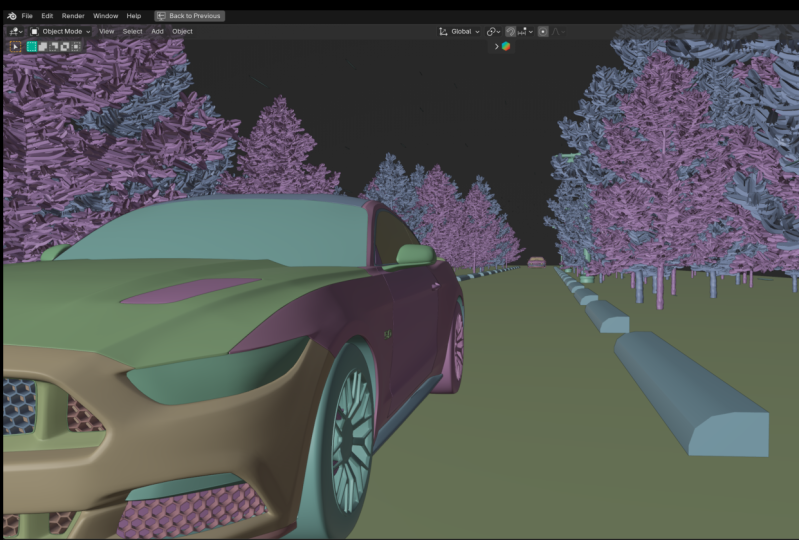
2. GROUND: In this tutorial, we will
use this car because it is simple and we don't
have much to do with it. And it fits the ambience. But you can use any
car from CD trader, Sketchfab and similar
sites or Add-ons, menu downloading objects
from other outdoors. My guest several problems. That's why I recorded
the past tutorial in which we saw
in three examples all problems you may have been downloading 3D models online. If you are interested, you
can look for that tutorial. And in this, we will
use this simple car. Let's start with Blender. First thing I will do here, I will delete these
three default objects because we don't need this here. And I will go with File Save As. And I will call this tutorial. Let's start with the ground. If you look at this animation, you can see this round here. But because this
is not so visible, we don't need high
resolution texture here, and we don't need
a lot of details. So I went back to Blender
and I will start with plane. Now I will press N and
every type here 60 m. And because we changed
now the scale. So I will go with Control
a and I will apply scale. To beg this to one. We can find nice and create
textures on NBN cgi.com. So I will go here to
materials and I will search for and you can
download any of these, but I will go with
this first one. And I will go with one
K resolution because we don't need high
resolution for this, which is barely visible. So can download this
without registration. And we can bring this
to our computer. And I will go with extra fives. And this is what you get. Now I will copy this address
and I will back to Blender. And I will select that object. And we'll go to
material and I will. And now we can go
to Shading tab. And now we need enable
Node Wrangler add-on. So Edit Preferences,
Add-ons and just search for no and enable this
Node Wrangler had done. And now we can select
this principle can be SDF and we can COVID Control Shift and t. Now we
can navigate to this folder. And I will select
Color and roughness. I don't want all this texture because this is not visible. And I will just go here
to principal extra setup. And we can one problem here. If you look to this ambiance DJ, you can see that
this two-by-two, two-by-two meters and scale
of this is displaying is 60 by 60 m. So we
need this to 30 times. And now this is real scale. If you want to add
some bump details. So I will go get bombed. And we can go with color ramp. And we can plug these two vector and this to fight
and these two nodes. And you can see that we
get some bumps here, but this is my mic too intense. So let's just bring this. And if we go to
material preview, we can see our texture here. Now we need more
space for our car. And I will go with Shift D. And if you hold
y for the y axis, we can move this on y-axis. And now we can repeat this
process with shift thoughts. So if you'll go with shift
or we can repeat this and I will repeat this
maybe six or seven times. Or you can do this manually. You can just go with the shape, the y for y axis and
you can move this. And now you can set
a vote on this and we can go with shift d by dy and y. Ok, and now last time, so we have seven of
these plates here. And I think this will be enough.
3. CAR, IMPORT AND MATERIALS: Next thing we need
here is Scott. So you can go to CGC
trader or Sketchfab, and you can search here for car. If you select this checkbox, you will search only three cars. But I will select
this card here. And if you cannot find this, you can copy this link
I will share with you and you can find this car. And to download this card, you just need to make
the profile so you can just sign up with
your Google account. And now you need
to free download. And you need wait, 20 s here. And then you can download
this first link. So I think this is Blender file. So this is 3D S max
and this is a gig. So this first one
is Blender file. And this is how this look. And now you can open
this blender file. So this is almost
ready to use object. But if you are a
blender beginner, maybe you will be confused. Why you don't see
this Layout tab here. And you can just go here, two plus and you can go
to general and layout. And we'll do material
preview to see how these look in materials. And I see a few problems here. So if we select this car, we can see that this
is this red material. But if you are not sure, you can always go to Edit mode. And you can select
one of these spaces and you can see that
this is this material. And if you select this glass, you can see that this is the last material and I
will call this glass. But I see that this
material don't look good. So I will go to Shading tab that I don't
see shading tab here. So I can again go with
General and shading. And if we select
this red material, we don't need this diffuse. I see that there is no
reflection later on this car. Specular or down to zero. And that's the reason why we
don't see a reflection here. So I will make this 2.5. And now we can play
with this roughness. But I don't want
complete the shiny car. I want to make some
variation in roughness. So we can make this quickly
with concrete texture. And usually I go
to textures.com. And you can search
here for Crete. But for now I will use this
texture from pixabay.com. You can also download this. You can just click here and you can download any of
this resolution. But I usually avoid this very high
resolution because this can slow down
your render time. But because this is only black and white
image and this is, this file is very small, so I will now move it
almost four K resolution. So it can download
this image here. Or you can use any of
this from textures.com. So this shaders are paid. This is not free,
but if you go down, you can find this texture here. So you can also
download this for free. Because you get the everyday
15 credits for free. But let's now use
this or pixabay.com. I will bring this
to my computer, picks up a folder and because maybe I will
use this next time. And now I will also
bring these two blender. You can also go with Shift
a and image texture, and then you can
select your image. Or you can just drag this here. And I will now enable
Node Wrangler. We can go with Control
Shift and we can click on this texture and we
can see how this is projected to our card. And this is obviously not good. So we can go to Edit mode and we can press
a to select all. And we can go with
you, your projects. Now you can see that this
is much better project that I think these
details are too big. So we can go with control, select this texture
here and go with Control D to get this texture coordinate
plane mapping node. Then I will scale this
maybe two to three. And let's not worry
to call them. And we can use this
for roughness. I will go with Control Shift
and click on this principle. Bsd have to beg this material. I will now plug
these two roughness. So in Blender, black color
or mean completely no rough, so that's mean completely shiny. White color, mean
completely rough. So if you add more
white color here, we get more of this rock part. But I don't want too
much this part here. So I will bring this
maybe to about here. And we get a lot of details
with just one texture. And if you want, you can
use this also for bom. Bom. And apply these to
fight and these two normal. And I will bring
this all down to maybe 0.00 or 0.004. And we can also use this
color ramp for base color. So if we go to mix node, we can plug this vector. And now if you plug these two base
color or we can choose, we can make variation
in these two columns. So I will go maybe brown color. And I will now
copy this hex code and I will get
this second color. I will just make a small
variation on this color, so I will go more to blank. And you can see that
this part here is now I can then this one. But if you want to
go with another, another color ramp here, and now we can 3D settings
here and you can choose one. This Black-Scholes. Okay, and let's now fixed
this glass material. So select this glass here. And you can see that
there is no glass at all. So I will shift a and
B as df and shift day. And so now with Control
Shift and right-click, we can connect
these two textures and we can get this mix shader. Or you can go with the mix shader and you
can just plug this here. And these two surface and now we get the transparent glass, so we get lost shader
and transparent. This is slider. So if you want more glass or more transparent, you can bring this all to 1.5. And we can also use
same concrete texture. So I will go with shift
the image texture. And I will select
this concrete texture and I will go hit Shift
a and color ramp. We can control this
texture with color ramp. So if you plug these
two roughness, we get the variation
in toughness and I1, more shiny parts here. So I will add more
black color here. We can now back to
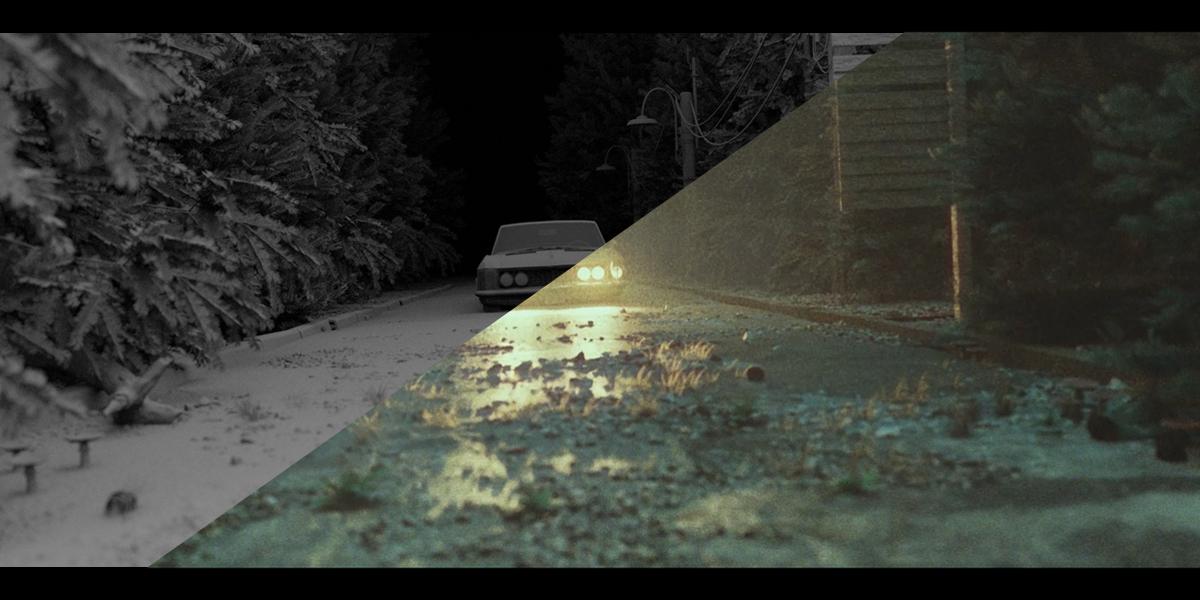
Layout. This animation. You can see that we will see
only this front part of car. And because we will use a
lot of motion blur here, this is not so visible. All this animation is too fast, so we don't need very
high model here. But if you want, if you go to solid
view and edit mode, you can see that this
is very low falling. If you want to go with the
subdivision surface modifier. You can set this to one. If you click here, you
can see before and after. And you can see that
we get a lot of details here and very
smooth mesh now. But just know that this will
slow down your render time. And I will in viewport use
this, set this to zero. So we will use this
only in render. But if you see that your
render time is very slow, you can also remove the
subdivision modifier. It's all up to you. You can decide if you want to use this subdivision or not. We'll solve not
visible in the render. So I think I will delete this for now because we don't
need this in our render. Now we can go with
right-click and copy. And we can now paste
this to our scene. And we have our car here. Because we are in
material preview, this can take few seconds
to load this material. And I will select this car
and I will go with the 180 to rotate this
in this direction.
4. CAMERA, SETTINGS: Let's now add camera
to our scene. So I will go with
Shift a and gamma. And now I'll summarize here. So I will move this
to about here. And I will rotate
this on x axis by 90 degrees and the
access to zero. And if you press numpad zero
vSwitch to camera view. And now I will change the
solution of this camera. So I will go here to
render properties stem, and I will go to
Output Properties tab. And I will send
this 2024 by 400. And we get this more
cinematic aspect ratio. Now back to this
render properties. And I will set these two cycles because you will lose Cycles. Render Engine and I
will send this to. And if you want, you can
set this noise threshold to point to get maybe
a little noise, but we will also speed up our render time for ten or
20 per cent with this value. And let's bring this
viewport samples to maybe 100 and also to render. And now if we press F2, well, we get first render here. We can also go here in the
viewport to render preview. You can see that the
VC discard because we have in war Properties, we have in this dark color
but not completed dark, so we can still see our car and I will bring this
almost to black. And one thing I forgot here, so to speed up your render time, we will use this denoise. But if you have this
optics, just go to, just use this optics
denotes that because it is much faster than this
open image denoising.
5. LIGHTING AND VOLUMETRIC: For lighting, we will use volumetric width
combination of point lamp. And this is effectively get, you can see what
Apollo metrics here. But you can see this in this my previous
tutorial and render. But the effect I want to get, so we get a lot
of volume metrics and ROI scholar in our scene. Okay, so we can now
go to solid preview. And I will go with
Shift a and cube. And I will scale, press S, scale this cube on
z-axis go to about 70 m. And now I want to cover all seen with this cube because this will be
our volumetric cube. So I will go with SY to
cover this on y axis, and Sx to cover this on x-axis. Okay? And now I will go with
Control a and apply scale. And we now can not see
what is inside this cube. So I will go to Object Properties tab and I
will go in viewport display. I will say these two bonds. Now we can see inside this cube. And I will now go to
material preview, and I will call this volumetric. Now, I will go to Shading tab and I will delete
this principle, be SDF and I will go
with principal volume. I will set this density to 0.05. And also I will go
with white color here, and I will plug this volume. If we go to render preview, we can see our
volumetric cube here. But now we need
light to go through this tube and make
our scene visible. So I went back to
Solid mode here. And now I will go with Shift a and I will go with
light point lamp. Number three to cite view. And I will bring this point
limb to about this one, maybe one half of this cube. And now we need very strong light to go
through this volumetric. So I will go with
value of about 80,000. So you can now go
to render preview. We can see how this look. But I want bluish color here. I will select this color. And we can see how this look. And now I want to just cover
all this cube with lights. So I will go with all the to make instance of
this point limp. And I will call, all right, two more this on y-axis. And now we can go with Shift
R to repeat this process. But I don't want to make
this perfectly align it. So I will just make
maybe more lights here and maybe less here. And we can bring some of
this may be a little up.
6. CAR AND CAMERA ANIMATION: Let's now animate car. So I will make two
solid preview. And I will select this car. And I will go to frame one. I will put the mouse here
over dislocation and I will press I to
insert keyframe here. Now, I will increase this
timeline to maybe 500. Because we use plenty
more frame per second. That means that our
animation will be about 524. It's about 20 s. I will now go to last frame to about 500. Or you can type here 500. I will move this
car to about here. And now I will press
I 0 or dislocation. And if you press space, we can see that our
car is animated. And if you put your mouse
over this timeline, you can press T. And you can choose this linear
interpolation. And if you press paste, now you can see that our
current constant speed. But we can see that our car go, but the camera is still here. So we need parents this
camera to our cart. So I will move. I will go with number
seven and I will place this camera to about here. So at first I will go to camera properties tab and I will
send this to maybe 35. So this is basically Zoom. And I will start with
the celtic vibe. Let's see in render
preview how this look and I will move this on y-axis. One thing I need to fix here, you can see this clipping. So just bring this
to 0.01 or okay, I think this is
good, so we can now remove this with left-click. We can move this y-axis
until we go inside car. Okay, to about here. And I will also move
this maybe on x-axis. And our camera is
now inside car. So I will now select camera, first camera and with
holding Control, know, let's call the shift. We can select our top. So important thing here is
that our car is plus selected, which means this
yellowish color here. So now we can go with Control P and we can set
better and to object. And if you press Paste, now, this camera will follow clock. So let's now animate camera. And for this we will use
camera shake if I add-on, which is very simple and
but very powerful add-on. You can go to this link here. So you can copy this link and you can go here to code and you
can download this zip. And after I will send
this to desktop, I already have this here. So now you can go back to Blender and you can go
to Edit Preferences, Add-ons, and you can
click here to install. And you can find this on your computer just like
this and install add-on. And then search for camera and just activate this
camera. Shake my head on. And when you select your camera, you can find your add-on. So you will find this
camera, shake it by ten. I'm not sure why I get this. Python errors here, because I
use old version of Blender. For now use old version of this add-on which is
called camera wobble. But I think you should
not get this error with this camera shake if i. And because this is same add-ons adjust this old version
and this one is new. You can just click
here two plus and you can use any of these presets. So last time for this animation, I will use this
bike when gravel. And I will just use old
version here and I will select here by content grabber, you can play with
this influence. So let's go first with an up at zero
and let's press Play. You can see how this
animation look. You can play with
this influenced. You can set maybe this top
tray to get more effect here. But I think this is too much. So maybe I will go
with maybe 0.7. So with this camera shake, if I just click Plus here and set this here is 2.7 into one. And we get this effect. So we now have animated
car and animated camera. And let's now press F 12
to see how this look. So let's now make a test render. I will go to about 20
and I will press F2. Well, I think we need move this little on y
axis because we have this, we see this inside part of car. And we don't have anything here. So we basically see
this hard edge. So I'm going to select camera and I will go to frame zero. Let's move this camera
a little on Vioxx. If you want, you can go to by zero and you can
switch to render preview. And I will not press
I over this location. Okay.
7. DOLLY ZOOM EFFECT: To make this thing look more
fast and more dramatic, I will create this vertigo
or dolly zoom effect. And you can see in this
example how this look. To create this effect, we need to play with
this for calling. So I'll first start
with 35 for culling, and then I will go
with about five. So you can see how the slope, so this is 35 and this is five. And I will show you how we
can create this effect. I will increase example. Show you how you can
create this dolly zoom effect and you
don't need follow this. This is just for test. So I will go here shift day and I will
get this monkey object. And now I will go with the lesson and I will
go with number zero and I will set camera United
degrees and bring this down. Now, I will, I need
maybe 100 frames here. And I will set this
for calling to 50. And I will press I to
insert keyframe here. Now I will go to Keyframe 100. And I will set this may be fine. I will press I to
insert keyframe here. And if we go to a free
press null space, we can see how, what
the effect we get. But if we add the same time,
unlimited dislocation, so I will want to first frame instead keyframe here and
now we'll go to frame 100. And now I will bring this
camera closer to this object. Now in set k from here, we can see in a top
orthographic view what we get. So we basically
at the same time, we zoom out from this object and at the same time we go closer with
camera to this option. Camera perspective, we can
see what the effect we get. To make this faster.
We can bring this to about here and
let's now press paste. This is basically this
dolly zoom effect. Okay, so let's make this
effect in this example. So I will make
this 35-millimeter and I will press I to
insert keyframe here. And I will now go to
frame about maybe 200. And I will now say this
maybe to five millimeter. And I will press I Here. Let's now go. So I will split this
window and I will go here numbered zero to switch to camera view to see
how these look. I will switch also to
this render preview. So you can middle mouse button, move this and you can switch
here to render preview. And I will now move
this on y-axis here. So I want avoid this part inside car because
we don't have anything here. So I will move this
to all, all to hear. Now I will press I to
insert the key thing here. And you can now see
what the effect we get. We can make before
and after render. So I will go to frame
zero and I will press f 11 to open
this image editor. And I will go to slot
one and press F2. Now I will go to slot two
and I will go to frame 200. And let's now press F to L here. So this is before
and this is after. I decide to make a test render. So you can see
better this effect. So you can now in your
folder, click Render folder. And I will call, I will create this folder one because maybe I will make
another test later. We can later, easy
create folder too. So I will now copy this
address and let's now go to our blender and healing
output properties. Just select this folder and paste these others here and select this
folder one, accept. Now, I will move it
here with a JPEG. And I will bring
this samples down to 50 because this is
just a quick example. Quick test render. So we need to make this fast. Okay, In this noise
threshold is for viewport. So I will also bring this noise threshold to
0.0, 0.2 hearing render. And we can now save this file. And I will go with
Render, Render Animation. And this will take 7 s or eight. So 8 s by 201,600 s. So by 16 is 26 min. So you can see
that we start from 35-millimeter Zoom and
we tend to only file. And you can see this effect. So you can feel this
speed up effect, but we will do later
this in post-processing, but I will cut this part here, and I will maybe speed
up this 50 per cent. So you can see this
effect even more. Next thing which is important
here is motion blur. So this is very simple to odd. So we can just go
to render to run the Properties tab and we can now enable this motion blur. And if you want to
increase this effect, you can set this maybe 2.8. And I will now just make a
before and after for vendor. So I will move it to slot
one and I will make before. And now I will enable
this motion blur and I will now go with after. Okay? So this is a before and after. And you can see
here this effect, especially on this trace here.
8. EMISSION PARTICLES: And one effect which is really important here is this particle. So you can see here, we can now back to Blender
and we can create this. I will close this file. And I will go right-click here, and I will join this area and click on left
to remove this. And we can now say
this particle effect. To create this effect, I will go with a mesh cylinder. And before I click anywhere, I will bring this
resolution to 16. Because I don't need
32 vertices here. And now I will press f x night to rotate this
axis by 90 degrees. And I will bring
this to about here. And I will press S to
scale this to about 5 m. So maybe my meters and I will bring this here
and I will now press S. Scale this on y-axis,
maybe 100 meter. Now, I will go with
control a applies cake. And I will go to Edit mode, and I will go with Control R. And I will
also add the resolution, more resolution
to this cylinder. And I will also delete
this face here. So the late phase, I will delete base here. Let's move this to about here. Now we can use this cylinder to add particle to this object. And I will now go with Shift a. And I will go with ecosphere. And now I will press S
to scale this on y-axis. I will press S and I will
scale this all down. And I will go with Control
a and apply scale. So this will be one particle. And if you want to can
double-click here and you can rename this to one particle. And I will now go to
material property stamp and I will grade this blue emission. And I will now click here and I will choose here a mission. And I will set this
maybe to lose color, and I will set
this value of ten. And in render preview you
can see how this looks. We have emission
object, blue color. And now we can select
this object and we can go to particle system here. Particle properties
and we can add a particle system and
we can select it. And now we can maybe bring
this to maybe 500 particles. Now we can do render and we
will render this as object. And for object we will use this. Select this particle here. And now we care this
particles here. Next. To rotate this, we need click here
to advance and we get this rotation option here, and that will rotate
this on global y axis. Now we can play with this scale. So I think these are two D, So I will scan this may be true, 0.02 or you can also
scale this object here. And also set this scale
randomness or to one. And if we now go to zero and if you go
to end the preview, you can see that we
cannot see sky now. And that's because we see
in render this object here. We can make this
object transparent if we had here modifier. And now we see these lines here. So we can send this
thickness all to zero. Now, we see in render
only these objects here. So if we press F2, We get all these objects here. I will select this object and I will scale this more on y axis. Control a and apply scheme. But in this example you can see that I start with a lot of these particles and then
I fade this effect. So we have here small
amount of these particles. So we can make this easy. We can just go with the shave
D and move this on y-axis. And now I will give to
particle properties and I will Click here to make a new
variation of this particle. So we will duplicate
this and now this is particle settings one and I
will send this mainly 200. And I will duplicate this with Shift D and move this on y-axis. And I will again
duplicate this and I will send this may be 100. So we have less and
less these particles. And they will also duplicate this and move this on
y-axis to cover all see. So if we select all
these particles, we can see this effect
also in solid preview. So if I press face, you can feel this effect here.
9. LIGHTS ON THE CAR: Let's now add lights to car. So I will go to frame
zero and I will select this car and I will
go with the numpad slash key to isolate
only this car. So we can work only
with caught and lights. And I will now set to stop here. And I will go with a and
I will go with light. And I will go with spotlight. Now I will go with it or
pay this or 90 degrees. Now, I will go to light properties tab and
I will say this might be too orange light and I will
send this maybe to 500. We can also play
with the spot size. And this radius here. I will just move these
little on y-axis and I will go with all the D. And I will make
double lights here. So we can go with
all the n. Why? No x to move this on x-axis. And we can now go all
day again, takes place. Place one here and
the x and one here. Now we can present
these to our car. So we can, because if we
move this to timeline, we can see that
this is no parent and you can select
one lump and hold, Shift and select all four lamps. Or you can select the
first one and go to Select Link object data. Because we use all to D. And now we can hold Shift
and select our cart and we can go with Control P and set its parent to object. Now we can see that this
slides ago with car. And now we can go with
number slash key to bed. And I make test
renders with lice. So you can see how these look.
10. TREES: The next thing we
need here is trees. So in this example here, you can see a lot of trees. And for this, I use
this platonic add-on. So polygon IQ and
botanic garden. But because this is
not free add-on, I think one of
these assets here, first one is free. So you can go to
blend their market. And you can search for tonic. And you can click here on
this polygon and botanic, and you can download
this for free. And you will get
few trees for free. And you can use this one is in C. So you can
just click here. Okay. And then you can
just place this over. So just to scale this
down with all the d, We can make an instance
of this object. So all day. And why
to move this on y-axis and all the
extra move this here. But the last time,
because I hear this add-on to version
of these trees. I think I use also this one. And I will press S to scale and just play with this so you
can rotate this on the axis. So LSD and all the d, y and just be sure
to not use CVD, just use D. But if you don't want to use
this botanic add-on, you can, of course, go to CG trader and you
can search for this. And you can click here to free. And you can find a lot of
high-quality and three models. So can download any of these models and you
can place it in your C. But in last Tonia, I suggest also this one, this website, so 3D shaker.com. So you can go to
library and free. And then you can download
this nice tree here. So you can click here
and you can also by this and download this retreat. And I will, I will start this on my
computer so we can open this. I will find this file. So this is what you get. I will go to layout here. And it will select this tree. And if you go to edit mode, you can see lots of mesh here. And because we will duplicate
this tree, a lot of time, we don't want
high-resolution mesh here, because this will slow down
your render time drastically. And we can go to Edit mode, and we can go to Mesh, clean up that image geometry. And I will see my
this ten times. So I will go with here with 0.1. And you can see from afar we still get the high-quality tree. But this will now all
seen much faster. And now I will go
with the object. And I will now back
to my blender file. And we can also use this tree. So I will press paste here and you can say
that this tree is very small. So I will press S and
I will scale this. And we can also use this shaky. So it can go with all D
and move this on y-axis. We can scale this, rotate and place over C after about 10 min of playing with these trees with
them, the duplicate. You can also duplicate. Select more trees and you can go with all day and you can
move this e.g. on y-axis. So you don't need to
duplicate these one-by-one. And I create this scene. And I put, let's trace
here at the end. So I get this effect.
11. STREET LAMPS: Let's now create
this straight lump. So believe it or not, this is a street lamp here. And if I move this frame, you can see that
there is three Islam. And because this
is barely visible, we don't need to put too
much effort to create this, but we can start now
with the cylinder. So I will go with Shift a cylinder and I will bring
this to 16 vertices here. And I will now press
number slash key. So we can work only
with this street lamp. And I will now go to
this, transform them. And I will type here
for meetups on z-axis. Now first I will scan, this
may be 2.3 on x and y. And now I will type here 4 m. And we can now
make basic shapes. So I will go with the
numpad want to x-ray mode. So we can go to edit more
than with this edge select. We can select this
part here and press S. So this is my reference
I download on Internet. So I want to create
something similar like this. We can move with Control R
to add one look at here. And we can press
S to scale this. Maybe we can scale this more. And we can add
your details here. So if you'll go with Control R, and now if we go with control, be an odd scroll your mouse, you can add one loop cut here. And now on control, if we go with the
control numpad minus, we can subtract selection. So if I go, it's Control minus. Now we have selected
only this middle one. But if these don't work for you, you can always
hold Alt and click one edge here and Blender will select all connected parts. So I will now go
with S to scale this and do something about here. And I will now go with
Control V to bevel this. I don't want too much
loop cuts here because I want to keep this low poly. Maybe something,
maybe two or three. Press S to scale
this little down. And we can do
similarly to this one. So control B, control numpad minus S to scale and
control me and maybe one. Maybe we can add a loop cut and press S to
scale and Control V to bevel. This get shaped
similar like this one. And we can also go to
Extrude and z for z axis. And we can select
all this and we can all t and x2 along normal. Now I will just
select this row here, so all ten click here and
now extrude ulama normals. Let's go with the
edge, select them, maybe Control V and
scroll mouse to add to loop cuts here
and Control V, again. Control numpad minus S to scale. So now I will go with
individual origins because if you know with
bounding box center press S, scale this middle parts. So I will switch to
individual origins and now I will press S. And now I
will go with Control B. Okay, and we can now go with
right-click Shade Smooth. But we have this shading here, so we need to go to Object Data Properties and
to normal sand out of smoke. Okay, and if you want, you can always go
with old devil here. But I think this is
not a necessary. I will now go with to undo. Because B for bevel, I want apply scales or
Control a in scale. I think we need bevel here. So. Or control V, or control V. And you can see that now Bevel who
works quadratic. If you want, add in
these details here. We can make this easy. So you can just go to
Edit Mode, paste select, and we can select every other
space with holding Shift. And now I will press
I to insert this. And maybe S to scale this. And now maybe all 0s to
extrude a log-normal. Now I will press
S to scale this. If you want, you can
go with control numpad to expand selection. And now we can go with Control
V and add one level here. But I think this is maybe
too much in details. This is too deep, so I will Control
Z to undo this. But we need bevel here because we get these
sharp edges here. So if you want, make this, you need more with control
plus C and Control V to make this look a little better. Maybe we can bevel
this edge here, so old and click here. And now Control V. Let's
now create this shape here. So I'm going to go
with numpad one and I will go with
Shift a and plane. So I will move this
here and I will go with Nike to rotate
this on x-axis. And I will place
this above here. And Sx to scale this on x-axis. And S to scale this on z-axis. Let's go with Control
a to apply scale. And I will add one loop
cut in the middle. Now, I want to keep
only this shape here. I will select, select this part. I don't need these
three edges here, and I will press delete edges. Now we have only this part here. Now we can vertices
with Control Shift. Select these two vertices. And I will, I'll
press S to scale this and maybe move
to about here. And now I will go with
control shifts to B. Now I will scroll my
mouse and moved up. Next I will go to object
mode and I want to convert this edge to corrupt. So just right-click,
convert to curve. Now we get to this option here. Go to properties and I
will go to geometry. And under there I will
add some volume here. So this is, I think
the centimeters, I think this is enough. And now you can also add
the resolution here. But I don't want a lot
of resolution here. And now I will go
with right-click Covalent these two mesh again. So this is now Not anymore and we can
play with this mesh. Let's now create
this part so we can go to Edit Mode and
select this part here. And I will now go to
Extrude and z for z axis. Now, I will press S, z zero, this z-axis to zero. And let's scale
these are lethal, so I will now go with E, z and plus S to scale. Now, again easy. And again easy to scale. And last time is z. And scale this. And maybe just again, easy and move this down. And now I will select this part and I will bevel
this, it's Control B. And maybe also this
part. This one here. And maybe this one. Okay, and if we want to
change this in edit mode, just be sure that you
are in x-ray mode. So can select all these. And you can also move
this to about here. And you can also rotate
this if you want. You can select this
edge here with all and press S zero
to line up this. And you can also scale this. And you can expand selection
with Control, non-tech plus. Okay, and we need more
of this on the y-axis. So I will go with number seven. And let's place this about here. And also let's connect
this like on this slide. So I will go to Edit Mode and I will add one loop cut
here and moved Control V. And one here control
V. And let's now select this face here
and this one here. And now we can go to
extrude them x for x. And here we can go with Shade
Smooth and output small. Let's now add simple bulb here. So I will go with Shift a and I will go with
maybe I ecosphere. And number seven,
just set this to position and press S to scale and numpad one
front orthographic view. And let's place
this to about here. And I will scale this one. Vioxx is maybe a little. Now I'm on a mission
material here so I can shade smooth this and I can add emission white material. And I will now select
this emission here and maybe ten and I will
keep white color here. So if we go to rendered view, we can see that this
light is turned on. Maybe I can increase this to also select both part and then we'll go with
Control J to join this. But now I think if we go to render preview of all
this is emission material. So I will create
another material. I will select this and I
will be metal material. Metal and I will think viewport, display change color to
something like blue. So we can see that
this is metal, this is emission material. I will also hear
these metal material. So now we can go to
Edit mode and we can press L over this part. We can assign this material. So now this is a
mission, this is metal. Let's go with select both part and go to Control
J to join this one object. And let's now play with
this metal material. So this is just the
Viewport Display. And let's go to material. So you can see that we have
only white color here. And now I will go
to Shading tab. In this layout tab, we are in local view. If you press non-paid
search query, go out for local view. But when we switch
to Shading tab, we also need to local view. Snap at slash key to
bring this object. And now we can work
with metal material. I will also use concrete
texture views before. So I will go to Image Texture and I will
search for concrete. So we can plug this here. And let's see how this looks. So we need unwrap this. So I will go to Edit mode, lets a to select all. And you may be smart UV
project or UQ projection. Getting this look
a little better. I can go with color ramp
and we can plug these two. Color ramp and two, roughness. So we can choose how much
we want shiny parts here. So if you increase breaks, you get more shiny parts. If we increase Whites, you get more parts. I don't want completely
shiny and completely love. So I will bring
this to about here. We can try also apply
this to metallics. So if you move this
metallic or to one, our objects is completely metal. But if you want, you can also move it. Duplicate this color ramp, and you can choose what which
part you want to be metal, which part is not met. So we can plug these
two metallic white part will be metal and these
black part will be not met. So if we want more metal, you can just trace this
white parts like this. And we can also go with bomber. So we can add small
volume warm here. Okay, and now we can also
play with the color, so I don't know it makes RGB. I can make this concrete texture
with another color here. So if you want to make
this more like brownish, maybe you can try it with
the multiply blend mode. I think this is pretty good
for that. What do we need? So I will go to layout
and I will not use this only this emission object for lighting because it will not
be visible in the render. You can see that these
strong orange light here. So I will make a solid
view and I will go with a light area length. I will go with numpad seven. And I will bring
this to about here, and I will press S to scale
this down with map Edwin, move this to about here. And I will increase
disliked, maybe 100, which is maybe too much for now, but later in
volumetric atmosphere it will not be too much visible. And I will add here
maybe orange color. So we can now move to render preview to see how this looks. Let's now select
these two objects. And I will know with number
slash key back to our scene. And I would go with late-night
to rotate this on z-axis. Know first, back to
bounding box center and now z and t. Okay? So type two times or 108. And let's bring this about here. Before I started duplicate this, I want to make this
in collection. We can easily select
all these lamps. So I will press M and I
will call this three lamps. So now we can see that this
is in this collection. And we can now select these
two object and we can go with all Lee and move this on
y-axis to about here. And now to repeat
this last step, just go with Shift Alt and
duplicate this whole time. If you think that
they are too close, you can always select
all these objects here. You can go with SY to
scale this on y-axis. So it can now make more space
between them if you want. Let's now go with that. Well, to make one test run, the heat is fuel renders
with this street lamps.
12. WINDSHIELD WIPERS: If we look my previous render, you can see another car here. And this car is from
transportation add-on. So this is not very end on. But if you wonder, you can look on blender market. I think I pay for lite version about $50 and I get a lot
of Karski and even boats. I use this one, this car here. But you can find a lot of car in this add-on, even planes. So I use this classic car here and obviously I get a lot
more dates with this carbon. And this is advantage
of paid add-ons. But I think you
don't need to pay for God if you are just
so blender hobbies too, can find a lot of
free a nice car. But I think this car we use
here, miss some details. And I think we can add this
windshield wipes to our car. I think this is very nice
details because it is always in front of our camera so we
can see these details. Very nice. And I will now try to
add this to this car. That is one nice
add-on for blender, which is called run their kid. And you can go to blend
that kids.com and you can download this add-on here. So just download from this link. And then you need to go
to Edit Preferences, Add-ons and installed
this atom here. And then you can activate
this blender kit add-on, and you will get this
search bar here. And from this
search bar here you can start a lot of free objects, materials since and even HDRI. We can try to search
for windshield. You can see that we get Q option for windshield wipers here. And if you'll see this
with dislocate icon, that means that
this is not free. So you can buy full version
of this render kit add-on. I think it cost
about $6 per month. And you can find a lot
of a nice objects here. But I will now select this card and I will go with number slash key to
isolate only this car. Now, I will bring one of
these three assets here. So maybe we can use
this first one. So just drag this here
and move this car. And now we have
this object here. And I will select all
these parts and I will go with Control J to
join this to one object. And now I can place
these to my heart. And we can also scale this. So I will press S. Let's
move this to about here. I think this means.
13. COMPOSITING AND RENDERING: We are almost done with Blender. And before rendering, I will try a few things in compositing. So you can click
here, use notes. And just click here to
activate this leg drop. And now we can go with
Control Shift and click here, we can activate this new node. Now I will press V to zoom
this out and to zoom this in. You can go with all three. I will try with the
lens distortion. So I will take it to fit
and I will try this, or this might be to 0.04. And you can add chromatic
aberration effect. Maybe it's again, 0.04. And if we go crazy about 05, you get this
chromatic aberration. Very strong chromatic
aberration effect, what? This is too intense,
so maybe 0.04. And you can also go with glow. Glare effect. By default, we get these
tricks effect here, but if you want, you
can go with low. So we get a very, very subtle glow effect. And if we want to see before and after you can select this node, then press M to meal to this. So this is before
and this is after. I think this is nice effect, but we can duplicate
this and we can also add simple star maybe
know, or streaks. And we can fade this. Okay, so we get
this effect here. So this is before and after. For post-processing
later, I will use also ambient occlusion and
glossy that extra class. So I will go here to let
proper step and I will enable this velocity direction and ambient occlusion pass. And you can see that we
get these two output here. And we can now go with
five output node. And I will duplicate this. And I will now go to
my Render folder, and I will go with folders. And I will also
create here a 0 for ambient occlusion and
GAL4 glossy direction. So for this main folder, I will back to Layout and I will hit in, oh, good properties. Select this folder here. So this is my main folder
and now I will go to compositing and for
glossy direction, I will plug these two losses
direction and I will select this lawsuit, that
action folder. And for ambient occlusion, I will plot this
ambient occlusion here, and I will select ambient
occlusion folder. And one thing we
need to do here, we need to plug this
less distortion, glossy direction and
ambient occlusion. So because this source, our image for this value, we need this sort also this direction paths
and ambient occlusion. But we don't need this
chromatic aberration effect in this direction and
ambient occlusion. So I will make
this to zero and I will go with Shift D and
I will plug in one here. And I will plug this
final result with the lens distortion and
glare effect to composite. Because this is just
the viewer node. To preview this in
this composite. Now we can go to Render properties them
before we start rendering. And my recommendation is to make test render bit maybe 50 per
cent of this resolution. Because this will speed up your render time by
two or three times. And you can go with
very low sample scale. Maybe. When you are happy
you can face this. Maybe to follow it and you
can read this resolution. The 100 or 200. All depends how your computer
is fast and how much time you want to spend to rendering.
And then I'll vignette. We are happy with
these settings. We can go to bring this to 100. We can go to Render Animation to be sure that
everything is okay. You can check your folder
so we can render images. May combine that. This is ambient occlusion. And here we have
velocity direction. But this will take almost
all night to render. And I will now start
with post-processing. And for post-processing, I will use my last renders we can discard basically
is almost same. I just use different color here. So there is no big difference. And we can start with
post-processing now. So I have main render, ambient occlusion
and lossy direction. I will now copy
this address and I will open After Effects.
14. AFTER EFFECTS POST-PROCESSING: I will now copy
this others and I will open After Effects. I will go with the new
composition from footage, and I will play
these others here so I can select this
glossy direction past. And first, I will make a folder here and I
will call this renters. So I can bring this here
and I can now set this to 24 frames per second
because by default in After Effects is 30
frames per seconds or 24. And I will rename this to me. I think because we
change frame rate, I need a little more time here. So I will go to Composition,
composition Settings, and I will click Control and on these numbers to switch
from frames to time. So now we have time here. So Composition, composition
Settings and this maybe to 7 s. Now we can move this here
and we can cut this part, we don't need, so composition, trimmed composition
to work in a. If you press paste, now we
can float out animation. This animation look pretty
clear because I use double resolution here and
I use maybe 500 samples. I can now import the
glossy direction. So first frame and image
sequence and rename these to move in this folder and set this to 24
frames per second. Now we can bring this on top. And cups looks to repair this and we can see how this
velocity direction possible with this possibly can basically back some
lossiness to our scene. And we can add more details. So if I set this to screen, this will ignore blanks and
keep only this bright color. So this is before and after, but this is too intense. So I will press T and I will
bring opacity to maybe 30%. Next we can import
ambient occlusion. So first sequence
and JPEG sequence. Rename this to a
row in this folder. And set this to 24 frames per
second and bring this here. And for upslope to refresh. And you can see how
this past luck. And I will set this to
soft light blending mode. So we basically get a lot of, a lot more It tastes with
this ambient occlusion pass. But this is also too intense, so I will bless thee and I will maybe use percent of this. Let's save this. So
I will go to File, Save As or Save. And I will call this tutorial. If you want add more
volumetric field, you can duplicate this. Control C and Control V. And
you can search for Jamboard. You can increase
this to maybe 300. And now we can set opacity here. So if I press P, I can set maybe 20 per cent so we get more volumetric here. You can see before and after. And I can rename this
too. May miss them. I will maybe bring this, maybe this is before and after. I think this is too strong. So I will move adjustment layer. We'll call this S curve. So I will do my three color. I will just select for this. Make slightly S curve effect. So I will bring blacks with two up to fade these lakes here. And we can bring
also whites down. And we can make S-curve effect. So this is before. And next we can add grain. I will go New Adjustment layer, and I will call this grain. And I will search for grain effect and I
will bring this effect here and set this
to find out output. You can see before and after. So we get this range here. You can play with this preset. So I usually use this one. It's not big difference. Okay, this is maybe too intense, so I will bring this to zero. We can also try glow
effect in After Effects. So let's go with a new adjustment layer
and let's call this glow. And let's search here for glow. So we have here this, we are globe and it has low. And let's try with this one. You can play with
this luma threshold. So I think this is
too intense maybe, so we can bring this up. And you can also play
with this radius. So if you move this value down, you will get more globe. Maybe we can keep this, but maybe only 15%. Okay? And this is before and
after or identify. And now we can add
correlation effect. You can see example
collision effects. So they basically get red
glow around highlights. So this is another example. And we can create these
quickly in After Effects. So I will go to New Adjustment layer and I
will call this correlation. And we can go find edges to
find these highlights here. And now I will move it
because I want this to read. So I will select here
reddish color or orange. Now I will invert
this and levers. I will isolate only this strong highlights here,
so I will move this. Right. Let's now go. Lobes blue. And I want to blow this
maybe with a value of ten. And now this is not so visible, so I will deliver. And I can increase this. Now. I think I will go to curves. So I can move this and
increase this bloke here. And maybe I can
decrease this to seven. Okay, and if, and I'll set
this to screen blending mode. We can see this red
glow around lights. And you can see
before and after. So you can see
these details here. Now we can add some overlays
and I will go with the lens. So I will share
this link with you. We can copy this link and you
can download this for free. And you'll get all
these lessons overlay. In for K. You can
use any of this. I think I will try it to this
one so we can bring this. I will go to project and you
can double-click here and, or you can just move this here. And now we can set this in our composition and we can
press S to scale this down. Okay, I will put this
red coloration down. Now, if I will scale
these little more. If we set this to
screen blending mode, or maybe lighten
screen blending mode and we get all these overlay. And I will press T and they
will maybe just 10% of this. And I will try maybe this one. So scale this down. And screen blend mode. I think this is too big, so I think I will
use another one. Maybe you can use this
only on left side. So we can bring this
in After Effects. S to scale this down. And screen blending mode. Okay, and I will press T and said this maybe
just 20 per cent. And I will go with this
film does texture. Or you can Google this
market for light, scratches, something like this, and you can find a lot
of similar texture. And I think I'm not sure
where I download this, so I cannot share this with you. I will bring this
in After Effects. And I will get this on
top and scale this down. And maybe move this here. And now I will set also screen blending
mode or write them. Okay? I think I will again use screen and you
can see before and after. So we get this cinematic
feel with this texture, but this is too intense. So maybe 50 per cent. But you can search a
lot of similar stuff and you can play
with this overlay. And lasting here I think I'll
go with color correction so we can rename these to see. And we can go with
the metric color. And we can play
with these values. So basically I will go
with vignetting two minus. So we get the darker color here. So it will go to minus five. We get this effect and I will
go maybe it's minus one. And now I will go with basic
color, Basic Correction. And we can basically play, go with change this value
to maybe plus 50 and -50. You can see which
look like more. So I think I will go to minus, but not 50, I will go
to maybe minus ten. And within, I
usually go to minus because I like this
green effect I don't want to affect if I
go to plus minus ten. And you can see always
before and after. And you can do same with
all these values here. So if you want, make this more bright too, can go with plus. So if we go to one, you get lots of lights here. And I think I will
increase this but not to one, maybe 0.5. And you can play
with this value. So I will try with
contrast to plus, plus 50 or -50. I think I want go
to minus maybe ten. And the highlights, I think
I was keep about zero. I will go with shadows
to plus maybe than the whites go to plus maybe ten. And with Blake, I think I will go with them to minus maybe just central same. And we can go with another
color correction here. So I'm going to name this too. And if you bring this
Lumetri color here, you can find here in Creative tab a lot of
these adult plots. So you can try this and you
can choose one you liked. So there is a lot of
predesignated options here. But I will not go
with 100% here. I will go maybe to
just 30%. It's 5,000. Shy. This one down. Okay, this is all up to you, so you can play with
this option here. And this is before,
before and after. So this is before and
after all these effects. So this is just from leather and this is after post-processing. Let's see here. So before, and this is final
animation after loading. And you can see this look. But I also make another animation with
flying drone effect. So basically camera follow car. And on one point, just go Camera go to fly him. Focused on this car. And I was taught how
I made this effect. Later.
15. CAMERA DRONE EFFECT: I also make another
variation of this shot, it, flying camera effect. So you can see here this scene. So at the one-point
camera go from car. And let's try to
create the scene. Now. I've been duplicate the last blender file and I've been making
new variations, so I will rename this
to tutorial drawn. So we have a backup
of this last scene. If you need to change
something or rerender, we can always back here. And let's now open
this new file. Let's first select camera
and go to frame about 500. And I will bring this camera. So I will type shape. Let's go. Let's bring this term out
to 50 m. Deep breaths. And you can see
that our Camelot, this point go to a. You can see camera here. Now I will go with number
zero to see how this look. And obviously we need
change this rotation to zero to look at this car. The next thing I would change, I don't want this
whole column 5 mm, I will change this to 35
because now discover big, very big area and we need covered this with
trees and grounds. So I will take these 235 and I will press I to
insert keyframe here. If you press this jump to keyframe button, we change here. And here is also five. And I will bring
this to maybe 20 mm. And I will again go with
itemset d prime here. We start from 20 and go to 35.1 thing I need to fix here because
we changed on this 500 notation to zero. We press here to insert keyframe and bring
it back to this keyframe. And we need change this or
beg this tonight in degrees. And press I to insert keyframe. And now we have this effect. And we have a few problems. First one is that I
don't want to wait too much time to focus on car. So we need weight
about seven or 8 s to appear in our camera. So we can go to about here. And we can now
change this to zero. Now I will press I to
insert keyframe here. And let's see how this look. Okay, but I don't want
put or focus to this car. So I will go to maybe 20, not zero, I will go to about 20. And so from these two
points we find carbon but not put this car
exactly incentives. So we need more time. Okay, In the next problem
is this camera shake, this byte form of gravel. So this kept sense
than we are on ground. But when camera go to air, they don't have sense anymore. So I will go to these
keyframes here when we are on ground and I think this
camera shake if I now work, so I will remove this camera. And let's change this
to Mike on gravel. And we have same effect here. Now I will set a keyframe here, 2.7 influence and
few frames later, I will bring this to 0.02. So very subtle, but let's
see how this book now. Now we have a very
smooth camera shake. Okay? And obviously we need
move these trees here. So just select this and move. And if you want to raise, duplicate few of these trees. So you can select all this area, e.g. and withholding control. You can deselect this graph. And let's go with all the Y, but you can play with
this. And I select all. So this particle here. In first scene, we don't put too much effort to this ground. We just made one plane because this is not so visible
and it is very blurred. But in this second shot, I need to fix this because at this point
received this ground. I will share this ground
potato skins vendor file, which I made for last tutorial. So you can open this file and you can use this to add
more details to ground. So I will go through
all these examples and I will paste this
in C. So copy objects. And back here and
just play with this. So I will go with the base, then I will start
placing this in my seat. I will separate this window so I can switch gears to camera view. So we can work on right
and look on the left. And this asphalt texture here. Let's place this here
that is visible in Ghana. If we want to match
this more round, you can go with G, T
and holding Shift. You can bring this down. This is before and
this is after. And that's basically
all for this scene. So that's basically
all for this scene. You can see that we can
get small adjustments. Make another
interesting animation. To render this, just
make another folder. And of course make this A0
and glossy direction and just change this to
hold that three. And healing composite
or don't forget, change this folder also
23 glossy direction and three, ambient occlusion. And if you wonder how
I made this animation, I basically the same. So I duplicate this file and I put camera here
close to ground. And I changed this reset. Shake if I preset
to investigation. So we can very
subtle camera move. And then a hearing
foreground layer is visible and camera I
put a lot of details. So this graph is from
what then they get done. But you can use any, another source to find grass. So it maybe you can use
this when their kid, or you can search on
Sketchfab or CGI trader, or you can find a lot of
this similar assets online. And then I re-render this and I make your cuts
in Premier Pro, but I think I will
talk about this later. So can see this cuts. And you can see
these details here. So this isn't grass. And I also use these
mushrooms here. Maybe it's not so
visible. And also here. And a lot of other details to make this road more visible. I put these blocks here. So this is basically just a few, Let's hope and blender again. No, I think this is PhotoScan
from Greek cell bridge, but it will not be big difference if you just
go with cubes or ship a and scale this on
the y-axis so as y. And if we just apply, Apply Scale and you can add concrete texture and we
can go to shading tab. And we can use concrete
texture from before. Okay, I don't care
if concrete texture in this splendor five silent during this from Pixabay. And we can just plug this here. And the material preview. You feel projection and and we can go with Control
T and we can scale. This might be the two. And they can use same
for darkness and bond and bring this down. So just add some level sheets so you can go into
canceling these two edges and you can go with
these four edges and control beaten
at some level here. To see an oldie just
duplicate this two times. For this scene here I use them blender file and I put
this main insight. So for this, I use Mixamo and I talk about mixed some more
in my field tutorials. But I found this name
on blends web.com. So I searched for
human-based mesh, siblings have.com, and then
I import these topics. You can upload that here. But if you don't want to
use another character, you can find a lot of free here. So you can use e.g. this one. And then you need
search for animation. And I search for driving. And I think I've found this one. And you can select
this animation. You'll get animated
character and then you need just download this.
16. CUTS AND SOUND EFFECTS: And for my short animation, I made a lot of these
shots and about 20 or 30. And I will now talk about some defects and
cuts in Premier Pro. But you can use
any video editor. And this shot here is
from my last tutorial. Let's now open Premier Pro. Premier Pro is a
very simple program. So let's reason I use this. Even if you don't use this, you can make this very quickly. Just watching the
tutorial center. I will start a new
file and I will now, for this, I will bring this in here. And we can also link
this to timeline here. And we can start
cutting this and you can see this animation. And I think this is too long, so I make a few cuts. I use this part here
and then I just make this razor tool. I just make two cuts here. And I deleted this two parts and right-click
and ripple delete. So we get this much faster
and dynamic animation. And also I will cut this plot. You can also get
the nice effect. They could just put
the black color between so few one
or two frames empty. Let's move this here. So let's see how this looks. Now we kept this flying
camera animation. And for this, I will put
this main inside car here. This down is audio track, but we don't care
about your hair so that we can delete this. So just right-click unlink
and you can delete. You can separate
this from video file and you can delete
this if you want. This animation is too big, so I will also just make
maybe two cuts here. And I will now delete this part. And let's say for the slope. I don't like this part
here because it's too long and it's
not so quality. So I decided to use this ambient occlusion
pass from this render. So I will copy this address. And I will double-click
here and forth to this just ambient
occlusion animation. So just select this
image sequence and you can import this here. I will replace this
to about here, and let's see how this looks. And I will just choose
this last part. So let's make a cut
here because here's like area here and let's cut this part
and maybe this one. Let's move this here and
now we have this effect. Let's take a little more
of this to about here. And these two end. We have this effect, but I don't like this
transition here. So I will go to
Effect Control and I will hear put keyframe to 100. So now this is completely
visible and I will set here who possibly all to zero, and I will move here. And now we have this
slide transition. So now this animation
on top go from zero opacity to 100
and we get this fader. But I want to make
this more faster, so I will bring this left then. Let's see now. And now you can add your title if
you want. We can type here. Tutorial. And then you
can choose nice font. I use this robot last time and we can also place this here. And you can under Effects, find a lot of this transition. So I will go to Window
transition and the soul. And you can use this film, this, or get this effect. But two can play with
all these texts here. You can use even this slide. Let's talk about sound effects. So first the source you can find for free is this YouTube Studio. If you have YouTube accounts, you can go to audio and you
can heat under sound effects, search, e.g. what car. And if you find
something you like, you can download this for free. Another nice source
for audio sounds is this site, three
sounds, resound.org. And you just need to make a profile and then you can
download our top three sounds. So let's search for crop dry. And we get 1,900
sounds, which is crazy. And then you can place on this. And if you like this, you can glue here and you
can download this. And the next nice source is this smaller software
called soundly. So you can download
this for free. But if you want 0, unlock all these sounds. You can see we have a
few of these for free, but most of them are fade
in this animation here. This sound effects here, I found on soundly, I search for rock-cut soap, settled for rocket, and
I list them, feel this. I found this nice effect. I just drag this here
and move to Premier Pro. And I put this here. And now we have sound effect
for this animation here. Okay, I will cut this first
part. I will just move this. And now when this camera go up, I want to cut this. And I also want to
fade these effects, so I will keep them here. And I will now go to
all two minus here. And now we fade in
this sound effect. But now you can add
another effect. You can search, e.g. for drone. Let's try for a drone flight. Now let's say that it must be somewhere. There
are no effect here. Okay, this last
one is maybe nice. So we can also bring this here and we can now faded this. So I will go to, I think this is too intense
silent movies to -15, but I will start from zero. So I didn't move this off to -287 and let's now
see how this looks. Okay, maybe this
is still intense, so I would maybe go with, Here's two minus minus. Then. I talked a lot about video editing
in my last tutorial, so you can look for them. And this is all
for this tutorial. I hope you learned something
new and see you in next one.
 šime Bugarija