Transcripts
1. Introduction: Hi, I'm Jake. This class will teach you how to
create visual hook for your social media
using Adobe After effects and without
using any plugins. You don't need any experience working with Adobe
After effects. You can even download
the free trial version to learn this effect
and it will work fine. I'll explain each step we will take to create this animation, and it will work with
your text or logo. Learn which prompts to use
to adjust your results using the free version of ha GPT and build a cool animation
in Adobe After Effects. You can always write
your questions in discussion section under
any of my classes. To get help from me, while
creating cool effects, I think it's the best way
to learn the software, while creating interesting
effects for fun. And to complete this class, our goal is to create the
school visual hook for your social media
using Adobe After effects and free
version of HIGPT. I'll be happy to
see in my class as also your result after
following all the steps. So let's get started.
2. How to Film Your Video: So I'm using Adobe
After Effects 2024, but you can pretty much use any version of Ado
After Effects. It will work fine. Even the pre trial
version would work great. So first, we need to import the footage which I provided in resource step to this class. So let's go to
File, Import, file. This footage will be provided in resource step to this class, so you can download
it and import it. Select it and click Import. Then to create new composition, we need to select our footage and drop it here
on this big icon. So now we have exact
the same dimensions as this video as well as the
frame rate and other settings, which is pretty handy and
it saves a lot of time. So as you can see, my
footage was pretty red. And I thought that I could change the colors
in post production. But even when I
apply the effects, so I'm going to go to
effects and precess panel. Here, I will try to
apply curse effect and try to boost mid tones
to see my skin better. You can see that I have
pretty reddish footage. So this is why in my
original example, I went with the effect tint, and in this way, I could boost my
skin a lot better. Make a bit of contrast. We can just switch these effects around to get even better look. For this class, we are going
to use this tint effect, go to Effects and Presets panel. If you cannot see the panel, you can just go to Window
and enable it from here, effects and presets and any other panel which you
can see on my screen. You can enable it from Window
and the name of the panel. Just apply here type tint
and apply it on this video, just like this, select it
and drop it on the video, and then apply curse effect. Just type here curves
and just drag and drop here and adjust with
this main RGB curve. In RGB channel,
make this kind of curve to get the same kind
of footage like this. So this is why I went with the black and white look if you will film your footage
with better lighting, you can use the original colors which you have in your video. So I encourage you to film
yourself and try to make this effect based on your
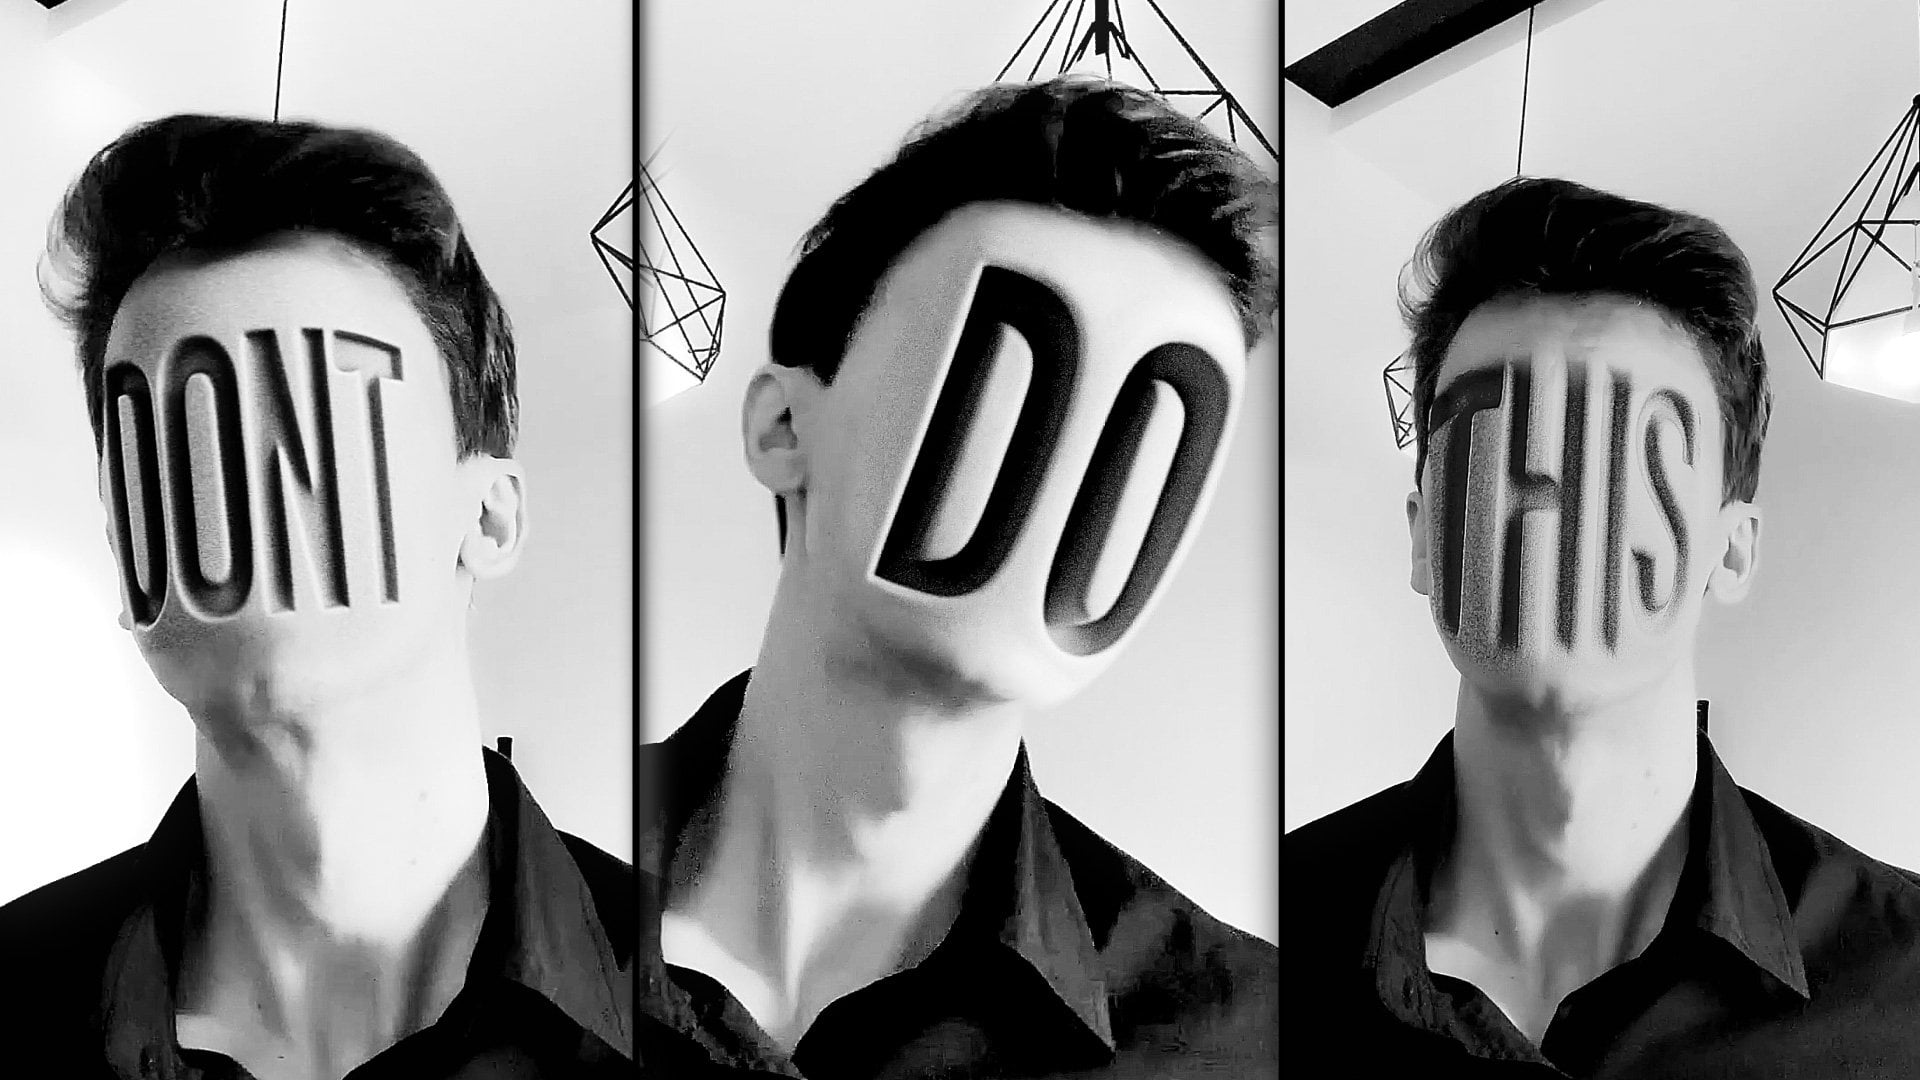
footage of yourself. So basically what you
need to do is to have a quick transitions
into your poses. So basically, I'm telling something and then
as you can see, it's just a quick stop frame
of me with my mouth wide open and make sure
that your head doesn't move a lot and
just open your mouth wide, so we would have this
reference on which we are going to make our
effect in next videos. Then we can just switch
back to other pose. So as you can see,
I've tried to make a transition from this
pose to other pose, just like this, so it
would look seamless. So make sure that your head
is about at the same place. It will make our
transition a lot easier to make here
and as well here. And basically, the last one
as you can see it same face. You just need to have this video motion where
we go from this to this. And this is basically
the whole effect. The next video, we
are going to make a screenshot of this and use Chat GPT to provide us with a lot exaggerated look.
See you in the next video.
3. Prompts for ChatGPT: So we already have
this video footage, which you could shot
yourself or use mine. And now let's make a
screenshot from this moment. Basically what you can
do is cut this work area just like this to just this
frame, just one frame. And we can just simply go to Composition, add to render Q. Then here in output module, we can just left most lick
and change here and format. Let's change to JPEG and
everything else is fine, just click Okay and select where you want to render your frame. So I'm going to
call it image one, click Save and render. And let's also render this
second frame, just like here. Let's pick this
frame with our pose, and let's go to composition at Render Queue and also change here and output module
to JPEG and click OK, and let's call it Image
two and click Save. Now we have these
two screenshots. You can just go to any
browser which you use. In my case, I'm going to use the edge browser because here I'm not login
in my accounts. Basically, you can just log
in with any account which you have and get a free
access to HIGPT. Just in your Google search, you can type HIGPT and click here on the
first link and Login. And let's click here to add our file and add
photos and files. Then locate your screenshots, which you've saved in our case
is these two screenshots, and let's select first
one and click Open. And let me show you
how I did earlier. As you can see, I
already have one chat, and here is my photo screenshot. I've used a colored one, but I think it will work with
black and white as well. Let's check if it works. Basically, this prompt will be available in resource
step to this class. So you'll find this text file. You can open it, and here
will be Image one prompt. So you can just
select it and copy this prompt and paste
in your Chad GPT. Let's do exactly this. I'm going to select
it here prompt, selected press
Control C to copy, and here Control V to
paste and just send it. You can just wait for it to try its best to go
with this prompt. Basically, as you can see here, is typed that I want
to have a photo to use this exact photo and extremely
white open shape mouth. Exaggerate is real, so it
would go really opened, as you can see in my preview. Let's also see this second one. I'm going to copy
this one as well, and it will be available
for second image image to prompt you'll be able to
copy this drum as well. Here it is describing
how I want to have my lips extended to the
side, just like this. As you can see, it
gave me a few options, which looks pretty hilarious. But this time, I
want to try with you and see what results
we are going to get. This process, as you can see, it takes a few minutes. This point, you
just need to wait when it will finish the task. In my case, I am
going to cut out these parts from the class
to not waste any time. As you can see we have
our first result. In case if we don't
like this one we can just simply copy this prompt and just paste it again
and set it so it will try one more time until you'll
be happy with the result. This moth looks a lot better, so we can use this one. Let's try the second
photo which we have. Let's click here. Also at
our photo, second one. Let's go to our document
and copy the second prompt. Let's also paste it and send it. Here our next result. As you can see, it's
unusable because here we don't have any
space for our text, and this is a good
moment to show you how you can use
image as a prompt. You'll know how you want it to look and you can just search a web and find the lips
which you would want to use. Case, I'm going to provide this image because I just simply redo my prompts over and over again until I got
this kind of image, which looks pretty
ridiculous and I thought it would look
funny for this video. Let's say that you find
something similar on the web, you can just simply
use this as a prompt. What you can do is just simply
drag and drop in our chat and just type make my lips from my original photo to look like this on the photo that I've
attached and just send. Basically, you can use any
wording which you like. As you can see, it's just I've typed from the top of my head. You don't need to be
super skilled in prompts. You can just simply type
in simple English or in your native language what you want to get and then send it. So now as you can
see, we are getting a much better result. And you can specify
if you would want to have it in black and
white or something else. Just for fun, we can just try to add another pumpt like great. Now please remove the blur from lips and just let's type and
make it black and white. But it's not that
important because we can make it in after
effects black and white. I just simply as
example that you can refine your results with another
prompts, just like this. You can see it will take a bit of time to get the exact
look which you like. But basically, if you
will run through, you'll get a better photos which will resemble your
original photo a lot better. Just be patient and send a few prompts or just
resend your original photo. It's a good idea to resend the original photo and
specify that you need to keep exact the same
person and a rest of the prompt leave as is and you'll get even
better results. As you can see, we are getting even a lot more hilarious lips, which I think looks even more fun than original
lips which I've used. So let's save these two photos. Let's save this one, and I'm going to save
this one as well. So I'm going to save in
the Chad GPT result, which these files will be available in
resource Sepsis class, I'm going to save
these ones too. Let's open to see
which one is which. Let's call it first, and
this will be second. If you would want to
use my own footage, you can just select all of
these and use it as it is. But it's more fun if you will use your own face
and your own video. Now we have our images. Next video, I'm going to show you how you can apply each of these videos on top of your own footage. See
you on next video.
4. Blending Face With Footage: So let's import our footages. Let's go to File, Import File. And let's go to Ch JBD results and select both of these
files and click Import. So now we need to find
the moment where we are going to transition to
our phase just like here. So we have this moment. You can even use this marker to select this moment in time, and we would know that this is our moment for this effect. So basically, from this
moment to this moment, we need to animate our
face which we just got. So let's select
our face and just drag and drop into our
footage composition. Now what we can do is to select our image and press
T on keyboard and reduce opacity to 50 to
see both of our faces. So what we are going to do is to roughly set them
close to each other. But what would be even better is to get this
opacity to fall. Let's set it to 100%, zooming into our frame. By the way, if you will
press space bar and hold, you'll be able move
your image around. So let's select this Pen tool. And we will cut out this face. What you need to do is
go around just the face. So if you would want
to have a busy aurves, you just need to left most
click and hold just like this. And here as well, you want to have a straight line
and straight angle. I just simply left most click. In my case, I want
to use Abs curs, so I'm clicking and dragging
to make this kind of shape, and I'll skip to
the moment where I've cut out my face
up till the end. Make sure that you've selected this image and not your
footage. This is important. And by the way, if you would want to see your mask better, just click here and change this to something more
visible, just like this. And just left mostly
on the last point and continue cutting this face
to use on top of our face. So the hair itself, I don't really try to be super precise. So something like
this could work fine. So as you can see, I'm not
cutting the Ich hairs, I just going for the most of the hair which I got,
something like this. Then you need to click
on this last point which is starting point
of our mask to close it. As you can see, we've
cut out our face, and let's select the
selection tool and just we need to cover our original phase
with this new phase. We can even make it bigger, so let's press S on keyboard
and just stretch it a bit, it's fine if you
will make it bigger. Let's cut to these moments where we know that
it will start. So here and here. As you can see now we have
this rough transition, and we need to match the
colors, first of all. So it's a good idea to
use this curves effect, and effects and presets, just type curves and drag
and drop onto your footage. And let's bring up this point
to reduce the contrast. And as you can see,
we already have more closer look to
our original footage, and just by playound
with our curves, we can get a lot better result. So it should be looking similar. So it's a good idea to click here on this camera button
to take a snapshot. And then just press
a five on keyboard, and you can just see if
colors are pretty close. So let's reduce the
contrast even more, something like this
is looking good. And as you can see,
this photo is too sharp in comparison with
my original footage. So what we can do is to go to afecmPresets and
type Gausia Blur. Just make it blurrier
to reduce the quality. Also, we need to use
something like noise. So let's select here under
noise and grain noise and click on the checkbox
to uncheck use color noise. We just need to use
black and white noise. We can just make it
a lot bigger and we can even use Gausia blur
one more time because now the noise can be super
crisp and we can just make this kind of noise which we have on
our original footage. Let's set it to full to see the full resolution
at all times, and we can just play around
with the size of the noise, so it will be similar to our noise in our
original footage. Now as you can see it
blends a lot better. So if we will select all of
these effects and turn off, as you can see, now it
blends a lot better. Spend a little time to match your footage
with this footage, and next step will
be is to select our footage and go
to layer precompose. Let's call it phase one. Let's move all attributes
and click Okay. The next video, we
are going to apply deformation effects on top of this phase. See
in the next video.
5. Warping Face: So let's open this composition. We need to have a few frames just about five frames before and maybe a
few frames after. It's a good idea to open this composition and
click we mostly here, go to composition settings, and let's just add
another second. Start code, we can
set just zero and here we can just simply add another second
and click Okay. Let's go to our
footage composition. We can just also rename
it, write mostly here, goo to composition settings, and let's call it main
comp and click Okay. I would be easier to see
where we're working. Render, we can just
simply close it. Now we can just offset
it a bit just like this. We would have these few frames before and few frames after. So as you can see here, it
disappears because we need to open this composition
and extend our photo. Now in this way, we fixed this problem
of disappearing. Now as you can see, we have
our photo entire time. And now let's try to animate it so it would look much
more interesting. For the animation, I've
used a mesh warp effect. So type here in
effects and preset, mesh, select it and just drag
and drop on this footage. So in my case, I don't want to have a lot of these lines on my face because as much
lines as you have here, as much distortion you need to make to each
of these squares. So I'm going to press and ChelZ a bunch of times, and instead, I would reduce the rows maybe something like
this and columns. So I would have as
little lines as I possibly can for
easier manipulation. We need to save this original mesh which we have basically in on
the stopwatch here. And here at the beginning, we can just simply press Y on keyboard to see
our first keyframe. And here, if we will
start deforming, as you can see, it
creates another keyframe, which is exactly what we want. Let me tell you
what is keyframe. Keyframes is a point in time which remembers the value
of sodium property. In our case, this keyframe
remembers this point in time, which is 2 seconds
and 22 frames, the value of property
distortion mesh. In our case, this value is
the shape of the mesh itself. Basically, it will go
from this keyframe, which remember
this kind of mesh, this kind of distortion
to this keyframe, and it remembered
the original mesh. As you can see, if I'm
scrolling through, it will distort the mesh to go from this
mesh to this mesh. It's pretty handy because it's exactly what you want to have. I'm going to press Control Z to undo my previous
step and this time, I would want to close my mouth, so we would have the animation of the closing mouth and we can even drag it to my
face just like this. We would have a
point of transition, and it's not have to be super precise because this
motion will be super fast. Basically, you just need to have this covering your
face just like this. Here is a good idea to
type here fill effect. Apply it and reduce
it the opacity. In this way, you're going to see the original phase and the
pace which we are distorting. We need to cover
this part as well. With this red mask,
we see where we need to cover for
a good transition. Something like this, it
doesn't have to be perfect, so I'm going to leave a and then I'm going to disilate
this fill effect, see if our face looks good. As you can see, now we have this transition where
our face is warping. Let's also save a project because after effects can
crash from time to time. Let's go to File, Save, and save wherever you
want on your computer. So now we have this
base of our effect, we can cut it to this
moment and also we can extend these keyframes
and go to Graph Editor and select this
handle and drag it down until you hit
this orange line, this baseline, and
drag it to the left. So we'll have this
kind of animation, which basically means that it will go fast at the beginning. And slower up till the end. And as you can see,
we have this kind of cool animation. And let's exit. By the way, if you don't see the graph editor,
as I'm seeing, you can just left mostly
here and change here to edit speed graph to see the
same graph as I'm using. And let's left mostly here. And now, as you can see, we
have this kind of transition. Can play around and see maybe we would want to
use it a bit later. As you can see from this moment, it even works better. Let's cut this work
area to this moment. When we press zero numpad, we would see only this moment. Let's check only up till this
moment to see how it looks. See it looks pretty cool.
And if you ask hA GPT, it will get a closer
version of your face, and it will look a lot better. As you can see here, I've got a pretty close
variant of my face. So this is why here it
looks more similar to me. So just spend a bit more time on hA GPT requests that may result in better
version of this effect. If you still get the face which doesn't
really resemble as you, it's a good idea to distort
this mesh even more, just like this, make sure to not select and do
something like this. Make sure to click only
on these cross points. If you moved your
image just like this, just press Control
Z and once again, click on these cross
points and distort your own image just enough so it would resemble you and
be as much distorted. It would be not that noticeable, it's not you,
distorted a bit more. By the way, if you will make this opening of the
mouth lot bigger, just like this,
you'll be able to fit even more text
inside of your mouth. As you can see now, it
doesn't really resemble Esme, but the effect is so strong
that people may not notice. So let's press zero
Nampet to see how it looks. It looks a lot better. One more effect
which I want to add is CC forths motion blur. Just select it and
drop it on our image. Just increase the angle as much as possible, just like 500. It will add a bit blur, which will cover up the
transition even more. So we can go wild,
something like this, like 1,500 and sample
don't decrease too much, maybe like 12 to
get smoother blur. And make sure to save,
press control as to save, and let's see how it looks. Now as you can see, we're
getting this really nice blur. Also what I like to do is
to exaggerate it even more. We can just press
S on keyboard and press P on keyboard to
see position scale. Once again, press S on keyboard, then hold Shift and press
P to see position scale, click on these stop watches
to see these keyframes, drag it to the left. So here will be the
original values of this. And here we can just
simply click on this log button
and extend it even more and move it a bit down to get even more motion because
as much motion you'll get, it easier will be to
sell this effect. The blur is a bit too much, so I'm going to set it to 700. I'm going to press
zero Up to see how it looks. It
looks pretty cool. I noticed that with
our mesh distortions, we lost our noise. So let's just type here noise
and apply it one more time. Let's increase it and check on this use color noise
and once again, use Gaussian blur and
just blur it a bit. So it will fit our
footage once again. Okay, so it looks really cool, as you can see, and now
we need out animation. So it will go out into
our face here after this. Let's cut it to
this moment where we know that transition
ends by this marker. Let's make sure to have
this out animation. It will be easy to
do because you can just select this
layer of the face and press on keyboard and just simply copy these keyframes. Select all of them,
leftmost leg hold, and select all of them, then
press Control C to copy. And here by the end,
press and salvo paste. Now, as you can see, it will go again to
the closing mouth. One more thing which you
need to do is to select this keyframe and click here on the graph editor and
make sure that it will also have this kind of speed up animation
towards the end. Here it will be super fast, a pause, and then
speed up animation. Extend this and this reduce this handle to
get this kind of graph. It's good idea to select these keyframes as well
and we can press F nine and also go to Graph
Editor and let's zoom in by clicking here
to see these handles, and let's drag it
also to the left, select these keyframes
and drag it to the right. Pay these handles to get this
kind of animation as well. Now we have this
kind of animation. Next video, I'm going
to show you how you can apply the text inside of the mouth so we can add something into the
scene. See next video.
6. Adding First Text: So now we are going
to work not in main composition but
in phase composition. Here, we can just simply go and type whatever you want
inside of the mouth. So let's type. And make case, I've used Bebas font, but you can use any tall font which you like and which
you would want to use. So just type your
text and then extend with this panel to fit
your mouth just like this. It's a good idea to extend
it even beyond a bit, so our teeth will cover
a bunch of our letters. Just extend it a bit more. Then we need to select
our image and then press Chul D to duplicate
and drag and drop on top. Now we need to use Pentool, and idea here is to cut
just by this tooth. It's a good idea to not use these inner parts of the tooth, but only go on these top ones because it
will look like it's stuck between the outer part of the tooth and go inside of
this part of the tooth. See in the moment.
Basically at this moment, you just need to cut just like this on the outer part
of the teeth and then go around this mouth and
just go maybe to this part. You don't have to be
super precise because this part of the video
will be a few frames, not even a second, it will be not that visible. So now when we close your mask, you can press on keyboard, select this second one, and go to subtrack. Now as you can see, it looks like this word is
inside of our mouth. So it's a good idea to
use words super short, like just do it because
it's a lot easier to tht. So these short words
looks really good. And you can just squish it, select them, and
squish it a bit, so it will fit the mouth better, and you can adjust it so it would look
exactly as you want. Second thing which you would
want to add is to go to effects and presets and type here something like
a gradient ramp. I'm going to type here
ramp and just select it and dragon drop on
your text layer. Then let's select radial
ramp here and AMP shape. Also swap the colors. This one, let's just
make sure that to set this first start of the ramp in the
middle of the mouth, select this icon gl here. And select the second
icon and click here. Now you can just basically change the second color
to a grayish one, just like this or the color
of your original footage. Basically, it may be orangish if you didn't use
a black and white footage. It's a good idea to just take this color picker and take
the color from your mouth. Like this and as you can see, it blends a lot better. Also, here is not a good
idea to use a white. Just don't go super white, maybe just a bit
grayish, just like this. So it will blend even better. Also, you can select your font
and go to character panel. If you cannot see this panel, you can go to Window and enable it from here character
and make this font. Bold if it would
look even better. And now we can go to
main composition, and as you can see, now it's inside of our mouth, which is pretty cool because it also follows our distortion. This is why we pre compose
layer and then applied all of these distortions because
now it's super easy to place inside of our
mouth wherever you want, even a logo or anything
you would like, which looks pretty
fun and interesting. And next part which I
want to show you is basically how you can hide this kind of
transition even more. In the final video, I'm going to show you how
to make this moment, but it's super similar to how
you would do this moment. So let me show you
the final step of this video is when you're selecting all of your animation, select all of your layers, when you'll do all the faces, and just go to
layer, precompose. Let's call it movement
and click Okay. Now what we want to
do is to press P, then hold Shift and press S, and create the keyframes
just before this transition. Here at the moment
of this transition, we would want to punch in a
bit more and make sure that it is in center of our
screen just like this. Then when it finishes, we just want to go back to
these keyframes, select them, press Consul C and press Control
V to punch out just like this and then it will be another punch in
on this animation. Just like this and
here we will have our text, then once again, Control C of the
original keyframes and Control V. So here I
want to show you how you can animate your camera movement to hide even more on
perfections of this effect. Let's select these
first keyframes of our first punch in
movement and go to Graph Editor and just drag it to the left and here to
the right, just like this. Let's select all of
these keyframes as well and drag it just like this. So we would have this
kind of inverted arc. And the same you can do with these keyframes,
also select here. These keyframes and drag it
like this and here as well. If I'm going to zoom in, you can see that I just dragging, I just dragging these handles, and I'm making sure that it's all lens on this baseline
to get this animation. Let's exit this graph editor, zoom out a bit, and let's see
this moment of the video. I'm going to cut this work area, so we would preview only
this part of this video. It's a good idea here is to click on this
motion blur and here on the movement layer to get even more motion,
smooth transition. Let's make sure that this will start at this moment
of transition, here and press zero not bad. As you can see with
this extra motion blur, we can cover up effect. If you use your own
face, it will be better. So let's maybe try
to fix this phase. I'm curious if we can just open this
movement composition, take our original footage. I'm going to press
Control CDO copy and go to this phase and
press Control Vito Paste. Let's find the moment of
the screenshot like here, let's try fix our pace in case if you didn't get a good
results with our Chad GPT. So now, as you can see,
I've pasted my eyes, which will make this
effect even better, and then right most
click time freeze frame. So I'm going to press
Enter to rename it eyes, so I would know that I've
added these eyes here. As you can see here,
nose doesn't blend well, let's select it and press F
and blend it using feather, then press S on keyboard
to see the scale and just resize it and
place it just here. Just play around with your mask to include
some of the features of your face and let's press Aon on keyboard to
see the feather. Maybe we will
feather a bit less. And now as you can
see it looks a bit closer to our face and maybe
let's reduce it a bit. The proportions
would look right. Finally, I would want to
add a bit more contrast, so it will blend even better. As you can see, you can
actually fix the face, even if you'll get not
really your face and it's few steps which make this effect look even
more believable. So let's press your naped. And as you can see now,
we have my own eyes, which will make
this effect better. And by the way, now when we have our face look more
similar to mine, you can always go to face, press your on keyboard, place your time cursor exactly on the keyframe
of the mesh distortion. In here. Now we can just
simply not distort that much because we know that our face looks closer
to my original face. So it's up to you how much
time you would want to spend on this effect to
get exactly as you want. As you can see, it
looks pretty cool. The next video, I'm going
to show you how you can add those labs. See
in the next video.
7. Adding Lips: So finally, let's
add those lips. What is great about this part of the effect is that we are going to use not the face entirely because it really
doesn't resemble Esme. And this time, we
can just simply cut out only the
lips, just like this. As we did with our face, just go and cut out the lips. And here, let's leave
a bit of our space. Something like this works great. And here, if you will
hold leftmost leak, you're going to get
this mask feather tool. Simply leftmost leak here to create this kind
of feathering and then leftmost leak
on this point and extend up till the
edge and here as well. So basically, this is
how we can control the feather where
we want to apply. In our case, we want to apply it only here on the
blending with our face. This is the first
step. Next step will be to go to effects and
presets and type here curves and apply it
on this image and just make it sure that it
blends with our face here. We can also press ASN
keyboard and reduce the size and match it
better with our face. Let's make sure that
we have feathering. I'm going to select this tool here and add another feather. Let's make sure
that here will be no feather and here
a bit of feather. I will look something like
this, which is pretty funny, let's also reduce the contrast
by dragging this point up. When you are color
correcting it, just make sure that this
blending part looks good. You can just simply play around and see if it looks believable. If you don't want to
see these outlines, you can just click here. So it would be easier for you to play around
with these curves. Then go to effects and presets and let's type
here Gaussian blur because these lips are very crisp and our footage is
not that high quality. So let's add a bit of blur. And once again, let's
type here noise and drag and drop just
before the Gaussian blur, add a bit of noise and
check the color noise. Reduce the amount,
something like this. Let's also press Control D to duplicate and place after it, and let's reduce the size, so it would be blending with
our footage, just like this. Now as you can see
it blends pretty good and we can play around with the blower to fit the sharpness
of our original footage. Also you can always
play around with this curve to blend
it even better. So it looks pretty good, and let's cut to this moment. And let's press P
and S to create key frames because we need
to track it onto our face. As you can see, I hold
it here pretty still. But sometimes you're
going to need a bit to move it if
you've moved yourself. Let's also hold
Shift and brass R to see the rotation
and create a keyframe. Make sure before the movement, you'll get all of
these three keyframes. Then when we have this
kind of movement, just find the place
where it's about to stop and then use rotation,
reduce the scale. And kind of roughly set it where your lips are in the original video,
something like this. Here is a good idea to click
here on this motion blur, so you'll get the motion
blur around here and cut this layer just before it
starts to be super crisp. So let's cut it here. And because this
movement is pretty fast, it will blend super
fast, as you can see. Also, let's select all of these keyframes and pressF nine. So now as you can see we have
this really fast motion. Here you can just simply make sure that it stays in the place. So I'm going to roughly using my up and down
arrows on keyboard. I'll try to track it. Here is just a few frames, so you can just simply track
it by hand, just like this. And let's also slate these
keyframes and press F nine, so the motion will start, not that fast, and
just make sure to go from frame to frame and
see if it tracks well. Once again, if you will
spend a bit more time, you can track it pretty perfect. So once again, before
this big movement, make sure to have all of these three keyframes and press F nine to see all of
these keyframes as smooth keyframes and find the moment where it about
to stop once again. Check it just like this
to the lips and cut it just about here where is a lot of blur to have this
really good transition. As you can see, this is how
you can add these lips, and then just simply
type your another word. In my case, it was do, go to Character panel, and just simply let's
make it a original font. And make it bigger and maybe
let's squish it a bit, just like this and
make it bigger. And once again, I
went to effects and presets and typed Ramp effect
to get a bit of shading, set my ramp here to white color because we have
this white lamp and here, change it to a bit grayish. So we'd get a
little depth to it. And with mesh warp
effect on our text, we can once again reduce
the amount of these lines, so it will be a bit easier and create a
keyframe for distortion. Press on keyboard and
here a few frames before. We can just simply distort a bit like it's coming from the
mouth, something like this. And if you will hold Control, you'll be able to make
these kind of angles. If you will hold Control key, just like this and maybe
something like this, and we can even squish it at. Let's cut it, and this is how we can get this kind of
little animation. Select this keyframe,
go to Graph Editor. Make sure that it will have this kind of animation,
just like this, and then select it and press
Control C and Control V, this first keyframe to get
this out animation as well. Let's zoom in. Let's make
sure that we have this kind of arc of the movement,
maybe a bit later. And what it called is
that when you have this middle part
of the animation where you have your
text fully visible, you can just simply
select it and parent to this
image of the lips. Make sure to parent with this
one and not with this one, not under Track Mat, but
under parent and link. And in this way, as you can see, it will move with your
lips here and here. So in our case, we can
just simply cut it to this moment just like this and maybe add
some motion blur. So we'll get this kind
of motion blur of its epeation and disappeation. So this is how you can get
this kind of animation. Now let's go to our
main composition. Here we already have
our camera movement from the last video, and here basically it will
transition to the last word. But this part of the effect
you already know because it's already explained here and it's exactly the
same effect as here. So let's press zero naped
to see how it looks. So this is basically how
I've done my effect. Follow me here on Skillshare. Soon I'll be having a new topic, which will be visual
hooks like this one, which we just learned today. For now, we have a lot of VFX classes using
Adobe After Effects, and if you click here on CMore, you're going to see
even more VFX classes. Also, I have this panel, which you can see
the new classes which come out this month. Here are fundamentals
of Adob effects. Log animation, you can
always click CMore to find even more log
animations free AI tools, complex VFX, D Venture resolve, and even more classes on
VfXs and motion design. Feel free to follow me here
on Skillshare and make sure to leave your project by
clicking here on submetPjects, and I check all of them and give you feedback
if you want. Follow me here on Skillshare. I'll be happy to see you in my next class. Thank
you for watching.
 M Jake, Lets Create VFX & Cool Stuff Together