Transcripts
1. 1. Intro: Hey guys and welcome to the Character Design
Crash Course. This is the first-class of the series where
we will talk about character expressions
we discussed in the previous class about how
to draw heads and portraits. And I strongly recommend
you watch that class before this one is they
are highly related. I'm so excited to be
continuing this series. I hope I will be able to share
with you some information, some insight and
some inspiration. If you wonder who I am and why I'm teaching
you this series. Hi, I'm Laura. I'm a freelance
character designer and the children's
book illustrator. I have been doing digital art professionally for
the last four years. There are many more years of traditional drawing and
painting that came before that. Enough about me, let me
tell you about this class. This class will
cover a breakdown of multiple expressions
from reference photos, multiple examples
of eyebrows, eyes, and mouths, three different
expression sheets. And there's a bonus
that was specifically requested how to
create a moodboard. This class is a part
of a series that will revolve around
character design. So if you want to create meaningful characters that
will speak to your viewers, that will be different, special, and that
will have a story. You should definitely
follow the whole series. This is what the series will
apply each month we will cover all sorts of things
such as character portraits, expressions, full
body poses, costumes, illustration, cinematic
posters, even props. And finally, I will
show you how to create your very
first art portfolio. I know that a lot of you publish your artwork
on social media. So don't be a stranger. Let's connect and keeping
inspiring each other. Find me on Instagram is
M laura underscore art escape and send me a direct
message with a simple high. I would love to chat about art. Answer any arc related
questions that you may have become artsy Prince. Come join my small
art community. Starting this month. I have been active
on tiktok as well, and I started posting up
to two times every day. I have the same handle is on Instagram if you would
like to follow me. Because I know it's really difficult to grow on Instagram. I want to help you
grow faster than I did if my classes help
you even one bit. That has me on your
posts and I will share your art on my stories. Not only that, but if you
submit your projects in the Skillshare classes
from this series, I will feature your
work on the next class. No one will do the work for you. So I want to compensate you for your work with a little
bit of extra exposure. You will also create your
portfolio bit by bit this way. So without any further ado, let's get started with
the first lesson.
2. 2. Expressions Breakdown: Hey guys and welcome
to the first part of this class where we will
gather some references, create a mood board, and then break down
a few expressions. If you are not new
to my classes, you already know
by now that I like giving such an introduction
to my tutorials, you can first understand what
to look for in a reference, instead of being
intimidated by transforming a photo into an illustration. All right, let's jump right in. I always go to my Pinterest and start gathering
some inspiration. It's already did this
in my expression sport. So let me just show
you what they found. I tried to look for
some happy expressions, some sad ones, and some
diversity as well. At the moment when I
was filming this part, I was not entirely
sure what they would end up using
for the whole class. Now I want to save some
images in my gallery. And for the longest time I took screenshots and cropped
the picture only. Like I was a caveman
of some sort. But since then I started noticing the free dots
right next to the photo. And I came to realize
that there was a download button already. So I'm confessing to not try
and to look around too much. Okay, let's get over this embarrassing
coefficient and move on. You might have noticed
already that I found a lot of smiling,
two references. But there are different levels
to smiling as I see it. You can either go from a subtle smile to
pull out laughter. Depending on the character
you are illustrating. Maybe their smile
only goes up until a subtle smile and maybe they are angry the rest of
the time, I don't know. I explained in previous classes
of this series the story is important if you skip my
story and concept class, which is the very
first-class of this series. Then I suggest you
pause this tutorial and hit back to watch
that form first. I wanted to have in
mind the story for your original
character before you start drumming
their expressions. Alright, so let's take a look
at the anatomy of a smile. I will take all the smiling
photo references that I have and put them in
a sequential order, like how I would see
it if someone went from a subtle smile
to one all output after I recently
received the feedback to my class that they should show the whole process of me
creating a mood board. And I realized that
maybe there are more of you fulfill that foot
habit, expressed it. Thank you for your feedback. I will now incorporate it. If you, however, already
know how to do that, you can skip ahead
about 3.5 minutes. Okay, so let's see how to
create the mood board. I already have a pastel
orange or gold rows, however you want to call
it for my background. And on top of it, I took a grain brush with a
very light orange. You might even think
it's white but it isn't. And sprinkled it on the
lower and middle sites. Then I went and use the
picture mental brush from appropriate presets and made
the few simple doodles. Actually they look
it along, kept, I might try harder next time
to make them look better. All you have to do afterwards is to start importing photos. Now you just grab all
of your references and dessert them as photos
on your canvas. When inserting photos, they automatically go on
different layers. So you can select the layer and re-scale and move the picture around until you are satisfied. Since I'm mostly
interested in the face, I will make the
pictures rather big and they have no issue with
them overlapping each other. After I add them all, I will choose a
texture brush from the presets and create
frames for the pictures. If you want to draw
straight lines. Procreate has really nice and
intuitive system for debt. Draw on naturally wonky line, but instead of taking the
pencil off from the screen, when you are done, you
just hold it down a bit and procreate will make
it straight for you. It works the same if
you want or narc, or a full shape like a circle or a square or rectangle
and whatnot. So after I finished doing this, I marched all the
photos on one layer, lower its opacity and get
ready to draw over it. Now I will draw over the
references so you can see what you should be looking
after withdrawing expressions. In essence, you should
look after the eyebrows, the eyes, and the MT. Other features that could change depending on the expression
is the face shape, which can either
shrink or elongate. Wrinkles around
the eyes can form, or around the eyebrows when the character
is angry or sad. Or some wrinkles may appear on the forehead
or around the mouth. Let's start from the first mile. Does my only subtle, the eyebrows are in
a neutral position. The eye shape is not changing. We will talk about that soon. The only indication of this
being a smile is the Mount where we can see the corners
going slightly upwards. The second reference is
a little more obvious, starting from the mouth
that has a larger smile, the point that the cheeks
are affected and the foot back on if the mouth is closed. The eyebrows are also more arched than in the
previous example, but the eyes are
still fully opened. Let's go to the next one. The first thing
that I noticed in this reference is
that the smile makes the eyelids covered the eye a little more compared
to the other, to the eyebrows are arched. I would say that maybe as much or a little more than
the previous reference. The smile here is with
the Melbourne mountain. You can tell how wide it
is by the cheeks as well. In an illustration, this reference within the
app squashing the head little and making the cheeks prominent to show how
large the smile is. In this reference, the eyes
are closing even further, which could be an indication
of a bigger smile. In illustrations,
the eyebrows are slightly brought more together but not yet creating wrinkles. It's around them. The next one, the eyes
are fully closed, the eyebrows are pointing
given lower and we can start seeing wrinkles
around the eyes. This person seems
to be holding back a laughter or to
be even laughing. Okay, so the last one
has wrinkled solo over so around the eyes
and the eyebrows as well. The ice are fully shot and
the smile is very large. So this is pretty much
the process of the smile. Going from fully open
dies no wrinkles and neutral eyebrows
all the way until I stepped are entirely
close to the kind of ours shutdown type and
that great wrinkles. Now let's take a look at
some semblance and angry once the first reference
looks kind of mad, maybe a little baffled. The first thing
that we notice are the wrinkles formed
by the eyebrows, which are mostly
for us to gather. The eyebrows also are
very close to the eyes, puts the eyes themselves
are in a natural position, not wide open but not closed. Either. The mouth is in a rather
neutral positions. So I can see it adds or
removes from the expression. The second reference
is somehow worried. And a lot of the expression
comes from the eyebrows, which are very braced and the eyes are opened
more than usual. If this girl wasn't looking
upwards, but three, the head, you might be able
to see her whole iris. The final one is mad, and I liked this one because
the mouth adds a lethal to the expression since it
has a little pout as well. Alright, so in the next lesson, I will show you how
to draw eyebrows in order to show
different emotions. See you soon.
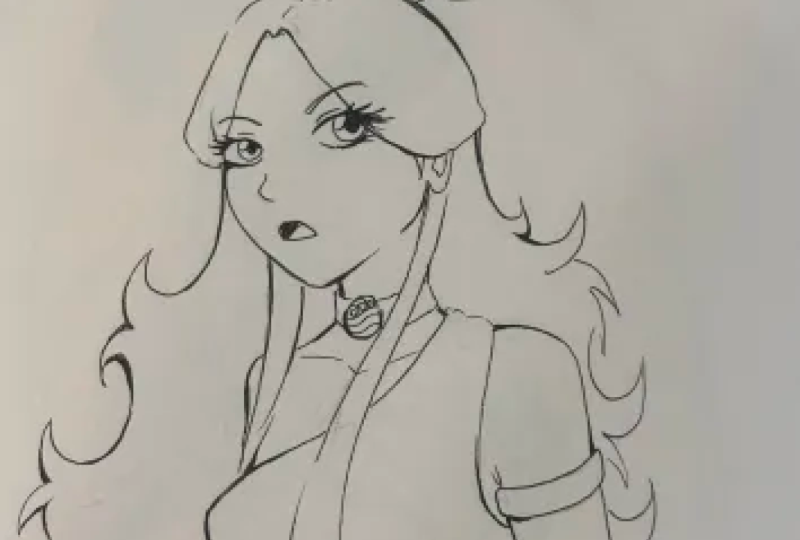
3. 3. Eyebrows: Welcome back guys. For this lesson, I prepared
to free versions of Victoria, my original character,
that we will use to draw different
versions of eyebrows. We will see how the
positions and angles of the eyebrows help to show a different
expression each time. That means that take
into consideration that the eyes and mouth are
in a neutral position, the expression won't be enhanced
by them in this lesson. So for the first
free expression, so I will only play around with the height of the
eyebrows and you'll see how each height can be
interpreted differently. I'm sketching below
the essence of what I'm trying to obtain
with each model. We will start with the high
position of the eyebrows, which can show surprise,
disbelief, £40 superiority. The ISR slightly close. It could also be a
sign of Bordeaux. Having a shorter
distance between the eyes and the eyebrows
can show a lethal Adler. Or it could mean that your character is
focused on something. Finally, having them so close to the eyes that almost
seems like they're touching the eyes is a way of exaggerating the expression
to indicate anger. However, in this case, she doesn't seem that angry
since her eyes are opened. They have a neutral position
and no wrinkles are forming. But we will get different
expressions as well and we will see how that can affect
the expression overall. You'll see when we come neutral
face the eyebrows still create three
different expressions depending on their height. Now we will try and
under free expressions, this time, they will vary in the way the arch
or in their angle. The first one is
quite easy to read. The position shows sadness, contempt may be betrayed
or empty inside. You can always use liquify
or the Warp Tool two weeks saturate the angle
even more in order to obtain the
desired expression. The next one is
rather surprised. The arch of the eyebrows is
very visible with the eyes. That's the model has right now. It almost looks
like this belief. The final one is an asymmetric
position of the eyebrows, so it shows lack of confidence, maybe want to confuse or
sarcastic in Luke, polarized. So now we will move on to a
larger range of expressions that we can obtain through the combination of
eyes and eyebrows. See you soon.
4. 4. Eyes: Welcome back. In this lesson, we will draw a lot of pair of eyes to show a wider range of expressions that can
be obtained with the combination between
eyes and eyebrows. Let's get started. I want to start with some angry expressions so we can see how the eyes positions can influence the perception
of the emotion. Over here we have a rather
simple expression of frown on one of the
eyebrows wrinkle to show that the eyebrow
is brought forward a lot and the eyes
are mostly open. Let's see the next one. This one, the eyes
are wide open, the iris is fully visible. This shows a certain degree
of surprise or shock, and it's accompanied
by arched eyebrows. Let's add some
wrinkles to show that the shock isn't
generating anger as well. Now let's try to have one of the eyes more close
than the other. The eyebrow of depth, I should be closer to the eye while the other one
is more arched. Let's see one with
the eyes closed. We can still show frustration
like this as well since the wrinkles will
be doing most of the job. Now we will move on to
some bored expressions. We can make the upper
eyelids cover more of the eye and showed that the
eyebrows are quite high. And this is a typical
board expression. Let's try to make the
little frustrated. The eyes will be
one more closed, so the iris will occupy even
more of the available space. And now the eyebrows are
brought down enough crown. Now let us go from
incredulous look. The irises will be facing up and the way the
eyebrows or position shows a disbelief towards what the character may
be seeing or hearing. Next one will be
looking downwards. So maybe it's a sign of superiority or might
be off this cost. Now we have a different
expressions obtained by the position of the
eyebrows, the eyes pose. Let's try some happy ones. But these expressions will be more limited due
to the fact that a lot of expressions will be obtained through
the mouth position, which we will see
in the next lesson. The first expression here
is a rather neutral one. But due to the eyebrows, it seems like the look is
warm, maybe from trusting. What if the eyes
would be more closed? It almost looks
like romantic look. Or if there's no smile, it could be a board look. That's why I said that in this case is the mouth
makes the difference. Let's try it with
the eyes closed. This one is quite
obvious to be happy no matter what's
the mouth shows. Finally, let's go for a surprise plan and
we will continue with it in the next lesson where we will pair it with
different mouth poses. I will see you guys
in the next lesson.
5. 5. Mouth: Okay guys tend to see how mounts are affecting
an expression. I told you previously
that some expressions could differ a lot depending
on the mountain position. Let's take center of ice from the previous lesson and
slept some most honored him. I'm selecting with
the Lasso tool, this verifies and copying it. Then I'm creating a new layer
and paste it over there. Then I will add the burst
simplistic mouth only so you can get an idea
of how much can change. Let's also add a node
so it makes more sense. It might look a
bit weird since we don't have the shape of
the face framing this, but it's only for
illustrative purposes. In the next free lessons, we will draw complete faces
and expressions together. We have a shy smile
with a pair of eyes. How about we erase this
and now try the opposite, a subtle from without changing
the eyes and eyebrows, the month position makes
a huge difference. Let's try an open mouth now and it looks like this person or this face trying to warn
someone about something. Useful Liquify to
lower the corners of the mouth and the personal
looks less concerned. We can also change the shape
of the open mouth and it looks like this phase
person is flustered. Let's move on to the
next pair of eyes. For this pair, we will try
making some happy expressions. Let us begin with a
slightly open mouth. And maybe this face person
is glad to meet someone. Let's try smile with
a closed mouth. Now, foreclosed mounts, I usually try to make the
middle of the lips and the corners then
connect them with wavy lines so as to show
the volume of the lips. Afterwards, It's time for us the lower lip rounding
with this curved line. I tried to avoid drawing
the line art of the lips because they look better
when they have soft edges. Now we feel simple lines. We can make it look as if the face person is holding her laughter
backward, is chewing. Those homemaker
small open smile to make it look innocent
and feminine. Now let's copy another set of eyes from the
previous lesson. We will use this
neutral expression and try to see what
we can do with it. They as thing that
comes to mind is to make it neutral, sad like this. We can also make it look middle college
with a soft smile. Or we can do an
open mouth and it looks like it's trying to argue. Now the last one is a
subtle open mouth smile. In the next lesson we will start drawing full expression sheets. See you soon.
6. 6. Angry Expressions Sheet: Hey guys and welcome back. In this lesson, we will draw a sheep demand rate expressions because anger can be portrait
in more ways than one. I pulled up a reference photo on the left of the
canvas and they will simply try to get
some inspiration from it and not
follow it towards B. Now, drawing this expression
sheet will involve drawing heads who are not
experienced in this. I suggest you watch my previous
class from this series, which is about drawing
heads and portraits. In that class I explained
how I think when I'm drawing pins and what methods you can use practice drawing. I feel quite inspired. Try throwing the open mountain
rage is usually explosion. I started quite doing the
eyes and the eyebrows, which sets the tone for
the whole expression. I also tried to show a wrinkle
on the bridge of the nose. Like in the reference photo. I want to obtain a rape, so I will try to grow the irises as visible
as possible so there won't be the
impression that the character has ***
partially closed. I also decided to make
the character clench their teeth instead of
having a fully open mouth. The mouth would have been open. It will also affect
the shape of the face. You can't really have
an expression with an open mouth without
eliminating the face. The same way that the different expressions
with make the face shrink. Okay, so I'll clean this up a bit and leave it like that for now until I decide what the design I should
keep the character. The next expression I
want to go with something silently mad with
the eyes closed, but with the feasible
from the eyebrows. Basically in this lesson
and in the next few, we will capitalize on what I showed you until
now and we will see how one or more of the framework them
features we talked about. We will fit the expression, namely the eyebrows,
eyes, and mouth. We can also use
the liquify tool. Move around the
features on the face. Don't be afraid of using
your digital books. That's why they are there. Now moving on to the
final expression, I want the heads to
be slightly inclined in this one and I want
them to be looking up. This could show a sign of
a slide dominance coming from the character that this
one is interacting with. I also wanted to show
the lower eyelids a bit brought up which will
intensify the handler. Okay. So while I was drawing. It figured I could transform
this character into one of my original characters who
is rather moody and bossy. This is Connor and this is an
illustration of him and of Alice from the story that I never really finished
illustrating or posting. Maybe someday I should
get back into that. The first expression
I want to add some motion to the
post so I will make the banks to be a bit bouncy and the ends will be a lot
spikier than usual. In animation. Details
like this adds to the context and the
storytelling of the moment. Alright, I will let you watch
the rest of the sketches and how I in them and I will
see you on the next one. Feel free to take a break, walk around patrilocal, come back with fresh
eyes and more energy.
7. 7. Happy (Smiles) Expressions Sheet: Hey guys and welcome back. In this lesson, we will make an expression sheet
full of smiles. I note the title says
happy expressions, but the smile isn't
always happy. And I think it's more
interesting to show a variety of smiles bird
with different expressions. This time I already picked up on original character
of mine that will be the place of this
expression sheet. You can see her in
my reference sheet. This is Alice. Bulky. So let's start. I want to make a fully
open mouth smile, the kind that goes together with closed eyes and highly
raised eyebrows. I'm going with a
slightly inclined head, which in my opinion shows a playful side of the character. When drawing this kind of smile, I usually go for around
their shape for the mouth, and try to avoid script
lines and harsh angles. After cleaning up
the schedule lethal, I will start adding the hair and the shoulders and the
little bit of the shirt. I loved drawing Dallas his hair because I can play
around with the volume, true unkempt streets
of hair-like BCE. You can see more of her
on my social media. All right, Onto the
next expression. For this one, I want
the closed mouth smile, but still the kind of
white eyed, bright smile. I will go with the partner
view for the face. I will make the eyes really around and the iris
will be smaller. So you could still that
her eyes are wide open. I think I mentioned this before, but I try not to draw the
contours of the lips. And they would rather draw
the smile and the lower, if only the color
will come later. Her eyebrows will be rise, then we will give her
a bit of a blush. Maybe she's really happy about something or
about seeing someone. Time to add the
hair starting from the banks that will
frame her face. Just like before. Don't be scared to use the
Liquify tool whenever you want to edit some proportions
instead of redrawing them. Same goes for any other digital
tools that you can use. Finally, moving to
the left fresh and I want this one to be
the kind of sad smile. So I will be making
the head facing downward so lethal and
she will be looking up. It makes me look more
bashful like this. The ice will be a
little closed so the iris will take up
much of the ice space. Eyebrows will be lower than
in the other two expressions. Smile will be subtle
and asymmetrical. Now I'm adding the details and the final sketch
will be complete. After finishing
all the sketches, I will proceed to
draw the line art. I will let you guys watch the rest before going
to the next lesson, which will be about
sad expressions. In
8. 8. Sad Expressions Sheet: Hey guys and welcome to
the last expression sheet. In this final expression sheet, you will see me draw my
original character of Victoria in free
different set poses. I want to start with a
disparate kind of pry the ugly kind where you can't
keep your mouth closed, the lower lip is going up, tears are streaming
down your face. It may sound complicated, but in reality in
this case the mouth. Thus most of the work and the tears are simply adding
to the dram activism. I mentioned this before, but it's really important
for you to understand how to draw heads before you
jump into expressions. I highly recommend to check the second lesson
from this series, which explains the two
methods you can use to exercise heads and the
different positions. The second pose, I want this
add expression that will face upwards in a really
melancholia equate. I will want to draw bigger
races that are partially covered by the eyelid
in the upper part. For some nice details, when you color this, you can play around
with the lights in the eyes to make
them look watery. The final pose I wanted to
play around with the shape of the and make her half
her eyes shut down. So much death her
face seems trunk, just like the posts from before. This one is highly
refined by the eyes and the mouth plays
only a small role. That's it for this
expression shape. You can handle around, watch how I polish the sketches, or you can tend over to
the final lesson where I will be giving you your
project. See you soon.
9. 9. Project and what's next: Congratulations, we're finalizing
this first-class from the Character
Design Crash Course. I'm so excited to be
doing this series of classes and I hope you are
loving it as well so far. I'm hoping to see many
entries from you guys because no matter how many
classes or tutorials to watch, whether they are free or paid, not working on what you
learn will get nowhere. If you watched this
class until the end, I know that you are
one of the people determined to learn and
get better results. Demonstrate that by
publishing your project, you will get detailed
it back and you will also get featured
on the next class. Your project is to draw one expression sheet with at least three
different expressions. It can be the same character or different characters
in this sheet, whatever makes you
most comfortable if you found this class
useful in any way, I would love it if
you followed me on Skillshare so you could get constant updates
on my new classes in-between the class
of the series. I am sometimes creating a shorter class in a drawer
with me kind of style. Last month there was one
about growing plants. This month will be about
drawing a mermaid, since it's more money
for the whole month, the filming is ready
for that class, so I will need to prepare
the voice-over and it also please follow me
on Instagram as well. It's where I share all of my art for three to five times a week, depending on how much time I
have for drawing on Tiktok, I post once or twice daily and lately it has been
picking up two. I would love to see you
there and gets to know you. The next class within the series will be about drawing
full body poses. If you have any specific
questions on the topic, don't be afraid to
ask until next time. Feel free to watch
my older classes for more details on coloring. And I will see you guys soon. Have a great day, a great week, and the greater growing
session, Bye guys.
 Lara Militaru, Digital Illustrator & Coach