Transcripts
1. Introduction: Hey guys and welcome to the Character Design
Crash Course. This is the second class of
the series where we will talk about head structure
and drawing portraits. I'm so excited to be
continuing the series. I hope I will be able to share
with you some information, some insight, and
some inspiration. If you wonder who I am and why I'm teaching
you this series. Hi, I'm Laura. I'm a freelance
character designer in the children's
book illustrator. I have been doing digital art professionally for
the last four years and there are many more ears of traditional drawing and painting
that came before depth. Enough about me to let me tell you what this class
will be about. This class will cover
two different methods of drawing the head because
I know that some of you need some reminder
on foundations and it's always great to
return to the essentials. Afterwards, I will
tell you about the free tool that you can
use at any given time. I will show you how to
draw on references. We will draw together heads
in multiple positions, and we will get the references for the
actual illustration. Finally, I will show you
how to draw a portrait into lighting scenarios and
health work smart, not hard. And of course you will
have a project to work on. This time I'm giving you a beginner level project and
the challenging project. So depending on where you are
on your artistic journey, how much time you
have on your hands. You can choose your
preferred project. This class is a part of a series that will revolve around
character design. So if you want to create meaningful characters that
will speak to your viewers, that will be different, special, and that
will have a story. You should definitely
follow the whole series. This is what the series will
look like each month we will cover all sorts of things such as character
portrait expressions, full body poses, costumes, illustration, cinematic
posters, even props. And finally, I will
show you how to create your very
first art portfolio. I know that a lot of you publish your artwork on social media. So don't be a stranger. Let's connect them, keeping
inspiring each other. Find me on Instagram as
am Laura underlined Arc escape and send me a direct
message with a simple height. I would love to chat
about our answer any art related questions
and become artsy friends. Common joined my,
the art community because I know it's really difficult to grow on Instagram. I wanted to help you
grow faster than I did if my class has
helped you even one bit. Tag me on your posts and I will share your art on my stories. Not only that, but if you submit your projects in the Skillshare
classes from this series, I will feature your
work on the next class. No one will do the work for you. So I wanted to
compensate you for your work with a little
bit of extra exposure. You will also create
your portfolio bit by bit this way without
any further ado. Let's get started with
the first lesson.
2. Loomis Method: All right guys, so in this
glass I will tell you about the two most common methods
for drawing the head. But before I dive
into the first one, I want to mention something. I know, I know it might
be tempting to skip over these two methods and
jump straight into drawing. But trust me, I've been there, I've done that and
they simply plots that the drawing after an animal reference will help me understand what
they need to draw. Well, let me tell you that it took awhile, but in the end, I finally realized
that I wasted a lot of time not knowing
what I was doing. So eventually I
started thinking that maybe all those
artists who insist and having strong foundations might know what they
are talking about. Maybe it was worth
spending some time doing some ugly sketches that
I didn't show to anyone. That being said,
let's start with the really easy and fast method that can help you understand
proportions bit there. This technique is called
the Loomis method, named after Andrew Loomis. This guy even wrote
a book called drawing the head
and hands in 1956. And believe it or not, it's a great book
up until this day. I have a PDF of this
book which I am going to attach in the resources
section of this class. I highly recommended
list skimming through and maybe practicing
some of the switches inside. So let's get started with an extremely short version
of this method and how I use it for quick outlines and proportions that I need
to consider when drawing. Usually for practicing heads, I recommend looking for male
portrait pictures because they have more obvious lines
that will help you practice. While female portraits
are difficult to exercise after because
they have faces that are soft and the shadows hardly indicate the
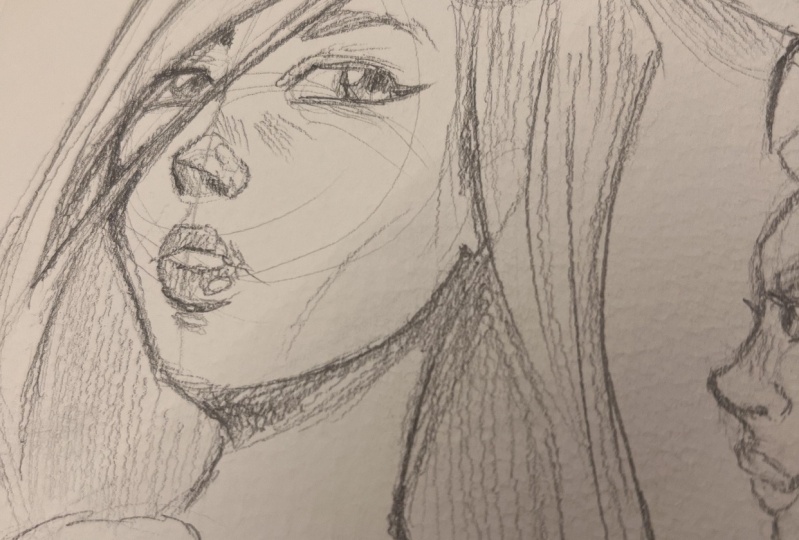
planes of the face. I have here three
different portraits in different angles. I pick them up from Pinterest in about five minutes of scrolling. So it shouldn't take
you too long either. But let's reduce the opacity of these pictures and drawn
on a separate layer, what we should be looking after Bluemix head starts from
a sphere or a circle, in this case, which will have
its extremities cut off. This is where the
ears will be pleased. Now you caught the circle in the middle with an
horizontal line. That's where the
eyes will be placed. From this line upwards at
the half of the distance, use another horizontal line. This will be the
hairline similar towards the bottom is where
the tip of the nose will be. The upper part of the circle
marks the top of the head, and above it will be the hair. Remember that hair won't
stick to the headline. It has volume. So it will be above this circle as it is
in the reference. On the lower side of the circle is where
the mouth will be using the same distance that you have between the
nose and the mouth. Going lower, you
will have the chin. The top of the ears will be
on the line of the eyes, and the lower part of the ears will match the line of the nose. The face is supposed to be
symmetric and this theory, however, it won't
always be the case. Methyl faces fit this model, of course, but for
illustrations, It's a good practice
for you to get used to where features of the
face should be placed. Let's move on to the
next preference. For the profile. Those we will
also start with a circle. It's extremities should match the forehead and the
back of the head. Draw another circle inside. This is where the
sphere would be sectioned if you saw it in 3D. Keeping in mind that the line of the eyes need to touch
the top of the ear. And the line of the nodes must touch the lower part of the ear. Let's go ahead and
trace this lines. Now let's sketch the line of the face going straight
down from the eyes. Another straight
line for the jaw, now going up towards the ear from this
intersection point. Simple triangle for the nose. And don't forget that the loops
will come outwards a bit. The upper lip will be more
prominent than the lower one. Again, the hairline
comes over here, same as in the first reference. That's pretty much
it with the profile, one broken down like this. I think a lot easier
to understand. Now for the one looking upwards, I'm starting again with a
circle and the middle line that defines the
placement of the eyes. Make sure that you respect the 3D shapes and
you use curved lines here in order to show that the perspective is different
from the other two. In essence, the
proportions are the same. So after you exercise
it for awhile, you will understand and gain an intuition about where
everything is placed. Now let's move on to actually
practicing the Loomis head. As usual, we will
start the circle for the head and another
one for this section. Then continue with
the eyes line, the hairline, and the nose line. Then we will create the frame of the face and the jaw line. Then if we trace
this line like this, it will be more obvious
whatever planes are. This is a simple
example of how it can exercise without spending
time on the face, it is just as important to understand the
structure of the head. Let's move on to the second one. A portrait in profile. Steps are, as I've
shown you before. So I will let you
watch this part and then we can move on
to the second method.
3. Asaro Head: Welcome back guys. In this lesson we will talk about the second method
of drawing heads, and that is the Asara method you might have heard of
the SRO had before, but if you didn't, No worries. That is what we're
here for. The US. Arrowhead is in
essence a free D, simplified model
of the human hand. And I'm saying simplified
because it's meant to show only flat shapes or if lanes and basically
no curved lines. You can see on the
screen two shots of freedom models of the arrowhead. One of the male and the
other one for female. This shots are taken from a
free tool on art station, which we will talk
about in a minute. If you can use the lumen method to understand how to
construct the head, the Asara method
allows you to better understand the planes
of the head and how the position of
your light sources creates shadows on these planes. Therefore, it is not a matter of preferring one
method over the other. You need a little bit of both
whenever you are drawing. Now let me show you the
tool I was talking about. As I mentioned before, it's a free tool which you
can find on art station. I will attach the link in the
description of the class. From my experience,
it's easier to use this tool on a computer
rather than a tablet. And simply take screenshots of the posts you need to
use as a reference. The tool allows you to
move back and forth, to rotate the angle of the head, to choose your favorite
lighting direction, and to choose between
female and male models. I recommend trying
to draw the SRO head and explains a few
times and simply create a rough version
of the plains and shadows in order to
get the hang of it, you don't need to share these
sketches on social media. So feel free to make them
look ugly with time. You will definitely
learn to do it better. In the next lesson,
we will warm up a bit and draw the head in
different directions. We don't need to make them
look beautiful just to get the technical idea of how to
draw nine different poses. Afterwards I will take two
screenshots of the SRO head in different poses and
lighting scenarios and use them for two portraits. I will show you how to choose your references and
create a mood board. And then hot correctly set up your canvas depending
on what your goal is. I will see you guys with
this preparation phase soon.
4. Head Positions (updated): All right guys, Welcome back. In this lesson, we will
warm up before drawing our portraits by creating nine
different head positions. We will only sketch
over here so we won't have to go into
too many details. The objective being to
get used to drawing different poses rather than
making it look beautiful. This is our grid and we will
draw a simple front view. We will draw a head looking
upwards and then looking. Then we will make the head
shift to the left for all of these three positions and
then shift to the right. Let's get started
with the front view. We will be mostly using
the loomis method here. So we will start by
drawing a circle, then a vertical line in order to establish that our head
is looking forward. Horizontal line to establish
the position of the eyes, then the jaw line that
goes below the circle. Let me just erase the circle a bit to make the
sketch look cleaner. Although I'm only doing
this because I'm filming, usually I work faster. And mesier, don't let the cleaning phase bother you when you are
doing this exercise. Drawing the neck to add a bit
of stability to the sketch, I prefer it like this rather than having only
a floating head. Now, refining the side lines
a bit and adding the ears, the eye sockets, the
nose and the mouth line. They are all simplified and
stylized because this is after all an
illustration class and not a figure drawing
one basically. In this exercise, you
will see me jumping into the stylization
after establishing the heads and the
features positions. You can do that as
well if you want, or you can stick close to your chosen reference and
more realistic sketches. In my opinion, the front facing P is the
most difficult one, as it makes you create a
somewhat symmetrical face. Any imperfection will
be immediately noticed. Not to mention that
in illustration, it's the pose that is
the most boring and lifeless you would normally want to give your subject
some life, some dynamism. And it's rather
difficult to do that with a perfectly
front facing pose. It's better if you give it even a bit of a
tilt or rotation. So this is our sketch. Let's jump to the
upward facing post. I will just copy paste the previous sketch to maintain
the overall proportions. Now I will erase the face and line and recreate the circle
and the vertical line. The vertical line remains
in the same position as we are not yet rotating the head to the left
or to the right. It will only be looking upwards. And we will sketch that
through the horizontal line, which will now be curved with the highest point intersecting
the vertical line. Remember, this will
be our eyes line. Also, the vertical line needs to stop where
the chin will be. Since our head will
be looking upwards, there will be a
foreshortening effect, which means that our
face will seem shorter. Let's draw the jaw line to better understand
how it will look. We will also see the part of the neck that is usually
hidden by the chin. Let's make this
shadow like this. Although the head
is looking upwards, if the light source
is above our head, there will be a
shadow formed here. Now, due to the position, the nose will appear
to be higher. Same for the mouth and the ears. However, you need
to remember to also create shorter distances
between the eyes, the nose, and the mouth in order to correctly represent
the foreshortening. The hair line will also be towards the top
of the head nail. So drawing hair might
help you add to the pose. I will sketch some
generic hair shape to better emphasize what I mean. Now let's see how it will look like while
facing downwards. Still grabbing the original pose in order to maintain
the proportions. Erasing the face and
redrawing the circle. Since it's looking downwards, we will also move the
circle a little lower. Now we will have the
same vertical line, but the horizontal line will be curved in the opposite
direction from earlier. Now we will have a
larger forehead, since it's closer to the viewer. And shorter distances between
the nose and the mouth. Since it looks slightly odd, let's add some generic hair. The point over here marks
the center of the hair. Imagine that all the hair will basically go from this point to the tips of the hair
in the other two poses. This center point will be different due to the
different angles. All right, let's move
to the left side of the canvas where our character will be looking to his right. Let's copy paste the
original proportions. Erase the face and jaw and adapt to the neck
and the shoulders. Now what will happen is that our vertical line will not
be in the center anymore. It will move towards our left, but the horizontal line
will be still centered. See how much this
cross helps you to determine the position of
the head you are drawing. Since we can now
better see the ear, let's also draw the
oval over here. Imagine this is where your sphere would be
sectioned in three D. Now let's add the nose somewhere around
the intersection of the vertical line with
the circle at the mouth, below the circle, The eyes
and the eyebrows clean it up. And that's it for the
upper and lower angles. We will have the vertical line in the same position as before. And we will only change
the horizontal line. The essence is the same. So I will let you watch
the rest of the sketches. I highly suggest you also draw along to get a feeling
of the different poses. I will see you guys
in the next lesson, where we will choose
our references and create our mood board.
5. References and Mood Board: Welcome back guys. This lesson will be a short
one, mostly twenties bar. You have to use Pinterest to
the best of your ability. I usually create boards
for all sorts of things. From portraits to lighting
scenarios that inspire me, or to specific animate
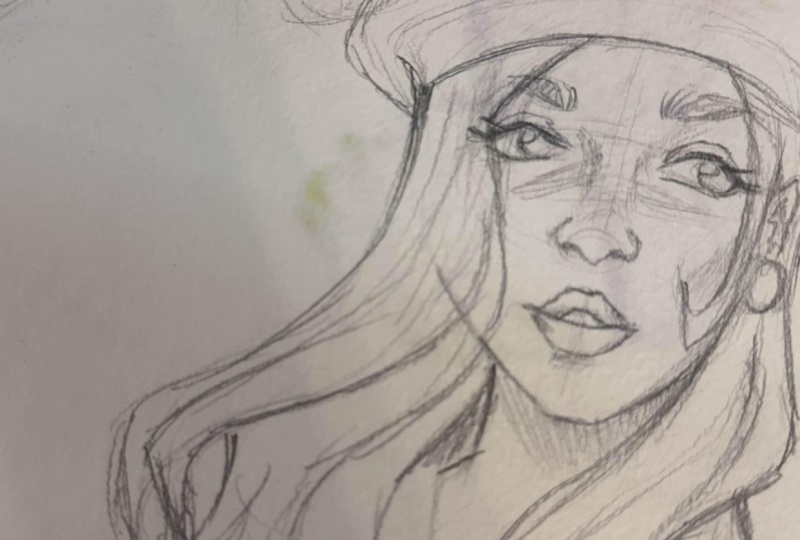
that had an awesome art. Let me show you my board. So portraits and the one that inspired me for my
next illustration. I want to use disposed
because it looks sort of dreamy and lips a lot of space
for adding dynamism fluid. Still looking around
to see if I find something that suits
what I wanted to draw. But they might stick to the
first one that I found. When I'm done, I save
the image on my gallery so I can then add it
into my mood board. After scrolling for awhile, I found my reference. So let me show you
my mood board. I create a moodboard
is appropriate by adding all the elements
that I need in one image. I will lay their bring this up as the reference
on my canvas and I will simply zoom in on the specific reference
that I will need. At every point of the drawing. Over here, I have the
portrait that I found on Pinterest into
lighting scenarios from the arrowheads tool that
I showed you before and the sketch from a few years ago
of this character of mine. I think this is the first
post I made on Instagram. So it's quite an old one. In my previous class, I mentioned that Victoria, my original character over here, will be the one that I will be drawing the most
during this series. So I hope you guys
liked her design. Alright, let's save
them on board and I will see you on the next
lesson where I will explain quickly how to create your canvas and what
settings choose.
6. Setting Up the Canvas: Hey guys and welcome back. Before jumping into the
sketch and everything else, I wanted to show you guys
how to choose your canvas depending on what you want
to deal with your artwork. I'm in my procreate gallery
now and you can see the size that I tend to
use for my artworks. If we go up here
on the plus icon, we will also see
that I have saved a few templates that
I repeatedly used. You can see for each template
that it has a name or code, like the F3 for instance, and the size either in pixels
or inches or centimeters. The template the most is this one for
Instagram portraits. I actually found that this is
an ideal size if you don't want to get your artwork
cropped by the app. But let's see what it's like. If we want to make a
new custom Canvas. First, we will need
the dimensions. Anything around three to 4 thousand pixels
should be quite decent. However, if you are working on a specific project or
banner or a book cover, you will be given
specific instructions from your client or your job. But what you need to know
as an artist is that dpi is what saves the quality
of your illustration. My suggestion is to have around 300 DPI at
any given time. Going bigger than that is unnecessarily consuming from
the layers you can use, but going lower than
that can damage the quality of your final image. Now let's move to
color profiles. In essence, there are two big categories that you need to know about no matter what
software you will be using. Rgb is the color profile
that you will want to choose if you want your art
to remain on a screen. It because greens
are made to read colors in one sense of
red, green, and blue. Therefore, this
color profile will make your artwork
more saturated, more vibrant on screens. And it's perfectly
adapted for this medium. If you only want to publish
your work on social media, this is the way to go. And I usually just choose the first option from
the RGB when I need it. Now on the other side, if you want to print your art and you want the
colors to be vibrant, RGB is not cut out for that, your colors will look
at DOL lifeless, totally different from what
you see on your screen. If you want to see
your art print, or download, julio need to
go with the second profile, CMYK, which stands for
cyan magenta, yellow, and black, which is adapted for most of the commercial
printers out there. Again, if you want
to print your art, I will choose the first option
from this color profile. Now that you know how to
choose your color profile, let's get started
with our canvas. I will post this portrait
on social media, so I'll be going with
the Instagram template. Feel free to copy
the settings and use them for yourself
if you want to. Now I have my canvas
where the sewing. The next lesson we
will start sketching.
7. Sketch Process: Hey guys and welcome to the
sketching part of this class. I think this is my favorite
part when ideas are getting out of my head
and onto the canvas. First in a rough shape and
then into a polished one. I'm actually working on making my sketching process more
clean for you to see. I want it to be more presentable and I'm hoping that it shows. Anyway, let's get started
with the actual thing. I pulled out my reference from the Actions menu and then
from the Canvas subsection, just choose the reference
and grab yours from your own gallery
and then resize it however big you want to zoom
in or out of it as you see fit and place it wherever
you want on your screen. That's why I put
all my references on one image so that
I don't have to keep changing the
image or splitting this screen between
gallery and Procreate. Although I do that
sometimes as well. But this method takes
a lot less space of your screen and beliefs, a lot of room to actually drop. Let's apply what we've
learned so far in this class. In order to create the
general shape of the head, I will start with the circle. Create the vertical line on the lift and the horizontal
line for the eyes line. The vertical line is a little too transparent to
see on the video. And unfortunately I'm only
seeing this while editing, but trust me, it's there. If you don't know what
I'm talking about, you probably skipped
listen for this class where I show you how to draw
hits in different positions. So stop watching
this lesson and go back to say it and those
who practice, okay, So following the vertical
and horizontal line, I will create the jaw line
that's going towards the year. Before drawing the year, I want to go ahead
and draw the neck. And the name is, it's quite important for
the post I chose to draw. One minute later,
we already have our base sketch down and now
we have to add the features. I start either with the eyes or the nose when
sketching the features. In this case, since
it's a quark, their pupils, the
characters, right? I depends a lot on
the nodes position. So I start by drawing the
nose and then the loops. This is going to be
a stylized portrait. So I'm using simple shapes
to create the features. And this can depend on
each artist's style. If you haven't found your
art file yet, no worries. The more you draw
and the more you study different art styles, the sooner your style
will form on its own. We added the eye as well
and they mutually going for a big guys with
few but fig eyelashes. It has been my style
since my high school days from the bleed chart style
influenced mine a lot. If you don't know
the bleach anime, you are probably way too young and I'm probably way too old. But the animates coming back this year for the final season. So you might hear about it soon. Anyway, back to our sketch. The beauty of
digital art is that you can get to
have a freedom and adjusting some things
and moving them around the canvas without having
to draw them again. It's way more
economic in terms of time and materials
and traditional art. It's time to add the hair. And I admit that I have to look for a few references
for the kind of hair that I chose for Victoria back when I
first created hurt. She doesn't exactly
have pigtails. More like all of
her hair is short, excepting for too long and thick hair streaks
that frame her face. In portraits, you can
use the hairstyle to your advantage and add the
dynamism to another wise, static posts create some streets of hair that seem to
have life of their own, or use the hair to
favor your composition. It really all depends
on your imagination or your references. In your hair. I have two separate classes on different hairstyles
and how to render them. So if you need help on that, go check out those two classes of mine after you finish
watching this one. Okay, so now we have
our sketch ready. What we need to
do now is clinic. I worked rather clean on
this layer, what they want. So I usually want a
cleaner line art. Before I jump into coloring, we will lower the
opacity of the sketch, a new layer above it. And using the line art
brush from my brush set, I will start going
over the sketch. You can find this brush set in the resources section
of this class. Feel free to download it and use it for your own line art. When it comes to line art, it's important to vary
the weight of your lines, make them thicker towards
intersections and where shadows should be
intense and thinner, where light would hit the area. Make sure your tablet
and your stylus have pressure sensitivity so you
can play around with this. It will take time to
master, but once you do, it will be so fun and easy
to create your lines. I will let you watch
the rest of the sketch face and I will see
you in the next lesson where we will start putting down our base colors. See you guys.
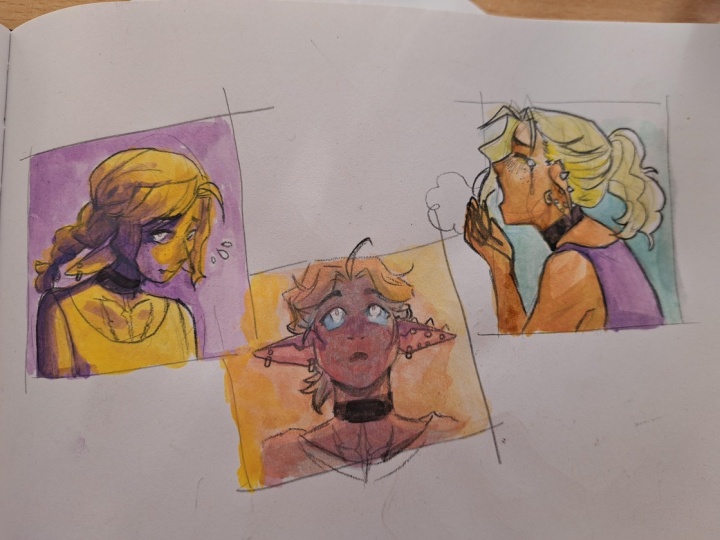
8. Base Colors: Welcome back to the class. In this lesson, we will throw in the basic colors of our portrait
and adjust the minority, make them work together. If you have seen my
previous classes, you know that I usually go for a grayscale color method because it saves a lot
of time in my view. But for this class I'm trying to change the approach
and see how it goes. Victoria has a pretty
earthy color palette. She has a slightly darker skin, warm brown hair, and
the golden eyes. I will use the Lasso tool
with a fill color option activated and create a selection to fill in the skin first, I will keep the layers for each parks that
breath at first in case I want to come back at any part and adjust the color. It also helps to
put the color on the background so we will not get distracted by the white. Having all white on the
background can make any color look darker
than it actually is. Try to put down the color
of your background or if you don't know what you will do with the background yet, fill it with a light gray
and change it later. Now we will do our first
color adjustments. For this, you will choose
the adjustments menu and go to any of the options
that procreate gives you. From Hue, Saturation,
Brightness, two curves. Gradient that digital tools
to your advantage and play around with
colors until you feel like they go well together. I want to change the color
of the lines really fast, the white bull to the
layer on Alpha Lock. And this allows me
to color only take distinct pixels of the
layer. For the eyes. I'm going for almost
the black eyelashes, and for the rest, I will choose
a slightly darker color. I will choose a slightly
darker color than the base. In the end we will add the little blush on
the cheeks, nose, and shoulders, which
we will smudge using the damp brush from
the Procreate resets. Now let's clean up and
we have our base colors. This is where you take your
time to check out the colors and adjust anything that
needs adjusting, make those. Afterwards we will march oldest layers after
fading copies, of course. We will start rendering or two different
lights scenarios. I will see you on
the next lesson, which will be the
daylight scenario. Bye guys.
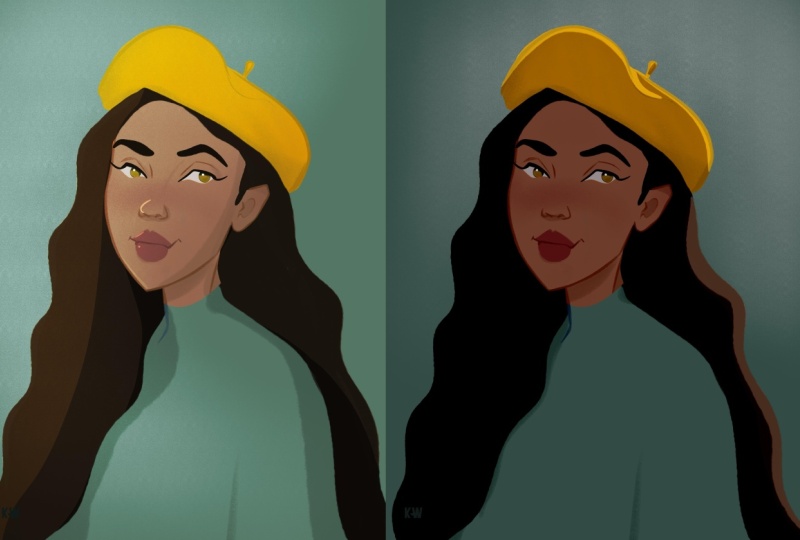
9. Day Light Scenario: Welcome back guys. This is probably the longest
part of the class so far because this is where we will do most of the work
on our portrait. We will add shadows and light at the bounce light,
create the background, and make it so that the character blends
in the background instead of looking like it was copy-pasted from a
different place. If you've ever had
issues within the grading your character
in your background, and then keep watching
and they take notes. Okay, So starting
from our base colors, the first thing we want to do is establish the direction
of the light. On my reference sheet, you can see the arrowhead. The right side of the
character's face is in shadows. Let me show you where the light source would
be coming from and show you where the shadows
would be on my character. Since the shadow is in the lower right
side of the canvas, shadows will be on the
opposite part of the face. Things like the hair, the notes and the
planes of the face will create shadows accordingly. I will mark them out with portfolio on the
canvas so you can have a general idea before we
start adding more shading. Now there are multiple ways of adding shadows
on your portrait. You can either faked
by hand darker colors or create the multiply layer
and select the Base Color. Or even use a
combination of the two. I'm using a multiply layer
and that they're picking up the base color I adjusted to
be more on the red spectrum. I will only lightly touch the areas that I
showed you before, and they will then
smudge it with the damp brush from
the Procreate presets. The objective here
is to get a tint of shadows and to have a soft base. So we could later come with
some more chunky shadows. The combination of
soft and hard shadows will give volume to
your illustration. And also it will create
visual interest. Now I'm grabbing a brush
with hard edges and you can use any brush like
this that you have. There are two like that with low opacity in my
brush that as well. Or you can use the
Procreate basic hard brush with a lower opacity. On a separate multiply layer, I will strengthen some of the existing shadows
with this hard brush. You can use the lower
opacity to create multiple layers and
add extra depth. If you don't like how the layers of different
opacity combine, just match those intersections
with the hard brush, but try not to touch the edges using the same brush
but in a smaller size, I will try to add more
volume to the hair. Now that we have enough
shadows to begin with, let's add our first
layer of light. On a separate layer. We set it to color
dodge and using a bright red with the same
hard brushes before, we will start adding
light in some key points. I usually add them in the eyes, nose, flips on the cheek, debt is facing the
light on the hair and in this case on
the shoulders, inches. Just like before we want the combination of
soft and hard edges. We will smudge some of the edges while some other we
will leave them chunky. We will leave unused
the lasso tool, but this time without
the color fill activated and create a really
hard edge of light. Right now we are going to
clean up our layers a bit. Let's group these layers
and create a copy, then March the copied
layers together. It's time to play around
with the color adjustments before we jump into
adding more details. Afterwards, I make
two duplicates of this layer and
make each one of them in a different gradient from the gradient menu and
then adjust its opacity. I'm going with a layer of portfolios and the
layer of yellows. And my goal is to use only
a part of which one to pay extra shadows in the case of purple and extra light
in the case of yellow. So I will erase a
part of each of the layer and then merge
them all together. This is what we have so far
and some might even stop here because the illustration
has quite a finished look. But we will push
a little further. In order to obtain
chunkier shadows. I like to create a separate
layer on multiply mode. And with the Lasso tool
and the color fill active, I create portions of
really dark shadows. After I finish this part, I will show you how to add
light in a similar way. Okay. Now that I have
deepened my shadows, it's time to add
some chunky lights. On a color dodge layer
using the hard brush, I create some large areas of a very saturated
light like this. The color will depend
on your illustration, but I will come with a
pinkish light later. That's why I'm using
red for this lights. After I finish adding
the slides to the hair, I take the eraser with the hard round brush and
erase parts of it like this. Then reduce the opacity to create some sort of
glowing green or light. Now I will take the lasso tool and add the light on
different parts of the character and
keep one hard edge and the other I will
slightly erase. Also using the liner
brush from my brush set. I add some details on the lips
and the later on the hair. I will also use this brush to add some extra strands of hair. This is your reminder to download the free
brush sets end-use, it is used to fit in
your personal work. However, I would ask you not to distribute
it any further. Using the liner
brush on Add layer, I create some rim
light on the face and dies on the shoulders
and on the hair. This is not always 100% accurate from a lighting perspective, but it does look nice. I tend to blend in some of the streaks of
light in the hair. Now let me show you
something nice. Due to the fact that
this illustration is in a daylight setting, we want to create soft blue bounce light
on our character. The blue comes from the sky
because the surrounding of your character will impact
the colors on the character. Essentially, since we only have a blue sky around our character, the blue will be reflected in a subtle manner on
parts of the character. If the character we're
close to a plant, let's say we would use some green because of the
light that would bounce off of the plant if it's
in an interior than the color of the
walls would also create an impact and so on. Okay, so now it's finally time to work on the
background some more. I have some new brushes from RAAS drugs which I want to use. This lesson is not exactly
about backgrounds. So this left three minutes
of the class will be kind of a bonus for you to see how I create a
simple background. I will let you watch
this part and I will see you on the next
lighting scenario.
10. Night Scenario: Welcome back guys. I hope
you took a break before this lesson because the
previous one was quite intense. In this lesson, we will take a good part of what we
did in the previous one. So a good part of the initial
shading and lighting. And then we will start adding
the different background, dark blue tint, but
different lighting. And we will create night scene. First, we will take
the background layer and the adjusted didn't curves until we obtain a nice dark blue or dark purple background. In illustration,
while night scenarios might sound like it
needs to use blacks. In fact, you've simply needs to use a dark blue or dark purple. Even if it's a night scene, your viewer needs to be able to tell what's in
your illustration. After I find a nice purple
for the background, I duplicate the layer, move it above the
character and pick up the darkest purple from it and change the color of
the holy or to it. Then I put this layer on
multiply and reduce the opacity. This will already give a darker biped to our
whole illustration. Even if we don't have
any details yet. I will be using the details from the previous illustration, but will change
the red lighting. It more orange one, because my goal here is to
create a magical orange light, maybe from some fireflies
or something like that. I think each layer of light from the previous lesson and adjust this color to an
orange spectrum. I also adjust some
of the shading and create the purple
tint since it's nighttime and the
shadows should have a cool tone instead
of a warm one. Now I marched the layers
and create the gradient. I will go for a purple
gradient telling densify the dark filling
of the illustration. I adjust the opacity of the gradient layer and
merge it with the base. Now because I still want the purple multiply
effect on my character. And I need to have a layer
for my character only. I will need to adjust it a bit. I duplicate the layer of my characters civics
to Alpha Lock. And I will fill it
with the purple of the multiply layer that
I made earlier. I will. Remember the opacity
percentage so I can reproduce it
on this new layer. The point of what I'm doing right now is that I need a layer of my character only and they need this multiplier
effect on it. But I will start adding
details to the character, like purple shadows
and orange lights. And I will need to do that
using clipping masks. I wouldn't be able to
use clipping masks above the original multiply
layer because the new layers wouldn't be
restricted to the characters, pixels, books to the multiply
layers, fixed cells. So it wouldn't help. Alternatively, if I made the details below
the multiply layer, all the colors I would add would be influenced by
the multiply layer. The easiest solution is to create the multiplier
layers effect, but only for the
character's silhouette. I think my explanation was
long and maybe twisted, but I hope you understand
what they mean. Okay, So now that I have
my character on one layer, I will start adding
purple shadows on a clipping layer
set to multiply. This will be the soft
shadows that I will blend in and the chunky
shadows will come later. Now I want to create a
complimentary layer of light. I will create an overlay layer, and I will use an airbrush
to add an orange. Then I play around with what I want it to look like
on the background. Because I want the effort
in this type of stuff Gulp, I will later use
the same cloud in the light scenario
but make them darker. Now I want to add some orange spark on the
iPhone as well. I added the bounce light of the dark purple sky on the hair. In order to separate the
character from the background, I will add to the bounce light on other areas of the character, such as the skin and eyes. I do the same thing on
the lighter side using the orange that I already
have on the canvas. This is where I'm adding some of the particles of light
that I mentioned before. I create some random
dots of orange. Then I duplicate the layer
and put it on that mode and use Gaussian blur to
give it the lighting effect. We will now monitor all
the layers together, including the
background, and see what color adjustments
we can still make. Like adding another
gradient layer or intensifying the light and
some areas like the eyes. This is pretty much how you create a nighttime illustration. If you work smarter
and save your layers, you can put it in other
different scenarios as well. I will let you finish
watching and see you on the final lesson where I
will give you your project.
11. Project: Welcome to the final
part of this class and congratulations for
reaching this point. I'm sure that many of you
were able to get so far. So let me know in the reviews if you enjoyed this
class so that I know you are one of the students really interested in
growing your skills. Of course, any feedback would be appreciated because
I want to help you grow as an artist with
every class that I publish. That being said,
you cannot become a better artist
without exercising. I'm here to give you two
levels of assignments. If you are a beginner, creating a full illustration
can be intimidating. So I would watch rather have you work on the drawing side. Therefore, your project is to create a matrix of
head positions, so you could use it as a reference for future
drawings of yours. Don't forget to also publish your project in
the project section. So I could give you advice
in case you need it. If you are further on
your artistic journey. And you want that color
more challenging project, create a portrait
illustration with two different
lighting scenarios. It doesn't have to
be there at night. You can simply change
the light source and half to datetime
illustrations. You can have an indoor
lighting scenario and an outdoor one. The possibilities
are really endless. Again, don't forget
to also public or illustrations in
the project section so I could give you feedback. I will be back with the practice section
later this month. It will be the first
practice class that I will be publishing
on Skillshare. And the goal is to
motivate you to work on your free time,
on your skills. If you want to be updated
with everything that I do, follow me on Instagram
and Skillshare, I would love to form a community of artists eager to grow. So don't hesitate
to also message me whenever you want or
need some motivation, some inspiration, or some help until next time,
stay safe guys.
 Lara Militaru, Digital Illustrator & Coach