Transcripts
1. Introduction: You are interested
in getting into picture book illustration, it's fairly important
to know how to draw animals because animals appear
in a lot of picture books. And so in this class, I'm going to teach you how
to create animals that are cute and cuddly and that are interesting,
that have emotions. And we also talk about
how to create animals anthropomorphized
animals where they walk on two feet and they
might be wearing clothes. And I've learned a lot
of tips and tricks over the years as an
artist and an illustrator, and I'm going to be sharing those lessons learned
with you in this class. And by the end of the class, you have created a series
of animal sketches, and we are going to be working on kind of
a simplified one, then one that has a little
bit more details in it, and then one where we
take the same character, and we put it on two feet and give it kind of human
like characteristics. I'm Mirka, and I'm an
author and an illustrator, and I worked with publishers
big and small over the last five years to create several different
kinds of books. I've done picture books and graphic novels and
non fiction books. This class is number
three in a series of three classes about character
design for picture book. In the first class, we talk all about
creating characters. We talk about how shapes
affect characters. We talk about emotions, posing, and in the second
class, we talk about how to draw your
characters consistently. And then in this third class, we talk about how to create animal characters
for picture books. While it's not required to watch the first two classes before
jumping into this one, it will be helpful if you want to jump
into those a little bit later or just skim
through them to get the basic ideas for character
design for picture books. Of the principles that I
cover in those classes also apply for this third
class for animal characters. Animals are my favorite
thing to draw, and that's why I'm super
excited about this class. I hope you're ready
to jump in. Let's go.
2. Class Projects/Exercises: Thank you so much
for joining me. I can't wait to jump
into this class. If you've done the other parts, I know that you've learned so much about character
creation already. And in this class, we're really going to dig in and do a lot of sketching
for animals. I have some photo
references that are going to be in the
handout for this class, including all the important
slides that I have. And you can download
that before you start, and then that way, you'll have
kind of everything ready. And I have the images digitally, so you can either
print them out for yourself and use them
to sketch on paper, or you can use them on your
iPad or on your computer. You're also welcome to use
any of your own photos of animals that you might
want to create on your own. In this class, we're going to be doing several short exercises. We're going to start with
using some photographs as reference and then figuring out the basic shapes that
animals are made of. And then from there,
we're going to sketch simple animal characters, and then from there, slightly more intricate
animal characters. And then after that,
we're going to take our animals and practice
some emotions for them, and then we're
going to also take our characters and practice
giving them personalities, making them old or
young, girl and boy, shy, extroverted,
things like that. We will also practice
drawing wings as hands. And then for the last exercise, we will be taking one of
our animal characters, putting them up on two feet, and giving them human
like characters. You can even add
clothing if you'd like. I covered that in
the class as well. And since we're working on several different exercises and doing a lot of
different sketches, it should be super easy to pick something that
you are proud of, or maybe there's
something that you're stuck on and then post that into the class projects
or the class comments. And you are welcome
to if you get stuck, you're welcome to
ask questions in the classroom comments section or in the discussion section. And whatever comments come in, I reply to everything. It might not be exactly on the same day, but
within a day or two, I always check back
in with skill share and answer questions that
are coming up in the class. Also included resources and a handout section in this class. You can download it in
the resources section, which is the button
on the right side in the menu down
below over here. I'm using Procreate on my iPad to do a lot of the
sketching for this class, but you are welcome to use any either digital program
or just pen and paper. Nothing that I'm doing in this class is going to
be very complicated, so any media will work. All right. So let's get down to business and start working
on our animal characters.
3. Comparative Animal Anatomy: So let's dive right
into our class. Before we actually get into
designing animal characters, what I wanted to do was take a quick moment and
just go over kind of what I see as the parts of the animal and general
animal anatomy. Most animals that, you know, have some sort of arms or wings or flippers and then legs, they have kind of the same they have the same bone
structure and body parts, but a lot of it's
just, you know, different um proportions, the way that their
body is built. But knowing all the parts for the body and,
like, you know, how an elbow bent, where the elbow is located, that really helps kind of drawing animals and
making them believable. And so that's why
I wanted to spend a little bit of time of that on that before we actually get to designing characters.
So let's jump right in. Alright, so here
I just have I've, you know, traced a
skeleton of a horse. And when I think about any kind of an animal
character, you know, even people, you know,
anything that lives, I basically imagine there to be six parts to be
designed and drawn. And so I think that
there's a head. There's some sort of a neck. There's a torso. There's front legs, or they could be arms
or fins or wings, and then there's the back legs, and then there's the tail. And the character
might either walk on two feet or it might
walk on all fours. But in general, they're going
to have these six parts. And so what I was
talking about earlier was that so if we
compare let's say, a person to a horse
to begin with, since that's what
I had up first, if you look at all animals, they all have kind of
the same bone structure, but just the length and where it's located might
be a little bit different. And so the first, we have kind of the scalpula
that's behind over here, and then you've got the arm coming down and
then an elbow right here. And then your forearm, and then we have our
palm and our fingers. But for a horse, it's located just a little
bit differently where the top of the arm is really short and it's kind
of inside the horse's body, and then their elbow is
located kind of right, whereas our elbow comes,
you know, straight out, the horse's elbow and
a lot of other animals that move on for their elbow
is kind of right around, like, where we would think
our armpit would be. And then their wrist where
it bends right here, is usually what we would kind
of think is their knees. So that's kind of
middle of their foot. Then the rest of our
bones, you know, they all come down
to form the hoof. And so in the same
way, you know, if a person was that's kind of how everything's
located over there. So from over here,
these two bones move a little bit, and, you know, the horse can extend its foot all
the way over here. But the way where it bends, so this one, this can bend, you know, all these
different ways. And this will bend
different ways this way, but there's a certain
limitations from right here. And then from here to
here, you know, obviously, you can only the knees
don't bend or their, you know, kind of forearm
doesn't bend that way. So you can only
bend this way when. Um, when we're talking
about this joint, and then for the rest of these, they curl just like fingers. So whatever happens down here, this is, you know, it doesn't
really go all the way. I can't bend that
way, but it can bend. You know, it'll bend
different ways this way. So this can bend
all the way here, and as it's bending this way, a lot of times the hoof
will come up that way, too. So that's kind of how the
forearm works and bends. And then when we're looking at the back, it's the same way. We've got hips, and then
we've got the top of our leg, a horse's knee is up over here, whereas ours extends
much further. And then we have the hawk
or kind of the ankle. And for most animals, you know, this is so from here to
here and here to here, a lot of times is
kind of the same. And then we've got what
would be our kind of bottom of the foot
for most animals is going to be
upright over here. And then where our toes are, this is where the animal's paws or hooves are going to be. And so in the same
way as our feet bend, this hip joint can move
from here, you know, anywhere kind of here, and it can come
out, but not a ton. And then this joint can, you know, straighten,
but it can't go past. You know, our knees
don't go past that way. So this joint really, you know, is just a joint straight
up and down this way. And then the same way
as our ankle joint, you know, it can go
pretty much straight, but it can't go past
beyond this way. And where as in this joint
moves in an arc this way, this joint will move can
move in an arc this way. And the same way, whereas in these curl this way, it will bend with pressure
a little bit this way, but most of the time, this joint is going
to bend this way. Alright? So when this
goes up, you know, this goes down, and when this moves up, this
goes down that way. So just knowing kind of these basics how
movement works with the different joints in our bodies and animal
bodies will just make it a lot easier drawing any kind of animal when you know
which way things go. And so I've got a whole
bunch of animals over here, and I'll add this in
our class handout too, so you can see it a
little bit better. But I've just color
coded everything. And so you'll be able
to see, for example, if we compare a horse to a cat, they're basically two,
four legged creatures, but you'll notice that there's some differences just in
length of different bones, where the shoulder
blades are attached and how the shoulder blades are attached will change the
mobility of how arms can, you know, and how the
hips are located, how the um, different bones
can move out from there. But in the same way
as with the horse. So from here, this can move
different ways this way. This can move this way, but it doesn't really move can't really move
your elbow past, you know, can't really move your elbow past the,
you know, joint. And so it can go
straight and in. And then these joints
are your wrist joints, and so it will bend a
little bit this way, but, you know, our wrists really
like bending this way better. And same thing goes
for the back leg. And we have a kangaroo
usually moves upright. And so with that one, we also, if we compare the kangaroo and let's say the horse,
you'll notice that, you know, the arms are kind of a little
bit similar obviously, horse just has one
hoof and, you know, many other animals have
more toes and fingers. But then if we compare where the kangaroo differs a lot is, we'll get we have
kind of a short femur and then
really long kind of where the shin area is and
then really long feet. And in general, when we look
at a lot of these animals, just the way that
everything is organized, you'll notice that
most of these animals, what I was kind of like what
we think of the armpit, which would really be
here, but, you know, their kind of elbow is kind of where is if you think about
the line of their torso. You know, most of the
time, that elbow is right there kind of at the
line. That's the walrus. This is a bird, so obviously
it's a little bit different, but we still have same things with the big difference
with the birds, you'll notice where the
scapula is over here, it's a little bit different
on birds because they have much wider kind of range of
motion with their wings. But for all these animals, this elbow with bat, obviously a little
bit different. But even with frogs, a lot of times, that bend is
kind of around over there. So that's just kind of something interesting to keep in mind. And then another
thing to keep in mind is the shape
of the back leg. It has this kind of a I don't know what you
would call this shape, a half moon or this curved shape and then it goes
down from there, and then we have whatever
we have a paw or a hoof or a toes or
whatever it might be. If you look at all
these animals, they all have this
kind of a shape, even the walrus,
you know, everyone. It just might be a little
bit with the elephant, it doesn't come out as much and it just goes
more kind of a straight. And with the frog, it's more pronounced because they
have really long legs. And even with the birds, most of the time the feathers
will cover most of that, so you'll just get kind
of this part showing. But those are just
good to notice. And then the other thing is just noticing where the
knee joint is, for some animals, it's
kind of in the middle. I feel like, you
know, for horses or gazelles or those
types of running animals, where we leave the torso
and start going down, it's kind of about
the halfway mark, but with a lot of other
animals with dogs and cats, for example, they're
pretty common. This part of the arm is
pretty short or pretty long, and then we have kind of a short part for
this area, and then the paw. And the same thing
goes for the cat. We have kind of a long arm, so it doesn't bend
in the middle, and then it just bends
down here for the end. But this part of
the this part of the arm especially with cats does have a wide
range of movements. So you just have to make sure you extend that out
when you're drawing. Those are some of
the basic things that I wanted you to notice. The necks obviously start where the shoulder blades are.
For all the animals. And so I'm usually
kind of aware of where the arm goes in
the shoulder blade and then the neck
goes from there. And then depending on the
animal, some animals, it's going to be longer, and for some animals, it's
going to be shorter. And so knowing your animal and the parts kind of then
make it easier to figure out how to draw
your animals going forwards and how their
arms and legs bend. So knowing where all
these joints are and how anatomy
works for animals, it's much easier to draw the
animals action in action. And in the next video, let's look at what
shapes make up each animal and what makes
an animal recognizable.
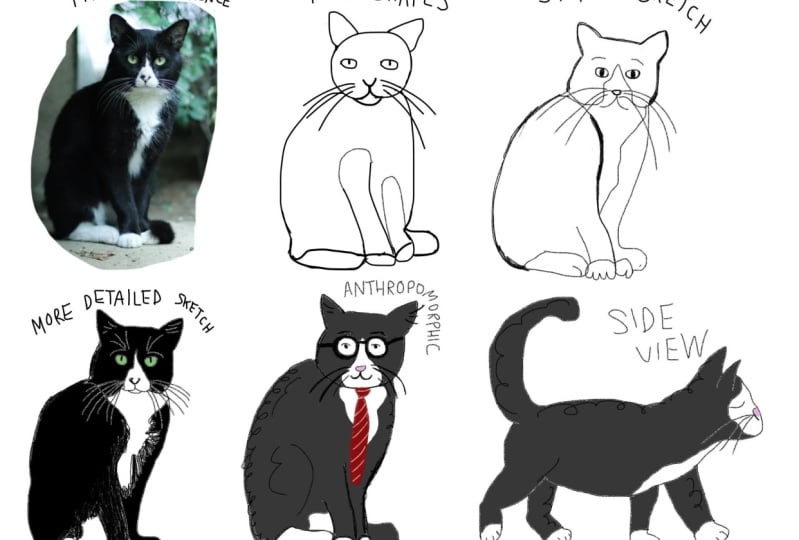
4. Animal Shapes as a Concept: In this video, let's break down shapes and how we
think about animals. And in the last
video, we looked at anatomy and how animals
are in real life. But in this video, this is kind of coming at it from an opposite point of view, where we are thinking about
a concept of an animal. Like when you think about a cat, what you think
about in your head. And so I've just gotten three circles with
some eyeballs in it, and obviously they don't
look like anything yet. But if we think
about, for example, a cat, what makes a
cat recognizable? So a lot of times, if
you think about a cat, it's going to have
point to ears, and just adding that already
makes it look like a cat. And then, you know, maybe it usually has a nose, and it's got some
sort of a mouth. Mouth doesn't need
to be attached. It could be a mouth like that, and it would still
look like a cat. Now, if I draw ears like
that, all of a sudden, we're starting to think,
maybe it's a bear, if we can start adding
some more details to it. And so this necessarily
doesn't have to be a bear, so we can make this
one into a bear, and that would look like a bear, but then we could do the
same here's over here, and then let's say,
something like that. Now all of a sudden,
we're thinking, Oh, it looks more like a lion. And so so what I want you to think about is what makes
up specific animals. And, you know, obviously, head doesn't need to be
a circle shape, it could be whatever
shape it is. But once you start
adding things to it, they start looking like animals. And so, you know,
this could be maybe a goat or it could
be maybe a cow. And so you might need some
other things to put into it, or you could take, let's say, to me, that usually looks like some sort of
a well, let's see. We can make it here.
We're obviously starting to think a bird
because it has a beak and we could add feathers to
it and before you know it. And so once you have these basic characteristics
for an animal, so let's say we've got
this guy right here, it doesn't really matter
where we go from here. If we already know
that this is a cat, we can draw this
character, very quickly. We can have a cat going this
way or we could have a cat, and he can be a cat this way, but it still looks
like a cat because we have these basic kind of
characteristics over here. So as we talked in the
previous classes about there being a wide variety of the ways that you can draw
a human character, the same thing kind of
applies for animals. And so I wanted to share a
few slides that I've made of just different ways of
drawing a cat or a dog. And so I picked kind of some
of the most common ones. And so these are
all different cats. That I've taken photos
from picture books, and so this is one of mine, but you can see there's
some very simplified. It still reads as a cat, some very simple things. Some of these animals
have collars. Some of these animals have, you know, it's a lion, but
it's, you know, a feline. It's got clothes on it, but it still looks like a cat. It's recognizable as a cat. I just wanted to make sure
that as we jump into this, sometimes we can
get so stuck into representation and
wanting to show everything just like the
way it is in nature, but I wanted you to kind of relax from thinking that
way and realize that, you know, there's more than
one way to skin a cat. There's more than one
way to draw a cat, so it can be very simple,
very simple shapes. This one doesn't even
have a nose or mouth, and it still looks like a cat. And so, just kind of relax. And once you figure
out the basics, then you can kind
of build on that. And, you know, any one
of these characters, if you just change
some of the details, they could be a
different animal. And so here's some
different ideas for dogs. Obviously, dogs come in a
lot of different shapes or, you know, a lot of
different breeds and sizes, and some are fluffy and
some have, you know, thin fur and different
shaped faces and bodies. And so these are just a few
different ways of doing dogs. We have you know, from the utterly most
simple things from Christian Robinson to things
that have a lot more detail. I love Carter
Goodrich's Zorro books. The animals in those just have
the most fun expressions. Just a very simple,
kind of a boxy dog. And then we have kind
of anthropomorphic dogs that are wearing
outfits over here. And I'll include these
in your handout, too. And we've got some birds. And with the birds, it's kind of the same
thing with the dogs, where we have a big
variety of birds. There's different shapes,
some have long necks, short necks, different colors. But in general, you know, they're still kind of
built the same, but, you know, just different
proportions, just like dogs. And so they still all
have wings and feet. But you just draw them in different proportions to make all these different animals. And some are, you
know, very simple, made from just
literally circles and, you know, half circles
and straight lines, and then some, you know, have a lot of be very
painterly and have a lot of characteristics to and we've
got some foxes and bears. They're pretty familiar.
So with foxes, a lot of times you'll
notice they will have they have kind of similar
characteristics as cats, but a lot of times
foxes, you will notice. Obviously, you know, the color
is going to be different. But most of the time for foxes, they're going to have kind
of longer skinnier snouts. If you look, if you think
about compare it to the cats, they kind of have
longer elongated faces, and then they have
the big fluffy tails, which then makes it
different than a cat, even though both have
triangular ears. And then we've got some
different kinds of bears, and bears are really
fun to draw because they're kind of big
and kind of lumpy. It's a big kind of
a mass to draw. So we have some
very simple shapes, geometric shapes,
very painterly. We have some anthropomorphic
looking bears over here. Personally, I like
drawing bears, but there's just a whole lot
of different ones over here. We've got different
kinds of bugs, and I just kind of lumped
all the bugs together, but there's a lot of Be books. So here's different
illustrators versions of bees. And kind of one thing that
you might want to think of is if your character
is, you know, one of the main characters
of a book or if it's just a book that's kind
of a plot based book, how much detail you want
to add to your characters, if you want them to have
a lot of expressions or if they're just kind of in
the background and they don't have a big role in the book. Under the sea, fishy
creatures over here, and fish have there's not as many fish books as there are books with,
let's say, mammals. Mammals are kind of the
most common animals to put in picture books. But there are this is
from Clark the Shark. We've got Nugget and fang. We've got Pop Pop fish or
Narwal and jelly books. And then we've got
some finding Nemo. And some other ones over here. But even, you know, between Benji Davis and Sophie desmas, you know, there's
a wide variety, but we can usually, you know, we can tell it's an octopus. It's got a big bulbous head, and it's got some arms. This one doesn't even have the
right amount of arms, but, you know, it's got
tentacles coming out, and we know it's an octopus. So at this point, I hope
that you've kind of got some gears starting
to turn in your head, and you're starting to think about shapes and the basic kind of minimal requirements
on what to make what makes a specific
animal, the specific animal. And I hope that you start kind of paying attention
when you are either looking at photos or reading
picture books for reference. Okay. And so in the next video, we are going to start
talking about how to draw kind of realistic animals. And then after that, we will talk about how to
draw anthropomorphic animals.
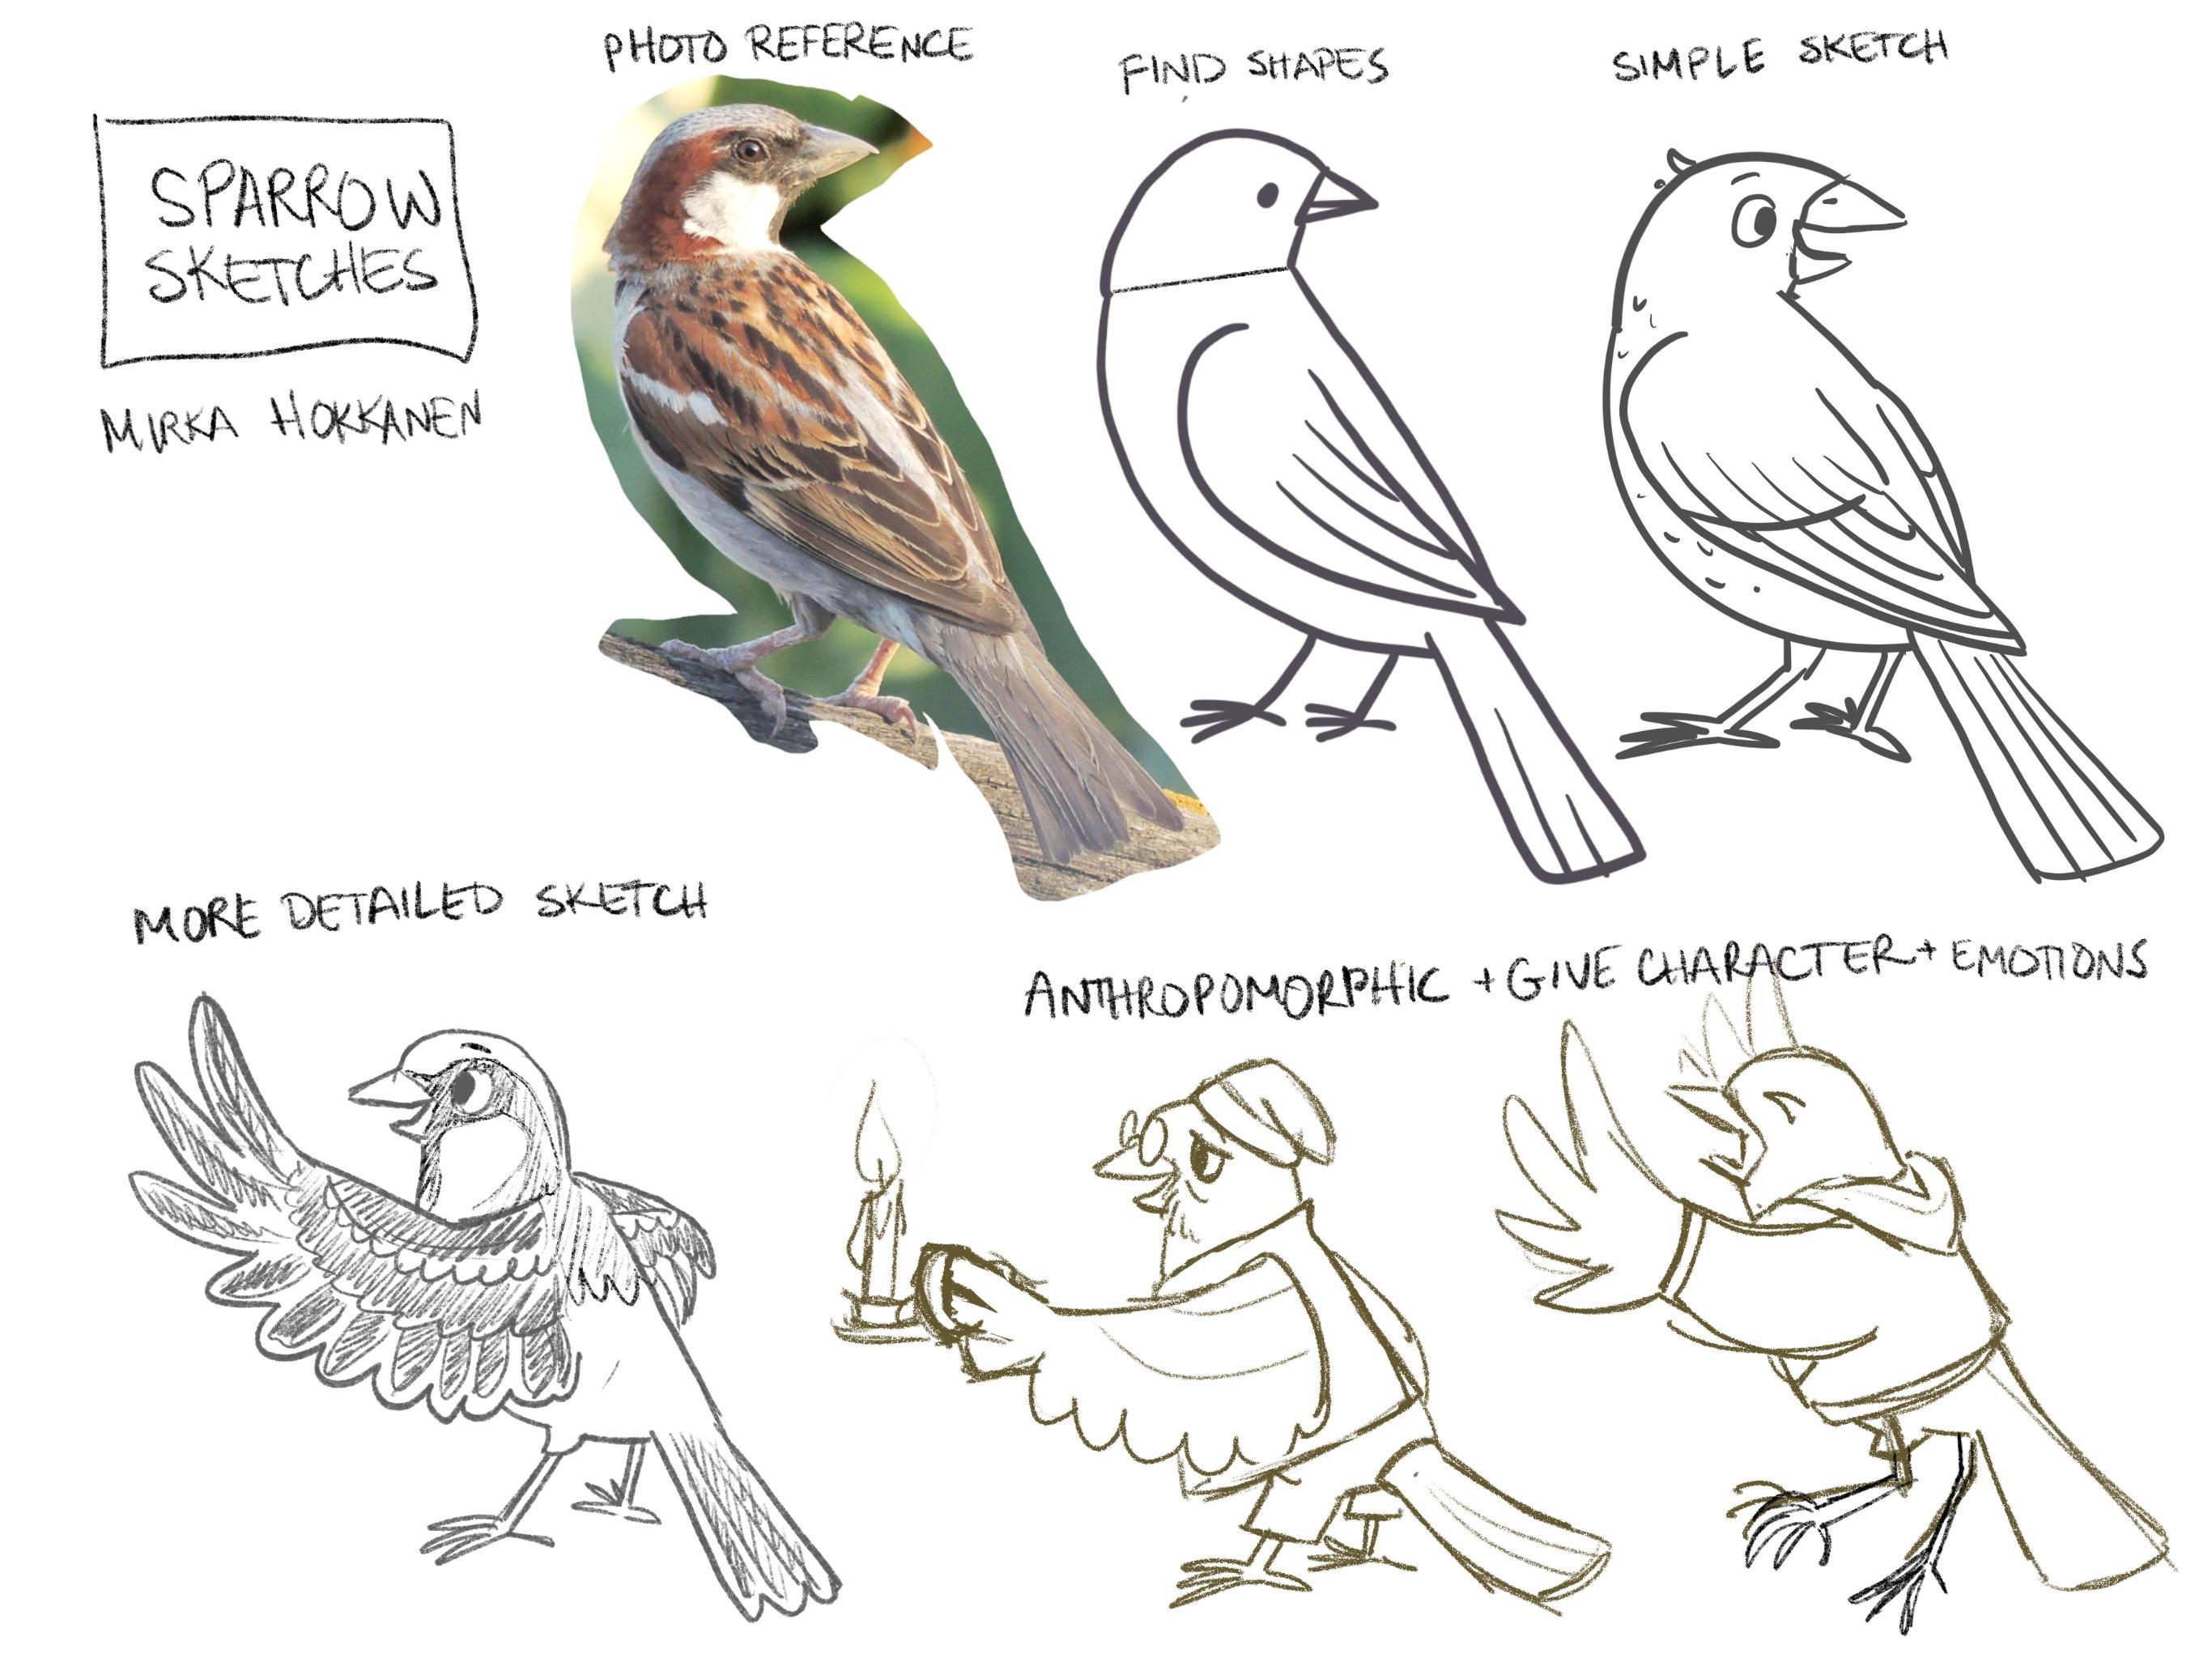
5. Reference Image Collage: In this video, we'll
start talking about how to draw more realistic
animal characters. And I figure we'll start with this because I think that this probably feels easier
for most people to draw, kind of look at an
animal, and then try to emulate that in
your illustration. I come from a fine art
background, and so for me, I really tend to want
to look at something, you know, down to
the nitty gritty, and I want to draw it realistic. And it's been kind
of a long journey for me to figure
out how to simplify characters and make
an animal kind of cute and cuddly or
make it look grumpy. And so all the kind of things
that I've learned over the years from trying
to draw really realistic to drawing more
illustrative animals, I'll share that with you. And if you've already taken parts one and two of this class, you're going to be in
great shape because we are going to use a lot
of those principles that we learned in those
classes and apply them in this one for animals as well. Alright,
let's get going. So when I'm working with reference photos
and on the iPad, what I will do most
of the time and sometimes even if I'm
working on paper, I will usually have a
set of reference photos, and I like to put
those together. And so I'm going to add
the photos over here. So I've got one and then
I've got another one. So this is my dog character. And these are copyright, you know, open photos that
I've downloaded from pixels. And so these will be
part of the class. I'll include these photos. And if there's a
lot of extra stuff that I don't need,
a lot of times, I'll just cut my character
or my photo out of there. And now I've got
my main character. There's not a lot of information here that's
interesting to me. I like the way that some
of the fur is here, so I'd rather keep
that than this. And then my photo
is kind of dark, so I'm going to lighten
it up a little bit, so I can see kind of basics over here. Maybe even still that. There we go. So now I've got all my
reference photos together, and what I'll do from here, I may or may not
lump them together, and then I will save
that onto my iPad. And then when I'm actually
working on my sketches, I can bring that I'm open Canvas Ops and
then do reference, and then my image
will show over there. And this is the previous image, I've saved this a few times. And so I can import whichever
image that I've done. This one was the one
that we just saved. The nice thing with the
reference on iPad is I can move that around
wherever I want. I can zoom in if I
want to just look at one part of something
from my reference images, but it's just nice nice
to have over here. Sometimes it gets a
little bit finicky. And so the class is
going to include, I have reference
images for a dog, a few for elephant, and then a few for a bird. And so let's start
with our dog first.
6. Drawing Exercise: Dog: And let's bring our dogs up, put a new canvas on top of them. And so when I'm looking at
the dog character over here, what I'm thinking, let's see. It's probably a good color. So I'm seeing kind of a
round head on all of these. That's kind of my basic kind of shape underlying
shape over there. And then from there,
if we look at the side profile,
dogs have snout. And if the mouth was closed, it would, you know, kind
of go something like that. If the mouth is obviously
open over here. And thing to remember with dogs is their mouth can go, you know, pretty far into their
cheek, I guess. But if we're still
thinking about kind of basic shapes, it juts out. I'm thinking the
mouth is closed, and then there so it's
kind of a kind of a lopsided little square or rectangle that
gets put on the edd. And then over here, if we think about this rectangle the way that it lands over here, kind of lands right here, and then it juts out. Thinking that if the
mouth was closed, and since same thing over here, the mouth is kind of well, it's open, so it's a little bit bigger than what
it usually would be. But something kind of
about and then from there, doggies have a neck and the
ears for this breed of dog, some either Australian shepherd or some sort of miniature. This one, the ears flop
up a little bit higher, but if I'm trying to stay
kind of similar to that, I might draw the ears down
here and then the neck. And then if we look at
the rest of the body, so we talked about
the six spots, so we've got a head, we've got the neck, and
then the torso, most of the time is
kind of shaped like a bean with the dog, it goes up a little bit, and then it kind of
comes out like that. And then, remember,
we talked about the armpit or the elbow. So most animals will have kind
of where the neck starts. There's kind of a
line over there. And then we've got and
then this is the paw. And then remember that
half moon kind of a shape or that kind of crescent
shape that goes down, and then we've got
paw over there. And so the paw in general, so we've got kind of a
straight line that tapers. We've got the half
crescent and then there's a straight line or
a box from there. And then for the paw, it's kind of a I see it as a shape, kind
of something like that. And then there's the toes
that go on top of that. So that's kind of how I see it, or it could be almost like that. And so that's kind of the
shape that I'm thinking. And then we have a tail
that's not super visible. And then on top of
that, now we have kind of the basic
shape of the dog, and then on there, we start adding our fur. And now that we've got Oops things simplified
a little bit, we could take this or bring
the opposite opacity down. We can also get a little bit of a nose
going over here, oops. I think dog noses in
general are a straight and then there can be
a little bit of a point and then it
goes down that way. Then same thing over here, we've got the nose
and then it goes out and then nose over here. Now if we take our
reference ups, we forgot to draw
our neck over here. Then let's add our
reference photo so now we can see our
doggies over here. And the fun part comes,
if you remember, we were looking
at these pictures earlier. See where's our dogs. Um, it's up to you how you want to draw kind of special
characteristics. So, you know, we've got
dot eyes, there's circles. This one, it's just fluff, this one, it's just,
you know, a line. We've got dots, dots, little teeny, tiny
eyes, big eyes. So there's all different kinds
of eyes that you can do. Some of them have, you know, big pupils in the middle, the black dots, and some
of them have little. So it just depends
how you want this one even has a little bit of
color inside over here. And so it's up to
you then how we want to start bringing
this dog to life. And so from here, so we can work on this guy first and so we'll add all of
our fluff over there. All right, so from here, if we're just looking at the face, I wanted to kind of make two
different versions of this. Let's make one where it's a
little bit more realistic, and then we can make one where it's a little bit more
kind of cartoony. And we've got our basic shapes, and now we'll add some of
that fluff over there. And instead of making all
the nobbes over here, if you remember, we talked
about simplifying things, I'm going to simplify. And then since this dog
is fluffy, actually, we'll probably start
with a line and then let's see how
do we want to. And then from here,
let's do that. And then we've got our nose. We could add a little
highlight on there, and let's see, we'll do
kind of smaller eyes. And then a lot of times, it doesn't matter
kind of which kind of a character you're drawing, but it's nice to add some eyebrows because eyebrows really make that character. I don't want him
to look mean, so I'm going to make
him kind of even. And then we can, I'm just going to make a
closed mouth for now. And we'll do. I'm following kind of this square that
I posted. And so now. And then if we
wanted to, we could add all the so
let's say he's got a a little line and then
something like that. And so here's kind of one
kind of a dog character. And then if we want to
simplify it even more, I'm going to put both
ears on the top. And then instead of trying to make this area look
three dimensional, I'm going to simplify
it like this. The nose could be big or small. I'm just going to make it big. And now we have kind of
two different versions of this dog where one is a little bit
more realistic looking, and then the other one is a
little bit more simplified. And the same things
would go for the fur. And one thing that I wanted to mention when we
are talking about fur and furry animals so instead of making
the whole animal furry, it's better to alternate. And so if you think
about grass, Oops. We don't draw grass like that. That would make really
boring looking grass. So we alternate. We're going different
directions, and so that makes for much more interesting looking grass. And so the same
thing kind of goes for animal if you're
drawing fluffy animals. So not both sides. I usually is nice to alternate. So at the top, I would make kind of straight. And you could add
maybe one or two, but adding straight lines over there and then adding you know, there's big long
lines over there, straight line over here. And then adding fur
on this side and adding fur and a straight line. Well, it's not a
straight line, but I guess a non fluffy
line, you could say. And then we could
add fluff over here. And so that just gives
a more balanced, same thing for the tail that
we can't fit over there. And you could add fur
over here if you wanted to and then do whatever
kind of eye you want to do. And so then that
way, we just have a much more balanced
looking character than if I was drawing
the whole character. I know the dog is
fluffy on both sides, but if I'm drawing if I'm drawing fluffiness
on both sides, it just it just doesn't it ends up being too busy and all
the lines are too busy. And if you remember
what we talked about in the previous class about
simplifying shapes, the same kind of goes
for animal character. So simplifying lines and
not drawing every single. So for here, I
don't need to draw every single knob of the
knee and alternating. It's a different drawing style, and for some people, it works. But in general, when you're
doing picture books, just simplifying
things instead of drawing every single
nook and cranny and knob will make for more pleasing looking kind
of simplified characters. So from our doggie, let's get into our elephant.
7. Drawing Exercise: Elephant: Alright, so the second animal that we'll work on
is an elephant. And I picked an
African elephant. They have kind of bigger ears. Indian elephants have
slightly smaller ears, and so I thought
African elephants would be more fun
and expressive. And so our anatomy comes
into good play over here. And if we look at the elephant, so I've got one photo
from the front, and we can kind of see it's
kind of an interesting shape. So it's almost I think of it, it looks almost like a
peanut, honestly. Doesn't it. But in general, I would
probably like to think of this more as just kind of an oval
to simplify it a little bit. And then the ears are kind
of like a rounded triangles. And then we've got tusks
and they kind of go out at the same angles as
the ears come in. And then from the face, we also have the trunk. And so going to draw
that like that, and then our eyes are
over here on the side. And then from the side
view, it's the same thing. So we've got big ear, the top part is curved
and then the bottom, almost like a pizza slice. Then for the torso, the elephants don't really
have a whole lot of a neck, so the head looks like it almost goes
straight into the torso. And so it's kind of
like a chunky peanut. Then we've got the
face looks um, it's almost like a rectangle or a parallelogram that's
kind of off to the side. And then from there,
we've got the trunk. And then from here, kind of at the same angle
as what the ears are, we've got the tusks coming out. And then for picture
book purposes, for here, for realistic purposes,
eyeball is over here, but for picture book purposes, eyeball could be where
you want it to be. And then for the feet, we've got armpit over here, we've got a straight line, and then we've got this
last part right here. So in general, we've
got kind of like a straight line for the leg, and then we can either
keep it straight or there's a pad on the bottom. Same thing, we can't
see it properly, but we've got kind of a
straight line, pad over here. And over here, we
see a little bit of that crescent shape
from where it's coming. And then we've got
the pad over there, and then we've got the tail. Tail, well, tail and we'll just make the
tail go over there. All right, there is
our basic shapes for our elephants from here, it would be pretty easy
to simplify or we can make these into these
already look really nice as picture book
characters already. I could almost keep this
just as the way it is and add my tusks and then
however the nose, however I want my nose to go. Then with all the wrinkles, I would probably want to
add some lines over here. And then if we want to
make it more expressive, we could add some
cute googly eyes, and adding the adding
the eyebrows just really makes a big difference because if we don't
have eyebrows, it could be kind of it can be we don't really know
what the expression is, but the eyebrows, um, make a big difference in
how our character looks. So it's really important, in my opinion or pretty
important to try to incorporate eyebrows into your character
design, however you can. All right. And then let's look at our
other characters over here. So if we want to do more
of a simplified shape, I could just choose to make
these completely just boxy. Same thing over here. But again, a little
bit it's nice to somehow alternate something. And so I could
choose to do that. And then for the ops
and for the back leg, I could choose to do
something like that. And then in general for
picture books, it looks nicer, or it looks cuter when the
heads are a little bit bigger. So for my character
design over here, if I'm trying to do a
really cute cute design, I would make my head bigger. So do some sort of an ear. And then I want to add some
sort of a mouth over there. Then I can have my simple eye
or I could do some fun eye. And I can simplify that too. Then they have their
little toes in the photo. A lot of times adding cute
little details might be fun. I could even add little wrinkly parts to
it if I wanted to. Then if I wanted to do a
little bit more of a detailed, if that's my simplified one, I could try to do a little
bit more add some more. Adding a little
bit more tapering, instead of making things boxy, adding just a little bit
of lines over there. But a lot of times the designs
will look nicer instead of making instead of making kind of the legs and the
arms and parts of your character very
kind of uniform, it's a lot of times
will look nicer if you choose to either taper
them one way or another, so tapering that way, or you could taper where the elephant feet
could be that way. It doesn't have to be a lot. You see, it's just a
little bit over here. This is a little
bit more extreme. But tapering things or even
having parallel lines, just lines that are
move out a little bit, make for more interesting
visuals or having one side straight and
the other side curved. General principles
to keep in mind. Then there's the knee. If I'm trying to
do more realistic, I'll add that more of
a curve line and make sure it continues
into my There we go. Oops. There we go. I could add wrinkles here
and there or shading. Then let's do. Let me bring my reference photo up so we
can see a little bit better. The body I feel like the heads and the faces are
always the most important. I'm going to add my
reference image over here. I've already
collected my photos. Let's look at what
we got over here. We've got ears. And then there's some
wrinkles that go down this way and some shading this way. We'll do the trunk that way. Well, look at how
cute his mouth looks. Now that you've seen me sketch a couple of different animals, I want you to take some time and either use the photos
that I've provided you as reference in this class and
sketch your own animals or pick a different animal and find some reference photos and
sketch your own animals. And what I would
love for you to try is do two different sketches
of the same animal, one that's more simplified, and one that's a little
bit more detailed. But I think it's a great
exercise to start working on your animal drawing
skills and get those gears working in your
brains for animal characters. So this is the normal
proportions for an elephant. But when you draw it kind of a cartoony or more of
a picture book style, I feel like a lot of times you need to take some liberties and some things
just need to be a little bit more exaggerated
for them to look good. I'm also thinking of, I'm going to move the
head up a little bit, so it looks a little bit
more alert, like that. And so now we have two
kind of cute animals. And then and then
for the last part, let's get a little
birdie going over here.
8. Drawing Exercise: Bird: Alright, for the birdie, we're going to cut corners a little bit and try to
go a little bit faster. And so I just have one
sketch of the bird. And if you are interested in
learning how to draw birds, I have a separate class
all about learning birds and finding out the shapes and learning how to draw birds. And so if you really
want to do a bird book, that might be a good
precursor for that book. So for the bird,
the bird has kind of they have the same amount
of shapes for the head. It's usually this kind of
almost like a pizza slice, but it's a little bit bigger. Like a wider, maybe almost
a third of a circle. And then if it's a smaller
bird like the sparrow, they don't really
have much of a neck. We just go straight
into the body, but if it's a flamingo
or something, then the neck would
go from here, and then from the
other straight line, we have the beak for flamingo, it would be a bigger beak. Then we have a tail, which is a rectangle that's
wider usually on one end. Then for the legs, the other ones
behind over there, we've got sticks and then we've got the other
ones are behind over there, and then an eye, the wings. And so for the body of the bird, it's usually kind of a straight or a slight
curve for the back. And then the body will be, you know, if it's a chicken, it's going to be nice and plump. If it's more of a hawk or
something that goes fast, then it might be a
little bit straighter. So let's move our character just out so we can draw on top. And so from here, Let's add some characteristics or make it into a
picture book character. And so I'll go from here. And the fun thing is always
adding the expression. So with birds, it's really fun. So you could, you know, normally they just
have straight lines, but to give them expressions, you just need to curve things
up or down a little bit. So if this bird is
happy, it looks happy. If it's sad, it can be sad. If we want to make
the mouth open, we can draw and then now it can be
terrified or something. Oops. Then we'll draw the faces
the rest of the head. And we draw his wings. I have a whole class
on drawing birds. And so they have different
sections of feathers. There's one, and then his other feathers
come around over here. And I think just
for cuteness sake, I'm going to make him
a little bit plumper. We might end up giving him a bigger might get him a little bit bigger head
too just to make it cuter. Not too much. Then for
the cuteness factor, I'm going to make the beak
a little bit smaller. We can still make him look like he's not quite sure
what's happening. Then for his feet, I'm going to simplify those. Maybe we can make
him look excited. Remember what I said about tilting that corner
of the mouth. If we have the top of the
mouth goes like that, that's a oh, no, a face or a mouth if
this was a person. But then if we tilt
the mouth just a little bit, really bad person. But when we either make it straight or tilt
it up just a little bit, it makes that mouth
excited and happy. Now we've given
our little sparrow a fun little
expression over here. Then to simplify. For our simplified character, we'll stick much
closer to these, I might make this just
straight and I'm going to simplify the wing
simplify the tail, it might not even need anything. And instead of actually drawing, the feet can just be
straight like that. And so there is a good example of just making simplified and
more detailed characters. And for the detailed character, you could always, you know, we could add other
details for them, too, if they had some
fun things going on. After you've done a few
exercises on practicing, creating animal characters
based on Bota references, let's look at how to start creating anthropomorphic
animal characters.
9. Considerations for Anthropomorphic Characters: Alright, so in this video, I wanted to look at some
anthropomorphic characters, and I've taken a bunch of photos from some picture books that we have around the house to show you different
kinds of options of ways that illustrators have created animal characters that kind of walk on two feet and have human like characters. And I wanted to
show a nice variety because I wanted you
to feel relaxed, knowing that there's no
one way of doing things. Kind of the that's kind of the rule of
thumb for picture book. You can illustrate in so
many different styles. Most of these animals
walk on four feet. But when you're creating these characters with
human like features, we basically take the structure
of a human character or a person's character and then superimpose them animal characteristics
kind of on top of that. And so one place where you can make a decision is obviously with the
hands and the feet. So, for example, with this
character by Lydia Nichols, she decided that this animals
going to have, you know, kind of the hoofs that Ama
would have for a hand. Um, same with this
lama by Anna Downey, it retains some of those the way that the limbs are shaped. So it's not completely
human like, but in the books, they
walk on two feet. Let's see what
other ones we have. The fox has paws, and they're still shaped, kind of like the fox legs
with the crescent moon shape. And but now instead of
being on all fours, the fox is on all twos. And then once we move
to kind of, like, the opposite spectrum of that, we get characters that
have human like hand. So, for example, over here, this elephant has human like, you know, it's got fingers,
it's wearing shoes. Same thing over here.
These are by Kate Hindley. Um, there's some that are
somewhere kind of in between. Like, it's got kind of paws and it's got
forefingers on there. And so you can
kind of, you know, choose to land anywhere in between the two
extremes of having things being very human like to things being somewhere
kind of in between. Like over here,
that's not really what rhinoceros paw looks like, but, you know,
it's been created, so it looks a little
bit like a hand. And same over here. And then, so that's kind of about
the arms and the legs. You choose how you're going
to represent your characters. And in general, it's
good to stick with kind of one style
throughout your whole book. So if you have multiple
different characters or different animal
characters in your book, it's nice to stay, you know, all of them have similar kinds of hands or similar
kinds of feet. So it's kind of a stylistic
choice that you make. Another choice that
you can make with humanizing these characters is are they going to
wear any clothes, and what kind of
clothes do they wear? So if you think about
Donald Duck, you know, they and like these characters
on the top of there, they're wearing
shirts, but there's no pants. Same over here. And when you have
animal characters, that is totally fine. Or sometimes you might
get a character. This one, these ones
are just wearing shorts. You might get something. This one's just wearing
pants and shoes. Or you might just
get something where they're wearing a bow
tie or something like that to indicate that
they have some of those more human like
characteristics, and some, you know,
characters are wearing full sets of clothing. And so when you're making
these decisions for your book, what kind of hands and feet
they're going to have, what kind of proportions
they're going to have, if they're going to be
wearing clothes and how much clothes they're
going to be wearing, um, the one of the things that you can take into consideration is what is
happening in the book? What are the animal
characters doing in the book? Are they going to be, you know, do they need to be grabbing
things or, you know, are they living in a
forest or are they living in kind of more like a city or somewhere,
like in a house? And kind of depending
on that, you know, how close to people are
they living if they're doing things that
people are doing a lot. They live in a civilization
with cars, you know, then maybe it makes
sense for them to be wearing clothes if
they have technology. But if it's, you know, if they live in more of a simplified thing
and they live in nature or do more kind of
things that animals would do, then it might make more sense
to have them kind of look a little bit more naturalistic or maybe less clothes
or something like that. You can also think if, you know, will the clothes add anything to the storyline of the book
or will it add anything to, like, the characters
of the book, anything to their personality? Um, is there something that the character has that makes them distinctly
that character. And so those are just good
things to think about and have in the back
of your mind when you're making these decisions
and then kind of try to keep it consistent
within the whole book. Alright. And in the next video, let's jump into some details and talk about facial features.
10. Animal Expressions: So in this video, let's
talk a little bit about adding
expressions to faces. And if you've taken
the previous class, we've talked about
different kinds of expressions and putting
expressions on faces. And so I decided I'm
going to put this. This wasn't in the
previous classes, I made it for this class, but I figured we'd have a reference, so when we draw animals, we could look at something
while we're trying to work on. Before we start
putting emotions, I just wanted to talk
about some decisions as you are coming up
with your characters. So when you're drawing your
characters, let's say, I'm going to draw a horse
character over here, and it's going to be a very
simplified horse character. And so if this is
my horse's head, the first thing to decide is how my features lay on my character. Now, do I want to have
just a side profile? With the horse kind of looking, you know, I guess you
could say normal, or then a lot of times, what I'll see is if people
have googly eyes, you know, you can have that one eye like
that, but a lot of times, what I'll see is I'll see both eyes on one
side of the face. The nose is still, you know, facing forwards, but then the eyes are kind
of from the side. And so this is just
kind of up to you, how you want to draw
your character um, then you if I'm looking at my horse from the
front, here's the eyes. And then I'd probably I could have my eyes
like this on my nose. Or, you know, my eyes could
be together like this. So you just have to kind of decide how your character
is going to look, how the different things are
going to land on their face. So you know then
how to change it. So let's say this horse, let's say we're going to just do just eyeball like this. Alright. And then for the mouth, too, normal horse mouth
would kind of be over here, but sometimes I see the
horse mouth put over here, so it's kind of up to you which
one looks better for you. And so there's a
little bit of always play with different characters. If I want to do a dog, let's say it's going to
be very similar. Let's say this dog is
gonna have a floppy ear. So I've got kind of
the basic idea of the ball and then the
muzzle coming from there. We've got There we
go. He's got a nose. Over here, I could do, you
know, same kind of eyes, but just for the sake
of this exercise, I'm just going to put
the eye the same, and then I'll put my mouth, and then I'll add eyebrows so that you can barely
even see the eyebrow, but it still adds
character over there. Alright, so let's give these
characters some expression. So if we want to
make them smile, so obviously, I'm just going to simplify these so we can kind of move
through this faster. Alright, so if we want to kind of exaggerate and give them a bigger smile or if we want to if I want
to open that mouth, I might decide to to open
up the mouth like this. On the side, or I might decide that I want to open the mouth like
this on the side. It's kind of up to you
which way you want to go. And then if I want
to, let's say, I want to make, like, a face where it's
kind of really, um elongated, I could
decide to then you know, maybe so maybe this guy is
going to be really excited. We're going I'm going
to make the eye bigger. We could have actually, if
they're really excited, usually, pupil go larger if
it's something exciting. I could even add
something like that. Like I said, these are I'm
just trying to go faster. If I wanted to make
it even happier, I could bring that up like that. And then if I'm
going for my dog, let's say I wanted Um, so let's make them look a
little bit more scared. So instead of pulling this corner of the
mouth up this way, I'm going to pull it that way. And then maybe the
ears going to go up. Ear could go all the
way up over here, too. And usually when we
do I do scared faces, it's, you know, looks
something like that. So now I'm stretching
the face out. Maybe that e needs to be. Maybe that is gonna
go like that. And then let's say
they're really angry. So I'm kind of
going to from here, let's do kind of, like, maybe something kind of like
this guy right here. And so now I'm going to
bring that eyebrow down, and then I'm going to
do a flared nostril. You know, that
guys really angry, and then let's do
a different kind of angry face for this dog. So with the dog, maybe
he's wrinkling his nose. And then usually the ears
kind of go against the head. I can even move this like this. And sometimes the
eyebrows can even lift beyond over there. And maybe we can do a sad one. So if this is a sad one, and then maybe it'll just be really down over
here like that, just a teeny tiny little mouth. And so the mouth moves a little bit more than what
is, you know, in general, possible with an animal, but you just make it you just kind of figure
it out as you go. But there can be a lot more
kind of things that move. So if we want to do
kind of like a oh face, like this one right here, we can make it so that the
mouth goes all the way out. So if we do that for the dog, so maybe the ears
are gonna come up, and then we have a big eye or maybe it's like
a interested eye, the people's really big. And then we'll bring it
all the way over here. So I was trying to figure
out if I bring that I could try to bring
the lips all the way over here like this, but I feel like this looks
better for the ooh ooh face. And so you can see, you know, it can go all the way. This mouth can move all
the way from here to here. And we just keep the
muzzle shaped the same, but the mouth moves
inside over here, except for when they're
angry and it's scrunched and kind of the same thing
goes for the horsey, too. So keeping the head
shaped the same, but just things move
inside over there. So that's kind of my
general directions on how I do expressions. And I just wanted to show one example of this is one of the characters from my book Kitty and Cat
opposites attract. And so this is kind of like the general grumpy
cat that we have. And then here are just
some of the other. And so we've changed the eye shape a
little bit over here. This is where they're
kind of tired. And you can see it's kind of tilted over to the side
just a little bit, and I give that illusion just
by moving everything over. And then the muzzle is a little bit over, you
know, down that way. And same thing over here. The mouth moves, the muzzle isn't getting
a whole lot bigger. And we have kind of
an indignant face, kind of a satisfied
looking face. We still have the
big black eyebrows over here, but, you know, they're just up and
somebody's been awoken, and then this one,
you know, screeching. The kitty cat had just
bit his tail over here. And so just showing different
ways, and then here, everything he's been wet, so everything is kind
of elongated long. And so you'll see how I'm kind of squeezing and moving things to give different
expressions for cat and how expressive an
animal can be, as well. So a little as a
little exercise, at this point, you'll have
these in your class handout. You'll have the emotions
in the class handout. If you want to take either
your bird character or your elephant or a dog or whatever other
animal that you want to sketch and practice
during this class, if you wanted to take
that and try and give that character a variety
of different expressions, that would be a great way to keep working on your
skills right now. And I have a little bonus
video coming up next on how to draw expressions if you are dealing
with a bird beak. And then after that,
we'll get into adding personality into
our animal characters.
11. Adding Personality: In part one of this series, we talked about character
and plot based books. And when plot based books, your character basically
just, you know, there's things going on or, you know, maybe this character, let's say we have a
dog character, like, it could be that the
thinking about it, the character of the animal is not super important
to the plot. So we're not talking
about how this dog is feeling or what it's doing. It's basically just
an accessory to the book as the book moves
on through its paces. But in more of a
character based book, we are talking about
um more specifics. So we want to know we usually know if
it's a girl or a boy. We know how old they
are or about how old. You know, we know specific
things about them, what they like, what
they don't like. The book usually concerns about their feelings
and their emotions, and we know a lot about, you know, the internal
workings of this character. And so if you're trying to
build a character like that, it's really good to know some of the details about
that character, so you can incorporate
that into their design. So it could be Is your
character old or young? Are they funny? Are they shy or are they
outgoing? Is it a boy? Is it a girl? You know, all these kinds of
things are going to affect the way that you
draw this character. And so let's say, if I want to make something
that's more masculine. We also talked about shapes
in that first lesson, so I'm not going to deep dive
into those, but, you know, we talked about round shapes, kind of S curves, those kinds of things are more feminine. If it's more angular, those things are going
to be more masculine, things that have
a lot of angles, like, uh, uh, triangles, those are going to look
kind of evil or, you know, those are usually
associated with, you know, things that
are more spiky, evil, and things that are round and voluptuous are usually
more happy go lucky, you know, easy
easygoing characters. And so all those
kinds of, you know, that shape language, those are
also good to keep in mind. And so what I thought
we would do is, let's make this character into a boy character
and a girl character. So let me duplicate it. Alright, so here we have
three of the same characters. And so now let's try to
make one that's, girl. Maybe she's outgoing. Um, I don't know. Maybe she's young. And then maybe this
one's going to be a boy. And then this one
could be more shy and she could this character could maybe be more of a teen. And then I thought
maybe we could do, like an old old I don't know. I guess it could be a man. Is it gonna be grumpy? And so now we can kind of try to incorporate some of these things into
our characteristics. And so if I want a character that's going to be more young, in general, we have
a bigger forehead. And so just changing, that makes a big difference, and then we could have
this for a teenager, it can be somewhere in between. And then if we're old Duter, then maybe it's going to be, you know, something like that. And that gives a little
bit to start off. And so let's see. So this is going to be a girl. She's outgoing, so
maybe we'll have, like, might be kind of fun to
have if one side is, I'm adding a little bit
more curves over here. You know, they could almost be like heart
shapes over here. If I wanted to add that, but I want her to have a
little bit of a spunk to her. So I think we'll add
some maybe bangs. So I'm just kind of thinking
out loud over here. So I'm adding a little
bit of some fur. Maybe she's got some
scruffy marks on her. Again, adding some more
roundness soft shapes. And then if we are we really
just want to stay simple, we can just keep little
dot eyes for her. If I wanted her to
be really cute, I could give her big, you
know, bigger googly eyes. But I'm going to also let's see what happens if
we set her eyes. Just gonna set those
out a little bit more. Be a little bit more lower. So I kind of want
big eyes, var set. I'm thinking still
softer shapes. Alright, I think that
looks pretty cute. So here's our younger
little girl character. And then we've got
our teen who's shy. And so maybe maybe his ears maybe his ears can be a little bit more off to
the side like a shy dog. And then I'll do more
angular for him. So thinking about shape
of the nose, shy smile. I like them having a little
bit of bangs or something, gives a little bit more. But maybe because he's shy, maybe his hair isn't as spunky
as this little character. And then for grandpa character, maybe I'll add some
extra things for him. And for him, we're
gonna add some jowels. I think I wanted to make the
eyes a little bit bigger, add some wrinkles for him. Maybe he's got some
bushy eyebrows. Like, usually, Grandpa, we could even add a
mustache for him. Maybe he's got a little bit kind of some sort of a
beard thing going on. And he can have a big old nose. Oh, no, he was
supposed to be grumpy. I forgot. Uh, let's see. I need to change his eyebrows
to look more grumpy. Maybe he's got like
one. I like that. Maybe he's got like one
thing coming over there. Alright, he's supposed
to look grumpy. Let's give him some
grumpy eyebrows. Maybe he's not as grumpy
as he could look, but he's looking a
little grumpy, at least. Here we go. So that was
kind of a very quick study. So we've got three
different character it was the same base character, but we've changed some of
the characteristics in each one just to change it and make it look
more like a girl, for the girl, even if we wanted to go more, what do you call it? We could even give her
eyelashes if we wanted to. Yeah, maybe she can have more of a
personality over there. There we go. Now she
looks more outgoing. And then we've got a little
bit of a shy teen over there. Maybe he's got a
crush on somebody, and then we've got the
grumpy grandpa over there. And so, same basis, but just changing
it different ways. In the next video,
let's look at how shapes and proportions
affect your character.
12. Bonus: How to Animate a Bird Beak: And I wanted to add just a
really quick little bonus before we get into our
exercise and our next video. I wanted to just show
you if you had a bird. And we talked a little bit
about we had that sparrow. Usually, my bird mouth goes inside of the
circle of the head. Or whatever shape your
head is going to be, and then it goes from here. And if you so it's
fairly simple. I already showed
you if you want to do happy face for your bird. But what happens when you need to draw a beak from the front? And so I just wanted to give
you a few examples of that. And so, usually, let's
say this is our bird, and this is our bird
from the front. And so this would just be regular expression,
neutral expression. And so then when I wanted to do happy let's just
work on the mouth. And so the eyes are the same, you know, as a human eye. And so if I do a mouth
like this, it looks happy. I can open the mouth. And so what I would do
is I would do that. And then if I want
the mouth open, and then I just
connect over here. And so now it looks
even more open. And so I just imagine
this part moving down. And then let's say we want to
do more of something upset. So if we have this over here,
now it's looking upset. And so I'm basically just working inside of
this thing if I want. I can also stretch it. And so for an upset or, you
know, if they're going. Like, something
awful is happening, you could then, you know, even stretch this down
here if you wanted to. Then have this right here. And then, let's say, if you wanted to do the oh face, then I would literally like, Oh. So it's just whatever you would do on a
regular human face, the mouth movements would be pretty much the same on a bird, but everything is happening
kind of inside of that shape. And then if I want to do
a really wide something, then I usually just keep this kind of like the
cat muzzle example, and then I could just move
that like that or make it a little bit bigger or maybe exaggerate these things
down that way a little bit. But in general, I try to keep kind of the muzzle or
the beak shape the same. Um, or I guess if
it's super happy, then the eyes could even be
closed, something like that. And so that's how I would
do Brdfaces or bird beaks. Alright. In the
next brief video, let's talk a little
bit about adding personality to your character.
13. Exercise: Shapes Defining a Character: As a short little exercise, let's work on those
shapes and proportions. And so let's think about so let's think about proportions
and shapes in a character. And so if we are going to have
something that's friendly, and then we'll have
something that's evil, let's say, or, you
know, not so nice. And when we are talking about friendly things, we
usually think about, you know, round shapes, any kind of, you know, bean shapes, those
types of things. And when we're talking
about evil, you know, things that are pointy and
yeah, just more straight. And so let's think
about doing two cats. And since I can't really
think of dogs being evil, so let's do an evil cat. And so if we try to do a
friendly cat, first of all, maybe this cat has
kind of a bigger head, and so maybe it's got kind
of more rounded ears. I'll do I don't know. Maybe it's a younger cat. Maybe if we want
it to be friendly, we want it to be
kind of a cute cat, maybe it's got a smaller body. I'll make it walking over here. Alright, so I'm
thinking this cat is a little bit It's
kind of cute and it's a little bit chunky and
maybe it's got a collar on with a little thing on it that'll make it look
like somebody owns it. And maybe even the tail is like, maybe it's got kind of
a cute little cute. Well, maybe it needs to
be a little bit longer. So I feel like right
now I'm doing it's too proportioned and so something
needs to change on it, so I'm doing there
needs a bigger body or it needs a smaller body. So let's do something like that. And then I'll try to do
how about like that. Maybe the ears are even bigger. It's got cute little whiskers. And we probably need to
move everything down. Something kind of
like that, maybe. Try to keep all my lines soft. Alright, so maybe for a quick sketch, something
like that works. All right. And then let's
work on kind of an evil cat. So everything over here is
soft and friendly looking. And then for more
of an evil cat, maybe this cat's going
to be hunched over. Maybe even its
tail is, you know, angular instead of
it's not quite right. Maybe it's got scraggles
on it. Who knows? Putting the ears kind
of off to the side, making them pointy and sharp. And so this is very we're
very much in stereotypical. Uh, I like it better when
they're going over here, so I'm going to try to make him look like
he's kind of looming. It's gonna be a
little bit smaller. Give him some more
pointy eyebrows. Well, it's not really
looking that evil, but at least it's looking
more evil than the other one. Might be good idea to look
at one of those, like, hairless cats. Well,
we'll just go with this. Actually, you know
what? We should probably make his hair. I know that was kind of good, but maybe his tail is it's
seen some better days. And so there we could have
one kind of a friendly, soft, fun kitty to hang around, and then one kitty that's maybe not so
friendly to hang around. So I don't know which
one you would rather go pet if you saw one outside. And for this one,
you could even add. These could be, like, those
little you could even add soft little marks for the stripes or something like that to make
it look even cuter. In the next video, we'll do a little review on what
makes for a cute character.
14. Proportions and Shapes in Character Building: And so in the first
class we talked about, we had the shapes game, and we talked about dividing a face with two vertical
and horizontal lines into kind of nine sections. And then depending, you know, where those lines
kind of intersect, you get different
proportioned faces, you know, things that are, you know, high up on
the face or down. And the same thing
with full bodies with changing the
size of the boxes or, you know, kind of segments
of how we draw our people. So the same thing kind of
applies for the characters. So when we kind of have an
idea of who the character is, then it's fun to play with
different proportions. And so I just have a couple of different examples over here. So we have this is Skippy
John Jones by Judy Shackner. And with him, he's a cat, and you can see the exaggerations
he has a giant head, but his ears are even, you know, are even huge
compared to his head size. And then he has this
teeny, tiny little body, and it just creates this
adorable, cute little character. And then we have this
character from the Zoro Books, and I can't remember his name is slinky or
something like that. And you can see
this cat character, how it's almost
almost snakelike in the way that he's been drawn as he's running
away from the dogs. The dogs are barking
and he's running away. But I just love the way that
he's been drawn over here. And you can see
that these two cats have two totally
different personality, just the way that
they've been designed. And then we have two
bears over here, and it's interesting
because they're almost in kind of a
similar position. We've got this bear
from Lewin Fa's book, and then this is Ryan
Higgins bear, Bruce. And you can look at
these two bears, and you can immediately
tell that they are two completely
different characters. This bear is kind of grumpy and he doesn't
look like he would be, you know, a very fun character, and he's got kind of a
grudge with the world. And then this bear, he is kind of the
main character, but it's more of a
plot based book where the bear literally goes
along for the ride. And he's, you know, he kind of gets into a
current and he goes down a waterfall and so he's
kind of a haphazard. You know, he's kind of
going on a journey, but he's kind of this
unwittingly being taken on a crash
course down the river, kind of a character. And so you can just
see, kind of, you know, from the design
and from his face, what kind of a character he is. He's kind of a fun
character in the book. And so those are a few examples. And then I just have a couple
of books to show, too. One character that I especially love is Olivia by In Falconer, and he has just done I mean, you look at this
little precocious pig. She's always got
interesting clothes on, but she's still very kind
of pig like in her Like, she's got the hooves
or the what are the cloven kind of hooves
on both top and bottom. But same thing with
Skippy John Jones, really big ears and
a really big head, compared to kind
of a smaller body, makes for this very
endearing character. And we've got little bows
on the top of her ears, and she doesn't have hair, but, you know, this is how we
can make it a female. And she's just, I feel like a really
successful character. And then another
character design that I really like is this shark
from Misunderstood Shark, illustrated by Scott Magoon. And with this one,
this character is a little kind of
rough around the edges. He's eaten the jellyfish that's trying to that was
trying to interview him. And he's kind of this gruff, gruff, very manly
kind of a character. And so you can see he's got
tattoo and he's, you know, just the way that he's more
angular and he's got teeth. And so he's this character that's kind of rough around
the edges, like said, and he is hungry
and he eats things, but then he also does have all these soft shapes
because he is kind of, you know, like, soft
soft on the outside. And so I just wanted to show that as a kind of a fun
character design for you. And then we have the dog character Gus
by Chris Chatterton, and you can see that for
his character shapes, he's kind of the same
as the other character, the Shark, where
he's very grumpy. And so you can see
that, you know, just by looking at his eyes. And he's also kind of stiff. He doesn't like change. He
doesn't like a lot of things, so you can just see from the
way that he's standing and sitting that he's a
very kind of a grumpy, grumpy character, but kind
of soft around the edges. And then we see all these
other characters around that are much more happier,
happier characters. And so he's just the fun
character design on his own. Then this is this goose from
a Benji Davies book series, George John Benji Davis where we have this duo of a
bear and this goose. And just by looking
at this goose, you can kind of guess his personality.
He's kind of goofy. He's kind of a goofy character, whereas the other ones kind of if we're thinking about
traditional Disney, this is kind of
like Donald Duck, and this is kind of goofy. He's kind of happy go lucky and isn't really aware of the
other character's feelings, and he's kind of, you know, very much out there character, and you can just you can just kind of see that
just by looking at him. He's got a lot of big emotions. And so he's just a really
fun fun character design. There's a couple of and
I feel like you can kind of see his larger than life personality just from
the way that he's been drawn. You know, he's not the
smartest character. He's got kind of a little head and kind of a big bulbous body. And then just the way that his feelings
are kind of extra, I feel like the way that
his wings are drawn, they're kind of like an
extension of his emotions. They're very kind
of not blustery, but they're kind of soft
and kind of going out in the way that his personality
and his feelings are. And then he's got those
little two dot eyes that also give him his little personality. Then this is also not as much of a maybe
character based story, but I just wanted to
show it as an example of this is by Lorna
Scobe and she has obviously made
the decision that all her rabbits have
these enormous eyes, and they all kind
of stare at you. And so whenever you're
looking at this book, all the characters in here
just have these giant eyes, which I think is kind of
funny and also the fox. So that's kind of
an interesting, um interesting design
decision that she's made, and she carries that out
through the whole book. And on this one, you can see that in some of the pictures, the rabbit does
not have eyebrows, but then when we need the
rabbit to have emotions, then the rabbit does suddenly grow eyebrows to show
emotions better. And then, lastly,
I wanted to show this hilarious character
design by Kate Beaton. This is a little pony. And you can see that the pony is completely
missing a neck, and it's almost
completely missing legs. It's just this kind
of a bean shape, and it just perfectly goes with this kind
of a wonky character. Oh, this cute little pony
that everybody absolutely. I mean, the tongue
is sticking out. And so everybody just falls
in love with this pony. But obviously, the main
character who wants to be a um who wants to be kind of a warrior amongst others is
not happy about receiving this character or this
pony as a birthday present because she really
wanted a warrior horse. She was waiting for
something like this, and then this is what she got. So it just makes for a
really great reveal. I mean, obviously,
it's on the cover, but she wanted this,
and then we see her. Um, and, you know, they cover her eyes, and
then da, da, da, here we go. And this is the pony that
she got and the text reads, but they didn't get
it quite right. And so I just love
that character design. For this pony, it's probably something I would have
never come up with myself. So these are just some
things to think about. When you are coming up with
designs for your characters, hopefully, this kind of provided you with some inspiration. And in the next video, we will kind of continue this discussion and talk
a little bit about style.
15. Exercise: Shapes Defining Character: So we've looked at
a lot of examples from books that I've showed
you on these kinds of slides, and then I also showed some actual books with
characters in them. And in general in picture books, if it's kind of a character
based book, well, in general, too, because
they're for kids, I guess, you want to try to make
your characters cute. And the same principles that apply for human characters for making a character cute also
apply for animal characters. We're on this slide
of dogs right now. And if you remember from the first lesson or from the
first class in this series, things that make stuff or
things that make characters look cute are big
eyes a lot of times. We have this puppy over here. We've got these characters
over here and then also dot eyes are also endearing. I'm going to put slash eyes and we've got this
character over here too. Then another thing that
makes characters cuter, if you look at all these
characters over here, the cuter characters in general
are the characters that have more simplified shapes
like this one over here, this one, this one, I'll put simplified shapes. Then another thing that makes
your characters cuter is soft and round shapes and then bigger heads,
younger characters. Younger characters usually
have big heads. Soft shapes. Then lastly, in general, I would say also childlike. We talked about the
big head, but just childlike proportions
in other ways, meaning where the eyes
are located on the head, there's usually a bigger
forehead and the eyes are located a little bit lower
on this character too. Then usually if the eyes
are higher on the forehead, that makes it look like an
older less cute character. And sometimes cuteness
can also come from exaggeration of the shapes. So either bigger
ears or right here, it just looks adorable when
this tiny little puppy has. Um, these huge ears. And so we could say I'm talking about
the face in general, we talked about
the head and then exaggerated shapes
or proportions. You can also think, if you remember that picture
of Skippy John Jones, that cat that had the giant ears and the big head and then the teeny tiny body. I kind of the same vein
of thought, in general, um these kind of these points make your
character look cute. So if you're trying
to create a really cute main character
for your book, think about these things
when you're working on it.
16. Style Considerations: Just kind of summarizing things up and talking a little bit about style for one of these
last lessons in this class. So as we've already talked, there is a wide
variety of styles that apply for picture
books from going from something that's
very flat without any shading to then
things that have a lot of things going on that have a lot of shading
that look very three dimensional or that have
a lot of details in it. Now, the style that you pick to work on depends
on a few things. One thing would be it depends if you are actually
working on a book project. It would depend, in my opinion, on the manuscript, what
kind of a story it is, if the story is something that needs a character
that has a lot of details or if the story is a more quiet story and maybe it needs a little bit more
simpler characters. And then the other thing that you want to take
into consideration is what kind of work do
you want to do and what kind of work do you want
to show in your portfolio? And if you are doing like
a character based book, like we talked about earlier, you might want to pick a
style that you can have. It can be a flat style, but you want to have a style where your
character can have a lot of different expressions
like over here or, you know, even with Peter Brown, that character has a lot
of different expressions. Unlike maybe something
like this where it's kind of it's got eyes but
no nose and no mouth. And so this is more of a side character that doesn't
have a lot of expressions. Um, so you want your character
to be able to emote, if it's a main character or it's a character that needs to be
showing emotions, though. So that's something to take into consideration how you
want to show that. And if you are making a book for younger kids
versus older kids, that will also probably affect your character
design a little bit. Obviously, simpler designs kind of go for younger kids and then fancier designs in general for a little bit
of an older audience. And also not only the
characters that you're drawing, but your characters also need
to match the background. I just want to show
a few examples, we'll zoom this out. And over here, we
have these very, very simplified characters, and we have a very
simplified background. And this is a book
illustrated by Kennard Pack and then
we have the Gruffalo, which the characters
have a lot of details, and they're painted
with, you know, paints in, you know, traditional paintings, and then the background has the same
amount of texture, too. Then we have this book, it's illustrated by Chuck Gronik and we have kind of a
very stylized character, and everything in the book, including the backgrounds are
very stylized in this book. Oh, and I also wanted to
mention that when this book, you'll see the main
character, it's kind of made out of these shapes and then it's got black lines in it, and he's able to tie that style with the
background with, you know, having lines that happen
elsewhere in the background, so everything kind of
goes together nicely. With this one, this
is by John Hendrix. You can see that he's putting a lot of detail
into his character, but his background, he's putting a lot of
details over here, too. And then this is Lydia Nichols. This was one of the
amas over there. If you have a very graphic
and simplified style, her backgrounds are
also very graphic and simplified and have
that same kind of mid century modern
inspiration to them. And then sometimes
the backgrounds don't have to be
obviously fully rendered. And so this was Lauren
Ascobe's bunny Book, where they had those big eyes. And so most of this book,
there's no backgrounds. It's got white backgrounds. And then we have these painterly watercolor bunnies on there. And then the same thing or the little pony book
in the same way, he's got kind of a flat color, and there's black outlines. And then pretty much
the rest of the book is also done with very flat
colors with black outlines around everything and the
lines used to add detail and texture to different
places in the book. And so when you're thinking about a style of character
that you want to draw, also think about the types of backgrounds that you
are comfortable drawing and then mold everything
together and make sure that your characters match the backgrounds that
you are drawing. All right. And for one of
the last bonus lessons, I wanted to include a
little video about how to draw wings and make
them look like hands.
17. Bonus Video: Wings to Hands: In this video, we will
talk about drawing wings for animal characters and then also making the
wings into hands. And before we jump into that, I wanted to actually
talk a little bit about the anatomy of birds. And if you wanted
a more kind of in depth lecture on
birds and bird wings, you can look at my
skill share class that's all about drawing birds. And so before I start simplifying more complicated
things like bird wings, I like to explore the realistic subject
a little bit before. So we've the spine over here, and then we've basically
got, you know, kind of like the
body of the bird. We have the shoulder
blades are up on the top over here,
and then from there, we basically have
the top of the arm, and then we have the
bottom half of your arm. So this part right here would
be this part of your arm. And then the top part this part is kind of
the thumb over here, and then we've got what would
be technically the fingers. And the way that
the wing is kind of structured is we have
hops it kind of bends. Remember we talked about bends. So this part bends like
an elbow like that. And then this part
bends like, you know, like if you think about
your wings like this, it bends down this way. And so when we look
at a bird wing, kind of the structure,
so this would be the body of the bird. And then so the elbow
would be kind of here, and then it goes up here, and then we've got
kind of the thumb and then the wings
go out of there. And so that's kind of the bone structure
underlying bone structure, so the wing will bend and
fold kind of that way. When you look at
the wings, you'll notice on all of these wings, there's kind of three
layers of feathers. And so there's these downy
feathers up on the top, and this goes both for
the top of the wing. This is a picture from
the top of the wing, and it goes for the
underside of the wing. So there's kind of a downy kind of smooth feathers on the top, and that goes up
to where the thumb starts right past
this bend over here, and then there's kind of secondary feathers that go a
little bit past over there, and then there's the
longer feathers. Go, you know, all the way up
to the edges of the wing, and then between these things, between these kind of
three different layers, there's also kind
of a segmentation right here where we have kind of the kind of the wings that go from the
arm to the technically, from the arm to the armpit. And then these ones are the wings that are basically
kind of go from here out. And so in some of the birds, it's a little bit
easier to see where the different types
of feathers are. So we've got three
layers over here, and then you can see
there's one segment this way and then there's
this segment right here. And so this is the same. And so when I start making an anthropomorphic wing and I want to turn that into a hand, what I do is I'll add a
bend over here, oftentimes, and then there's kind of a I make this feather
into kind of a thumb, and then I'll have
three or four, however many you want wings
as kind of the fingers. And then the rest
of my feathers kind of act as one kind of
section of feathers. And then from there,
I oftentimes do one and then two
layers of feathers. And so that's kind of
how I segment and start working my character's
wing into a hand, or that's kind of how I see it. And so let's put this kind
of knowledge into action. And so here I have my character, and let's copy,
take his wing off, then let's turn his head. So let's think that he's uh let's think he's going
to be going forward. Let's make him go forward. And like I was saying, so normally the wing would
be bent in over here. And so we don't usually
kind of see the elbow, um, and so it would be kind of like this where the
thumb is over here, and then the fingers
are over here. But let's say, you know, he's extending his
arm then he's saying, kind of, we're trying
to make him say hello. So let's imagine that our character he's trying to say hello over
here or something. He's trying to flag
something down. And so from here, do one. I usually like to do three. And then let's sketch
this stuff out over here. One, two, three, and then
we'll sketch that over there. Then we can get our photo
reference so we can see a little bit more
about the feathers. If we were adding
color, this part looks like it's hidden, but we look at this
bird right here, it's wing is kind of so
it's not you can't see it, but the elbow would
go here and then the top feathers are covering the elbow
underneath over there. For the coloration, I'm not going to color
this all the way in, but this would be
fairly a uniform color. And then it looks like there's kind of a white
stripe over there, so we could add I add a white
stripe and then looks a little bit more uniform for the kind of secondary
feathers over there. So this could be all
kind of one color. And then it looks like there's more kind of
individual feathers. And so that's kind of my sketch, and now we can kind of formalize that
a little bit better. So I'm thinking that
the thumb is kind of inside over here so
we can't see the thumb. Maybe his other arm elbow
is kind of going like this. And then I'm going to give
him a little bit more head a little bit more upright, can you can make this decorative or it's kind of up
to you if you wanted it to be a straight line and then it looks like
they're kind of feathers that have a
lighter color on the edges. So I would probably add a
brown highlight like that over there for these feathers
to simplify the design. He could use some
longer legs maybe. Depending how I wanted to
use that hand, if I imagine, let's say, I want to imagine I'm going to draw
kind of a fist first. So if I imagine a fist with
fingers going down like that. So if this is my so
from the other angle. So if I'm thinking
about a fist, you know, kind of like something like this where the fingers are
kind of curled up, if I wanted to draw a
wing that goes like that. I kind of imagine this structure being
underneath over there. Then I might add feather
over there and add one, two, maybe the feathers
are a little bit longer. When I'm drawing the feathers or hand like
appendages for a bird, that's how I think about it. I wanted to show
just a case study of this rooster character
that I've done. When I'm imagining this, I'm just imagining how I would draw a regular, you know, fist. And then wherever
the wrist goes, instead of there being kind of a skinny
part of the wrist, I just take a straight
line down this way. And then, like said, I'll do instead of four
fingers over here, I'll usually do three
feathers over here. And then, like I said, this just gets extended into a wing shape instead of
a wrist of a person. So that's how I imagine doing
kind of wing shaped hands. And so you can see elbow, arm, and then hands
going over there, and then on the
other side, elbow, and then and then
same thing over here. We've got, you know, he's rolling his sleeves up he's
getting kind of angry. And then over here,
they look more like regular rooster hands. Over here, let's see. Over here, he's grabbing, so he's got his arm kind of over and he's grabbing
something over there. Then over here, he's you know, the elbows almost bending
backwards with the arms going, both going kind of
out and like that. Over here, we've got going straight and then trying
to climb over something. And then over here, same thing. We already looked at
it. Uh, up over here, here, instead of him being, you know, upright
and looking cocky, he's, you know, more there's more movement
going this way, but the arms are kind of
the same in both over here. But over here, it's
a little bit more. Instead of the elbow
being down over here, the elbow is kind
of up and over. Alright, so hopefully
that was helpful for you in figuring out how to
put wings on your ecors. And just as a super
quick reference, if you are if you are trying to do some
type of a hawk character, so let's say this is their wing and it needs to
have some stripes. What I would do in this
case is in Photoshop, I would do an Alpha lock. You can also do an Apha oc
by using two fingers and swiping over and then you can see it turns
the Alpha lock on. Now whatever I do on here, let's say I'm going
to change color. I only colors on the
pixels over there. From now, it's really easy. I could grab I don't know,
some kind of a tool like that. That's how I would
add them on there.
18. Case Study: Cat Character Development: Alright, so for this video, I really quickly just
kind of wanted to share my process for the kitty
and cat opposites attract, for the cat character. This cat character took me a
really long time to come up. And the process was
took me, I want to say, it took me at least
probably over a month, where I did a lot
of thinking and I did a lot of just sketching. And so I wanted to kind of show you um, what I did with it. And so, the first thing I did, I did draw some cats, and I wasn't happy with any of the kind of simplifications
that I was making about cats. So then the next thing what
I decided to do was find all the illustrations of cats on Pintrest that I could
and from picture books, and I basically just
went and I just copied everything that I could. So none of these are
my original designs. These were just sketches or illustrations of
cats that I found. Online. There's some illustrations
from Calvin and Hobbs. Some of these are from pictures, some more from Calvin and Hobbs, trying to figure out how other people I think these were some that I did
on my own, maybe. But I was trying to
figure out, well, how are other people
I think these might have been my own little
sketches I was thinking. And then these ones are copies
from other people's work. And I was just
trying to figure out how is Oh, this is mine. How are other people
simplifying their cats faces, especially the faces,
and making them cute and lovable and
interesting to look at? And I knew, kind
of from the start that I did not want to go kind of like this Disney esque
type of a cat route because I feel like this kind of a cat has been done a lot, and I wanted kind
of my own design. So then these are kind of
some of my early pictures. I was also doing working on this story that had
a cat and a bat. And so I made some sketches
thinking about that cat. And these are some of
the early ones for that. I, you know, was
working on stuff, but I just wasn't
really happy about it. And so I kept sketching, and I sketch on a lot of
random pieces of paper, and these are also sketches
that I did on my iPad. And so over here, some of these top ones are I
think these are my own, but then there's some
of these cats were from Lorna Scobe's Catbok and then I feel like I
got down to here. So this is kind of
my first sketch of cat that I did that
I went, like, Oh, I think I finally kind of
started to figure out, Alright, this is kind of the direction
that I wanted to go to. And so this was kind
of the first sketch. And then from there, the idea for cat was born. And then from there you
can see these are some of my early sketches for the book, and you can see the face kind
of started getting shape where I have it this
kind of hexagon shape, which is what technically the shape of the cat's
head ended up being. This was one of the
early sketches, and I tried to do some hand
painted sketches because I thought I was going to hand color and hand paint some
of these things first. And then I decided not to. So these are digitally composed and they're a lot
more kind of fluffy. And hairy when you
kind of zoom in close, but it still wasn't quite
hitting the note because the story is kind of a wordless
picture wordless story, and the words are
kind of simple. And so I still wanted
something more simpler. So after kind of putzing
around a little bit more, then this is kind of the final character sketches
that I ended up with. And with this one, there is I don't know if it
shows up on the screen. You can see the gray part
has a little bit of texture in and then there is black
linework on the top, and then there's a muzzle in the middle and that's
basically how cat came to be. If we look at the side
view, the side view, it's kind of a simplified, either a rectangle
or a bean shape. The tail is fluffy, and then the way that I
treated all the feet where, you know, the triangle goes, kind of like the way it's
supposed to go over for the back feet and then so it's all the top parts are kind
of fluffy and then there's a stick basically that comes
out with the paw at the end. And then the head has
kind of a straight top, it comes down and then there's the little part that ends
up being the muzzle. And then for the cheek, where it's supposed to
kind of jut out, I ended up doing this
kind of a curly or, you know, a line over
there to indicate that. And so that's what cat
looks like from the side, and then that's kind of, you
know, closer to the front. You can see the
expressive ears too. The ears can point straight
side when he's mad and then straight up when it's
more like a regular face. And so that's how the cat
character came to be. In the next video,
let's talk a little bit about putting clothes
on our character, and then we'll be
done with the class.
19. Adding Clothing, Part 1: And so since we've been working with this little bird character, I thought, let's put some
clothes on this bird character. And so it's up to
you if you wanted to make this character
have shoes or boots. And so let's do one where
we do kind of bare minimum, and then I figured we can do this other one where we add
a little bit more extra. And so if we just want to
kind of think about the bird, if we want the bird
to be able to fly, maybe it's easy if we just add some sort of a
vest to our bird. I would think kind of
something like this, and then it would cover. Maybe it could have
some sort of a collar. I could look up some
images of vests online, but this will do for now and
then maybe a little hat. Maybe he's kind of a
scrappy little fella. There we go. He could
have if we wanted, we could give him glasses. His glasses could be up
on the top over here. Like that or if
we wanted to give him he could also have
glasses up over here. And sometimes depending how
they sit on the animal, they don't need to
have the ear part because this animal
wouldn't even have ears. If we wanted him to have some
sort of goggles or glasses, he could even just have a pair of he's starting to look like maybe I'm thinking he's starting to look like a
scrooge or something. Maybe he could even
be holding if we're talking about how do you hold I'm thinking if he's
holding a candle. If there's a thing for a candle, I'm running out of
space over here. Maybe he's holding a the thumb be coming
I'm trying to think if the thumb would be
coming out this way or not. Maybe the thumb would
come out down this way. Something? No, I
think the thumb would be wrapping around the
other fing fingers, so maybe it wouldn't
come out that way. All right, so maybe he's
older older bird maybe. And then since he's older, I'll give him some little he's got that kind of
scrooge thing going on. And sometimes these kind
of things just happen. You just, you know,
I wasn't planning on making this into an old
bird scrooge character. So maybe then he's
got even some sort of what kind of pants did
they have on back then? So maybe it's just pants, something similar
to this that just have it's got to have
some sort of hole. And then maybe maybe the tail comes out of the
pants, something like that. Alright, let's see
what he looks like. I'm going to bring this
out a little bit this way. We can't really see
all of his jacket, but I think you get
the general idea. This could be him
holding on to that. That would be that character. Then if we want to
give on full on outfit that maybe maybe he's wearing
a hoodie or something. What does a hoodie hood look
like? Something like that? There's a little
pocket in the front and then maybe he's got both of maybe he's in a
concert or something. I think he's younger one than maybe he doesn't
have pants on this time. Maybe he's going to be jumping
up and down or something. So this guy can be a
little bit younger. Maybe we'll tilt his
head up a little bit. I don't know what
you'd be doing. Maybe I don't know what
his face is what his face should be doing at maybe his mouth should
be open after all. Maybe he's trying to sing. So I'd probably do something
kind of like that. I'd probably look up some references for
what hoodies look like, but just trying to
do this without too many references to
try to make this faster, but you get the idea. And so if I'm trying
to give him sleeves, I might make them a
little bit skinnier, so it doesn't look so
disproportionate having ginormous sleeves
for him that I can imagine his feathers could be a little bit compacted
when they're inside over there and then he's
got his tips of his feathers would be a little bit bigger bursting
out of the sleeves. So that's what I would do for a bird character to
add some clothes for them. Then let's see do
you want to do? Do you guys want to do elephant?
20. Adding Clothing, Part 2: We've got kind of
our basic shapes for elephants over here.
Let me duplicate that. And we can put those
onto the side. And so if I want to bring, I'm going to make our
elephant stand up. All right. So let's see. So we want to give our elephant. I'm thinking of, you know, elephants are kind of sturdy. They're, you know,
kind of blocky, so I'm going to make my elephant
pretty blocky over here. I want him to be kind of stout. And so we're still doing
kind of a basic human um, human characteristics,
you could say. So we've got torso, we've got two legs. We're going to add some arms, and I'm just going to have
him be kind of straight, you know, kind of
stiff over here just to give you an idea. So if that's his body, I think now his head's
not quite big enough. So it's I feel like his
head should be bigger. So maybe something like that. This is a kid
elephant and then we want some ears coming
out like that, simplifying those as well. Then if we want
the mouth to show, then the trunks got to go
somewhere off to the side. Over here, you could make
some stylistic choice where the run the trunk goes
from the middle of the head, we've got eyes over here. Actually if we think this is the for a child like character, you want to have the
eyes down below, and then let's say
the trunk goes from somewhere over there and then
this would be his mouth. So I can put trunk
somewhere over here, and then I would
have enough room for the mouth to show
down below over there. I'm not sure if I'm really convinced about my character skayet, but we'll work on it. Then for clothes, let's say
he's just wearing a T shirt. It's just the same thing as putting putting clothes on
your regular character. Let's say he can be wearing
shorts. So same thing. And then it's up to you whether you want him to have regular
hands, regular feet. So maybe if we want, kind of he can have kind of kind of small smallish
hands kind of like that. And so or kind of smallish
fingers like that. So it's kind of a stump with
fingers coming out of it. And then maybe it's
the same thing. You know, it might be kind
of cute if he had little, like sneakers on or something, he's got little you
know, some kind of cool. Maybe they don't have
the stars on them, maybe it's just a black
shoe, something like that. So he could either
have bare feet or then he could have
shoes on his feet. But I think, having a big
chunky chunky animal, then it's nice to have
big chunky feet for it. But, it might look cute if he's got a big torso, you know, maybe his feet they
could come down like that or you could
choose to taper them. His feet could also come out, you know, kind of like the way we were drawing them over here. They could come out, you know, something like this where
they get bigger and they're skinnier on the top
and bigger on the bottom. It's up to you, however, you could try different things
out and see which one. Tone this down a bit. A
lot of times I'll sketch multiple layers and try
to refine my shapes. I don't know, maybe he's got some I don't know
if it's a girl. Maybe there's a flower
on here or something. Maybe there's a belly
button showing if he's a little bit
on the trunky side. I'm thinking that ears ears
would cover the shoulders. See or maybe if
it's a little girl, maybe she's got some sort of maybe there's some
sort of little shoes, something like
that, kind of like little some sort of
little Mary Janes. Maybe there's a little flower
on top of it or something. There you go. Not convinced
about this face yet, though. Since it's a cute
little kid character, maybe it's a short
little stumpy trunk. But I guess I haven't
really I've never really drawn elephant
character before, so I'd have to work
on I think I need to work on how I want to do the trunk and look at some references on how
other people did trunks. Easier to do it on the, it's still not really
looking all that good. So right now, if I'm
feeling really stuck, what I could do is I'm
going to grab this guy. All right. So I figured out. I've gotten some other
references for elephants, and it seems like elephants are a character that look
best done from the side. I still want to make this work. It's easy to get
the elephant trunk to work from the side because then you can
still see the mouth. But if you're doing it
straight, on the front, then the trouble is the
trunk is always in the way. And so this is a great example. So let's do. I'll try to do a little bit of problem
solving over here. We're starting to get a little
bit more cuter definitely. Remember originally,
remember the elephant shape the head shape was a peanut
shape, if you remember. From the very, you know, when we talked about
elephants earlier. And maybe if I'm drawing the elephant from
this direction, it's basically going to be a
mouthless elephant and then it's going to have eyebrows and then however the eyebrows are, that's how the elephants
going to look. So let's to make this
a little bit less. We want to delete
some stuff over here. Let's see if we can get this
elephant looking cuter. Maybe we'll add some cheeks like a little kid and we'll play with the head compared to
the size of the body. Remember we talked about
making the head bigger. If it's an older character, giving it a longer
torso and longer arms, that would make it look
more like a teenager. Making it more short and
stout would it makes it more less of a neck makes it
look more like a little kid. So you know, maybe that could be something for an elephant
character from the front, and then if I draw
that character from the back or I mean,
from the side. Remember we did the lineup, so I could do let me do
this on a different layer. All right. So we have kind of basic
lines going over here, and so I'm going to
do a round head. Let's see if I want
there to be kind of like a mouth area over here, and maybe the trunk can come something up like
something like that. Her chubby chunky little body, then she would have
these cute little shoes. Her feet are a little bit more there a little bit
more chunky going this way. Maybe she's got a cute
little tail over there too, and then she's got arms. I'm thinking maybe
she's got her arm out like this and then
she's got her t shirt. Then I wonder if her trunk
should also be her mouth. We wanted to there could be some I don't know
if there should be some little what do you call it little mini tusks over there. All right. There we have our
little elephant character, so that would be them. Hopefully that was helpful and the same thing
would apply for a dog or any other
random character that I would be drawing. Here's just some other examples. From designs that are super simple without any kind
of shading and there's just some lines
that indicate where the pants are for
this character to then a lot more detail with buckles and wrinkles
and things like that, but still fairly simplified, but a really fun character. You can also see the
variety of characteristics. So if you look at all these, none of these elephants
really have a whole lot of a neck except for maybe
Mo Willems elephant. There's a little bit
of an indication where it goes out and the
same thing over here. But then for these
two characters, just the neck seems to everything seems to
continue to be one. This one is just basically
a big long oval with legs and arms and everything
sticking straight out of it. So just really fun
character designs. This one by Corey Dorfield
is also a nice simplified. All right, thanks so much
for hanging out with me. And for your kind of final sketch or your final
assignment for this class, I hope that you can take
one of your characters, the one that you've
been working on. Maybe it's the bird,
the elephant, the dog, and then create both
regular character that's on all fours and then create another version of
it that's anthropomorphic where it's standing
straight up and down. All right. And come and
join me in the next video, and we will have some
closing thoughts.
21. Final Thoughts: Thanks so much for
joining me in this class. I hope you've learned
a ton and are excited to practice sketching
animals for picture books. If you love the class, I hope that you would leave a
positive review for it. It's really simple. There's a little menu
right here below, and in the middle,
it says reviews. You just click on there, and it takes less than a minute
to fill that out. I would love to get
any kind of feedback, and also if you have ideas for future classes that
I could be teaching. I love seeing student work, and if you've been doing the
exercises in this class, I hope that maybe you would feel brave enough to post
one of your sketches or your final kind of
characters into either discussion or the
projects section in this class. And if you wanted any
kind of feedback on it, that's a great place to ask. You can post your
sketch and then ask your questions
about it if you've been stuck or you're
not quite sure. Like, I had issues, trouble trying to
figure out how to make my elephant character
look kind of natural. So if you're kind of stuck
with your animal character, feel free to ask questions, and I am more than
happy to reply to your comment and
give you some feedback. You can also post your projects and any questions
on social media for me, and I just make
sure that you tag me so that I see
it on Instagram, I am under America Jaws, and then on BluSky
I'm at Mica Hokanen. And if you just tag me, then I'm happy to give you
feedback on social media, too. And so as I've mentioned
several times in this class, this class is part three of a collection of character
design classes. In the first one. We talk about character
design in general. We talk about and color and adding personality
to your character. In the second part, we talk
about doing your character, drawing your characters
consistently, and then this third part was how to draw
animal characters. And so if you're wondering or want to be more rounded and you haven't done those
first two classes, I encourage you to do those first two parts of
this class series as well. Also have other picture
book related classes, a bird drawing class, and some watercolor
classes on skill share. And if you'd like to see those, you can just click
on my name above and see all the other classes
that I have available. Thanks so much for joining me. I cannot wait to
see your sketches and designs in the
projects below. All right. I'll see you
in the next task. Bye.
 Mirka Hokkanen, Illustrator/Author/Printmaker/Educator