Transcripts
1. Introduction: Hi. Spring is here, and it's a great time to be thinking about cute
little baby animals. In today's class,
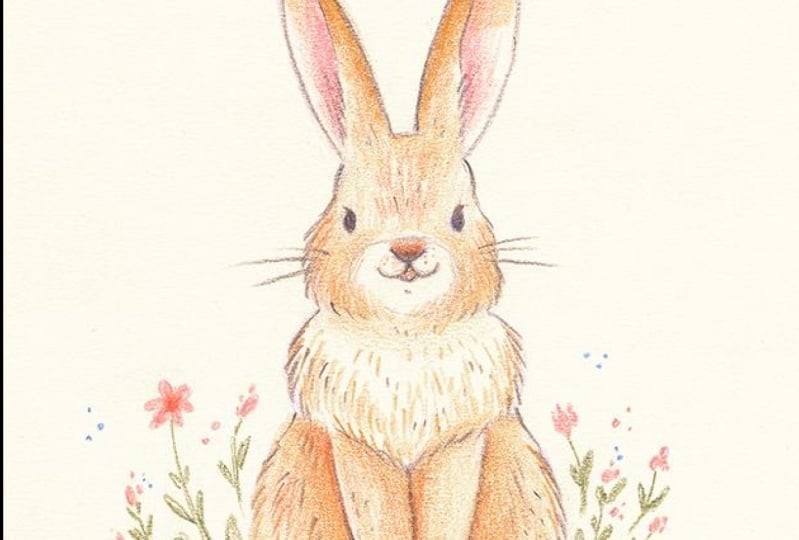
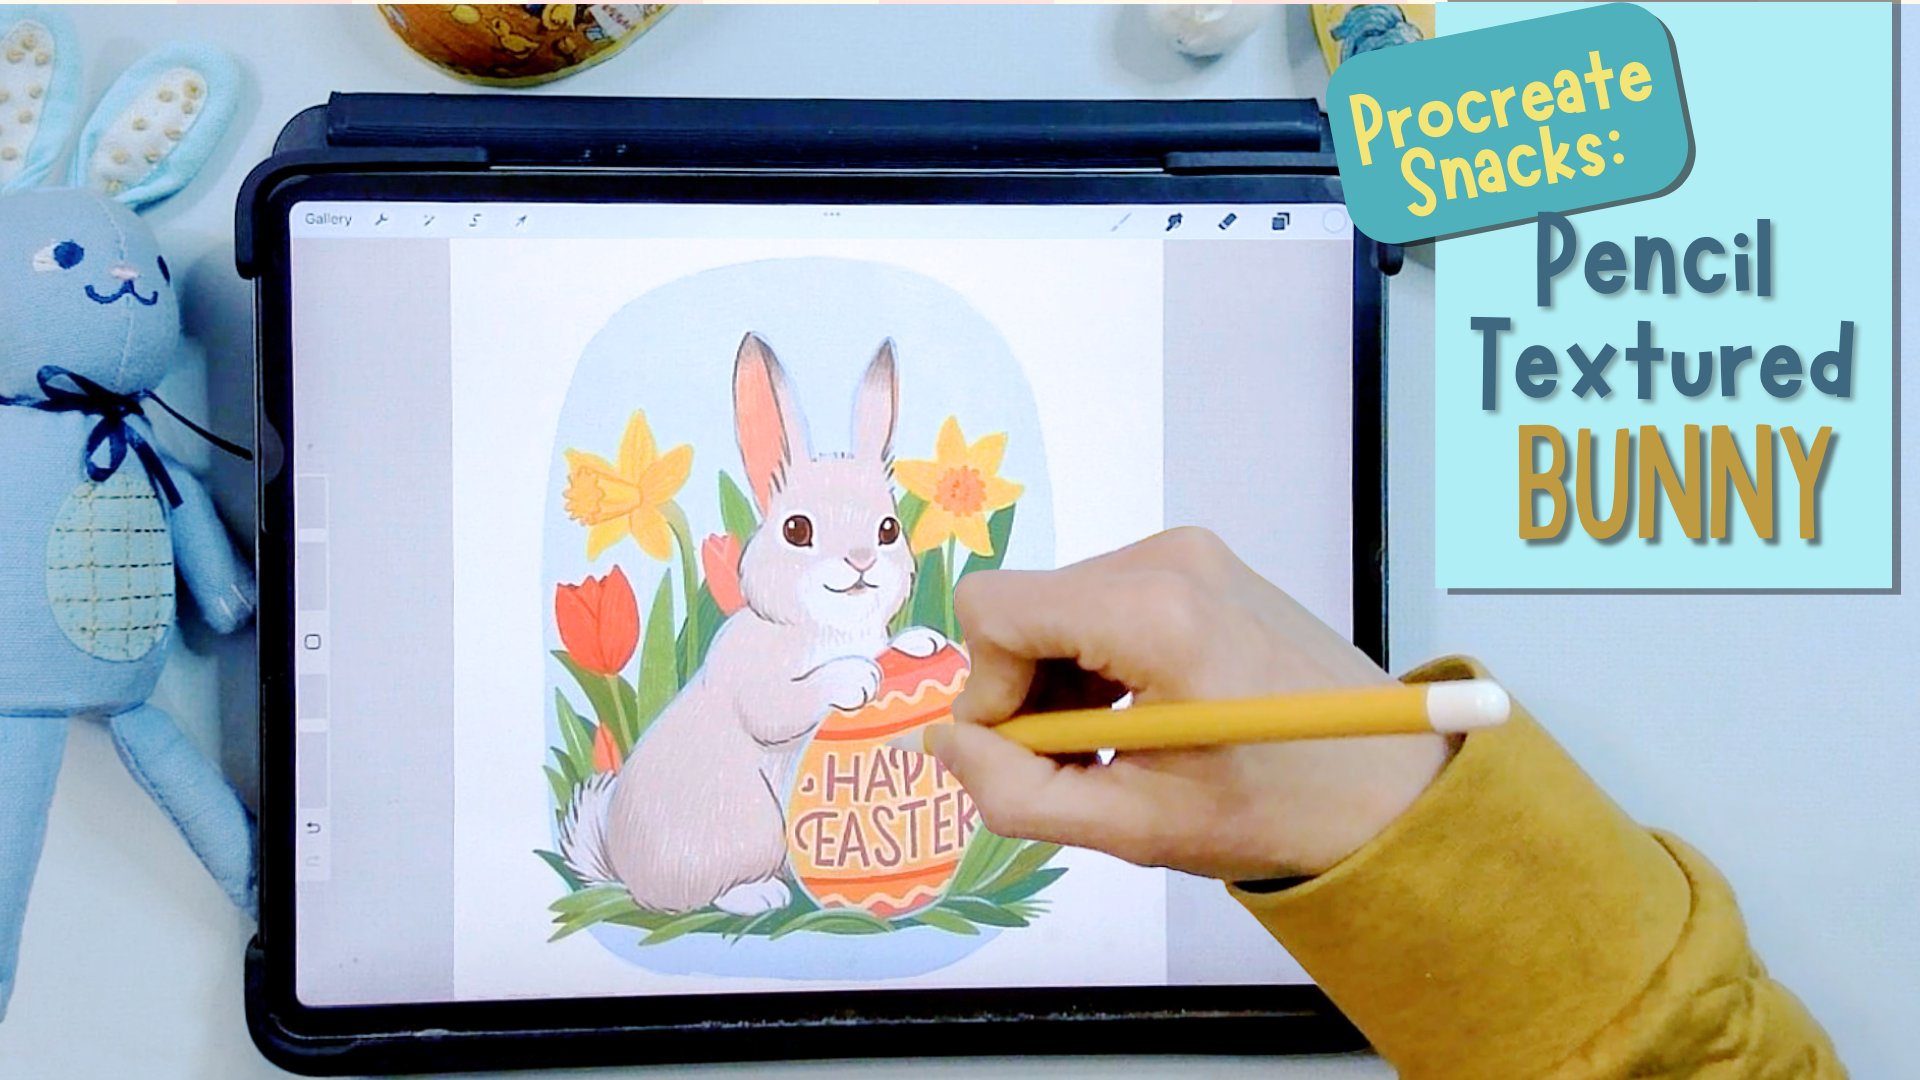
we are going to be drawing this adorable
little bunny rabbit, and you can draw it with
colored pencils, with markers. I'm just using regular
colored pencils that you have around the house
and a pencil and eraser. And so you don't need
a lot of tools to get started with this
fun little tutorial. Use this little bunny rabbit for a greeting card, scan it in, make it into a screensaver
on your phone, and send it to your family or just pin it on
your wall to enjoy. In the class, I'm going
to show you step by step how to draw the bunny, and I'll show you
how to color it in simply with a
little bit of shading. If you're ready to
add some spring into your day, let's go.
2. Class Project: For this class project, you need very simple materials. You'll need a piece of paper, or it can be card stock. If you'd like to make
this into a spring card, then you'll need some sort
of a pencil and an eraser. And then I'm using color
pencils in this class. But if you want to use
watercolors or gouaches or paint, I'll show you how I color
it in and how I shade it, and then you can
choose which media you want to color
your bunny in with. And so the colors
that I'll be using is kind of two different browns for your bunny rabbit and then also a pink color for,
like, the nose and the ears. And then I'm using a dark color. In this instance, I'm using purple that I'll be
using for the outlines, but you could use a
dark red or it could be a dark blue or brown or black. Then I'm using I have three
different colors of green. I'll mostly be using two, but I'll toss a little third
color in there at the end. And then I have a
darker pink and a yellow crayon to add a couple of flowers at the
end to the bottom. The flowers aren't necessary, but if you wanted to add a
little bit extra on there, I put a couple of
flowers at the end. And so for the
project, we're going to be creating this
cute little bunny, and I'll show you how to create it with
very simple steps. We'll start with a
triangle and a letter V, and then we'll sketch
our bunny out from that. And once you're done with it, if you can snap a
photo with your phone or a camera and then upload
it into the class projects, I'd love to see what
your final bunnies look like and how
you colored them in. So if you're ready, well,
let's get to drawing.
3. Sketching: So we're going to be using
our pencil to sketch. And with your pencil,
you can do very, very light and gentle lines. You can kind of barely
see this line right here or you can do
very dark lines. And so when we're just
sketching and we're trying to get our
basic shapes down, try to use very,
very light lines, and then that way you can erase them and get them out of the way so they don't mess
your final drawing up. And so we'll start with kind of a tall triangle over here. And where the top
of the triangle is, that's going to be close to
the top of your bunny's head. And so you want to start
somewhere over here so you have room to
do ears over there. And so I'll start
right around here on my paper and I'm
drawing a triangle. This triangle, it's
a little shorter on the bottom and then
it's a little tall. Looks like an upside
down ice cream cone. Then about this much down, we're going to draw another
V shape. Kind of the same. Oops. It so the same kind of a V shape as you
have going over here, we're going to draw a V
shape going up this way. I'll erase this so you're
not distracted by that one. And then from there, we're going to start
working on our head. And so we'll divide our bunny up into kind
of three sections. So this will be one section, and this will be so
I'm trying to kind of divide it up about
evenly over here. And so for the head, I'm going to draw
kind of a drop shape. Kind of like this. And then from there, this
is going to be his cheeks. So I'm kind of staying within
my top triangle over there. And then for the ears, um, I'm going to draw kind of
a curved line on the top, and then I'm going to match kind of where this line is over here. I'm going to draw one like that. And this can be if you
want to make shorter ears, you can make shorter or longer. So if you wanted to
make shorter ears, you could just make
your, you know, let's say, I want it
to be right here. I could have shorter
ears for my bunny. Depending how long you want
your ears, that's how long. That's where you want to start. So coming up on top
and then going down. And then what we're
going to do is we're going to draw
another line from the tippy top now to
this side, like that. Then same thing on this side. Like that. And then
we'll draw kind of like what would
you say the shape is? It's almost kind of
like a heart shape. So we'll come down
in the middle. And so this is kind
of the bunny's chest or it looks kind of like
a beet root, right? Or almost like a heart if it
was going in right there. Then from here, wherever
you're going down, we'll draw one curve and then
we'll draw another curve. And then from here,
we'll do his front legs. So we'll draw a line
down the middle. And then close to
this part right here, we'll do his 1 ft and
then from around here, we'll draw a line towards in and do other paw right there. You can do little lines, two
little lines on each paw. Then for his back legs, you can make them
bigger or smaller. We'll do one kind of like a half a circle and then
draw another half a circle. And there's the body for our
bunny and then for the eyes, we're going to draw right here where this kind
of goes in right here, we'll draw one black
dot over there. We'll do one black
dot over here, and then we're going to draw
an oval underneath here. So an oval, and then
inside the oval, we have this big
V, and we're going to do a little V inside of it, that's going to be our nose. And then from there,
we'll do two curves, kind of like letter
Cs, one going one way and one going the other way. And there we have our
sketched out bunny, and now we're going
to draw on top of it, and I'll take my eraser and I'm going to erase all
my extra lines. And so I'll erase all
my lines over here. You could also use a
marker for your outlines. And so that's why
it's good if you were doing really light
lines with your pencil. And that way, it's easy to
erase all your extra lines. And now that I've erased
most of my lines, this is what my
bunny looks like. And I'm going to
take my dark pencil and redraw the outlines
with the darker pencil. So now we'll go in and make everything much
more visible, yeah. And then on some of these outlines like
here with the ear, you can break the
outline and make little hairs on it like that. I'm going to bring
this other side in, do the same thing
on the other side. And then do the top of the head. Then we're going to do part of the head
and then the cheek, you can add some little lines on the cheek or some little fur
on the cheek, like that. Then I'll draw this
little part where the muzzle is and
we're going to draw his nose and his little mouth. And then his eyes like that. And then can draw some
little lines over here like that and making all
those little lines darker that are the
main parts of the body. And then his bottom. And then if you wanted
to go around and erase any more of
your pencil lines, so I'm just going to tidy
mine up just a little bit. And if you're drawing
a little bit slower, you can always pause the video so that you
can catch up, okay?
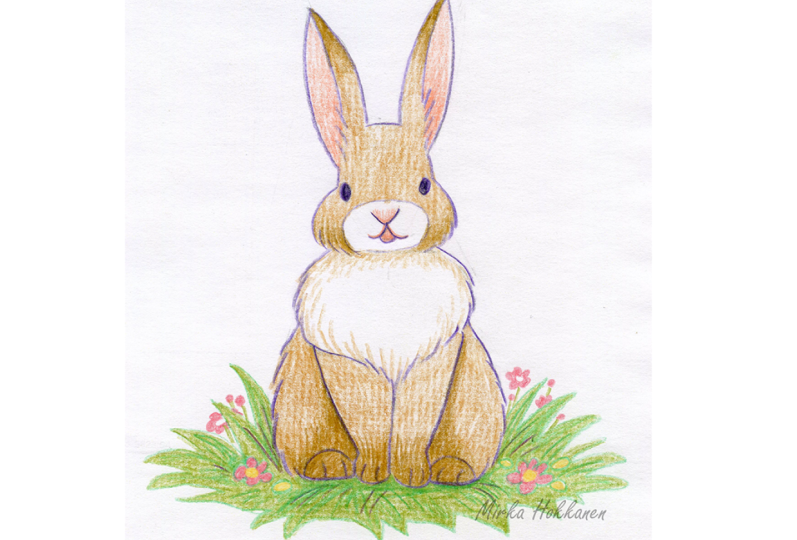
4. Coloring: And then we'll add a little
bit of before we start, we'll add a little bit of grass, so I'm taking my darker green, and we kind of draw a
zigzag line on one side. You can draw zigzag
line on the other side, and then I'm going to
connect these two. You can either connect them with a straight line like this, but I'm going to add a little bit more
zigzags over there, and then we'll color that
in after a little bit. And so then we'll start
working on our bunny. If you have a light pink color, we can start with the ears, and so I'll start with
the inside of the ear, and you can try to
make the bottom of the ear a little bit darker and then kind of fade it out and make it lighter
towards the top. And then I'm taking
my lighter brown, and I'll just kind of
color most of my bunny in. And I'm leaving the
little muzzle part. You can leave that part
white if you'd like, and you can also leave
most of this white. I'll just add a little bit
of hair to it like this. So I'll add a little bit
of hair on this side, and then I'll color all of this. So I did one side, then
do the other side. All right. And you can
add either pink for the nose or you could
add brown for the nose. I'll add some of my
pink over there. Also pink for the
inside of the mouth. There we go. And then I'm taking my
darker brown pencil and just adding some details. What I'll do is I'll
color the tip of the ear with a little
bit of a darker color, and then I'm coloring
the other tip of the ear with a darker color. And then I'm also
going to do the pause, the back pause the other one. And then we can add
a little bit of shading right behind this leg. Kind of in a curved shape over here and then same
thing over here. And then I'll add a little
bit down to the cheeks. Then I'm going to take my lighter color one
more time and add a little bit of shading
underneath the chin over here. And there's our bunny,
and then we can color in our grass, and I'll start with
my lighter color. And if you want to, you
could add flowers over here. So if you wanted to add flowers, you could draw those in, and they can just be kind of basic flowers, and then
you just leave those. And some of them can be oval
shaped and some of them can be be, you know, flower shaped. And then when I color in, I'm just coloring around them. And so in the same way
as we did with the body, I'm just starting
everything with my lighter color first and then I'll add my darker
color in second. All right. And then I will add some yellow for the middle. I'll I can make those pink, and then I'll make
these little circles. Yellow. Then I have a darker pink. I could add this right here. But if you wanted, you
could just do grass too. You don't have to
put flowers in it. I'm making one flower that's
kind of behind over there. And then maybe I'll add one more flower back
behind over here. And you could even have
a little flower buds, and then I'll add just
little stems for them. It's going down into the grass. And so now I'm going to
take my darker green, add some lines in there. And if you wanted, you could add a darker area right underneath your bunny to highlight your bunny a little bit more like he's making a
shadow over there. Like that. I guess my
green isn't super dark, but just using two
different colors just gives it a little bit more, makes it a little
bit more livelier rather than just doing
one color of green. And if you didn't
have green, you could even use a light blue color, and that would look
nice in the grass too. This is a third different
color of green. And this one's almost a blue
green. And there you go. And even if you wanted to add some extra little details in your grass with your outline color, you
could do that, too. And there we have our
cute little Easter bunny.
5. Final Thoughts: Thanks so much for joining me in this mini class. I hope
you've enjoyed it. And as I mentioned
during the class, once you get the
basic steps down and understand how to color and
shade your bunny rabbit, you can use anything
to shade it. It doesn't have to
be color pencils. It can be markers or
watercolors or guashes. I'd love to see your bunnies and the way that you
colored them in. You can grab your cellphone
and take a quick snapshot and upload your picture onto
the class projects. You can also post on
social media and tag me at Mica draws on Instagram
or Mica Hook on BluSky. I love to see student
work online and always i and comment
on your posts. Thanks so much, and I'll
see you in the next class. Bye.
 Mirka Hokkanen, Illustrator/Author/Printmaker/Educator