Transcripts
1. Introduction to Class: Drawing can be a challenge. You start a drawing and
get to a good part, and start adding all the
details only to realize later that everything seems out of
place and wonky in the end. What if I told you that
drawing can be a lot easier, if we change the
way we look at it. Instead of getting
lost in details, we can learn to break our
subject down into basic shapes and organize those shapes in
proportion with each other. Hi, my name is Marika. I'm an illustrator, author,
educator and a print-maker, and I've always loved
to draw animals. My drawings,
paintings and prints have been shown in
galleries around the world, and I love to share my
passion for drawing and animals with
people that I meet. I wanted to create this class, drawing realistic animals
with simple shapes, birds, because I believe that everyone can learn to
draw realistically, and when you learn to
draw from reference and figure out how to
be a good observer, then those skills
will trickle down to all other areas of
your art practice. The structure of the
class is simple, and I gave you several
exercises and handouts, so that anybody can jump in and learn the basics of drawing. I'll provide you with reference
images for this class, and show you how to
break down birds into the simplest of shapes so that you can then put them together correctly and
draw realistic birds. For the final project, we'll use a reference photo. We'll first break
the shapes down and then translate or
observations onto paper into a realistic proportional
drawing of an owl. I am excited to get started. Let's begin.
2. Class Project: I think a lot of
teachers would agree that observation is one of those foundational
skills that's most important when
it comes to drawing. You might think, looking at demonstrations or beautiful paintings in a gallery that artists don't copy and they draw everything
from their imagination. But actually exactly
the opposite is true. You can't really learn to draw without using
a reference first. Let me use myself as an example. If you asked me today
to draw a horse, you might be impressed by how well I can draw one
off the top of my head. But what you're seeing is just the tip of my
experience showing. What you don't know is that
since I was a young kid, I've practiced drawing
hundreds of horses, copying them from photos,
books, and magazines. The beautiful drawing today
that you see is really the accumulation of experiences from observation
and then drawing. In order to learn how to draw
something realistically, you have to use references
and look at them carefully. Since this is a
beginning drawing class, I wanted to start with birds because they're
fairly simple shaped. We'll look at several
different kinds of birds and their
shape breakdowns, and then we'll concentrate on one reference photo
for our final project. I'm going to go step-by-step and explain to you my
thought process when I'm observing and breaking
down a subject and then reconstructing
it as a drawing. These skills can also be used to draw
from live objects, but because we are
in a classroom, reference photos work best, so we are all looking
at the same thing. We'll also briefly
cover how to apply the same method to shading
and adding details. Learning and practicing the basics can feel
tedious at times, but learning the basics of drawing from
observation comes with big rewards as it's the foundation for the
rest of your art creation. Strong observation skills affect not only your drawing, but your coloring, details, compositions, and
all other creating. When you know the
basic rules of shapes, it's a lot easier to break
them down and then that ables you to create interesting characters
and illustrations. When you're finished
with your final drawing, don't forget to post
it in the gallery. I'm always excited to see
everybody's final projects. Let's jump over to
the next video, grab a handout and let's start looking
at basic shapes.
3. Breaking Things Into Shapes: Let's get right
down to business. When I want to draw anything, what I do is I always
want to break it down into general
shapes in my head, and then I figure out how those shapes relate
to each other. Before we get to our birds, I just wanted to show you just a few examples of other things that I
might be looking at. If I'm looking at a
picture of a cat, this is how I might
break it down. I might look at and think, we've got a rectangle shape for the body with a
little arc at the top, and then when I'm
looking at my leg, it's a triangle for the back leg and then little sticks
for the rest of it, then tail isn't super
interesting here. There's a straight line and then a little bump and then another one as
it curls over there. The same thing for
the other legs. I'm thinking this is almost like a triangle with
the tip cutoff, or a rectangle that gets
skinnier at one end and then you have a
little power over there and then the same goes
for the back leg. Then there's almost a rectangle for the neck in the same way I'm thinking the straight line and then the rest of the head is almost a triangle over here. Then the ears is
also a triangle. This is how I break things down. If I'm looking at it on the side and now I'm trying to draw it, I'm looking at my
reference photo and I'm trying to draw
it here on the side. Now I would do the same thing. Obviously I showed you how I break it down
when I'm looking at it, and so then when I'm
sketching it down over here, I'd do the same thing, so then then when
I'm figuring out, well, I'm trying to get this. This is the same as this. If I'm thinking,
this is about this long and then my box
was about this long, and so this goes over here about a little bit
over two times. I have two boxes over there. Then if I figure out
how big is this head compared to the
rest of the body? Then I start adding, so it's going to be
about that size. Then I had that the nose and
then my triangle for my ear. Just looking at the
relationships of everything. Then I have my
tail was over here and I'm looking at
when I do this, what is the angle
between these two? To me it looks about like that. There's that and then I
have my triangle for my leg and if I'm drawing
a rectangle here, this barely just
catches over there. It's almost on the same level. Then there might be a little bit of a
curved line over here. Again, if I'm looking
at a straight line, where does this line up with? It lines up around here. Then I know where to put my other other parts of the cat. That's how I break things down. You want to start with the
big things and big shapes and then you start getting
smaller and smaller. This applies for anything
that I'm looking at. You can look at a car,
an animal structure and so the same thing. There's a rectangle first and then there's almost
a triangle on this end. A rectangle at this end
with one part cut off and then obviously we have
our wheels are circles and then we have
a, what is this? A parallelogram over here. Then to figure out, so that would be my basic shape. If we want to tone
down the piece below and then to figure
out your details, then you would just
start breaking the big shapes down
into smaller shapes. You start breaking
the the big shapes down into smaller shapes and figure out how
things line up compared to each other to then
start putting the details. Then as the last example, I just had this tree over here. With trees, I imagine them as being cloud shapes are round, they often have very
rounded things. With this one to begin with it, we have a big area over here, we have a big area over here and then we have these little
pieces that join them. That would be my
basic shape of a tree and then I would figure out where my tree trunk goes and then you figure your
details out as you're going, but you just want to have those basic shapes first
down and then like I said, then it's easier to start
working on your details once you have your basic stamp. That's how we go. Let's look at birds next. How this applies to birds. Let's look at our
basic shapes of birds. Birds are really fun to draw. They're beautiful
animals and they have fairly simple shapes that
are easy to figure out. Here we have a bulfinch and in general, when
we're looking at birds, their bodies are a tear shape, tear shape kind of a shape. Depending how they are, so they can either be, you can think of it
as a shape like that, or you can think of it almost
like as a letter D-shaped, whichever you feel like. With this one it's
more rounded on the belly side and then it's
more straight on this side. Then the second part, if we're going down first, they have two parts to the tail. They usually have
this rounded part and then there's the actual
tail that's goes straight or bends out a little bit
depending on the bird. Then we have the wings. The wings are usually
a triangular shape and then the top is
usually rounded. Then the head it has
a curve on one end and then a straight line usually where the beak area
connects to the body, so it's straight with
a curve like that. Then depending on what
bird you're drawing, then they'll have
different shapes of beaks and then they'll have
their legs obviously. These would be our
basic shapes for a bird and then after you have
the basic shapes down, then you would start breaking it down smaller and
smaller and smaller. After we have this down, then you could start figuring out that there's
an arc over here, eyeball goes over there, and then figuring out
all your smaller shapes. If I'm looking at it hits
right here on the corner, so that would be right here. Looking at how the shapes
relate to each other and so this is a half
of a crescent shape. Then this is almost a pentagon, so just breaking and then there's a line
that goes over here, and then this is our line that we already
found figured out. Then the same thing we
already have these. This is where we drew the shape, but there's actually
a second shape. It becomes fairly
simple to start and then if you have an eraser, you could erase
some of the lines that are not necessarily,
don't mean to be there. Then we have our bird. Now that we know the basics of how to break things
down with shapes, let's look at how that applies
to other kinds of birds.
4. Bird Shapes + Wings: Now that we know how to break a bird down
into its basic shapes, let's look at all the
different birds that there are in the world and how we can find the shapes in each one of them. I just have this. We're working on my
iPad just because it makes it easier
to go in and out and show you close-ups
of everything. We were talking about it having that teardrop shaped body. We have that right here
and then we have the arc where the top of the head and then we have our straight
line for the bottom. Then that shape for the tail
is underneath over here. We can't see in this photo
and then we have our tail. Just breaking it
down to basic shapes and then obviously our beak. Beak is a much bigger thing. When you're drawing
this on the side without your reference, the way that I would
calculate the beak size compared to the head
shape is, you could, first of all, if I'm drawing it here and then I have
my teardrop shape. One thing you could do
is you could imagine if there's a line
going over here. I would imagine, same line going over here. That's where my tip is. Then there's a little
line right here where it starts and then I look, okay, well is the shape here same as the
shape over there? That's how I would figure
out how long to make this and another way would be you could take the shape of this or the width of this
and then figure out this is about
two times over here. Then for our leg, we just have a little triangle and then the leg
goes from there. That's our basic
shapes for a toucan and now let's look at a goose. Obviously they have longer necks than some other birds do. We have almost more
of a, in this photo, at least, there's almost
more of a like that D-shaped that I
was talking about and when I'm using
this reference photo our tail is very much
just a short triangle. Then there is like an extra
part on the bottom over here and then there's a neck that
tapers towards the top. Then the same as for
everything else, we have our arc and our straight line and then
the beak is a triangle. Our leg and our feet and which are underneath
here in the grass. The cranes and egrets
and birds like that are the same as our goose and so if we look at the
underneath structure over here, you can tell that this
is the a teardrop shape, but this is just a
piece of a feather. This is not actually part
of the body over here. Then we have our wing structure, which is a triangle
here and our legs. Then instead of having a
straight line like a goose, the egrets, especially
and pelicans, don't have a curved neck. It's almost like a S-shape. First we're going to go one way, even if you wanted to do that. Then same thing as
everywhere else, we have our arc going this way, a straight line,
and then our beak. Continuing with a
plump little pigeon, we can find our body shape
here like a tear shape. The wing is on a little bit of
a different spot over here. It's got a longer tip than
on some of the other ones and the wing is almost like
a oblong tear shape too. We got our tail and then here, the bottom is a little bit
more curved with the neck. We have a top of the
head and then straight. There's almost like
a parallelogram and then our beak at the top and then a little triangle for though our little
rectangle shape for the leg or the
top of the leg and then the feet over there. Oftentimes, owls can be boxy because they're fluffy
and thick stocky animals and so if we're looking at
this for a reference photo, it's a chunky tear shape. Then over here we have a
little bit of the neck part and then since it's looking
more straight towards us, instead of having our
curve and our straight, it's more just the curved shape or you could even think of it, in this case, more
of almost like a box shape with a little
bit of a curve on the top. Then the ears are part of
that top box over here. We have a few feathers. Our tail extends
behind over here. We have our triangle for wings, and then parallelogram
for our leg and then our feet go over here. Then I feel like
owls and parrots are in the same category with being plumped in and
rounded like that. Even though we can't
see the whole body, I'm still drawing my tear
shape over here, got our tail. Then we can actually see a little bit of
both of the wings. I have one triangle
for one wing over here and then another triangle
for a wing over here. Then the curve is a
little bit different than some of the other
birds and then we have our little feathers
on the top and our leg. Then I just thought
this roadrunner was such a cute little guy. He's got a straight back, so we're more in a
D-shape over here. Wing triangle and then he's
got a really long tail. To figure out how long this was, again, you could
look at the angle. I'll just draw our neck first. He's got a long-neck,
straight and our curve and then the feathers
that go off of there. Then if I'm looking at it
compared to over here, these feel like they go off almost on a similar angle
in this reference photo. Then if I'm drawing
it on the side, again, I would probably look
at where is this hitting, if I imagine. This is about twice the length and then I would figure
out how long to make that. Then we just have a
little bird that is, we're looking at it
straight from the behind. We're still finding all
of our shapes over here. He's very plumping
the wintertime. You have a little
triangle for our leg and then we have our tail and I would still draw
it as a rectangle shape. Then you can add those details
for the feathers later. Then we have two
triangles for our wings, and then our straight and
our curve and then our beak. Then if we just look at all of these as individual shapes, that just breaks down the shape language of
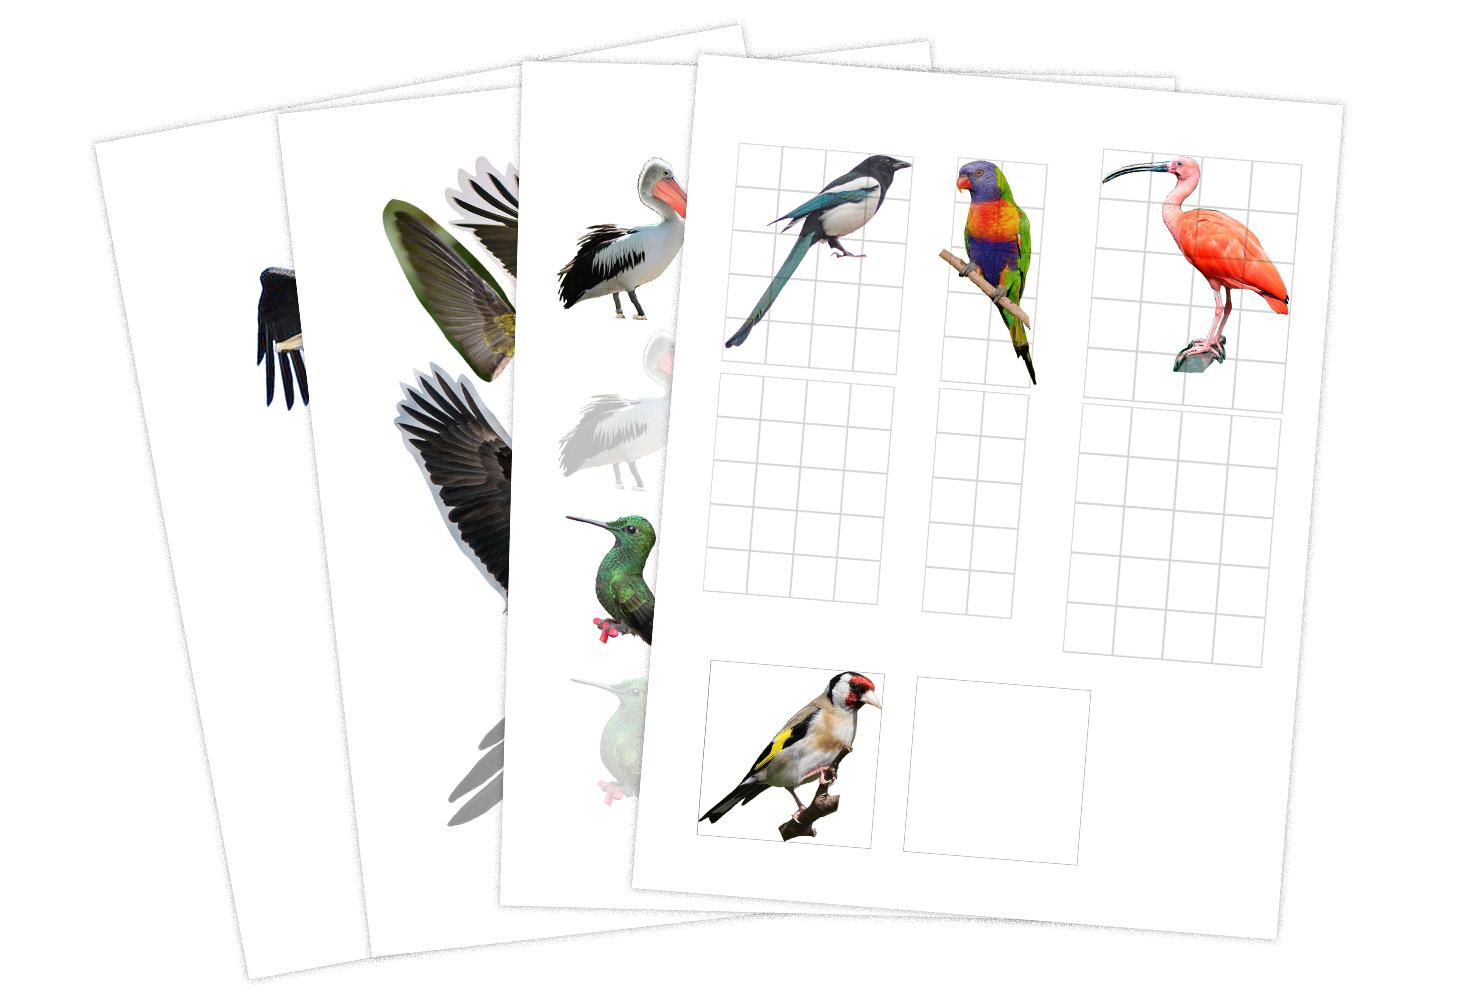
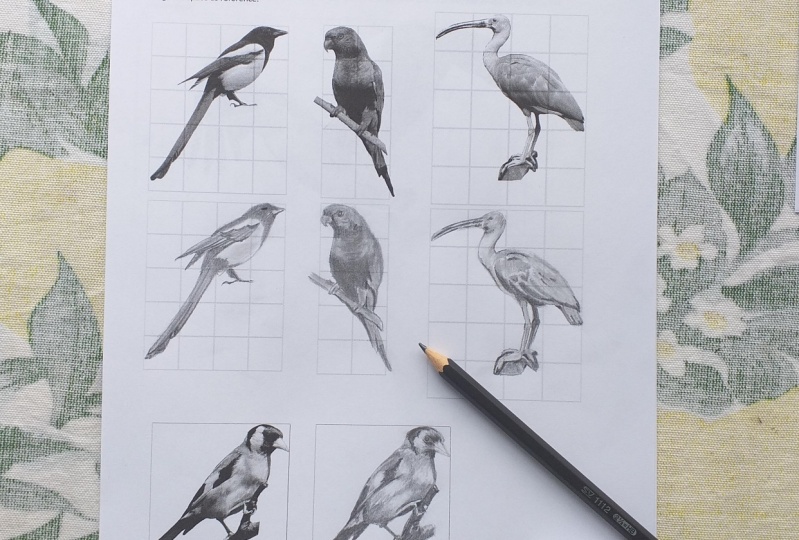
each of these for you. What I've created for you, for this class is just
an exercise sheet. I've created the sheet for you where you have the
pictures of the birds and then very faintly
a second row of birds so you can practice drawing
the shapes over here or you can practice drawing
the shapes over here. While we're looking
at general shapes, I just wanted to look
really quickly at the bird's wing shapes
and structures, since that's something that's very
idiosyncratic to birds. Here I've just took
some several wings that are clipped off with
photos and the bird wings can obviously be
different shapes depending on the function. Some are good for short bursts, some are good for gliding
or acrobatics in the air, but they all still follow
the basic template. When we're looking at the wing, we have two major sections. If the wing goes off, this is elbow and
this is the wrist. We have two sections
and depending on which one of these
you're looking at, it might go differently. I think over here
it's about here, here, arm will be here. It's a little bit harder to see. Here. We have two major sections and each section is
divided into three. On the top section, you'll have these short feathers that cover the top of everything and then there's oftentimes a
secondary layer of feathers. Then there's the third
layer of feathers that are the biggest one. Just when you keep that in
mind, you'll notice that. So when you're
drawing the birds, if you have to
fudge a little bit, just knowing that there's
three layers of feathers in there will help you understand
the structure of the wing. The layers of feathers might
be a little bit different depending on what bird
you're looking at. It gets a little bit more
complicated than that, but that's the
basics of the wing that I want you to be aware
of when you're drawing it. When the bird pulls
its wing inside, what happens is is
it'll go in order. This will be on the top, this will go next, and this will go third. When we're looking
at these two birds, you'll notice that we'll have the short
feathers over here and then we'll have this is
the secondary set of feathers and these are the
last set of feathers. They overlap on
top of each other and just understanding
how things overlap. We have one, we have
two, and we have three. Obviously that's just
the natural way of going if you think of rain
or wind coming down and then trickles. If they overlap
the opposite way, then whenever rain
would come down, then the rain would go
in-between the feathers. It's just a natural
way of the wings of folding up into each other and so when you're
looking at photographs, just understanding
the basic structure of a wing will help
you then figure out how to draw the
feathers into it. I've also included this as a worksheet in your handout and that way you
can print it out and observe the different
layers and practice, finding and drawing them
over here if you want. Now we can also do
this exercise on any of the photos
that you have taken or that you'll find online or when you're observing
birds that you see outside. Now, let's move on
to the next lesson where I'll teach you how
t use negative space to check for accuracy
when you're sketching.
5. Trick 1: Using Negative Space as a Guide: Now let's move on
to a little bit more challenging
drawing exercises. Some birds can be a little bit trickier to draw
because it might be hard to find and draw the shapes in relation
to each other. Birds that come to mind are
like flamingos and cranes and poses where there's
long parts that are hard to relate to the
rest of the body. The first tip I
have to assess how your shapes are lining
up is to look at the negative spaces
around your bird in the same way that you look at
the shapes inside the bird. For example, over here, you can look at the
shapes, for example, right here you can look
at the shape right here, and this little thing is actually divided up
really nicely over here. You could just look
at the shapes that we have in relation to everything
that's going on over here. Even and between the legs
trying to figure out what angle the legs go away
and out from each other. We have a lot of great
information over here. [NOISE] If I were to be drawing that on the side over here, I would figure out
this is going to be, you want to figure out
your basics first. This is going to be my
teardrop shaped body, and then if I figure it
this is about this long, let's make it really
simple over here. You can see that the legs are about the same
length as the body. If I look at it over
here, starting, so it's one, two, and three. That gives me the
general idea of how big my bird is going to be. If this is over here, then I know that compared
to where this starts, that's almost the
middle over there. Then I know that it's going to be about this much over here. Then the neck starts from the top over here
and then it's going to be this and this and this
are about the same height. That gives me my general shapes or proportions for the bird. Now it's becomes a lot easier to figure out
where things go. A smaller wing shape over here. Tail, cranes don't
have very big tails. Then now remember when I
just told you about the looking at the
shapes of the legs. We have a little bit of
a triangle over here. Then now I want to look at how
they relate to each other. There's a parallelogram and
then a rectangle over here, thinking this is my
teardrop shape over here, and there's another
wing down here and it matches up right
where the leg starts, and then it continues. Now, if I imagine that there's a straight
line right here, so that's actually a straight
line I have over here. Then I know that this starts where I have a
triangle right here, and then I have that shape. Then it actually doesn't
go behind over here. It just curves and goes away, and there's another
triangle right here. This is my height
where I want to go. I'm aiming over here, the top of my hand straight. Then it goes along the
same, gets a little bit, it's a little bit
thicker over here, a little bit skinnier and then
gets a little bit bigger. I'm just trying to
get looking at how long this is in relation
to something like that. It looks like it's maybe
actually a little bit too big. Then once you have your
basic proportions down, then it's much easier
to start sketching it and then adding your details in. Then I wanted to bring in this cute little
roadrunner just as a second little
exercise to look at the negative shapes that
we have in our objects, since it's a funky little thing. I've drawn a rectangle
around my image, and then you can see that the tail points to the
corner and it almost runs, if I would draw a straight
from one angle to another, almost runs straight through, but it goes on a little
bit of an angle. That helps in just figuring out. Then when you look at this
whole shape as a whole, you can tell that it
becomes a pentagon shape. Then if we look at the basic
shape over here, to me, this is like a half of
the shape upon the top, we're almost similar, so almost similar
but you would have a little triangle over there. The same thing we
would have over here. Then for this last
shape over here, I would imagine a straight line down from here and
see what shape. This is almost a
triangle shape over here what we're getting. Then you could also
do the same thing. Then this is almost a
rectangle with a little bit of a [NOISE] curved top that
ends up being down here. Then when you're looking
at your space below, we got a triangle and then
almost another triangle here. Then if we actually
take our photo out, you can see how we
can look at our bird. Our negative shapes
around to figure out the correct proportions for our positive shape of our bird. Now that we know how to use
the negative space around the bird as an extra reference
to when we're drawing, I wanted to just show
you how to use a grid as a second little tidbit on how to get your drawings
more accurate. [MUSIC]
6. Trick 2: Using a Grid: [MUSIC] So using a grid
is a little bit like having a cheat sheet
where you're drawing. If you're drawing from nature
you can use a pencil or a straight edge to check
how things line up, but when drawing from a photo, you can use a grid for
extra reference points. So when I use a grid, I use it in the same way as I do when I break things
down into shapes, but with the help of a grid, it does a lot of the work for me because it breaks things up
into smaller proportions. So usually when I'm
working with a grid, I will have my photo
printed out and I literally draw just
lines on top of it. You can choose what
size you're grid is going to be and a
grid is also helpful if you want to make something
bigger or smaller in scale. [NOISE] Usually, I draw my grid with just the
pencil and lightly, but for the sake of this class so that you can
see everything better, I decided to use a thick
orange color pencil for it. So now we have our
grid marked down and then you would need a grid or wherever
you are drawing. So I'll draw on my paper. So let's see. Maybe I want to
make my piece a little bit smaller so I'll do
slightly smaller squares. [NOISE] So now we have our grids drawn. So you can see that these squares are bigger
than the squares, so when I draw my
image it's going to be smaller on my second one. Then now drawing my image has
become quite a lot easier. So I can figure out, okay, this is the third one
down and this starts from the corner and it makes
a lineup like that. Then I can count that
the first one is here, second one, third
one, fourth one. So now instead of
looking at everything, all I have to look at is the relationship of items
in one little square. So it makes it a lot faster
to start looking at stuff. So then when I'm looking
at my next square, this one right here, I can see that this is just
under halfway through. So I can measure
about the same right here and then it makes a
little deviate over here. Then I have along this
line continues right here. Then for the next one, this is a little bit past the halfway point so
around over there. Continue my line
and then you can either look at your
positive shape or your negative space. So the next one, I can see that this is a
skinny little triangle over here and then it
curves and connects. So you would just go
square by square and keep connecting
everything as you go. So it takes a lot
of the brain work out of it in figuring out
where everything goes. If you're trying to
make a final piece, on your final piece you can draw your square's grid
fairly lightly. Once you've got the
basic shape down, then you just keep
going and you add all the details in
just the same way as what you did the outline. So now I can start looking
at where my eyeballs are. So you literally just
go one square at a time and you figure out where things are and then you'd
go from there. So in your practice sheets, I have also given you
a grid exercise and the grids are already
marked for you so you don't have to worry
about drawing them. Then you just need to
worry about transferring your birds down onto the
squares on the bottom. Again, you can use
the grids not only for figuring out the outlines of your bird and the
shape of your bird, but then you can use it
for all the details of where the white and
the black shapes are, where the eyeball is in relation
to inside of the square. Again, just look at one square
at a time and concentrate on where things are lining up as far as just the
one square at a time. So if it makes it a
little bit easier for you for even a second tool, you can cut a little square into a piece of paper and then now you can concentrate on one square at a time
when you're drawing, if that makes it easier for you. When you have that
little information then it makes it really easy to
figure out what goes where. Now that we've practiced a bit and understand the
basics of drawing, let's practice drawing
a larger image of a bird and get to our
final project. [MUSIC]
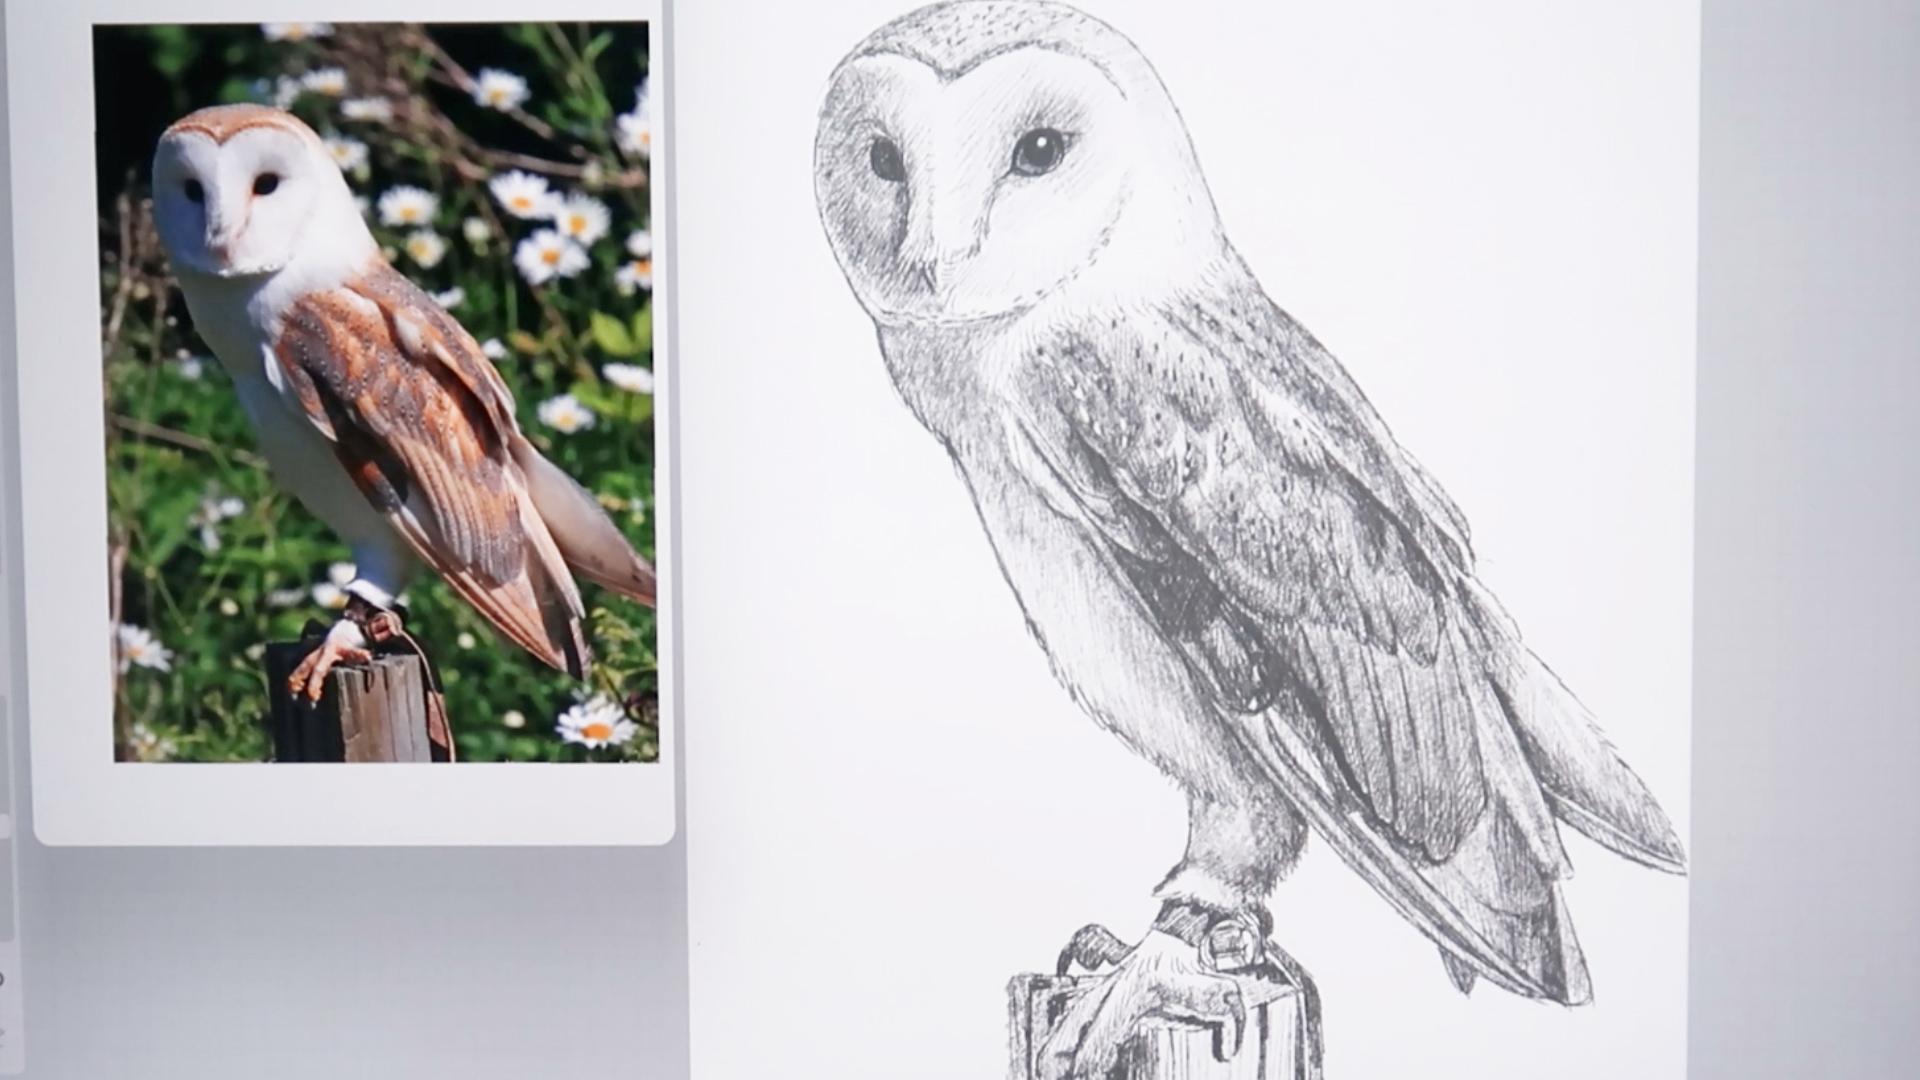
7. Final Project - Owl Sketch: Now that you've learned all
the tips and the tricks of getting our birds drawn, I figured this owl would be a fun practice piece
for us to get going. If we're looking at our owl, we can start by drawing our teardrop shape and
if you look at this, you can see that it's a fairly
long and skinny teardrop. I'm going to just figure out
my general shape of things. You can do this on a
regular sheet of paper, I'm using Procreate to draw. I'm just trying to get my general shape of
a bird over here. Here's my body of my bird. I'm also looking at
this angle right here. If my tail goes this way, it's about that
straight of an angle. Then looking at how big
this slice is right here. There's my wing and
then let's see, the wing goes about here and then our head and
there's one straight and then a bump and then a bump. I've got one bump, two bumps, and then
my third bump. If you need to erase, you can erase just to make
things easier. Then we start looking
at more detail so we'll add looking
at this corner. I actually drew it a
little bit too high because I'm looking at
how skinny this is. Go and then there's a
leather strap right there, you could either draw
it or don't draw it. Then we have our claws
going down here. That's our basic drawing. Then let's look at some details
so we still need a face. You can see that
it's a little bit wider up towards the top
than it is on the bottom. I just want to make sure this is my center of my face over here. Maybe not quite that dark. See now I almost made a mistake, look at here and look at here. This might be throwing
off a little bit. I want to make sure that I
have all my proportions right. There's my general
shape of my bird and then as you can
see, there's a ridge. Then towards end of it, ends right here, we have a beak. You can see this right
here and then see this side is skinnier
than this side so I want to make this
skinny and it curls around. We're moving from getting
our basic shapes down now to a little bit more detail. Then for our other shape, you can look the shape
is skinnier here and then it's wider up here so I just want to reflect
that in my sketch. I'm just adding a general shape first so now we have our face. Then let's look over here just closer at the wings just to make sure we get
all of our shapes in. You can see there's
a skinny shape right here at the top, so I know this one and then there's a second
feather over there. I think this went too far. Let's see. Now I've got to fix, this
went too far down here. See how little I
have left over here compared to over here? This should be really
close to over there so I need to redraw it. As you're going, you have
to reassess everything that you're doing and then
fix things as you're going. Keep looking at the proportions
of not just one thing, but that thing's relationship
to everything else. Then this is actually
the backside of the wing over here and then this is
our second wing. Let's look. Then we have a second
shape that goes down and it's looking at
how thick is this over here and how thick
is this over there, so it's slightly maybe
thicker right around here. We're drawing the shapes and not the individual
feathers yet. Then we have the second shape and now let's see
where this lines up. This lines up a little bit past. Also looking on my
negative shape, this piece of the
wing underneath looks for me about the
same and then going down. Then it comes down to a
point, something like this. My sketches are always
really loosey-goosey before I start
tightening them up. Then we've got where this ends. There's one feather. This one is more in the shadow and then there's a
big one right here. Then there's this little shape, three lines that
converge down here. There we have those. We need to use our
eraser in between just to make it easier to see. Always if you make your sketch and then it ends up
being too messy, you can always transfer then your final drawing onto
a second sheet of paper. You could draw through
or you could stick it on a window and then just
draw through a window. The advantage of drawing
digitally is that I can just put another layer on the top and
then draw through. Let's see, I'm just going to erase a little bit over here. See how this is thicker over
here than it is over here? I going to make sure I'm getting all those proportions right. Then this one, there's
a little bit more of a curve over here. So this would be
my basic sketch. Now that we've got
the basics down, you keep doing the same thing what you've been
doing until now. We've been breaking
things down into shapes and we look at relationships
from one shape to the other and then
as you keep going, you just keep going
smaller and smaller and keep breaking things
down further and further. The same thing that
goes for drawing the shape of the bird
goes exactly the same for drawing all of the
details in the bird. Now if I wanted to actually then start painting this
in or coloring in, I think it would
be a good example to do this first as
a pencil drawing. We can work this into
a pencil drawing and then start shading
things up over here. Then there's a big
knot right here. You can choose to
draw that or not. Now that we have our sketch, now if you wanted to
continue with this, now let's start actually adding some of the
details in here.
8. Final Project - Adding Details: Now that we have our sketch, now let's start actually adding some of the
details in here. I'm going to start
another layer, and I'm going to make the second
layer little bit lighter. If I was working on paper, what I would do is I would
actually use an eraser and I would erase all my lines so that they weren't
quite as visible. That way I could start
with my shading. Let's look at face first. Now we can start breaking
down the shading. If you look over here, there's almost a straight
line right here, and then it goes
where the beak is. All of this, I would shade, start shading part darker. I would first start
with a lighter shading, and then I would start
analyzing everything that goes inside over here. We look at this reference. I mentioned a little bit closer. You can see that it continues
here just a little bit, and then it's a little bit
darker right around here. Then it's a little bit lighter. Then we've got a dark area
right here from the eye. There's a little bit
of a cast shadow underneath over here. Draw our eyeball in. There doesn't seem to be much
of a highlight in the eye. But if you wanted to add a
highlight in there, you could. I can add a little bit of
a highlight right there, and so it's a little bit
lighter across here. You don't ever have to get everything down on
the first pass. Then you can see there's
even a little bit of a light hitting right here, and then it's darker
underneath over here. Then we can come back. You can see this makes
a triangle right here. I'm trying to make the
same shape of a triangle and shade all that in. There we go, and now
let's look at the rest of this rest of the space. This isn't completely
white over here, there's a little bit of shading still coming up to this line. Then this is white. Then it's up to you whether when you're doing your shading, if you want to go along with, you can see that this
is radiating out. You could shake things so
that it's radiating out, or personally in general, I just like to shade all going one direction
a lot of times. Then when I'm doing
the details for the feathers and
things like that, then those things
I would usually do alongside with the
way that it's shaded. If you can get photos that
have great resolution, then that's always helpful. You just work little by little. You don't have to be in a rush. There's a little bit of a
triangular shadow down here. If you wanted to add some details for the
feathers, you could do that. Then we get to our face. That's actually our brown. When I'm trying to do just the, it's going to be a darker color, I want to just add a
layer of tone on there. That'll be the basis
for everything. You can see it fades over here, I'll try to do the same
thing in my drawing. There's a few little
darker spots over here. Now looking at just this, we have two arches. I'm going to shade those two arches in
a little bit darker. But drawing and putting all these elements
in just gets so much easier when you actually
have everything lined up. We're going to add a
little bit of shadow and then there's
some little spots. Now we'll get to our shading. There's not a perfect
line over here. I'm adding just lines to
indicate where the wings start. Now breaking up, we can break
this part up right here. You see that there's a
cast shadow right here. We can just add
shading here first, and everywhere evenly. Then we see this is
shaded that brown color. I'm still adding just
shading to this whole area since this is what
I'm working on. When I'm working on my drawings I like to work in
one area at a time. It can be dangerous if
you start immediately with your drawing working
in one area at a time. But now that we've gotten
everything parceled out and we know where
everything goes, then in the same way as
with their grid drawing, then it becomes much
easier to then work inside of these shapes and then figure out
where everything goes. We're going over here, we see there's a little bit
of a cast shadow right here. Then there's this, hangs out and then there's
more cast shadow. If you look at it closely, there's actually little
bumps over here, or angles, so I can
try to emulate that. Then I'm just going to
add some more shading. You have to keep an eye on
and just look at proportions so you're staying on track
of what you're doing, there. We've got that. Now we've got our cast shadow over here. This one, if you look at it, it also has one, two and
then there's 3 and 4. Darker area right here. I'm looking at just
relationships. When I'm looking at
this part right here, I'm just looking okay, there's a darker and
then this is lighter, but then this is darker. When I'm shading over here, I just want to make
sure that I reserve even a darker
coloring over here. I'll make sure that I'm
getting all my feathers in, a little bit of a cast shadow. There's a little
bit of a lighter, almost white right here. Darker color at the tip. One, having my cast shadow. Right now you can see that when I'm adding
my cast shadow, I'm adding that on
a different angle. That gives me a little bit
of an advantage over here. Let's see, I'm putting my cast
shadow in the wrong spot. Let's see, it needs to go here. I need to have a
triangle right here. Then this is in the shade
except for this part. I'm looking at this and this. This is shorter than this. But then I've got a
little bit of that, something's off over here. This should be shorter and this. So maybe this just needs to
be shorter down this way. I'm looking at the
shape so it goes down, and then it's a little bit more blunt at this end, there. Well, I feel better
about the shape, and then I need to
add my shading in. If you wanted to, you
can always work on smaller pieces in the beginning, almost black over here. Then if you wanted to, there's little white dots, you could add those with
an eraser in there. There would be that
part of the wing. Then we have our little
highlights over here. Then there's a little
highlight right here, that's the shape of a little
half moon or something. Outline for an owl. There's some little wispy
things going the wrong way, but I choose not to add
those to my drawings just so it's not so
distracting over here. First I'm just going to
add my all over shading. If you look at just
compare these two, obviously this is
darker than this, so I'm adding shading
but it's not going to be as dark as what
I did for the wing. I'm just adding a general
shading to begin with. Also this part is shaded, so I'm going to add that in
except for just right here. Now that I have the
general shading done, then I'll look inside of this shade and see where there's lighter
and darker areas. There's obviously the
lighter areas here. Darker area behind over
here, darker here. This is fairly even down here, but it's a little bit
darker right along this, right along that. I'm just trying
to make sure that I add everything in there, and there's a little bit
more shading over here. A lot of times if you have some digital
tool available to you, you can always take photos and make them black and white first, so that that way having the colors on there is not going to be as
distracting for you. When I'm working on
pieces like this, for me the most important
thing is just having clarity. It's hard to see now because
we're not quite ready yet. But once we get
towards the ending, finishing stages and get more closer to
being done with this piece. If there's areas that
I feel like they are just not working I will go back and lighten or darken some areas just for adding
readability to my piece. A lot of times I'll add
darker outlines just to help with figuring out
what part is where. Just making sure that
whoever is looking at my piece understands
how it is aligned. Let's continue on our piece. I'm looking at this
line and it goes right underneath those
little wing tips over there. Then there's this second
line right underneath it. Then there's actually
a cast shadow. Right here it's a little bit
hard to see what's going on. When I squint my eyes, I realized that there's a dark. Then if you look
at it right here, so there's dark and a light
and a dark and a light. When I'm adding that in here, I'm just making sure that I'm adding all the
right bits and pieces. If you are drawing this
on a smaller scale where you're not able to get this far into detail, then you have to make a
decision on which one you're going to make darker and which one you're
going to make lighter. In the next video, we will add the last parts
of shading to this drawing. We'll do a bit more
drawing and less talking. You can keep it on the
background or scroll and use it as reference when you're working
on your own drawing, when you've come up with issues. I'll see you there.
9. Final Project - Final Touches: [MUSIC] In this
last drawing video, let's add the details that
we need to finish this out. What I learned about drawing
birds over the years, is that as long as you have
the basic shapes down, if you miss a few
feathers here or there, nobody will ever notice that. As long as you're getting
most of them there, if you need to
fudge some feathers or leave some feathers out, you can totally do that and nobody will be
the wiser for it. So in that sense, animals can be more forgiving
than drawing people because if something's not looking right on
a person's face, we will immediately notice it. But if a feather is not quite
right on a bird's back, one individual
feather in a wing, in most cases, nobody will ever know. So in that way, when you're learning to draw, animals are really great
subjects compared to people because you can learn in peace and you can get
really great results that will wow people even if they're not 100
percent accurate, they'll still look nice. Here's a great example
where I got too carried away with my details
so I'm going to erase this. Probably nobody
would have noticed, but since we're trying
to do realistic, I erased it so we can
go over this again. [MUSIC] I'm going to turn my background
off for just a minute, making it a little
bit hard to see. I'm just adding overall tone. I need to make sure I leave
this white part right here. The rest of this has
a mid-range color to it and then just adding the
little details in there. There's a little bit of a
lighter spot right here so just racing some of that up. Interesting these little feather patterns [inaudible] over here. [MUSIC] I realized that if I'm looking at this one
where it aligns up right here. [MUSIC] Let's see what
we're looking at. Add a little bit
more shadow here. See there's a little bit
of shadow right here too. [MUSIC] In the end, you can use all the
skills that you learned on how to draw the owl. You'd use the same skills on
how to draw this wood too. [MUSIC] There we have our owl drawn from our photo reference. Then once you button it to the point where
you're starting to feel like you're close
to being done with it, I usually like to just
look at everything as a whole and just gauge
how I'm liking it. So if I just squint
my eyes and look at this both of them together, I feel maybe this is a little bit too dark
over here so I might go in and erase this and make this just a hair lighter just so that my wings appear a little
bit darker in general. If you're using pencil on paper, then you can either
use a eraser or then [inaudible] that's multiple is really great for going
back and just lightening. You roll it over areas and
it'll lighten things for you. But I always like to have
bright lights and then dark darks and then that
way you can create a nice contrast in your piece. I'm just looking at
the shape of the eye, maybe it goes out
a little bit more. There's a little bit of
shading there so let's see if this gives us any
difference over here. Now if I'm looking at
things in general, I feel like I want my wings just to have a little
bit more tone. Might go back and just
add just a touch in here, just to darken them,
just a smidge. Try to leave some lighter areas. Just in general, bringing this just
a hair darker. So now I'm not using my
reference as much anymore, but I'm just using my eyes to just judge what
the piece needs, and I feel I want
my wings to just have just a little bit
more depth to them. So as a whole, when I'm
looking at the piece, I can tell that I
want my wings to be darker than my actual
white belly for my owl. So when I'm just adding this
last little tone over here, that enables whatever
brights that I have over here to just
pop out even more. I feel just adding that
tone over here just overall gives me a
better contrast in my piece so maybe I need
to go back in and erase this just a hair so even
though it is in shadow, I'm still wanting it to read a specific way
compared to the wings. So this is then where your
artistic license takes flight. I'm pretty happy with that. There's a weird dark spot right here that's catching my
eye a little bit too much. [MUSIC] There, I think
I'm happy with that. Some of the things
are a little bit looser like over here. But I feel as long as I have the face and some of the
details in the wings, then I'm pretty happy
with the way things are. Thanks so much for
drawing along with me, I hope you've figured
out some tips and tricks on how to take your
drawings to the next level. I hope that you'll spend some time just
practicing and whatever skills of the way that you break things down into shapes
and to draw something, the same applies for shading and for adding all the
details into your drawing. Once you figure out
how to be observant and how to break things down
and do the basic shapes, then the same thing goes
for everything else and looking at how they are in
relation to each other. So now we are done with
our final project. This reference photo
will be in your handouts and then if you would rather
work on your own photograph, then I would love to see those pictures in
our classroom too. Congrats, we're all
done with our owl. Now let's meet in the last
video for some final thoughts.
10. Final Thoughts: Congratulations on
finishing the class. I know that learning, drawing, and observation skills
can be a little bit boring and tedious at times, but I hope that
this class has made it more fun for you and encouraged you to
keep practicing. We've worked on, how to find the basic
shapes in birds, and then how to use
negative space and grids to break your subjects
down even into smaller, manageable chunks in order to draw them properly
in proportion. We've looked at how to use negative space and
the grid to break your subjects down into manageable chunks and how to find the basic shapes of birds. Once you learn how to
observe the world around you and break it down
into basic shapes, drawing anything
becomes possible. All the handouts that you need to complete the class are in the Projects and Resources
section of the class page. They're easiest to access and print out on a desktop computer. I encourage for you to upload a photo of your drawing
practice sheets or your final drawings
into the class so we can all cheer the progress
that you've made. If you want feedback
for your drawing, don't hesitate to mention
that in your comments, and I'll be happy
to do that for you. If you are on social media, you can tag me at MirkaDraws, or at MirkaHokkanen, and use the hashtag
MirkaSkillshare. Remember to follow me
here on Skillshare so you get notified
for new classes. Take care. I hope
you keep practicing, and I'll see you in
my next class. Bye.
 Mirka Hokkanen, Illustrator/Author/Printmaker/Educator