Transcripts
1. Introduction: Hi, I'm Emily. I'm a professional drawing
teacher from New Zealand. And today I'm going
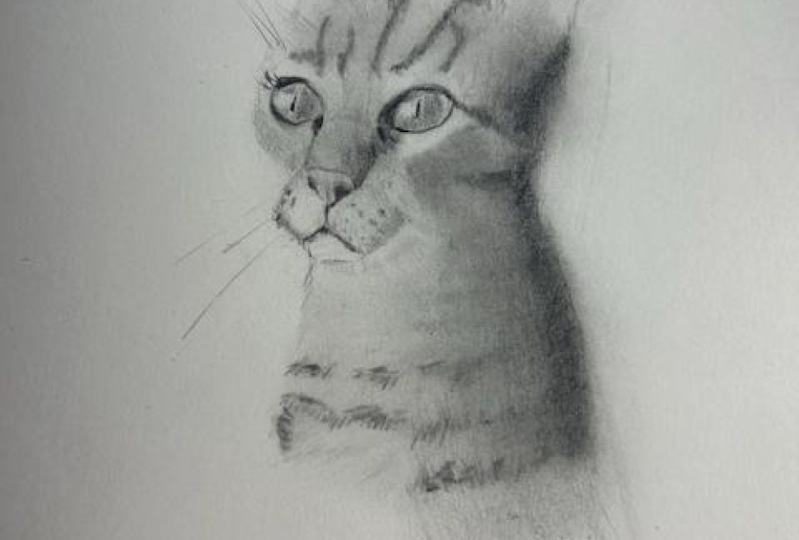
to take you step by step through drawing a
realistic cat portrait. This lesson, we'll
focus on how to draw a portrait with a strong
sense of three D form. We'll warm up with some
simple exercises and have a practice run at the portrait before we move on to
the final project. Creating a sense
of three D form in a portrait takes a
bit of a mind shift and change in the way
that you think about what you're looking at in your
resource photograph. This is a great starter class
for moving into drawing human portraits and using
techniques like lumos method. We won't be specifically
covering this method in this, but the approach
is very similar. Because it's a
cat, it's a little less intimidating than
trying to draw a person. We'll also use a range
of drawing techniques to capture the likeness and
expression of the cat. Like proportion, negative space, angles, and contour drawing. But we're going to keep
coming back to how to achieve a strong sense of
three D form in a portrait. Well, in a cat portrait, grab your pencils and we're going to get started right now.
2. Materials: Okay, so let's get started. The materials that
you're going to need, just our usual materials
to start with, we're going to be doing an
exploratory drawing first, meaning we're going to be
figuring out some things about form and light for that. Just an HB pencil will be fine. If you wanted to
use a two H pencil, you could do that and keep
your lines really light, especially if you are
maybe a bit heavy handed and tend to get
really dark lines. In the Exp drawing, we're going to be layering
lines on top of each other. It's important that you can see what's underneath and you can see what's over top as well. Maybe you have a
two H pencil and an HB pencil on
hand, just in case. I've also got my
mechanical pencils. We'll see if we use these. If you don't have them,
it doesn't matter. But when we go into
the final drawing, you'll see in the photos, this is a photo
we're going to be, you'll see that there's some
very fine lines there for fur and whiskers and these
could be useful otherwise. Just make sure you have
a nice sharp pencil, so you might want
a pencil sharpener then for that final drawing. You may also want some
different grade pencils. I'll probably use
this three B pencil and just my HB pencil as well. You could use 2s3s4 Bs just
to get those darker values. And you're going to need two
pages in your sketch book. So the first one will
be for the exploration, and then the second
page will be for putting that into practice
in a final drawing.
3. Our Focus - Form & Light: There's two things that
I'm going to talk about in this class that we're
going to be working on, especially with our
exploratory drawing. Those two things are form, especially three
dimensional form. How do we get
something looking like it's actually got depth? And also the effect
of light on form. They go hand in hand together and I think when
you first start drawing, you are looking at your
subject for what it is. You'll look at this picture here and you'll see
that it's a cat. And you'll be trying
to draw a cat. You'll be trying to draw
your idea of a cat. And sometimes you get those cartoon drawings
because you're putting symbols in place of
what you can actually see. When you get past that stage, maybe you're starting
to think more about line and angles and edges. It may be some shape
in there as well, but even when we're
at that stage, when we're thinking about shape, it's usually still quite flat. We might draw like a triangle shape for
those ears rather than a, some pyramid or
something like that. We're not going to be drawing
pyramids in this class, but how I'm hoping that this class will help
you is to get past that stage of just thinking about lines and angles
and flat shapes. To really start to use
your perception skills and your translation
skills to think about things in three dimensions
and as having form and depth. This is particularly useful when it comes to
drawing portraits. You may have heard of the
Lumas method that is all about getting that three
dimensional form onto paper. It's not a great method for beginners because they
haven't developed those skills yet to
be able to think in three dimensions and translate that into two dimensions
on the paper. That's where I'm hoping
this class will help. We've got a cat portrait here. It's not quite as complicated
as a human portrait. We can afford to make a few errors and
it's not going to make a big difference
to our drawing. Whereas if you're doing
a human portrait, you're really wanting
to get everything super accurate so you
get that likeness. But this is a good
place to start, especially if you're
thinking of going on into doing some portraits. And to get you head around that way of thinking
in three dimensions.
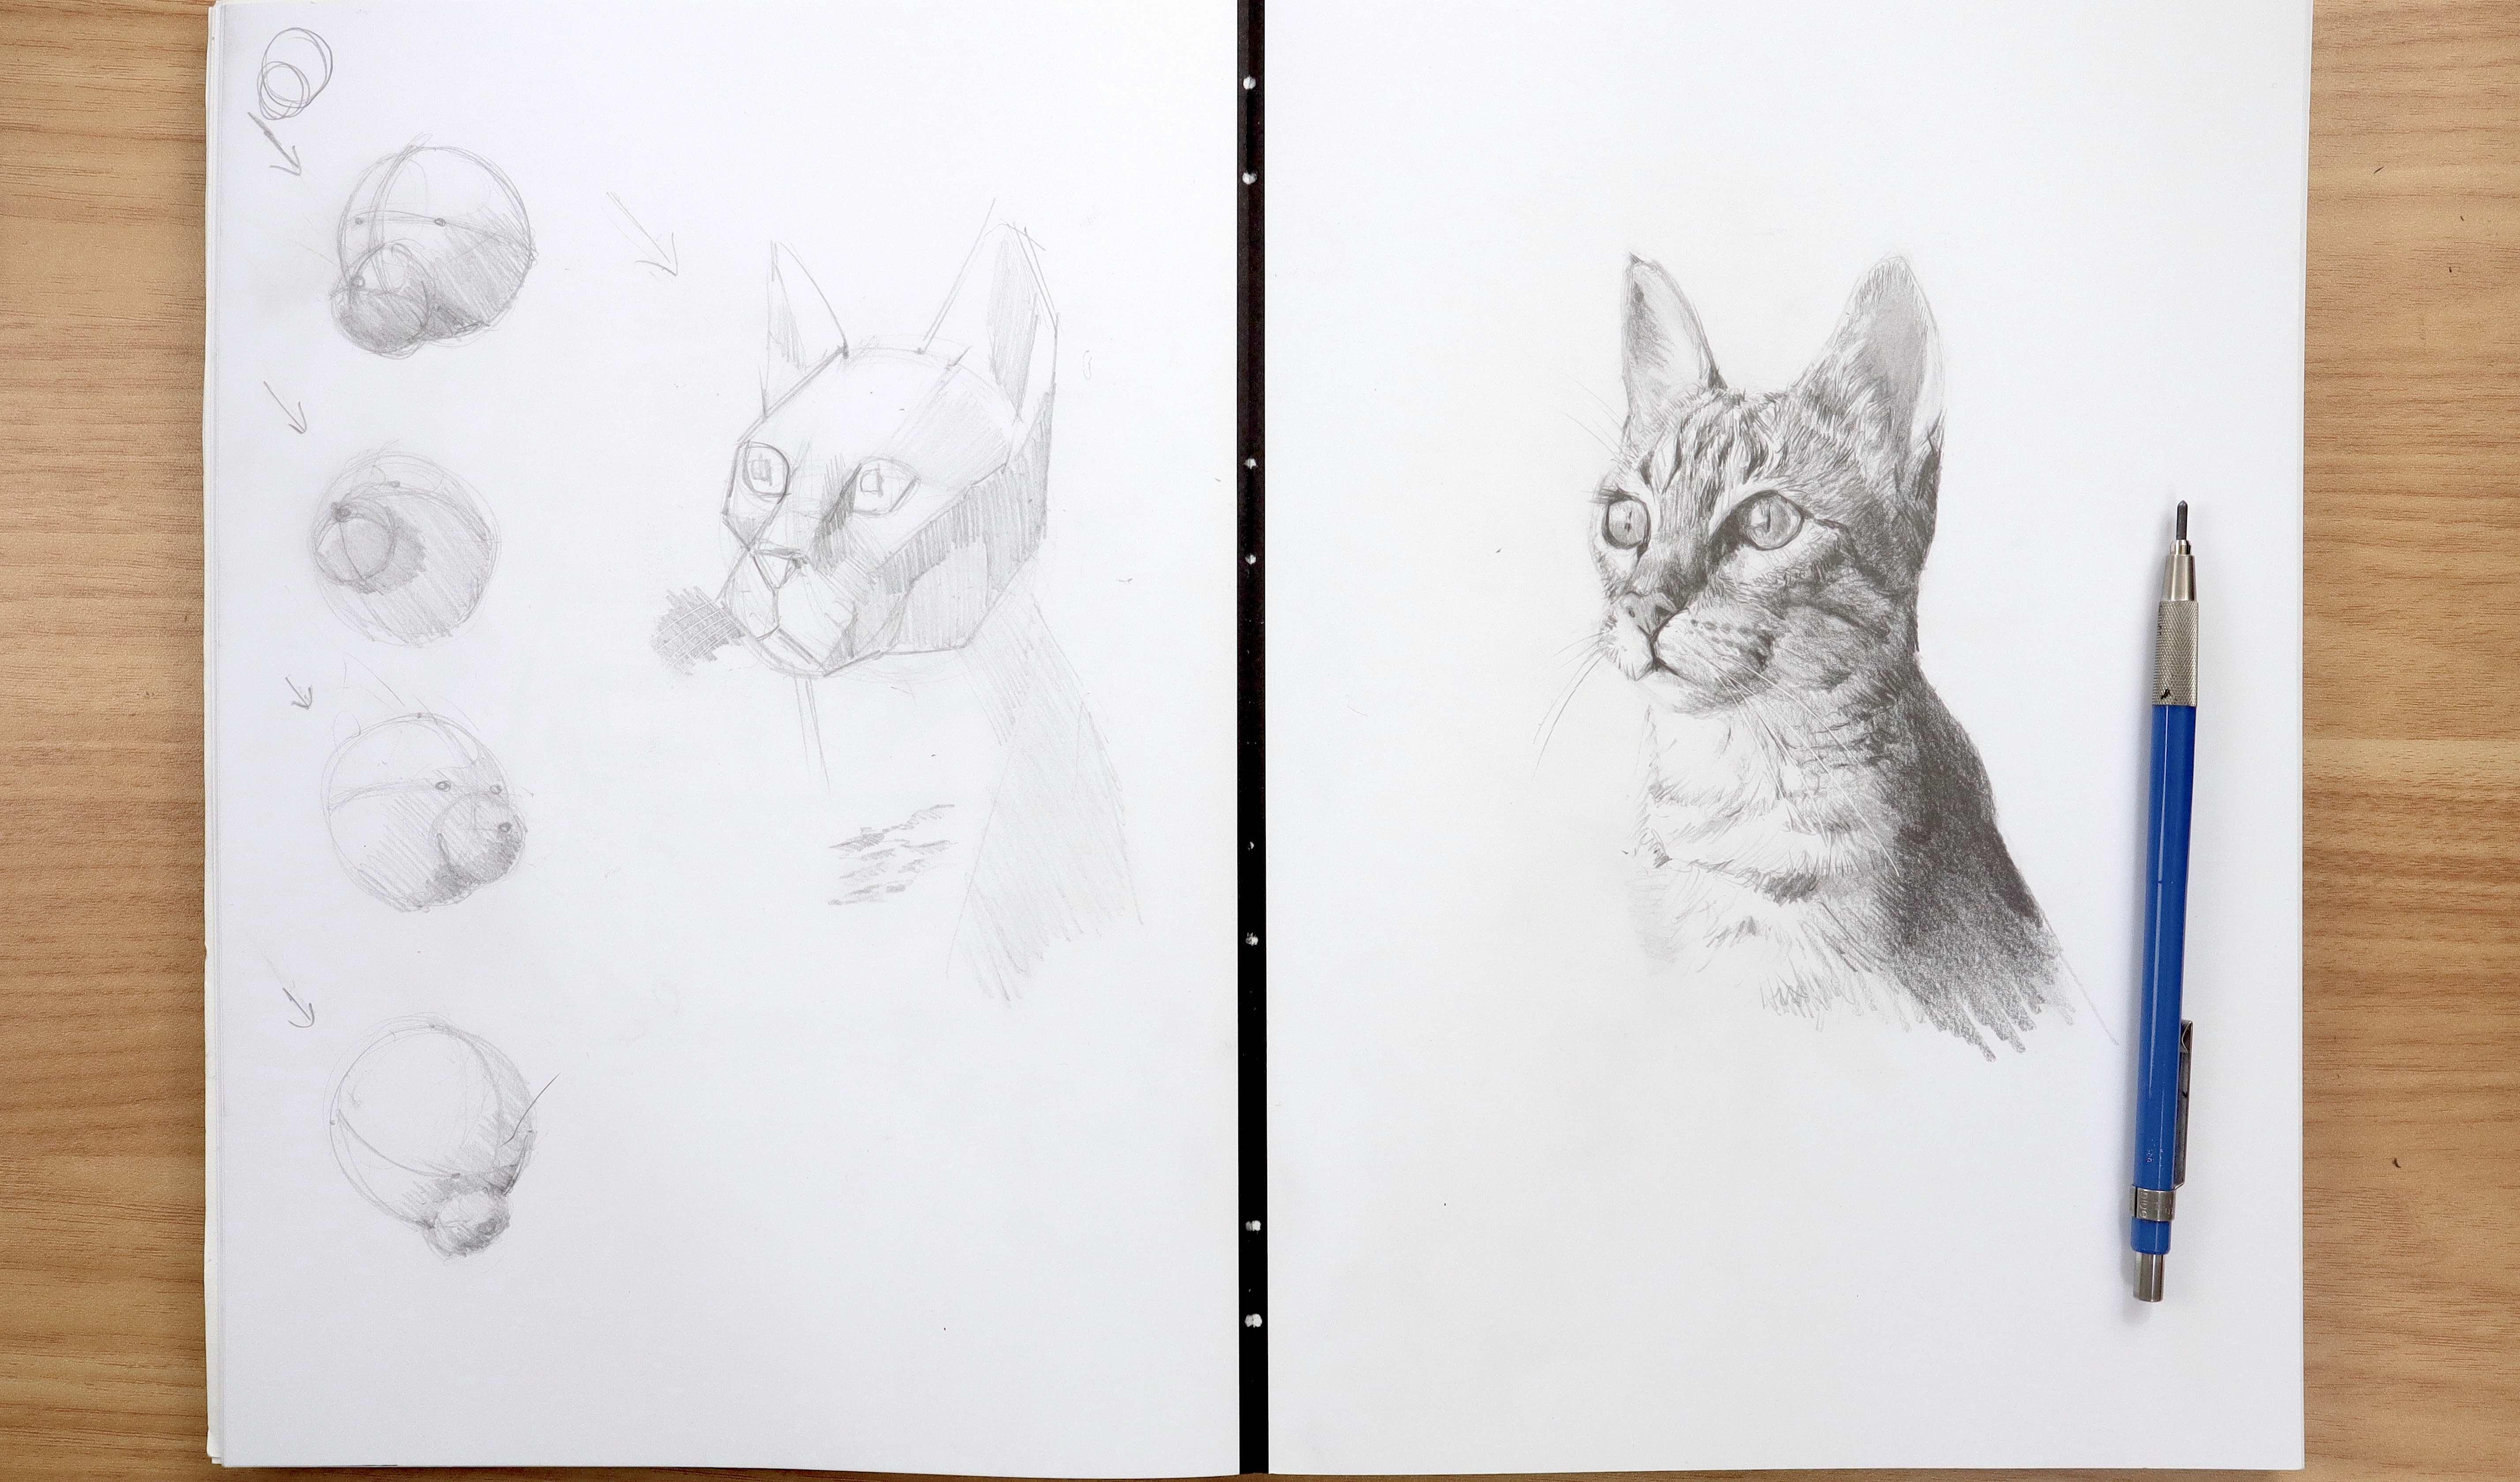
4. Exercise: Understanding the 3D Head: How do we look at this
portrait in three dimensions? Sounds funny, because
obviously we can see it's a real life thing. It is three dimensional, but it's also a
photograph, so it's flat. It's two dimensional
in that sense, our page is two
dimensional as well. We're creating an illusion
of three dimensions. Really. We do that using three dimensional shapes
like spheres and cubes. And putting those on
dimensional page, as we always do
with these classes, we're going to look for
the bigger shapes first. The main shape for that head, or for any head, really
is a circle or a sphere. I'm just going to draw a
series of maybe three or four down my page here
and you can do the same. They're just going to be a little representations
of head, especially of cat heads as well. We have a, I'm going
to draw quite dark. I've got a slightly darker
pencil here, actually, just so that you can see it, but keep yours nice
and light if you can. I would normally draw
much lighter than this for these little
exploratory sketches. We've got a circle there, if we're thinking about
turning into a sphere. Then if you've done any
of my other classes, or I learn to draw classes
or lessons on Youtube, you'll know about wrapping
a string around the ball. You can imagine that there's
a string wrapping around. This could represent
the line of the eyes. Then if we use that photograph as an example for
this first one, we can also wrap
a vertical string around the ball or around the vertical axis
that represents that line that comes down
the center of the face. Don't think about
going out to the nose, but just going straight through the ball that forms the face. It would be something like this. That's the first step
to getting something on your page that represents
three dimensions. These would be our eyes here, maybe not that far
apart for a cat. Then we'd also have another
shape on here as well, which forms the
snout of the cat. Even though it's maybe like a triangle shape coming down from the nose
on either side, we're going to draw
that as a circle. It overlaps the first
circle a little bit. Let me just draw this on the screen here so you can see
what I'm actually drawing. We've got a circle
of the head there. Then we have a, what we're going to
draw as a circular shape here as well. So that's what we've
drawn and seen ones a little bit crooked,
doesn't really matter. All we're doing is we're getting that idea of three
dimensional form. And then this one is
also going to have those contours or
those axes around it. So we could have one coming
around the front here, and then maybe one
across here as well. You can see if you're
drawing dark like me, your lines start to
get a little bit, a little bit blurred. If you're drawing
light to start with, then it means when you've
got the correct lines, you can just darken
up a little bit and you'll be able to see
those nice and clearly. So can you see how
we're starting to get a representation of
three dimensions there? Now it doesn't look like this, which looks quite flat. It looks like it's protruding out from
the page a little bit. And then if we were to take this further, we'd
be putting on ears. In refining the shape as well, we'd find the triangle shape
of that snout and maybe put in the cheek bones
and the jaw line. And those things usually
with straight lines. But let's do a couple
more of these, maybe facing in
different directions. This line here, which
is the eye line, that's also going to help us show whether the face
is looking up or down. Let's do one that's looking
a little bit more upwards. This is about as light as I would draw if I was
doing this myself. I'll do this one light and
then I'll darken it up. If we did a cat facing the same way but looking
upwards this time or a person, the eye line would be
curving up and over around the ball in the center of the center line of the face of vertical
line would still be facing the same direction. You see how the eyes
are now up here, you get that sense that the casal person
or whatever it is, is looking upwards, also means that we're
going to be able to see the bottom of this
part underneath the chin. This one is going to
protrude out a little bit, but we're going to be able to see most of the
underneath of it. Maybe the nose might be here. Should put the nose
on this one as well. It takes a little while to
get your head around that. This is what I'm
trying to get you to think about and hopefully
develop some of those skills, is how do you use your
imagination to think about, well, what would I see if that
head was tilted up? You'd better see much more
underneath the chin, you bet. To see if it was a person, you'd better see up
their nose as well, or the shape of the bottom of their nose rather than
the front of their nose. Let's do a couple
more and hopefully this will help you to start, see this a little bit
more clearly as well. Again, another circle. Let's do one facing
the other way. And maybe we'll just do
facing the other way. First we can put in
the vertical axis. I usually try to go
from the top and the bottom center and then
bring it out and around. Not always entirely accurate. Sometimes there are
exceptions to that rule, and it comes down to looking at the photograph and
seeing what you can see. Then we're going to
do one going curve slightly upwards or curve
slightly downwards. Then we're going to
draw another snout, another sphere on
top of the sphere, or some spherical shape. That's going to have a
cross section as well. Nose is going to be
maybe just across. Those two lines intersect, then the eyes will be
on this line here. It looks a little bit like
a teddy bear as well, so you could use it for
drawing all of animals really. Then the ears are
going to be added on. That's where we look to
our photograph again and find the place where they sit. This first exploratory section, we're not thinking about
proportion at all. We're going to do that in
the next part of the class. I'm going to do one more
here and let's do this one. Looking a little
bit further down, you can do it facing either way. You don't have to do exactly
the same way that I'm doing. But this one we want
to tilt the head downwards so we'll get a circle. You're having trouble
with these circles. You can always map them out. You may have seen other classes that I've
done on this as well. Putting it at four points, and then putting a curve around
each one of those points, and then just joining together
with short light lines. But it's much quicker
if you can get used to this technique here. This
one we're going to do. I'm going to have the face looking slightly
to the side again, like this, 13 quarter view. Then I'm going to have the
eyes wrapping down and around. If you want them to look down, they've come down or up, it's got to come below halfway. This one, if you think about
halfway through that circle, it's curving up beyond halfway. This one's about halfway, curving up, This one's
curving down below halfway. And we could put the eyes in there just to
get a feel for it. This time we're going to see
more of the top of the nose, on the top of the snout. This takes a little
bit of practice. If you hadn't done this before, you might be thinking, I'll
draw a circle like this. But that's not
facing the same way. The snout is more
like a flattened, a little bit like a
lozenge or something where it's squished down. And it's not going to be a complete circle from this angle, we're looking slightly
from the side. It's going to be a little
bit more of an oval. That's another thing that
just takes a bit of getting used to and looking at
photographs and things. The horizontal cross section is going to be
lower down as well. The nose might be out here, maybe the nose would be just
a little bit lower down. Why would it be lower down? I'm just thinking in my
head about how the angle of those three dimensional forms would affect what we can see. We'd be able to see
much more of the top, whereas here we can only see a little bit of the top
or half of the top. This one we can't
see any of the top. This is a really
good practice to do, to start thinking
in a different way about anything that
you're drawing. It doesn't have
to be a portrait. Is particularly
useful for portraits, but even if you're thinking about drawing a camera
or something like that, that has the lens on the front, the body and then
the lens reacting. Or how are they
working in space, in three dimensional space.
5. Exercise: Understanding Light & Shadow: We've done these
four drawings here, just as a bit of a
exploratory practice. Soon we're going
to do a bigger one based a little bit more
closely to the photograph, but also practicing
this technique. But first, I want to talk about the second thing that
this class is about, which is how light and
form work together. What happens when
light falls on Form. How does that affect where the light side
and the dark side are? If you take a look
at the sphere here, this is like the
head of the cat. If we take a light,
we shine it on here. This is quite a
strong spot light, but hopefully it'll help
you see what's happening. One side of the ball is very
well lit up the side here. Then as you come
around the other side, the light doesn't reach around that curve and that's why
you have the light side. In the dark side, if
there was light coming from like a window
on a person's face, wouldn't be quite a strong, but you'd see half of their
face would be lit up. Then when you get
to the nose here, the light wouldn't be
reaching the other side. Pretty much the whole other side of the face would be dark. There's would be a few things
like the cheekbones that might a little bit
lit up because they stick out and
they'd catch the light. So think about how a form
can catch the light. If I move this light around further towards the front there, you can see that more
of the ball is lit up. I hope this isn't too
bright on the video, it's a very bright torch
that I've got here. And as I bring it back around, you can see that
only half is lit up. And then I won't
bring it around to the back because I
don't want to shine the torch at the
camera into your face. But the same thing happens
when we move it up. You can see that the top half, I guess maybe a little
bit less than half is hit by the light. And when we bring it down, you can see the bottom part
of it is lit up there. This is just to get your head around thinking about shadow, the light site and the
shadow side of any form, but in this case, a sphere. So how does this apply
to our cat portrait? You could have a look at the
portrait now and maybe just see if you can tell
where the light side is, where the dark side is, and where that point is,
where it changes. It's a little bit hard
with the photograph and quite often with
anything that you're drawing that has pattern on
it and has light and dark on it because you can see that
dark side of the face there. There's light areas. They are light areas that are in shadow. They're darker than the light
areas on the light side. If I turn this into
black and white and take some of the
light down a little bit, you'll be able to see a
bit more clearly where the light is hitting the form here it is just in
black and white. You can actually see on the back wall where the lights are coming across to. You
should do it this way. The light is coming
across and then it gets to a point and then
you can see some shadow. The front of the cat's face
is still lit up a little bit. But if I take the brightness
down a little bit, then you can really see the
areas that are in shadow. Even on the nose, you can
see the light reaches to about here and then it
doesn't get past that line. This area here or that edge, this area here is all in shadow. There's probably a
little bit of light hitting this part here. A little bit of light hitting the cheekbone or in the top of the head as well.
There's some light. But then all this area
here is in shadow. Can you see if I take
away all these lines, can you see the point
at where the light hits like a corner or
maybe like the edge of a sphere or the
edge of a curve, and then it doesn't reach
over the other side. It's about here. The lights coming
up to that plane, hitting that plane,
and then it gets to the edge of it and it doesn't
reach over the side of it. This is all stuff I want you to be thinking about or
starting to think about when we're looking at how to build a sense of
three dimensional form. Remember the sphere. Let's start to apply
some light onto these spheres that we've
got in our drawings. Say the light, the same as the photograph coming
from the upper left. Coming towards the sphere is getting to about
the midway point. All the side is
going to be light. Maybe a little bit of the front is also going to be light. If it's coming slightly
from the front, it's not directly from
the side of the head, it's this angle. Then this part might
be lit as well. All of this side of the
sphere is going to be in shadow because the lights are
coming from the top down. This area here will
be lit as well. Then we've got a
second sphere here. The light is going to work independently on the sphere than it is on this
sphere as well. Going to react in the same way because the light's
hitting it from the same direction
and the sphere is facing the same
direction as the main one. But just get your
head around that. Imagine the light coming
down onto the sphere. Whatever you've drawn,
the secondary sphere, this part here might be light. This top part, this side, but underneath this
sphere is going to be dark because the
lights aren't going to reach around very
far past that midpoint. All of this side
will also be dark. Then there might be a
bit of shadow here too, where there's even
less light reaching the main sphere because this
snout part is blocking it. Then we start to build an even stronger sense of
three dimensional form. We're going to go through
each one of these and just put in really rough
shading like that. Maybe two layers to
block in some shading. And then another
one just to define where there might be
any really dark areas. Maybe under here it would
be a bit darker as well. Let's do this one here. I think we'll just
keep the light coming from the same direction. If you want to play
around with it, you can. But because I'll photograph the lights coming from
the left hand side, it is just going
to help us get in the right frame of mind for drawing our main
portrait later on. The lights coming down here, you might even circle the areas where you think
the light would be hitting. It's coming from above
and from the left, the areas that are at the top of the sphere and
the left of the sphere are going to be the same on the
secondary sphere shape. Here the top and the left
are going to be light. The right side and the bottom are going to be
dark or in shadow. How dark they are depends on
the strength of the light. But they're going to be darker than the side that
the light is hitting. If the lights coming from here, it's hitting this three
dimensional form. Maybe there's a bit
more shadow cast onto the main sphere From
that smaller sphere, we're really having to
use our imagination and our knowledge of how light hits form and what happens when light
hits one side, what happens to the other side. Using our imagination
a little bit, but our imagination is based on, on science or experience, on rules as well. These are also rules of drawing, but they're based in reality. This one here, all of this back of the head will be lit
coming from the top, so some of that light's going
to reach over this side. Maybe something like
this will all be lit. If you imagine the
curve of that sphere. If you get a quarter of
the way around here, it's going to start to
bend back the other way. That's where the light is not
going to reach it so much, especially down the bottom. All of this will be in shadow. This part here
might be in light. If it's starting back slightly, it'll be maybe catching
a bit of that, maybe about here actually. Because this part here, the light will be blocked by this part of the main sphere. That half should all
really be in shadow. All of this should
be in shadow here. Like I said, maybe just a little bit on the nose
might be catching the light if it's jutting out beyond the shadow of
that main sphere. That's getting a little
bit more complicated. Don't worry if that
is going overhead, where would be an
even darker shadow? Maybe underneath the
bottom of this sphere. I'm having to use
my imagination in my visual thought process to think about where that
light would be hitting. Then this last one, we've got all of the
back of this head, it's going to be lit up. We're thinking about this
sphere in three dimensions. This sphere of the head, the light is coming
from the upper left. Where does that curve
of the sphere occur? Where the light is
not going to reach beyond? Maybe about here. It's actually
happening a bit with the natural light
in here as well. Darker on this side and
lighter on that side. We can maybe even
put a little bit of a line there to think about
where the curve is shade. And all of this area here, all of that is
going to be shadow the top because the light is
coming slightly from above. This will all be lit out. Maybe this side will be
a little bit darker then this side then below
this curve here will probably be even darker
below this curve here. In this one, we had this area here which
was a bit darker. And that's because it's the
part away from the light. This one here, you might think, oh, I have to make
this part darker, but it's actually quite
close to the light, is probably going to be
getting a little bit of diffused light reaching
around that side of the ball. This part here is the
furthest way from the light. And this part here, as well as also the furthest
point away from the light right on that
other edge of this sphere. Maybe all the front
of that. If it was quite a flat nose as well, all the front of that
would be quite dark.
6. Practice Drawing: The 3D Head: I hope this exercise
has helped you get your head around that idea of three dimensional
form and light and dark. Right now, we're going to go into a slightly
larger drawing. We're going to look at
the photograph up there. And we're going to use
that as our subject, but we're not going
to worry too much about getting a likeness. We'll save that for
our final drawing. Instead, we're going to take
these drawings a little bit further in this
bigger drawing here. And we're going to add in some angles and some
war planes as well. Getting in the cheek bone, getting in the correct
shape of the snout. Not worrying too much
about proportion. So don't worry if this cat that we're going to draw doesn't
look exactly like that cat. We're just using that as a very general reference
for this drawing. So let's start the same
way that we did over here. We're going to start with
this sphere. There, is there. I'm going to do this one
maybe about tennis ball size, Move in whatever direction feels most comfortable for you. Just get rid of a few of those extra lines
that don't need. And then we're going
to put on the sphere of the snout as well. Like I said, we're not thinking too much about proportion. But if you did have
a quick glance at that photograph there, you'll see that the sphere, the smaller sphere comes about halfway up the main sphere. Maybe a little bit
less than half way. It might just give
you a place to start. Then we could put in a
center line to get a feel for the direction that
the face is pointing in. You see, I haven't
put that center line. Coming through the nose is
something that sticks out, especially if you're
doing human portraits. This is a really important
mistake to avoid. You don't want to
bring any center lines out through the nose
is just an addition. It's stuck onto the ball of the face, the
sphere of the face. We're just imagining
this sphere and bringing that center
line through there. We could bring one
across this way. It doesn't have to
be too accurate. What I'm actually doing is I'm looking again at
that photograph, just thinking about
where the eyes are and that's where
I'm putting that line. And we could even just put a couple place holder ovals
in there for those eyes. Now you see how light
I've kept my one. It's because I'm going to
build up the lines over top and be good if you can
keep yours light as well. This is the basic shape
of the two basic shapes. And then we can start refining
it a little bit further. So I'm going to get
rid of these lines. We can start thinking about the different planes that
you can see in there. One really strong
plane that I can see line the shape along
the top of the nose. We can make a little
mark where we think the very top of the
triangle part of the noses. Maybe even put that in there. Then we've got this
quite strong bridge of the nose here, which is flat. Maybe it angles in and
then angles up slightly. Might have two planes there, but generally facing the light that lights coming
down and hitting it. We can start to put in
the edges of the snouts, and now we're thinking
in straight lines looking for the shape of it. This is where I could
draw a little bit darker. Now I'm looking. This angle along the
left hand side here. This angle, and then also
this one here and this one. Putting those in, what other
angles can you see there? There's one coming up, forming the shape
of the cheek bone. Then we could bring that up and put in the side of
the face as well. Then under the chin here, quite a strong line just here. If we're doing human, this would be like putting in the jaw line. Maybe we could even
put in this shape too. Have a look at the photograph. What are some other planes? You can see the plan, the different facets or the different sides that will be either facing the light or
facing away from the light. This front part of the snout is a plane in itself
as well. It's quite flat. Then also this side
here, maybe this part. It's like the side
of the cheek bone. If I take away those lines, see if you can see those
without the lines. Like I said, it takes a
little bit of imagination, maybe visualization as
well. It's hard to explain. But I guess I'm thinking about a cat's face at my
experience of a cat's face, and I know that it's quite flat. It's not just that I can
see it in the photograph, it's that I know that this
front part here is flat. It's not like a complete dome that comes around the
front of the face. I know that's a bony part,
I can see that as well. But I also have my
experience to rely on that. Cheek bone may be coming up
around to the air there. Maybe there's another
plane here as well. It comes in, the snout comes in, and then the side of
the face is flatter, closer to this plane here. I hope this is
making sense to you. You can either copy
exactly what I'm doing or you could just draw
the ones that you can see. You can understand. Hopefully
you can understand. Front plane is flatter. We know that the
nose is quite flat. It's not round or
anything on the front. Even though it's
a triangle shape. The three D form the front
of it is quite flat. We've got that bridge
of the nose there. There's a couple of planes on the forehead, but
they're very subtle. It's that rounded part of
the sphere at the top. There's not really
any strong angles like there is with
the cheekbone. The cheekbone, you come across the nose here,
and then you come down. Then you hit the cheekbone
and then you come down again. It's a serious change in plane. Whereas, this subtle change in planing from one side of the ball to the other
side of the ball, There's no strong lines. I mean, you could imagine that there's something like this
in here if you wanted to. I'm not going to worry
about that for this one. Let's go ahead and
put in these ears, don't worry too much
about the likeness. But we could line up the points, or the starting
points of the ears. This ten ear starts in a line with the inner
corner of the eye. This is good practice for the portrait that we're going
to do on the other page, starting to figure some
of these things out. You can see that line
there and put the ear up, probably intersects with
this eye somewhere. I think I've got this part
a little bit too big, but like I said, we're not
worrying about proportion. This is just about practicing
the planes of the face. The other one probably intersects
about here, the angles. Something like that. So now we've got quite a strong
three dimensional sense in this drawing here. It was quite quick and it's
almost just like a diagram. It's a little bit
like if you were to build this cat
out of cardboard. If you imagine the different joins that
you'd have to make, the different
pieces of cardboard and planes that you'd
have to create. It's very hard to get
cardboard to stay in a nice curve because
it just sort of bends. And this could be a good way
of thinking about a drawing, how you can approach
your drawing. How would I build
that as a sculpture? What kind of sides would I
have to create and then join together to get that three
dimensional form in real life? Now, this doesn't mean that you need to start every
drawing this way. This is more like a diagram. But having done this
and understood this, hopefully it means
that you can also kind of almost like do
it in your mind. I think that's the
way that I do it now, is if I'm approaching
a portrait, I might draw a few of these
lines, not all of them, but I have an understanding
of what to look for. I know to look for the planes. I know to think about
the light as well, which we're going
to add in a moment, and how the light is
hitting those planes. This was not something that I
did for a really long time. I've been drawing for, I don't know how many years, probably 30 years
or something now. Probably only in the last, maybe seven to ten years, I've been thinking about this idea of three
dimensional form. Or I was introduced to it with lumos head and
that sort of stuff. So my drawings really changed from before that
time to after that time where now I have a much
stronger understanding of three dimensional form and anatomy as well,
which really helps.
7. Continuing The Practice Drawing With Light & Shadow: Let's add a bit of
light to this now. We can imagine that light is
coming from the upper left. It is coming from the upper
left in the photograph, which planes is it
going to be hitting? I'm just going to
get rid of that line there because that was
just a measurement line, a plane line, which corners of the planes are
going to be casting shadows. This here is definitely going to be casting a shadow
on this side. This cheek bone is also going
to be casting a shadow. The front of the face is
getting a little bit of light. The left hand side and the top definitely
getting a lot of light. All of this here
can be in shadow. Even just doing that extends the sense of three dimensional
form straightaway. Because it's what three
dimensional form is all about. It's about light hitting
with height and depth. Got this one in here, up a little bit
stronger this plane, it's getting a bit of light, but it's a bit in shadow
from the nose as well. Then there's a bit of a plane
here which I missed out, which is also in shadow. Maybe a little bit more
up the nose there. You can't really see
it in the photograph. But this part of
the cheekbone here, if you think about a cheek bone, it comes out and
then it comes down a bit and you get shadows
under cheekbones. Probably from this point
of the cheekbone here, underneath that is
probably going to have a bit of shadow just a bit. Might be a bit too much. Then
we can build this up a bit. Where is the amount of shadow? Probably over here, that's the furthest point away
from the light source. You can actually see that in the photograph that it's
very dark over that side. And actually all down
the body as well. If we wanted to put
a little bit more of this body down here, there's a very strong plane there that is all in
dark, dark shadow. I won't do it too
dark just because I haven't drawn it
very accurately. But just block something in this part here
would also be in shadow where else you can see that would have
some strong shadow or even just a little
bit of shadow. This part of this side
of the head here, I think has a little bit more shadow than this
side of the head. I'm looking at this area here. If you imagine the
curve of the ball, the sphere, this is the
other side of that curve. The lights coming
from this direction, it's definitely hitting the
left hand side of the ball. And then it may not reach as far around the other
side of the ball. The light in the photograph
is quite diffused. It's coming from a window. I think if it was coming
from a spotlight, like the torch that I was using, probably all of
this would be like in complete shadow except
maybe the cheekbone, it'd be really strong,
strong dark shadow. But because, you know, it's a very large light
source but very soft, it's reaching other areas
on this shadow side. Then we've also got
the ears as well. If we wanted to think
a bit about how the light is reacting with the form there
or hitting the form, some of it's a little
bit hard to see because there's a bit of
fur in there as well. I'm switching a little bit
between shading or where the light is not quite reaching and also
just shading in the darker areas that I can see. There's all these
different ways of looking at a photograph or
looking at a subject. You need to pick and choose
what's going to suit needs best for this one is to create
a three dimensional form. So that's why I'm
picking to think about the light source and
think about the planes. But when that fails, then you just go back to thinking about, or looking and observing, where can I see dark,
where can I see light? Rather than thinking
more conceptually about the three dimensional shape. Let's build this up
just a little bit more before we move
on to the next one. I'm going to put in the
shape of the eye there. It comes up from the
nose and then around, then it's quite strong. Line across and then
curves around and up. So it would be very tempting to just sort
of put these in. There's like almonds, but when I look for
any straight lines, there's quite a strong straight
line there, then a curve. If we broke this up
into straight lines, there'd be a
straight line there. And then there'd probably be another one just across
the bottom here as well. In those, we can build
up a little bit more. Don't worry if yours is not exactly the same shapes and
everything as a photograph. We're going to work on
that in the next one. And then we can put the mouth in maybe a little bit of the pupil, but the whiskers
on there as well. It looks like an
Egyptian sculpture at the moment because we're
not really looking at the lightness and giving any particular
kind of character. Quite a severe looking cat. There's a dark area
in here which is, I think it's dark color, but it's also quite a
strong shadow in there too. I think because I know that the light would
be hitting this edge here and then casting
a shadow deep in that recess of the eye as well. Maybe a bit more shadow here, just to build this up
just a little bit more. When we come to do the eyes
in our final portrait, you can see the
high light there. That's really important. Just note where that is now. I'm just getting your
eye used to this. It's like a practice run
before we do the main drawing.
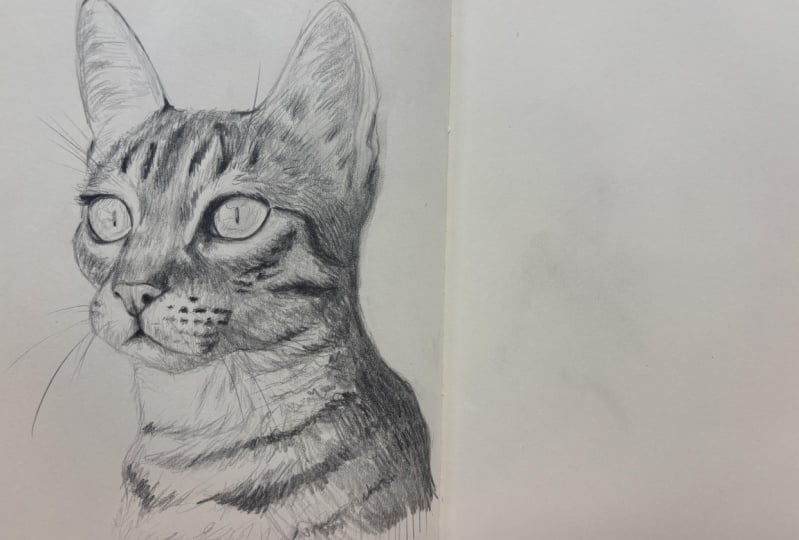
8. Starting The Cat Portrait: We're going to move on
to the main drawing now. It's going to start off in a
similar way to this drawing, looking at the shapes
and the angles, but then we're going
to focus on getting the likeness of that
particular cat there. For this one, you might
want to start with a two H pencil just so you can keep those lines that
we nice and light. Basically going to be doing a drawing like this
to start with, just to map it out, but we'll focus a little bit
more on proportion as well. So there'll be even more
lines and things in there then Once you've
used your two H pencil and you've very
lightly put everything down and then you can build up the lines
that you want to keep. We're going to focus
mostly on the head, but we can put in some of
that body area as well. Especially to show
the shadow side, that strong shadow
side on the right. Start by sphere. Again, about tennis ball size. Don't go too big. Make sure you leave room for
the ears as well. We'll go through this pretty quickly because we've
already done it. But we're going
to maybe mark out a few more proportion lines when we put in the
second sphere. Remember it came about
halfway up the main sphere. It's about halfway and it just overlapped a
little bit outside. We can change this
if we need to, but we need to get something
down to start with. I am keeping mind a little
bit lighter than usual because this is going to
be our finished drawing. You want mind to look like
a finished drawing too, and not just be full of
lots of scratchy lines. Let's put in the
line of the eyes. We didn't put in the line
of the center of the face. You can do that if you want to, but now I'm looking
more at the photograph. I'm not relying on that diagram so much on the idea
of the diagram. I'm more looking
at the photograph to think about
where are the eyes in relation to the top
of that snout there. Come through here and here. And then we could
again put it in a little bit of a
circle or oval. They're in line with each other, maybe this one comes in
a little bit closer. Just thinking about where
the edge of that snout is going to go and
where it's going to intersect with the
center of the eye, maybe the top of the head
is a little bit lower down. What we can do now is start
to put in some proportion. We're going to go
back and put in those lines and planes
and things again. But let's look at the
proportions here. We've got the eyes, which are
pretty much in the center, if we're going straight
through the eyes. Something about here,
here, and here. You draw these in
if you want or just check them. You don't
have to draw them. If you don't want too many
lines all over things, then the mouth is going to be about the bottom
of that circle as well. The top of the nose is going
to be just slightly halfway, or maybe halfway, between that line of the
eyes and the line of the mouth or the bottom of the ball in
the middle of the ball. This is the way that
you'd approach drawing a human photo as well
a human portrait. Maybe not exactly the
same proportions, but the same idea. You'd measure the
mouth to the nose, to the e to the top of the head. We've the top of
the ears as well. I think we've got this line. This one, they're
about the same then. Yeah, I mean, that one's
pretty much the same as well. So we could go 123, Put the ears up here. The segment and the segment
are all about the same. We may have to change them or you might find some more
accurate measurements. I'm just doing
this on my screen, it's really just by
eye, not by pencil. By pencil as a ruler. If you've got the
photograph with you, you might want to
double check these. Now we can go and start putting in some more of those shapes. So we've got the top
of the nose that's put in the shape of the
nose just generally. Now I haven't put in all of
the planes and things yet, but I am still thinking
about three dimensions. And with three dimensions
and perspective, especially these angles
will be different. Because this side of the nose
is further away from us. Then the side of the nose, we've got that center part of
the nose sloping that way. Then we've got this angle
coming through here, then the one across the top. And then we can start
to bring this up, putting in these three D forms. Now putting in the mouth, then putting in the
shape of this snout. This angle here, the
shape of the snout. I'm looking at the
angle in the planes, but I'm also looking at the distance between
that and the eye. There needs to be a little
bit of a space there. And then this side of
the face, the snout. Putting in these angles, there's this angle
of the cheekbone. Again, I'm looking
for the angle, thinking about three D form. But now I'm also lining
it up with points. I'm thinking where
does that angle of the bone intersect with? The nose lines up
with its come up. How does the angle change
as you come around that cheek bone
there in this angle? Then it changes
and then it comes in close to the eye there. Then there's the angle
across the forehead, put in the angle
of the che bone. These are just guidelines still, so don't worry if you haven't
quite figured it out. To put something
down and to start thinking about the
three dimensional form. It's putting the straight lines around that overlapping
part of the air there, that curved part of the air
we can put in the jaw line. If this is very new to you, it might feel a little bit
strange and you might feel a little bit out of your depth or like things aren't working, but
just give it a go. And we can always go back
to our usual processes that you might have done with
me in other classes where we look at negative space and those sorts of things. Just putting a straight
line up there to find where that ear
is going to start. Then the other point
of the ear lines up, straight line here through
the center of the eye. Just clipping the
nose there as well. So this is a good
way to just make sure you've got things
in the right place. The center of the eye
doesn't line up with the corner of the nose. Something not quite
right with my nose, I think I might have to
sort out in a moment. And then the other ear,
using vertical lines, it comes outside the
edge of the snout, intersects that eye, intersects the cheek
bone there as well. This could also mean maybe you have to move your eye
across a little bit. If the space is right, but
your eye is too close in, you might have to move
it out a little bit. Look at the angle of that ear and this other side
of the forehead. So I definitely haven't
gone up high enough with my ears because there's
my guideline there. It feels like it might be
a little bit too high. We'll see what happens. Yeah, definitely too high. If something like that happens, then it would be
a good idea to go back and do some
more measurements. This is way drawing works. You're always having
to adjust things. We could go through the center of what would be the sphere
or the ball or the circle. We're not thinking
about it as a sphere. I'm thinking about how does
this compared to this. Yeah, I could do it this
way and then we can have a really close look. So if I take that
and then I move it, I don't know, it kind of
looks like it's halfway. It's maybe just slightly
less than half. And then I need to
measure on my drawing. So the ball, what's
it to come up to? Or maybe the corner
of the mouth. Take that the ears need
to be half of this. Oh yeah. So they're
definitely more than half. So there was just my mistake in my drawing, it feels better. Now, look at the angle
at the top of that ear, and then it starts to curve a little bit and look at the angle at
the top of this ear. And we could also look
at the space in between, like a triangle shape
with a flat bottom. This edge is actually pretty
much straight up and down. It might look like
it's on an angle, but if it does, it's
probably just because we know that a cat's ear
is like a triangle. So we imagine that
this side will be coming down like this, but actually it's got
a slight curve in it, but it's pretty vertical. You know, maybe got that
angle in that angle there. Let's put in a bit of the
body as well and that's going to help us just figure
some things out. Here's the side of the body thinking about
what's on an angle, but I'm also thinking
about how does it line up in a straight
line with everything else intersects through
that eye there. Then on the other side, we've got that part of the ear coming down
the back of the head. Then at a point
that is about even with maybe the center of the
mouth comes out at an angle. Then another angle. Then we have that shoulder
blade there as well. About point of the mouth is
where it starts to angle out. Let's see, we've
got the air comes down in straight along
the side of the sphere, down to the mouth. Angles out, shoulder blade. In the size of these lines. I'm just doing my eye, but you could measure them if you wanted to
get really technical. But the body isn't really so
important in our drawing. I'm more concerned with getting this portrait part
of the cat accurate.
9. Refining The Sketch: At this stage, before
we go too much further, we'll use some of our
other strategies like negative space and
just see if we can pick out anything that
might not be quite right. I can look at the negative space around this side of the head. Just bringing my pencil with me, I think definitely something
not quite right there. I noticed that a while ago
I'm going to do almost like a bit more of a contour drawing or just looking
closely at that edge. Now, using your eraser to
correct anything as well, I'm looking at this shape and hair rounding off some
of these lines too. We're using very
straight angles. And now we can start to
bring in some curves, but make sure they're not
curves that you're making up, so you still looking at them, still using the angles
that you had there. This center line of the
mouth is on a slight angle. We've got that front plane
of the snout, remember that. Then it'd be slanting just
ever so slightly downwards, that's why this is
on an angle again, a little bit of contour drawing, looking at the
shape of the nose, the planes or the edges
that I might have missed out is a edge
that comes down here. Now this is only a good idea if you've got everything
else in the right place. Let's just make sure that our eyes and the other parts of the face are all
in the right place. I think there's something
not quite right in here. I feel like this is a little bit too long or a
little bit too big. And that could be a
problem because then I'll have resize everything else, shrink everything
else down to fit it unless I make that bigger. I'm just going to
do a little bit of just playing around here, just moving my pencil around, trying to figure out
what's not quite right. And hopefully you don't
have the same problem. I'm just doing like an
analysis with my eye now, but moving my pencil
around as well, figuring out where
the eyes should go. I think the eyes need to
come up just a little bit. Look some of the other shapes, like the shapes of
the light colored fur there could help as well. Yeah, I think this nose just needs to go a little bit bigger. Such a little nose on the cat that I think I might have shrunk it
down a little bit. Now we're about trying
to find the likeness. And I thought there was
something wrong there. And that's been exaggerated even more now that I've
moved the nose over. So I need to go back
and correct that again, make that just a smaller. Now starting to get more of a likeness of that
particular cat. I've still got all
my planes in there, figured out the
proportions, hopefully. Yeah, I think those
are mostly correct. I'm very, very honest with you about what's
going on in my drawings. I know there's a lot
of artists out there who will speed up
a whole lot and it looks like it's all
just kind of come together and that they've
done nothing wrong. I probably could have
like skipped over some of these errors that I'm correcting or maybe just done them
without saying anything. But I think it's
really important that people who are
learning understand that it's not perfect every time and it's not
an easy road every time. You don't always get it
exactly right the first time drawing is actually more about responding to what you put down. You put down something first
and then you can correct it. It's always about editing and correcting the white area there, serving another quick
look at this cheekbone, running my pencil along, looking at the photograph
at the same time, just checking that I've got
ear apart in the right place. What led me to do that was just looking at the photograph, Comparing the photograph
and my drawing, Switching my eye back and flicking my eye back
and forth between them. Something looks not
quite right back here. Then I'm trying to
figure out what is that what needs to be corrected? I think it's that there's a bit of an angle here
that I left out. Spend a bit of time just looking at the photograph
in your drawing. Now this is the stage
Just before we get into adding the fur and the dark areas and all
the details and things, it'd be a good idea to
take a little break. I'm going to take a little breakdown
and then come back to it and flick your
eye between the two, the photograph and the drawing, And just try and pick out what
might not be quite right. If you find something's
not quite right, then you need to use those techniques like
negative space and lining up. So you actually need
to do some work. It's not enough to
just look at and go, oh, there's something
wrong there. I'll just fiddle
with it and see if I can make it look better. You actually have to find
a reason to change it. This is a big
problem I think with learners as well
as they don't have the skills to change
it or to know what's wrong or they just
fiddle and think of, I keep working on it, it'll
get better and better, but it's only going to get better if you've
got something to compare it to or if you've got some reason for changing it. I'm looking at this
eye again here, or this space here, and
the shape of the eye. I'm comparing those to each other and the shape of the air. So there's something here. And maybe you need
to change just this angle a little bit, just looking at that space. Maybe I think that's right. So just go through and do that
after you've had a break.
10. Assessing The Drawing: Did you discover anything when you came back from a break, by flicking your eye
from the photo to the drawing is something that I noticed about mine
almost straight away. This is because I'm trying
to capture the ness of that particular cat and
the attitude of that cat. This line here, I've got going
completely the wrong way, It makes a big difference. This changes the posture of the cat you see
in the photograph. It's actually leaning
slightly, this way line, I guess the neck, that
makes it look like it's maybe jutting its head forward or it's
looking at a bird. It changes the likeness. Sometimes just tiny
little things like that as this line here. When I look at this line, I'm also drawn to
look at this angle. I'm also drawn to
look at this angle. I think maybe I need this to come a little
bit further across. I'm drawing from my
screen in front of me, rather than having a
photograph next to me. Sometimes there might be little things that
I can't quite see. I've got another version
just over here to the left, which is the feed that's
going to the screen. If you've seen me leaning over, that's why when I look at it, I think I extreme there. But I think this line here, it comes straight
from the corner of the cheek and it comes down to match where
the chin would be, and it's quite shallow there. That's made a little
bit of a difference. I think to the ness of
this particular cat, the eyes are going to make
a difference as well. Once we put the pupils in, it's going to show that it's
looking up a little bit, also getting these curves right? It's going to make
a big difference. Still feel a little bit like maybe my forehead and my
drawing, it's a bit too big. But that may come
together when we put in the fur and the shading
and that sort of thing. Hopefully you've
stayed nice and light. And that means you can make
some changes if you need to. What I'm going to do now is
rub out most of the lines. Any of the lines
that I don't need, we are going to
block in the shading like we did with this one, but just a very
light soft layer and maybe a piece of tissue
might be handy as well. Just to blend some of those shading layers or that one shading layer before
we add in some detail. Rubbing out all the
lines I don't need, some of them will still be useful like the cheekbone line, but we want them to
be light so that they disappear under any shading or anything that we
need to put over top. Definitely, any of
these proportion lines, we can get rid of those.
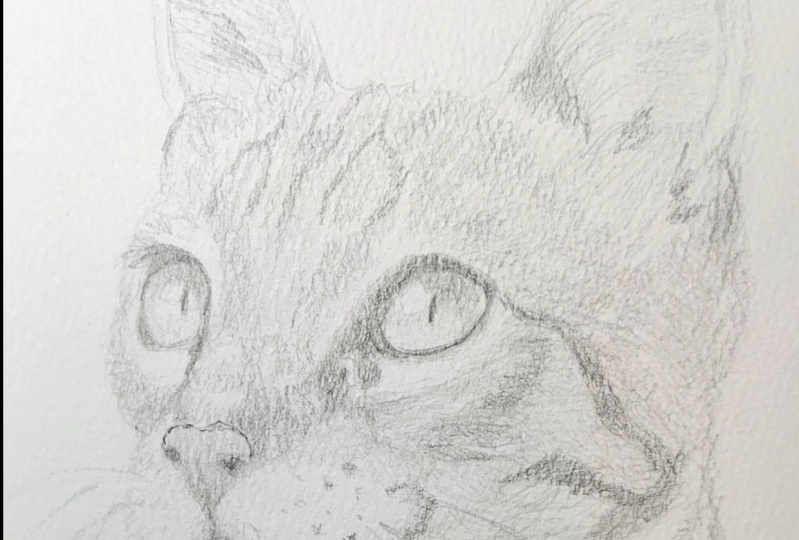
11. Blocking In Shading: Like I said, we're
going to block in some shading and we're going to keep this shading just
as a light layer. Keep it quite tidy. What I've done is just identified where that shadow
plane of the face is. This parts in shadow too, but it's also very light. It's darker than this side because it's got shadow
on it, but it's white. It's maybe more
like a light gray. So I'm not going to worry
about that for now because I don't want to go too dark. But this edge here
along the cheek bone, underneath that
little white part up here in the upper
side of the air. I'm going to shade
all of that in, and then I'm going to bring
it down to about here. That part of the body as well. It won't go all the way down, but you can do as
far as you want. All of this just
going to shade in. I'm just using up
and down lines, can go in any angle. Really, one technique I've heard is that you should go in a direction that's perpendicular
to the light source. When you're shading the
light sources like this, that would mean that we'd
be shading this way. But yeah, I'm not
worrying about that for this one's something that I
came across not too long ago. It's more if you're just drawing or shading
with these lines, these very graphic lines. And you're not going to
be blending them in. The reason we're putting
our shading in is so that we can help
enhance that idea of three D form by showing how the light
is hitting that form. Put in that shadow plane
there of the nose, then come up through
the eye here as well. It's another area where I'm not quite sure about something. I'm looking at the shape, the shape of white and
the shape of dark hair. And I think maybe
it's just said, I haven't got the correct
shape of the eye in there yet. Let's just put in the shading first and then we can go back and put in the details
of things like that. May put in the ear as well. I'm just looking for
those main shadow areas, I can get that bit of this mud. It's just like a
block in of shading. My drawing is quite
light at the moment because I wanted to lose a
lot of those dark lines. So hopefully you can see, okay, can probably build that
shading up a little bit more. This is quite a hard pencil,
probably should have said. If you switched to something
like a two or an HB, it'll make things a
little bit darker, a little bit more quickly. Then straightway, we've
got a stronger sense of three dimensional form just
from that light layer. I'm going to put a little
bit of shading up here too. Remember that was an area where not quite so
much light is hitting, but some light is hitting because the light is
still coming from above. It's just not quite
reaching as far around that sphere and maybe a little bit here. Okay, so let's work on the eyes and the nose
now, the details. And try and get that
lightness switched over to black and white here so we can see things a little
bit more clearly. Get distracted by
some of the colors. I'll start with the eye on this side and then we'll
move over to that side there. Now I'm going back into
contour drawing mode. Looking really
carefully the photo with my eye and then following what I'm looking
at with my pencil as well, trying to get these angles right then putting
in the double lines, the areas that you're
going to shade. Or maybe even just straight away putting in a thicker line. Then we could also put in where the high light is going to go. A little bit of that pupil sticks out just underneath
the high light. It's just a little bit of
dark and then not very much at all of the
pupil that you can see that slit
part of the eye, this dark part under
here, my HB pencil, I'm not putting in
the black points yet, but I am shading them dark. This part here is
going to be very dark. Later on, a few
little flicks out of there to show the eyelashes. See the quality of line
around this eye by quality. How thick or how thin it is, how soft or how hard it is. Just tidy up some
of my lines from underneath there
so I can show that it's very thin on this side. Then you got that thick
part and then around here thin and then it gets thicker
and then thinner again. Make sure when
you're doing that, when you're changing
the thickness, that you're not changing
the shape of it. The shape needs
to stay the same, or the outer edge of
the shape anyway, needs to stay the same. And come down here and
work on this nose. Tiny bit of shading here
which comes in a little bit. And I think that's important
because that's showing the way the n is starting to curve around
the front of the nose. It's quite hard to see. This is one of those really
small details. I think it's partly just
the color of the fur, but it helps show
the contour as well. Just part there. See
if you can see that. Then on this side, it comes just inside the top of
that side of the nose. Again, it's got a little
bit of a curve on it and then it starts to come up and
between the eyes there, it's a bit of a
change in the type of fur and coming down
the other side, it's going to dark
shape in here. Go around the edges
of that dark shape, make sure you've got
the right angles, the right proportions is
too high or too wide. And change those if you need to. There's some things
that you get to a point and you're just not going to be able to change
them and that's okay. If it's going to ruin
everything else, then I wouldn't worry
about changing it. I'm just putting in a little bit of shading in here as well. It's definitely dark on the
right side of the nose. All of this is shaded really, but then it's a little
bit darker just here, maybe just over the
bridge of the nose, a little bit of a
darker patch as well. Let's come down and do the nose back into
contour drawing mode. Contour drawing,
remember, is when you are looking closely
at the edges, the change in direction, moving your pencil at the
same time as your eye. Sometimes this can
really help you find, identify some of those errors drawn in the shape of
the nostril there. And then I can shade in
the shape of the nostril. Let's put this
other eye analysis, the one where I thought I
might have a little bit of trouble. A bit of a problem. I'm looking at the shape
of this dark area. I'm going to work my
way up just following, I've got the edge of the
dark area just here, then there's a
little bit of light, and then there's this shape that comes around
the eye like that. So have a look at
the photograph, especially if you've
printed it out. Maybe even drawer on top
of your photograph if you want to see if you
can pick out those areas. The edge of the dark shape of the snout or the
side of the snout. Little bit of light
sneaking in there. It's not light, it's
light fur I think. Dark shape here, but there's just a tiny bit of light
left in that as well. We're going to piece it
together like a jigsaw puzzle. I've got my dark part and then we've got that
little light part. And then we're going
to follow that shape, leave that little bit of
light peeping through there. Let's have a look at
that. Again, without the lines on the photograph, try and get an accurate
shape for that dark part. It comes around the
rest of the eye there. When I'm re drawing this eye, just relying on what I
already had down there. Because I think that
might be incorrect. But even if I thought
it was correct, I'm looking again at the
photograph all the time. You're never just relying on the drawing that
you've put down. Because that first
pass especially, there's usually something
not quite right. Some kind of error that
you have to correct that you just don't
see until you start putting other
things in there. Look at the quality of
the line around that eye. Where is it there? Are there any little changes? There's a tiny little
bump in it there. I think that bumps taken mine
a little bit too high now. It's just slightly higher
than the other eye and it should be on the same level. This is just another
eraser pen that I found. It's a bit broader than
the tombo mono zero, which I have used
in other classes. But it just gives you a bit
more control than using the Putty erasers which are the only other eras that I use. Really these sometimes
you can't quite get it at the right point or
the right place is a pyramid or a triangle. It always has a point on one of the sides.
It's quite handy. It's not as clean as the
mono zero is the only thing, sometimes at least a few marks and we'll put in the
highlight of the eye, then the pupil look at where it is overall in comparison
to the rest of the eye. Is it right in the center? Pretty much is right
in the center. Hopefully once you put that
iris in, in that highlight, in actually it's put a
little bit of shading as well so that we can see
that highlight pop out. Hopefully that has created the same look on the cat's face or is looking in
the same direction. At least to make sure you've got the highlight to the left
of the pupil in each one. And it's the right shape, It's touching the pupil in
each side as well, this one. It's actually overlapping
the pupil a little bit.
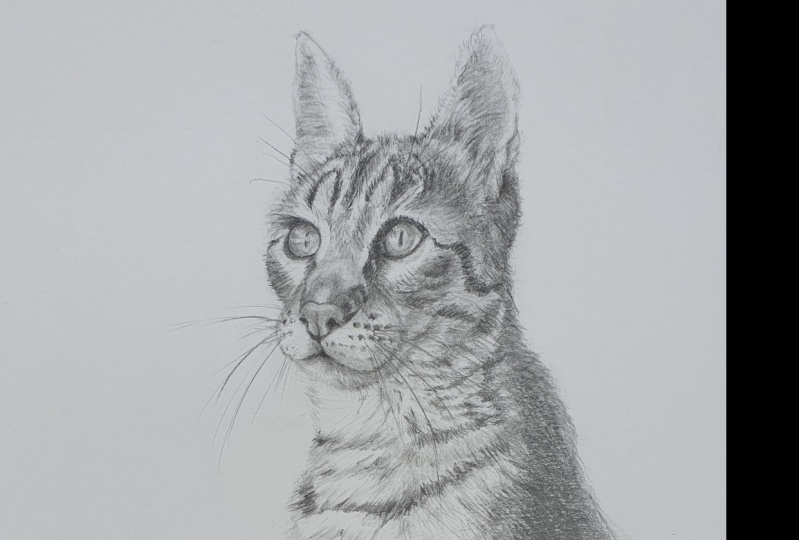
12. Continuing Shading: I've put these about
the same size on the screen now as the
photograph and my drawing. And it might be good
practice for you to have a look at my drawing
and the photograph. Just flick your eye back
and forth and I know it's perfect yet it's not tidy yet and put
everything in there. But are there any major
flaws that you can see, Shapes that are incorrect, or any angles that
are incorrect? It's going to
change a little bit when we put the fur on there. That's going to
make it look like the head is not so
smooth and flat. I'm pretty happy with it. I know that you if I spent
a few more hours on it, I'd definitely find
things to correct. But yeah, I'm reasonably
happy with what I've got. So we're going to
move on from here, but do always feel free to compare my drawing with
the photograph and see where I may have missed
something because that's a really good
learning exercise as well, just putting in a few
of these fur marks now or finding the
white areas as well. So preserving the white areas by putting some
lines around them, just very light lines. There's this white area
around each of the eyes, the dark area through here. I might just kind of block that in some scratchy
lines too just to start getting the fur patterns in there and seeing
how that affects the way that I see the
rest of the drawing, the white part around the eye, but a dark coming up here. This is making me question
the height of my forehead, but it might be all
right if I can't find anything that clearly
demonstrates that I've got the forehead in the wrong place or that it's
the wrong height. I'm not going to change
it. I might see it later, but when I'm putting
these patterns in here, maybe a couple of millimeters different but there's
nothing major, I'm just trusting that
everything is okay. I need to have a reason
to change something. I'm not just going to change it because I think
it looks strange, but I don't really know
why it looks strange. If you have any problems
with your drawings and you're not quite sure
what's wrong with it, but you think there is
something wrong with it, then remember, you can
always share them with me. It's much easier for someone
else to see any issues. I don't know why that is
exactly, but it's true. There's lots of times where I can't see what's
right in front of my face. There's an error there, and I might see it a few days later. But it needs a really
fresh viewpoint and someone else can
give that to you. You need to make sure
that it someone who has some experience with drawing and not someone who's just going
to look at it and say, oh, that's a cat that looks like a strange cat or
something like that, because that's just not helpful. Still, putting in
these patterns here, finding the white areas, using the patterns to jigsaw
piece things together, make sure I've got all the
parts in the right place. If part of the
pattern doesn't fit, then there's something
wrong with my drawing. But so far, everything
seems to be fitting. Okay, We've got
the whiskers here. Maybe should have
done this before, but if you've done
the dog drawing, you'll know that you can
indent these whiskers. The only thing is, there
needs to be no shading there, which there is a pay to
practice this somewhere. I'll give you another
quick demonstration for this class here. You need something
that is hard or sharp. I'm the tip of this
mechanical pencil, but I'm not using
the pencil end, squished the pencil
back inside it. It's just the metal end. If I did some on this one, do them on this side quite
firmly pushing down. You don't want to rip
the paper though, and that's why it has to be
a soft or not a sharp end. It just needs to be something
that's a little bit blunt. Then you see those
whiskers showing up there, lidar there's no
point in doing it. If it's going to be an
area where it's not going to have any
shading over top. On this side, there is going
to be shading over top. This might be an
area to do that. Don't do it. If
you don't want to. I don't want you to ruin your drawing or rip your
paper or anything like that, but I'm just going to
put a few coming down here that might show up
a little bit later on. Just one chance to do it. You can't draw in short lines or anything like that
because you've got to keep the same pressure
down the whole time. This side, there's not
going to be any shading. So like I said, it's
silly to do on here unless you're going to shade in the background, which yeah. I mean, you could do, you could do shade in the
background in your own time. The other way to do it
is you're just going to use a very fine pencil, like a mechanical
pencil, to put those in. Right. Where were we before I started talking about whiskers? We're just putting
in these patterns. That's right. So there's
a bit more pattern here. Just coming around the
side of the cheek, making sure that line of
the mouth is correct. Now look at the line
quality of that mouth. Very soft down here. It's not a hard line like you'd
draw in a cartoon drawing. It's almost just made up of little furs overhanging
a darker area. So you can't actually see the darker part of the mouth here. When you come in here,
you can see it darker, but it's very soft. Disappears a little bit or
it has a smudgy edge to it. Same in here, it's very soft. It's not like the hard edge
of the, around the eyes. And there's a little
bit of shading on each side to show a bit
of fur and then hair. Very soft's dark, definitely
dark, but it's soft, which means you might have to do slightly lighter shading
first and then come in with your dark over top using more of the
side of the pencil. I hope you can see
on the video how soft this is when I do it with a bit of shading first and then come in darker
as a blurry edge to it. A little bit of shading
here as well help create that softness,
shading around here. Just doing it as I see it now, to put in this edge, there's not really
a hard line really. If we wanted to bring
out that white, we'd shade the background. I haven't decided if I'm
going to do that yet. But another way
to do it would be to just flick inwards
a little bit. It's quite hard to see, I can't get any
closer on the video, but flick bit darker, don't do yours this dark. But just to show that there's fur overhanging even
though it's white fur. Drawing the spaces in
between the white fur. Then as we come up here, just following the direction
the fur would be going, a little bit dark up
here around the ears. Let's put a bit more
detail on the ears, make sure you get
the shape right. Again in the dog video and actually in the
rabbit video as well. Drawing a here we did
those dark fluffy areas. This part here is light
and white fluffy fur. It's coming from this
side, the white fur. We're going to shade what isn't, what's just like the
inside of the ear. Maybe smudge it a little bit and then we're
going to flick inwards into that white area. I'm using more the
side of my pencil, so get nice soft mark, but that's just going to create the illusion that it's
actually white hair that we've drawn and not dark
hair and same hair. Flip down a little bit. Then I'm just going to tidy
up some of that shading. What have I done with this
air too straight here, Maybe it doesn't have
enough of a curve in it. That's what it is. A bit of a curve at the top
that I missed out. I thought it was looking
a little bit pointy. I'm working on this air
now, doing the same thing, putting in some shading, thinking about where the white fluffy parts are coming from. Then from the shading area, I'm going to flick
into the white area, following the direction you get really detailed
here if you want to, and pick out each one of those little clumps
of white fur. But I'm just going to do it just generally find a
few clumps in there. Maybe down here I get a little
bit more particular about the negative spaces that I can see there's a bit
of shading in here, always following the
direction of the fur. Then maybe put a bit more detail just in these areas where it's
a bit grayer around here.
13. Adding Fur Texture: From here I'm going to do
a bit of work on the fur. I'll just keep working on this air and shading
it while I talk. It's up to you how
much you want to do. If I'm just doing a drawing
that's like an hour or two, then I just keep all of this fur and detail
quite sketchy. You could choose to do
that if you want to. There are times where I might spend a couple of
days on a drawing, maybe 10 hours or maybe
spread across a week, but still a couple of days. In that case, I would
spend a lot more time, like, if I was doing
this part here, I'd be zooming in
really closely and trying to get all of those
individual negative spaces. There's some tiny, tiny, little shapes and they're dark shapes in between
each of those hairs. That is something you
could do if you want to, if you did want to get more
detail that I'm doing, then feel free to just
pause the video and come back to it in a couple of
days or whenever you need to. But yeah, like I said, I'm going to do some more on the fur. I'll show you how to do that. And then some of
the black points, and then the rest will be up to you how much you want to do. As we do the fur, we'll add in a bit
more shading as well. These are all quite light,
these furs coming up here and then it gets darker. It's just under the air. There was going to
very lightly sketch a line to guide where the darker part is and
where the lighter part is. The lighter parts, I've got
a bit of shading in there, I'll just take some of that out. Again, I'm going to flick
into the lighter part. It's coming from this darker
part on the air here. Flicking down then, and then
when you come over here, there's not really
a darker part, but I'm as if I'm doing the flicks in
between the lighter fur. I hope that makes sense. Not drawing the white fur, I'm trying to draw
around the white fur, the dark spaces in between, and then that gives
the illusion that it's actually white fur. We can do a little bit coming
from this side as well. This is the darker side. We're going to follow the
direction of the fur, still using my big pencil, but my two millimeter pencil. But probably I should
be switching to this. If you've got a
mechanical pencil, especially for these
very fine furs at the back of the head, on this side, we
want them to be very small because things that are
further away are smaller. Spend a bit of time
on the pattern here. Remember, we mapped out
those lighter areas. There's a lighter area
coming up through here. Light, dark, light. Then all of this area
here is pattern of fur. It's got a curl or a curve to it comes around here and then
it does come down this way. I'm looking in the direction of the pattern of fur that
curves up towards the air. All of this probably needs
another layer of shading, but I can do that over
the top if I want to. If I want to take this
drawing a bit further, then put some more
shading over top and get the values exactly right
when we come down to here. A lot of that is just
going to be shading, but I'm going to put a
bit of texture in here. Now, just while I've got my pencil mechanical
pencil here. Some darker marks that
will get shaded over, but they'll show through still. Then maybe we'll
work from this side of the face over to this side. We don't want any hard
line here because this is a very soft line that's
made up with just furs. Do some flicks the
eyebrows there as well. I think eyebrow furs look at the value compared to
the inside of the air. So it's a bit darker
as you come along here, then it's lighter. And then we've got
a dark mark coming down to meet that
white area of the eye. It's a little bit of light
fur here on this side. Let's put in that dark shape. If you don't have a
mechanical pencil, then it would be a
good idea to sharpen your pencil so you
really nice fine point. And you can turn that
pencils around as well, so it'll start to get blunt. And then you just
need to turn it a little bit and you have
another side of a point there. This dark shape that comes
up here, you can see how. Changes direction, that helps to show the plane of the forehead or the
curve of the forehead. Got a little bit
of light in here. And then we've got this dark, almost like a long
triangle shape. Compare the values, not
as dark as these ones. Some of it is, but
some of it isn't. Again, as you get to the top, it curves over a little bit, is a little bit of dark there, which shows how it's changing as it goes over
the top of the head. These furs here along
the side of the nose or above the nose here
are pointing upwards. And these ones as following
the plane of the nose. We're getting there, just
working our way across. Drawing what we can
see as a sketch. I'm not getting
too detailed about exactly what hair
is going where, but I'm following the
general direction and I am looking for patterns. What might you be looking
for in the patterns? It could be how long hair is it, could be the
direction it's going, it could be how dark it is. Then you're imitating
that in your drawing. Rather than replicating every single tiny hair
that you can see. These light areas here, they are light, but they've got a little bit
of value in them. Very light pressure with
my mechanical pencil because this is a to
be mechanical pencil, I'm just putting
in a little bit of fur marks even into
those light areas. A couple dark fur marks
in this light area, just here, and then on the other side of it is a
little bit darker as well. Where else do we need to add some fur marks? Definitely here. It's quite short here
along this cheekbone. What direction is it going? Actually, it's going this
direction away from the nose. Let's put a bit more
shading in here, then within that shading, there's some patterns come
around the side of the face. Again, these are helping to show the contours of the face. So pay attention to the
direction that they're going on this one down
side of the face here. Even though the line
is coming down and around and following the
direction of the fur, which is moving outwards. And here's another
one coming up here. And then we'll just do a little bit around
the mouth here. And then most of it done. And that's just a
matter of putting in the darker values what we
got happening around here. Looking for the darker areas, the patterns, look at these rows of holes that
the whiskers come out of. So have a look at how
they line up with the nostril on here. They get a little bit bigger and they're
very soft as well. Soft edged, if using mechanical
pencil or any pencil, using it a little
bit more on its side with firm pressure. So you get a dark mark. You want a soft mark.
Lighter, smaller. And then they get a
little bit darker as you move out and join together. As you move outwards as
well, this row here, it comes right up to the mouth, but it's very light then I think there's maybe one more row underneath that one. We'll just give an indication. Just a couple of little dots. Maybe a darker dot here. Let me put the whiskers
in right at the end. Put these dots on this
side of the face too. Just a light row there and then a slightly
darker row here.
14. Shading Fur Continued: Shading in that chin there, then the body is white. All of this area here, there's a few little very
light tufts that you can see that we can shade
in just very lightly. Another way to do this would
be to shade it all in, and then use your party
eraser to pull them out so we could shade
this area very lightly. Then, rather than putting in
the dark areas of the Tufts, we could bring out
the light areas. You can choose any eraser. But a funded party
eraser works really well because it is. So it gives that soft mark. I see the whiskers just
coming out there as well. Party eraser, you
put it into a point, you get that kind
of idea that it's like white fluffy parts
might need to pull it. Just a little bit
more detail on those. There's three main ones there. 123 very fluffy on this side. Bit of pattern coming in. I'm not going to do this too dark because I don't
want to detract from the face just
following the direction, generally following the values. But a little bit lighter than
they are in the photograph. Will be nice to put
in these Ripley parts of fur hair. They're quite nice. We could put, let's see, we've got this dark part, then a lighter part,
which is still gray, but it's a gray. Then we've got a dark
part then we almost like tiers or levels fur
as I usually do. I'm just giving you
an idea of them. You can study them really
closely if you want to. But I'm doing a mark like this, using my pencil on its side and then changing the
level a little bit. Maybe have a little
practice of this. First starts off light and then push a bit harder bit of scribble and
then light again. They're jagged and staggered, then you might need
a little bit of shading underneath each one. Maybe a bit of a smudge
of the shading is a bit too strong. It's one of those
things where you find a wave drawing something. We zoom in here so
you can see it. A wave drawing something
without actually having to draw every single tiny
little detail of it. Can see what I've done. I've just put in, I do a few
more even though they're not completely accurate
to the photograph, but putting in zigzaglinesjust, putting in some
scribbly lines in a, in a linear fashion across. And then underneath each
one of those sets of lines, you shade a little bit more. You're creating the illusion
that these white areas are sticking out a little bit tufty. Maybe even put a few lines
coming out of there too. At the moment,
this is all white. We don't want it all white, so need to put in a bit
of shading there. It's white when you
get to about here. Then underneath that
there's our dark fur flicking from the
dark fur into the light, the light area to create
the illusion that there's light fur on
top of that dark area. The same here, we've
got this light area, the dark area underneath it. Sometimes I like to just map it out, Okay, where's
it going to go? And then create
the illusion from this dark area coming this way. Then from this dark area
going back into it as well. Maybe a little bit
more pointy from this dark area coming back because we want to show the
detail in between the fur. I've done one then
this is the one that comes quite far across the body. Then up again on the
other side here, follow the direction of the fur. Just an indication of it, especially on that
side of the body. Maybe here we go a little
bit darker because that's a significant
part of the pattern. I'm trying to follow the
direction of the fur. It changes direction as
you come around here. Then all of this is
going to be quite dark and I'm going to need
to switch to another pencil. So if you want to, you could
put a few fur patterns in here or this stylistic choice. Or you could keep it
very flat that area. So I could get my
three B pencil. Just make sure I've got
the right shape here. Checking that shape, again, comparing it to the
fur marks as well. I think my fur marks might
be a little bit low down. But then all of this, if I wanted to keep it flat, doesn't have to have
fur marks in it. But then as I come
towards the fair, I want to lessen the pressure, Have it integrate
with what's there. How dark do you go is
up to you as well. But if you go too dark here and you don't
have dark in the face, it's going to draw
your attention, or the viewer's
attention, down here. Which we don't
really want. But I am going to go
darker in the face, so got a little bit darker here. Let's let it fade out as I come. I quite like having pencil marks and I could easily just
leave it like this scratchy. I think that's nice, especially if you put a little
bit of fur over top. But if you don't like that, then you just get your tissue, smudge it out however you
like, whatever style you like.
15. Working On The Body: Shading in that chin there, then the body is white. All of this area here, there's a few little very
light tufts that you can see that we can shade
in just very lightly. Another way to do this
would be to shade it all in and then use your party
eraser to pull them out. We could shade this
area very lightly. Then rather than putting in
the dark areas of the Tufts, we could bring out
the light areas. You can choose any
eraser, but a fund, a party eraser works
really well because it is, so it gives that soft mark. I see the whisker is just
coming out there as well. Party eraser, you
put it into a point, you get that idea that it's like white fluffy parts
might need to pull it. Just a little bit
more detail on those. There's three main ones there. 123 very fluffy on this side. Bit of pattern coming in. I'm not going to do this too dark because I don't
want to detract from the face just
following the direction, generally following the values. But a little bit
lighter than they are in the photograph
will be nice to put in these ripply parts of fur hair. They're quite nice. We could put, let's see, we've got this dark part, then a lighter part,
which is still gray, but it's a gray. Then we've got a dark
part then we almost like tiers or levels fur
as I usually do. I'm just giving you
an idea of them. You can study them really
closely if you want to. But I'm doing a mark like this, using my pencil on its side and then changing the
level a little bit. Maybe have a little
practice of this. First starts off light and then push a bit harder bit a scribble and then light again. They're jagged and staggered, then you might need
a little bit of shading underneath each one. Maybe a bit of a smudge
of the shading is a bit too strong. It's one of those
things where you find a wave drawing something. We zoom in here so
you can see it. A wave drawing something
without actually having to draw every single tiny
little detail of it. Can see what I've done.
I've just put in, I do a few more
even though they're not completely accurate
to the photograph, but putting in izaglinesgjust, putting in some
scribbly lines in a, in a linear fashion across. And then underneath each
one of those sets of lines, you shade a little bit more. You're creating the illusion
that these white areas are sticking out a little bit tufty. Maybe even put a few lines
coming out of there too. At the moment,
this is all white. We don't want it all white, so I need to put in a bit
of shading there. It's white when you
get to about here. Then underneath that,
there's our dark fur, flicking from the dark
fur into the light, the light area to create
the illusion that there's light fur on
top of that dark area. The same here. We've
got this light area, the dark area underneath it. Sometimes I like to just map it out, Okay, where's
it going to go? And then create
the illusion from this dark area coming this way. Then from this dark area
going back into it as well. Maybe a little bit
more pointy from this dark area coming back because we want to show the
detail in between the fur. I've done one then. This is the one that comes
quite far across the body. Then up again on the
other side here, follow the direction of the fur. Just an indication of it, especially on that
side of the body. Maybe here we go a little
bit darker because that's a significant part of the
pattern I'm trying to follow. The direction of the fur changes direction as you
come around here. Then all of this is
going to be quite dark and I'm going to need
to switch to another pencil. So if you want to, you could
put a few fur patterns in here or this kind of
stylistic choice. Or you could keep it
very flat that area. So I could get my
three B pencil. Just make sure I got
the right shape here. I'm checking that shape, again, comparing it to
the fur marks as well. I think my fur marks might
be a little bit low down, but then all of this, if I wanted to keep it flat, doesn't have to have
fur marks in it. But then as I come
towards the fair, I want to lessen the pressure, have it integrate
with what's there. How dark do you go?
It's up to you as well. But if you go too dark here and you don't
have dark in the face, it's going to draw
your attention, or the viewer's
attention, down here. Which we don't really want, but I am going to go
darker in the face. Got a little bit darker here. Let's let it fade
out as I come down. Quite like having pencil marks. And I could easily just leave
it like this, scratchy. I think that's nice, especially if you put a little
bit of fur over top. But if you don't like
that, then you just get your tissue smudge it out however you like,
whatever style you like.
16. Adding The Black Values: We're into the final stages
of this drawing now. You've got everything down, everything is mapped out. You've got the lights
and darks mapped out. Hopefully you've
got a good sense of form happening in there. Now we're just going to
add in the black points. If there's anything that
you need to change, you want to change it now. Hopefully you've got a bit
of a likeness to the cat. If you don't, it's okay. Hopefully you've got something
that looks like a cat. But every one of these videos, these classes, is an exercise. It's probably something
you haven't done before, it's a practice exercise. Doing something new
is always difficult. There's always going to be
failures involved with that. That's how you learn, you do it. Maybe it doesn't work out
exactly like you want it to, but the next time you do it, you've got a much fuller understanding of
how it all works. It usually just comes
together like that, which is nice and surprising. Makes you feel good about
achieving something. Let's add our black points
in with whatever you've got. At the very least,
that's going to give our drawing some impact. As you do these black points. You might also
notice that there's something that needs
to change as well. We're looking for
black shapes now. I've got my three B pencil and I'm going through
just starting on one side of the face,
following the photograph. Again, going back
to the photograph, not just blindly going over top of what
you've already got. When I do this now I can look. It might be a little
bit of fur coming over top of this in some areas, just here, I can pay
attention to that. Pay attention to the soft, soft eyelashes here in there. I can pay attention to the
subtle shading inside the eye. The iris there, Any
changes there anywhere? It should be light or dark. It needs to be a, just a touch darker to bring
up that highlight. It looks like the highlight looking closely at
the photograph. It goes just over the pupil. So you can see a little bit
of the pupil at the top of that part of the
high light and then a bit more of the
pupil underneath it. It's very minimalist. You know, there's not much that you
have to actually draw there, but it will create
what you need. Moving across, darkening
up some of the shading, paying attention to the
pressure of your pencil. So there might be times where you need to push a bit harder. As I come into the
nostrils here, I'm going to push harder,
get a darker mark. Keep looking at the photograph then as I come across
the nose here, which is also gray, I'm just going to lessen the
pressure coming down here, pushing a bit harder in
any of those dark parts. How do we get the
definition between the nose and the
bridge of the nose? Is a bit of dark
shading in there. I think it's just a bit of
a dark fur, I should say. That we can add a
bit of dark shading. But pay attention to the shape and the direction of the fur. You see any patterns in there
that you can replicate? This line here is
quite dark as well. I think it might
be a dark color, but I think it's just
the curve of the cheek coming out where the light
is hitting the lights, Not hitting right on
the inside there. Put in the dark
part of the mouth. Again, remember this
is soft, soft edges. Doesn't mean you
have to do it light, it just means you have to pay attention to the
angle of your pencil and feathering that line out rather than
doing a solid line. Just let it drift into gray. Moving along, Going to put in this really dark shape in here. I didn't figure out
what my problem was. I think it's a pretty
good likeness. It may have just been that I was looking at it prematurely. Comparing it to the
way I thought it should look at that
stage of the drawing, I was judging it prematurely. Now as we come
around this eye and put in that darker line and follow what you can
see in the photograph. But the iris itself has a little bit more
detail than this one here. So we zoom in on the photo. Can't get quite as
big in my drawing, but I can show you
hopefully what I can see. So there's a bit of a shadow
actually cast on the iris. And it's sort of hard
to see where that starts and ends ends into
this dark shadowy area here. He can just see maybe
a hint of where it blurs into the lighter color there or maybe a
slight curve there. Then we've got the highlight. Just do this side first.
There's a lighter area there on the outside
edge of the eye. I just need to
shift my pupil over just the tiniest amount. Then
we've got the highlight. To show that highlight,
we need to have the darker areas around it
is not as dark as the pupil, but definitely underneath
that high light there here in the
photograph in here. That needs to be darker than
the high light up here. It blends in a little bit more. And this is where the mono
zero would be useful. Erase a pen, just bring a bit of that
highlight back again. The more you look,
the more you see. It's a little bit of
shadow up here too, doing the lower eyelid, nice and dark. Pretty even. And a bit of shadow
around here as well. So I want you to keep
building up your dark areas, the dark patterns, but
also keep thinking about that three D form under
the cheek bone here. We can push that a
little bit further. Remember that shape came all
the way out here to the air. I'm not following
the direction of the fur here because all I'm doing is building up the plane, the darkness of
the entire plane. It's not about detail, it's just about getting
a shadow side in there. I'm going to keep on
working on my one. I'm going to build those darks
up just a little bit more. Not so much the details
but this side of the head. So let me just show
you how dark I'll go. I won't do all of it now.
Just do it carefully. So have a nice gradation, but I also want to make sure I've got
the correct line there. I might have to just
adjust it again. Probably go about that dark
for most of this area here. That's really going to bring out the light areas you have, the dark areas recede and these lighter areas will
really pop forward. Keep in mind that this
area here is in shadow. Maybe a little bit of
light hitting the, little bit more light hitting
there than everything else. But this should also be
darker than this side. It's still light, but it's a
darker light than this one. It's a light that's
in the shadow side. Once you do something like that, then you'll notice
I've got to darken up everything else because you're changing the relationship
between the values. Oh, and then the last
thing you can see, my whiskers are just
starting to come out there, where I put in those
white whiskers. And I don't know if
I really want to put too much more in
for the whiskers. I don't want to have
big dark lines there. But maybe I'll do a
little bit on this side. And you could do this too. This is a lighter, a
mechanical pencil. But you're just going
to do, actually maybe it's a dark one, I think it's a
dark one actually. I just going to do a few
flicks and that's about it. So a couple of long ones, a couple of short ones, not worrying about the fact
that they're white. And then you could do
the same on this side, or if you've done
the indentations, probably just leave them. Maybe just put a line
here or there just to create an illusion that there's whiskers
coming out of there. You don't actually have
to draw every single one.
17. Final Thoughts: I'm just trying to
think if there's anything else I need to tell you before I leave you alone
with this drawing. To keep working on it
and building it up, just remember to keep following
the direction of the fur. Remember that you
don't have to draw every single strand of fur. You're just looking for patterns and you're also
making decisions, creative decisions about
what you want to stand out. What do you want to be a
feature of this drawing? Maybe you really want
to focus on the fur on the top of the head and
draw the attention there. This area here, it's
quite significant, significant area of
pattern on the cat. You could build it
up a little bit, but just be aware of how this area is relating
to this area. We want the face to be the
prominent part of the drawing. Maybe you want to
work a bit more on the eyes and really
make the eyes pop. You could even exaggerate them
a little bit and make them darker or make the iris darker than it is
in the photograph, if you want that high light
to pop a little bit more. If I think of
anything else as I'm going through and just
finishing off this drawing, then I'll let you know. But otherwise, I'm just going
to speed up this process. It can take as long as you want. I'll probably spend
maybe 20 minutes on it, just bringing things
into balance, especially this darker side here and maybe tying up a few of
the edges around the eyes. I don't know if
you can see them, but in my drawing they're
just a little bit messy. Just because of the
way of sketch and also the way I demonstrate I guess as well in these classes, sometimes it's hard to
show you what I mean. And also I get the
effect that I want. At the same time, thanks
very much for joining me. I hope it's been useful for you. It is a different way of
approaching portraits and drawing anything
really when you're starting with those three
dimensional objects. And it takes a little
bit of getting used to and a little bit of
what it takes practice. Really a great idea to go back and redo some
of these again, maybe even different
directions to get better at creating the three D illusion and to get better
at interpreting how light affects light
and shadow on form. When you have a light
coming from this direction, what's going to be in shadow? How does it hit the
form? How does the form cast shadow on other
parts of the form? Good luck with finishing off
the rest of your drawing. I hope you get a good result. Remember that I'm
here and I'm happy to have a look at your work.
You may as well use me. Use my drawing experience and my teaching experience to help
you improve your drawing. Sometimes it's something really obvious that you might
not have noticed because we all get
a bit too close to our drawings and it
takes a bit of distance. And I might be at
a point something out to you that can
make a big difference. I can also point out anything if I think you are
struggling with something, I can point out areas that
you might want to work on as well to get better
overall at drawing. You can then take into your
other drawing projects. And I'll also point
out the things that I think are working really
well in your drawing too. There's always something
good happening. I hope you'll join me for the
next sketch club tutorial, and I'll see you then.
 Emily Armstrong, The Pencil Room Online