Transcripts
1. Welcome to Class!: Hey there, creative friend Melina thrill to welcome
you to my new class. Get ready for an
artistic journey that will not only
ignite your creativity, but also leave you with
tangible masterpiece. From the subtle glow of a sunset to the intricate details
of a glowing street lamp. We'll explore the art of capturing light
with what colors. With over five years of experience and a passion
for vibrant creations, I can't wait to share my knowledge and
techniques with you. So why is learning the art of glowing light with
water colors crucial? Well, because it's not just
about colors on paper. It's about creating
emotions, telling stories, and turning ordinary scenes into extraordinary works of art. By the end of this class, you'll possess the
skills to infuse your paintings with that
captivating, luminous quality. Now let me give you sneak
peek into what lies ahead. We'll start by going through the materials that you'll need in order to complete the class. Then we'll have a separate video about the colors in which you will learn how to choose the right colors for
painting, glow and light. Then we'll go through some
foundational techniques, gradually building up
to our final project, a captivating street lamp scene, where we'll master the art of
glowing light step by step. This class is tailored with
intermediate artists in mind. Both both beginners and advanced creators looking
to refine their techniques, we'll find something
valuable and inspiring. So are you ready to
unleash your creativity? Let's get started on this
artistic adventure together. In the next video, I'll give
you a more detailed look at the class structure and the
final project. See there.
2. Class + Project Overview: Welcome back to our
Vertical wonderland. In this video, we'll
have a detailed look at the class structure
and the final project. We'll start the class
by going through the materials that you'll
need to complete the class. I will give you some
recommendations and of course, some options. Don't worry. If you don't have exactly
the same materials, then we'll have a separate
video about the colors. They are the main star in this class and you
will learn how to choose colors that will give you this warm, glowing effect. Then we'll lay down the
foundation with basic techniques, Layering, blending,
and capturing light. After that, we'll delve into the specifics of
our final project. In the street lamps in. Don't worry, I'll break it down into bite sized,
manageable steps. By the end of the class, you will know my past tips
for painting glowing lights. Which materials and techniques will serve you best
with this subject? And you will have painted a
beautiful and captivating, glowing street lamp
on winter night. Don't forget to share your
masterpiece with the world. Applaud your project to
our project gallery. It's not just about competition. It's about celebrating
your creativity and connecting with
fellow artists. I'll be there ready to offer insights and applaud
your artistic endeavors. I are ready to transform your blank paper into
a radiant masterpiece. I know you are.
Let's get started. In the next video,
we'll talk about the material that you'll
need for this class there.
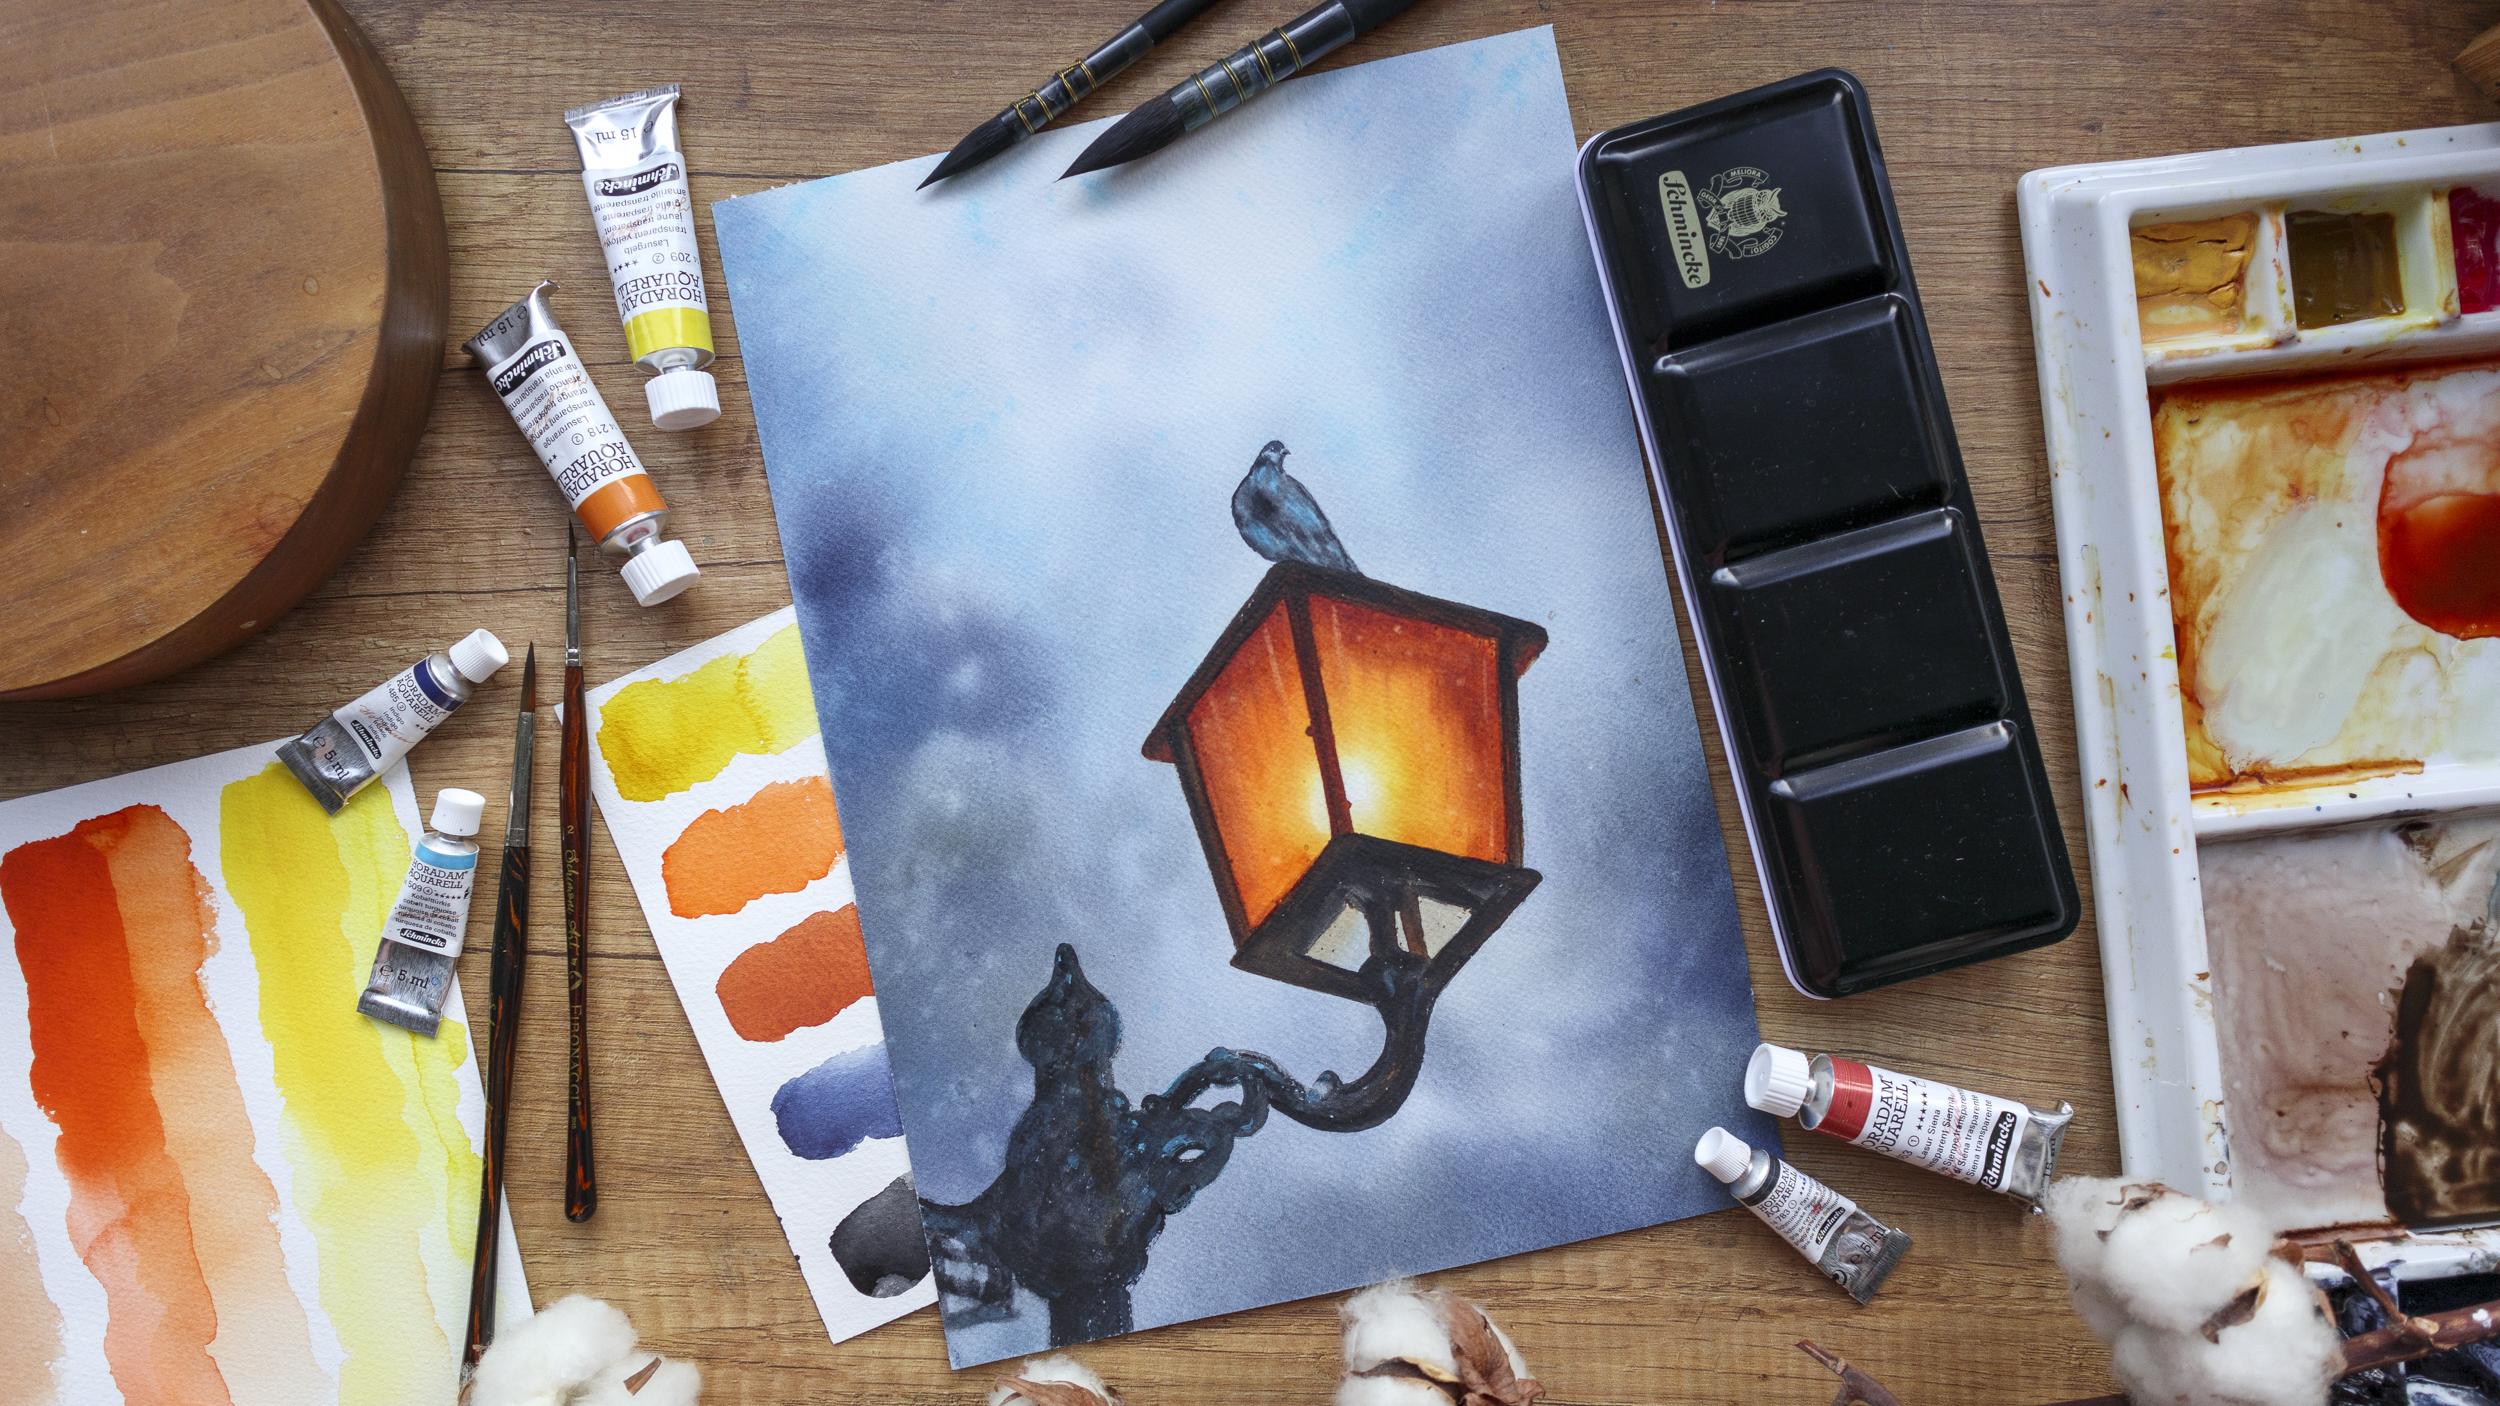
3. Materials: Welcome back. In this video, we'll go through the materials you'll need to
complete this class. You don't need have exactly
the same materials, just use whatever
you have available. Let's start with the paper. For this class, I'll be using Canson Heritage 300 GSM paper, which is 100% cotton. If you don't have cotton paper, you can try to follow
along with ease paper. Just keep in mind that you
won't be able to apply some of the techniques and
the results may differ. My sheet of paper is a
little bigger than four. I have an four
cutting mat here for comparison. Next are the paint. In this class, I'll be
using water colors. Pas Mike, a 122 pan set to which I added some
of my favorite colors. I'll also be using these
three colors here. In the next video, we'll
have a more detailed look at the colors and I'll provide
you with some options. I'll be mixing my paints directly here on
the thin palette. As for the brushes,
I'll be using the soft modular by Simoni
Art to wait my paper. These two soft
quills by Tintoretto are synthetic
squirrel in sizes 6.2 Additionally, this round
size six by Shani Art, again synthetic hair
with good spring. You may also need a
smaller brush for the tiniest details like the round size two
that I'll be using. You also need a pencil and
eraser for the sketch. I'll be taking my paper to this board with the
help of paper tape. You will need two jars of water, one to rinse off your
precious, and another four. When you need clean water cut on or paper towels,
I'll be using both. I will also use this
prey bottle to activate the paint. That's it. These are all the materials
that you will need today. Supplies. And in the
next video will have a more detailed look at
the colors see there.
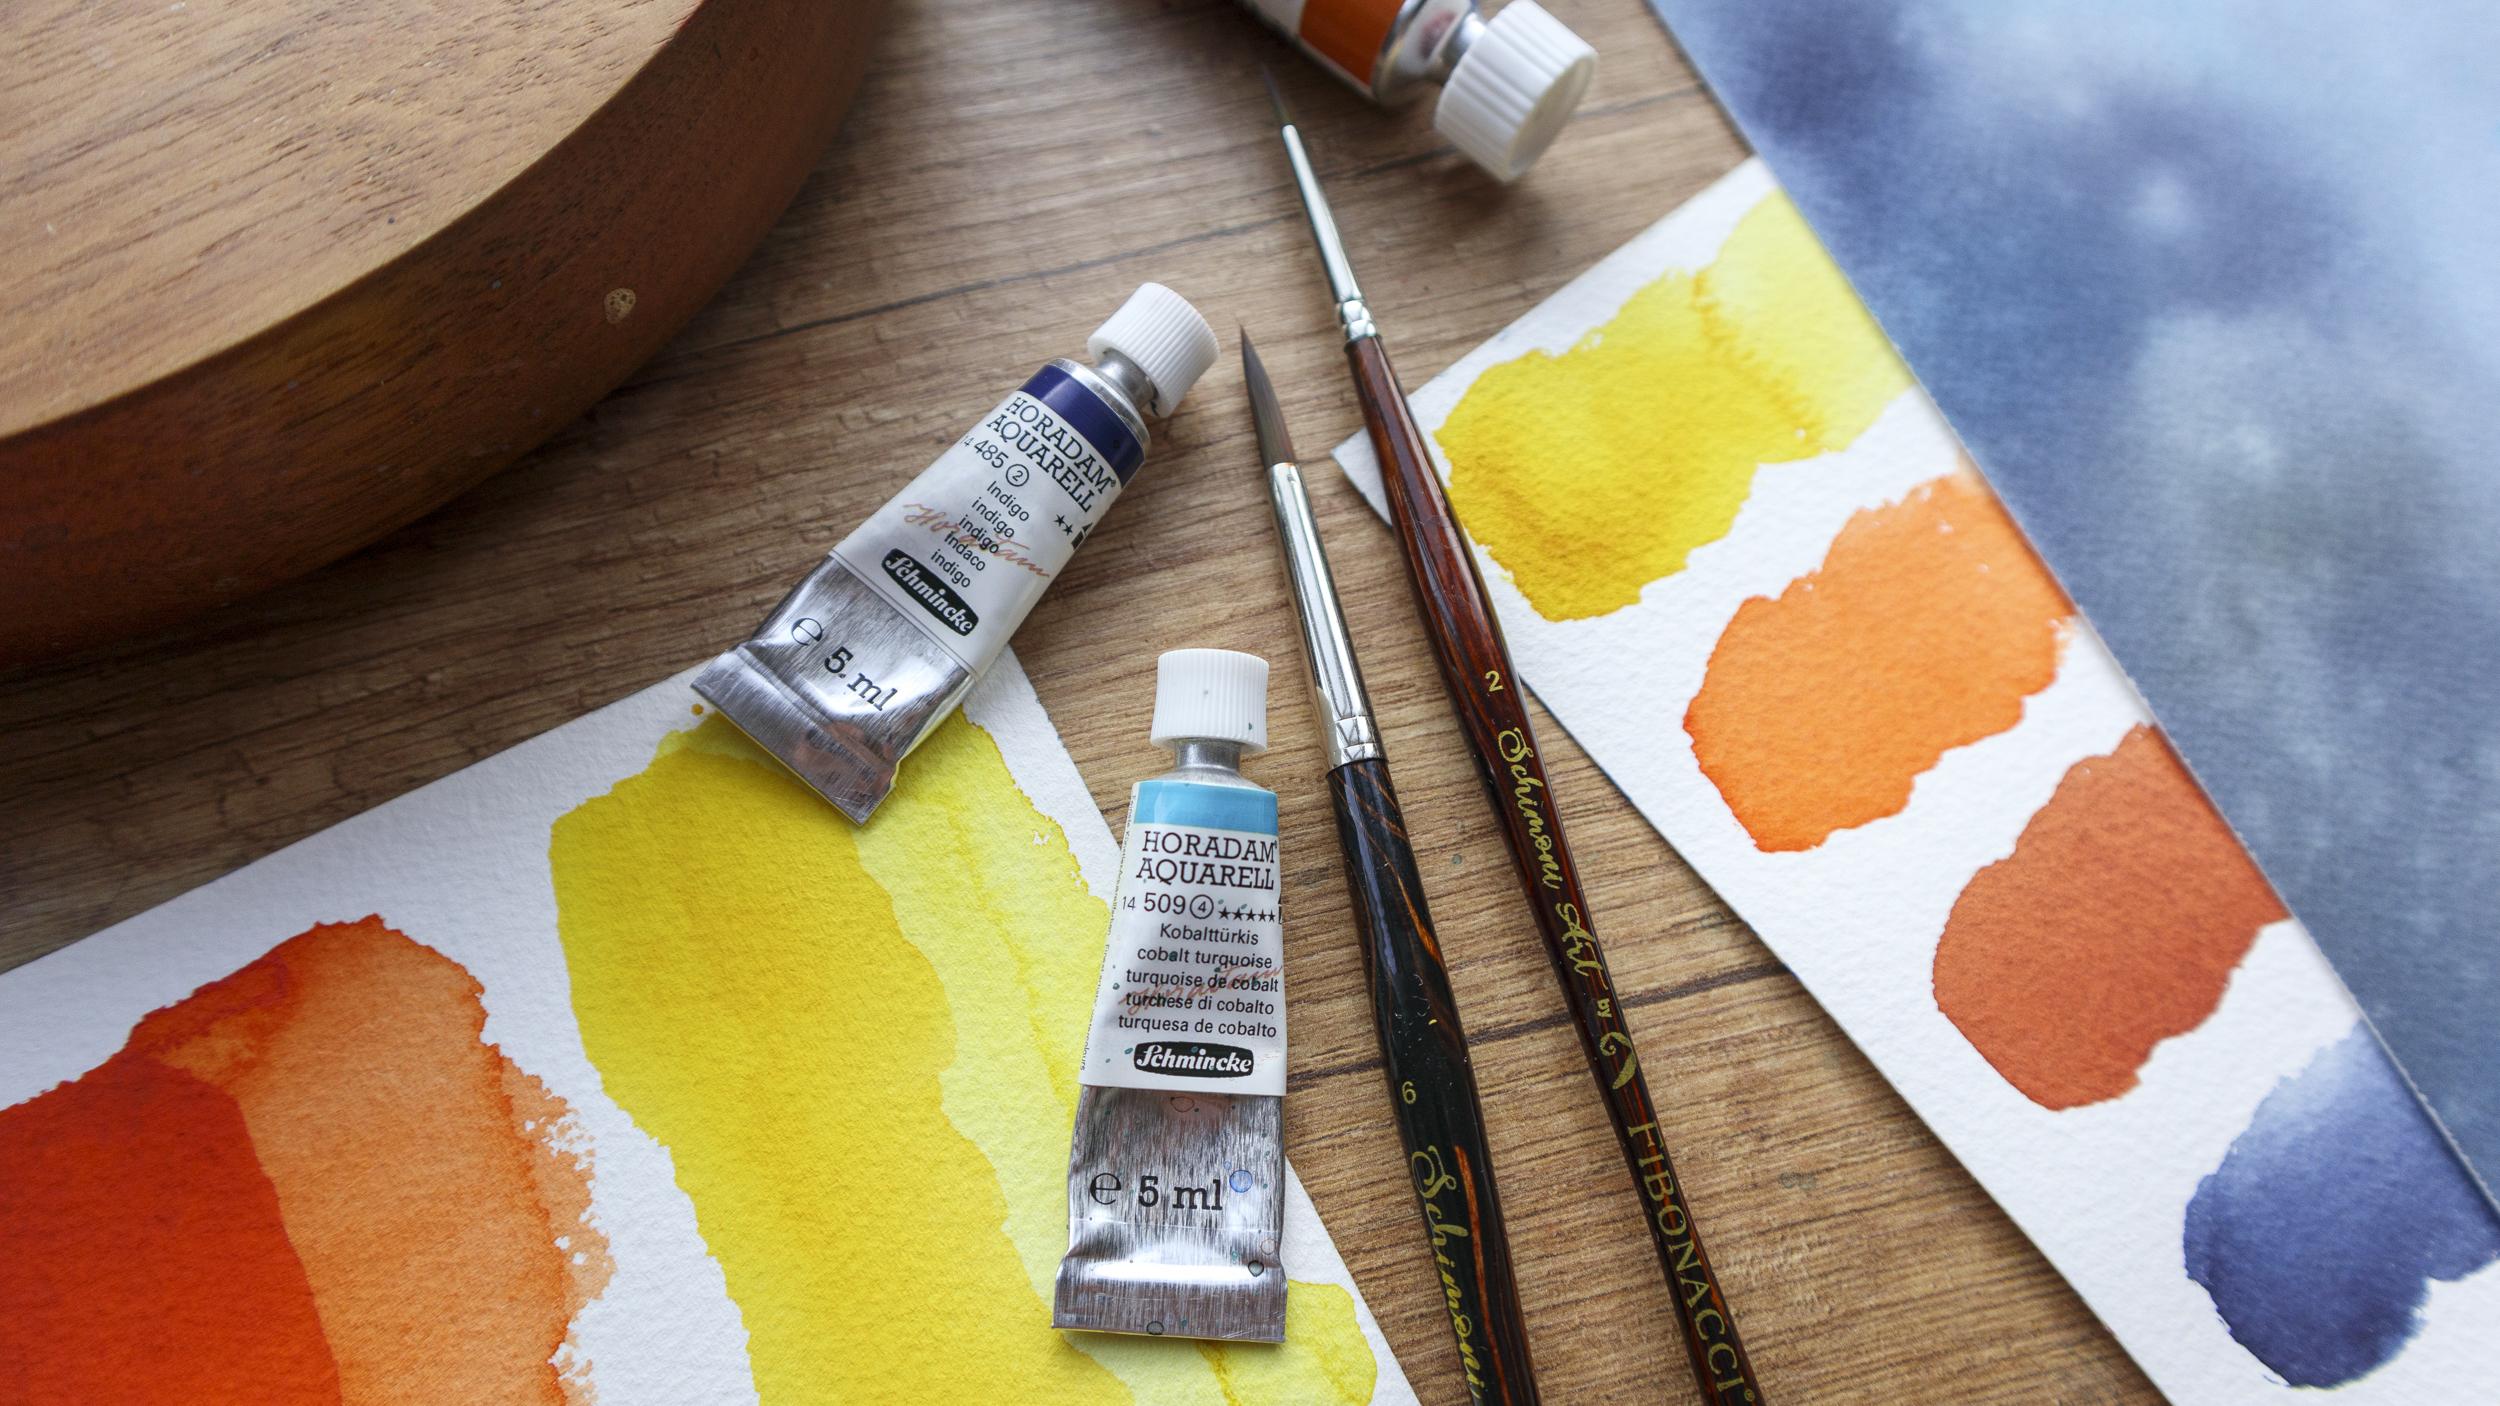
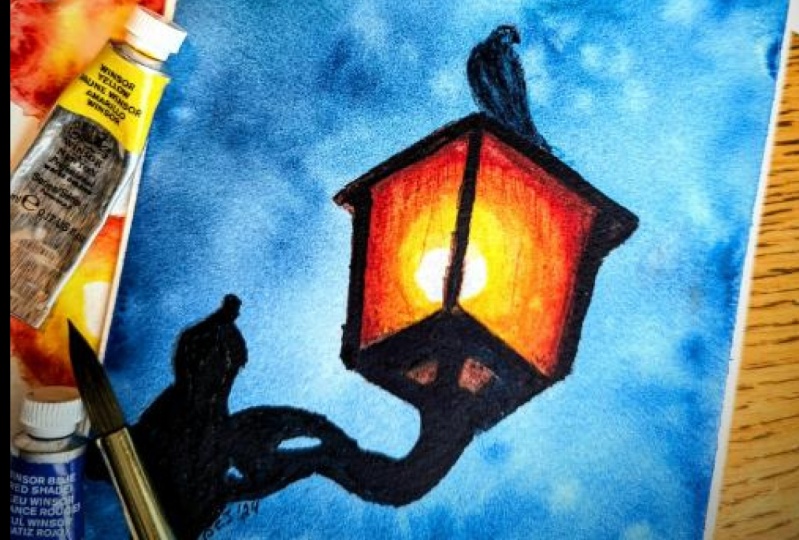
4. Colors: Let's now discuss the colors
you need for the class. As I mentioned in
the previous video, I'll be using this
custom them palette by Schminke plus three
additional colors in tubes. I'll spray my paint
to activate them. First and foremost, since this is a class about
painting glowing light, let's look at the
colors you need. I'll be using these three
colors by Schminke, transparent yellow,
transparent orange, and transparent Siena. I'll squeeze a small amount
of each here on my palette. And I'll watch the colors
so that you can see them. You've probably noticed that all three colors have
transparent in their names. This is not a coincidence. This is actually the
first tip I will give you for painting glowing light,
use transparent colors. Now, you may say, aren't all
watercolors transparent? Usually, yes, but many colors
contain opaque pigments. Talor pigments come
in various forms, and their transparency
is largely determined by their
chemical composition and particle size. Transparent watercolors
contain finely ground pigments that allow light to pass through any
reflect off the paper, creating a luminous effect. Opequataclors have
larger particles that obstruct the
passage of light, resulting in a more
Pac appearance. Opequataclors tend to have
a chalkey or mud finish, lacking the
brilliance, achievable with transparent pigments. This makes them less suitable for capturing
subtleties of light, particularly when aiming for the mesmerizing glow that
defines certain scenes. Transparent water colors excel at conveying
luminosity of light. When light passes through
transparent layers of color, it not only illuminates
the pigments, but also interacts with
the white paper beneath, producing a radiant
glow and creating a sense of thept and
atmosphere in a painting. When selecting water colors, pay attention to the
transparency rating indicated by the manufacturer. Pigments such as
quinacrdones, talos, and many other tones are
known for their transparency. Another tip for painting
glowing light is to use high white instead of the
typical egg shell colored watercolor paper. The brightness of high
white paper can help colors appear more
vibrant and intense. When transparent water colors are applied to a
high white surface, the colors maintain their
quality and brilliance, contributing to the
illusion of glowing light. Let's now leave
the paper to dry. Now that the paper has dried, let me quickly show you
the difference between transparent and non
transparent white colors. I watch the colors next
to my previous watches. Let's start first with orange. You can already see how much thicker and opaque
that color is. There is no white
paper shining through. The only way to achieve
this is to add more water. Let's now swatch these cadmium, lemon cadmium pigments
are generally considered. They are known for their
fifth and intense uses, but they tend to be opaque or semiopaque depending
on the specific color. The opaqueness of
cadmium pigments can be an advantage in
certain applications, especially when
you want to cover underlying layers or create more solid and vibrant
areas of color. However, if transparency is a critical factor for a
particular painting or technique, you may want to opt for other pigments that
are more transparent. Finally, here, wales
watch a regular Barcena. As I already mentioned, earth tones are generally
considered transparent. Here you won't see
that much difference as with the previous two colors. I hope this convinced you why transparent colors are much more suitable when
painting light. Don't worry if you don't have
such colors at the moment, just try and follow along with whatever you
have available. Maybe next time you're choosing new colors to add
to your palette. Keep in mind what we have
discussed in this video. Let's quickly have a look at the color palette for
our final project. As I already mentioned, I'll be using
transparent yellow, transparent orange,
and transparenciena. Regular piena will
work just fine too. Next for the background
fire painting, I'll be using indigo. If you don't have indigo, you can use person
blue, Aultomarine, or any other blue that you have available for the iron part of
the street lamp. I'll use Pinscray.
If you don't have paint scray, you can use black. Finally, for some color accents, I'll be using turcoise blue. If you don't have turcoise blue, you can try and mix blue and green and add some
white clash to it. These are the colors that I'll be using for today's class. Find the closest colors you
have in your collection. In the next video, we'll practice some
techniques that come in handy when we're painting glowing light. See you there.
5. Techniques: Welcome back. In this video, I'll show you some
techniques that you can use when painting
glowing light. I have four circles
here and in each I will demonstrate a specific approach and then some
additional techniques. In the first one, I'll paint the light by using wet
and white technique. I would the entire circle with clean water and make
sure the paper is evenly moistened
and that there are no pools of water
or dry patches. I'm waiting for a while until the paper has
absorbed the water. When you have a nice even sheen, But you can see the
texture of the paper, that's the perfect moment to start applying the first color. And for me that is yellow, leave a small white
circle in the middle. This will increase the
illusion of light. This could represent the sun in the setting sky or the
center of the light bulb. I spread the yellow a bit, but there is no need to go to the very edge with that color. I wash my brush and I
can switch to orange. I apply that color outside
of the yellow circle. And now I will blend
the two with ambras. And finally let sets
on transporting tena or burn tiena
to the other edge. I'll blend this color
with a clean embresh. There you have it. Nice
going sun or a lamp. Let's move on to
the next technique. This one is for
those who find it hard to leave the small
white circle in the middle. In that case, you can wet the area of the light
by leaving the center. This way the colors won't flow there and you'll have
a crisp white circle. The rest of the
process is the same. I start again with
a yellow and I apply it all around
the white circle. No, and finally, sienna. This technique is especially suitable when your
painting. Sunset skies. And if you want, you can still soften that edge
with a clean brush. Once you're ready with the rest, let's move on to the next
technique for painting light. This one is for those of you who struggle with
weight and white. Maybe you find it challenging or maybe you're using cells, paper, and you need more
predictability here. Instead of weight and
white, we'll use layering. Each of the colors will be applied Once the
previous color is dry, I start the same way as
with the previous circle. I'm leaving a small dry
area in the middle. I apply the yellow around it. Now you can leave it
to dry on its own or use a head dryer before
you apply the second color. Okay, The yellow is now dry, so I take some orange I applied following the
outer edge of the circle. You can leave it like that if you're going for a
more expensive look. Or you can soften the edge with a clean dumb
brush like that. Now we need to dry
this layer too. Now it's time for the
third layer with Sienna. I apply it alongside the
outer edge of the circle and then I can leave
it like that or I can soften the edge
with a clean dum brush. Let's try. You can now probably see
how the second circle is much more vibrant and glowing
compared to the first one. We can correct that again by
using the layering technique with the entire circle. And I'll start by adding
some transparency, Na, some more orange, for
additional vibrancy and glow. You can use the
lifting technique if you need to take out
some as color with a clean down brush
and wiping some of that orange, there you have it. If you're painting
on cell walls paper or if you need just a
little correction of color, you can also apply
this technique con here I will add a
little bit of sienna and once again, I will bled
this color with the rest. And for the fourth circle, we'll have a maser version
of the weighting weight. So instead of trying to follow
the shape of the circle, I'm just adding some
spots of color. I need more Ps. That was orange. That's okay. I'll switch their
places on my palette. The first spots we Nato, you can do some blending. You can even splatter
some clean water, which will give you some
beautiful additional effects. If you have lost
the white center, you can always use
a clean napkin to pick up the colors
while still white. These are my favorite techniques when it comes to
painting glowing light. Practice them and
pick your favorites, the ones that come
more naturally to you. And I'll see you in
the next video where we'll start painting
our final project.
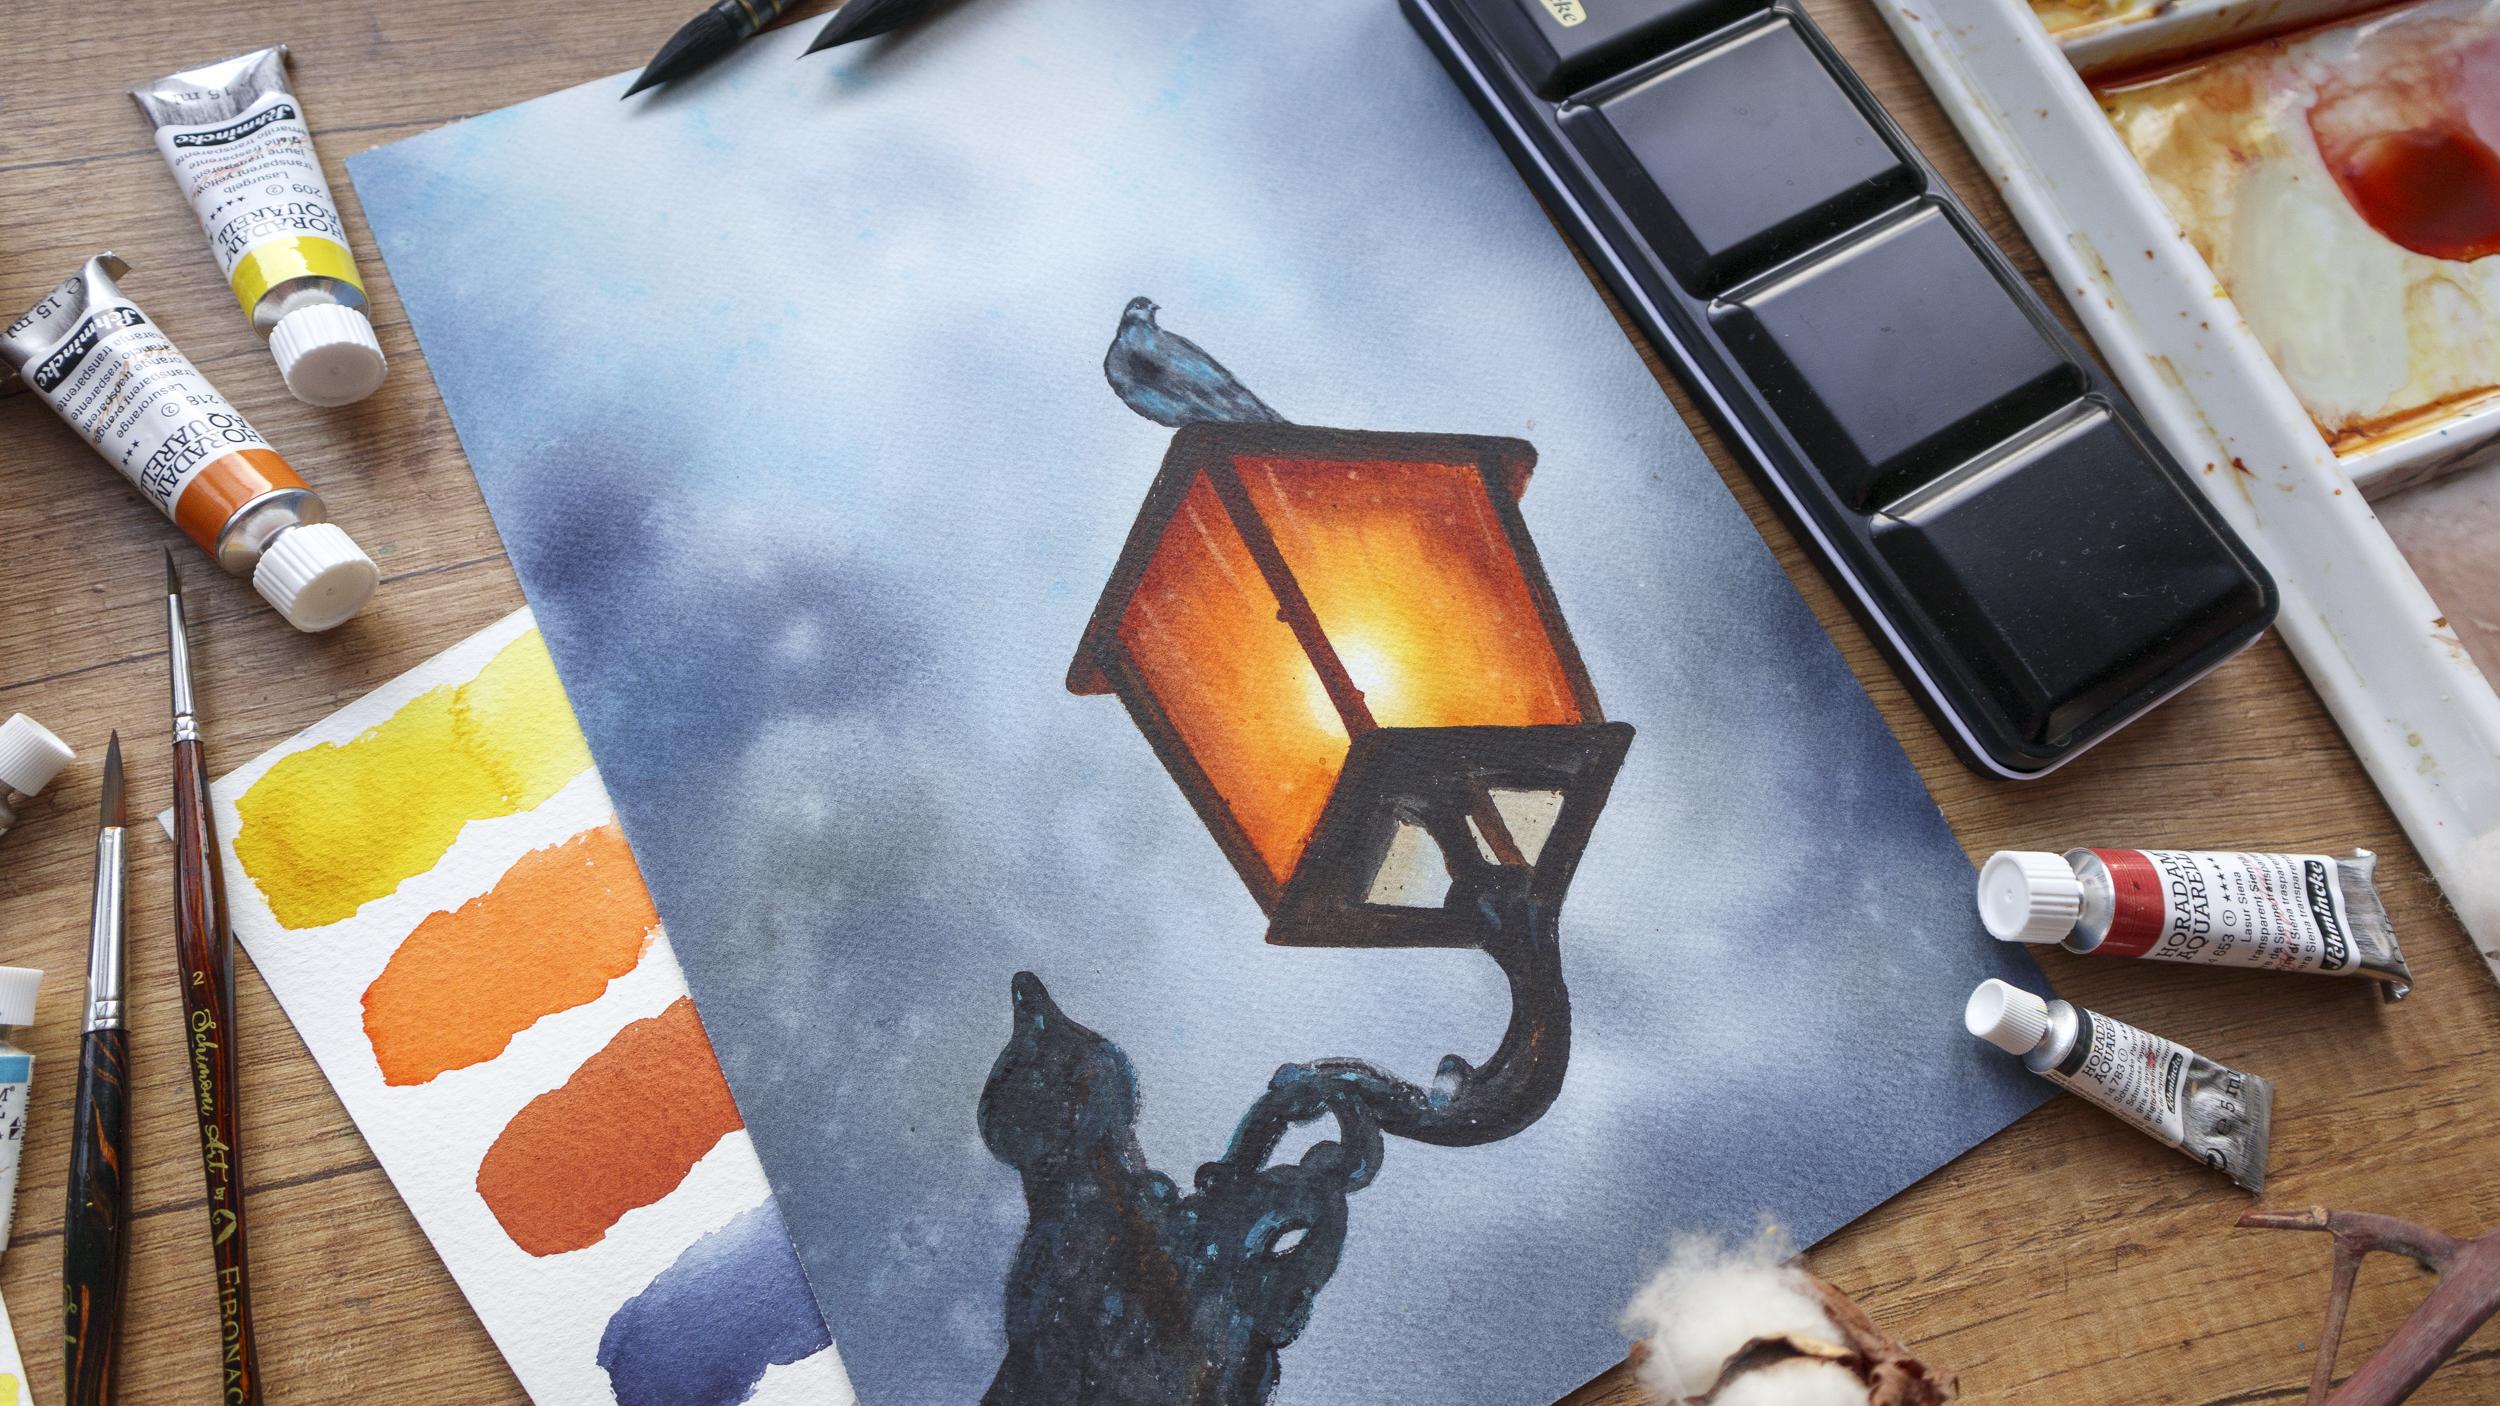
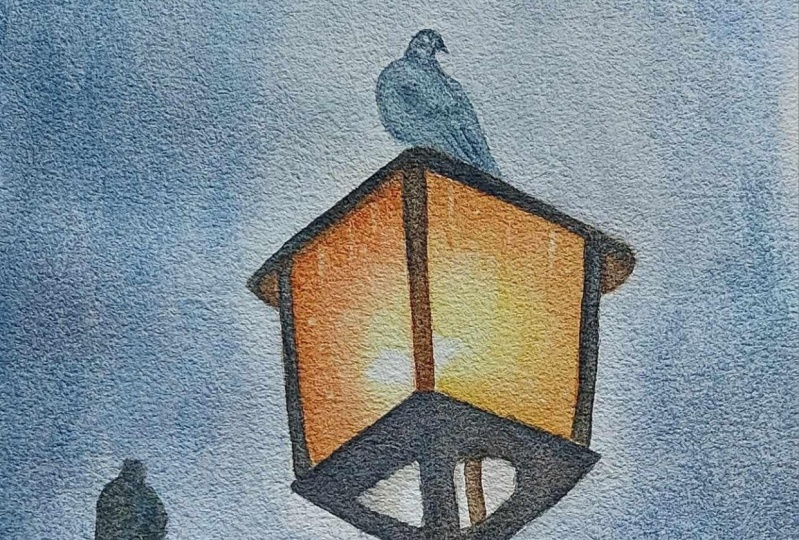
6. Painting the Background: Welcome back my
creative friends. And this video, we'll paint
the background fire painting. In this case, that will
be the evening sky. I have already
traced the image on my watercolor paper using
my favorite method, tracing directly over
my laptop screen. If you want to know
exactly how I do it, have a look at this video from my class about
granulating watercolors. Otherwise, you can post a video
here and copy the sketch. Or you can download it from the class resources and printed or trace it
however you like. I am now taping my
paper to the board, which will secure it in place and prevent it from buckling. If you've been painting
with me before, you know that I love to paint smooth backgrounds
with lots of water. This one won't be
too much complicated because our focus needs
to be on the lamp. I will place my paper tape
below my board like that. This way liquid will flow down instead of creating pulls
on the paper surface. For this painting, I will wet everything besides
the inside of the lamp. On the photo reference, wherever
you see the warm yellow, orange and brown, this is where we need to
keep it dry for now. Everything else I will cover with an even layer
of clean water. Cotton paper takes
a lot of water. I'm taking my time
with it until I feel the paper has
absorbed enough water. And with my quill size six, I will take some Ming. I'm preparing a puddle
here on my palate just to make it more
interesting and cohesive. I will add to that a
little bit of burn sienna and now I will add some color spot switching
between that color and the. Purely from the pen. I'm going around the lamp, you can boldly go
over the iron part of the lamp because that one
will be very dark in the end. If you have your
course, you can add that two to the mix and use it in the upper part
of the painting where we'll try to
keep things lighter. There is no specific
pattern following. I'm just trying to move my brush organically and leave some
lighter spaces here and there. Some more point Sienna
here and there. Some turcois here
in the upper part. Use a water mixture here
with just some water. I will cover the
larger white space. We can splatter some turcos
for an additional effect. Some darker spots
with pure Indico. The idea is to make the
background look natural and interesting without making
it too saturated or bold. We can even add some
spots with Ce gray. Play around with your colors
and see what happens. You see, I'm not too
precise or careful with it. In fact, I'm quite Macy here. I have an area that is drying, so I'm using my spray
bottle to gently wet it. Now when I feel I have enough color and
water on my paper, I will tilt my board. This will give me natural
and very soft plants between the colors
and will create a look of cohesiveness as if that background is not
just some color spots, but one cohesive entity. Observe how the colors are flowing and change
directions if needed, you want to eliminate
all podles and to distribute the liquid evenly
on the paper surface. Here in the upper right corner, there seems to be some of
problem with the paper sizing. This leads to the
pigment settling in the paper fibers right away. Probably, I won't
be able to fix it. I had some dark spots
here and there, and now I'm wiping the sights before
tilting my board again. You can correct it with
a clean nine times. So press lets now platters some clean water
for additional effect. Here the droplets formed two parallel lines which
doesn't look natural. So I'll try to fix it some more splatters. I'm fixing some bigger draw plates
that formed harsh edges. I'm wiping the sites, and now I will leave it to see you in the next video where we'll start painting the light.
7. Painting the Light pt1: Welcome back. In this video, we'll start painting the light. For that, I'll use a combination of the
techniques I showed you and particularly in this video
will apply the technique that we use in the very first circle
waiting. What technique? I start by weighting the
entire area of the lamp. I'll squeeze some more
transparent sienna here while the paper is
soaking up the water. And with my quill size too, I will take some yellow. I'll apply it with
a circular motion, leaving a large
round area white. Note that the white
area is not exactly in the middle as we painted
it in the techniques video, because for the perspective we are looking at the
lamp from below. I will switch to the orange now in the same as we did in
the technique section. Now we'll go with that
color around. The yellow, I'm adding more yellow here. And now with a clean M brush, I will lift some of the colors here to make it a
smoother transition. Some more orange for
additional vibrancy. I blended and final, Alison transparent sienna I added around ages. I need more paint
and less water. So I'm using my paper towel to take off the excess
liquid from my pressure. I'm blending the colors and this is how I will
leave it dry now, and I'll come back to
it when it's dry too, and has the impression of glowing light. See you
in the next video.
8. Painting the Light pt2: Welcome back. In this video, I'll add a second layer to the light area to make it
more vibrant and contrasting. If you're happy with yours,
just leave it as this. You could probably tell
by looking at it that it needs more darkness and
saturation around edges. Some taking some orange, I had it around the edges. And with a clean brush, I will blend it seamlessly. This can be tricky sometimes, but don't panic. Take your time. You may need to go around
the H multiple times. I'm adding some more orange
while it's still wet. I'm cleaning up a bit. Now let's add some darkness. I'm taking some
transparent Siena and I added around the edges. This way we're creating the contrast and the
impression of glowing light. I touch it up a
bit with a clean, damp brush and I will drag some of the
color down like that, creating some vertical line. This will help us emphasize the class surface of the lamp. Now leave it to dry. In the next video,
we'll paint the pigeon.
9. Painting the Pigeon: Let's paint that pigeon. Now, I use my size sick
to wait the entire shape. Now I'll take some turquoise straight from the pen and I'll add it wherever I see some
areas in the photo reference. Next time. Taking some
paints create straight from the pen and let
it into darker areas. The pigeon is pretty dark and the light areas are
more like an accent, so don't be afraid
to cover them. But make sure to leave some here and there to
give it follum. Not that I'm following
the direction of its feathering and the shape of its body so that
it looks natural. Feel free to switch to smaller brush for
the tiniest details. With my size to very
thick turquoise, I let it out for the eye. If you have a gel pen, you
can add a very tiny dot for air affection and
that's my pigeon. I'll leave it to dry
and in the next video, we'll start painting
the iron part of the lamp. See you there.
10. Painting the Iron pt1 : Okay, now it's time to paint the iron construction
of the street lamp. We'll do that in two stages. If you have a look
at the reference, you'll see that this
part is not just black. There are some warm
reflections from the lamp. By adding them to our painting, we will enhance the
feeling of glowing light. And we'll even go a step further and create the
contrast by adding some colder nuances to the parts that are not
illuminated by the lamp. In this video, we'll add those
warm and cold reflections. In the next one,
we'll use paints, gray or black, to paint
the actual iron part. Let's get started
for the warm tones. I'll use transparent Siena. You can also use orange
with my size six, I'm taking some tick
transparenciena and I'll start covering
this part here. We don't want it
to be too watery, so I'll use my napkin to take
off the excess moisture. I'm not being too careful now because we are going
to cover most of it, tied away with a darker paint. So once again, I'm using
very little water. So I get these dry
brush marks which will help us emphasize
the texture of the iron here in this part, especially we want to keep it very
light and warm. I'll move on to
this bottom part. Now we see some of those warm reflections
here on the parts too. So I'll add them now. Let's add some cold
reflections for more contrast. The warm oringe tone will contrast very nicely
with the turquoise. I'll use that. If you don't have turquoise and you
can't mix it yourself, just use whatever blue
you have available. I'm adding it here and there. Again, I'm using lots of
pigment and very little water. And this is it. That's
enough for this part. In the next video, we'll
finish the part of the lamp.
11. Painting the Iron pt2: In this video, we'll finish the iron construction and will be almost done
with our final project. I'm taking again my size six and some thick paint s cray
straight from the pan. I take the excess
moisture of my brush and this way I get these
dry brush marks which will help me emphasize the iron
texture using this color. And this technique, I will cover the entire iron
frame of the lamp here in the reference
photo, brighter reflection. So I will let more Siena and now I'm going back
to the base gray. I'm just fixing the shape here, trying to make it as
straight as possible. But if you look closely
at the photo reference, you will see that the outline of the lamp is not
perfectly straight. So this gives us the freedom to have group lines
and imperfections. Now this line here and on the other side here, again, I will add more
ciena to make it brighter. And while it's on my push, I will add some here as well. Going back to the pain scray. Let's finish this line here. And I will actually have
to turn my board this way, otherwise it will be
too uncomfortable. Some more senna for
additional glow. Let's now paint this line
in the middle of the line. First I start with
some paints, gray, and here I will lot more sienna. So this needs to be the warmest
part of the iron frame. That's why I will
use less paints, gray and more sienna to
emphasize the clock. And back to the pain scray, now that we finish the part
that surrounds the light, we'll use only pain scray
for the rest of the frame. This is where the process
becomes a little monotonous. So I'll speed it up so
you don't get bored, actually. Here we have this line that is also illuminated. So I'll cover it with tena and back to the dark pint. I'm just filling in
the pencil shape with some thick paint scrap. Again, I'm using
very little water so that I get this nice texture. I tried to leave some of the
chercos paint uncovered. More paints, gray here
because it's too light. And finally, some spots with very thick turcoils
for additional effect. And that's it. Now what are
just unfinishing touches? And our painting
will be complete. See you in the next video.
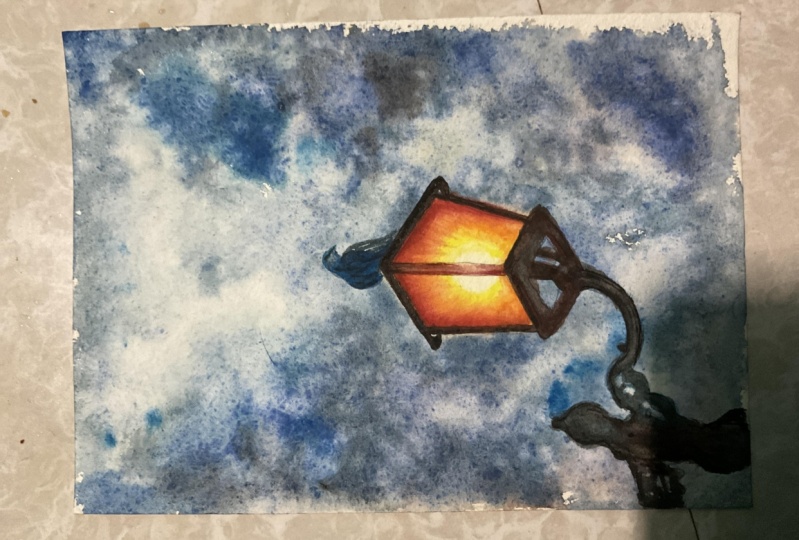
12. Finishing Touches: Okay, we are almost
done with our painting. Let's add some finishing
touches and details. First, I don't like how harsh some strokes
on the pigeon look, so I will use my
size six to wet. This will gently blend and soften some of
the harsh lines. I add some turquoise
spots here and there. Here I have some
uncovered parts, so I cover them
with paints gray. I add some paints gray to my transparent sienna
to make a darker brown. And I'll use it to go around the inside edge
of the iron part. This way I will cover any
white spots that are left. I will fix the shape if needed. And will also create
a small shallow which will add to the realistic
look of the lamp here. This part needs to be
warmer because there's glass illuminated by the light
mix, orange and burn. Tianna, I will add water to it. I'm adding some of that mix here and I will blend it
with a clean press. Let's cover the other areas. Now let's add some lines and dots to the
glass of the lamp. I will use a clean, damp brush to lift some
of the colors. First, I'm making some dots with clean water and I'm gently
scrubbing with my press. I will add some lines too and then I blot with
a clean paper towel. I will repeat that
process multiple times. Let's now add some dots
with the dark brown mix. Some lights here and there. Some dots with Rene. We too. If they come out to pronounce, you can blow them
with your napkin. Some dots here as well, to show that this part
is made of glass to some light touches
with the clean brush. And that's it. Our beautiful, glowing street lamp
is now complete. Let's wrap up the class
in the next video.
13. Wrapping Up the Class: Congratulations on completing the class, First and foremost. A huge thank you to each
and every one of you for joining me on this
artistic adventure. Let's recap what
we have covered. We start by exploring
the materials, dive into the magic of colors, and hone our skills with
foundational techniques. If there's one thing I hope
you take from this class, it's the ability to
infuse your painting without captivating
luminous quality. The art of glowing light is
not just about techniques. It's about creating emotions and telling stories
through your artwork. Before we wrap up, a gentle reminder to share your
masterpiece with the world. Head over to the project gallery and let your creativity shine. Your fellow artists are eager to see your
glowing street lamp and I'll be right there ready to applaud your fantastic work. If you enjoyed our
journey together, don't forget to
follow me here on skill share for updates
on future classes. Your support means
the world to me. And if you have a
moment leaving, your review will be
the cherry on top. If you're hungry
for more tutorials and in depth process videos, hop over to my Youtube channel for a sneak peek into my studio, current projects, and
daily creative music. Follow me on Instagram. Thank you once again for making this class a vibrant
and inspiring space. Keep creating, keep exploring, and until next time,
have painting.
 Elina Zhelyazkova, Watercolor Artist