Transcripts
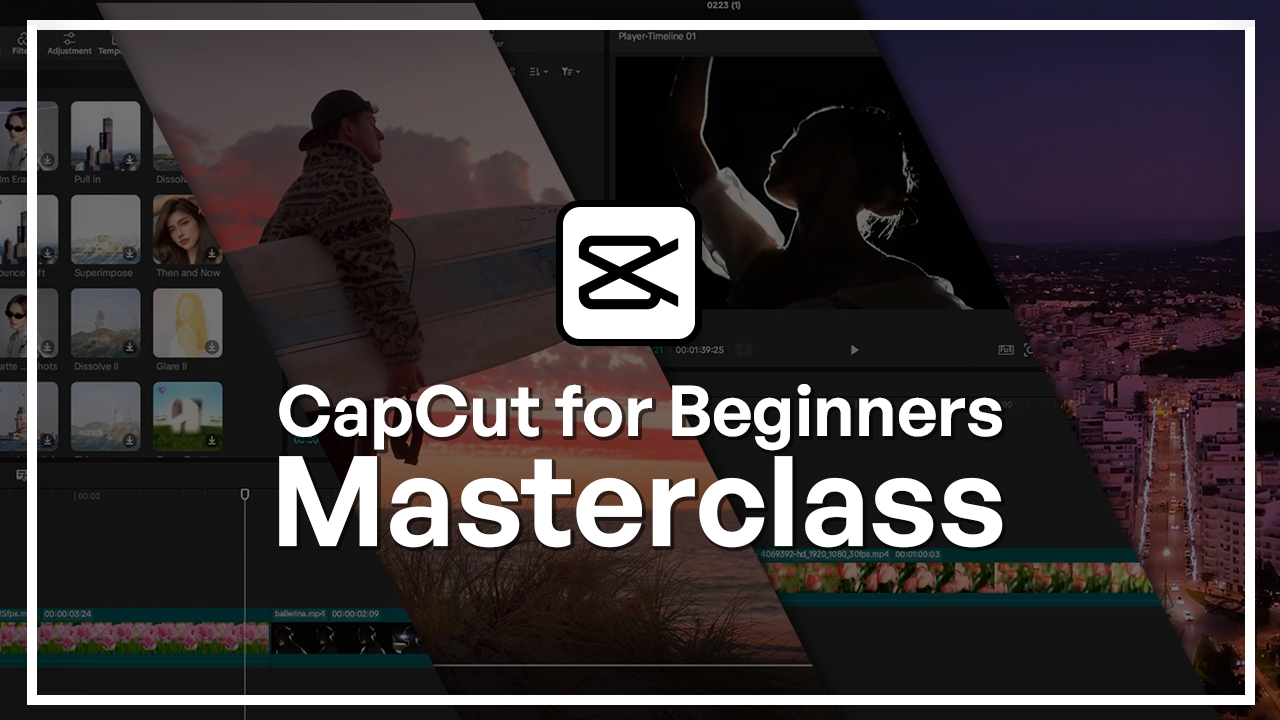
1. Welcome to the CapCut for Beginners Masterclass!: Short form content is one of the most powerful ways that
you can communicate today. In this class, we're going to be learning CapCut
from the ground up. We're going to start with some basic editing and then finish up with your own short form content that you made confidently. Hi, I'm Hosta kahui a freelance creative professional and
an online instructor. I have taught over
200,000 students worldwide and have made
more than 15 courses. I work regularly with short
form content and design, and I love taking tools like
CapCut and breaking it down into workflows that are beginner friendly and that
anyone can follow. We're going to begin
by first understanding what CapCut is best used for. Then we're going to explore
the differences between the desktop version and
the mobile version. Then you're going to be creating your first project life
from importing to editing, fine tuning, and even exporting. Same time, you're
going to be learning the essential foundations of
video editing in general. That way, you're
not just following the places that I click, but you know exactly
why you're doing that. We're also going to look
at the many tabs that CapCut offers from sticker tabs, effects, transitions,
captions, text, and many more. CapCut is popular for
their mobile version, and that's also
something we're going to be looking at in this course. So you're going to
see how you can quickly edit something
that's trendy and really engaging with just a few tabs on
your mobile device. So by the end of this class, you're going to have
a fully edited video that you did from scratch. Do not need any prior experience for taking this class
as I'll be going over video editing foundations and how CapCut
functions in general. So without further ado,
let's get started.
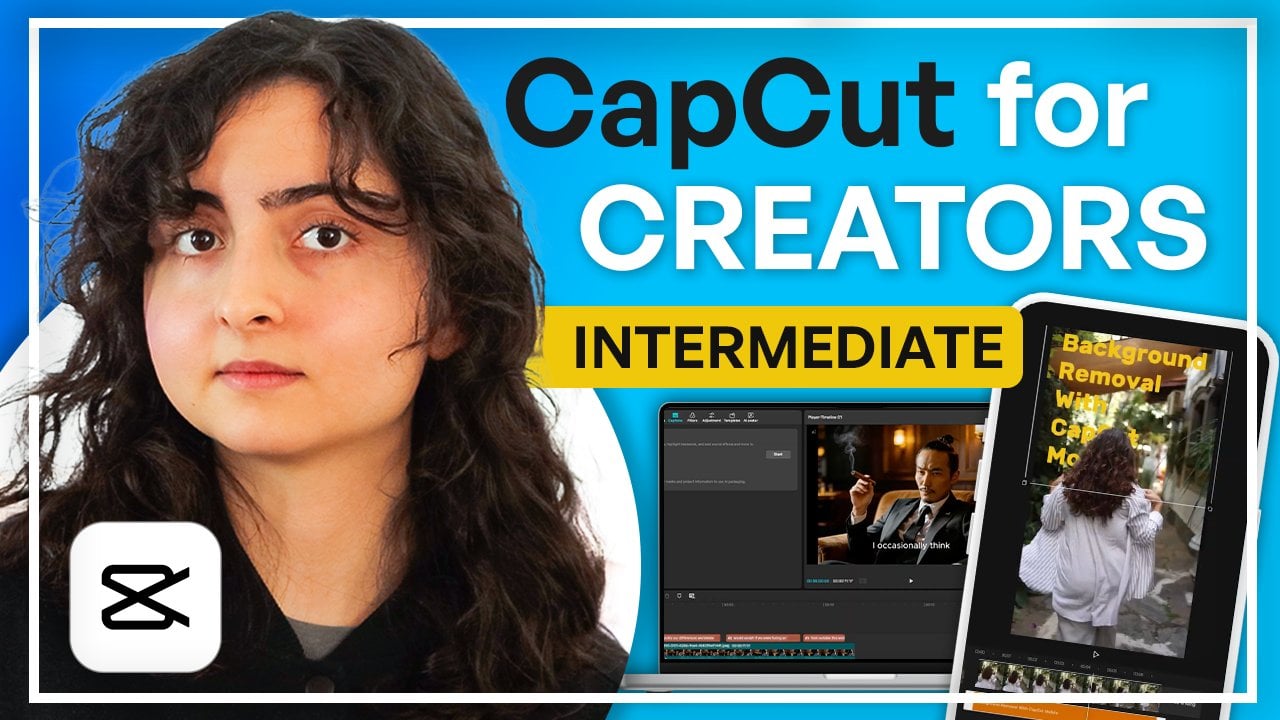
2. Welcome & What You’ll Create In This Course: Mm. Welcome to this
CapCut course. By the end of this training, you're going to be able
to confidently make videos for social
media and be able to alter it in ways where
you can catch up with trends and try to make something
that's out of the box. With the first chapter, we're going to be building
a video from scratch. So nothing fancy,
but something that's going to capture all
the essential tools and techniques that
you're going to be continuing using in the rest of the course. So
let's get started. O.
3. What CapCut Is Best For - Short Form Video Explained: Mmm. Mmm. Now, some of you
may be wondering what is CapCut and why
you should use it. CapCut is a platform
that you could use to build short form videos, meaning that those are
clips that are vertical, a few seconds long, trying to have a strong hook and are easy to redistribute. So if you're thinking long
documentaries, YouTube videos, cinematic footage, CapCut is
not the best option for you. But basically with CapCut, you get to make that
short form clip and then distribute it across
platforms like TikTok, Facebook Reels, Instagram Reels, and even YouTube Shorts. You're trying to build an
audience on social media, whether it's on TikTok, Instagram, Facebook, or
even YouTube Shorts, CapCut is definitely
something you want to have in your toolbox because
it's really easy to use, and the amount of
content you can make in a matter of minutes
is just a lot. So let's go ahead and
continue exploring and learning more about it in the first chapter of the course.
4. CapCut Desktop vs Mobile - When to Use Each: Mm hmm. So there is two
versions to CapCut. We have the Dk Stop version
and the mobile version. In this course, we're going
to look at both of them. But first, I'm going to
start with the Dektop and then I'll have a chapter
separately for mobile only. So Deck Stop is what you can
see on the screen right now. You can download it for
free on the app store or from the official
website if you want. You don't have to purchase
anything or make an account. Of course, they do
have pro versions and the option for you to sign into your account
in case you want to work across
different devices. Now, when it comes to choosing which version you want to use, think of the mobile version as the more convenient
and fast version and the dek stop for something that you could have
more control over. So let's start with the dektop. I just opened it
up, and right away, we get this recommended
box where it tells you of the new updates and all that stuff that you get to explore. I'm just going to
click away from that and show you
the home screen, which is what you see on
the screen right now. As you can see, does have
a pretty similar interface to other video
editing platforms. Your projects are
going to be down here. You get use some of
their tools quickly, create a new project, get your sign up right here, and it's pretty standard stuff. In the next lesson,
we're going to see how we can do the
very first thing, which is to create a project
and start importing. So let's go ahead and
see how we can do that.
5. Create a Project & Import Footage: Just like any other platform, we first need to build a project and then import
some clips inside. So I'm in the
homepage right now, and there's a big blue
Create Project button, and that's exactly
what you press. So click on it, and it's going to bring you this interface. So before I actually import, which is, again,
right over here, as I mentioned, this is a
very user friendly program. I'm first going to tell you what these little panels
are just for you to get a little familiar with the space before we
actually build something. On the top left side, this is where you
deal with your media. You can see it's labeled
that. We have imports. You can sort with
different medias, sub projects, go
based on ownership, type of media, the space, and even some libraries, which is free footage
that you get to use. If it's not free, it has a little diamond
on the top left. So that's how you can know.
You also go over here, check for commercial,
search for something, and there's different
categories for you. In terms of spaces, you would have to connect this
to your account. Media. You can actually build something using
artificial intelligence. This could be image, a video, or even
a dialogue scene. So we'll get into those later. We also have things that
you could, you know, categorized based on favored
clips that you have, your own presets, and some
branding presets as well. The next step is regarding audio CapCut has a lot of
audios that you could use. Again, some of them are paid. They have the little diamond, some of them are free to use. When you want to use an audio, you can just either download it or drag it into your project. We once again have a
category on the left side, and this makes it easy
for you to just find that clip that audio
that you're looking for based on what
your clip is about. So if I have a marketing video, I would have to go
into this category. So have a searchbar just
like all the other panels. The next thing is text. So we have text over here. You can add your own text. There's also a AI
caption generator that you get to use.
It's currently free. We have your own text effects, things that you made and
saved for later use. We have text effects in general. These are, again, from CapCut
with the little diamond. Different categories
you could look at. We have text templates, which are basically
ready to use. You get to drag it
in and just maybe change the text or
not change the text. You can see there's
a lot of fun ones. We have the little categories
on the left side as well. Next up is auto caption. This is different from the AI one because it doesn't use AI. Really depends on
which one you want. With the AI one, I would
say it's less work for you. But if you want more control, you can come to
captions right here. And then, of course,
you can import a caption file in the
following format, and it's going to, like,
sync it to your clip. We have some stickers over here. You want to do something fun, lots of categories
for you to try out, and you get to have your
own stickers, as well. Next up is some effect. We have video effect
and body effect. So this is if you
have a human subject in your video or media, it's really simple to use. You just click on it
and it gets applied, like the lightning eye effect. Then we have some transitions. These are the way your project goes from
clip A to clip B. If you go over any of them, you can see how that transition
is going to play out. Different categories
again, your favorite box. Then we have a whole different
section for captions. So again, we have auto
captions, templates, and AI packaging from
the previous text tab, but you can also do auto
lyrics, if you have a song, and you can add your
own manual captions. We also have some
Mogis for you to use. Then there's some filters. This is regarding the color
grading of your video. Tons of options out there, too. Want to manually colour
grade your clip, you can come to adjustments
and start using the LUT or maybe adding your own custom
adjustment like that. We have some templates.
I'm not going to go over each one because
it plays the music, but when you drag these
into your timeline, it's going to come
with the material, and you would just
basically put in clips. So in my case, that's 12
clips that I need to put in. You can see that I get
to change the text, and it's pretty easy for
me to maneuver from there. Once again, we have the
different categories. Last is AI Avatar. So this is if you
want to do, like, a little talking head or you just want to
make something funny. There's tons of characters
for you to use. You can go through the
different categories and do something cool with that. Alright, so that's regarding
media of any sort, any sort of element media. It's all on the top left
box right over here. This in the middle is
the playback preview. So whatever you're doing here, it's going to show
up in this window. You can pause it, play it, skip it, do whatever you want. The panel on the right
side is the details. So we got details
here down here, this long thing,
that's your timeline. So any sort of clipping,
copying, pasting. Basically, the bulk of the
work will be done down here. We're going to take a
look at that later. Have some options on the top regarding how you
deal with your clips, the volume, and so on forth. On the top, we
have the big well, not big, but the very
vibrant Export button. You get to share your
project or share a link. This is a link to
the Pro version. You can deal with your
shortcuts right over here, and then change the workspace according to the layout
according to what you need. Is the name of your project, and then it's all going
to be auto saved. So it's telling me what
time you did that last. And then up here, we have a few more options
for a new project, new timeline, import export. Got a few editing
options, a help button, and just stuff regarding
updates and other layout stuff. That's just a quick overview
of the whole program. As we go forward, you're going to get more
comfortable with this, so don't worry if it's still
a little bit unfamiliar. So we made our first project. Now we're going to
import something. So go to Media, import. Then click on the Import button. I have two clips in
the resource pack that you could just,
you know, bring in. So these are both in
the resource pack. You get to download them, and we're just going
to drag them in. Okay. So just like that, click drag, put it
in your timeline. That's all we're gonna
do for this lesson. If you've made it this
far, then good job. In the next lesson, we're
going to see how we could do some basic operations
on these clips. So how do we make it
longer? How do we cut it? How do we remove
something, add something, and just play around with it until we have our first project. So let's go ahead and
see how we can do that.
6. Basic Timeline Editing (Trim, Cut, Arrange): Let's take a look at some
basic timeline editing. So we have these two clips
from the previous lesson. We have the first one
and then the second one. I can select each clip
by just clicking on it, and that's going to
highlight that box, which means that
whatever changes you do, it's only going to be
done for that clip. The name of the clip is
right on the top left, and this is deoration. So this thing right here
is called your Playhead, and it basically shows where
in your timeline you are. So you can see as
I'm moving this, there's a little time
difference here. And then on the other side is just the total time that
these two clips amount to. So for my case,
that's 27 seconds. So let's say you want
to make your first cut. So the first thing you
want to do is have your playhead at the place where you want to
make that split. Then go right over here
and click on this. You can see that when
I hover over it, it says Command B. That must be Control
B on Windows. Just click on at
once, and now you can see I have two boxes. So that's going to be two
clips from the original. And make as many as I want, make another one here, and these are going to be separated. So let's say I don't
want the middle clip, I could just grab it, hit backspace, and
now it jumps back, snaps back to just
these two cuts. So the middle part is gone. If I want to bring it back, I could hit Commander Control Z. There's also some undo buttons up here if you don't
want to use shortcuts. So we have these three cuts. Let's say you want to
duplicate a scene. So let's say this scene
is really important. In order to duplicate it, you're just going to hit
Commander Control C, then come to the end
Commander Control V. So it's kind of copy pasted, and you could just
move it down here. Now I have my last
video playing, and it jumps to this
new pasted clip. Now notice how when
I first did that, the clip ended up up here. Now, these are called layers. You can see that
currently we have two. Layers will allow you to
do overlapping effects. So let's say I want this to be playing right above
my bottom video, I could do it just like that. Reason why you would do
this is because you want to add a transition here or effect, which we're going to
take a look at later. But these are
basically your layers. We have some options
here, such as locking. So if I lock this track, I can't move this clip anymore. But the one below
it is not blocked, so I could still
make my changes. Click like that to unlock. You can hide that track or
layer by using the eyeball. And if I say that, you know, I want to take a
look at the video underneath real quick,
I could just do that. Next one is regarding audio. You can mute the track. Currently, none
of my videos have audio or else you would
have seen some sound waves. We have some three little dots. You can deal with the
height of the track. So let's say I want
to make it taller, it's going to expand
it just like that. This is just for
display purposes. It doesn't really change
how your editing is done. And then the audio
wave form size, which is going to be those waves that you've
probably seen in audios. This is just how tall they look. So default is 30%. You can make it
really big by 100%. You would do that when you
want to manipulate the audio, and those peaks and dips are
going to be very important. But I'm just going to
leave mine as it is. We also have something
called cover that's going to be the
cover of your video. So I'm just going to close this. Let's say that when
I export this, I want the, you know, thumbnail to be of this guy. I could select it from video, but I could also maybe upload
something that I made. So this way, when I
upload it to YouTube, to some other platform, it's going to have
this ready to go. Again, you can design something and upload
the image here. Once you're done, you can
create new cover or edit it. So if I hit Edit, it's going to give me some
templates for thumbnails. So I could just maybe
put this thing. My video is over here. I could double click to change the text and get
a nice thumbnail. Over here, we also have a
design with AI feature. This is something that is
a little bit advanced, so I'm just going to close this. Hit Cancel at the bottom, right, exit, and then
go back to where I was. Said cancel here. Apart from the things
that we looked at, there's a bunch of
other options up here and also some more when you
right click on any clip. I'm just going to
briefly go over the main ones and tell you
what the other ones do. First step is this plus button. This will allow you to
make a new timeline. So you can work on multiple
projects at the same time. This is the timeline that we
were in. This is a new one. I could hit the Hamburger menu
to make another timeline, rename this to something
else. Like CO video. I could pin it so that, you know, it's easy
for accessing. I could delete it,
and then go to timeline settings to change the way that it
handles my eclips. So first up is name, which is what we had for
our project, save it too, and then we have like the aspect ratios
original means that it's just going to look at
what your clip had initially. So if your clip is vertical, the timeline is going
to be vertical, too. But you could convert
your horizontal clips into vertical by
just choosing 916. You can decide on
the resolution. This is, again, going to adapt to the clips that you import, but you could customize it
to four K or lower quality. Frames frame rate is regarding how many frames
are within a second. The higher this number, the
more high quality it is. But it does make your
project heavier. So I would only recommend
you doing this if you're doing a slow motion clip where you want
everything to be smooth, or if you're trying
to do some special effects that needs you to be able to access each of
those frames, separately. You can go to performance. If you want to not
lose video quality, you can create proxies
on your local device. This one, you don't really
need to use it as a beginner. When your projects
get heavier and you notice that there's a lot of lagging, you may want
to turn this on. But other than that,
I'm just going to delete this new timeline
and go back here. So we have some tools over here. I just clicked on
this little arrow. We have the Select
tool, which is what's letting us move our
clips around and click things. The split tool we
already looked at, it's just going
to cut something. Select Left word
is going to make you choose whatever's on the left side of the
clip you choose. So if I click here, it's
going to choose everything. We have select right word. So if I choose this guy, it's going to choose
whatever's on the right. If I choose this, it's going
to be whatever that's here, which is just itself. And so on forth. We have the undo buttons. This is, again, the split key, the delete left, whatever's
on the left side. So if I click this, you
can see that it removed whatever's on the left
side of this clip, can do the same thing
for the right side, the trash icon, or just hit
backspace on your keyboard. Then we have some markers, which is going to let
you mark parts on your timeline so that you remember where to add a
text or a transition. Similarly, you can add
some notes on these. So if you just right
click can edit marker, let's say, add text. And then decide on the color. So now I have this red guy. If I go over it, it will tell me the name that I
just chose for it. The last thing is transcript, so you can automatically build transcripts from the audio
that your videos have. So currently, mine
doesn't have any audio, but if you wanted to do
something really quick, you can just utilize this tool. Now when we right click
on re click on the clips, a bunch of other things show up. So we looked at
markers. This is crop. So this is regarding
what's in your video. You can crop it like
that, zoom in and out, or go forward in time and decide how much you
want to take off. We have rotation right
here, and then crop, you can go for a certain aspect
ratio or do a free range, which is what's letting me
to these squishing effects. If you regret doing
your adjustments, you can hit reset, and it's
going to go back to normal. When you're done, confirm, and you've just cropped your
image, your video or image. And the next thing is some
things regarding speed. So you can freeze a video. So this is what I
have right now. It's like a moving clip, but I could freeze
it at this frame. So when I click on
that, this new section popped up and it says
freeze over here. So it's going to keep
playing normally, but then freeze at
that part where I selected and then continue
moving as it was. We have some other stuff. We have reverse so you
can reverse the speed, mirror the video or rotate it. On this side, we have the
transcript that we looked at. We have some split scenes, allows you to have two videos
playing at the same time. So half of the screen is one, the other
half is the other. You can remove the background if there's a human
subject involved, which is not the
case for this video. You can auto adjust it
in terms of lighting, color grading and all that. And then we have some
additional stuff that are not exactly free. You can stabilize a shaky video or enhance the quality if
it just needs some of that. Right click on a clip, we have pretty much the same tools. So we have cut, copy paste, and edit is the stuff that I just
talked about, split screens. We have some removed
backgrounds. This gives you
some more options. So auto removal is going to let CAPCA
decide what to remove. Chroma key is going to let
you remove a certain color. Custom removal gives
you more flexibility. Adjusting the visuals, that's regarding stabilization,
the quality. You have some color
grading stuff. These are some
motion adjustments. So motion blur allows you to blur whatever's moving.
That's in motion. You can track a camera and even have AI help you by
tracking the movements. You can make a compound clip. This is like a pre comp
from after effects. Basically, you get to create a mini project
inside the timeline. We're going to take a
look at this later. You can save a preset if you did a lot of adjustments
to this one clip. Instead of redoing it
for something else, you could just make a preset. You can export whatever
you have selected. We'll look at that
in the next lesson. Deactivate the clip, which
means it's not going to be in the timeline anymore,
it's going to be hidden. You can do some replacements, some trimmings, changing
the file location, and that's about it. On the right side
of your timeline, you have the voiceover option. We have the magnet, which is basically when
you move something, it doesn't, snap back to
what's on the left side. So when I turn this on,
you can see it just goes back and I don't
have that empty space. So auto snapping, that's
also regarding that, or snap it back to the usual. These are just for
preview purposes. So now we know how to split copy paste and just work around the different settings
that our timeline has. In the next lesson,
we're going to take a look at how to export a video in CapCut using the
most basic adjustments. So let's go ahead and
see how we can do that.
7. Exporting Your First Video: Now let's learn about
exporting within CapCut. So we have this clip that
we made in the last lesson. All you really got to do is hit the Export button
on the top right. You can also access it from
up here, file, export. Hitting E on your keyboard is also going to
be the shortcut. But once you press it, you're
going to get this window where you get to specify
the destination, the name, bit rate, and all the other
video specifics. The first thing you want
to do is give it a name. You see that it's
telling you which timeline it's
currently exporting. We only had one, so that's
why it's timeline 01. If you had multiple projects, make sure that it's
the correct one. Let's give this a name. Then you can export it to
whichever location you prefer. Now, down here,
you can hide this, and it's just going to
export the audio for you. But because the video that I have did not have
audio to begin with, you can see now
nothing is selected. But if I check this again, you can see that
everything comes back. So for video, we first
have resolution. This is the quality of
your exported clip. We have the bit treat, which is again
regarding quality. You can go for recommended or alter it by choosing
one of these options. Codec is going to be the
format in which it's exported. So h264 is just MP four, but there's a bunch of
other things down here. Now, because I'm using
an Apple device, these are going to
be available to me. If you're using Windows, it may be a little
bit different. But just go for the format that you want your video exported as. We also have format down here, so if I choose this codec, I could just pair it with P
four, and it's already to go. Also do MOV if you want. Think of Codec as
the way that it's exported and format as
the way it's presented. Lastly, is frame rate. This is something
we talked about, but you get to also
alter things here. By default, it's
just going to match to whatever you had
set in your timeline. Optical flow is just
going to match all of these settings to what
you had in your timeline. So if you just click
that, you can see that it's going to do
a little bit of thing, a little bit of processing. Then I'll be ready to export. Just going to undo that for now and then go down to
show you the other stuff. The audio tab is
currently turned off. As I mentioned, my video
did not have any audio, but if yours does, it's just going to be
checked right here. You can export this as a gift. Choose the resolution. You can export the
captions alone. So whatever you check is the thing that's
going to be exported. So right now it's just video, but I could pair it with a
gift and with the captions. Next is copyright, so I
could check for copyright. Right now, it gave me an error because I don't have an audio, but you could do that
to make sure that you don't run into any problems when you share it on TikTok or any other
social media platform. The cover right here is where you get to
change the timeline. You can also do that
during your project. We already took a look at that. Down here, it tells you how large the file sizes
and the current duration. When you're done, you
can just click Export. It's going to do a little
bit of processing. You can see all the
information up here, and let's see what comes out. Can also hit Cancel
to cancel the job. So once you're done,
you can see that it's playing my original
video on the top, but it also made me
a TikTok version. And that's only because
a lot of people use CapCut for TikTok
to begin with. So you can see it just gave
that to me, and I could, you know, share this on
my social media platform. Going back to the original, I can now share it directly
on TikTok or YouTube. You can even sign in
your account here, and it was just one click. It's going to go public. Can give it a name, a little
description, visibility. You can allow people to
comment, duet, or stitch. That's going to be
different for YouTube. It has its own
options down here. You can also share on TikTok. You can do a little bit of ads, description, playlist,
category visibility. These are all things from
YouTube's direct platform. The last thing for
TikTok is copyright. You can turn this on
if you have any audio. To see where you
exported your video, you can click on Open Folder. And you can see that I have
the gift version and the MPF. It cancel when you're done, and that's how you can easily export videos within CapCut. So now you know all
the foundations there is to CapCut Desktop. In the next chapter, we're
going to dive a little bit deeper into how we can
edit with the program. So let's go ahead and move
on to the next chapter.
8. Essential Video Editing Concepts: Before we start cutting and
adding effects to our videos, we first need to understand the four building blocks
of video editing. The first thing
is your timeline, which you can think of
it as your workspace. We looked at this in the
previous chapter briefly, but everything that
you choose to do, whether it's a text
and effet, a sticker, it's going to take place
in this little long box. You can actually extend this. If you're doing a really
large project where there's, like, tons of tracks, you can easily adjust
the height of it so that you're able to see
everything that you're doing. The first thing
is your timeline, which is this big
horizontal box right here. This is your entire workspace. So whatever you choose to do
out of all these options, you're going to be arranging and adjusting them in the timeline. And the timeline is
a horizontal space, meaning that the longer it is, the longer your video is. So if I have a clip
that's really short, it's going to be squished
out horizontally. If it's really long, it's
going to be stretched out. Speaking of clips, that's your
second element in editing. This right here is a clip. Now, when we say clip, it could be various formats. So it could be a
video like this. It could be a gift file, it could be an animation. I could even be a music track,
and all the other stuff. So any sort of media
that you import in here, you could refer to it as a clip, and that's what I'm going
to call it moving forward. To sum it up, you're basically trimming and arranging clips the entire time that you're on CapCut or any other platform. The third thing is transition. So how do you go from
video A to video B? We have the most simple
transition, which is just this. It just cuts to
the second video. And when your clip ends, it cuts to nothing
because it ended. Now, transitions are a category of things that we're
going to look at. CapCut has its own
section for transitions. We simply drag and
drop it in between a clip it just how
long it's going to be. So, for example,
this is what we did. And now I'm going
in a different way. I'm going from video A to video B via this
pull down effect. I'm able to do some
adjustments to my transitions, but just think of
transitions for now as going from video
A to video B. You can have thousands of
transitions in videos. Well, it's going to
be a really big file, but you can have multiple
transitions for your clips. Anytime there is a cut, that is a space
for a transition. You can also put
one at the start of your video at the end, so it's not only
limited to in between. Tip for you is that even though when you see
the transition tap, there's, like, tons
of things out there. Most professional editors
stick to hard cut transitions. So instead of doing
something like this, they would rather do, like, a cut like this or feed
or dissolved transition, basically, the most basic stuff. But all of these
options are things that a lot of people
use on social media. So it's good to know
the difference. You should know what
you're making this video. The last thing is layers. So here, they're called tracks, but it's essentially layers. If you've worked with any
sort of adobe programs, you should know what a layer is. But basically, they
work vertically. So you get to stack them on top, and you're always looking at the project from
top to bottom. So that's why we're seeing the animal here and not the
city that's right below. You can build up
vertically as you go. And when you have
a lot of tracks, there's going to be an
option for you to scroll up and down so that you can see
fully what you're doing. Now, in terms of hierarchy, that's because we have a
lot of stuff going on. Media is going to be
right in the middle. Text is always going
to be at the top and audio is always going
to be at the bottom. Just to demonstrate,
I'm going to grab a random text right
now, put it above. You can see it goes up there. If I put it below, I'm able to, but as long as it's above a clip,
that should be fine. You can see I'm not able
to put it underneath my clip because there's
nowhere for it to sit on. Now, for music, it's
the exact opposite, so I can put music on top, it has to be on the bottom. Underneath whatever clip
you have right now. The other types of media that's going to be, you
know, in the middle. So let's get a
sticker, for example. You can see that I'm
able to go up bottom, even above my text, but I cannot go below the
audio or below my first track. So there's just a little
bit of hierarchy, but the most important
thing is that anything audio is
beneath the clips, anything visual is
above the audio. So now we know the
four basic components of any video editing project. We have our timeline, which
is our workspace, our clips, or any sort of media, the transitions between them and the layers that
we get to build up. Next lesson, we're
going to take a look at some aspect ratio rules. So how do you determine
the size of your project? Which size should
you be choosing for which platform and all
that other cool stuff? So let's go ahead and
see how that works.
9. Understanding Aspect Ratios: Aspect ratio determines
the shape of your video, and it's basically
the relationship between the width
and the height. And this is something
you choose before you edit because it really
affects everything. So there are three main
types of aspect ratios. We first have vertical, which is nine to 16, and that's basically going to be good for mobile application. So right now, what I
have is horizontal, as you can see, but I could
just make a new timeline. Timeline settings.
And right over here, you can see that we do have
the option to easily switch. So you can see nine to
16 is a vertical video. I'm going to hit
safe. When I drag the same video in my timeline, it's going to be like this. I'm just going to scale it
up so it fills the screen. So this is a vertical
video, as you can see. So this type of video is good for TikTok, Instagram Reels, and YouTube Shorts
because it fills the entire mobile screen
as you're holding it. The second type is
going to be horizontal, which is what we had
in the first place. So this guy is going
to be filling in screens like tablets,
computers, TVs. So think more of a big picture high production
sort of work. So, for example, a
YouTube blank form video. Those are usually horizontal. We have presentations, if
you have something for your business and just for anything you want
to see on your desktop. Even this course right now is horizontal because
it's a lot more engaging and it's not really meant for fast paced content. You want to do
anything professional, you can utilize the
horizontal aspect ratio, and you can go over here
and switch back like this. So 16 to nine is the ideal aspect ratio
for horizontal clips, but we do have cinematic
ones and the four by three. So just click Save and
it's back to what it was. The last type of
thing is a square. So this is one to one ratio. I'm just going to change
this guy just like that. So now it's a square. Skill in. So square was popular for Instagram posts because when you go to someone's when you
go to someone's profile, you can see that the
grid is just squares. So that's where the first
idea was introduced. Some people like to do this
for gifts as well for, like, a little funny clip. So that's something you
could do easily as you saw just by changing
the timeline setting. It's a balanced option, but it's less immersive
than a vertical video. Now, why do these matter? What do you have to take time
to choose your aspect ratio when you can just go with
whatever the default is. So if you edit horizontal
footage for a vertical video, you're going to get
something called black bars. So, for example,
if I change this back to our vertical
aspect ratio, and then re import my video, I'm going to get the black bars. The same thing applies for a vertical video inside a
horizontal aspect ratios. You're just going to get the bars on the
left and the right. So you want to avoid black bars unless they're intentional. Let's say you're going
to put the video here, where you're going to
put a lot of texts and stickers in the
empty space around. If you end up choosing
the wrong aspect ratio and continue editing, when it's time to export, you realize that
you made a mistake. So you actually have to
go back and readjust, and it's going to be pretty
much really tedious. So the first question that you should be asking
when you're about to edit a video is where
is this clip going to be? Is it going to be on
LinkedIn, YouTube, TikTok? Wherever it is, you
want to make sure that your project and
your timeline is matching the required
aspect ratio. Not sure what the ratio
is for a platform, you're going to
put this video on. You can also Google search it. For example, there's some
platforms like LinkedIn. It's not exactly always 16
to nine on vertical videos. There's some other
ratios in there. There's a ton of information
on Google for you to find. So we went over aspect ratio. Now, let's talk about
quality and resolution.
10. Resolution, Frame Rate & Quality: Now, we're talking
about video quality, and there's three main things that you need to understand. The first thing is resolution. But let me just drag this in. Resolution is about how
sharp your video is. So think of it as, you know, the options you get on
streaming websites like 720 P, 424 ADP, ten ADP, four KHD. These are all words that
are associated with the sharpness of your
videos or your images. Social media, it's usually
common to do 1080 pixels. But if you want to
do something more high end like a cinematic clip, you can go for four K or above. Just bear in mind that if you
do four k for social media, there's going to be a
lot of compression, and that may result
in your video being a little bit blurry. The second thing is frame rate. So frame rate is basically how many pictures are
there in 1 second? So this guy right here, if I click away, my
frame rate is 30 FPS. So per second of this clip, there's 30 pictures
that basically capture the movement of this creature or any motion
in a video, basically. So if you start with
the lower numbers, so 30 is like the mid range, 24 frames per second, that's going to be a
more natural look. 30 is pretty common. A lot of content creators
on social media use 30. And then we have 60, which is something for a more
high end project. Like I said, a cinematic video or like a super
slow motion clip, you want to pump
up the frames per second so that it's
a lot more smooth. But don't increase or decrease your frame rate
unless you really have to. So if I were to do
this for Instagram, I'm just going to keep
it 30 FPS because I'm just going to add some
songs and keep it very simple. Last thing is quality and
just compression in general. So when you're
exporting any clip from CapCut or any
other platform, it's going to be
condensed into a file. So all this data is going
to be put into one file that you get to upload and
just share it in other places. The higher the quality
of your video, which is a combination of
the FPS and the resolution, the larger that file
is going to be. And the lower the quality, the smaller the file
is going to be. So that's just the
relationship. And, you can kind of take a look at that when you right
click on a video. So let me just bring
my file explorer. So this is the information for our first City
clip it like that. So we can take a
look at the size. This is 49.3 megabytes. There's some information
about the dimension. We have duration, but there's not much about
resolution and frame. But you can basically take a
look at your file size here. And then decide if you want to do a smaller one,
maybe a larger one. Sometimes you do
get errors when you put in a really large file. You try to upload
it to a platform. You can just come
in here and see how much you need to remove. If it's a few megabytes, you can basically
change that in CapCut. But if it's a large amount, you may want to go into your project and
change a few things. You ever uploaded a video and you see that
it's really blurry, you probably exported
a lower quality clip. So that's just some basic understanding regarding quality. Those terms I'm going to be using a lot throughout
the course, so it's good to know
what means what. And if you ever
come across them on any other platform, you
now know what they mean. Now, let's go ahead and combine all the information
that we talked about and see what the real
process is for video editing. I'm not going to be showing
a project on screen. That's for the next chapter, but just for you to
know what the structure is and what the general
overview should be like.
11. Editing Workflow Explained : So this is where a lot
of beginners struggle. They open up the program. They just start cutting things, and then hopefully they
hope that it goes well. But if you plan to be a
professional video editor, you need to follow
a routine workflow, which is to start
with the concept. What is this video for? What
are you going to be doing? Where is it going to end
up? The next thing is to import the proper material, so that could be
videos, pictures, logos, clips, music, text even and basically have everything organized in your media tab. Then is the editing part, which is going to be using
a bunch of the tools here, some of the resources
up here, trimming, slowing things down,
speeding things up, and anything else
that's necessary. And then finally is exporting. So that's going to be choosing the correct format
for that platform you initially had in mind and
choosing the right options. Step one is to organize. Don't just drag clips
into your media tab and then go about editing because when your
projects get larger, you're going to have
50 clips in here. It's going to be
really hard for you to find the one that
you actually need. So right after exporting
or before exporting, make sure to rename your videos. You can see the
names are showing here. And then if you're doing
this from your own camera, let's say you shot the clips, remove anything
that's not necessary. You don't want to overcrowd your media tab because
when you're editing, it's going to get a
little bit tedus. So when you rename your tab, let's say I call this city, you can easily look
for it here and not have to scroll up
and down to find it. And regarding what sort of
clip you want to bring in, that's going to be for your
brainstorming session. So what is the purpose
of this video? What are you trying to achieve? Where do you want this to? Second step is the editing. So we're not just going to be immediately adding
in transitions, stickers, captions
and all of that. The first thing you want
to do is do a rough cut. So what parts need
to be trimmed out? What parts need to
be shorter, longer? Do you have all the clips that
you need in your timeline? And once you have
that rough draft, you can start putting
in the transitions, the effects, the music,
and the other stuff. So the order is really
important here. So after you have
that rough cut, you can add the effects next, the transitions, and
finally, the music. Once you have everything, you can go ahead and
do some adjustments, like playing around with the music volume
at certain times, the length of each text, if the text needs
styling, and so on forth. So once you have the
general overview and the general draft
of your project, you can go ahead and make
some finishing touches, such as color grading. You can go into your clips
and adjust the colors. Maybe you want to do
some overlay effects. You want to add
some logos to the maybe preview a
bunch of the exports or just preview it over here,
make sure it flows well. The volume is good enough, and that the texts
and elements are on the screen for the
appropriate amount of time. The last thing is exporting. So make sure you're aware of the things that we talked
about in the previous lesson, the aspect ratio,
the resolution. It's really important to know which platform you
want to export this to because you will know
exactly what to do when you're dealing with that panel.
So export it once, watch the full video in
your computer's preview, make some notes
in your notebook, maybe the audio is too low or something didn't
make it through. Then you're going to have
those notes with you, go back to your project, implement the
notes, export again until you have the version
that you're happy with. So editing is not just
about the fancy effects, but a lot of the
planning that goes into. This chapter was just for the foundations
of video editing. In the next chapter,
we're going to have more of a hands
on experience. We're going to be putting
things on screen, and you guys can
follow along with your own clips and CapCut, and then we're
going to be able to understand things better
through actual experience. So let's go ahead and move
on to our next chapter.
12. CapCut Desktop: Home Screen & Project Setup: This chapter is going
to be all about the core tools inside
CapCut desktop. We're going to focus
on tools that you're going to be using as a beginner, and then in the next chapter, we're going to do a
little project together so that you can apply what you learn in this very chapter. So first, let's take another
look at the homepage, and we're going to see how
we could set up our project. So we've been here before. These are the projects from
the first two chapters. You can see they're
displayed nicely. I could just upload another one, rename this,
duplicate it, delete. And organize it as I go on. If you want to connect this
to your CapCut account, you can do so by first signing in and then syncing your
projects like this. So what I'm going to do is
just click on Create Project, just like that, and we're
back to where we started. So when you want
to make a project, you just click a button, and like I said, if you
want it to be synced, you can sign into your
account in the beginning. Simply upload your videos. I have three clips listed in the resource pack
for this chapter, so just upload them right here. So here are my clips. You can see that
they're all here. I could again right
click to rename, if I wanted to be very
specific ballerina. And then I could easily
search for it when your timeline is going
to be adjusted to what you upload in
in the first place. So if I just drag this
onto my timeline, I'm going to have a 16 to
nine ratio, as you can see. But if you wanted to work
on multiple projects, you just click on This plus
and then maybe you can work on a separate
video that's vertical. So just using this button
that we already know about. Click Save, and now you can work on two projects
at the same time. We're going to focus on the horizontal one
just because there's a lot more to it. So
let's delete that. Inside the import
panel with media, we could make new folders. So right click on
this empty space, and I'm just going to
call my first folder. So we're just going to
delete this for now, and I'm going to drag these
two clips into my folder. Just like that. Now
it's more organized. Let's say this folder is
just for the flowers, and I could just make another one inside of this
and so on and so forth. Organize it the way you want. You can rename it. You can also rename the folder like that, add more to this, or add the
entire folder to the track. So if I click on
this, you can see both the videos show up
right after each other. If you have separate clips, you can just right
click on them and do a new timeline only with
these two clips selected. But I'm not going to do
that. Instead, I'm going to go back to my main media tab. So now that we have
our project set up, we're going to move on
to editing the clips.
13. Timeline Tools Explained : So we're back here.
I'm just going to click and drag my
files right here. Click on this too, and
that's going to be very easy to drag
all three clips in. So we have this ballerina, and then we have this flower, and then we have another flower. So first thing I want
to do is rearrange these guys so that it's a
little bit more diverse, so we can maybe have the
ballerina between the two clips. And perhaps I could start with the shorter flower
video in the beginning. When I play this back, you can see that the clips
are very long. This guy is a good
couple of seconds, and then we have this flower
one, which is the longest. So that's the thing that
I was referring to in the second chapter that
the longer the video is, the more it stretches
out horizontally. So I'm just going to simply
trim the clips and maybe, like, mix a bunch
of them together. So the ballerina one, let's place the marker on the areas where we want
to make those splits. Use the spacebar to
hit pause and play, and then I'm going to make
a cut right over here. So hit M on your keyboard, and you should see
a little marker right above. Play that again. Let's do another cut when she
stops spinning. Maybe here. And then let's see what
happens in the end. Maybe right over here
when she opens her arms. And then right before the
light peaks from behind, we're going to make another cut. So now that I have my markers, I just simply click on each one, and my playhead goes
directly to that second. Over here, I could hit
Command or Control B or just use the button right
here to make your splits. So, click on the markers, use a shortcut to
make your cuts. Alright, so we have
this situation. I'm going to get rid of the
stuff that I don't need. And to see the space in between, I'm just going to
disable the magnet so that when I remove this
middle part, it stays empty. When that's turned on, it's
gonna, like, snap back. So this is not what
we're looking for. Alright, so we're just
gonna remove this. So now we're gonna repeat
the same process with the longer clip and just put
it in the empty space here. And I'm not sure how long
exactly this empty area is, but what I can do is grab a
little bit from this clip, drag it in between. And since there was already
some of the clip left, so I split it a little short. I could click on the side
and drag it just like that. You can do another one. You can make markers again if you want. Get rid of this part, maybe
put this guy in the middle. Okay, so now we have
a good balance, and I'm just gonna cut this middle the beginning
part short, as well. Maybe this as well. Turn on the magnet and it just collapses everything
into one place. So now I was able to use the
trimming, the splitting, and the stretching to make a very simple sequence of just
flowers in our ballerina. To make sure that I'm making my cuts exactly on those
areas that I want, I could use the plus
here to zoom into my timeline and work with,
like, smaller increments. You can also use
your left and right arrow keys to move
in frame by frame, and if necessary, cut out, like, some parts
that you don't need. So, for example, I have
my magnet turned on. I could just click this to shorten the start of my
flower video. Just like that. So those are the
main timeline tools. We're now going to look
at in the next lesson, how we could add
elements on top. So we're going to
look at some caption, some text, and
then some effects, color grading, and all
the other cool stuff. So let's go ahead and continue building upon this
very simple sequence.
14. Text & Captions: Let's explore the text
and captions panel. This is where we left off. We trimmed our clips. We organized them. And we have
this very simple sequence. I also imported the audio
that I forgot to do earlier, so this should be
available to you guys. Just import it like usual. You can rename it or just
leave it as the way it is. So right over here, we're
going to go into this tab, and we're going to
add a default text. So add text, default text, and immediately, it
shows us a preview. I'm just going to
drag it on top. Let's put a text here. You can move it around so that it starts at the point
that you wanted to. And then once we
have it selected, there's a bunch of options
on the right side. So I'm just going to
collapse this a little bit. Double click the text
and write something in. Like my first video. You can also change
it over here. Now you get to decide the font. So there's commercial
fonts, regular fonts. The ones that have the diamond, you would have to pay for them, but there's a ton of
free ones to use. So I'm just going to have
to downloaded first. So this is what I have.
It's like a dotted script. Then we can deal
with the font size, make it a bit
larger, the pattern, so folded, underline,
italicized, your regular text options. You can work with the case. So all caps, all lower case, and the first letters
being capitalized. We also have the text color, so I'm just going to
choose something similar to gold just because it
looks like little crystals. Click away when you're done. And then you get to create some space between
the characters. So you can see they're
spacing out and the line. So line, we only
have one of them. So when I do this, not
much is going to happen. But if you have two
lines above each other, that's going to create a
space between the two. We also have alignment,
pretty straightforward. And then we have some
presets that you can click to quickly
get a style. So this right here
is very basic, but I could make it glow. By clicking on this, and now
I have a very nice effect. You can also transform the
text, such as scaling. Now, this is not the
same thing as font size. Scaling is going
to scale the box, whereas the font size
is going to scale up each individual letter.
So that's the difference. You can scale it uniformly
or just do width and height if you want to do it separately, and
turn this back on. We also have keyframes for this. We're going to get into
animation later on. For a beginner project, you don't really need to
worry about that right now. Also have position, so you
can move it the position and the Y position or
just simply click away and drag this
wherever you wanted to go. And then we got some rotation and some alignment features. So if this was here by accident, I could quickly bring it to the center by
clicking that button. Next is the opacity. So how visible is that layer? We also have some
blending options. We also have some
stroke options. If you want to do that, the thickness can
be adjusted here. You can turn off an effect by just clicking the checkmark. We can put in a background
such as a solid color, which you can adjust
the color here or just have it go
around the text itself. So the entire box or
just the letters, then this is regarding
the background color. So opacity, rounded rectangle,
if you want to do that, the height, the width
and then some offsets. This is the Y offsets for the vertical one and horizontal. And just to quickly show you what animations are meant for, let me just hit this button to reset everything,
turn off background. So let's say I go
back to opacity and I want the beginning
to be faded effect, I could click on this
button to make a keyframe. You can see it made a little
diamond on my text layer, go to the beginning
and just lower the opacity all the
way down to zero. Because I do have
the glow effect on, there's going to be an
extra section over here. I could simply turn off that glow effect or
make some adjustments, such as the intensity
of the glow, the range, the offset
for Y direction, and then X direction. You can change the
color as well, and add some shadows
if you want. This is going to help it stand out from the background video. Again, we have opacity, the blurriness of the shadow, distance, and the angle from which the light
is hitting that text. We also have some
curving options, so that's pretty standard
and simple to do. There's only one
slider for this. But, again, if you
don't want to do this, just turn off that check
mark, and you're good to go. I couldn't even turn
off the globe effect. So that's the basic features. You could do some
text bubbles as well. So let me just download this. And now you can
see my first video went in this text bubble. There's a lot of stylish
options out there, and you can even filter
through them for commercial use or
just all of them. There's some additional
effects on the last part. These are mostly paid, but there are some
free ones like this. So if I dabble click it, you can see I get
the text bubble and this globe three D effect. Tons more to check out. If you don't want
to do any of them, just hit the X button. You want to go back to the
beginning of what you had, just click on Reset down here. This is going to reset everything regarding the
effects that you made here. So when you reset the bubble, you can see the text bubble
disappeared. All right. So back to the basic tab, I'm just using my computer's track pad to zoom
in and Zoom out. You can also do it over here if you want
to do it manually. So that's regarding text. You can make multiple text
effects at the same time. So two texts, three texts,
and just keep on going. Similar to layers, you're
able to trim or expand this. But because this is
not an original clip, you can extend this for
as long as you want. Just go to delete
all these stuff, and then we can move
on to some captions. There's a bunch of stuff
down here for, like, AI packaging, more text effects. These are where the effects are categorized
based on the style. So we have, like,
Valentine's Day, food stuff, and just a lot more
options for you to explore compared
to the tab here. Now, the captions are going
to be pretty similar. This is usually used for
when you have, like, a one speaking in a video, and you want to
have that caption. So you can see it's asking
for the spoken language. Our clip doesn't have
anyone speaking in it, but you choose a language, and then you can even
make a bilingual caption, which is, like, in a
different language. And there's, like, a
few options available. So you can see this one is a pretty popular one
right now on TikTok. If you drag it on here, you can just quickly change the text. So this is what the thing
says, but let's do, like, so the best
dancer in the world. Let's say, that's what we
want to do. Click away. And now we have a caption. Alright, so captions
are going to be something we can explore
further when we do have audio. But for now, you know how to
deal with text in general, how to add the effects, how to choose a
template quickly, and how you can deal with
the different layers. Next up, we're going to
look at some transitions. So these are going to be
pretty much the same flow. We have a separate tab for it, and you just simply click and drag something in
between your clips. So let's go ahead and see
how we can do that. O.
15. Basic Transitions & Speed Controls: So transitions are going to be focused on going from
point A to point B. So this could be a first clip like this and the
second clip like this. How do you want to go
from here to here? We have a separate tab for that, and all you really got
to do is click and drag it and put it right in
between the two clips. So now you can see I get this faded effect just by
dragging it from the panel. Now, for transitions,
when you click on them, there's not that
much you can do. So this is just a fade, so you can decide on how fast
you want the fade to be. The shorter it is, the
faster it's going to be. The longer it is, the slower. So you can apply it like that and hit reset if you want to go
back to the original. Now, of course,
there's a bunch of transitions that are a
little bit different, not as basic as the
one we looked at. But let's say we
want to do that one, it's going to be a
little bit different. Once again, we have a
duration slide. That's it. So you can explore the many
transitions that you have. You can also make
some transitions with animating things yourself, but that's something
you would do when you're a little
bit more advanced. Now, the last thing regarding clips and not audio
is the speed. So for speed, you
have a few options. When you click on
a video like this. So when you clicked on
your video like this, on the top right,
you'll see speed. All you really got to
do is let's do it on the last clip so there's some space on the
side. Scrap this guy. You can see that
when I click it, when I'm on the speed tab, it tells me one times. So one times is the normal
speed of the original clip. But if I speed it up, try to make it
faster, you can see that my clip starts to shrink. That's because it's going to go through the clip a lot faster. On the other end, I could
slow it down by 0.10, and that's going
to be really slow. So you can see that it's kind of moving in pixelated ways, and I could even just click on this little arrow and do a
quick adjustment like that. So this is 0.5 speed.
It's a little slow. I could do 1.5 and just alternate between the
different options. The video that you were
dealing with had audio, that's going to alter the pitch. So when you speed
up someone talking, you've noticed that
the pitch goes up. This is going to auto
adjust it for you, but we don't really have
an audio to begin with. Now, when you're more advanced, you can explore the curve tap, which allows you to do
something called speed ramping. So this is going to
give you more control over how the speed of
your video plays out. So you could follow
a map like this. Whenever there's a peak, your video is going
to get faster. Whenever there's a drop,
it's going to slow down. So you can see how we're kind of playing with these
different maps. And you can even make your own. Now, velocity effect is going to match your audio with
the speed ramping. So for example, if
you go on Flash, you'll see a little preview. If I dabble click it
on my clip right now, you can see that I
don't have any music, and it's not going to let me. So that's something you
can explore later on, but you have that
option for you. It's pretty easy to
play around with. You just select one
of the options. And the animation tab I was telling you about
is right over here. Got a few little things. Again, a lot of the stuff
on CapCut is ready to use. You just got to scroll around and find the
one that you need. That was transition and speed. In the next lesson,
we're going to look at the last main component of
video editing, which is audio. So we're going to use the music
that we imported here and see what we can do with it
in this very basic sequence.
16. Audio Basics: Now, finally, we can
talk about some audios. We have our sequence
here pretty simple. Let's just drag in our music and put it right
underneath the sequence. So as you can see, we're
seeing a lot of waves, and that's going to
tell you when there's a peak and when there's
a dip in the audio. So notice the parts that
are a little bit red. Those are basically
the parts where the volume goes beyond
the standard limit, and it may suggest that you
have to lower the volume. So if I play this right now. You can see how
the last note was, like, a little bit too high, so that's why it's red. Now, you can do some
adjustments simply by lowering this
horizontal line, and you can see that it
fades out of that red area. So this way, when you keep
it all in the blue range, it's going to be easier
and softer on the ears. But in some cases, you
may want to, like, really increase the volume
for some special effects. When you click on an audio, you also get the panel
on the right side. We have volume, which is the same thing as
that horizontal line. And we have something called
fade in and fade out. So when you start
playing the music, it immediately
starts from a note. So it goes from nothing, and then it jumps
up to that note. In order to make this
a little smoother, you can use the fade in in because we're at the
start of the audio. When you click and drag, you can see this curve
starting to appear, and that's basically how silence is being transitioned
into that song. So now with 4.9 seconds
of fade in, I have this. So it's a lot more smooth. And if I go further, the music will start later. You can see that it
slowly went up in volume and not like the
first original song, which is just going
straight into the music. The same thing applies to fade
out, which is at the end. So let's, like, do it over here. I'm going to cut
out this extra bit and increase this all the way. First, let me play it as it is. Now I'm going to increase
this all the way and we have this black curve. Oh You can see how it fades out even
before the song ends. And zero second is just
your regular audio. Now, if you don't want to do the loudness
adjustment yourself, there is an option to
do it automatically. This is a paid feature. You can see that it tells you that it lowered
it to negative 23. And that's what CapCut deemed
proper for this scenario. We have enhanced voice. That's if there's someone
speaking in that audio, let's say they're
in a crowded room or if there's not a mic nearby, you can use this feature. Auto translator
is going to again need someone speaking
in the audio. Reduced noise is
background noise. Isolate voice is you separating
someone's voice from, like, any sort of
background noise or music. And then we have something
called fill channel. So you can basically move the audio to one
side of the channel. So we have left and
right channels. Think of headphones. There's the left side
and the right side. You can kind of switch out the volumes using
the field channels. I'm just going to turn that off. We have voice changer
that's going to need someone speaking
in the audio, but um you can try
some of these things. Like, low is going
to lower the pitch, and you do get the handles
to further adjust this. So you can see I'm able to
play around with the music, and each of these effects will have different
sliders for you. With frequency, tremble. You can do, like, a live stage. So it's gonna have a
little bit of an echo. Those are the voice filters. We have voice characters. We don't really have
a voice in our thing, but you can still play
around with these. So it looks like this trickster is attempting to
sing the piano song, which is not working out so
well, but you get the idea. With just one
click, you can make your audio into something
a little funny. So speech this song
is going to need a shorter audio. These
are just for fun. I wouldn't really work around with it unless you
have a purpose for it. It's similar to the
voice characters. The last thing is the speed. So the speed is going to change
the pitch of your audio, hence this tab right here. So one times is just
a regular speed. But you can speed it up. So
right now, it's really slow. And then when you
do speed it up, you could try turning this on. You can see how that
makes a huge difference. Now, if you want, you can also add your own voice
into the track. I'm first going to
show you how to do multiple tracks.
It's really easy. You just drag it
right underneath and move this around like
you would with the layers. If you want, you can also do your own voiceovers
straight in CapCut. I'm not going to
press it right now because it's going to
disturb with the recording, but you simply click on this. There's a box that shows up. There's an option
for you to choose your input device so you can choose a mic or your computer. There's a big red button, you press it and it records. And whatever you record is
going to be in your media tab. So like I said, I
recorded this earlier, and it's just like a
separate audio file. If I delete it from my timeline, it's still going to be
there in my media tab. So this guy, I could
just drag it in. And just like any other audio, I get to work around
with these settings. So if it's too low, I
can increase the volume. I could do the
fade in, fade out, and it's all pretty
easy to maneuver. And if you don't
want to bring in your own audio from the outside from like a website
or something, CapCut does have
its own audio tab. So just click on this and there's tons of options
for you to choose from. They're based. They can be
for one particular category, and you simply click and
drag it into your timeline. So that's another way that
you can deal with audio. The same settings apply. So you just have a
lot more options. Now, that's the end of our
more in depth CapCut chapter. I didn't go over some of these panels just
because it's repetitive. They're all basically
templates in different formats
that you get to click and drag into
your timeline. In the next chapter, we're going to be doing
a more hands on lesson. Basically, we're
going to be building a project from start to finish, and we're going to be using all the stuff that we
have learned so far. Hopefully by now, you are a little bit more confident with the workspace and the tools
that CapCut provides. Over time, you're going to be using some of these features just so we have a video at the end that we are
really happy with. So let's go ahead and move
on to our next chapter.
17. Project Planning (What Makes a Good Short Video): We touch the timeline,
we need a plan. So most beginners fail
because they just open the software first and then try to plan it
throughout editing. But with short form content,
clarity is everything. So think of your videos as
like a marketing pitch. You basically have 3 seconds
to capture that audience. And in order to get closer
to that perfect hook, you have to ask yourself
a few questions. The first one is,
what would stop someone from scrolling
to come see your video? So is that like a
question, a movement in the clip or like
a bold statement? Whatever it is, you have to
think about that because that's going to
really contribute to the number of views you the second step, once
you have that hook, is to have one clear idea. What is that whole video for? Are you trying to
promote a product? Are you trying to show people
your experience traveling? Are you showing a recipe? What is it that you
want to communicate? And it should be one idea if
it's gonna be a 32nd clip. The last thing is to
keep it very polished. So if there's any sort
of awkward pauses, any sort of like breaks, take those out, trim, split, and refine them so that everything is straight
to the point, and it flows well with whatever audio you have
in the background. With that in mind, I'm
going to be doing, like, a peaceful video
where I'll have, like, a bunch of
clips of nature. We're going to put a
nice music in the back, and I'm just trying to show people my
traveling experience. So we made our project. In the next lesson, we're
going to import and start kind of rough
chopping our video. So let's go ahead and do that.
18. Editing Start to Finish: So let's go ahead and import the videos that are
in the resource pack. I'm just going to
click on this guy. So here are the footage. There's five of them. And as you can
see, they all have the similar theme of
people and nature. So if I put a random
animation in between, that's gonna kind of
disturb the flow. So we have our first clip, which is just trees. This is trees in winter. This is people on horseback.This like a
distant nature shot. And then this is someone
about to go for a swim. These are all
downloaded from pixels. You can download
more if you want. But for this chapter, we're going to be dealing
with these guys only. If you're doing this with
your own footage and you're importing directly
from your camera, this is the time where you
get to take things you don't need if you
accidentally imported them. Maybe make a folder if
you took different takes. But for me, I'm just going
to deal with these guys, and I've kind of named them
for the resource pack, but you can just
right click on each one and give them
something more specific. So maybe like green trees. And you can see
where renaming it just like that snowy trees. I just name these so that you know which clip
you're dealing with. It doesn't have to
be that descriptive. The drone, and then we
can call this one surf. Okay, so now I have the names and everything
is pretty organized. So let's go ahead and
drag these guys in. I'm going to decide on the
order as I'm dragging them in. So because this is
meant to be, like, a peaceful video
and I'm trying to maybe spread some
positive messages, I wanted to start on, like, a really peaceful scene. So as you can see, the
sun slowly comes in. We're slowly zooming
towards the tree. That's a perfect
opening for my case, because I have set the
plan to be that way. So right after that, I do want
a little bit of diversity, so I'm going to cut
to something that's a little bit different
from this camera angle. So something that's
not zooming in. So that could be the
horses. Just drag those in. And I'm not going to worry too much about trimming right now. I'm just dragging them in and
thinking about the order. Let's do our drone
shot, the snowy trees. And then finally, maybe we
could do the surf first, kind of sandwiching
things together. So the end of my video
is also peaceful. It's like a very
slow upward motion. Again trees. It's very, like, peaceful over here,
and we could maybe put a text on the top. Okay, so I have my clip. And this would be the
time where you would trim it according to where you
want to publish this. So if this is
supposed to be like an Instagram reel and you
want it to be 30 seconds, you would have to
think how many seconds you want to allocate to
each of these clips. But I'm going to do a
horizontal 1 minute clip. So you can see it's
already close to 1 minute. I only need to take out a
few seconds at the end. You can make your
trimmings here if you plan on not
putting any audio, but since I do want audio, I'm going to basically align my trimmings
to the sound waves. So let's go ahead and get
something from the audio tab. I'm going to search
for Peaceful. Let's see what comes up. Okay, so I like this one better. I'm just going to drag it in
my timeline just like that. So notice that there are some
peaks in these sound waves. That's what I'm
going to use to make my cuts. So when I hit Play. So right here where it goes down and there's a peak right here, I'm going to make a cut. So I'm going to select
my video and then hit Commander Control B
and delete the excess. And then you can see the
horse's video just cuts right, basically snaps to where we are. So another peak, I'm
going to just zoom in. You can use the
slider here as well, and position your playhead
right at that peak. Grab the video Commander
Control B, delete the part. That's extra, and then
it should snap back. If your clips are not snapping, it may be because you don't
have these turned on, so just click on them
until they're blue. All right, so there's
our next clip. So here on purpose, I'm
not gonna match this with the peak just so that
it's not predictable, but you can do that if you want. So here at the end of
the video, there's, like, a little bit
of camera shaking. I'm gonna cut that
out. So just grab the end here so that
we have a stable shot. And then I'm gonna end
my video before it goes to this peak just
so that it ends on, like, a lower tone. So let's trim our video like that and cut the
rest of the audio. So Command and Control
B again, delete. And now we have a
very rough chop. One thing that I do want to do is looking at the
speed difference between all of these clips. I'm just going to mute
the audio for a second, click on the speaker icon. So this video is very slow and then the horses
are a little fast. So what I'm going to do
is drag this guy up. Let's turn this off for a
second, drag it up like that. And using the speed
property for the video, I'm just going to lower
so that it's not as fast. So this would match better
with what we had initially. Then we could cut the excess and put it back
into our sequence. I think this guy is fine, but if you want, you
could do the same thing. Okay, so that was a
speed adjustment. Now, for transitions and, like, texts and stuff, we're going to do that in the next lesson. But for now, just
make sure you have a good basework
for your project. If you want, you could
add in more clips, maybe change the audio. You could even add in some
sound effects if you want. As for the audio, I'm going to bring
it back, and this right here is good enough
for me as my basework. In the next lesson,
we're going to add in some text to the top. We're going to add
some transitions and try to smooth things
out before we export.
19. Adding Text, Music & Transitions: So this is where we left off. We made a rough
draft of our clip. We split it, and we also
slowed one of our videos down so that it's flowing smoothly from
the start to finish. We also added this audio track. And in this lesson, we're
going to add in some text, some color grading,
and some final touches for this very simple clip. So what we're going
to first do is put in the all here portion, which is the text, and
then we'll do some overall color grading near
the end of the lesson. So in the text tab, I'm just going to put
a default text for now. Rag it like that. And in the animation tab, I'm just going to look for
a very simple animation, such as fade in so that my
text can fade in and out. And then the same thing
for out, so fade out. So if we zoom in here,
you can see there's, like, a line at the start
and one at the end. So now we have this effect. Let's give this a
different text, type something in,
such as I know, nature is the remedy
for the cure. Command of Control A
to select everything, go back to text and just style it the way
that you want to. So we have some fonts. I'm going to do, like,
a typewriter effect. Just grab it like that. Work with the font size. It's a little too big. And then I'm just
going to give it a shadow so that
it's easier to read. For the shadow, we're
going to blur it out and then reduce the opacity. So now we have the side. I think the shadow is still
a little too harsh. Alright. And I'm gonna sink the fade
out with the sun coming in. So let's pull it back like that. So it fades out with
the sunlight. Okay. So that's our first text, and then we could
add in some more. So let's go to Template
and see what we have. So on this side, I'm gonna
look for maybe retro stuff, vi vlog. Let's take a look. So let's put this here. This is one of the templates. I could dap a click and
change the wording. Let's see. Actually,
I think I'll stick with what I made in the
beginning, something very simple. Just hold down,
alter our option, and then click and
drag it to duplicate. So I'll have it start over here, and then we could do
like weather on horses. Another duplicate. And I'll do, like,
or in the sky. It's actually to all lowercase, so I'm just gonna click on this button to make
it easy for me. Same thing like that. So whether
on horses or in the sky, then we have two more. So just duplicate
it two more times. The sky's a little too long. Okay, so around here, I'm going to make another duplicate and then
trim it like that. And I'm just gonna
put it in the corner, maybe like a things
for watching message. They get lower case just so that everything's and this
is gonna fade out. At the end anyway. Alright, so we have some
basic text effects. Now I'm going to
work on transitions. Now, personally, because
I do want this to be a very slow moving
and mellow video, I'm not going to be
adding any sort of transition in between
the two clips. That's what a lot of the
professional editors will do because if you put
something very distracting, it's going to take away
the attention from all the storytelling and all the mood that you
were trying to convey. So I'll just do one
in the beginning. So go to Animation. First clip selected, Animation. And I'm gonna try
to find fade in. Let's go transitions,
actually. Look for fade. Okay, I think we have fade
is sometimes hard to find, so So the only transition I want to use is for
the end of my video. So I'm going to
select snowy trees, go out and choose fade outs. So that's gonna fade
it out like that. Alright. And we have our music playing in
the back as well. The last thing I want
to do is sort of blend the text into the video
because it's really, like, harsh right now. You can do that by grabbing the text and then
going down to blend. So if you want to, you can lower the opacity or
change the color. So I'll choose a
different color, something a little bit
more mellow like this. And I'll just copy
this code so I could use it for other
spaces if needed. So here is fine. And, yeah, I think only this one looked
a little weird. Alright. Now the last thing is to add in some overall color
grading or effects. So you can do this yourself manually by grabbing
the clip and then going to adjust where you get to play around with
the different settings. So basic is going to
let you deal with, like, the lighting, the colors. So this is the let me
choose a better frame. This is, like, the warmness
or the coldness of the clip. The tints, how saturated it is. And you can explore
all of these. I'm just going to
lower my contrast. And then let's see
what else we have. We have single color
adjustments so I could maybe turn this
green and change the hue. So I'll bring it more
towards the yellow side, maybe lower the saturation. Then we have the horse video. For this one, I think
it's a little too dark. So let's increase the exposure. This one looks pretty good, but I do want the colors to
stand out a little bit more. Let's increase the saturation. And these two are fine. I'm
not gonna do anything here. Alright, so we have the
effects inside the clips. These are, like
for color grading. But again, if you don't
want to do this manually, you can just go to filters and drag one of
these on your clip. So that's gonna add the
filter. Going to undo that. There's tons of options
you can choose from. So just explore and
see what you prefer. You could add some effects. So there's some, like,
raindrops, snow. These are not that
realistic, in my opinion. But if you wanted to
just drag it on top, now you can see I'm getting
these sparkle effects around. So that's not really my taste, but feel free to explore
and just drag them on top. Okay, so now we have our video. The audio is there, as well. And maybe I'll just
increase this. So that's the end of
my editing phase. I'm going to export it
in the next lesson, and we're going
to take a look at some of the options and what I should be doing
for a horizontal cinematic clip like this one.
20. Exporting for Social Media: Let's see how we can
export our video. This is where we left off
in the previous lesson. All you really got to
do now is just press the Export and then choose
how you want it to be format. So when you hit Export
This Window Pops up, we already looked
at this briefly, but just to refresher, you will give your video a name. Let's call it my video. Choose a location,
choose a resolution. Because I want to go for
something cinematic, I'm going to leave
it at ten ADP. But if you want it to
be very compressed, you can go for 480 or go really high if you have the
foundations for it. Then I'll leave the bit
rate as recommended. Codec, I wanted MP four. Frame rate, I'll leave
it 30 because I think all the clips that I imported
was 30 to begin with. And yeah, so I'm just
going to uncheck IF and make sure
everything else is fine. So once you're done,
you hit Export and it should the
location that you chose. So here's our finished product. So that's how you can format your videos from
start to finish. We took a bunch of footage
from the resource pack, combined them in the order
that we wanted to be. And the overall theme
that we planned for this lesson for
this video was, like, a peaceful, inspirational
nature compilation. And I chose to do it horizontally because I plan
to put this on YouTube. But if you guys want, you
can go back and change it to a vertical video or maybe
add some more effects. So hopefully you guys
were able to get a similar result and you're
happy with what you have.
21. CapCut Mobile: Interface Overview: Mm hmm Now we're going to be
looking at CapCut mobile. So I have it in my
phone right now, and the interface is
pretty much the same. There are just some
things that are collapsed and maybe
in different places. So this is what happens
when you first sign in. You don't have to sign
in, but there's some, like, things that will
pop up and preferences. When you set all of that up, you should land in the same page. So the first place it
took us to is templates because that's the
fastest way you're going to be able to edit things. So over here, we can
see tons of templates. There's also a search boar right we already saw templates
in the desktop version, so it's pretty much
the same idea. So you can search for something that you want to
edit the video for. So, let's say, food. And I'm going to get some
pretty cool templates. Now, in order to use a template, all you really got to
do is click on the one that you like and click again. And basically, all
you're going to do is replace these clips
with your own videos, but the texts, the transitions, they're all going
to be the same. So when you click
on use Template, you're going to be
able to use it. I'm going to show you guys
that in a further lesson, but for now, I just want to show you the general differences. So that's a template tab. You can now move on
to the next thing. The next thing is the AI lab. That's everything regarding
artificial intelligence. You don't have to use this because there's a lot
of templates already. Just to, you can make templates with
artificial intelligence, such as these things that
you see right above. You can make fictional
stories if you want to do something
for your social media, some viral stuff,
religious videos, and there's so many
other categories. So over here is where you
get to create a new project. We can see the big
button over there. You can jump into something
that's quick and easy, such as AutoCut where
you give it a video, and then CapCut is
going to automatically take out the pauses,
any sort of, like, disturbance that may have came and give you the edited
clip in the end. We also have retouch. This is regarding a human
subject in your videos. You have auto captions,
AI generator, if you want to make an image or a video, removing
the backgrounds. And if you click on All tools, you're going to see a
bunch of other things. So not all of these are free. You can see that some of
them have the diamonds, some of them have the red thing, which is just an indication that this uses artificial
intelligence. I'm going to choose a
video from my library. This is the video that I chose. You can trim it or
add it the way it is. Just click on the top right. There's a little circle. Now I have that selected. And then at the bottom,
it says add one. So just click on that, and that's how you're going to
build your very first project. So starting from the top, we have the Export button, same as the desktop one. Everything regarding quality is going to be on the left panel. So on the left side of Export, right now, it says AilraHD. That's what we have
right now, but you can change the resolution
of your clip, the frame rate, the bit rate. You can turn into an HDR video, and there is going
to be a watermark. You can just remove
that if you want or position it somewhere
that you would like. So there's, like, the
upper left, upper right. You know, if you want
to keep the watermark, it is free to remove
it completely. Alright, so that
is the resolution. There's a search bar where you can search for
a certain music, in effect, something
from your own clips. But you can see
some of the sounds. Got some stickers down there. And yeah, anything for quick
access, you can look it up. Now, down here is where the bulk of the mobile
version is going to be. So on the desktop, we will see the different
tabs on the top left. Now they're all lined
up at the bottom. So edit is where you
are in your timeline. So all the timeline tools
are inside the Edit tab. We have split volume
animations, effects, and all the other
things that are pretty much identical to
the desktop version. So you can see
there's so many if you just keep scrolling
to the right. So they basically took the
animation speed effects color grading and
just put it into one line down here
inside the edit tab. The next tab is the audio. So this is where
all your music are. The voiceover is also in here. You can see it says
record, text to audio, brand music, custom voices, and a copyright checker. Then we have the text tab. You can add regular
text captions, stickers, draw something,
have templates. And even do something
with auto lyrics. We have the effects
overlays, captions, filters, and yeah, pretty much
the same things you've seen on Desktop. They're
now at the bottom. Now, the timeline is this
portion in the middle. You can see that right now,
I only have one track. If I click on it, it's
going to get highlighted. I could see that
it's 5.7 seconds. Grabbing the left and right, I get to, you know,
trim my clip. If I click on my
video or tap on it, I still have the
options down here. So I can crop it,
add an effect to it, maybe slow it down, remove the audio and all the other
stuff that I get to do. Below my video, you
can see that there's an add audio option
and an add text. So you can click on either
one to add something. So if I do audio, it's going to bring
me to the audio tab. I can maybe look for a sound, and I'll just grab
the first one here. So now I have an audio
underneath my video. If I click away again, I have the option for text. So if you click on that, it's going to get you
to the text tap. You just add a text. D will tap the middle and
just type something in. Once you're done,
hit the checkmark. You can also add
in, like, effect. Like this and just have
it be on your timeline. You can also press and
hold to move these around, expand their duration by
grabbing the left and right, and just build up your layers like we would do in
the desktop version. If you want to add more footage, there's the plus on the
right side, the white plus. When you click on that, it's going to take you
to your library, so you just grab as many
videos that you need, and it's going to come up
right here in the timeline. You can also delete
something you don't need such as this CapCut animation. I can click on it and hit
Delete. And there we go. If you want to
preview your work, you can hit the Play button, and it's going to start playing. So that's the quick overview
of the mobile version. You can see that it's
not that different from what we have on Dektop. It's just that it's a lot more cramped and a lot
more accessible. So if you want to
quickly edit something, the CapCut mobile version
is pretty handy to have. Now, regarding templates,
because that's usually what people come to
for this version, I'm just going to go
on the next step. I closed my previous project, and you can see that it's
listed right here as 0224. You can rename it, duplicate it, delete it, favored it, whatever
you choose to do. But now I want to move on to templates. So that's
on the right side. We already looked at this,
but I want to show you how you could alter a template
and use it for yourself. So, let's say we want to do
a sky. I can see a preview. If I like it, I could
hit use template. I could like it, comment, and even save it to my
favorite on the bottom left. So let's click on use template. So immediately it brings
up my video library, and I get to choose what I
want to go into this template. Now notice on the bottom,
there's like seconds. So the first one is 5.6 seconds. Number two is 3.7 seconds. Those are basically
the time slots that you get to
put your clips in. So for example, I
will put my dog here. It moves on to the next one.
I get to put like this food. The third one, I'll
put this street, these flags, and then
maybe another dog. So once I filled up
all of those spaces, I could click on
the pencil to edit it or hit the little
minus to remove it. But let's say I'm happy
with my template, I'm going to click on next. And it's going to load
the effect and basically take your videos and turn
it into that template. I could export it
on the top right. And if I changed my mind, I could just hit Backspace, save the project for later, or just delete it entirely. On the top, there is
categories for you to look at. So you can look at
business videos only. You can look for
holiday season stuff. So that pretty much
sums up the overview, now that we know the
templates as well. In the next lesson, we're
going to be looking at how we could edit a video
using CapCut mobile. I won't go over
every detail because it's the same tools as
the dek stop version. They're just placed
in different places, and they may have fewer
settings to work with. So let's go ahead and
start doing that.
22. Quick Mobile Edit Demo: Let's work on a quick demo on
how you could edit videos. So the first thing I'm going
to do is just click on the Plus button for new video and then choose something
for my library. So I'm going to hit
Add on my video, and it's back in my timeline. So the clip has some audio. Let me just increase the volume. So the first thing I want to
do is get rid of that audio. I'm just going to click on
the video itself and then go to volume on the bottom and reduce it all
the way to zero. So now when I play it
back, it has no audio, and that's perfect because I
want to put a song instead. So clicking on the
add audio underneath, I'm going to go to
sounds and just choose something that
I'm going to like. Let's look at the categories
and maybe choose, like, a dreamy one and just
listen to the options. So that's something
that I want to use. I'll just hit on the Plus
button on the right side. And now I have it
playing with my video. Next, we're going to
add in some text. So there's a lot of templates
that you could use. So just click on
text at the bottom, and we can add a text template. It's right next to draw. Then we're going to
look at some of these. Let's try something classic. I guess I'll do this guy. And then in the box here, I get to change the text. So let's call this my
fun Travel travels. And then when we're done, we
could click on the bottom, the thing on the left
side of the box, and that's going to collapse the keyboard and then
hit the checkmark. I can now position this text somewhere in
the middle by clicking, holding, and dragging it, and now it's going to pop
up after a few seconds. There we go. Let's say I want to add in
some more elements. I could go over to some
stickers, perhaps, and choose, like, a fun
one like this heart. I'll just mute this. Put the heart wherever
I want it to be. So let's do it right at the
bottom, hit the checkmark. And now I have two
elements for my video. If this is too long,
I could click, hold it and try to
match it with the text. So I want to make
sure that it does not linger longer than my text. And we can do
something like this. Now, the stickers shows
up out of nowhere. There's no animation
at the start. So with the sticker selected, I'm going to go down to
animations and then do, like, for the one. We'll do something that's a little subtle, like, dissolve. You can increase the duration
and then hit the checkmark. So you can see the heart now
dissolves into our video. Alright, so we have that. I'm going to remove the
CapCut animation at the end, and let's give our video a fun little animation for
the start and the finish. So again, with the
video selected, I'm going to go to Animations. Go to combo because I wanted to have a start animation
and an end one. And once again, we
have tons of options. I'm just going to
search for fade, because that's, like,
the most simple one. Let's do screen fade. Maybe give it an ounce
Animation, hit Cancel. Let's try something
else. Fade out. And then we can maybe do something different
for the in animation. We can do let's see like a turbulence one
just to play around with it. And at the bottom, you
can see that we have the red one on the left side and the right one
on the right side. Those are just the duration for your in and out animations. So you can see in is 8 seconds. You can make it five, just to
match it with the out one. Press the check mark when you're done, and
when you hit Play, you now have animations for
the start and N finish. I'm just gonna cut
this around here, and that's gonna give me a little bit more of
an organized look. I'm going to add
another animation for the out just because we sort of cut it out
with the video. Okay. The last thing is some
effects for my videos. So just click on
the clip itself, then go to effects
on the bottom, video effects, and we can do
something like blrifocus. And now there's, there's
an added effect in addition to the transitions.
Just like that. You can see the music is really
long once I clicked away. So I'm just going to
click on it around here with my timeline right
at the end of my clip, and we're going to hit split while having the audio selected. Now it's going to select the other half that
we don't need. So just hit Delete and then grab the first
half of the audio, click on fade and we can do a little fade out so that
it's, you know, smoother. Once I click away, I
should be seeing my audio, my text, my sticker,
and my video. So let's hear what
that sounds like. You can see that
is the fade out. And if you want, you could add some filters to
the video itself. So with that selected, I'm going to scroll all the
way to the right for filters, and we could do,
like, a fun coloring. The intensity slider
is at the bottom, so just work around with that. I'll do City because it is
snowing in the video as well. And now I have a
nice little filter. Alright, so there is
my very simple video. If you want to do a full preview on the left side of the screen, there is a expand button, so you can just look at it on your full screen and see
if you missed anything. On the bottom right,
you can zoom out, and we could now
export the video. So when you click on Export, the only thing that
you end up choosing is the location and the stuff that we looked at on the
desktop version. So it's not that different. Right now I'm using
the standard features, so you can see that I
need to pay for this, but you can easily switch them out for some free versions. So the Export tab is
very straightforward. You just click on it, choose where you want to export it on. And if you want, maybe change your resolution and the
quality, and that's about it. So there's more options for exporting when you're
on the Dektop version. The mobile gives you
something that's pretty flexible and
pretty easy to work with. So as you saw, the
mobile version is a lot more condensed, but it's really good
for some quick results. So you have the template tab, which is the first thing
CAPCA takes you to. You just put in your
videos instead, maybe change a few things,
and then you're good to go. Now that you know
how to work with the desktop and the
mobile version, you can now decide
which one you want to use depending on the project
you're dealing with.
23. How to Practice & Improve Faster: Mmm. Now that you know
all the basics, the best way to improve
isn't just endless editing. It's actually smart
ways to practice. So here are three tips
on how you can improve after this course using all the stuff that
we have learned. The first tip is to always have mini projects for yourself. This could be taking videos for different creating videos
for different industries, and then you can try
different styles. For example, one day you make a short 32nd marketing clip. The next day you make
like a travel log. This could be done
with your own footage or with footage
online. It depends on. These mini projects are going
to be more goal oriented, and you get to try different
variations at the same time. The second tip is to go from online downloaded footage
to your own footage. You can use your
phone, a camera, if you have it and
just try to record your own clips and then edit
them into something final. Reason why this helps is
because as you're recording, you can kind of imagine how
you're going to edit it, and that's going to
give you more of a flexible way to
combine your creativity, your own work into
that final product. So you're not just taking downloading other
people's videos that you purchased and trying to make it
like a nice video, you're going to be planning
everything from scratch. And that's going to be a
whole different experience. The last tip is to
repeat and refine. So if you finished a
video editing project that you're really happy with, try to alter it in smaller ways and create
different versions from. Way you're able to catch
onto the shortcuts faster, learn how to combine effects. Maybe you'll end up with many presets that you
made for yourself. And that way, you're just
not stuck with one concept, but different
variations from it. And just to close
off the lesson, remember that skill comes from focused repetition and not
just endless clicking.
24. Common Beginner Mistakes: Most beginners make
the same mistakes. Knowing them now will save you a lot of time and
effort in the future. So the first mistake is
putting on too many effects. You may find it tempting to
grab on a bunch of filters, a bunch of transitions, but you're going to
be moving away from the composition of your video and more towards
the aesthetic part. Now, that part is
really important, but you want to mainly focus on how you edited the
clip and leave those final adjustments to simply elevate and not
replace your entire work. So let's say you worked on a log, you're going to need to focus more on how
you edited that vlog instead of trying to put in five color grading filters
to make it stand out. So make your video stand
out by proper editing, transition, maybe some
text, the music choice, and so on forth and not just by putting whatever
templates available, piling them on top,
hoping that it's going to make a
really good clip. So Less is more focused
more on storytelling. Second mistake is
ignoring audio. Sometimes you just
have this perfect clip and you just drag
a random audio. You don't really
check to see if it matches the mood of your video, if you have the copyright
access to that, or maybe you just don't
put audio at all. Now, you don't have to
put music for everything. And when I say audio, I'm
talking about sound effects, music, and maybe
voiceover in some cases. But basically, if
your goal is to tell a story with that clip for
whatever purpose it is for, you have to kind of use audio to balance it out and elevate
it, as we mentioned. Not only should you be using
audio as much as you can, but make sure you're
adjusting the volume. If there's background noise, remove those and maybe add some sound effects
to complement it. So let's say you have
a video of a forest, instead of just putting
a pop song behind it, maybe you can put in
some birds chirping, some wind rustling
sounds just to create that atmosphere
that your viewers can basically immerse
themselves in. The last mistake is skipping
organization completely. You have a lot of videos
and audios to edit, dumping them into your media tab is going to be a bad practice. Make sure you're organizing everything in folders,
renaming them. And that way, you can
always go back and find something you need instead of just scrolling through, clicking on each one,
checking the previews to see which video was the one
that you actually needed. Having an organized
space is also going to be really helpful
with bigger projects. Your timeline is going
to be color coded. It's going to have names, and you're just going
to have an easier time. So once you avoid these
three big mistakes, your workflow is going to
become smoother over time.
25. What Comes in the Intermediate and Advanced CapCut Courses: Once you're comfortable with
the basics from this course, we do have two more courses that you guys can look at if you want to continue
your CAPCA journey and become a professional. The first one is an
intermediate level one. Over there, we're
going to be looking at more applications, and I'll be going over all
the AI features and some of the hidden tools that
you may have missed or that we didn't go through
them in this course. There is the advanced course, which is going to be solely
for professional editors. We're going to be looking at
more structured projects, how you can deal with some
of the bigger errors, how you can organize your work, and how you can get close
to a very cinematic output. We're also going to be
looking at animations, creating your own
presets and transitions, and maybe your own audios. So think of this whole journey
as a flight of stairs. You have to start with
the foundation first and then move up to the
next whenever you're ready. Kind of build upon each other to make sure
that you're fully confident using CapCut for basic use before moving
on to our next courses. You can also go back to the courses whenever
you needed to, but it's good to have
a strong foundation before moving on to the next.
26. Class Project: Create Your Own Short-Form Video: Now it's your turn.
For the class project, you're going to be building
your own short form video using everything that
you have learned so far. Your video could be
any of the following. It could be a mini
blog, a tutorial, a promotional clip, or
anything else that's creative. Once you have the idea, you should then move on
to planning the video, knowing exactly
where you want to publish it and what the
purpose of that video is. Then you're going to be gathering the clips
that you need, edit them inside CapCut, polish them with some texts, some caption, some
stickers, if you want. And then finally export it to the place that you
want to publish it. You're done, you can upload the finished video to the
class project gallery. If you don't want
to export anything, you can also send
in some screenshots of the first frame
and the final frame. Alongside your final results, you can also give
us a description as to what made you want
to make this video, what you found challenging, and what else you
are curious about. You can also tell us if you made this video for a specific
platform like TikTok, Instagram, YouTube,
Facebook, or anywhere else. I will be going over all of your submissions and we'll provide you with some feedback. So good luck on your project.
27. Congratulations! What’s Next?: Now learned how to edit your
first video using CapCut. You also know the
difference between the desktop and the mobile
version, what transitions are, how you can use your timeline, how you can add text, and how you can export
your content properly. The best way to improve
is just practice. So try different formats, resolutions, try
different effects, explore the new templates
that are coming out, and see what else you can
create using this program. And if you have not uploaded your class project yet,
go ahead and do that. Thank you for taking this class, and I hope to see you
guys in our future class.
 Skillademia Academy, Creative Skills for the Future