Transcripts
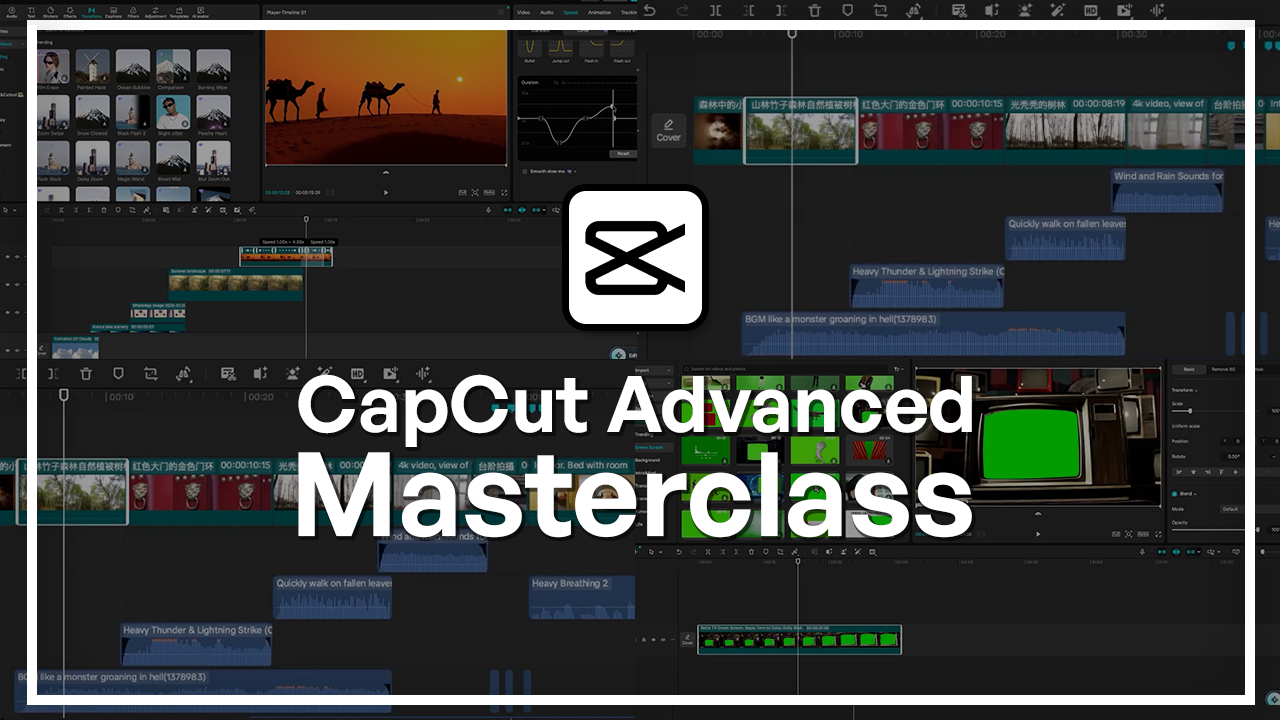
1. Welcome to the CapCut Advanced Masterclass!: Welcome to the CapCut
expert course. If you have reached this point, you already know how to edit. Now is the time to
make your videos more intentional, cinematic,
and professional. In the class, we're
going to go beyond basic editing and beyond
faster workflows. I'm HosteKihi a freelance creative professional
and online instructor. Have taught over 200,000 students across more
than 15 courses. Through the courses, I help students learn more weights
that they could express through creativity and learn practical skills that they could apply to their digital contents. In my own work, I
focus more on content that is polished,
intentional, and engaging. And that's exactly
the things that we're going to focus
on in this class. We're going to start with
some advanced techniques such as working
with multi tracks, managing your timeline
with markers, managing layers, and using keyframes to create
more smooth motion. We're going to move on to more visual effects and compositing. We're going to look
at green screens, thumb color grading, overlays,
and many more things. You're also going to learn
how to blend audios, shortcuts to speed
up your workflows, and how to create
thumbnails that will actually attract clicks. The core of this class
is a cinematic project. For the project,
you're going to be creating a short, scary clip. We're going to do it all from scratch, from start to finish. We're going to go over mood, visual design, sound
design, and overlays. Effects are going to continue onto the mobile
version of CapCut, where we're going to
learn more shortcuts, more visual effects, beat syncing, and
many more things that you can achieve
from your mobile. By the end of the class, you're going to be shaping
how all of your videos feel. But without further
ado, let's get started.
2. Advanced Timeline Workflow: When your projects get bigger, you're going to be dealing
with a lot of layers. And it's very important
how you maneuver that and how you go about dealing
with multi layer editing. So in this lesson,
we're going to create a more complex project. I'll just be dragging media
in from the Capcot library. And that way, we can see how we could begin organizing
those layers. What are some of the
ways that we could work on one while keeping
the others as they are? And I'm just going to import
a bunch of videos from here. So it doesn't really
matter because it's more about the layers that
we're going to work with. So I'll just go to
scenery for this lesson, and I'll go for maybe this out and try to layer a bunch of things
on top of each other. And as you can see, some
of the clips are long, some of them are short,
and this is the, you know, perfect situation. Not going to be dealing
with audio in this lesson. That's going to be a
few lessons forward. But for now, just think
any sort of video layers. Let me just zoom in here. Okay, so when you first drag
everything all at once, it's most likely the case
that they're going to be snapped to the
side like this. Before you bring in your clips, it's a good idea to make
sure that's the correct one. So in our case, you could just use the star to
favorite something. Let's say you just plugged in your SD card and there's
like 100 videos. Instead of importing
all of them, bringing them into the timeline, you can watch through each one. So just dapple click on it, and it's going to
be previewed here. And then if this is
the correct video or if it's something
that you want to keep, you just hit the star button. So you can see that this clip
is not in our selection. So just by Dapple clicking,
we're only previewing. Once you have those
selected videos in, like these that I
have down below, you can start
moving them around. So with layers, you can
think of it as though you have a bunch of books and you're looking at
them from the above. So the top video, top layer is going to be what's going to show up
on the playback. So you can see that when
the first video ends, we jump to what's right below. So these two ended early, but this guy is visible, so we're going to see this
clip and then the last clip. So that's just a review of how layers work in case
you weren't familiar, and we're just now
going to move them around in the order that
we want him to show up. So let's say I want
the first video to be of the clouds
and then I want this leak to show up
and let's do this guy. And I'll put this in the end
and this guy in between. So this right here is fine, but it's not that organized. And when it multiplies, let's say you have 50
videos in one project, it's going to get very hectic. So try to build a staircase
in your timeline, and you can easily do that by changing the order
of your videos. So we can see that
the second video that shows up is
actually this guy, but this clip is
currently on layer two. So all we're going
to do is click on this guy and drag it down. So you can see a blue line appears right above the clouds. Once I let go, we just change
the position, the order. And I could do the same
thing with this video. Just got to find
the middle line. There we go. So now we're
building that staircase. And let's say this
is the last clip. So now that everything
is ordered, this is going to be a lot
more helpful for you, especially if you want
to do transitions. You know that you need to
find a transition that's suitable going from this
scenery to this scenery, and then just go about
doing the rest. Same way. Now, we already know how
to trim and cut clips, so I'm just going to speed
through that and just do that. So now I have a full staircase. Now, if you want to blend
two videos together, you could have them
placed like this. So both of them are overlapping. And while the top
video is playing, we still have the
bottom one underneath. Think, Okay, I'm just
going to move this to the side so that
they're perfectly aligned, and then bring this
in a little bit. Okay. So just go on the top one. This is just an example
of layer application. So just go over to blend, hit the triangle to open it up, and you could try one
of these blend modes. So let's say multiply. It's going to darken
the two clips together and have them
overlap like this. So you can see this guy
just shows up and it maybe intensifies the video if that's something
you want to do. Obviously, we have a lot more that we could do on
the side for video, so feel free to experiment
and go about doing that. Let's say you have
the perfect sequence, but you change your
mind about this clip. Instead of reimporting something and then dragging it down, trimming it, you can
just replace that clip. So right click on the video
that you want to replace. Then go to more clip
actions and hit Replace. So when you do
that, the window is going to pop up for you
to import something. And I'm just going to bring in something from my downloads, and then you can see that
it's going to be right in that same placeholder. So I just brought in
this image just example. You can hit Replace clip, and you can see that
it just flipped it out and put in this image. I did not have to trim
anything, move it around. It just completely
changed the content, but kept the placement. That's how you can
keep your timeline organized without
having to start over. We already know how
to use the top bars. You can use them for
snapping features. So that's generally
how you can work with multi tracks when
it comes to video. We're going to take a look
at blending audios later. But you can blend
clips like we did here with the image, the lake. You just drag them in
between two clips. In our case, we don't have two clips right next to each other, so we're going to have
to utilize animations. And that's going to be the
topic for our next lesson. So I'm just going to keep the
timeline that we have here, and we're just going to
build it on in this chapter.
3. Keyframe Animations: Keyframes allow you
to animate between adjustments when it comes
to clips and audio. This is the sequence that we
made in the previous lesson, and I'm going to focus on this longer one so we can see how we could apply multiple keyframes and make various adjustments. So just place your playhead at the moment where you
want something changed. And then when you come to
video on the right panel, you can see these diamond shaped symbols that are just keyframes. If you don't see it being blue, that means that
there's currently no keyframes at that moment. This is the moment that we are paused on, so 8 seconds in. And say I want to maybe have a sequence where we zoom in for a few seconds,
then we zoom out. If I wanted to do this
the traditional way, I would have to cut my clip
and then use a transition. But now we're just going
to do it with keyframes. So go to scale, which is the zoom in and
zoom out property. Click on the diamond shape, and you can see that we got ourself a diamond on the clip. Then moving forward,
make another one. Can see when there is a
keyframe at that moment, the diamond is colored, and then one last one over here. So basically, we're going to
be neutral at this point. Zoom in here and then zoom out. So all we got to do is go
to the second keyframe, which you could
just scroll past it like this or click on
the arrow right here. So it goes to the next keyframe. Because if you're a little off, you're going to end up creating another one when
you make a change. So let's click on next keyframe. And once this is full, it means that I'm currently
editing a keyframe. I'm just going to grab the
scale slider and Zoom. And then when we
go from the start, you can see that
here it's normal, zooms in and zooms out
to the original video. So think of this as
different points, and whatever's happening in between is the
keyframe animation. So this is a very
simple example. Now, you could delete
your keyframes by right clicking and clicking on Delete
or just click on Backspace on your
keyboard, just like that. And you can apply keyframes
for various things. So you can see that they're
next to scale, position, rotation, even blending and everything else
that comes after. So if you see this symbol, that means that you're able
to create a keyframe for it. So that was for scale. Let's open up the
other properties and try something else. So once again, I'm going
to make a scale keyframe. So let's make one like this. If you want something to
go back to the original, it's a good idea to make the two keyframes before and after without changing anything and then make that
transition in between. So let's scale right in. And say at this moment, I want my video to
rotate a little bit, and that's where
I get to mix and combine various key
frames together. So what we just did is
regarding scale alone. But right at this moment
on this keyframe, it's going to move it
towards the center. I'm going to grab rotation, make a keyframe right above. So you're not going
to see it here. You can see that it's
only one keyframe. But if you see these two color,
that means there is one. Then I'll go back to the
first scale keyframe, make another rotation one, and then at the end. So right over here. So
when we go to the middle, I'm just going to
highlight it so that I'm changing that keyframe. And now I get to, you
know, add a few angles. Let's say, six degrees, and then we have that
transition happening. So it's going in,
then going out. We could add other properties
as well, such as position. So currently, the X and Y
axis is set to the origin. I could make one, change after
we finish this animation. So if you don't do
a before and after, and say you make one keyframe
and make your change, that's going to be applied
to the whole video. So if I do 50 plus X, the whole clip is
going to have that, 50 plus X effect. So it's really important
to have a before and after if you want things
to transition over time. Let's delete that guy, and I'm going to
turn this to zero. That was position. Let's
try one for blending. I'll make a keyframe here. We actually need a
video from above. So I'm just going to
drag the camel video and then make a
keyframe right here. So blend, we're going
to put three keyframes, just like we did for
scale and rotation. Let's say for the
middle keyframe, I'm going to lower the opacity. And if I get rid of
the first keyframe, it's going to be we
can do a transition. So the first keyframe, I'm going to set it to zero
opacity, delete that guy. So we have zero
opacity going to 100. So we have this fade in
effect without having to use the transitions that
are there. All right. There's a bunch of other
things, for example, with speed, if you want to do
something, you're able to. Let me just delete
these keyframes for now and start over. So let's go for a clip that
has a little bit of movement. I'm going to bring
the opacity up. So we have these camels
and people walking by, but I could use speed keyframes to manipulate the
speed at each second. So highlight the video, go to speed, a custom, and we have that same
keyframe logic over here. So there's a plus button and
you get to move it around. When it comes to speed, there's
a whole different layout. The middle line on this graph refers to the original speed. Anything that goes
up is sped up, and anything that goes
below is slowed down. So let's say at this moment, I want everything to slow down, I'll just click on plus, and we have our keyframe, and then I'll come back, say here and let
everything stay normal. So I want things to slow down, so I'm just going to grab this edge and then
the other edge, then maybe let's make
a keyframe here. Here, I'll make everything
like sped up a little. And the smoother
your curves are, the better the transition. You can use the minus here
to delete a keyframe, and now I have a
much smoother curve. Do something like that. Okay, so we have the video
playing at normal speed. It slows down at this curve, then speeds up and then
goes back to normal. And if we preview that, it's
going to look like this. So you can see how it
performed that curve. You can kind of imagine the speed curve as
a roller coaster. If you guys were here, you know, you would dive down, slowly make your way up before
diving down again. So if I make something
very steep like this, it's going to drop to slow a
lot faster. Just like that. Once you're done, you could,
you know, click away. If you want to
remove these curves, you can just click on none, and now it's set
back to one time, which is the original speed. Now, the same thing can
be applied to audio, the whole keyframe logic. So I'm just going to grab a
random audio, drag it in. And you can see that we
have the same things except we're in the audio tab. So for audio, you can manipulate volume,
fade in and fade out. And what that means is
that at this point, I'm going to make a keyframe. I could set it to whatever
decibel it's on right now. And then around here, I'm just gonna make another
one and make it much lower. And then around here, I could bring it
back to what we had. There's like a dip right
now in the sound waves, and that's what we did
with the key frames. Mm. So this is important for times where you have multiple layered audio. Let's say you have
the background music, the SFX, and a dialogue. You would want to play
around with these so that you could set
the mood and still have you be able to hear the dialogue and enjoy the
music in the background. And that's going to be the focus of the next lesson where we learn how to use keyframes
and blending audios.
4. Blending Audio with Sound Effects: Now, let's apply that
keyframe mentality to audio. So just like we did with
the different sequences, we're going to bring
in a bunch of audios, and I'm going to be
focusing on dialogue, background music
and sound effects. So right now we don't really
have a track for audio. So to make one, you just simply drag in one from
the audio panel. So let's just grab
the first one, drag it right below, and we can put in a
few other things. So let's try to find sound
effects in the other library. And I'm going to match
it to our video. So let's say here we
want the sound of birds. So I'm just going
to look for birds, and we can listen to a few
and see which one is the best. So that's pretty good. I'm going to drag it
right underneath. The second thing is gonna
take remove this picture. So we have four
clips for this guy. I'm not sure if we need
any audio or this we could do like wind and trees
maybe to have wind trees. So this is okay.
I'm gonna drag that underneath and just
build up as I go. And for here, I think I'll do an owl sound effect just
'cause it's nighttime. So let's search owl. Mmm. Mm. Mmm. Okay. I'll drag this guy, and I'm sort of matching
them with the clips. Just drag them like that. I'll offset this a little bit. And for the last guy, I'm not sure if camels, we can find something
for that here. So those are camel sounds. I'm surprised they have it here. Let's just track that
right underneath. Alright, so now, same
as the previous lesson, we have a bunch of audios. And for the dialogue, I'm going to use the
AI tool within Capcut. If you search for text
to speech Capcut, you're going to get
this free interface, and I'm just going to paste
my poem right over here. So generate AI voice, and we could listen to a few of these sounds and see
which one works the best. Let me try one of
the categories. Okay? So these are
just languages. I'll click on the
filters and maybe get someone that's
elderly. Only two. So I'll just create it with
the poetic male voice, which probably
works fine for us. So hit generate, and then
you can download it, put it into maybe who kit
it with the captions. Then you can put it
into our project. There we go. I'm just going
to give this a listen. The time is right when you
feel the winds speeding up. So it's like a low deep voice, which works perfectly with the nature scenes that we have. So position the dialogue
where you want it to be, and we could start putting
all this together. So you could use markers to identify where you
want the sound to be, or you could just do it with
your playhead directly. It's really up to you. I know that each of the lines in the poem is
one of these sound waves. So the first sentence
it's from here till here. Oops. Let's mute the other guys. Right. When you feel
the winds speeding up. So that's the first line
I'm going to make my cut. When the night sky
makes you feel at home, the forest speaks
with all its might. And there's the
fourth one. So I have four lines because
I have four clips, and I obviously want
this to be a lot slower. So we have some dialogue, some music, and then we
can blend it as we go. So let's unmute all the audio, and I'm going to scroll
down so I only see that. Now, instead of just going
up and down like this, I could set markers
on my timeline. So let's say the
video ends here, I'm going to click on Marker. What was that? No, no, no, no. That words marker. No. So I'm just going to
put all my markers on something that's constant, like the background music, and then I'll just
have that selected. Go to the end of each video
and click on at Marker. You could use the keyboard, key on your keyboard, and then you're
going to get these little marks that will, you know, prevent you from
scrolling up and down. So this is where the
other video ends. M again, last video. Well, there's two more. Let's actually move
this a little bit to the right and then click on. I have four markers
on my main audio. Now we just work
around over here. So I know the first
one is bird sounds. So let's focus on these two. And I'll just bring the other sound
effects and match them with the video that,
you know, it's for. So this guy, I wanted to
be in between this area, drag it to the right and we
don't need the extra bits. Maybe two hoots it's enough
because it's an owl. This is wind blowing. Let's put it here.
Use the trim tool to get rid of the extras. And this guy, I
think is the camel. So I'll take a little bit more from this because in the middle, it sounds a little odd. Okay. So the lower sounds
are accurate, but I'm not sure what this
is for the middle section. But anyway, I'm now gonna put in each of these
sentences together, each of the sentence
where it should be. So this is the first one. Put it right at the start, the second right over
here, third, and fourth. So we're adding some space, and I'm going to see how
long my clips should be. The time is right. So this video is too short. I'm gonna drag it like this and play around with the placement of the
clips a little bit. Force. So the placement of
the dialogue is good. Now we just got to
play around with the volume because
we can't really hear what the person is saying
over the background music. So what you could do is
use keyframes here or just turn it down completely.
This is up to you. But I'm going to do the
keyframe method just so you guys can see how you can
apply it to audio and video. Right over here, zoom in here. You can use the bar
up here as well. I'm going to make a keyframe
when the dialogue ends, clicking on the main music, which is the last one. I'm going to click
on a keyframe for volume and then do
another one a bit after. So basically, from the start till this point, let
me just extend this. We're going to lower
the audio a little bit. The time is then you can
see the audio just goes up. Yeah. We're going to do the same thing right
before he starts to speak. We're gonna add a
keyframe and another one before so that the
transition is smooth and, like, it doesn't suddenly drop. Then I'll do one after he
finishes this sentence. So something let's click on it. So now we have
something like this. Night Sky. I just muted all
the other tracks, except the background
music and the dialogue. Let's see what happened here. I'm just gonna try to
match the other side here. The time is right when you
feel the wind speed up. When the night sky
makes you feel at home, And we're just going to continue this for the entire poem. One thing that we do
have to do is smooth out the key framing
a little bit, so it doesn't suddenly
rise up or down. Just repeating the process here. So let's try to match
the decibels, as well. I could do 6 decibels, negative six. There we go. Next one, type in negative six. Okay. So this one's fine.
It should be at zero. This one, we could
do negative six. The other one should be
negative six, as well. The night sky makes
you feel it, huh? Okay. So let's just continue
for the last sentence. So let's make one
here, one at the end, and then one on each side. Negative six. Negative six. And then the rest
is just the music. Alright, so now we have
to work with adding more space between the two
key frames so that it's not, you know, a very
quick transition. Give this a listen first. And you're no longer
in the twilight. Mm. Okay, so this guy is fine, but this guy needs
to be stretched out. Just click and drag
until you have a similar curve
to the other one. If you hold down
shift, you're able to, you know, make the changes
that you were making up here. For example, this guy
is way too steep, and this guy is
obviously very steep. Okay, so let's increase the volume for all
of the dialogue. Time is right. When
you feel the winds speeding up. The nights. So, the original one is too low, so I'm just gonna go for 5.5. And let's cut the rest
of the audio here, trim that, trim that. And similarly, you
could just change the volume for these guys
depending on your preference. So these guys will vary loud. The time is right when you feel the winds When the night sky
makes you feel at home Oops. Gonna cut deep birds. We're gonna learn
more about blending audios in our project lesson, so this is just an
introduction. The time is. But over there, we're gonna
create a scary short film, a scary clip, actually. So we're able to
look at the mood on the screen and better connect the different
sound effects. Right. When you feel the winds speak When the night sky
makes you feel at home. The forest speaks
with all its might. So I'm just going to fade
this out a little bit. And the middle section for the camel audio is
still a little odd. So I'll just utilize key
frames again to kind of dip it in the middle and then bring it back
to the original. So click on that, hold down shift, and just bring it down. Let's do 8.1. Or maybe lower. I'll do negative 12. And you're no longer
in the twilight zone. And there we go. So that was
a quick demonstration of blending audios and using key frames from the first
lesson that we looked at. In the next lesson,
we're going to be looking at some
keyboard shortcuts, and those come really in
handy if you plan to do this in a more professional way or if you're just
running short on time.
5. Essential CapCut Shortcuts: Shortcuts are always
a good way to save on time and work around your
project more efficiently. So in Capcut, you can access the list of shortcuts
from the Help menu. So just click on
that, go to shortcut, and you can see all the
different things that you can press on your keyboard to
make something happen. Now, there's obviously
a lot that you can see, but the good thing
is that you can kind of have different
sets of shortcuts. And if you don't like something,
you can change it out. So let's say I want to add
a shortcut for reverse, I'm going to click on that
empty box and say I want to do Option Command K.
And then click away. So now I have made a
shortcut for myself. And if I don't like a shortcut, I could just, you know, click on it and do
the same thing. So let's say instead
of the left arochy, I want to do Shift left, and I'm going to get an error because
that already exists. So let's do Shift
Command left aroch. That is unique. And then you can
revert it back by just clicking
something on it again. If you click on Reset, that's going to give
you the system default. But there's different
things that you could do. So this is regarding
everything in the timeline. This is for the player right here where you see your videos. Basic are the
universal word cut, such as copy paste cut. And we also have some
additional things here. G to click on Cancel. And I'll just show you some that could be helpful at this moment. So one of them is something we looked at in the
previous lesson, and that's adding markers. So just by clicking
M on your keyboard, you're able to make markers
on the timeline if you're not selecting a clip and on the clip if you are
clicking it first. So M, just to add some markers. The next thing is
trimming your clips. So instead of clicking this, you can select the clip and
do Command or Control B. And that's going to
split it for you in a very fast manner. If you want to trim the
left side, you just hit Q, and it just gets rid
of the left side, and you can undo with one of the universal shortcuts,
Commander Control Z. If you want to get
rid of the right, you hit W, and now the
right side is gone. It's dependent on where
you have your playhead. You can undo with
Command or Control Z, but you can redo. So let's do Commander Control Z. You can redo, which is
to bring something. Doing Command Control Shift Z. So it went back to the
trimming that we had. If you click on Command Shift B, that can allow you to trim
multiple clips at a time. So let's just drag them all together, and I'll click away. So Command Shift B, you can see that I split it
three clips at the same time. Another way to do this
is by clicking and dragging all three with a playhead at where
you want to cut, you just do Commander Control B. So it's the same thing,
but different ways. If you want to
duplicate something, you can click and hold Alter
option on your keyboard, and that's going to
make a duplicate. Can do Command or Control C to copy Command or
Control V to paste, Command or Control X to cut, and then use paste
to bring it back. So those were some very quick shortcuts that
you can look at. Again, if you want
to learn more, see what's currently
available on your system. Each computer will have a
different set of keyframes, especially if you've
already modified it. But if you click on Reset, and if you're on Mac, this
is what you're going to see. So you can take a look
and see which action you do often and then
see the shortcut for. Now that we know some more advanced techniques
regarding blending, key framing, and shortcuts, we can now move on to different
types of visual effects, and that's going
to be the center point for our next chapter.
6. Video Effects & Overlays: An overlay is when you
combine a top image or video onto the one below using either opacity
or blend modes. And that's going to be the focus of today's lesson because you can use overlays
to enhance a mood, add additional textures or add different elements
without having to bring them in separately. So let's start by bringing in a random clip as our base video. I'm going to go
to media library, and we can just pick something
like going to go for life, maybe something that's
a little brighter. Okay. So this guy, I'm
going to drag it in, and it's gonna download
the material first. So when you think of overlays, it could actually be any clip, so I could grab a
second one from here and then blend it
into my bottom video, and that's technically
an overlay. But it's not going to be that good unless I
have a plan in mind. So let's say this
is my base video, and at the same time, I want this plane video to
play right above. I don't blend the top
video onto the bottom, it's just going to show
me what the top video is. So with the top one selected, all I have to do is
go to video Basic, open up the blend menu and
use one of the blend modes. So I could try
multiply to darken it. I could do overlay, just going to kind of
blend them in like this. You can see that it's mostly keeping the contrasted elements. And there's a bunch
more other blend modes. It really depends on what
you're trying to do. Color Dodge, linear burn, and hard light, these are the ones that
brighten and blend. Multiply color burn and overlay are the ones
that darken to blend. So that's the main difference, and these are the ones where
they sit in the middle. And then the ones below are just going to completely
brighten up to brighten up the top clip
to the point that you can't really see the
outlines of our plane. Darken it. On the other end, we have soft light,
and we have screen. So again, try each one, see
what you're trying to do. If you're trying to darken,
you can go for those. If you're trying to brighten,
go for the ones above. So this right here is a
very simple example of an overlay where the top video is an overlay for
the bottom clip. But if you want
something more natural, you would want to grab
a video that's made for overlay purposes
because this plane clip is just a video of an airplane. But if I type in the
search bar for overlay, I'm going to get a few things that are just those elements. So this guy, I believe is in. And if I place it
above my video, it's just a black
background with some white elements
coming in at an angle. So if I scale this up so
that it fits the screen, go to my blend mode
and click on screen, we can see that I'm
only getting the rain. I'm just going to zoom
in my bottom clip. I'm only getting the
rain from the top clip. And this needs
some more editing, but it's a lot more natural
than the airplane example. I could go in with
some opacity if I want to blur it out just to make
it a little bit more natural. So let's just do this effect. I'll get blur, ad that on
there and make the amount a little less because the focus of the clip is on the
girl that's running, so we don't want to
take away from that. And we could just darken, lower the opacity, I mean, for the top clip. So now we have this effect, although the cameras moving
forward in the bottom clip and the rain is static.
So that's another issue. But that was one example
of how you can add rain without having to
download three D elements, adding animations to
them and all that stuff. So we just dragged
in a overlay from the media tab and you can
search for certain elements. So let's say I want fire. I get something that's isolated, such as this guy
with a black screen, once again, I'll scale it up. I could just go in with one
of the brighter blend modes. So it depends on how intense
you want this to be. But then I have myself a fire element or this
white cloud situation. And it's interesting to
see that the white here is completely white because we
chose a brighter blend mode. If I choose multiply, this is going to be
the exact opposite, and it's actually a
pretty cool video effect. The same thing applies here. You can just play
around with this. One very common overlay
that people like to do is light leaks, and
you can search for that. And this just creates a very subtle romanticized
mood for your video. So if you're doing
a log or something, you may want to look into
an effect like this. So I'm just going
to choose screen, and you can see that we
have this very nice, subtle color changing circles just going all around the video. Just like the previous lesson, we are able to stack
effect on top. So let's say this
is the first one, and I'm going to look
for something else, maybe this more intense version, drag that above,
scale it so it fits, and then choose another
brightening effect. So maybe brighten or screen, and if it's too intense, I
could just lower the opacity. So now, this top
effect is blending into the first effect
and the base video, and it just goes
down from there. So I have something like this. You could add effect onto these as well because
they are videos. As we saw, you could add, like, a blur, you could add
different things. So there's two effects on
these overlays right now, and that looks a lot better. So that's one way to add
effects onto your videos. The work is already done. As you saw, I didn't
have to make anything. I just dragged in the
effect that I wanted. The videos are already there. If you can't find
something you're looking for within Capcut, there's so many other resources out there where you could just download overlays for
free or the next lesson, we're going to look more
into background removal. So you've probably
seen green screens, blue screens, and just videos where you want to remove
the background completely. So that's going to
be something we're going to look at in
our next lesson.
7. Green Screen & Background Replacement: Welcome back. Now we're going to be looking into backgrounds. So I will just clear the
overlays that we had, and now we're going to
look for green screens. And you can see that that is a category within the library. And when you click on
it, you're going to see various green backgrounds. So let's just grab
something like this lady. She's like, dancing, we could put her in the
background, maybe. Let's move this to
the corner here. And if you want to get rid of the background,
it's very simple. You just scroll down to basic, remove background, actually,
and then go to Chroma che. Then you're going to click
on the color picker, click once on the green. And when you let go,
background is gone. Now, once you've done that,
let me push this here. You can change the intensity and basically the
edges a little bit. I'm going to zoom in here.
So you can see that we have, like, a halo right now
and that's not good. So first of all,
it's the intensity. So how much do you want removed? We can remove a little bit more. So now it looks there
isn't that green halo. And when I play this
back, we essentially have this random woman dancing in
the bottom of the screen. The same thing applies
to everything else. As you can see, we have humans, we have logos, we have items. And we have a lot of screens. So the way you would work with the screens is like
this, you drag it in. And this time, instead of having the base
video underneath, you're going to have the base
video inside the screen. So basically, I'm just going to bring back the video we had. So it's still at the bottom. The only difference
is that here, I'm not isolating the center. I'm isolating the background,
the surrounding area. So once again,
remove background, chroma key, and let go. I have, you know, my subject inside the TV. And the green screen
footage is moving as well. You can see that it's
zooming into the television, and that's a pretty cool effect. There's a lot of other
things like mobile screens, tablets, and anything else. So we have, like, this multi
screen situation, too. If you wanted to change the
scale of your base video, you can do it by selecting it, going to basic and
using the tools here. Just make sure that you're
not leaving a black bar. So that's green screens, and some of you may be
wondering why is it green? The reason why they choose the color green is because there is less of this bright
green in any subject. So this is a very rare
color, especially on humans. It's the exact
opposite of, you know, skin tones, hair
colors, and clothing. So unless someone is
wearing this green, the chromake is not gonna be touching any of
these subjects. So if you are importing
your own videos, just make sure that no matter
what your subject has, there is no bright green in the video.
So this guy is blue. And I could pinpoint, you know, this darker green and still be able to
remove the background. Now, you may have seen that
we also have blue screens, so that's the other
side of the spectrum. If you pick on this, you can see that we can easily remove blue as well without, again, taking anything
from the human subjects. And if you play around
with the intensity, you can isolate
that a lot better. So blue screens are another
set that you can look at. So we got these stuff. And I would say that
it's not as common as green screens because
this is a color that some people like to
use in their videos. But you may have seen the
blue screens as well, so I just want to give
that a shout out. Now, on another note, you're able to remove backgrounds
as they are, as well. So let's say here, I'm going to skip to the end so we don't have the
sun in the video, just so that we can see
the clear horizon here. You could use custom
removal or auto removal. And that's basically going to
get rid of the sky for you. So we can't really
use chroma key here because we have multiple
colors in the background, and the auto removal, it did a decent job. I wouldn't say it's that good, but we could try custom
removal as well. So I could just use my brush, start outlining the subject, and then just apply the removal. So that's another way that
you could isolate subjects. Or if you don't want to just use one of the green
or blue screens. So now that you know how
to change the background of your videos and how
to isolate subjects, we can now look into blending
them with color grading.
8. Advanced Color Grading: So in this lesson, we're
going to be focused on how to professionally color grade and how to blend two clips together. So I'm just going to use
green screen footage. One more time, I
have this person cooking in front
of a green screen. And instead of making it look like he's in his
basement or something, I'm going to put a very
nice background behind him. Just going to look through one where we don't really move. So in the library, I'm
going to look for kitchen, and using one of these clips, I'm just going to, you know, choose the frame that I like. Then going up here, I'm
going to click on Freeze. So now we have a freeze frame, and I could just get
rid of the first bit, scale this up, and I have
this image of the kitchen. Now we're going to move the
kitchen in the background, have our subject in front. Once again, we're going
to remove background with the chroma key and
select the green. So just hover over and see which one will give
you the best result. I think the issue
here is that we have some shadows in
our green screen. You can see that
there's some dark bits, and it's also reflecting
onto the table. Before I start even removing
the green from this clip, I need to first fix the darkness and the
brightness that we see here. So by having the
top clip selected, we're gonna go to adjust. Let's scroll down to lightness, and we're going to
lift the shadows. So now this side
is less extreme, darken the blacks, and just play around with this until
you have a decent Oops. This is Brilliance. Until you
have a decent combination. So removing the contrast is
gonna help make it flat, and then we could play around
with the other sliders. Okay, so that's a little better. I'm just gonna go to video, remove the background now, and it should be better. So let's grab here. I know we're leaving a
little bit of this behind. The issue with this clip is that it's reflecting
off the table, and that's a problem
with the original clip, not so much here. So I'm just going to increase the intensity and then
feather the edges. Then using masking, we could
sort of save the table. So let's go to the start. Luckily, this clip
is not moving, so we don't have to stabilize
or motion track anything. Let's duplicate the clip, hold down Alter option, click and drag right above, make sure the two videos
are perfectly aligned. The top video,
we're going to make a mask only for the table. So I'll use the Pen tool
to make it more precise. Try to grab the table
the best you can. I'll just close it like this, and then on the top video, we're going to
disable Chroma key. See that we got the table back. But then I'm just going
to go to the mask again ops and try to find the
correct edge of the table. So now we have the table set
and everything looks good. If I didn't do this, this is what we
were dealing with. The table is, like, fading away, and that's not a
good thing. Okay. So now we have our subject
in front of the kitchen. Let's blur out the background a little bit to help
this blend better. So go to effects. We were already on blur, add it directly onto
the kitchen image and blur it slightly.
Just like that. Now we could grab these two, right click and hit group. So whatever I apply, it's going to be
hit onto one combo. You can see Combo A, Combo A. And when I click on either one, it's going to select both. If you're color grading
with a duplicated clip, make sure you follow this step. Alright, so for
the color grading, we could do a bunch of stuff. So let's go to
adjustment and use the color grading tools to match what we have for the
subject with the background. So we're looking at lighting, the vibrancy and any sort
of color adjustments. So if, for example, the
background clip is very warm, we have to match that
with the subject. So you could use Auto
adjust or anything that you see up here to make
some quick adjustments. There's also a color correction here so you can play
around with that. But I'm just going to jump to the adjust panel and
do everything myself. So the background
video is pretty warm. Let's increase the temperature. To cancel out some
of that green, I'm going to introduce some
magenta and then saturation. I'm going to lower
it a little bit. Then we have the
light adjustments that we looked at earlier. So this could be
fixing the exposure, lower that and I'm
now moving on to HSL, which is hue saturation and luminance and changing
each of the colors. So the first thing is to go to green and kill the saturation, so we don't have that
green reflection anymore and also any sort of, like, halo effect
that we had around. And I think we don't need to do anything else
regarding color. Maybe we could, um, lower the saturation,
and there we go. That looks a lot better. To finish this off,
I'm going to put a overall color
adjustment right above. So this could be something
from the filters panel. If you scroll down, we
have a lot of options. So if you do food, for example, this guy, this is a filter that's applied
to everything below it. So I think I will do, let's try something retro. Okay, and then play around
with the intensity here. So now I have my subject
cutting his mushrooms, I guess, in front
of a fake kitchen. We started with a green screen, and then we use color grading techniques to blend this in. So now you know how
to overlay stuff, how to use green screens and other background
removal techniques. And finally, how to
make all of that blend together with
color grading. In the next lesson,
we're going to look more into thumbnails
and especially what really grabs the attention of a viewer on
YouTube or Tik Tok, what makes it clickable and
how you could, you know, summarize all
that's happening in your video onto one image.
9. Designing Clickable Thumbnails: So AI design is
where you can make thumbnails really
easily and with a few clicks because a lot
of the work is done with the prompting and what you
ask the AI to make for you. When you click on that, we'll be brought to this interface. And if you want, you could
look through some of the examples or just put
in your prompt directly. Given that we focused on a cooking video in
the last lesson, we kept the green screen, and there was this guy chopping
mushrooms in his kitchen. We're going to make a
thumbnail for that, and I'll show you
how you could take a thumbnail that's not going to be as engaging to something that will
engage your audience. So we're going to
go over typography, some color psychology, and some layout techniques
that you could try. So right over here, I'm going
to ask for a thumbnail. So I made a cooking
video about mushrooms. Make a thumbnail for YouTube that's colorful and engaging. So we're just going to throw that out there and
see what we get. You can see if you're
signed into your account. Here is where you get to see how much credit you have left on the bottom
of the screen. We have a chat bar on the right, so you get to make your changes and communicate with the AI. And we have some tools here
where you could edit things. So this is the
thumbnail that I got, and I could make
my changes here. So let's say I want the chef
to be in the thumbnails, as well, add the chef
to the thumbnail. And it's going to change
what we were given here. Now, you could also ditch the prompt here and
just use the tools that's going to give
you a lot more control over where you want that
new element to be placed. But the problem with
this current thumbnails, let's talk about
it a little bit is that it's not as engaging because we don't
really have much. So, this is not even
a good addition. I'm going to do
Command or Control Z. So the issue with this
is that we're getting basically a lot of similar
colors for the image. So we have a lot of browns, maybe a little green here, but there's nothing
that's going to catch someone's eye
when they're scrolling. Now, some of the
elements that will catch someone's eye is a human figure. So you've probably came across thumbnails where the video has
nothing to do with humans. Let's say it's like a knitting tutorial where the whole clip is just
someone's hand knitting. But the thumbnail
has an image of the knitter or someone
from a stock platform. Reason why we put human faces on thumbnails is because
psychologically, that's the very thing
that we're going to get attracted to when we're
looking at images. So we could easily pass this image without
feeling anything. But when we recognize
another human, we are instantly attracted to that or anything that
resembles a human. So you can go through
this variation and have it placed a chef
on the bottom right, bottom left, what please. Well, that's one of the
first tips that you can apply to any video thumbnail
that you're making. Second thing is
regarding typography. So it should match the vibe
that you have in your clip. So if I use a cursive
font for this image, it's not really gonna fit
well because I'm kind of implying that this is going to be a fine dining experience, and it's going to be
a very chill video. But say my video has
a lot of jokes in it or it's a lot more different
than what's out there. I want to communicate that
with my font selection. So we would go with
something bold, something big, something chunky, but not anything
decorative or script. So you could just ask
for the text to be removed and then place your own text using the text tool on the right
side, the left side. So now it put back the chef and it left the food as it was. Just go to click on this again and try to remove this guy. So I'm just going to
click on this and we could just try one
of the tools here. So hit remove and just go
over the text with the brush. Once you let go, you can hit generate on the bottom
of your screen, and that's going to try
to remove this text, and as you can see,
did a really good job. So now I could use in paint
to add something on there. So let's make this bigger. I'm not sure how it's
going to generate a human with this tool, but we could try something. So in the bottom,
there's a bar where you could type in
your next prompt. So add a chef to the maybe add a chef
with a wooden spoon. It generates and let's
see what options we get. Now, while that's generating, let's talk a little bit
about color psychology. Usually, when you
scroll past thumbnails, you may have noticed that
there's a lot of bright colors, especially when they're warmer. So a lot of bright reds, lot of yellows, oranges. And the reason for that is
because that's an alert color. So when we see that
with our eyes, if we are able to see color, we're immediately engaged
into why that colors there. So you usually see
red for, like, a stop sign or you see it
on like a danger sign. Any sort of other sign where it's trying to communicate
something urgent. And that's really the
point of thumbnails. We are urgently trying to grab the attention
of the viewer so you could utilize a lot of the warm bright colors
for your thumbnails. If you want to go for
something sophisticated, you can use colder colors. So let's say blue
for Trust or maybe green for something
grounded and earth like. Over here, we have a
lot of neutral colors. So brown or this beige color
are considered neutral. So it's not really inciting any sort of feeling
in the viewer. The one good element
that's creating contrast here is the
green from the parsley. So if you want to make
this more engaging, maybe you could
add some flowers, some red flowers or
maybe some mushrooms, some tomatoes, sorry, in the background and
then use the in paint tool that
we're using right now to make it a
lot more efficient. Couldn't really do
the chef thing, but we could try the
tomato because it's one small portion of the image. So let's do cherry tomato. And then the text that I was telling you earlier,
it's right over here, so you can add a
title or use one of the recommended fonts to make an introduction as to
what this video is about. You simply click on it, and it's going to
go on your thing. Now, the generation part, it's taking a bit longer. But if you saw that you're running into problems like this, make sure that your
prompt is specific. If you just say, put a vegetable there that's
not going to work, describe the tomato,
describe the color, the state of it, if
it's chopped or whole. And if you still run
into some problems, you can just hit the
refresh button on the top. But generally, just some quick recap of
what we went over, try to add a human subject
to your thumbnails, add engaging colors, and keep the space relevant
to what the videos about. So you can see that
the biggest portion of my thumbnail is mushrooms, and that's what we were doing in the clip in the
previous lesson. And then once you're
done, you can hit Download and use it for your video that you're
going to export from CapCut. Return to CapCut, you just hit the X button and click on Home. So that's how you can
design thumbnails. As you can see, it's very easy. We did not leave CapCut, and this comes in handy when
you have a lot of clips to work on and not enough time to work on your thumbnails. Now that we have
the basic skills under our belt for more
advanced training, we can apply it in
the next chapter where we're going to be building
a project from scratch. We're going to be
building a horror clip. And the reason for that is
because horror clips are the perfect situation
where you get to do a lot of audio
blending, sinking, overlay, color grading, and other stuff because
you're really trying to create that scary mood and
heighten everyone's senses. So let's go ahead and jump
into our class project.
10. Class Project: Cinematic “Scary Clip”: Project Setup & Concept: Mm hmm. For the class project, we're going to be building a cinematic scary clip using everything that
we have learned so far. So first, let's make a project. And I'm going to be importing footage from the Capcut library. If you guys search
the same thing, you should be able to see them. If not, you could
go ahead and use other platforms to
download some free clips. So first, let's go
to the library, and I'm just going
to brainstorm as to what I want the focus
of my video to be. So I'm thinking a lot
of sound effects and things that I could use overlays
to make it more intense. So I definitely want something
with a forest in there. We can make this a lot
more eerie if we add the correct color grading and some overlays,
as I mentioned. So I'm thinking we have, like, a ghost in
different places. So it's in the forest. And then it follows
the subject home. It's like, by the door, and it's just
haunting the subject, which is the viewer
in different ways. For that, I'm just going
to search for forest, and I'm going to grab the ones that I think will
be good for this. So we have this moonlight. I'm just going to cut
out the rest later. We have the forest. You could double click
to see a preview. I think this panning motion
is going to work well. Basically, because it's horror, I want things to be very slow. So if there's any sort
of zoom or panning, I want that to be in a
controlled way, so slow motion. Got some trees here where we're walking
through the forest, so that could be the subject, trying to run away
from the ghost. And I think that's
enough regarding forest. Now we can look for, you know, when the ghost follows the
subject in their home. So let's say door,
look for door. This guy looks interesting. This could be the end scene, which is when the subject
opens the door and, like, the ghost pops
out or something. So drag that in, and we got a bunch of
interesting options. I'll use this guy. And we could even add
some ghost footage. Capcot has a lot of stuff
that you could use. There's even some with a black screen that you could
blend into the footage. Like, we learned already, but I'm trying to find something that's, you know, suitable. So we have some ghost clips, some zombie ones like this. But let's see. So we have ghost busters here. I think what I will do
is look for a room, like an empty room, and, like, we could add some sound
effects for footsteps. So this is actually pretty good. And I'm looking for horizontal clips because that's the dimension for
my entire project. So just looking at some of the videos. I'm not
sure what that was. Oops. This guy, drag
that in and just build the basic sequence
for your project. I think the last thing I
want is curtains, some wind. Okay, and then we can
do and I think for now, I'm just going to stop with the clips because I have plenty right
here in my sequence. So these are the
clips that I chose. Notice how all of them are
they have slow movements, and if they don't,
you can kind of use that to your advantage
where we're creating panic. So let's say this
is the subject. They find the ghost or sort
of panicking in this room. But the other parts, we could create that eerie mood where, like, the ghost is coming. Then there's the
forest, got the moon, and then we could do I think
a stare video as well, like walking up the stairs. So this is like the ghost
coming up to the subject. It works in our favor. Okay, so we have this sequence. You guys can add
more if you want, but try to think of the story
line here and how you plan on integrating sound effects and overlays to create
that scary feeling. So before I move on, I do
want to trim out anything I don't want from these
videos, such as this guy. I don't want the second clip. I think that was a dinosaur, but I'm just going to make a cut right here with Command or Control B and hit backspace
to delete the extra bit. We have this forest scene. I'm going to stop it and
cut it at this moment, and I'm just working
through each clip. So this guy is okay. This guy is fine. This is fine. Here I want it to be stable, and then we have
the video playing. And then, lastly, we
have the staircase. I'm going to stop it here before we actually make it to the top. Now, here it's a
great opportunity because the door opens, but it just stays on that
scene for a bit longer. We could actually use one
of the ghost overlays here. So let me just find
that real quick. Horror overlay. Maybe this
clip, that could be our ghost. And because he is
surrounded by black, we could kind of blend that
into our second clip easily. So I'll just put this above, and I'll keep the clips where the part of
the clip where he's, like, surrounded the head is surrounded and get
rid of the extras. Okay, so now this guy we could kind of have pop out of nowhere, and that's like the jump scare. And then we're going to
work on the sequence. So what should come first, and then what should
follow after. So I think the moon
is a great opening. We have, like, the forest, but I do want this
clip to be in between. So we have one forest shot, then we have this door thing, another forest, one, this
guy I wanted at the end. Let's take the overlay with it. Maybe the subject wakes up,
or let's put this first. So there's, like, you know, a sensation that something
came into the house, like, makes their
way up the stairs. Then the room is, like, empty, subject wakes up, panics, opens the door, and then the ghost pops.
That's my sequence. It's currently a
minute and 8 seconds, but we're going to play around with that in
the upcoming lessons. So make sure that you have
your sequence of base clips, kind of figure out what
storyline you want to follow, or if you just want to follow
along what I have here. Trim your clips, put
them in the right order, and then we can move
on with wrapping some sound and then doing some color grading to bring
this whole thing together.
11. Blending Sound with Atmosphere: Now, let's look for
some sounds that can complement this scary clip. The first thing we need is a overall scary
background music. So let's go to audio, and let's see if there is
a category for horror. But we could just look
for something here. Give this a listen. So I will choose this one. It's a ghost stories
background music, so it's kind of perfect. Drag that underneath,
and I'll get rid of the excess by hitting
Command or Control B. And it works perfectly
with the moon opening. Okay. So now that we have
the background setup, you can make the decision
as to whether you want a narration
for this project, so someone saying something or if you want to
just leave it as. So now is a good time to see if you want to add a narrator. So someone who's saying something over all
of these clips, maybe talking about the ghost in past tense or
something like that. I'm going to leave mine blank as indoors just instruments
and sound effects. But if you do want to add
some talking over the video, you could use the AI text
to speech on Capcod. You just have to go to
the browser for that. Make your changes, choose your sound, and
then download it, import it here, just like we did in the
previous chapters. So now looking at
this, I'm going to start choosing
some sound effects. So for this one, the sound
effect that I'm thinking is, like, heavy breathing or like some sort of
monster sounds. Here maybe like the
door creaking open, maybe some footsteps
on leaves, some wind, foot up the stairs,
and you can kind of pair it well with what
you see on the screen. So let's go to sound Effects and start looking
for things we need. So let's look for monster. Yeah. So that's perfect. We're going to drag that
right above the forest, the forest video, and
then cut out the excess. Well, actually, I
think, I'll extend it to all three because
we have forest, something else than forest. But here, it starts like that, then maybe door hinge. Okay, I think the
first one is good. I'm going to put this for
the last clip, actually. For this, maybe you put lightning sounds.
That could work. Okay, drag that right
here and we're going to, you know, cut it from where the lightning actually shows up. Do that with steps So this one, I think I'll pair it with the background music, the original one maybe
put it somewhere here and it starts where the
ghost sort of wakes up. So let's put it a little
bit after the creepy door. This guy I'll put this
for the stair scene. And then footsteps on leaves
just to be specific here. So just drag that right here. We have some wind else. So maybe just wind. Sometimes it's hard
to find something you need. Okay, this works. So I'm just going to
put this right here. And one important
thing with audio when it comes to professional
editing is that you do want them to sort of overlap so
that you have enough space to fade in and fade out or do
any other sort of blending. So I'm going to
cut this here and then maybe some heavy breathing here because the subject
is looking for the ghost. H. Okay, this is more natural. I'm going to put
this maybe from here on just because the subject
is looking for him. He's waking up, and then, you know, they open the door
and the ghost shows up. So we have a bunch
of different audios. I'm just going to cut
this guy real quick. And I think that's
pretty much all we need regarding audios. We can always come
back and get more. But as you can see, I still
have not left Capcut. Everything is already here, and that's the great
thing about using it. So now let's focus on
the different audios. I'm first going to
match the first one. So we have the music
for the first scene. Okay, so even without editing
the audios to blend them, it still sounds pretty good. So mood wise, I've accomplished
what I was looking for. The one thing that you may
have noticed is that a lot of the large basically louder
audios, they end abruptly. Okay. So a lot of the louder audios do need
to be, you know, faded out. So you can see it just cuts out, and then the stare is
not really matched with the actual
movement of the camera, so we do have to match that. And I saw somewhere
where yeah, like, around the end of this video, the camera pans to a random person, so I'm
going to cut that out. But overall, I just
have to work on sinking and playing around
with the different volumes. So make sure you were able to follow along until this part. If you want more audios, now's the time to bring
them in because once you attach them to a clip or
blend the entire sequence, it's going to be hard to disturb what you have already
to add something new. So let's go ahead and
do that and continue our project in the next lesson alongside some color grading.
12. Editing with Markers & Timing: So now let's continue
our project, and we're first
going to start by mixing in and syncing our audio. So as we saw in the
previous lesson, the stare audio is not matched
with the camera movement, and some of these audios
are either way too loud or they're too low and
we can't really hear them. So let's start at the beginning. So the first two audios, I think sound wise,
they're okay. If you are adding dialogue, make sure that you listen
back to it and lower the volume for the two music so that they could hear
what the person is saying. But we don't have
any dialogue here, so that's okay for me. But we do have this thunder. So I'm going to see if
this is loud enough. That's okay. Let's
hear the footsteps. So the wind is too loud, so I'm just going to click
on it and lower the volume. All right. Now comes the stairs. Using markers, I'm
going to hit M on the part where I want there
to be a footstep sound, matching it with the stair that we're moving past.
So let's zoom in. Hit M to make that marker. Okay, so we have four steps, and you can see the sound waves. So just try to match
that with the markers. Gonna cut this like that. The second one, we
may have to split it. So Command or Control
B and then match this with the other marker and just continue going forward. Okay, get rid of the rest. And this first part is a
little weird Zoom in effect. So I'm just going to start the
clip from right this part. There we go. Let's check
the audio. Match it again. Okay. Then the last one, I'll just move it forward. So that there's no stair
sounds in the room. Then we have deep breathing. And then the door sound. Okay. I I cut the excess, and this is heavy breathing. I think I'll have
it stopped by here. You could add a
scream sound effect for the monster, but I'm
not going to do that. Let's just drag this in. There we go. So now in terms
of volume and placement, my audio is perfect. We do have to deal
with the cutouts. So right now, if you
look at this audio, you can see that it fades in. So that indicates
that we don't really need to do any sort
of adjustment. Here we have the rain
sound just suddenly start. So if you zoom in here, you can see that there's no fade in, and we could easily
do that by grabbing the little circle and just
pulling it towards the right. And I'm going to have
the sound effects start a little bit earlier
than the actual video. And that way, we can
sort of introduce the sound before we
actually see the screen. Maybe fade in more. Let's fade out on the other end. Okay, and we have the footsteps. The same issue. You can see that it's starting out of nowhere. Just drag that in. Repeat
that with the end. The steps are fine.
The winds out. Got to do that, too.
And the rest is okay. I'm just going to fade out the
audio by, like, 7 seconds, so really long, just to compliment that eerie
mood that we built. So the video ends here. They can see it
sort of like zooms out, and it's pretty good. Alright, so my
audio is complete. The next thing we're going
to do is color grade each of these clips just to
make it look more scary, and then we're going to
add in the overlays. So starting with the first clip, I think this is pretty cool. The second one is
during the day, so we're going to turn it to night by using some
color grading. Click on the Forest video
and then go to adjust, scroll down, and we have the adjust sliders that
we could utilize here. So the night is cold. Bring this towards the left. Tint. Let's make it purple. Saturation. We're
going to leave it. Lower the exposure quite a bit. Highlight, lower that, too. And you can see
that we're sort of, like, making
everything more dim. Decrease the blacks, and then we could decrease
the whites, too. I'm just going to go to whites and increase it a little more. And now using filters, I could turn it to night by putting in an
overall blue filter. So let's type night. Now I'm just gonna add
the black gold filter on this just to make it a
little bit more intense. Add some winner to the end, and now we have this
creepy looking mood. Save this as a preset, and I'm just going to scroll up and basically repeat the same thing with
the other ones. For some of them, you
can add a filter just to make things more convenient.
We'll go with this guy. This is way too bright
and make it darker. And you can see that just
by making things darker, you kind of add that
horror movie effect. Same thing here. We have a very bright forest. To darken that, make it
colder, little purple. And I'll try one
of these filters. Maybe add some wig
towards the end. We have the room, and it's
basically the same thing. Just play around with the
different sliders until you get a weird creepy ibe. The reason why I'm
not adding one filter to everything is because we're dealing with different lighting, and you would have to
adjust each one separately. So I just like to go in with
each of the sliders and get more control over how the
clip is going to turn out. So this guy is way too bright. We need to really make
this less lovely. And sometimes when you
remove the saturation, you make it less
appealing anyway. So lower the saturation, but not exactly black and white. Something like that,
and then we get more wig, got this room. And then finally the door. This guy could use a little
bit of desaturation, coldness, and some of that. Okay, so now all of my
clips have a weird, desaturated and
darkened look to them, which is very suitable
for the horror film. Now, in terms of transitions, I'm not going to be adding any just because the rough cuts are gonna help in my case
because everything is uneasy and not smooth
in a horror setting. But if you want, there's so many that you could look over. And because we have a sequence, you just drag it in
between the two clips. So now that I have this
in the next lesson, I'm going to start adding
in some overlays. Oh
13. Effects & Overlays for Horror Mood: So let's add in some
overlays and add some additional
textures and elements. So this right here,
not much to do. But since we have a
thunder sound effect here, I'm going to add,
like, a rain overlay. So go to media library, look for a rain overlay. There's tons of things
that you could look at. I'm going to go for this
one, it's straight down. And then we're gonna just, uh go to video, basic, blend and choose overlay or perhaps
screen, actually. So, there it is.
We have some rain. We're just going to
add some blur effect here for the rain only. Drag that in, lower the amount. Okay. Then we have the forest. I'm not going to do much here, but I think for here, this is where we got to, you
know, introduce our monster. So I'm going to drag this in towards the part where
he opens the door, select the video above, and then choose
screen right here. So you can see that because he was surrounded by the black, it actually helps
a lot in our case. So let's grab this clip
and put him somewhere in the corner away
from the light. Let's mute all of
these for a second. Uh I'm just making sure that he's in the
screen the entire time. Alright, so you can see that he's sort of there
at the beginning, but I want to do some
very simple animations. And the first thing I
want to do is just go a couple frames forward until where I want
his head to be, and we're going to do a
position and scale keyframe. Then we're going to go
back to the beginning, a little bit, offset it, and then do another
scale and position. Now, at the beginning, we're gonna remove the scale
completely so that it's a tiny little video and then use the same thing for position to put him somewhere like that. Scale equals zero, so it sort
of just pops in like that. I do want to mask out
the unnecessary parts. I think I'll stop the clip
somewhere around here. And then with the
masking feature, we're going to remove
the excess area that does not
involve the subject, the head of the
ghost, in this case. Just do that. Okay. And we're
going to feather the edges, and I'm just going
to play this back. Make sure that we don't
cut any part of the head. Okay. Now, the ghost head
is a little bit faded. So what I'm going
to do is just hold down Commander Option or Alt, click and drag above
to make a duplicate. And you can see how now
he is more pronounced, and we could sort
of see the head. You could do this one more
time to get another result. Just make sure that you're
not moving the key frames. So we have this
effect right now, and the head is a lot, you know, more visible. Near here, we could
do a sudden effect, maybe a glitch effect
or something like that, just to end the video, glitch effect, maybe. Okay. I'm going to add that
to the one on top. Maybe have it start
towards the end. Mm hmm. At the speed,
add to the speed. So we get something
crazy like that. And then the video ends. So we're gonna stop here for this lesson and then
finish everything, do some final polishing, and then export the video
in our next lesson.
14. Final Edit & Export: Mm hmm. Welcome back. Now we're going to finish off the scary project by
doing some final touches. We pretty much have the
entire concept there, all the overlays, all
the color grading, and the sound is
perfectly blended. Now, one thing that
I did want to do was add some additional
scary overlays just to make this more intense. You can leave it as it is, but I want to try a few things. So let's search for
horror overlay, and I'm just going
to see my options. So we have this, like,
grain effect that I'm going to put above the moon. Video that we have
in the beginning. Then I'm just gonna
blend it with screen, so we get this,
like, film effect. So it's like the past, the ghost has risen
or something, and then we jump into reality. I did want to put
it here as well. Maybe this store is, like, related to the ghost. So we're just gonna
put that on there. And it helps that
there is, like, a thunder sound effect
in the background. That works just fine. Now, I can see this eye video, which I think is interesting. I think I'll just
put it in between this video just because it's
very chill and relaxed. So in order to change that, I'm just going to make cuts
with Commander Control B and replace these little bits
with that eye video. So we get a subtle liquor effect just by replacing the two clips. Okay, let's put this guy above the first
video and then make the same cuts on this
with Commander Control B. I'm gonna do it
from the right side. Okay, so now I'm just
gonna get rid of the bigger portions
of the top video. So just get rid of those. And then we're
going to get rid of the I have to put them
in here first because we have snapping turned
on and then get rid of the little sections of
the original video. So we get something like this. So it's like flashing like that. And to make this more intense, we could speed up the
cuts near the end here. We're going to have the original
play for a little while. Then we're going to
make smaller cuts and more frequently. So cut, cut, cut, and just keep going like that. Try to make them as random as possible because if
it's too uniform, it's not going to be as intense. And then at the end,
I'm going to have the eye video play for longer. So now I'm just
going to get rid of the little cuts that we
made and replace it with the video above. So same thing. We're going to first
stretch this all the way to the end and
make the little cuts. You can use your arrow
key to make this faster, right arrow key to
move to the right, forward, and left arrake
to move backwards. Okay. I'm gonna zoom into my timeline and
just clean this up. Dig this in between. So we have a more intense
waking up effect, use the next scene is, you know, him looking up at the
roof of the room, which we could assume is him waking up because
of the ghost. So we have this effect. And I think I will have the ev Video play
a little longer. So let's do that. Okay,
that was perfect. Turn these back on
and Dapple check that the audios are okay. Break it. So now I could export my video. We have a lot of
things going on, but overall, it's
looking pretty good. I do want to darken this last clip a little bit more just because it looks
very bright and normal here. So let's go to adjust, and I'm going to add a keyframe. So right before he
opens the door, we're going to make
an adjust keyframe, then move forward to
when the door is fully open and make another keyframe. On the second keyframe, you can see that
it made a keyframe for every little slider, you're going to make things
a little bit more dark. So exposure, make that low, more contrast, lower
that saturation, highlights, and just keep going. So now we get this transition
darkens, and we get, like, the pop in. With the ghost. I do want the pop effect to
be a little bit more smooth. So right at this
second keyframe, I'm going to make
one for opacity, and we're gonna fix that up. So let's find adjust. Oh, let's go to video. Make a keyframe for
opacity at 100%, and then go towards the center
and just make this zero. I think the same thing
for the other duplicates. Key frame, key frame, and then go back. We did 0%. So same thing, 0%, and then 0%. Alright. I think the
mask does need to be a little bit more smooth. I think this guy has the effect. I'm going to switch
out the glitch effect for something a little
bit less colorful. So let me see what this is. We have pixel glitch. I'm
going to try that out. I think this is better. So when he opens
the door, we get, you know, this guy
starting to glitch. And then everything
fades to black. All right. So let's go
ahead and export this. It's very simple, as we know, we just hit Export to
scary movie or scary clip. Choose the location. Then you can decide on the
format and everything else, but I'm going to leave
things as they are. Just make sure that
you have audio checked or else it's going
to be a muted video. So this is our video. Let's see what it looks like. So I hope you guys enjoyed the class project and
that you had fun with it. You can take this two very
different types of videos, maybe a fun one, a dramatic one and just play around with the
different moods. The most important thing is
being able to, you know, start with a strong
concept and then try to recreate the mood
using the transitions, color grading, overlays, and everything else that
we have learned so far. In the next chapter, we're
going to be looking at CapcaD mobile and learn a few things about how
we could edit there.
15. CapCut Mobile: Mobile Transitions & Motion Effects: So this is the Capcot
mobile home screen. It's pretty much
the same idea that we've been looking at for
the past few chapters. But essentially, this lesson, we're going to look at
how we could add some of the effects and transitions that we've been learning about, but inside the mobile version. So I'm going to click
on New Project, and that's going to
prompt me to import some clips from
my photo library. So I'm just going
to do that real quick and then we'll be
back so we could continue. You go to the library on
the top part of the screen, you're going to get the
same stock footage that we've been using inside
the Textile version. So we have the green
screen over here, the background, the
overlays that we discussed, and so many other stuff. So I'm just going to grab a
few of these live categories, just so we can experiment
inside a project. So let's grab a couple
nice ones with groups. Just clicking on them, we'll bring them into the selection. And if you want to
get rid of that, you just click on the
minus at the bottom. So I have four clips. Let's add all of them at
the bottom of the screen, and this is our timeline. Using your two fingers, you can zoom out
from the timeline and begin putting in
some transitions. For the mobile version, it automatically adds
the final screen, but you're able to remove that. So just click on
it and hit Delete. That's just done
by Capcod mobile. It's not a thing in
the desktop version, but it sounds like
you have to pay for it in order to remove it. Okay, so let's add in some of that overlay
that we talked about. I'm going to add
some light leaks, just as we did in
the previous lesson. We're going to hit
on Add overlay and then come back
to the same library. So the first screen
you're going to see is your own photo library
on your device. But if you just go
to library here, you will come to
the same screen. So instead of searching, I think I'll just grab the
light leaks here so we got one right in the front,
and I'll grab. I think that's the one
I'm going to grab for now. So select that. If you click on it again, that's going to
give you a preview, and I'll do one with a heart. Click on add and now we have
the overlay underneath, but it's technically
above the video. Okay, so now we're just going
to click on that overlay, head down to splice, and we're gonna find I can't
find screen for some reason. Just do Dutch or I think, in this case,
softlight would work. But you can use Dodge as well. I'll do Dodge, but I'll
remove the intensity. And now we got
ourself an overlay. The same thing can
be applied here. You just click on
overlay at the bottom, and you choose that
additional clip. So let's do something here. Once again, we're going
to have that selected. Go to slice at the bottom and
choose one of the options. So I'll do this, and I'll position this
towards the center, so click and hold and then move it to where
you want it to go, and I'll increase the size so that it's covering
the entire screen. So now we get this very
simple overlay efet I could match that with
when they throw their hats. Let's go backwards. And we got ourselves two effects that we already
did in the desktop version, but we can easily replicate that within
the mobile version. Next thing is
regarding animations. So there is a dedicated
animations section at the bottom when you
select your video. When I click on it, we get all of these different transitions. So if I click on
let's say Scroll app, we're going to get this
very simple effect applied to the
beginning of our video. Just like that, if
you go to adjust, we have all of those
color grading features, so you could use it to
maybe darken something, get brighter, and just continue
on making your selection. Oops. So then you get
adjustment layers. You don't normally get this
within the desktop version. But for mobile, you can see that it's a different interface. Now, the one thing
you don't have here is the keyframes
for adjustments. So when you go and adjust, we don't really have
the option to add a certain change to 1 second
of the video and then, transition to another second. That seems to be an
option for the desktop, and it makes sense
because you can't really work with the curves of the
keyframes using your fingers, whereas on the computer
you have your mouse, you have the track pad, and
it's a lot more efficient. That's pretty much how you
could add overlays and effects to your clips within
the Capgod mobile interface. In the next lesson, we're
going to focus more on titles and some motion
that you could apply.
16. Titles & Motion Text: Welcome back. Now we're going
to work on some titles. So titles are very easy to
add within Capgad Mobile. You simply go to text, and you have the
option to draw stuff. Since you're using
your fingers here, you have the options to use some of the templates
that are available. So let's do one of these. And easily I could turn my static video into
something more engaging. And just like any other layer, you can click and hold to move
this title anywhere else. Another thing that you
have is the cover option. So you're able to add a
cover from the video itself, what you have on the timeline. You can edit the
screenshot that we have right now by adding
in some more text. So let's hoops make this a little smaller,
put it in the corner. Then delete that extra
semiclumn then hit safe. So now I have my own thumbnail,
essentially. My video. You don't have the AI design
within Capcod mobile, but you are able to use
other AI features here. So you have AI packeting which is going to be
regarding captions, audio, and you have
auto captions. Same thing from desktop. And regarding other AI things, you have the AI Media. So we have AI image, AI video, and AI dialogue scene. Those are things
that we looked at within the desktop
version as well. We also have the AI Avatar, which is going to be regarding a fake AI character that's going to maybe speak for
you, point to things. You can do video to
avatar, photo to avatar, change their expressions, lip sync, and many other things. The key thing about
Capcod mobile is that there's a lot of quick
effects that you can apply. And I'm not talking
about the effects or transitions where it
does a certain thing. I'm talking about some of the tools that we
have down below. So if you select a
video right here, you're going to get a bunch
of options on the bottom. So the first one is all the
way towards the right side. You can retouch automatically. We have AI remove, AI remix, changing
the eye colors. If you get a red eye effect, you can fix that.
Some lip syncing. You also have camera
tracking within the mobile and a bunch of the other stuff that is available on Deckstop. But these are all tools that
you can experiment with. I could try maybe AI
remove here. I agree. It's going to open
up this interface, and I'm going to brush over those two people
in the background. Once I'm done, I'm
going to hit Remove. And you can see that
the same AI model is being utilized here. You can minimize this and
continue doing your work. But if you want a quick fix with a clip that you took
with your mobile, you don't have to, you
know, import it into the desktop version
and remove it. If you click on it, you can see that we got this
one in the corner, and that's the AI remove. You know, currently being
applied, it's at 48%. We could try a few
things with audio here. Let's go to sounds, grab something like
this where's the audio. Add it in. And I'm going to click and drag it so that it starts with the
rest of our click. Now, to recreate
that audio blending, you're able to do
that here as well. So let's go to sounds and
bring in a random audio, and I'm just going
to build this up. So we go to click away. We have that first audio. We can do another one. So
we have some sound effects. Let's look for laugh laughs for a group because
we have a group. Here what we have here. I'll go with the second one. And you can see that now I have two different audios
right above each other. I could click on volume to
make it lower if needed, and just go about
adding some more. We have some audio
effects as well. If you want to quickly maybe
remove background music, highlight one
particular speaker, you can do it just like that. Can also switch audios
to different characters. So if I click on this audio, the music, go to Audio Effects. You can do voice characters and maybe turn this into Mini. You have recorded a video of yourself and you're
talking in that video, you have the option to
do some silly effects, such as going over let's say
this is my voice recording, such as going over
to audio effects, voice characters and turning yourself into Minion or Homer. This will not work with audios that you bring from
Capcot to make sure that you have
access and rights over the video that you're
going to apply this to. So our background removal is
done, but it couldn't do it. And the mobile version
is not as good, but hopefully it gets
better as we move forward. So that's just a quick overview
of the mobile version. You can see a lot of the stuff
is pretty much the same, whether it's on
Dektop or mobile, and they're just put
in different places. But you can use the
mobile version. If you want to do
something quick, you want to add an effect without having to
go into details. Use the dektop for when you want advanced techniques
such as key framing, animation, curving, and all that stuff
because in the mobile, those features are not there. So I hope you guys now have a better understanding
of the mobile version. Now that we know how to
use the mobile version, we can move on to
our next chapter.
17. Where to Next: So you have now completed
all of the chapters. I hope you guys found this
helpful and we're able to follow along for
all of our exercises. The next step from here is
to continue on practicing. There's so much that's
going to be added to CapcoT in the following
months or years. Always try to update your
workflow, try new things. If you're within a community
which I highly recommend, make sure to share your
creations and receive feedback on them because that's really the best way that
you're going to grow. So I hope you guys
enjoyed the course, and I hope to see you
guys in the next one.
18. Class Project: Create a Cinematic Video: Now it's your turn.
For the class project, you're going to be creating your own cinematic short film. The goal here isn't
to just edit, but to create a mood. So this could be something
scary, something fun, inspiring, or anything else
that you wish to go for. Start by planning
out your concept. How do you want your audience to feel after watching your video? Then you're going to gather your clips and import
them into Capcut. As you build your video, focus on the following things. Using markers to mark the beats so that you
can sync your audios, working with multi
track layers and learning how to blend
different audios together, using color grading to create
a more cinematic look, adding visual effects
such as shadows, g, and flickerings, and finally, some keyframes to make
your motions more smooth. Finally, export your video, and if you like, create a
thumbnail that can go with it. Upload your final video
or screenshots of it to the class project gallery alongside a note that can
explain your concept. Maybe some of the
challenges that you faced. I will be reviewing the
projects from time to time, and I always found
it interesting how different students
approach the program. Good luck on the project, and let's see what
you guys come up.
19. Congratulations! What’s Next?: You have now reached the
advanced level of CapGuT. Congratulations. You know how to control timing, use keyframes, adjust different
audios, blend them, and use visual effects
on top of your videos. These are the very elements
that can transform your videos from ordinary
to engaging and polished. From here, the biggest
difference comes from intention. Every cut, sound, and effect
should serve a purpose. And at this level,
improvements comes from practice and
attention to detail. If you have not uploaded
your project already, be sure to do that, as I'd love to see what
you guys have made. Thank you for taking the class, and I hope to see you
guys in the next.
 Skillademia Academy, Creative Skills for the Future