Transcripts
1. Welcome To The Course - Building Your Online Presence From Scratch.: Hi and welcome to Module two on building your brand
and online presence. This module, we will go
through all the steps of building your online
profiles and establishing the digital presence that
qualifies you to become an affiliate marketer and helps you establish a trusted
relationship with your audience. This model includes how
to build your brand kit, which is the brand style guide. This is the guide for your
entire online presence and it includes all the
brand visual elements that you will decide
for your brand. From logos to colour,
pallets, images, fonts, and everything else
that you really want to include in your brand's
visual identity. In this part, I'm
going to introduce you to a simple
multi-step process to building your brand kit by using free and beginner-friendly
design software. This process is designed for absolute beginners and those who never created a
brand kit before. You do not really
have to worry about anything from hiring
Design experts to having previous experience or spending long hours on
designing your brand. I'm also going to implement
the same process to create a Brand Kit example
in a tutorial video, which is included
here in this model. To help you get a clearer
idea where to get started and speed up
your own process. The second part of
this model is how to select your main
property on the web. As not every affiliate
marketer uses the same type of website
or social media platforms. So you will want to
select the platforms that make sense for
you and your business, and most importantly, platforms that your
audience are active on. Inside this part, we're also going to answer
important questions. Like, is building a website essential for your affiliate
marketing business? And how many Social Media
channels should you be using for your affiliate
marketing business? Which social media platform is the right one
for you to select? And also whether it is a good idea to introduce
your new business, your existing social
media profiles? Or should you build
your social media Presence From Scratch? Once we're done with this part, we're going to move
to the third one. The third part of this model is dedicated for websites
and how to select the best type of website
for your business based on the content that you're planning to create on it. And of course, how to build your website and
have to optimize it without any previous experience and web creation or designed. Very much like the
brand kit Design, I'm going to introduce you to a simple multi-step process
to building your website. For those of you who already
have an online business or those who wants to hire
professional designers. Some of the parts and this model might not be relevant for you. Since you could already
have a running website or an established brand and
social media presence. But this modal designed to help those who
are starting from scratch and those who are not interested in hiring
professional help. And therefore, it
covers all the steps needed from start to end
2. What Is The Difference Between A Brand & A Visual Identity?: Now let's talk a
little bit about brands versus visual identities. Because we tend to
confuse brand's with logos and colors
and appearances only. While the visual identity of every business does indeed
belong to it's brand, there are a whole
of other aspects of the concept of branding
that you will want to work on and keep in mind
when you're starting to practice your business and
creating content online. Your brand is your entire Unique Presence on the Internet. And it includes your
mission statement, Your Unique Content,
your tone of speech, your sense of humor, and your message, and
what you stand for, and everything else
that sets you apart from other online
entrepreneurs out there. If you do not have an existing brand and business and you want to kick-start your
online Presence From Scratch right now. This can truly be an amazing experience you will go through while following the
steps I'll share with you and the upcoming
parts of this model. I know that this sounds
like a lot of work, but building a business on
your own is indeed a lot of work and it will take time for you to complete this model. But by the end of
it, you will have an established online presence based on your chosen niche and a clear idea what you want
people to feel when they interact with your business and visit your online accounts?
3. Early Limitations - What Is Holding You Back?: The final point that
I want to mention before we get started
as early Limitations, which is something
that I feel like most of my customers
struggle with. As a freelance web
designer myself, I often sense that a lot of new online business owners worry a lot about being
very new to the game. They might be thinking, I'm new and I have little
to no knowledge to share. How am I going to
establish such a brand? They worry a lot
about the amount of content and value
that they have to share to establish the
sophisticated brand and business that
they're aiming for. It is true that if
you're a beginner, you do have experience and
knowledge Limitations. But the reality of
it is that we must acknowledge and embrace
the natural progression of building their experience
and the knowledge we need to own a solid and
trusted brand and business. Because everybody
starts somewhere. And failure is knowledge
and experience on itself. And if you failed more than
you've accomplished so far, you still have a lot to
offer and many people want to hear your story and
learn from your experience. However, the good news that I want to share with you is that affiliate marketing
does not require the suffering of
reinventing the wheel. As this business model does
not rely on you coming up with a product that
overcome certain obstacles. Because countless others
have done that job for you. And your job is to
showcase their efforts and an attractive manner and connect them with
those who needed, which is your target audience. And becoming an experts
requires you to conduct product
research and learn from others in your field
and explore your niche and always stay updated
with the latest trends. That for the sake
of coming up with a unique and original
style of talking about it. Utilize and create as much
content as you can to constantly improve
your skills and experiences within
your niche and market. So don't rush into
sounding authoritative, unexperienced to early on because you're aiming
for a quick results. And instead, try to embrace your newly established business by showcasing your brand as a young and fresh establishment
that is fired up with excitement and it's ready to grow and connect with
the right people. I really hope that this introduction to
the model will give you an idea where you need to start and the points
you must focus on. Now I believe that
you're ready to move to the first part and get started
on building your brand kit
4. How To Build A Brand Kit (Brand Style Guide).: Hi, and welcome to Part One of this model on how to
build your brand kit. In other words,
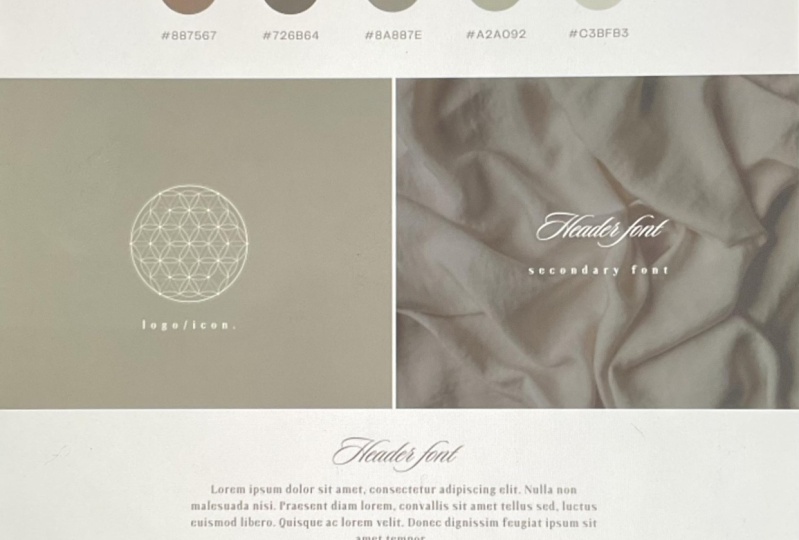
brand style guide. A Brand Kit is a guide to
your brand's visual identity. And it includes all the
brand visual elements that you decide for your brand. From logos to colour pallets, images, fonts, and Unique Marks. As looking consistent, Unique and well-rounded
on the Internet is essential to enhance your professional presence
as an online business owner. And therefore, when
showing up on the web, whether on your website
or social media, you will have to apply your
brand kit holistically and always stick to your
brand's familiar Design as randomizing your appearance and ignoring the rules that you set for your visual identity will make your business
look questionable. Whether you're planning to hire an expert to build your brand, or whether you want to
create it by herself, as I will be teaching
you in this model, you will always have the final
say in your brand style. So therefore,
collecting ideas and inspirations before
getting to worry can always help you explore
your options and decide on the visual
identity that you love. It's also normal to have
mine shifts when it comes to the design and visual
appearances of your brand. Because the more attractive
brand's you will find, the more inspired you will be. And this can make settling on one brand kit difficult
and time-consuming. I highly recommend
that you keep track of your brokers and maybe set some deadlines to finalize your brand work and
make final decisions. That is to avoid
getting lost and the process and
wasting valuable time. Designing your
brand kit can be as complicated or as simple
as you want it to be. There are a hundreds of
different strategies and platforms to use. But I've created here a simple process of
seven steps that you can follow regardless
of your level of expertise in design and
branding in general. You can use this
process to build a professional looking brand and use it for your affiliate
marketing business. The Seven-Step Process starts with defining your
brand identity. It's important to
start with defining your brand identity
because it guides the visual choices of
your entire brand kit, from colors to fonts and images and all the
other Unique Marks. All these visual assets
should tie back to your brand's identity and what
your business stands for. So let's assume that you
started and Affiliate Marketing business that targets young
professionals as an audience. You plan to promote courses to them that helped them build side hustle Projects
and maybe increase their income and pay off
their student debts. So this should not only be represented by selective words, but with colors and
Visuals as well. And understanding the basics
of color psychology can be a great way to improve your online presence in general, because different colors
trigger different emotions. So take your time to
carefully identify your brand's identity using
the niche that you've selected and the group
of audience that you're focusing your affiliate
marketing business towards. Here I have some
examples for you. So I help Independent
Business Leaders write great books
and 30 days or less. Another example I
found online is, I hope female
entrepreneurs reassess their life choices to discover their true
path to success. Or another example could
be helping you unleash your potential and build a big brand with
your small business. So these three are
examples of strong, short and descriptive
brand identity statements that clarify
what the brand stands for. By the end of this step, you
should be able to come up with a few brand
identity statements for your own business
and use them to continue the process of building
your brand style guide. And once you're
done with that, you can move on to the second step, which is your
official brand name. Now what can really
determine whether using your own name as a
good or bad thing for affiliate
marketing business. This is different than
a case-by-case basis, and it's something that you
need to decide for yourself. If you build your business
based on your name, you give yourself the
opportunity to build a personal brand and become an authority figure
in your niche. There are some
well-known entrepreneurs like Tony Robbins or Oprah. They have created brand's after their own names and that
allowed them to become public figures and associate their names with a value
that they add to the world. But others might not
like that. Attention. Might want to sell their
businesses later on. So the other option is
to select the brand name based on the niche or market
that you're working with. And this way, you make it
easier for your audience to understand your business
and what you offer early on. To make this decision
easy for you, your future ambitions of your affiliate marketing
business and what your plans are for the upcoming
years have a lot to say when it comes to
selecting the brand name, like expansion, partnering
up with others, or even potentially
selling the business. Once you have a
few names in mind, try to check their
availability using the free domain check
feature on godaddy.com just to make sure that the
name is available and there's no other person that created
a business under that name. By the way, if you
ended up loving at brand name and
you want to create a website and you're considering to buy
the domain right now, I really do not recommend you to buy any extensions beside.com, because.com is the most search domain
extension on the Internet. And Google itself
refers.com domains. And they made it the
default search because it is the oldest and the largest and of course the
most memorable. But do not worry about buying any domain names
right now because we will cover everything in detail in part three of this model. The third step is selecting
Your Colour Pallet. To keep your brand
recognition strong. You need your brand
colors to be presented consistently across all
your online profiles. As using a random colors are different colour pallets
every now and then, we'll make your business look unprofessional and inconsistent. Whichever way you shake it, the more colour
rules the better. This really goes to emphasize the importance of
the first step, which is defining
your brand identity as creating a Brand Colour
Pallet might sound easy, but it should really
be a reflection of your brand values and the niche that you're building
your business around. Let's say as an example
that you've selected yoga and mindfulness
as your niche. In this case, using
dark colors or flashy colors like really dark red or black will
not be suitable. And you're going
to need some soft comforting colors like linen, ivory or soft green Colour
Pallet should not really include more than one
to two primary colors and three to four
secondary colors. They should also
complement each other in a visually appealing way
that looks cohesive. And a great way to
get inspired for your own color palette
is through research, ideas and other
businesses online. Maybe consider visiting
some websites and social media accounts in your niche and see
what colors are using. And of course, when
you're selecting your own color palette, you do not want to
copy anybody's work, but this is just to
get inspired and to create a unique
palette of your own. The fourth step is Your Logo. And logos are probably the most important part of
your brand style guide. And your brand logo helps people recognize your
business immediately. And standing out Online is
one of the main reasons you're creating a visual
brand and the first place. And a unique
eye-catching Logo is an important part of establishing a professional
presence online. There's also what's known as secondary logos that
work as an extension to the primary Logo with
small differences like simplified looks or flip colors are
different dimensions. So in case you want to include a secondary logo
for your brand kit, you will not have
to modify or misuse your primary logo and situations when it doesn't really fit. And today, anyone can design a local regardless of
their level of expertise. So thanks to the countless design software is
available today. Here I'm going to mention three
different design software that I'm familiar with and have had good
experiences with. But feel free to research
other tools if you prefer to. The first one is Luca. Luca is a complete
Branding Design tool. You can start by
adding your brand name and selecting different
options for your logo. And from there you get access to their pre-designed templates
for brand guidelines. The second one is Canva. Canva is a Design platform
for countless design needs, including brand kit,
Marketing Content, social content, or a website content, and everything else. Indeed, there are plenty of free and premium
pre-designed templates on Canvas that can help you
with your logo design. They also have the
drag-and-drop feature, which is quite excellent
for beginners and those who do not have any previous
experience in design. And Canva will
serve you well for other Design parts of your
business and cutting creation. The third one I want
to mention is Adobe, which is the most advanced
tool of all three. Adobe requires some
design background and a lot of practice for
you to get the job done. But if you're willing
to take the time to do the software training and take your design skills
to the next level. Illustrator is a
really great choice. But if you re looking for more beginner-friendly
tools that help you get the job done
professionally and quickly. Then I really recommend that
you go with Canva or Lucan's that the fifth step
is Your Unique Marks. And this type isn't
really necessarily essential for your
brand style guide. But I included it in this
process in case you're planning to include design
elements to your brand kit. These design elements
can be anything from graphics, icons, textures, or patterns that compliment the visual appearance and add a unique touch to
your brand kit. If you decide to design
elements for your brand, you can use it on
your own website or maybe social content. You can maybe create some
templates for Instagram or Pinterest to make
sure that you're not going to randomize
it later on. Step number six is your fonts. Typography is one
of those things that go unnoticed if
they're done right. But really they send out
if they're done poorly. And very much like selecting a color palette for your brand, you need to identify
the fonts that you will be using a cross your
online presence. If you want to use
more than one font, you can break down your
collection of fonts to three, like headers, Fonts, subheaders, fonts and body text fonts. Or you can stick to one versatile font and
use it everywhere. So classic Sarah friended and modern or some of the
most basic font types. And I really want to ask you to think of your brand's
personality when you're considering the
different options and the fonts that you want to
include in your brand kit. And also consider
the tone that you want to communicate
your brand with, because the front indeed plays
an important part in that. And again, it's a really
good idea to get inspired. You can look up some brands you personally like and check
what fonts they're using. By the way, if you're
using Google Chrome, there's an extension
called what font. You can install that on your Google Chrome and you can identify the fonts that you are seeing on the web
and you can see the size and the ways and everything else and
of course the name. So you're able to use that
font for your own brand kit. The final step in this process
is the Supporting Visuals. This is a step to
create some guidelines for the imagery that you will
be using for your brand. So whether you're planning to create your own photos yourself, or maybe you can
hire a photographer, or maybe you will
want to outsource these photos from
Pexels Unsplash. You should set up some
standards for the style of these photos and the
colors included in these photos and maybe
the filter types, the level of complexity and
the compositions and so on. The same thing applies
if you're planning to create your own illustration or infographics or
charts or anything else that can actually
support your brand kit. You should consider creating some stylistic guidelines
for them and make sure that your brand color palette
and fonts are applied holistically on these charts
and graphics as well. Now that you have the
Seven-Step Process ready, please take your time to
build your brand kit. Just another gentle
reminder to keep track of time and
progress and to make sure that you're not
wasting your time on making decisions regarding your brand kit and
forgetting the fact that you have an entire online
business to build. Getting lost in the process is easy because you're entertained, especially if you're
discovering how to create a brand from
the first time. And there's going to limitless options for you to select from. So please consider creating some time lakhs to
stay on track for your brokers and set some deadlines for you to
have your brand kit ready. And also once you're
done, make sure to download and save your
brand files somewhere accessible so they're ready
for you to use when you begin creating content on your website and social media profiles. Let's move on to the
next video where I'll show you a quick
tutorial on how to apply this seven Step Process To
creating a Brand Style Guide
5. The 7-Step Process To Building A Brand Kit (Tutorial).: Hi there. In this video, I'm
going to Apply the Seven-Step Process To
designing a Brand Kit. And for this tutorial, I'm going to be using a
hypothetical brand that I want to build and I wanted to go for something related
to photography. Let's say as an example that I want to create
a Brand Kit for a photographer that wants to build and Affiliate
Marketing business. So maybe he or she wants to
start promoting products related to cameras
and camera equipment. Maybe some photo
editing softwares for designing this brand kit. I'm gonna go ahead and start
with the very first step, which is selecting the
brand identity statement. Before using any design tools, I'm just gonna go ahead and open my notes so I can write down some ideas for the first step. So I'm just going to write
down first Step number one. Since the business
that I have in mind is something related
to photography, I also want it to be more specified into
nature photography. And I have thought
of some examples for a Brand statement that
can fit such business. And the one that I
seem to like the most is maybe uncovering. This is just on top of my head. The wild nature. Maybe another example
could be connecting you to the nature and wild life. Through my Lynch, exploring epic world
through a small lens. And the final one, bringing you closer
to the wild nature. Just simple and short
brand statements just as examples that I can start from here
and always just keep updating one of them until I
reach something that I like. Of course, this is an example, so I'm not gonna go
ahead and spend hours on creating the best
brand statement. Also, do not want to make this
Tutorial too long for you, but just to show you how
you can start somewhere and just keep updating until you're happy with
the end result. So by working on
the brand identity and the brand
identity statement, you can also start thinking
of other aspects and the framework that you want to build the rest of the
brand kit around. So for example, you can
start thinking of how do you want people to feel when they're interacting
with the brand? Is it going to be
a minimalistic? It's going to be a
sophisticated or friendly and the colors
that you want to use. And we've also talked very briefly about color psychology, the colors that make sense for the business that they were
building the brand for. So for example, here, it makes perfect sense
for me to include different degrees of
green or maybe blue, representing nature and
sky and see, and so on. So I highly recommend that
you actually start writing down some ideas that
you want to include, even though they're not
for this very first Step, it makes sense to write
them down because this that will actually help you move
on for the rest of the steps, as we also talked before
in the previous video, that the brand identity
is going to be your framework to build the
rest of your brand kit. It's also going to
help you decide some other aspects
of the brand itself. So go ahead and
spend some time on brainstorming some
ideas and writing them down on a piece of paper or a note like
this one right here. For my case, I'm
actually going to write down some ideas of
maybe for the Logo, green, blue, sky blue. I also think that I want some visual elements
related to camera. Maybe lens, tree, leaf, color, palette, maybe navy blue, just as a primary color. Dark green. Again, sky blue, brown. I could also see yellow
with, I'm not sure yet. But just to write
down some ideas, I want fonts to
be maybe classic, very easy to read. Small I imagined because the images are going to be the main thing in this set brand since it's photography based, also dark blue or black, I imagine as well that
I will not include so many visual elements
because I feel like photography and pictures here are going to take over. However, I will want to consider some design elements on Canvas once we move
on to that step. So this is Step one, which is basically deciding
on the brand identity itself. Working a little bit
on a Brand statement. I think I'm gonna go ahead and select this one because I feel like it's the
one I liked the most. I'm just gonna And delete these. In your case, I wanted to spend longer time on working on
your own brand statement. Of course, I think that makes
sense for your business. But just for the sake of making
this video short for you, I'm not going to
spend longer time on working on the words here. Of course I've not done any
keyword research and so on. Which is something that I
really recommend that you do when you work on your
brand identity statement. But this is just a
hypothetical example to work on brand
kit in particular. And therefore, I'm gonna
go ahead and pause working on the brand
identity statement for now. Let's move on to the Step
number two and start working on the
official brand name. Alright, Step number two,
Official Brand Name. Gonna go ahead and
mark these ones. What I have in mind is a name that seems to be very suitable
for this kind of business. Again, I know it's
just an example, but I want you to know how
you can research names. In my case, I actually
have I for nature. Let's say that this
is the name that I want to name my business with. The thing that we need
to do right now is to research the name to
see if it's available. So the first thing to
do is to go to Google and do a quick search
for I core nature. Just to see if going to be a very well-known
brand with that name. The good news is there isn't. However, the second thing
that you want to do, and especially if
you actually want to build the website
for your business, is to go to GoDaddy and
search for I for nature. The good news is that
the domain is available. The bad news is that
somebody has already bought this domain name and
they want to sell it for a very, very
expensive price. This is To be honest, something that I would
never go ahead and buy. 3,000 years or almost €4,000 is a ridiculous amount of money
to pay for a domain name. And I also do not recommend
going for any extension, like I said in the
briefest video, going for a different extension, then.com is not a good idea, especially for a new business. However, if you want to go ahead and consider
something else, then feel free to do that. What I would do is to consider
some different names. It's not like you cannot name
your brand I for nature, if this was you in my example. And of course, you can
always figure out a way to name your domain with
something extra, like for example, IFR nature of photography.com and so on. But what I would do is maybe try to consider some different names just to see if there's going to be a better opportunity for me. In this case, I
can actually name my business eyes nature. So let's try and see if
the domain is available. There you go to a €0.18
compared to almost €4,000, is a huge difference. And that's a price I'm actually willing to pay for a domain for. That is of course, in case
you actually want to go ahead and build a website
for your business. This is really my way
of showing you how you can do the research
first to make sure that there's no other
brand or business created under the brand that
you're interested in and the name that
you're interested in. And seconds just to
make sure that it's available in case you
wanted to create a website. It's also not really a bad
idea to go ahead and research other social media
accounts to make sure that there's no other brand
created under the same name. Alright, so Step number three
is your color palettes. This has to be honest, is my favorite Step because
I get to use Pinterest. If you've never used
Pinterest before, it's like a search
engine, but for ideas, and what I love about
it is that I get to use it before I get started
on designing anything, because it is always
full of ideas. What do you need to do is
just a Create an Account is just like any other
social media platform. And then you can of
course use it for free. And then you can just go
ahead to the search bar and type some keywords for
what you're searching for. In my case, I'm
actually searching for nature, Colour, Pallet. And there you go. There's already
beautiful color palettes that appear on the search. This one is really nice. I like the combination, and this one is very similar to the collection of colors
that I added here. So navy blue, dark green, sky blue, navy blue here, but the rest of the
colors are really nice. This collection is
amazing as well. So if I was a real photographer and I'm actually building
my own brand kit, I would consider maybe
taking a look at my own photography and see what colors seem to dominate most of my
photos and pictures. But since this is just a
hypothetical business, I'm just gonna go ahead and
select colors that I like. But this is just, There's so many things online
to get inspired by. You can also actually search for nature brand kit just
to see what appears. As you can see, there's already
so many nice brand kit. So maybe not these
purple colors. That's not so much my taste. But take a look at that. So these colors are really soft. Not a big fan of the fonts here. I like the logo. I like those leaves right here. It's really nice idea just
to get inspired by the way. So many of the stuff
that you see here are stuff that you
can actually buy For example, this is a
Brand Kit that you might find that this person is actually selling
those brand kits. So you can just have a
Brand gets ready for you. So you can just buy this one and go ahead and apply
it to your business. I can see this one
being a very nice logo. It's a flower. So it's nature-based with a font that I actually
also really like. I might change a little
bit in the colors, but this is how I actually get
inspired for Design Ideas. And I highly encourage that
you do type the keywords of your own niche and try to see
what Pinterest shows you. So you can just collect
some ideas before you go ahead and start
working on your own. Let's say here that
you actually found some really nice colors
that you want to go ahead and apply for
your own brand kit. So I'm actually
going to go ahead and I researched the first one. So nature Colour Pallet. Let's say that you
actually really like some of these
colors right here. So you want to apply some of these colors for
your own brand kit. What I would do in this case is used this Chrome
extension right here. It's cold color pick eyedropper. If you just go to Chrome
extensions or if you just search for color pick eyedropper chromosome
extension on Google, you'll be able to find this
one and install it on Chrome. By clicking on it. You can hover over any color. You will find the code for it. So let's say that
you really like this color right here and maybe this one you can just click
on it and then copy the code. This code is the code for
the color that you find on any web page and you can
use it on any place. So as you can see now
it's a white, the red. It really shows you a lot
of very small details, which is really cool in
case you want to find what is the code for these colors and also use them for
your own brand kit. So make sure to use
this a Chrome extension when you're searching
for colors. Then once you're done with
collecting some ideas, it's time for us
to actually start assembling the color palette. And for that I'm gonna
go ahead and use Canva. So the first thing I'm
going to search for is brand guidelines
presentation. So I'm just gonna
go ahead and use this one to speed
up the process. I'm just gonna go ahead and
use some of the templates. So let's see here. I'm just going to
apply the 20 pages and see the first one. I'm just going to
Name eyes for nature. So that's really cool
about Canva is that there's pre design templates. So let's just use the word
nature to see if there's templates specified
for that niche. Alright, so this
one is really nice, but it's not really like
I want some of this so I can actually start adding my
color palette immediately. Just gonna go ahead and
add Brand Kit right here. I might write a statement, so I'm just gonna go ahead
and actually copy this one. You can also write a little
bit about the brand here. My case, I'm just gonna go ahead and generate some
text. Lorem Ipsum. This is another very
cool Chrome extension to generate some texts. So if you're a designer, you will want to
install that as well. Then I'm just gonna go ahead and just slide this
one right here. Or maybe I'm actually going
to slide this one right here. And here I'm going to add
the colors that I like. So let's say that you're
actually applying the same steps and
you'll want to create a brand guidelines
presentation for yourself too, so you can always use it and
in case you want to pitch it to somebody to see what
they think of your work. You can just go ahead
and apply one of these templates like
what I'm doing. Otherwise, if you have
the time and patients, then you can just
design one on your own. I really enjoy designing
one on my own as well. I think we can get
really creative with it. Then there's so many other
features that inside canva. However, for the process of
speeding up this tutorial, I'm not gonna go
ahead and do that. Alright, so the first
color that I want to use, let's say that I actually
like this color right here. I'm gonna go ahead and copy it. And then just click on this box right here.
And then pasted. Alright, so for
the second color, I actually want to go
for something green. I'm going to search
for more ideas. I like this combination. This one also seems
to be very nice. And this one as well. It's really again important to mention that I'm
speeding up the process of just randomly adding colors to the color
palette that I'm creating. Because I don't want to
actually sit and try to think of the colors that
I'm including right now. And I don't want the
video to be too long for you because I wanted
to get started on creating your own brand kit. This is just my way of
showing you how you can add colors until you're happy
with the combination. Ideally, you want to focus
on two primary colors. So let's say that these
two are going to be the primary colors
in my color palette. So maybe I can just move them
up a little bit and then just add primary colors here. So primary Colour number one,
primary, color number two. Then just keep changing in
these colors until I'm happy. I think I left
this one as it is. If you'd like this
one, but the degree is a little bit too strong. You can just click on it and
then go here and then try to move to different degrees of green until you're
happy with the result. So it might take some time. So just, just enjoy the process. Just keep thinking of what does look visually
appealing to you, what makes sense to your brand, to your brand statement, to the brand identity statement, to what you want
people to feel when they're looking at these colors. How does it make sense with the fonts that you have in mind? It is a simple yet
complicated process and it's okay to have mine
shifts especially early on, then give yourself some time and take a look at it tomorrow, See if you're still like it. You might want to duplicate this slide right here and then
maybe change some colors. So maybe this one. See if you want to
include this one instead. And then take a look
at them tomorrow and see which one you seem
to like the most. And then by the end of it, you should just have
one of them ready. So this is the step of
selecting a color palette. If you're not happy
about Pinterest, you can actually go
ahead and just go to Google and search for Colour Pallet for nature
photography, business. Let's see if they will
actually show us. It seems to be the same
ideas that are taken from Pinterest itself. Mostly. There are some more
other ideas here that maybe you will like more. Do a little bit of research, do not copy anybody's work. Just get inspired and just make sure to give
it some time before you confirm that this is the color palette that
you want to move on with. Because once we move on
to advance steps and create logos and also
move on to the website. You will want to apply
the same colors as well. So it will be a little bit of
a hassle for you to change the colors every time
you have a mind shift. And I believe that
we're done with this step and let's move on to the Step number four and get started on designing the Logo. Alright, so for
designing the logo, I have two ways. The first one is using Luca. I have mentioned a little
bit about Luca before. Let's say that we actually
want to use look, all you have to do is
just go to look at it. Come on, let's say eyes for
nature and get started. The industry here is
photography. Continue. Now they want you to pick
something that you like. So what you had in mind
when you were actually thinking of your brand and
what you want to build. This one. Maybe it's something
I would like. These two. I would also go for I
wouldn't want to go for like a full text
unless it's very thin, like these might go
for something circle. But I think that's it. I would go for this one. And this one. And also
maybe the gray at a slogan. So maybe just closer to nature, right? So graphy camera. I think that those are
enough, maybe a photographer. Okay, so now they're
generating some logos for me. Not sure that I'm really
a big fan of them. Maybe this one is
minimalistic and nice. However, I do not
like the colors. I'm just gonna go
ahead and continue as a guest. It's
going to load more. So you might find something
you might be very lucky with what logos suggesting and you might like something
really cool, like this one seems to
be really nice since there's a big lens
here that looks like a castle tower
or something. This one, I'm not
really big fan of this round font right here. This one is really nice. I do not like the use of this
golden color in the logo, so I'm going to skip that. So basically, let's say that you actually like one of these. Let's say that you liked
this one right here. You can start
customizing the logo. You can start thinking of
different backgrounds, maybe different fonts and so on. And then by the end
of it, you'll be able to either download or take a picture of and so on and also sign up
and create an account. So it did the job quickly. However, what I would
actually want to do, and especially if
I was beginner, I would go ahead and
design something on Canva. You can actually go back
to Canva right here and just click on Create a
design and go to Logo. And then right here Let's
look at photography. Some of these templates, like this one right here,
actually really like it. And I also like the
color combination. You can consider
maybe different ones. So this could be your primary logo and this
is the secondary one. I liked the designs in Canva, generally more, especially that many of them
will actually be for free. Like I pay for gamba process, I'm able to use all of these, but even if you just
use Canva for free, There's many templates
that you can just customize and use for your own without having
to pay for Canva. So let's say that you actually stick to this color palette, or you have to do is
just go to these colors And copy them. And let's say that you actually like this designed
for your logo. And now you have
these colors that you selected for your brand
kit on the logo as well. We're still going to work on the fonts and the
upcoming steps. So do not have to
worry about that. But working on your logo, especially if you
want to also give it some time just like you did
with the color palette. If you want to design something right now and maybe
take a look at it tomorrow and give
it some customizing, some adjustments there,
change some colors, maybe look at the secondary
logos and see if you still like them or if you
want to make some changes. But working right now on the first version
of your Design, taking a look at it
later will help you determine whether you actually
still liking it or not. And with that, I'm actually
going to stop with a Step and then move
on to the second one. Alright, so Step number five, Your Unique Marks and the design elements that you want to
include in your brand. So this is of course up to you. If you actually want to
include any elements, maybe it doesn't really make sense to include any elements in photography based
business because your focus is your pictures. However, just for the sake of showing you how you can
include any elements, I'm gonna go ahead
and search for sum. I'm going to use
Canvas for that. Let's say that I'm going to
use this one right here. Here to elements. Let's say that I want to
include something related to camera and then go to graphics. Any elements that you
really want to include in your brand designs
you can include here. Maybe including cameras, will not make a lot of
sense because you already have something that is very clearly related
to your brand. But however, let's say that
you actually want to include some patterns not necessarily
related to photography, but they just emphasize the visual appearance
of your brand and make it look more recognizable and the
eyes of your customers. So maybe you want to include
something like this one. Whenever you're working on, let's say, a social media post. Or if you want to create some pins that you want to
include with a text on them, then you can use this one as
background of your texts. So these all the visual elements that you decide if you
actually want to include them. And you have to make sure
that you actually stick to the elements that
you choose right now, because you can go ahead and add all these elements whenever
you're creating something. So the goal of this step
is to decide whether you first want to include
elements and second, what is the collection of elements that you really want to use and apply it holistically
whenever it makes sense. So go ahead and
spend some time on this elements section in Canva. You might want to consider
also looking elsewhere. But for the sake of not
making this video too long, I'm not gonna go
ahead and do that. This one is actually nice. It's just say as an
example that this is a visual elements that you want to include
for some reason it doesn't really make
sense to photography, but it looks nice. And let's just say that you actually like it
and you just want to keep it on your brand files. So yeah, that's it. This is the step of selecting elements. I know it's very short, but for you who want to give it more attention and
maybe just look for different keywords like lines. Maybe something like this. Maybe you can actually
have a signature. Like you can create your own digitally and included
something like this. And that's right if
you actually also can change the color of it. Maybe this one say, you can include
something like this. So just give it some
time, depends on how important that is
free to include it. And just make sure
to actually add all these elements on one of
the slides just to make sure that you have the
elements ready with the colors that you want the
element to be visible with. So whenever you
creating content, whether it's on the web sites or whether it's on social media, you can just go ahead and click on the COBie and you'll be able to use it anywhere else that you actually
want to use it in. Alright, so Step number
six, which is fonts. As we said before, it's
really important to decide on the fonts that
you want to include. So let's actually
use the fonts that they have included
here for fonts. So I'm just gonna go ahead
and use the topography here and then start applying some search ideas inside
canva for different fonts. So as you can see this font right here, it's called Hatton. And if you scroll
down and Fonts, you will find, I don't
even know the count, but I could imagine that it's thousands of different
fonts available and Canva, and you cannot really use these ones because
therefore Canva pro, if you're not paying
for Canva pro. But as you can see, there's
going to be hundreds and hundreds free fonts for
you to select from. I actually imagined something
like this for the brand, for the photography brand. Something very thin and also
something very easy to read. It's just gonna go
ahead and actually try to change all of them. This is actually exactly
what I had in mind. I'm just going to
make this one bold. This one would be
my primary font. And then I would actually
go ahead and apply something classic for
the secondary font. So it's not really necessary that the fonts
that you will find here on Canva or fonts that
you will find elsewhere. But let's say as an example
that you did like this font a lot that make sense for you to
include in your brand. But you couldn't really find
it when you're designing your website or you're creating some designs
outside Canva, then what you can do
is maybe search for fonts for my brand kit ideas. I was hoping to
get like a image. The Chrome extension
that I wanted to introduce you to is what font? I think it's this
one right here. Let's say that you actually
liked one of these fonts. You can just simply click on it. And then you will be able to see the family that
the font belongs to, the weight of the font, style, the size, and
the color, and so on. Let's say that you actually
like a Brand so much. Alright, so let's say
that you actually really like this brand and you'll
really like the font, but you really just
want to know if it will fit to be used for your
own brand as well. So you can just go ahead and click on the Chrome extension. As you can see, this font
is called Agra and beer. So 400 is the weight. The style is normal, this is the color and this is the size. So you might want to
consider just researching the font just to see
if it looks the same. So parenthese a font family. Alright, so this makes sense. Now, let's see if it's
available on Canva. Alright, so there it is. So if you've ever seen a
fund that you really like, if you think it suits the style of the brand that
you're trying to build. There's nothing wrong with just trying to apply the same font. Or maybe tried to find
something similar. Yeah, they're trying
to show me right now some fonts that put lumped
at the same family, but they have maybe
different sizes and so on. And then we can do the same Step of selecting the
Chrome extension, what font hovering over, and then getting the name, then seeing if it's
available elsewhere. I'm actually going
to stick to these fonts because I really like how minimal and easy
to read this one is, this is what I also
decided when I was brainstorming
ideas for Fonts. I'm also going to
keep the color and dark and with that,
they Step is over. However, please make
sure to give it enough time and attention because you will want to use
a lot of texts later on, especially if you're going to be promoting products
and social media, you want to create some
infographics and so on. And then it will make sense to stick to one font
that you really like. Alright, so the final step of this Seven-Step Process is
the Supporting Visuals. Let's say that you want to outsource some pictures
for your brand. So in this case, this business
belongs to a photographer. I really hope that
this photographer, It's taking their own pictures, but this doesn't mean that they're not going to be setting some standards for the pictures that they want to include. However, let's say in
your example it's not a photography business and you want to outsource
some pictures, for example, from Pexels. So let's go ahead to Pexels. At this actually my own account where I just upload
some pictures. But what I also want to do is to research for other
people's pictures. So let's say nature
and see what appears. It actually doesn't
really make a lot of sense to decide
on a standard way of pictures and the composition
and the colors here, because it is a photography
based business. So you will have to
show different stuff. If you actually own a
photography based business, you can have just always upload
the exact same pictures. But let's say that you have
a fitness based business. So fitness gym maybe. This is when it gets creative. Do you want to have
your pictures always taken outside or maybe
inside the gym right here. You want to have
pictures of people exercising or do you want to maybe just focus on equipment without showing any
people's faces. So this is when you
decide on maybe how, for example, dark or bright, the pictures are, they
type of filtering? Maybe your entire
brand will have only black and white pictures
like this one right here. And then the same thing
applies if you want to create some templates, for example, for social media. So it's not really just images. So let's say that you
want to go ahead and create some Instagram posts. Then you can stick to
templates that you Design for your own brand or you can
also just get inspired by the templates
that you find here. Let's say that you actually
like this template. You can go ahead and add the fonts that you
have selected for your brand in the previous step can also apply the same colors. So let's say that you went
for these colors right here. And now you're designing
some templates. I'm just gonna go ahead
and copy this one. Then maybe the same font. I just forgot what
the name of the font was. I think it's this one. Or maybe I think it's thin one. So now I have the same font. I can also do the same
thing for the second fund. Alright. I think I would just
do a final thing which is maybe adding my own colors. So let's say this is a template
for some Instagram posts. For some reason I feel like
colors here are wrong, but just wanted to show
you quickly how you can design some
templates and always stick to them when you're creating the Supporting
Visuals for your brand. So this is in case
you're creating something for Instagram. And every time you were
posting something, you can just always like
change something here. And there's like
first post content. Welcome to my new business,
and so on and so forth. So this is it, of course you're not really sure yet what platforms
you'll be using. So are you going to be
extra on Instagram or Pinterest or you're not
going to be on social media. Are you going to be using
these infographics or not? Are you going to be
using pictures are not very much like pixels. You will find Unsplash, which is a very similar platform that you can upload pictures on and also you can
download pictures for free. If you want to pay for pictures, then you can go ahead and
use the stock images. I personally always
go to pixels. I upload content on it and I use content from
it the whole time, especially for my customers that are not able to
hire photographers. So it's really great place, especially if you are starting
from scratch and you do not have a lot of visual
content for your brand yet. And then also try to think of templates that
you want to include. The great thing about Canva
is that you can Design the template and you can
just always name it, IG template, maybe brand kit. Then every time you
want to post something, you can just enter this
design so it will be saved, just make the changes. And then you can share
it, you can download it, and it will be saved
on your phone or computer so you can upload
it on social media. We have to do is just go
ahead and Design this and just keep it
with random words. Once it's time for you to
start publishing content, you can go ahead and make the customisation that you
need and save it and shared. With this, the Seven-Step
Process is done. I really hope that
I made it easy for you to understand
the steps that you need to apply so you're able to create and design
your own brand kit. If there's any questions,
please go ahead and ask me here on
the section below, or by just getting in touch
with the instructor online. And I will be more than
happy to help you with it. I do a side hustle as
a designer myself, so it'll be hopefully able to answer any questions
that you have.
6. Selecting Your Main Property On The Web.: Hi, and welcome to part two of this moodle on selecting your
main property on the web. We're going to start this part with a very important question. Is building a website essential for your affiliate
marketing business? Today, many argue that having a website is not essential
for your business growth, and social media can
make it easier to reach people as an alternative
and free approach. But as you will come
to see for yourself, when you start
submitting applications to join affiliate programs, many companies will ask
you to provide them with a website URL so they can
evaluate you as an affiliate. Besides that,
having a home where your audience and potential
customers can find out more about your business and read your story in your
page and check your reviews is going to boost your brand awareness
and help you kick start your
business as a beginner. And besides that, social
media channels might temporarily break or shut
down for a reason or another. And also the fact that
you do not really fully own any of the social media
profiles that you have. If something is to happen,
like, for example, unintentional misuse
from your side or maybe multiple
reports from others, regardless of the reason, the platform can decide to
shut down your account, which could harm your business and disconnect you
with your audience. But with all that being said, social media does indeed play an important role of
starting an online business. From building brand awareness to attracting new customers, social media is indeed
a strong tool at your disposal to use for
growing your business. With more than 4
billion active users spending an average
of 2.5 hours a day, social media does give
you the opportunity to establish relationships and to communicate directly
with your audience. Luckily for affiliate marketers, many social media platforms allow affiliate links
directly on the content, which helps you to make
direct affiliate sales inside the social platforms
without having to direct people to
your website first. So even if you're
planning to focus all your affiliate marketing
efforts on your website, you still need to use at least
one social media platform to reach as many
people as possible as it's indeed the easiest way to build brand awareness and to tell people about what you do and drive traffic
to your website. But there are plenty of social media platforms
to select from. So which one is the best one
for you and your business? Many factors are included when deciding on the right
platform to focus on. And it's not
necessarily true that all social media platforms suit your business and
your target market. So it's a waste of both time and effort to grow a profile on a social media channel that your target market
isn't really active on. Each platform has different
approaches, content types, and sharing opportunities,
and therefore, the user's demographics differ from one platform to the other. Millennials have fully
embraced the newcomer TikTok. While young adults are
demonstrating Instagram. Female designers and online
entrepreneurs took over Pinterest and college
educated professionals account for the majority
of LinkedIn users. And of course, everyone is
on Facebook and YouTube. Deciding on the right
platform to use starts with your own business
and the products that you're an affiliate for and
learning the best way to convey them and showcase them to your audience and
potential customers. It doesn't really have to be an all or nothing
approach either, so you can use different
social channels to reach different audiences or to meet
different business goals. So for example, you can dedicate
Instagram to showcase or promote products and pictures to drive traffic
to your website, or you could use Instagram to build relationships
and connect with your audience and YouTube to showcase and
promote products. It's really up to
you to determine the best thing for you
and your business. Now, a question
you might have is, how many social media
channels should you use for your affiliate
marketing business? If you are planning to use as many social channels
when starting out, you might be risking
the quality of your content and the
potential to grow on each individual channel because your efforts are going to be
spread between many places. So please keep in mind
that everything from competition analysis to defining the channels buyer persona to creating content calendars
and engagement with the audience is
your responsibility as an independent
business owner. So before you decide to start a new account on a
social platform, make sure that you are
comfortable with monitoring your account and creating consistent high
quality content on it. As establishing a presence on one or two channels with regular and unique
and optimized content is far more fruitful
for your business than starting many different
social profiles that are not well taken care of. Now, for those of you who
are thinking of introducing your affiliate
marketing business on your existing social
media profiles. Many new entrepreneurs decide to use their existing
social media profiles to introduce their new business instead of creating new
accounts from scratch. If you have a number
of friends or loyal followers who engage
with your content regularly, they might be the perfect
opportunity for you to announce your new business adventure
and have them visit your website and check out the products that
you're promoting. While helping you spread
the word online as well. So if you decide to do so, try to introduce
your new business on social media the same way that
you would do in real life. Short, simple, and with meaning, do not trush into
telling every detail on the first few weeks
and all of a sudden, you out of stories to tell. Instead, allow your
personality to connect and leave marketing
out of it to begin with. Because people are often
short on time and how you introduce your new business to them is really important. With consistent and genuine
content that is balanced between promotional content and relationship
building content, you will be able to build long
lasting relationships with your audience that will definitely empower your
affiliate business. And whether you will be using your own existing profiles or creating new profiles
from scratch, your branch should
definitely embrace and implemented all around
your online presence. As visual consistency
will help you establish a professional looking online
presence and make you more memorable and trustworthy in the eyes of your existing
and new audience.
7. Build, Design & Optimise A Website.: Hi and welcome to part three of this model
on how to build, design, and optimize
your website. We've covered earlier
the importance of owning a website and the
fact that you do not have to apply your affiliate marketing efforts directly on the website if your plan is to use social media
channels to do so. In that case, your website
could be a personal website and the content on it could be oriented around you
and your business, more so than the products you're promoting
as an affiliate. But if you're planning to
use your website to create articles or plug posts
that promote products, then you can use your website as your main affiliate channel. In any case, you should
really be clear on the purpose of your website
before you begin creating it. Your website cannot be just another website with replicated slogans
and zero personality. Please keep in mind
that Internet users are digitally mature and smarter
today than ever before. Small efforts and
replicated messages are not going to make you memorable and trustworthy in their eyes. You should aim for a
website that reflects your genuine message and the heart of your
business and brand. No empty promises
or fake stories. It's not only because
it's illegal, but it's going to be
easily detected by your readers and they won't
give you a second chance. Moving on with this part, please keep that in mind
as well as how you want your readers to feel
about your business and brand when they come
across your website. Now before we move on to
the web building tutorial, I would like to ease down
the process by talking shortly about the principles
of building a website. Because when I say web building, I cover a lot of ground and the ways to do so
are becoming endless. And it doesn't really
matter what purpose your website will serve. The basic principles behind building any website
remain the same. Websites are made up of code. Theoretically, you can
learn the coding language, open a blank web page
and get to work. But well created websites are made up of many
different elements, coding languages
that print together both the visual appearance and
the structure of the site. Manually coding your website isn't really how websites
are created today, unless they are for
large companies, and you should never
go about it this way. A CMS system, which stands for
Content Management System, is a tool that you
can use to create websites without the need
for this manual coding. Cms systems allow you to
focus on the content and the visual appearance
of the website without the need for coding. This doesn't really
mean that it's a shortcut or a lazy
way to create websites, It simply means that websites today have become so advanced in terms of coding requirements that unless you are an
educated developer, you have no chance of knowing all the different
coding languages required to build a website
that you have in mind. On top of that, it's just
unnecessary work to do when a CMS system is able to do all that
hard work for you. The good news is that there are many options that
are extremely user friendly and created
for people who do not have a strong
technical background. The CMS systems include, but they are not limited to, Wordpress, wigs,
and square space. By using a CMS system
like Wordpress, you can develop an
entire business website without learning how to use
any of the coding languages. As for the design part of it, these systems offer thousands of free and paid
design templates. We call them themes. And you can use these themes to customize the design
of your website. As you will come
to learn about in the upcoming video for
a web design tutorial, the website building
and design process I've created in this course
fits into any skill level. Even if you've never typed
a code in your life, you will be able to build a
professional looking website from scratch by following
the steps in the next video.
8. Web Design Tutorial One - Step (1) - Hosting & Domain Name.: Hi there and welcome to
the web design tutorial. In this video, I'm
going to show you how to create a
Wordpress website. As mentioned before, this guide is created for
absolute beginners, no need for any design
skills or coding skills. I'm going to show
you how to design a website using free templates and dragon drop tools that do not require any
prior experience. Inside this video, I'm also going to introduce
to you some of the best and most affordable web hosting services
that you can use, so you can store
your website files and launch it on the internet. Let's go ahead and move on to
the first step. All right. The first step of
building a website is to get web hosting and also
purchase a domain name. Web hosting is basically where all the website files
are going to be stored. There are companies that offer web hosting services to
individuals like you and me, so we can display our
websites on the Internet. For this step, I recommend using the hosting web hosting service. They do have one of the best
and most affordable options for hosting websites
on the internet. And you also get a free domain. When you sign up with Hostinger, the first thing
to do is to go to Hostinger.com As you can see, they currently have an
offer that you can have your website hosted for as
little as $3 per month. This is very cheap compared to other web hosting
services available. As you can see, you also get three months for free In case you do not see this offer available at the time that you
are creating your website, then go ahead and just add my
name here besides the link. And I guarantee
that you will get the best offer
available on Hostinger. I have recently partnered up with them and I want
to provide you with the best prices in case the
offer was there already. You do not have to use the link, but just in case
you're interested in claiming extra deals, bear with me to the
end because I also have a promotional
code that you can use when you're checking out to get more discounts on
top of these ones. Right now what you want to do is click on Claim Deal right here. Then you will see that there
are three plans available. And this might be different at the time that you are
creating your website, but you must select
one of these plans, The first one is the premium. Go ahead and read
all the features. As you can see, they do
have managed Wordpress, but you cannot build
an E commerce. There's also the hosting
Website Builder. This is the AI tool that you
can create websites with. It's different than Wordpress. I will create a tutorial in this course to show
you how to use it, but right now we are
focusing on Wordpress. However, if you want a
recommendation from me, I suggest that you go ahead
and use the business plan. It has all the features
that you need and it has a lot more to offer
than the premium plan, but it is your own
personal choice. After you select one, just click on Add to Cart. Here you need to
select how much in advance you want to pay for
the web hosting service. As you can see, if you pay for one month monthly payments, it's going to be very expensive. But if you are planning to have your website for a longer time, maybe a year or two
or three years, then it makes more sense to pay for these years in advance. And you will be saving
a lot more money than having to pay
month by month. I do recommend going
with the 12 months if you're not sure yet how long you want to keep your website. But for those of you
who are planning to have their website
for a long time, maybe three years or more, then of course, go
ahead and use the offer of 48 months so you can
save the most money. After that, you will want to go ahead and create an account. The first thing to do is to add your e mail here and a password. You can move on to
the check out here. You need to select
the payment plan so you can pay for the
web posting service. Go ahead and add all your
information right here, But then before you check out, make sure to add this coupon. Just simply add my name. As you can see, you will get an additional discount on
top of this one right here. And then just fill up your
payment information and submit the payment
so you can have access to the hosting
your dashboard. Then once you're done
creating the account, you can access the
hosting your dashboard. It looks like this
one right here. And you can access it
by using the e mail and the password you provided when
you created your account. The first thing that we want to do now is to go to hosting. And then you will want to
set up your business web hosting by clicking
here on Set Up. It's up to you if you want
to answer these questions. They're just trying to create a personalized
experience for you. So you can click here on I'm creating it for myself
or for someone else, or I already have a website. However, if you do not want
to answer these questions, then just click here on Skip. Then you will need to
decide between two options, the Wordpress or the
Hostinger Website Builder. Once this tutorial is done, I will actually include
another tutorial using the Hostinger Website Builder
instead of Wordpress. It's actually a great website
building tool to use. It's AI powered and it saves a lot of time and
it's amazing for beginners. However, this
tutorial is focused towards building
websites with Wordpress. I'm going to go ahead and
select this one right here, and then move to
select Wordpress. Here they're asking
you to create a Wordpress account so you can access the
Wordpress dashboard. As you can see, they already
added my e mail that is associated with my
account on Hostinger. All I need to do is
just create a password. This is not the same password as the one for
Hostinger account, but a new password
so I can access the Wordpress account in case you want to change
the language from English to another language that you prefer to use Wordpress with. Then you can change
it from right here. I'm going to go ahead
and keep it in English, and then click on Next. Then here you need
to select between the prebuilt templates
or the standard themes. There isn't a big difference between templates and themes. They're both control the
overall layout of your website. If you want to go
with templates, I know that they're going
to be very intuitive and very easy for you
to create the website. But I do want to show
you how you can use themes and also do some
of the work yourself. I'm going to go ahead and select Standard Themes and
then click on Next. Here they're asking
you if you want to include the pre selected
pluggings to your website. Pluggings are
something that plugs in to the website and
adds extra features. These features can
be, for example, adding the credit
card information so people can buy
something on the website. They can be adding
contact forms. They can be anything related to the design or the functionality. However, I do not want to
get into plug ins right now. I want to explain them
later in the tutorial. You do not have to
worry about that, but it is your
personal choice to decide if you want to
include the plugins that hosting are selected for you or you can just go
ahead and select no. Then once we move on
to the plugin step, you can study each
plug in on its own and decide if you
actually want to include it. And then you will
be able to include any plug in you want,
including these ones. I'm going to go ahead
and move these. This is another cool
feature of Hostinger. It's asking here if you want to generate some content
for your website using AI by writing the brand name and also writing a
website description, what is the purpose
of your website? Then the AI tool can generate some text
and images for you. If you feel like
using this tool, then go ahead and do so. However, I'm going to
go ahead and skip it. Finally, we get to
the part where we select the domain
name for the website. Hopefully, at this point, you have already selected
the brand name and you have researched the
desired domain name that you want to
name your website. But in case you didn't, then you still have
the opportunity to search for it here and
see if it's available. Since I'm building
a demo website just for the sake
of this tutorial, then I'm just going
to go ahead and pick a random name and then try
with.com As you can see here, the affiliate marketing
formula.com, is not available. Somebody else has purchased it. In an ideal scenario, I will want to go
with a.com extension, because as mentioned before, it is the default Google
extension for websites. But in this scenario, I'm going to just
select anything else, because this is just
a demo website. I'm going to go ahead
and maybe select Shop or Store, or maybe space. And then click on Next Here
you will need to finish the domain registration by completing some of the
personal details about you, whether you're creating this
for a person or a company, just go ahead and
fill this information and also add your country. I'm just going to go ahead
and do that quickly. All right, so once you're done with the domain registration, hostingers going
to ask you about the geographical location
of your target audience. This is another cool
feature of hostinger. They basically let you select the closest server to the target audience that you
selected for your website. As you can see
here, they do have many servers around the globe and you get to
decide which server is going to be
hosting your website. For example, if your
target audience is in the United States, then you can get to select the server in the United States. And that means that your website will load a lot faster than selecting a server
that is a little bit far away from your target
audience location. I'm going to keep
the server that they selected for me because it
is going to be the closest. And then I'm just going
to click on next.
9. Web Design Tutorial One - Step (2) - Getting Familiar With The WordPress Dashboard.: All right, so now we
have a hosting account, we have a domain name, and we also installed
Wordpress on the website. Let's go ahead and access
the Wordpress dashboard. You can do that by clicking
here on the admin panel. This is what the inside of the Wordpress
dashboard looks like. As you can see here,
there is a menu to the left, on top right here. If you click on the name of the website that you selected
and click on Visit Site, then you will be able to see
how the website looks like. This is just a demo design that Wordpress has
created for this website. Of course, I'm going to show
you how to change it later. But for this step, what I want you to do is to get familiar with the
Wordpress dashboard. Go ahead and click between these different tabs on the left menu as
you can see here. The first one is
the Hostinger tab. That is because the
website is hosted by them. This type right here
might be different to another name in case you selected another
hosting provider. On the next one, we
have the dashboard. This is basically
just the main page of the Wordpress dashboard. There isn't much to do here. The one after that is posts, this is the place
that you create some blog posts and you
publish them on the web. After this one, we have media. This is the place that you
can upload some images and videos that you want to
display on your website. There are, of course, other
places to include some media, some videos and images. I will show you that later. But this step is to
do that as well, especially if you want
to upload them in bulk. Then after that, we have pages. This is the place to include
pages on your website, like a contact page, home page, blog page, and so on. This really depends on how many pages you want to
include on your website, and of course, we will get to
that in the upcoming steps. As for this tab right here, this is where you can
see a notification in case somebody comments on
one of your blog posts. You can respond to that comment,
answer their questions, or just basically read the
review that they leave for you or whatever interaction you get from your blog readers. Then as for appearance, this is the place that you can change the theme
of your website. In the upcoming
step, I'm going to show you how to install a theme, a template that controls
the design of the website. Then we have plugins. This place is where you
installed the plugins that were mentioned when we were creating the hostinger account. As I said, plugins is something that plugs
into the website to add extra features that the word
press default dashboard does not provide you already. Then we have users. This
is the place to add users that can control the Wordpress dashboard
on your website. Right now, I am the only user because I'm the one who
created this website. But let's say that
I want to be able to manage this website
with somebody else. If this is a mutual project, then I can just
simply click here. I can add their name and their e mail and generate
a password for them. Somebody else can also access
the dashboard and help me with designing the website or maybe creating content on it. Then we have tools here. These are different tools. To be honest, I do not
use this tab so much, but feel free to browse around them in case
you just want to get familiar with the options available inside this dashboard. Then we have settings.
This tab is actually useful in many cases,
as you can see. First, we have the general
settings for the website. You can change the
time zone right here. You can change the format
of the dates and so on. And then just make sure that every time we change something, you have to click
on Save Changes, otherwise nothing
will be changed. Then we have writing, this is
the place to, for example, set the default post
category Later on when you create a lot of blog posts and you want to collect them
in different category, then you can go ahead and
select the default one. So far, I do not
have any categories because this is a
brand new website. I cannot change that.
Then we have reading. This is again related
to blog posts. How many blog posts you
want to show on each page? Again, do not get into
these details right now. I'm just showing you
the different options available on the
Wordpress dashboard. But you will get to
change all these later. Spend some time getting familiar with the Wordpress dashboard. And then once you're done, we can move on to
installing a theme.
10. Web Design Tutorial One - Step (3) - Installing A WordPress Theme.: All right, to install a theme
on your Wordpress website, you can go to Appearance, right here on the left menu, and then click on Themes. As you can see here,
there are already three themes that have been
installed on Wordpress. By default, I'm not the one
who installed these themes, but they just came with Wordpress when I installed
it on my website. You might actually see
different themes installed on your own Wordpress
dashboard depending on the time that you are
creating your own website. As you can see here, there's only one theme activated
on the website. The other two themes have just been installed,
but not activated. And there can only be one
theme active at a time. Since a theme is
the template that control the overall
design of the website, you cannot have two themes
active at the same time. I do have a personal
advice to not keep any installed themes on
your Wordpress dashboard. Only keep the one that is active because even though
they're not activated, sometimes it could happen that they mess up
with the design just simply because they are installed on the
Wordpress dashboard. All right, so with that
being said, right now, let's go ahead and change the theme into something
else that we like more. To do that, you can click
here on Add a New Theme. As you can see here,
there are plenty of options that you
can select from. All you have to do is just
check something that you like, you like the layout of it. Of course, it will
look a little bit different when you
add your own content, your own text and
your own images. But this is just the template that you can fill your
own content with. And it will look very similar to the templates that you're
seeing right here. Let's say that you like
this template right here. Just click on
Detail and Preview. You can check out how it looks. This is not the
theme that I want to install, so I'm
going to go back. Since we have over 6,000
themes to select from, sometimes it is a good idea to filter the search
by clicking here. Then you can select the type of website that you're creating. Are you creating a blog
or an e commerce website, educational website,
entertainment and so on? Let's say that I'm
creating a blog, then you can also select
the features that you want. Let's say that I want to have a custome header and the
theme that I select. And then I also
want three columns. This way I filter
out the search. As you can see here, the
number of themes that fit into my filtered
search has went down to a little bit over 1,300
Go ahead and filter the search based on
the type of website that you're building and also the purpose of your website. Then if you find a
theme that you like, then all you have
to do is click on Install and then activate it. Now there's something that
I want to mention here regarding choosing the most
suitable theme for you. As we said, themes are templates that control
the overall design. These templates sometimes
might have a lot of customization features
and sometimes they will only allow you
to change a few things. You will have to be limited to the design of the
theme that you selected. If you want a theme that
gives you a lot of features, so you can change as
many design elements and design features as you want, then you will have to
go with a theme that gives you these
features for free. Of course, the options for
customizing the design of each theme will differ
from one theme to the other. If you want some recommendations
for themes that offer you as many customizing
options as possible, then I have two recommendations. The first one is
Ocean Wordpress. It's this one right here. Ocean Wordpress is one of my favorite themes to use
for designing websites. It will offer you all the design customization options
that you can think of. It's very flexible and
super easy to use. If you want to go ahead and start with a simple
theme that gives you a lot of opportunities to design the website
that you have in mind, then this is a very
good theme to go with. The other one is called Astra. This is another
great theme to work on when you're building
a Wordpress website. It gives a lot of opportunities for design features as well. You can change almost the entire layout the way
that you want to. It works really well with a lot of plugins that I will
introduce to you. Once we move on to
installing Plug in step, I'm going to go ahead and install and activate
it on the website. As you can see, Astra is the only active theme
on this website. And then 2024 has been automatically deactivated
together with the other themes. Because as we mentioned earlier, there can be only one
active theme at a time. Once you activate the theme, you can click here on Customize, you will be able to access all the design features
here on the left menu. The first one that you
see right here is Astra, trying to get you to buy the pro version so you
can access more features. I personally do not recommend to pay for any theme because the customization
features that are available here for free
are more than enough. Especially for those
who are building a website as a
beginner in case in the future you want to access
other features and you want to include more design
elements on your website, then maybe it is
a good idea to go ahead and buy the
Astra Pro theme. But honestly, I do not think that it's
worth the investment when the free
version of the theme offers you so many
design features. Over here, go ahead and take a look at all the options
that the theme provide you. Take a look at the changes
that you can make. As you can see right here, you can change the
site title and logo, the menu, the social
icons, and a lot more. In case you installed and activated a theme
that you did not like, then all you have to do
is just click here on Change and then
Wordpress org Themes. As you can see here,
this is the same list of themes that were available to us inside the
Wordpress dashboard. You can just search for
a theme right here, maybe let's say Ocean
Wordpress. There you go. All you have to do is just
click Install and activate, and you will have a new theme
available for you here. The good idea is to install
and activate a theme, and then check what
design features and options they have
available right here. And then once you find
a theme that you like, you just simply have to activate it and then
click here on Publish.
11. Web Design Tutorial One - Step (4) - Installing WordPress Plugins.: And right now we're ready to
move on to the next step and start installing some
plugins on our website. So to do that, you
want to go here on the left menu and then
click on Plugins. As you can see here, there
are three plugins that have already been installed and
activated on the website. Just make sure to not
delete the plugging that is associated with the web hosting service that
you have selected. In case you went with Hostinger, you will find the
Hostinger plug in right here in case you went with
blue host or go Daddy. You will also find
the plug in that is associated with the web hosting
service of your website. Just make sure to not
deactivate or delete that. The rest of the pluggings that
usually come in default to the website are
something that is up to you to decide if you want
to keep them or not. In this case, this
one right here, the light speed caching is
a plugging that came by default at the time of me recording this
tutorial for you. It might be a
different plugging at the time that you are
creating your own website. And it is up to you if
you want to read more about the plugging and decide if you want to keep it or not. In my case, I am already
familiar with light speed and I do not believe that I need it on my website At this moment, what I can do is
deactivate it and then click on Delete and to install
a plugging on the website. You want to click
here on Add New Plug. In. Since we have come
across plugins before, a few times we mentioned
that there are pieces of software that can be plugged into the website to
add extra features. Then what you want to do is search here for the keyword that is associated with the feature that you want to include
in your website. Let's say that you
want to include a contact form so people can write their name and email and contact information
and reach out to you. Then you can search for
a plug in that help you display a contact
form on your website. Let's search for contact form. As you can see here, there are plenty of options that
you can select from. We have over 1,000 options. How do you know if
the plug in is good? So you can install and
activate it on the website. To decide if a plug in is good, you want to look at
two different things. The first one is the
reviews of the plug in. As you can see here,
the contact form seven has received
over 2000 reviews. It seems that it's doing okay, but this one right here, the
contact form by Wordpress, has received even
better reviews. This is a good indication
that people are really happy with the
functionality of this plug in. This means this plug in is
a good choice in case you want to install it and use it on your own website as well. Now the other thing
that you want to look at is the latest
update of the plug in. As you can see
here, this one has been updated three weeks ago. This plug in right here has
been updated one week ago. The other plug ins
that we can see here on the bottom has also
been updated three weeks, two weeks, four weeks. All of this is actually
a good indication that these plug ins have a team of software developers that are working constantly on making sure that the product
that they are selling or adding here on Wordpress is something that is updated and is
functioning well. If you may be scroll
down to the bottom, we have two months here
or one months here, but these are also good
indications. There you go. This is a plug in
that has not been updated since nine months ago. This might be an indication that this plug in will not
function as it should. When you want to consider a
plug in for your website, then make sure that it has been updated within the
previous three months. Anything more than that
is not a good indication. Let's go ahead and install
this one right here. Then we're going to look
for another plug in. Let's say that you want
to create a webshop. The products that you
are promoting are going to be available
on your own website. And you want people
to be able to add their card or credit card
information and they can buy things directly
from your website to have that kind
of functionality. You also need a plug in the
same thing with contact form. You can search for credit card. As you can see here,
there are plenty of options to choose
from as well. We have more than 1,000 items. Simply look for
the same features. So good reviews and also
the last updated time. And consider whether you want to include the plugin on
your website or not. Right now, let's move on
to the plugins that I recommend that you
install on your website. The first one is
called Elementary. It's this one right here. This plug in is one of
my favorite plug ins to design websites. And it's perfect for beginners. I will show you how
to use it later. I recommend that you
install this plug in in case you want to
create a website fast. Because I'll show you
later how you can download the templates
available and then you can customize them using
the dragon drop feature inside elementor so you can
publish your website quickly. The first thing
to do is install. I'm going to activate all the plug ins that I install later. But I do have another plug
in that I want to install. And it's called
starter template. It's this one right here. I'm going to click on Install. The final plug in I recommend
to install is Yost SEO, which I will explain
later how to use. All right, so now I'm
going to go ahead and start activating
the plug ins. As you can see
here, the Yost SEO has been added to the left menu. And this will happen
every time you activate a plug in
on the website. I'm going to activate
elementor and also start their templates and
the workers forms. This is the list of plugins that I need for my own website. I do recommend that you do not include so many
plugins to begin with. You do not feel overwhelmed with so many set ups on the
website. Keep it simple. And you can always include more plugins and more
features to your website. Now we're done with
the plugging step, and let's go ahead and
move to the next step and start creating some
pages on the website.
12. Web Design Tutorial One - Step (5) - Creating Website Pages.: To create pages on your
Wordpress website, navigate to the left menu and then click on
Pages right here. As you can see, there are two pages already
available on the website. We have the front
page and there's a privacy policy page that
has been added by default. It's up to you if you want to
keep those or delete them. However, I do recommend
keeping the front page, which is the home page. And of course, you can
change how it looks later. But for right now, let's include more pages
on the website. The first page that I want
to add is an about page. Click here on a new page and then close the
tab right here. And then you can name the page. Then you want to click here
on Edit with Elementor. This button appears because I have installed the
Elementor plug in. If not, then you will have to use the default page builder. It's called blocks, but I do not prefer that
builder, to be honest. I do not think that it
offers a lot of features. I'm going to design
the page with my favorite plug in
which is Elementory. I can also show
you how it works. First, I'm going
to close this one. And the Navigator as well. As you can see here
on the left menu, there are plenty of design
elements that you can include. These are the pro features. We do not want that, I do not recommend paying for
elementor pro at this stage. We want to keep using the
free version of element. As you can see here
on the bottom, there are more free features. Let's say that you want to create an about page
for your website. All you have to do on
element or is to click on the element that
you want to include and simply drag it to the page. As you can see here, you
already have a heading. And then if you go back here, you can type whatever you want. You can change the style. Let's say we want it in black, maybe in the middle of the page. You can change the size. You can change the
font from here. But I do not
recommend doing that, because I will show
you how to change the entire font for
the website later on. You can change the style. As you can see, there
are plenty of options. You can include a
link on this heading, so if somebody clicks on it, they will land on
a different page if this is what you
want them to do. Let's add a new element. You can add a video here. You can add a button. Let's say this button is going to
go to the contact page. And you can create
a contact page on your website and you can
add the link for it here. If somebody clicks
on this button, they will land on your
contact page and reach out to you using the contact form
that you will be creating. As you can see, elementor
is very easy to use. You just have to drag and drop features from whatever
you see right here. Just go ahead and browse
around the different options. You can see that there are
icons that you can fill. There's an image box right here. If you just simply
include that here, you'll be able to add an image and add here anything you want. And then just change
the text here to write something that is related to
the content on your website. Of course, you will want
to create a layout. The content that
you're including makes sense and it's also
aesthetically appealing. It might be a little
bit difficult in the beginning to understand
how Elimitor works. What I'm showing you right now is just a very quick tutorial, but just give it some time and
browse around the options. It's so easy to delete
something if you include it and you don't
want to add it anymore, just write, click and
click here on delete. Do not worry about changing
something by mistake, because by clicking
here on history, you can always go back
in time and then undo any work that you've done that
you wish to go back from. Then once you're done, you
just want to click here on Publish and then you have a
new page on your website. Decide on how many pages you want to include on your website. It makes sense to
include about page, a blog page and also
a contact page. And of course, the home page and whatever else
you want to include, of course is relevant for the content that you want
to fill your website with. This was my way of
showing you quickly how to include pages
on your website. But right now, I
want to move on to the design part because once we start creating the structure of the website and decide
on a design template, then all of this will make
sense and you will see some end result for all the work that we've
been doing so far.
13. Web Design Tutorial One - Step (6) - Website Design & Customisation.: All right, so it's
time to move on to the exciting part and
get started on designing the website to help you design a website
quickly and professionally. As a beginner, I'm going to
show you how to use one of the pluggings that I installed in one of the previous steps, which is this one right here. It's called starter templates. You want to click
here and get started. As you can see here, it's
giving you two options. The first one is to build
a website powered by AI. It means that you give the tool some information about what
website you have in mind. Then it will generate
a template for you based on the information
that you have provided. However, what I want
to show you how to use is actually
the template that this plug in provides you to
see the available templates. You will want to change this
plug editor into elementor. As you can see here, there are plenty of beautiful templates that you can download and use for the design of
your own website. Let's go ahead and start
with filtering the search. Let's say that I'm building
a restaurant website, then I can just simply
filter the templates that are suitable for
a restaurant website. And then as you can see here, there are plenty of
templates that I can use. I can customize later and then add my own pictures
and my own text, and then I can just launch
a website very quickly. Let's use another example. Maybe an agency, maybe
this one right here. I do not want to go for a
premium template because I do not want to pay
for the plug in, but I want to use one of the free options
that they give me. Let's go for this one then. Take a look at the
entire design. Of course, if you
do not like it, then just click here and then browse on different templates. But I do not want to make this
tutorial too long for you. So I'm just going
to go ahead and move on with this
template right here. Then once you select a
template that you like, you can upload a site
logo right here. You can also select the font in case you like the design
but you do not like the font, then it's a good idea to
browse the other options. As you can see, every time you
click on a different font, you will see the
changes right here. And then the same for
the other options. I'm going to keep it
as the first one. Then here you can change the overall color
of the template. Maybe we do not like
this purple one. You want to turn it into
blue or maybe green. Then afterwards,
once you're done, click on Continue. Right here. You just want to add some
basic information about yourself to get
the entire design that they have created
in this template. They're asking you here
to agree on some of the advanced options like importing the customizer
and widgets and so on. Agree to that if you want to, and it is up to you to select whether you want to
share the data or not. I'm going to keep it
as it is and then click on Submit and
Build my website. Now it's going to take
some time until it completes to 100% So
let's go ahead and skip. It's ready, so let's
go ahead and take a look. There you go. They built the entire website for us using this
template right here. This is the one that I selected. As you can see, they also
included some pages. All I have to do right
now is just to customize the text and add the images
that I want to include. And maybe just take a
look at the other pages, see if there's something
I want to keep. It's also possible to
remove some of the pages if they're not relevant for the
website that I'm building. But the great thing
about this plug in is that it provides you
with a lot of options. That you can just
take whatever you want from, delete the rest, and of course, move
on to the step where you can
customize the design. Add the text that makes sense to the website that
you're building, and launch it very quickly. This is considered to be one of the fastest and easiest ways to build websites for beginners. So let's go ahead and change the content
on the home page. And to do that you want to
click on Edit with Elementary. Just simply by hovering
over any item that you see. You can see that we can
change the text right here. We can add anything
that we want. This is just on top of my
head to show you how you can update the content
on the template. Then as for services, we can just change that
to service number one, service number two, and so on. Or maybe a name of a product
that you're promoting. Let's say that you
want to change this picture right here
so you can go to Style. It is included as a
background first, you can move it and then
click on Insert Media. If you have a picture
ready on your computer, then you can just
select it here. Otherwise, you can
take a look at the free images.
Let's say Agency. And maybe select
this one right here, Save Insert. There you go. This is it for how you
change the template. And then make sure that
once you're done adding all the content and
the images that you want to display
on your website, click here on Update, and then you can view the
changes by clicking on this Preview Changes
button. There you go. Now let's go back to the word
prestacheboard two pages, and then click on Refresh. The template has already added all the pages that was included in the template design that we have installed to the website in case there are pages that
came with the template, but you do not want to
keep them on your website. Then just simply click on this bin button right here and you'll be
able to delete them. I'm going to do the same for the about page because I have to, let's say that I want to include a new page on the website. I'm going to go ahead
and click on a new page. This is going to be the
page that I display the blog posts that I
create on the website. I'm going to name it blog and then I'm going
to publish it. If we go back to view
the website right now, you will see that the blog
page has not been included. But I do want my
visitors to be able to see the page so they can read the blog posts that I
will be creating as I move on with my
business on this website. To do that, you want to
click on customized. Then you want to go to menu. As you can see here,
there's a menu here that is called
the primary menu, which is this one right here. There's a page that is
included, but it's invalid. That is because I moved it. I'm just going to move this one. Then I'm going to
click on Add Items. There you go. The
plug page is right here, as you can see. The plug page is now
displayed on the menu. Then of course,
once you're done, remember to click Publish. Now a final thing that is important to mention
before we move on from the design part is regarding the header and the
footer of your website. As you can see here,
there is a header where there's the logo
and also the menu. If you scroll to the bottom, you will find a
footer right here. This one you will
not be able to edit from going to element
on each page. For example, if
you go to Contact, you still can see the menu. And also you will be able to
see the footer right here. And the same thing for
what we do, or home, or about us, or all the pages that are included on the site. That is because
these are the places that the website can
be navigated through. You should be able to display
them on all the website. If you click on Elementor to change the design of the
header and the footer, you will not be able to. That's because
they're not a part of the page design but a part of the website
design in total. Therefore, to change the design of the header or the footer, you must go to customize. Let's say for example, that you want to change the
text right here. If you click on this one, then you'll be able
to change this text. Contact us. The letters on the
editor are not very clear because they're too large and they're
tabbing one another. But that's not
important because on the website they're
being seen clearly. Let's say that you
want to change the contact information
right here. Then you can just
simply add your number, E mail, or address, or anything else that
you want to include. Then the same thing here for
your social media channels. And you can also select
something else if you want to, if you want to change the
design of the header, then you must go to header. As you can see right here,
you can change the logo. Right now, it is displaying the default logo that
came with a template. It's this one right
here. But of course, you want to add your own logo. You can remove it. You can select the logo that you have
created for your own brand. Let's say that it's this
one, just as an example. Then I'm going to also change the retainer logo. And
then there you go. Assuming that this is the logo that I created for
my own website, I'm just simply showing you how you can update the logo that you find in the template with the one that you
have created yourself. You can also change the
type of the header. So far we have a
transparent header. If you click here
on the design tab, you'll be able to change
some colors, like, for example, the color of
the logo or the menu color. For example, right now if I go on these pages,
it will be green. But if you want to
change the color to something else,
like for example, plague, then you can see that the changes
happen immediately. Just make sure to include also the color palette that
you have created for your own brand to make sure that your entire online
presence will be cohesive. And make sure to
apply the same colors all over the website as well. Of course, once you're
done, click Publish. Now let's go ahead
and move on to the next step and
create a blog post.
14. Web Design Tutorial One - Step (7) - Creating Blog Posts.: All right, let's go ahead and create and publish a block post. To do that you can
either click on this plus button and
then go to Post. The other way is to go
back to the dashboard. Then here on the left menu, click on Posts, And then you can click
here on addnew post. I asked Chad GBT to write me just a random post with the title of the Importance
of Regular Sleep. I'm just going to go
ahead and copy that. Just simply creating an
example of a blog post. Then afterwards I
want to create it as well with Elementor,
just like the pages. I'm going to go ahead and
click on this button. Just like using the Dragon
Drop feature for pages, you can do the same for
blog posts, which is, to be honest, really
great because you can add any type of
content that you want. I'm going to start with a
text editor right here. I'm just going to copy
based the first section. I'm also going to add
another header right here. I'm going to make it smaller. All right, so I copy pasted
everything from Chat GBT, but I think I also want to include some images for example. If you want to do that,
just go back to elements. You can add an image here, or basically anywhere you want. I'm going to search for sleep. I'm just going to go ahead
and select this one. Let's say as an example, that I want to promote
a certain product inside this plug post. Let's say that I am an affiliate for this sleep
tracker for example. I'm actually not, but I just want to generate
a link for you. Let's see if a testimonial
will work. No, it doesn't. I'm going to stick to adding a heading and I'm going
to write something very quickly like check out
this sleep tracker. Of course, the text is supposed to be a lot
better than this, but just to show you an example of how you can include a link, I'm going to copy this one
again and just paste it here. And open it a tab. I think I'm going to increase the padding and also
change the background. Something like this
should work right now. Okay, so let's publish
and take a look. There you go. This is a blog
post that somebody can read. And of course it's
supposed to be longer than this one
and more advanced. Not just something
copied from chat GBT, But what I'm trying
to show you is that once you have your
affiliate links ready, assuming that this link that I added here is my affiliate link, you can include it
inside your content. And then once somebody is reading this plug post,
they can click on it. Then they can read more
about this sleep tracker and end up purchase it if you were able to review it well. And of course, add a lot more
content than just the link, because of course nobody's
going to click on it this way. However, this is just my way of showing you how to include your affiliate links inside the content that you
display on your website. Now if you go to the blog page, you want to see the
blog posts that you create throughout the time
after you launch your website. But as you can see right
now, we cannot see it. That is because we
did not associate this page to display the
blog posts that we create. To do that, you want
to go to customize. Then you will want to go
to Homepage Settings. As you can see
here, the home page is already set as the home, the page that displays
as the home page. But I have not selected a
page for the posts yet. I'm going to go ahead and select Blog and then click on Publish. There you go. There are
already two plug posts. This one came by
default with Wordpress, and this is the one
that I just created. I really apologize for making this tutorial
too long for you. But there's one final thing that it's important
for me to mention because I know it will help you a lot with growing your website, which is how to use the St
SEO plugin that we have installed when we were talking
about plug ins earlier. To use the SEO plugin
is to basically help your website rank higher
and the search engines. In this hypothetical scenario, I do want those who are
searching for tips or maybe a blog post
so they can read about regulating
their sleep schedule. I want them to find
this blog post. I want them to find
this link right here. To make that happen, you
need a plug in like Oss. Let's go ahead and show
you how you can use it first, Go to edit post. Then because we
activated the plug in, you will find the widget
for it right here. As you can see here,
the first thing it's asking you to do is to decide on a focus key
phrase for this plug post. In this example, it will
be best sleep tracker. As you can see right here, the plugin is not so happy
with the efforts done so far to rank this plug post
high on the search engine. The great thing about this plugin is that
it actually gives you some recommendations of
things that you need to do so you can rank higher
on the search engines. For example, right here,
it's telling me that there's no internal links within the
plug post that I created. This way I can think
of ways to add some links within the plug
post into my own website. Maybe I can add a
button that says, contact us for more tips. Or maybe sign up to our
newsletter or something else. And include a link
inside that button that directs to the website
that I own myself. And this will help the
website rank higher. Another example could be that the key phrase has
not been used. It says here that
the key phrase is supposed to be used
minimum of three times. I only used it once because
I added it only right here. This means that I need to
think of other ways to include this key phrase to help this blog post rank higher. I hope you got the point. And ideally, you will
want to keep working on your blog post until
this one is green. And that means that
you've done a good job by optimizing your
blog post for SEO. And of course, once
you're done with fixing all the points
mentioned right here and adding they made a
description and so on, then you want to
click here on Update. You will also want to
go back to each page on your website and make sure
that it is optimized for SEO. Include the keywords that are
relevant for your business. These keywords you have
already found in model one of this course
and include them as focus key phrases on
each page to make sure your entire website is
optimized for search engines.
15. Web Design Tutorial Two - Build AI-Powered Websites Using Hostinger AI Builder : Hi there and welcome to the second tutorial for web
design inside this course. Earlier when we built
a Wordpress website, we saw that there
is an option inside Hostinger to build an
AI powered website. Inside this tutorial,
I'm going to use the AI website builder of hosting instead of
using Wordpress. For those of you who
are interested in exploring different
options than Wordpress and building an AI
powered website using the Hostinger template, then this tutorial is for you. However, I'm going
to go ahead and skip the first step of creating
an account on Hostinger, getting the hosting service, and deciding on
the billing cycle, as well as getting
the domain name. If you want to do all
that, just simply watch the first step
of the old tutorial. And then you can go ahead
and skip installing Wordpress and select the AI
website builder instead. Right now I am
inside the H panel of my Hostinger account and
I'm going to go ahead and use the same domain that I
used for the previous tutorial just to switch from Wordpress to the AI website
builder of hosting. I'm going to go here to
these three dots and then just simply click on Change
to the Hosting Builder, then click here again
on this button. Then they're just telling
me here that basically all the work that I've
done is going to be gone. But that's not a
problem because I was just creating a demo website. As you can see right here, there are plenty of
beautiful templates that you can select
for your own website. You can also filter the search, so you can maybe get the
most popular templates, or maybe just take a look at the categories that these
templates are built for. For example, if you are
building a travel website, you can click here and then
you can view the templates that are made specifically
for this type of website. As you can see here on
this purple button, it's asking you if you want to let an AI tool build
the website for you. I do want to show you this tool because I actually
think it is great. It is very simple
to create a website with and it can happen
within minutes. We're going to use this
tool very quickly, but then afterwards I'm
going to go ahead and go back to using one
of these templates. Because I want to show you how
you can use a template and then customize the design until you get a
website that you like. Let's go ahead and
click on this button, and then click on
Start Creating. Here you will want to tell the AI tool what type of
website you're creating. As you can see, the
first question is, what is the brand name? This is where you add the
brand name that you have selected for your affiliate
marketing business. In my case, I'm just
going to go ahead and add the same name and then
select the type of website. If you are selling
something on the website, then you can click on
online store, a blog, the business showcase portfolio
lending page or other. I'm going to go ahead
and select blog. Then here you will want to
add a description that helps the AI tool create the proper
template for your website. I'm just going to go ahead
and add a text here, just something on
top of my head. I wrote that I am building a minimalistic website to showcase my affiliate
marketing coaching business. And write blog posts to promote affiliate marketing tools and resources suitable for
beginner online entrepreneurs. I believe that
this is enough for the AI tool to
understand what I want. So let's go ahead
and give that a try. There you go. We have
an AI created website. As you can see, they added blog posts
right from the start. That is because I wanted a blog. The text here makes sense to the description I
gave the AI tool. There's about a section right here and then just a
very simple footer. It's important to mention
here that you don't have to take the design
that I tool gave you. You can always go
back and maybe try to add a different description
and then give it another try and see if the second design is
something that you would like more if you end up liking the design
that was made for you, but you still want to
make some changes on it. Then you can click
here on Edit Site. By hovering over anything here inside the design,
you can make changes. As you can see that the design is split into
different sections. There's a section here, and then if you scroll down,
there's another section. There's a section right here
for about us and so on. If you want to include
more sections, then all you have to do is just click on this plus button. And then you can see all
these predesigned templates that are created inside
hosting that you can just select and make
some changes on and then include them on the website
page that you are editing. If you do not want
any of the templates, then you can always include a plank section right here and then you can drag
and drop content as I will be showing
you in a second. Let's go back just to take a
look at the options that you have for changing the overall
design of the website. As you can see here to the left, we have this menu starting with Adding elements.
Let's click on that. As you can see, there are plenty of options that you can
include in the design. You can just drake
and drop something to the design and make
some adjustments. Let's say that we
want to include a button maybe under the
afflite marketing formula. Then just simply click
here, add a button. Then click on Edit button. Right here, we can
change the name. Then here you can add the link for the page that you
want the button to be directing to decide if you want it to be open
in a new type or not. And then you can close
this and then simply drag the button anywhere inside the section that
you are designing. This is actually a very
cool design feature that is not available
inside Elementor here. You can actually drag the
element anywhere you want, but inside elementor you'll
have to make a lot of changes for the element to be exactly
where you want it to be. Then there's this
other feature where, as you can see when you
click on a specific element, you see these lines appear. And then you can see exactly
where the element goes and how it is aligning with the other elements
inside the section. Let's say that I want to
delete this button right here. I will just simply click on this delete button and then I'm going to drag the new
button right here. Then let's say that you
want to change the picture, maybe you want to
change the size, or maybe you want to change the picture itself because
you don't like it. You can either ask the
AI generator to get you a new picture or you can upload your own picture
if you want to. You can also change the style of the image or
maybe the borders. You can decide on
a specific action. If somebody clicks
on the picture, they will be directed
somewhere else. You can change the shape
of the picture and so on. Now, this website was
created with only two pages. Right here, we have the home
page and the blog page. To include more pages
to the website, you can go here to Pages and Navigation and then
click here on a page. And then you can
either click on at an empty page and you
can design it yourself. Or you can select one of the redesign pages that are available here, for
example, Contact. Then you can pick one of the templates that
are available, Let's say we want this one. And then you can change
the name or the RL if you want to and
then click on Safe. This is to be honest, is one of the fastest and best
ways to build websites. As a beginner, as
you can see so far, it is really easy to use and navigate through the
website builder. Inside Hostinger, there's a
lot more options to explore. Like, for example, changing
the entire website style. They have already selected these colors for us,
for the website. But you can change all
these colors to include the color palette that you have created for your own business. You can change the font of the entire website and
pick one that you like. Also change the
shape of the button. If you remember earlier, when we were creating
a button for home, this is the shape of it. But let's say we
want to change it, something else, maybe this one. As you can see, the design changed for this
button right here. As I said earlier, I
just wanted to show you quickly how to use the
AI website builder. But I actually want to go back. I want to show you how to find a template created by Hostinger, then how you can customize it and launch your own website. Let's go back and then click
on Create, New Website. Then here you can either ask the AI creator to
design a new template for your website
or you can click here on Use pre made templates. Here you will find all
the templates that are created inside the
hostinger web builder. Let's say that as an example, I am building a
marketing website and then just pick
one of the templates. As you can see, this is
the same design platform, just like the previous one. But the difference
between this template and the one that AI
generated for us is that the other one was
created based on the content that we have added on
the AI generator tool. Meanwhile, this is
a default template that we need to customize, add the content at
the pictures that we want and then launch
it as our own website. As you can see here,
we have the same tabs, adding elements and also
pages and navigation. And also changing the website style As for the fourth one, I do not believe
that we covered it. This is another cool tool inside hosting that
it helps you create or generate a text
or images that are suitable for your
website or even a logo. As you can see here,
there's an option to let the AI tool
create a logo for your website and you can also ask it to create a plug
post, for example. And this is the
one where you ask the tool to create a text that is suitable for the type of content that you must
include on the website. As for this one right here, I believe that this is
one of the new features that they added on the
tool. It is the heat map. Now, I'm not sure how
accurate this is, but it basically shows
you where is the focus on the website When somebody lands on your website
for the first time, where do their eyes go? In the beginning, so you make sure that the design is suitable for the focus of the
first time visitor. As you can see right here, it means that the first thing that people will see is going to be this text and also
this button right here. The second thing to read is going to be this one right here. And then those images, and then this big text
right here, and so on. In case you want to take
advantage of this cool feature, then of course go
ahead and use it. But make sure first to change the texts inside
your website and also add images and see if you are happy with
the overall design. For example, you can make
this one smaller right here. Maybe just take this text a little bit down to the bottom. Maybe adding a picture here
is going to be a good idea. I'm just going to go ahead
and click on Picture. As you can see, it is very
easy to design a website with this tool and then just keep going until you include all the content that you want to include inside your website. In case there's a
section that you just simply do not
want to include, then just hover over it. And then you can
click here on Delete, and then the entire
section is gone. It's important to
mention here that choosing a template
does not mean that you'll have to give up all the design options that you have or the
features that you have. A template is just
a basic layout that Hostinger is giving you. It does have some default fonts and colors and so on,
but as you can see, everything can be changed and
updated to something that fits your website and what you want to launch
on the Internet. Then once you're done
with the design, it's a good idea to
take a look at how it looks like from a mobile. If somebody visits your website
from their mobile phones, how does the design look like? For example, if this
button is too small, then you can just make
it a little bit bigger, then this will not change
how the button looks like. For desktops, make sure
that the entire website and the entire layout
is suitable for mobile users to be able
to visit your website. That is going to
be the most device that you will get people from, especially if they are visiting you from their social
media accounts. And remember to click on this
Go Live button right here to launch your website and make it available
on the Internet.
 Thea A., Online Instructor