Transcripts
1. 01 What you will learn & Build: Hey, everyone. Welcome.
I'm Flutter Sensei, and in this class, you're going to learn how
to build a beautiful, fully functional random
code app using Flutter. This project is
short, practical, and absolutely perfect if you're just getting started with flutter or want to sharp your skills with a
real world mini app. In this class, you
learn how to add and configure packages like
provider for them management. Add custom fonts to make
your app feel unique. Set up light and dark themes using a single toggle switch, use AI tools to generate
random codes, automatically, write the logic that displays the new codes at the
tap of a button, and finally, learn how to design a clean and elegant UI that
looks great on any device. By the end of this class, you will have a complete
flutter app ready to run, share and customize, and the best part is that you will understand
every line of it. As for your class project, you will create your
own app that will display an inspirational
code on screen, randomly change codes
with a single tab, switch between light
and dark themes, and use your own custom
font to make it stand out. It's small, simple, and
incredibly satisfying. The perfect project will
develop your flutter skills. Before you start,
you need flutter installed on your system. Any code editor, I'll
be using VS code and a little curiosity to
play, explore and experiment. All right, fire up your IDE, grab your favorite ring,
and let's dive in. In the next lesson, we'll create a project and start
setting up everything. Let's bring your
random code generator to life. Let's get started.
2. 02 Setting Up The Project & Custom Fonts: All right. The first
thing we need to do is create our filter project. So go to your terminal
and let's navigate to desktop and let's go
inside our flitterPjects. And then let's create a new flutter project
called flutter, create random code
generator and hit Endo. This will create our
base flutter project. Next, we will get
inside the project, the random code generator, and then file it up with code. It's code. Now let's close our terminal, and let's expand our screen. Now, the first setup we will do is to add our dependencies. We'll be using provider for theme switching between
Light mode and dark mode. So open your Pupspeck
dot YAML and in the dependencies, add Provider. Let's save that. Once you hit Save, Flutter will automatically
fetch the package. If it doesn't run Flutter
Pub G from the terminal. Next, let's add some personality to our app with custom fonts. In our previous class, we used Google Faunt, right? But this time, you
learn how to add your own custom fonts
manually in flutter. For that, let's add
over to the browser. Let's go to pons.google.com. I'll be using Playfair Display, but you can pick
any font you like. Just make sure it's in
the dot TTF format. And let's download a font
called Playfair Display. Let's go ahead and click on Get font and then click on Download. And let's save
that in downloads. Now we can close the browser, and let's open up our
Downloads folder. Then we can go to more options. Sum and Zep let's
open this folder. And you will see that we
have a font here called Playfair Display
variable font dot TTF. This is what we need. Now, let's head over to desktop, Putter projects,
and you will find your random code generator
app here. Let's open that up. Now here, we're going
to create a folder called assets and inside that, we need to create
another folder. We'll call this as fonts, and then inside that we're
going to move our font. Now this name is
quite complicated. So I'm going to rename
this as Playfair Display. Now, make sure the extension is true type one. That is TTF. Now, once that is done, let's
close the download folder. Now, in pupspec dot AML, let's scroll down to flutter. And here, we'll add our assets. And inside assets,
we're going to add assets Fonts. Let's say that. Once that is done, if you
scroll down a little bit more, you can see there is a
guide on how to use fonts. Here we're going to
follow that guide. All we have to do here
is we need to first call Fawns and then inside that, we need to add the family name. Here I'm going to set
the family name as Playfair Display. And then Winter
defined the fonts. So we'll say fonts, and the font is inside assets. And the folder is Assets
folder called funs. And inside that fonts, we have the font name. So if you open the assets,
you can see this is the name. So I'm just going
to rename this, copy that, and paste
it here. Save that. Now, in order to use this font, we will be using
this family name. Nice work. We have got
our project ready. Our dependency is installed, and the custom font setup. In the next lesson,
we will configure our main file to enable dark mode and Light
mode using provider.
3. 03 Setting up the Main File & Provider: All right. Now let's head over
to ib main dot dart, let's clear everything
that we have here. In this lesson, we will
set up our main functions, creative state Let's
widget and enable the dark theme support using provider. Let's go
ahead and do that. So we'll say Import, package, flutter, material dot dart, I'll say Import, provider. So that's package provider. Then we'll say void main, and inside that we'll say Run and then we need to call the change
notifier provider. So this is going to
be them provider. And then we need to
call the child that is const random code generator. Save that. Now we need to write the class for
the theme provider. I'll say class them provider
extends, change notifier. We'll call a bullion, is dark. I'm going to set that
to falls by default. Then we'll call it getter, that is boll get, is dark. I'm going to set
that to is dark. Then we'll write the
toggle method that is void toggle theme. And then inside that
we'll say is dark, is equal to is not dark. Then we will notify the
listeners and save that. Next, we need to create the random code
generators lates widget. We'll say class
Random code generator extends stateless widget and inside that we're
going to say const, random code generator,
super dt key. Then we'll say, build, here we need to create the variable for
the theme provider, that is them provider is provider of them provider. Save that. And then we
need to return a material p. Now inside the material
p, we need a title. We'll call the title
as random code arator. And we'll disable
the debug banner. We'll set the theme data
to use material three, then we'll set the
color scheme to choose from seed that
is colors dot blue, or set the brightness to
brightness dot light. Now, to enable the dog theme, we'll just copy this will
say dark theme and paste it. Now this time, this is going to be now we need to
enable the them mode. Let's check the them provider
is dark. We going to say? Them mode dot dark
or the mode dot. Then let's call the
home that cast. We'll call this as home screen. Let's save that. Perfect. We now have our
base setup ready. The project can
already switch between light and dark themes when it's called with
a toggle button. In the next lesson, we
will start building the home screen for our
random code generator, and that's where the
fun really begins because you will finally see things come
alive on the screen.
4. 04 Creating The HomeScreen & Setting Up Quotes: All right. Now let's
start building the main screen of our
app, the home screen. For that, let's
get into the lib, and we'll create a folder here. We'll call this as
screens, and inside this, I'm going to call this
as home screen dot dot. And then inside that,
we'll say import, package, flutter
material dot dot. Let's say class home
screen extends, stay full with it. Then we'll say const, home screen, superdt key. Then we'll say
Alright, create state. And then we're going
to take this home screen, apply that here. Then we're going to create
a private state that is underscore home
screen, state. Let's spell that.
Let's just copy that. Se class, home screen state, extends state, which
is the home screen. Then we'll say at,
all right, build, and we're going to write
the theme provider. I'll say provider dot off. And here, I'll say
them provider. Now here, we'll have
to return scaffold. Save that. Now let's
get to the main file. Let's import our package
random code generator screens, and then the home screen. Save that. Let's get to
our home screen now. Awesome. Now before we start
coding the actual logic, we will need a list of codes. Our app will go
through these codes randomly and display one
each time we tap a button. We could go and search
for codes manually, but that's going
to take forever. So instead, let's use AI to make this
faster and more fun. For this, let's go
to our browser. And then go to d.ai. It's a lightweight tool
for quick text generation. So here we're going
to write a prompt. I'm going to type in,
I want you to generate a list of ten codes in this format. Here I'll type in final list, which is a string. And here we'll say codes. And inside that, we
will list our codes. That is code one code two. Then code three. Let's hit Endo. This will instantly give
you a clean dot list of ten codes that you can directly copy paste
into your project. Now let's go ahead
and copy this. Let's get to your project. And right after the state, we're just going to
paste it. Save that. You can see there are
some tiny errors. We want to escape this. We don't have any errors anymore.
Let's save that. Scaffold is a place where we are going to
display those codes. In the next lesson,
we will write the actual logic that will randomly pick and display a new code every time
you click on a button. That's when the
real magic begins.
5. 05 Writing The Logic for Random Quotes: Okay, it's logic time. In this lesson, we will make our app actually do something by writing the code
that will randomly display a new code every
time you tap on the button. First, we need
something to show on the screen before any
code is generated, like a welcome message or a
gentle hint for the user. Let's define that inside our underscore
home screen state. So right after
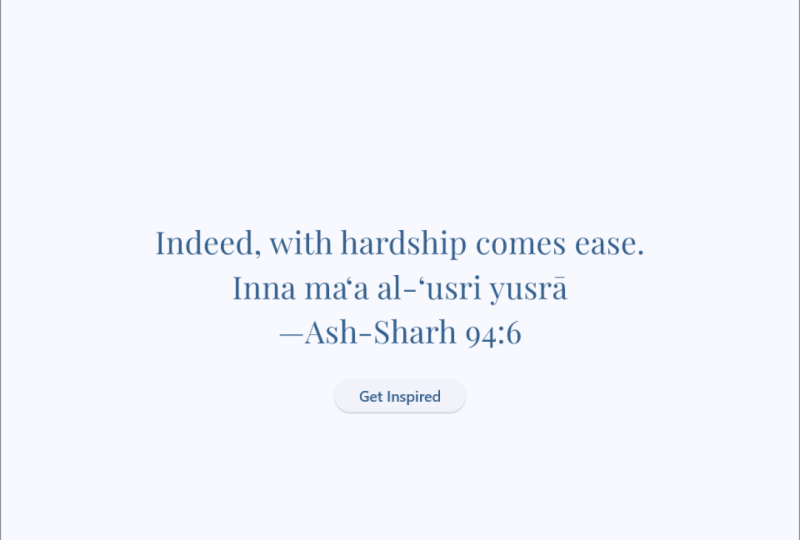
this random codes, I'm going to type in string. We'll call this as current code. And we'll set that to, tap
the button to get inspired. I'll save that. This will be the default message that
appears when the app launches. Now, we will write a
function that picks a random code from our list and displays it on the screen. So for that, here
we'll say void. Let me just scroll
this a little bit. We'll say show random code. And here we now write a
variable called random, and we'll use the random
method from dot math. We'll create another variable. We'll call this as index. So this will be the random number which we're
going to pick. So that's going to come
from random next INT, and here we need to
set the max limit. So that's going to
be codes dot length. And now let's save that. So here's what's happening. We created a random object, then we generate a
random index number based on the length
of our codes list. This gives us a random position
in the list anywhere 0-9, since we have ten codes. Now, to actually display
the code on the screen, we will update our current
code variable and call the set state to rebuild
the widget with a new code. For that, all we have to do
is write in a set state, and we'll say that
the current code is code and we'll set A index, which will be the random number. Perfect. Now, every time
we call Show Random code, Flutter will randomly
select one code from the list and then update the current code
and refresh the UI. Awesome. In the next lesson, we'll bring this logic to
life by designing the UI. We'll display the current
code beautifully on the screen and add a
button that triggers this. That's when your
random code generator will actually start
looking like an app.
6. 06 Building The UI for the Random Quote App: Alright. Now it's time to bring everything together and
make our app look alive. In this lesson, we'll design
the user interface or the UI for our random code generator and assign the functions
that we built. Before we start coding, let's go ahead and run the app. I'm going to run
this in Windows, but you can choose
your own platform. All right, let's go ahead
and arrange this properly. And I'm going to
put this like this. Okay, so let's
collapse this one, and let's go to our home screen. Let's close this. All right, so inside the scaffold, we'll start writing our widgets. So the first thing that
we need is the appun. So we'll say title, say const, I say text widget. And here, I'm going
to call this as random code then we
can add the body here. Actually, first,
we're going to need the toggle button for
dark mode and light mode. So this is going
to be icon button, and on pressed, is going to take them provider and
look for toggle them. And then inside the
icon, we'll say icon. Then we'll look for them
provider dotes dark. We're going to say icon Dot. Light mode or icons, dark mode. Let's save that. And we need to get rid of this
one to align it properly. Right. So after the appr, we're going to add
the body here. I'm going to set the
padding for this. And the padding is
going to be 25 pixels. Now, before that, let's go
ahead and check this one. So the light mode
and dark mode works. And now inside the body, after the padding, we're
going to add a child. We'll call this as column. And inside this column,
we'll add children. And first, let's add a text
widget which just says hello. So you can see it
comes over here, so we need to align
that to center. So after this column, we're going to say
main access alignment, main access alignment
dot center. Okay, so that comes over here. And since it comes over here, we need to align
everything to center. So I'm going to refactor
this to center. There, that's better.
So after the text, we're going to add a sized box with the height of 25 pixels, and then an elevated button, which for now, we can
leave it to blank, and then here, we
can add a const, text widget which
says get inspired. I'll say that. So
now you can see if we get this get
inspired over there. Now for the text, what we can do is
instead of just hello, we can display our current code. That would be current code. If I don't save, you
can see it says, tap the button to get inspired. Now, if I tap on this button, nothing's going to happen
yet because we have not assigned this
button to a function, so let's go ahead
and assign that. Here, this function is going to show random code save that. Now if I click on this, you can see every
time I click on this, a new random code appears. But this looks too basic. We want this to be style. This is where our custom
Google fonts comes in, the custom font that we added. Now, what we can do is here to make it work, we
can give it comma. Let's say text line, say text line, the center so
that it can look in center. Now we can give it a
style, say text style. And inside the textile, we can say font family. And remember the font
family that we gave. If not, you can go back
here and can check this. That's the font family
that we assign. Let's copy that,
let's get back to our home screen and
let's paste it here. Now you can see that the
custom font is applied. It looks good, but the font
has to be much bigger. So what we can do is here
we can say font size. I'm going to set the
font size to 40. So now it looks much better. So maybe 30. Yeah, 30 is good. And now, if I click on this, you can see every
time I click on this, we get a new font which is much styled and looks really good. And it can go back
to dark theme, and you can see how that looks. But the color of the
font here is white, so we can change the color too. For this, what we
can do is here, we can say comma, color, and we can use the theme color. So that is theme de off. Dot color scheme, dot primary. So this is going to take the
primary color of our app, which is blue, and it's
going to show that. If I shift back to
the light mode, you can see it looks still in the primary color of
our color scheme. Alright, let's quickly go over through what's
happening here. So first, we have this app bar. AppR displays the
title random code and adds a theme toggle
button on the top right. And when it's tabbed, it's
called the theme provided dot toggle theme to switch between dark mode
and light mode. Then we have the body so this is the entire
body here. Tell here. The entire body here is
wrapped with a padding and a centrifuge to keep everything nicely
spaced and aligned. Then inside that,
we have a column. Column vertically
centers our content and the code text
and the button. Then next, we have
a text widget. The text widget displays
the current code using the custom font Playfat display
in a large elegant size. The color adapts automatically
to the current theme. Then finally, we have
a elevated button. And when you tap on it, it calls show Random code function, picking a random code from the list and updating
the text instantly. Now, when we run this app, you should see the
welcome text first. So if I run this you will
see the welcome text first. And when you click on
the G inspired button, the code updates every time
with a new random one. You can also now try
switching from dark mode to Light Mode or light mode to dark mode's smooth and instant. And there we go. Your random
code app is now ready. You have just built a
functional flutter app with custom fonts, theme switching, and a fun
AI generated code list.
7. 07 Recap & Class Project: Alright, we made it. You
have just finished building your very own random code
generator app in flutter. Let's do a quick recap of everything we
learned in this class. You learned how to create a new flutter project
from scratch. You added dependencies like provider for managing
them switching. You finally
understood how to add custom fonts and make
your app truly yours. You built a theme
provider to toggle between light and dark
mode dynamically. You created a home
screen with a list of codes generated by AI. You wrote a logic to pick a random code each time the
user taps on the button. And finally, you
designed a clean, elegant UI using
your custom font and a responsive design. That's a full working app from start to finish,
all in one class. For your class project, I want you to take this app
and make it to your own. Here are some ideas
to play with. Add your own custom
set of codes. Maybe change the
color of the text, change the color scheme or font style to match
your personal taste. Add categories like motivation, love, life, and wisdom. When you're done, upload
a quick screenshot or a short video of your final app in the
class project section. I'll be checking them out
and leaving a feedback. If you made this far, I'm really proud of you. Every line of code you wrote
built not just an app, but your confidence as
a flutter developer. From now on, keep experimenting, keep building, and don't forget. Every project you finish
makes you stronger. Thank you for taking my class. And, trust me, next one is
going to be even more fun. I'll see you in the next class.
 Flutter Sensei, Teaching Flutter from Scratch