Transcripts
1. What you will learn & build: Hey, everyone. I'm Flutter
Sensei and in this class, we will be building something simple but powerful together, a form validation
app from scratch. In this class, I will
guide you through each step of the process
from creating the project, designing the layout, adding
the form fields to finally validating users input and showing a beautiful
success message. By the end of this class, you will have a
fully working form with proper validation. Something you can easily reuse in your future
Flutter wraps, like login pages, sign up forms
or even feedback screens. In this class, you
will learn how to create and structure a
flutter project from scratch, how to work with
state full widget and manage form states, how to use text
editing controller for capturing user input, how to write custom validators
for fields like name, email and password, and finally, how to show user
feedback using Snackbar. It's a short beginner
friendly class. Perfect if you're just
getting started with Flutter or want to shop
in your fundamentals. For your class project, you'll be recreating
this app yourself. But with your own twist,
try customizing it, adding a few more perros, changing the color scheme or personalize the message
in the Snackbar. When you're done,
share your version. I would love to see how
you make it your own. This class is designed
to be hands on, practical, and
beginner friendly. You don't need any fancy setup, just VS code and Flutter
installed and a curious mine. So if you're ready,
open your editor, and let's start building your very first form
validation app in Flutter. So what you waiting
for? Let's get started.
2. Setting up the project: Alright. The first
thing we need to do is create a new
flutter project. We'll call this one
simple Form validation. So open a terminal, and let's navigate
to our project. This is where I keep
all my projects. And here, let's type in Flutter, create simple Form
validation and hit Enter. Once the project is created, let's move into that folder. CD, simple form validation. Now let's open a ten VS code. Code dot Let's
close our terminal, and let's maximize this. Next, let's head over
to the lip folder, and let's open the
main dot dart file. Go ahead and clear everything. We'll be writing our app
completely from scratch. Let's start by importing the
Flutter material library. Let's say Import package, Flutter material dot dart. Then let's create our main
function and call the app. Void main run app as a const, and we'll call this as
simple form validation. And let's close that. Now, we will define our main app widget, a stateless widget named
as simple form validation. So for this, I'm just
going to copy this. And here, we can
say class and paste it extends stateless widget. And inside that
we need to create the constructor,
so it's paste it. And here we can say supertkey. Then we need to overwrite the build Now we can
return material app. Let's save that. Now let's
add in some details. I'm going to give the title
as simple form validation. Then we'll remove
that debug banner, call this as false and
we'll set the team data. I'm going to use
material design. Then let's apply the seed
color that is colors dt blue. Then we can define
our home screen. That's home const
homepage. Let's save that. We have now set up our base app and linked it to the
homepage we end. In the next lesson, we'll create that homepage and start
building our form.
3. Creating The Home page: All right. Now, let's head
over to the lib folder, and here we will
create a new folder. I'm going to call this as pages. And inside that pages, we will create a file named
home underscore page dart. So the path will be inside Lib. We have pages and inside pages, we have home underscore
page dot dart. Now, let's import the
material library over here. So we'll say import package,
Flutter material dot. Now we will define
our homepage widget. Since this page will handle
user input and interactivity, we will make it
State full widget. Let's build that.
I'll say class, homepage extends
State full widget. And inside that, you can
create the constructor, const, homepage, super dot key. Now we need to
override create state. And the state full wet
here is the homepage. Get rid of all of these things. They're going to create
a private state, call this as home page
state. Let's save that. Next, we'll create the private state class
for the witche. Just copy this right below this, we can see class, homepage state extends state. Then we can add
in homepage here. Now inside this, we'll
say, Alright, build, and we're going to get
rid of these items here, and we can say return, scaffold. Let's save that. Perfect. We have now our
basic structure ready, a homepage widget with
an empty scaffold. Now let's connect this
file to our main app. Let's head over to main
dot dart and in the top, we're going to import this file. Import package, simple
form validation. Then we have pages, and then
we have homepage dot TT. Now, as soon as I do
this, you can see the error from here
goes away. All right. Everything is now corrected
properly. Let's run the app. I'll be running this
as Windows app, but you can run it as an
Android IOS or even web. Let's run the app.
And there we go. The app is blank for now,
that's totally fine. Let's go and arrange
this properly. I'm going to put this over here and let's compress this to
look like a mobile app. And now we can see our code too. In the next lesson,
we'll start adding an app bar and begin
building the form layout.
4. Adding AppBar, Body & The Form Holder: Okay, now let's start adding the AppBar and the
body to our homepage. Inside the scaffold, that
is inside the homepage. Here, inside the scaffold, we're going to say appr a par. And here, we're going
to add in the title. And for this, we're
going to say const, text widget, and
he will call this as simple form validation. And let's add in some
styles for this. So we'll say style text style. And inside this, I'm going
to set the font size to 16. And then we'll set
the font weight to font weight W 500.
Let's save that. Now, let's style our appa. You can see the appa now. So let's go ahead
and style that. So here we can see
background color. It's a theme DF, dot color scheme dot primary. Let's duplicate that, and this is going to be the
foreground color, and it's going to be on
primary. Let's save that. I can see the app
bar for our app. Now, this gives us
a simple app bar with the title text style, and right now, it's in the left, but we want, we can actually
style it to center. We can do that by just
saying center tile is true. If I do that, you can see that text actually
comes in the center. Now that we have the app bar,
let's move on to the body. Right after the app bar here, we can say body,
I'll say padding. Let's say edge, and set, and I'm going to set that to 25. Beside that, I'm going to add in a child and this
will be the form. In that form, we'll
have a center widget. For now, we will just add that child as a text
widget called hello. Let's save that and you can see that hello
message over here. This is what we need
to customize now. Inside center widget,
we will get rid of this text and we
will add a column. Now this column will have
a cross axis alignment, and I'm going to say
cross axis alignment, dot stretch because we want the form to take the full width of the padding that
we have given. Then we want it to be
aligned in center. For that, we will say
main axis alignment. The main axis
alignment dot center. Save that Okay. Now inside this column, we can start adding the
children for the column. So we can say children. And inside this for now, let's add a text widget
which says hello. Let's save that. Now you can
see it's coming to the left, not in the center, but
vertically, it's in center. So what's happening here? We are wrapping everything
inside the padding widget, adding some space
around the form. You can see the space over here. Then we have added
the form widget. So later help us
handle the validation. Inside that form,
we have centered everything with a column and set its alignment so that the
widgets stretch across the screen perfectly for
a clean form layout. Right now is just showing
a simple helloworld text, and that's right now
just a placeholder. In the next lesson,
we'll replace that with three text fields and a submit button and then start working on the
validation logic.
5. Creating The Text Form Fields: All right. Let's clean
things up a little. Go ahead and remove
that text Wen. So let's go ahead
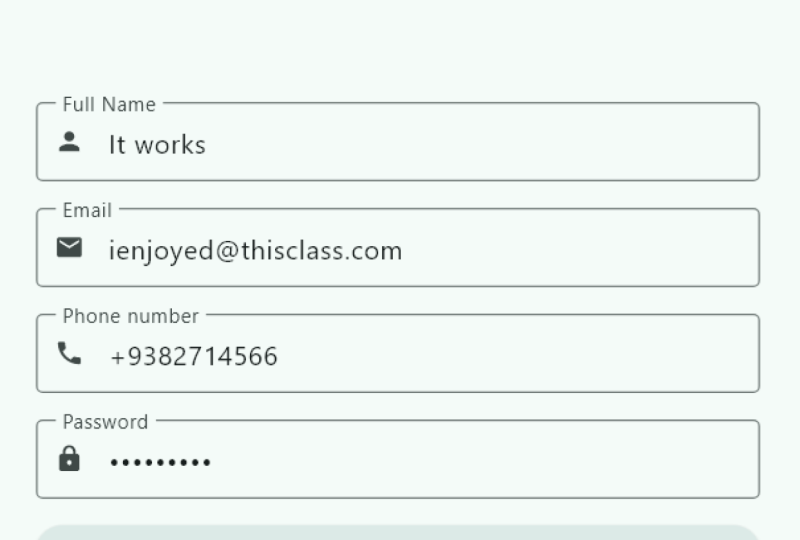
and remove this. And inside the column, let's add our form fields. We're going to add three farm
fields, one for full name, one for email, and
one for password, followed by a sign up button. So let's go ahead and add them. The first thing, what we'll
do is we'll say text field. And this is actually going
to be TextFormField. And inside that, we
will say decoration. Say input decoration. And inside that
input decoration, I'm going to say border, and the border is going
to be outline border. And right beside that, we're going to need a label. So we'll say label text, and we'll call
this label text as full. And let's save that. Now, as soon as
you save, you can see we have a text
field with a full name. If I click here, you can see the name goes up
pretty awesome, right. Now, let's add in some
spacing below that. So right after the text field, I'm going to say sized box. I'm going to set
the height to 16. I'll save that. And
now you can just copy this entire thing
then paste it here. Okay, so we got two full names. So we're going to change this to email ID. Let's save that. You can see we got full
name and email ID. And let's carpet this sized box, paste it, and we need
another field now. That is the password field. So here, I'll say password. Let's save that and now we're going to add the
sized parts again. And now what we need
is an submit button. For that, we will add
the elevated button. Now, we don't have a
function for this yet, so I'm going to remove that, and here we'll add
a blank function. And the child is
going to be a text, so I'm going to say const, a text with chat which says, sign up for free. Let's save that. Now
you can see here, we have the sign up button too. Perfect. We have got the basic fields and
a button in place. But let's make this form
look a bit more polished. It would be nice if each
field had an icon inside it. Let's add that icon
to each field. Now to do that,
let's go ahead to the first form field
that is a full name. And here, right after
the label text, just type in icon
and you'll see we have different types
of options available. The one we want is prefix. If you go to Sufex icon, you'll get the icon over here. So we want the icon
in the beginning. That's the prefix icon. Let's go to prefix icon. And here, we're
going to say icon, icons that person.
Let's save that. Now you can see the
user icon over here. Okay, so the icon kind
of looks bigger so we can make it smaller.
We'll say size. I'm going to set the size to 16. Yeah, I think that
looks much better now. Let's do the same thing
for the other fields too. Just paste it over here, and
this is going to be email. And for password,
let's paste it here. I'm going to call this as log. Let's save that and we have the log icon
for the password. Nice. Now we have got
icons for each field, making the form look cleaner
and more user friendly. But there's still one issue. If you type in the name, it works, email, it works. But the password shows
the password in open. We want the password
text to be hidden, like a normal password field. To fix that, we just need
to enable one thing, and that's called obscure text. Let's go ahead and update that. So here, in the password
field, right after this, we can say, O Bs, and you can see the obscure
text comes up. It's a Bollan. So I'm going to said
that too, true. So as soon as I save
this, you can see the password is now
hidden, and that's it. Now the password text will
be hidden automatically. In the next lesson, we
will learn how to capture data from these fields and
validate them properly.
6. Adding Form Validation: All right, it's time for the
real stuff, form validation. Now for this to
work, we will need a main key that holds
all the form data. For that, let's scroll all
the way up where you can find the home state.
So that's the one. After this, what we're going to do is we will create a variable here and we'll call this
variable form data. This is going to
hold the global key. And the global key
that it's going to hold is the form state. All right. Let's close that. So here we created a private variable called
underscore form data, and we are storing the form
state inside a global key. This will allow us to access and validate the
entire form later. Now, we need to connect this
key to our form widget it. Now if you scroll down, you can see this is our
form, and inside that, we can simply say key and then add the form data
here and let's save that. Perfect. Now let's go
back to the top again. Here. Now here, we need to create a few variables to store
our form field values. Let's add three text editing
controllers, one for each. So you're going to say final
text editing controller, and we'll call
this as full name. It's going to store the
text editing controller. Let's create another
one and for that, we're just going to
duplicate this three times. This is going to be email ID, and this is going
to be password. Let's save that. Now let's connect
these controllers to their respective text fields. If you scroll down, we have the first one,
that is the full name. Here, all we have to
do is say controller, then we have full. Now let's scroll down. We have email, so
we'll say controller. Let's connect that to email. And finally, we
have the password. So here, we'll say controller. Password and save that. Nice. We have got our
controllers in place. Now we need to validate
each field one by one. Let's start with the full name. Scroll up, and you can see
this is the full name, this entire thing here. Now, for this, it's
actually pretty simple. We just need to add
a validator function to check if it's empty.
Let's go ahead and do that. For this, right after
this decoration here, we're going to say validator and we need to check
the value here. So inside this, you're
going to say if and then here we can say
if the value is blank, or the value is null. What we need to do? We
need to return a message. The message is going to be
full name, cannot be empty. Okay. And else, we're just
going to return null. Let's save that. Now let's do the email field. Let's copy this entire thing. Scroll down, and here we're going to paste
it in the email field. Now for email, we need
some additional details. So this is going to be the same, but we're going to name this
as email cannot be empty, but we also need to
look for that at sign. So we'll say else
if and here we will say value dot
contains an add sign. I want to check if
it's not there. So we need just add an
exclamatory mark here, that's going to
turn to negative. If it's not there, we will
give a different message. So it'll say return, and then here we can say invalid email ID,
and let's save that. And finally, let's validate the password field. Scroll down. And after the obscure text here, which is going to paste. And here we can say
password cannot be empty, and here we're going to add
some additional details. That is that the password should be greater
than six characters. So here, we'll say else
if and here we can say value dot length should
be greater than six. And for this, we can return a different message.
We can call this has. Password must be at least six characters long. And
let's save that. Perfect. Now all the fields have proper validation
logic added to them. In the next lesson, we'll
focus on the submit button, where we will trigger
this validation and show the results
on the screen.
7. Submitting Form, & Snackbar Message: All right. Now that we have added validations
for all the fields, let's create a function
that actually checks the form and shows a message
when everything looks good. We call this function
validate form. So to add that function, let's scroll all the way up
and below our variables, I'm going to create a void and a private function here and we'll call this
as validate form. And inside that,
we're going to check if the form data that we have, which is in the current
state has validation. And here we need to add
an exlatory mark telling the dart that everything inside
that form does have data. So after this, what we will have to do is
we'll have to send a message for our scaffold. So for that we'll say
scaffold messenger, the, and here we need
to show a Snackbar. So here we can say Snackbar, and this is where the contents
of the Snackbar goes. So here, it's going
to be a text field, and we can show the data. For example, form
submitted success fully. Save that. And to close this. I'll save Great.
What's happening here? Here we are using the underscore form data key to check if our form is valid. If all validation passes, we show a Snackbar at the
bottom with a success message. Now let's connect this
function to our submit button. I scroll all the way down where we have the
elevated button. That's over here, and you see we have this plank function. What we're going to do is here, we're going to just add that
function call validate form. And let's save that.
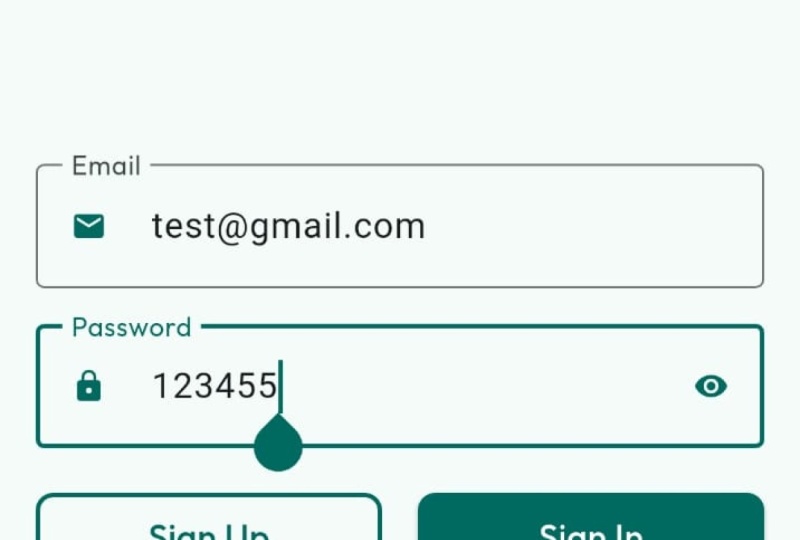
Perfect. Now, let's run the app and twist it. So I'm just going
to refresh our app. Now let's type in the
name, email and password. But before that, let's
leave everything blank. Let's just click on
the sign for free. Okay, so we got all the error messages that
we want to see. So now let's add in the details. I'm going to call
this as John Doe. Let's hit Submit button. I can see that
validation is passed. We need to add an email ID. So we'll say john doe.com. And if I hit submit, it says it's an invalid email. So here, what we'll do is
we'll say at fluttersens.com. Let's hit on submit.
You can see it works, but now password
cannot be empty. So now if I add one, two, three and hit Submit
button, it says, password must be at least
six characters long. So now we can say four, five, six, that is six characters.
Let's add in seven. Now if I don't submit button, you can see a Snackbar at the bottom, form
submitted successfully. Pretty awesome,
right? We just built a fully working form
validation system in Flutter, clean, simple, and effective.
8. Recap & Class Project: All right, let's quickly recap
what we have built so far. We created a new Flutter
project from scratch, set up a state full
widget for our homepage, build a clean form layout with three different input
fields and submit button, added controllers to
capture user data, wrote validation logic for each field name,
email and password. And finally, added a
submit function that validates the form and shows a success message
in the Snackbar. That's a lot of solid process. Now you have a working flutter
form with full validation. Now it's your turn to build
on what you have learned. Your project is pretty simple. Create your own
version of this app, but customize it a little. Here are a few
ideas you can try. Add one more field like a
phone number or a username. Try changing the color
theme of your app, or maybe use a different
Snackbar message with an icon or
an action button. Once you have done
that, run the app and share a quick
screenshot of your version. This will help you not only reinforce what you have learned, but also give your
app a personal touch. Great work today, truly. You didn't just code, you understood how form
validation works in Flutter. I will see you in the next
class where we will take this foundation and make
it even more interactive. Until then, keep coding, keep practicing, and
build something awesome.
 Flutter Sensei, Teaching Flutter from Scratch