Transcripts
1. 01 Introduction: Thank you for taking this class. In this class, I hope
teach you how to make these different
chalk and put them into different types of gift boxes for you to give
to family and friends. First, I will teach you how
to make Peppermint Patty's. Next, I will teach
you how to make almond butter,
chocolate truffles. Then I will teach you how to make chocolate Peppermint fudge. Next, I will show you
how to make carbonyls. After that, we move on
to eggnog truffles. Next, I will show you how to
make field chocolates with two flavors, lemon
and raspberry. We now get to package our candy for our
friends and family. I am a self taught
Baker, cake decorator. Many years ago, I decided
I wanted to open up my own bakery so that I could make cakes and other t-shirts. For other people. They're special occasions. So I read a lot of books, watched a lot of videos, took some classes, and of course did a lot of
practice until I felt like my cake
decorating skills with the level that I could make beautiful cakes
for other people. I then open up my own home. I had this business
for several years, making cakes and other t-shirts. One thing I did
with my businesses, I went to different
festivals throughout the year and farmers markets. One of the festivals
I went to was a Dickens festival
at Christmas time. And my candies were a big hit. I had this bakery for
many years and tell my husband got a job
offer in New York City. We felt like this was a
good fit for us and so I closed my bakery and we moved across the country
to New York City. Now here in New York City, I do not want to go through the steps to open
up another bakery, but I still love baking cookies. And as we type teacher, I like teaching others. So I decided to share my
skills on Skillshare. This class is for the cook who would like to learn how to
make different types of candy and put him into
chocolates to give to friends and neighbors
for the holidays. I am excited to teach you
the skills in this class. Let's move on to
lesson number one, making the peppermint
Patty chocolates.
2. 02 Peppermint Patties: We're ready to make the peppermint Patty
type of chocolates. The first thing we
wanna do is get the chocolate melted
because this is very small. I've divided the amount
of chocolate into thirds. So I have one cup
of chocolate chips and two-thirds a teaspoon
of shortening here. And we're just waiting
for this to melt. Once it melts, I'll
show you what we do. As you can see, this is most of the way melted. So I'm going to turn the heat down so that it stays melted, but it doesn't keep cooking. Then what I'm gonna do
is I'm going to take this paint brush and dip
it in the chocolate. Then paint and fill
in my chocolate mold. And I want it thick
enough that I do not see any of the
details that's on there. So if you look real carefully, you'll see it's painted all the way up to the top of the sides. And I'm just going to continue
to do that on all of them. Hated all the way up to the top. Making sure it's thick enough that I don't
see the bottom, the imprint because
this is a Smiley face. And I want that to come
through in the chocolates. But I don't want to
see it on the inside. So I'm going to continue
to paint until I have all my chocolate molds
filled with the chocolate. The reason we're
using a paintbrush is because the paintbrush will help make it a fairly thin layer. And we can spread it there
because we want to have room in the cavity for the candy that's the
flavor besides chocolates. So we don't want it
a very thick layer. I just finished coding all
of those with the chocolate. I'm now going to stick this in the fridge so that
chocolate can set up hard. Before I add the
peppermint feeling to it. Then we'll be ready to start making the peppermint filling. In this bowl. I'm going to add my three-fourths cups,
sweetened condensed milk, my one teaspoon,
peppermint extract, and my one-eighth
teaspoon of the vanilla. Then half of the powdered sugar doesn't have to be
exact because it's all going to get added in there. The main thing is,
is we don't want the powdered sugar
fluffing up too much. Then I'm going to turn this on. Low speed is I can then I'm going to add more. I'll be not all of it yet, but lot of it because
a lot of it felon. And I want to start
over here right. Then I'm going to add
that last little bit. We're ready. I want to kind of get this
all in one big mound. We're ready to start putting this into our little chocolate. Let me move this to
our smaller bowl. We're now going to get
the chocolate molds. So they've been sitting
in the fridge out and fill them with our mint candy. You can see the
chocolate is hard. I'm just going to take
a piece of this candy, roll it in Nepal to begin with. And then Misha down
into that mold. And I want to do
that till I have all of them filled
with the candy. You notice, it's not
a very big ball. That, that one might be a little bit bigger than I want it to be. So I'm going to take
it out, roll it again. You just want it to
come to the top there. I'm going to continue
until I have all of these cavities
filled with this mint. With that done, I'm
now coming back to my chocolates and I use
the spin this time. I just want to
spoon it on top and totally cover that
with the chocolates. And I just keep
doing this until I have all of the
cavities cupboard. Again, it's very important that you cover all of that white. We can always break some
of the chocolate off. When we take it out of the mold. We don't want any of
the white showing. We're now going to stick this back in the
refrigerator to set up for five to 10 min so
that we can remove it from the candy,
from the silica. So we'll be back in
about five to 10 min when the chocolate has set up. I checked this out
of the fridge. It sat for quite awhile. Now I'm just going to push chocolate out with
the chalk itself. I'm just going to come around with a knife and
cut the excess off. Still a little bit
soft on the bottom. I'm sorry, I've cut
that excess off. Smooth it. I'm trying not to touch the face because I want to
keep that happy face there. I'm going to let these I'll
set up more, get harder. You can tell I didn't get
enough chocolate on that one. You begin to see where I didn't quite get enough chocolate. So I'm going to love
these setup more. I'm gonna get the
next one started. We're back to the paintbrush. We're going to paint. You want to make
sure all the way up. Notice on the last one there was a couple
of spots where it wasn't there wasn't
enough chocolate on it. So I want to really make sure that this one
has enough chocolate. And part of that is
making sure I see not none of the eyes are
smiles on the bottom. Because if I see some of that, then it's not going to
have enough chocolate. You'll notice I'm making sure the top going up the
sides has plenty. Then I double-check to make sure that the bottom has enough. And each time I do this, I am getting 15 pieces of candy. Because there are 15 mol
in my silicone mold. You can see one batch of this is going to
make a lot of candy. Because when I get
done with this one, it's gonna be up to
30 pieces of candy. We're now going to put this in the fridge or the
freezer for about 5 min. This is now SAP in the fridge. I went ahead and wrap this in Saran wrap so it would stay fresh and soft and
not go crusty. So just again, just
a little bit off. Roll it in the fall
and push it down. Do that for all of them. There's our last one
in there. This time. I'm going to try using
the paintbrush on this, see if we can get less
excess chocolate. So I'm just going to
paint the top of this, making sure I seal it. Try not to go way over like
I did with the spoon on. We'll see how this works. We'll decide after
this one's done, which way we're going
to do the others. I came to me looking at it right now and
how it's working. I'm betting I'm going to do
it this way from now on. Because it just does not seem
as messy as mooning over. I'm just going to
keep going until I have them all covered. Then I will put this in
the fridge or freezer. You can do either one
until it sets up part. In though I do want to make sure there is no white showing. I have all of the
white cupboard. And as you can see, we're getting for
the second set, almost completely done because we have all the bottom part and now we're getting close
to the top part done. And I'm still on that
first cup of chocolate. Okay, we have this cell done. Now we're going to stick this in the fridge and let it set up, and then we'll be back. We've let this sit. So now we're going to go
ahead and fill this out. Then let's see which
way we like it better. I'm not saying as big of
a mess with it this way. I'm still having to come
and clean a little bit off, but not near as much. So I think I'm going to use the paintbrush on
the rest of them, then I can just pick
up a little bit there. Instead of a whole lot. You can kind of go like
this and the heat of your finger will smooth that. Just rubbing along their light that just kinda smooth it out. Gives it that lip I like. Keeping my fingers all down. They're not up on the face. Let's see what happens when
you don't get enough of the chocolate in there. And you can see it doesn't
have nearly as much chocolate, but it's still going to be okay. People will enjoy it. You go ahead and decide which way you want to do
it either way is fine. Then we'll move on to our next
candy in our next lesson, I'm going to continue to fill my moles and get it cold and do this until I
have all my candy done. And then our next lesson
will be our new camp.
3. 03 Almond Amaretti Chocolate Truffles: We're ready to start
making the Ahmed, who read TO chocolate truffles. We need to start by cutting
up our bittersweet chocolate. I have my chocolate. And with these already
having those divided spots, I'm mainly just going to cut it where the dividing spots are. And it may cut a little bit smaller than that
and that's okay. Let's see if we can cut
that down the middle there. Then we're just going to
put this in our home. We have two more packages of bittersweet chocolate
for the total of 12 oz. And there we have. The last. Else. With this. We're
not going to go to the stove to heat up
the cream and butter. I'm going to turn the
heat on to immediate. And then I'm going to add the
butter and the heavy cream. And we're going to
bring this to a simmer, coconut on a medium heat. And we want to start a little bit because we don't want it to
burn on the bottom. You don't need to
start constantly, but you do need to start
every few minutes. We will be back when this
is coming to a simmer. As you can see, the butter is pretty
much melts it. If you look around the edges, we're starting to get bubbles. So it's almost to
that similarly stage. So we want to start
a little bit more frequently so it doesn't
burn on the bottom. As you look at it. Starting to get more
bubbles all the way around. And we're even bubble starting
to form in the center. Basically there to summary. We're going to go ahead
and turn the heat off. And we're going
to take this over to that chocolate
that we cut up. We're now going to pour this hot liquid
onto our chocolate. Make sure all of the chocolate or as much of it as you can, is covered by the milk. We're now going
to let it sit for five to 10 min so that
chocolate can completely melt. So we'll be back
in five to 10 min. This has been sitting
for about 10 min. Now I'm just going
to stir and get all of that chocolate
milk mixed together. And as we stir it, it's going to look more
and more chocolate and less and less milky. You can see we're
getting a lot more of the chocolate look in a
lot less of the milk. We do want this to be completely smooth and be
completely chocolaty. None of the milk. So I just keep stirring
until we get there. Almost there. You can see how smooth enrich
the skin Nationalists. Now, what we want to do is we're gonna stir
in almond butter. Almond extract, the vanilla. And we want to stir this
until it's again a nice, smooth and shiny ganache. You can see that's now a
nice smooth, shiny ganache. I sprayed my container down so that this won't stick as
it cools and hardens. And now I'm just going to pour my ganache into this
container and spread it out. We're now going to cover this. With that covered, we're
going to refrigerate this at least 3 h so that it
can become very firm. Then we'll be ready
to start forming the truffles and rolling them in that the
crushed cookies. So we'll be back in about 3
h when these have firmed up. Our candy has sat in the
fridge for about 3 h. We're ready now to finish it up. I'm going to put these cookies. And I'm going to start
by just doing half. I can always, I can do the other half if I need
it for I don't know for sure how many cookies it's going to take because it's just
the coating on the outside. So I'm going to
put the cookies in the food processor
so you can see it. And I want to make them
grinded up very well. As you can see,
the open that up. We have a fine powder. We're now going to just dump our powder or our cookie
crumbs into this bowl. Here is our truffle mixture
and our bread crumbs. And then our Pam to let
them sit in when we do it. So I thought very small scoop, that's just one tablespoon. If you don't have a
script like this, you could just measure
it with a regular spoon. So I wanted to just scoop up. And then I'm going to
in my hand like that. If I have too much in there. The reason I want
to put up my hand is because I want to roll this to be a nice ball. And then I'm going
to cover it with those cookie crumbs and stick
it on my pan like that. And I just continue to
do that until I'm done. And I like using the
scoop because I feel like I have better size
control and they may not all be exactly the same, but they're going to be
pretty close to the same. So just continue to do yours and I will
continue if your mind, until I have them all done. I have rolled out all of the candy and coded them
in the ground up cookies. Now what I wanna do
is I just want to cover them with plastic wrap. With them covered
with plastic wrap. I'm going to put them in
the fridge to let them set up for at least an hour. And then I will put them in a small airtight container to store until I have
all the candies made. And we're ready to put
together our chocolate boxes.
4. 04 Chocolate Peppermint Fudge: We're ready to make our
chocolate Peppermint. But the first thing we need
to do is get the PAM ready. I have my band and
I have my foil. And I'm going to put my foil and my coil to go to the
corner of the pen. Also come up as far
as it can come up. Now, I'm going to
spray the pan down. Now this is ready
when we're ready to put the sludge candy in there. In Japan, we have our heavy cream and we're going to add three
tablespoons of corn syrup. Already have one in there. There's 2.3. Then we're going
to add our sugar or salt. Half a teaspoon, and a
two tablespoons of water. One. We're turning the heat
on to a meeting heat. We're going to stir this. We want to stir it constantly until the sugar and
everything dissolves. You can see that the
sugar is dissolved. Now we're going to
add the chocolate. We're going to stir
it until it is melted and the
mixture is smooth. You can see the chocolate is melted a little bit
more to go on the melt, but it's getting there. Once a chocolate has melted, we're going to bring
this mixture to a boil. You can see that it's
coming to a boil. So we're going to stick or
a candy thermometer in. We want it in their chocolate, but not touching the bottom. And now we're going
to bring this to 38. And at this point, we're going to take
this burnout and we're going to turn the heat
up to medium high. And we're gonna use this pastry crust that
we have sitting in cold water or
sitting in water to brush down the sugar
coming up on the edges so that we don't have the sugar crystals forming
and ruining our fudge. So we'll just keep brushing
that down as it comes up. And we already
have an up to 200. So it moves up pretty quickly. We wanted to get to 238. It is reached to 38. So I'm going to
turn the heat off. And I want to very quickly
pour this into our bowl. Not scraping the bottom now, scraping the sides, just
pouring that into the bowl. Now I'm gonna take my candy
thermometer and clean it. I cleaned my candy to monitor. And now I'm just going
to put it in the bowl. And we want this to come
down to 110 degrees. Now, right now it says 125
because I just cleaned it, but it's gonna go up. Now that it's back in the candy. But we want it to come
down 110 degrees. And that should take 30-40 min. Before we let it sit, we want to put our butter
little dabs on top. Just break your butter
up, put it on top. We're not going to stir it
and just sticking it on top. Now, we'll let it sit for that 30 to 45 min until this moment it
gets down to one tenth. So I measured out my
puffs and then I put them in this nut grinder,
grinding the Cambrian. And because they're peptides, so not as colored as
regular candy canes. So they actually grind up
quite nicely in this grinder. Once I have this ground up, this will be ready
for the function. Now we just need to wait for that fudge mixture
to come down to 110 degrees and
then we'll be back. Eye candy is registering
110 degrees. I'm going to go ahead and
take the thermometer out. And I'm going to add
two teaspoons of vanilla and one
teaspoon of peppermint. Now we're going to repeat
this with the hand. First, I want to mix it all in. Then I'm going to turn it off. Now. We're going to go ahead
and pour this into rpm. Then we want to spread
it around so that it's even thickness and smooth
or smooth as we can get it. Now we're going to sprinkle
this peppermint that we ground up on top. And then we're just
going to kind of push it down into our fetch. With that done,
I'm going to take some plastic wrap and
I'm going to cover this. And we're going to
let it set up at room temperature for about 4 h before we cut it.
Then we'll be back. When it came time to cut
the fudge and stored. It was getting pretty
late at night and I forgot to record how to do that. So let me just quick
tell you what I did. Here's my container fudge. What I did is I lifted
the foil out of the pan, set it on the calendar
using a knife. I cut it into the 1 " strips and then cut it the other
way into the 1 " strips. Then I would get
fudge that licked. This size, ready to go
and our chocolate boxes, as easy as that. Go ahead and cut this up and get it ready for the
chocolate boxes.
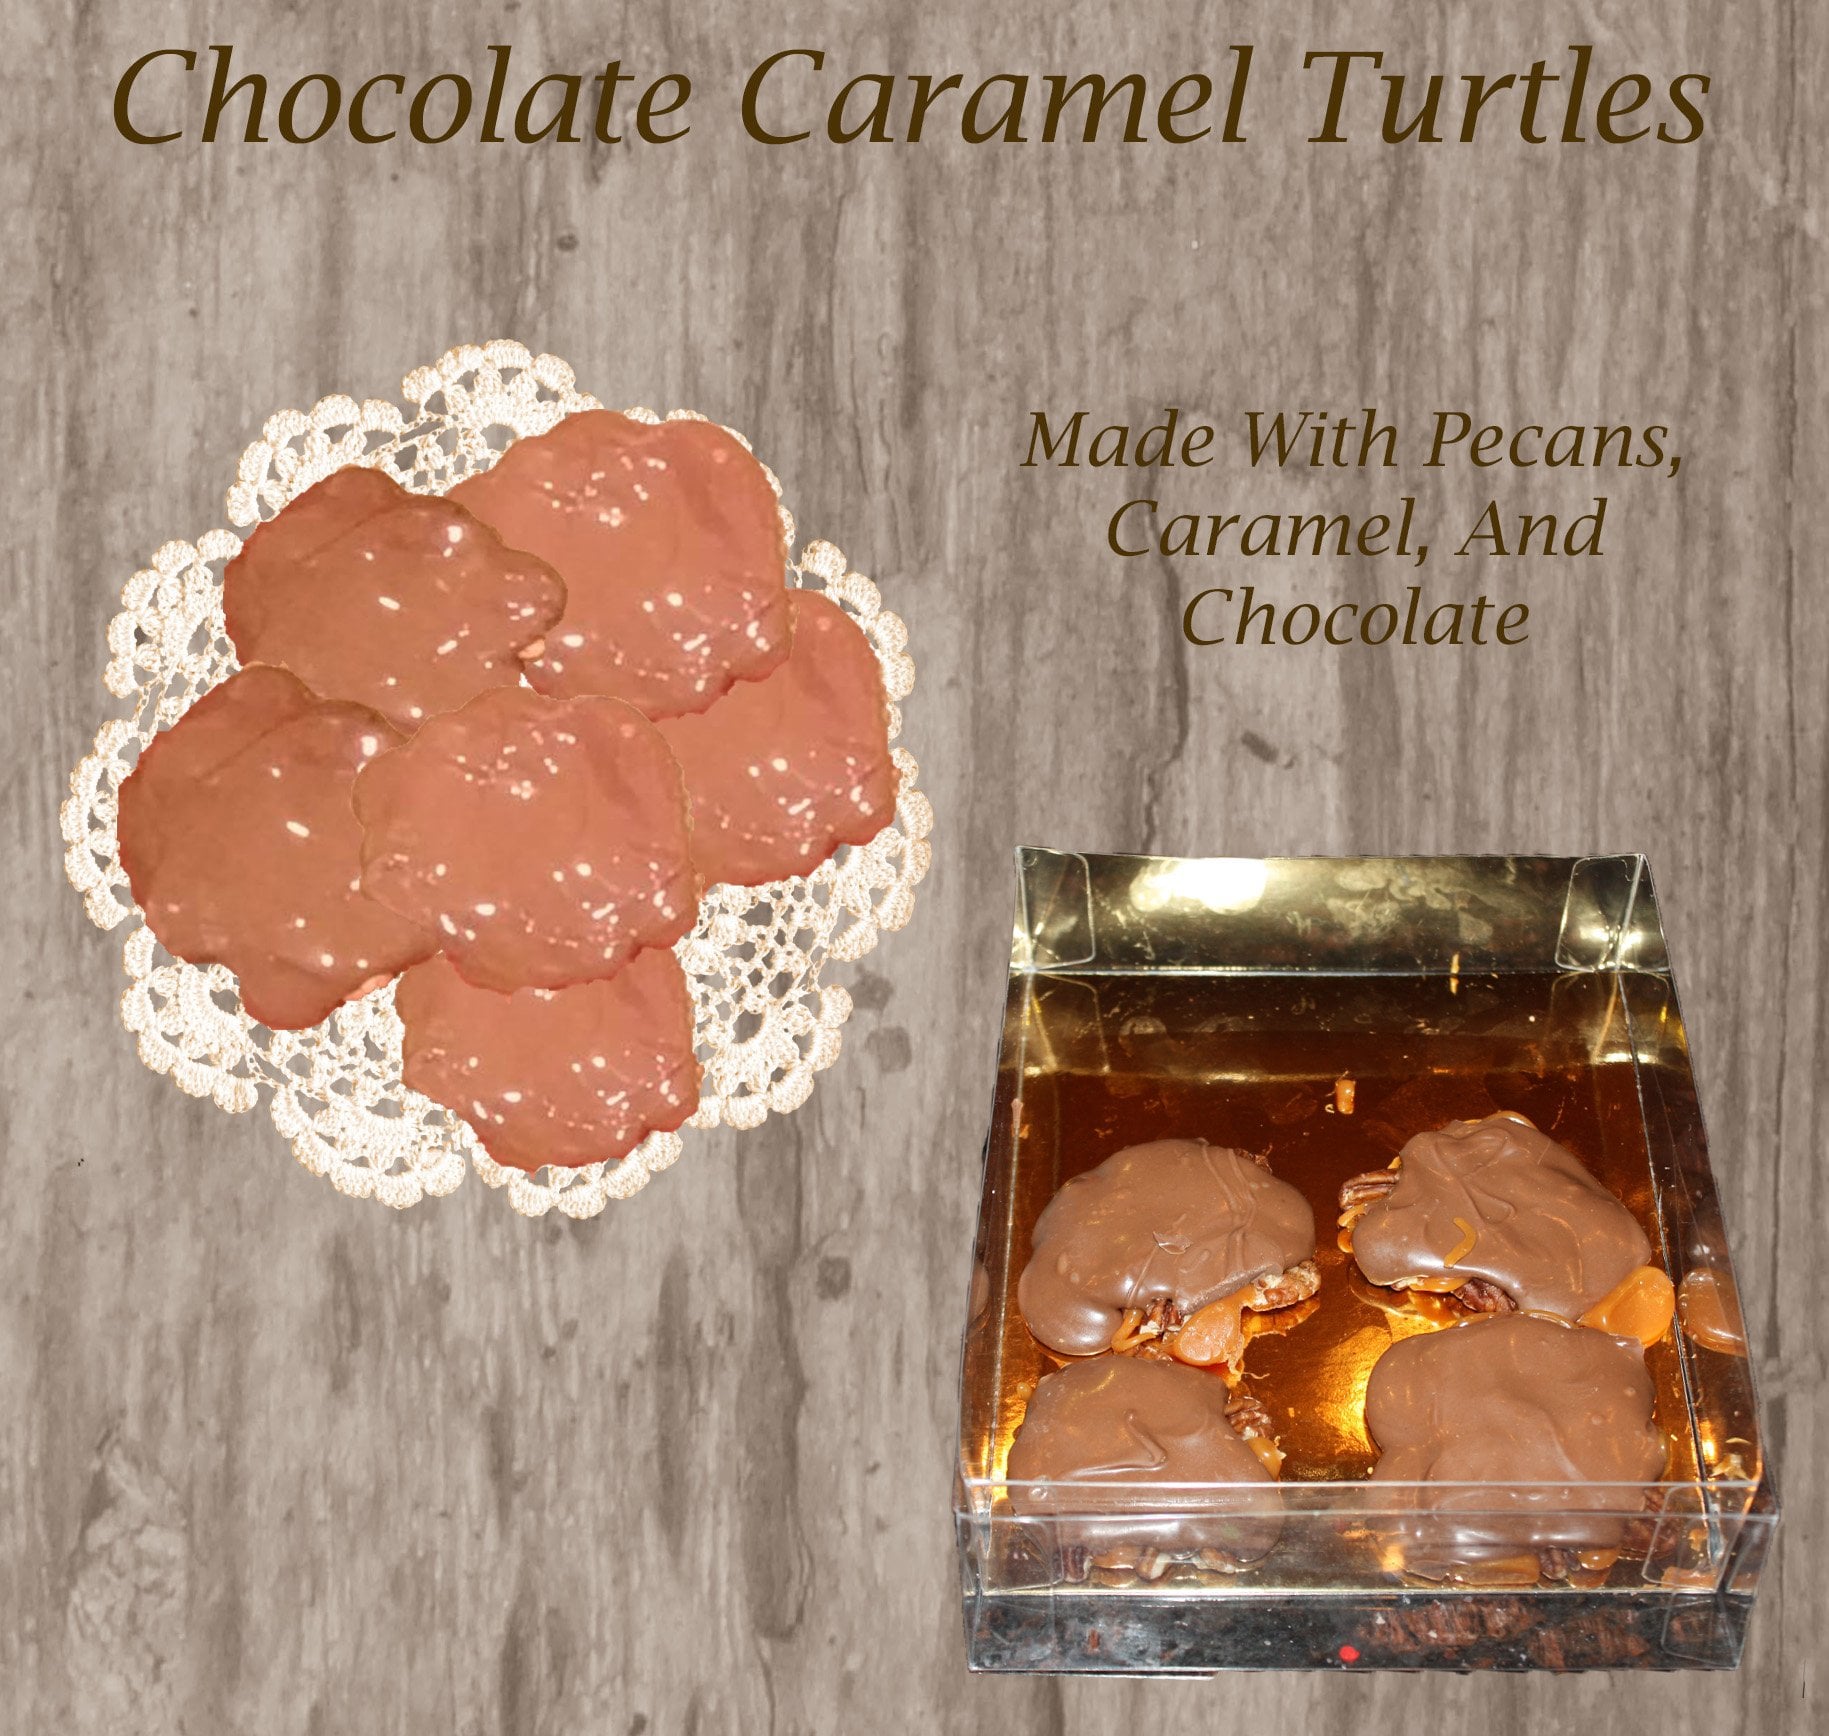
5. 05 Chewy Caramels: We are ready to make
our caramels for our chocolate caramel sauce pan. We're going to
combine the butter, brown sugar, sweetened
condensed milk. The coin, a pinch of salt. When I turn the heat
on, medium heat. And we wanted to bring this to a boil and we want it
stirrup constantly. Although you'll notice while the butter is still
in very big chunks, it does not stir up very well. So we're just trying to
keep it moving somewhat. As the butter melts, it will be easier to stir. And of course it doesn't
need to be a vigorous stir. We just want to
stir it enough that it does not stay in
one spot and burden. And it will become easier to
stir as that butter melts. As you can see, the butter is almost
completely melted. With the butter melted, I'm now going to stick
my candy thermometer. And I want to make sure it
is not touching the bottom, but it is into the liquid. And I'm going to keep stirring. This is going to come to a boil and we want to cook it till it gets to 240 degrees. You can see now it's
starting to boil. Still want to be stirring it because we don't
want it to burn. It doesn't need to be vigorous, stir just enough
to keep it moving. It's about 35. And we wanted to get to 40. And then we're going to
be cooking it for 2 min. So since it's a 235 to 40, I'm going to set the
timer for 2 min. Basically a 240 and 234-40
disposed to time it for 2 min. Now I'm gonna kick it for 2 min. Well, I'm kicking into 2 min. I'm gonna go ahead and remove the candidate monitor
because it does make it harder for
me to stir and we're no longer looking at
what the temperature is. We're just doing
that to minutes. The time was just gone off. I'm going to turn the heat. Now. We're going to store in that
1.5 teaspoon of vanilla. That in. Once we have that stirred in, we're now ready to go and
pour this into our panel. We just want to pour
this into our pen. And we're going
to let this cool. Wow, are caramels or cooling. We're going to melt
some chocolate and get silicone mold ready for
the caramels to go into. I have my chocolate
melting here. Now. If you don't have a
chocolate melter, you can melt it
in the microwave. 50% power for thirty-seconds. Well, the first time you
would probably do a minute. And then 30 s after that at 50% power and
staring in-between, the only problem with
that is you would occasionally have to
go and do another ten, 15 s to remelt it because
it would not stay melted, it would slowly cool. Having a chocolate
melts through here. Once it melts, I
can turn the heat down to a warm and
it stays melted, so I don't have to
continually heat it. So we're just going to
wait for this to melt. And instead of a spoon this
time I just have this little secure because I don't want a big spoons
sticking in there. This is to stir it. Once it melts, I will
use my paintbrush. As you can see, it is mostly melted. There's still a couple
of chunks in there, but those couple of chunks
will melt down as we work. So I'm going to take my
paintbrush and I'm going to paint the bottom
and up the sides. I want to make sure
there's no green showing in there at all. Painting up the sides and that there's
enough on the bottom. Then I'm just going to
continue on filling in all the cavities in tune up the side and feeling
in the bottom. Sometimes you do
need to turn it so you can see all angles of it. Being square. Those corners can
sometimes get missed. So turn it to make sure that
you have all parts of it. I'm just going to continue until I have all of these done. I have filled in all
the cavities here. You'll notice the first ones have already started to harden. But I am going to stick this in the freezer for about 5 min before I start putting
the caramels in. We've taken our caramel
out of the pan. It's still on the
map that we have. Now what we wanna do is our
chocolates or 1 " square. So I've got this measurement. And I'm just going
to mark 1 " there. I know. And mark it down here. And then I got to put this
so it's lined up there. And I want to cut this all the way
through that 1 " mark. And now as you can
see, it's the right. For now, I'm just
going to put this on there and cut at 1 " intervals. I'm going to stick
the car animals in there and I'm just going
to lay this down here. Go 1, " 1 ", stick
them in there. Get a little bit out of shape, just push him back in so
that they fit in nicely. Because the Cardinals are soft
and we want it to be soft. What makes some really
good when you eat them? I'm just going to
continue doing this until I have all of my
containers here full. Then I'll come back and
show you what we do next. I have failed all the
cavities with the caramel. Now I'm just going to
take my paintbrush and I'm going to paint the
chocolate to the edges. And if it goes down to
fill in, that's fine too. We want this to be
completely covered. We don't want it
to come outside. Dislike that. I'm gonna go ahead and do
that with all of them. Some caramel seemed
to be a little bit smaller than others. Which case they end up
getting more chocolate because the chocolate goes
down and fills in the side, which is what we want. Because we want to be a
nice, perfect square. When it's done, you go ahead
and do your chocolate, getting that chocolate in
there to encase the caramel. And then when you have them all done and I have
mine all done, we'll come back here and I'll
show you what we do next. I have covered all
of the cardinals. You can see it takes a while because these
have already starting to look like they've set where
these are still very moist. I'm going to now stick this in the fridge or the
freezer for about I'm going to probably give
it a half an hour so that it can be come really firm. And then we will pop them out and show you what
they look like. These have been sitting in the freezer for probably
about a half an hour. So they should
definitely be set up. We're now just
going to turn this over and push our karmas, all the criminals
out of our moles. Now we just wanted to
turn it right side up. I'll need to take
this mold and do at least one more
batch because I think I only did about
half of the kernel. So here are our
chocolate caramel.
6. 06 Eggnog Truffles: We are ready to make
the eggnog truffles. Let's go ahead and begin. We're going to start by melting these 8 oz of chocolate
in the microwave. To do that, I'm going to
cook it in the microwave at 50% power for 30 s
and then stir it. It has bent seconds. I'm gonna go ahead
and check this out. We want to stir it. As you can see, thirty-seconds
was not that long. And the chocolates
not that melted. We're going to put this
back in the microwave for another 30 s and then start. And we'll get to continue
to do that until it melts. I've done this a
couple of times now. I'm thinking this is
probably going to be yes. Let's check it and see. As you can see, that
chocolate is melting. So there's no chocolate melts left is just
the liquid form. So this is ready. We're now going to dump into
this bowl or cream cheese, our confectioner's
sugar, or nutmeg, and our rum extra. This is not a very big bowl. But then we're not
making a whole lot. I want to turn this
on a low speed, which you can see it. I'm going to add this
melted chocolate and I'm gonna beat it
until it is well-mixed. Just want to taste that
mixture. It tastes, try it. Tastes really good. Now, I want to cover that well. First I want to
scrape down the bowl, makes sure it's all mixed in. And it looks good. Now I'm going to cover this. Let it chill for about 4 h. Then we'll be ready to
finish up the candy. The egg not truffle mix has been sitting in the fridge for about an hour-and-a-half, which is probably good for
what we're going to be doing. I am now ready to melt the chocolate and prepare
the molds for the truffles. This is the mold I'm
using for my truffles, has a little pattern on this
side, which is the top. But it's pretty deep so I can make these a little bit bigger. I also have my chocolate right here and I just
barely printed in there, so it hasn't had time
to really announce. As soon as it melts, we will start painting our
chocolate on our mold, and then we'll be ready
to put the center. So we'll be back once our
chocolate has melted. While the chocolate
is still melting, we're starting to get parts
of it that have melted enough that as I put my
paintbrush in there, it's coming on the paintbrush. So I'm going to go into that. I want to paint the
bottom of my chocolate. And then I want to
come up the sides, totally covering
this with chocolate. So you can see that it is
totally covered with chocolate. There's none of the
mold showing through. Just going to add
a little bit more. I want a little bit of
thickness to the sides. And then I'm just going
to go on to the next one. First I'm covering that bottom. I want the bottom
to be so that I do not see the pattern
on the bottom. I can see the pattern, it's not thick enough. And then I just
paint up the sides. Once I have that bottom enough. I'm just going to continue
to do all my cavities. Once I have all of them
completely painted, the bottom and the sides. Then I'll be back. You go ahead and do yours also. Then we'll be back once
we have all this painted. As you can see, I have filled in all of them. I'm not going to stick
this in the freezer or fridge for about 5 min
so that this can set up. If I put the filling in, I have my eggnog truffle mix and I'm just going to
take a little bit out. It's a little bit sticky still. And I'm going to stick
it in my cavity, which use a spoon, stick it in. And I want to fill that cavity
up to the top and it'll continue to set as we put
it back in the fridge. But it's kind of nice
to have it a little bit softer when you
fill in the cavity. Because then it goes
into all the crevices. It is a little messy. That's okay. Just expect you can have a little bit of
a mess as you do. So just get a
little on the spoon and then get it in there. Once I think I have
enough in there, kind of use the spoon to spread it around, feel the cavity. So it's kind of a mixture of
the spoon and my fingers. You can't let this sit in
the fridge a little bit longer and get firmer and it wouldn't be quiet, just messy. I find it doesn't
really need to sit in the fridge longer
because it's going to sit as the chocolate soon. So keep doing it till you
get all of them failed. And I will keep doing mine. And then we'll be back after
all of them are filled. Okay. I have failed
all of the sensors up. Now, if you want, you can
come back and you can wipe and get a lot
of this excess saw. It's really up to you
on how many chew on it. I cleaned my hands up and I
got some damp paper towels. With the damp paper towels, I'm just going to come, I'm cleaning up around the candy so that I
don't have any of the truffle mix
really out there. And it doesn't have
to be perfect. I'm just trying
to get it so that when I paint the chocolate on, it's going to sell. I'm trying to guess Bessie
around the candy things. I have my chocolate again. I'm just going to take my chocolate and start
by putting it in the middle and
spreading it out to the edge ceiling
that at the edge. So I don't see any
of that feeling. And I'm going to do
that for all of them. I like to start at the
middle because then I have more control as
I take it to the edge. You see I had a little bit
truffle there over the edge. So I'm taking the
chocolate there over the edge to
totally ceiling in. Go ahead and do yours like this. When you're completely done. Back in, I'll show
you what we do next. I have covered the
top of each of them. I'm now going to stick
this in the fridge or the freezer for
at least 10 min. If in the freezer in the fridge, probably at least
a half an hour. And then we'll be back and I'll show you how
to finish these up. These have sat in the freezer
about a half an hour. So I'm now going
to just turn these over and push these out. Still soft. Seeing how soft that is, this one turned out
get this one did not. Anyway, we are pushing this out. Some of them are
not coming out as smoothly as I
thought they would. Now, the one thing you can do, you don't want a much
chocolate on your paintbrush. But the one thing you could
do is you could come back here with the chocolate and
fill in those little spots. That came off. Won't be quite as pretty. It'll still work. Some
of them came out fine, so I don't need to do
anything to others. I need to just a little
bit of fixing up. Now with that part done, I'm just going to take
my eight max seasoning. I'm going to do just a
quick little sprinkle on top of eggnog. And as this one's up
to room temperature, that eggnog who go
into chocolates, I'm gonna go ahead
and finish it up. And you go ahead and
finish yours up to you.
7. 07 Easy Homemade Filled Chocolates: We're ready to make the
easy filled chocolates. The first thing we need to do is get the chocolate molds ready. I have two different chocolate
molds because I'm going to do two flavors in
this chocolates. I also have my
chocolate which is, which is melting, and I
have parts with melted. So I can go ahead and
start filling my molds. And just like with the other, I want to put a nice
layer of chocolate down and make sure it comes
all the way up to sites. And I don't want to
see any of the bottom. And I do like to
turn it around from all angles as I'm doing it, to make sure that it is
indeed totally covered. Fill all my shell once. And then after I have
filled this shell once, I'm going to fill
the roles at once. Once I have all of them done, we will be back and I'll
show you what to do. I have felt the 2 mol up with the chocolates
or painted around it. I'm now going to put these in the freezer so that they
can set up and become hard. While I make the
filling in this bowl, I'm going to put the white
chocolate and the butter. And you'll notice the
butter I broke up, right, cut into smaller pieces so that later it
will melt faster. I'm now ready to go over
to the stove top and use the stove top for the next
part of our making candy. This pan, I'm going to put the marshmallows
and my evaporated milk. I'm going to turn the
heat up to medium high. And we're going to stir this frequently because we
want it all to dissolve. We're going to have it dissolve
and then come to a boil. We just keep stirring
frequently, not constantly. Until this comes to a boil. We will be back when
this comes to a boil. It is starting to boil. So I'm going to put
the kitchen timer on five-minutes and
I want to stir it. Well, it boils for 5 min. We'll be back in 5 min. When this is done. This is bio for
almost five-minutes. The time is just about
ready to go off. When the timer goes off, we're going to remove it
from the heat and part over that chocolate
butter mixture that we measured out earlier. Let's go pour that over. The chocolate mixture
on the poor had all out over that mixture. And then we're
going to stir this until it's all mixed in. Chocolate and butter is all melted and it's all
mixed together. You want to be careful
when Stern it because this is a very hot mixture. We don't want to burn ourselves. You'll now notice the
butter slowly melting and we're slowly getting
this to 0 mixin. We want to keep
stirring it till it's all the same consistency and
basically the same color. You can see it all looks basically the same
color and well blended. Now we want to take
this because I'm making two flavors and
divide it into these tuples. It is hot. So I
want to be careful. Suppose of different sizes. That is a little bit hard to decide whether
or not you have half. Now we want to add the flavor. So in this big one, I'm going to add lemon. This is a one-and-a-half
teaspoon. I'm going to stir that. And then in this one, I'm going to do one-and-a-half
teaspoon of the Raspbian. You can choose any flavors
you want for your chocolates. These are just the
two flavors I picked. Now that I have that, I want them to look like the
flavor they tastes like. So in the lemon drop, a couple of drops of the yellow so that we can
get this to look yellow. And in the raspberry, my red seems to be a
little bit more solid. So I'm sticking a
toothpick in there instead and adding
the red that way. Let's see if that's enough. But if we need to add more, I'm thinking I want
just a little bit more. Little bit more red. Hopefully that'll
be enough to give it a much brighter color. We're now going to
let both of these cool to room temperature, and then we'll be ready to put them into the chocolate mode. Are chocolates have firmed up
and our feelings have cold. I'm just doing a quick stir. Then I'm going to stick
the feeling in this bag along to turn my
back down so that it's easier to hit your
failing all the way down. And then I just hit. My feeling in the bag. Once I have that
feeling in your bag, I'm going to push it down. And then I'm going to cut
not a really big hole, just a little hole like that. And I'm going to take this
and fill in the cavities. And I don't want it
going over the top. So you can see I'm
filling in the cavities, making sure I stop. So it's not going over the top because I'm gonna be putting chocolate there over the top. So you can see right here is 15. And I still have a
lot of feelings. So I'm gonna be doing
several batches of this. With that done like that. I'm now going to take
my chocolate paintbrush and I'm just going to
fail and go to the edges. And I'm going to do
that for all of them. So it'll take me a
few minutes to do it. You go ahead and do yours. And we'll be back
when it's all done. So I'm doing the same with the lemon that I did
with the Raspberry. I failed my back like
I showed you with the raspberry and I'm
filling in the shells. The important thing
that I have done with each of these is I have picked a different shape
for each flavor that I can use my finger
to level these out. It says any sticking up, getting it to go to the edge. Paintbrush will also
help to do that. Let's bring the paintbrush. I'm going to push that down. As I put my chocolate. And I do want to seal this up. Chocolates go all
the way to the edge. I think I felt these
a little bit fuller than I felt the raspberry ones. So it's gonna be a
little bit more of an overhang and trying to
push it down a little bit. And I am trying to make sure
it's completely covered. You go ahead and do
your second flavor. And if you chose a third flavor, you can do your third flavor. And then we'll be back. There is our last one. We're now going to take both
of these to the freezer. And we're going to
let them set up for about 15 min to half an hour. We'll be ready to
take them out of the mold and do another batch. These are sad in the freezer. We're now ready to take
them out of the mold. So I'm just going to push them
out of the mold like this, just like I did on
the other chocolates. And then of course I
can always break off the edges and smooth it around. And I'm going to do the
same with these ones. There. I have the raspberry
and the lemon chocolates. In our next lesson, I will show you how
to package them.
8. 08 Packaging The Candy: I bought these small
chocolate boxes to fill out chocolates and you could
use a much bigger box. If you are just going to do for yourself and you wanted to mix. But if I'm gonna give these
two friends and neighbors, I'm not going to
want a gray box. The first thing that
I'm going to want to do is stick my liners in there. And after I stick the liners, I can go ahead and
stick the cambium so I can stick one lemon raspberry. Have to fudge in Carmel. One of our AMR at a truffles eggnog shuffle and I've still got
one spot there. I seem to have a
lot of this fudge. So maybe I'll stick
infection there. I wanted to I could try to put more of these
and then I could put another candy and see if
I can fit another one in a really big cup right here. So that I have three. The middle row is not
as good as the other. Let's put that in there. Then. I could just
put the lid on it. Sure. It's clean and it's
ready to be given as. Now, maybe you want to
give a little bit more, go ahead and stick these. And then we can stick
some chocolates. And you just want to
randomly put them in there. There is no set way. It has to be. Let's see, what am I missing? With this box with
a band deeper? I can put a separate
layer and I've got this last paper,
which is Christmas. I can see this is a little
bit bigger than that, so I'm not going to
fold it in half. Fold it put, it
actually builds data. I'm going to just turn it up. Then I can go ahead and
another road chocolates. And once I have those, I can
just stick like candy down. And as you can see, as I start to put the candy, it becomes more stable. I like to try to make sure that I don't get to the
next to each other. Then with this, I can also
just put the lid on it. And there's a bigger box
of chocolates I can give. Maybe you're wanting to make this chocolates to
take to a party. So you want to have more than what we had
in those smaller box. Here. I have a bigger box. And I'm going to go ahead
and line the bottom. Coming up the sides
a little bit. It'll work better when I get
the chocolates in there. Come up the sides a lot. Nine. It's really coming up the side. And then I can put
my cups in here. This is a deep enough box that I will end up putting two rows in. Problem I'm having is that part that I'm going to start
putting a role here. Some candy and chocolate. Kernel, one. Mentor. And our morale,
notice the weight of that does keep it there. And then I can lay
out Laura, my cups. I'm going to have to get the
actual chocolates in there. So let's put the next row. Supplement, raspberry and put lemon, raspberry, kernel, peppermint or Morado. And I'm just going to keep filling it till I
haven't completely. You can see once you get
the candies in there, it stays much easier. So I have that
layer totally fall. And because this is a
bigger well, in reality, I could probably wanted
to I could go in and squeeze Moran and maybe I do want to because that's going to
make it more stable. If you squeeze more in on it, you're going to have
it more stable. Low of cops do kind of mold in so that you can
get more of them in. One of the nice things about it. People take them, they can
just take the whole cup. And it's really up to you on how much of each one
you want to put in. Maybe you want more, a lot more of one kind in
there, really up to you. So this font is
pretty much full. So now I'm going to do like
I did with the smaller one. I'm going to put two in there because this is not quite the same size as the box. I want this to come
up a little bit. And I'm going to do
the same with this. Come up a little bit. Then. Head start with the four. Kind of grounded. I'm going to go ahead
and mark ups get that. On the bottom. You can see how it's really up to you on how much of each
you're going to put in there. So you go ahead and decide
how you want to package it. Gift-giving. And then you'll be
ready to give these fun little chocolate treats to your friends, families,
and neighbors.
9. 09 Final Thoughts: Thank you for taking this class. We had fun making our different gift boxes of chocolates to give to
friends and family. We first learn how to make
our Peppermint Patty's. We then learned how to make the almond butter
chocolate truffles. After that, we learned how to make chocolate Peppermint bunch. We then made caramel, my favorite types of chocolates. Next, we made eggnog truffles and put them in a chocolate. Then we made our
field chocolates. I made two flavors with this, raspberry and the lemon with
all of our candies made, I then showed you different ways that you could package it. To give away to friends, family and neighbors, to take a bunch to
a party to share. I hope you can do is turned out the way that
you wanted them to, your project for
this class is to make these candies, chocolates. And then in nice packaging to give to friends,
family, and neighbors. Please take a picture
of your work and posted on our project page. Let us know how it went. Which one was your
favorite candy. The recipes for
all these candies is in the project section. From my kitchen to your kitchen. Happy candy making.
 Nadine Thomas