Transcripts
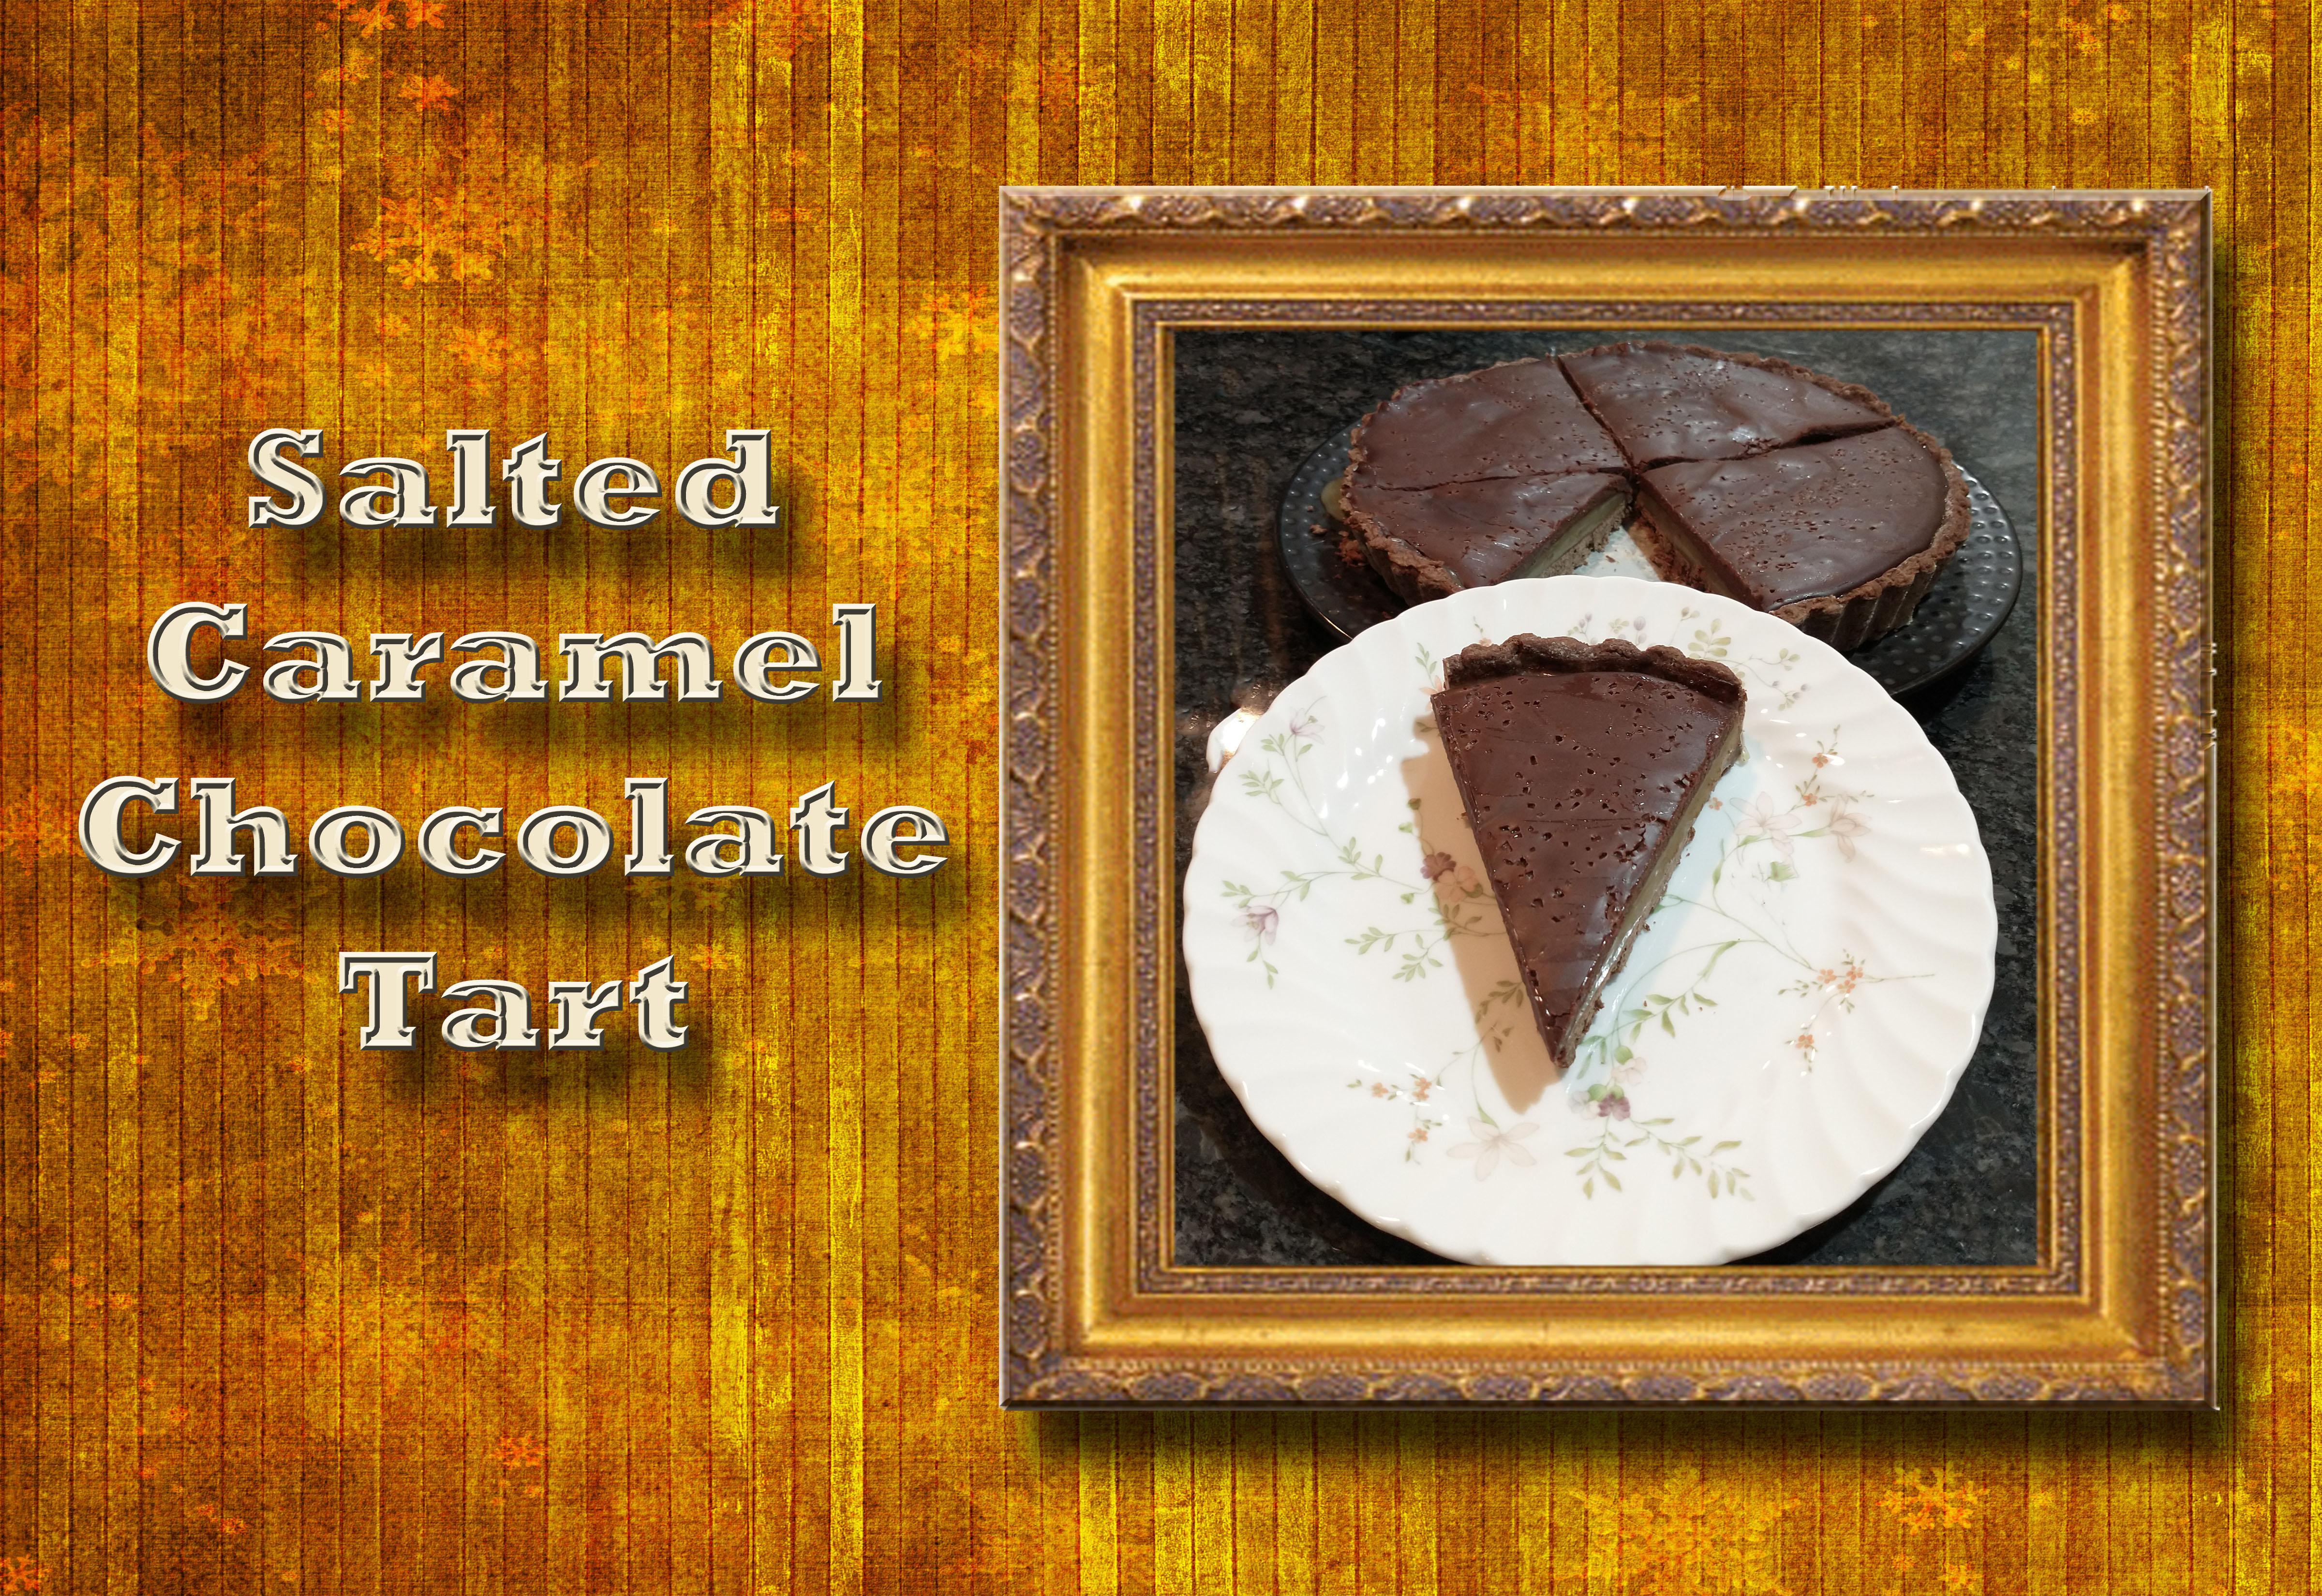
1. 01 Introduction: Thank you for taking this class. In this class, I will
teach you how to make salted caramel chocolate. First, I will teach you how to make the dough that
the tarp trust. Next, I will teach
you how to roll out the dough and place
it in the tart pans. Then I will teach you
how to bake the crust. Next, I will show
you how to make the salted caramel filling. Then I will show you how to
make the chocolate ganache. We now get to assemble the tart, adding all the
layers to the crest. I am a self taught Baker. I have loved baking
most of my life. Many years ago, I decided
I wanted to open up my own horn cell cakes and other deserts to other
people for special occasions. So I watch videos
or read some books, took some classes, and of course did a lot of
practice and tell. I felt like my decorates
skills at the levels that I can open up my own home bakery and decorate cakes for it. I opened up my homepage, and I had this bakery
for several years, making cakes for birthdays, anniversaries, weddings, and
other special occasions. I also make t-shirts to sell at festivals
at farmers markets. I had this business for several years until my
husband got a job offer. We felt like this was a good
fit for us and so I closed down my homepage and we moved across the country to New York. Now here in New York City, I do not want to go through
the steps to open up another. But I still love me. As a retired teacher.
I love teaching. So I have decided to share my skills with you
on Skillshare. This class is aimed
at the picture. There would like to
learn how to make a delicious salted
caramel chocolate tarts. I am excited to teach you
the skills in this class. Let's move on to
lesson number one. That tart for us.
2. 02 Making The Crust Dough: We are ready to make the dough. For the tart crest. I have a bowl here. And in the bowl I'm going to put the one-third cup, cocoa, the two tablespoons of sugar, salt, and the flower. Now I want a whisk these altogether so that
it's all one blend. I don't see any like flowers showing out beyond the cocoa. It's all blended together. I have the photo
here ready to add. And I'm just going
to put it in there. And you notice I kept the batter into much smaller pieces. And now we're going to talk with our fingers
and cut the butter. And after we've tossed
and somewhat coded it, we're going to start breaking up that butter as we
continue to toss it and break it up until all the dried pretty
much disappeared. Both fingers and that might
work faster, break it up. Just keep working at it. It'll take a little while. Notice I'm starting
to get a lot of p size things up butter. But I still see a lot of flour, cocoa mixture that's dry. I'm just going to keep
breaking it up underneath, bring some of that dry out. We want to keep doing this until the dose can start holding
together a little bit. So when I squeeze it, it would hold together. That's not quite
holding together. Unit. So you'll notice now
when I squeeze it together, it's starting to stay formed. Now what I want to do is I'm going to make
a well in the middle. I've made this well
in the middle. Now I'm going to add egg yolk and my three
tablespoons of milk. 12.3. Now I'm going to use my fork and slowly add that dry or wet. I'm gonna do this until
I have all of that dry incorporated into the wet. Once you get to where
you don't think the fork is doing anymore good. Just go ahead and take the fork out and need
that a couple of times. Working the dry into the wet. Dry works into the wet. You're going to get a
dough with no dry spots. You just got to keep
working it to all of the dry is worked into the rest of my life to
actually pick up the dry, place it on the
wet, then need it. Still got some dry here. Places on they're going for no dry spots and
the smooth dough, we just have to
keep working at it. Notice I'm getting
to where most of the dry is incorporated. Still have a tiny bit. Now I just want to keep needing that till I get a smooth dough. Has that butter warms up. It's going to become
a smoother DO. But it's going to
help smooth it up. You'll notice we have a
pretty smooth dough here. We're now going to take some
plastic wrap, DO on it. Once it does on there, I want to flatten it to about three-fourths inch
and I want to try to make it somewhat of a dish
shape because it's gonna be easier to roll
out if it's round. Try that again, please. I didn't have it
in a bulb before. It was kind of a weird shapes. I want to make it in a ball, then add it to their flatness. Once we have a flattened
we want to cover it. Sure, it's completely covered. Then we're going to put this
in the French for about 2 h. Then we'll be back
for our next lesson.
3. 03 Rolling Out The Crust: Our dough has chilled
at the fridge for about 2 h. We brought it out
the rest of the few minutes. We're now ready to roll it out. To start with. We want to sprinkle our
counter with flower. You want a flower surface? Then we're gonna take our tart dough and we're
going to roll it out. I always like to start in the
middle and work my way out. Now, this is the bottom
of the chart, Pam. So trying to get it
to come out a few inches bigger than that
for about 14 " total. Alright. Duty to
use a little bit of vessel to get this to row. I'm actually going to
pick that up. Flip it. I do like to keep this kind
of moving as I roll it out. So to put this on there to see, you can see it is
bigger than that. So I'm going to stick
this underneath. And we're then going to take this and place it
into our tart pan. Without like that. I can readjust it. At this point. I am just pushing the tart
into the bottom up the sides. I'm folding it so
that it comes clean. Pushing down like that. So that it comes clean. I just want to load
this a little bit more. Make sure it's totally molded. And I want to actually
push with my thumb. So the target is into that fluted groove
all the way around, making sure it's at the top
and pushed him to the group. And you'll know when you have gotten all the way
around because you'll be able to see that it's
pushed him like that. I'm now going to
***** the bottom of my chart all over with the fork. And I'm going to
now chill this in the freezer for about ten to
15 min before I bake in it. So while this is chilling, I will preheat the oven. And I'm going to take this
extra dough and wrap it up. Keep it fresh. In my graph. Because at some point I made me choose a little
bit more to fix the tart. So this is going in the freezer. And then I'm going to preheat. The oven will be back. Once this is chilled.
4. 04 Baking The Crust: I DO chilled in the
freezer for about 15 min. The oven is now preheated. What I want to do now
is I want to take this parchment paper
and stick it in our tart pan and
then fill parchment. With these beans. You can get pi weights also
either way it's gonna work. I just like using the beef because they're
a lot cheaper to buy. Really do want to make sure that the parchment is going all the way down and up the sides. With this fill.
We're going to bake it in the oven for about 12 min, and then we'll be back. The timer is about
ready to go off. When it goes off, we will pull the tarp crust out and get it ready
for the second week. We took this out of the oven. We're just going to lift
the parchment paper. Then I want to look at
it and see if there's any places that need fixing. For instance, right here. I'm going to push a
little bit in there. I'm using that extra
crustal that I had to fill in any cracks
and that that I see. And I actually don't
see that many cracks. So I don't have to
do a whole lot. A tiny bit. This is
the second spot. I'm now going to take this, put it back in the oven, and cook it another 18 to 22 min until it is firm and
dry out over this time, I'm not going to
have the parchment and that over because
it's halfway kick. So it's not going to bubble up. Or at least it shouldn't. So we'll be back after
this has cooked. For the 18 to 22 min. The crust is about them. So we're ready to take
it out of the oven. As you can see when
you look at the crust, it is very dry. What I want to do, there's lifts this crust, can rack and let it
cool completely. We needed to cool before
we add the caramel sauce. But wow, it's calling
will make the current.
5. 05 The Salted Caramel: We're ready to start making the caramel feeling
for our chart. We're gonna do
that at the stove. This pan we avoided or sugar. Our charter and our water. We're gonna turn to
heat up to a medium, low service until it's due. So we just keep stirring until
we get totally dissolved. We have the shooter
pretty much dissolved. Now we're going to
continue to cook this for another
eight to 10 min. This time we're going
to not disturb it. We will swirl the
part occasionally. To keep it moving. We're going to keep clicking
until the mixture turns a deep amber and wisps of
smoke rise from the surface. We're just going
to go like this. As you can see, it is boiling now. We're just going
to keep swirling occasionally and letting it go until it gets that
amber color and smoke is rising from the surface
will be back at that point. You will notice it is
starting to turn color. It's not done yet. It's not even close
to being done. But it is starting to not be so clear and get just a little
bit of a color to it. So we just keep swishing it like this every
few minutes and letting it while until it becomes that amber color should just be
a couple more minutes now. Okay. I think I've seen a little
bit of smoke coming. It's kinda hard to see
it with the camera. And we've got it Basically
the color we want. I'm going to swirl
it one more time. Kinda when I swirl it, then I start seeing
smoke coming up. And now we're going
to turn the heat off. We're going to pick the butter in one piece at a
time and stir it. And I notice it is going to reflect that once
that until Milton, I can drop the next
one in and stir. I'm just going to keep doing it till I get all the butter
in there, stirred it. Now, if you want
the color darker, you could have clicked
through a little bit longer. You wouldn't have wanted to
have cooked up much longer. And to me this is
carefully enough. I just keep stir until
I get all the buttons. You can see the butter is
almost totally melted. We want to get that
last little bit melted. Now we're going to stir in
the cream and the salts. We want to get. Keep stirring it till it's completely smooth. All the same color. Now going to pour this caramel into
our measuring cup and we should get about
one-and-a-half cups. We're now going to let this
cool and once it's cooled, report into our tart shell.
6. 06 The Chocolate Ganache: We're ready to start making
the chocolate ganache. I have this pair of water
that the water to simmer. So I'm going to
turn the heat down. I don't need that big of a
flame now with the water spot. And I'm going to stick
this ball on top. You'll notice the water
is not touching the bowl. Now in this, I am going
to place my chocolate, my butter, and my cream. Then I'm just going to stir
this until it's smooth. Is says about five-minutes on
getting this going to take longer than 5 min because
I did not cut the brick, the chocolate, into smaller
pieces as I probably should. But we're basically
going to do it until this mixture
is very smooth. Basically when we put a bowl
on top of the pan like this. Well, making a makeshift
double boiler. So if you actually
had a double boiler, you could use that
to there may come a time where this bulk gets
too hot for me to hold it. Which case I'd have
to use an oven mitt. That as long as I
am able to do this, I'm not using an evidence. You can see as it's
starting to melt, the Bose become more stable. Because I don't have
many big chunks. I'm still stirring up
a chocolate melts. We will get a darker
chocolate color. For our ganache. You can see that
chocolate Start melts. We are getting that dark color. There. We have our ganache. We wanted to call
until it's thick enough that when I pick
the spoon in there, it holds the index. And to do that, of course, we'll get to want to
remove it from the PAM. In our next lesson, we will be assembling
and finishing.
7. 07 Finishing The Tart: Our current role has
cooled quite a bit, so we're ready to put
it into the chart. Wanna make sure we get
this in the chart. Well, it's still
portable and before it sets, we have
it in the chart. We just want to
spread it around. And now this is going to go in the fridge for about an hour and then we'll put
the ganache on it. We're ready to
finish up our tart. We put the caramelized and then we let it chill
for over an hour. Now we're going to put our
chocolate ganache on top. This monk could have cooled longer because it's not a set as the recipe
says, it should be. But since I'm not
really trying to get any kind of a swirl in it, but I like the smooth top. I figured it had
sat long enough. So I am spreading it
to cover the top. And then I have to be careful because
I don't want too much. I've got my sea salt going to sprinkle a
little bit on top. Now I will put this
back as a fruit to set up 1 s. I was just
totally set up. I'll be able to remove
it from the pan and our tart has sat in the
fridge for over an hour. We're now ready to
remove her from the pan and put it on the surfing
plates so that we can serve it. As you look at this plate, you can see there's an intent here where I don't want
the heart to break. As I moved the
tart from the pan. I'm going to put this tart with the bottom of this
panel onto the plate, therefore making it so that
it's got a level surface. Now if I had a flat no indent, I would remove that metal
pan that was there. But because I don't I am not
this is now ready to serve.
8. 08 Final Thoughts: Thank you for taking this class. We had fun making our salted
caramel chocolate tarts. We first learned how
to make the crust DO. After the DOE had chill. We learned how to
roll the dole out and put it into the chart Pam, with the dough in the chart, PAM, we then children again and then added some beans
inside the tart shell. And we did our first big. After the first big, we removed the beans and
did our second week. Once the shell was
completely baked, we let it cool. Wow, that's cool. We made our karma feeling. As the caramel
feeling was cooling. We made our chocolate ganache. With all the ingredients done. We then assemble our tart, giving the caramel time to set up in the fridge
inside the chart. Before we added our ganache. It all then was able to
set up in the fridge. We removed a chart from the pan and it is
now ready to serve. I hope your target turned out the way
that you wanted it to. Your project for this
class is to make start. Please take a picture of your chart and let
us know how it went. I look forward to hearing
the recipe for this. Top part is in our
projects section. From my kitchen to your kitchen.
 Nadine Thomas