Transcripts
1. Introduction & Project Overview: D. Hello, everyone,
and welcome to this class using
watercolor paint to create botanical shapes, which we're then
going to collage into cards,
bookmarks, gift tags. You could do them on gift bags. You couldn't turn them into
a painting if you wanted to. And the idea about using the watercolor paint
is we're using it in a very non traditional way because we're using it to paint some really lovely autumnal
colored backgrounds. Hi, I'm Dawn Codra, artist designer and
listic health educator, and it's lovely to
be back here with you today doing something that's a nice follow on from the Stylised Botanicals that
I published the last time. Using photos that you might
have taken yourself or magazine images or images that you've got
off the Internet, using these as inspiration, we're then going to paint background papers using
the watercolor paints. And I'll take you through
the process of that. It's really, really easy. And I'll show you
the process of how I actually choose the
colors by doing a little color chart
first so that I know exactly which color palette is that I actually
want to work with. We're going to be using
these then to cut out and collage onto the cards, the gift tags, and
the bookmarks. I'll show you how to do some mark making on
top so that we take those flat leaf shapes and
make them look a little bit more three D. Not that we're trying to make them look
realistic because they are, as I say, stylized botanicals, but it gives them
a little bit of a shimmer and it just gives
them a little bit more depth. You can draw your leaves
by hand or you could use the resources in the
Stylised Botanicals class. I'll put the link down
below to that class, and you can get these sheets of botanical leaves from there, cutting them out
individually and using these as a way to get the
shapes that you want. If you're confident enough using a knife with
a cutting mat, then it's useful way to cut out the leaves because you can
create a mask and a stencil. And the stencil is
a really nice way then to be able to see which parts of the
background colors you want to use to then
make your leaf shapes. If you don't feel
confident enough using a knife and a cutting mat, then you can just
simply use scissors. I'll also show you
another way to get your images onto the paper. And that's by using the downloaded
cutout leaf shapes and tracing them onto
the background paper. And then once you've
traced that image on, you can just use scissors
then to cut that out. I love going out walking
at this time of year and seeing all the stunning
colors that Autumn brings. You know, the golds, the
oranges, the yellows. Even on a gray day, I
find it so uplifting. It really, really does
lift the spirits. So, you know what I'm going
to say next, don't you? Get the kettle on.
Make yourself a cupper and let's see
what materials you need.
2. Materials: Let's take a look at the
paper, first of all, so I'm using a mixed
media art pad, and it's 250 GSM. That's the paperweight. Now, I'm using an A three
size. You don't have to. You can use whatever
size you like. It's just that I've cut
down the side of it here. You'll see when I show you. Because I can get two lots of card out of this A three pad. So that's quite a useful
size for me to use, because I already had
these envelopes, anyway, so it made sense to cut the card down to the
size of the envelopes. And this is the paper
that I've also used for doing the painting on using
the watercolor paints. Even though it's not
watercolor paper as such, you know, it's perfectly
adequate for that. Don't want paper
that's too thin, otherwise it will buckle when you put quite
a lot of water on. But you might find, if
you go above 250 GSM, that it might be a little bit on the thick side for cutting
it out and gluing it. You're going to need
some watercolor paints. Now, just use
whatever you've got. It could be a palette.
It could be tubes. I happen to be using these
little palettes here, and they're kind of dye
as well as a watercolor. So they come out very strong. And the name of this
is ua, hard mud. You probably can't
see that there, but I'll put the link to it.
Well, not the link to it. I'll put the name of it and
the description underneath. So you're going to need what
colors to be painting with, which means you're going
to need some brushes. Now, because I'm using
these big palettes here, I can get away with
a really big brush. If I was using this little one, it might be a bit too big. So go with the size of brush where you can get
as much water as possible, sorry, be able to load as
much paint as possible. But obviously, in proportion to the size of your palettes. So you'll know that
when you decide, you know, what it is
that you want to use. Which ones do you want to use? I've got some frog tape here, which I've used to
tape down the paint, sorry, to tape down the
paper as I'm painting it so that it doesn't
lift too much. Again, that's
optional. You might decide you don't
need to do that. You're going to need a pair
of scissors, a pencil, preferably one H
B or above 2b3b, one that's got quite
a soft lead in it, you might need an
eraser as well. You're going to
need a glue stick, or you can just use
PVA craft glue. I like to have a
bit of kitchen roll just so that I can wipe
my brushes off on that. Something to put your water in, of course, and I've got
a spray bottle here. Now, if you don't
have a spray bottle that you can spray water with, you can literally just
dip your fingers into the water and sprinkle it
all over your painting. That's not an issue at all. This is another optional thing a knife sharp knife
with a cutting mat. If you feel confident
using that, if you don't just
use your scissors. And then I've got my
lovely Posca pens. I've got a white and a gold for doing the
extra decoration, and they're both size
one M. Now, obviously, you're going to need
some sort of images so that you can be
inspired by the colors. So either take yourself
off for a walk and your phone or
a camera and start taking some photos
or have a look through some gardening
magazines or have look on Pinterest or
the Internet and see if you can pull off some images
that inspire you there. The last thing you're going
to need is a little bit of ribbon or string or twine, just for your little
gift tags as well. And I think that I've covered everything that we need
there for materials. I'll see you in
the next session.
3. Working with a Colour Chart: What I've done
here is I've taken one sheet of A three paper
from my mixed media pad, and I've just cut it
into four pieces. You know, you don't have
to be as precise as me. You can just do
it with scissors. I did it with my rotary cutter, but that's absolutely fine. And I've cut them down
to A five sizes so that it doesn't feel quite so overwhelming when you're
putting the color on. You know, you're not able to
put it on such a big space. I mean, if you wanted to,
you could even cut it down into A six into half
the size as well. So do whatever you
feel, you know, is less overwhelming in terms
of putting the color on. Then of course, I need to choose what colors
I'm going to use. And this is where
I just love using these little palettes,
these watercolor palettes. And of course, I always like to do a color swatch when
I've got palettes, when I've got new
paints in because you wouldn't imagine that that one there or this one here
would produce these colors. That's number three,
and that's number four. You just wouldn't imagine that's what would come
out of these palettes. So it's always a
really good idea to give yourself a
little color chart. And I have these
pinned up on the wall, so it's really easy
for me to see. You know, I don't have to
keep having a look at them, putting them in my
hand, having a faf. I can just look at them straight in front
of me on the wall. So I'm going to be
using a combination of colors from these
palettes here that will reflect the photographs
that I've taken today that really shows the beauty of what's
happening in nature outside. And, of course, if you just
have an ordinary palette, watercolor palette or
maybe using tubes, then already you can see, even with this section
here, that, you know, I could just use section these colors in
this section here, and that would already mirror the gorgeous colors that I've
been seeing today outside. So whatever watercolors
you're working with, whether it's tubes or a palette or something similar to the
ones that I've got here, then yeah, just go ahead and use whichever colors
reflects the colors that you want to put basically
into your leaves.
4. Painting the 1st Paper: I'm going to be using
this brush here. It's called an oval
wash, but, you know, you don't have to
use this at all. You just really want
a brush that can hold a lot of paint and
that you can get onto the paper fairly quickly because we're really
This isn't about precision. This is about applying color. So what I'm going to
do, first of all, is I've got some water
here in my spray bottle, and I'm just going to
lightly spray this. I'm not going to dampen
it down too much. I'm going to dampen that brush. Wow, bring a bit of tissue there so that if I make a
mess, I can dab it off on it. And I'm going to go in with this palette here
at number three, and I'm going to start off with this gorgeous color
here, first of all. And perhaps I need a
bit more on there. Just take a bit
more of that paint out. Oh, you see, look. Isn't that lovely? Just
get it onto this page. Now, because I'm
using a thick brush, it's picking up a little bit
of the paint from one of the other colors on
the palette as well, and that's fine
because, you know, it's really just
about getting color on that I see in these leaves, and some of the leaves
do have green in them. So let's pick up a bit of that and put some
of that in as well. Now, because I'm not using specifically watercolor paper,
this is buckling a bit. But that's perfectly fine
because once it dries, it'll dry flatter again. So I'm not worrying
about that at all, but I want some really deep. Well, I want a contrast, actually, of, you know, quite deep tones and
slightly lighter as well. Now that's really buckling. I guess I could
have what I could have done is to
have taped it down, which might be a better idea, but we'll just go with it because this is what
I've started doing. And without washing the brush, I'm going to go into that
lovely green color as well and see what
that brings up. Some nice colors there, all very reflecting what's
happening in my garden, excuse me, what's happening
in my garden outside. So let's just clean
that a little bit. Bring in another color. Then we've got these
lovely browns. We've had a bit of
a wash up there. And, you know, it
doesn't matter what kind of pattern you're
really putting on here. You don't well, I'm
saying it doesn't matter. If you can blend it slightly,
then that's helpful. But what I'm saying is you don't really want
to be doing like a stripy pattern or a spotty
pattern at this stage, anyway, because, you know, you really want to keep it
looking fairly blended. I mean, that's not completely blended, but fairly blended. And, of course, when
we put the shapes on top of this paper
to draw around, then we'll pick out, you know, areas where we think
that that would be a good um what am I trying to say? You know, that would
be a good patch, if you like, to want to maybe put on an oak leaf
or something like that. So don't you know, don't be fretting too much about it all blending perfectly. And, you know, what you can
do here at this point is just add a little
bit more water, and that then gives you this absolutely gorgeous,
spotty effect. And, of course, it'll
blend even further. You know, these things
will blend even further. Let's put a little bit
more green down here. And it really is
as simple as that. So what I need to do is to
let that one dry completely. So whilst that one's drying, I will bring in another piece of paper and some
different colours.
5. Painting the 2nd Paper: In this next one, what
I've done here is I've just taped down the
top and the bottom, and I'm using frog
tape, basically, which is a low Tack, as it says, Low Tack painters masking tape. You don't have to
use this. The other one's drying really nicely,
and it's drying flat. But if you prefer to have it so that it's
not moving at all, then I would suggest that
you use something like this. Now, on this one, I'm
going to do a combination of paint wet pin onto dry paper, which I'll then spray
away afterwards. So let's see what effect
we get with that as well. And I'm going to start off
here with this lovely color. Now, because I've loaded quite a bit of water
onto my brush, you can see that that's, you know, quite wet there. That's fine because what
I want to do is I want to start that off like that and then drop other colors
into it because I'd really like it to reflect yeah, some of the leaves that I'm seeing on the
hydranabsh outside. So I'm actually going
to drop a little bit here of very bright
orange into this. Now, as I'm seeing the
leaves on the bush, I'm not trying to replicate
them exactly, by any means. They're just giving me an
idea of colors, basically. Let's put some of
that into there. And bring some of
that around here. So I didn't wet the
paper first on this one. I've just put, you know, a rather wet filled brush. With, you know, filled with water straight onto
the actual paper. And as you can see,
it's pretty effective. Just put a bit of these in here. But then I'm going to get the
spray again and I'm going to spray over it just to
blend these a bit more. Not too much, a little bit. Just keep going.
Don't overthink it. It's really easy to overthink
it, but try not to. And you can see here that that's obviously helped
by taping it down. You know, so that it's
not buckling as much. You don't have to hang onto it in the way that I was
having to do before. Let's get a bit of that
really nice pinking as well. Wow, look at that. That's a bit splendid, isn't it? Drop a bit of that
up there as well. And why not some up here. So, wrong one. You can see, you know, I have no plan as such here other than
to use the colors. Basically, just want
to get the colors in. Now, that's not as blended
as the last one was, but let's see what
happens when we spray it. Lovely. You know, we could even do
a little bit of dripping. I always find it's
a bit easier to kind of drip it just
in one direction. Otherwise, it tends to
look a little bit chaotic. So I'm going to leave that
drip that onto there, I think. Let that go right
down to the bottom. I mean, that's creating
such a lovely effect. Just tip that so that thats right down to the
edge here, there we go. And of course, there's all sorts of things
that you can do to add a bit more texture to it, literally just going
in with things like this edge of a tissue. Because when you look at
the leaves themselves, you can see that they've got so many variations
of texture in them. I want to bring a little
bit more of that. Actually, let's have a bit
of that color up here. That up there is a bit
too yellow for me. And then I'm going to give that some spots with the spray. And that's the second piece
painted. Very simple. Take the tape off,
put it to one side, let it dry, and then
once that's drying, we'll move on to the third one.
6. Painting the 3rd Paper: So I want to get some colors
here that are similar to it's called a
smoke bush outside. And when you see it in
springtime and summertime, its leaves are very purple. But now, as it changes
color in the autumn, which is such a magical process, I know there'll be
a scientific reason as to why leaves
change the color, but I don't want to delve into it because I just
want to enjoy it as an absolutely splendid
display of magic, really. So I'm going to be using this
number here, number five. And again, it's
very similar colors to what you'd find
in a normal palette. Now, obviously, if I was using a smaller
palette like this, I'd probably have to use
a slightly smaller brush. Otherwise, you know, if
I used one this big, it would probably
hit at least two, if not three colors altogether. So if you're using
a smaller palette with smaller pans in it, then obviously reduce
your brush size. But as I am, you
know, using one, that's this size, which is a
much bigger pan in each one, then I can get away
with a big brush. So I think we're
just going to go straight into the colors here. Not going to wet
the brush first. Sorry, I'm not going to
wet the paper first. I'm going to do what I
did with the last one. Load my brush up
with a lot of water. That looks a bit wishy washy, doesn't it? So let's instead. And, you know, you might
put something on it that you're not overly keen
on or you think, well, that looks a bit pale
really compared to these absolutely stunning colors that are showing at
this time of year. So go bold. Change it. Go bolder if you want to. You know, you don't
There's no rules here. Just go with what
you want to go with. Make it psychedelic,
if you like. So as you can see again, I'm just getting the color on, not worrying too much
about where it goes. And what I could do
here as well is when this paper is as wet as this, another way of getting
some nice texture into it is by actually
adding salt to it, and that gives you some
really lovely effects. The only thing with that
is that you have to then brush it all
off afterwards, which is why I'm not using
it in this technique. But that's another thing
that you could do to give you lovely little
sprinkle effects. Which are rather sweet. But I must say, for this
particular project, I'm just very happy to
stick with, you know, using the water spray to create a little
bit of extra texture, get a bit more brown
in there there we're going to get a bit more
depth of color now. And of course, you can mix the colors actually
on the paper itself. I'm not using a palette
to mix colors here. So, look at that now. Look
what's happened there. What I could do here is to create texture like that just
with the edge of the brush. It's very easy to create
a little bit of texture. These are blending
in here nicely. I can go back into
that with those. What I could do here is
actually take water off so I could really
dry off the brush just by doing this on a kitchen pad by the side of it and
actually then take some of that water back off look to create different
kind of textures. So you can see how easy it is just to create something
a little bit different. And when we put the
shapes on top of these, they'll look stunning, actually, when you start seeing them as
a leaf. It's so effective. So please, please, please
don't overthink this. See what this color
looks like on it. And now, I've got some of that lovely orange
in there as well. And that's okay, too. I don't
want any white showing, though, because I don't have
any white on the leaves. So I really do want
white showing. Now, what happens if I just go in and do some little dots? So it's not that I've got
paint on the brush there, I've just got water on the tips, and you can see there that that creates its own
little effect as well. So with this one, I might
not even bother spraying it. We might just leave
this one as it is. Sometimes the
leaves do get a bit spotty as they turn
towards winter. So I'm not trying to create a specifically spotty pattern, but I'm using that to create a little bit
more texture there. So this is looking, again,
really quite interesting. So what are we going to
do over this bit here, let's have a look? I'm going to actually put
the water on here first. Just spread that over.
Get rid of those sharper edges a little bit and
drop the color into these. I'm sort of doing
a dotting effect, a continuous dotting effect with the brush sort of up and down on the page, if
that makes sense. Hope it does. And I want to alternate that a
little bit with the pink. So you can see it
already, you know, I've used a few different
techniques here up to now, with these different
pages, different papers. So just experiment and have
a little bit of fun with it. Don't be taking
it too seriously. Whatever you do actually
will look fabulous once you've got the shapes cut out. So I know I always say
this in all my classes. Just allow yourself to play. That's looking a bit pale
in that section there. So let's just give that
a wee bit more paint, a bit more texture, and I'm going to leave
that one as it is. I might just take
a little bit of that excess paint off down that edge. I'm not
even pressing. I'm just laying on and
tacking straight off. And that in itself has created a really
nice texture there, L. Just do that down the edge. Doesn't really matter
so much about your edge just because you'll end up. Obviously, leaves don't
have sharp edges, so you won't end up with any of the edges of your paper anyway. But you can always
keep them and use them for other collage projects. And there we have the
third one painted as well. So that can go to one side with the others and dry
whilst I then go on to the last piece of paper and decide what colors I'm
going to put in that one.
7. Painting the 4th Paper: So these are the three
that I've already done, and they're all drying nicely. That was the first one that
I did that wasn't taped up. And you can see it's dried,
you know, quite flat. These obviously will dry flat as well because
they were taped down. So I've got a lot of oranges
and purples going on, and I've got a little bit of this gorgeous yellowoca and lovely sort of burnt
browny color there. So I'd like to get a little bit more of this kind of coloring. So I'm going to bring in some more greens and some
more browns on this one. And again, starting with I'm quite liking not using
wet paper, but adding, you know, putting enough
water onto the brush so that when I'm actually
loading the paint onto it, it starts off quite pale,
I guess, you would say. So let's get a bit of green onto here because as you can see, as you've seen from, you know,
the other demonstrations, that even just
getting some color on to start with and then
dropping other color into it transforms it into a
different look altogether. So let's get this green on here. And put this bit of
this brown in as well. That's rather lovely. In
fact, I think actually, what would be rather nice is to drop some of that
looks a bit like yellow ochre from this palette
here into there as well. That's lovely look.
And, you know, it gives a very different
feel to it, doesn't it? But I do want to
make sure that I've got some nice brownie
ones going on as well. Browns can be really rich. And, of course, once we end up, adding the details on top
of the leaves, for example, maybe with a gold
pen or something, then that transforms those
leaf shapes even further. Just getting these colors in the background is the
main thing to start with. That's nice. That's really nice. And then we start the next
bit of this lovely process. You can see how fast
I'm doing this. I'm really, really not
overthinking this at all. Like a little bit. That greens I'd like some of
the green to stay, but I also want a slightly
duller green, as well. So I'll pop a bit
of that in there. And then I'm just going
to spray that with the bottle to see
what effect we get. Now, you'll probably notice that as I've been
going on there, I've got faster and faster. I'd like that to go into
there a little bit more. I'm going to spray that over
as it were to encourage it. I don't want to do a
drip effect on this one, but I do want to encourage that to just merge into
there a little bit. There we go. That's paper number four done. So what I will do
is I will let those completely dry and then bring you back into camera when we're ready to
do the next stage, which is, of course,
using the little cutouts to draw around and
create some leaf shapes.
8. Drawing & Cutting Out the Leaves: Here are my four finished
watercolor papers, and I'm really pleased with
how they've all turned out. The paints that I use leave
quite a matte finish on it, so there's no glossiness
to it or anything, which is really useful
because then I like to add the gold pen or a
combination of the gold and the white pen to give it
some detail afterwards. And doing that onto a very flat matte surface
is much easier, and it really makes
the pen stand out. And, you know, in
certain lights, it's quite shimmery,
as you can see. I've done that
detail just by using a white posca pen and
a gold posca pen. As I said earlier,
the size is one. So there's a couple of ways of getting the shapes
onto the paper now. And what I've got here is one of the leaf resources
from the previous class, the Stylised Botanicals class. So I've put you the link to that class underneath
projects and resources, and you can download
this if you want to if you'd rather
work from this. And this is where I've just
taken that larger sheet, and I've cut up some of the
leaves into smaller pieces. Now, one of the ways
in which we can do this is with a knife
and a cutting mat, we can just cut around that
shape quite carefully. You don't have to
bother about the stem because you can add that later. But it's good to be able to get the actual shape of the
leaf as cleanly as you can, as neatly as you can. And I'll show you why in just a moment when
I've cut that out, so as we did in the
Stylised Botanicals class, we created both a
stencil and a mask. And the nice thing about using a stencil type is that
you can then put it. I mean, just look
at that to give already to give a beautiful
leaf coming out of that. In fact, that's so nice. I'm going to draw that
in already because, I mean, I just sort of did that at random there, but
that's really lovely. So what I'm going to do now
is draw around the inside of that shape like this. And that then gives me the shape of where I want
to cut that leaf out. Now, another way of doing it is you'll you'll need at
least an HB pencil for this. So I could take another
leaf, for example, and what I can do here
because I printed these out onto just a very
thin copy paper, I can see through
the back of them. So I don't even need
to use tracing paper. I can just use that directly. So let's take that up
there, for example. And what I'm going to
do is I'm going to draw around the back of that, just like we did in the
Stylised Botanicals class, it's exactly the same procedure. Now, I could do that. And then I'm going
to turn that over. And because I've got the
pencil line on the back of it, then when I then go over the top of the
outline of this leaf, then it will leave me
an image underneath, which I can then bring
up again in pencil. Now, that actually
hasn't worked very well. I can just see it. You
probably can't I can just see it enough to be
able to trace around that. So using a softer pencil such as a tube would
probably be easier. So that way, then, I've got another leaf
shape there as well. You can, of course, just
go in free hand if you're quite confident about doing that and just draw some
leaf shapes like this. Now, it's quite easy to
draw smaller leaf shapes, you know, in a simple, you know, that kind of shape. I've got some here,
some smaller ones. I've cut out some
smaller ones here look so it's quite
easy to just draw them by hand because it's
quite a simple shape to do. And having a few of
these, you know, smaller leaves, make
them a bit fatter, a bit wider if you want to. Having a few of
these smaller leaves just helps to fill in any kind of gaps or spaces that you
might want to fill in. And as you can see
with this card here, I've also done it
with berries as well. So again, you can free hand
draw those if you want to. So I would probably, you know, do that maybe in the purple. Maybe some in the pinks, different sizes, slightly
different sizes. And then, obviously, cut those out with a
pair of scissors. So it's entirely up to you how you want to get
your leaf shapes. If you're quite happy
to do it freehand, then just go straight onto your paper that you've painted. If you want to you know, download the resource
of the leaf shapes on here and then cut them out, then do that as well. I would avoid shapes like
this because they're a bit complex to then cut out. So, stick to kind of slightly more solid
looking shapes leaves. And of course, within those resources of the
last class as well, there are also flower seeds, flower heads, seed heads,
that kind of thing. But because I wanted to really
get the effective autumn, I just wanted to
create something that was like, you
know, falling leaves. So I've stuck to leaves,
but obviously you can use whatever I'm going to use a combination of both stencils and tracing method
for doing mine. So I'll cut three
stencils out here. There's another
one. I'm going to cut a fourth one out. Excuse me. Now, these two leaves
are very similar. That one's slightly more
complex, as you can see. So I'm going to
go with a simpler one for cutting out
with the knife, and I'm going to
start it here and just if you're not that used
to working with a knife, take it to each
corner as it were, and then twist it
around so you're moving the paper
rather than the knife. I'm going around a little
bit of a curve there. Taking that up to
that corner there. Well, not corner of the
point, I should say. Let to move out a bit
further over there. You know, if you're not confident with doing
this, don't do it. Just either use the
tracing method, or you could even cut it out
with a pair of scissors, or, as I said earlier, just have a doing it freehand. It's not about being perfect. We're not trying to
recreate the exact thing. We're just, you know, again, it's a stylized version
of lovely autumn leaves, and maybe some seed heads, if that's the way you want
to go with it as well. I like creating my
own little stencils like this because, you know, I can use them time
and time again, which is really useful. And I can also use the
masks for other pieces, you know, other works as well. So there we've got that
one as well, look. So if I take so that's, you know, reminiscent
of a maple leaf. So if I look at that there,
that's just so nice. And, you know, you've got
this little bit here, which you often get in leaves. So that's perfect. I've swapped over my pencil now, in fact, for a five B pencil, which is much, much softer. So I'll be able to trace a lot easier with this and
see the outline. On the back of it with this softer pencil than I
did with that HB pencil. Now, again, you know, don't try to be too perfect if it doesn't quite go to exactly
the same shape as it does. You know, in your
stencil, it's fine. That's perfectly adequate, and I shall cut that
out, obviously. So let's do another one
with this method now. So again, using
the five B pencil, I'm going to draw
around the edge of it. All the way around. Do you
remember doing this as a kid? Did you ever get to
do this as a kid? I used to love doing this as a child tracing
things like this. And then again, sort
of have a look at where you might
want to put that. I'm going to put
that just there. And then I'm going to
get the other pencil, which was a harder pencil because that'll give
me a harder point. And let's just see if
that works better. I'm going over the
back of it again now. As you can see, I've already
used this leaf shape. It's already got pencil
lines on it because I've used it on the other
things that I did, on the other card that I did. Keep it firmly in place. And that is better. It's still quite faint, but actually it's enough for
me to see it and be able to draw around the outline there and know where I'm
cutting out my shapes. So it's useful for you with each piece of your
paper to, you know, do a few shapes on
each in different, you know, as in different
styles of leaf. And then you've
got a choice then as to what you want
to put on your card, your bookmark, your gift tags, or maybe you'd like to do a little picture
with it instead. You can do whatever
you like with it. So I'm going to
cut a few of these out or get a few of them
on ready to cut out. And then we'll start
to look at how we're going to arrange our little
composition on things. O.
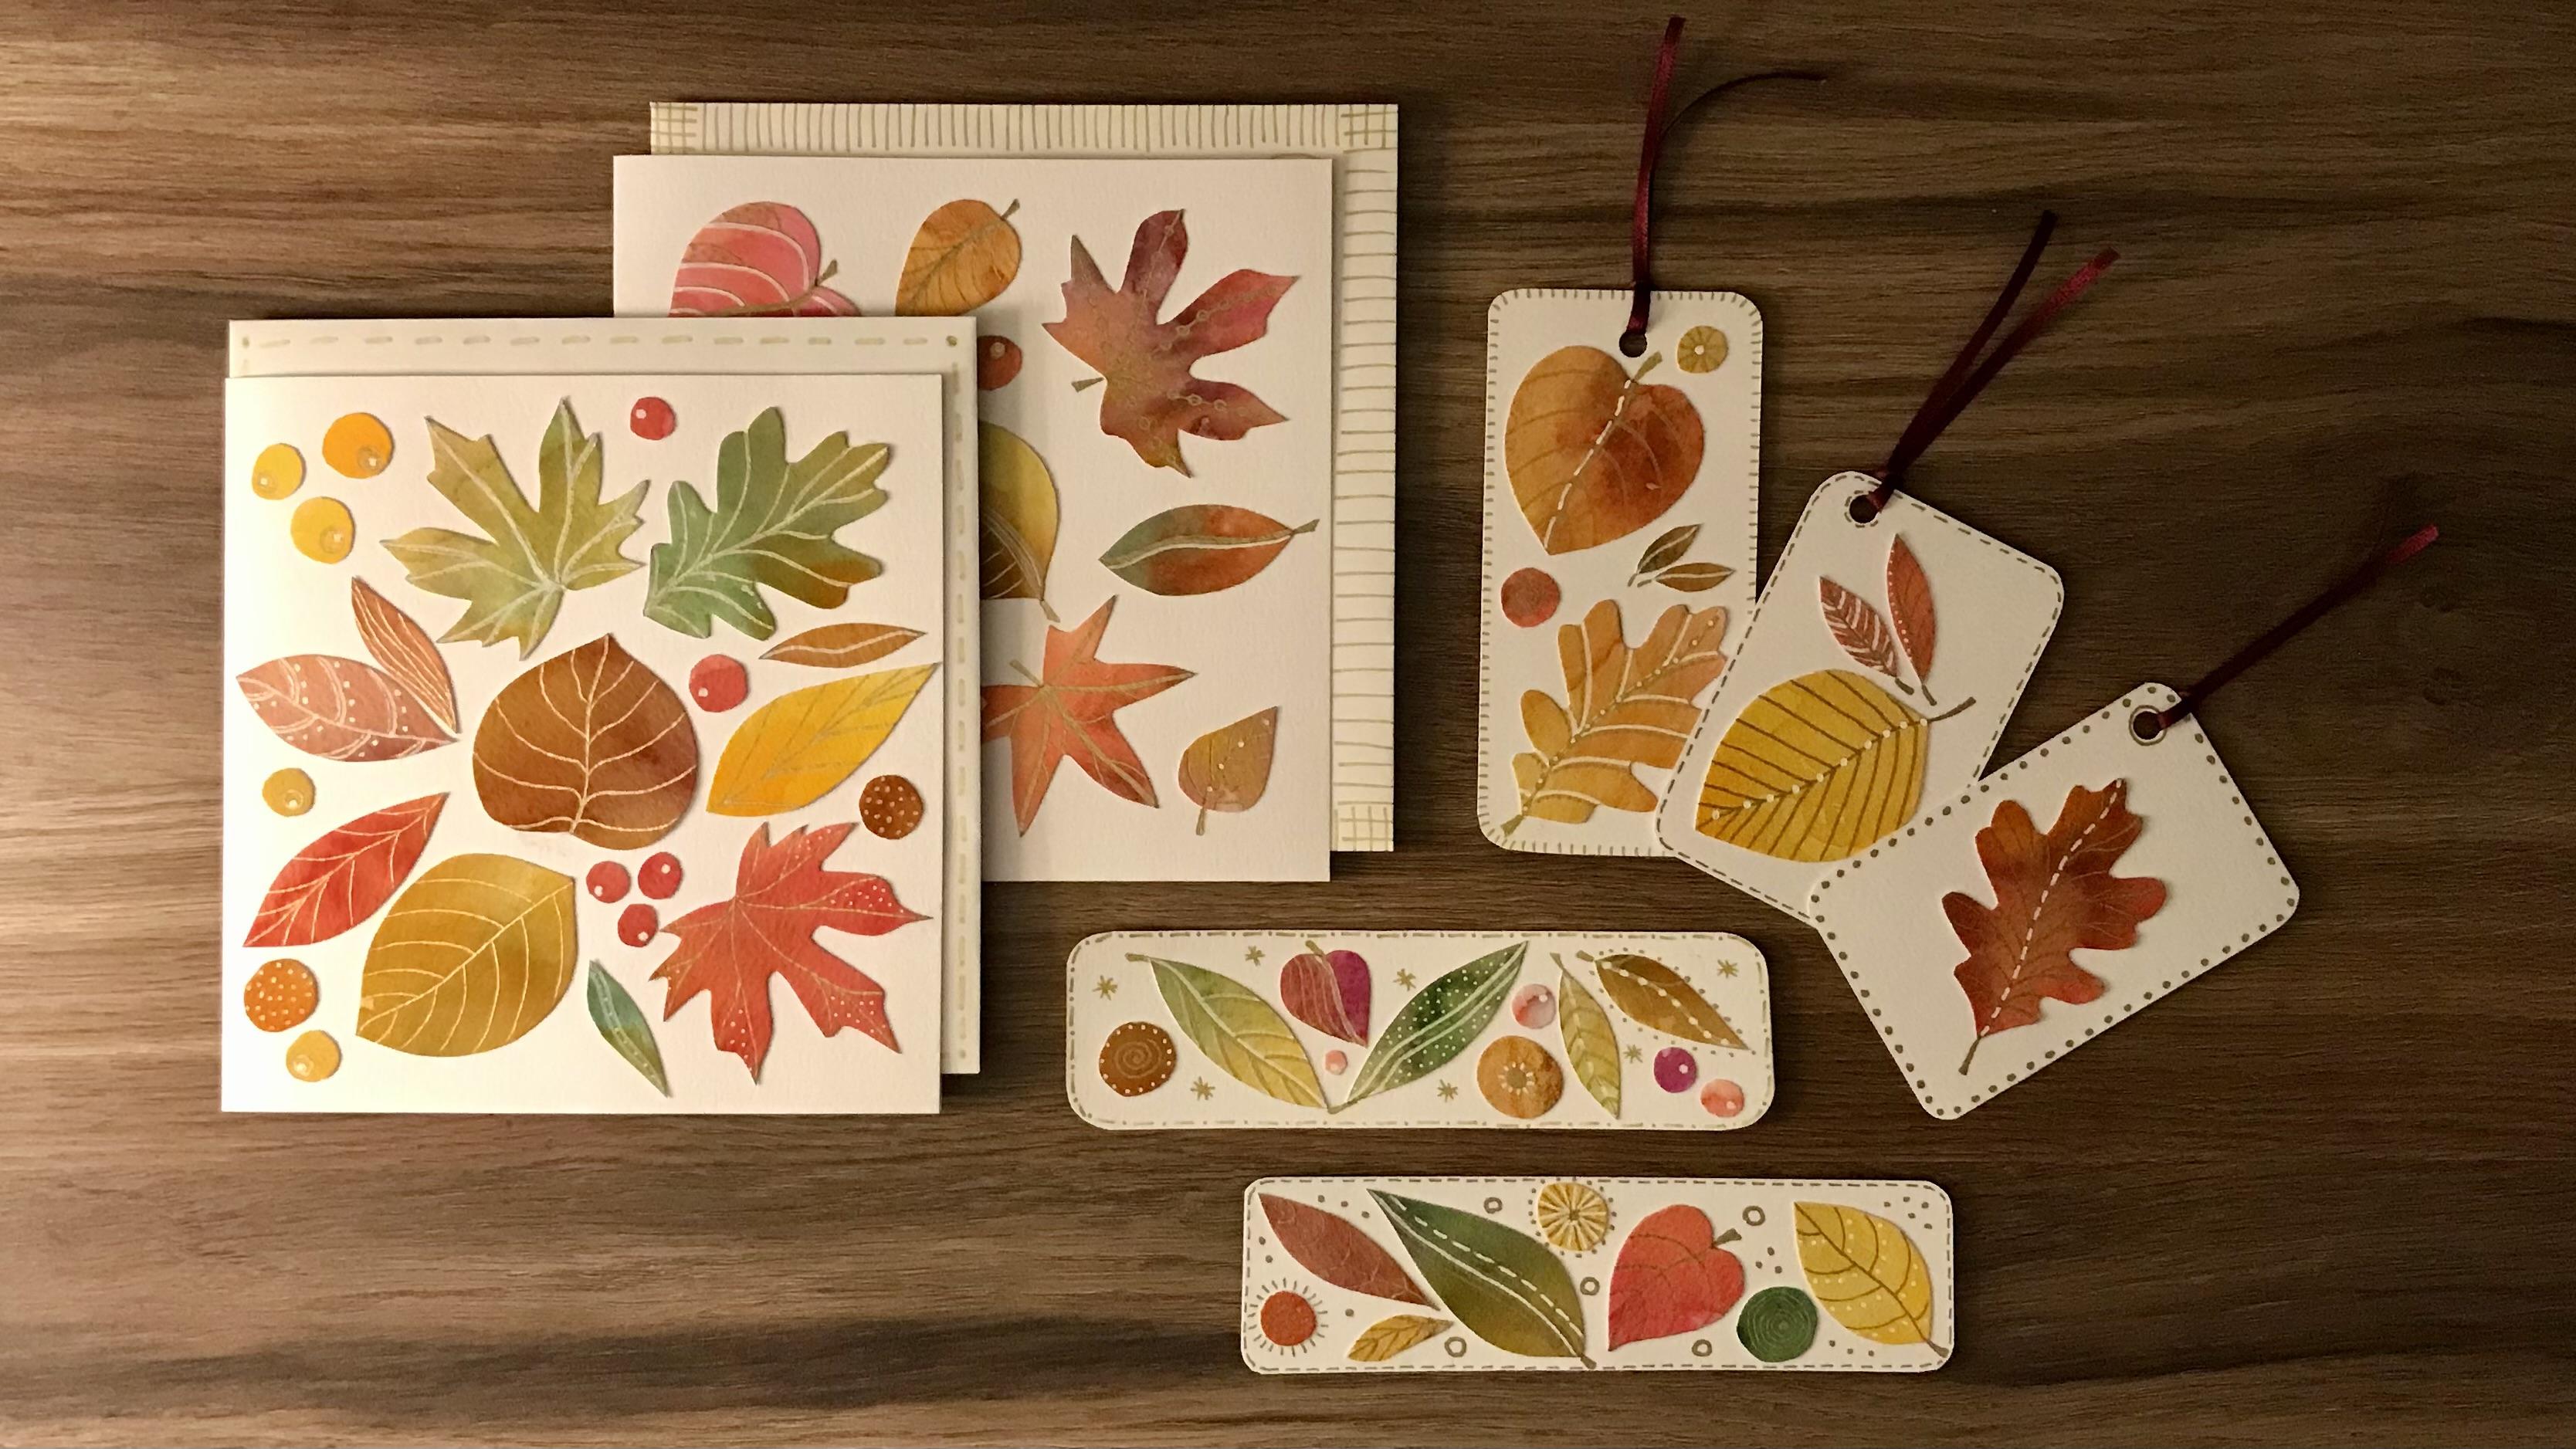
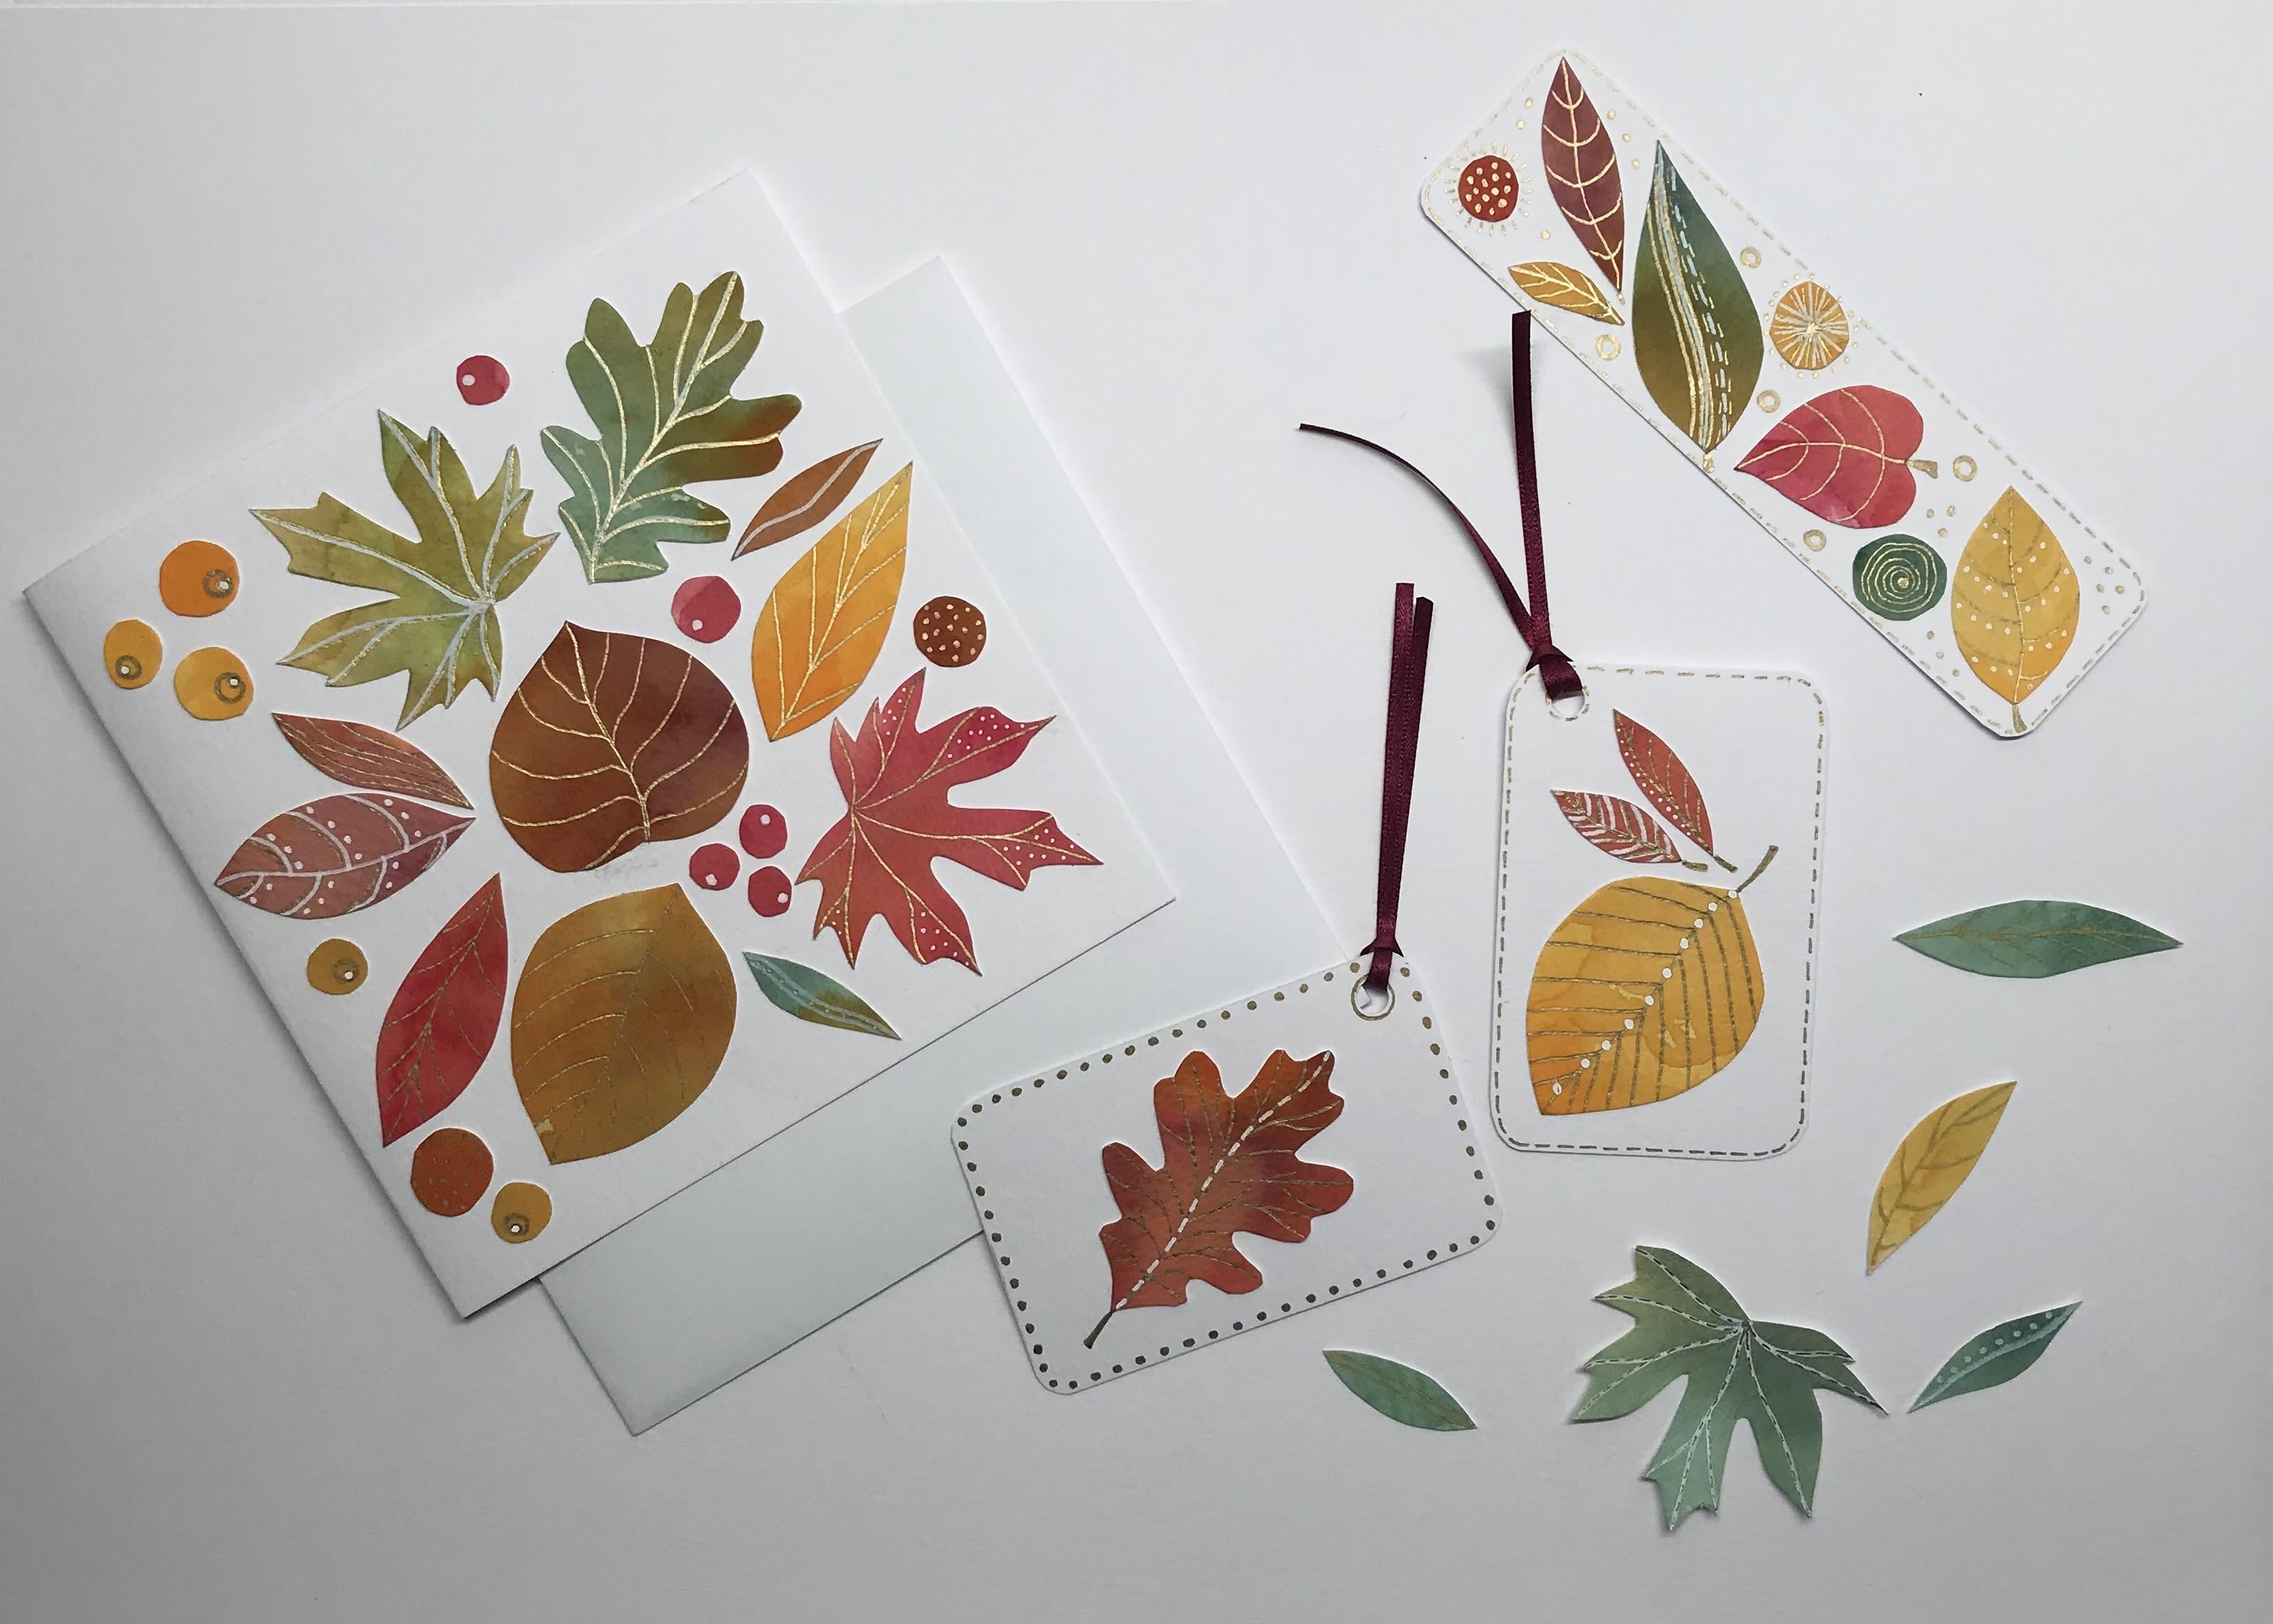
9. Composition : Here now are my pieces
that I've cut out. I've used something from every
piece of paper that I did. Some of them, as you can see, I cut out with the sharp knife. Other bits, I just cut round the edges
of it with a pair of scissors and then
went into it with more detail with the scissors. So whichever way you
feel comfortable in getting your shapes cut
out, you go with that. I've got paper here, which is exactly the same paper
as I've been painting on, and all I did here was to cut out the edge of one of
the sheets in my pad. It's the same size
as this card here. And then I had a couple of spare pieces of paper
from the same pad. So that one's going
to be the gift tag, slightly different size and shape to that one,
but that's okay. And that one's going
to be the bookmark. And you can see here that I've rounded the corners
off a little bit, because I always think
it looks a bit better. So I've had a play with
a kind of composition, and I really like
that one there. I really like this one here. I've put a little hole in
the top with, you know, a simple hole punch ready to thread a little bit
of ribbon through. And I think I quite like that
composition just as it is. I don't think I want
to add anything else, but you just don't know
until you have a little play around that also looks nice. Or I could have just maybe
put a little leaf in there, just something tiny, a
couple of leaves, perhaps. Let's have a look. You know, that also looks
quite sweet as well. And I like that. I've kept that a bit
simpler than this one. I've just used similar
shape leaves in there, mainly because
everything that I cut out I've used apart
from these pieces here. So I just thought
I'd do that slightly different to this one, you know, less choice of shapes. So I'm going to get those
glued onto the card, the gift tag and the bookmark. And then we'll start looking
at what kind of mark making. Now, I prefer to do my mark
making once it's glued down. But if you would prefer to do, your decorative additions, if you would prefer
to do those before you glue them down,
that's absolutely fine. The advantage of doing it that way is that if you
make a mistake, it's not glued down and
you haven't spilt it all. But I like to do it because, well, maybe you can see
with this one here. For example, you know, I've drawn a line down
here and then I've carried it through to
make it the stork. And obviously, I'm quite
confident about doing things, you know, directly onto it. So, again, it's entirely your choice
as to what you prefer. So I'll get these glued
on and then see you in the next session
where we look at what kind of decorations
I'm going to do.
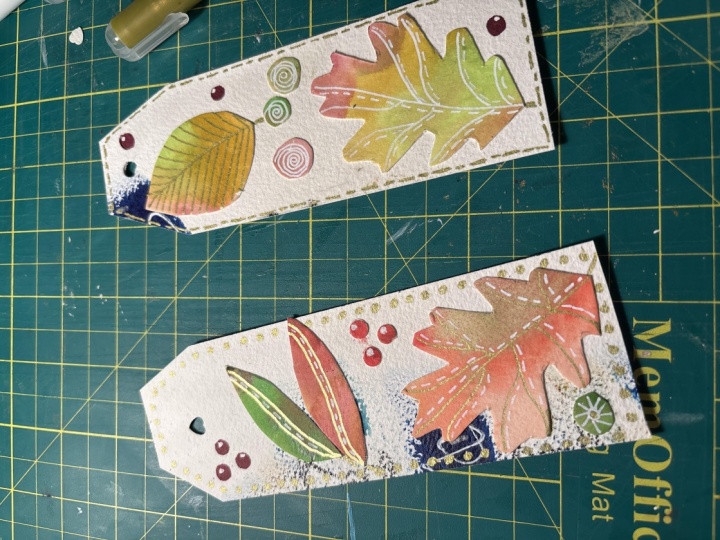
10. Decorating the Bookmark: That's all three of
them now glued down. I just used a Pritt stick. What sometimes happens when you use a Pritt
stick is, you know, you put the glue all the
way around the edge, and then the glue goes over
the edge a little bit. So what I like to
do is to just get a tissue and just wipe
around the edge of it so that it doesn't
then spread out onto your piece that
you're working on. But obviously, you
can use any glue, you can use mod podge or PVA glue, whatever
you like, really. I just find it convenient to have a glue stick, basically. So I've taken a photograph
of these, as well, now that they're all glued on, just to remind myself, actually, of what it looked like before
I put the decorations on. I mean, when I look
at this leaf here, you know, that really
could be a real leaf. It's so gorgeous, the way
that's just come into it there, and that was the first one,
of course, that I cut out. You know, I just think
they're so lovely, which is why I love
this technique of just getting the paint
onto the paper, not worrying too
much about what kind of pattern it's creating, you know, allowing it
to have texture in it. And then, as you can see, once you've cut them out, they just look really, really lovely. I'm going to put those
to one side for a minute and start with the bookmark. And here I'm bringing in my trusty gold posca pen
and my white posca pen. And I'm going to start
off with actually, I'm going to start off
with the white Now, if we just have a
look for a moment at what I've done
there in comparison, you know, I've kept it
pretty simple really. And I think because
we don't want to lose all the lovely textures and different tonal qualities that are going on with the paint, you don't want to be putting
too much decoration over it. Otherwise, yeah,
you just lose it. So I'm going to keep
it quite simple. But I'm going to start
off with the white. Now, this is a new
pen. There we go. That's okay. Just
get rid of that bit. And basically, I'm
just going to flow up with a bit of a curve. Now, I might have to go over that white
again, which is fine. Yet, you can see that it's not just quite
coming through properly. So you might need to
do it a couple of times once it's dried,
let's try that again. This is the challenge with these paint pens that you don't want them to
end up blobbing. So if you're not that confident about doing it actually
on your bookmark, then decorate your leaves
before you glue them down. I'm going to do them all
with white to start with. And then I will
follow through with the gold pen and give a little bit more
detail with the gold pen. Now, do make sure that
each mark that you make is dry before you then put
another mark on top of it. Let's give that one. A line down there as well. And with the little ferries, what works really
well, actually, is to just give them a
little little dot of white which makes them look
a little bit more three d. I'll leave those two for
the minute because I might do some kind of spiral
or something on them. I'm just going to go back over
that with the white again. And back over that one
with the white again. Leave that to one
side. Now, what I've also tried to do when
I've glued these down is to make sure that I've got a little bit of space
around the edge because I like to just
decorate the edge and it kind of gives it that
little bit of a border. So whilst those bits are drying, I'm going to use the gold pen. And I'm just
carefully going to go around the edge of
the bookmark with a little sort of dot
and a dash on this one. No this one here, I'm going to give
it a little spiral, but not all the way around, just so that we get keep some of that lovely rich
brown showing as well. And with this leaf here, what I'm going to
do is I'm going to draw next to the white line, not on top of it,
but next to it, which sort of gives it a
little bit of a shadow. And then I'm going to
give it some veins, make it look more leaf shape, and the same on the other side. Let's bring that
white pen back in. And I'm going to go underneath those veins with the white and that just
highlights it nicely. So you can see it
starting to, you know, transform from a very
flat looking leaf shape into slightly more Rudy. Now I see this bit here, I'm going to add some
little dots around there. Because I can. There we go. And on this here, I'm just going to add
one or two little lines, marks coming out
of that one there. And so it is that you, you know, just decide what marks
you want to make really. We'll do a couple
of lines on there. And then I might do some dots going down the middle
in the gold pen. So it's not even
as if you have to, you know, make the leaves
with veins in them all. You can just add pattern
to decorate it basically. So let's see what
that's going to look like with some little
dots down the middle. Yeah, that's probably
enough on that one. I do that one more
time across there just to make that
gold a bit stronger. It stands out a little bit more. And that's one of the
tricks with the paint pens. Go over it a second
time if you need to. I'm going to give this
one a little tail on it. I bring that down actually on top of the white
in this case. So I'm just really making
this up as I'm going along, deciding how I want
to decorate them. Let's give that a
little tail now. Calling it a tail.
It's a stem, really. Now, as I didn't finish
that one in gold there, I won't bother giving that one. Well, actually, maybe I will. Let's just bring that gold
down there and make it look a bit more intentional.
There we go. Maybe I change those dots
into Dashers instead. I'll finish doing this, and then I'll also have
a go at decorating the gift tag as well
and bring you back in when I've done those
so that you can see the kind of marks
that I've made.
11. Finished Designs: Here's the bookmark and
the gift tag finished. I've just done the same kind
of mark making on both. I've given the gift tag a little decoration
around the edge, and I've also done it around
the back edge as well, because obviously that's
where you would write, who the gift was for. So that needs to
look nice, as well. And to attach the actual ribbon, basically, I've just
folded it in half. Made a loop at the top, and then fed that loop through the upper portion
of the gift tag, put the two ends through, and that creates quite a
nice neat little knot there. So I'm going to do exactly
the same on the card. I'm just going to
treat it exactly the same with the same
kind of marks. If I look at this one here, then, again, you can see that I've treated it
really quite simply. This is quite hard
for me, you know, because those of you that
know me and have done, quite a few of them classes now, you'll know how much
I love to put pattern on things, particularly dots. So this has been
quite a lesson in minimal pattern making
for me, really, which is quite interesting and, you know, a lot of
fun. It's great. Here's the second
card complete now. Now, it's interesting for me because as I
mentioned earlier, you know, I do love
color, I do love pattern. And I do love dots. But I've really tried to
keep this one more minimal. In fact, I've hardly used any
white really on this one. And what I've tried to
do instead is just vary the thickness of the lines so that that's how it
adds a bit of contrast. On this card here, I've
actually got 23 elements to it. On this one, I've only got 12, and yet, I think it
looks really pretty. I think they both
look great and just, you know, very different. At the same time, which sounds a bit of a
contradiction in terms, but I'm sure you
understand what I mean. I do love the way that
I've managed to keep these different colors within the leaves without overwhelming
them with too much marks, with too many marks, but still being able
to add some decoration on top just to lift it. And you can see the color play and how that all works together. So I also decorated the envelope that this card
will then go in so that's, you know, all in all, a really nice little
gift set there. Send somebody a card. If
you're giving them a book, there's the bookmark
to go in it, and there's the little gift tag to go in it once
you've wrapped it. And you can see how
the whole thing just links together
really nicely.
12. Bye for Now: I really hope you've
enjoyed this class. It's a lovely way to
bring nature indoors. And of course, you
can change the colors and the shapes of
the leaves and, you know, use the
same techniques for any season
throughout the year. I'd love to see what
you've created. So if you'd like to leave me a project and upload it,
that would be lovely. And then I can see
all your lovely work. And if you'd like to
also leave a review, if you've really
enjoyed the class, that would be really
useful, as well. Until I see you again, do take care of everyone.
Lots of love.
 Dawn Cawthra, Artist, Designer, Holistic Educator