Transcripts
1. Introduction: Hello and welcome to my studio. In this course,
we're going to learn how to make a
handmade portfolio. If you are an Artist,
Illustrator, Printmaker, Photographer,
Calligrapher with you purely love Bookbinding
and Box Making. This course is for you. My name is ido Agassi
and I'm a Book Artist. I combine the Crafts of
flips, press printing, Bookbinding, and Box Making to create my Art in
the form of a book. I have been making
books and boxes for 30 years and I would love to
share my knowledge with you. I want to teach you how to make a Portfolio special and unique. Your outward will stand out. There are many types of portfolios in different
shapes and styles. We're going to make one
with the cloth spine. Three flaps. Can we are going to close
it with an elastic band? We will start with the
tools and Materials we would need and how to
cut them into size. From there, we will cover
the Portfolio starting with the cloth spine,
then with paper. I will also teach you how
to make beautiful corners, how to make flaps and connect
them to your Portfolio. This class will take you step by step with clear explanations
and detailed shots to give you a better view
on the binding process and help you create your
own special portfolio. Through the years, I made
many portfolio for artists, exhibitions, our
school submissions. You can make it as a gift or an elegant way to
store your Art. Actually, I'm not sure
you need a reason to make one just for
the joy of making. I'm sure you will find
what to put inside. So are you ready?
Let's start working.
2. Tools and Materials: Hello, and thank you for
joining this course. I'm really excited to
start teaching you. I want us to start going through the tools and materials that we would need
for the lessons. I'll put a great board on the table that would
be a nice background. And we will start
with the long ruler. Imagine size ruler
and a small ruler. You can manage with one. But these are, the rulers
are using this course, a triangular ruler for making
The Corners, a cutting mat. I really recommend that thread scissors or
regular scissors. A small craft knife, a 30 degree blade. A big craft knife for
cutting the boards, a bone folder, a needle. I use it for marking. Two pins. A chisel
around 1 cm wide. If you're having
trouble finding one. I will also show you how
to improvise with the flat headed
screwdriver at pencil, PVA or white glue, whatever works for you. Stopper. It could be brass weights, marble, a piece of woodblock. The important thing is for
it to be heavy enough, sits flat on the table and
have a 90-degree angle. A spacer constructed from
two Bookbinding board. So it would be around
half a centimeter. A small glue brush number 12, which is two centimeter wide or three-quarters
of an inch. A big blue brush number 18, which is around 38 mm or one and a quarter
inch in diameter. Moving on to the materials, a piece of Bookbinding cloth, 70 on 35 cm, a sheet of paper for
covering the board, 35 on 40 cm. Strips of wastepaper for
Gluing, Bookbinding Boards, 52.40 cm, three sheets of A4
paper for lining the inside. Thin double-sided
tape, just a small piece and the 1 cm
wide elastic band. So these are all the tools and materials that you would
need for this course. I also added a file in
the Class Resources. So go ahead and check there. There's a list of all
the tools, materials, everything converted into
inches, Templates, Layouts. So go ahead and check there. And that's it for this lesson. And I'll see you
in the next one.
3. Portfolio - Parts and Measurements: Welcome back. There are many
ways to make a Portfolio. I want to teach you one
that holds A4 paper. Widely used
Measurements, I'm sure you and your home printer
are familiar with. Let's go briefly
through the parts of the portfolio before we
start cutting on material. The portfolio is
constructed from Bookbinding board
with paper and cloth. We have the front Back Cover. We have a strip of cloth that connects them together
with the spine. And we have three flaps, one for top and bottom, and one for the fourier edge that helps secure
your work inside. Also, in this portfolio, I designed an elastic band to hold it close because I
find it much easier to use. As an overall rule, the desired Measurements
are the size of your work plus 4
mm on three sides. So if we are working
with A4 paper and adding 4 mm on three sides, we get to the number of 30.5 cm on 21 point for about the
thickness of the portfolio. That depends what you're
going to put inside. But the rule is the
thickness of your work. The two inner flaps
are going to be the thickness of your work
plus one board thickness. The forage side would
be the thickness of your work plus two
boards thickness. And the spine of the entire
portfolio is going to be the thickness of your work
plus three thicknesses. By the way, if you prefer
to work in inches, you can work with a
letter size paper. And now we'll add a PDF file
with all the measurements converted into inches
in our Class Resources. So that's it for this lesson. In the next one, we're going
to start cutting home. See you there?
4. Cutting Materials Into Size: Welcome back. Let's start
cutting Materials Into Size. Who will start with
the Bookbinding board? First of all, we want to make sure that the Bookbinding board is in the right drain direction
parallel to the spine. What's the grain direction? Every material, if it's
Bookbinding board or paper, cloth, has a grain direction and we need it
parallel to the spine. So if I will take this
Bookbinding board and try to fold it, this side would be
much easier to fall. Then this one, we
can clearly see, this is our grain direction and we need it
parallel to the spine. I really recommend you to go and see my bookbinding
Beginners Class. In lesson number three, I given elaborate explanation about paper grain direction. And it's very
important for you to understand before
we start working. Let me take a pencil and
mark the grain direction. So after we cut the
material into small pieces, we will still remember what's the grain direction
because when it's smaller, it's much more difficult
to understand. Let me take a stopper, a ruler, and a needle, and we will
start by measuring 21.4. Let me mark one mark. And second mark. Put the ruler between
these two dots. I'll take my craft knife, hold the ruler firmly and cut. Now, when you cut board, don't try and push the
knife strongly and cut because it usually takes four to five times to cut
the Bookbinding board. And if you press very firmly, sometimes the ruler
can move and you'll have a line that
is not straight. So what I recommend you to
do is do one light cut, a path for the
other cuts to come. A pioneer. So you do a light cut
and then you go deeper. 1234. And the board is cut. Let me measure the length. Soil mark, 30.51 mark. And the second mark. If you're wondering what
I'm holding in my hand. This is a needle just connected to something that
could help me hold it. I'll take my ruler, hold it firmly between
the two dots I just made. Take my knife. And again, first light cut
and then go deeper. 1234. We have the first board. Let's take the second one
and Measure 21.4. 21.4. Ruler between the dots. First light cut and
then go deeper. And the short side, 30.5. 30.5, I want to show you can
also mark with a pencil. Why do I mark with a needle? Because sometimes the
pencil is not sharp and the dot can move half a
millimeter or a millimeter. When you use a needle, it would be always the
same thickness and you have the point
exactly in its place. After you've finished. Let's make sure both boards
are the same length. It looks great. Moving
on to The Spine. Spine, supposed to be
one-and-a-half centimeter. So my point I have here And here, don't try to cut like this because
your ruler can slip. I'll flip it over. Put the ruler on
the bigger board so it won't move
between the dots. And cut one. And then go deeper. Make sure you hold
the ruler firmly. All we have to do now
is cut the spine, the length of the board. You can measure it
with two points, but I'll show you a trick. Can take the board. Put a stopper, put one
here. Take your ruler. Cut. So we have the front
and back cover with the right green
direction and the spine. Let's move on to
cutting the cloth. For making the portfolio, we would need two
strips of cloth, one for the Outside, one for the inside. The length of the cloth
is going to be 34.5, which is the length of the Bookbinding board with
2 cm on top and bottom, about the width, it's
going to be 11 cm. And I want to show you
how I got to 11 cm. I'll take the Bookbinding board and I'll put it here
for you to understand. You have 4 cm on
the first board, then we have a gap of
half a centimeter. The spine, which is one-and-a-half
centimeters, another gap. And then we have the second
board with a 4 cm overlap. It all adds up to 11 cm in. Why am I telling you
this and not just saying cut 11 cm with that is because I want you to
understand the method behind calculating so you can
apply to different formats. I'll take my long ruler
and a pencil mark, 11 cm. Cut. The length is going to be 34.5. Mark it here. Hold a ruler and cut. The industry is going
to be 7 cm wide. That would help cover inner
spine and go over the boards. I'll hold the ruler
between the marks and cut. The length of the inner
strip is going to be 29.5, holding a ruler and cut. So we have all the parts
for our portfolio. We have to Boards, spine and outer strip and
in a strip about the Flaps. Who will do that in
a different lesson. So that's it for this lesson. And I will see you
in the next one.
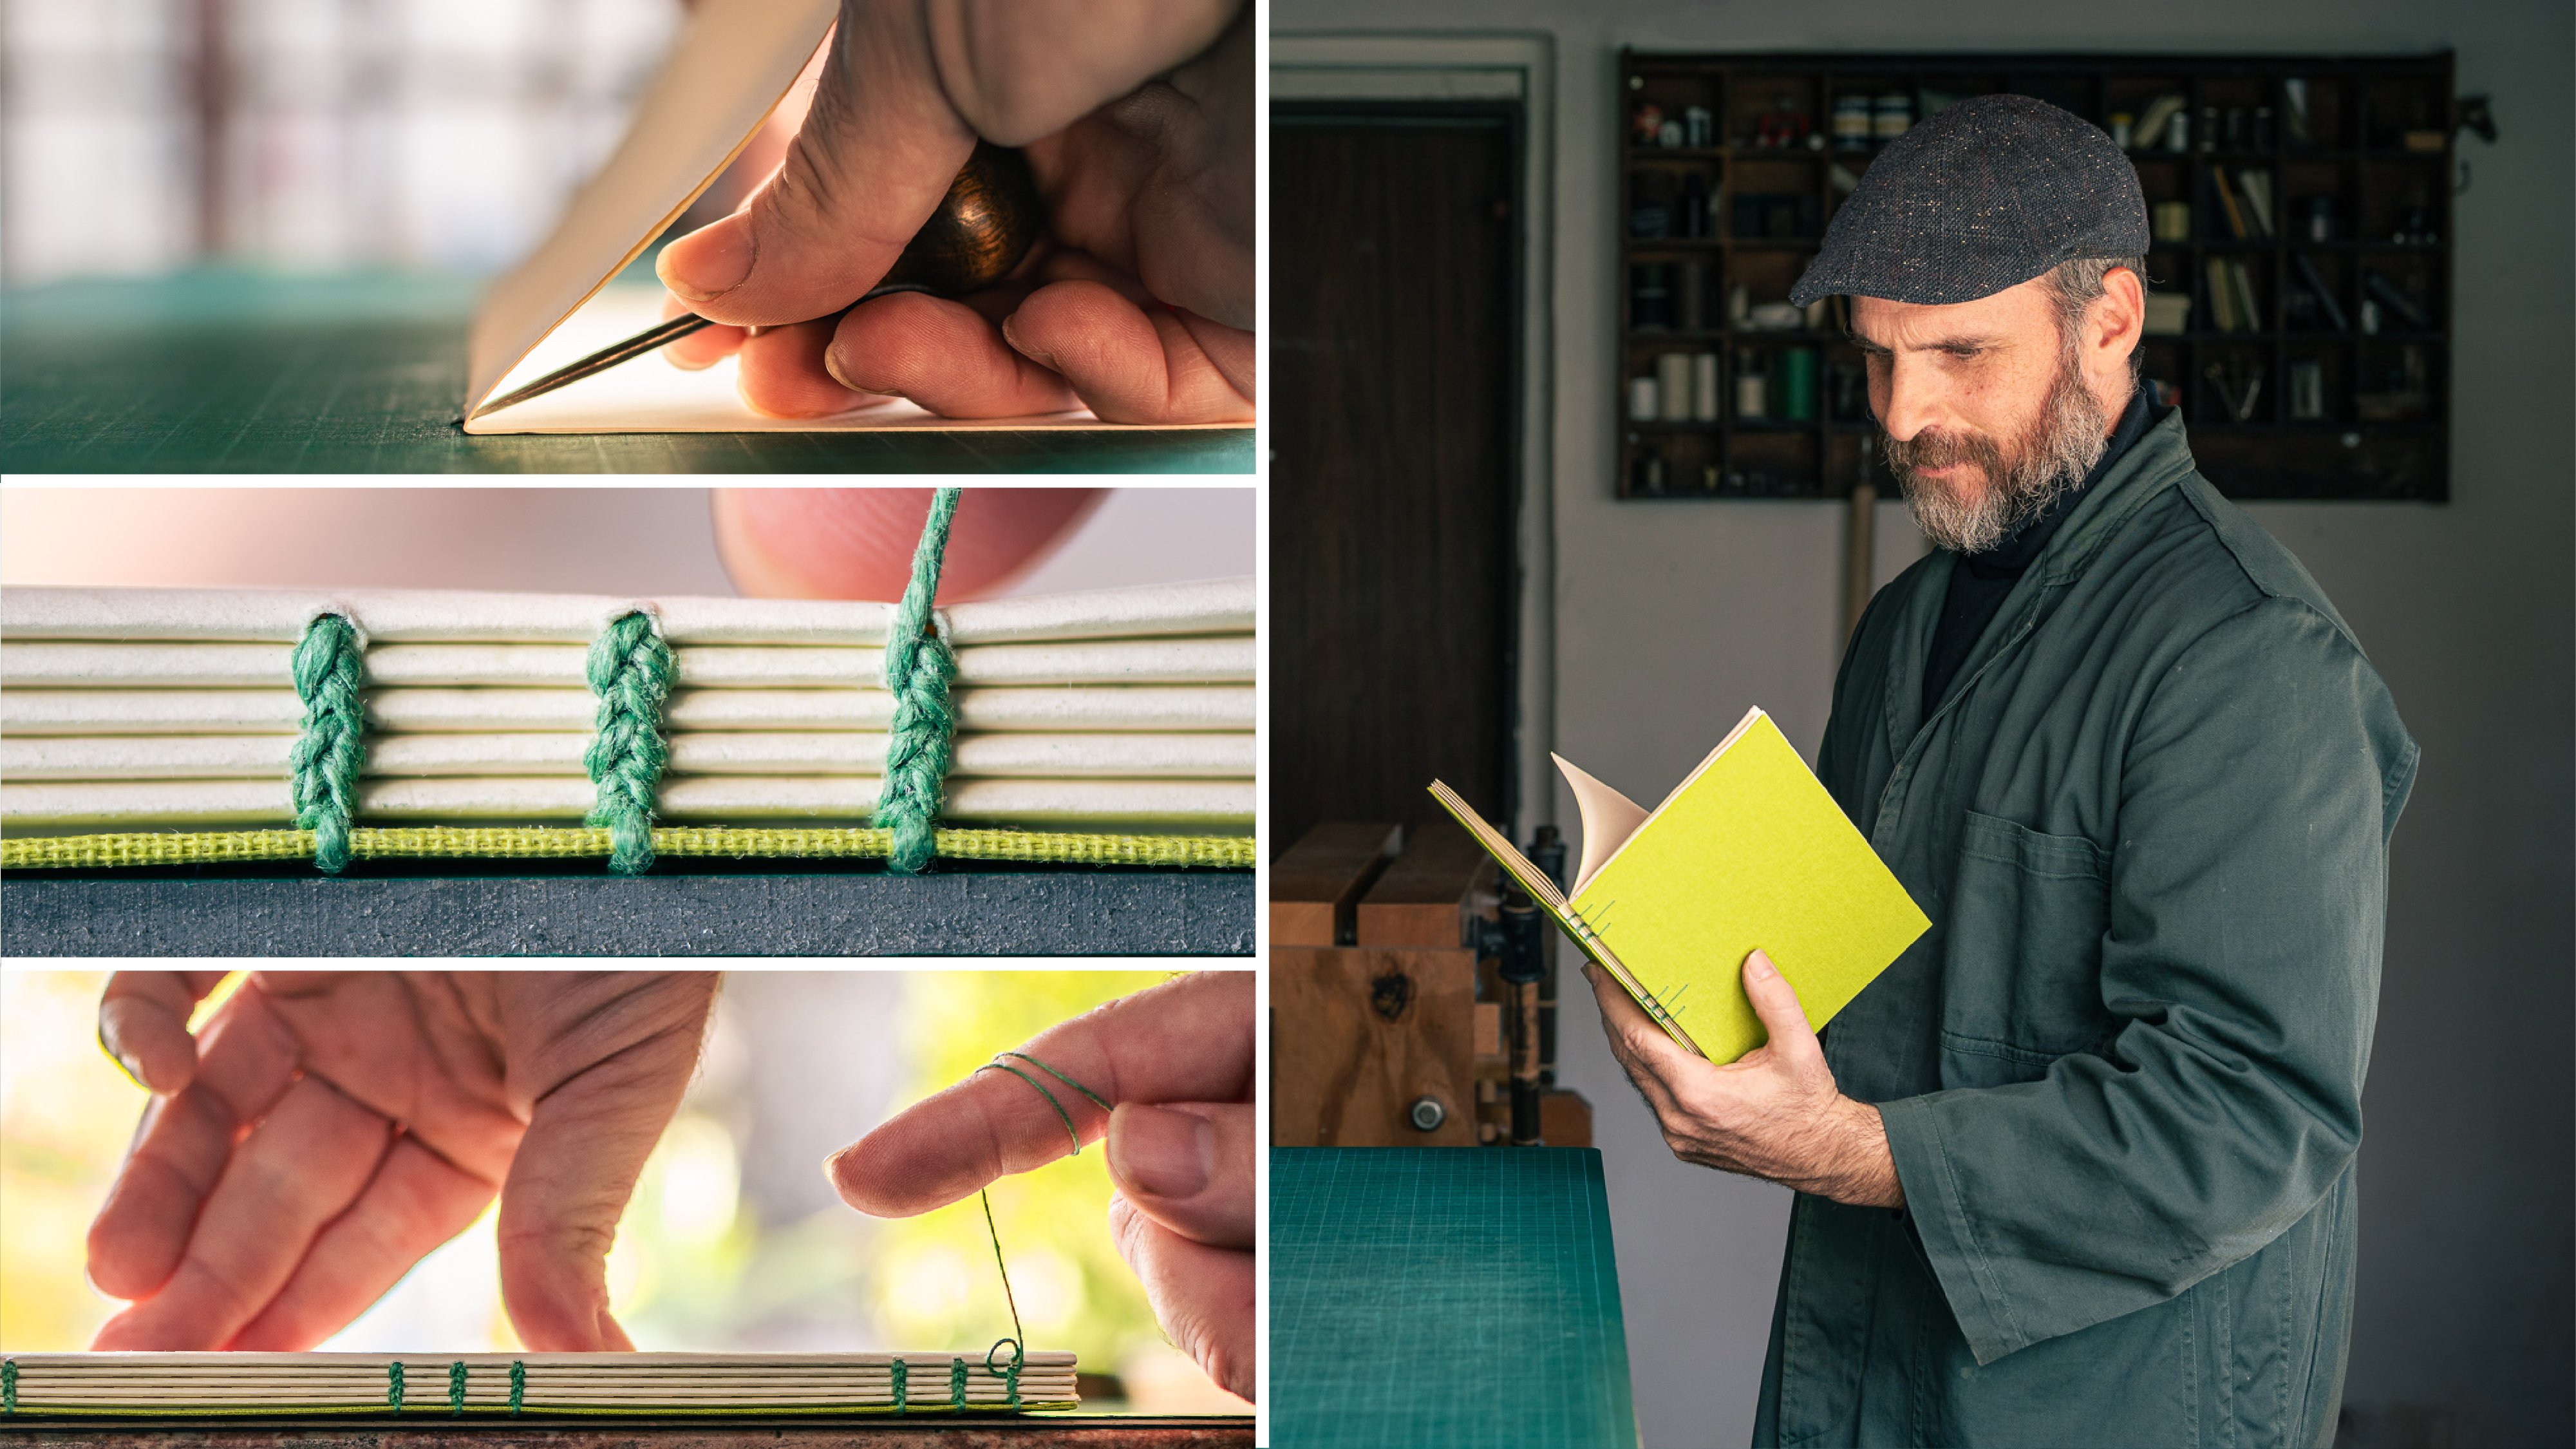
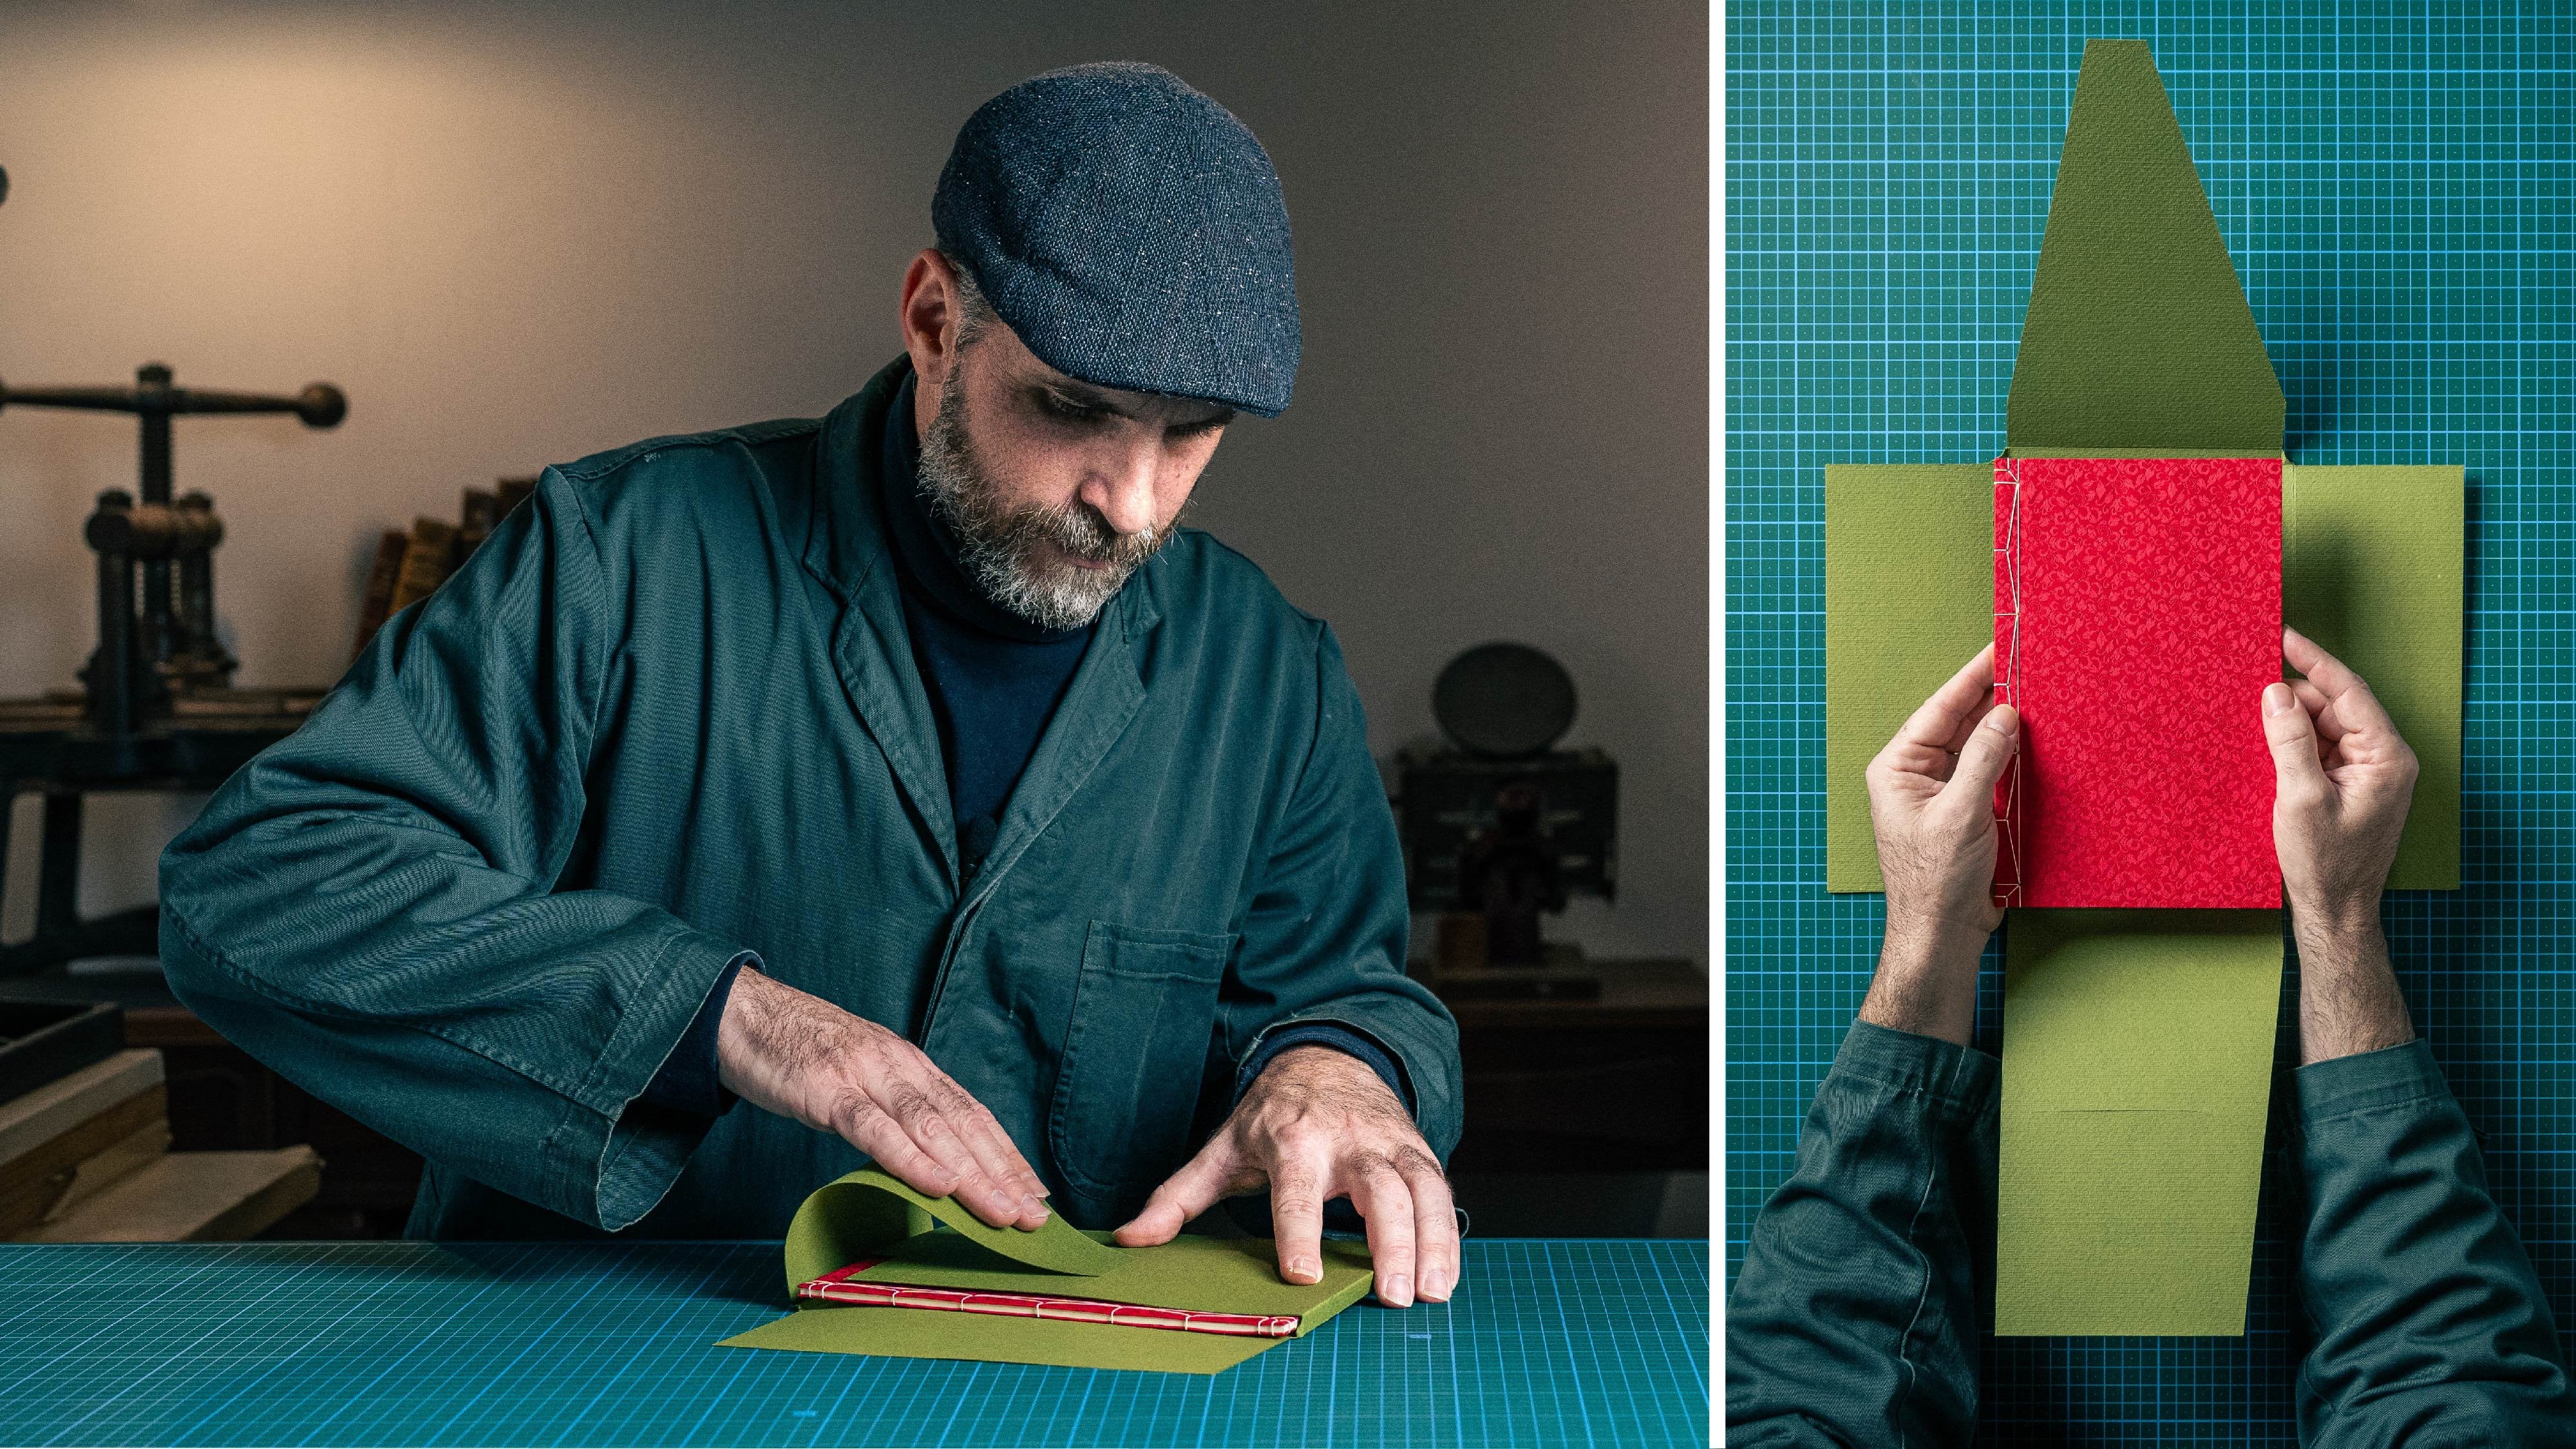
5. Gluing The Spine: Welcome back. A couple of words about
Gluing before we begin. When gluing or
pasting to a surface, always aim to glue the
thicker material first. Why is that? You remember we talked about grain direction. When the material is damp, it moves, it expands, and the thinner the material, the bigger it will expand. So for your easy work, always aim to glue the
thicker material first, and we will do that
in our lessons. So let's start Binding
our portfolio. Let's start by taking
the Bookbinding board, a ruler on a pencil. Mark, four centimeter from
the edge of the board. Let's mark a straight
line between those dots. Great. Now let's take our cloth. The outer side, which
is the bigger side. And I will mark 2
cm from the edge. I'll take my bone folder, n-fold until the pencil mark. This fold will help
us later locate the cloth exactly into
place. This aside. Now what I'm going to do
is take a piece of paper, put one underneath the board, and one on top of
the board, exactly. Until the pencil line. I'll bring my glue brush and put the glue from the paper to the board and
not the other way. So no glue will go
underneath the line. Take the wastepaper out, put it aside, Make sure
not to use it again. Now, let's take the
piece of cloth, bring it to the fold
and to the pencil mark. First with your hand, then with bone folder. Now, let's flip this over. Take your pencil and mark
half a centimeter here. Half a centimeter here. Take the ruler, Make a line. Can other option. He's to glue two pieces of
Bookbinding board together. And that would give you two, both thicknesses, which is supposed to be
half a centimeter. So I'll use this. This is much more easy
for me to work with. Let's glue the spine. I'm doing it from the
middle towards Outside. Around half of it. Flip it over the other side. Now I'm Making sure
the spine goes towards the spacer and to the line of
the pencil off the weight. Take it outside, Making
sure it doesn't move. Flip it over. Let's mark the
second board. 4 cm. Now what I'm going to do is put the weight here for
my straight line. Put the gap here, measuring until the mark. And then I will
cut it into size. Will take another piece of
wastepaper and put underneath. And one exactly on the
line and glue the board. Remember from the paper
towards the board. So no glue will go
underneath your paper. Take the waste paper out. And also this one. Now we're going
to take my board, bring it to the straight line on the upper side
and to the gap. Take it outside Flip it over. Now, what we have
left to do is connect the turbulence will
take another piece of wastepaper put
underneath in blue. Axis of cloth, points out
of the Bookbinding board. Take the waste paper out. Grant edge with a bone folder, grid completely, then
go inside the gaps. Ship it over. Take another piece
of wastepaper, put underneath. This side. Also. Wastepaper out. Lift it and
work with the bone folder. Go inside the gaps. You can let the
binding move a bit. Moving on to the
inside of the spine. We have the smaller,
the inner peace. What I want you to do is
look on the upper side and the lower side and
located evenly. And I wanted to show
you a nice trick. Take two needles. And mark. After you see everything is Parallel up and
down, right and left. And put one needle here. And one needle here. The needle is mocking, not Connecting this piece. What we're going to do is
glue the spine and glue this and then bring it
to these two marks. But before we do that, let me mark 2 cm with a pencil. So I'll know more or
less where I want to glue to reach two sides. Great. So and take the brush and work with the
thicker material. First. Try do it until the
line, but no worries. If you go a bit over it. Everything would be
concealed afterwards. I'm going inside the gaps also. Second side. And make sure you work
Just until the Cloth, not on the cloth. Okay. Now I'll take a
piece of wastepaper and I'm going to glue
only the edge of the cloth over here and edge here. Now look how easy
it is to bring with cloth until these two needles. I'm going to glue the center, the spine first, and then go
inside the gap in one side. And go inside the gap
the other side also. After that will coincide. And the second thank you guys. Work with a bone folder
between the gaps. See everything is glued. That's it for this lesson. We have The Spine ready, the Outside and the inside. Let me clear out here and
prepare for our next lesson. We're going to learn how to
cover the rest of the board. Who paper. I'll see you there
6. Covering The Boards: Welcome back. So we've finished making the spine
of the portfolio, and now it's time to
cover with paper. You can use decorative paper, marbled paper, pace
paper, whatever you want. Just make sure that the grain direction is
parallel to the spine. What we're going to do is
cover one side with paper. The other side
we're going to Make cloth corners and then
Cover with paper. And we'll do that
in the next lesson. The reason I'm teaching
you both methods is because I want you to
decide whatever you want. You can do it. Paper
corners or cloth corners. So let's start by taking paper. This is the right
side, this black. But I really loved this. Matt Gray and I'm going to actually work on the
other side of the paper. Let's start by measuring
34 and-a-half centimeters. One mark. Marks cut. And we want 20 cm here. And here. Take my knife and cut. Last thing I want to
do here is Mark two lines of 2 cm from the edge, the top side, and
on the other side. Let me put this aside and
let's take our portfolio. Mark with a needle 18th
centimeters from the edge. Supposed to be around half
a centimeter overlap. Now I want to show you a
trick. I'll put this here. Can take my ruler
and put it until the two marks and let the ruler
stick out to centimeters. Let's put a piece of weight on it and move it aside a bit. And let's make some preparations
before we start gluing. I'll take the paper
and put for wastepaper underneath this with paper to put underneath the
Bookbinding boards. Just up until the cloth. Okay, let me put a piece
of weight on this one. Great. Now let's take the brush. My 20-year-old brush. Remember we talked about, first of all, gluing
the thicker surface. So that's what
we're going to do. I'm going to put glue on the board just until
the cloth line. Not on the cloth. Okay. And when I'm gluing,
I'm blowing from the inside out to
the wastepaper. Even mount. If you have something on
it, you can clean it. Now. I'll take the
wastepaper out. And now let me take
the small brush. I'm going to glue
only a thin line until the pencil
mark we did earlier. Just the edge. It's nice to hear the
birds wastepaper out. Now we're going to
take the paper, bring it to the edge, the two centimeter edge we made earlier and until
the ruler line. So you have a
straight line here. And this, this is
going to be parallel. Let's move the ruler. Take our bone folder. Make sure everything
is connected. This aside. Let's flip the Cover over. And now we are
working The Corners. I'll take my small ruler and
a pencil and put the ruler between the corner of the Bookbinding board and
the corner of the paper. And mark half a centimeter. Then I'll take my
triangular ruler, hold it when the
inner triangle is straight with the
Bookbinding board and bring it toward my mark and mark a 45-degree angle
with the pencil Let's do it here also. Corner to corner,
half a centimeter. Take my triangular ruler. Made sure the inner
base is straight. With the Bookbinding board. Move it toward my mark
and mark 45 degrees. Now I'll take the ruler
and a knife on cut 1.2. Let's make the turn ins. I'm going to turn this one in
the lower side, upper side. And then the forage will take wastepaper and put underneath, glue the edge of the paper
from the inside out. Take the wastepaper out, take my bone folder, and slowly work my
way inside the cover. Now I'll make the
corner, I'll take it. I'll take my bone
folder and take the axis material inside
the corner like this. Let's flip it over.
Takeaways paper underneath. From the inside out. Make sure not to stain the
cloth until the corner here. Not a lot of glue. Just an even amount. Take the wastepaper
out with the thumb. Moving towards inside. Make sure it's connected
to the edge of the board. And then work the corner with bone folder folder and move
it towards the fore edge. Let's do four size wastepaper. Some glue until the corner. The next corner. Wastepaper out. Don't forget. Make sure there's no air between the boards
and the paper. Make sure you have nice
connected corners. And that's it for this lesson. One side is covered. In the next lesson, we are going to
Make cloth corners and then cover them.
See you there?
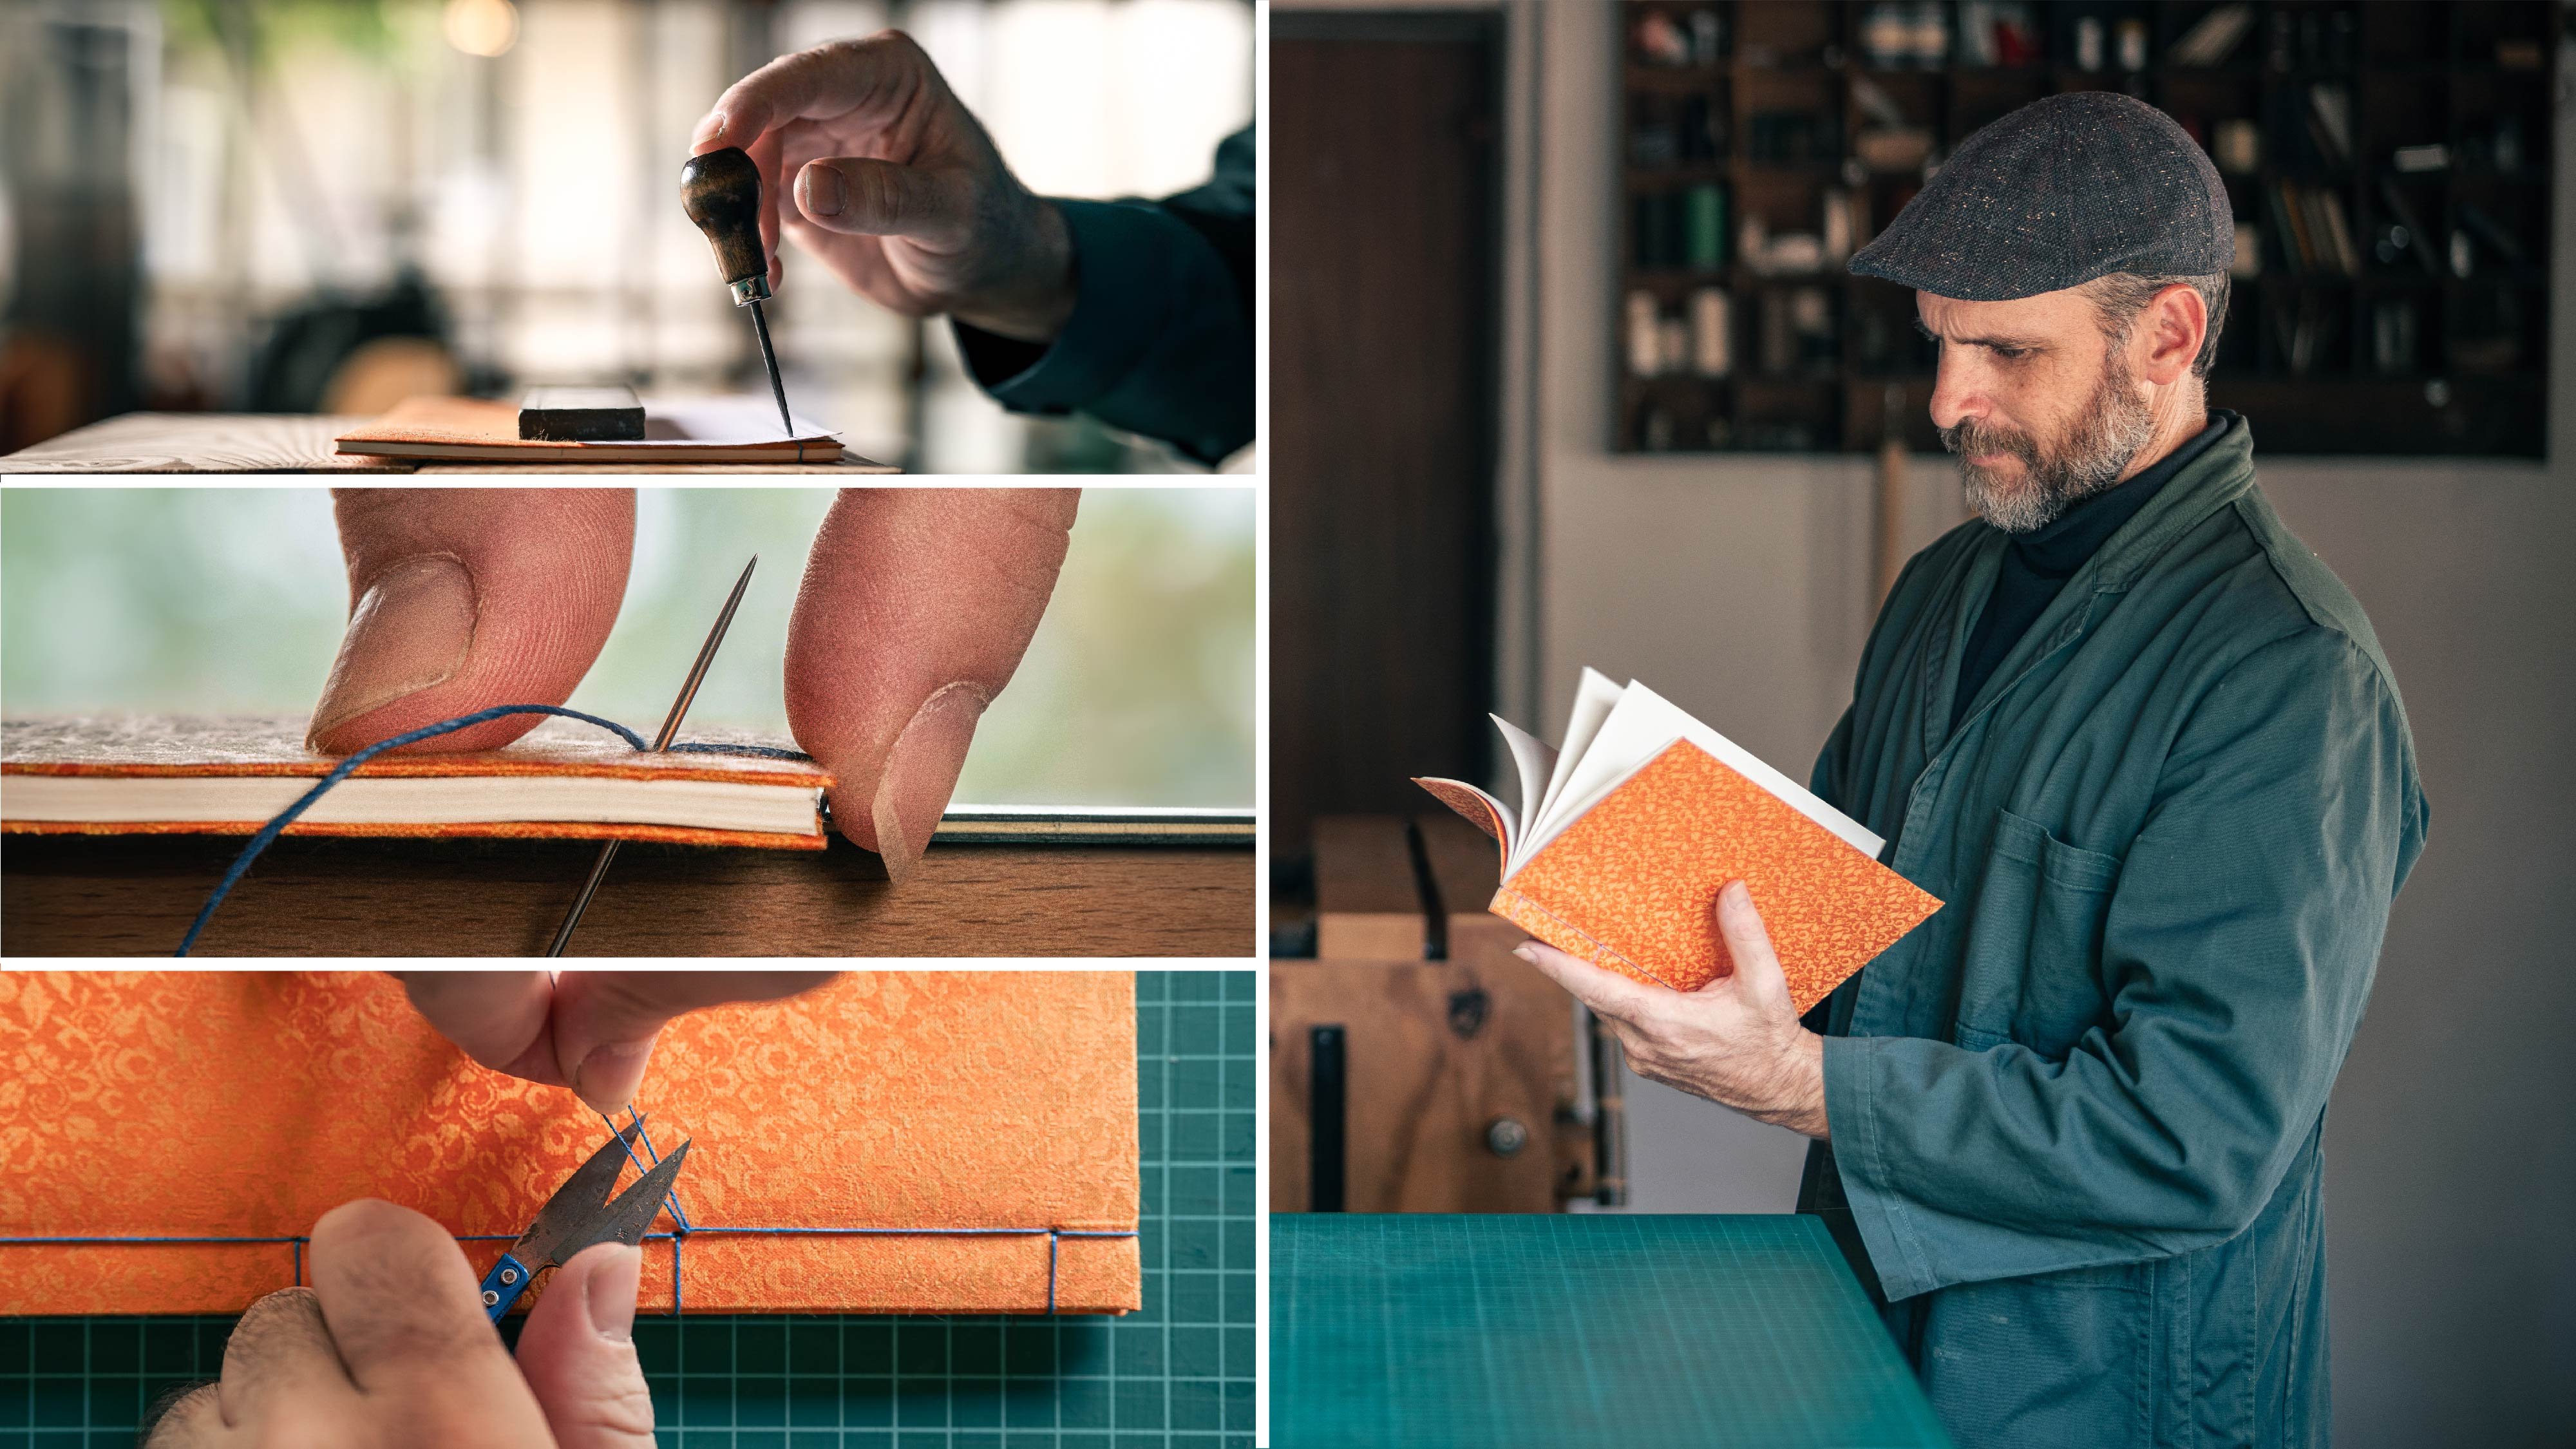
7. Adding Cloth Corners: Welcome back. In this lesson, I want to teach you how
to make cloth corners. Cloth corners are aesthetic
but also practical. They are much more durable
than paper and protects the corners of our
portfolio for our book. In other cases,
the overall rule, this is to make the size
of your Corners equal to the size of your strip of
cloth that comes to The Spine. But in our case, I want to make it a little
bit smaller because I wanted to close
with an elastic band. I will make it a little
bit smaller and the strip of band will make it more
pleasing to the eye. And proportional.
How do we start? Will take a pencil and
ruler and mark 4 cm from the corner towards for edge and one from the corner
to the top side. Now, between these two marks, I'll make a straight line. This is one side. Let's
do it to the other side. 4 cm, 4 cm. And make the line
between these two marks. Okay, let's put this aside
and bring a piece of cloth. We want to cut eight
centimeter square. So let me Measure H centimeters. Measure here also 8 cm. And cut. And I'm going to take corner to corner, make two triangles. Now. Take my ruler and
the small ruler and mark line into 2 cm and make
a fold with a bone folder. Let's do one. 2 cm mark with pencil and folds
with manslaughter. This false will
help us afterwards, connected to the corner. And let's take our portfolio. Will take the wastepaper and
put underneath one on top. Thank you. Cool brush. Include the corner.
Takeaways, pick it out. Bring the triangle to the line of the Bookbinding
board and the pencil line. And work with a bone folder. Let's do the other side. Stick another piece
of wastepaper. One of the leaf on top. Glue that edge until the line. Take the wastepaper out. Take your corner, bring it to the line of the pencil and the line of the
Bookbinding board. If you are off by a
bit, don't worry, we are going to cover it
afterwards with paper. But we are aiming for a
nice straight corner. We're always aiming
for the best, right? That's it. I'm flipping it over. Now it's time to make the cut. The 45 degrees. I'll take my pencil and
the small ruler and put corner to corner and
Mark half a centimeter. Now, I'll take My triangle ruler, see, the inner triangle base is trade and move it
toward my mark. And mark with the pencil. Let's do it here also. Corner to corner. Mark, half centimeter. Take my triangle ruler and bring it towards the mark,
mark with the pencil. Now I'll take my small ruler
and a knife and cut one. And to bring another
piece of wastepaper. Want to glue first the short
side and then the long side. So I'll take my glue brush
and glue the short side. Take the wastepaper out, take my bone folder and Connect. Work the corner. It's actually like we did
in the previous class. Around wastepaper underneath. Put some glue on the
short side. Paper out. Bring it with bone folder inside the Cuban folder
and work the corner. Now we have left to
do the forage side. I'll glue them both
the same time. 1.2. Take the wastepaper out. Take your bone folder. Since slowly drifted and Connect. I love making corners. Look. We have to Corners ready? That's it for this lesson. In the next lesson we'll
learn how to cover them with paper and cut in an angle so the corners would be
revealed. I'll see you there.
8. Covering The Corners: Welcome back. After finishing
our beautiful corners, it's time to cover the
Outside with paper. Let me take a piece of paper. I cut it to the size
of 34.5 on 20 cm, like we did on the first
side of the portfolio. So what we are going to do is mark 2 cm on three edges. So this is one side, 2 cm over here to centimeters on the forage. Great. Now let's put
the portfolio with the Outside up and take
the backside of the paper. This is the side that we're
going to see the backside of the paper and put it underneath. I want you to put it between the pencil
mark we just made. Put weight on it. Make sure that if you measure the paper, you get to 18 cm. That's correct here. That's correct here. Great. Now, let's take our triangular
ruler and a small ruler. And I want you to measure from the edge three-and-a-half
centimeters. Take your pencil
and mark a line. Let's do it. On the
left side also. Bring your ruler to
the small ruler. And when they touch
on the corner, three-and-a-half centimeters,
you make a mark. Let's do it on this side also. Pretty good seats,
three-and-a-half, exactly. Three-and-a-half. And Mark
and let's do it here. So bring it three-and-a-half
centimeters. That's about right. And mark lines. Okay. Let's take the weight out. Move the portfolio
out of the picture. And I'll take the small ruler, hold it between the
45-degree marks and cut 1.2. Let's take our Portfolio. A stopper, ruler and the needle. And we will mark 18 cm. Again here. 18 cm. Smoother to do it like this. Now, I'm going to
take my long ruler, put between these two marks. And as I showed you, Let's bring it out 2 cm. I'll take a piece of wastepaper and put underneath
the portfolio. Now, what we're
going to do is take the paper, paste The Corners. And this line that
goes with the spine. And the rest of the
glue is going to be on the surface of the portfolio, will bring it to the line of the ruler and see it
goes exactly 2 cm. And then the two corners
would be parallel. I think this is the
most important part in this course that
you need to be exact, because if you go half a
centimeter left or right, The Corners with actually
won't be the same size. That is why we marked the 2 cm, and that is why this ruler is pointing
to centimeter Outside. So when you bring it
exactly into place, you will have equal Corners. Okay, so let's put
the paper here. I'll bring my brush, my 20-year-old glue brush. And I'll start by gluing
The thicker material first. When Gluing, bring it just until The cloth and not on it. Let's do around the corners. Not touching the corners. Because you're gluing the board, you have time now. If you see piece of dirt on it, you can take it out. Cps here. Take it out. I'll take my small brush. Can glue between pencil
mark two, pencil mark. Forage. I'll take the wastepaper out. Now. Only glue The Corners
between pencil mark, pencil mark, right about here. And this corner. Wastepaper up here
and out of here. Now, this is a time
to be precise. I'm taking the paper, bringing it to the ruler, pointing to centimeters and touching the straight line here. Let's move the ruler and
work with a bone folder. If you have a
problem and you have some air bubbles
here from the paper, you can actually take a
hairdryer and work with it. It works wonders really. Okay. Now let's take a piece
of waste paper and glue. Short side. Be careful
not to stay in the cloth. Take the wastepaper out, and with the bone folder. With your hands. You can cover. Decide. Flipping over. Paper. Brush. Hold it. Put the glue until Edge. Be careful not to
stay in the cloth. Take the waste paper out, and work with a bone folder. And we have the forage. Next. Please paper, slowly lifted. Make sure everything
is covered nicely. And behold, the Outside of
the portfolio is ready. I think this is a great place to stop and have a coffee Break. I want to share with
you some tips and thoughts from my
experience designing portfolios for many years for Artist and
different purposes. So go ahead and make yourself
a cup of coffee or tea. And I will see you
in our coffee Break
9. Coffee Break: Hi, I wanted to give you some tips and share my
experience designing portfolios. You can't even imagine how nice and
professional display of your Art can
make a difference. I would start by saying it's
completely okay to make a Portfolio just for
the front of making one without any specific reason. But if you do have
a specific reason why you want to make one, Here is my advice and
thoughts about the matter. I think the first decision
you should make is whether the portfolio is
vertical or horizontal. If you have both, see what you have more of, because people don't like to flip over the world
call to time. Also, if you plan to
showcase your Art, I really recommend to put
no more than 30 papers. That is usually a common
limit for a person to see without being
overwhelmed or board. Because usually you are
standing by the person looking. They can feel awkward
in this situation. If you having trouble
deciding which are the 13th, asked several people to
look through your work, then choose their favorites, after their choices,
consider it, and then do whatever
you want, okay? I think the first
five artworks are the most important
works in the portfolio. And usually I find the
common ground of these five and that indicates the
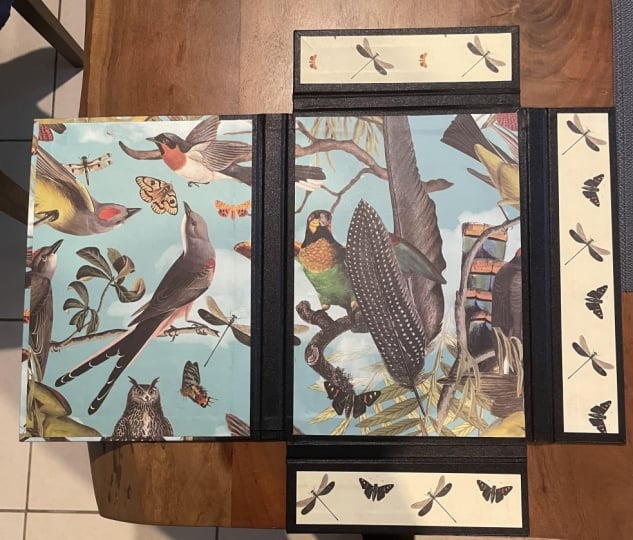
color of the portfolio, the proportions of the Flaps. For example, in this portfolio, I chose a light blue color and three short flaps that goes with the margins
of the artwork. So it works beautiful together. Also, the spine is the
same color as the orange. And I decided to put
the cloth that is the same color as the
Outside in this portfolio. I chose to make it
entirely black with just a hint of a
corner in purple. When I open it. You have to purple flaps so they speak to
the outside corner. And when you have the same color on the
inside and outside. Actually, the focus
is on your artwork, which is very
important sometimes. Again, the proportions
and the color. And this also gives the
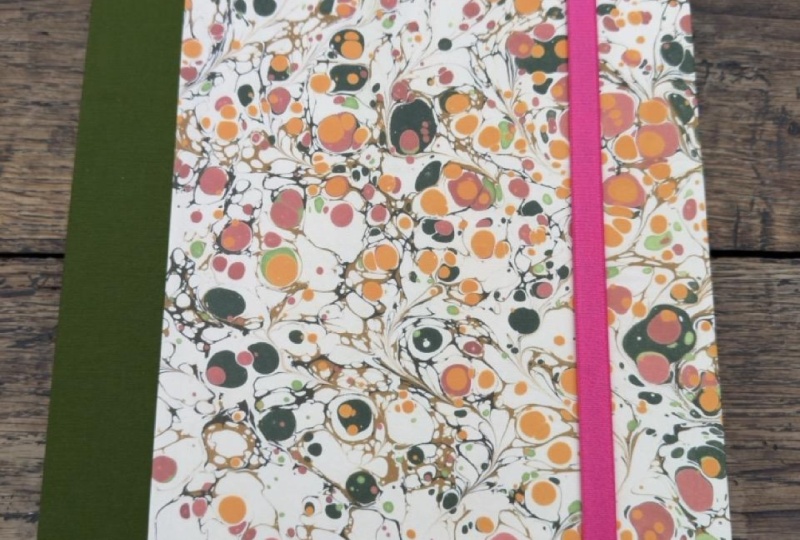
direction of opening. I'll show you another case. Here. I decided the light
blue with marble paper. When you open it up. You can see here the Flaps are covering the entire portfolio. And when you open it, you can see the calligraphy and the colors are matching
the colors of the Outside. So as you can see, there are many choices. Another example is
this portfolio. This is covered with leather
and leather corners. When you open it, this is marble paper by the way. When you open it, you have three paper flaps and
photographs inside. So that's also an option
to make paper flaps. It's less durable, but it's also a nice solution
for the portfolio. There are times when you have your artwork in different sizes. Then what I recommend
you to do is see the largest one and cut
vapors to the same size. Then what I recommend you
to do is make a passport to and cut windows
according to your artwork. So you cut windows to the different dimensions and
mount the work underneath. Then you have one size
for all the papers. But the artwork inside
is in different sizes. I won't get into proportion
and how to do it, maybe in future classes. Another important detail
that can make a difference is labeled wire
labels important. First of all, in most obvious, it tells you what
you have inside. It also gives an opening
direction to The Portfolio. Usually there are two labels, one for the spine and
one for the front cover. The label on the
spine is usually texts and indicates
what you have inside. If you have a pile
of portfolios, you can elegantly store them in. It looks beautiful on the shelf. I really recommend that about the label on the front
of the portfolio. There you have many
design choices and you can do several things. And I want to show
you some example. For instance, what you can
do is print on your printer. I'll take the same paper as the inside calligraphy
and take a piece of tape and put
it on two points. So when you put it inside
the printer, it would print. Let me also put one for
these to take a piece of tape that actually helps you print not the entire
page of a special paper, but just a piece to
locate in its place. Have to your printed
what you wanted. You can just take it out. You can cut it
according to the marks. You see portions here. Here, I want to leave bit of
a border around around 3 mm. Let's see how it looks. In this label. I will add some watercolor
to give it a handmaiden, unique touch that can
make all the different. I hope that tips were helpful
in not too overwhelming. In the end, it is your design choices that
makes your unique style. I'm eager to see your creations
in your design choices, so please share it with
us in the Class Projects. I would see each and
every submitted work. So please do that, finish your drink or put it aside so you won't tip
it over your work. And I will see you
in the next lesson.
10. Flaps - Cutting Materials: Flaps. That's what we are going to work on in this lesson. I love flaps and the way
they hold your work inside, you can make them from bookbinding board or
from thick paper. We are going to work with bookbinding board the same
thickness we worked on, on the outside of the portfolio. The flap has two parts. One, the spine, and the second
one is the flap itself. The size of the flap is a design choice and it depends
on what it holds inside. We are going to
prepare three parts. Let's start with
the fore edge side. I'll measure 30.5, the
same size as the outside. Take my knife and cut. The size of the flap
is going to be 6 cm. The spine is going to be 1.3 cm. The market here, flip it
over between the dots. Crystallite cut,
then going inside. Great. Moving on to
the top and bottom, there are going to be 20, 1 cm. Let me mark 21.21. Take my knife between
the two dots. First, light cut
and then go deeper. The size of the flap
is going to be 6 cm. Forage. Remarks. First cut
and then deeper. The spinal off the top
and bottom is 1 cm. Flip it over and
cut it into size. We have another one to cut. So 21, 21. Credit. And the flap itself is going to
be six hallmarks, six here and six here. And the spine, which is 1 cm, it's the same size
for top and bottom. Let's move on to the cloth. For the cloth, we
would need 34.5. Let me mark it here. 34.5. Take my small knife. The width is going to
be 12 centimetres. Smart 12 here. And here. The side. Now we have the top and bottom. And there are going to be 25 cm, the length, 12. Don't worry, I made
a PDF file with all the flap
measurement and layout. You can find it in
the class resources. So go ahead and cut
all the materials. We have three parts, the forage and the spine, the top and bottom flaps, and the 1 cm spine. And the cloth we have for forage in two pieces
for top and bottom. Go ahead and cut everything. And I will see you
in the next lesson.
11. Flaps - Constructing the Outside: Hi, welcome back. Are you ready to start
Constructing the Flaps? Let's start by taking
the face of cloth. I'll put it on the table
and bring the long flaps, the forage side,
and locate it to centimeters on top and
on the right and left. I'll take my ruler and make
sure it's 2 cm here and here. I'll take my pencil and mark. The line. Can also
put a stopper here. What I'll do is I'll glue the forage side and
bring it to the marks. So I'll glue the freud side. We don't need a lot
of blue button, even amount all through
the Bookbinding board. I'll take the Bookbinding
board and bring it to the pencil line on the
right and on the top. Move the weight over. Where should my hand? And then with a bone folder, I'll flip it over. Now I want to make sure
this is a straight line, so I'll put the stopper here. I'll take my half a
centimeter gap and put it here and then take the
spine and glue it. I'll bring it to the
stopper and to the spacer. Should this doesn't move
aside and take it out. Flip it over, and work
with a bone folder. Now, what we're going to
do is make The Corners. I'll take my small ruler. Mark from corner to
corner, half a centimeter. Take my triangular Bueller, Make sure this one
is trade here. Move it to the mark. Let's do it to the other side. Corner to corner
half a centimeter. Bring the triangular
ruler and mark. Now, let me take my knife and the small ruler and
cut the corners. Now we're going to make the turnings on the
top and bottom. And then on the forage. I'll take a piece of wastepaper, put underneath, glue
the short side. Take the wastepaper out with a bone folder lifted
towards the board. Then go with bone
folder inside the gap. And after the spine
like this, Connect it. It would be a bit crooked, but that doesn't matter because afterwards we're going
to cut it 45 degrees. Let's work the corner. Flip it over. Takeaways paper. Underneath. Clue, the short side. Can you hear the
birds singing in the background? Let's paper out. I'll work with bone
folder folded inside. Go with bone folder
inside the gap. And then after The Spine. Again it would be a bit
crooked inside but it's so K. And then with bone
folder work, the corner. What we have left to do
is make the forward side. Take a piece of
wastepaper, take my glue Hold the FAB and put the
glue until the corner. Take the wastepaper out. Work with DICOM folder. Make sure it connects nicely. Making a nice corner to size. That's it for the forage. Let's move on to the sides. I'll take the small piece of cloth and I'll take the flap. Again. I will locate
it to centimeters, all rounds, so left and
right and on the upper side, remark with to stop or if you have one,
Let's glue it. Bring it to the marks. Over. Put a stopper here. And the gap. Bring
The Spine, glue it. Spine to the spacer
and to the stopper, which should this doesn't
move. Take it out. Flip it over. Work with bone folder. Corners, pencil
between two corners. Mark half centimeter here. Let's see two meter here. In Mark with a triangular ruler. Take my knife and
cut the corners. 1.2. Now we'll take a
piece of wastepaper, gluing the bottom side. Take the wastepaper out, take my bone folder and
bring it inside the gap. And after the spine. So K that it's a bit crooked. Going afterwards,
credit 45 degrees. Work the corner. Move the Class
inside the corner. Shifted over. Another
piece of ways paper. Do the second side. Takeaway, speak out
with a bone folder. Turn the cloth inside. Worked corner. And we had the short side do hold it. Oh, the Ford side
to The Corners. Take the waste paper out with a bone folder connected
to the inner sides. So that's it. We
made two of them. A flap and the top side
or the bottom side. I'll leave you to do one by yourself and I will see
you in the next lesson. We're going to cover the inside cloth.
I'll see you there.
12. Flaps - Gluing The Inner Cloth: Welcome back. Our
next step is to connect The Inner Cloth
inside the Flaps. Let me start by measuring and cutting the piece
that we would need. The cloth needs to be 29 cm, 29 and cut it on 7 cm. The short side, we need 19.5, seven. Now I'll fake flap
of the forage side. I'll take the long ruler and the small ruler
and measure 2 cm. And mark with a pencil. I'll take the long strip of cloth and check that
it's lined up and down. It's supposed to be
around seven or 8 mm. I'll take my pins
and pin one here. One here. That would
give me the mark where to bring the cloth. When I want to glue
it. I'll prepare a piece of wastepaper
to put underneath here. One will wait. Here. I'll take my glue brush. In blue. The spine. The gap between just
up until the Cloth. Don't touch the red. Go after the spine. Take the wastepaper out. Now I'm going to glue only
the edge of the cloth. One side. The other side. Moved to waste paper. Now I'm going to bring it to the needles are tens and make sure I have a straight
line with a pencil mark. I'll take my bone
folder and I'm going to first of all glue
the Flaps itself. Then I'm going inside the gap. Then I'm going on the spine. And after the spine side here also will
take the pins out. Finish this one. Let's
move on to the short side. I'll take a ruler and the
small ruler Measure 2 cm. I'll take my pencil
and make a line. Now. I'll take the next
strip, the smaller one. And look that it's
aligned up and down. When I see it's okay. I'll put my pins. One here. One here. Again, wastepaper
underneath the slab. And one waiting for me here. How glue inside of the spine. The gap until the pencil mark. Again, don't touch
the red cloth. Take the waste paper out Now I'm going to
glue only edges. Cloth, one side. And
the second side. Take the cloth and bring it
to the two needles of tens. Make sure it's in
a straight line. First, glue the Flaps itself, then go inside the gap. Moving on to the spine. And after the spine
Gluing to the board, then the flat side. Take the pin out. That's it. We've finished the first step. Moving on to cutting the paper would need
four-and-a-half centimeters. Let me cut four-and-a-half. And we need 2091 mark. Second and cut. This is for the Ford site. For the two short Flaps. We need also for
and-a-half centimeters. The length is 19.5. Now I'm going to take the
long flat and I'll take the strip of paper.
I want to see. It's even on four sides. I'll take my pins and
put one over here. And one over here. That would give me
this straight line. On top and bottom. We would locate them exactly as the cloth
because it's the same size. Now we'll take a strip of
wastepaper and glue the paper. I'll start from the
middle Outside. Because it's a small
piece of paper. I'm going to glue
it directly and not first on the
thicker material. And then just the edges. Take the wastepaper side. Now I'm going to take the strip, put it to the needles, and see it comes exactly
to the line of the cloth. Take the pins out and
work with a bone folder. Nice. Let's move on
to the short side. Put it here. Take the small piece of paper. Again. Straight all around. Will take my pins. Locate one here. One here. Will take a wastepaper
from the middle Outside. Take the wastepaper out, bring it to the pins. And to the line of the cloth. Will take the pins
out. That's it. We have a long one, short one. And I want you to make
The last one by yourself. And I will see in
the next lesson
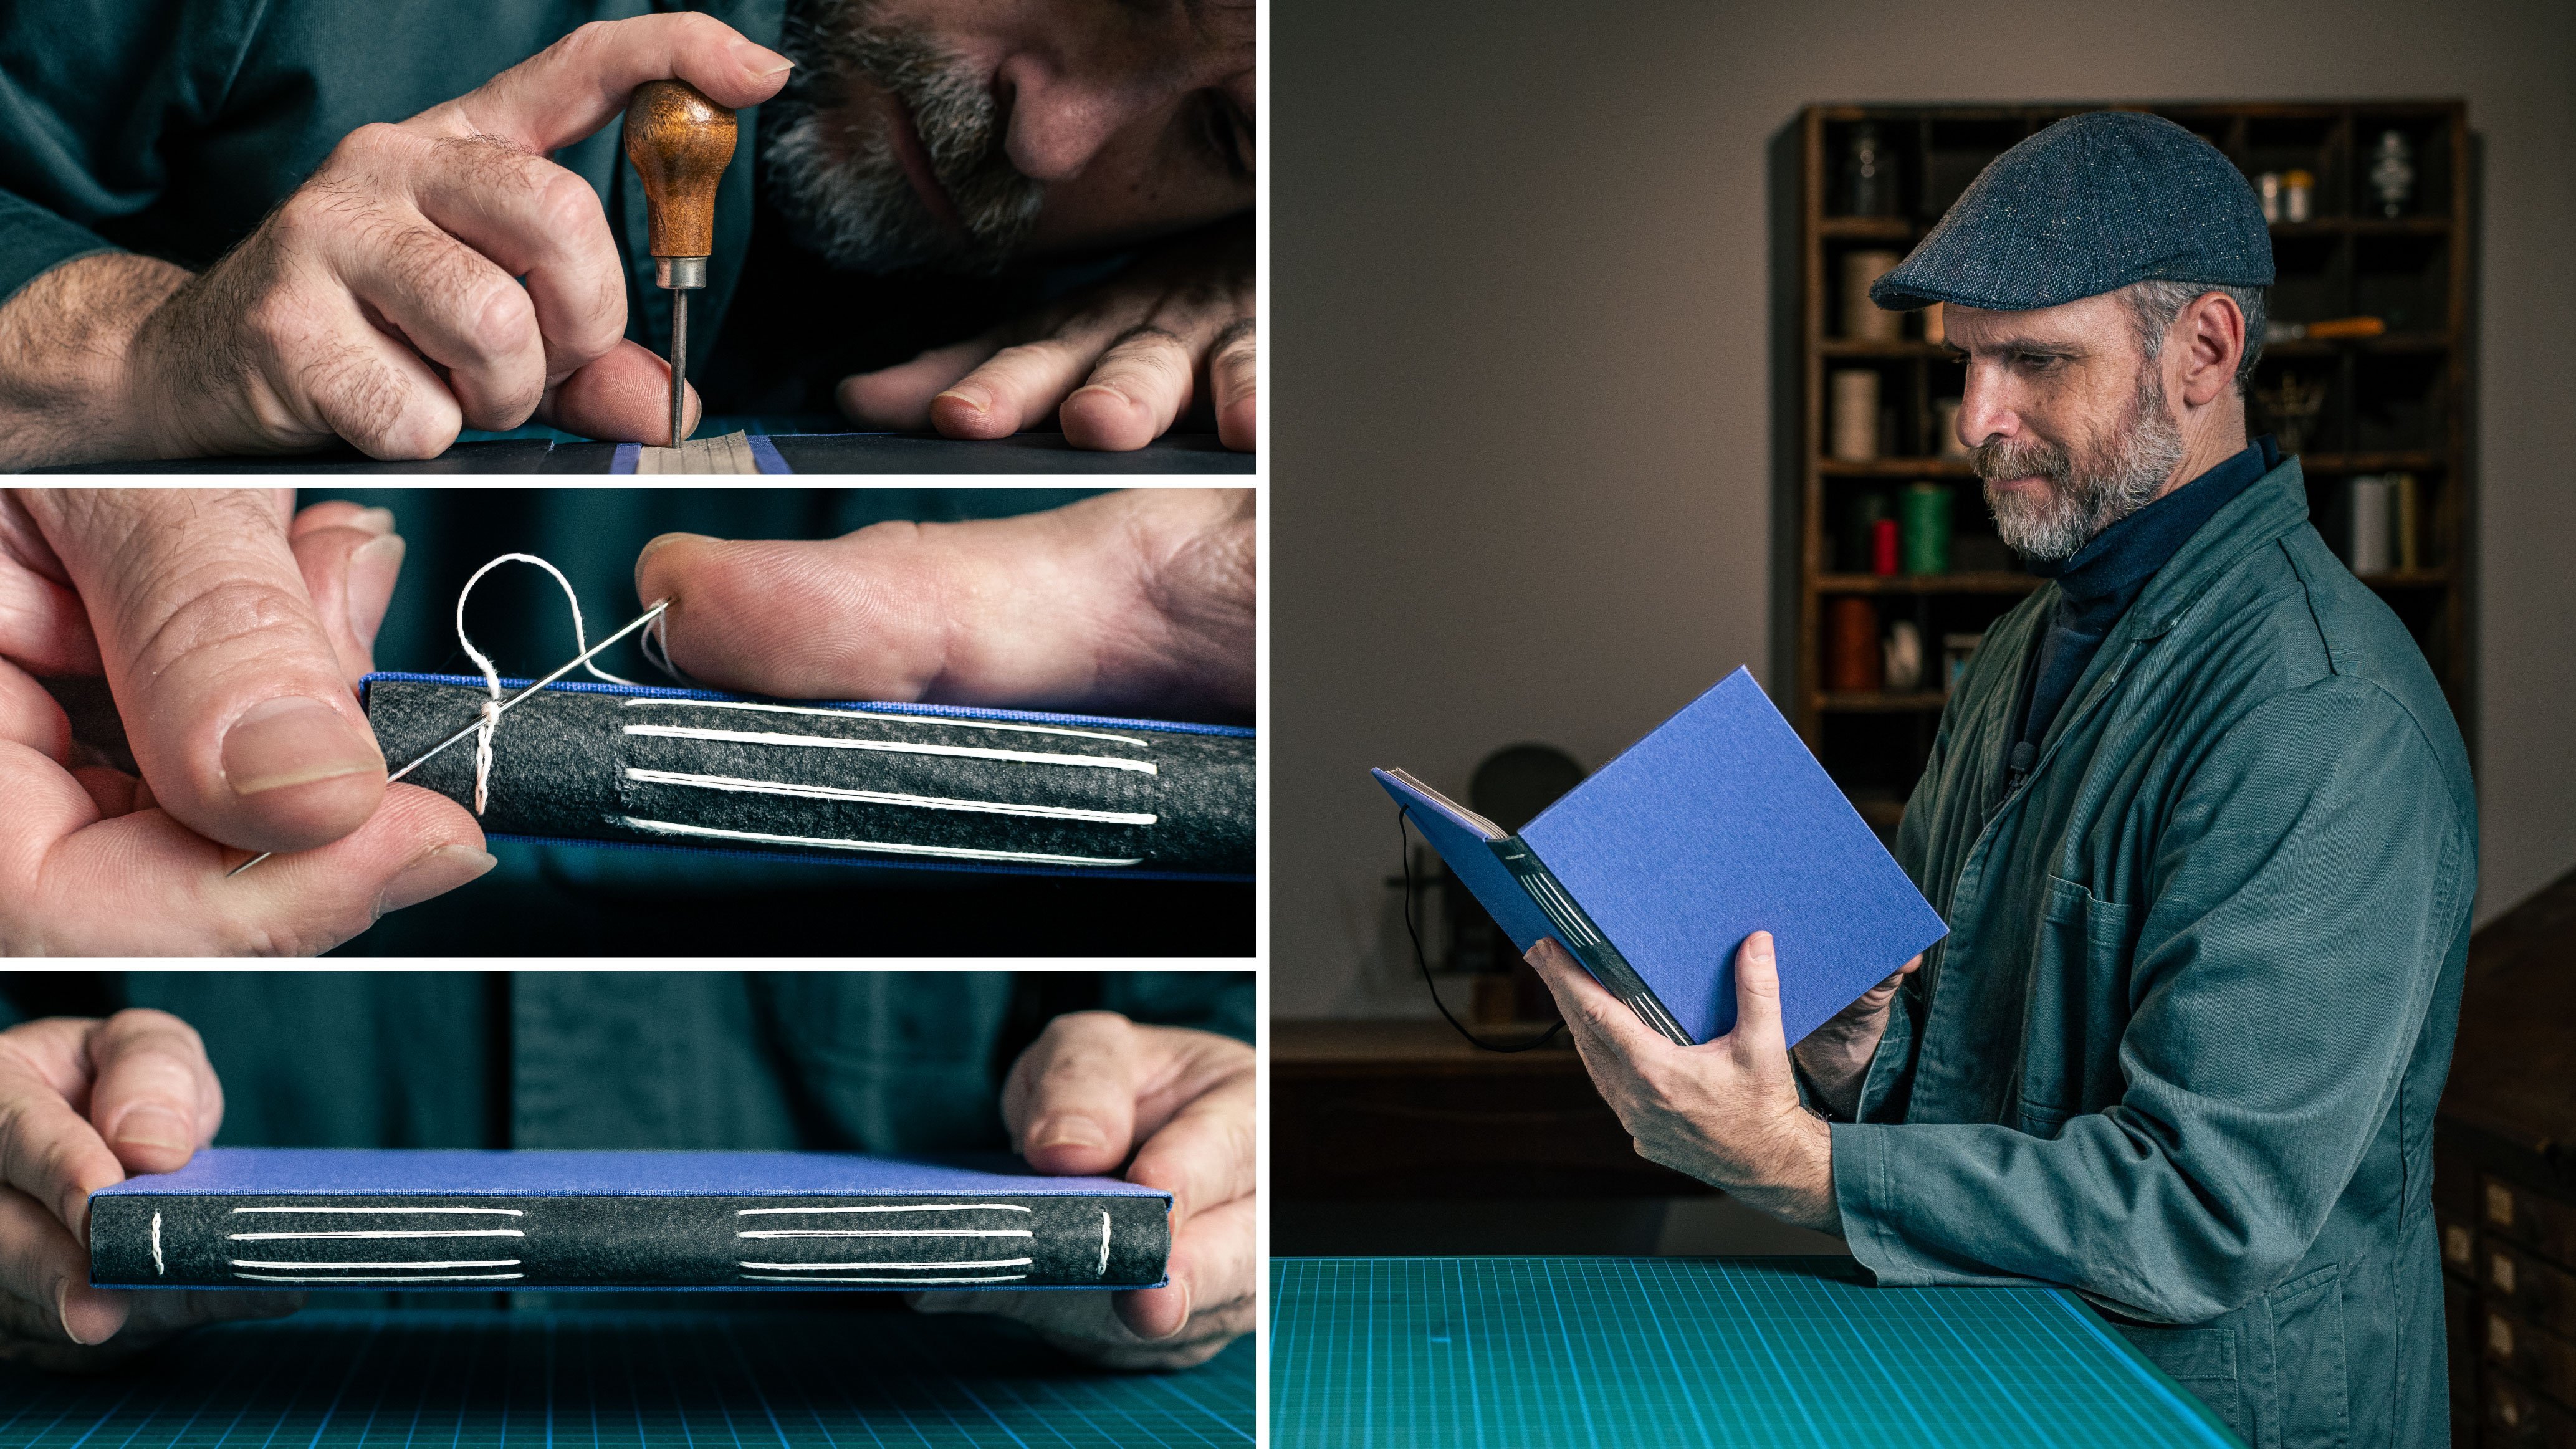
13. Adding The Elastic Band: Hi, I love this part
of the process. It involves fine details. Before we connect the Flaps, I want us to connect
the elastic band. That is because the Flaps are going to cover the entry point. We are going to use
an elastic band because I find it much easier to open and close the portfolio rather
than the classic ribbon. So how do we know the exact
place of the entry point? Let me bring my portfolio
and put it on the table. We are going to work
on the backside. What I did is I made a
PDF file with Corners, one for top and one for bottom. And you can find it in
the Class Resources. But before we begin, I want you for better
understanding, know why the Measurements of
three-and-a-half and 1 cm. The reason we are measuring three-and-a-half centimeters
from the forage is because our corner is starting exactly in
three-and-a-half centimeters. And then they elastic band will cover just until the corner. It would look beautiful. About the top and bottom. It's 1 cm from the edge. What I want you to
do is take a piece of Bookbinding board and put underneath the portfolio so we won't damage
the cutting mat. And then you're going to align the template
to the corner. I'm going to take my chisel and put it exactly on the dot. And then press down and insert the board. If it's 1 cm, you can keep on
going until you have 1 cm. Take the template out. And now I will work
with a chisel. I will bring it inside, wiggle it a bit to make the whole bit bigger.
I'll take it out. Now, if you don't have a chisel, I want to show you how
you can improvise. I'll take the second
corner and put it here. This is the bottom corner. And now what I'm
going to do is take my knife and cut
according to the line, Gerson till the dark. Now, what you can do is take a flat head
screwdriver and put it inside the cut and
wiggle it a bit. And that way you can
insert it nicely. Inside the boards. The chisel is much better. But if you need to improvise, that would work also. Let me flip it over. Now what I'm going to do is
take my triangular ruler, put it in the entry point, and make a line around
two centimeter long. I'll move it to the
other entry point and make a line also. Let me do that to
the other side. Align the triangular
ruler and make a line. And on the other side, I'll take my small ruler and
connect between the lines. One here, one here. Now I'll take my knife
and cut a shallow cut. It's not supposed
to be very deep. It's a shallow cut. I'll put it in the other
pencil mark and make a line. And make a line here. That's one side. Make a shell cut here, also. On the other line. And on the short side. Now I'm taking my chisel and this is the
fine detail part. I'm going to just take out one or two layers
off the board. Look how nicely it came out. Let me do that on
the other side. Taking my chisel, going inside, lifting one or two layers. That's why we did a shallow cut. Now I'm going to
take my elastic band and cut it around 2 cm
from top and bottom. Now what we have
left to do is take the elastic band and inserted
inside the portfolio. You can work with a needle
or even with the corner of your ruler and put
the elastic band inside. To glue it. You can use the
double-sided tape and put it inside. Let me Connect here
and cut the axes here. So this is one side. Now let's Insert. The other side. Will take
a needle and Insert. You can also use the
edge of your ruler. Doesn't really matter. Now, what I want you to do is make sure this
is tight enough. How can you tell? If you take and put
your finger inside? You can feel if it's enough for you wanted
a little bit more. Okay. Of course, it depends on
the thickness of the spine. I feel this is quite enough. So flip it over. What I'm going to do is cut until where I took
the materials out, put some tape and Connect. This is the proper way to
connect the elastic bands. Just let you know there
is a possibility. You just put it inside and
glue it and put the Flaps. It will have a bump,
but it would work. But I'm aiming to show you
the most professional way, what it took us five-minutes. And it makes all the difference. By the way, if you want
to connect ribbons, It's the same process, just on two sides, and it's usually in the center of the portfolio on
the forage side. So that's it for this lesson, and I'll see you
in the next one.
14. Flaps - Connecting to The Portfolio: Welcome back. All the parts are ready and it's time to
connect everything together. Are you ready? Let's
take all our flaps. I want to cut them into size. How to take my knife and a two centimeter ruler
and just trim it. So it would be
everything the same. Cut the top and bottom also. Great. It's not a must, but I like everything
underneath the paper to be the same length because it's
all in small details right? Now, what I want you to do is take the top and bottom sides. Can take your triangular ruler, put it against the inner spine, move it until the edge and
cut a 45-degree angle. Let's do it to the other side, which is the opposite
side. Until the end. Can cut 45-degree angle. We're not going to cut
the longer flap yet. That's later. Let me
drink the portfolio. Now what we want to do is glue
first the top and bottom. And we need some
kind of stopper, can use our beloved weights. But we can also take a block
of wood spine of a book, whatever you have in
the house that is 90 degree angle and
it can give you the straight 90 degrees when we want to glue the
spine and the flap. So let's put our stopper here. And let's prepare
the bottom side. The bottom side, the 45-degree angles are supposed to be
towards the forage. I want you to check
before you do. I want you to check and see that when you close
the portfolio, it touching and not
preventing it to close. What we can do is take a needle. Mark for ourselves. The right location. Okay, Now, I'll take my flaps. Take a piece of wastes paper
underneath and one on top. Now what I want you to do
is glue this inner strip, but not the edge because
then you can have a stain of the glute
showing how to do it. You take the glue and put on the cloth just until the edge. Let's take the place paper out. Now. We're going to bring
it to the needle mark. See this is trade. Make sure closes nicely. If not, you can move it a bit. Seats. Okay. Take
my bone folder, make sure it's 90
degrees. Connect. We take the pinout. That's it for over. I'll take my bone folder and work on the edge of
the inner Portfolio. I like afterwards to
lift it and check again that it's
okay, it's aligned. When you close, it.
Looks nice. Great. Moving on to the other side. Let's put the stopper here. Take the second flap and
bring it into place. See when it closes. Looks good. Can also look that it's the
same place as the other side. I'll take my pen and
mark the location It's folded a bit. Take a piece of wastepaper,
put it underneath. Another piece of wastepaper. Put on top. I'm going to glue only the upper
side of the cloth. Take the wastepaper out. I'll bring it to the needle. Let's close it and see
take it looks great. Work with a bone
folder on the edge. Take the pin out. Let the Flaps fall over. Now I'm checking again, lifting, looking. It's okay. I can move on to the
next forage side. Now. I'm taking the Ford side. A bit. Can work
with bone folder. I'll take my stopper
and put it here. Now, remember this is the
length of the portfolio, so we need to make sure
it's exactly in place. Now what I'm going to do is take my triangular ruler in after I see everything is straight
here, top and bottom. I'm going to take my knife, put the triangular ruler
exactly into place and cut. Let me do that for
the other side. If you having trouble working
also with your left hand, you could take a pencil and
make a very thin line exactly where the triangle here of the first edge and cut it
Outside of the portfolio. Make sure everything is okay
before you start doing. Looks great. Okay. Let's take another piece of wastepaper. Put underneath. And
a wastepaper on top. Again, I'm going to glue
only the upper side. Note the edge. Up until the end. Take the waste paper out. Now, don't be alarmed. You have time to move it around and see it's exactly in the place
you wanted to be. I feel it's on the stopper. It looks good here. Maybe a bit to the right. Yeah, it moves. Nice. Let's see here. Looks good. I'm going to glue it here. And glute here. Let it fall back. Let's check it again. So that's it. We have the
two flaps for bottom and top forage and
everything fits nicely. I'll let it dry a bit. And I will see you
in the next lesson.
15. Lining With Paper: Hi, There's one more thing to do before we
finish our portfolio, and that is to cover
the inside with paper. I really recommend you
to use 200 gram paper. And I'm going to cut it a
little bit smaller than A4 so you can see the cloth
all around the edges. Let me bring the piece of paper and we're going
to cut it to size, which is going to
be 29.5 on 20.5. So let me measure 29.5 here and cut and 20.5 here and cut it. You
do the next 129.5 on 20.5 and cut. Let me bring the portfolio. First. We're going to do the
bottom and then the top. So I'm going to take my
paper and locate everything. All four sides are equal. Take a stopper and put it here. So right and left are even. And now I'm going
to take my pins. And I can talk like this. So I won't put my pin in my
mouth and locate one here. And one here. That would help me. When I bring the paper to bring it
exactly into place. I'm going to take a
piece of wastepaper, put it here, the paper on it, and piece of weight. Now going to take
my big glue brush. And I'm going to glue
only the inside, only the bookbinding board. So try not to touch the cloth. Now, I'm going to glue only
the edges of the paper. Take the weight out, take my wastepaper and bring it to the needles and
to the stopper. See everything sits
in place. Nice. I'll take my bone folder and start working
to move this side. Let me take out the pins. Thank you. And connect
everything around. Great, the bottom side is ready. Let me bring another
piece of paper. Now. I'm going to
locate the paper. I'll take my stopper and
put it here near the spine. So I see it's parallel,
right and left. On top and bottom. I'll take my pins
and put one here. And I'll put one here. Again. Big brush. Only on the board. Who to wait here
so it won't move. Glue edges of the paper. The paper. Bring it to the
stopper and to the pins. See two lines. You can
move it if you need. Look nice here and here. Move the weight and work
with the bone folder. I'll take out the pins. That's it. We finished
our portfolio. Let me clear out
everything here and I'll see you in the next
and final lesson.
16. Conclusion: Congratulations on
completing this course. I'm very proud of you. I want to take a moment, observe what we have created
and listen to the birds. Actually, the biggest
challenge while filming this course was to talk when the birds are singing
in the background. I guess that's what happens when your studio is in
such a great place. Some closing remarks. I want to thank you again
for participating in this course and adding a
Portfolio to your skill set. Learning something
new is a great thing, and I'm truly honored
to be your teacher. I am eager to see your Portfolio and what you decided
to put inside, so please share it with
us in the Class Project. I promise to see every submitted work and answer questions
if you have any. You're welcome to see
my previous classes and follow me here on
Skillshare and Instagram, then you would be notified
when a new class is published. One more thing, if you
enjoyed this class, I would really appreciate it. If you can leave a review that
would help others find it. So that's it for this course. Thank you again
for being here and I will see you in
my next course.
 Ido Agassi, Book Artist