Transcripts
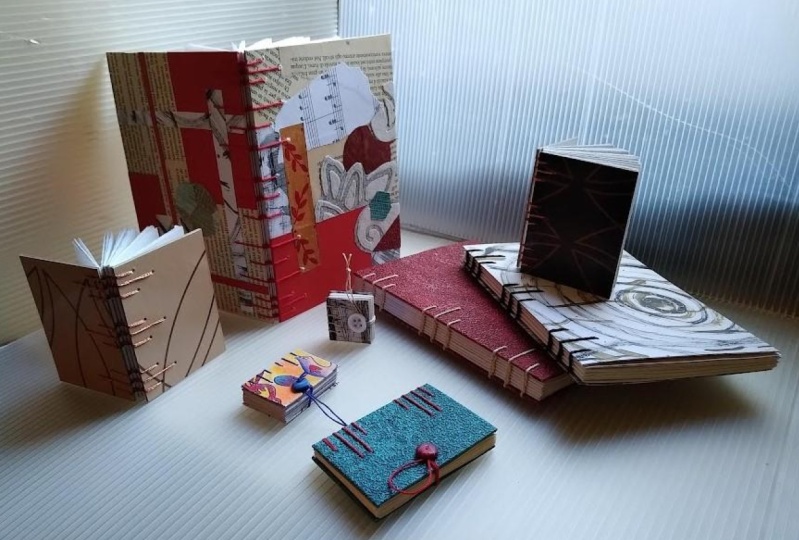
1. Introduction: Welcome to my studio. Today I want to teach you how
to create a Coptic binding. A binding technique
that is both practical, and beautiful, and
most important. It doesn't require previous
knowledge or special tools. My name is Ida Gassy
and I'm a book artist. I combine the crafts
of letical printing, bookbinding, and box making to create my art in
the form of a book. I have been making
books and boxes for 30 years and I would love to
share my knowledge with you. The Coptic binding has simplicity in its exposed,
unsupported spine. Many variations were made
since the fourth century, but in all of them the
principle is the same. A beautiful binding that opens flat and can be made easily
and in a short time. You can make it very simple with only paper thread and
re, used material. But you can also
dive into designing your own special
and unique binding for yourself or as
a gift for others. Through the lessons, I
would guide you step by step and show
you my special way of binding with
tips and tricks to help you create your
own Coptic binding. So if you love working with your hands and
creating new things, if you always wanted to
experience book binding, this course is a
great place to start. So I invite you to join me in this wonderful journey
to the world of books.
2. Tools and Materials: Hello, and thank
you for joining me. Before we start our course, I would like to go through the tools and materials
that we would need. I will put a gray board on the table so we will
have a nice background. I will start with
the cutting mat, which I really
recommend you to use. Moving on to the rulers. A medium sized ruler, a small ruler, triangular
ruler, a bone folder. You can use a
regular bone folder or a teflon bone folder. A craft knife, a
pencil scissors, a needle and two pins, a bow of wax for
waxing the thread. If you don't have wax, you can also use a
candle linen thread. I'm going to go over
the threads and the sizes and thicknesses
in our coffee break. A piece of weight
that sits flat on the table and has
a 90 degree angle, we are using it as a stopper and also
for sewing the book. Pva or white glue, Whatever works for you. A glue brush, you can use a straight one or a rounded one. Moving on to the materials, we would need a 1
millimeter thick board. You can also re,
use materials like food packaging and that would
be really, really nice. 30 sheets of four
paper, around 90 grams. And paper, four size
around 200, 250 grams. Two pieces of
decorative paper or cloth, 27, 20 centimeters. Some strips of waste
paper and a paper clip. So these are all the tools and materials that you would
need for this course. I also added a PDF file
with a list of everything here also converted into inches if you prefer
to work in inches. So that's it for this lesson. I'm eager to start working and
I'll see you the next one.
3. Folding Paper into Signatures: Welcome back. I would like to start this
course by teaching you how to fold paper and make signatures. What are signatures? Signatures, also
called sections, are folded papers, nested
one inside the other. I'm going to work with 90
gram paper and that is why I'm going to make
signatures of 16 pages. That means four sheets of paper folded and inserted
one inside the other. If you prefer to work
with thicker material, thicker paper, let's
say around 200, 250 grams, then I would consider making
signatures of 12 pages. That means three folded papers inserted one inside the other. By the way, I'm
going to work with four paper because I
work in centimeters. If you prefer to work
in inches, no problem. You can work with the
letter size paper. In our class resources, I will give you all
the information and measurements
converted into inches. So go there and find a PDF file with all the
details that you would need. Let's start folding our paper. And we will start by taking our bone folder
and I want to show you the first way of folding
just one sheet of paper. What you do is you take
the sheet of paper, bring corner to corner, hold it, see it's aligned. Fold first with your hand and then with a bomb folder.
I'll show you again. Take a sheet of paper
corner to corner. See everything is aligned. Work first with your hand
and then with a bomb folder. What you can do is also
use a piece of weight. It's important for it to
be flat on the table, so when you bring the paper, it would not go
underneath the weight. But you can also use a
piece of wood marble. This is brass and I work
with it all the time. What you do is you bring
the piece of paper to the weight and
bring corner to corner first with your hand and then with the bone folder. After folding four
sheets of paper, you can make a signature. And I want to show you how
you take the first one and put one inside the other. We have a signature of 16 pages. What you can also do is fold four sheets of
paper at the same time, 1234 set lined. Bring it to the weight
corner to corner. Fold first with your hand and
then with the bomb folder. So go ahead and fold all the papers until you
have six signatures. If you want to make
a thicker book and more signatures, no problem. Just remember to add more
thread while sewing. I will remind you later
and teach you how to measure the exact length
of thread while working. So that's it for this lesson and I will see you
in the next one.
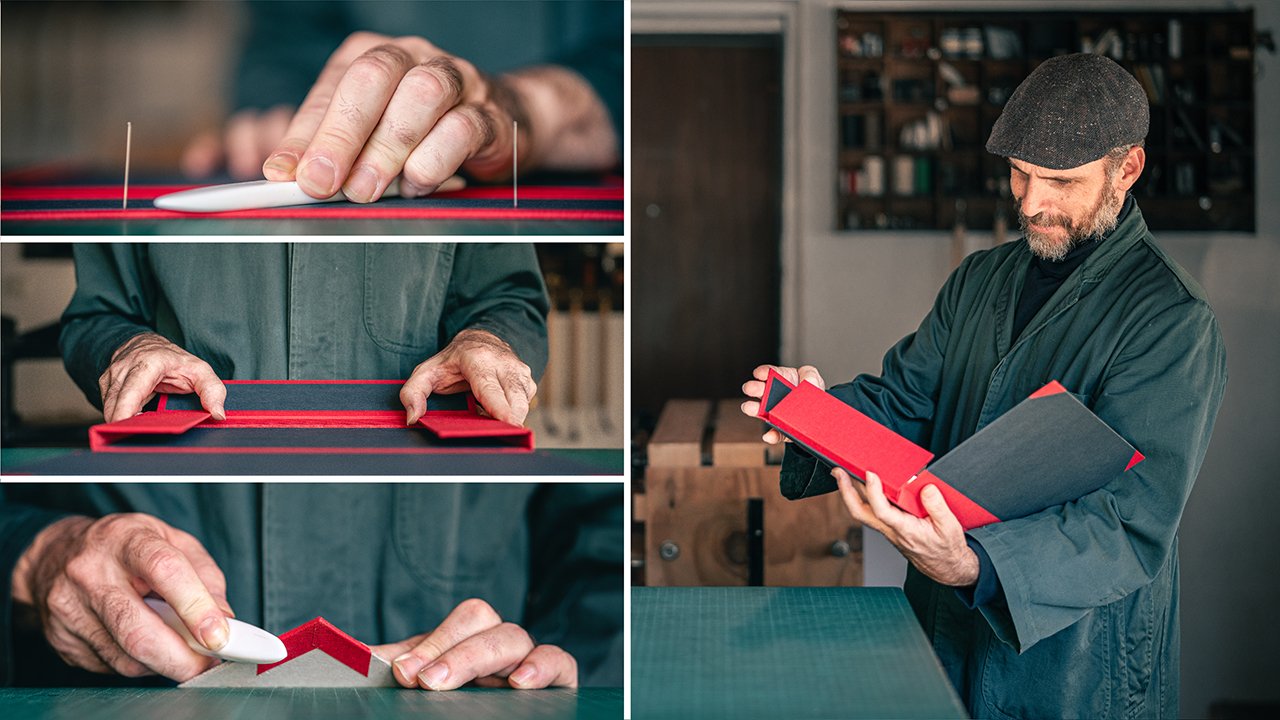
4. Front and Back Cover: Welcome back. After preparing our signatures and before we
start marking for sewing, I would like to teach you how to make the front and back cover. The front and back cover
can be made out of thick paper and also
bookbinding board. I want to make this binding a semi soft binding and I would use a 1
millimeter thick board. This is a very common material that you can use and also re, use from food packaging. Let me bring the cover material. I'm going to cut
the cover material the same size as
the inner paper. That is because we
are going to make a non adhesive binding
with unsupported spine. We want the binding when it
sits on the shelf not to sag. The outer cover and inside paper are going
to be the same size. We will start by marking
the long side, which is 21. I'll take my ruler and
mark 21 with the needle. This is a needle just
connected to a plastic, so it would be easy to
hold and use 21 here. Take my knife, hold it between
these two dots and cut. Now I would mark the short side. I want it to be 15 centimetres. So let me mark 15
centimeters here and here. Hold it between two dots and cut again. And 15, hold it between
the dots and cut. I will leave this for
the template later. Moving on to the cover material. It's important to say
this part is optional because you can work with a
cover bar and bind it as is. It's much more simple and you don't need to work
with any glue. If you prefer this, you can
just skip to the next lesson. I want to teach you
how to work with this beautiful green cloth. And I'll bring piece of board and show you
how to cover it. I'll locate the board
here on the cloth, 2 centimeters on top
and on the right side. I'm going to use this weight and locate it exactly in place. But what you can also do is
take a small ruler and mark 2 centimeters here and
here. And make a line. And it would also work, I'll put the weight over here, move it a bit aside, and I will bring a piece of waste paper and I want
to glue the board. When you glue material, always aim to glue the
thicker material first. So I'm going to glue the
board from the inside out up until the edge. Let's move the waste paper aside and I'll bring
it to the pencil line. And the weight here, flip this over and work
with the bone folder. I'm going through the edges now. As you can see this
is 2 centimeters, but this is not even. What I'm going to do is take a two centimeter ruler
and just cut all around. This is a small detail to do, but I think it makes
all the difference. Because when we turn in, it would be equal on all sides. Our next step is to make
the 45 degree angles. What I'm going to do is
take my small ruler, bring it from corner to corner, and mark half a centimeter from the board corner
corner to corner. Half a centimeter here, corner to corner,
half a centimeter. And have a centimeter here. Now I will take my
triangular ruler. The base of the ruler would be aligned with the straight
line off the board. And I will bring it until my
Mark and mark with a pencil. Here. Here, we'll
flip it around. Mark this corner, and
this corner, great. Now what I'm going to do is take my ruler and cut the corner. 123.4. Great. Let me follow it
a bit so it'll be easier afterwards to glue it. I'll take a piece of waste
paper put underneath. I'll take my small brush
glue from the inside out. I take the waste paper out. Work with your thumb, fingers and thin with
the ball folder. Move the cloth inside another piece of waste paper. Hold it from the middle outside. Take the waste paper out
and bring it inside. Short side another waste paper, Hold it conc it. Take the waste paper
out and fold it inside the last side. Fold and glue it. See the corners are
nice and even now, every material we glue or paste, when it's damp, it moves
a bit, it expands a bit. What I want to do is glue
the inner side so it won't. What I will do, I'll put
this aside for a second. I'll a piece of
paper from inside. This is a four and
I'm going to cut it 1 centimeter less
than the binding. If this is 21, I'm
going to cut 20. This is 15. I'm going to cut 14. Let me take ruler'm. Going to measure 20
centimeter because we want 1 centimeter less
then the book itself. So we have half a
centimeter all around. Cut it and we want
14 centimeters. I'll bring the cover. As you can see, it
started to warp a bit. And I'm going to
locate the paper, so it would have half a
centimeter all around. What you can do is put
a piece of weight, but I'll show you a trick. You can also put two pins, one here and one here. I'll take a piece
of this paper here. What I'm going to do is glue only the exposed board and
just the edges of the paper. I'll put this here, don't move. And I'll take my big glue brush and glue on the inside. If it touches the cloth, it's okay because it's going to cover up until half a
centimeter all around. Now I'll take a glue brush
and just paste the edges. Take the weight out.
Take the paper and bring it to the
needles, see aligned. Take the pins out.
Thank you, society. So that's it. One side is ready. I want you to make the
other side by yourself. If you're not sure, just rewatch this lesson and I will
see you in the next one.
5. Making a Template and Marking: Welcome back. Our next step
is to prepare a template. A template would help
us make holes in the exact place in each
and every signature. And also on the front
and back cover, we will start by taking
a strip of paper, nine centimeter wide, and the leftover piece we
have from our cover. The first thing I
want to do is make sure that they are the
same length as the book. Our leftover is of course the same length because
we cut it already. But for the paper, I
want to show you how you can measure
the exact length. What I'm going to do
is take a piece of weight and put it until
the edge of the paper. Bring the signature to it. See everything is aligned. I'll mark with a
pencil two marks. Take my ruler and
a knife and cut. Now what I'm going to do is
fold the template in words. Take my palm folder. Moving on to marking
where the hole should be in a Coptic binding. It doesn't matter if you have
an even or odd number of stations because in each
station you go out and back in. Again, it is actually
a design choice. As you know me, I
like designing. What I want to teach you is
to make a Coptic binding with three sets of three stations
in close proximity. Because I like it, but I
also encourage you to find your own way and design your own template for
your own binding. The only thing you
need to consider it is at the top and bottom, or the head and tail of the template to make it
as close to the edge. Let's say around one
to 2 centimeters. That is because the start and finish is what's
holding the binding. And because this is a
non adhesive binding, it would hold the
binding together. Okay, so let's start by marking. I'll take a pencil and a ruler and start marking our holes. I would start with 1 centimeter, 2 centimeters, and
3 centimeters. Let's do it on the other side, see it straight to the edge. And mark 12.3 Now we want to make the center, which is 102 and then 1
centimeter on the right. And on the left we
will mark 9.2 and 11.2 Now what I'm going to do is fold the template in words right up and connect paper clip. That's it for this one. Moving on to marking the cover. This is the template
for the cover. From the edge I'm going to mark 1 centimeter line at
two centimeter line. Now what I'm going to
do is in every set, two stations on the 1
centimeter line and one on the two centimeter
line from the edge. I'll mark 1.3 on the
two centimeter line. Two, let's do it
on the other side. I would mark 1.3 on the
two centimeter line. I would mark 2 centimeters. Now moving on to the center, I would mark 10.2 on this line, I would 9.2 and
11.5 Don't worry. I will also make a PDF file with the template so you can
print and download. The reason not all of the
marks are lined on the cover is because I find this design much more special and unique. And I again encourage
you to experiment and try your own design and please share it with us
in the class project. So that's it for this lesson and I will see you
in the next one.
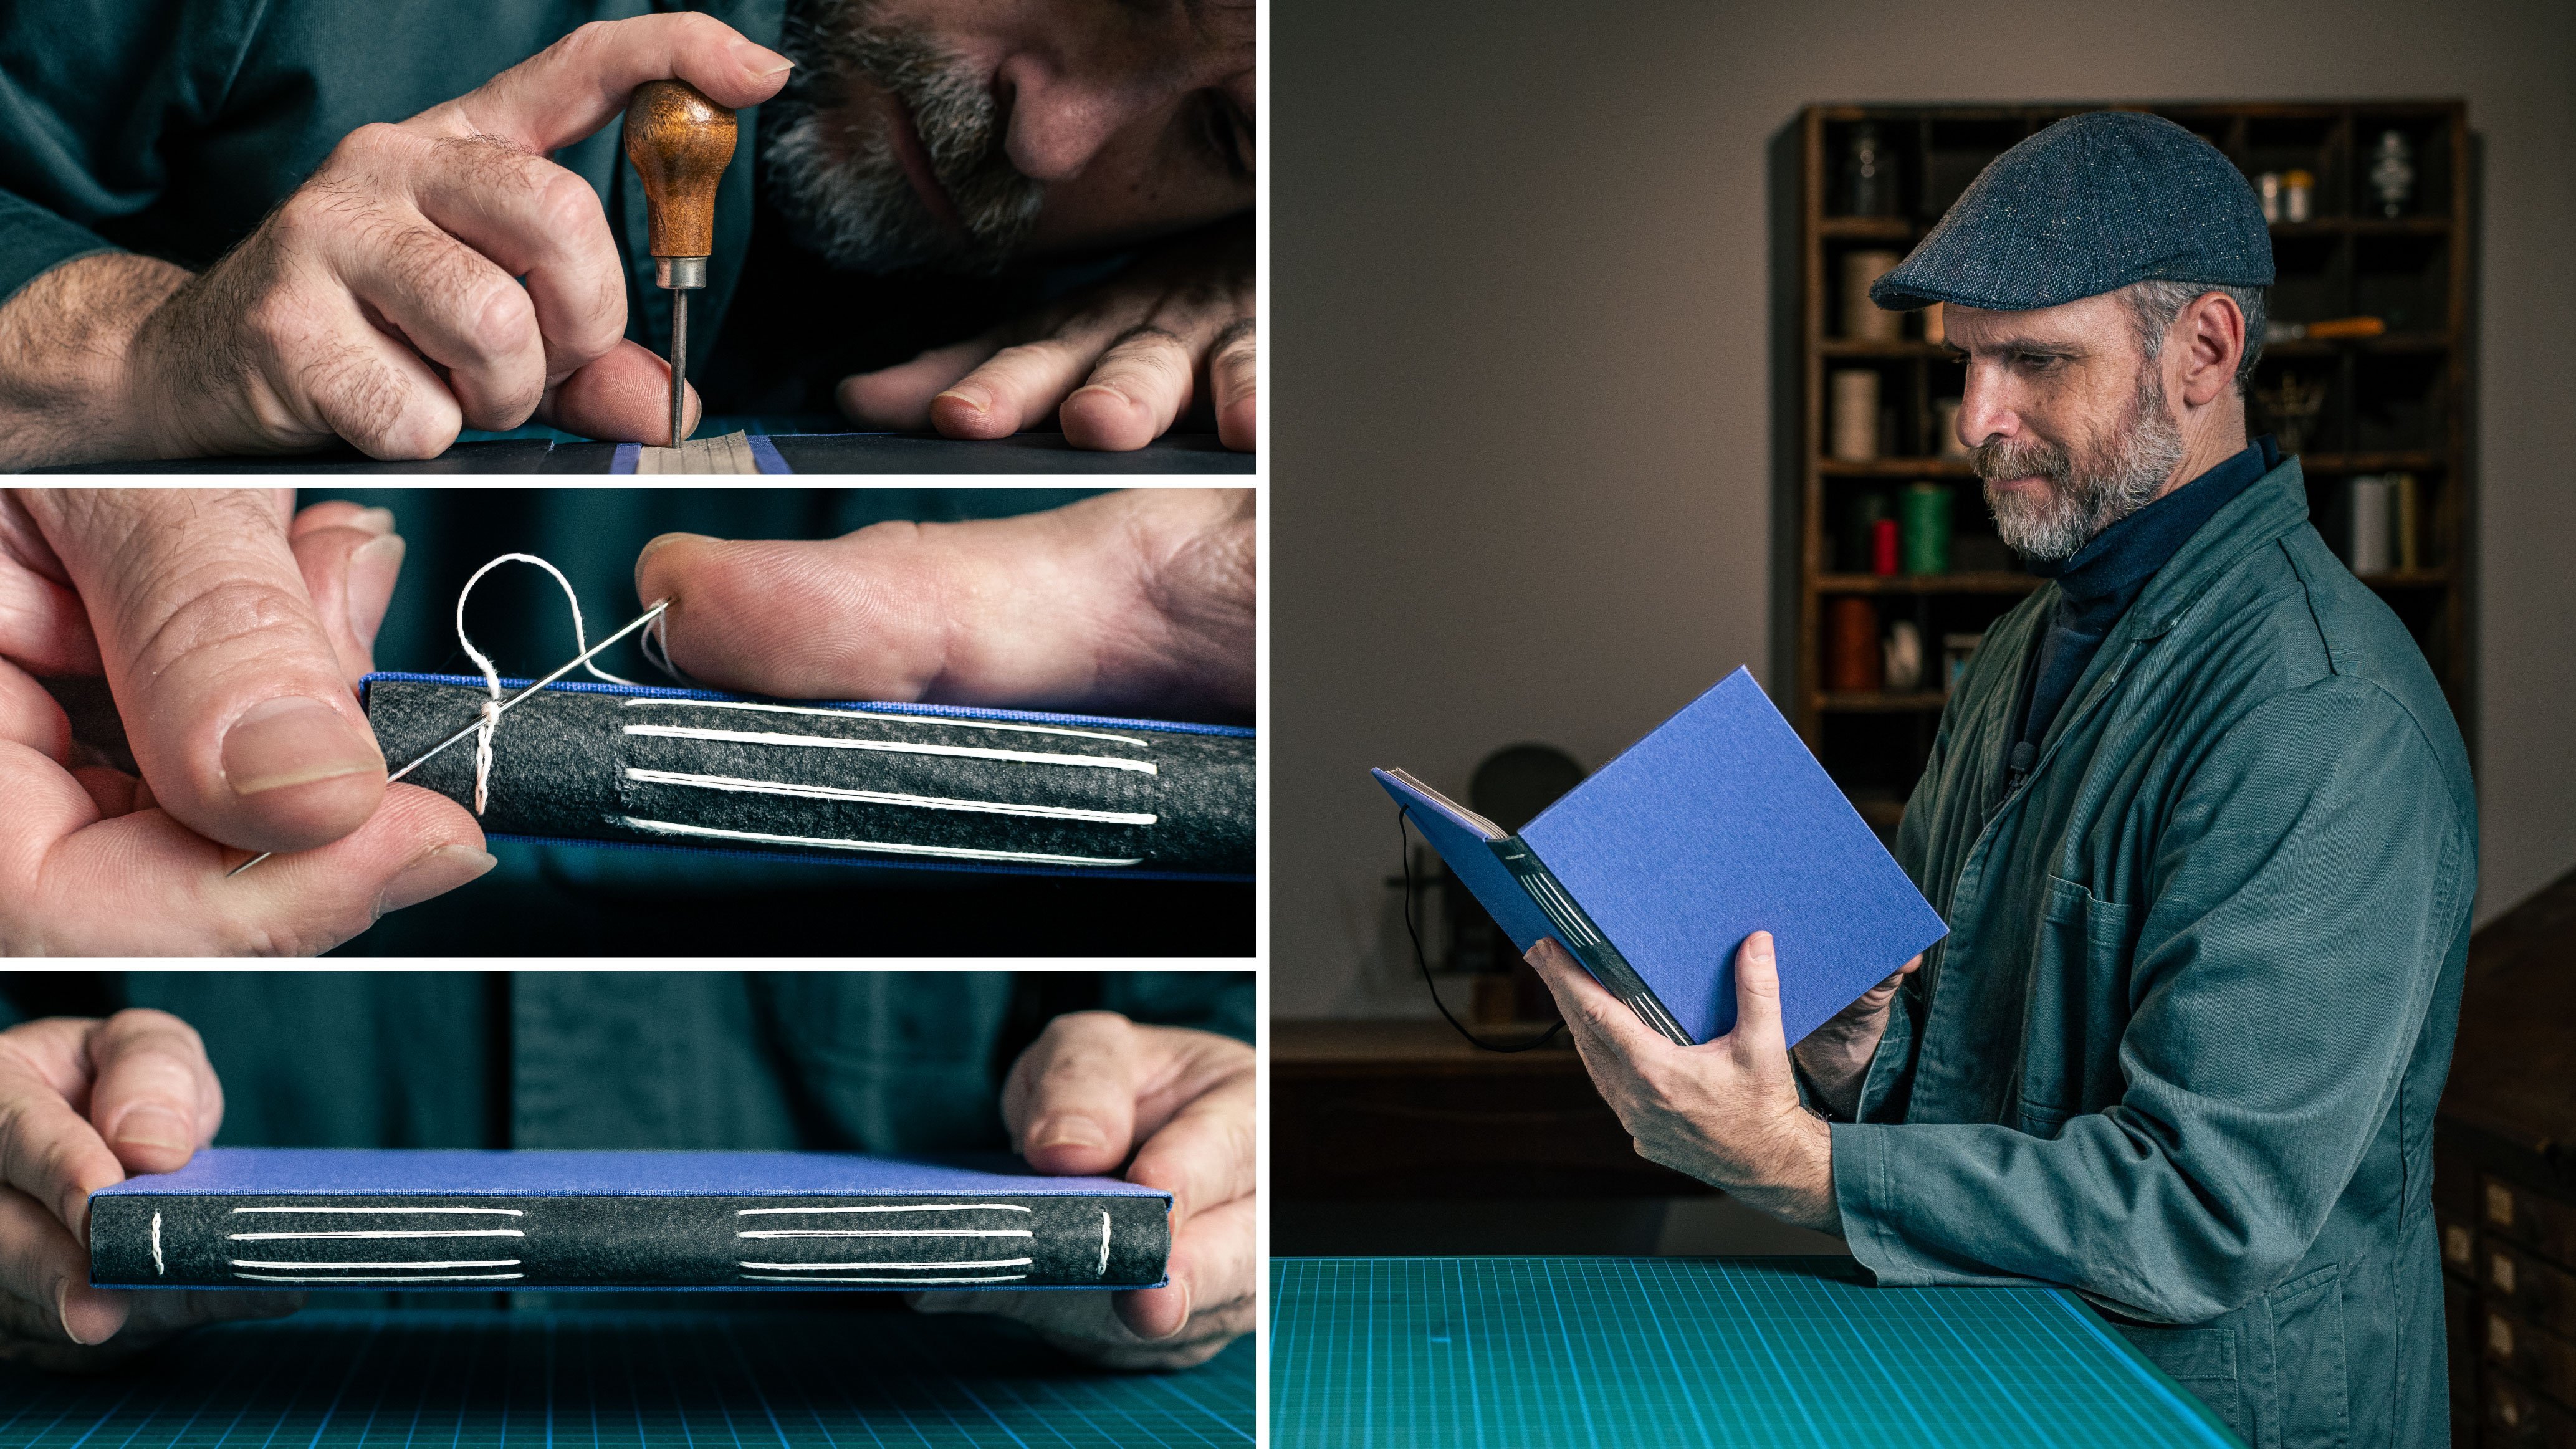
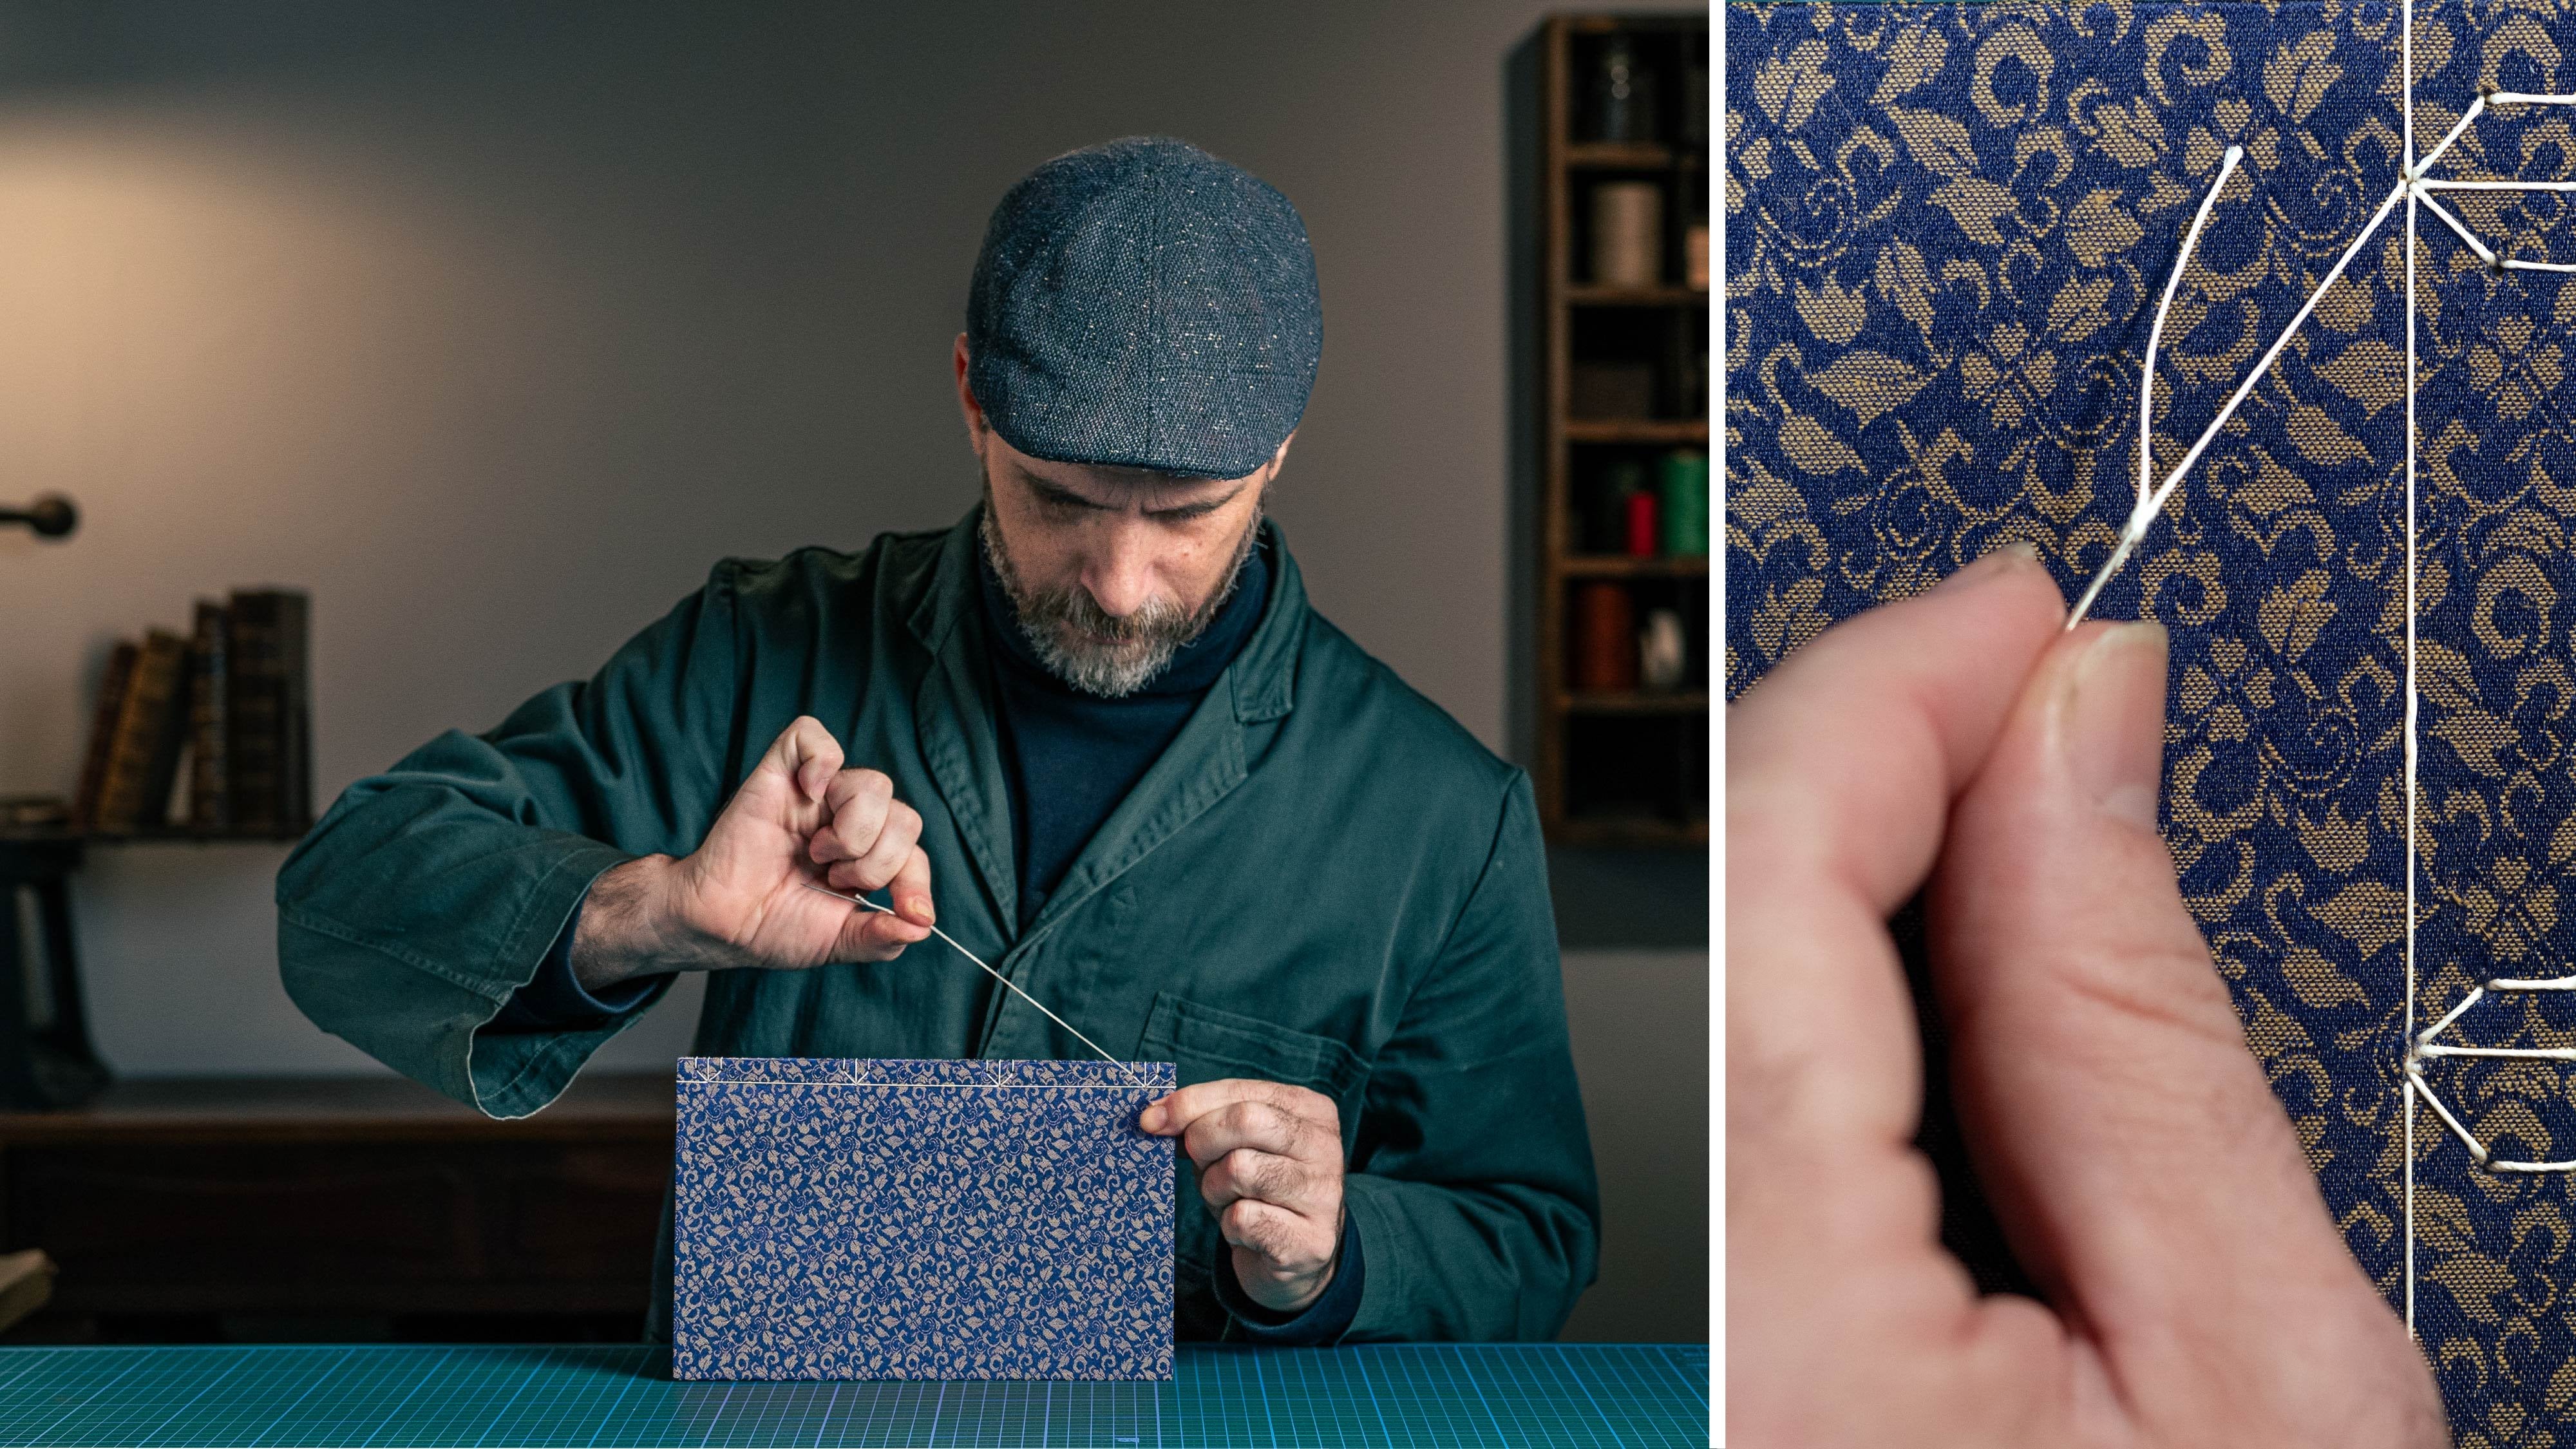
6. Piercing Holes: Welcome back. Our next step, and it's a very important step, is piercing holes for sewing. Why is that such
an important step? Because we are going to make a binding with an exposed spine, and everything is going to be revealed while you are working. Try to be as precise as you can. Okay, let's start by
taking our signature. Taking the template, I would connect the template
from the left side, which is the upper side. See it straight? I'll take a piece of board
to put underneath. While I'm working with all, I would pierce through the book binding board
and not the green mat. Let's open our signature. Make sure that the
template starts exactly as the signature and we will start
making the holes. You take your all in
the palm of your hand, put it in the first mark, close it a bit and pierce
inside the second one, and pierce and the third one. As you can see, I'm
opening the signature, putting the oil and then
closing it so I can see the oil and the point
of the oil going exactly in the fold again, we said we are going to
be precise each time, close it, and make the hole. Moving on to the next one, take the template out
and put it in a way that I can make all the
signatures pointing the same way. Let's take the second one, open it again, the template
exactly at the same place. If you're going to
put the template exactly at the edge
of the signature, all the holes in the book are going to be precisely
at the same place. Opening and piercing. Opening and piercing. Take the template out, put it on top of the first
one. Opening it again. See it straight. This is one of the things I love
about book binding. I love the process of
piercing the holes. Let's do the second one. As you can see,
opening and closing, and I can see it's going
out exactly in the fold. Can you hear the birds
singing in the background? And the last one
open in the middle? Take the template, connect it, make sure it's straight
and pierce the holes. Great as you can see. Try not to move it
around so much as you can see everything
is at the same line. I'll put this aside. Moving on to the covers, I want them to be inside. Inside, I'll bring a
piece of board for underneath and
I'll bring a piece of weight to hold it,
see it's aligned. I'll take our template, put it exactly in place, all the weight to put on it. I'm going to take the oar
and start piercing holes. So I'll start at the left side, at the middle 12.3, and at the end, 12. And the reason we are
piercing them both together is to make sure they are exactly
at the same place, make sure they are aligned, and then pierce through them. If you're working with a thicker material than
what we are working, you can flip over
the back and then work again on the other side because you will have the marks, but you can make the
holes a bit wider. Just remember that the holes are not supposed to be very big. You just need the
needle to go through. Okay. Because if it's wider, the cover could be a bit loose, so make it as thick as the needle that is going
through while sewing. Okay. So everything is
actually ready for sewing, and I think this
is a great place to stop and have a coffee break. I want to give you some tips and information about threads, how to connect two
threads together. How to wax them a bit about the sizes and
thicknesses of threads. So make yourself a
cup of coffee or tea, and I will see you
in our coffee break.
7. Coffee Break: Welcome back to
our coffee break. I wanted to talk to
you about threads, how to wax them, and how to
connect two threads together. Let's talk about threads. The most common thread for
bookbinding is linen thread, and it is considered to have more strength and
longevity than cotton. There is also polyester
and nylon threads, even ones that come
already waxed. Like this one, you can see it comes in beautiful,
vibrant colors. What you need to do is fuse the edge with a lighter
before you start working. But I do recommend
natural materials. Book binding, lining
thread is almost always specified in the
Lear numbering system. And ply, what is ply? Ply is the amount of yarn twisted together to
make a single thread. I usually use three ply about
the Lear numbering system, it's the number of yarn in
one pound divided in 300. But you don't need
to remember that, just the thicker the thread, the lower the number
you can find it sold in three different
ways, in scoops, in Cops, which is
larger, 250 gram, and in scales, I usually
buy it in skines. I want you to see
the difference. What I recommend you to buy, and I mostly use is
18 by three ply, 25 by three ply and
40 by three ply. What kind of thickness
should you choose? That's a complex question. It depends on the thickness of paper and the amount of
signatures you have in your book. I'll try to explain. The thread adds up in every signature
along the spine. If you have many signatures
inside your book, it adds up. And sometimes you
have a binding with a thick spine and the
forage is very thin. If you look at this book, you can see it's more
or less the same, but the thread is different. Here you have a thicker
thread than here. If you look, you see the spine is thicker than
the forage on this book. On this book, it's
more or less the same. I generally use for thick
paper, thick thread. For thinner paper,
a thin thread. On the other hand,
we are working with the Coptic binding and everything is
revealed and exposed. When you use a thick thread, you can see much more visible, the chains along the spine, and it looks beautiful. This is actually a design choice and there's no strict rules. So you need to find
the balance for your own work between
the signatures, the thickness of thread,
thickness of paper. Just experiment and
see what suits you, how to wax thread and why. A wax thread in the Coptic binding has
a lot of advantages. First of all, it
holds a knot better. And also the chains are
more visible because the thread is a bit
stiff and it's sticky, and it's much more
easy to work with. It also doesn't twist as
much as unwaxed thread. I must say, I'm usually
working with unwaxed. But for this binding and non adhesive
bindings in general, I just take a bar
of wax and wax it. I want to show you how
I take a bar of wax. You can see all the signs
from previous times. I take a piece of thread, I hold it on the wax. What I do is hold my thumb on the wax and then
move it as fast as I can. Because when you do it
fast, fast, make friction, friction makes heat and the heat absorbed inside the thread, you move it very
rapidly, several times. Let's do it again
over here again. After that, I take my fingers and move
it along the thread. Make sure there's no extra wax on it, and you are good to go. Let me put this aside. Now I want to teach you how to connect two
threads together. There are times when you're
out of thread, it happens. Sometimes you have a
very thick book and you need to work or with
a very long thread, and it takes hours
or to cut it to smaller pieces and you need
to connect them together. There are times when you
have a knot why you are working and then you
need to cut it or resow. I want to teach you how
to connect them together. What I would do is take
two colors of thread. You understand which
one is going where. What I would do is cut this one. And this one would be the one that I just
finished working with. This one would be the
one I want to add. What I do is make a simple
not to the new thread. I would put it on the old one. And the advantages of
this kind of connection is I can slide it to
wherever I want it to be. I'll make it tight. Now
what I'm going to do is take the old thread and
make another simple knot. So I'll go it over
the thread and inside and bring it
towards the first knot. Now what actually
happened is we have 2 knots that are
holding one another. And if you pull, they will never get loose because they are working
against each other. That's how I connect
two threads together. This is called a
fisherman's knot. There are many ways to
connect two threads together. I like this one because you can locate the knot exactly
where you want it to be. Now it's very important
for me to say, if you are working with
the non adhesive binding, when the spine is exposed, always make the knot
inside the signature. But if you are working with the binding and the
spine is concealed, always work on the
outside of the spine. When you flip over and read
the book, you won't see this. Not so that's it
for this lesson. I hope it gave you
some information and tips and I will see
you in the next lesson.
8. Preparing the Thread: Welcome back. Before
we start sewing, I would like to show you how to measure the length of thread. It's important for me
to show you the key to measuring so you can apply to different formats and
thicknesses of bindings. So what we are going to do
is measure the length of the book times the signatures we have plus front
and back cover, plus two extra
length of your book. We have six signatures, front and back cover, that's
eight plus two. We have ten. Let me bring the thread and
we will measure ten times 123,456,789.10 And
let me cut it here. I'll move this aside. Now what I want to show
you is how to thread the needle without the thread getting loose and without
a knot on the needle. What you do, first of all,
you thread the needle. Now what I'm doing is I'm
taking the short side, around 3 centimeters
from the edge. And I'm going to insert the
needle inside the thread, more or less in the middle. Call the needle and pull
the long side down. That's it. The
thread is connected, it won't get loose, and there's no not
interfering with our sewing. Go ahead, measure your thread. Thread the needle and I will
see you in the next lesson.
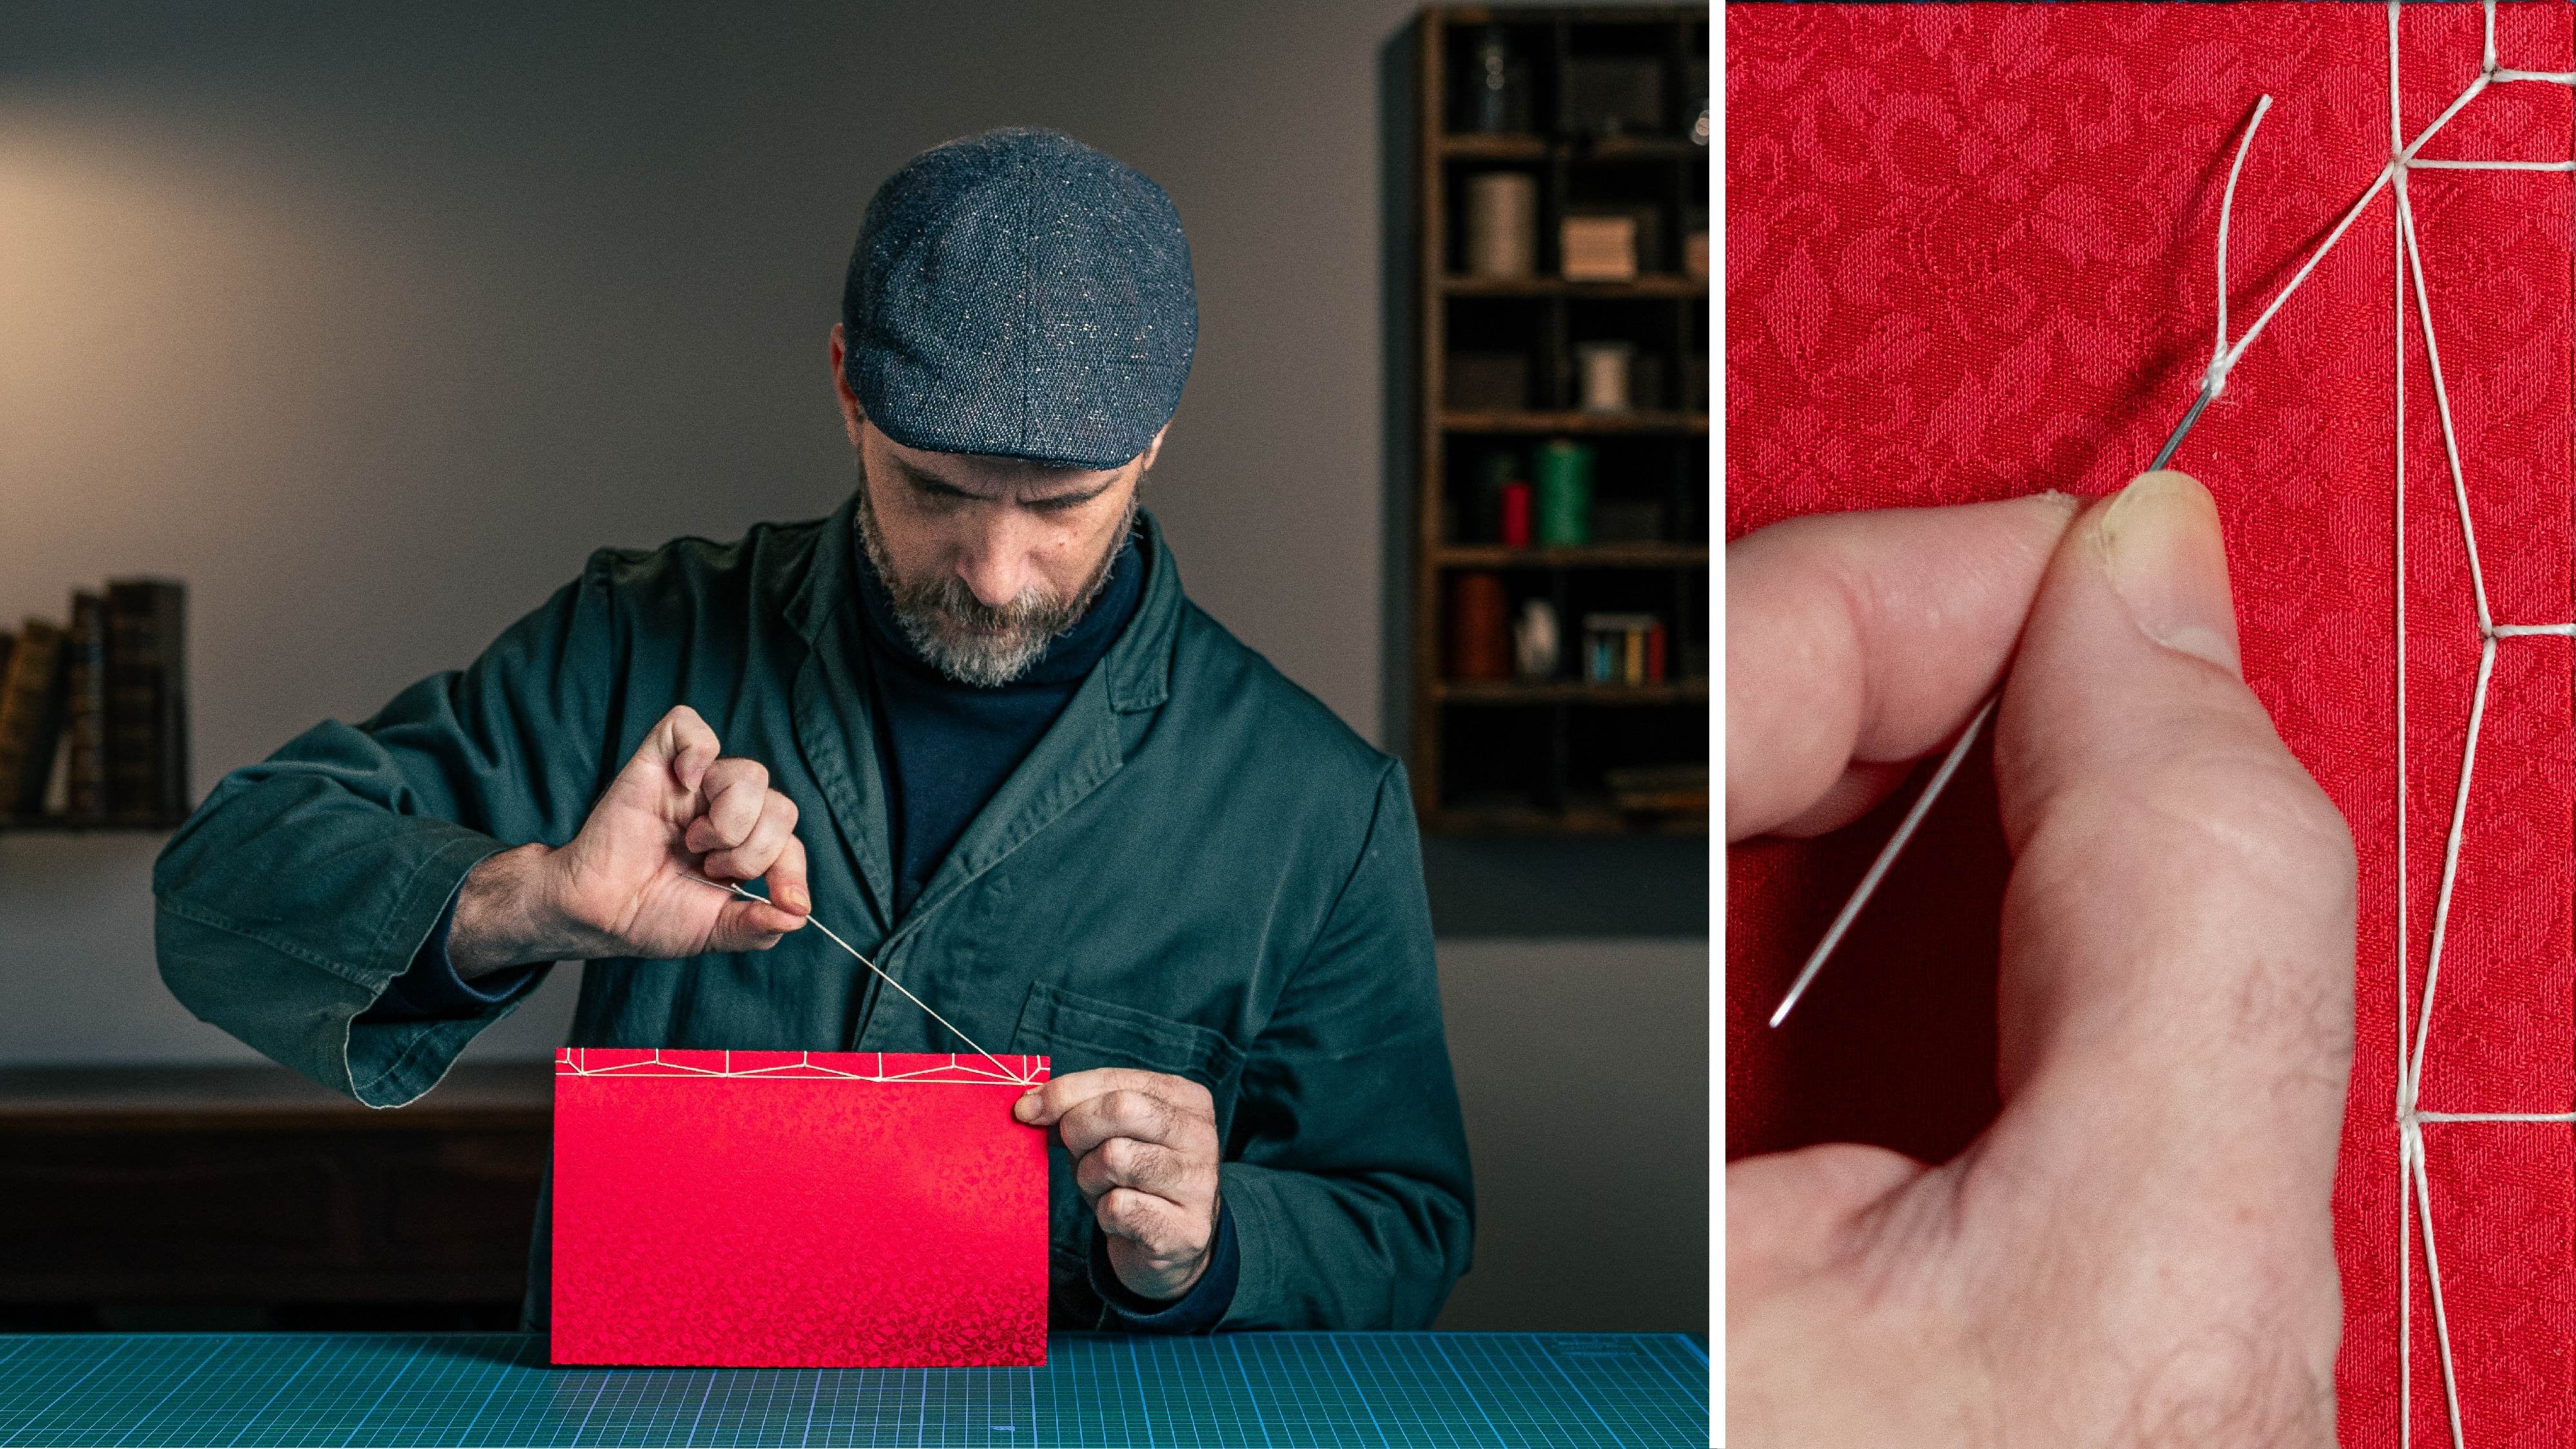
9. Let the Sewing Begin: Hi, welcome back. Everything is ready for sewing. I'm going to break down the procedure of sewing
into three lessons. The first lesson is
going to be how to connect the cover and
the first signature, which needs a bit of attention
and flipping around. The second lesson
would be sewing the entire book up until the
second to last signature. And the third lesson
is going to be how to connect the last signature
and the cover to it. Are you ready? Let
the sewing begin. I will start by placing
the back cover on the edge of the table and I'll put the first
signature on it. I'll take my needle. And what I'm going to do is from the inside of the first station, take out the thread and leave a tail of
around five centimetres. Now what I'm going to do
is flip over the binding, Insert with the needle in the first section,
put the thread, pull it back, flip
over the binding, and enter the first section
that we started in. Now what I'm going to do
is make overhand knot, a simple knot of the beginning of the thread
and the rest of the thread, I'm going to tie one.
Let's do it twice. Second time, great. I'll take my needle
and go out from the inside out at
the next station. Flip the binding over. Now I'm going to enter
the next section, which is the far one, The two centimeter one. Pull the thread, go back to
the spine with the needle. Pull the thread, make it tight a bit, flip over the binding, and enter inside the hole. We started in pulling the thread to the next station, the third one in my first group. Pull, pull it towards
the sewing direction, the paper won't tear out. Flip over, take my needle, go inside the next
station on the cover, From the outside inside,
pull the thread, go with the needle inside, back to the spine, pull it tight, flip over
the binding and go back inside to the next station. Pull the thread back, flip the binding over, open the cover a
bit, and go through going with the needle
back towards the spine, pull it tight, flip over the binding and go
inside the section we just came out of next station towards the direction of sewing. Flip over the binding. Let's open the cover
and bring from the outside in in
the next station, going with the needle
back towards the spine. Pull it, see it's tight, and flip it back over and
go inside same station. Pull the thread back, flip over the binding inside the cover
from the outside in. Pull the thread back
back towards the spine. Flip the cover over and go
inside the same station, pulling the thread
to the next station. Flip over inside the cover from the outside In pulling my fred going back
towards the spine, make it tight,
pull it backwards, flip over the binding, pull it back and inside
the same station, pulling out the thread. We're almost done
with the first one. Next station, pull
the thread back. Flipping over, opening,
this is our far station. Back inside towards the
spine, pull the thread, flip over and insert back to the same station we are
in, the last station. Going from the inside out, flipping over inside the cover, back outside again,
pull it back, flip it over, and I'm going to stop here and I'll see
you in the next lesson.
10. Sew with the Flow: Welcome back. Let's continue. What I'm going to do is lift
the first signature and put a weight on the cover that would help me find
the needle each time. So what I'm going to do is take the next signature and
put it on the first one. Make sure you are putting
it in the right direction. I'm going to take
the needle and go inside the first
section on the right, which is right above
where we finished. I'm going to insert the needle
back to the next station. I want you to pay
attention that I'm pulling the thread up until the end before returning
towards the spine, so the thread won't
twist around. Now what I'm going to
do is pull it a bit. Insert the needle
between the cover and the first signature lift it. That's why the weight is here. So I can find the needle easily. I'm going after the stitch here, going back before the stitch, pull it tight and back
inside the same station. Moving on to the next station, needle from the inside out. Now again I'm taking the needle, bring it between the first
section and the cover. Lift it, find the needle inside, pull the thread and bring the needle
before the stitch, and go back inside the station. Moving on to the next one. Pull the thread inside. Now again, I'm
taking the needle, going after the stitch, and going back
before the stitch. Pull it a bit and go
inside the station. Moving on to the next one. Put it out inside the needle, between the cover and the
first section. Find it here. Pull the thread, go over the thread and outside again on the other
side of the stitch, pull it inside the
section we came out of. Moving on to the next
station needle from the inside out needle, between the cover and
the first section, open it, find the needle here. I'm always entering after the stitch and going
back before the stitch, pull the thread and go
inside the station. Next station between
cover and first station, back to the spine that is
going to make our chain. And back inside
the same station. Next one between the cover in the first section, take your needle and
back on the other side, pull it up to make the chain nice and then back
into the signature. Now we're reaching the last
station from the inside out, pull the thread
up until the end. Now what I'm going to
do is take my needle. Between the first signature and the cover and go
towards the edge. Pull it and make a loop. Now I'm going to take my needle from the bottom
up through the loop, make sure it's tight, pull it towards the
direction of sewing, and then lock it. Let's take a bone folder,
work on the edge. Now what I'm going to do
is take my weight and put it between the first
signature and the second one. Again for me to reach the
needle much more easily. I'm going to take the next
signature, put it on it, and enter on the first
station on the left, just up from where
we came out of. Let me pull the thread, go inside to the next
station, pull the thread. Now I'm taking my needle
and going between the first and second
signature after the stitch, pull the thread and then go back in before the chain stitch, pull it, can see the chain
is becoming very nice. And go back inside
the signature. Next one between the first
and second signatures, lift it, find the
needle, pull the thread, go back towards the spine, pull it a bit to make the chain. And back inside, going from the inside out the needle between the
first and second signatures, find the needle here and back towards the spine, pull up to make the
chain not very strong. Because if you make
it very tight though, the chain would be very close. You just need to lift it a bit and go back inside
the signature. After the first and
second signature, I'm going forward, then I'm going back before the
first and second signature. I'm going back each time pulling it a bit back inside
the signature. I love that there
is a rhythm to it. Swing the scoptic binding, always entering
after the stitch, and going back before
the chain stitch. Pull it a bit and go
inside the station between the second
and first signature. Catch the needle and back before the chain stitch, pull it bit and go
inside the section. I love this process of sewing going forward after the
stitch and back to the spine, pull it a bit and
inside the section, and we are in the
last station in our third signature
I'm going to pull, now look what I'm doing. I'm taking the needle
and going between the first and second
signature towards the edge. I'm going to pull the
thread until I have a loop. I'm going to take
the needle from the lower side inside
toward the top. Pull the thread a bit towards
the direction of sewing. Don't pull like this
because you can tear the paper and then
lock the knot. I work with pomp folder. Move my weight one
signature up again. It would help us
find the needle. Each time I'm going to take the next signature and start from the right
side the first station, pull the thread and back
outside pull it a bit. Now what I'm going to do
is take my needle between the second and third
signatures after the stitch, pull the thread and
then go back toward the spine on the other side of the thread that's
going along the spine. Pull it a bit to make the
chain don't pull it very tight so the chain would
be visible and nice. And then go back
inside the signature, moving on to the next station. Go after the stitch and then go back around the
chain stitch on the spine. Pull the thread back inside. Moving on to the next station. Pull the thread
inside the needle between the third and
the second signature. Then I'm going back if
you feel comfortable. You can go on and sew
the entire book and just stop the second
signature before the last. But I'm going to work
until the end of the book so you
can work with me. Needle from the inside
out inside the needle after the stitch and going
back before the chain stitch, pull it a bit and go
inside the station. Moving on to the next station. I'm going after the stitch, pull it up, finding my needle, pull the thread and then go back in before
the chain stitch, Pull it and go back
inside the signature, pull the thread, insert the needle between the third and the second signature
after the stitch. And bring the needle
before the chain stitch, pull it back inside. We got to the end of the fourth signature
pulling the thread. Now I'm going to
take the needle, go between the third and the second signature,
make a loop. And go with the needle from the bottom up through the loop, pull the thread towards
the direction of swing and lock the knot. I'll move the weight
one more, station up. I'm going to take the signature. This is the last one
For this lesson, I'm going to go and enter on the first station
on the left, just up from where
we came out of, Go inside The next
one, pull the thread. I'm going after the
stitch, pull it up. Finding my needle. Back on the other
side of the stitch. Pull it up to make my chain
don't pull very tight. So we'll have a nice chain and
back inside the signature. Moving on to the next station, after the fourth and third
one, find the needle. Go back to the spine
from the other side, pull it back inside. Next one, it's quite easy
when you get the hang of it right inside the needle after the stitch and then go
back before the stitch. Pull the thread and go
back inside the signature. Next one inside the needle. After the stitch, find it, pull it, go back to the
spine from the other side, pull it back inside, pull the thread, moving on to the next station
inside the needle. After the stitch, find it, pull it and then go
back before the stitch, pull it a bit and go
inside the station going after the stitch, and then back before the stitch, pull it a bit, back inside, go after the stitch, and then back before the stitch, pull the thread and go
inside the station. Last station we're going out and now I'm
taking the needle, going between the fourth and third signature
towards the edge, and I'm going to make a loop. This is called a kettle stitch. Take my needle and go with the needle from the bottom
up through the loop. Let me pull it a bit
and lock the loop. Great, I'm going to stop
here and in our next lesson, we are going to do the final
signature and the cover, because it's a bit different than what we did up until now. So I'll see you in
the next lesson.
11. Final Signiature: Welcome back. Here we are
at the last signature and I want to show you how to
do it because it's a bit different than what
we did up until now. First of all, I'm going to lift the weight one
signature up again, it would be easier
to find the needle. What I'm going to do is put the final signature
on it, the cover. And we are going to sew first the cover and then going
back inside the signature, I'll show you how I'm going
to take the needle and go inside the first station on
the cover, pull the thread. Now what I'm going to
do is take the needle, go between the fourth and
fifth signature in an angle, and then back to the
spine, pull the thread. Now I'm going to go inside the station and pull the thread. Make sure it's tight. Now everything is tight. Pull the thread, and
then I'm going to go back out to the spine
in the next station. What I'm going to do is go first with the needle
inside the cover, pull the thread, go
back to the spine. Pull the thread, so
it would be snug. Go between the fourth
and fifth signature. Lift it, let's find it with
the help of our weight. Here it is, Take it out and
then back towards the spine. Now go inside the last signature and go out in the next station. What we are actually doing
is going out of the section, going over the cover between the fifth and
fourth signatures, making the loop the chain, and then going back inside
the last signature. Let me show you again, I'm
out at the third station. First of all, I'm going inside the cover from the
outside in pulling the thread going back
toward the spine. Now I'm going with the needle between the fourth
and fifth signatures, pulling the thread
and going back to the spine pulling and then going inside the last
signature after the chain. Okay, so from the left
side pull the thread. Let's do it again. Next station, take it out over the cover. We're going from the outside
in back to the spine. I'm going to pull it again between the fourth
and fifth signature. Find the needle, go
back to the spine, pull it so you
have a nice chain. Then I'm going to go
inside the last signature. Let's do it again.
Outside, over the cover, from the outside in, pull the thread back
towards the spine. Now again, we are
going to make the loop between the fifth and
the fourth signature. After that, go inside
the last signature. Again, I'm going between the, you know that you are right when you lift it and you
find the weight. Around the thread, make the chain and then go
inside the signature. Last station in the middle, over the cover, back
towards the spine. Pull it a bit, see
it looks good. Take the needle between the fourth and fifth
signature, lift it, pack out around the chain stitch and inside the last signature, take the needle and go out in the next station
inside the cover, back to the spine between the fifth and fourth signature. Remember we are going each
time forward and then backward forward and then
around the stitch, pull it and go inside
the signature. Pull it a bit inside the
cover, pull the thread. It's much shorter
now, much easier. Back towards the spine, pull the thread, so
it would be snug. Go between the fourth
and fifth signature. The chain towards the spine, pull it so you
have a nice chain. And then I'm going to go inside the last signature we are in. The last one go from
the inside out, around the cover,
back to the spine, between the fourth
and the fifth in an angle, Make a loop. Go inside the loop to
make a kettle stitch, pull the thread, and then go
inside the last signature. Now what I'm going to do, let me move the weight
so you can see. I'm going to take my needle, go underneath the thread here, and then go with the
needle inside the loop. That will make us a knot. Let's do it again
underneath, make a loop. And go inside the loop, I'll bring my scissors and cut. Let's go to the beginning
and cut this also. And that's it. We
finished our binding. Let me clear out
everything here and see you in the next
and final lesson.
12. Conclusion: Congratulations, you
reach our final lesson. Learning something new
can be a challenge. And I'm very proud of you for completing this
Coptic binding. I'm also eager to
see your creation, so please share it with
us in the class project. I promise to see each and every submitted work and answer questions
if you have any. You're welcome to
follow me here on Skill Share and
also on Instagram. And then if a new
class is published, you will be notified. You can also see my
previous classes and learn more
about bookbinding. One more thing, if
you enjoy this class, please leave a review
because that helps me promote this class and
helps others find it. That's it for this course. I hope you enjoyed it and I will see you in the next course.
 Ido Agassi, Book Artist