Transcripts
1. Introduction: Hello, everyone. I'm so
excited you're here. In this class, we're diving into a fun and creative
project that adds a bold, personal touch to your
handmade journals. DIY painted art buttons. I'm Denise Love, an artist
and creative educator, and I'm excited to bring you
into this fun mini class on making your own really cool painted buttons
for your journals. We'll be turning simple
coconut shell wood buttons into tiny glossy works of art that you can
use as closures, embellishments or
statement pieces on your journal covers. I'll walk you through the
whole process from painting your designs to sealing it with a shiny finish that
really makes it pop. Whether you're brand new to mixed media or a
seasoned journal maker, this is a relaxing, satisfying project that lets your
personality shine through. Let's get started and
make something beautiful.
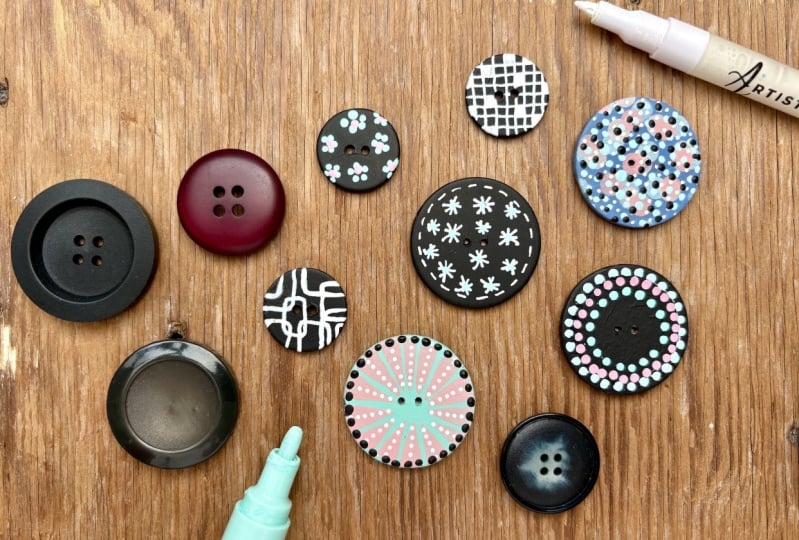
2. Class Project: Your class project,
I'd like you to create several painted glossy buttons that reflect your unique style. These can be themed
like florals, abstract designs, or
totally free form. Play with color, texture,
pattern, and shine. Post your finished buttons
in the class project area. I love seeing how different every artist's
buttons turn out. It's one of the best
parts of the process.
3. Inspiration: Talk about what has
inspired this class. I started making my
own art journals when my very favorite one with all the different mixed pages
in it, quit being made. I'm like, Oh, no, now this
is how I want to work a lot of time is working a book and have a lovely finished piece of
art when we're done. That has just spurred me on
to making dozens of books. Now I've got a new problem. So these gigantic buttons
are my very favorite. And now I feel like every book
that I make going forward, I want to have a gigantic
button on it because it makes for the
most lovely closure, and it's just a statement piece on the front of your books, and you can have a pretty
ribbon and then it can close up your book
and just look beautiful, it's the most lovely statement and finish off of a journal. And so now these
great big ones are 2.5 inch buttons that I
got from Joanne Fabrics. If you didn't know
or hear the news, Joanne Fabrics is closing.
I'm like, Oh, no. While I do have a few colors and buttons that I can still use on some other art journals, I'm not going to be able to
get these big ones again. You might can find them if
you search hard enough, but they're hard to find. They're by organic elements, and they run five bucks a
button. They're not cheap. And they're just very large. You can also get almost
identical buttons, but in the two inch size, this is 2.5, this is two
at the hobby lobby and they offer different options
and they're really cool. But I thought what about
if we could make our own? Because they're different.
They're not the same. They don't have this little
glossy finish on it. You can do this
gloss finish with epoxy and you can
use the clear epoxy with colored stains that
they make now for it or we can paint
buttons of our own. And coat them with
epoxy and end up with some super cool
painted buttons to now use on our art journals that
we weren't going to get any other way because now
these are very personalized, one of a kind, anyway that you
could want to decorate it. And so now that could be the
cover class of our journal, it makes it even more special. Because we painted and
made these ourselves. So I've got a
couple of different other finishes that I'll show you in class if you don't want to do the
epoxy, but I really, really love how gorgeous
these turn out, and they're a whole lot cheaper than $5 or more per button, which I know you're
going to love. And now you can have a button
for anything that you made, and you can say you
made the button too, or you painted the button too. So that is where this
class is born from. My willingness to experiment and explore and find something similar to the great Big buttons that we won't be
able to get anymore. You keep searching
for big buttons. It's really hard
to find a two or 2.5 inch button
that's really cool, maybe colorful and
reasonably priced. A lot of times these are, five, six, seven, $8.
They're expensive. That is where this
class has come from, I just thought that
I would show you the resources and the
little techniques that I found that work the best, and then we can all
have really cool buttons on our journals. I'll see if I can class.
4. Supplies: Let's take a look at the supplies that
you'll need in class. I found a resource
on Amazon that has these two inch
coconut shell buttons, and that is essentially what my inspiration
buttons were made of. Pull these back up
here and show you. But these are coconut
shell buttons, and it even says on the label for the one that I still have
on the package, coconut. I know that I've got
the right element, and I found the two inch
size fairly easily, which is the size
that you can find at the Hobby Lobby two already finished if you don't want
to make any of your own. But I just think these
are so much more special when we paint
them and make them cool. The 2.5 inch, which I love love, I did not find a good resource for a really inexpensive set. Like, I got a set of 30
of these buttons for $10, which roughly makes it three
buttons for $1 price wise, which is super cheap, considering these buttons
were $405 a button. And the littler buttons
from Hobby Lobby, you can maybe get them on sale, but there's still a couple
of dollars a button. So you can make them three
for $1 plus whatever supplies that you want
to do and you have something super special,
making them yourself. I wanted to share
that Amazon link for you and the supplies on
where I found a great price. But you can also search online two inch
coconut shell button, and these will come up and
you may find a better price or you may find a pack
of ten or whatever. I did find a pack of ten
or nine or ten on Amazon, but the best price
was the pick of 30. Because I just plan on
keep on doing this, I thought, why not? Got to have some
buttons. You can use any kind of
buttons you want too. You could do this
with any buttons that you find that you like. Any wood buttons with a
cool pattern or shape, you could do the
same things on that, so it doesn't have to
be limited to the one that I found that matches
what I'd like to do. For the finishes, I tried out several different finishes and I just thought I would
talk about them. This right here, I painted
with temper sticks. And so that worked okay. And it was a little bit harder
to get a good coverage, but I did like that
stained quality about it. So that was still fun. Then I painted this with
matte acrylic varnish. It is a matte finish on there. What I did not do was I did not do the prep
work underneath it, and so you could take your finger and scratch
off this finish. So it's really important to prep this before
you paint it because I tried several different prep
ways and I didn't prep one just to see which one is really
the way we need to do it. But I just wanted to show you
that kind of matte finish. You could do it with varnishes. That's a matte varnish
and that's the finish. You definitely need to prep it, so I'll talk about
prepping in a minute. I did try a gloss finish
with the varnish, and that's two coats and it's pretty shiny and
that was just fine. And you'll notice
as I scratch it. I cannot scratch that
finish back off. I did prep that a lot better. The prep is super easy, but it's definitely important. If you don't want to
go with an epoxy, you could go with
a gloss varnish and get a really nice finish. So that's another choice. Those are the grand tone brand. It's just a random brand I found when I was
looking for varnishes. This is the Vago.
Probably said that wrong, but it is a polyurethane
gloss varnish, whereas those were
acrylic gloss varnish. I do out of the three
choices of the varnishes, I like that one might have been. That might have been the
high glass acrylic one. This one was the
polyurethane varnish. When I was all done,
my favorite out of the three was the polyurethane
gloss varnish. I'd recommend this one out of all the different varnishes, and I do believe it
was this one here. It was the one I liked
the best because the other one with the acrylic, it wasn't as shiny. As the polyurethane one. You don't have to use
the ones that I found. These are art brand varnishes. You can go to the
paint store and get a urethane varnish if you want a one from
the paint store. But I do like the
polyurethane gloss varnish the best if you're just
going to use a varnish, you could test out any
other gloss things that you have that you like. Don't have to use any
of the ones I found. If you think, what about
this or what about that in your mind,
Mod pod or whatever? Yes, you know what? Try it. It's all about experimenting. If you've got an
idea, give it a go. What I really love the
best is the epoxy finish, and I've got epoxy cast, which just happened
to be in stock at a hobby lobby because my favorite one is art resin and that's the brand, art resin. It's non yellowing and I've used it a lot in art projects, but it just is not
coming, I guess. I ordered it and
I ordered and it just takes forever to come. But it's guaranteed
not to yellow. But because this is on a button
with lots of color on it, I don't know that I care throughout the long term if
it yellows or doesn't yellow. Art resin is the one that I
know for sure doesn't yellow. It's just taking a
while to get here. In the meantime, I'm
using this other brand, which is the exact same method where we take two
parts A and the B, and we mix them together to
get the super shiny finish. But I love it. It's
the closest finish to my inspiration buttons. I did notice at a Hobby
Lobby where I got this, they have epoxy stains or coloring for the epoxy,
which is what this looks like. This looks like they've
colored the epoxy and painted it on, so
you could do that also. I'm doing acrylic paint finishes because they're cool and I
can use my paint pens and I can use my markers and I
can use my different mark making things and get
something super cool to match a journal
I'm trying to finish, but I do like the
super shiny top coat. I am using Easy cast
epoxy from Hobby Lobby. Probably there's 100
different brands out there, I'm sure. Then I'm using some graduated measuring cups that
I got there because these are super cool because they've got little
measurements on the side. I don't know if you
can see that, but those make a big difference when you're trying to
get the exact quantity of A and B to mix. I usually mix much
larger quantities of epoxy to pour on art. But this, I wanted little
tiny quantities of epoxy. These are one fluid ounce cups with measurements on the side. I put the A and the B and I pour them into the third
cup to mix them. This makes the process
so much easier. I also have silicone
covered stick, which I got off of randomly on a collection of silicone
cups from Amazon. But you can also use a
spoon like a plastic spoon, which I usually use, but because I had these and
it was easy to clean up, I just used it instead,
but a spoon is just fine. You also need some sand paper
and I'm using 400 grit. I like the 400 grit
because it doesn't scratch the piece that we're painting and it gives
me enough grit to, um get the finish or whatever
that is on the button off of there so
that my paint will stick and not scrape back off. See, I can just
scrape that back off. If you don't sand it, you're going to be able to
scrape your paint back off even with that finish
on it. You have to sand it. You don't necessarily
have to put gesso on it, but the ones that really
held up the best best was sandpaper with a layer
then of clear gesso. I do have the liquitex
clear gesso that makes it really hold up good
and accept the paint. Um, so I do like that. I also have I'm painting
mine with acrylic paints. You can try different mediums and just see what works for you. Once you get the gesso on it, a lot of different
paints will stick to it just like it will a
canvas or a paper. But I'm using different
colors of acrylic paint. I'm also using
some paint markers because that made it really
easy to draw patterns on it. I also had super good luck
using the Nibal Cignas to do the little drawings on here. I worked really good for
drawing on there also, you can use any of your
drawing pins probably. Then you cheap you need some little paint brushes
for the acrylic paint, but you need a paint brush
that you're willing to sacrifice for the epoxy, a cheap one that
you can throw away. Um, and when I say cheap, cheap cheap is fine because
the poxy is self leveling. So once you get it on
there, you might have to go two coats possibly to get a
really, really good finish. But a cheap brush would be
fine because these self level and you won't see brush
streaks in there, usually. And then I thought
it was really fun on these to play with stencils. Like this, the little
pattern in here is, uh, this little
Tim Holtz stencil, that was one of my
favorite actually. You can see where I just held it down and stenciled on there. Any of these littler stencils, Tim Holtz has a bunch of them
from Stamper's Anonymous, this one, THs oh 16 with
these little diamonds. That's one of my favorite. But I did test out lots
of different ones. This was another
fun one, THS o26. It's a really pretty
kind of pattern on it. So just play and see what
you got, what you can do. And another thing that
I really needed was paper towel because I
put all these out on a paper towel and then
a toilet paper roll. This made it really easy when
I was all done painting to finish these and
let them dry and kind of sit up on the paper. So go save a little
toilet paper roll or a paper towel roll. And I just cut this
into little pieces, and then that made a perfect
perfect little button piece for me to let those buttons dry, especially the epoxy because you don't want the epoxy
to get out and stick the button to your table or the paper towel or whatever. That made it really nice to just let them sit overnight and dry. Paper towel roll or
toilet paper roll. I think that's all the supplies. I do have some rubber gloves because you're doing the
epoxy, you need the glove. If you're doing urethanes, you probably don't Okay, so that's mostly
all the supplies that I'm probably
using in class. And you can try out
any supplies that you happen to want to try out on these us once you
gesso that button, you can paint on it with
anything you can paint on gesso. And so let's get started.
5. Button Prep Before Paint: Take a look at
prepping our buttons. So I have just a
400 grit sandpaper. I like that because it
didn't scratch the buttons. So one that's a little rougher, will scratch your buttons. But it wasn't so fine that it was super hard to
get the finish off. And you just need
a little piece. So I just cut a strip of
it off of my bigger piece, and then you can hold the button down and you just want to lightly sand the
very top of the button. I'm not trying to overdo it. I'm not trying to go
down several layers. I just want to spend a second roughing it up a little bit so that the next layer will stick without any trouble and
it just takes a second. So don't spend too much
time and thought on this. Just sand it lightly. And
move to the next one. And I find it easier if you'll do just a whole
bunch at the same time. So, if you're thinking, I'm going to paint ten buttons, then go ahead and prep ten
buttons right up front. You're just trying to
really knock the shine off and give it
just a tiny bit of grit so that when we go put this gesso on it,
it will be ready. So once you've got your
buttons just lightly sanded, we can just take a cloth. And just make sure that we get
all the dust off of those. This is my microfiber cloth. I keep here in my art room. I love these. They're great for getting all kinds
of dust off of things. Then we got clear gesso. I did do some yesterday
without doing the gesso, and it worked okay. But this is clear
because I don't necessarily want to
have the top of the button white and then just a regular
paint brush is fine for painting the
clear gesso one. Then I do like
having the edge of the brush just to get any paint that I get in
the hole out of the hole. How convenient is that? Yeah, go ahead and paint
all your buttons with your gesso once you've
got them sanded. There we go. Now we're
ready to go with those. I'm going to let those dry, but I wanted to point out you could do this with
any type of button. There's lots of buttons out
there with a pattern on it, and you could do the
same with any of those. You could slightly
sand the texture off of that pattern and
off the top of there, just sew it and paint
it just like you do these coconut shell ones. I just thought I would mention if you had any type
of wood button, you could probably
do that very easily. Once you've got all your
buttons prepped and you've got the sew
painted on them, now we're going to let
these dry and then we're ready to paint. I'll
see you in a bit.
6. Painting Your Base Color: Now that we have
our buttons with our gesso all dry and you can feel it's got a nice
fun rough finish on it. We are ready to
paint some buttons, then you might think,
what am I going to paint? Well, you could just paint some that are your
signature style. That would be one way to do it. Another way to do it is to get some papers and fabrics
that you plan on maybe making some journals with
and then using that as some inspiration for color so that maybe that
could be future button. That you're painting stuff for. I really love for some reason, these are some fabrics I got
at a quilt fair recently, and it was lots of vendors,
and I thought, Oh, look at all these fun
fabrics and things, I got this one right here also. That I was making yesterday. This is a fun fabric from
the quilt store and a piece of cork fabric,
which is super cool. And so I did a design
here on this journal, and this is that Deena
Wakeley premade journal. So it's one of these
ledger journals, the new journal that she
came out with this year. 2025, if you don't watch this
when I put the class out. But yeah, I thought most of the journals I'm covering and making for myself are ones
that I start from scratch, but this one's one I already
had and I thought, oh, I want a fun cover on it, and then painting different
things in the book. I worked on this
cover yesterday and I was toying with ideas for
fabrics, for the ribbon. Then I also was tying with
an idea of a button on here, so it's probably going to be the button that I
use because I like it. But I was just showing you some ideas of
different things that you might consider
and pull pieces out of the book that you're making. I obviously didn't look at this too good
when I was making, but I might use
this one for that because I actually do like that, but I also could be inspired by these colors
and make something completely different to put
the button on that journal. So I was thinking some
of these colors I'm currently obsessed
with and it might be fun to use that as
my inspiration. I'm also obsessed with
the book I just made, I might use that
as my inspiration. Another thing about
something like this is then you can also pull some of these elements out of here and duplicate
that on the button, the little flowers and such. In this case, I might
do a button and a blue and do some
opposite colors. I could do the yellow,
but then it'll just blend right in with
the yellow because I'm thinking this blue like a navy or a pains gray might
be a good choice for that. I've just pulled out
some liquitex, basics, just some other colors that I don't necessarily
have Pains Gray. That one's too light, I
think. Oh, that's a dark one. Yeah, I was like, let's
just use different elements that you're considering
for your inspiration. So get a little piece
of palette paper here. Maybe I'll start off with
one of these colors. Actually, way too much. Oh my goodness, way
too much paint. And just a little
paint brush is fine. But you might start
off painting the base, and I do like just
a little brush. This is a Robert
Simmons number ten. I don't know, it's just a
flat brush, flat brush. Yeah, just be real careful
and I like painting towards the edge because then that'll save me from painting
on the edge or the back. I might take two coats of the base paint to get the
button covered really good. But it may take less
if you're using a thicker acrylic paint
like I'm doing here. Then we can check the
back to make sure I didn't paint before
it gets too far. The thicker paint might cover in one coat because I was using thinner paints yesterday
when I was painting stuff. I may do two of
those. I like that. I love that dark pains
gray, almost black. I also found that
the paint markers, they mostly work good. They work really good let me
put that brush in the water. They work really good
for drawing on top. These use little artyx markers because I've got
them right here. They're really good
for painting on top. Some of them were good
for painting a base, and some of them were not. But I could see, do I have one that's got a good green or
something that I like? Maybe I like this one here. Um, no, I don't like that one. That's too bright. That
does not look like valid. I mean, it kind of does,
but it's not enough. I'm going to go ahead and
just pick another brush. Doesn't really matter
your brushes on these, something small and easy. This one's a Princeton
select number eight. I can tell that this
color definitely going to take two coats. We'll let that one dry
and I'll come back to it. I also tried the timber stick. I can't say that I like
that one very much. I also have the tulle
art paint markers. That might be
another good choice. These are fun colors. Looking at some of
these fabrics here. I like this pinky color with
maybe that burgundy color. You see how fun this makes
it to matching colors. So yes, Tuuli art ones. These are the earth
tones by Tuuli art. Let's just see. Let's just see and then we'll
come back to painting. Maybe I'll paint it in this color. I like
the color of that. I can't say I like the pen
itself for doing that. But I do like that color. I find it easier on the base to do it with a paint
brush, actually. Just interesting observations
as we're painting. You might keep a baby wipe handy and then you can
wipe it off the bottom. You're going to see
that once you actually use that on a journal, but it would be nice just
to leave it clean anyway. Those those so the
tulard is so so. I'm still going
to paint with the tiliard on the rest of it, and then we'll
definitely be able to that would be all right. Can you use acrylic not
acrylic alcohol ink on these? I would probably
avoid the alcohol ink because the alcohol ink fades. And if you go to all this
work, I want orange button. After you go to all this work, do you really want
your button just to have that color fade away? Okay. I'm thinking orange. I'm gonna grab
another random brush. I'm just got a bunch
of them back here. This one has a flaw, which
I kind of don't like. So I may paint two orange ones. I mean, it's okay,
but it's gonna be hard to paint
anything else on it. I kind of let's agree. I like this fun blue color, and it might be fun
grayish blue, sage blue. This is orange deep. Those blue and green ones that I like so much over
there were yellow, green, deep, and aqua. That color was
light olive green, and this was Panes gray Just to tell you what
I've grabbed out of here. But I like this
fun Tiffany blue. It's like a blue gray. And then once you've
got all your bases painted that you think you're
going to do for the day, go ahead and let those dry and then we'll be
able to do the next step.
7. Decorating Your Buttons: Mostly dry here. I think
what I'm going to do is now start to play and I might start with the one
that matches that fabric there and just just play
a little bit and see. This one has Oh, you know
what I just thought of. See, this one has leaves on it, but I just thought of a
new stencil that I got. It's a Dina Wakeley one. I don't know if it's
still available or not, but it came came in this
package with some birds on it, and it was called Little Birdies and it had this
leaf stencil in it, so it's just a fun leaf stencil. That might be fun to
experiment with and to experiment with marker and a stencil instead of just
paint and a stencil, but I think we're
going to run under but we can always if you do
something you don't love, you can always paint over it. Nothing is permanent. So See, I don't like that. Okay. So what we could
do is put some of this paint on my paper here. So what I'm going to
do real quick is maybe a a baby wipe and see if that just wipes back off or if
I need to repaint it. Oh, look at that. Do
something you don't like, wipe it back off and repaint it. But I think I'm going to
paint it a little bit more with a paint that's
just similar color. Well, no, I do like
the color it was though. Maybe I'll fill in. Decisions, decisions. Okay,
we'll come back to that. I got an idea. I got an idea for that. We'll
come back to that one. And I'm thinking. So now let's go to one of these
others. I like the gray. I like, um I like this stencil here that
I had on one of the others. I'm wondering maybe this is a jackards just
acrylic paint. I like the container it's in, but maybe this on top of the orange with ink
blending brush, which is my favorite
stencil tool. And I'm just getting it
really in there good. To stencil on these, I hold the stencil
down on one half, and then you can hold the
stencil down on the other half. It's a little awkward and at the same
time, it's not hard. Then we end up with our stencil on our piece.
That's pretty cool. Then we can come
back and mark make around that. I really like that. I think that might be a
pretty on top of one of these gray and maybe one of these
swirly things perhaps. And I'm just again, just pressing
through the stencil, holding it as still as I can, and then doing the other side. Need more pain. Again, we're going
oh look at that. We're not going for
perfect, but that looked pretty
perfect, didn't it? I like that and
maybe in the green. Kind of feeling that green. For some reason, I like that. Let's grab some of that on
another blending brush. These inc blending
brushes really make this a much easier project. We could do that's the THSO 26, Tim Holt stamper is anonymous, and this is THSoh 16,
Stamper's anonymous. I also got some random I got I think I'm going
to use this one though. I also got some random
stencils from stencil girl. I mean, it's really just fun to play with
all the stencils, and these smaller ones
work really nicely for working in these buttons cause the buttons
are kind of rounded. That's what makes these
a tiny bit trickier. Wo I had way too
much paint on that. Okay. Way too much paint.
We'll just take our baby wipe and take it off. I just made a big blob. I didn't even make anything
nice there, did we? Alright, we'll just
paint that again. And come back to it. I made a big mess on that one.
Way too much paint. But I just want you to not be discouraged if
you do the same thing. It's not a big deal
and it's easy to fix. I'm thinking maybe we can come over here and it's way too
much paint on that one, but we're going to set it
right there for a second. We can come back over
here now that this is starting to dry and we can either draw something or
we can do a stencil on it, but I think we'd have to
do the paint over here. I don't know. We want to
try the leaves again. It's all about
experimenting in play. It's still a little
bit wet, though. Let's see. What else do we got? Kind of like this
green and maybe oh, do we like orange on top of
the green? That'd be crazy. See, I've got these crazy
ones that came from Amazon, but I don't think I
have a link for them. I don't know if they're
available anymore, but they look like patio
block on my grandmother's at my grandmother's house
on her patio years ago. Let's just throw that in some
water and grab a new color. What were we thinking? Were
we thinking orange on there? I'm going to try
the patio block. It's all about playing
and experimenting. We don't have to end up
with anything amazing, but I would just like them to look good to be
on my journals. Okay, did we do last paint? Well, yes, we did.
That's pretty cool. I have one spot that didn't cover, but I'm okay with that. It looks like a
little patio blocks. So just look around on your different things
that are out there available and just see
what else is out there? Kind of feeling like
on this because I was inspired by a fabric. What I inspired by a
fabric? Oh, you know what? I was inspired by
this on that green. I totally went a
different direction. Um, I want to paint something
pretty on this one, but I want it to be like
this pretty pink color instead of orange or we could even mix
some colors together. Like we could mix this blue and this orange and get a
whole another color. Let's see what we
get if we do that. Then maybe a leafy
pattern on this one. Then we can mark
make on top of that. Oh, that's cool. That's exactly
cool. That's super cool. Oh, my gosh. That's a good one. That's a Dina Wakeley
leaf stencil, but I don't know if you
can still get it or not. I do have some
other just random. This is a stencil girl stencil, but I don't have the number. Look around on Stencil
Girl. Let's do this one. Look around on Stencil Girl and look around on let's do this
with this greenish one. I don't know what book we're
going to use these on, but they'll be cool to
have and to play with. Then later as I have a
book to use things on, well, I'll have options. Or I'll know how to paint some more. That's what it's about. It's just fun, options, discovery, and then
figuring out later like, Oh, this is what I love. Oh, way too much paint. That one did not
work out as good. Okay. Ah. Don't get discouraged when you do some that work out
great and some that don't work out great because we can just clear it off
and start again. Oh, that one cleared off and didn't even pull the paint off. So that was definitely dry dry. So it pulls the paint out, we know it's probably not dry dry. All right. I'm going
to do maybe some of these flour
things on this one. That's on this
fabric, maybe some of these flour things that
are on this fabric. I'm just playing. Because then we could
take this maybe. This one's super pretty. I found out that the UIBL signal pin draws
really nicely on these. If you want to do drawing on, do a base and then draw with your pins or your
poscas or any of those. These draw really good. Experiment with all
your drawing stuff. Actually, I think I'll
leave it like that. Look how pretty that turned out. With the lovely gold on it. See how easy that could
be once you get going. You could draw it patterns. I think I'll come on this one. Do we want white on this one? Maybe we'll do white on this one because I got the white pen too. I got a silver one also. I don't like the
flower one. We'll have to repaint on that one again. Then we go back in, add a few dots if you wanted
to see how nice those. These do really good Signo
nibals. I love that. It's just fun to play. I think on this one, I'm actually going to go
with my little white pen. What I like about these
brush pens is you can get this really lovely teardrop
shape out of these. That could make a really cool
pattern on your piece and whatever color that you're
trying to emphasize. But Then you can come back with another color
and draw around those, which is exactly what I did my very favorite
one here that I did, see that I drew around the little white things
that I created there. Once this is dry, now you can just come
and draw around those or make little dots in them
or create a pattern. If you like the
little patterns that you do sometimes in your
watercolors, you can add those. And this is like this works super good for drawing on here. There we go. Then La That one's super
cool. I love that one. I love that one. I
love those four. This one we're still going
to work on some more. This one. This Oh, yeah, I like the gold. This one, we could go ahead and draw cool pattern
if we wanted to. Might not be what I intended
originally for this color, but you got to go with the
flow when you get inspired. Look at that. Pretty pretty. We can even come back in there with some color now
if we wanted to. Could come back in with
some other little dots just to add some color in
there if we wanted to. Just fun, fun, some little
extra fun bits in there. That's what I like about
the paint pins when you get to decorating in more detail.
Look how pretty that is. That one's pretty pretty.
Oh, I love that one. It's just fun to have
a whole bunch of buttons just to be able to play. I mean, I'm almost wondering, maybe a little pop of
some blue or maybe not. Hm. I don't know. So I'm gonna keep
painting on these. So this is your goal.
Paint all of your buttons, be inspired by fabrics
if you want to. That actually weirdly enough, is a really nice contrast for that fabric I was
using as inspiration, so that could be the button
for whatever I do with that. Instead of the wonky flower one that I started painting that
I'm going to paint over, don't get discouraged if you get any that you
don't love love. Oh, look at that. Oh, look
at that one. Maybe that one. Because you can always
paint over them. If you don't love love them, that one looks pretty good, too. The goal here is just to
play and have some fun, create some buttons
that you're like, these might look
really good with whatever fabric
you're inspired by, and then we will be ready to put a finish on these
in the next video, so I'll see you back in class.
8. Adding Finish Coat to Top: Alright, so I went ahead and
painted the last couple, did some fun stuff there. This was just splotches of color and then ringing
it with some color. Do it with just the little
Arctic acrylic markers, and that turned out
super fun, too. So I actually like
that quite a bit. So I thought still might color
this one with some gold, but I thought what we would do, I would just show you how I
use these different finishes. My favorite of those, again, we've got the mate
varnish and you've got the acrylic
high gloss varnish. Then we've got the polyurethane
gloss varnish by AO, BALLJO and the mate
one it's very mate. There's no shine at all there. Then the acrylic hiloss varnish. It's shiny, but it's not as shiny as the
polyurethane varnish. My favorite is the
urethane varnish, I use these all in the same way, so I'm just going
to go ahead and paint one of these. Let's
just paint this one. All I do is I go ahead and have a little paint brush handy because you can go wash
these out in the sink. I just do a little pool of three or four or five drops of varnish on my piece and
then spread that around. Then if you need
some more varnish, you can go ahead and add
some more. Let that dry. Then if you're thinking, I
think it needs a second coat, then come back and
put a second coat on it and I just make sure I've got the whole thing coated and then you can set
that down to dry. That's it. That is how easy
the urethane varnishes are. I'm just going to throw my
brush in a water bottle. And then we are ready
for the next finish. So all the varnishes work
in that exact same way. You just pour a puddle on there and then go ahead
and paint that on. Nice even coat. You could
come back with a second coat. I had a drip there, so I'm
going to go ahead with my little toilet paper roll
piece and set that up. That way, if you let
it dry overnight, your button hasn't stuck
to your paper towel. I've just got a
paper towel down. And then what we're going to do. So to make these things, I just had a toilet paper roll. And I just took about
half an inch or so and just cut myself some
of these little holders. And so going to
go ahead and have one for each of
our buttons here. I get that ready. I do want them even. Not all of these are very even, but I want them even. You can move them a little
bit with the button. But for the most part,
the more even the better. The resin is self leveling, but it still helps if
it's mostly level. There we go. One more. See how perfect those
are? Perfect. And now we are ready to get
our epoxy ready. I like these little self
these measurement cups. These are 1 ounce cups with
measurements on the side. I'm gonna epoxy coat
all the rest of these because that's
my favorite finish. That one's kind of crooked. Let's just get a straighter one. That one I've got nice
and crooked. There we go. What we're going to
do is we're going to take both our cups here with the measurements on the side that I can see them, and we're going
to put A and one. You got an A and a B and you want these to
be completely even. That's why the measurements
help on the side here. I like the little
bottles of the resin because they're not so
overwhelming as the big bottles. For this project, the
little bottles help. Then I can just
look on the side. Get them as even as I can because I got little
measurements there. There we go. This little bottle, it's got a number five
on it right here, so I was going up to the number five because you don't need a gigantic amount mixed for
just ten or 12 buttons. Then I take both of those little cups and let
them go right in a third cup. And then we're going to
mix in the third cup. That way we have got
an even mixture there. Then I do throw these out because I don't know,
they're hard to clean. I like that they're disposable. Make sure there's nothing
sticking on this. You can use a plastic
spoon also and your basis for a
couple of minutes and it'll tell you on the box how many
minutes it requires. I do about 3 minutes, I think is usually
what I aim for. I'm going to mix these up really good and I'll be right back. Once you've got that good mixed up for a couple of minutes, that's what I like about
these silicone things. You can just clean that right off or you can
throw out your spoon. This has a ton of bubbles in it. So I found if you just heat it up for a second
with your heat gun, you get rid of a lot
of those bubbles, but we're going to
use the heat gun in a moment because that's
how we're going to pop any bubbles that we have
pop up on our buttons. I've just got an
inexpensive old brush. Who knows what
this one even for? Because I don't want to
use a nice brush on any of this because it'll
get everywhere. Basically, you just want
to brush it on just like we did our urethane. And you want it just to
be a nice good coat, you don't want to
be super heavy. Usually when I'm
using art resin, I'm pouring it onto something. I don't really want to pour
it onto these because they're curved and that'll pour it and then they'll all
settle in the middle. I don't really want
to do that because I don't want it to
be real thick at the middle and then
off of the rest of it, making sure I got
it all over that. And then I'll just
move to the next one. Then tomorrow, you have to
let this dry overnight. This is not one of
those flash ones. There is the UV ones that have a little UV lamp that goes with it or you can set
it out in the sun. This is not that type.
But those are faster. They dry faster if
you want to do that. If you get any resin
in the hole and it makes a hole covers it, you need to get that out
because that hole is important. This is the resin, we
have to let this dry. I let it dry overnight. If you got the UV resin, that could dry pretty fast or you could set it in the sun. If you come back tomorrow
and you're thinking, it's not perfect and
you need another coat, you could always do a
second coat the next day. I just try to get a nice, even, not too thin, thick ish because it
self levels and it'll pull towards the
middle and that's okay as long as it's
not clogging our holes. You're not going to
be able to tell that it's thicker in the middle
versus the outside. As long as you have
a gloss finish on the whole thing,
it'll look good. But with the acrylic paint, I have noticed sometimes
it'll repel on a spot or two. In that case, I'll
go back and just add another layer of the resin. And I should have my gloves on. Completely forgot to
put my glove on. Sorry. If you've got the gloves, put the gloves on because
the resin gets on your fingers and it's kind of
a weird texture to get off. Again, the resins self leveling, so don't worry about brush marks on the resin because it's
going to level itself out. Then just make sure you don't
have any holes clogged. That's why I like using a brush that'll let me poke through
the holes just in case um because then I can make sure that there's nothing coated over 'cause
we need those holes. And once you've got them
all where you want them, then you're gonna have
some bubbles on there. So this is where we
use our heat gun, and you can take that
heat gun and just very gently heat those
up and pop any bubbles. Do not hold the dryer there for any more than a
few seconds, though, because you don't
want to heat this up or make it do
anything like smoke. You definitely don't
want these smoking just enough to pop a bubble
and then leave it alone. Then some of this,
I'll see on this one, the acrylic paint
repels it a little bit. And so I might come back tomorrow and add another
layer of the resin. But for today, that's
all we can do. And now we need to set
and let these dry. And so I'll be back
tomorrow to see how we did.
9. Finishes & Attaching Button To Journal: See what we got now that I've
let these dry overnight. I did come back up and
add a second coat of the epoxy to the buttons
last night probably seven or 8 hours
after I had painted these just to catch any spots
that it had run down from. Because when you heat these up, if you can avoid heating
them, that'd be great. When you heat them up, it
makes the stuff really liquid. More liquid than it already is, and so it runs from the edges, so I added another coat.
These worked perfect. I did add a piece of cardboard under here because
anything that dripped down, it's going to stick
to your surface. I decided I better add a piece of cardboard under
here instead of my desk. Of all these that did this one might be a
favorite. It's lovely. I painted that, so I ended up coming back after
we had finished painting and I put little flowers on that.
That one is super cool. This is one of my favorites and it's one where I
just dabbed bits of paint pin all around and then colored a circle
around it with a paint pen, and that one's one
of my favorites. That's a fun little technique. It's just blobs of paint
covering the whole base. That one ended up really cool. Look how cool that would be on something that I
do with that fabric. That was a good choice
for that fabric. This one, I love it. Because it ended up really
cool with the painting. And this one really
pretty. I like the colors. They're unusual. This
one's still my favorite. And then I came back
also on these two, the original that I painted with the gloss urethane and the one I painted with the
gloss urethane yesterday. I added two more coats to those, and that makes
these super shiny. And I think for ease of use and less frustration
and quick drying time. This might be my favorite way to paint these because you could paint three layers or so and it is very similar to the epoxy. The epoxy might still
be a smidge shinier. But it's a pain in the butt to use compared to the urethane. This is the urethane
polyurethane gloss varnish and there might even
be a high gloss, one that's even shinier. But for the ease of
use, the lack of smell, and these don't really smell, but they do have a
little bit of a smell. For that, I actually like
maybe the urethane finishes, a tad better because they are so much easier and
they're very close. If you don't want
to mess with epoxy, definitely go with
polyurethane gloss varnish and whatever brand you've
got. These are art varnishes. You can get the paint
varnishes either way. Um, but yeah, these ended up gorgeous with three
coats of urethane. You could paint it, walk away, come back a little bit later, paint another coat, walk away, come back a little later
and paint a third coat, and you get that
super high shine. I think that would definitely be the easiest and that
might be my favorite, even though I did all
these with the urethane. If you're going to do the epoxy, do a bunch at the same time so that whatever you're doing, you get all the pain over. Right up front pin at
one time because these, you have to mix the
stuff up every time, but this you could just pull out and come back and keep going. For ease of use, I definitely recommend the gloss
varnish on those. That's a gorgeous finish, and I'm happy with that. I thought what we would
do is put a button on a journal so that you know
how to use these buttons, and then we'll be offset. This is the journal I'm
currently working in on color palettes and stuff. I made this cover out of just fabric and I glued it on instead of sewed it on
because I was being lazy. I think what I'm
going to do is just take some shelf liner. And somewhere around the middle, I'm going to give myself
a little bit of cushing there and you need
an all and you need a waxed thread or whatever thread it is that you want to sew your button on with. Then I sew these on with a
great big embroidery needle, which is what I also use
for the book binding. Then you also need a needle. That is our supplies. I decided out of all
the colors I had, I thought this weak color was the easiest match
for what I wanted to do. I'm just going to give
myself a length of thread. Then out of all the
ones I painted, weirdly enough, even though it's not exact, I still like it. It's got a fun contrast
to it and I might just get what the center of this book is. Let's
see what is this. This is I don't like that
ruler. I can't even see it. Let's see what we got here. We got about 12 ", six would be the center. So somewhere about right
there is the center. I just got to decide now don't want the buttonholes
side to side or up and down, kind of your choice,
and you need an all. And this will work
for just about any type of book cover
that we're going through, and I'm going to be
real careful not to not to damage the book
underneath, hopefully. I'm going to how about
if we even put one of these under there just so we don't go down
through the paper. And again, about the center
where 6 " about right there. Then we're going to
take our all and we're going to punch a
hole all the way through the cover of the book and you can pick it up to see,
did you get through? Yes, we did. There we go. Then right next to
that, another hole. Again, real easy to get through. I didn't even have
to push real hard, even though I was
pushing very hard. I did not have to
now I got two holes. Now we are just going to double thread this
because I got enough thread. I'm going to knot
it at the back. And find my holes
here. And there we go. And so now we've got that
knotted on the back side, and we're pulling through
to the front side. And you just need a
couple of swipe throughs. I normally do at least
two if I've got it double knotted like this.
There's that one. I might go back one more time. And then you can
just knot it off. So I just knot that on the
back side, a double knot. If you can do it before
you put your fabrics down, then this little back
part won't show. You could also hide the
knotting do all the way down, all the way down, talking at
the same time I'm pulling. You could also knot it before you got everything glued
down and then you can hide the knots under
everything that you've glued. Then just pull that tight, and then I double
knot it usually. But I'm not going to worry
about it on this one. I'm just going to
leave it and let it show because it
does not bother me. This thread's waxed,
so that's why it's pulling a little bit. Okay, I'm gonna
pull that down and then pull it all the way
down and tighten it down. But then we got a double knot. You can decorate
it with something on top of there
if you wanted to, but that doesn't even bother me, so I'm just going to leave
it where it is there. And now we have a
sewed on button. What I like about these and I've picked this wonky
color for the ribbon. I had some blue ribbon also, but I thought this
looked more fun. I hadn't quite decided
on if I'm going to glue the ribbon somewhere because I decided on
ribbon after the fact. But basically, what we
could do right now is just loop this around and
let it live there. And then until I decide if
I want to cut this off, I can just tuck it in here until I'm ready to
decide what to do with that. Another thing that we could
do is if I do glue it in, let's say I glue a little
piece to the backside here, maybe I glue a little
piece right back here. Then you could cut this
to a smaller size, and then you can just wrap it around your button
for the closure. You got a lot of different
options with button closures. I could also just pull it and have it loose so that it's not
attached all the time. I could just loop that
around the button depending on how thick your
ribbon is that you're using, but you could just loop both
sides around the button. There's lots of
different ways that you could decide to use
the button closures. For now, I'm just going to
think about it and let it do its thing with the long
ribbon because I'm just not sure exactly what I want to do with the
ribbon, C loop it around. Kind of need to loop
it around this way. Could just kind of loop it
around this way if I wanted to and loop it around that button and get a
good closure that way. So yeah, I'm going to think
about it for a while. I'm not sure exactly what I
want to do with the ribbon, but that's how we
get our closure on there and you could
just glue something back here to loop around if you wanted something just to
take that right there. Anyway, that's how
I attach a button. That's how we paint
our different buttons. I'd be interested to
see your buttons, definitely come back
and share those. I also want to know what
your favorite finishes, if you went for the urethane or did three or four coats or
if you went for the epoxy, urethanes definitely
the easier of those, and it gives us this
gorgeous finish that I'm actually super happy
with and going forward, that's exactly probably how I'm going to paint
these because if you do the urethane finish, you could do one button
at a time and you could really customize each
button to each cover that your mom and then
just coated a couple of coats in something that
dries pretty fast. This was the easiest
way and I love that. Okay, well, I decided
how I'm going to wrap this particular journal for you. I guess I'll show it
to you real quick so you can do it on your own
if you decide to do this. But it's unattached.
Piece of ribbon, so it's not glued down. This is an option if
you don't want to glue the ribbon down or
you want to protect the ribbon while you're working on your book so that you don't paint all over the ribbon
every time you would have this ribbon that's
pretty when you're done. But I just looped it
right around the button, just found the center part there and just looped it
around the button going across the front to the back and then looped it all
the way around and brought the two loops on
either side of the button so that it's still pretty
and you can see the button. So just tuck that
underneath the button, and then I actually
just pulled this underneath so that we
have it just like that. I think that's exactly how I'm going to use
it for this book so that I don't have to have the ribbon on it the
entire time of painting, and it's pretty when we're done. It latches really pretty. I just goes across the back. I just wanted to show
you that that's what I decided on this one instead
of gluing any ribbon down. You can glue ribbon down. You
can make a butt enclosure, all kinds of fun stuff
that you can do with that at least have that
pretty decoration on there. I'll see you guys back in class.
10. Final Thoughts: Thank you so much for
joining me in this class. I hope you had as much fun creating your own art
buttons as I did, sharing the process with you. There's something
so satisfying about turning a simple wood
piece into a vibrant, shiny little treasure
that's completely yours. Remember, there's no right or
wrong way to approach this. Every button you make
is a tiny canvas, a creative playground,
and a chance to explore color,
shape, and personality. Whether your buttons
are bold and graphic or soft and layered, they're a reflection
of your artistic voice and what makes them so special. Don't forget to share
your finished buttons. I truly love seeing your
take on the project, and your work might just inspire somebody else to dive in
and create their own. Keep playing, keep painting. And, above all, keep making
art that feels like you.
 DENISE LOVE, Artist & Creative Educator