Transcripts
1. Introduction: Welcome to my custom Foam
stamp making workshop. In this class, you'll discover the fun and creative world of making your own
unique foam stamps using inexpensive craft foam. Whether you're a seasoned
artist or just starting out. This workshop offers an
accessible and enjoyable way to add personalized touches
to your art projects. I'm Denise Love, an artist
and creative educator, and I'm excited to
bring you this fun and exciting dive into
custom foam stamps. I'll guide you
through every step from finding in and gathering supplies to designing and and using your custom stamps in various painting techniques. And by the end of class, you'll have a
collection of durable, reusable stamps, and
a whole new set of skills to enhance your
creative endeavors. So let's get started.
2. Class Project: Class project. You'll design and create your own
custom foam stamps, starting with simple shapes and progressing to more
intricate designs. After crafting your stamps, you'll use them to a series of unique paintings or prints, experimenting with
different colors and patterns and techniques. This hands on project will not only showcase your
new stamping skills, but also provide you with personalized tools
that you can use at future art and craft projects. O
3. Foam Supplies: Let's take a quick look at the supplies for making
the foam stamps. Then when I get to
some paint projects, we'll talk about supplies that I'm using in
my paint projects. But these are super
easy to make, and I'm just going to tell you the ways that I have
discovered that I prefer. What we're going to make these
with is cheap craft foam. If you go to the hobby
lobby or the Michaels, that's usually over there in the children's craft section. They're really inexpensive
for a whole pack of the foam. What I've used is a quarter
of inch foam for my backing, and I've used the 16th or so, eighth is two millimeter. That's probably eighth
of an inch foam for my top decoration. Then I'll be able to use a little brayer and put paint on that and
stamp that down. Now, I have chose
to use foam for the top and the back because
now they're washable, they're reusable,
and they're durable. I can keep using
these as long as I want and I don't have
to throw them out. Unless I just get
them disgusting and don't clean them or something.
They're easy to clean. You can clean these with water and a little
bit of dish soap. While you're
working, if you want to keep the paint
from drying on it, you could have a
little tub of water sitting beside you and as
you're done using them, you could throw that
in the water until you're ready to go wash them. So they're nice and
durable and easy to make. For the top foam section, I've got two different
types of foam. I've got foam that you
glue down and I've got foam that has already
got sticky stuff on it. And what I don't like about
the foam. It comes in. I just got a pack of sheets in different
colors. It's cheap. The quarter inch foam backer came in its own little
package and several sheets, and this goes a long long way. And then I also got some of these sheets that have adhesive on the back of them already. This is the preferred one same color on
the front and back. This one has adhesive on it, so you peel it and
you stick it down. To work, but Some of
these are not permanent. I don't know, somehow
on the edges. There's not adhesive on the very edge maybe because
I started at the edge. Those did not stick
down like I expected. The rest of it is pretty firm, but I feel like I could
pull it up. It works fine. Maybe don't go to the
edge and you'll be good, but I thought I'd
point that out. This was not my favorite
because of that. I actually preferred the one that was not with
the adhesive back, just the foam with both
sides know it eases, and you cut your shape out, and then I like to
use a glue stick to glue my foam to my backer piece. I recommend just a glue stick
is the one that I have. This definitely made the process fast and easy because you'll
cut all your shapes out, put the glue on
the whole backing, stick all your shapes
where you want it, and then set it to the
side and let it dry. Super fast and easy. Love that. Those are
my basic supplies. In addition to, you
might want to have a utility knife with
some sharp blades on it. Also, I liked having
a very sharp pair of scissors in the shorter length here and a full size
set of scissors. This was more for
cutting details and edges and fussy cutting.
Your shape out. Smaller scissors, like
embroidery scissors or something like that would make that easier. I
do like having those. Also. Thought it was nice
to have a pencil to draw out maybe some ideas that gave me a pattern
of what I wanted to cut, so a pencil or a pen to
draw with would be handy. That's the basic supplies. It really is super easy. We're going to make
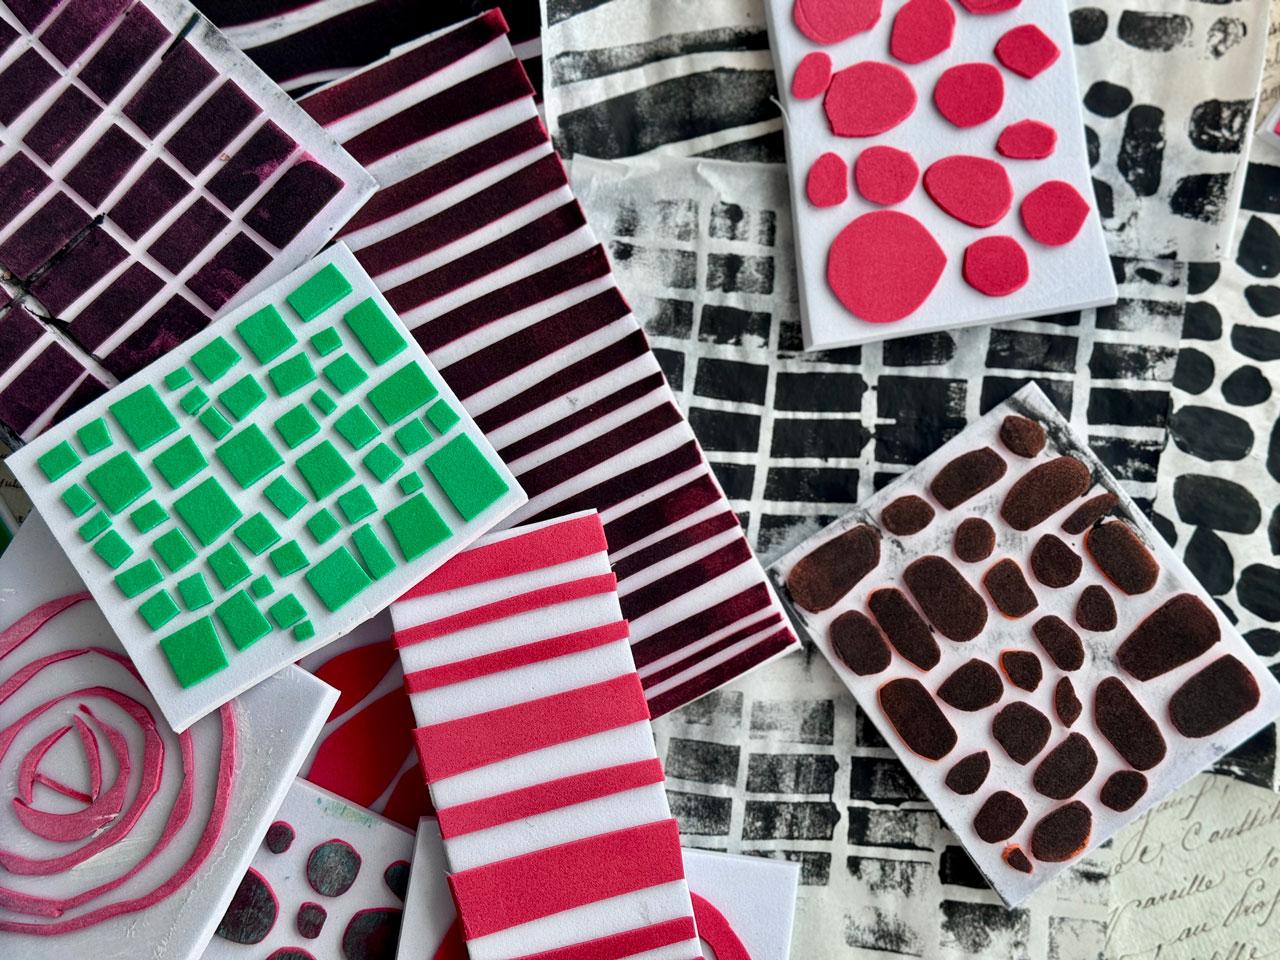
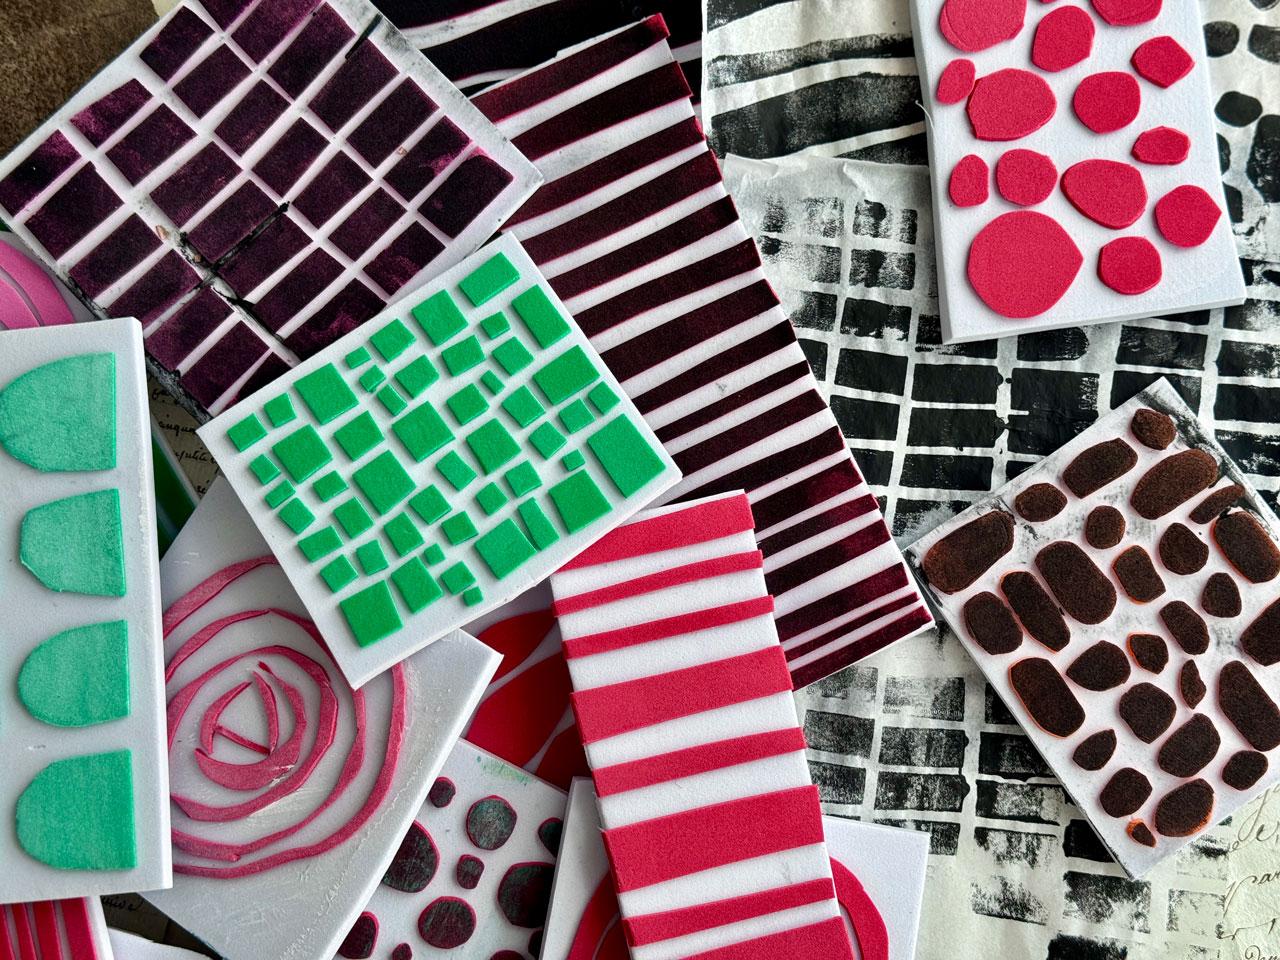
a bunch of these. Here's one of those
that I'm cutting up the big sheet
into smaller pieces. I've just experimented with
lots of different shapes, I want randomness, I want things that aren't
going to look perfect. I wanted different things that I could stamp yummy
patterns into my work, just to show you a
few of the ones that I have been playing
and experimenting with and whole punches allowed me to make
some yummy dot ones, leftover pieces from
stuff that I cut out, allowed me to make a
cool one like this. I do see that I didn't
get a piece glued down. Before I used this on
something I'm painting, I would just tack that down with a little bit of glue
before I use that. Also like lines and stripes. In different sizes. Those were easy to make. Also like irregular
block patterns, and then some
random cool things. I also want some that
are flower shaped. Then I keep all the extras
because some of these extras, you could make little patterns out of like this
out of them and you could stick them down and have the little
extra bits be something. Don't throw the stuff out. I just have a little
box sitting here on the side of all the stuff that
I was experimenting with. I want to tell you a little bit about what inspired
making my own stamps. I know people do that. I've also done the carved
out rubber stamps. I have a class on Mat. If you want to carve
your own stamps for the line o print things. But those are pain. They
take a while to make. They're interesting
and intricate, but there's a lot of time and effort that goes into
making the carved stamps. Os these, I'm just looking
at it and thinking, Okay, maybe I want
to do some circles, and here I am just cutting out
some fun irregular shapes, and I'm going with whatever it is that I might have cut out. You can see how easy that is to cut with a little
pair of scissors. Because I like fun
irregular shapes, I was looking at Amazon
for different paint defect stamps and looking at different shapes
and things on those, which is, you know, little dots and little circles
and little lines. And so that's very
inspiring to me. I also found some on Amazon that were like little half
roll stamps of pattern, and I'm like, Okay,
looking at those, thinking that's pretty cool with the different
patterns in there, and a lot of these are
geared toward children. But for some interesting
art practice, I didn't even care. Little painting
textured art stamps. I was kind of looking at that. And so I was thinking, you know, These are not expensive, but what if I wanted 100 different patterns
instead of just a few? And so that got me to kind of thinking and looking
around at other options. And then I thought
about my art foams, which I just got
some art fomes from Seth Apor these are so cool. I don't know how
to make art foams. I don't know if these
are carved out with a big machine or three D printed or how
they actually make these, but it's a lightweight
piece of foam and you can take a bray and put a little bit of color on
that and stamp it down, or you can use these
on your jelly plate. I mean, I feel like because
of the pattern under there, they're carved out
somewhere with maybe a laser carver or
something. But they're so cool. But these range
like $10 for say, the average price of these, and I just love them and I love all the interesting
different patterns and designs that people have come up with for these
little art foams. And then I'm looking at my stencils and I use a lot
of stencils in my work. I love the ones with the dots. These are joggle stencils. This interesting pattern ones is the stencil girl stencil
from the stencil club. Some of these, you can
see that would be very easily to make out of foam
and then have your own. Look at some of your different
stencils that you have. You can look online at
different and things for ideas. I like these things that look like old walls or
old stone walls, and it's just
irregular squares and rectangles put
into a pattern and that'd be very easy for us to make on something
like an art form, which is where I was
going with this one here, like different irregular sizes, but I could keep on going
with this theme and do more and more and get
some really cool looks. This is one of my favorite ones by Jogles and it's
the ancient ruins. Ancient ruins definitely
says in my mind, different things I
might want to make. That's where I got inspired
to make my own foam stamps. And then after I was putting them together
and making them, I'm like, Wow, these
are so easy to make, and I have a whole little
section of classes on making your own
brushes and making your own stencils and
carving your own stamps. I thought this would be a
nice little additive of custom art things
that we can make for ourselves that are so
easy, it's not even funny. And we can just make 1 million
of these with just a pack of the thin foam and a
pack of the thicker foam. So I think you're going to
enjoy making some of these. I truly makes your t one
of a kind and your own. Nobody else is going to have your custom stamp that they're using as decoration and pattern
and layers in their work. So can't wait to show
you how I made these. That's the basic supplies and inspiration here in this class. So let's get started.
4. Making your foam stamps: All right. I want to show you three easy ways to do
a design on our piece. One way is to just
take some paper. This is just a piece
of regular paper and brainstorm out some ideas. I like that ancient wall one. It basically had
different shapes. I'm not looking at it currently because I don't want
to copy it exactly. I want it to be something a
little more original to me, but would give me
that same feel. One way of doing that is to maybe look at patterns
and inspiration, say look at pinterest
or what have you, and then close that up and
then draw something similar, but not because you're
not looking at it, you're not copying it exact, but maybe you're getting that
feel that you were wanting. A lot of times I'll have doodle inspiration or something like that that I thought up, and I will then translate
that into a pattern. I've pulled out a piece
of the foam without the adhesive already
on it because again, the ones that are pre adhesive, now that this has been on
here for a couple of days, that is actually
sticking pretty good. They're probably okay.
When I first made these, they weren't sticking as good or the edge wasn't and
I was upset with it. But now that this has been
on here for several days, it does seem to have
latched pretty good. I think the biggest
issue is if you're on the edge of the ones that have the adhesive
already on it, you can see, I've cut
these off this edge. That quarter of an inch at the edge does not
have adhesive on it. I can see that it doesn't
have adhesive on it. If I look in the light, I can see where
the glue stopped. If you're going to use
the pre adhesive ones, maybe trim off that quarter of an inch so that you
don't get caught with some pieces that aren't sticking down
like I did here. And then use the rest of
the center part of that, don't use the very edge, and they do seem to have
been stuck pretty good. That's my tip if you want to go with the peel and stick ones. Otherwise, I'm using the ones that don't have the glue on it. I just happen to think,
what could I do if I wanted to draw my pattern onto the piece that I want
to cut these out of So I could I could
draw it free hand, you know, I could come over here on the piece that
I'm going to cut, and I could have just drawn those shapes that
I wanted to cut. And so I'm just using a pencil. You could probably
use a ballpoint pen. Or a marker, I mean
just get creative. Whatever you've got sitting on your desk would probably
work just fine. But let's say that you wanted to design something fancier
on the computer. A lot of people like
to illustrate and do stuff on their
iPad in procreate. Let's say you wanted
something like that. Well, how could
you transfer that to a piece of foam here that
we could then cut from? If you do that say on that and maybe print it out
on a piece of paper, you could do the same idea
that I'm about to do. You can just draw right on
the foam and now you're ready to cut out your
different pieces, and you can get as elaborate
or simple as you need. The nice thing about
having them on a piece of paper is then when you
cut all these pieces out, you could match them
back up to your paper. How can you transfer
that to the paper? I actually randomly just have
some carbon paper sheets. Over in my art room, just
a random thing that I had. Apparently, I haven't
really ever used. It's not a required supply. I didn't pull it out when I was talking about supplies because I thought about it
after the fact. But you could just put
a piece of carbon paper down and this may
or may not work. I'm thinking pencil or ballpoint
pen, should it be fine? Then we could just redraw on top of whatever it
is that we've designed. Hopefully that
will just transfer that pattern to
our piece of foam. L et's see if that's even
working. It is not working. Definitely not a pencil, wondering if maybe a ballpoint,
something would work. I got a ballpoint, this
is a jelly roll pin, but it's a ballpoint pen. Let's just see if that works. Now you'll know if
it doesn't work, You'll know not to try this. I like to do and
discover with you. I'm not worried about everything working perfectly or not because if I make
the mistake here, that a tiny bit works,
but not really. I would say for the foam, if you're thinking of using carbon paper or tracing
where it traces it on there, not well, it does if you're
right on it, but not good. I'd say that was not going to be a good technique for
getting it onto your foam. Now we know I like doing
some of these things with you because then you don't have to think of
it and think, Oh, I wonder if that would
work because now you'll know that it really
doesn't do that. Now, what I'd recommend
you do because I know the carbon paper and
you can keep trying different carbon
paper methods to see if you find one
that works for you. If you do, feel free
to share that on the discussion page
and let all of us know what you found
because I was thinking carbon paper because
you can do paper on paper. If I did that right on
this other piece of paper, then I should have had It should go right on
the other piece of paper. Pretty easy, but the foam, see that works on
another piece of paper. That's what I was thinking. But the foam is not
going to be the same. It's a different
surface. It doesn't seem to want to grab the carbon. I like being able to test out an idea with
you guys and then say, Okay, no to that,
it does not work. W's say if you
wanted to get real intricate and really think
out your design first, maybe draw it on paper and then come back over
here to the foam and do your own drawing
on the foam with pencil. Another thing I
like about the foam too is if let's say you did
something cute like a cat. Let's just draw like
a little kitty cat. Maybe that's our cat. This
stuff actually dents. If I wanted to draw, like a nose with some whiskers. Those whiskers can dent
down into the foam, so I can just really press hard and then I could cut around
the shape that I made. When we use this as a stamp because that's
such a deep indention, we should have that indention show up as we stamp it down. Just another thing to consider, like if we did a flower, maybe we would want to into
the leaf or the pattern, and that would show up when
we paint and stamp that down, because it's dented in,
that should show up. I'm just throwing some
ideas out there at you. Once you've decided that, yes, this is what I like, we might just mark out
on our thicker foam, the foam that we're going
to use for the back. We could just mark out
how big that needs to be. Then I go ahead and
cut With my scissors, stuff very easy to cut. I just go ahead and cut out that size I've decided I needed, and then I'm ready. You can make a ton of
stamps out of these. All these ones that I've already made was like two sheets, and then a red and a pink. That's made like
a ton of stamps. You could definitely
get started, feel your way around making
it and then know that. You could make 1
million little stamps because they're super
easy to cut and glue. The more you make, the
more adventurous you get. Now that we've
drawn this on here, I has something to guide me for shapes. It's going to be exact. That's just up to how exact
are when you're making. They could be more
exact than I make them, but my goal is not perfection. My goal is creativity and just hopping in with the perfections of the
pieces that we make. I'm not looking to
make it perfect. I like it when it's crooked and the edges are not
square and I think that's a little more creative in the art when stuff's
not just perfect. You can rearrange them
after you cut them out. So that you can get a
better configuration even. Then you can cut extra pieces. If you're like, I got a hole
there, I didn't intend. You could cut more pieces out, but they're super easy. You can tell just by how easy
these are as I'm talking. This stuff just cuts like
butter. It's fantastic. You can get a lot more
detailed than I get. But I like things
that look old and imperfect and just add
interest into our pieces. That's my goal. T. Then I like to that
in that's imperfection, if I wanted to make a
whole pattern on a piece of paper that I'm going
to use for collage paper, then I can repeat this
imperfect pattern. That is what I
really really love. That's another goal of
my stamps is to maybe go and make a lot of
collage papers for myself. Then on the jelly plate, you can easily roll paint
on your jelly plate, and then stamp your little stamp down and that'll
pull paint back up. Then when you do
a pull, you have that pattern on
your jelly plate. Then you're going
to have paint on your stamp if you're
pulling paint up like that, so you could easily stamp that down on a
spare piece of paper. Another thing you could
do is put the paint on the stamp and stamp it
onto the jelly plate. The way that I'm going to
be playing with these most probably is to
paint my painting, and then usually
when I come back and do stencil work or some fun
layers on top or in between, this is going to
be those layers, but maybe with a
stamp instead of a stencil. That's what I want. Lovely perfect pieces that I can stamp in my work
for different layers. I like stamps because
if you've got a signature mark that you like, you could turn that into a stamp and speed up your workflow. Or maybe you don't want to
spend all day on a page today. You're working in
maybe your sketchbook because I'm doing a lot of art journal work filling up
some lovely art journals. It's always been my goal to have some books of art like that
that I made that I painted, that I can flip through later. Maybe I want to spend half
an hour working in that, and so stencils and
stamps and stuff like that speed up that
work process for me as I'm playing and experimenting
and trying different colors and I enjoy in that
process in that way. Third way that you can
do your stamp work. I'm going to do a couple of
these to make sure I have enough is not to draw
on your stuff at all, just come over here and
start attacking it with no plan at all as far as shape, or maybe you have
a plan for shape, but we didn't draw them all out, or maybe you need
some extra pieces. Just start cutting and go in the shape or direction that you're
thinking you want to go. That is another way
to work with these. Then I don't throw these
away like this leftover, I keep it all because
maybe I can use the little parts or
maybe Maybe I'll think of something else that
I want to do with that and then I'll not have thrown it away because
I do have some stuff that have thrown
away and I thought, why I throw that away? I can use that. If
you think about it, don't throw this away yet. Just have a little container sitting to the side
that you're like, Yeah, I'll just
save it over here. If I need a little piece, then I don't have
to cut a big piece. A Let's see if this gets us. What I do when I've
got it all on here, I can, if I want, plan it out, right beside it and just see which way do I think I
want to go with these? This is just a cutting
math that I'm on top of, but it is nice that it's got a grid shape to it
because then I could actually plan for the
exact size I'm using, I'm not going to
get that specific. I'm going to be a little
more free flowy about it. But you could really plan it out on something with
a grid like this, and then you're like, maybe I don't want two of
these together, and maybe I want this up here, and maybe I want
these dots there and maybe I want this up there
and this going that way. Then you could really
sort and plan. Once I've sorted and planned, and I've got this piece here, I like using a glue stick
because it's easiest. I did try gluing each piece
and sticking it down. What a pain to try to get
glue on the entire piece. Now I have decided it's just easier to put a nice
thick layer of glue, I am pressing down enough
where it's a nice good layer. Then that will just dry and it will not be in the
way or anything. Then I can just start
sticking stuff down. Now I do want to
move fairly fast, but I do have some time. It's not going to dry so fast that I have
to worry about it, not stick in my pieces, but I do want to work fast. Then while you're going, you
do have a little tiny bit of leeway to smoosh things
around a little bit, which is why I like
the glue stick because I've got enough
time to stick and think. For a second, Then
once this is dry, once I'm done sticking stuff, I'm going to just
prop it up and let it dry for overnight
because it's still wet. I don't want to use
these immediately. Maybe I want that there. I can see I'm going to have
a few little gaps, maybe. We'll move this around
as we're going. Hopefully, I've got enough. If we don't, I might cut another one or
squish these around. Let's just see what
we end up with. One tiny piece right there. Let's just take our
extra little piece here. I'm going to take this one here. Then I can look
around I've still got a little tiny bit
of movement time. But again, this is going
to dry enough where you don't want to work
this for very long. Then I've got one
spot right there. Let's put a little
piece in there. Look at that.
That's pretty cool. Let's move that one down. Let's move this one. Tiny bit. Before we overwork it, I think I'm going
to leave it there. I do have a spot right there that might be bugging
me a tiny bit. Still working as fast as I can. Let's see if that'll do
it. Is that too long? Nope. That's what I wanted. Then I'm going to take rather than trying to
squish all that down. I'm going to take what's my
backer board just a piece of it and just press
it down on top, so I'm getting all the
stuff on top pressed nicely or you could flip it over
and press that down a bit. I don't want to squish it
back and forth, though. I don't want to move
any of those pieces. Then we need to let
that completely dry because the back is tacky where the glue is still sitting, and you just want
to let that dry. You can see how easy
that was to make, whether we draw it on our
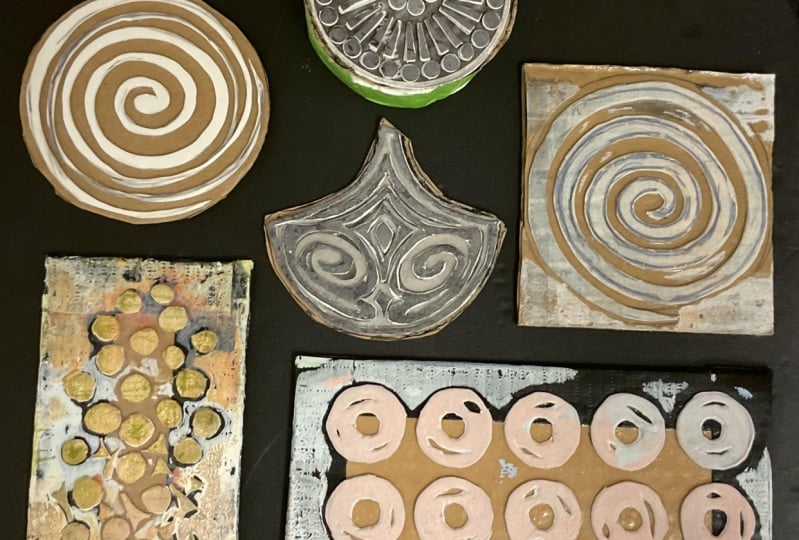
piece or we cut it free hand. Those are very easy to make. I'm thinking in my mind, I like stuff like this. That was just me cutting stripes and then cutting
the stripes into sections and then gluing the
sections down with some left over space
in between them. This one was just me cutting some longer pieces not straight, and gluing that down. This one, I just drew a circle on here and I
cut that circle out, and then inside that circle, I cut a circle out until I ended up with all the
layers there cut out. This one was fun because
it was long stripes and I'll be able to stripe
long pieces on there. This is fun because
it's just thumb shapes. It's just that half circle
shape. Those are interesting. This is fun because it was leftover pieces that I then
pieced together on here. I love that very
interesting organic shape. This one was like the
shape of fishes or eyes. It was just free flow forming, that petal shape and
gluing those in there. This is particularly fun. It's a rainbow, so I cut
out the big rainbow and I cut little rainbows
out of that. I did Cut out one and then I
cut the next one out and I threw that strip
over here in my box. There is a little strip out
of those in the middle. You could easily do one with the big pieces and then
you could come back and do one with the little pieces a
little bit differently. You can see my shapes
there that I cut out, that I could then glue
to another one of these. That would be cool. You could probably glue it
on the back if you wanted to double stack your stencils. That'd be another
option. I've left the backs of mine plan. This one again was pieces
that I had over here. That I then cut apart and
used the little strips there. It's fun to use the leftovers. This was little circles
that I cut out in a random pattern. I love those. These were just little stripes that I cut out,
that was real easy. This was some circles that
I drew onto my phone piece. Basically just was like circle. And then maybe circle here, then maybe there
was a circle here, and then I went
and cut those out, leaving a little connector piece and then cutting the
center out of it. That was pretty easy to
make something like that, very organic and interesting in making something like that. Then this was a whole punch. You can use whole punches
for this foam stuff. You just punch out that shape, and then you get the
different pieces there. That you can glue
down. That's fun. This is a more stripes. I like stripes in
different configurations. I did a lot of those for
my own work and interest. Then I like weird shapes. I started cutting out
some weird shapes connected with a little
stem so that could be some crazy extra terrestrial
flower, something like that. You can do flowers
and shapes like that. If I wanted to do
some type of vase, and then some type of
flower coming out of it, with leaves or something, you could do
something like that. Just start looking around
and thinking of what are your favorite marks and things that you might
want to create? And design, I like odd shape circles and different stone wall
looking things. I like things that odd
shaped squares, I like that. Start looking
around, you can look at pinterest for
different ideas. You can look at your stencils
for some different ideas, another idea for you
that you might consider as if you have a favorite
stencil. Let me move over. Just a little so
I can grab this. I have a random moocci stencil that I've gotten at some point, but you could easily
take a stencil and draw that stencil onto the piece of foam and create your own
little stamp out of that. These are not things that I make and sell to other people. That's the only reason why I wouldn't feel bad about
say using a stencil that I have and drawing around that pattern and cutting that pattern out and
making my own stamp. If you're going to make things like this and sell
to other people, the design needs to be
100% your own idea, so you cannot use
somebody else's sencil or pattern or whatever to make your stencil or
pattern or stamp. Just thought I'd
throw that out there because If you're
thinking that, well, once I draw it on here and I cut it into a
different material, then maybe the copyright
doesn't apply. But I would disagree with
that. I would not do that. If it's your own stuff that you're using
in your own work, then you might just experiment and play with
that idea for your own work. Now I want you to start brainstorming and thinking of some different ideas that you can make for your own stamps and start cutting and pasting and see what you
can come up with. Then I want to use some of the
different things that I've cut in some paint projects
just to see what we can get. Hope this gives you
Lots of good ideas, how easy it is to cut these out, smear the glue on our piece and then
just glue stuff down. Then I just set these
to the side to dry overnight before I am
going to use them. All of these are
ones that I've been playing with all week
because I wanted my owntsh of things
to use in my work. Hope you have fun,
brainstorming and creating and I can't wait to see what stamps
you come out with, and I'm going to
paint some projects. I'll see you back in class.
5. Painting Supplies: Let's talk about supplies
that I'm going to use just to paint a few projects
to give you some ideas. I was thinking that we can
make some collage papers. Maybe we could paint
a painting and use one of our
stamps and stuff in our paintings to
take the place of where I might normally pull a stencil or
something like that. I thought for those, I might work in one of
my handmade journals. This is the fabric snippet rolls and clusters journal workshop. But I also have several others for making your
own art journals. I have artisanal
journals from scrap to treasure and layer
legacies and those are all on skill share there for you. What I like about these is
I use a lot of textures and marks and
stencils and stamps. I thought that I
would use a few of these in the way that I
traditionally like to use them. My goal is to fill up some of these handmade books
that I've made. I'm going to pick
a page in here. And paint it and use some
of my custom stamps in it. So that's going to be
one of our projects. Another project I
thought would be fun is making some
collage papers, and then maybe we could put together a little collage piece, and so making collage papers, you can use any
paper that you want, but I tend to like it to be a little bit lighter
weight paper. So you could use
regular copy paper, that might be a good choice if that's what you have on hand. Other good choices are
onion skin paper, which is nice translucent thin paper. I have a pack of that that
I pull out sometimes. I'm not going to
use that today, but I'm just giving
you some choices. You could use some of these
mulberry papers that are handmade papers like
this one is like a rice paper thing.
It's very thin. It's got a yummy texture to
it and it's translucent. I like the collage papers to all be a little bit thinner because you're
layering stuff, and then you can
layer other things in it and create
texture and such. You can have deli
paper or wax paper. That's fantastic for
making collage papers. I always have this stuff on hand because I use it to protect
pages when I'm painting, and sometimes I use these
as my paint palette, and if you have any
of that on hand, or you can just get a big box of it from the grocery store, I have a big box
from the Sam's club that I just keep here in my room and this is like a dry wax paper and
those are fantastic for doing collage papers. And then another paper that's new to me that
I wanted to play in today is Carnival papers
wet strength tissue paper, and I get these off a joggle.com and they're not expensive, but they are more expensive than just regular tissue paper. But you get 20 sheets, and I think they're
like 12 13 is dollars. Don't quote me on that,
but I think that's around where I paid and
they're big sheets, and so I've cut those
into smaller sheets, and they are tissue paper, but they're stronger than
a normal tissue paper, and They have the benefit
of even possibly disappearing the paper part
once you glue that down, so I think that's pretty cool. And then we're going to make some tissue paper pieces and then maybe do
a collage piece, and I'll be using Mt medium
as my glue more than likely. I like Mt medium and yes
paste to glue stuff. So let me just get
those out to show you. Mat medium that I
like is liquitex, and this is when do
you use which one? If your papers are
lighter weight, then Mt medium is
my choice of glue. It dries clear and I
get the MT Mt medium because I don't
want the shiny glue to jump off the page
and people is like, What's that shine
in that one spot? I like Mt Mt medium. Then yes, paste is the paste I use when pieces are
very thick and heavy. Texture that we might be adding, maybe a piece of
burlap or whatever, then I do go with
a heavier glue. For the collage piece, I'll
probably be doing that. For the painted piece
in the journal, I'll just be using
acrylic paints. My painted choice,
usually for those is the Blick mat acrylic
paint because they are a nicer quality paint
than say craft paint. If I'm doing art pieces, I do like to use
nicer quality than the craft paints because
craft paints are full of fillers and
very little pigment. This is still, I'd say, probably a student
gradih grade of paint, but I like all the colors that came in and I
like that it's Matt. I don't like shiny paints. I'm using Matt Blick acrylic
because I like Matt paint. But you can use any
other acrylic paints to paint with and
to do your thing. And I'm thinking and you can do your collage papers
in multiple colors. You don't have to do one color. But I just thought we would get a little look at how
these would work. I'm going to put a
little black paint out and I've got a brayer, and then I'm going
to put the paint on the stamp and stamp it down. That's the goal for today is
to make some collage papers. That big sheet, I just cut
into a bunch of sheets, so I can test out lots
of fun ideas on those. That is probably the most of
the supplies I'll be using, I might pull out something while I'm making a
painting or something. Um, as we're going, but that's the basics. All right, so let's get started.
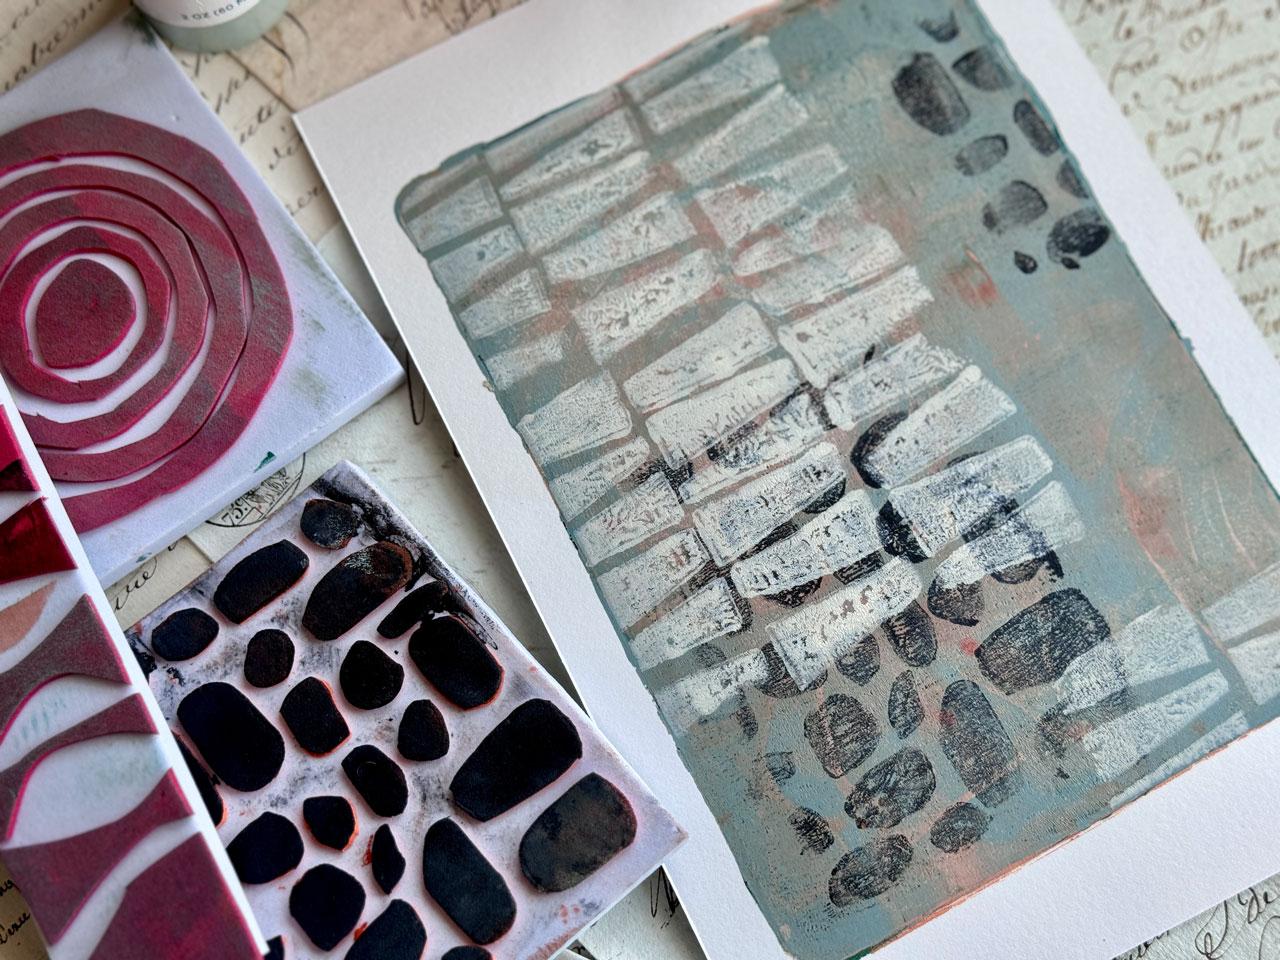
6. Making Collage Papers: This video, let's make
some collage papers, Let's test out how some
of these stamps work. I'm thinking collage paper wise. I made tons and tons of stamps, I've got lots of fun
different patterns that I experimented with. I did make a few
more of the green, the ones on the peel
and stick stuff. I will say that stuff
sticks pretty good after If you don't use the edge because you remember me
telling you that this one has a whole edge that's up and I discovered on that green paper that if you started
at the very edge, there wasn't any of the sticky stuff on it and I didn't even realize that until right here, the glue starts like a
quarter of an inch in. I didn't realize that. Look at that if you use the peel and stick foam instead of
the glue stick foam. Because once I got further in, those actually have turned out really nicely and
that was easy to use. I did make some
more of those using that one piece of
peel and stick stuff. This stuff goes a long way. I think I've only used one sheet of that and I made all of these. Look how much I got leftover.
That stuff keeps going. But I want you to do
different patterns. I got lines. I got
some funky shapes. I did some little Xs and
I like this one a lot. I like the funky
different circles. I have several different
funky circled ones. I like lines, and so
that's a good thing. I did different different
sized squares. That was fun. I think that would make
fun collage paper. Yeah, just get creative. They don't have to
be complicated. Nice easy patterns. I
like this one a lot. Just get out the ones
that you're thinking. I like these little
fishy shapes. I want to just get started. I'm going to use my brayer
on some black paint. I'm going to do some black
paint ones right now. Then I'm using the
brayer because that will help me get a nice
thin line of paint. I don't want to do that. Maybe
I'll set that to the side. I got a fan on in
here because it's hot and you can go wall
to wall with the paint. You could Stop it short if
you want to stop it short, but I'm thinking that for these, I'm just going to do
that and stamp it down. Look at that. Oh, my gosh. Okay, I'm going to do
this one over here. Look at that. We
get one good one off of there and
then a ghost print. I could have put some
more of this on there. To clean these off,
you can take these to the sink with a little
bit of soap and water. Or I just it's acrylic
paint, it will dry, but I want to just get any paint off that might have gone down to the sides or change my shape. I just take my microfiber cloth. And do some cleaning that way, and that's how I'm going
to clean off those. Once I get a pattern
that I like, then this would be something
I could tear a piece out of. That's a good one.
We'll save that. Then we could just
keep on going. I must have paint on my fingers because I've got some
on here. Look at that. You can that was a lot of paint. You can use heavy
bodied acrylic. You can use any of
the acrylic paints to get the color that you want, the thickness that you
want to work with. That one's got on the side. Let's just do this.
Look at that. You can be more careful that I'm being and get real
exact if you want. I'm just playing and seeing
what can I get this to do? And my little fan,
it's hot in here. It's the middle of.
It's like 80 degrees, and I got the fan on in here, and this paper is so light, it's blowing around.
Look at that. If we get it for careful, we can get that pattern
just to keep going. I left a little line
there, but here I didn't. Then before that has a
chance to really dry good, I'm just going to take
my microfiber cloth and I'll just sacrifice this one to paint and just clean
that off a bit. That's cool. Let's that. These dry really fast. This
paint is pretty thin. What I do notice now
too is this paint soaks through to
the bottom layer. It's not thick enough to Keep the paint all on
one layer. Good to know. Let's take a piece
of wax paper or something underneath that layer so we can protect the
layer underneath it. That could be the way
that we can go with that. I'm thinking this one here. The messiest painter. But
I'm going to keep going. Well, I actually want this
to be on the whole thing. Usually when I'm making stuff, I'm not looking for perfect, I'm looking for interesting, so I don't have to have all
the paint to be perfect, but you can work it
as you're going, what's whatever you think
you'll end up liking. But I'm good with
perfect and interesting, that's I like that one a. Then I will just wash this off. Another reason why I like
using foam on the back and foam on the top so that they're washable if I want to run into the sink and wash
them with some soap. You might want to
consider cardboard, but if you do cardboard, they're not washable with water. That's why I did not do that
with cardboard on the back. I like the foam more durable. Now, this piece right here could also be a piece
of collage paper, so I don't have
to waste my piece of wax paper once I'm done, I got another piece
of collage paper. I'm thinking maybe this one. Here we go. Maybe I'll
do this one coming down this way. Look at that. And just a real good
layer of paint. You can see how good
we can get a print. Oh, my gosh, I got tissue
paper falling everywhere. It gets like my studios upstairs in my little
condo. Let me tell you. Nothing gets hotter than
the upstairs of a condo in 9,100 degree heat in the
summer here in the South. It wouldn't be so bad
if it were not so. But you go outside
and it's suffocating, it's so humid on top of that. Let's flip it over and
kind of mirror that. Look at that. Look at that. This is the coolest one. Oh. Okay. I love that. All right. Then I might
just get the wet paint off. That just gets it out of the
edges and everything and lets me keep a nice,
good, crisp shape. That is where I'm going here
with my different papers. Let's just take a look here
at what we've created. To clean your brayer off, I just keep a piece of paper handy to get
some of that paint. Smooth back off. I don't worry about it on the brayer so much. I just want the heavy
layer of paint off. Then occasionally, and
that can be a good piece of collage paper also. Occasionally, I will have enough paint on the brayer
that I can peel it off, but I keep it pretty clean having just a scrap
piece of paper like that. But check that out. Here's
extras hang on to me. Push this over here. You can do tons of colors. They don't have to all
be black like I've done today, different shapes. I'm love and loving this one, and I'm love and
loving that one. Then something like
this, I would then tear the elements out
of it that I liked. I like to tear rather than
cut because I would rather have the organic edge
rather than a cut edge, but that's just my preference
when I'm creating. This stuff tears better one
direction than the other. I could have folded it and it probably would
have to easier, but look at that. We maybe fold it and
create a tear edge. That would probably
tear a lot easier, but again, I want to torn
edge rather than a cute. Super cool, little piece I can keep to use
for something else. Um, I do actually really love the way this looks on this wax paper and the wax paper doesn't go all the way through. That might be my number one
choice for collage papers, might even be the wax paper, but I wanted to try
the tissue paper because I've never
tried it before. Really love this right in here. This one is super fun, having that bold stripe. I can see that being
a whole element in a painting. These are fun. This is how easy it is to
make yourself collage papers. You can do it in any color. You can do yourself a
little rainbow variety and just have them available. Take a day and make
papers and just have them available from when you're ready to paint, that's the most fun. Then when we go to clean these, just get them as
you're going and then that'll be ready for the next time you want to use it. It's not going to look
brand new anymore, but it's my art tools, so I'm not really
worried about that. Hope you have fun trying
some collage papers. I can't wait to see what you
end up creating with those. I thought maybe we could make a piece using one of
these collage papers. Let's see you in
the next project.
7. Using Your Collage Papers: For this project, I think since I was already wanted
to work in this book, and my goal is to finish up and fill up some of these handmade
journals that I made. Look at this pretty page. I think what I'm going to
do is do a collage piece in this book because I'm just thinking that that
would be really cool. This has different
watercolor papers in it. I've got think the hoomul paper in here and different
handmade papers. I think a collage piece
on say a page like this. I'm just going to fold that
where I can flatten it out. I'm I'm thinking that
maybe a collage piece on a page with a really
cool handmade paper next to it would be super cool. So I feeling like that
might be what I do. I'm also I want to keep myself within an edge because I
like having some edge, and I like having some go wall to wall or edge to edge,
I guess you could say. I might give myself a little
visual frame with some tape. This tape doesn't
tear this paper, this paper is great
for not being damaged. I've got some of this
tape paper right here. This is what's in
the sketchbook is this Homule Cal press
watercolor paper, which is one of my
favorite papers to use. I thought, some of these
books that we make ourselves, you might as well put
your favorite papers that you like to work on in it, because let me tell
you there's nothing more of than creating your own custom handmade book and then filling all the
pages with your art. You can't imagine how
amazing that feels. I'm feeling like for
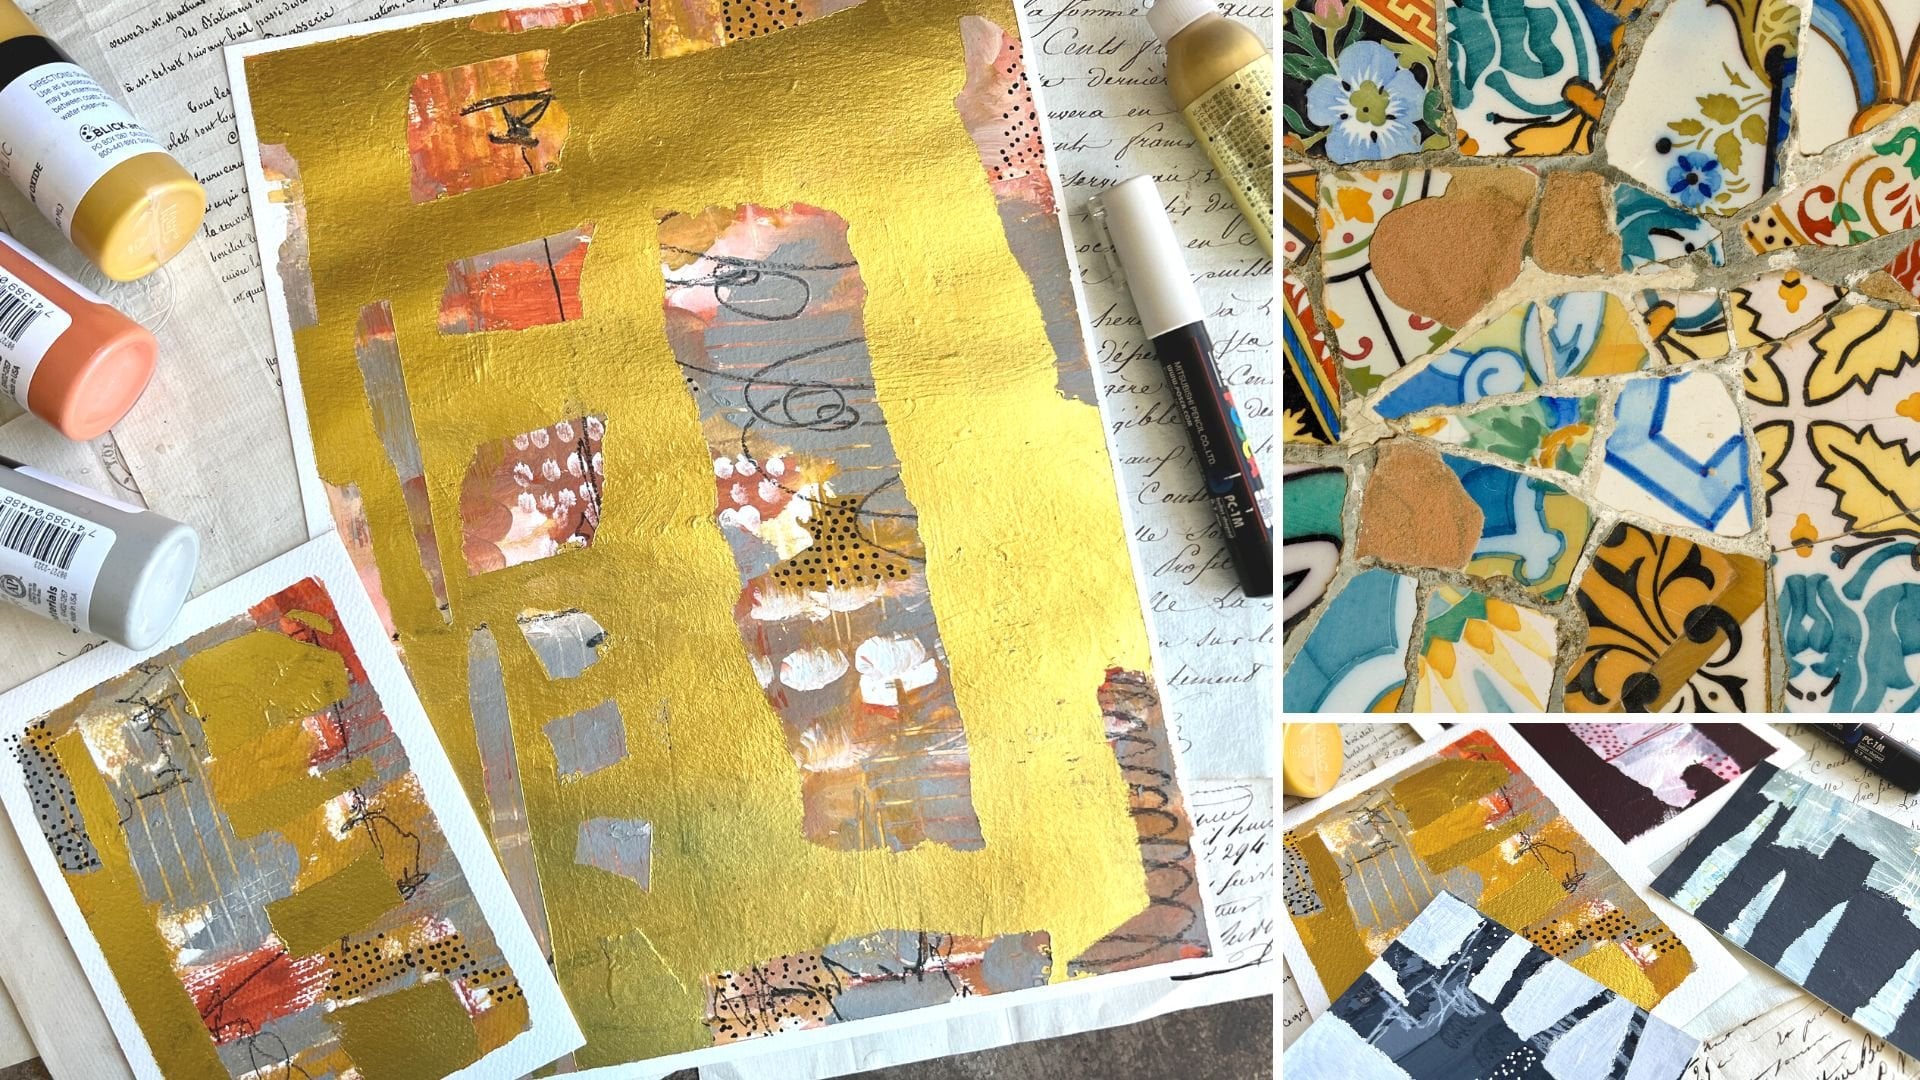
the first layer, I might do an old book page. This is just a random
old book page out of a very old book that I got
for photography props, and the word magic is at
the top and I thought, oh, I like that word magic. This paper is thin
and easy to tear. I'm just thinking how would I want to put some of this in
here and just glue it down? I am keeping in mind my framing that I've
created for myself. I might end up
painting all this. I don't have to have any
of it showing at all, but I thought it would be
fun to at least start there. Look, one of my
little stamp pieces from the square one that I had randomly sitting over here with the piece of
pilling stick on the back. That's how I made the one
with all the little squares. I could even go ahead
and peel that off and add this to this stamp. We could just put another
one in there just randomly. How fun is that? I just hap to notice it's sitting on the desk
there, how fun. Yeah, I might just look
at these and think, where do I want to put
paper to begin with? Maybe I don't want
straight edges and maybe I'll do a little
painting and Who knows? Let's just see where we end
up here with this piece. I'm thinking a
little bit of paper. I also have some of that deli
paper that must have been a little page that I put like I washed something off on or who knows what I did. But I like the colors on there. It's probably a page that I had something that I was used as a waste
paper, but I love it. I love don't throw those
things out either. I want the edges to be. I'm just looking here, getting some ideas,
nothing set yet. I really love this stuff. And I might paint I
might paint below that, but I'm like where
we're going here. You keep all your little scraps. It might help to
have a little one of those boxes that you can keep pictures
in or something, might help to keep
one of those handy. I don't want to get
anything on this page. I think I'm going to take
a piece of wax paper and protect it because I am super messy and terrible about getting things on pages
beside pages I'm working on. Maybe let's just
tape this down and protect that white
handmade paper. B man. Talk about somebody that can really mess up what
I'm working on. That's me. I'm feeling
like I like these pieces. I'm liking this piece. Let's go ahead and glue the
paper down here. I might add some more paint
in there and collage. I'm just thinking out loud. This is the map medium. I'm going to get a brush that I don't mind
getting glue in. Here we go. I usually use one of these simply Simons or
Simmons, how you say that? This is a glue brush and
it gets real stiff on me. I wash it out and then I
can soften that back up. I'm thinking Map medium. We'll glue these down, and I'll put some of this over there and
then we can let it dry and then it won't hurt
the paper or the page at all. Then I'm not worried
about it going over the tape so much because I can get that to come off later. Usually, I'd put this
right on the paper, but I don't want the map
medium everywhere yet. I don't know what else
I'm going to do yet. I put it underneath and on
top with these thin papers. Hopefully, by doing that, we're going to avoid air
bubbles and wrinkling because these thin papers,
they're just real thin. Love that. That's good. I can look at it and
consider, do I want to? I like this one too. I say, where did I put
the ones I said I loved? I think, let's go ahead
and get this one down, and I'm going to put some
glue on the back of that, and then I'm going to get some
glue on the front of that. There we go. I'm thinking right there. I'm looking a bit
at composition. Got it off to the side.
That acrylic paint. We'll come off a little if
I've saturated it there, which I don't mind because
I can keep on painting. But you'll notice how
that tissue paper disappears into the background. It's not real obvious that that was painted on tissue paper. But depending on your paint, it might it might
not be completely dry too because remember
I just painted these, but that did smish outside and
get rewetted a little bit. That's an interesting
observation. I am thinking I like
these pieces also. L et's go ahead and stick
one of those down and then I'm thinking that I
might do some paint on here, and then we could come back and do some more collage work. I'm going to throw
that in some water. Now that I've already got some of this blue and green in there, what if we say some
more blue and green? Look at this color.
I love this color. I love it so much. I
think that's the new one. Yes. I look at that. Gorgeous. I'm getting excited
here about this page. That's got a little
bit of texture to it. I'm okay with that. Just happen to notice it. I'm going to get a filbert out. This is one of my
Princeton filberts. I think it's like a half inch. I also like working with Jess with my acrylic
paint, D to put out. But I like to in and get
other goodness going. Then the white can be my white paint
because it's just so, it's got some texture to it. I'll be able to layer
on top of that with some pastels or
some other pencils or other paints
or what have you. I like that option also. This color is my favorite color. I love that color. Quiche. I love it. That's fun. We could also put more. I'm going get my
bowl scraper out and help some of this
stuff move around at bit. We could also do some
more collage work on top. Just however you want
to collage your stuff, it's open to your
favorite techniques. That's my silicone bowl scraper. I like moving paint
around with that. I keep it right up there. Now we could actually
come back on top with ale more collage
work if we wanted. I'm almost thinking perhaps
a little bit over here, maybe. Paint still. I should let the paint
dry, but I think on this, it'll grab that paper
for me underneath and be my glue and then glue
on the top to set it. It's acrylic paint, so
it dries pretty quick too. That's pretty cool. I'm loving where we went there, and I'm almost thinking
that we can now even add a little more
stamping on top of that. What do you think? Filling it
and sow those in the water. Thinking we did some type
of stamp work on top, maybe in white that
I would like that. I've got some white open. Yeah, I've got white paint. I could use the gesso
as my white paint. The thing I'm going to use
white paint as my white paint. I'm going to I'm going to set that to the side and hope not make a
big mess out of it. I've also got a little
piece of cardboard here. I'm wondering if we
did some type of, I don't know, some other
texture or something, but I'm feeling like,
what about this thing? Let's just put some paint out. Let's grab our brayer. All right. And I'm liking
the funky shapes here, so let's just do it. Thinking right up here. Look.
Oh, my gosh, that's cool. Then we can stamp that on
some other paper or just take our microfiber cloth
and just clean that off. Look at that. Oh my gosh. Okay. I'm feeling like maybe a few a little
white stripes. We've got stripes going,
this kind funky shape with the crosses or the Xs or whatever you want to make that super fun. I'm loving that. We got a lot going on there. I've lost that lovely
green that was up there. Let me get a piece of paper, and then I can clean
my brayer off. It's nice if you have
some inexpensive paper sitting over to the side, and then you can
clean your brayer instead of a lot of
paint sit on it. Then this can be
collage paper too. There's that. Thinking thinking we could be there for a moment. I could do some more mark
making on top of this, which I'm feeling like maybe. I want to mark make a
little bit on top of that. I could take some posca pin. Let's do some posca pin.
I got those right here. Is that one? Yeah, we going to shake it up and
make sure it's actually, I'm actually splatting
paint everywhere. I got little paint dabs now
where I didn't realize. That's okay. I'm thinking
like a few little dots. I like dots because I
think they're whimsical. They add just fun
extra and a piece. Just for a little extra fun. I do like that green
that I've lost there. I'm almost wondering
if maybe some green, here's some of
that. I like this. It's not a bright,
but I do like it, and I could just put a
little more green in here where we've lost it
because I like it up there. Just a tiny bit in
there have to be a lot. Maybe just a little
for some mark making. I like that. Just a tiny bit. Feel like for the collage piece, I personally am there. I'm going to be real
careful and peel our tape, and we'll see how that works
with what I've glued down. Look how pretty
this going to be. I don't love those colors. I love that I had just
a little piece of something that inspired
the color palette. Look at that. Oh, my
gosh. Look at that. And then it flanks this
lovely handmade paper. Then when we have it closed, you can see whatever's
going to be under there. Then I could actually add things on top of the handmade paper. But that's pretty darn cool
for the second piece here. Actually, that would have
been a good That would have been really good to flank this handmade
paper, wouldn't it? Oh, well. Maybe we can use
similar colors on that page there now
that we know how that looks. That's a super fun. That's how I would personally
use collage papers. I'd use them as elements
underneath paint, elements on top of the paint. I like using the wet
strength tissue paper because it basically
disappeared into the piece. That was a good choice. I also like the wax paper, and it does the same thing. It's a little bit thicker
and it doesn't allow paint to see through like we
noticed it did on that one. That was a really
interesting observation. And now I have two
layouts painted in this. I am thrilled with
how that turned out. Hope you like the way our stamps worked as a little
extra element on top. Then we're going to
paint another one in here without the collage papers, just using the stamps
and seeing what we get, so I'll see you in
that next video.
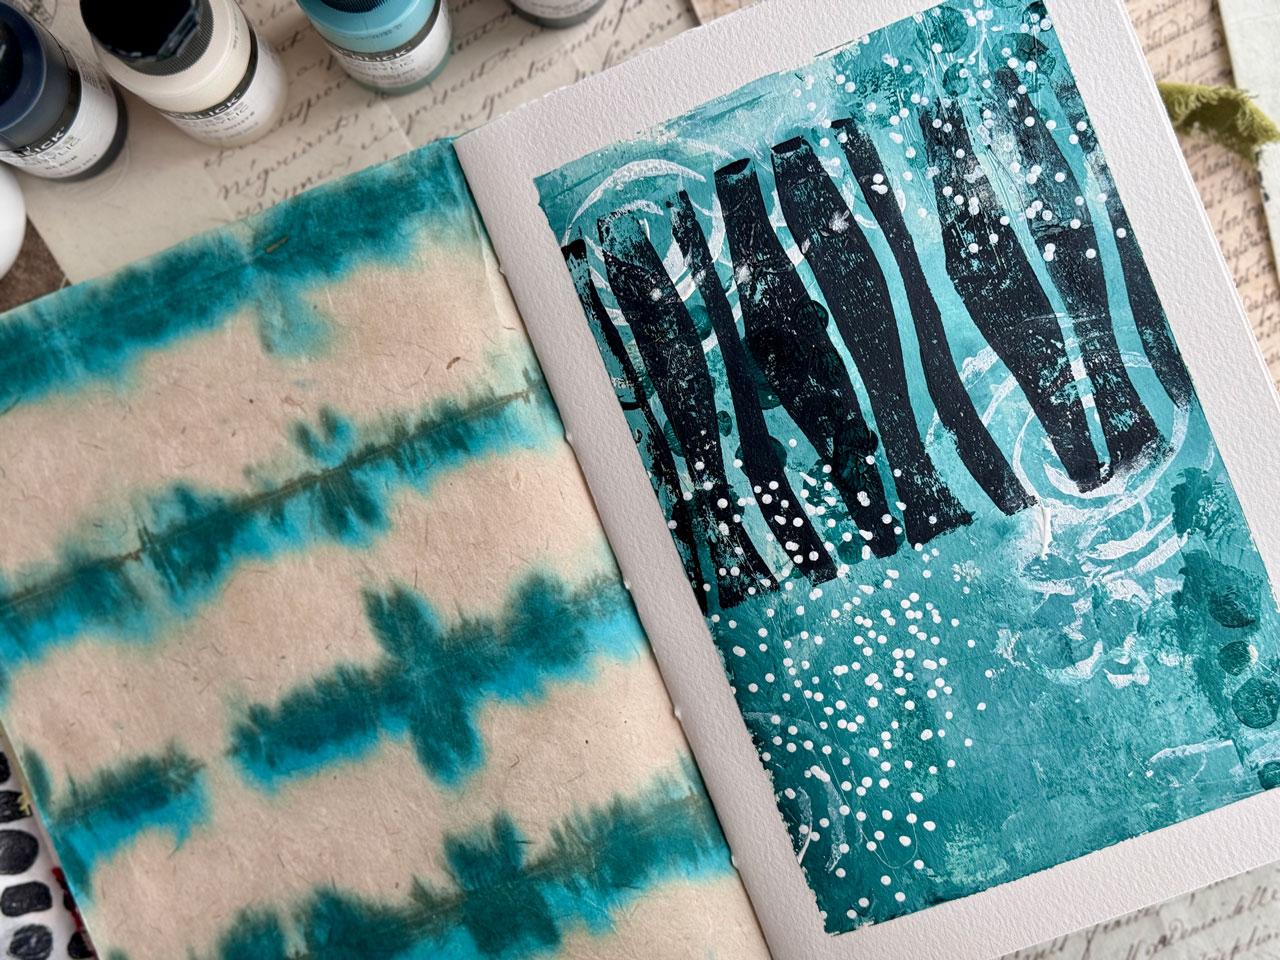
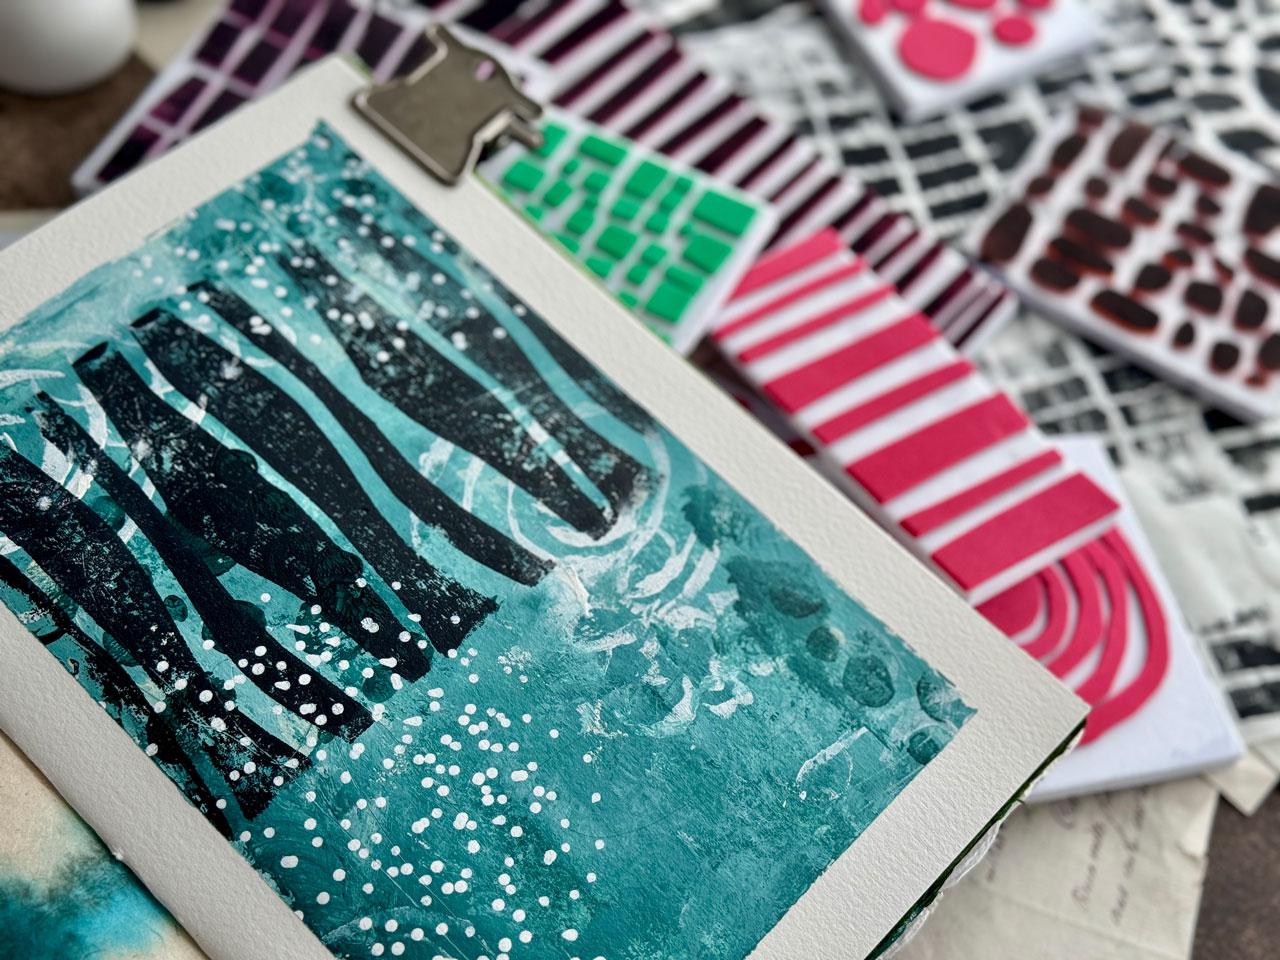
8. Abstract Painting: All right. I have
picked another page in that same journal because why not just
keep painting in that? I always have people ask me, what do I do with all
the stuff that I paint? Before I painted in some of these handmade
journals I've made, I would paint on a piece
of paper and stick it in a sleeve and maybe it's in the closet because my
goal is not to sell art. My goal is to create art and maybe I need the pieces
to do for classes and examples and things later and I just don't want to
go through the hassle of trying to sell things when that's just not what
I'm interested in doing. And so that stuff lives in
the closet and then nobody gets to see it until
unless you dig through a big tub or I pull it out and
frame it or what have you. Whereas now, doing
these in a journal. Now you have a finished book when you're done and you
can pull it out and flip through the pages and you
can take it with you and show it off and it's so rewarding to do that with
something that you have created yourself
like the book and then filled it up with the art. I'm just putting out some paints here to match that
handmade paper because I'm using this paper
here is what's right there. It's at the front of the book. This is going to be close to the front. I hope
I don't mess up. I like starting in the middle before I get to the front
because then if you mess up, it's in the middle,
and you can just gesso over it and
paint it some more. I've got some of the same
colors that are in that paper. I've pulled Matt
acrylic off white, green, blue, deep, dark green. I'm also going to put down some white gesso because I like to mix my
paints with the Gesso, make some more spreadable, and it makes it gritty so that other
things can stick on it, and it takes away the shine because I don't
like shiny paint. And I think what
I'm going to do is paint an abstract
and then we can then add other layers
and pattern on top. I'm going to get it
started with paint, and I could use a little bit bigger brush
to go a little further. This is another filbert, but I think this is a bigger
three quarter inch maybe. I'm just thinking I've taped it off with a
little bit thinner tape. I've just used artist tape. White artist tape. It's
about a half inch. And I'm just going to
fill this up mixing the white and the cream and the gesso and the
different colors here. Then I might use a
contrasting color or maybe black as a thing to put
on top or maybe white. I don't know. We're just going
to fill it up and then add some layers and see where we end up and I might pull
my bowl scraper out because I like to paint, but then I also like to
squish things around and just see like,
what does that do? What pattern and lines
does that give us? And you can use
clear Jess if you don't want white in with
your paint if you want that same flexibility that that adds without adding
white to the color. I do that a lot, I usually
have white and clear out. See about getting some
pattern in there, just that. Maybe drag some
other cream on top. I'm just playing just
creating, having some fun. That's what's fun about
painting and stuff. I like texture. I like pattern. I like color. Probably
why I made textures for photography for more
than a decade because I like texture and how it reacts with its surroundings
and its environment here. I love that feel. Thinking that I could do some
dragging mark making here, just to get some
marks under here and another layer
while this is wet. This is just a
mechanical pencil. Just to get some some
extra in that layer there. I feel like I need to let
that dry and maybe we can put that in some water. Maybe we can then stamp
a little bit on top of this with maybe the
brayer and some color. What are we thinking?
I'm like in that. Let's see here. Hang on. I'm like in this. This is
like cutoffs of the pieces. When I was cutting circles, this was the cut
off and I like that wonky circly look and
so I'm wondering, let's just do the eso
because that's what I've got over here out already. I'm wondering, let's just see what we can get
here. Look at that. Yeah, I just took the cutoffs and made a circle out of that. I love that. I love that. I love that. Again, just a little swishy off with the towel or
your cloth here. U I have a piece
that's coming up, so it may not be glued as
good as it could be glued. Interesting to keep
in mind there. I might just tack
that back down with some glue later and then
a little cut off one and I know I got a
lose one on there because it was loose
when I started. That's different.
Just going to that. Then I like I like
these funky shapes. I like these rainbows,
but I feel like there's too many lines with those
lines that I just created. I also I like this. I also like the line lines. Now I'm thinking. Let me pull
my paint brush back out. Thinking another
layer on top of here. I could also go ahead
and clean my brayer off on just a piece of paper that I've got handy so
that I keep my brayer clean. There we go. Then I'm thinking that we could then paint a little
on top of here. It's going to do
that darker color. Maybe that darker
color, wait a minute. Maybe that darker color
would be good for some dots. Let me get some more
of that out there. That's that dark green deep. I need a little bit bigger
spot here to do these. But my little
filming rig is here. I don't want to be
moving around the room because I need to have
it where I'm filming, but man, I need another
like two feet right here. Super. I like that. Almost like I could even
do something black on top. I did some funky shaped
things that were super cool, almost like alien botanicals
or like that look. Those are fun. I could
do something like that. I could do a botanical, I could get a
stencil out and just now stencil some black
or something on there. That would be fun. But
I wanted to keep it to our different stamps
that we were using. I like this. I'm thinking, what do you think this in
a little bit of black. Let me just get that
cleaned off the brayer. Because I want to have a piece just with the handmade stamps. Let me move this paper
here to the side. Feel like I need that's
just black Mt paint. Feel like I need just a
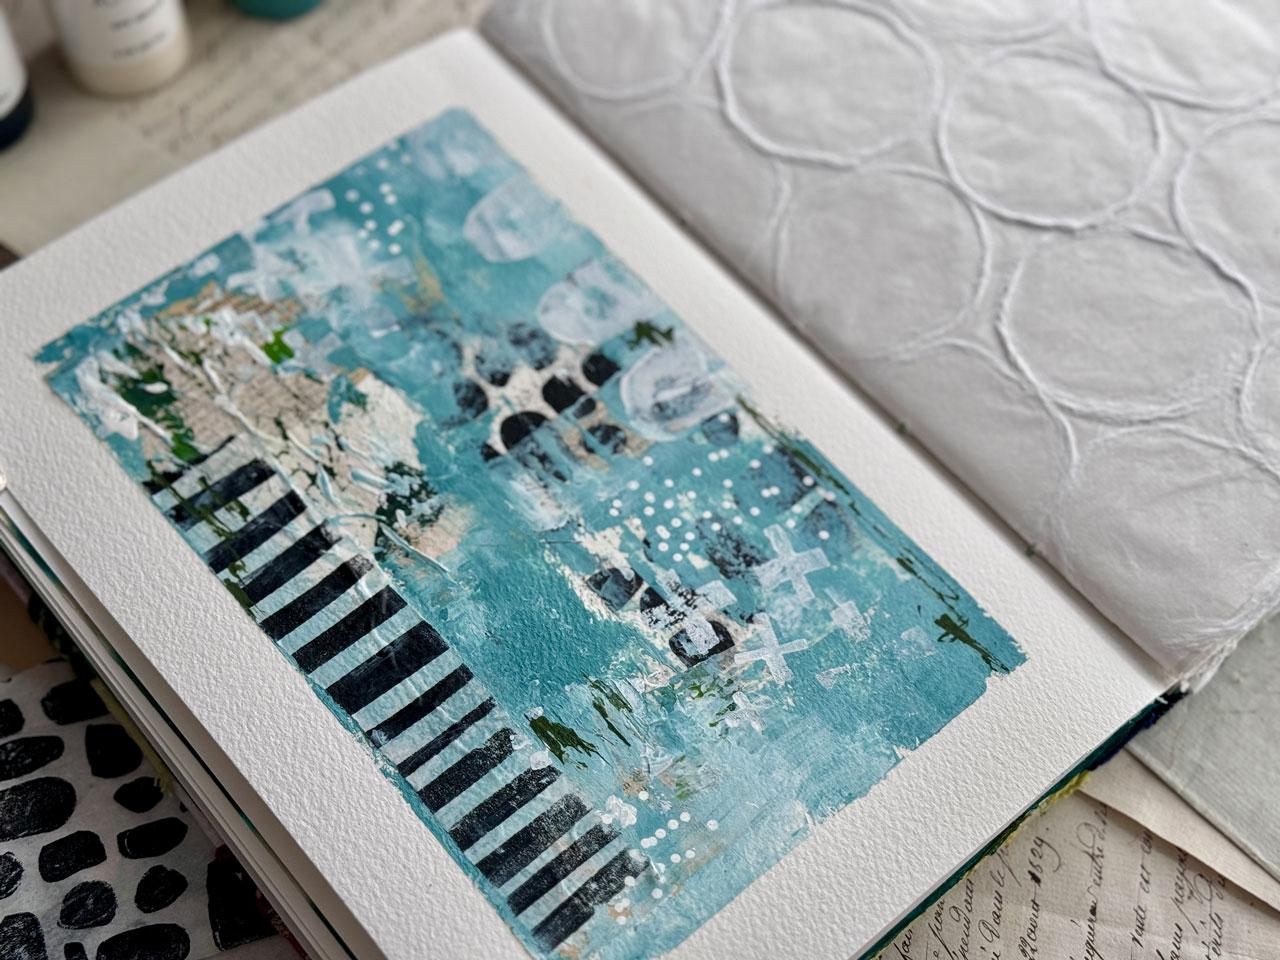
pop of the black somehow. Oh. What if we do all
the way across. Oh. What about that? Oh that's cool. And I'm just going to
wipe that paint off. And knocking stuff over. Just clean my brayer off on this grab paper that I
had sitting out over here. Then we can look
at this and think, Is there anything else
that we want to do? Feel a little bit
like I've covered up my yummy circles there. I almost want that. Well, maybe I'll do with ma, ma sho mark instead. I got some white posca pen because now I feel like there's
nothing like right here. But I could do dots because
we know I like dots. L et's do dots. We'll take it up over the blacks so that it's got a reason
to really be there. There we go. I like that better. Now I've got pulled that
in a little better. Then we can look
at it and think, is there other
stuff that we need? We can keep adding to it. I could get to a stopping point at any
particular day and then think, now I'm ready to add more to
this, which I do that a lot. Sometimes I'll be like, I thought of a great
idea of something I could do on a piece that
I've already been working on. Feeling pretty good about this. I could come in
with another color. If I wanted to come back in
let's say a green or a color, I could come back and
add on top of this. A shape or a pattern or design. I think for right
now, I'm going to say that I'm pretty happy
to with where we've landed, color wise, and I want to look at it without
the tape on it. Then we can decide
at a later point, do we want to continue
adding to our pieces? A lot of times it's
fun to just get going, have a background on there, come back later and say, Okay, now I know what it's asking for rather than forcing it on
the day that you're like, I'm not sure what it needs. But actually I'm happy
with where we're sitting. Then as a whole book, as you're flipping through your
book, you might think, that was finished or Oh, no, I need more stuff, and this gives you that opportunity
to look at that. Look at that. I like
the black on the top. That's super fun. I've just protected the other
pages with that. Look at that once we
pull everything out. Now it looks like
a finished page. I do feel like later it could maybe add a little
extra something, but I don't know
what that is today. That was pretty
cool and super fun. I really like this funky
just three lined piece to make some interesting
stripes like that. This might end up being
one of my favorite. The funky circles in
the just cutoffs, making interesting shapes.
That was super cool. I hope you had fun painting
that layout with me. I'm definitely interested
in seeing what you guys end up creating with your stamps and what you end up painting. I want to see your stamps and maybe some artwork
that you've done, and I can't wait to
see what those are. I will see you back in class. Oh.
9. Gelli Plate Ideas: Hello, everyone. I
thought in this video, we would take a look
at using some of our foam stamps with
our jelly plates. It's not really a
jelly plate class, but I just wanted
to give you another idea of what you could maybe do with foam stamps
with your jelly plates. I've pulled out my little
five by seven jelly plate, and I've cut some
paper in half out of my mixed media pad here, these are nine by 12, so I've just cut them in half. We've got six by nine sheets to work on our five by
seven jelly plate. I like the mixed media paper
because it's smooth and it's a little bit nicer
quality than say, a little nicer quality than like tissue paper
and stuff like that, which are some other things that I normally do
with the jelly plate. And I'm going to just tape one edge of
the paper down about centered where this would be
wherever I want that print to line up as I add
different layers. I'm just going to do that so
I can lift it up and down and have it hit in the same
place every time hopefully. That might even help if I tape the jelly plate down too because I can feel it moving on well, I guess I could take
this back piece off. I like to keep the
plastic on one side, but If we don't keep
it on that side, it will stay put on our board
here that I've got here. I'm going to set that where it's just going to stay, excellent. We'll tape that right there. Now each time I lift, hopefully, I can just put that
right back down in the exact same spot. Here we go. I've pulled out some paint
colors to play with. I've got some of these
Blick mat acrylic, got sage blue, dark
green, orange, deep, yellow orange medium
and black and these are a color palette
that I pulled out, inspired by a color cube card. This is a card from the color cube Volume two
by Sarah Renee Clark. I like pulling color
palette cards and having some color palette inspiration that guides me into a color
palette because for me, Color is the hardest part of a project sometimes because
I like all the colors. Then how do you narrow it down? You can do the standard color palette from the color wheel, complimentary and
things like that. But I feel like these give
you a deeper dive into a more complex color combination than just picking say two
colors off the color wheel. I really lean into
picking color palettes. This is what I have
picked inspired by got as close as I could in the
paints that I have pulled out. Just thought I would talked
about how I would do that. Whether I use them all or
not, that's questionable, but I do have them ready and I've got some
lovely stamps here. I like the circly one. I also like the odd elongated
and circly looking one. I also really like stripy ones. Lots of fun choices in the ones. I really love this
one with the three, just weird looking stripes. Lots of good choices
from what we've already made in class and just looking through
my different options. I really like this one too, and it goes along with
that. Odd circle one. These might be the ones that I start with
and then we'll see. Couple ways that you could work with these
on a jelly plate, you can paint these
and stamp them down, and then layer it with
a color and then do your print anything
underneath is going to be what you're going
to see on that paper. Another way is we
could paint a color, we could stamp into it and then create that pattern and
then smooth the paper out. We've got a couple
options there. And I'm thinking, maybe we'll
start with this dark green. For this, I'm just going to put a little bit of paint way
more than I intended. A little bit of paint goes a
long way on the jelly plate. I've got just some
scrap paper over here to rub my brayer on and I may be rubbing some of this paint off
because it really is a lot. I've also got some
blick paint extender. If you have a hard time
keeping that layer wet before you get the paint
off of it onto your paper, you might consider
some extender. Let's just start this out right
here and see what we get. I'm just simply
stamping it down, and then I like to have a rag or microfiber cloth or
something like that handy. That is how I mostly
keep the paper. The stamps pretty clean without having to go
wash them every time. You know what else, I
also got another fun little gadget that
I just remembered. Yeah, I can't wait
to be using this. This is my speed ball, and it's a barren, which happens to be just a little thing to
help you get a nice print. I'll be using that bar printing. It's a block print
speed ball help there. Then we can just peel that
away and see how it did. At that. I get that works giving you that pattern on that
paper. That's excellent. Then we want to do Let's see. I may just do a
whole another layer. I could do these as
Let's do another layer. Just play and experimenting. And what about stripes? Let's just play and see
what some of these do. That's nice. Maybe we
want it another one. Okay. And then can just
smooth this around a bit. See what that does. That's pretty cool. Now we could put a
little paint out over here on a palette paper or on your junk pat
paper if you want. I'm feeling like I might want this odd ball,
strip the pieces. I'm just going to set this right here on it and do this game. Oh, look at that. Look at that. Again, I'm just going to while I'm going,
clean those off. Let's just see what
this one does. Super cool. Now, I want
a cream weirdly enough. I know I didn't put a cream out, but I want a cream. What we might could
do is I'm just adding to the layers here,
playing and experimenting. And we may cover up layers that we've already put on there, but we're just testing out the different ways
that we could use. Oh, that's pretty cool there. Now I'm thinking because we did that maybe some more orange, and maybe we could add one of these favorite ones back in here because I really
liked the circle thing. And I really liked odd
shaped stripes thing. It might be the same though with that not being much
different than that cream. But it is just fun to test
out different techniques. That was too much
of the same color. Maybe we'll go back
over it with the blue. What? To. You don't want too much paint
because too much paint just doesn't work like
you think it would. Let's do this in the blue. I want one over here. Then just going to
clean that off. Let's come right
here with this one. Let's just see
what we got there. I think I'm really going
to like that tool. Oh, interesting. I feel like maybe we
need something dark, maybe a little bit of
like a black, possibly. That's way too much.
Maybe some black. Alright. Let's see
what that does. And we can get our paint too thick too when you're
doing the jelly plaint. You can get too thick,
and you might need to set these to the side to
dry between the layers, but it's still fun
just to experiment. Oh. Okay. Now I feel like we're getting somewhere with that.
I like that a lot. Almost feeling like what if we had We could after
we do all that. We could just do mark
making with some of our favorite tools and stuff. But now I'm thinking
what about a little bit of some interesting
cream on top of that, maybe with this one, which
we've still got a lot of paint here on our plate. I'm feeling like let's take a ghost print to maybe clean some of this off and
just see what that gives us. I've got another
piece of paper over here that we can just pull
like a little ghost print. Look at that. I still want a little bit of
this off of here. Let's see if we can
get it with a second. See, that's super cool. Now I'm thinking, what
about some cream? Let me get rid of my
extra dirty paper here for a clean sheet. These you can keep
for scrap papers. They could be a lovely
print in themselves. Definitely your papers that
you're using for runoff. Picking up a bunch of black
that was on my roller. Alright, let's see, right about. Let's do it right here.
Alright, let's see what we get. I like that. I almost want to see if I get
some right down here. Oh, yeah. Might even want
to keep going just a tiny bit higher up. Perfect. I like that. Almost, I feel like we're
there with this one. I might just take my
runoff prints and just do them down again to clean
off my jelly plate and see where we got here with our different stamps and stuff. If you saw how we
tape that down, look how our print is
nice and lined up, even though I just
did a ton of layers and some super fun
different patterns and designs and colors. Now I might even come on top of this with some mark making. We could come back with
different pencil marks or different elements that might want to finish off
a piece of work, but for a jelly plate
starter print, I love that. This is an excellent
way to play with your foam stamps and have something that you can reuse
over and over and over. I just keep microfiber cloth handy to clean the paint off. You can also what I really like about these is take
them to the sink, wash them with some
soap and water. I'm loving how that
one turned out, just testing out our
different stamps. Hope that gives you a bunch
of fun ideas on how you might use some of your
custom foam stamps using your jelly plate. I can't wait to see what
you create out of that, and I'll see you
guys back in class.
10. Final Thoughts: We wrap up our custom foam
stamp making workshop, I hope you feel inspired
and empowered by the creative possibilities
these simple tools can offer. You've learned how to
design and create durable, reusable stamps and explore various ways to incorporate
them into your art. Remember, the key to mastering any new technique is practice
and experimentation. So don't be afraid to try new
designs and applications. Thank you for joining
this workshop, and I can't wait to see
how you continue to use your custom foam stamps
and your artistic journey.
 DENISE LOVE, Artist & Creative Educator