Transcripts
1. Introduction: Hi, everyone. I'm so excited to have you
here in this class. We'll be diving into the world
of intuitive abstraction, inspired by Willy
Kandinsky's love of music, movement, and expressive
color choices. I'm Denise Love, an artist
and creative educator, and I'm excited to
bring you this fun and exciting dive
into Willy Kandinsky. The goal of this
class is to let go of perfectionism and
embrace spontaneity. We'll be working on
a large sheet of watercolor paper,
layering color, marks and shapes in response to creative prompts inspired by Kandinsky's artistic philosophy. Then we'll cut the sheet into artist trading
card sized pieces, turning them into a personalized
art prompt deck that you can then use again and
again for future inspiration. This is a great way to
build creative momentum, break through artistic blocks, and experiment with mixed media in a fun, low pressure way. You don't need to be an
expert in abstract art. This class is about playing and exploring and letting
intuition lead the way. Whether you're a
seasoned artist or just getting started
with abstraction, you'll walk away with a
unique handmade deck of inspiration cards that you can pull from whenever
you need fresh ideas. I can't wait to see what you create. So let's get started.
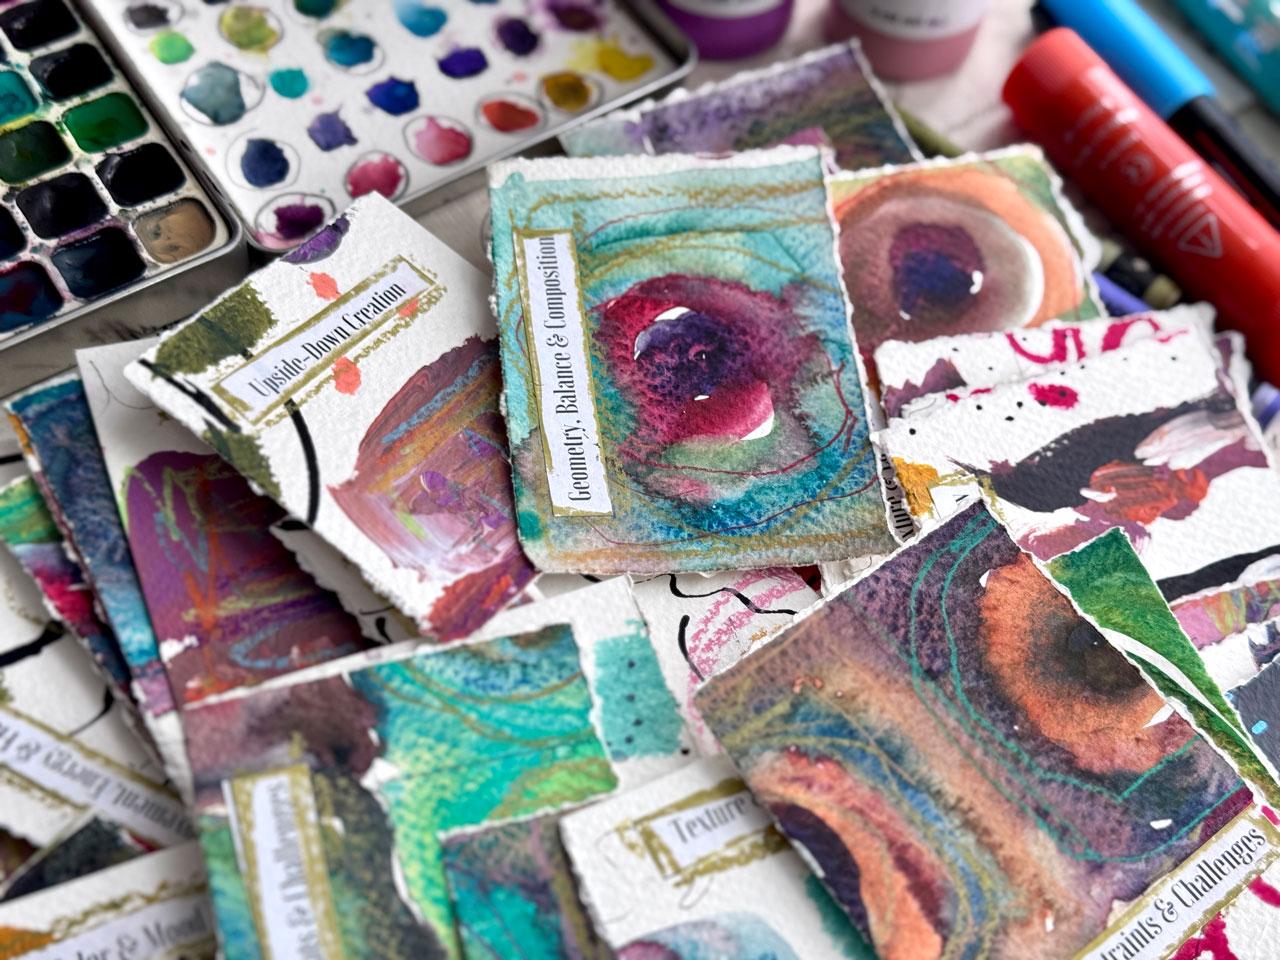
2. Class Project: This class, you'll
create a one of a kind hand painted
art prompt deck inspired by the
abstract expressionism and musical influence
of Willy Kandinsky. Using intuitive mark making bold colors and
expressive shapes, you'll fill a large sheet of watercolor paper with layers
of dynamic abstraction. Once the painting is complete, you'll cut it into artist
trading card sized pieces and attach creative
prompts to the back, resulting in a unique, personalized deck to
spark future artwork. I can't wait to see
what you create.
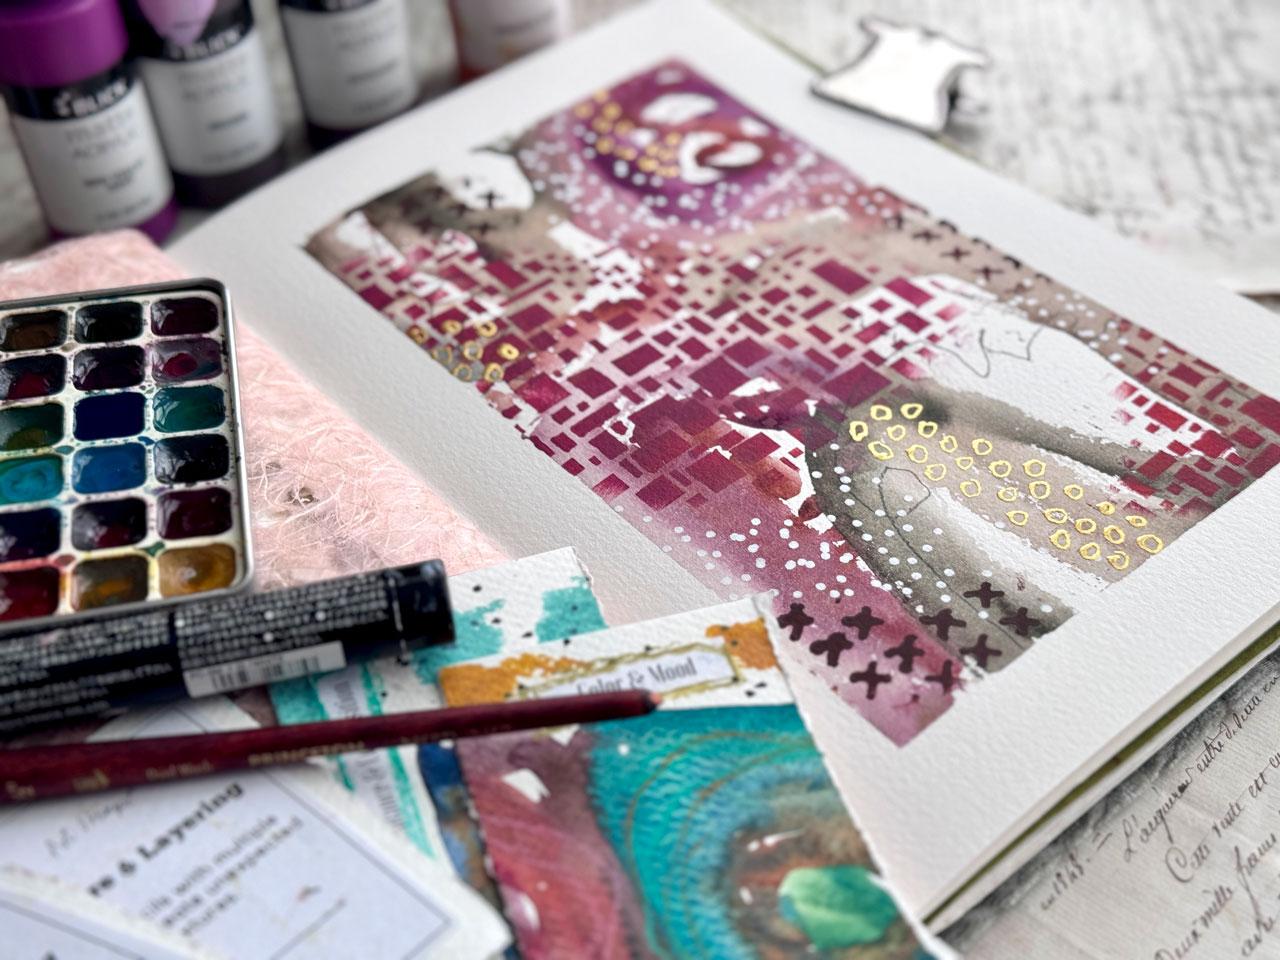
3. Supplies: Let's talk about the supplies
that I'm using in class, and then I want you to tweak the supply list to whatever
you've got on hand, this is the kind of project that it's fun to experiment with what you have and just see
where that can take you. So I'm using a great big
piece of watercolor paper. This is the artists of
for Michael's 18 by 24. I also like the Canson XL pad. I got a pick a pad of
that. Could use that. You could also just use nine
by 12 sheets and maybe put four or five together and pretend it's a great
big piece of paper. And then I want you to use whatever supplies
you have on hand. I would probably
recommend because these are prompt cards and
you'll be touching them, probably things that
won't smudge or smear or get on each other as they are stacked if
you're not going to finish these off by
laminating them or something. So I did kind of avoid
things like pastels in this particular project just because I would be handling
these and touching them. So I have used in class, I've used some watercolors. So any watercolor you
want to use is fine. I've used my mass watercolors. I've used some paint pins
for some mark making. So any paint pins or um, any of the fine liner
pins would be fine. A kind of drawing that you like to do,
that would be fine. Then I've used some black ink, so you could use
the ultimate zero. I've got this from Sketchbx. That's the only reason
why I have that. You could use black magic, India Ink, you could
use black paint. You could use anything
that you wanted. I've also used some
acrylic paint. Just in some various colors,
nothing special there. I've used some temper
sticks because I have them and dry
fast and I like them. I've also used
Neoclor two pastels for mark making because
they're convenient and easy. Then you'll print
out the PDFs that I gave you because that'll
be your prompts and your front categories
that you can then use to glue to your prompt card and
keep those organized. I've I've given you
72 prompts to pick and choose through those to
see which ones speak to you. I know every prompt
is going to speak to you in a way that's inspiring, so you can just pick through
the ones that you love love and make those into cards. This is a super fun, easy, low stress just make
a big mess on paper, and when we cut them up, you
just don't know what's going to end up on each page and
how cool each page is. So I love doing stuff like this. It combines many of my favorite things playing
with your supplies, cutting up your artwork, ending up with really cool, interesting
compositions on pieces that you never would have maybe
just painted on your own. Like, I never would
have created that, but look how cool that is. Um, so all my favorite bits, and then you end up with these lovely little cards that you can then use to inspire you forward in some
other projects, especially if you get
stuck or you're like, I don't know where
to go, or you just, you're tired and you want
to just have some fun. This project is super fun. I hope you enjoy
making these with me. I can't wait to see how
your deck comes out, so I'll see you back in class.
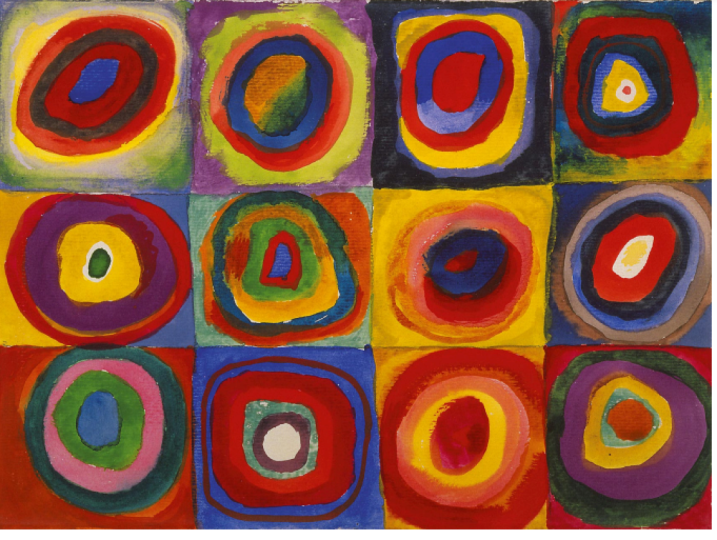
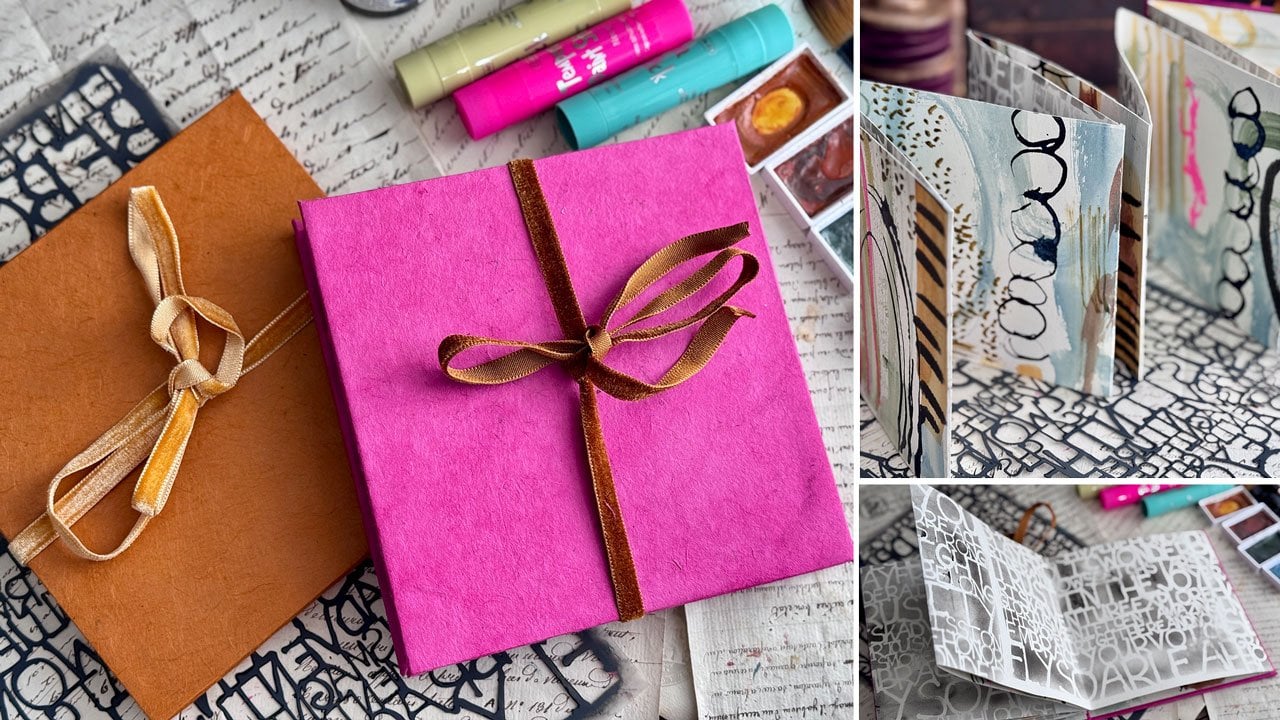
4. Inspiration & PDFs Included in Class: Let's talk about our inspiration and the PDFs that I've
got for you in class. So this class is a companion class to my
Kandinsky master class, unlocking Kdenski the art and color theory of
a modern master. And in that workshop, we did five different projects, and there was a
bunch of bonuses, and we practiced and played and we made a
little concertina book of some of his techniques and the different things that he
taught us in that workshop. So lots of fun with
the concertina book. And then we also painted squares
with concentric circles, and we painted his
painting upward, and we took a look at his
painting houses in Munich. And then we took a
look at his painting 30 and we learned all about Kandinsky and lots of ways to use his techniques and
such in your work. What I thought
would be good would have a companion
class to go along with that in continuing to use Kandinsky's
techniques in your works. I've got a PDF for
you in this class on exploring Kandinsky's
techniques in your art. This just goes through some of the themes around
how he created. Exploring abstraction movement
and expressive color, et music guide your marks. This is a little PDF
on tips and tricks to continue using what you
learned in your work. If you took that class
and if you didn't, then it's just to give
you some ideas of things that you could use with
these prompt cards because you could use these prompt
cards just to guide you whether you've studied
his art or not. Use color emotionally,
not literally. Balance, order and chaos. We're just taking
different themes and directions off of some of the paintings that he did
paint from intuition, not from planning, think shapes
and lines as characters, how this relates to
your art prom deck. So I'll give you a little
information there. So that's a fun little bonus PDF on how you can use these and think about
these as you're going. And then I've also given you a PDF blanks so that you
could make your own um, cards and other prompts
that you think of. There is a PDF of blanks and
then expressive abstraction, a Kandinsky inspired
art project. This PDF has all your
creative art prompts that I've got for you, and then you can
think up more of your own and add to it or you can take away the ones that
don't really speak to you, so you've got plenty
to pick from to make your own creative
art prompt decks. You might read through these
and take your favorite 50 or your favorite 40
or however many cards that you cut out of a
big piece of paper, you might pick that many
prompts to fill your art deck. I've actually got
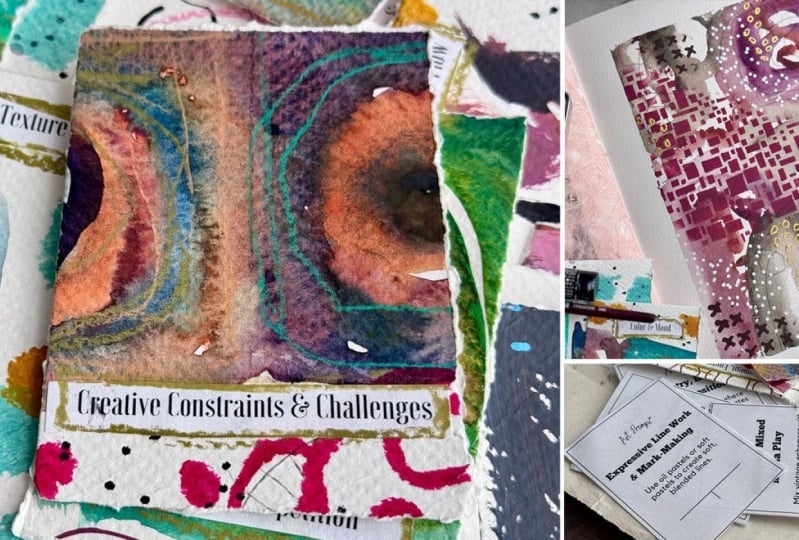
these in categories. There's nine prompts
on each page, and I've got a texture
and layer category, texture and layering,
create an artwork by lifting paint away
rather than adding to it. Layer pastel over acrylic, then smudge and we
rework the surface. I will say if you're doing
it over pastel over acrylic, which I absolutely love to do. I usually mix my
paint with gesso, clear gesso or white gesso, so that my acrylic paint has
a little bit of grit and that pastel has something
to ground it and stick to. Make a piece with only torn
collage elements, no brushes. Use stencils with
multiple colors to create unexpected textures. See, a lot of these, you
can just see they're definitely things that I already love to do. I love
to use stencils. I love to layer
pastels over acrylics. I love to lift paint back off
by mark making and stuff. Um, build a background using at least three transparent
layers of different mediums. That's super fun. It
could be watercolor, gouache and acrylic paint. You can just play and
mix and match here. There's one category of
texture and layering. Then you've got a category
of color and mood. Layer transparent
colors to create new unexpected hues.
Super fun there. Lots of ideas there. You've got a page of movement,
energy, and flow. Let your hand move
freely and create a sponanous rhythm
driven composition. In something like
that, you might even put on some music and just see where does that music guide your hand as
you're creating? Um, so that's super fun. And then we've got a page of geometry, balance,
and composition. Create a piece with floating
disconnected elements. So that's right up
Kandinsky's alley where he's got those big
abstract compositions of just floating things. Collage and mixed media play. Work with unexpected materials, string, fabric or
textured surfaces. So that's super fun.
Mixed vintage ephem with painted marks to
create visual contrast. So you can see, I
mean, these are deep. These are not just the the run of the mill adds some
dots to your work, like some other prompts that
I've created in the past. These go a little further
and really take in to respect the work of this particular artist
that we're studying, which this time is Kandinsky. I did a set for Klemt A. If you took the Clem class, there was a set of prompts
to go along with Clemt. Master studies seem
to be my thing. I love to just dive in and give myself
permission to study several pieces of
art and see how did they come about in
their thoughts. And you just get such a deeper learning
and understanding, and I get so excited, especially with Kandinsky's
concentric circles. That's my very favorite
of his paintings. And so now I've done two pieces of those
that I love love. So we also got a page of expressive linework
and mark making. Creative constraints
and challenges, make a piece that is entirely black and
white, no color at all. So that's right along
with his painting 30, where we've got all those black
and white squares that we did that I showed you a moment ago where everything
is in black and white. And that's actually super
fun to do and takes away a lot of decision making process because there's no color
and marks to worry about. Abstract. So then I've got
one last page here with a little collection of extras, abstract self portrait layered
time, dissolve the grid, start with a strict
grid structure, and gradually break
apart with fluid marks. How fun does that sound?
Sound versus silence, musical interruptions. This is the set of prompts. You've got all of these with a whole set in a category and then a little set of extras
and not in the same category. Then I've got the word
prompts of those, the titles here. That you
could put on the front. This will be the front of the card and then you're going to have colors and things on
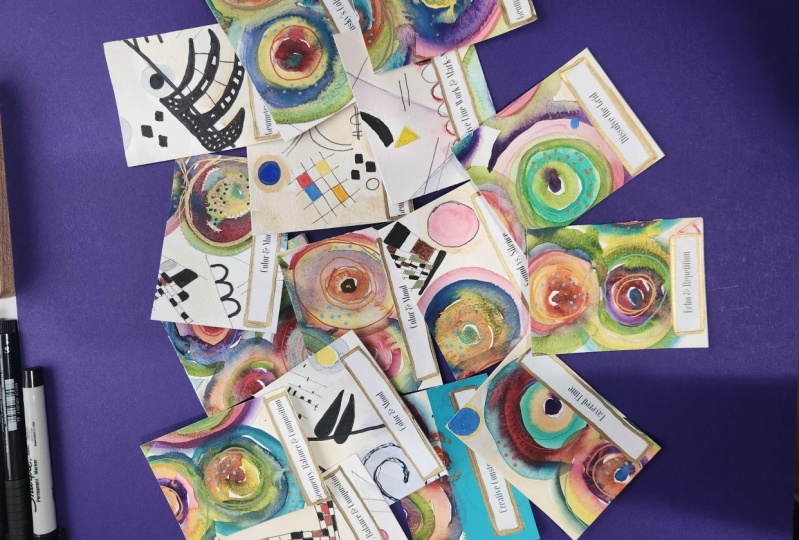
the back of the cards. Just to give you an example, I've got my little
clemed prompt cards that I've got here that
we did in that class. You can see I put
the word prompt on the front for that right there, and then you flip it over and you've got the pattern play, the little art prompt
glued to the back. So this is like the
little front thing, and then the other
part is for the back. And I love these. Now I
can pull and play and discover and just all
kinds of fun things. And so I don't know, little
prompt things just seem to be the thing that
makes me happy. There's nine of each
on those pages, but there's ten of these
in case you mess one up, there's ten and ten of the next. I've gone through and I've
given you and then here's that last one with
the little mixed ones and then a few extras. That is the PDFs that
we have in class. I hope that these inspire you, what we're going to
do next is paint our a gigantic piece of paper. You're welcome to work on any
size paper that you want. I'm working with an 18 by
24 inch piece of paper. I got a big pad at the
Michael's the other day, but I also like the
Kens and Artists loft, which I have a pad of that. So any of these big pads
of paper would be fine. You could also work with several nine by
12 pieces of paper, just kind of push them
all up together and paint the whole thing like
it was one big piece. And then cut your samples. You're little artist
trading card sizes, your little prompt card size, these little things here. Then you would cut
these out of there. Then it's really fun because
you end up with a lovely, unusual composition
on these cards that you really didn't expect to get and it makes them
super interesting, a little piece of
art in themselves, and we are going to
do that with this, but with Kandinsky
inspired prompts. In my mind. Here's
what I'm thinking. I'm trying to leave
this out here so that my camera stays focused. But what I'm thinking is I'm going to do
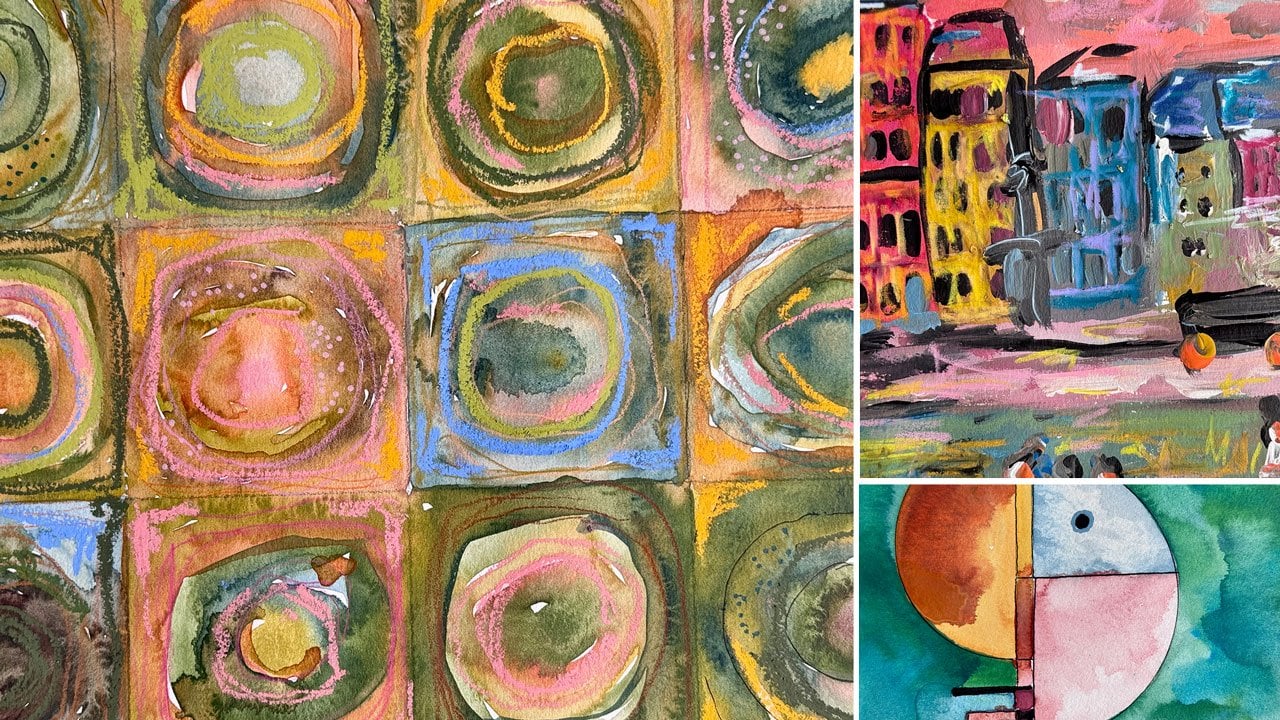
some squares with concentric circles randomly
in more than one place. I'm going to do some
free mark making. I might even do some
black and white marks in certain little areas
like the 30 painting, and just see maybe a few
abstracted landscapes out there, just interesting some things. We could just be very spontaneous on
the entire sheet, too, if we wanted to
kind of like we did in the book that we created
of the warm up stuff. We could do great big
abstract piece marks and things inspired by
his marks and stuff, or we can just randomly go
at it with color and marks. No specific thing
that you have to do. I was just thinking that my
very favorite thing to do is to paint these squares
and concentric circles. I really loved the
second one that I did, so I used the Masha's
watercolors for this, and so I might go in with
Amashas watercolors. On the bigger one to just
recreate some of these again, in strategic places on
this big piece of paper. It is different paper than
I originally had there. So it's going to look a little different on
here than it did on that. That was all cotton paper. But I just thought,
you know, let's just play and give it a
go and see what we get. The goal is to fill
the whole page maybe with a base layer, come back on top with
maybe some mark making, and then we'll be ready to cut these up into prompt cards. So I will be back in the next video and
we'll start painting our base layer. And
5. Gathering Materials & Painting Your Paper: Ready to start painting
the base layer on here, what I recommend
you do before you start painting is if you haven't taken the
master class and looked at some of the
paintings and done that study, look at the different
prompts and just see what the different
prompts say and maybe then pick
several of the prompts to do on this larger piece of paper to get
you started there. Then what you can do
when we cut these up, then you have some
of the prompts that you've already used on
this big piece of paper. Um, so color and mood, choose a non traditional
color scheme for an everyday subject like blue trees or pink sky or
different things like that. But just kind of read through
these and think, Okay, how could I use some of these elements in my big
piece that I'm painting? I'm already going to replicate different ideas of the
paintings that we studied. So I feel pretty good
about doing that. But if you didn't
do that with us, then read through
those so that you can incorporate some
different things. I'm thinking that I'm going
to grid out a little bit of this to it doesn't
have to be perfect. I'm just going to
kind of give myself just a few parameters
with the little grids and circles just to kind
of get me started. There's no rhyme or reason here. There's no composition. I'm not worried
about where this is going later because who knows
where this is going later? We're going to go ahead and
maybe just dive into some of the different things that we like about his
paintings and stuff. I like the squares with
concensric circles. So I'm going to go ahead and
just start that right there. Um, picking some different
colors that I like. When we cut all these up,
these are all going to be different in different places because remember the
cards only this big, so we're only going
to get a portion of each of these in there. You don't have to
be worried about, this one's not straight or
this one's weird colors or whatever because you're not going to see that
when we're done. You're going to be cutting
these up into cool things. It's the perfect
chance right now to experiment with different
colors and different play. If you get some paint
water on your paper, don't even worry about it. I'm just mixing and matching and playing and seeing
what can we get here? No, no rhyme or reason. It's the perfect time
to experiment and play with different
colors and be like, I've always wanted
to try this or that then look what that did. Maybe come back in here with
your brush just dipping into the next color
without even washing your brush out and see
what that gives you, W is fun because
some of them will be mud and some of them
will be lovely pure color. All kinds of fun stuff
when we do this. Oh, I love that. Pretty, pretty
bright aqua colour. Right now we've got
all of that on there and I'm not worried about what the circles actually
look like at this point. I'm going to let them dry and do their things as we move on
to some other mark making. I could at this point do some fun mark making
with some black ink. I've got several different
kinds of ink that I could use. I've got the Higgins Black
Magic ink, which is fun. I can dip a brush
into some ink and let that make my whatever
random pattern that I'm wanting to make
I want to make a few of these patterns inspired by what we've got going on
here in his painting 30. I'm going to look at
that and think, well, I've got some really
lovely scrolls and things that I could replicate here with
something like this. Let me just get it started. I'm just going to draw with
this and we'll see what that gives us and just play. With some random marks that
will hopefully later come out in a piece of a card and just
be something interesting. Let me just get a few of
these really on there. We could do this with a pen and ink too if you want these to be finer lines or
something like that. You could do pen or ink like
dip pen, that could be good. Got this fun little
squirrel here. Mine's way more. That's more like a clemed swirl. Oh, I like that.
It's more like that. Maybe another one
of those somewhere. Maybe one of those right on top of our little circles there. That's super fun.
Might also come in. Now I'm just picking
and playing with different art materials that
we've already got on hand. I like this little hash mark that we've got here.
That's a fun one. That would be easy to put out
here in one of these areas. It doesn't have to be
completely perfect. In square or what have you, because that's going to
be on more than one card the way that we've done that, just some different
marks and stuff is what I'm thinking here. What I like about doing
stuff like this is we have no idea where these pieces are going to end
up on our sheet. Um, I also want to do a little bit of some
abstract painting on here, maybe with some acrylic paints. Let me grab some of those. Now I've got some
acrylic paints. I've just picked some
that looked interesting. I'm thinking something
in the range of an abstracted cityscape like
you did in Houses in Munich. Doesn't have to be perfect. I'm not looking for
anything specific. I've just put out three
colors and some white and black and just picked up a random paint
brush because again, you're going to see
you're not going to see the whole thing when
we're done painting. So might just draw some
random buildings in here and it's going
to be something fun and interesting when we're done. I could mix these
with some gesso, which I love to do, which makes the paint.
More spreadable. It's white gesso. I've got some clear gesso back there,
but we'll go with the white. It makes the paint way
more spreadable and it's cool to work with
with the gesso in it. Let's just do some buildings, just some abstracted
buildings here. Nothing specific, just play. Those are some little
abstracted people pulling that out of his little painting of the abstracted city but completely different than what the painting actually
looked like, but just something
fun and different. Who knows what that'll
be on our prompt card. But yeah, just keep
playing and mark making. I feel like I need some more abstracted maybe buildings
over here and I've put little windows
in the buildings and that's what those are doing
there coming down the side, little windows and we can
do some more mark making. We can do some more watercolor
painting throughout here. The goal is to fill the
whole page with something. I'm going to keep on
painting on here, and then I'll be
back. All right. I just added a few more marks, and then I decided that the next set of
mark making on top of this could be more
mark making on top. So I thought what I would do now that this is
mostly dry is come back on here with
some different mark making fun stuff like the
No color two crayons. I like adding more circles in my concentric circle
layouts here. I'm going to keep adding some fun little details in those because that's
what I like about these is the extra
lines and marks that we can get in the little
squares of color. Could have done the
whole thing in squares of color and that would have
been a good sheet to cut up. So if you just want to do
concentric circles everywhere, that would be fantastic. I'm just going to now
just mark making play. The color is mostly dry on here, but it's a little bit
wet, that's okay. I like fine lines. I like heavy lines. I like dots, we got
some dots in there. Just a variety. A about play and
have some fun on your piece without stressing about whether it's beautiful
or ugly or what have you. The whole thing might be an
ugly stage until we cut them up into lovely
little prompt cards, which is what I love
about cutting stuff up. It's amazing what interesting compositions you get and how fun they are
when you're done. I can't really love
that color right there. So I kind of feeling like maybe some mark making in
that right there. I mean, we could do little concentric circles
further out too, all the concentric circles don't have to be
in a paint layer. We could go ahead and come out here and start just layering out layered concentric circles inspired by the
idea of this thing, the stuff that we
were already doing. Those are fun. It was a gold crayon.
I didn't realize I had a gold crayon,
but that's kind of fun. The things that make
these so interesting to me is all the layers
that we put on top. So I like the layered. Stuff on these. I love these. Might be looking
at this thinking, that is crazy. That's okay. And then we could come back
in here with Temper sticks. Those are fun. We could add some fun marks and
stuff with those. Let me get those
colors out of here. The goal is just pull all your supplies out
and experiment. It's not about getting
one specific look, so I might come back in now with just some color and play on top of some of the
stuff that we've already done. Layers of stuff. Those are fun. I like that color. These are the shuttle art temper sticks. What I really like about
them is they dry super fast. Maybe some of those over here. You know, every time
I do one of these, I totally don't end up where I was really expecting to go. That's kind of fun about these. Maybe I'll put some
of these back over here. Yeah, I don't know. I have one thing in my mind, and when we're all done,
that's not where we ended up. But it's kind of fun just to
see where will we end up? What can we get? How can we surprise ourselves
when we're done? Okay, that's fun.
I like this color. That's one of my
favorite colors. This pretty aqua. So every single one of these
big pieces of paper that I paint to do
different things with, they all come out
completely different. The more marks you add to
these, the more fun they are. Keep on keeping on. What other fun stuff that we got on here?
We've got circles. I'm pulling my mark ideas
out of some of this still. We've got little
circles everywhere. We've done our concentric
squares and circles. We've got some fun dew lollies. We could add some more fund
lollies if we wanted to. I like this brighter pink. We might just go through and add some just random
Amba shaped designs, totally inspired by his pieces, maybe some other dots like
they're moving around. Why cracking me up. Oh, my goodness. This is what I really enjoy
about stuff like this. Then you just start getting
brave and you're like, What if I do this?
What if I do that? Then you crack yourself up
because maybe it worked out, and maybe it didn't and it's funny at some of the choices
as you're just like, Okay, I got to fill
this big page. How can I fill this big page up? That we're going to do next? Okay, that's a
bright color there. If you've got something that you're like, oh, I
didn't like that. Don't stress about it. Put
it in more than one place. That way, it looks like
you did it on purpose, and it doesn't look
like a mistake. Let's see. Is it full? We want to make sure
that there's no corners or edges or anything
left out there. I feel like I'm going
to have to maybe feel like the edges go
edge to edge on these now. Don't stop. If you've got white edges
or big white spaces, go back in with some
crazy swirly Amba looking things because we need that space to be
filled and I don't need any blank things at the edges or anything that's going to be the edge of a card. You don't want a blank space at the edge of all your cards. Okay, I feel pretty
good about that. So once you get to the
point where you're like, Okay, I think I like
where we're at. It's a little crazy.
It's kind of fun. I feel like I need, maybe
some gold Temper stick. Let's just throw
some more out here. Again, we have no idea where
these are going to end up, so I'm just going
to go ahead and assume they're all on different cards but
spread them out. Just something fun. Then we need to let all that dry and we'll come back
and cut these up. We're going to let
this dry for a bit and then I'll be ready to slice this up, so I'll be right back.
6. Cutting Up Art & Adding Prompts: Okay. I think we're mostly dry. I hope we are. And what we're going to do is now
cut this into strips. And what I like about
this is you can either cut it with
a an exacto knife, for instance, or you can tear and have torn edges,
which I like. I've got an 18 inch ruler
here that I can use to tear, which would make it easy because I've got a metal edge there. These cards that I'm cutting
out of here are about 3.5 " by 2.5 " and there's no
centimeters on this ruler. Let's see. If you're
doing centimeters, they are about 9 centimeters
by 6 centimeters, which is like artist
trading card size. Basically, what
we're going to do is we're going to tear
along this way and you could either do this way or that way, for instance. If we do this way, then
when we come back and tear those strips
into little strips, then we'll tear them that
way or we can go this way. So as I'm just
looking around here, came back and abstracted my
buildings a little more. Some of those are going
to be the whole card. Once we tear these up, you can then look at individual
cards and say, Okay, what else does this need? What other thing add to it? We could continue adding
to it just like it is. We could stencil on top, we can continue
adding mark making. I think what I'm going to do so these look maybe a
little more like that is tear them at
3.5 " and we're at 24. If I get, of course, this has got inches marked but not half inches,
I'd be guessing. I could just go ahead and mark these I've taped it
down a little bit to keep my paper steady because I thought
it would be easier. Maybe I'll do
something I can see. I thought it would be
easier in tearing. 3.5 at the very end, we're going to be a
smidge smaller than 3.5 just because the
size our paper is. I'm okay with that. Then I'm just going to line my
ruler up hopefully with some lines that I've
already got here on this cutting mat
that I've put out here. Once you've got it where you're like, Okay, I think I'm ready, if you'll hold down
your ruler super hard and then just tear the
paper towards the edge, then you get some fun torn edges that look really good for cards. And you can cut these.
Whichever way you find to be the easiest when you're doing this, you just go for it. It's nothing specific. Just whatever makes
it easier for you. If you just have a
card 2.5 by 3.5, you can use that as
your guiding line for cutting these or
you can mark them with the ruler just like we
did going the other way. And if you tear and
it's not perfect, part of the charm of the cards, I don't worry about it
because the paper going in one direction tears easier than the paper going the
other direction sometimes. I just don't get worried
about what it's doing. I just take it slow, and then
any pieces that are weird, I just pop off and
I don't bother me. If it bothers you, use
scissors and cut these. I like the interesting
hand torn nature of pieces like this. And it does better if you
tear towards the ruler, you are less likely to
get the weird sections. That's our leftover.
You could use this for collage, paper or
something like that. You don't have to throw
away the little pieces. But what I really love is how
interesting and different each card works out compared to the last sheet that you might have painted and did
these or what have you. I like how different
the compositions look and how cool those
are when you're done, completely different than
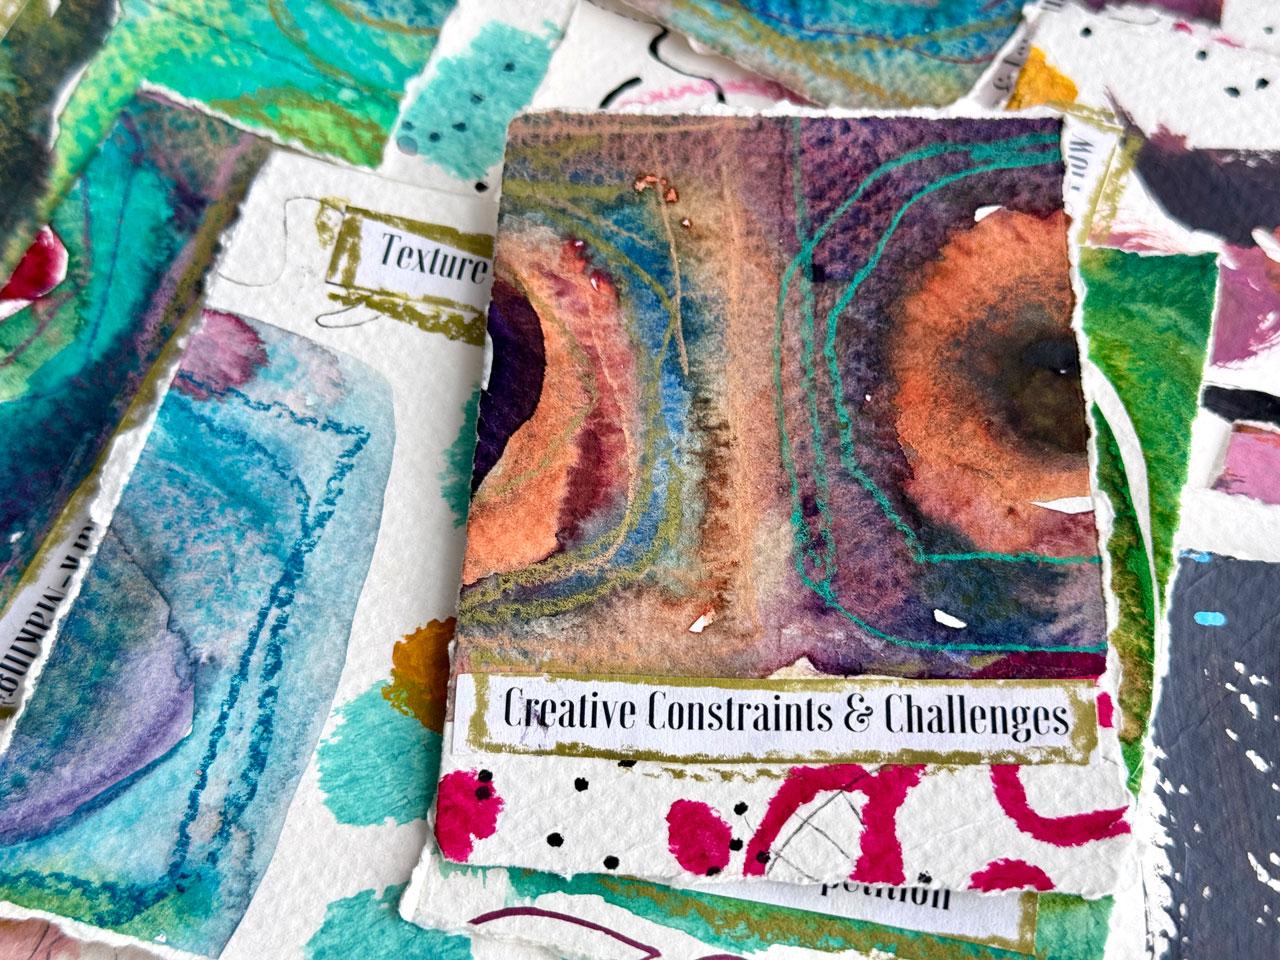
anything else that I've done. And then what you're going to do is cut out some of your prompts. These pick the ones that
really resonate with you. I've made these the same size as our art prompt cards
that we've cut out. That's why I like the
artist trading card size of 2.5 by 3.5, it's a good size for a deck. We're just going we can cut
out our prompt and it fits precisely on the
bic of there really nicely and we can take
our little hu stick. And glue those if you want and you want to
hand write them on the back, you can handwrite the
prompt on the back of these, your choice there. But see how that just
frames it out nicely. So texture and layering, experiment with drips,
splatters and controlled chaos. Now what I'm going to do because I've got that on the back of there is go and find my texture, that's the texture and layering. Now I can take my texture and layering and you can use the little frame that's in or you can cut these out
of that little frame. I just like having choices. I framed them and then I out
of the frame if that doesn't work for you and a little
bit of glue on these. And we can glue
that to the front anywhere that you are
inspired to put it. Maybe I'll put it right here. Everyone can be in
a different spot. Then what I would do, what I'm going to do
is take something and color that in
like it's framed in with a color so that
it looks finished, and that's how I'm going to glue down and finish
each of these. Now what I'm going to
do is continue cutting up my strips into
this size paper, gluing my prompt on the back and that category on the
front of these cards. I'm going to go ahead and
continue on doing that. I'll be right back when I
have those all glued on.
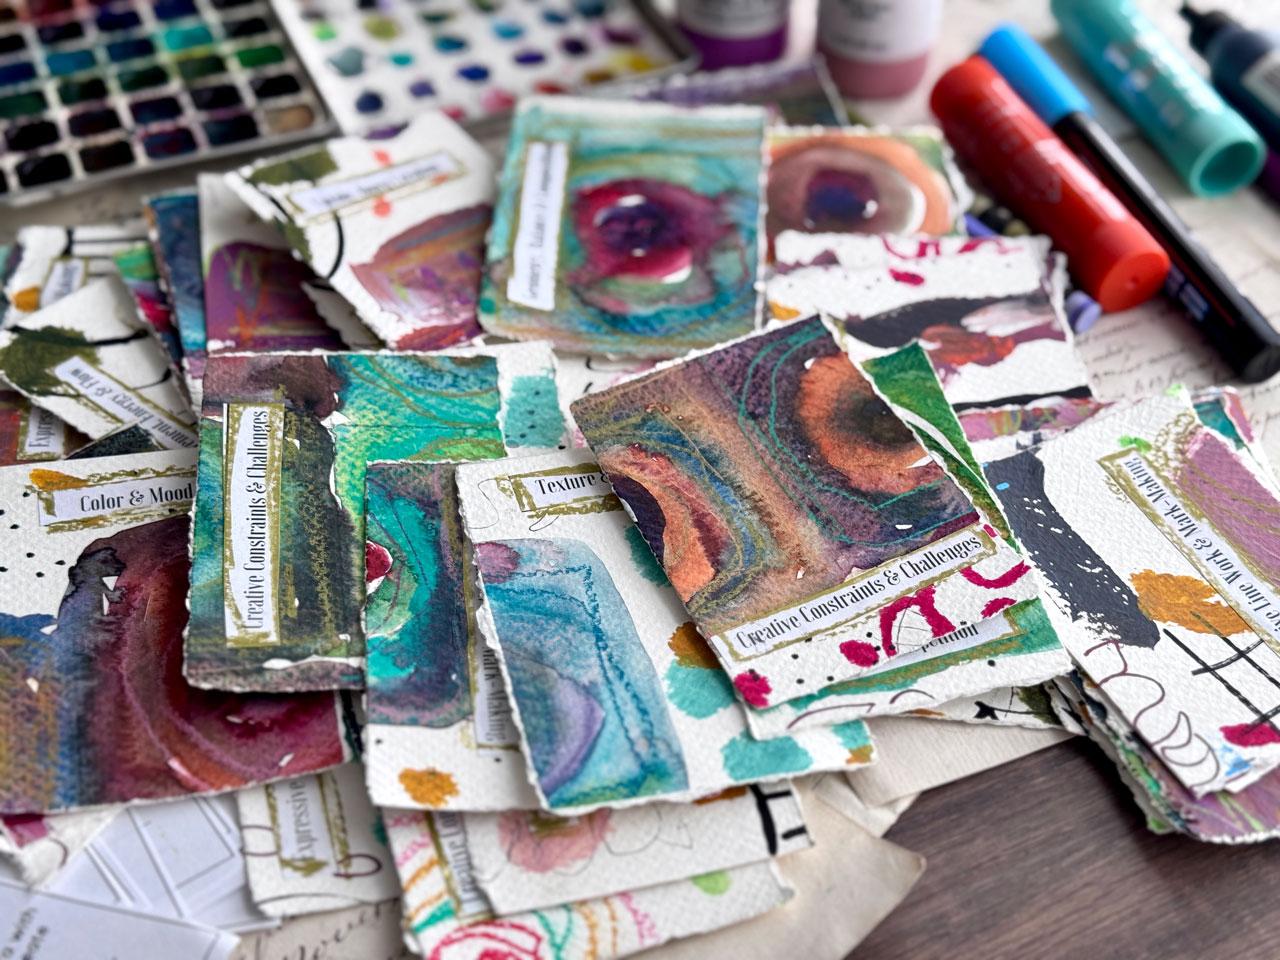
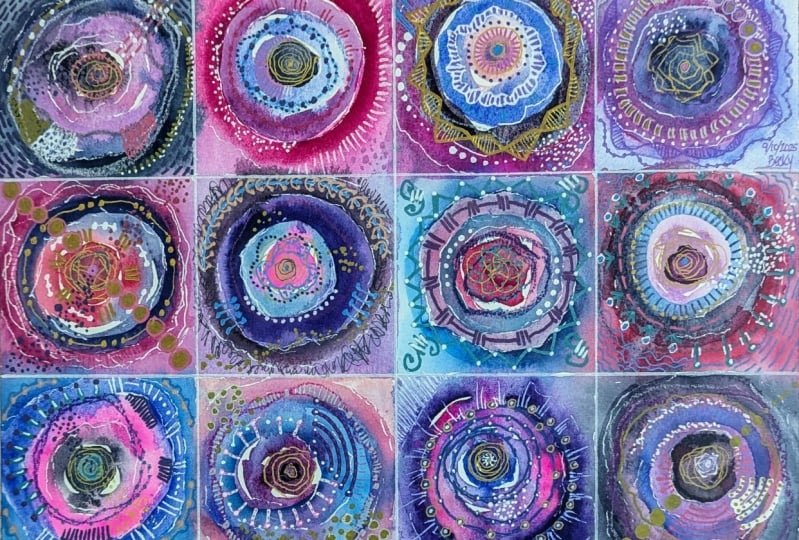
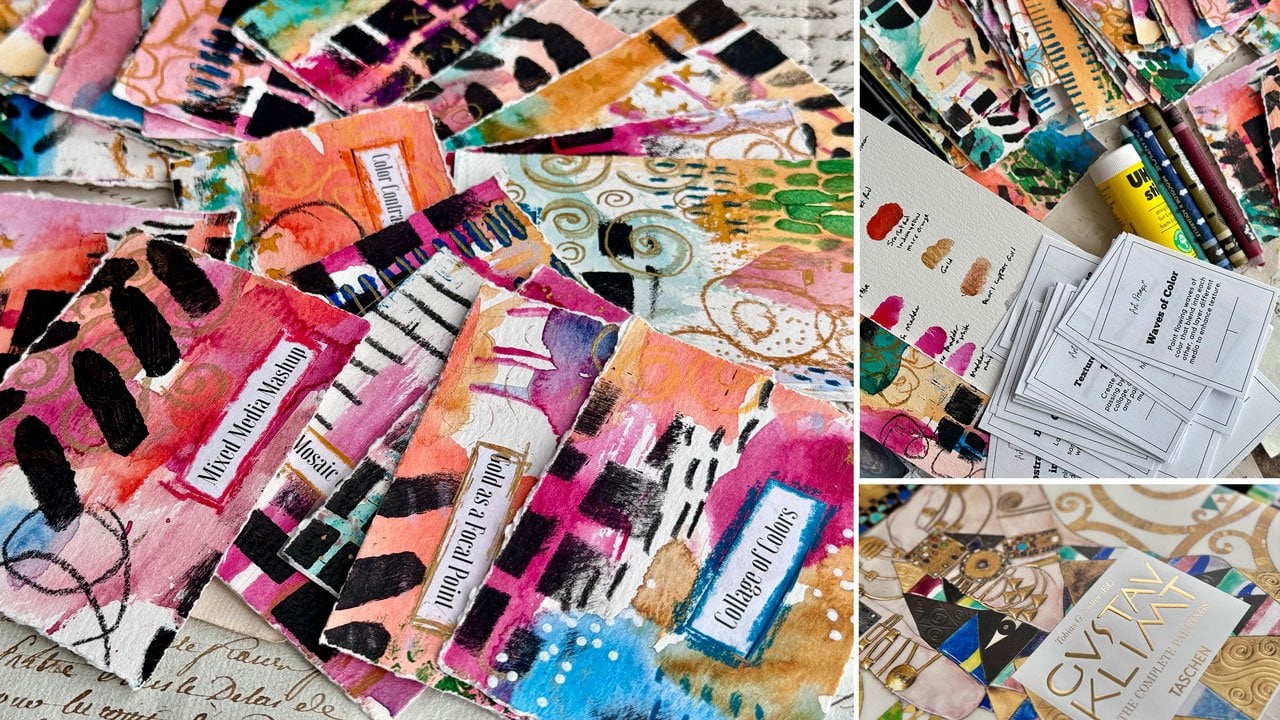
7. Finishing Prompt Cards: All right. I have
completed all my cards. A couple of these are so cool. They remind me of
peacock feathers, like the edge of a
peacock feather there. They just look so cool that
they remind me of peacocks. I love that. Some of these are
just my very favorite now. What I love about these is
now you have the category on the front and you flip
it over and you've got some instructions
to guide you. They don't have to be perfect. You're not trying to
do anything exacti. It's a prompt to get you out of a rut or to push you into
a different direction. I ended up with about
20 something leftover, so it made 48 or 50, however many were
left over here. You might need to
paint two sheets of paper if you want
to use all of them. I just picked and chose the ones that spoke to me
as I was gluing them on the back of these pages and
it worked really nice to work in a little assembly line, cut all of the prompts
out with a paper cutter, and then I cut all
of the little strips out and then had those in little piles and then
I glued everything. I worked really nice to work
in a little assembly line. Look how amazing these are. What's really cool is
these are completely different than the
clamped cards so you can see being inspired by a particular artist
and their style, how different the paintings
can come out color wise, mark making wise,
just idea wise, and I love those differences. Once you finish these, you can leave them
like they are, which I probably will
because I didn't use anything that will
smudge and smear. But if you did use things
that will smudge and smear like oil pastel or soft pastel, then you'll need to use the
canela pastel fixatives on them to fix that powder. The problem with the
powder one though, and I'd caution you on something like a prompt card that you're going
to be touching, even though you seal
it with a fixative, it's never really fixed good because there's nothing on
the underside of the powder, holding the powder to the paper, for instance, so you can still
even though you fixed it, it would still maybe smudge. In that case, I might fix it, and then I might laminate it. I like these self
laminating sheets. You laminate the top and the
back and then you just cut your piece out of it and I've laminated one of
my clemped cards. But you can then it's
adhesive all over, and then you just cut the
card out of that sheet. You can laminate a whole bunch of them and then cut them all out that works really good if
you want to laminate them. I would be careful with
the different materials. I know there's some
stuff that I love that I went ahead and decided
not to use on these. My favorites are the
watercolor paints, the Neo two crayons, and then I used a gold crayon to kind of draw around the
box on most of these. There's a couple that
I changed the colors up, but that was super fun. Then if you want
to varnish them, you could varnish them too. Some type of crylon, any of their art
varnishes would be fine. You could take them
outside and spray them down and varnish it to protect the top layer because it's watercolor paper that I've used. And so if I've got
stuff on my fingers, I could get that
right on that paper and smear something on it. So if you want to
protect it, in that way, you could just spray it with
art varnish would be fine. Crylon has several. So I hope you have
fun creating these. I do want to create a
project with you guys, so not really done
with class yet. I want to maybe pick a few
prompts and paint something with those and just show you
where you can go with those. Look how beautiful that is. That is beautiful. Whoa. So I want to paint
some stuff with you guys and then see how we can use these lovely
prompts in our art, so I will see you
in the project.
8. Pull a Card & Create a Painting: Video, let's take
a look at using our prompts now that we've
got all our prompts made, and this might be my favorite
set that I've made so far. I don't know. Every one of
them tends to be my favorite. I was just looking through
them, admiring them. I picked a few out already just because they
appealed to me. That's how I like using prompts. I like them to push
me in a direction, just get me inspired. M read one of these and say, yeah yeah, yeah, that's
what I need to do. Okay, so I've pulled out a
movement energy and flow card. This one says, make a
piece where one element appears to echo
or repeat itself. That's pretty easy when we're mark making, that could be dots. That could be a stencil
of some pattern. That could be quite
a bit of things. I like that. Let's
set that one up top. Then I've got one from
the expressive linework and mark making category. Draw using only your
non dominant hand for spontaneous marks. I love this because
I already like to draw and mark
make on blank paper, gets rid of that
blank page paralysis and we can do that with
our non dominant hand. Got one for texture
and layering. Use stencils with
multiple colors to create unexpected textures. That appealed to me because
I already like to use stencils in my work and I've just pulled out a bunch of stencils that
I might consider. These are all from the
Tim Holtz collections and I don't have all
the names of these, but you can look on the
stampersnonymous.com and find the Tim Holtz collection because
a lot of these come from that collection or
you can look on Amazon and look for
Tim Holt stencils. I've got this fun one from the crafters workshop, TCW 248s. I like it because it's
geometric and a lot of Kandinsky's focus
was geometric stuff. I thought, that
might be a good one. I've got these over
here as options. I don't necessarily say, I'm going to use
any particular one until we get there
and we're inspired. We'll just see. Got
that one there. Then I've got one from the
color and mood category. Making artwork using only
warm colors or cool colors. That's going to be fun. In the blue greens, that could be the
cool colors, oranges, pinks, browns, that could be
the warm colors, yellows. Yeah, blue and
maybe some purple, maybe some green, something
in the cool range. I don't know. Let's see.
Hang on. We'll get there. Then I've got one from the geometry balance
in composition. Leave negative space. Let the negative space be as important as the painted areas. I already like to work with a little bit of negative
space in my abstracts. All of those just
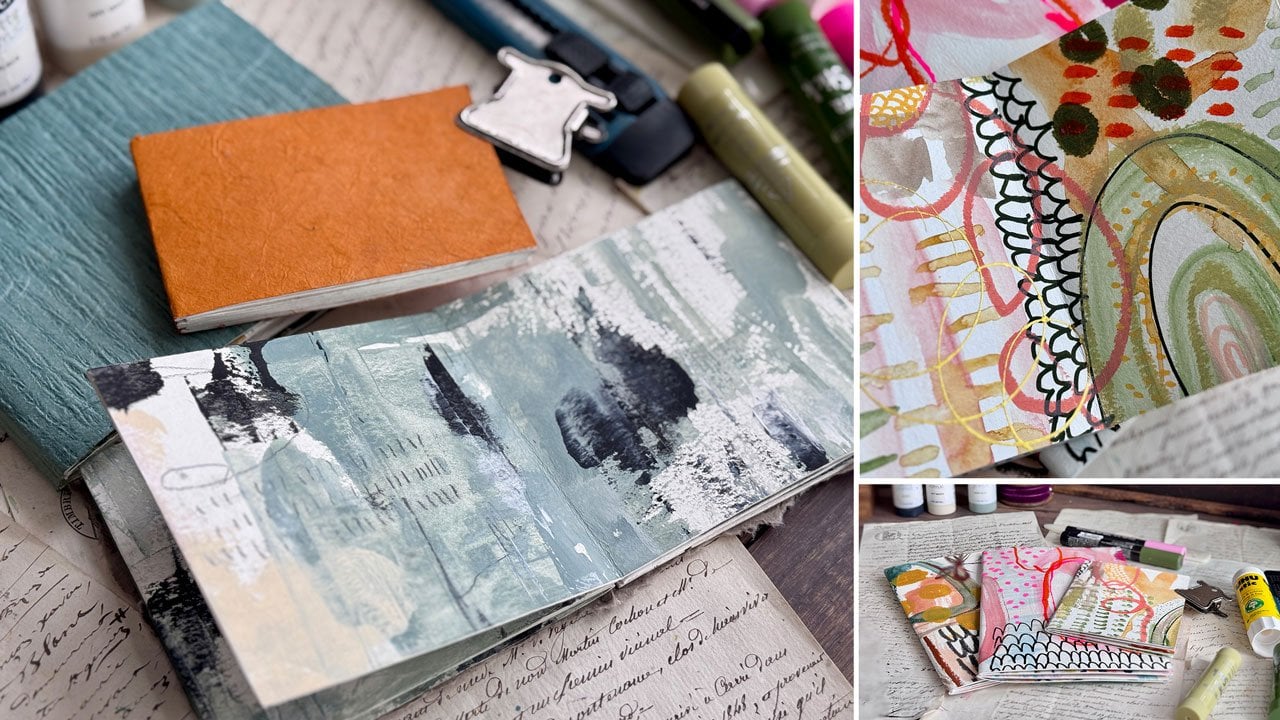
really inspired me. I'll be painting on a piece of Arch is Cold Press
watercolor paper, which is in my handmade journal. So if you want to make
some of your own journals with your favorite papers, which is why I like using
these and I'm trying to fill this one up and
we're getting very close. I do have a whole series on
making your own art journals. The reason why I like
painting in art journals now instead of blank pieces of paper a lot of the times is
because when we're done, have this amazing
piece of artwork. The book itself
is a piece of art and we have all the art
that we created in it, and then we can flip through at all the beautiful
pieces that we created, and I get so much joy out of looking at
and flipping through all the different things
that I've done and painted in this book
and we're super close. I'm almost to the end of it, so I'm going to paint this today in this book that I've already
filled up so much of. I think I'm going to leave
these lovely papers, the handmade papers or
pieces of art in themselves. When I started the book, I'd consider going back
and adding paint to those or something to those and now I'm to the
point where I'm like, that is a piece of art and I'm probably just
going to leave those. I'm getting to the very
last section here. We're getting close to
having the journal full, which I'm very excited about. I've got my watercolors. I'm going to do watercolors and then maybe acrylic paint
or something on top, maybe o color two crayons. Tempera paints. It doesn't really matter. Work
with what you have. These are about experimenting
and play and putting to use some of these cards in a way that you
already enjoy painting. It's now time to work these into your own painting
and how you can work these into what
you like to do. I like to paint abstracts. We're going to
paint an abstract. We're going to draw with
our non dominant hand, we might as well start with
that. I've got a pencil. This is a we pull one
out with a point on it. There we go. This is a
ten B PIP MAC graphite, which is my favorite
set of pencils. They're mat, they're dark
because they're bold and I might just go ahead and
do some yummy mark making. And as far as Kandinsky
is concerned, he liked organic shapes and just some interesting marks
and stuff in his work, so we're just going to go with that flow and see
what we can create and we've got concentric
circles because that's one of his
ongoing themes there. Let's start there. We
can keep adding to it, but I feel like that's
got me started. So make a piece where I don't appears to
echo or repeat itself. I feel like that's right there also and this
is repeating itself. I feel like we've done that
with our non dominant hand. Then we're going to go ahead. I feel like because this
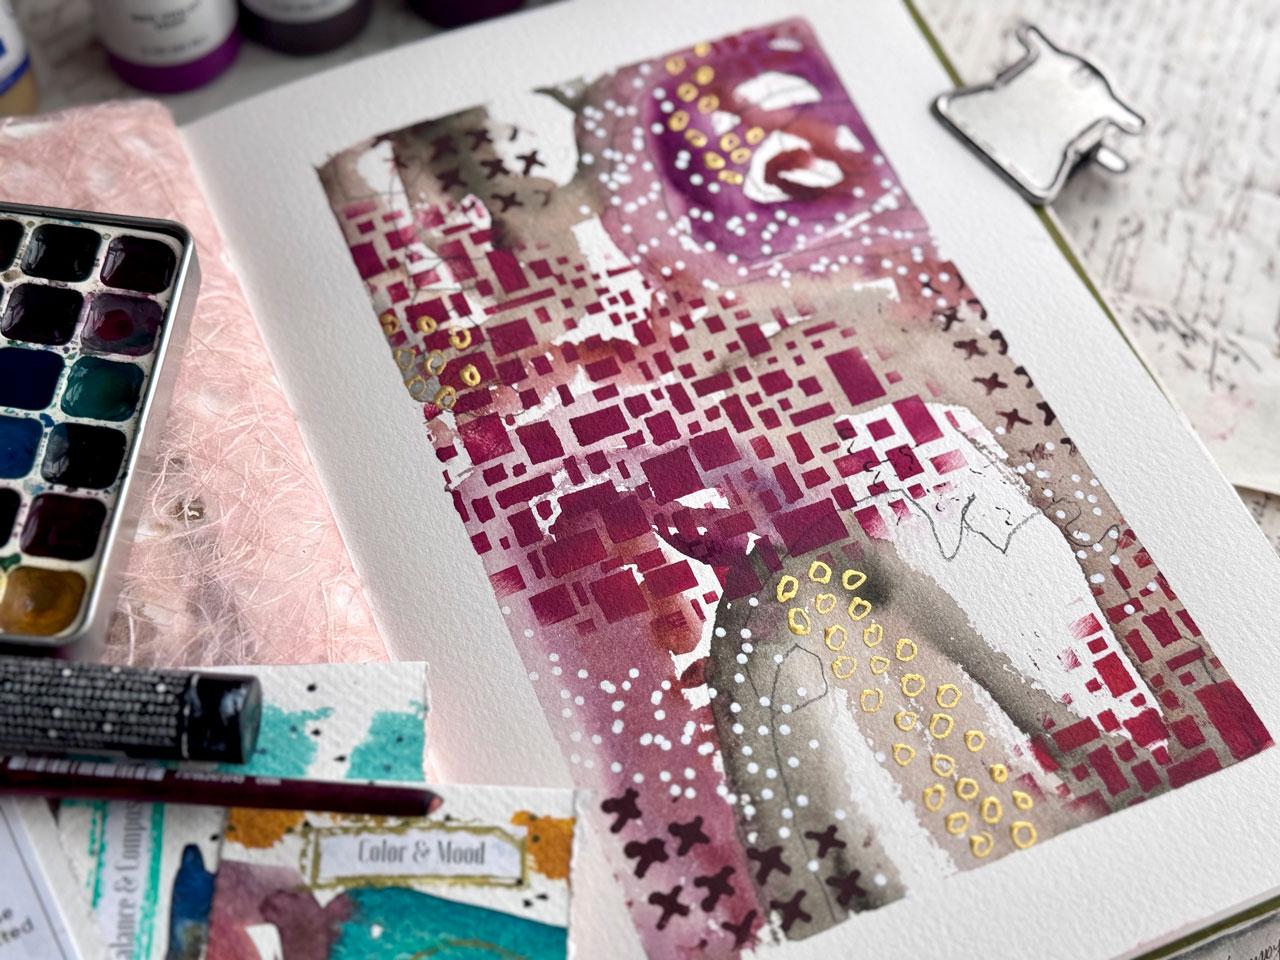
painting over here is coffee. These are coffee paints. Go in my sketch box by Rockwell and they
smell like coffee too. Because we're in the warm
browns and that kind of family and I've got this pretty pink handmade paper right there. I feel like I'm going to work in the red oranges and pinks and brown maybe
in that category. I've just got out my
Princeton Neptune and a half inch oval wash brush and I feel like that's
where we're going to go. We're going to do
an abstract and just see where it takes us. I'm going to say
orange and pink and brown are going
to be the colors. If I flip that over, I could
actually see what those are. I feel like we could
have even used that coffee paint since
it's in there too. But let's just get
started with brown, which is coffee esque. I like going with
large ovly shapes. Because then I purposely leave negative space in the piece that I wouldn't normally do and
I didn't used to do that. Ever since I started doing that, I really have started creating some of my most favorite pieces and so that's just a fun after
effect of an experiment. I'm just like, Oh, I love these. Let's just make that a
feature of what we do. Look at that color.
Wow, that is so pretty. Masha's watercolors are
handmade watercolors. It's a lady that
has watercolors on Etsy and I found her a
couple years ago and I just love her paints so
they are some of my favorites to pull out
and use from time to time. Look at that. Let's throw
some orange in there. Oh, my goodness. Look at this when I have
this come over here. These granulate so beautifully
that I just love them. Let's just throw a
little orange there. I really digging
where this got to. Maybe a little orange going up here and I'm leaving some space. I'm deliberately
trying not to fill it all in. Loving that. So I'm going to stop right
there with the water color. We've got our warm colors. We've got our
repeating elements, we've got our non dominant hand. Now we need to leave some
negative space, which we did. The only one that we
have in the art prompts. This is why I love this
because this took us in a direction I wouldn't
have gone otherwise. It's like a little map that
took us in a different way. Now we want some stencils
with unexpected texture, and I'm definitely feeling the cubes because
everything else here is rounded and
that could give us an opportunity to work in a
shape that was unexpected. I'm also a little bit liking these hash marks or these
X marks. That's fun. I'm also loving
the brushstrokes. But I don't know the
brushstrokes, we'll have to see. Let's let this dry and
I'll be right back. It's almost completely dry. Look how pretty these colors
are these colors right here, they are just gorgeous. Let me just pull
this up so you can admire how pretty that color is. I'm not sure what those
colors are in that Masha set because this is her
36 piece sampler set. But pretty, pretty, pretty. I put out a few of my
Blick mate paints, which I like the Blick Mac
paints because they are nicer than craft paints. They're a lot more
pigmented. They're like a high grade student
paint, basically. They're a lot cheaper than
your artist grade paints and there's lots of colors. I've pulled out orange deep
and burgundy and brown and red violet deep on my paper
here in those mate paints. And what I also like about
those is they're not shiny. Because they're already matte, we will have a much
better chance of drawing and painting on top of them than we do the shiny paint. They've got some other
fillers in there that make them matte, which I love. I'm thinking. It wants
multiple colors. I've got an ink blending brush
here as my stencil brush. What I love about these
is they are amazing. We just little bit
of paint and we get a really good stencil
technique out of these. I have found some
of the paint stain, but they wash out really
easily in the bathroom sink. These are non toxic
paints, which I also love. But to clean these, I just
use a silicone scrubby pad. There's little makeup cleaner
pads that are silicone, there's water brushes like this, water cups like this
that are silicone, just some type of silicone
mat and I use this to clean with the masters brush
cleaner and preservative. I use that when I'm cleaning these and they have cleaned up good and I've been
using these for a while. Even though some of the
paints paint stain it, they still are nice and soft, so color doesn't even matter. Kind of thinking that
we'll mix a little bit of the blue and the burgundy. Let's just mix those right
out here so that as, and then I just tap
it down so there's not a real thick
amount of paint there. I'm thinking. Then I just lightly let it
do its thing here, just off like this. I'll just see what
we get. But I do love the nice clean stencil work that this usually gives me. And I'm putting
multiple colors in here because that's what
it said multiple colors, should I did a Look
how pretty that is. Oh, my gosh, now I want to
come off the edge over here. So that it didn't just
appear out of nowhere. Look how pretty that is. That is so pretty. Okay. Now I'm like, what else
do I want to do that? I think maybe brown
for these lovely Xs. I want the xs. I don't know why. We're just going to throw
some in there, make us happy. Oh, look at that. Just a tiny bit
kind of coming in. Okay. Then I just throw
this in water until I'm ready to go clean these out. I just throw it
right in the water. And then we've used all of our prompt cards and now I'm
looking at it and thinking, what is left that
it could maybe use? This is my white Pasca
I'm thinking maybe a few dots because
I think dots are magical and that will give
us a repeating element, which is again
going right back to our prompt card and it'll help
us bring some of the white in on top of the color so that it kind of pulls that background
forward a little bit for us. Oh, my gosh, look
how pretty this is. I love it. See, I
never would have painted this without the
direction of those prompt cards. That's why I like
doing stuff like this. It just really gets you
outside of your comfort zone. It takes you other
places that you wouldn't have gotten
any other way. You just wouldn't have
thought of it or you wouldn't have put the same elements together or you
wouldn't have had this moment of creative
problem solving, like, how can I use
this prompt in my work? Which is what I
love about making prompt cards and being creative and channeling an artist
as we're doing it. That's pretty cool.
I almost feel like it needs some Gold. Who's saying gold
out there, right? I'm thinking a tiny bit of gold. What gold might we
want? We're just going to channel a tiny bit of
our Gustav lmp down here. I've got some gold in my little fine line
bottle that I just used a little pipe at Um if you've never had a pipette
before, they're amazing. They look like this right here. So I've got little pipettes. I just get a little bit, squeeze up a little
bit of gold from the KuratakiGld mica ink and then squirt it right
into the fine line bottle. No mess. Super easy. That is the super easy. I mean, you could try a
funnel if you got a funnel, but it's not nearly as easy. I'm thinking that maybe
and then I do like to practice a little bit on a side piece of paper and
holding the fine line, and this is the one with
the smaller needle. It's the fine fine one. You got to practice a little bit to get your groove on how that
actually is going to work and just shake it
up before you use it. I feel like just a tiny bit. This could be a
repeating element. This could be just a little
bit of a pop of something. It could be little tiny
organic shapes that are lovely and surprising that we know that
he liked to use. We could do little circles. I'm filling circles since
I just put a circle down. Let's just go into circles. We'll call that little
repeating elements. Let me move this paint out of my way before I
stick my hand on it. We'll just call this
another repeating element one from our prompt card, and I'm at a weird angle to get the clean
circle. There we go. We could have done
a little splatter, like it could have been a
little splatter in there. That could have
been a good choice. That would have been
some unexpected movement with a splatter. That's okay, though. We're
going to go with what we got. All right, that's pretty fun. We got a lot going on. We got a lot of repeating elements. Might have been too
busy in the end, but I loved it, so
I don't even care, and this is all about bringing Kandinsky's inspiration and
style into our own works. I'm feeling pretty
good about that. Let's just peel the tape and see where we're at. I love that. I managed to effortlessly
pull some of these prompts in and use it as my roadmap of what we
were going to create today, which I think still lovely with my handmade paper and
the piece on the other side, they blend, which is
what I was hoping for. Oh, my gosh. Look how
gorgeous that is. Like, for real. Look
how pretty that is. And then a little
bit of that gold shine with those
circles that we added. Oh, my gosh, look at that. Good paint day. Alright, so we've got making artwork using only warm
colors. Yes, we did. We used warm browns and
purples and oranges and reds, so check that off. Let negative space be just as important as
the painted space. I do like how our
unpainted paper sections are adding to the composition and the movement of our piece. Use stencils with
multiple colors to create unexpected
texture, which we did. We've got that
yummy grid texture going in there that's
not quite straight. It's a little bit wonky but very geometric and that
fits right in with Kindenski's teachings and
his arts then we've got repetitive elements
in those grids and those Xs in those
circles and those dots. I really did that one.
So where's the echoes. Then draw using only your
non dominant hand for marks, so we can see all the marks
they're coming through from the very bottom
since I used watercolor. I would say, this was a
great art prompt paint day. Hope you had fun
painting these with me. I hope you enjoy
creating your own set of art prompt cards because
these I truly love. Every time I come up with a
new art prompt deck inspired by abstract art or Gustav
lemt or Um Kandinsky, they just get better and
better, and I don't know. These are some of
my very favorite. I hope you love these, and I'll see you guys back in class.
9. Final Thoughts: Congratulations on
completing your Kandinsky inspired art prompt deck. I hope this project
helped you tap into a more intuitive expressive
approach to art and give you a fun way to explore abstraction without
overthinking. Your new deck isn't just
a collection of cards. It's a creative
tool that you can turn to whenever you
need inspiration. Now that you have your deck, I encourage you to keep using it. Whenever you feel stuck, pull a card and
let it guide you. Try combining
multiple prompts or using them as warm ups
before bigger projects. And don't be afraid to
continue expanding your deck. You can always add
new prompts and experiment with different
themes or color palettes. If you enjoyed this process, I'd love to see
what you created. So share your work in
the class gallery, whether it's a painted sheet, your cut up cards, or
even a prompt in action. Seeing how different
artists interpret these prompts is
always inspiring. Thank you for joining
me in this class. Keep experimenting,
keep creating. And most importantly,
have fun with your art. See you in the next class.
 DENISE LOVE, Artist & Creative Educator