Transcripts
1. 1 Intro: Welcome to another
exciting journey in the world of Blender. I'm thrilled to have you here in my latest class where
we'll be modeling a stunning realistic wooden
chair together in Blender. As you get to learn about all the common modeling
tools you need to know about as a beginner. Now, allow me to
introduce myself. My name is Ken, and I've been passionately
exploring the possibilities of Blender for over 18 months
now that's almost two years. And throughout this
awesome journey, I've honed my Modelling
skills by working on several personal
projects almost every week. And now I'm eager to
share all those secrets, tips, and tricks that
I've learned with you. Now this class is tailored specifically for
Blender beginners. So if you've at least
watched a quick video on how to navigate the
Blender User Interface. You are the perfect candidate. And I promise you this
class is designed with simplicity and clarity in mind. My goal is to make it a
breeze for everyone to follow along regardless of
your prior experience. Our focus in this class is to model a simple wooden chair. And this is a project
that will bring out the artist within you will be using the most commonly used
Blender modeling tools, unlocking their potential,
and harnessing their magic to create a 3D object
that you can be proud of. By the end of this journey, you will have a beautifully
crafted 3D wooden chair that can be used in games, animations, or even showcased as an impressive portfolio piece. And the best part is you'll
have the knowledge and skills to recreate other 3D objects
of your imagination. Going forward in the class, we'll embark on a delightful
hands-on experience. Step-by-step. I'll guide you
through the modeling stage, where we will block
out the various parts of the seat in the
right dimensions. Add textures and materials, add lighting and a
camera to the scene, and finally render out
some images of the seat. And throughout the
entire process, I'll be sharing
practical insights that will help you quickly start creating amazing 3D models
of any objects around you. So whether you've been following my previous classes or if this is your first
time joining me, I'm thrilled to have you here ready to embark on this
adventure together. Trust me, it's going to be a rewarding and
joyful experience. And I can't wait to see the incredible designs that will come to life under your hands. So if you're as excited as I
am to get started and learn how to model these wooden
chair with me in Blender. Let's go ahead and get started without wasting any more time. See you in class
2. Project Overview: They say the best way to
quickly grasp and understand a new skill is to work on a project that
requires that skill. And that's exactly what we'll
be doing in this class. We'll be reinforcing your blender modelling
skills with a project. I'll start by showing
you how to prepare the blender UI for a
modelling project. We'll add our reference
images to act as a guide that we can look
at as we modelled a chair. Then using the default cube, you'll move on to
model the legs, will give them the right
shape and dimensions to give our chair a solid
foundation to stand on. After that, we'll
move on to the seat. You go on to create a
comfortable spot to see on firmly supported by the
legs you've just created. You will then move on to
model the arm rest and backgrounds to make the chair
as comfortable as possible. And as we progress, you will learn how to work with Booleans to refine the joints, ensuring seamless connections
and a polished finish. You will also learn how to use a few other modifiers to make your work easier and faster to make the
chair look realistic, I'll show you how to add and customize textures and
materials to the model, will then set the mood by adding some light
into the scene. Proper application of
lighting is crucial for any final scene that
you want to render in Blender or any
other 3D software. Finally, the big reveal, your render your
finished your model, ready to showcase to the world. Once you've rendered out a
few images of the chair, remember to upload them
to the resources and projects tab right below
this video player. At Skillshare, we love sharing our projects to inspire others and get some
constructive feedback from our teachers
and fellow students. So are you as excited
as I am to get started? Let's open up Blender and bring these food and chair
to live together. I'll see you in the next lesson.
3. Prepare the Workspace: And welcome. So here
we are inside Blender. This is of course
the default view. When you open up Blender, we have the defaults
camera, light and cubes. So I just wanted to get rid of the camera and they'd light. And now we only have
the cube remaining. And that's where we'll start. The default cube is two by 2 m, 2 m by 2 m by 2 m, all sides 2 m. So that's
a good reference point. Another thing you will
notice right here in my Blender is that I have
this small gizmo right here that shows you
which mouse button click so that you're able to follow along and work with me. So if I left-click, right-click, as you can see, it shows
clearly when I middle click. If I hold down the middle
mouse button to orbit, it's very easy to see that. So just keep an eye out on the, so you understand
exactly what our fleet. And now without out of the way, I want us to prepare
the work environment by bringing in the reference
images we're going to use. I want to split up the screen
into different editors. So what I want to do is go to
the very corner right here. And when the mouse cursor
changes to that plus sign, I'll just drag to
divide it into two. Now both of them are
viewport editors. And you can tell by this. But as you can see, we have different other editors that we can change any
division here into. So for this division
of the screen, we can select what do we want? We want an image editor
because we're bringing in a reference image. So this is now an image editor. Let's go ahead and say open, and I'll navigate to where I have the realistic wooden chair. Let's go with chair design one, and I'll provide these images. I downloaded a few reference
images that we can use. So feel free to use this. Or that's chair designed
to or chair design one. Let's go with chair design one. And then you can apply
the same principles will learn to build design chair to. So let me select this,
I'll double-click this. And now it appears here. Now the same way we
divided this into two. We can also divide this
into two, just like that. And I want to change this to a different perspective
of the same chair. So I'll go in here. And let's pick this one. Now we're looking at
it from the side. So at least now
we're able to see it from the side
and from the front. Alright, and I'll
also get rid of this timeline because we're
not doing any animation. So I'll just click on this line when the mouse cursor changes to that double-sided
arrow and join areas. And then drag it
downwards and click. Let's do the same here. Right-click. Join
areas, drag downwards. Now we've gotten rid
of the timeline. So now we're able to look
at what we're working on and do it right here
in the 3D view port. The final thing I like doing
is if I zoom in on the cube, this is how it looks currently, but I like it having this mad cap instead of studio
lighting, just like that. And go down here and
activate the cavity. And what that does is that it
gives the cubes are models, some nice conspicuous edges
as you work on them so that it's much more appealing
to the eye and it's easier to see the edges
regardless of the lighting. So basically that's how
I like to set up Blender when I'm working on
a Modelling project, now we're ready to start
working on the 3D model. So let's do that in
the next lesson. I'll see you shortly.
4. The Legs: Welcome back. So now that we have our
Workspace prepared, we're ready to start working on the chair and we'll
start with the legs. So without wasting
any more time, Let's zoom in here. And what I want to do
is bring up the N menu, so I'll hit M on the keyboard. And now here we have
the dimensions. Because of course,
every single object here has some dimensions. So we want to use these to set the dimensions
for the leg. So looking at these, I would just assume this
leg is about feet tall. And as you already know, in Blender we have three axis, we have the x-axis, the red one, the y-axis, and we have the z-axis, That's the one running from
the top to the bottom. And you can tell by
this gizmo right here. So the X, Y, and Z. So now to set the
height of the leg, we would need to set
it in the z-axis. So here let's say 2 ft to F T. It will convert that
to feet into meters. So now this is to finito Next. From here, from this
edge to this edge, this looks like 1 ". So in the x-axis, the red, along the red axis, 1 " one in. So now that's 1 " in thickness. And in the y-axis from
this edge to this edge. Of course, down here, it's thinner than up here
because that's a design. It looks like a wedge
and incomplete wedge. So what we want to do is
start off with maybe 3 ". So now that's 3 " in thickness. What we need to do is
make this side narrower and fix it is three pages. Now that we have the leg ready, what we want to do is
save ourselves some time by using what we call
a mirror modifier. Blender offers you
many modifiers. And of course,
modifiers is a deep, extensive topic, would
need its own class. And I would expect you will
go and do some research. But while I have this selected, if I go in here, you'll notice we have this Add Modifier and
when we click that, we have a list of modifiers
that we can apply here. And you can use all
these in combinations. You can combine different
Modifiers On the same object to create some very cool
varieties of the same objects. Different combinations
of these modifiers will make your mesh
behave differently. In order for our mirror
modifier to work, our mirror modifier works
in reference to the origin. The origin is this tiny
yellow dot right here. So you can move that dot around, but typically it's in
the middle of an object. So while this is selected, if I hit G of grabbed it, now I can hit X to constrain
it to move on in the x-axis. And if I put it right here, you will notice the origin
has also moved with it. It's in the middle of the mesh. Now, how the mirror
modifier works is it reflects the object with reference to where
the origin is. So if the origin is right here, this object will be reflected
our gross on this side. So let me show you
exactly what I mean. So while this is
selected, first of all, let's move this
origin to the center of the world and you do
that by control a while, this is selected the object
control a Apply location. Now when you apply location, it resets the origin
to the center, but the object
remains where it was. So now if I move the object, the origin in relation
to the object has some offset escape. Now with the origin in the center and this
objects on the side. If I add a mirror modifier. Now as you can see, the reflection is on this
other side of the origin. And now we're currently
in object mode, so we can't edit the mesh, but if we hit tab
on the keyboard, now we're in edit mode. Now we can edit the mesh. We can select
individual vertices, we can select individual
edges, drag them around. G And edit them and
you will notice whatever changes we're making to this original is also
happening on the reflection. So if I hit a to select
the entire mesh, this is not selected. This is just a reflection,
it's not a mesh. So if I drag this in the
x-axis, as you can see, we can bring them closer or pull them apart
to create a bench. So I want them here
at that position. I think that's a good width. Now let's move it
slightly outwards. I'm looking at this, so I think that's
a good distance. Now let's hit Control S to save. So I want to go inside here. Now I want to create
a new folder. So plus wooden chair. Let me get in there. Wooden
chair, save Blender file. So now it's saved. Remember we had this slim
bottom and the thick top. So let's go ahead and
select the bottom part. So now we have three
selection modes. Birdie selection mode,
edge selection mode, and face selection mode. You can switch
between the three by selecting the one that
you want to switch to. So now we want to
select the face. And I want to hit S for scale and hit Y to constrain the
scaling to the y-axis. So now as you can see, we have that green line. Now when we scale down
where scaling down in the y-axis only. As you can see. I want to make heat. That's limb on the bottom and I think I like
it where it is. Let me select the top face. Let's make it
slightly bigger. Why? Once again, let's leave
it somewhere there. Alright, so that's what we have. Next. Let's reflect this
original in the y-axis. So I want to switch
back to object mode. And I want to select Y here
because we're currently reflecting it in the X
axis, along the x-axis. And I want to
offset it slightly. Gee, why? Push it forward like that? And you will notice
the origin is moved, is still in, in the
middle of the two. So what I want to do is while
this is selected control a, Apply all transforms and that returns the origin to
the middle of the world. Now we can activate the y-axis. Now. It's not only
reflected in the x-axis, but also the y-axis
along the y-axis. And here's the thing. We still have just one leg, this one, the original. These others are reflections. We cannot edit them directly. We only need to edit this one. And you will see
that by hitting tab. And the only leg that's
activated for editing is this. So once we're satisfied
with our legs, we can convert all these
other legs into Meshes, editable meshes like this one, by applying the mirror modifier. And we'll see how to do that. Finally, I want to select, while this top is
still selected, heaps number three on the
numpad on your keyboard. To switch to
orthographic side view. Orthographic side view
is three on your numpad. One is orthographic front. So now we're looking at it
from the front, front side. And top is seven. Now if you want to
see the opposite of any side, you hit nine. So if we're viewing
the left side, if we want to view
the right side, we hit 99 again. We will switch back to
the other opposite side. Alright, so now remember
we have this selected. What I wanted to
do on this side is hit G to drag that top face. Heat. Why? Because it's along
the y-axis and drag them. Je Once again, I want
to just position it up to somewhere there like that. Now, you will notice here
we have this slanted line, and right here we have
some vertical line. It's not slanted like
this, it's vertical. So what we want to do is
create an edge loop here. So I'll zoom out Control R. And when that
yellow line appears, I'll click to create a loop cut. And then I'll pull
it upwards and place it right where
those two intersect. Then click to commit
it right there. And I also want to create
another loop cut right here, cutting the very
center of the world. So Control R on this hover over the edge to bring up the
loop, cut, cut it. And when you get to
the blue intersection up here, cut there. Alright, so now what
that does is it gives us the option to switch to edge
mode and select this edge G, Y, drag it backwards. I want to put that
right there for a second and enable clipping. Switch to three G. Why? Clipping makes sure
that when you drag the original beyond into
the side of the reflection, he doesn't go beyond. So they just meet in the
middle and stop right there. So there we have it. Now switching back to
object mode with tab. Now we have our
two legs and we're ready to move on to
the other parts. So I'll see you in
the next lesson.
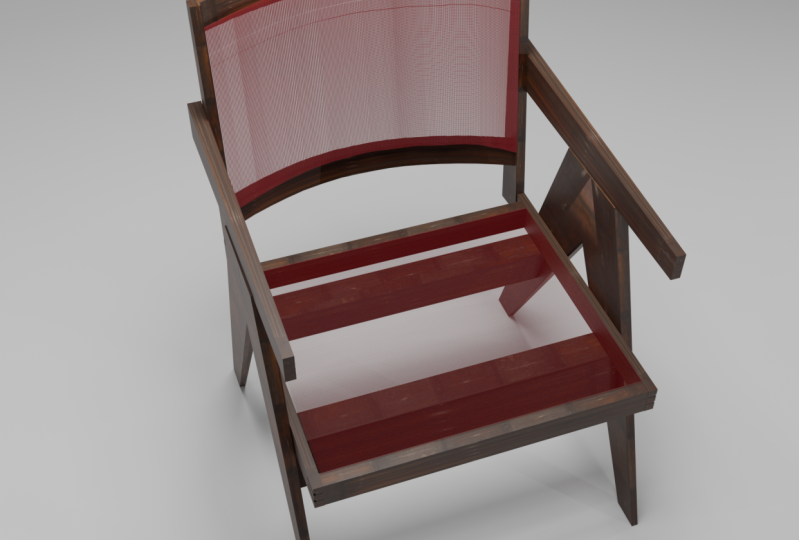
5. The Seat: Welcome back. So now we're done with the Legs. It's time to create
the seat itself. And I'm just calling
this part the seat. Of course, the
chair is the seat, but I'm calling this area
that you see on the seat. So that's what we're working on. So let's start with
these supports. The front one and the back one. So shift a, I'll add a cube. And it's very big. So I'll just zoom out with
my middle mouse wheel. Let me hit S to scale
it down. Then zooming. Switch 23 side view as
to make it smaller. I think that's a good size. I'll hit G to grab it. And let's see, I'll
just eyeball it. I don't know exactly
where to position it, but I'll eyeball it. I think that's a nice position. And now when we
get to that point, hit R to rotate it, hold down, shift to shift in
smaller increments. I think that's a good position. So I wanted to leave
it right there. And now let me
scale it in the Y, hit Y twice, scale it locally. After that point. If you're scaling it
and you hit Y once, you're scaling it
in the global-wide, you hit Y twice, you're scaling it
in the local Y. Now, he taught to you to go out and do a quick research on Google and find out what global and local
editing is in Blender. So now it's still narrow, of course, because
we may be too small. Now switching to the front
with one on the keyboard, I can hit S and X to
scale it in the X axis. Precisely there. There we go. So that's a nice support. Let me switch the side
zooming Shift D to duplicate. And I want to put
it right there. Now, when you have
an object and you notice the origin is outside, because sometimes you want
the origin inside the object. When the object is selected, go to Object, Set Origin,
origin to geometry. And now it'll put it in the
center of the geometry. Now, what I wanna do is rotate it and put it somewhere there. Let's see the difference. Alright, we'll adjust it
as we work on this part. So let's go ahead and
create this part. Shift a. I want to add a cube once again.
And there we go. Scale it down, zooming, switch to three G
and push it upwards. And what we want
to do is hit S to scale it down in the
z-axis, so he Z. And now it's about 2 " tall. So z-axis 2 ". Yeah, I think that's
a good height. And it looks like it's about
one-and-a-half feet long. So in the y-axis, 1.5 ft. Well, that's too
short. Let's make it 2 ft. Yeah, like that. G Z, GZ. And now let's rotate it so
R to rotate it slightly. I think that's slanted enough. And you will notice right here, these legs are more
slanted than ours. So let me zoom out. Select this leg. Switch to edit mode with tab. Select these two phases. In this one. Hit three to
switch to decide mode. And then G and white
drag it in the y-axis. Await. We already created
that loop cut up there. While. But then again, let's just add that unique
designed to our own seat. If we didn't have
this loop guard here, it will be a straight line
like this, but no problem. At least we didn't know we
would need to change that Alright, I think
I'll go with that. And now of course, let's switch back
to object mode. Select this object from the top, hits seven on the numpad to switch to the top.
Let's zoom in. This is the right side, so G and I think it's
about 1 " thick. So selecting this in the x-axis, 1 " G X. And let's play seat
right there in the inner side of the Legs. Just like that. We want to make sure that this phase
is supporting this face. So while this is still selected, I'm going to hit tab to
switch to edit mode. And I'll select this edge. Now let me hit tab to switch
to object mode and select, hold down Shift select this. Now these two selected, I want to hit forward
slash on the numpad to isolate those two so we
can see what we're doing now, let's hit three to
switch to side mode. With this selected,
I want to hit Tab now to switch to
Edit Mode, heat two. And now we've
selected this edge. Now switching back
to slide mode, I can G and drop it right there. And now it's fully
supporting that board. So he tapped the seat
back to object mode, hit forward slash
on your numpad. And now it's looking good. Now it's supporting that board. So now that we have this, let's go ahead and reflected
on the other side. So of course, let's first of all Apply all transforms to push the origin to the center and
apply a mirror modifier. And there we go.
Control S to save. So we don't lose our work. Now let's create a this
front and the backboard. So now let's go ahead and
add a cube shaped a cube. Of course S to make it smaller. Let's zoom in. I want to
switch to side view three. Let's make it much smaller. Once again, then G, I want to put that right here. And we want to size it
the same as the sole one. We want it to have
the same height as this, just the same way. This one is the same
height of this. So remember this is
supposed to be 2 " tall. Just like that. Zoom in and I want to rotate it. So our holding down Shift movie smaller increments
just like that, then G to grab it, R to rotate it
while holding down shift for smaller increments. G, Then I think now
it's well angled, so I'm going to put
it right there. But now we want it to
be slightly shorter. Maybe 1.5, maybe 1 ", just like this one, remember this was 1 ". So let's make this
one Lynch as well in the y-axis. Just like that. Now, let's switch to the
front orthographic view with one on the numpad, S, X to scale it in the x-axis. Let's pull it all the
way to the very edge. Like that. Very good. Now, let's switch to three. First of all, when
we say G, Then why? First of all, that's
why in the global. Then Y again, now we want to
push it in the local space. So who shipped to
the edge like that? Right? So now there we go. They're intersecting very well. So the next thing
we want to do is of course now duplicate this. Duplicate it like that. Escape to let go of it
while it's still there. Then G, Y, Y, and let's put it right here. Zooming. So the duplicate is going all the
way to the edge. Ey, holding down shift. Right there. There we go. Control S to save. And now we're done
with this area, of course will work on the mesh. This mesh together with the backrest mesh
later in the lessons. So right now we're just
blocking out the major parts. Next, let's add
these armrests and the backrest before we
move on to the Meshes, I'll see you shortly.
6. Arm Rests: Welcome back. So now we're done with the legs, the supports, and
these Seat area. So now it's time to work on the armrests and the backrest. So let's get started. I'm going to hit number
three on the keyboard. And now you will notice
the armrests have the same angle as
this Seat area. So I'm just going to duplicate this shift B and
put this up here. And what I wanna do
is first of all, bringing the origin to the
center of the geometry. So while it's selected, set geometry, set
origin to geometry. And there we have it. With this selected, I'll hit G and push it backwards like that. So now that gives us a nice angle to work
with for the backrest. And that's the same
parallel angle right here. So I think the designer of
the seat did a very nice job. Alright, so with that, of course now notice
the backside of the armrests is slightly
taller than the front. So that means this needs to
be shorter and it's taller. So first of all, switched the top view. We want to place it and
want to place this GI, want to place it right above
the legs because as you see, it's above the legs because
they're attached with glue and possibly
some wood joint. Just like that. Alright,
so now selecting this heap tab to switch to
Edit Mode and select the face. So I'll switch to face selection mode or hit the number three below the escape key. Or switch to face
Selection Mode. S for scale Z. And now it's slightly
taller than the front. And I think we, I think we
should leave it right there. Let's not make it
too conspicuous. I like it where it is right now. And now that we
satisfied with that, hit tab to switch
back to object mode. And of course, as
you would guess, it's time to give this a mirror. And it seems to have
some sort of mirror. So let me just remove that. And of course, let's
first of all pushed the origin to the center
of the world. Control a. All transforms. Now it's right there,
Add Modifier, mirror. And there we have
it, our armrests, Control S. And now
we're ready to start working on the Back Rest. So I'll see you in
the next lesson.
7. The Back Rest: Welcome back. So now we are working
on the backrest. So let's start by creating
this blank right here. So Shift a. Let's add a cube. Let's, of course, scale
it down with S, zooming. And let's go to maybe the
front view. First of all. Gee, I want to put
it right here. Switch to side mode. No side view. G. Let's put
it right here. And now. Of course this looks like
it's about 2.5 " thick. Up here. It's slim, while down here each peak. So let's just go ahead
and say in the y-axis, we want it to be maybe
let's start with 2 ". And from here up to here, it looks like it's about 1.8 ft. So now in the z-axis, 1.8 ft G. Of course, let's rotate it. And I'm now noticing
this part right here is also very nicely slanted. We'll see how to do that because ours is not currently
looking like that. But we'll find a
solution. With that. Let's go ahead and switch
to the front view and let's make it 1 " in thickness, so that's in the x-axis, 1 " just like that. Gi X. And let's put it right here in line with this other blank, this blank right here
because they intersect. I didn't show you yet
another reference image. Let me just show it to you. Let me just create a new reference image
area here, image editor. So if we look at the back here, notice we have this joint
and we need to work on that joint and will also work on these are the Joints
here, so don't worry. So that's why we want
this plank to be in line with this other
plank right here. Because they intersect. Now, going here,
Let's look at it from different angles to see what we can
improve. Oh yeah. We're supposed to make the
lower part slightly thicker. So while it's selected, I'm going to press forward slash on the numpad to isolate it. Rotates, can switch to
edit mode with tab. Select this face scale, then Y twice, to switch
to the local scale. There we go. I think
that's a good thickness. Can reduce this S Why twice. Let's reduce that
just like that. So it's 23. I think
that's a good angle. So switch back to object mode and hit forward slash
to an isolated. So now, now that we're satisfied with that,
I'll select it. Control a, Apply all transforms. And I'll go inside here, inside the Modifiers and
add a mirror modifier. And now it's mirrored
across on the other side, Control S. So now
let's go ahead and create this plank
and this top plank. But one thing you need
to know this is that they are slightly rounded. They're not just running
from the left, the right, straight like the armrests. They are slightly
slanted like that. So how do we achieve that? I want to go with this. Let me pick this
shift D. Alright, let me first switch to the
front view with one on the numpad. And then Shift D. Hold down Z before letting go to constrain
it to the z-axis. And I want to pull, pull it up to the
top right there. And there we have it.
So switch to three G. And let's also rotate
it to give it that angle. Scale in the Y. Wants to give it the same width as the top of this
plank right here. So Y G to play seat
smack at the top here. So as you can see, we need to rotate it slightly So rotated holding down Shift G. And let's
put it right there. So now there we go. Control S. But now we need now to work to make it
have that rounded corner. So how do we do that? So first of all,
there's something I forgot to do all through. When you're creating a
3D object in Blender, It's always important
for you to shade smooth. So I'll go ahead and select these and right-click
and ado Shade Smooth. That gives it a nice shading. And sometimes you
might notice some of your objects have
some weird shading. And if you apply auto shading smooth, it solves everything. So that's what we're
doing right now. Or to shade smooth. Even when you apply materials, they look better when you have odder shade smooth applied. So I think we've
captured everything. So now let me go
ahead and select this and switch to
edit mode with tab. Now we're in edit mode. And I want to switch
to the top view with seven on the numpad. Now we're viewing
it from the top. Now, I want to hit Control
R to bring up loop cuts. When that yellow line appears, I'm going to scroll upwards to increase the number of segments. I want to maybe get to
something like 14 or 15. I just wanted to have one
loop cut smack in the middle. So that's 15. 15 it is. Click once again to commit. Now with that, I
want to activate the proportional
editing mode right here by going to this
dot with a wave here. Now, what this does
is it allows you to influence whatever amount of the mesh you want influenced. So you can influence a
huge area or a small area. And let me show you
what I mean by that. So currently we have this
sharp rounded waves selected, but I want to select
this inverse square. So let me select
this inverse square. And these define the
shape of the influence. So if I activate
these inverse square, this will turn blue. And now if I select just this
edge, let me just switch. I want to select
this entire edge. So I'll hold down Shift and Alt to select the
entire edge loop all round. That's another thing you
need to keep in mind to select an edge you hit, you just select it. But if you want to select
the entire loop all round, you hold down Shift and Alt, then click the loop. So I want to select the middle
loop with this activated. And when viewing it from
the top view, seven. If I hit G to drag it backwards, now I'm dragging
the middle loop. But notice all the
other edges are also influenced by
what I'm trying to do. But if I push the middle
mouse button forward, you'll notice we had
a circle outside. And now it's getting smaller
and smaller it gets, the less the areas might
grab tool is affecting. Remember we press G
to be able to grab. So now this allows us to have this gradual rounded
edge like that. And I want to leave
it somewhere there. Let's reduce it slightly. Just like that. So now we have this rounded
back area of the seat. So basically this is just
a rough way of doing it. Of course, now, if I were doing
this very professionally, I would take time to shape it and make it look
absolutely phenomenal. But right now, this is me just showing you how
to use these tools. So now, now that we're
happy with what we have, I can switch to object mode. And I want to grab this G, Z and push it
downwards slightly. Gee, why? Why? And push, hold down shift to push
it forward slightly. I just wanted to get rid of
that artifact that was here. So now they blend into
each other very properly. And I liked that result. So the only thing
we need to do is duplicate this and
put it down here. So three to view, side view, select this
shift D to duplicate. And let's put it somewhere. Let's put it right there. There we go. So now we
have that rounded back, the rounded backrest,
and I think we've captured it
in the next lesson. Let's now start working
on these meshes. So I'll see you shortly.
8. The Meshes: Welcome back. So now it's time to start working on these
Meshes right here, this one and this one. So let's get down to it. So as usual, shift
a, I want to ship a. This time I want to add a plane. And I want to switch. First of all, let's
make it smaller. Scaled it down. Switch to front view
with one on the numpad. Let's reduce the size once again and make sure it touches. Maybe it's somewhere
in the middle of this backrest
plank right here. So as you can see right here, it doesn't touch the edge. It's in the middle. That's what we're
trying to achieve. Grab it, drag it in
the z-axis, like that. Switch to the side
view with three. Rotate it. And let's try it. First of all, let's reduce
the size in the y-axis, because remember, it was the, this was the y-axis. We could have scaled it
down in the wildlife that, but the moment we
rotated it, remember, it still keeps its local y-axis. So scale it down in the
Y axis, local y-axis. Like that. Then let's drag
and drop it somewhere there. Get closer. Let's make
sure it's parallel. So scale it down yet
again in the local why? Up to somewhere there.
Alright, so now rotate, hold down, Shift to move
in small increments. G. Let's place it somewhere
there. There we go. So now zooming out, of course it's not rounded. We need to make it
rounded like this. So switching to the
top view, zooming in. I want to switch,
while this is elected, switch to Edit Mode. Now it's in edit mode. Remember what we did? We added a loop cut. So look at and before you click, increase it to 15, because the last
time we made a look, the last time we made this
curve equals 15 segments, so that we have this
one at the middle. And now if I select
the one on the middle, and with a proportional editing
tool active, if I hit G. Remember we have this level of influence we used last time. So let me just hit Y to
constrain it to the Y. Up to somewhere there. Let's say somewhere there. Alright, let's rotate
and have a look at. The next thing we wanna do is
subdivided this into cubes. So I'll hit R to
create lookouts. Let's make them as
cube like as possible. Just like that. And now what
we want to do is select all a right-click sub-divide. Right-click sub-divide again. Alright, so now let's
switch to object mode. Now. Of course, it's curved. But what we want to
do is create a mesh. Note this solid here. So first of all, I want
to select this control a, Apply all transforms,
right-click, Shade Smooth. Now at least you
see it's smoother than before. Shedding smooth. And I want to apply a modifier here called the
wireframe modifiers. So let's look for the
wireframe modifier. Here we go. Wireframe. So I'll select that and the wireframe modifier
gets applied to it. Now, I can reduce this
until it becomes a mesh. Let's continue reducing it. 0.06. There we go. And we can even take it
further, maybe 0.04. So now that's a perfect mesh. There we go. So now let's repeat the same
thing for these other mesh. And I've just noticed this
blank right here doesn't go all the way to the Back and ours goes all the
way to the back. So switching to the side view, selecting G and then white twice to go
to the local space. I'm going to drag that
all the way to here. I think I'm looking at this. Alright, so now We rotate. Yeah, that's exactly where it's
supposed to be positioned. And this is supposed to
be shorter because now it's protruding from these
other ones in here. It's not. So I'll hit S X to
reduce it in the x-axis. Hold down shift for
small increments. There we go. Alright, so now it's time to create
this mesh right here. So once again, shift a, add a plane, switched to three. Now switch to top view. Which seven? Scale
it down. Zooming. Scale it up a little bit until it's halfway
through this plank. And of course now
we want to reduce this leg along the y-axis. So S for scale. Why? Y1's because we want to, we want the global
scale just like that. G For Grab. Why for y-axis. So we can drag it
towards the front. Let's switch to side view with three G Z to move it upwards. Zoom in R for rotate, hold down, shift to rotate
in small increments. G, Let's place it
somewhere there. I think it's well-positioned. Alright, so now let's
increase the size along the y-axis on the local space. So S, Y twice. Hold down Shift. Remember we want
it to be halfway through this blank
and right here. So G, Y holding down Shift, I want to move it down a bit. Alright, so there we go. So control a, Apply
all transforms. Shade, auto smooth. There we go. So now let's switch to Edit Mode and switch to the top
view with seven zooming. And what we want to
do is subdivided. So our first of all, I wanted to create eight
segments in 15 segments. Let's see 14, 15. Now let's create squares by creating new loop cuts
running along here. Like that. Then select all
with a right-click sub-divide. And sub-divide just twice. Alright, so now switching
back to object mode, Let's add our
wireframe modifiers. Let's reduce these to 0.0 054 to the, I think that's a good spot. Now we have our Meshes. The next thing we wanna do is work on these joints to make sure we give it that I steady
clip, beautiful, finished. So let's see how to do
that in the next lesson, I'll see you shortly.
9. The Joints Part 1: Welcome back. Now, we're done
with these Meshes. The next thing we
wanna do is work on these joints to give
it that nice finish. So let's start by
zooming in on this. As you can see, we need to make some corrections here
because right here these plank goes all the way to the Back and it has
the same angle. So let's see how to do that. Selecting this zooming. I'm going to hit on
the keyboard Alt Z. That will switch to x-ray view. Now while this is
still selected, I'm going to switch
to edit mode. And then hit number two below
the F2 key on the keyboard. Or just select the edge
selection mode here, and select this edge. Now, I'll hit number three on the keyboard to
switch to side view. And now because the
edge is still selected, I'll hit G. But before I hit G, Let me switch off
proportional editing to avoid influencing
all the other edges. So now that it's switched off, I'm going to hit G for Grab. And then drag it holding down shift all the way to the edge, the edge of that other
plank right there. Alright. Next, I'm going to
rotate and zoom out. Then grab that edge, switch to side view once again. Hit G. Holding down Shift to make sure we're
moving in small increments. And there we go. So now at least our seat looks
like this part. So the next thing
we wanna do now is start working on this part. So let's do this. I'll switch back to object mode. And I'll hit out Z once again to toggle away
from x-ray mode, or select this toggle x-ray
mode, just like that. So now zoom out and
shift a, add a cube. I'm going to scale it down. Switch the side view, zooming, grab it, place
it somewhere there. I wanna give it a height of 1 ". So in the z-axis, one in 1 " is too big. So let's say 0.5 " and then hit R to rotate this slightly because he wants to
be parallel to this plank. Grab it and place it somewhere
there. Let me zoom in. S. Why twice scale it
down in the Y axis. Are hold down,
shift to rotate in smaller increments. Let me ship. Turns out it's, it's two peaks, so let's reduce the
thickness once again. Let's say 0.4 " 0.4 ". I think that's the
perfect size Shift D. We're doing this freestyle, so we didn't have these
measurements beforehand. So help you understand. Let's separate
these a little bit. So now that we had those, let's switch to the front side. Like that. Select both of them. So select the first
one, hold down, Shift, select the second one, gi, X, move them in the x-axis. Alright, so let's scale
them down in the X axis, just like that. Gx. Alright, so there we go. So what we want to do is
use the Boolean modifier to cut this blank with these two small
cadres we've created. So if I select this
main plank right here, let me just drag this
upwards and go inside. Modifiers, add
modifier, Boolean. Alright, so now we've added
the Boolean modifier. Now, this icon right here
is an eyedropper and it allows us to select which
object we want to cut with. Which object we want to cut the currently selected
object width. So we want to cut it with this. So now we've cut it. And just to show
you what I mean, as you can see, it's
changed to cube 0011. This is cubed 0011. So now if I select outside, then select this plank and isolate it with
a forward slash. As you can see, we've cut it. Alright, let's an isolated
and repeat the same this. So once again, select the
object we want to cut first. Then add another Boolean. We already had the Boolean
we've just added a while ago. Now, this is the new one. Let's use this eyedropper to
select this second cutter. Alright. So there we go. Let me isolate that for a
second with forward slash. Just like that. Now, all we need
to do is duplicate these two over across
to the other side. So what I want to do is control
a, Apply all transforms. Now the origin has
moved to the center. And I want to go inside Add
Modifier, mirror modifier. Now that's mirrored across. Let's repeat the same
for the upper one. Add Modifier,
mirror. There we go. So now if we isolate these two, now they have that cut. Now the next thing I want to do is duplicate these two colors. So Shift D and then
just right-click, release them right
where they are. So now we have 12.13. Those are the two new cubes, because first of all, want to select these and apply these two Booleans
we just applied. Apply, then Apply. Now we can get rid
of that. And that. So now we've gotten
rid of the first Carter's, that was 10.11. Now we're left with the
ones who just duplicate it. And we want to use those
on this plank right here.
10. The Joints Part 2: So now let's just zoom in a little bit and
I want to select this plank and the two cutters and hit Slash on the
numpad to isolate them. Because we want to focus
on this area for a minute. So now going back in here, but before we go there, let's go back here and
switch the front view. So I'll hit one on the keyboard. And I wanted to make sure These
two are on the very edge. Just like this. So once you align them very
straight on that edge, now, let's switch back
to where we were. Go back in here. And now, now we
have them isolated. So what I want to do is select this and switch to side view. Just like there.
With it selected, I'm going to switch to
edit mode with tab. Now we're in edit mode. Then I want to switch
to x-ray mode. So Alt Z. So we can see through
then Control R, so we can create some loop cuts. Let me increase the number
like that precisely. So I've added FOR loop
cuts in their place precisely where the
edges of these two are. And that's what we want. Because the next thing
we're going to do right now is switch the front side. So one on the numpad. Remember we moved these to align to the edge
of the other plank. So now is the time
we're going to use this edge Control R
to create a loop cut. Let's drag it all
the way up to there. Let me zoom in. I think
it's positioned correctly. So now let's switch
off X-Ray mode. Now we can get rid of these to switch back to object mode. Delete that, and that, select this switch
back to edit mode. And I were to rotate and
switch to face selection mode. By selecting this
or number three below F2 on your keyboard. Select that, hold down, Shift. Select those faces
and delete them. Select these three
phases. Delete them. Then select these four
faces and delete them. Alright? So now what we
want to do is fill up these spaces with new faces to leave only these two
protrusions like that. So I'm going inside Edit
Preferences, Add-ons. And I want to search
for loop tools and make sure look tools is
activated like that. Check this box and make sure
you save the preferences. Once you've done that, you'll be able to
select an edge. So if I select this edge, this edge holding down Shift, I can hit F to fill
it with a face. I can do the same. Right here. Select that edge,
hold down, Shift, select that edge, F. We
filled up with a face. Let's repeat the same, this edge and that edge. Face, face and face. Next. Face. Face. There we go. So now let's switch to
object mode with tab. And now hit forward slash on
the numpad to an isolated. Alright, so there we go. Now, as you can see, this is what we were aiming for, but these seem to be a little
bit deeper into the woods. So what we can do is select
this switch to edit mode, switch to face selection mode, select this face and this phase. Switch to number
three, sideview, zooming G to grab those faces and drag it all
the way to somewhere there. Switch back to object mode. And I think we have a
nice joint right there. It's not perfect,
but at least you understand how to
achieve such results. And you can take your time
to create a perfect joint. And of course, we need
to do the same thing we've done on this
side of this blank, on this other side. So right now as you can see, what we've done
on the other side is not reflecting right here. So switching to the front
view with one on the numpad, I'm going to isolate this. Just like that.
Switch to edit mode. And I want to create a loop cut. So Control R and bring
it to the very center. Alright, so there we go. Now I'm going to select
everything on this side. So everything rotates. So let's, I'm just
going to use see, he'd see on the keyboard,
just like that. Escape. And hit
Delete. All faces. Enter. Alright, so
select everything. Add Modifier, mirror modifier. So now we've reflected everything on this side
to the service side, switch to object mode,
an isolate everything. Now this side also looks
awesome. There we go. So now, of course
we haven't done the backside and that's an
assignment I want to give you. Now that you
understand how to work with the Boolean tool
to create joints, to cut out parts of an object. Use that same
knowledge to create these joint on the
back of the seat. So that's a quick
assignment for you to try and learn more
about Boolean's. I think we're almost
finished with the Modelling. The next thing we want to
do is add the materials, do the lighting, the camera, and render our chair. So I'll see you shortly.
11. Apply the Modifiers: Welcome back. So now we're
done with the Modelling. It's time to work on the materials and
biomaterial, I mean, this wooden texture and this sort of beige
color on the Meshes, just to make it look realistic. So right before we proceed, I've just noticed we have
this joint right here. You might be wondering why
we didn't make it slant. I think I like it
exactly the way it looks embedded into this
plank for stability. But just in case you
wanted it to be flat all the way parallel to
this. It's very easy. First of all, you need
to apply this mirror. Alright, like that. And once it's applied, you can go ahead and
hit Edit, isolate it. And now it's up to you
to select these edges. Pushed them up and
down as you please. Including these are
the ones that are inside switching to three. Let me select this. G, Z holding down shift. So now that's the other
side that's protruding. So as you can see,
it's something that might take some time,
but as you can see, it's possible to, to model it until it looks exactly the
way you want it to. Gz. Select this GZ. Gz. Now at least the one
on this side is slanted. So just take your time and continue working on
it until it's flat and parallel to this edge and parallel to this lower edge. But as I mentioned, I like the way it's embedded
into that plank. So I'm not going to spend
time working on it. So let me just undo that. Finally there, that's
where we were. But anyways, I still need to
apply the Boolean modifier. Same case applies to
all these others. Let's make sure we
apply all those. So now after applying
the mirror Modifiers, what happens is initially dispose a reflection
of the mesh, but now these two
have become meshes. So if I switch to edit mode, this is a mesh, and
this is a mesh. So I can actually edit this. But remember initially
I could only edit the original,
know the reflection. And now to separate them into their own
individual objects. I'll just let me
show you what to do, because right now if I
switch to object mode, Blender sees this as one object. When I select the
original, it selects both. When I select this selects both. So how do you separate them? Because now they are
their own objects. Edit mode, select one of them. Now, notice we've not selected the backside because
it was hidden from us. To select the backside as well. You need to be in
X-Ray mode like that. So now when you select, you select it all sides. So Shift Z, x-ray mode. So what I want to do now is
hit P separate selection. So select that. And now switching
to object mode. If I select this,
it's an object, and this is an object. Let me do the same for this. So select that or
that edit mode. Shift Z to switch
to wireframe mode. Select that be
separate selection. Shift Z to switch
back to Solid mode, tab to sit back to object mode. And now they are
separate objects. So do the same for all the
other objects we have in here.
12. Add Texture and Materials: So now finally, let's go ahead
and apply the materials. Let's switch over to Paul
II haven very quickly. So let me switch to my browser. Poorly haven. This is a place you
can find H DRIs, textures and models and download
them for your projects. So we want textures. And as you can see, we
have different types of textures that you can use. So I'll just type would
search for a wooden texture. I like this dark wood. Let's see if we
have some others. Wooden table one. I think I like this as
well. Let me select that. Now you have the
option to download it in different resolutions. I like downloading the list
for these types of projects. So one K is okay, download it. There we go. So let me just pick this downloaded folder from
my other screen right here. Here we go. So this
is the texture. What I wanna do is
switch back to Blender. And in here we have
different workspaces. Now that it's time to do
the materials and textures, Let's switch to the
shading workspace that will bring up all the tools
we need for our texture. Zooming on this. And I like switching
from this outdoors HDRI to this indoors HDRI. Where is it this one? When working on objects
that are usually indoors. Alright, so now selecting
this leg, as you can see, it has a default material
by the name material we can call it would Enter. And now what we need to do is add an image texture right here. So I'll hit Shift a
texture, image texture. Drop it right there, and let me hook it up
to the base color. And now it's black because
we have installed Blender, what image texture
we want to use. So we need to tell
it by going to open. And now let's navigate to
where we have that texture. We've just download it. So let me just pick it. Here it is. I want to drag
and drop them in here. Let me double-click that. And now as you can see, it's changed to that wooden texture. Now, we can do the
same on these. Now that we've already,
let me select this. Now that we've created
the wood texture Blender knows about its existence
and all the textures will, we will create, will
be listed here. So as you can see,
what is the first one? So if I have this selected, I can go to this list
and say I want to apply the wood texture to
it just like that. Select this drop-down
food Texture. Select this drop-down
would texture. As you can see, it's a very
straightforward process. Select that would
just like that. There we go. So our wooden
texture is now applied. Let me hit Control S to save. Now one thing a
lot of 3D artists do when they're texturing, and I recommend you do it
and learn how to do it. Is UV unwrapping? Uv unwrapping is an entire topic on its own that
needs its own class. I recommend you go
and study about it. Let me select this. Tab, edit mode. Select all with a you. Then smart UV
project. Click, Okay. When I click Okay, if
this pattern will change, as you've noticed, so
switch from edit mode. And you can always change the direction of this
pattern after UV unwrapping. So switching back to edit mode, I can go here and
switch to UV editor. And now zoom out. As you can see, these are
the UV unwrapped faces. If I select all with a, I can rotate them with
R. And as I rotate them, the direction of the texture on the faces is
changing as well. So I'll just leave you
to experiment with it. Hitting tab to switch
to object mode. So now to add the textures on
the meshes, as you can see, if I switch back to layout, the mesh is sort of beige or brownish in color, light brown. So switch back to shading. I want to use something
called the principle be ISPF. And if I select this, this is the principle
be SDF is a shader. So selecting this,
we can Add New, and this is it by default. So what we want to do is change the base color to that beige, just like that.
Clicking outside. Alright, let me select that
and call it mesh material. Alright, so I think
it's to reach. Let's also reduce
the saturation. Now let's increase the
saturation a little bit. Now this is just to show you that you don't
necessarily need to download images from poly
haven to texture your objects. You can also use
the principle be SDF and built-in tools within, within Blender to
texture your materials. Let me also apply the
same here, mesh material. So that's what we
have right now. It's not perfect. You can also just go to
Poly haven and look for, let me just go home. Textures. You can also just look for any similar
colored texture here and added, including these rough concrete, we can just drag this
fact the way it's rough. Can drag it and apply the same way we applied
these textures. So just bringing
an image texture, hook it up to the
base color and apply this concrete
material to the mesh. So now that's how to
apply the textures. In the next lesson, we're going to do composition, lighting, and rendering
the image out. So I'll see you shortly.
13. Lighting and Rendering: Welcome back. So
now we're done with the texturing and
material addition. Now it's time to create
a scene for the seat, light it up and Rendering. So let's see how to do that. The first thing we need
to do is switch back to layout, the layout workstation. And now that we're
done with these, I just want to get rid of them. So in-between here, I'll
right-click join areas. The same case applies to here. Right-click join
areas. Right here. Click. There we go. Let's get to the front view. Zooming a to select
everything G For Grab Z, so we can move it in the z-axis. Then when we get there, hold down Shift to move in small increments to make sure we play seat almost on the ground. We're assuming that this is the ground Shift a to add a plane because you
want to add a backdrop. The plane is 2 m by
2 m, by default. Want to scale it up. So S, then ten to scale it
up ten times. Zoom out. I want to grab it
with G. Then why? Because I want to push it back in that direction,
just like that. Now, while it's still selected, switch to edit mode with tab. Select that edge. Now we're in phase
selection mode, so switch to edge
selection mode. Edge selection mode. I'll hit E on the
keyboard to extrude. And now I don't want
to extrude ingest any direction Z to
extrude upwards. That's the z-direction
up somewhere there. Select this joint
control be to bevel it. First of all, let me
escape to zoom out. Control be to bevel that. Then scroll upwards
on your mouse. We'll increase the segments
and make it smooth. I'll switch to object mode. Control a, Apply all transforms, right-click, Shade Smooth
to make it smooth. Now I want to increase
the width as well. So scale in the X
axis. Now zooming. I think now we have
a nice backdrop, but I think that
back is too far. We've pushed it too far. So Gy out to somewhere there. Control S to save that. Now, we're currently in
solid mode, solely display. We want to switch to rendered
view. Rendered display. This is the display
that shows you what the final product
is going to look like. So switching to that,
it's very dark. And that's because we now
need to add something very important in every scene. And that's lighting. Shift a light. And let's choose an area light. Here we go, G, Z, MOBI team the z-axis. Let's put it somewhere there. I want to increase
the intensity. So while it's still selected, I'll go here to the
object data properties, increase this to maybe 20. And I wanted to go
back in here, ship a, Add Point Light, G, Z. So let me, first of all
put that right there. I wanted under and then Shift D X to move
it in the X axis. Shift D Once again X to
move it to that other side. I want to select that
and hold down shift with this G Z to move it upwards. Let's increase the intensity. Let's reduce the
intensity of this five. I want to duplicate this one. Why to move it in the y-axis? So let's put it maybe
somewhere here. Zhe Xie, push it upwards. Let's increase the
intensity to maybe 20. I'm starting to like the result. We're actually just
we just winging this. It's not a pre-planned
lighting setup. So we're just trying
to do this as we go. Maybe we can add another
lights in the back. So let me select that shift. Shift D. Then why? Push it back? Jie Zhi. Let's increase the
intensity to 20 Or maybe 30, know, maybe 50. Gee, why? Let's bring it closer. Just like that. Increase the
intensity of this to 30. Gee, why we need closer GZ, push it down slightly. Alright, finally, I
think I'm going to duplicate this Z to
push it upwards. Then S to scale it up. And then let's increase
the intensity to maybe 60. Let's see what that looks like. Maybe 100. To light up the entire scene as
well. There we go. So Control S to save. And now we want to add the
final thing before we Render. And that's the
camera through which we're going to look
at the final render. So shipped a camera. And there it is. So G, Z to push it upwards. We want to look at
it from the top. So seven on the
numpad, zoom out. Let me drag it up to somewhere there to view
through the camera. Hit number zero on the numpad. There we go. So
we can just hit G to drag it while we're
viewing what we're seeing. Just like that. Now, once we fix the camera where we want
it, for example, here, we can actually now rotate what we're looking
at within the camera view. Right now, if we try
to rotate or orbit, we're going to orbit
together with a camera. Let me show you. You
see now we're out of the camera view because we've rotated everything
including the camera. But now hitting zero to
go back to camera view. We can go to View, Lock to camera view. So if we check this, now, if we rotate our orbit, we're still within the camera
view and this will allow us to arrange everything
exactly the way we want it. So I'll select the backdrop, hit R and Z to rotate
it in the z-axis. Alright, so that we don't have that hard edge right there. Finally, let me zoom out. I want to increase the
intensity of this slide. It's still not enough. I want to increase its intensity while we're zoomed beams. So let's zoom in. Now let's go in here
and say 200, like that. So now with that setup, Let's switch to the
Render Settings right here, the
render properties. And of course, the
first thing we need to choose either Render Engine. I like using cycles because it produces more realistic results. So I've selected cycles
and I want to select GPU, compute because I'm using a GPU. Now, make sure this noise
is checked under Render. The noise that makes sure your Render doesn't
have these particles. And now with those settings, I think we're good to go. Of course, you need
different settings for different scenes and setups. Right now I'm just
going to go with the default Render settings, except I've changed to
the Cycles Render Engine. Now, let's go to the
output properties to decide where we want
to save these renders. So I'm going to the outputs, select this folder
and now choose where you want to
save your render. So I'll select wooden
chair, That's the folder. And I'll accept so
that's the folder. You can also select
the file format. I'm good with PNG. We also have JPEG and
all these others. So PNG is good. And with those settings, I think now we're
ready to render. So going up here, Render, Render Image, zoom out. So basically that's
how to set up your scene and
render your models. I'm going to do a few
more renders from different angles and share them at the end of this lesson. So here we go.
14. Outro: Congratulations, you've done it. You've successfully crafted
a stunning 3D wooden chair. And I think you
should feel proud of yourself because I
am proud of you. And now is the
right time to share your artistic achievements
with a world. Don't forget to upload your
final rendered images under the resources and projects tab below this video
player right here. Sharing your artwork with
the community not only allows others to admire
your incredible talent, but also provides a
fantastic opportunity for constructive feedback
and inspiration. Speaking of feedback, I would be forever grateful
if you could take just a moment of your
time to leave a review of this class is going to take
you less than a minute. Your honest thoughts and
insights will immensely help other prospective
students determine if this class is a
right fit for them. Additionally, your valuable
feedback will play a crucial role in shaping and improving
my future classes, ensuring an even more rewarding learning
experience for everyone. Now, if you're eating for
more exciting adventures in the world of creativity
and web design. Don't forget to check out
my Skillshare profile. There you'll find
a treasure trove of other captivating classes, all designed to help you
build fully functioning websites and refine
your artistic skills. Just in case you'd
like to say you're 3D Modelling Skills online
on your own website. So learn how to build
your own website. Before we part ways. Remember, this is not goodbye, but a, see you soon. I genuinely cherish our time
together and I'm already looking forward to welcoming
you in my future classes. So for now I just wanted
to say goodbye and I'll see you in the next class piece.
 Ken Mbesa, Web Designer | 3D Artist