Transcripts
1. Intro: Welcome back to another awesome
blender modelling class with me can better. Are you ready to take your 3D modelling skills
to the next level? As usual, you come to the right place because I'm about to show you
how to do that. By the end of this class, you'll not only have a realistic 3D
wooden coffee table that you can show to your
friends or potential clients. But you'll also have the skills
and confidence to tackle more complex 3D modeling
tasks in the future. Imagine being able
to effortlessly model the objects
that are around you, like furniture, electronic gadgets,
kitchen appliances, ETC. It all starts by
knowing the tools that are most commonly
used in modelling. I'm about to show you that
this class is designed for Blender beginners who loves
learning new skills by doing. My assumption is that you've already installed blender and familiarize yourself with
the blender user interface. Throughout this
class, the goal is very simple to guide you through a complete 3D modelling project using the most commonly
used tools in Blender, the tools that you will be using most in your future
modelling tasks. We'll start with the
humble default cube and embark on an exciting
journey together, shaping and refining our
coffee table until we achieve a stunning
textured final render. Now, a little background
story about myself. Most of you who have seen
me know me for teaching web design to be more specific,
elemental web design. But in the last 1.5 years of immersed myself in the world
of Blender 3D modelling. And I've been improving and
sharpening my skills for the last 18 months by working on several 3D modeling projects. And I want to share
everything I've learned during that period with
you through this class, I want to show you how to use
those tools that I've been using most to create
what I've been creating. So if you're ready to embark
on this journey with me, if you're eager to
learn how to bring your ideas to life in a
three-dimensional space. Then join me right away
in the first lesson. I look forward to seeing
you there. See you shortly.
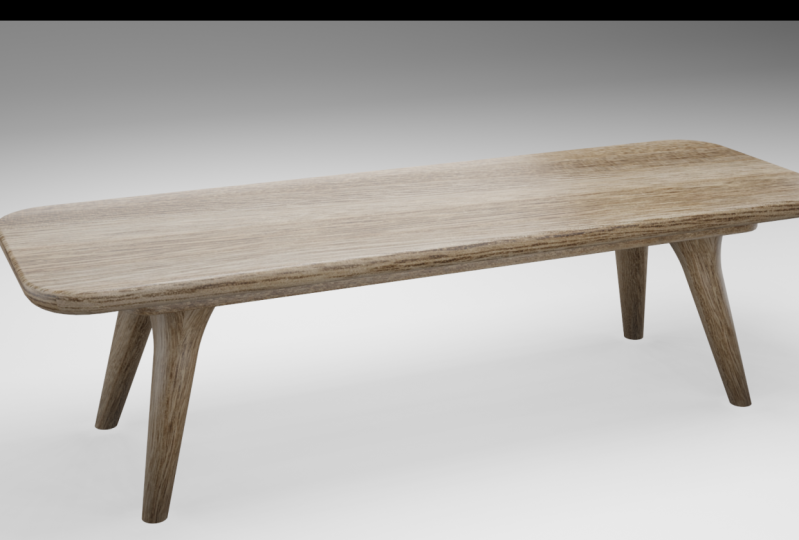
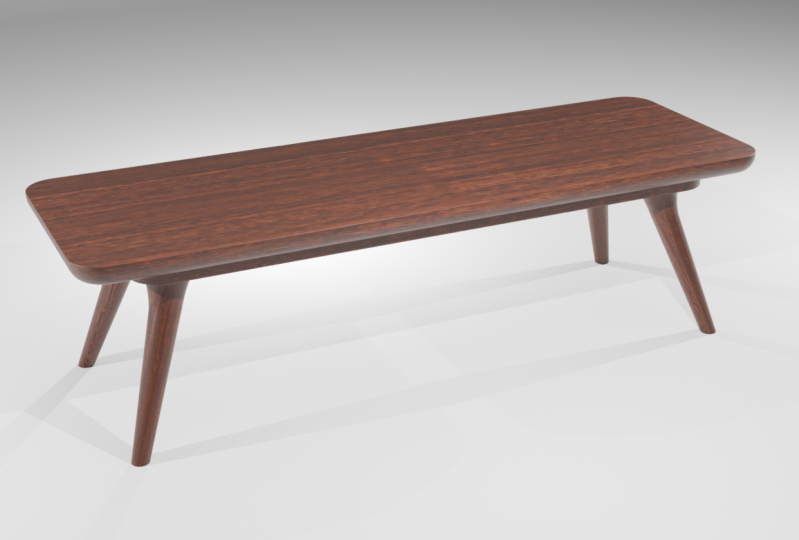
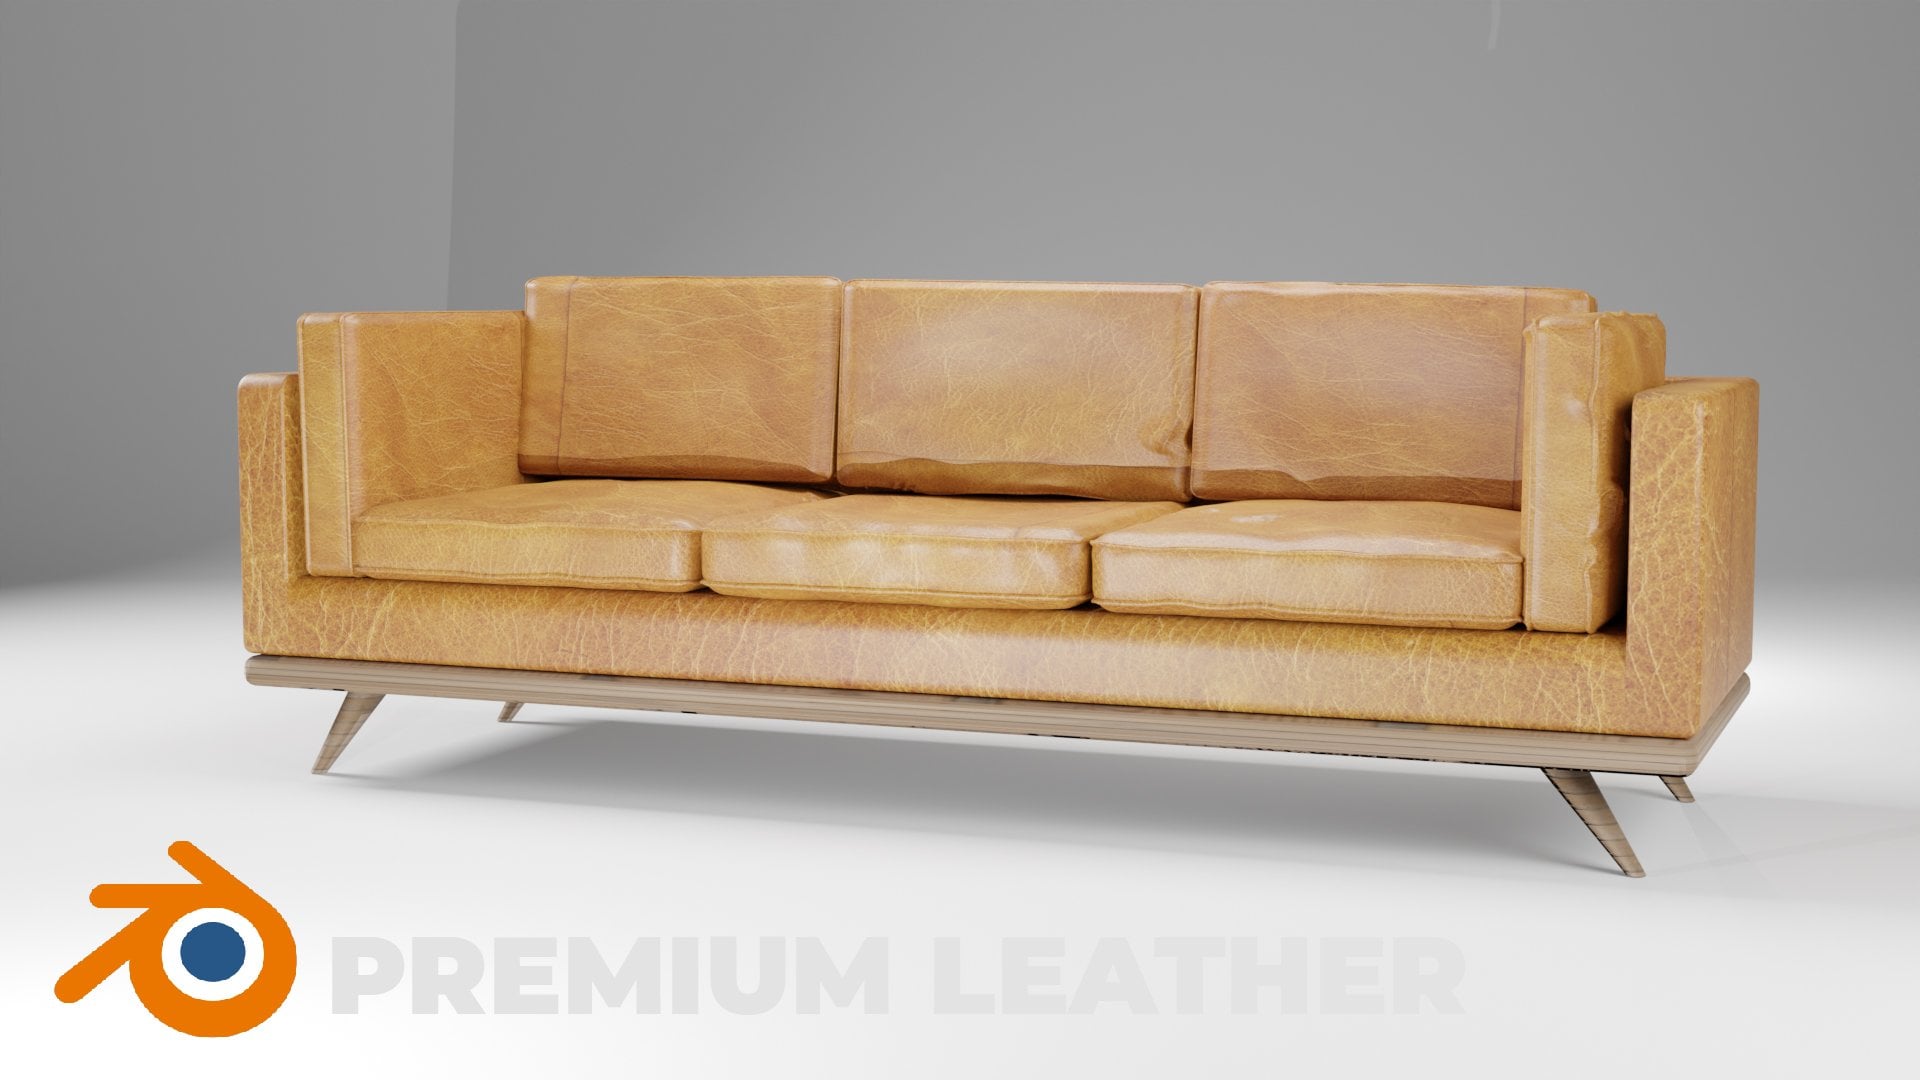
2. Project Overview: Right before we get
started with the task, here is a quick overview
of what we're working on. So this is the table. I went ahead and
downloaded these images online and I'll provide them
below this video player. So just click the projects and resources tab below
this video player. And you will download this
folder called assets. So once you download them, you'll find these three images. I just want to quickly show
you some of my renders. So here are some of the renders that have been
able to come up with. So this was, of course,
the class thumbnail. You've already seen this. So here's another one, and you'll get to
see the rest once we finish modelling
and rendering. So just wait for the big reveal to see what we
will have created. So once you've finished creating your table and rendering it, remember to go to the Projects
and Resources tab and upload your project so
you can share it with us. We want to see what you've
been able to come up with. So that was a quick overview
of what we're working on, at least now you
know what to expect. Now, without wasting
any more time. Let's jump inside. Lesson number one
3. Prepare Workspace: So here we are inside Blender, and as you can see, this is Blender 3.5. But what I'm about
to show you is a universal workflow for
modeling 3D objects in Blender. So it doesn't really matter what version of
Blender you're using. Blended 2.92, 0.83, 0.03, 0.4, they will all work. So as always, there are
a few things I like doing to prepare my workspace
before I start modelling. And the first thing I always do is when I zoom in on this, first of all, let me get rid
of the light and the camera. Then let's zoom in on
this a little bit. And going in the
shading options here, I like to enable the cavity. And that just makes
the edges more conspicuous and
honestly speaking, just more appealing to the eye. The other thing I like
doing is changing the lighting from
studio to mad cap. So when I change it,
notice what happens. So going back in here, mad cap and it adds, it adds that nice shadow on
the object as we modelling. And the next thing
we're doing is, I want to get rid of
this timeline because you're not doing any
animation right now. So I'll just hover over this
and then drag downwards. And now we only have the
modelling workspace. And finally, if I drag
this up to that point, we can change this editor
into an image editor. So of course, there are many
different types of editors. This is one editor, this is the 3D view port. And then of course, as you can see, it's
one of the options. Whenever you have
any window open, you can change it to
any editor you want. So this can be a compositor and this can be
the Graph Editor. But that's not what we want. We want to change these into an image editor and
this one as well. Because what we
want is to bring in the images we're going
to use as reference. Images will be looking
at them as we model. So I'll just look
for that folder very quickly. So here we are. Let me just bring in this. Now we'll leave it right there. And in here let
me just say Open. Going back in there once again. As you can see, there we are. So of course, I'm zoomed in. I just want us to
be able to see what we have at very close range. So now with these as
the reference images, we can now get started
with the modelling
4. Set the Dimensions: Let's get started with this
lower part right here, this base that is holding
the legs and the top. So let's start with this,
with this selected. Let me zoom out
just a little bit. This looks like it's about
one-and-a-half meters long. I could be wrong, but
I'm just eyeballing it. So let's make it 1.5 m long. Selecting this, I'll hit N on the keypad and you will notice whatever I
press appears here. I forgot to mention that. So if I press N, As you can see, I mean the
n letters on the keyboard. And now we can change the
length from here to here. We want to use this x-axis
from some way here to here. So in the x-axis we want
it to be 1.5 m long, 1.5 m, like that. And in the y-axis we
want it to be about maybe 1 " from here to here, this height 1 ". So while this is still
selected, that's the z-axis. One, I n four inch because as you can
see, it's in meters. So if you specify the units, it will convert to those units. All right, so there we go. If we zoom in on
it, as you can see, it's now very short in height. Zoom out. Alright, so now
the distance from the front to the back here, this distance can be
maybe half a meter. So with this selected, we want from the back, Front, back to front to be 0.5. So that's in the y-axis. This is the y-axis, 0.5 m. There we go. So now we have the
basic dimensions of this would
implant right here. And what I wanna do is
while it's still selected, Shift D, to duplicate it, then I'll right-click
to drop it in place. It's still in place, then G, to grab it. Now it's grabbed Z to
constrain it to the z-axis. It can only move up and down. Now, holding down Shift, I'll make sure I reduced
the distance between the two. Before we do that. Let me put it there because
we want to change the height from here to here. That is the height of this
top two, maybe 1.5 ". So the height should be 1.5 ", the z-axis, let's say 1.8 " 1.8. And now it's slightly taller
because as you can see, it's thicker than this one here.
5. Orthographic vs Perspective View: So now with that, let's change the
orthographic view. Now we're in
perspective view and we can change to orthographic view by using the numpad
on the keyboard. Number one switches to the
front, or the graphic. Number three switches
to the side, or the graphic, the
right or the graphic. And number seven switches
to the top orthographic. Now, when you press 13 or
seven, as I've explained, if you want to view
the opposite side of the current orthographic
view, hit nine. So right now we've hit seven, we're viewing the
top or the graphic. If we hit nine on the numpad, it will switch to the bottom or the graphic the opposite
of what we're viewing. So if we hit one, it will switch to the
front or the graphic. If I hit nine, it will switch to the
back or the graphics. So it's the opposite. Nine is the opposite
6. Scaling the Top Boards: So with that, let me
switch the front view. And we want to of course, make this top part longer
than the part beneath. Now let's make the
lower part shorter. So I'll just eyeball
it because you don't have a precise dimensions. So I'll just estimate. So while it's selected, hit S to reduce the
size in the x axis. So hit X to constrain
it to the x-axis, to maybe somewhere there. And of course now let's
switch to the side or the graphic S for scale. And now we're reducing
it in the y-axis. So heat, why? Let's say up to that point. There we go.
7. Apply Transforms: So the next thing we want
to do is you will notice that this corner right
here is rounded. Of course, the top
corner is also rounded, but we want to start
by rounding off the corners of this lower part. So while it's still selected, let me zoom in on it. And before we start
working on em, before we start editing
the mesh, It's always, always very important to apply any transformations
you've used. So remember we've
changed the scale, so we need to apply
this transformation. All these are transforms, location, rotation, and scale. So when you change anything
right here in the transforms, we need to apply that
while it's selected, I'll hit Control a. And now of course,
as you can see, we have the option to apply
the location rotation scale. We can apply all of
them at once if we have all of them used, if we made changes
to all of them. So now I want to apply the scale and notice what happens to
the scale here when we apply. So control a scale. And now it's been reset. That tells Blender, this
is now the scale we're going to work with
as the reference. Alright, so let's select
these and do the same. Control a, apply the scale. And you will notice
we also have, we moved it in the z-axis. So control a, I'll just
say Apply all transforms. And now all of them are
back to the default
8. Bevel the Top Boards: So now with this selected, I'll hit tab to
switch to edit mode. You can see by this, if I hit Tab once again, changes back to object mode, you cannot edit
the mesh while in object mode we can only
select the object. So if we switch to edit mode, now we can select individual vertices
and deform the mesh. You can also select the
edges and the faces. So let me switch back to, let me switch back to
edge selection mode. Select this edge. Now I can also select this edge. Then holding down Shift, select this edge, holding
down Shift, select this edge. Now, I've selected all of them. Another way to select all similar edges is by
selecting the first edge, want to select, then
hold down, Control out. And select again.
Now as you can see, I've highlighted all of them. Now with the edges on
the corners selected. Control B for bevel. And now start pulling
just slightly. And in fact, let me, let me let go of that. We want to switch it upside
down so we can see properly. So remember to view it from the top or the graphic
is seven on the numpad. Now we're looking
at it from the top. And to view the bottom, just press mind the opposite. Now we're viewing it from
the bottom and remember, the edges on the corners
are still selected. So now if I hit
Control V and pull, now we can see it from
a bird's eye view. And if I scroll my
mouse wheel upwards, I can increase the
number of segments. And I want to bring
them to eight. Let's say that point. And there we go. Now, in the real-world,
every single edge, no matter how sharp it looks, always has a tiny babble. So we also want to
give a bevel to this edge right here,
this lower edge. Because as a human being, when you're pulling the table, you don't want to have sharp edges that make
you uncomfortable. So selecting this line, I'll hold down, Shift and Alt. Select all the edges
around in this loop. Then I'll hit
Control B for bevel. And I'll give you
just a slight bevel up to there then as k. Alright, so there we go. Very nice. Let's isolate it. So we can have a look at
it individually with it selected on the
numpad hit slash. Now we've isolated it, we can only see it. Now of course, to stop
seeing these segments here, what we can do is auto
smooth, shade, auto smooth. So right-click Shade Smooth. And now it looks much better. Before you apply
shade auto smooth. Always make sure you first
applied all transforms, as I mentioned earlier, control a, apply transforms before you, right-click
Shade, Smooth. You can do some more
research to find out why. Now let's bring
back the top part. So I'll hit the slash on
the numpad once again. There we go. So now let's do the same
about these corners and make them rounded for the top. And as you can see, the edge is also slanting inwards on the lower side
while the top part is flat. So with this selected, and remember we already
applied all transforms. I want to right-click
and shade auto smooth. And then while it's
still selected, I'll hit tab to
switch to edit mode. I'll select this corner, hold down Control, and all
the others are now selected. I'll go to seven on the numpad
for top or the graphic. Then I'll hit 94, the opposite
of top, which is bottom. And now Control B to babble because we had
already used eight segments. Lastly, it's by default
at eight segments. And I think I like
it up to that point, I think I like it. Next thing I want to do is
round off this bottom area. So selecting this edge, holding down Shift and Alt, then selecting again, select
the lower area control B. For bevel. I want to hold down shift
for smaller increments. And let's drop it
somewhere there. I think I like it like that. Of course, let's bevel
the top part as well, the top edge so that
it's not too sharp. So I'll select this or
any other edge here. Hold down, Shift
Alt, selected again. Like that, control B for bevel. I want to be able
to just slightly, I'm liking it so far. Now, of course, reference
image is much more slanted. This is just me showing
you a workflow on how to put together these
different parts and how to use the common
tools that blender provides is not meant to be
a perfect table or replica. Alright, so there we go.
9. Create a Leg: So the next thing we wanna
do is create the legs. So as you might have guessed, we want to start by
adding something cylindrical shaped,
a mesh cylinder. There we go, and it's very big. Remember we resized it by default when you add
a new primitive, it's 2 m by 2 m, as you can see right here, the cube was also 2 m
by 2 m in all sides. So with this added in before
clicking anywhere outside, we have this option
here, Add Cylinder. If you click that, you
can increase the number of segments or divisions
to make it smoother. You can play around
with all of these, but I don't really want to
play around with them for now. So now clicking outside
makes that mainly disappear. Now with this selected, I want to hit S for scale. I'll resize it up
to somewhere there. Let me zoom in with
my mouse wheel. In fact, let me switch to
front view numpad one. So now we're in the
front orthographic. I want to hit G on the keyboard and just place
the leg somewhere there. Hit a on the keyboard,
select everything. G For Grab, then z
to constrain it to the z-axis and push them
upwards, up to somewhere there. Now, as you can see, this table looks like it's maybe like half a meter
tall, maybe even less. So let's make it 40 cm. Half a meter is 50 cm, so 40 cm in height. I'll select it. Z axis, 0.4 m. Alright, let's make it 0.350, 0.35. Then I'll select these two g z to constrain it to the z-axis. Hold down Shift when
we get there to move in smaller increments so we can make sure they're
very close together. Once again, to grab Z, to constrain it to the z-axis, hold down shift while
pulling it downward. That means you're moving
in small increments. Alright, That's awesome. Select this top part, G For Grab z, for z axis, and then start dragging it
while holding down shift for small increments somewhere. They're awesome. And then of course now hit
a G to grab all of them. Z to constrain them to the z-axis and then hold
down Shift while you drag. Now I think it looks
awesome right there. So Control S weight. We hadn't even saved. If we lost power, we wouldn't be able
to recover it. So let's go inside our folder. Let's save it in
here. Coffee table. Enter. So with this selected
first of all, let me zoom in. Remember, we haven't applied any of these transformations
that we changed. So while it's selected, control a, apply all transforms. Then right-click, Shade, Smooth. Just like that, looking awesome. So now let's select
this, Zoom Out. And in fact, let me switch
to perspective view. Let me zoom in a little bit. In fact, let me change to right-side view because we want to position it right here. So g, y to constrain
it to the y-axis. Hold down Shift when you
get close to the edge. And I think that's a nice spot. One for the front view. I think it's also looking
good from the front. So now this is what
we have control S. Now the leg has this shape. It's slimmed at the bottom, or rather its narrow
at the bottom. Here it has these rounded angle and we need to see
how to do that. But before we do that, why don't we add the
other four legs? And one good thing about
lender is it provides you with modifiers to make
your work easier.
10. Create More Legs With the Mirror Modifer: Now, if you don't know what
modifiers are, don't worry. We're going to use a
modifier right now. This is just me
introducing you to modifiers because you might
be using them in the future. You can Google them or Loop for YouTube videos about modifiers. But for now we're going to use a mirror modifier
because we want to mirror this Leg in this axis. So Mirror E to the other side. So we have another leg here and Mirror these
two Legs to the sides. So we have to More Legs. With this selected. I'll go to this
range right here. Modifiers Mirror the
moment I do that. Here's the modifier. And by default it's
set to axis X. So this is the x-axis. The original is on this side of the x-axis and the reflection
is on this other side. Now, if we check why, you will notice nothing
happens and that's because the origin is in-between
these two Legs. This origin, these
yellow dot here me, it's supposed to be
in the very middle. So I'll just leave that checked. And while this is
still selected, I'll say control a,
Apply all Transforms. And when I apply all Transforms, the origin will be reset to
the center of the world. So control a, all Transforms and now it's been reset to the
center of the world. And that's why now it's
reflected to this other side. If I undo that
because it was here, we couldn't see the reflection
because the origin has to be in the middle of the
object and its reflection. So if we push it to the center, now it's in the middle of
the reflection and the original Control S to save that. And now you will notice that
when I select the original, all the other three
are selected. And that's because these
are not yet meshes, these are not editable meshes. They are a representation
of a mesh. And that also means if I switch to edit mode
by hitting tab, whatever I do on this leg will happen on all its reflections. So for example, if
I switch to face selection and select
this lower face, I can make the lower
part narrow like this by hitting S for scale. And now that affects all
the other Legs as well. If I switch to the front
end or front view, as you can see, the Legs
seems to be at an angle. It's not vertical,
it's at an angle. So with the bottom
part selected, if I switch the front side, I can hit G for Grab, hold down, Shift and drag it up
to maybe that point. Click to release. I want it to be right
below the end of this. So just like that. If I zoom out, it has
affected all the other Legs. If we rotate. Now these Legs seem to
be too close together. So if I switch to three, that is side orthographic
view and zoom in, we can do the same for this
side because the lower side, because the lower face
of the leg is selected. If I hit G to grab and why to
constrain it to the y-axis? I can push it out words, maybe out to that point. There we go. So now it's
starting to take shape. I'm liking it. So
from the front, the leg is slanted. From the side.
It's also slanted. So I think we're
getting somewhere
11. Shape the Legs with Loop Cuts: So now how do we achieve
this angle right here? So let me zoom in just
slightly up to that point. Then we need to add a loop cut. So Control R. When that yellow line appears, click and then drag out
to maybe somewhere there. Let's say somewhere there. Click to let go.
Yeah, there we go. And now I want us to isolate
the leg a little bit. So if I hit on the
numpad, the slash key. So now we're left with the legs. I want to zoom in on this part. I want to switch to
Face Selection mode. Up here. Select this face, then S for scale. Let's say up to that point, then hit Slash on the numpad once again
to reveal the top part. And I think I like that. Now, as you can see, this is very sharp. Sharp angle while
this is rounded. So let's see how to do that. Zooming in on this, I would select that edge. Now we're in face election, so let me switch to
edge selection mode. Select that edge. Now I want to hold down Shift Alt to select the
entire edge like that. Now he controlled B to babble. And then I'll just pull
it until we have almost squared rectangles
all through from the start of the
loop cut to the top. So as you can see, this rectangle here is almost
the same size as the rest. That gives it that
gradual angle. Just like that. And of course you can move
the legs as you want. If I select the original tab, edit it, control it. If I hit a, I'll select
everything and I want to hit G and Y to constrain it to the y-axis and
then push it inwards. Just a little bit tough
to get out of edit mode. And our table looks cool. I mean, I like it
12. Find a Wooden Texture Online: So now the only thing
remaining is to add some nice materials, wouldn't materials like this? You can get them from
places like poly haven. Very quickly let
me switch over to Google and search
for poly haven. Here we go. Let's
go inside textures. This is one of the
best online platforms to download textures, models, and other important
assets for your 3D projects. Now, in here I'm just
going to type in wood. Wood. And here we have
several wouldn't textures. Let's see which one is better. Let me switch back to our work. So it's a little
bit dark in color. So kitchen would, let me take
kitchen would select that. And then in here, I'll just
download the two K version, but you can download
the resolutions. And of course it's a blend file, but you can choose
these other types. So I'll just hit download. And here we go.
Alright, so let me open up the downloads
folder and extract it. Let me just pick these
folder and put it inside our elements here. Then let me switch back to this. So now I'll put this
texture right inside our project folder where we have the coffee table
dot blend file, that's our blender file. So it's in there.
13. Add the Texture to the Table: I'll go back inside Blender. And what we wanna do, because now it's time
to start texturing. The model is switch to
the shading workspace. We're currently inside
the layout workspace. Let's switch to shading. And that will bring up
the tools we need to do texturing and adding
all materials. So here's our table. I want to go inside the shading options
here and change this to this indoors background
like that, HDRI. Because that's the kind of
light that will hit the table. So we want to optimize it
for such an environment. And now with that, we can start texturing the different
parts of the table. So now selecting
this, as you can see, these objects already
has a default principle, the SDF shader applied to it. If we select this other one, it also has that.
Let's see the legs. They don't have a
default shader, but you can always select a
shader by first selecting the object and then going in here and starting to shade it. So let's start with the top, with that selected and
with the principal, BSD F already added for us. I'll go ahead and hit
Shift a to bring in a texture and to be more
specific, an image texture. Let me drop it there. Then I'll connect the color to the base color of the principal, BSD f. So the next thing
we're gonna do is click Open and navigate to where we have those textures that
we've just downloaded. And of course, I've put
them in this folder. So I'll double-click
the kitchen would diffusion or
diffusion to k image. There we go. So this is
material and of course we're going to edit it to make
it look more realistic. But first of all, we can change the name
of this material here. By default it's called material. And if we click this
drop-down menu, we only have one
material, which is this. The one that was here by default with the
principle be SPF. So I'll just change it to
wooden text or texture. Enter. And now if I click
this drop-down menu, we have wooden texture. If we have many materials, they will be listed here. And now with that, you will notice this
does not look realistic. This does not look like good
14. Smart UV Project: So to customize it, we need to switch
to edit mode first. So I'll switch to edit mode. And now we're in edit mode. I'll hit a to select everything. I'll hit U to bring up the
context menu for UV mapping. And then I want to
smart UV project. Click Okay on this menu. Now, as you can see, the pattern looks
more realistic, but we can go further and
change this to a UV editor. Zoom out by scrolling down. And now I'll hit a. So what blender has done
is it has unwrapped these objects for us in order
to apply our image texture. But that's a topic on its own. And I don't want to
go deep into that, but it's something you can
always google or find out more about and I can cover
it in future classes. But essentially, if
you'll be working with textures and materials, you will need to learn about UV unwrapping and UV mapping. And when I hit U
on the keyboard, you noticed we had
several options here. We use smart UV project. Sometimes some 3D
artists use unwrap, which gives them more control of how their textures are applied. That was just a
quick by the way. So now with this change to UV editor and after heating
a to select everything here, we can now use maybe
R to rotate it, and that will change the texture on the
table in real time. So I'll just leave
it where it was. In fact, let me just rotate it slightly after maybe that point. Then you can also
hit G to grab it. And then just drag
it across to move across the texture and position it where you
want the texture. I like it like that. You can also make it smaller to make the
patterns bigger by using S. But I just wanted to go all the way to the edges like that. And now, because I'm
satisfied with this texture, you can also constrain
it to the x-axis. So by hitting X and then X, you can expand or
compress it like that. Let me leave it somewhere there. And now because I'm
satisfied with this, I'll just go ahead and hit
Tab to exit edit mode. And I liked the table so far. And now you will notice
the same texture has been applied to the lower board. And of course that's because these two had the same material, default material,
remember it was called material and we changed
it to wooden texture. These have the wooden texture. We changed from the
material texture, and this has the same
mood and texture. When we select this, you will notice this
will change because it doesn't have that material. So selecting this, we can make the same customization we
made to the stop words. So let me just select that. And then hit tab to switch to edit mode a to
select everything. U to bring up the UV mapping
map and smart UV project. Okay? And as you can see,
it's also worked. So now because this is
already the UV editor, we can go directly to editing this a to select
everything I wanted to, S and X to constrain
it to the x-axis. Then G to grab and drag it along the x up to somewhere
there. I like it. Hit tab to switch
back to object mode. And I like it like that. So now I don't like the way this pattern looks on this edge. So let me select the top
switch to edit mode. And then I want to shrink
it slightly on the x-axis. So S, x. Just like that, I think
now it looks much better
15. Add Texture to the Legs: So let me also select the legs. And now this is how to add that principle be SDF shader you, so by default, just click plus. And then here we are. We have a principle, be SDF. And notice by default it's
just called material. Now, this is the material
applied to the legs. And if we click this
drop-down menu, we have the wooden texture. And now this new
material we just created when we
hit the plus sign. So now we can change this
to maybe would texture B. Then we can go
inside poly haven. Let me just go back textures. And let me see
which one we like. Select here. I just wanted to show
you how to apply different textures
to the same artwork. So let me select plywood. This is just for illustration
purposes to k Again, let me just make it
one K through NB. Download that. So here we are. This is the plywood texture
I've just downloaded. Going back to our blender. With this selected. I'll go in here, shift a to
add a texture, image texture. Drop it there, connect
that to the base color. Open. Go inside where you just
saved the downloaded texture. Now here we are, plywood. Now there we go. If
I switch to edit mode a to select everything, you smart UV unwrap. Okay, that will change the pattern slightly and you can go ahead and
play around with it. But I just wanted to show
you that you can apply different textures and you can create as many textures
as you want here. But I prefer to have the same
wooden texture for this. Let's see how it will look. So escape. And then I just want to hit
tab to switch to object mode. And then I'll select the wooden
texture for consistency. There we go. So of course now if
I switch to edit mode and then smart
UV unwrap. Okay? Alright, we had
already unwrapped it, by the way, when we had
the plywood texture. So this is how it looks with
the new let me hit Tab. This is how it looks
with the original, consistent texture that we
used on these other parts. And there we have it. So we have a nice table. What I wanna do next is
switch back to Layout mode. And the texture is still there. It's just that now we're
not in the shading mode. That's why we see it
as solely solely view. If we switch to shading, if we switch to preview mode. Of course, as you can see, the texture is there. It's just that we need
to add some light. And that's what we'll do in the next lesson when
we're doing compositing. So I'll see you shortly.
16. Create a Backdrop: So let's go ahead
and add a backdrop. So I'll hit Shift a to
add a plane. Zoom out. And I want to make
it much bigger. So S, to scale it up, up to somewhere there. In fact, let's switch to
material preview mode for a second so we can see
it with more light. And with the plane selected, I want to hit tab to
switch to edit mode. And then of course now it's
in edge selection mode. I want to select this edge, zoom out E for Extrude, and then extruded outwards. And to constrain
it to the z-axis, I just want to hit Z like that. Select this edge
controlled B2, bevel it. And when we get to that point, scroll upwards to
increase the number of segments to make it smoother. Let's say after somewhere there. And let me zoom in, hit tab
to switch to object mode. Control a to apply the scale. In fact, Control a to
apply all transforms. Right-click, Shade Smooth. We're doing all that
to this to make it a nice backdrop
for the table. Just like this
17. Lighting and Rendering: So now what we wanna do
next is add some lighting. So shift. Let's go to light. And we want to add
an area light. There we go. While
it's still selected, I'll hit G, Z to constrain
it to the z-axis. Control S to save. And now this is the
point to switch back to the rendered mode. And I want to zoom in. And while the light
is still selected, I'll select this light
properties here. And I can increase the
power of the light here. So let's say 100. That's too much.
Let's say maybe 50. Let me zoom out. One to switch to the front view and then Shift D to
duplicate these slides. Let me put this there. Then R for rotate, rotate it like that. Shift D once again. I'll put that there, then R to rotate it. Just like that. Now we're starting to create
a nice environment, to display, a nice environment
to render our table. But we can do more. What if we changed this
slide to point spot? No point. Let's switch back to
area and then change these two points like that. Points like that. Let me make that 100. And based on 100 as
well, like that. Controlled save,
control S to save. And we also need
to add a camera in here because we're just
about to start rendering it. So shift a camera, and here's my camera. So I just wanted to
switch to top view by hitting seven on the
numpad, zoom out. And while the camera
is still selected, I'll hit G to grab it and put
it maybe somewhere there. One front view, the camera
is still selected so G, to push it upwards, up to maybe that point. Now to look through the camera, hit, hit zero on the numpad. And now we can see the
table to the camera. So we're done with these two
so we can collapse them. Let me just collapse
that like that. That we can have entire
screen to ourselves. Alright, so now let's also, let me select this
light from this angle, from this, from the
right side view. Shift D to duplicate that. And I'll put it
here in the front. Shift D, put that in the back. Switch, the front view
with one on the numpad. Here they are now g x to constrain it to the x axis and output
it in the middle. Select this other one. G, x. Also put it right there. Select the two of them, g, z. Elevate them. Now put them somewhere there. Select these two g, z, push them downwards. I want to select this g x, pushy closer the table. And the same for this. I'm just trying to illuminate the table with the different
lamps we've added. This is freestyle, So, so you don't have to do things exactly the
way I'm doing them. We're just trying to find g, z. Push this down a
little bit like that. Right now, let me
switch to camera view zero on the numpad Now you will notice if we try to rotate around with the
middle mouse button. We also get out of camera
view to stick to camera view, to arrange our view properly. We can go to View and click the lock camera to
view like that. And now that means it
will be panning and rotating and moving around
within the camera view. And that will allow us to
properly composite our table. Now let me unlock this and zoom out because I want to
select these two lights. I want to bring
this light closer, g x, g y. Bring it forward slightly. Up to that point. Zoom out. If I hit S, I can make the
light occupy a larger area. Let me make it
smaller like that. Hit Enter to hide the end menu. And I think now we
can do a test render. So of course, this is something you can
keep playing around with until you have the perfect composition
before you render. I just wanted to show you how to prepare the environment for rendering with your table textured and your
composition ready, it's time to go inside the
render engine settings. We can change these two cycles, which is more realistic. And we want to change these two GPU because
it's very heavy, so it would be too heavy
for your CPU to handle. We can also click the
noise here to remove all that noise that
you saw a second ago. And I think for the
Render Settings, I'm good to go. Next. Let's go inside
the output properties. Here we can select what format
of imagery want to export. So currently we
have it set to PNG. I think I'm good with that, so I won't change that. We can also select
where to export to. So I'll select this folder and then I'll go
inside the folder where we're working
and say accept. So that's the project folder. And now we're ready. All I need to do is now go
inside render, rendered image. So let me hit Render Image. And now we're rendering it. So depending on your
computer system, your GPU, This might take a
few minutes or maybe longer. So for me, I'll
just fast-forward this part and show you the
results in a few seconds. So see you shortly
18. Final Thoughts: I just wanted to
take a moment to say congratulations for making
it to the end of the class. That means you are a finisher. And I'm very proud of you for completing this journey with me. By now, you've gained
valuable skills and knowledge in 3D
modelling in Blender, enabling you to
confidently tackle more complex blend of projects. Before you go, I have a
quick favor to ask you. Your feedback means
everything to me. If you've enjoyed this class
and found it valuable, I would greatly appreciate it. If you could take just a
moment to leave a review, it will take you
less than a minute for your review
will not only help other students decide
if they want to join this class or if this
class is right for them. But it will also provide me with valuable insights to continue improving my classes and
creating better classes. Also, if you're
interested in expanding your skill set
beyond 3D modeling, I have another exciting classes available right
here on Skillshare. If you're looking to
master Elementor, the leading WordPress website
builder from scratch. I can show you all that. Just visit my profile
and don't forget to hit the Follow button to be notified whenever I published
a brand new class. So every time my new
class goes live, you will be notified
through e-mail. Finally, I want to express my sincere gratitude for
joining me in this class. I hope you'll take the
skills you've learned and continue to explore, create, and push the boundaries of your creativity until
the next class. Stay safe, stay creative piece. Can
 Ken Mbesa, Web Designer | 3D Artist