Transcripts
1. Intro: Welcome back to another
awesome class with me can. As always, I'm super
thrilled to have you here. And today. I'm going to guide you through the step-by-step
process of modelling a stunning 3D leather couch
from scratch using blenders, most commonly used
tools and features, whether you're using
the latest version of Blender or older versions. This workflow will apply seamlessly because
I'll be showing you blenders Universal
Modelling tips and tricks that apply
to all versions. By the end of this class, you will have a better
understanding of blenders, powerful
modelling tools. We'll be using Blender only without any third-party add-ons. Because it's always
crucial to first learn how to use the
default tools that come with any software will block out every part from
the legs to the arm, rest, the backrest,
to the cushions. And then we'll add
the leather and wood and textures to all
those different parts. Do some lighting
and composition, and finally, render
the 3D model. This class is specifically designed for Blender beginners. And to be more specific, if you've already learned how to install Blender and
what's a couple of quick tutorials and
get familiar with the modelling concepts like
extruding and beveling. And you understand the
blender user interface. This class is for you. But don't worry if you're
completely new to Blender. The lessons are designed to be easy to follow and understand. And I teach with simplicity
in mind to ensure that everyone can grasp the
concepts effortlessly. The most important
requirement is for you to have a burning desire to
learn blender modelling. And in case you're
wondering who I am. My name is Ken and
I've been using Blender for the last 1.5 years. That's about 18 months, starting towards
the end of 2021, I immersed myself in
Blender and by mid 2022, I had gained extensive knowledge
and experience with it. We then just six months, I had transformed from
a complete novice to a confident 3D artist by
practicing modelling daily. And throughout this time, I've been able to create
several 3D objects in Blender. And my goal is to share
all the knowledge that I've learned in
the past 1.5 years. I want to create
the 3D modelling classes that I wish
I had as a beginner. Courses that introduced
the most common tools and features of blender before diving into
more complex concepts that can overwhelm new cameras. So I want to make it as easy
as possible for beginners. And that's precisely how
this class is designed. Beginner friendly
approach, teaching you what you need to know
right now, not later. Rest assured you will learn more advanced concepts later on. And now that you know
a little bit about me, are you ready to
embark on this journey of modelling realistic
3D couch together? Are you excited to enhance your skills as a blender
modelling artist? If so, what are you waiting for? Joining me in this class? And I can't wait to
see you in lesson one.
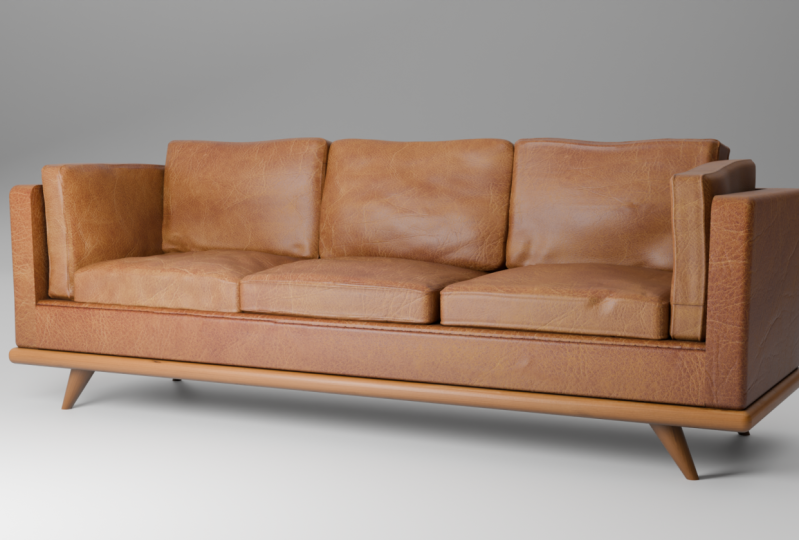
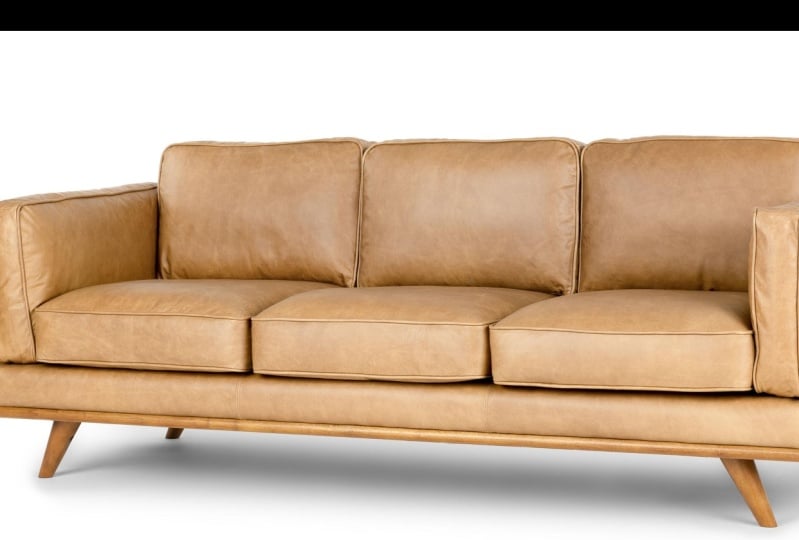
2. Class Project Overview: And as you already know, the best way to
learn a new skill is by working on a project. So as I already mentioned
throughout this class, our goal will be to model
this 3D leather couch. And to give you a
good starting point, I will provide you with
a reference images used in the class. Simply download them
from the projects and resources tab below
the video player. Once you download
the image folder, you will find a variety of couches just in case you
want to get more creative. And once you've
finished the class, share your work with
the community and get some reaction from
fellow students and me, your teacher, we would like to see what you were
able to come up with. So upload your rendered image
of their couch by clicking the projects and resources
tab below the video player. Then in there you will see
a Create Project button. And the process is
just a few clicks. So now, why don't we open
up lender and get started.
3. Preparing the Workspace: Welcome to this first lesson. So this is Blender, where inside the default screen, this is what you
see when you open up Blender for the first time. And of course, as you can see, this is blended 3.5. Just to make sure you
know precisely what I've pressed on my keyboard
or on my mouse, we have this screencast
gizmo down here. So when I press Shift, you will see sheath right here. When I right-click my mouse. Of course it shows that I'll
click my right mouse button, left mouse button, mouse wheel. Basically it shows you
everything I press on my keyboard or my mouse
Without out of the way, every time I open up Blender for the first time to
work on any project, I like setting up a few things
to help me work better. The first thing I like doing is selecting the default cube. Let me zoom in on
it and go inside the shading settings
here and a naval cavity. And what that does is it makes the edges more conspicuous. The next thing I like
doing is going back inside shading and change
this to mad cap. And that gives the objects better shading while
you're working on it. I just think it looks
much better this way. Of course, feel free to
use the studio lighting. If that's what you prefer. I'll go back to Mac app. And the other thing
is because right now we're not doing
any animation. I want to get rid of
this timeline down here. So I'll just go here to this
corner and drag downwards. And now we just have the
modelling editor right here. And the final thing I
like doing before I begin modelling is to bring
in the reference image. So I want to split
this editor like that. And in here, I want
to change this editor from the modelling
editor to image editor. Then I'll go to open. Let me navigate to where I
have these elements or right, and I'll provide these images to use so you can follow along and rebuild this couch with me because of
course that's the goal. So you should be able to find a folder containing
all these images in the projects and resources tab right
below this video player. So this is the image
I want to import. So I'll select that. Then open image and
there we have it. So I just want to
have it right there. And now we're able to look at it as we build it
right here on the right. And now we have our workspace
set up to our liking. We're ready to start modelling. And we'll begin with the base. And that's the legs and this wooden board that
the couch is resting on. So let's work on the
base in the next lesson. I'll see you shortly.
4. Modeling the Wooden Base - Set Dimensions: We're back, So now we're
ready to start modeling the legs and this wooden
board right here. So of course we
first need to know the measurements of this couch. So let me just pull in this image from my other screen
and bring it right here. And as you can
see, the length of the couch from the
left to the right is 90 " and the height is 26 ". So going back in Blender, Let's begin by zooming out. And I want to get rid of this
default lights and camera. So I'll delete that, then
select the default queue. And of course, as
you would expect, blender allows you to change
your measurement units. If you want to use imperial
or the metric system, we can do that by going inside
the same properties units. And you can change that from the metric to imperial if you want. So by default, it's
set to metric, that's kilograms,
meters, degrees. If you change it to Imperial, that will change two
pounds, feet, and inches. So now selecting this
cube and hitting N to bring up the menu. As you can see, the dimensions
here are in inches. And I want to model the
seat facing this direction. So it means the
length from here to here will be from this
side to this side. So selecting the cube with the middle mouse
button rotating. As you can see,
this is the x axis. So on the x-axis I
want to type 94 ". So that becomes 7.5 ft. So these are actually fit. I call them inches a moment ago, but they are actually fit. And going back in
here, of course, you don't know the height
of the legs or this board. So we'll just have to wing it, just make some realistic height. So I just want to assume
that's a three inch board. Let me zoom in on this. I want to assume this board is maybe two-and-a-half
to 3 " tall. So selecting this cube, scaling it vertically,
That's the z-axis. Let's make it 2 " to him. Just like that. And now from the
front to the back, Let's make it 2.5 ft. So two-and-a-half
v in the y axis, 2.5 ft, two-and-a-half feet. There, we have it. So now we have a base that
we can work with. Of course, you don't
necessarily need to use these specific dimensions. Just use what looks
realistic to you.
5. Modeling the Wooden Base - Shading Smooth: And now we need to do what
we call shading smooth. So if we right-click, we have this option
to shade smooth. But before we shade smooth, it's always very crucial, very important to
apply our transforms. Whenever you change the
location, rotation, or scale, you alter the
geometry of your object. If you apply smooth
shading to your object, before you apply any transforms, you changed here, you're going
to get some weird shading. And that's a whole
topic on its own. So to apply the scale here, while this is still selected, I'll hit Control a. And I'll just apply
all transpose. But of course, the
only transforms we've changed here is the scale. So I can simply apply scale if we had changed the
rotation as well, we have the option to apply
rotation and location. If we had changed all
three transforms, we can simply apply
all transforms. So let me just apply scale. And of course,
applying transforms is a more detailed topic that
you can learn more about. But just know that before
you shade your objects move, you need to apply
your transforms. And that means you will
have consistent shading. If you don't apply
your transforms, you might have weird
shading results. So with that out of the way, let me right-click this
and shade auto smooth. And the next thing we
wanna do is give this board these rounded
corners like that. As you can see, the corner
right here is rounded, as well as the edge here. It's not just one flat
face and a sharp corner. So while this is selected, I'll hit Tab on my keyboard. And now we're inside edit mode. If I hit Tab again, we changed back to Edit Mode. If we want to edit the
phases and the edges, we need to be in edit mode. So tab. Now we're in edit mode. And while we're in edit mode, we can switch between
Vertex Selection Mode, which is where we're
able to select the different
vertices. Edge mode. We're able to select the edges
and make changes to them. And face mode, we're able
to select the faces. What we want to do is hit a on the keyboard to
select everything. Then I'll hit
Control B for bevel. And then I'll pull
outwards just lightly, but I'll hold down Shift to
move in smaller increments. And then I'll roll
my mouse wheel up to increase the number of
subdivisions to make the edges. Just like that. Then I'll left-click to commit each tab to get out of
edit mode into object mode. And now we have this rounded
based. Let me hit Save. In fact, I hadn't saved that. So let me just create
a brand new folder. So right-click in here. New folder. Leather couch. Leather couch,
saved blender file. Now it says leather
couch up here and see.
6. Modeling the Wooden Base - The Legs: So the next thing we want
to do is create the legs. So I'll hit number one on the keyboard to rotate
it to this side. So let me just show you on the numpad on the right side of your keyboard, hit number one. Now that changes to
orthographic view. When we're viewing it this way, we're viewing it in
perspective view. When we hit one, we're now viewing
it from the front. When we hit three, we're viewing it from the side. And when we hit seven, we're viewing it from the top. And depending on
which side you're on, if you're viewing it
from the front, e.g. this side, if you
hit number nine, you will view it from the back. That is the opposite side of the current
orthographic view. Alright, so now
going back in here, if I switch to the front view, let's hit G while this is
selected G to grab it. While it's still grad, hit Z on your keyboard to
constrain it to the z-axis. And I'll drop it
somewhere there. And now we want to add the legs. So I'll hit Shift a. Then I'll add a cylinder because of course our
legs are cylindrical. Now, when you add the cylinder, immediately you drop
it before you click anywhere else you have
this option here. Add Cylinder. You can increase the
number of vertices. So let's give it something like 50 to make it much smoother. And while it's still selected, I'll hit S for scale. And scale it down
completely like that. Switch to front view by hitting
numpad one G to grab it, and then I'll put
it somewhere here. Let me zoom in with
my mouse wheel. I just want to align
it to this line. And then S for scale and z to constrain
the scaling to the z-axis. So now we're
increasing its height. Just like that. And now it's in the
middle of course. So remember we've talked
about the orthographic view. So if I hit seven, we're viewing it from the top. But if I hit nine, we will view the
opposite of top, which is the bottom,
just like that. So now we're viewing
it from the bottom. By zooming it g, I can place it somewhere there. Now if I hit one, we've placed it right
in the front side. Now to save us time, instead of creating
each leg individually or instead of creating this
leg and then duplicating it, we can use what we call
a mirror modifier. And a mirror modifier is
one among many modifiers. So if I select this leg
and go to this range here, which is the
modifier properties. Add a modifier, mirror modifier. And now of course,
as you can see, nothing has happened
and that's because we haven't applied
the transforms. So let me just get rid
of that for a second. While this is selected, I'll say control a. Apply all transforms and on
applying the transforms, one of the things that happens is the origin of this object moves from the Geometry
Center to the world center. So if I undo that, as you can see here, the origin, the yellow dot. So once again, if I
apply all transforms, as you can see, the dot
has moved to the center. Now, if I apply the
mirror modifier, as you can see now, it's mirroring this with this
as the reference points. If I hit one, this is the reference point. So now if I rotate it, right now we're mirroring
it in the x-axis. As you can see,
the right side of the x axis and the left
side of the x-axis. And now if we add the y-axis, we've also mirrored it
on the left side of the y-axis and the right
side of the y-axis. So there we go. Now, whatever change you make on this original object
will apply to the rest. So if I grab it and drag it, it will apply to the risks. So let me just drag this and while this
is still selected, I'll right-click Shade
Smooth, shade, auto smooth. And that gives it
that smooth surface. Remember we had
applied transforms. That's why we don't
have any weird shading. Now of course, the
bottom of the leg is narrower than the top. So while this is still selected, I'll hit tab to switch
to edit mode, rotate it. And while we're in face mode, select this face S for scale and make it
smaller like that. And that will apply
to the rest because these are not actual meshes, because we've not applied
the mirror modifier. We will do that later. So now that we have that, let me switch the
front side and of course the legs are slanted. So while this face
is still selected, this space switch to the front. I'll hit G to grab that face. Then x because we want to constrain it to the x-axis
and then drag it out. Words like that. And now their role slanted. Of course, because
this is mirrored. We'll go in the opposite
direction as this. And now we have our base. So right now we have
something similar to this. In the next lesson, Let's see how to
create these parts. I'll see you shortly.
7. The Leather Base - Part 1: So now we're ready to start building this leather
base right here. So without wasting any
more time, Let's go in. It seems you're still in
edit mode on this leg. So I'll just hit. In fact, I want to apply this
modifier because remember, I mentioned that these legs
are not individual geometry. The geometry we have these, this leg, these are, the three are
representation of geometry, but they are not
actual geometry. The only way to make them
geometry is to go to the modifier and apply. So now each leg becomes its
own individual geometry. And you can see that
by hitting edit. And now as you can see, we can edit each
leg individually. But now there are still not individual objects because
they are seen as one object. And that's why if we hit
Tab and select any of them, it selects all of them because
they are still one object. And the way to separate
them is to hit tab. I'll select this. And now we've
selected all of it, but if we rotate, you will notice we
have not selected the backside that
was not visible. And to overcome that, what we need to do is
enable X-Ray mode here. This is X-Ray mode. And now if we select this mesh, we've selected all sides, every single part of that mesh, including the past that are
in the back that we can see. And now I'll hit P on my
keyboard, separate selection. So now that is separated. If I hit tab and select this, now we're able to
select only that, but these three
are not separated. So if I select this
still one object. So going back in here, and because we're
already in x-ray mode, I can select that. Hit P, separate the selection. Select that hit P
separate selection. Now, if I hit Tab to
go into object mode, each of these legs is now
its own individual object. So now let's exit x-ray mode. A quick way to do that is Alt Z. To get back in is our Z, rather than going in here. Alright, so the next thing
we need to do is now, let's create a cube, because we want to start
creating this part. So control a mesh and remember
to be in object mode. If you want to add new objects, don't add new objects
while you're in edit mode because that will mean that new object is part of the current object
you are editing. So make sure you're
in object mode. Shift a to add a cube. Of course, let me drag
it upwards with g, g, z. Let's switch the front
orthographic view. And I want to hit S for scale. Then z to constrain it to the z-axis because we want
to reduce the height. And that's this area right here. So g, to drag it
z in the z-axis. Let's hold down Shift to
move it in small increments. If you don't hold down Shift, you'll be moving into fat. And let me just drop
it right there. Like that. And then I'll
hit S Once again for scale. But I want to hit X
to constrain it to the x-axis and drag all
the way to that point. In fact, let me
hit S Once again, x hold down, Shift
Up to that point. Now rotating it to view it
from this side S Once again. And this time we want to
constrain it to the y-axis. So why hold down shift
for small increments. And there we have it. So if I hit three, I think that's a good size. Hit one. Great size. Control S for save. Now while this is
still selected, we want to apply the scale
and all other transforms. Because notice of
course we've changed this location because it
grabbed and move it upwards. And we also change the scale
on the different axis. So control a, apply
old transforms. Now we're back to
their original scale. Well, that is still selected. I also want to shade smooth
associated auto smooth. The reason why we're shading
auto smooth is this was the old way of shading smooth and it involves
a few more steps. So if I hit Shade
Smooth, first of all, it has this weird appearance. And I have to go in here inside the object data and then go inside normals and auto smooth. Switch that on. So what happens
is let me undo all that. When we shade auto smooth, we don't have to go through
all those steps because blender automatically
checks this box for us. So watch this right-click, Shade, auto smooth, and
it's done the job for us. So we don't have to see that weird shading and go
in here to switch that on. There we go. Now, because we've applied all transforms and
applied auto smooth, now we're ready to go to
the next step, which is, first of all, let's switch
to edit mode like that. And what I wanna do is
create some loop cuts. So Control R and hover over any edges to determine
where your loop cut will be. If you hover over this, loop, will move in
that direction. If you hover over this, or this will be in that
direction before you click, scroll upwards to
increase the number of loop cards you can
have as many as you want, but we need just two for now. Now you can click. And before you move, hit S on your
keyboard for scale. And X to constrain
it to the x-axis. And now we can push them out. Words like that. Let's say up to there. Then click, click
again to release. And let me create another
loop cut here, just one. So when that yellow
line appears, I'll click, then drag
it out to there. If I switch to the top
with seven on the numpad. As you can see, it's
not well balanced. So in fact, this
is the right size. We pushed these
outwards too much. So I want to select that and then out shift to
select the entire loop. All round. Hold down shift to select this. And then Alt shift once again to select
that loop as well. And now we can hit S
x, push them inwards. And I think that's a good size. Now the next thing
we need to do is switch to Face Selection Mode. Then I'll select this face, that face holding down, shift, that face, that
face and that face. And with those selected, I'll hit E for extrude. E extrude, and then z to constrain it to the
z-axis, all down sheets. So pull it upwards
because we don't have the actual measurements of
this backrest and arm rest. We're just going to wing it. Because remember, it's not
shown here how tall it is, so we're just going
to wing that. But I think it looks
presentable now. At least we have that
base, that leather bass. In the next lesson, let's continue refining
it and giving it these rounded corners before we go on to create
these cushions. So I'll see you in
the next lesson.
8. The Leather Base - Part 2: Welcome back. So this is where we
reached before we move on to give this arm
rest and back rest, some rounded corners,
we need to separate this area from the rest
of the leather bass. So I want to select this
face and this face. And he'd be separate
the selection. And now that's its own object. If I hit Tab. Now that's a
separate object from this. I want to select
these and hide it by pressing H on the keyboard. Now that's hidden. So now let's select this and hit tab to switch to edit mode. Let me switch to edge mode. Select this edge, this edge, and that edge, and I
want to extrude them. So E on the keyboard and z to make sure they're
constrained to the z-axis. Now I want to hold
down Shift and pull them out to
maybe that point. They don't necessarily
need to touch the line up to that point. So hits tab to switch
to object mode. And if I hit Alt H, I will unhide the other
part that we had hidden. Now we have that nice
connection right there. And the reason we did
the extrusion on this, if I undo what you
just did very quickly. If I undo that and then switch back to object mode than
out H to unhide that. I want to select this
switch to edit mode, select this edge
Control B to bevel it. And now that it's babble, let me add some few lines
with my mouse wheel. You can add as many as you want. So let me just make them eight. Now, if I zoom in on this, you will see that we have
this space right here because this is now beveled. And when it was not beveled, it was covering that space, but now it's leveled. We have that use less
space right there. That's the reason why we
needed to extrude this. So if I switch back to
object mode, select this. First of all, let me
select this and hide it. If I select this Edit mode
and now extrude this, because these edges
are already selected. Extrude in the z-axis. Put it almost at the bottom. Switch back to object mode, alt H to unhide that other part. Now at least we don't
have that space. So that's the reason why
we did that payable. I mean, the reason
I'm explaining I need to explain some of
these tiny details because that's what makes a
difference between just following along and actually understanding why
you're doing anything. So with that out of the
way, let's select this. And now what we wanna do is have these rounded corners
on this area. So with that selected, I'm going to hit tab to
switch to edit mode. And I'll select this. And this control be like that. I mean, it's not that bevels, so Control V and I think
it's something like that. I also want to select this
edge, hold down control. When you hold down
control after selecting an edge or a face or a vertex. And select another
edge along that line. You select every other
edge in-between, out to that edge
you've selected last. So now we've selected
those edges. And I want to go on and select. Now we're up to here. If I select hold down
control and select this will select all
the edges along here. We can continue all the
way to the other end. Now we're here. So let me select that. So let me select that. So now we have all these
outer edges selected. If I hold down, if I hit Control B. For bevel, we have that
rounded corner right there. Select outside. That's a rounded corner. But we also need to have
these rounded as well. Because I bet it's
also a rounded here. So let's select this. Are we able to? So basically I've just selected this edge, hold down control. And that next let's switch
to this other side. Let me zoom out. Hold down shift to select this. And I'll hold down Control to select everything else there. And then Control B,
hold down shift. And there we have that. So now if I press Tab to
get out of that mode, I like where we
were at and don't worry about this
weird shading here, we're going to sort that out. Let's also Babel,
the lower part. So let me select that edge. Hold down Control, hold down, control, hold down, Control. Hold down control. Then let's bevel it. Holding down shift. We have a small problem right below the part
that we separated, the other part
that we separated. And that's because it's not
selected the edges in there. So let me hit Escape. Then to isolate this
entire part that we're editing on the numpad on the right side
of my keyboard, I'll hit slash, forward slash. And now that's the
only thing visible, the others are hidden. So the reason we had that small artifact right there was because this edge
was not selected. Hold down Shift, select that. Now if we come here
and hit Control B, right, it still
has that problem. Okay? Alright, so what I
can do is select this face. So let me switch to Face Selection Mode
and separated also. Know that it's separated. If I select this edge, let me switch to edge mode. Select this edge the same way we had done a
little bit earlier. You find now Beverly shouldn't
have those problems. Just like that. Now the only problem here is this inner edge
we had extruded. So let me just select
this edge all the way to the other side like that. And then G For Grab Z
to move it upwards. Now leave it somewhere there. So now if we switch
to object mode with tab, It's all rounded. On all sides. Don't worry, we'll take care
of all the weird shading on the sulfur as time goes. Alright, So on your numpad, hit forward slash once again
to bring up everything. And there we have
the cout so far. I want to select this. If we zoom in on this, I want to sort out this
problem right here.
9. Removing Geomentry Artifacts: So if I switch to edit mode
while this is selected, select, go to Face
Selection Mode. Select this, get rid of it. Delete that face. Now we're left with
this blank space. And the reason we
have that artifact was because this concentration of these vertices here
is creating that crease. So what I wanna do is zoom in on this corner right here
where we did the bevel. And I want to switch to
Vertex Selection Mode. I want to leave only one vertex or one
vertice right here, and then create a face. So I'll select this vertex, this one, this
one, and this one. Let me see. Here we
have four as well. The number doesn't
really matter. Just select all the
vertices and then the one in the middle of all
the others you selected, selected as the last one, and then hit the letter
M on your keyboard. That will bring up
the context menu. And you want to
merge two, the last, That's why we selected
the middle one as the last selection. Now, all those other vertices
will march on the last one. Now we have this phase. If I switch to edge
selection mode, select this line
and then Shift Alt. We've selected all those edges. Now if I hit F, We've created a face. If I switch to object mode, now we don't have that
artifact or that weird face. We can do the same on this side, although it's not showing. Let's just do the same. So selecting this switch
back to Edit Mode, let this face, delete the face. Let me zoom in on this switch
to Vertex Selection Mode. And just in case you're
wondering what I've pressed, I'm pressing the numbers 12.3 right below the
escape key on my keyboard, 12.31 changes to vertex mode, to edge mode, three
to face mode. So one, let me select
that, that, that, that, and then this, this, this, this, then the very last
one like that. And then M on the keyboard. Merge them at the very
last switch to edge mode. Select this hold down Alt Shift. And now you selected that, then F to fill up that space with a face
switch to object mode. And now our seat looks awesome. We're getting somewhere. So one more thing we need
to do is also give it that rounded corner inside. We'll see what to do about that. But for now, our seat is
coming along just fine. It doesn't have any
artifacts or weird shading. So that's it for this lesson. In the next lesson, let's start creating
the cushions. So I'll see you shortly.
10. Modeling a Cushion: Now it's time to
create the cushions. And of course, as you might
already have guessed, we're going to create one
cushion and then duplicate it and make those other
duplicates unique. So let's work on one cushion. So in here, of course, the first step is to add a cube. So shift a cube. There we go. While
it's still selected, G For Grab, then z
to push it upwards. Let me switch to the front
side with one on my numpad, G to push it leftwards. Just like that. Let me put it right there. Then S for scale, z, for the z-axis. And that's about right G
to put it somewhere there. And before we end, before we continue
to work on it, I want to duplicate it to
have an approximate size. So Shift D, then x to
constrain it to x. Shift D Once again, then X to constrain
it to the x-axis. We're just blocking them out to have an approximate size to work with g x. And of course, let
me press 32 more, Two switch to the
side S Then why? Let's increase the
size in the y-axis. But don't forget this one
is eating into the back, so we need to push
it forward. G. Then why to constrain it
to the y hold down shift. And the moment it
touches the back, now we know where it's reaching. So let me push it forward. We have some space here, so S, y hold down sheep
for small increments. I think they are too big. So let's make them
slightly shorter. Sy that space, I'll
just hit G to grab it. Hold down, Shift to drag it backwards until it
touches the back. I think that's a good size. So now let me select this. Delete, delete, and
let's be left with this. Saved out Control S. As always, control a, apply all transforms
that we had applied. These transforms control
a whole transforms. Now it's set. Then shade auto smooth. So let's isolate it with
the numpad slash like that. And now what I wanna do
is switch to edit mode. So tab and hit H to make
sure everything is selected. Then Control V to babble. And I want to pull it
up to somewhere there. I think that's a good size. And of course, as you can see, I have eight segments. You can increase the number of segments as much as you want, but I just want to
maintain them at eight. So just like that, save that. Now what I want to do
is switch to face mode because we want to create
this crease right here, these creases on
the top and bottom. So I want to switch to
Face Selection Mode with three right
below the escape key. And now the next thing
I want to do is switch to edge selection mode. And I want to select
this line right here. When you look at the
corner right here, you will notice we have this very slanted corner
right here does not work. We want, we want this
one that's less slanted. So I'll select that edge, then hold down shift to
select the entire line. Then I'll go down
here and do the same. This is not the one we want. We want this one. So I'll hold down shift and
then hold down Shift Alt. Select that line as well. Now we have both
of them selected. And what I want to do
is hit S for scale. Now, I'll scale
outwards like that. For now, I'll just
drag it up somewhere there and then Control
B to babble it. Just like that. So now
before we do anything else, if I hit tab, at least you see now we have
something similar to this, but we can refine it. So let's see how to do
that in the next lesson. I'll see you shortly.
11. Refining the Cushions: So here we are. We're
continuing with the cushion. So selecting it and
going in edit mode, I want to zoom in on this part. You'll notice here, of course, every cushion has these indents right here, as you can see. So let's create that indent to switch to edge
selection mode. Number two or just
click this control are, I want to create a
loop cut right here. And let me make it bigger. Let me bring it closer
to this. Just like that. Let's turn over to
the other side. Control are once again,
create that loop cut, hold down, Shift to move in small increments.
Just like that. Now, with this created, I'll change to Face
Selection Mode. So three, and I'll select
that face right there. Inside the loop cup
we've just created. Hold down control and now start selecting all round
because the reason I'm not holding down Alt
and Shift select is because that will select the faces in the
shortest distance. That's what happens when you
hold down Alt and sheep. He looks for the shortest
distance between phases or vertices or edges
on a single line. So I'll select that. Now, just select all round. Then I'll just select
that line all around. That line of faces
holding down Control. Rotate that, zoom out. I think we're almost done. Alright, so that's selected. I'll rotate to select
the lower side as well. So hold down,
Shift, select that. And then now hold down Control. Select that line to continue selecting more
faces in that line. Just like that. Just like that. And there we go. So now with the both
sides selected, what I want to do is hit S for scale and z to constraint
to the z-axis. That means, you know,
scaling it in the z-axis. Just like that. Then of course, on this other
side, it's moved upwards. Now, as you can see, we have that nice sort
of seem in there. And that's, that's what
we were aiming for. You will notice we
have these corners that look indented a little bit. I wouldn't really
worry a lot about that because we're still going to
have some sort of creases, as you can see on the edges. We have these natural
looking creases because no material, even leather has straight
edges like these. So we're going to
have these bumps, if I can call them
that these bumps. And these are going
to get lost as we add more bumps because they're
already looked like bumps. And that's something
we'll be aiming for. So with that, let me hit
save control S for save. Now you will notice that
these cushions seem to be a little more
filled up there, more sloppy on the edges. And that's something
we can achieve. But of course it's
something that will take some time and effort. And one way we can
achieve that is by going into edit mode. And let me first of
all sub-divide this. So Control R to
create a loop cut. And now I will scroll upwards
to create more loop cuts. And our goal is to have
looked cards that are almost the same size as these ones that we already
have on these corners. So as you can see, they're almost the
same size now, Control R on this edge. To create this
something similar, I think that's good enough. No, that's not enough
because this is rectangular. We want something
almost squared. So let me undo that. We want to have as close
to a square as possible. Then let's also create
loop cuts right here. Nope, let me escape
and undo that. Yeah, so now clicking outside, we have squares and the
squares will come in handy when we're creating these bumps, these
natural creases. Because we'll be
doing that using sculpt Sculpt Mode tools. So that's for a later lesson. But right now, it's
good that we have this. Now. I just want to show you quickly how we can increase
the sloppiness on this. So if no, why we're
still in edit mode? E.g. I. Select switch
to Face Selection Mode. If I select that face and
switch on proportional editing. But let me just switch it on. This option affects how much of your mesh is going
to be affected by whatever you're trying to do. So if e.g. I. Select the center of this phase, the center of this mesh. Well, this is active. If I hit G. If I hit G, I can grab all of it. But if I scroll upwards
on my mouse wheel, I can determine just
this area within the circle to be affected by
whatever I'm trying to do, which is, I've grabbed it. So if I wanted to
pull it upwards, if I scroll downwards
on my mouse wheel, that will mean the area. Or the area that will be
affected is much larger. And if I push upwards, it means that area that
will be affected by the Grab is smaller. So now pulling this upwards like that and then scrolling downwards
on my mouse wheel. We'll add a bump to my cushion. And all I need to do is
continue doing the same. Select that while
this is still on G. And I can pull it
upwards like that. Scroll forward to just affects small part
or a small area. Select this GI, bleed
upwards like that. Select these G. And I'll just go on and
do that very quickly. So for now, that's
what it looks like. Let me hit Control
S to save that. And now our cushion is
ready to be duplicated. Now, of course now, it looks a little bit
more natural than just having a super straight surface, which is not the case
in the real-world. A leather chair can not
be that super straight.
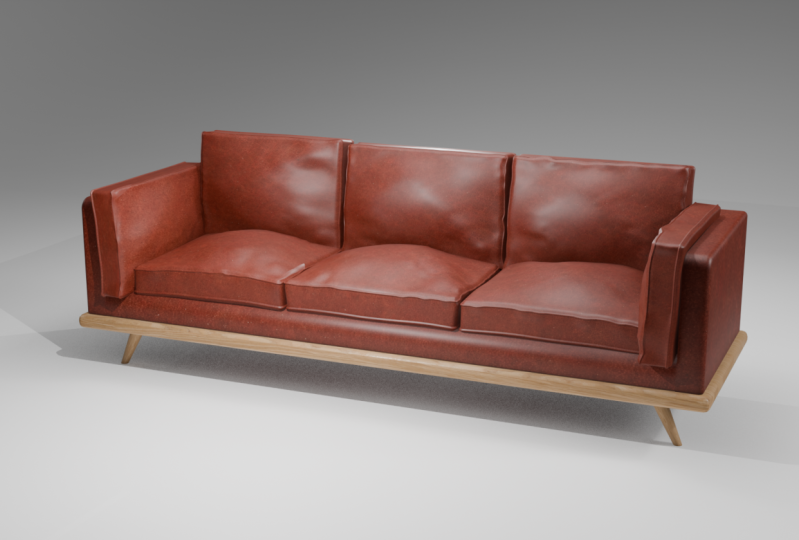
12. Create More Cushions: Alright, so now on
my keyboard numpad, I will hit slash to reveal
the rest of the models. And then now, while
this is still selected, I'll hit Shift D to duplicate then x two
constraint to the x-axis. Let me hit number
one on the numpad, switch to the front. Hit Shift D Once again
and x to constrain that. And now we have three quotients. Then I'll hold down, shift
and select the other tool. Now we can grab the
three of them escape. So what I want to do is Shift D to duplicate them once again, then escape to drop them there. Then I'll hit G to push them up, then z, push them up vertically. I'll make them shorter. S for scale. Why? For the y-axis. Now push them inwards like that. Then of course, as you can see, the origins are outside the geometry and we want
them inside the geometry. So object set
origin to geometry. And now here they are. So now we can rotate
in the x axis, R for rotate x, the x-axis, the front side, g, z, push them downwards. They are still tall. So scale S. Why twice? Right now you might be thinking, why aren't we constraining
them to the z-axis? And that's because remember
we've just rotated them. They were horizontal just
like these original cushions. And to decrease the
size from here to here, we were using y. So right now, although
they are rotated, they are still using this y to re-size from this side to this side
until we apply transforms. And that's because
these what we call global and local
orientation or axis. So if I hit S, Then why that's a global y? Then y again,
that's the local Y. So I'll scale that downwards. One. And I think that's good enough, g, z and pull them downwards. Three to move to the
side view. G to grab. Why to push them backwards. Just like that, we're almost touching the back, but not yet. So g y, after that point. And don't worry that these bumps look distorted and uniform. We're going to take
care of all that. Right now what we
want is just to arrange that cushions where
they're supposed to be. So let me select that, duplicate it with Shift D. Drop it there,
then G to grab it. Why to drag it in the y-axis? I want to draw it there, then R to rotate
it in the z-axis. Like that. In fact, let me just
say 90 degrees. 90. In case you didn't know what I just did
remember I duplicated this, so let me just grab
it and put it there. Then I'll hit R to rotate Z for the z-axis and then
94, 90 degrees. Alright, so now switching
to the front end, I'll pick G to grab it, drag it out to their
rotated slightly. And then S for scale, z for the axis, G to grab it. See, for the axis once again, let me zoom in a little bit. It's not touching yet, so g, x up to that point, and don't worry about this part. We're going to
take care of that. Let me push it backwards. G, y. Just like that. Now of course, let
me duplicate it. Shift D, escape
to drop it there. Switch to front,
front view, zooming. G x to drag it to
the other side. And then I'll rotate
with R. I just use my eyes to approximate
the rotation. Zooming and I think
it's well-positioned. Let me select this,
this, this g, z hold down shift for small increments and let's
place them on the very bottom. Now. There we go. So in fact, now the
couch is actually coming to life and it's now starting
to get more realistic. And as I mentioned, don't worry about these bumps looking uniform and distorted. We're going to take
your oval that when we start using the
sculpting mode tools. But now in the meantime, that's how to create
the cushions. I hope you enjoyed this
lesson, a long one, but at least we've finished
that in the next lesson. Let's look at how
to take care of all these bumps before we
start working on the textures. So I'll see you shortly.
13. Texturing the Cushions: Welcome back. So now we reach a point
where we can start texturing the different
objects we have in our scene. That's the leather cushions, the backrest, the arm rest, and the wooden base. So let's begin
with the cushions. Now we can do the
shading right here in this layout workspace. All we need to do is switch to material preview
or render preview. But the better way is to
switch to Shading mode. That just brings up the
tools we need to do, our texture or shading. So basically, of course, as you might already know, these different workspaces, our suited for different tasks. So now that we're doing shading, we don't need to be in
the layout workspace. It's better to be the
shading workspace. And as you can see, it's
split up the screen into different editors that we
might need wireless shading. So let me just zoom in on this. And at the moment we have
this type of lighting. I'll go inside shading and
change this to be living room. Interior shading like that. This is the one I prefer
for indoor objects. Alright, so now
with that selected, let me select this cushion. Fact. Let me zoom in. With this crucial selected. I'll say Add New. And that will bring up a
principle, be SDF shader. And navigation in
here is the same as in this viewport or
in any other viewport. Then middle mouse. The middle mouse button or the mouse wheel is
for panning around. Shift. A is for
adding new stuff. So if I want to add
an image texture, I'll hit Shift a, and then I'll go to texture, image texture, and
drop it right there. Then I'll connect the color
to the base color here. That will change to black. But what we want is to define, because this is
an image texture, we need to tell blend of
where to get the image, the image that will
provide our texture. So I'll click open. And I have these
fabric leather texture that I downloaded
from poly haven. Here we are. We have
the texture itself. We have a displacement which is almost the same
as the normal. And then the roughness. You don't need to worry so much about the complicated
naming here. Just know that the Diffuse, Diffuse goes into
the base color. I'll double-click that. And now, because it's connected
to the base color, these has changed to
that level of texture. Now looking at it,
you will notice the letter patterns look a
little bit bigger than normal. So while this is selected, if I hit tab to
switch to edit mode, then a to select everything. I can right-click
this and go to unwrap faces, Smart UV project. Click that, and then click OK to commit the default
settings here. When I click this, watch
what happens to the cushion? The pattern has
changed a little bit. And if I hit tab to
get out of edit mode, the pattern is a
little bit different. The patterns are slightly
smaller than the original, and that's what we want. So now that this
material is set N, of course, we have these other images we
left in the texture. So if I add Shift a to add
another image texture. If I drop it in
there and say Open, going back in here, we have these others. What are these? The normal or the
displacement image creates an illusion of
bumps over texture. So let me just show
you what I mean. If I double-click the normal. Now, that's what we have here. I need to connect the normal
to this normal node here. But in-between we need
to have a vector bump. So shift a vector bomb
connected to normal. And the color here
goes to the height. As you can see,
there's an illusion of bumps on this material
or this texture. And we can reduce
that with this, without this normal
connection of the texture. We wouldn't see these bumps. So it's all up to you. If you don't want
your materials to have illusions of bumps, you don't need to
add the normal. So if I so if I select
that and delete it, now as you can see, it's smooth. It doesn't seem to have bumps, only flat dark spots. So I will leave it like that. Now that this is our material, I can name it leather texture. And now if I select this and
go to this drop-down menu, I have the leather
texture material here for me. If I select it. It's applied to any
new object selected. And now of course, we
need to do something about the size of
this pattern as well. So while this is selected, hit tab a for all. And then right-click
unwrap faces. Smart UV project. Okay. And now that's slightly changed. I'm going to repeat the
same for all the cushions. So with that selected leather
texture, that's reduced. Bees. There we go. Alright, so now we're
done with the cushion. Of course, we can do much more and we will do much more
before we finished. But right now we've finished
shading the cushions. In the next lesson, let's take a look at the rest
of the parts of the couch. So I'll see you shortly.
14. Texturing the Couch: So now let's go ahead
and work on this part. So going directly
and selecting that, I also want to give it that leather texture
just like that. But now you will notice
it seems stretched. Let me go ahead
and hit the numpad forward slash to isolate that. And now I live in
isolated hit Tab. To go into edit mode a
to select everything. Right-click on Ralph
faces smart UV project. Okay, and now you've
restructured the texture. Let me get slash ones again. I'll hit Tabs exit edit mode. And I'll select this. Repeat the same process
while it's selected, give it that leather
material or leather texture. Heats Tab to go into edit
mode a to select everything, Right-click on RAB
faces, smart UV project. Okay. So there we have it saved that. And if you want to
change the direction of the pattern while
this is selected, you can change
these to UV editor. Uv editor. Zoom out. Can you, if you hit a
to select everything, I'll hit R for rotate, then I'll give it 90 degrees. 90. Now it's rotated. And I think I like
how it looks so far. So let me go ahead
and save that. Next. Let's go ahead
and work on the base, which is wooden texture. So let's see how to add
the wooden texture. I'll see you shortly.
15. Texturing the Wooden Base: All right, so we've just added this leather texture to
the arm and backrest. So I just want to hit
Tab to exit from here, to exit from edit mode. And I want to select this would, this wooden board right here. And then isolate it with
forward slash on my numpad. Isolated. And while it's still selected, what I wanna do is give
it a different material. It seems I already
have this principle, the SDF as the texture. But what I wanted to do is
add another image texture, which ****, a texture,
image texture. I'll connect that
to the base color. Let me go into wooden planks. This is the texture I want
to use for that base. So I'll select that. This is a diffusion. There we go. Let's see what
it looks like when it has some roughness, a image texture. Or you can just go to ship
a texture, image texture. Or you can just do select this and Shift D
to duplicate it. Then I'll connect this
to the roughness. And then go inside
here to select rough, mess, the roughness image. Double-click that mapping. Let's see if we should add
a vector bone right here. Not much difference,
so I'll just select that and delete it. Alright, let me just get
rid of that roughness. Let's see what it looks
like with a bump node. So sheep, a texture,
image texture. Back to the height. That to the normal
open wooden planks. Let's reduce that. Yeah, I think it should be connected to the
normal like that. And then normal right here. I think I like the way it looks. So let me unhide the rest. Of course with forward
slash or my numpad. And that's how the base looks. And then give this name. Whoops, let me just
give it the name. Now, if I select this and
apply the wood texture to it, it has these nice
wooden texture that has several layers on
the leg, which I like. So I'll select this and
give me the same material. I think it looks good. So now our couch is
almost complete. But in a natural world, don't have cushions having the same exact
repeated patterns. So we need to add some randomness to the
different elements on the couch to give it that natural randomness
of similar items. Because even right now if
you look at your couch, cushions, although they
might have the same colors, do not look identical, but these look identical
and we need to work on making them a
bit more random. So let's see how to improve
these in the next lesson. I'll see you shortly.
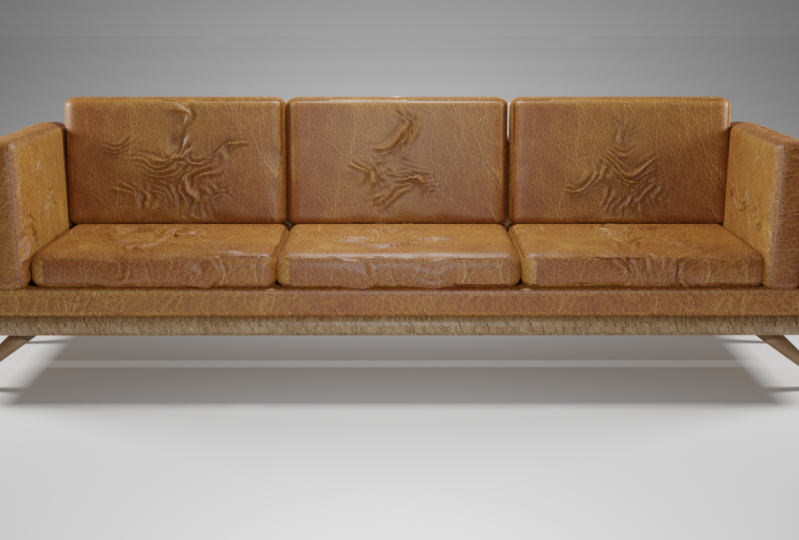
16. Texturing Final Touches: Welcome back. So now we're almost
done with the couch. We've done some texture me. But of course, remember,
as I mentioned, feel free to experiment with other textures by
going to poly haven. Poly haven textures. You can just type polyhedron and then go straight
to probably haven. This is one of the best
online resources for finding h DRIs and textures. So if you scroll downwards, you can just click
textures, browse textures. And in here they are many from
rocks to Briggs, to dirt. Whatever you want you
will find in here. So all you need to do is
type in the search box. And now it's brought leather
materials in the first slot. If you type maybe club. You can see we have
some denim fabric here, some other cool
fabrics. Let's see. Metal. So of course, just go ahead and type whatever material
you want to type. And once you find the
one you like, e.g. let's say this one. Open it and then come here and select whatever
resolution you want. I usually download to
k, then hit download. And it will start downloading. And we just go to that folder. If I open it inside, you will find the
same for images. How the diffusion or diffusion, the displacement map, the
normal and the roughness. Alright, so now
going back in here, I think I already
like what we have. So what I want to do is switch back to the layout workspace. And this is what it looks like. Let me switch to
material preview. With this, we can preview
the deeper materials we've applied on our scene. And now what we want, of course, this leather color is
different from what we have, but of course you get the gist of what we're trying to do. Now what I want to do is add some randomness on these
different cushions here. So e.g. let me
select this, then. Hit R for rotate y to
constrain it to the y-axis. And then 180 degrees, rotate 180 degrees, but
now it's slanted forward. So let me rotate
it in the x axis. But I won't make it precisely
as rotated as these. I wanted to select
that rotated slightly. Select this rotated slightly. We're holding down Shift and the areas they're touching or not creased. So let's go ahead and
add some creases. So while this is still say no, let me select this. And now I want to
switch to sculpt mode. And now, if I hit tab, we'll go into edit
mode for a second. Remember, we created
these tiny squares on the mesh of this cushion
and every other cushion. And this is where
we're going to use this topology or
these divisions, subdivisions in sculpt mode. When we have this tool now, scroll downwards and look
for this globe tool. And now with a cloth activated, we can brush our cushion mesh to add some creases in
different parts. So e.g. if I select that part, ever so slightly MH, you can increase or decrease the strength and radius
of your tool here. Or by hitting F. When you hit F, You can drag out or ink to
make it smaller or bigger, or to make it stronger
or less strong. As you can see now
it's much bigger. If I hit F and drag
inwards like that. Now this section is
slightly smaller. And now I can use that to add
some creases to the side. Just making sure they
look normal and natural. Nothing out of the ordinary. And guys remember, of course, this is the kind of
work that takes time. You can't expect to
have a perfect couch, perfect model without
spending time working on it. So you need to give
it time working it slowly until it gets
to a 0.0 satisfaction. All right, so now if I
switch back to object mode, I can select this other
solution here, the sculpt mode. And our tool is still intact. So I'll just go ahead
and do that for every other cushion
on this scene, just to give it back those natural creases
in different parts. Now fast forward this
section because it's very repetitive and we're doing the same thing we've
done on this cushion. Take a moment and work on yours. Add some creases and make it as natural
looking as possible. Here we have it. So here's what I have currently. Of course, it's not perfect, but at least we're
getting somewhere. And the most important thing
for you to understand, at least point is how to
use the Sculpt tools to add creases so that the surface is do not
look unusually straight. And that's what we've just done. So I've also gone ahead and flip some of these
cushions 180 degrees. So like originally,
this side was facing forward and
this was the backside. I just flipped it 180
degrees just to add more randomness to it
because the backside had this crease here and
the front side didn't. So with that, I think we're almost at the end of the class. Let me see. If I switch back
to object mode, select this. You need to push
it down slightly. So it's selected g, z for the z-axis. Let me put it there. Select this g z, rotate that. And g z. Push it down like that. I think now it's
starting to look like an actual leather seat. I'll hit Control S to save. And then I'll switch back
to the layout workspace. And this is what we have. And that's how to add
textures to your model. In the next lesson, Let's see how to do composition. That is preparing
the environment, the visual environment
for rendering. So we'll add some light
to the environment and a white backdrop like this before we go on
to render our couch. So I'll see you shortly.
17. Composition: Now it's time to
light up our scene. So going in here, what I wanna do is hit
Shift a to add a plane. There we go. Hit S to scale it up. Just like that. Let me zoom out. Once again. I want to grab, I want
to grab it so G and move it in the y-axis
up to that point. Next, while this
is still selected, I'll hit tab to
switch to edit mode. Select this edge. Then each extrude
Z for the z-axis. Up to that point. Select this edge once again, Control B to bevel. When it gets to that point, I'll increase the number of cuts to make it a smooth slope. Something of that sort. Hit Tab to exit from edit mode. And I want to switch
to render preview. Because now we're
adding our lights. We want to see how we would
look when we render it. So becomes dark because
we don't have light. I'll hit Shift a to add light. Let me add area
light. Here it is. While it's still selected g, z to constrain it to the z-axis. I'll put it up there
S to scale it up. And while it's still selected
under the object data, we have settings for the lights. I want to make this
maybe let's say 200 watts bright. That's okay. While it's still selected. Once again, let me go
to the front side. While it's selected,
Shift D to duplicate it. And I'll drop this one here. Then are to rotate it
in that direction. Select this shift D Once again. Now put that here, rotated. So now we have
those three lights. Shift a to add yet
another light, and I want to add a point light hits here below the seats, So G to grab it. And I want to put it
behind the scenes. So switch to side mode, switching side view, and grab it and put it
behind the seat like that. And now it's Shift D to duplicate it and put
this in the front. Like that. Now we have five lights. I want to add a camera. So sheep, a camera. Camera, he's now
here by default. So G to grab it, Z to pull it upwards. G, once again, why to
constraint to the y-axis. And now I want to
view it from the top. So I'll hit numpad seven. I want to rotate this so
our art to that point. Now to view through the camera, I'm going to hit numpad zero. Like that. Basically what we're trying
to do is composition. We're trying to set up our environment to
prepare it for rendering.
18. Lighting the Scene: And while the camera
is still selected, let me just make
sure I selected. And you can see right here, while the camera
is still selected, I'll go inside view
on the N menu. First of all, let me
zoom in slightly. Up to that point. I
wanna make sure that camera is in full view. In fact, let me get rid of these for now because
we don't need it. Just like that. Now what I wanna do is
lock camera to view. And what that does
is it allows us to navigate our scene while
viewing it through the camera. So if this is unlocked, if I zoom in or out, I will zoom in on everything
including the camera. But if this is locked, I can zoom in and out
through the camera itself. And that will enable
us to arrange everything precisely
as we want to. We can rotate, we can pan while looking at it
through the camera. Let me position
this right there. Then let me select
this background. Hit R for rotate, then z to constrain
it to the z-axis. I want to rotate it in
the z-axis like that. And I think that's a good spot. So let me hit Control S. We can now uncheck this. Now, what I wanna do is select this light and increase its intensity to
something like 600. Let's say 400, 400. Let me select the, let me, first of all collapse
this menu by hitting M. Let me select this light. 400. Me also select this other one. Maybe 300. So let these spotlights,
this point light. Let's keep it maybe
200 like that. And then this real, then be satellite
behind the scene. 100 numpad zero to switch
back to camera view. Let me just make sure we're
locked to view like that. I think these lights
are too bright, so let me reduce
that to 300 or maybe the original 200, 200. And you will notice this
plane or backdrop has these, these lines over here and that's because you've not
changed and it's smooth. So I'll select it. Control a to apply
all transforms. Then order Shade Smooth, and that will Shade
Smooth like that. Now, I want to select this base because it looks
a little too bright. And as you can see, we have some ugly-looking creases here, but that should not worry you because I think this light
is still too bright. Once again, let me
select this light. 200. Yeah, I think that's
the right spot. And we should also be 200, 200. Alright, so now let's also
make sure that the plane, alright, yeah, The city is
not floating in the air. So grab this, drag it downwards. Just trying to find
the sweet spot. Grab it y in the y, and then rotate it in the z. From the top. Select this g, y, R to rotate it like that. Alright, so now let
me uncheck this box. So what we want to do now
that we have all our lives, our backdrop, and our camera. We want to be able
to rotate around the couch while maintaining
the lighting setup. So what we want to
do is add shift. We need to add an empty, and I'll go ahead
and select a sphere. There's the Mt. Once you
select all the lights, the backdrop in the camera, and then parent
them to the empty. So if I select this
light and this light, all the lights, and then the
backdrop and the camera. And then select the empty as the last item while
holding down Shift. Hit Control P. That will bring up the context
menu for parenting. And we want to
parent everything to the objects that we selected
last and that's the empty. So now, if I select the Mt, rotated in the z-axis, everything will rotate
together with it. So if we're looking at
everything through the cameras, so let me hit numpad zero. Let me zoom in. If we rotate and constrain
it to the c-axis, will be moving around
the seat while maintaining the lighting
setup we created. And I've just noticed something. This edge right
here is very hard. We forgot to make it
slightly rounded. So while this is selected, I'll hit Edit tab to edit mode. Then I'll select that. That hold down control. In fact, let me hit a
to select all of it. Then numpad forward
slash, switch to this. And then I want to select
this edge. Select that. And then I'll hit Control B. For bevel. My pink that's rounded enough. Yeah, right now is
slightly rounded. Alright, so let me hit
Control S. Let's save that. And now that the
scene is well lit, we have a backdrop and a camera. We can render out a sample
and see how it looks. So let's talk about rendering
in the next lesson. I'll see you shortly.
19. 19 Rendering the Model: So now that we have everything set up and ready for rendering. First of all, let's go
inside the random properties and make sure we select the right render
engine we want to use. I like using cycles, so I'll select cycles. Cycles is much more realistic and I want to use
my GPU to compute. And basically that's all. The next thing I want
to select maybe is, let's go inside the
output properties. This is where we can
choose which type of image format we
want to export in. I want to do P and G. And I will leave it
exactly the way it is. No need to make
any changes here, but I can also select where
I want to render it to. So let me go to
the leather couch. Accept. And now we're
going to render to that specific location
in my machine. So with that done, I'll go inside Render. Render Image. Blender is doing its
magic. So here we are. This is what I've been
able to render so far, but as you can see,
it's still rendering. That means this texture
is quite complex. That's what's causing
it to render so slowly. But of course, just give it some time to finish rendering. Now there's one thing
I've noticed as well. Right here on this edge, we also got to make
it rounded like here. So I want to go back in
here and select this. Let's isolate it. I'll hit Tab to go
into edit mode. Then I'll select this edge
Control B. Right now. He doesn't have an
edge to bevel two. So first of all, heat E to extrude
than y because we're heading in the y-direction up to maybe somewhere in there, then select this edge
Control V up to that point. Alright, so now if we unhide everything and zoom in on it, let me just go inside here. Under Render
properties, the noise. Let's remove those particles. I can see the bevel is not
yet aligned with this. So going back, so I'll just undo the bevel Control Z now until we are left
with just one edge. Control V once again. Now I think it's beveled enough. The noise that tab to
switch to object mode. Select this white
plane appearing from the bottom and delete that. All right, so there we go. Control S to save. Now let me select the empty and rotate it in busy. Maybe like that. Save that. And then we can render
these ones again. Rendered image. Now, of course has
mentioned this is so this is what has
been rendered so far. So here we go. And basically that's how
to render your 3D models. Depending on the type of
textures you add it, the model. It might take some time. Someone take long, something
will take a few seconds. Just continue playing
around with the lighting. Change the values of
the different lights we have in the scene to
balance them out. So select a light
than going here. Maybe let's make this 80 watts. Reduce the lighting
just a little bit. By playing around
with the lighting, you'll be able to create a more realistic set up
before you render it. So another thing we
can do is let me select this and go
inside the materials. In fact, let me
switch to shading. Now. Of course, now with
that selected, wait, let me press Slash
to bring up everything. Now with these cushions elected, of course the
material is leather. I want to come in here and increase the roughness
just a little bit. Let me switch to that mode. I want to make it less
shiny because it looks, the less rough it is. The more shiny it is, the more reflective it is. So I want it to be less shiny. So maybe somewhere there. And now I'm satisfied
with that surface. I didn't want it to be too
reflective of the light. So yeah, go ahead and continue playing around with the
lighting. Increase. Some of the values, reduce some of the values. Move the lights to
different locations in the scene and see which combination works
best for your render. So I'm just gonna go ahead
and switch back to Layout. Switch back to rendered mode. Zero on the numpad to
view through the camera. And for the n menu. And I just want to go
inside view and lock these ones again so I can
orbits around the camera. I think I'm ready to render
this and see the results. We have an I just
go ahead and do a few more renders and share them as we conclude this lesson. So I'll see you in
the next lesson.
20. Final Thoughts: That wraps up our
awesome class on modelling a realistic
leather couch in Blender. I sincerely hope you had a fantastic time and experience learning
throughout the class. But guess what? This is just the beginning. I have more exciting blender modelling classes
in the pipeline. So stay tuned for upcoming
classes where we'll explore even more fascinating
aspects or 3D modelling. And to get notified when
I publish a new class, simply go to my
profile and follow me. Make sure you follow me. But that's not all. In addition to
blend a modelling, I also offer classes in
Elementor web design. So if you're interested
in mastering the art of designing standing
websites using Elementor, I encourage you to
visit my profile and explore the range of
classes available to you. You'll find a
wealth of knowledge and practical guidance to elevate your web design
skills to the next level. Remember, learning is
a lifelong journey, and I'm here to support
you every step of the way. If you found this
class valuable and it helped to enhance your
blender modelling skills, please take a moment
to leave a review. Your review will not only assist other
prospective students in understanding what to expect when they
enroll in this class. But it will also
motivate me to keep producing more engaging and informative courses
like this one. So share your
thoughts, suggestions, and experiences by clicking the reviews tab under
this video player. And it will take you less
than a minute to get it done. Thank you once again for
being part of this class. Keep honing your skills and I look forward to seeing you in the next class until next
time. My name is Ken. Peace. Be creating.
 Ken Mbesa, Web Designer | 3D Artist