Transcripts
1. Introduction: In this Blender tutorial, I'm going to show you step
by step how to create, render an animation that will bring us back 50 years in time. But I also recorded a shorter 1 hour tutorial
where we create this scene. As a bonus in this
master tutorial, we will create two scenes
with a street and car. I decided to record the creation
of two scenes because I used two slightly different
methods in the first scene. We don't stick to much of
the reference image and I mostly use assets from
before or from the Internet. In this way, we can quickly and easy reach
the final result, in this case in
only about 1 hour. In the second part
of the tutorial, which is completely
step by step, we stick to the reference
photo that we will bring to the life and
turn into animation. I will show you how to use the photo not only
as a reference, but also how to use some of the texture to speed
up the process, get closer to the reference, and get a realistic
result faster and easier. In addition to the tutorial, I will share with you
the final Brand files, as well as two asset packs that we will use
in the tutorial.
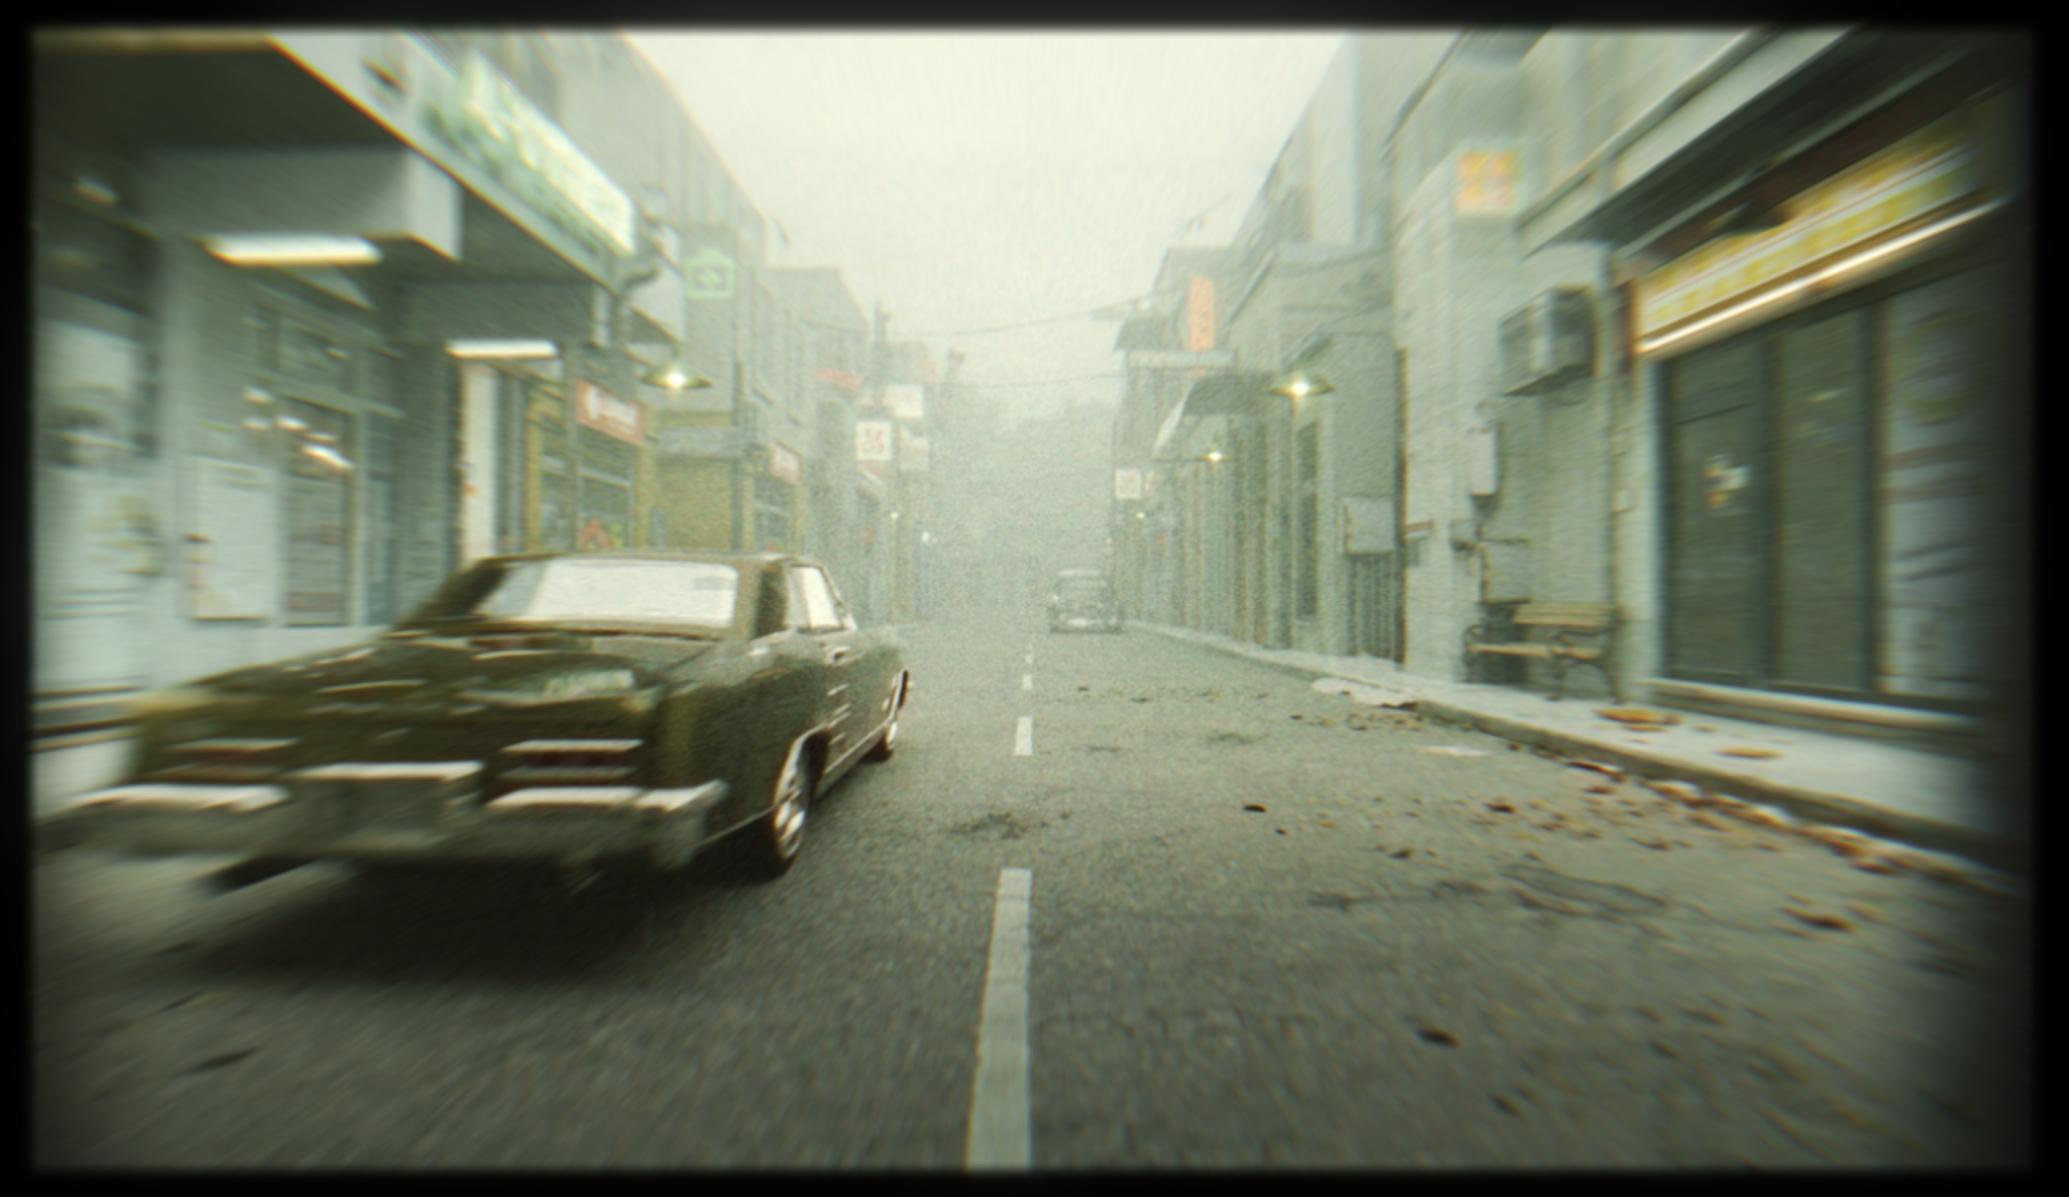
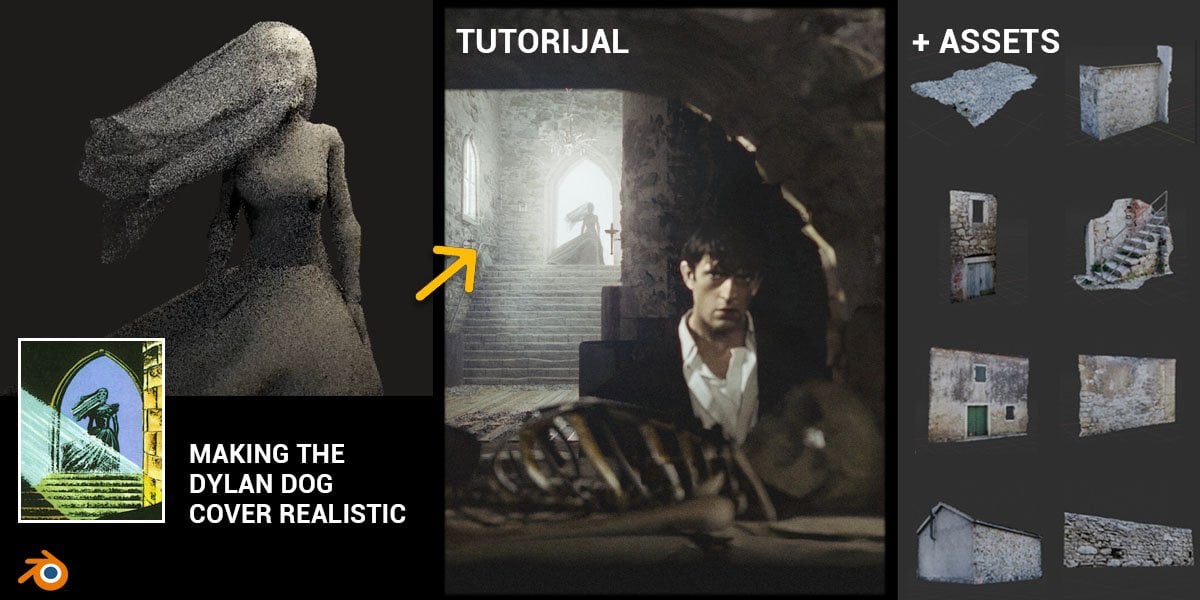
2. Creating scene one part 1: In this tutorial, we will
try to recreate this scene. This scene is a screenshot
from film or fake. Here is a link where
you can find this film. Our animation starts from, I think 59 minutes. Here is animation. We will also do at the
end of this tutorial, but I also cut one
part of this window. We will recreate and
I will share this in resources folder
with you want to. This is a result
I get last time. We can compare our reference and the final result
I get last time. And in this tutorial we will try get something similar like this. Here you can see that we have a lot of a similar
render and on this reference, but this scene is
completely CGI, there is no background image
and if we select camera, see that there is no any
background image here. You can see all these buildings are real, these buildings here. But you can see how this
look in material preview. We have a lot of stretch
texture here, also here. But when we go to camera view, everything works pretty good. But before we start with this step by step
tutorial how to do this scene with image
projection method. Four weeks ago I made this and here I use a
little different technique. I think we can maybe start with something
similar like this. We can recreate this scene with technique I usually
use before this tutorial. Maybe we can spend just
five or 10 minutes recreating something
similar like this. So you can see how this
process hook we are now in Blender and we will recreate this using
all technique, but you can skip this
part of tutorial. I think this will as maybe five or 10 minutes usually. When I want to recreate
something like this, I want to put this
reference image in Blender so I can always take a look on reference image. We can just pleat
this window with the right click and we can
open here image editor. Now we can open this image, we can keep this image in
this part of tutorial. I will not explain every
step I do because I will do this as fast can. And this is not point
of this part tutorial. It is point just to understand
how this process of creating this similar scene with street buildings
and car look. Usually how I do this before, I usually like
split this window, we can just move on
left, left side. I will press numpt zero so we
can switch to camera view. I will also go here
to render preview. And let's just set
the two cycles and maybe samples on both
on port and render. Let's set this to GPU and these buildings can be
this motel or hotel here. I think this is about 15 meters. And I will press, and I
will type here maybe 15. We can now move this here. I will also bring
this on x axis, on zero, so we can
type here 7.5. Maybe scale this on
y axis, y, okay? Now I want to set camera, and I will set this to 90
degrees and maybe here zero. We can now move
on Y axis with Y. In this process, I just
want blocking the seam. Just place basic shapes
I will do with shift. Let's start playing. This will be our
street and S, Y. Maybe we can scale
this on y axis here. Let's now place this
building in distance. But I want to change
length of this. Camera. Now it's 50 and let's
bring this to maybe 35. Now we have this point lane, but I will delete this. Let's now load the
HDR for lighting. We have just this color, but I will HDRI. We can load HDRI here. You can use any HDRI
this process you like. But I will try
this urban street. I will now also create
this buildings here and this on right side,
I will go with ship. Let's scale this down. But here and Shi the wine
maybe make one smaller. Now I will maybe duplicate this to another
side, so shi the x. Let's place few buildings here. Let's also try this road here. I will go to Edit
mode and I will press control R
and add cut here. And maybe with control
B we can this here. And I will go with X
to move about here. And now control B to add
one small level and now we can just move this down
with GZ and withholding sheet. This will be our street, our asphalt part later. Let's try line up a little. This camera, I will select camera and
I will set this to maybe 1 meter on the axis. I want this camera pretty low. And let's now just bring
all the closer to camera. Now when we know
where is our street, where we want to
put our buildings, we can start importing
assets here. And I will now jump to
asset browser for this, mostly my assets and I will
also share this with you. You can also find instruction how to add this in acid browser, but you can also use
this without acid. Okay, Now we can just
pick some acts and we can place this in start
covering our scene. I will place this shop
here and let's now go. Okay, I need to
send this origin to geometry minus N to rotate
this in this direction. I also see this
missing texture here. We can easy find
this If you go to Material Preview and
Material Properties. And here under
Preview, you can just select few of the materials. When you see this
purple material, just remove this material
and this will fix problem. Okay, let's now continue
with another assets here. Maybe we can use this apotechre, but I will use most of this. Building order is not important, there's T. Let's now
place this here. Let's also scale this. Now, just quickly delete this with the
control lumped part, plus we can spot selection. And now I will delete
this part here. Okay, I will place
this one here. Z mighty again, scale a little. Let's place this one here. Maybe we can go with all DY. Duplicate this maybe to
another side, Z 180. Maybe place one here. I also made this block
of shops and stores. And you can see how this look, we can cover more area with this Z -90 Let's press
S to scale this. I forget, but I have video on how I made
this shops asset pack. This video is only about
2 minutes and you can Stand better. How I made the shops and how I
get these assets. Basically, this is just
image projection method. I take photos of these
buildings on street. Then I import images as plan or just
project this on cube. Following images, I
start adding loop cuts and adding details on
the threat models. I also use concrete texture for roughness bump to
get more details. All of these shops
also have interior. I also model low poly
interior with lights. Okay, now when you understand
how I get these assets, we can continue with tutorial. So I will continue with
just blocking this scene. Maybe we can copy this block
of buildings with all y. Maybe we can just place
this at the end of the street net, okay? And you can see that I cannot
see this building here, only when I move this on y axis. And I think we need to fix this. In camera settings,
we have this clip, and I will just increase
this to 1,000 Okay, now we can place this, so here, now we can select
one of these buildings. We can also use this texture
to cover this part here. Maybe I can try this
texture here for this one. Okay, just to cover
the white parts. But what we can do, we can also duplicate, maybe this building with shift the Z if we want to
make this bigger. And we can just move this here, and this will also look fine.
3. Creating scene one part 2: Now we can add some
ground texture here. And I will jump to
my asset browser. Here I have Quick
Bridge Megaskins folder and this is from
Quicksell Bridge. When you have this, if you
sign with Epic Games account, you can download all
these assets for free. And there is also
ad for blender. Sometimes when I try for this
blender just doesn't work. I spend some time and I just download all these
assets I think I need. I just put this in my Act browser and now
it's much quicker. I just move this here and
this area works, okay? I will now jump this to
surface and asphalt. And let's try find
asphalt I like, okay? We can use something rough
here and I will now place this here because this
object is not material. I will just copy
this material here and bring to this asphalt. Now I will go to, let's
just check scale. So control a apply scale and UQ projection and now we can
reproject this in UV editor. We can back later to materials. Let's now for some cars here. For this last time I
used transportation Don, and this is paid Don. Later when we start
building this scene, I will also suggest 33 car
models and let's now go to maybe this classic folder and I will place origin here. And I will import this
object but maybe this car but low pod Z 180. Okay. I think because we
scale the buildings a lot, we also need maybe scale
this car a little. And I will place one car here. And maybe we can add one in
background. Maybe this one. Okay. With this set on, you can also simply
change material. Maybe this bluish color
and just apply or maybe this gray I think I
will just building. I will holding control. And maybe this little on
left and also the building. This one on left and
this one on right. Let's now make first render. So I will press F 11 and
slot one I will press F 12. We have here 22
Samples, which is okay. This is what we have for now. I like to use this slot, we can a compare before. When I make one render, I always go to
slot another slot. And when we render this J
compare before and after. Let's now make this side walk
through all this street. We can reuse this one
from this model here. I will go with GC.
Let's bring this down. Now what we can do, let's numpy, bring this here now. I will just this face, this one and control Ump. I will select all this part. Okay, I have a problem here. I will do this now. Manually shift and control. Shift and control
select all this. Now I can go with Shy. I can also separate
and separate by selection and now set
origin to geometry. We can now just go with shi
y and cover all this area. And select all this, and shi x z 180. Let's also place this
to another side. Before and after. Let's try with another
camera setting. This is Focalin 35, but what if we go with White Focalin with
about maybe 18 or 20? Let's try with 18. And let's now move
camera closer to car. Okay, I think this can
look more interested, and I think I will
keep this for now. Now I can continue with the asset browser and next asset I will
share with you is, here is my assets and new sides. We can just place some
of these neon signs in our scene and let's place
this apoteteon sign. This is before and after and you can see what
look we get with this white camera with
all these neon signs. I also from Pixel
Bridge download all these decals and
we can view of this. You can see this asphalt texture and I will place one here. Now in Viewport, the same
color, this asphalt. I will go to Material Properties
and I under Viewport, just select another color and now I can see
that this intersect. I will go with GC
and bring this here. You can already
see how this look, but I see that this
is too intense. I will go to Shape the editor. If in alpha go to alpha,
if we go with color. If we just bring this white
color means transparency. If we bring this transparency
down, we can fade this. Okay, I think now this
look pretty good. I will go with all D
and maybe rotate this. I also have this white
road line decal. We can simply add
this line here, L Nike a little to
avoid intersection. And let's scale this a little. Now we have this line here, Y. With old Y I can place one here. And now with shift R I can
repeat Last step, okay. Also this dirt and leaves, but you can find a lot
of these decals on pixel bridge or
anywhere on Internet. All of these are just overlays, but I also have here some dirt decorations,
pretty low poly. And I will also
play now with this. Okay, this one are
so big and I will place a few in these corners before and after. Let's now add field. Now everything is in focus
and let's go to so five. I will now select camera. And I will select
here enable field. And select this car and
put this car in focus. I will go with very
low, this stop value. Lower we go, it will
be less area in focus. I will go maybe to 0.8 this
is before and this is after. And you can see that we had
the blow in background, but this car stays in place. And we know that because we
cannot see any motion blower and any object which is
moving motion blower. And we can now make this. I will go to slot six to make motion blower,
we need motion. I will now open here
with horizontal split, I the middle mouse button. We can move this
navigation here. And I will open here Timeline. Now on frame one, I will place car here,
press Set Location. And now I will go to about
1 second or two later. And I will place this car here. Press Cert Location. And now our car is moving. If you press, we can change
the interpolation to linear. Now we avoid this start, slow start, and slow end. We have linear interpolation
will stop to about frame 26. And now we can enable
motion blower. Just click here and now
with this slide that you can basically choose how
much you want Motion blur. Let's make a test render. This is before and
this is after. You can see how much
this motion blur out in our scene before and after. I also animate this card to
get some motion blower here. Maybe this is a
little too intense, so we can always bring
this, maybe 2.5.
4. Creating scene one part 3: Now I will just continue
with decoration. So from an Hubert I have
a lot of the nice thing, so we can bring
some antennas here and I will also use
this agreeable stuff. So I can bring this here
and now I can rotate this maybe in this direction. I will just start placing this where I think
this can look good. Okay, I can change
lupole color here. In material properties, it will be easier to see
where is this object and place this on this roof so it will look like a
fence or some structure. Maybe scale the axis little and maybe a
little background. I also have this street boxes. Let's place one
where is this bench? Okay. Maybe one here. X minus eight has to scale
and maybe Z 180. No. Okay. I think this
is correct side. And let's go with all
Y made one small here. Let's also place this model here Y and try line up this. One thing I like to do here, I'm not sure how
big textures are, I download from Internet. I like to lender settings and under simplify
I will enable the simplify. Now I will set
texture limit maybe to two K, okay? Each texture which is bigger
than the dimensions blender will just reduced to
maximum of this size. And here is Newport. We can just bring this
in Newport to maybe 512. We don't need the
high resolution here, but this is rendered. When we press 12, we will get this high
resolution texture. I will also bring few
street lamps here, maybe this one Y 90, L, Y -90 Let's place
this here and 90, Okay, as to scale a little. Now I can go with y p. Place one here. And
if I go with shift R, okay, now I can go
with Shift, I think. Select Linked Object
Data or Shift Material. Blender will select all objects
with the same material. And now I can go with all X, move this to another side, and Z 108, we have this Ms also on
another side before and after. We can also maybe add some here. I usually do this
with Curve object, so I will press Origin here
Curve and Ieri num seven, edit mode, or you can just
press temp to go to edit mode. Now I will press A to select all and Y z to line up this y axis. We can now go with X
to scale this x axis. Now I will select we, just two vertices
here. I will press Select all and subdivide. Now we have one here. And now we can press
to scale this. But this one I want to scale
down to scale this down. And maybe L Y also. This one. Scale this down,
Y now cable here, but this is not
visible in render. This is just line and
we need add depth here in properties we can find
geometry level and add here. I will hold shift and
move this on right, I think this is 2.5 centimeters. This is maybe too much, maybe just 1 centimeter. We can also quickly
add create material. I will just call this black and just add
black color here. Let's see how this
looking render. Maybe we can add more depth because this is not so visible. I will also bring a resolution down because this is not
visible in background. Then we don't too
much resolution here. Let's now go hid Y and
just make some variation. We can go again iy both
selected and maybe now we can add some
haze or volume metric. And for this finite
cube ship scale. And just be sure to cover whole scene to
scale this on axis. Now I will go with control, A apply scale with the Full Stop key on
your lumped keyboard. You can, when you press
and hold mouse here, Blender will navigate
to this object. Now we know that this
is volumetric tubes, I will call rename this to. Now we can disable this in
port render still here. But better option is also to set this under up display as bounds. No texture bounds, we can
still see this our viewport. But this bounds, I will
now go to share the editor and create new material
for this volume metrics. Now I will lie this
principle, BDF volume. Let's plug this to surface. Volume will bring
density to 0.00 Maybe we can also add
this anatrocophy, our case will react a little
more with these lights here. I think this is a
little too much. Maybe 0.04 Let's see before and this is before and you can
see a lot of haze here. Maybe it's a little too much. But I will still keep this. I think I will remove
these two poles there, maybe too close to camera. I will just on this corner here. One thing we can do here, when we have very low field, we can just put some object
very close to camera. This will just add some shadows. Use this as vignetting object. I will duplicate this
street lamp with hold y and I will just
try place this very close to camera to
see how this look. Okay, we now have this
vignetting object, and this will add a lot
of depth in our scene with x and the holding shift we can move this precisely so x. Shift. I will also try
add one on the left side, all the X and maybe
place this here. You can see what we get. And I think this is okay, but this one is too intense. Maybe we can just
bring this later, Y. But I will for now
go to Posit tab. Let's see what we can do here. Enable backdrop and
used with control and shifting this viewer node. We can zoom this
out and zoom in. Let's see what we can do here. We can do what we
usually use here. Shift lens flare,
lens distortion. And we can set this to fit. And if you want to make
this even more wide angle, you can he distortion. If you pay 0.2 you
can see what we get. We get this lens. But I will go maybe 0.02 selecting the snow,
then pressing them. We can and out. But I think I will
keep this on zero and I will just add dispersion. This will add
chromatic aberration. If we go with crazy value like 0.1 we get a lot of this
chromatic aberration. But I will go with 0.03 here m. We can see
before and out this is, I think, still too much. Next we can add some
globe glare for glare. Now we add the streaks. I will try Pawn and
I will duplicate with glare and I will
say this tool globe. Okay, now we add this
globe, this is after. If you now press 11, this is render result and
nothing is plunder result. This composite node
basically render result. But if we search
here for viewer, this is after, this is before. But when we are happy, we can also plug this
here if you want. You can also add some color
correction, color balance. I will plug also the two. Now we can add color
to highlights, shadows and mid tones. This midtones, we can add
some greenish effect here. I think this is shadows. We add some blue. This
maybe highlights. We can add this
orange to highlights, blue tone to shadows. This is before and after, but you can play with
this color correction. I will put for now like this. Okay, this is what
we get from lender. And I usually jump a
little to after effects to add some grain and
color correction and maybe some effects. For after effects, I need
also maybe med pass. I will now go here. You can preview is pass here. If you go to Material Preview, now we can click here and
we can combined it said to first we need is pass here. I will enable this is
pass for composite or. And now we can go to World Properties and you
can find this is pass here. We have said this from zero. We start from zero to maybe 40 meters because we
have very long street here. Okay, this is about 35 meters. This value is, I think, better than default values. Now I will press again
12 to render this. Now when I finish render, I can go to Composite
Or and I can press 11. And I will now just
save this file as J peg on my computer. Okay, I rendered this before, so I will just
overwrite this also. I will save this
missed pass here. Okay? I think we need
the noise for this, but I will just keep for now. Let's see if we go
with the noise. Okay, This work I
think I need to enable this in the noise in data, but this still works. I will go with 11 and I will
save this is pass the peg. Let's now back this
combined here. One thing I do I
like to do usually is put something
to block lights, which comes from this area
because you can see that. Let's back to render result. Usually for composition reason, I won't make this in foreground more darker
than in background. I can get this very easy
if I just had a big plane here and if I go with X to
rotate this about here, I will also select
this black color here. Without this black plan, you can see that render here on right is more pleasant
to watch than this one, and I will now
just receive this.
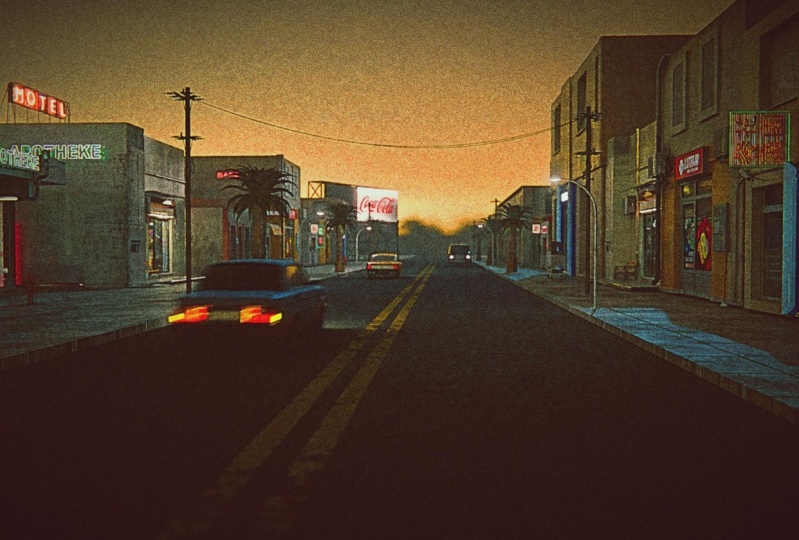
5. Creating scene one part 4: Hello, It's another day here. And I play with this render
without recording a little. And this is my final result. I play a little with
lighting and I add this fog. And this is with
color correction. And this one with fog is a
little better than this one. I will show you now
how I get this. This is a result from blender
without post processing. And you can see how this look. Basically, I just change this volumetric cube here with principal volume and
with the settings here. Big part of this
create point lamp here with very strong power,
with 1.5 million. When this light go through
this volumetric cube, create this fog effect here. I also add little emission here. We have here with no fog fog because I was
not sure which I like more. I mix this missed path here. Basically I put this surrender
with fog in foreground. Background here is black color. I tell after effects to put
this surrender with fold. Also get this ambient
occlusion path from brand. This is how this look. So basically you
just need to enable this in layer properties. Here is ambient occlusion. And then just go to compositing tab and just with control
shift and clicking here, I download this
ambient occlusion and then back to after effects. Then I said this to soft
light, this is before, and this is after we get
more ambient occlusion. And we can highlight
some details with this, but this is obviously
too intense. And I said this to 25% and
this is before and after. I also do same with this
glossy direction pass, so you can also enable this
glossy direction here. And I also download this pass from lender and then I put this
in after effects. And if we send this to 100, you can see what we get. Basically, we get
more glossiness in our render for this Is pass. Also, if we remove this is pass, you can see what we get. I decide to put this
glossiness foreground here. I said this to Luma, I also tweak this is
pass with the levels. This is P here. Basically, I put this
glossy direction, pass only in foreground here, and this is how this looks. So basically we add
this glossy direction, pass only in this foreground with the screen blending mode. And I also bring opacity down to 25% this is before and after. Then I add blue effects, Basically I duplicate
this render, and then I add gasium blue
here with the value of 300. And if we bring opacity or to
100, this is what we have. But if move this
opacity closer to zero, we basically get missed here. I said this just, well, this is before. And after we get a little atmosphere or
volumetric in our render, then I duplicate
this one more time. But I now said this to
screen blending mode and I add mask just in the
center of this render. This is before and after. If you increase this,
for example 50, you can see what
effect I get here, but I keep this very subtle, only 7% Next is film texture, this on Internet,
you can search on Google something
like this and you will find a lot of
similar texture. This is how this look, I keep this very sub, maybe just 10% and with screen art blending
mode or screen to ignore blacks and keep
all these scratches here, then I use this film converted. This is not free. If
you don't have the Don, you can try Lumetriclorselots
from Adobe. If you go here to Creative, you have a lot of the slots here and you can
choose one you like. But this film covered is a little more pro than just free. Lots from ad. I think
you can download this Don for free and you
can get all the option. But just with watermark
over this render, you can try this if you want. The next is color correction. I also just change
some settings. You can see before I basically
add little exposure. I bring temperature down and add some
contrast highlights, whites, and bring shadows down. This is before and after. Next is haalation. I talk about this before I bring opacity to 20% Let's see if I
increase this to 100. We basically get this
red globe effect around the edges for this. First I start with fine edges, then tint the red
color these edges, then I blur the edges. After that, I isolate, I have too much edges now and
I isolate this with levels. If I move this to right, I put only this on
some parts here. Then I highlight this
little more with these curves and
this is what I get. Then I just bring opacity to
20% This is before and out. Last thing we have here is
this optical composation. Get this more like
fish plans here, but if you want to get
this effect from blender, you can change in
blender settings. In camera settings, in blender from perspective to panorama. So last time we use
18 millimeters, and if we now swish
to panoramic, just be sure to add here
same lens, for example, 18. And this is panoramic and this is with perspective
we use last time. This is final result
and I also put Paul on my Youtube channel and I see that you are
more interested in this one I create last time. We will talk about this
in next part of tutorial, But I also think I can do better if I put more
time in this render. Let's now continue with Tutorial and with
this render here.
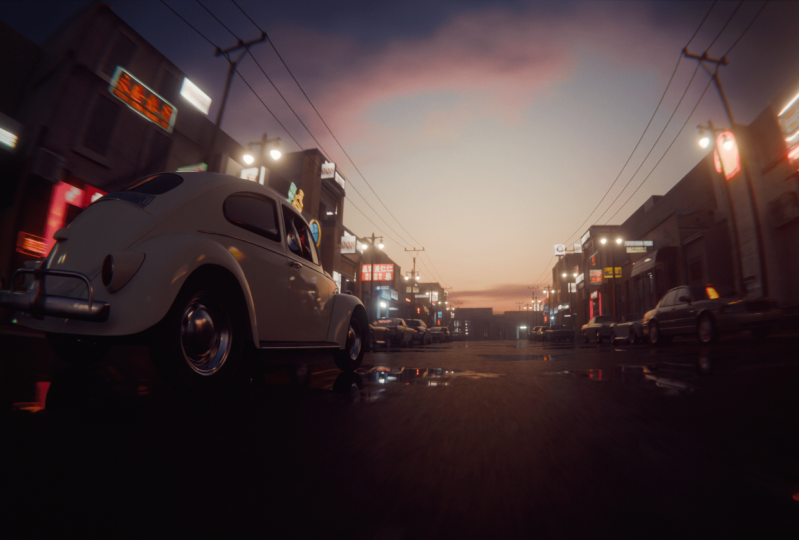
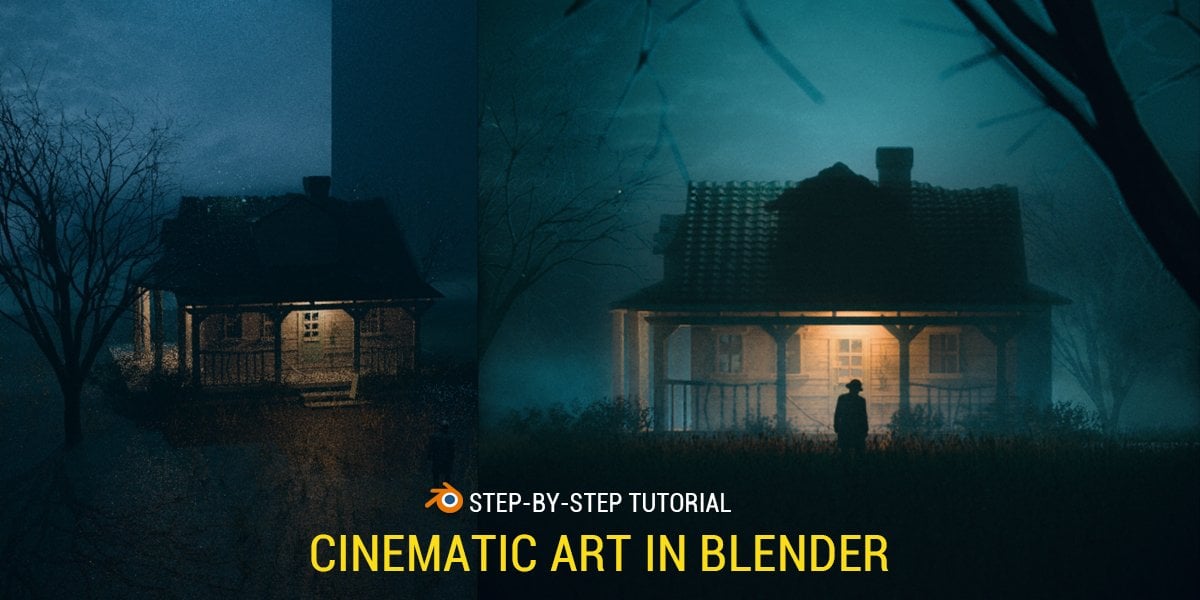
6. Scene two - F-spy: Okay, let's start with
the new Blender file. I will save this
file, File save. I will say this in
this folder and call this fake tutorial. This is the name of movie
where I found this screenshot. I want to explain this
files I'll share with you. This is our reference, this screenshot from film. You also can see this
main reference here. And this is same frame, but I just try clean
up these cars here. Because in this part of
tutorial we will also use this reference as
texture in Photoshop, I just use content aware fill and you can see that
this is not great. We will cover this bad area
later with new textures. And I don't care too much about this last part of tutorial. We just use reference photo and make something similar with
new models and textures. But in this part of tutorial, we'll try get perspective of
this photo and use some of these textures in
our threat models. I will show you how
we can do this. First we need set this photo as a background in Blender and
you can skip this part. I will just show
you how we can do this without spy tool
we will use later. We can just select camera. If you go to numer zero
to camera perspective, you can set background
image here. We can try model this following
this background image. But we will have
hard time because perspective don't
match with this photo. And if I try, for example, line up this, you can
see how hard it will be. But if you don't want, you can also skip this spy
part because I will share this py file with
you if you want. You can just import
this in blender and skip this p part of tutorial. But just to know to be able to work with pi in
Blend that you need. Download this pid. Just click here to
code download zip. We have here, this pid file. And you just need to go
to Added Preferences, Ads install, and just
select this zip file. And just installed,
just click here, Activate, and then
just say references. When you open Blender, next
time you will see this Pedon. If you press, you will not
see anything here because pedon is only here
under file, import pi. Then you can copy address of this folder and then
you can go to file. Let's first delete
all this file. Import pi, just
import this here. Now with this py file, we can just go shift a cube. And you can see this cube match perspective
of this building. Very close, I show you how to
enable this Spy in Blender, but you also need to
download Spy program here. Just click here and
install this program. Because I use Windows, I will choose here Windows. Then after downloading,
you can find this C file. Just double here,
I think you will be you already installed
this program here. If you want to the
two task bar here, if you want to find more
information about this software, you can read this
or you can just go to Youtube and find a lot
of tutorial about this. But for purposes
of this tutorial, we will set this
in maybe 1 minute. Now we can open, I will now
import this main reference. This is image without the cars here we can just move
this inside Spy. This image is one
vanishing point image. If you go to Google, when
all points go to Center, you know that this is one
vanishing point example. And you can see
another example here. And all these type of images
are one vanishing point. If you change this to two,
you can see difference. Basically, when we
have this building in 45 degrees angle, we have two vanishing points. One on left and
another go on right. Another example
here, another one. We now know that this is
one ship point image. Another thing, we know that all lines which
go from camera to distances yx and Z
lines which go to A, we want here Y axis because we can follow this line
of this street here. We also need axis to follow
line of this building here. But you can also use
x axis if you want. You can also follow
this x line here. But I will change this to z. If you can see clearly
this background image, I will open another one here. You can see this line here. And this one is not so visible, but we know that we have
also one line here. We can now set this
as our y axis. I will select this one
With the holding shift, we place one point here in this corner and
also here in distance. Zoom this scene, we can also
see where is this line? Okay, I will now
set this line here. Also here, we can see this
white color a little. Let's now set axis. We can use this corner here. If you look at this building, you can see this
brownish color here. This is of this building here. Now, if we move this point here, this should line up pretty good. But I think this is
not the case here because focal length is
only 24 millimeters. And I think this photo,
this camera I use, may be 35 because most of
film are 35 millimeters. And I will just change
this here to 35. And you can see that now
this is closer to our image. We cannot be perfectly
precise with this. We even don't need because
we will fix later. Most of these textures
we project blend. In my last tutorial, when I use this pi, I get one problem when I said
this to 35 and go to blend, I always get here 50. I'm not sure why this
happened, but I, when I select some of
camera with 35 millimeters, last time I changed this,
can 60, then this works. If you just wonder why I
changed this, this is reason. But I think this
should work for you. When you change this value
should also update blend. Of course, when you
update this file, one thing which is
important in P, where we set origin here in pi, it will also be
origin in blender. You can see origin here. I want to place this origin
in corner of this building. We can later start from this
point first building here. If you look this reference, it is a little hard to know where this corner
of this building, but I know must be
somewhere when I move this z axis and this axis
here, somewhere about here. We can see this wall here. I will try follow
this corner here. And also on this one axis. Okay, now we can
go to file Save. I will save this test. Let's now go to Blender. I will press A to select this camera and
delete. So we can. New py file file, import spy and I
below this test. You can skip this part, but when I now start
building this motel here. Now when I select this cube here and press then you can see that how big this hotel is, less than 2 meters tall. This is a problem for us. I will show you how
we can fix this pi. We can use scale of
this building like this, about 2 meters. And adjust the scale of cars and other objects in our scene. We will have cars, maybe a few centimeters big to match scale of this building. But we will have a lot of
problems with some settings. For example field because
I want to use that field. If we set this to one, we will get all the
look like miniature. Make this building
about real world scale. This building should be about, maybe 15 meters tall. And I will try to
get this. Now Spy. Actually we have one tool we can set about real world scale Spy. This is called here
reference distance. And I will now choose
here, maybe axis. Then we get this ruler. So we can tell pi how much some of these
elements in our image. I can maybe place this to this balcony or what I can tell. Okay, this is maybe one
meters or 1.5 meters. If I type here, I will
try now go to file Save, and I will overwrite this file import and Spy and
now I can load this pi here. Now this tal, about
8 meters on z axis. This is still too small and I will just
continue playing this. When I am happy
with the results, I will type here maybe 1.5 here. That's how you can get closer
to this real world scale. But now I will just delete
all this and I will now import this file, which I prepare for
you, this fake fi.
7. Modeling buildings: Now when we know how to use Y, we can start
modeling this hotel. And the rest of scene
I will go here. When I know that this is
corner of my building, I will go with shift
and start with cube. I will now try set this corner of this
cube to this origin. You can move this here, and also x axis. And with numper seven, I will also move this here. Okay, now we can select
this side of this cube. If you have problem
with selecting this, you can disable this remote and you can now
select this part. Now I will go with Numpad
zero to camera view. Or if you don't have Numpad, you can go with view
Viewport and Camera, okay. You can use this move tool, but it will be hard
to select y axis. Now I will go with for grab
and Y to stick on y axis. The reason I don't want to
use this move tool here is because if you don't
select right axis here, you can move this
along all axis. But when we use this
type of modeling, we always want to
move this along y, X, or Z axis. I will go with Y, and now I'm sure that I stick
only on Y axis. I want Y, and we can move
this about this line. One thing we can do to make this background image more visible is to select
this camera here. Under Background
Image settings here, we can increase this
opacity all to one. Now I will select
this top face here. You can go here to edit mode, or you can just press tab on your keyboard to switch
between object and edit mode. And I will select
this top face now, zero to camera view
and x ray mode. And now we can move this. Okay, I have this
problem because I have enabled this symmetry
tool on the axis. Just be sure to disable this. And now we can continue
with modeling. And I will now move this all up to about
this corner here. Now we can select
this site here. If you have a problem
with selecting this, just disable this Pm mode. Now, Ump zero again. And let's move this to about here on this building here we can see that this
wall is extruded out. We can also model this. I will select this edge, select and control
scroll, mouse up. I will add to look cuts now Y to scale this
on y axis about here. Now you can select this
middle phase and go with X. I will control Z here because you can see that
we have these pass here. And now we need to
fix this problem. We can fix this, but
easier solution is to just extrude these
two phases out. I will go with X and
move this a little out. And now I will go to numer zero. Now we can select a, a building and move out. Now one thing we
can do here here, we can basically disable this from visibility and see
better these lines here. You can see that don't
match perfectly, but you can see also the
distortion of this image here. This image is also not perfect. I will not care too
much about this. I just want to get
close to this image, and I know that I cannot be
perfect with this image. Let's now create this
small building here. I will start, I will
go to edit mode, and I will select
one of these faces, and I will go with Sid Y. I know that this building here
is very close to this one. I will move this just a little. Now I can select this top edge
here and go to Nupe zero. Now it's pretty hard to see because of this
building here. What we can do, we can
separate this object. If we press, we can select
only this part here. I will press now selection. Now we have one object
and another object. This object takes
the same origin as this last object from
which we duplicate this. And I will now just go to
set origin to geometry. If we go to Nper
zero to camera view, we can basically
disable this for now. We can focus only on
this object here. Now I will try model
this second object here. I will select this phase here. And I will go with Y To
extrude this on y axis, we can go to up zero. And let's try model this. Okay, let's select
this face here. Let's go with Y to move
to this corner here. You can see this corner
of this building here. Let's now select top face
and go with Z about here. Now I can model this part here. We'll go with control R. Let's now go with x to
extrude this on x axis. Okay, We can now select this, Select and select
all this top part. And we can move
this little down. You can see this part here. Let's also move this
little more on y axis. I think we have also small part of this building or
small shop here. Let's now back this
building here. Let's go with control
R. Maybe add one look cut here in the middle or
we can follow this balcony. We can follow line of
this balcony here. And we also have this top
part of this balcony. We can go with control R
and add one look cut here. And now we can select this face here and go with x to extrude this out a little. Okay? Now I can select
this face here and I can make this
small shop here, Y. In this process we
just want to create basic shape of this
street and city. We cannot be too precise with this image and we
don't need to be too precise because we will fix all these bad parts and cover
with three D models later. We can now create
this road here. I can start with this bottom
plane of this building here, so I can go with X. I know that this road is connected
with this hotel here. I will just bring this
maybe little down. I will now go to number seven
to top portographic view. I can just extrude this Z. Now I can go with X. Now this can be side, we have a small side here. All this is just our road. I will also move this little x. We can now go back to
camera perspective. And I will now select
this edge here and shift. We can select the
three edges here. With holding control,
we can select short line between
first and last one. It will also select
this one in middle. Now I will move this about here. I will select this one
with holding control. Let's now go with Napa zero
and Y to move about here. We can also select camera
here and set this clip end maybe 2,000 meters because we cannot move this
without disappearing. This part here, this part here is also parking
maybe about here. We can also model this. If we select this edge here, we can move with X. We can move this on x
axis to about here. Now we can go with Z and
make side here, about here. And now x and move
this on x axis. This will be our road here. And this is a, this
is sidewalk here. You can see that this edge
here is a little hard to see, but we can enable this
cavity in viewport. And now this edge here
is much more visible. It is still not visible. If we go to top
portographic view, maybe we can enable
set this to both. Okay, now we can
see this edge here.
8. Modeling buildings part 2: Now we can continue with
modeling this part of street. Here I will try model, this small shop I can see here. I can go to Edit mode
and duplicate this with she x and move
to another side. Okay, so this should be
closer to camera about here. And let's now go to x ray mode. And let's press to scale. And let's try place about here. I will add with control R, one loop cut here. If we add one support
loop cut here, we can move this
face on x axis x. Let's move this here. Now we can make this
part here with x. Let's extrude this on x axis. If you want, you can press
x zero to line up this. I also see this part here. We can also select
this edges here, and we can move this up. Let's make this big
building we have here, this big white building. I can again, start with selecting
this space and shift Y, move about here,
because I know that I have also one small
building between these two. Now I will select
this edge here, and I will go to xy mode. And I can project to this
corner here of this building. This edge here,
and also this one. Let's also move this here. We select this space and we
can go with Y, with Tmp zero. See that we have this edge end of this building about here. We can disable this
from visibility. And we can see this
edge about here, Y. And try match to this edge here. Okay. Now I also see that I have similar building
here in distance. And between these two
buildings, small building. I will press L and I
will go with Shi Y. This is another
similar building. And we can also, later, we can also create this
small one, shift the y. And let's go with y to
scale this on Y axis, because I see that
this one is small. So I will also bring
this face down. Let's see how this look first. I will maybe select
this face here, okay? And let's go to xy mode. Or even disable this. I will move about here. I think this match. Pretty good without reference. Okay, let's select this
middle of this building here. Let's bring all to
this part all down. Now I can create this
roof very easily if I just select this edge here. If I go with Z, if I just move about here
maybe to about here, I think we need to
extrude this pace out. I will add support loop
cut here and I will now move this inside. Again, it is not easy to
replicate this image here, but we also don't need care too much about all the details. I just want the basic
shape of this city here. Select this edge here
and extra. Okay. Now I see this billboard and
neon sine here and also one. Let's first create this one
because I know that this is on edge of this
building here. Select this face here, we can go to x, y mode. And it shift x, I will move on x axis, because I know that this is
on this same position as this face here, x z. Now we can select
this edge here, and let's now project this here. We can see here is end
of this sign here. We can also, if you want to text through this little on y axis y. Let's now create this one here. I know that this one is
between these two buildings. So we can go with ship y
and we can numpad seven, place this between, somewhere between
these two buildings. Okay, and I also see this small one, it is very hard to see
of these buildings here. We can only these two phases
and separate by selection. And now we can hide these
buildings we don't want see. And now we can
model this easier. Okay, I will also go with control here in
middle, and control B. We can now this column here, we can see here now we can go with Z to
extrude this axis. Next, I see here this billboard on angle here on top
of this building here. I will go to edit mode and
I will select this phase and x x axis to scale
this on the axis. And let's now we can see
this billboard here. And we can see that this is
maybe on 45 degrees angle Z, And let's rotate
this about here. Now, we can try
reproject this here, Let's see what is
this part here. Okay? So this is another sign, and I think this is
pretty good for now. We can also maybe
duplicate this face here, select this face, and shi the Z. Move this here, and
press to scale. We can also this small
piece we can see here. Now we can create the small
buildings we can see here. I will not care too much
about these details because it is impossible to
recreate this perfectly. We can select this
building here, this space here,
and shift the y. We can selection, we can
set origin to geometry, and for now we'll
just disable this O. It will be easier to
see what we work here. I will go with Y. Y. To extra this Y axis, I will press, and I will just now duplicate this
a few times shy. Okay, now I will just create
this neon sign detail here, but for rest I will
not care too much. I will go with ship Y. Maybe bring this axis. Let's just reproject to
this neon sign here. Okay. And for rest
I will just go with tell Chief and duplicate
this few times. One thing I want to just
avoid here is to project this sky here because later
we will use HDRI for sky. And I don't want if we have
projected this building here, we will also project
this part of sky here. And that's what I want to avoid. I just want these cubes to
cover the buildings here. Okay, I will press L
now and shift Y here. Maybe one more. Okay, I think this
is enough for now. I will also model this
neon sign here because I like this detail and we can see that this
is on this small roof. Let's also cate this
neon sign weekly. I will go to edit mode here, select one phase and X. Let's now go to zero
to camera view. Now let's go with x 90 Z axis. And now I will project this
to this neon sign here.
9. UV-project modifier: Let's now project texture on these objects we created so far. First, I will disable this X
ray mode and I will select all these buildings and I
will go with control J. Now all this is just one object. To be able to use UV, project modifier and project this background
to these objects, we need to share their editor
and create a new material, and I will call
this male material. Now I will go with Shift and
search for image texture. From here I will select
this fake five Pi. We use this in for our background image
camera settings Here I will select again this object and plug
this to base Color. If we now go to
Material preview, we can see that we have
something but not what we want. Now we want to project this background image
from camera angle. For this, we can use
UV project modifier. I will select Project, and I will now
select this UV map. Because if you go with control, you can see that by default
we use UV map here. But I will delete this for now. For object, I will select
this fake five pi. And you can see that
we get something here. But this is still
not as we want. Now for this aspect x and y, we need this resolution here. Copy this resolution here. I will copy this
value here and back to modify here and
place this here. And also y. Now we have correct aspect
ratio but still is not good. That's because to project the texture of three
object we need mesh. But if we go to edit mode, you can see that we don't
have enough mesh here, especially on this road here. Difficult to edit mode. And go with control R, we add some mesh. But I will now go with control Z because I will add here
subdivision surface modifier. Now I will say this too
simple and set this on top. First we need subdivision and later you will project modifier. Now when we increase this level to maybe for and
also for render, we can see that we line
up this pretty good. This is before and this is
after the subdivisions we add, we correct this texture more, but I will I think
I will keep this to 41 thing you can note here that these buildings look
pretty good and also, but this road don't look good. That's because this road is
stretched a lot on y axis. If we go to edit mode, you can see that we have few look cuts here on Y
axis but not on X axis. We can fix this If we just add a few look
cuts on this road and make the faces more
square with control, I will add five or six or even
more look cuts on Y axis. And if you now go
to camera view, you can see, let's
go with control Z. And you can see what
we get if we add more look cuts here, okay? Now this look pretty good. Maybe if I go even to five here, I can fix this and line up
pretty good here, okay? I think I can handle this. If for example, apply
this for a second, I can see measure
density of this, okay? I think this is a
little too much, so I will go with control Z
and I will keep this to four, but I will just add to look cuts here in four ground
on this road. Okay, this looks
pretty good for now. Let's see what happened now. When we go to render preview, I will set these two
cycles GP and maybe here 10.4 final render
for now, maybe just 22. Let's now split
this window here. And let's go here to Render. I will press to remove this tab. You can see what
we have for now. Let's go with 12 so we
can see this better, but you can also know
that this is too black. And the reason for
this is because we have word light almost black. If we increase this, you can see that we get
more brightness here. But because this
reference image already built in in this image, I don't even want to this object here react
with light here. I can fix this. If
I plug to emission, we will basically take
lighting from this image here. When we plug to emission. And one thing I don't want here is to react with
light from our scene. You can see that when
we add more light here, this reacts with
this light here. We can fix this if we just
bring specular to zero. No, it is not important. Lighting we have in our scene, this will not affect
our buildings here. If you now go select this camera and disable
this background image, you can see what
we basically get this three DC projected to this object without
this background image. And this object because of
this specular don't react with this light we have here because
we plug this to emission. We take lighting from
this image here. We can now build rest of this city with three D
models and another texture, but we can keep
this for our base. I will also add a
little more details. We add only details
here in foreground. I have nice L I like
here in background and also some parts on left
back, this background image. And I will just
continue with modeling. I will select this
face now go with Y. Let's model this neon sign here. I see this neon sign here, and another one here, and also the
Mcdonalds sign here. We can go with Sex and S
Z to project this here. Now I will go with
Y Control here. Control. And let's now
select this phase, and EZ extollelect this phase, shift the Y, and project this
one to this neon sign here. And let's also go
with shifty and let's try model this Mcdonald sign. Now, I talked before
that I want to avoid this sky background, but I want to keep
this hill here. I will go with knife tool. Let's go with X to about here. And now I will go
with K for knife. And I will try cut
this hill here. Okay? Now this stick
to this building. I will stick this here
and I will continue with K here. Pork knife. Let's now just delete this
Sky delete faces and okay, now if we press 12
we can see what we.
10. Lighting and cars: Let's now create lighting
and the HDRI in background. Now here we are
in Shader editor, but I will switch to
world here for this. Let's now select Camera and disable this
background image. I will go with Shift and search
for environment texture. For this I will use
HDRI from poly hen. Last time I use
this one you can, I think I will paste
this link or HDRI, but you can search this name on Polyhn and
you can find this HDRI. If I forget now, we can plug this to color here. Here on right. We are
in material preview. You cannot see HDRI, but you can see this
HDRI here on left. Now I will try adjust this
brightness of this HDRI. I will bring this down about 0.25 I think I used
this value last time. Now we can also rotate
this HDRI with control, you need a node wrangler here, just search here, node
enable this node Brangular. If we go with control, we can get this texture
coordinate and mapping node. Then I can now rotate
this until I get something which is closer to this reference image,
this background image. I think last time
I go to the value, if you wonder how
I get this HDRI, basically test maybe
ten or 20 similar HDR. And this is closer I can get
to this background before, and this is after, and
now it's much better. But later when we
add volume metrics, this will also match
more this background. Now I think I will import
cars in my scene last. In first part of this tutorial
I use transportation. Do that, I will suggest one link where you can
find high quality cars. I will share this link with you. I found a lot of nice and
retro models on this link. You can download, I
think all this for free. I already tested this, and I put this car here
in my acid browser, so you can see how this look. This model is pretty
high quality. This is a low poly
version because I reduce this mesh density with mesh
cleanup dens geometry. But you get very
high density model when you download this object. But just be careful, you can see how much
polygons, almost 1 million. But just be careful
because this can kill your computer and just be
careful with this polygons. My recommendation is to first reduce this
meshed density here, but you can also check
sketch B or CG Trader. For example, if you
go to CG Trader, you can search for car. If you check this
free check button, you can also find a lot of
free and high quality models. If you want to learn more about car and optimization
and textures, you can look at my tutorial. This one and I think
also this one. I will now back to my, I will delete this car because
I will not use this one. I will from transportation. And last part of tutorial, I show you how I
import this car. So I can just select this
category and import this car. But I think I will
skip this process because this tutorial
is already too long. And I will just jump to my
last scene where I build. I will copy cars
I use last time. We will lose a lot of time just importing this car and
match these positions. I will just go to re promote. Then I will select
all these cars. And now I will select all
these parts I don't need. Okay, now I have selected
all these cars and I will go with copy objects. And I will now paste this to my C. Now I will press M to
add this to car collection, so if I need later, I can just disable this quickly. Okay, but this position don't
match with my last render. So I will just now with this and also all these cars
intersect with ground. I will go here under
Car Collection, select Objects, and
I will go with Z. To bring this up, you can see
that we have sunlight here. That's because we
get lies from HDRI. In this reference, we don't
have the sun on this car. I will just block this now. We can basically make fake buildings here just to
hide the sun lights here. I will go with Z Y until I see that I block
this light from here. Okay, we can maybe
duplicate this one more. Time shy. We are now sure that we will
not get any light here. But also if you like this
detail, you can keep this. I also get some lights here. Maybe I can go with ship D Y. Okay. Now I block this. Let's go also on
this side here to be sure that's all for today and I will continue
with recording tomorrow. But I think I will
skip some or not skip. I will speed up some of this process because
this tutorial already last too long and we still have a lot of things
to do in this scene.
11. Asphalt texture upgrade: This is what we have for now. Let's try to improve
this very low resolution texture of this. First, I will, on right, separate this ground from
the rest of this building. Here I will go to Edit mode, and I will press L
over this ground. Now I will press and
separate by selection. Now I will go to
Material Properties, And I will just click here
to duplicate this material. And I will call
this Main ground. Next I will go to, and I
will change this color here. I'm now in Viewport. Also know that this
is separate material. Now we can try improve
this material. And I will on right
go with number zero. And I will press and
to remove this step. And I will switch from Viewport Shading
to Material Preview. Now we left Render Preview
and Right Material Preview. And now I will go to
Shade the editor. And from World Switch to object, I will improve this material
with two materials or two textures I download from Texture.com So this
is the first one. I will use this for bump later. The second one I
will use this in color input and roughness input. Let's start with this one. I will bring this in Blender. If we go with control
shift and click here, we can see how this look. And that's because we have one UV map which is
projected from camera. We don't want to change
this map because then we will destroy
this texture here under maps,
create a new one. And I will call this
concrete or something. We can, just to be
sure, plug this. We don't need to do this
because this is by default. But just to understand better, I will plug this here. Now I will duplicate
this shift D, and I will change
this to concrete. Now we can go with
control shift and C here you can see that now
this texture look different. And I will go to edit
mode and projection. Now I can here on
left, open UV editor. Now if we press and scale, we can see that we
change this up here. But we don't touch
this first one, okay? Now with control
shift and click here will scale this until I think that this is
a real world scale. We can even go with top
view to see how this look. The cracks still too big. I will scale this up. Okay, I think this
details here look nice. And now we can first add
this in color input. To do this, I will go
with control shift and right click to mix these
two textures together. Now I just want to add the
black parts of this texture. We can isolate this with color. Again with control
shift and click here, we can see how this looks. Isolate this white
black part from white. Now we can go here with
multiply, blending mode. Multiply will keep only dark
part of this bottom input. Let's go here to object
mode and let's see how this look you can see when on left we take
only this image. But when we move on right, we get this cracks here. This is before and
this is after. You can see that we had some details here and
some resolution here, but I think we have a lot
of black colors here, so we can move this little On
left, we have one problem. We have a lot of the
repetitive textures here. We can see, I think we can
fix this with Noise texture. I will go with shift and
search for noise with control. Shift, click here.
Let's see how this look now I will go with color M. We need more contrast here, let's bring this
scale down, or up. Now we can mix the two textures. Let's see now how this looks. I will also go with screen
multiply bending mode. I won't go with the screen. Now with screen, we keep only white color of
this color m here. Let's back. We wash some
parts with white colors. This is less visible. If we move this
factor all to one, we wash more of this area here. Now we can also, I will back this
material here and we can also use this as roughness. We should now get shiny parts
where this black color. I tweak this also with color ramp if we add
the black colors here, okay, I know that the reason why this don't work because we
bring specular or to zero. I will now back some
of specular here. You can see effect. We get basically where
the black color is, we get the shiny parts. Now I think this is maybe
a little too intense. I will bring little to white. Okay. And let's now
make test render. Okay. This is without any texture in just color input and this is with
roughness input. Let's also bring this
texture I prepare for bump here and I will bring this to blender because these two textures are
similar proportions. So you can see that both
of these are square. We don't need new UV map, we can just use this concrete
up here and it will work. If I go with control
shift Cl here, I can see that this
is pretty good. But if I want just
change scale of this, I can go with mapping node. I can scale this maybe
two times or maybe 1.5 Now we can go with bump, but because this is
texture with color, I also need to convert
this to black and white. And I can do this
with color ramp. Now plug this to height
and this normal here, maybe with control
shift back this material so we can
see how this look. Okay. You can see some
bump details here. This is without, this is
before and this is after. After we get some bump, but we also lose some reflection
here because of bump. If you want, you can
back some reflection. Let's try to improve
this white line here. I will for this use decal. Last part of tutorial. I download this from
Quick sub Bridge and let's see where
I can find this. I think I put this in asphalt
folder and road decals, okay, I have this
white road line, this is before and
this is after. You can see a big difference without improving this material. Now let's try as
a second texture, heat in color input. Maybe we can get better
results with this. I will again mix the
two texture here. Let's see, now if I
move all to left, I get only this texture. If I move this on right, I also get some details from
this texture here, okay? This texture look too bright, so we can always go
with huge saturation. I will bring this
value little down. This is before and
this is after. Let's see if we said this
to multiply blending mode, we will keep only dark
parts of this texture. This is without this new
texture blending mode. And this is with
multiply blending mode. I think I will back this to mix. I will also bring this
all down to maybe 0.0 y just to keep 5%
of this texture here.
12. Bricks texture upgrade: And last time I do something similar with this texture here, you can see how this is
very low resolution. We cannot even see
any bricks here. But I know that this
is a brick texture. But complete this building
look pretty weird. Last time I decided to model
this building from scratch, but I will just keep this part of original
texture of this wall here. I will first go to edit mode and I will press
L will now we shift the x. We can keep this as back up. I will press and
separate by selection, we just call this back up. We can now disable
this from renderill. Also, do same with this
part, this building here. And separate by selection
now I will go to edit mode, Select this building,
and go to edit mode. I will select this part here and maybe again and
separate by selection. Okay, this works. Let's now improve on
this wall here later. We will model this
hotel from scratch. I will now press Key to
bring only this wall here. I can go with Set or right click and set
Origin to geometry. Now I will go to
Material Properties here and click here to
create new material. And I will call
this Main bricks. Let's now report this
bricks texture here. You can use anything similar, but I found this on Texture.com and I think I will share
also this with you. Let's again go here
with plug this here and Create map
and call this bricks. Okay, now I will go
here to select Brick. Plug this here, and now with control shift
and click here, we can see how this look. And I will go to, let's
just check scale. Okay, scale is one. I
will go to edit mode, projection and
open here, editor. If we go to edit
mode and press A, we can select this wall here. And now I will scale this until I think that
this look right. I think this look pretty good. Now I will go with color M and control shift
to isolate this texture. And let's see, Now I will tweak these settings and because I will use this as
multiply blending mode, I care only about
this black color. All colors, which is white,
will be transparent. Okay, I think this
can look pretty good. And we can now bring this here. And with the control shift, right click, we can
mix the two textures. But I hope you know to be able to go with control
shift and right click, you need to activate
not angular at, okay, now I will say this to
multiply and you can see we basically get only
the dark parts here. We can finally here that
this is brick texture. We can see before and
after, before and after. Okay, let's now make
texture for bump. I will go with another color M. Now I just want isolate
lines here for bump, I will go with this
hole to right. I want this white
color to be bright. Now we can go with, we can apply this to height and
this to normal, okay? And you can see now what we get. Let's try invert this. I think this need be opposite. Okay. Let's see if we
move this on all to left. This is before and
this is after. This is, this is after. You can see some bump here. Now, after, we can also make
some variation in roughness. But for this I will use
very soft variation, calm. I don't want to make
this too shiny. So I will bring the black sclars down and maybe make
more conscious here. Okay? And now we can
plug this to roughness. But nothing changed here because we have this
specular hold down. If we bring this specular, we can see that this
is pretty shiny. So I can bring this more down, but if you like
this shiny bricks, you can also keep this. But I will bring this down. Okay? And maybe here, 0.2
13. Hotel modeling: And let's see what
we can do with this very bad hotel here, Tim. This is my old
blender file time. I basically start modeling
this from scratch. I add this balcony here with
completely new texture. This is from quixel bridge. I think I also add
here glass shader. This building here is
basically model from scratch, but basically I just
go to edit mode. I just start adding
Le cuts here, following the balconies,
something like this. And now I can just extrude
some of these parts. I can, for now, remove
this texture here. Okay, so we can see
better what we do here. Now, for example, you can add here one material and the
second will be glass. If you just go with glass, SDF transparent, you can
make transparent glass. If you mix the two texture, now we can maybe apply on
this area glass material. And you can see on
left how this look. Now for this rest part, maybe find some texture
here in quick bridge or you can find this anywhere
on Internet or for example, if you have this blender kit, you can just search
here quickly. Bricks texture, you can load any of this
texture very quickly. Just moving this here. Okay, so you can
see how this look, we just need to unwrap
this with projection. Now we can go to Shape
the editor or UV editor. We can scale this down. You can also, for example, go with and send this to color. You can mix this with
yellow color here, because in our reference here, we have the yellowish
bricks here. I will now send this to yellow
color and I will choose here multiply blending
mode, or color. Okay, this color
look pretty good. Let's quickly make
this part here. We can go with maybe just
cube here, shift and cube. And let's scale this all down. And S Z to scale this on Z axis. Let's see our reference, this go all to top about here. And I will just here
some black color. Maybe we would shift
y and now shift Art to repeat this last
process or last step. Okay, let's see
how this look now. This is before, very bad and
very low resolution texture, and this is after. But you can invest more time and following
this reference, you can add more details here. I forget about Blender kids, Go to Google and you can
download this ad for free. Just download this here and you can install this under
Edit Preferences. As install, you will see some of these
textures or objects, materials, or even scenes are free and some
of these are paid. But if you want get paid
version, you can pay. I think last time when I checked this is about $6 per month.
14. Shops, trees, poles: Next thing I do last time, I import some assets from my asset browser and mix
with these objects here. Let's jump to asset browser
and now I will open my assets and shops assets here. I will share this pack with
you so you can also use this. I pick some of these
assets here and I bring on place where I think that I need a high resolution and
hide some bad parts here. Let's go with 11. I want maybe something better
here and also this part. So we can now go with R Z 90. And we can just bring
this here. Okay? And maybe we can try bring
this to another side, or you can use any of
these assets here. I will go with all
the D x z 180. And I will place this here. Maybe we can scale
this a little, okay? Let's try measure
this a little better. So I think this one is too big. Okay, I think I deleted
this great part here. Let's do this now. We can just go to
edit mode and we can maybe delete
this top part here. Delete vertices. Now we keep only this part
of this building here. Let's now move this
maybe on with x, x axis because we use instance of this
object with all the. We do same also on
this part here. This is before and
this is after. Next thing I use here to improve this scene
is all these trees. This is my last scene. Last time I used this botanic
D, which is not free. You can find this and market. I will show you how this looks. This is from polygonic. I just click here and now I search for some of
these trees here. Okay, Here under
tropical category, I found this palm tree. I also use one tree here, but we can try what we can
find here under Vender Chit. Don just keep this here. Two objects and let's
search for Palm. Okay, I need to look on left. Okay, here is 13 and another
one, third one here. You can find a lot
of this free stuff, but you can also search on
CG Trader or Sketch up. Now, I will not lose time
placing the Ches in scene. I will just select all the Ches from my last scene and I will
go with copy objects. I will now past this here, I will press and I will say
this to Ches collection. Okay, I need to move
this a little on, right, but just be sure about
mesh density of the object. I will go to isolate
this object. I think last time I go with mesh cleanup and
that's in my geometry, so you can reduce this geometry. I do this last time. I will now delete maybe
just 20% of this. This is before and this is after we get a lot
with these trees here. If you back this
background image, you can see that we have
here this electrical poles. Last time I modeled
this cylinder object. Because the objects here
consist project modifier, I just select this object
and go to edit mode. Now this will be
part of this object. If we go here with cylinder, I will reduce this
maybe to 12 vertices, go with Z and X, and we can make one
object on this pole here. I will press to scale and Z
to scale this axis a lot, we can go to up zero and now we can
just grab this top edge here and we can just project
on this texture here. Okay, let's go to my last scene. This one here is same, but I just add this
little cubes here. This cables curve modifier,
modified curve objects. I just go with curve and now Np seven to
top portographic view. You can just go to add more
than y zero to line up this. Now we can scale this Z 90. Let's just line up this. We can now do same, we do in first part of tutorial. Just subdivide this
here and now move this Z, move this down. And let's scale
these parts here. Now you can just go, let's set this set origin to geometry. And now you can go under curve
property and a depth here. You can now place this
between two poles, but for now I will just copy
this from my last project. We have one here,
face this here. I will now line
up with this one. I model, so I go
with X and move this about here without the pulse.
15. Motion blur: Let's now animate this car, and we can add motion blur. I will select this car here, and now we are on frame one. And now I will move
this with Y here. Now I will press
Insert Location. You can choose key frames
here you want and depend on you if you want to make
animation or if you don't want. But I will for now just
move this about here. And let's now move car here. And I will now press
and insert location. Last time I animated this car to go all to
the end of the street. But now I will press Space, and I will see how
this car look. I think this car is too fast, so I will now just
move this right. And I will also press and
change interpolation mode to L. Okay? So this look pretty good, but for now I care
only about one frame. And I will now move this here
until my car appears here. Okay, about here. Now, if we go here when there are settings
and enable motion blur. When we press 12, we can see what we get. This is before and this will be after without motion blur. We can see how this
look and this is. And we can see that we get a
lot with this motion blow. Next thing I add here
is my sign at pack. Now let's try this
neon sign here, X, 90 Y night. Let's press to scale this. You can see here how this look. I will go with Y. I will also share
this asset pack with you so you can
play with this. Let's also place something
on this building. We can play Chinese neon sign. I will, okay, here, this intersect with
this building. I will X night, maybe Z. Here we can see this neon sign. Okay. Here we have
this motel neon sign. Okay. Here I have
this hotel arrow. And I will place on
this building here. So again, scale this and
Y and rotate about here. Okay? And I also
have this motel, this big motel neon sign. And I also last time placed
this on top of this building, L Z 90 and BZ. And we can put this
Mcdonalds sign on this Mcdonalds here. I will just bring this M here. And let's press to
scale and 90 end. Y, nine minus N. We can also place something here in this building
in foreground. This is before,
and this is after. You can see this neon sign here. And this one here, I think this one is
a little too bright. So we can also select this object and we
can go here Material. So we can see this
near signal and we can bring to values to
about, maybe ten. We can see at the beginning
how this look now.
16. Volumetrics, reflection on the car: I will go with shift a
cube and just be sure to cover all scene Y. Now I will go with control, a apply scale here under
object properties. I will set this in
Viewport as bounds. We can see only
these edges here. Now I will create new material
and call this Volumetrics. Now I will delete
this and I will go with Principle volume. And I will plug this to volume. I bring this density
last time to a 0.0 005. Now you can choose color here, maybe some orange atmosphere. And let's just for bro 05, you can see that
this is very dense. I will bake this to 0.005 We can also
bring this atrosophy. Let's now see before
and after this. Before and this is after we
get some atmosphere here. Before and after. One thing which is
really important here, I add the last time is
reflection of this car. You can see that we don't have any reflection on this car. That's because we basically put this big white cubes here. If you look here, you can see reflection
on this white cube here. Also, behind this car
is not in real world. We expect maybe some cars behind this car here or maybe some
city or street lights. We can now make this, I will basically project image
texture behind this car. I will go to here and I will go with shift A images as play. Now I will, under resources, maybe use this image from
our reference photo. Okay, I will place this here. And I will now press
and scale this up. But I don't want this
only in color input. I want this to plug
these two emissions. This reference photo
will emit lights here. Now I will go with X, but one thing we want to do here is disable visibility
from camera. We can see this image here. I want to disable this camera. We will still be
able to see this in glossy diffusion
and all this stuff. I just want to be sure to
remove this from camera. Okay, let's see what we get. If we bring this
closer to this car, you can clearly see that
this affect this car. I will remove this
alpha blender create. By default we can increase
this emission strength. If we go with map node multiply, we can now plug this to emission strength and we can multiply this maybe by ten. You can basically see how we
increase brightness of this, but I think ten is too much. I need maybe two or three. Now it's all about
positioning this. So let's see how this effect
we can make one test render. Okay, so this is before, and this is after. We can see clearly some
reflection of this photo. We put this here, but last time I put
more time in this and I searched on Google night, car, street lamps or something. I found not just
this one texture, I found four of these textures. I will now just copy these textures here and
I will place my scene. You can basically search on Google and find something
similar like this. Okay, this one is same. I duplicate, Just
change angle of this to affect maybe
this side a little more. I put also this one on top. Let's see what happened if I
just past the objects here without the images as plain. And this is, we get a lot of this
realistic reflection here. Okay, I think this red color
is from this neon sign here.
17. Shadows and compositor: One thing I missed on
this render is shadow. If we go to reference image, we can see that we have
very strong shadow here. But we don't have here. Even if we have
some shadows here, it is not what we want. That's because
lighting of the HDR is different than on this image. We can increase this
with shadow catch. If I said this object
as a shadow catcher, it will not be
visible in render. It will just disappear from
render. I don't want this. I will now go with, I
will now go with Z. I will just move this, Ali. Okay. Now I will
call this shadow. Now we have basically
duplicated this ground. Now let's remove this material because we don't
need this material. And now we can see that we have only this white plane here. Now we have this
nice shadow here, but we cannot see this asphalt
texture we made before. If I now set, this shadow now disappear
from visibility. But we have this weird thing here and I'm not sure
why this happened. I decide to render this overlay. We can now later say
this in Compositor. Now I go to layer properties and I enable this
shadow catcher here. Then I press F 12
to render this. Now when I render this, I will go to compositing
and I will click here. Use nodes with
control shift here, we can activate this view node. Now I will press to zoom this out and I will navigate
to this shadow catcher. You can see that we have
some information here. Now I will go with 11 because this is plug
only on in viewer node. I will navigate here, search for e node. I create this folder here
and I will copy this. I will go with file,
save, save this. I will keep this PNG. Okay. I will back to Blender because we use this
only as shadow catcher. I will for now disable this
from render and viewport. Now we need to go again with
F well and rerender this. Now we come back to compositor. If we navigate to
this image here, we can now just bring this shadow of catcher
in our compositor. I will now go with mixed node. Let's plug this to second input. And now I will say
this to multiply, to keep only dark
parts of this color. You can see what we
get If we go to left, we don't have any shadows here. If we go to right, we get a lot of shadows here. But you can also note that
the whole image here. And that's because we
have a lot of gray areas. We can tweak this
with color ramp. Now I will add more white areas to
remove these dark parts. If you want to make the
shadows even darker, you can move this on. Right. But I think
this is pretty good. I will even bright a little. This okay add of realism in our scene. This is before and if you search to viewer
notes, this is after. My recommendation is to add
scale and render size later. Decide to move this resolution
because this is just over. This texture can be
bigger or smaller later, but if you add here scale
and fit to render size, this image will follow
this resolution even if you change this when
we are here in composite. Or let's also add some, maybe less distortion
or just dispersion. Basically chromatic aberration. You can see if you
press before and after and also if you want, you can add glare or glow. We get this glare effect here. And I will go with glow. Maybe if you want, you can duplicate this
and you can also add this streaks or Simple star. Okay, let's go. I think
Simple star is better. And let's say this a lot. Okay. This is 210. So we can always go, we can mix this without
this glare here. We can now just control
how much we want. If we go all to left, we add 100% of this. If we go right, we this effect, okay, maybe 0.8 Now when we
are happy with this, we can also plug this to composite and this is
also render Result here. If we go to render result, this should affect this, but I think maybe we need render because this
didn't update here. Now I can save this render because I think we are
done with Blender. You can know that this is only 22 samples and this
still look pretty good. I will go with File Save, I will save this render. We have final result
from Blender.
18. Post-processing: We are now in after
effects and I basically duplicate my last file
when I do this scene, but I just replace this
from render we do today. This is our render. And let's see what I
do last time just to know that this is not the
same render like last time. And I should update
some settings here, but I think this look also
pretty good, this from red. When I put this
in after effects, I start with color correction. And what I do here, I just change the
settings and you can see what I do here. Basically, I usually
go with, for example, -100 And I see what
look I like more. If you want to add
the temperature up or this orange
tint you need go up. Let's now bring this down
to get this bluish tone. Also, say all these settings. Just type here plus and
minus and see what you like. If you go down, we get this green tone. If you go up, we get
this purple tone here. I note now that we forget
addint in blender, that's de and field, and you can see that this
car is so sharp here. We have a lot of blue here. Let's quickly just
this in second, I will enable depth and
field will select this car. Now I will go with this value, maybe to about one, okay? This is pretty low. Maybe even three.
And that's because these objects are not
real world scale, okay? This is now much better. So you can see this car
is pretty blue and maybe 3.5 I will now render this and update
this in after effects. Now this is much, much better. So you can see this
car, how this look we also bring out from focus
also these cars here. And also this in
background before sharp. Okay, let's continue
with the effects here. A, a little grain
effect but only 0.1 because also the film
convert filters create grain. If I say this one, I will get a lot of grain. I give this maybe 0.2 Then I have this film
convert without this. And this is I also have another one here,
this preset, this. I use this preset, I disable both of this is
before and this is after. Then I add some haalationffect. This is before and
this is after. If I press and bring this to
100, let's see what we get. We get this red glow. But I will bring this to
maybe 12% after that. I also glow effect here
we are the same blender, but I add small value
of this also here. Again, I go with
color correction. Okay, this is one
more film convert. I see here, I use
this preset here, but I said this to 50% These
two are again grain effect. If we go with double click here, we have this film grain overlay. This is video file because I use this for animation holes. I download this from premium bit website and I will
share this link with you. This is how this look. I also, I think this one. Okay, I copy this link. I will paste this link here, so you can download
this if you want. One thing I add at the end is this grading gradient effect. Basically, you can
see that we add little black color and
gradient from top to down. This is before and after. If I press and bring
opacity to 100, we will be able to see better
this gradient effect here. This is all for this tutorial. I hope you'll learn something
new and see you next time.
 šime Bugarija