Transcripts
1. Introduction: In this 2.5 hour long tutorial, we will create
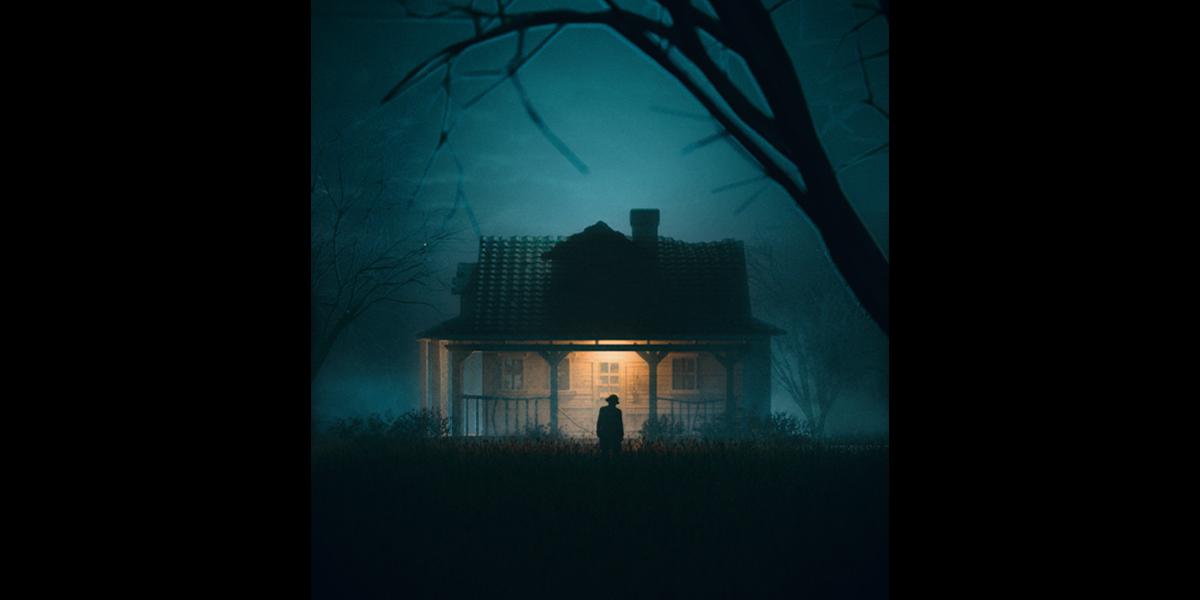
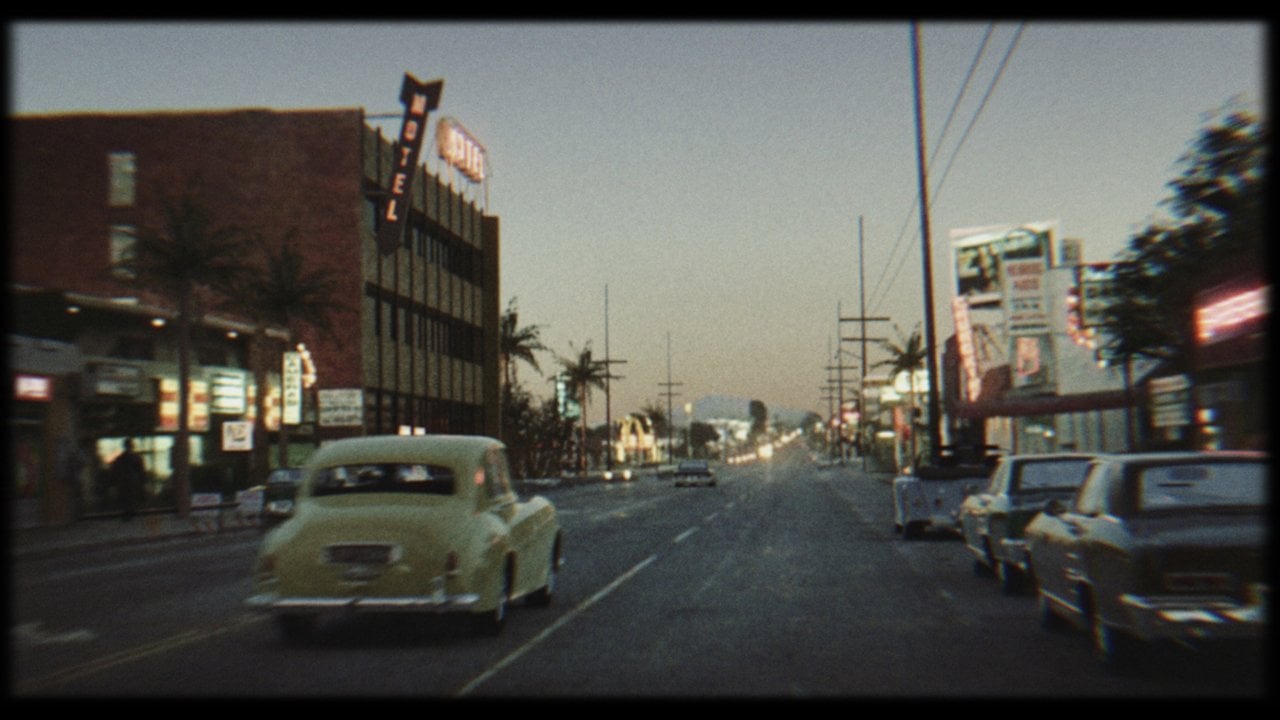
cinematic art from the introduction completely in a blender from start to finish. The original composition is from this photographer,
and three, the artist recreating works is the best way to
learn and progress. I decide to recreate
this work to try to discover the settings
used by this artist, and I think I came pretty close. This tutorial, I will show you what I learned
recreating this work, as well as over the last
six years using Blender. First, we will talk about setting the scene
and camera settings. After that, we will start modeling and texturing
the abandoned house. I will explain how to speed up the modeling process
with the help of shortcut keys and modifiers. And how to make the low poly model look detailed
in the camera. I will show you how to achieve a cinematic misty look
using volumetric. Where to find good free models, how to create
materials and more. In the last part of
the tutorial listing 40 minutes and divided
in four parts, we will talk in detail about
the blender compositor. Post processing will
be done entirely in blender without using
other programs. The entire process of creating scene is recorded step by step, so the thetorial is easy to
follow even for beginners. The tutorial is separated
into 17 parts with the average duration of terminus to make it
easier to follow. All resources and
links are included in the tutorial and subtitles with shortcuts are
also available.
2. Camera and scene setup: I'm now in Blender
4.0 and you can download it for free and
install from Blender. Or in this tutorial we will
recreate from this guy here. I will share this link with
you in this link file. First, my recommendation is to create folder where you want
to save all these files. I created this folder now I
will copy this address here. I will save this file. File Save, and now I will
pay this folder here. I will call this
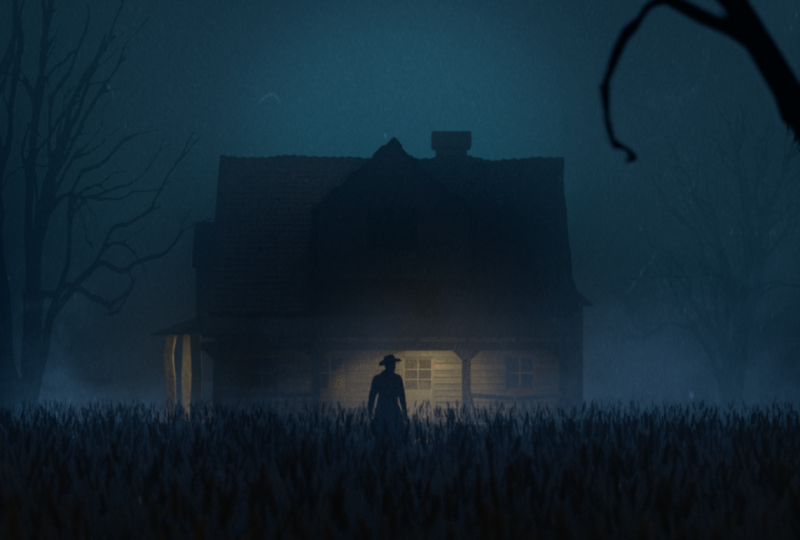
Abandonment House Tutorial. This is our reference
and this is what I get when I first time
try recreated this. And you can see that I get pretty close
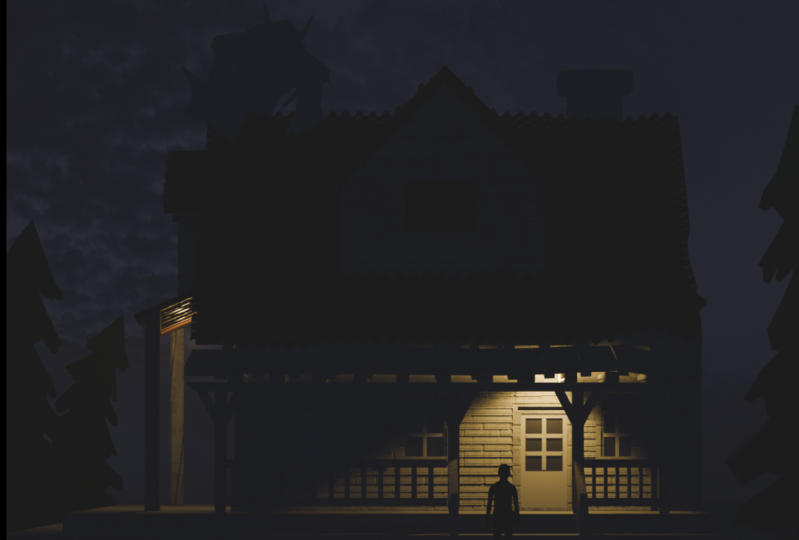
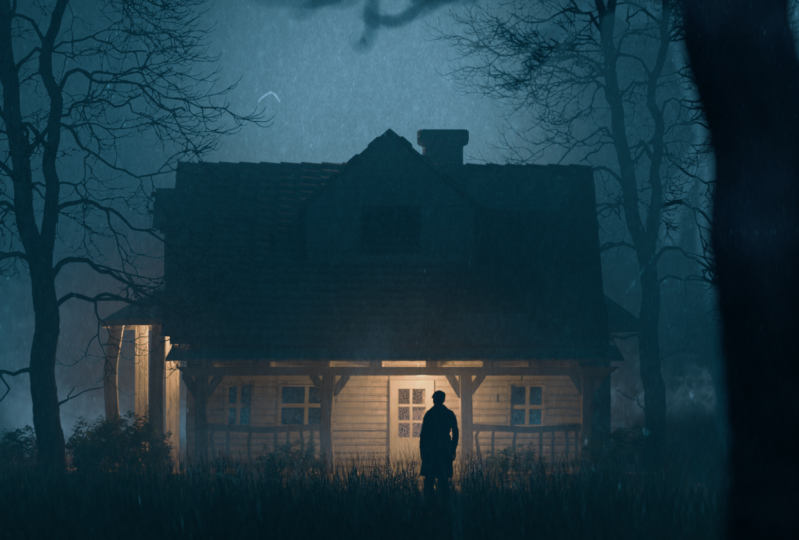
to this reference. This is another version, just another lighting set up, a little more dramatic. This is when I tried yesterday, recreate this scene to
prepare for this tutorial. And the difference between
these two scene is that I use model three models
from sketch fab. In this tutorial, we will
use all these models, but I will show you
also where I download this guy if you want
to use this model. And I also replace this three model with
31 from sketch fabre. You can also know that
this scene is different. Another difference here is
that I do post processing in this example in after effects
here, all in blender. You can see how this looks. If I go to here in
Composited tab, you can see that we have
a lot of nodes here. And in this tutorial I have planned to do post
processing also in Blender because most of you don't use after effects
or any other program. This is Blender
tutorial and we will do all this here in Blender, but I will also show you
my after effects file. We will go through
all the settings I use in this scene here. Let's now start with Blender. First thing I will do here, I will go with shift
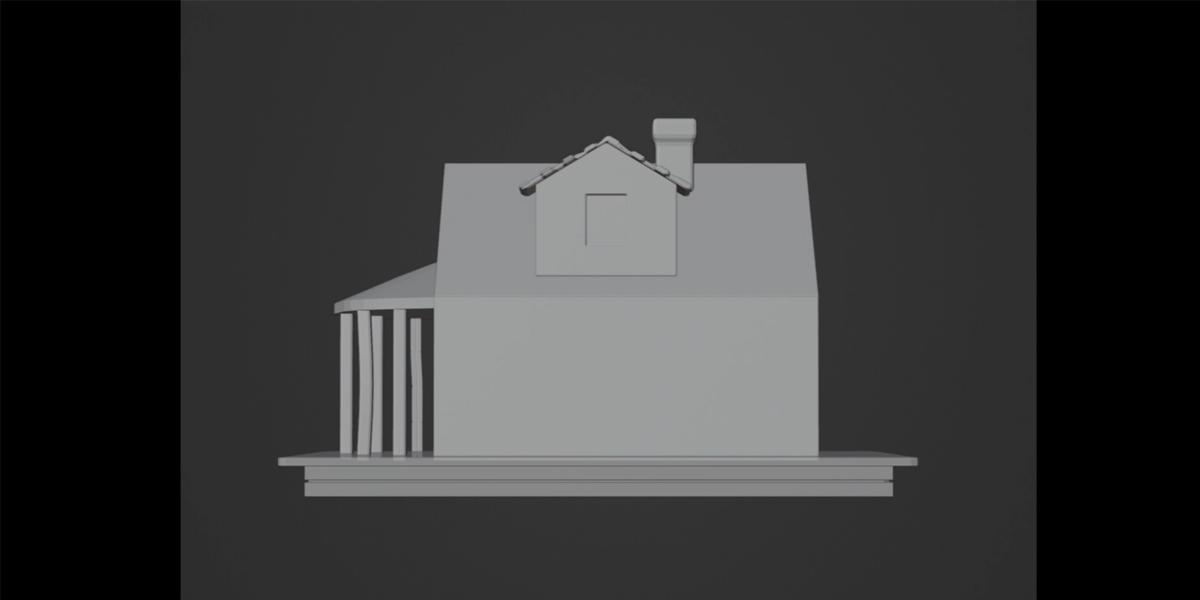
and add plane, and this will be our ground. Next, I will create base
of this house here. I think this part here can
be about 3 meters tall, and this one about eight. I can select this cube
and I can type here eight on the axis,
maybe 3 meters. Now I will go with numped one
to front rtographic and we can bring this here
on this x axis. But if you want to be precise, you can just type here 1.5
Let's now set up camera. When I look at this render first time I get
the impression that camera is very far away from
this guy in this house. Here we can create easy, similar effect select camera. I will now go with
Nampa seven to top orthographic view and I will
say this to 90 degrees, this axis to zero. Now I will try line
up with this axis, world Y axis here. When you see this
little cross here, you can just drag and move
this right on left side. When you put mouse,
you can press Nampa zero and we can go
to Camera View. Now we can look what we do on left and we can
work on right. I will on left press to
close this tab here. And now I will set similar aspect ratio or
resolution that this image use. Usually I just press
print screen and I have this small
software lie shot. I can easily see the dimensions of this
render or aspect ratio. And last time I go
with 901,050 here, now we get a similar aspect
ratio as this photo use. Let's now switch to
Render settings and I will say this to cycles and GPU. And I will type here
22 and also here. Now we have a very fast render. We can switch here
to render preview. Now when we have
selected camera, I will go on the axis to
1.5 meters from ground. We can move this, or we can just scale this ground here to get effect that camera is far away
from this guy here. We can just put a camera far
away from this object here. Last time I go all to 60
meters from this house here. I will go with same settings. Now I will just create
cube with shift A. And this will be just
for measurements. I will type here 60. Now I will just
move camera here. Now I will delete this cube I don't need and I will now
just scale this ground. I will on left switch to render preview and
we can see how this look because we are now
far away from this object. To put all this in frame
like in this shot, we need to change
zoom or focaling. I will now click to
Camera properties. Now if we bring this focal up, we can see that we basically
to this object here. Last time I go
with value of 120. I think this is similar to setting the values
in this render, but you can play
with these settings. For example, I will show
you what you can do. This is my last seeing here. And I disable volume
metrics from here for now. And you can also go pretty
close to this guy here. But then you need to, of course, change this focal
length, maybe 15. You can use the camera settings if you like this type of shot, and nothing wrong here, but I think you just tell a different story in
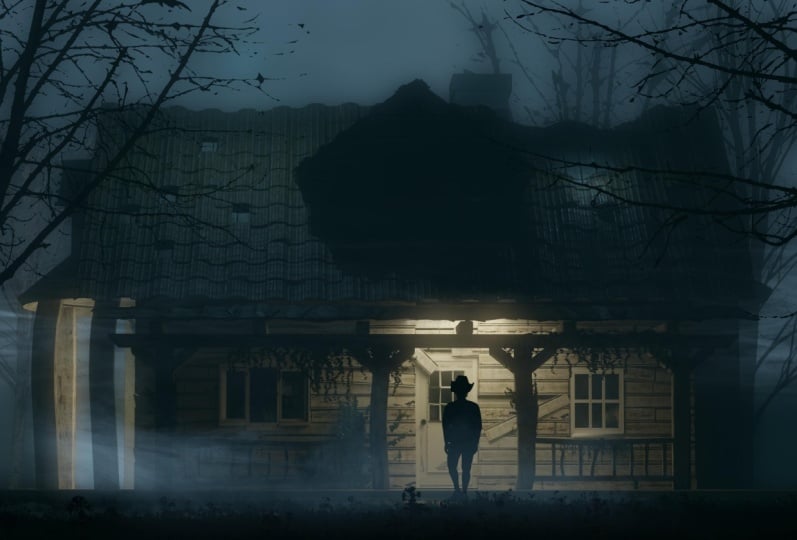
this render here. When I look this render, I get impression
that someone who recording this shot
is behind this guy. When we look, I get impression
that this guy is alone and someone from distance is hiding in this grass or weed. This look more horrorsh for me and because I want to
create horrorsh footage, I think this setting is much better than in this render here.
3. House modeling, basic shape: And let's now start
with modeling this abandoned house for model. I will close this tab here because I don't
need this anymore. And now I will select this cube. And I will press Numpatkey to isolate only
this object because we will now work only
with this house here. You can also go with view, local view and to local
view if you don't have naped back to scene just again, local view and togal local
view or just nupskeyen, We can import this image as background image and I will not share this
image with you, but you can just go with
print screen and you can just save this shot
on your computer. Now I can import this background image
or reference image. I will go with shift
and image reference. I will now go here under
where I save this image here. And I will import
this reference. Now I will go to x ray
mode and wire mode. I will scale this image
to match this cube here. This cube is part, this part of house here. I will try adjust. I will select Image
this cube because this cube are about real
world scale dimensions. And I will press to match this. Okay, about here. Now I will select this cube. And let's bring this little. I will bring this
reference image in background so
we can see cube. I will go with control
A to apply scale. If you press, you can go
quickly to edit mode, or you can just go
here to Edit mode. If you click here, you can select edge select. But you can also press two on your keyboard to activate
this edge select. One is for vertex select, two is for edge, and
three is for face select. This is shortcut and
I will now go with control R to add lout here. I will select just
this edge here. You can go with this move tool and you can bring
this on Z axis. But I will go with
control Z to undo this because I will
use shortcut here. Shortcut for grab is when
you press, you grab this. But because I want
stick only on Z axis, I will press C. But I will now press Escape
to remove this selection. And I will go with amped one
to front portographic view. And I will go now with C.
And I will move about here, this will be our roof. I will just select this image. I will stick to time here and I will rename this reference. But we can see that this
is reference image. I think I will disable
this for now because I import here reference image. I will likely here
horizontal split. I will open here image editor. Now I will open this
reference image here. I can always just
take a look at how this look and I
can model here on. Next thing I will create here
is this small house here, because this look pretty
similar like this one. I will just press A to select all and Y to move
this on Y axis. Now I will go with Z to rotate this on Z
axis by 90 degrees. And now I will press, I
will place this here. If num ped one, I
can see that this go little over this roof. I will go with GC and I
will place this here. Maybe scale a little and Y, scale this on Y axis, and maybe move this here. Now I will press
three on keyboard. I withholding shift, select these two faces.
I can move this. If you want to select
only this part of house, we can press L and Blender
will select a loose part. This part here is
loose part here. I will press to scale
this little on axis. Let's first add some details
on this small part of house. I think we can see
small window here, but let's first create
this roof type here. I will go with Shift
and Shift here. Now, if we press Y on
keyboard, in edit mode, we can we separate this Y on keyboard
and we get this? No. I will press Al, I will press first to
scale this little here. And I will go with
move this down. And I will now press Alt to
extrude this along normal. So I will here extrude
phase along normals. Now with holding shift, we can move mouse up and we can precisely
move this little up. We get this small roof here. Let's now create
this window here. I will go with two on keyboard. And I will press control
R to add loop cut here to line up on the axis. I will press, now we can
go with control to bevel. If we scroll mouse up, we get more loop cuts, but we need only one here. I will not go with
to bring on axis, but I will not go
over this corner here because I get
overlapping faces. Now I will go with control here and move this little on
right and this one on left. Now we can face selection. Or three go to face selection, And we can select
these two faces. And we can go with y
to move this inside. Okay. But this roof
is perfectly flat because we will see only
silhouette of this part here. We can just add some random details and
I will go with control. Are here to add some cuts. And also here we can now just select
maybe every other here, this part are not the same but because we will
see only silhouette, I think this is not
important on this surrender. We can see better.
I just want to avoid this flat proof here. Okay. Now I will go with all x along normals to
bring this little up. We can also add few lots axis. Now we can proportional editing. Just select few of
these parts here and we can go with just to make
some imperfections here, I will also select view of
this withholding shift and I will go with y, t, this little on y axis. Now I will press L
over L over this part, and this part here. And I will go with control B. If you have more loop cats here, just scroll mouse down to remove this loops because I
want only one here. I want to keep this lo pole.
4. House modeling, basic form, part 2: Let's create another roof here. I will select these two parts and we now press,
we scale all the. That's because last time I go
with Y keyboard to separate this and now we can press but without
proportional editing, so just disable this here. Now we can press S, we
can scale this roof here and Z to bring this down. Now all extrude along normals
and just move mouse up. I will press with holding
shift and right click. We can place course here. And now I will go
with cube scale this axis x to scale
this on x axis. Now we can move this out, maybe S Z again, x to rotate this about here. Now we can go with control R and add a bunch of loop cuts here. And control to be level. Now all extrude
along normals and just move mouse
up to scale this. And now I will press L over this part and control
to add one bevel. But with holding shift
I want be precise. Okay, we can now go with SZ again to
scale this along z axis. Now I will again add some imperfections because
this is abandoned house. And I will select few parts of this and I will go with
proportional editing. And you can see this brush here. If we scale this up, we get influence over
bigger area here. Maybe something about this. And we can also add
smaller details here. But let's now create
this part here. Also we have small
on this right side. Let's go now with shift
A mesh and cylinder. Now I will go with pat
seven and to edit mode and also x ray mode because
without x ray mode, if we select this we select only top part but
not bottom here. We need to go to x ray mode. Let's now go to here
and delete vertices. Now we can select this two, and X to X on X axis. And now we can press A
to select all and S, Y scale this y axis. Let's see how this look. X and x, y to scale this. Now I will go with
select and with holding, I will select all
this loop here. And I will now press to
scale this about here. Let's see how this look. We can now back our reference
to see where this go. And now I will go to x ray mo. Move about here, but we don't need to even
follow this reference. Just make something similar. Okay? Now I will maybe
select this with all again and I will
go with extrude. And now to scale this, okay, let's just
move this inside. But let's move all
this inside here. Now we can go with all
extrude along normals. Just add some thickness here. Okay, let's add some,
these columns here. For this we can just go
to shift and likely here and I will go with pad
seven and mesh cube. Let's scale this down. Let's move this little
out, scale this down. Let's just create a few
of these columns here. I will go with Z to scale. This is if you want to scale
this only on x and Y axis, and remove axis,
you can go with S. Scale. Hold shift to
remove and press Z. Now we can scale this, but not on axis. Scale this on x and y axis. But if this is too hard for you can just press to
scale this down. And now to scale only on axis. Okay, let's place one here, move this here on axis. Now I will go with shield the X, place one here, shield Y, and move one on Y axis. But let's now add
some imperfections because this is perfectly flat. And you can go with
control R a lot here. And now you can go with to move this here and maybe control B to level this with tab, we can skip to object mode
and we can select this one. And again with tab we
can go to edit mode. Control R control, I
think this is okay. And we can now select all these columns here and
go with tab to edit mode. Press a to select all
control and add one level. But you can see that this
bevel don't work correctly. That's because if we go to
edit mode to object mode, we can see the scale is not
one control, a applies scale. Now to go to edit mode control
or be with holding shift, you can be precise. My recommendation is to turn on cavity when you do
modeling like this. Because if we go with upped one, we cannot see the
edges but cl here. And if we enable cavity, we can see all these lines here. We can also set this to both the edges will
be even more visible. Let's create also the
small part on right side. I will duplicate this
with X. I will now press X minus one to
flip this on X axis. Let's now to scale this. We can just add small
part of this house here just with cube numped one to go to front
tortographic x. To scale this on x axis Z, we can go with temp
to edit mode three to go to phase selection
and move this here. But all this is just
about silhouettes. If you go Ump at one we can see just silhouette of
this and nothing more. I will go here with edit mode A and control
B to add Bella.
5. Roof, porch: Let's create roof tiles here. I will go here with Shift, right click to
place origin here. Let's create first
one shift, a plane. Maybe I want x axis. Maybe only 10 centimeters. I can type here 10
centimeters, maybe 12. I will now press S Y to
scale this about here. Now I will press Passkey. First one, this
back to our scene. And second, when we press this, we can only this one tile here. Now I will go to tab to edit
mode two for edge select. And I will go with control
R. Now I will bring this little up and control just maybe three loop cuts here. Now A to select A, Al and extrude along
normals, scale this up. But I think it is important
in which direction if you go, you get correct
phase orientation. But let's go with
control Z, Go down, I think we now get incorrect
phase orientation. To fix this you can
just press a and three flip or you can recalculate normal
calculate outside. Okay, now this is correct and we can disable
this phase orientation. And we can go with
numped one shield x. Now I want to rotate
this on y axis y 108. Let's place this here. But we now have two objects. I want to keep this as
one object because I will now use R
modifier control J. Now I will go here under
modifier and generate array. Now I will just
increase this count. I will add another RA
modifier on X axis, I will send this to
zero and on Y axis one, we can array this on axis. Now if we go with Tab
and we go to edit mode, but we have only two
of this in edit mode. And I will now press a X, But now I will go here. I don't want offset of
perfectly one here. I will move this little inside, maybe 0.9 We have
roof types here. Now I will go with Pests Key. I will select everything
which is part of this house. I will press M. I will
create new collection, and I will call this
house next time. When we want to
select this house, we can just go with here
and select objects. Now we can press Napa. This is now not so important because we don't
have too much objects. But for example, in this scene, it is pretty hard to
select all this object and isolate this, For example, move this here is very
important to create, okay? I didn't create here last time, but I created here for example. When I select this object, I can go right click
and select objects. And I can select whole house. And I also parent with this empty cube if I
need move this house. But I will show you this later. Okay, now we can go with naps key to bring
this object here. And let's place this tiles. I need more array here, about 21 on yaxis. Let's now increase
this on X axis. Now I will go with nope
three to write orthographic and X to rotate this on X axis. And I will now try
line up this with this roof X and I need more. This array on y axis, I will count the 226. I think these tiles
look pretty small. We can go to edit more
than press to scale. Now they are bigger, but we now go outside of this. I will bring this little down. The roof tiles are
visible in red, so you can see how this look. We can see all these details. I think this is
pretty important now. We can add some imperfections. But to do this we need to
apply this R modifier. And you can click here
to apply one by one. But you can also go right click
and convert this to Mesh. Now we apply all these modifiers
and if we now edit mode, you can see that each of
these is separate part. We can now go with
L. For example, we can delete few of
the delete vertices. We can go again
with L. We can go with X to rotate this little x axis, or Y. But you can see
that we rotate this from center of these objects. But if we switch this
to individual origin, we rotate this from individual point of each
of these selected objects. One thing we can also do here, for example, select
few of this here. If we enable proportional
editing with we it hold this part
with this brush. I will do something like this
now and also maybe here. Okay, let's do
similar things here. Okay, we can t to
go to edit modes like this part and to add some
imperfection of this part, we can go with control
to add loop cut. Now we can go with control
to add few loop cuts here. Let's add one with control
here and also lots here. Now we can use
proportional editing to this to affect
this part here. I see this small roof here. We can go to edit mode with tab and we can press
the two parts. And I will just duplicate
this with shi x Z -90 Okay, but without proportional
editing -90 Let's go with amped seven to line with this roof
and now to scale. But again I will
go with control. We use this individual origin, but I will say this to bounding book Shi X Z -90 num seven, line up this little
with this roof and has to scale and
bring this down. Okay, let's go with L.
And let's move this here so we can see the
silhouette of this roof here. Let's create this porch here. I will go with shift like click. And I will go with
cube num per one Z. To scale this on Z axis, x, about here, num seven and Y. Okay? We can go with
z Little more now. I will apply scale control. A. Apply scale, and I
will go with tab control. Look cut control B. Maybe to add a little
more details here, we can press L and
Control to add level. Let's create these columns here. I will go here with
shift and right click. I will start with cube
as to scale this down. X to scale, on x axis, z, and maybe y. Okay? Last time,
small parts here. Let's do this now. I will go with Z
scale, stzaxis again. Now I will go with sh, Z, Y scale, y axis, numpad three. Let's move this about here. Now I will move this about here. But before I will go to edit
mode control to bevel this, but first to go to object mode, control A, apply scale, edit mode, and control B. Now I will shift the x, I will click and I
will go with shift. Shift in Blender is
to repeat last step and you will just repeat
this duplication, okay, and we get this. Now I can go with
control a apply scale. And I can go with
tab to edit mode. Select this edge here, this one. And control just one be
to add this nice detail. Okay, now I will create
another column here, shift and likely here. And I will go with cube, scale this down to scale this Z axis, Y. Let's apply scale. And now I will go with z. I will scale this
all down and to scale this on the axis y 45 to rotate 45 degrees
to create this part here, shi x y on another axis. And we get this detail here. We can go shied x p one here, one here, and maybe one here. Okay, let's just add
some imperfection. Tap to edit, mode, control R maybe one here. And control. Let's create this chimney here. So we can go here with
shift, right click cube. We can enable this
reference here but references out this local view. I will select this
and I will select objects to select all house
and this reference here. And now I can go here and I will go with to scale this down, scale this little z axis. Let's now disable
this reference. Now I will go with tab control R three to go to face selection. I can hold this loop and all
the extrude along normals. Now again L and
control B to bevers.
6. Doors and windows: Let's create doors and windows. Here I will select
this part ped, one control tab to edit mode. I can go with Z02. Let's disable this
proportional editing and zero. Now we can move this about, we can move this down
and we can now go with control to level this. Here is our window and I
will move this little up. Okay. Now I will go with control R And I want door here so we can
see that where is our door? And I will go with control, this will be place for door. I will go with control R here. Control to make place for
window here and here. I will go control R, I don't want anything here. And also control R here. And now we can go with
control to create loop cut control
to create Bevel. Now I will with
holding this part, and with holding shift, I can add selection. And again select this loop here. Now I will go with control
to create two windows here. Now I can select one window, another one door and
one window here. And I can go with all extrude
little out just a little. Now I can press to insert this. Let's just check scale. Okay, to insert this now
y to move this on Yaxis. Let's just repeat this again, just to, to move this on X. Before I click anywhere, I will press and
separate by selection. Now this is a separate part. We can work only with this part. Because I will go with control Z to show when this
is part of this object. When we go with control R, we add out on this house. I want to avoid this, I will press P and
separate by selection, now I can select this
part here and control and control to add this frame here. Control here. Let's also now I can, I will just go with shift. With holding shift, we
add selection and just select all these frames here. And control B to level this and now all all
extrude along normal. Move this little out with holding shift,
you can be precise. And again, I will now go with
control B to bevel this. Let's now add some
details on this door. So we can go with T. I can
select just this loop, cut here and I will go with
three to pay selection. To insert this, I can
go with Y to extaxis. Let's now create on
x axis and two axis. Let's select this
control B or bevel shift to move this slightly and
all rude along normals. Okay, we can just add
some random detail here. You want to move this out, we can create effect
of broken window with K. If you go tap
edit mode K knife, just be careful here. When you press K, you stick to this axis here. You can see that nothing
happened because we need to stick to this edge here. This one. But this one here, it's all about angle
where you put camera. So I will move to about here and now had some effect
of broken glass here. Let's see how this is visible. I create this effect here. You can see that
this is not visible. I can quickly preview
this in Render Preview. So quickly here we go
to Render Preview, and we have one point lamp here. Okay, this intersect with this. It's a little hard to select, but let's go to We mode. Okay, if we now switch
to render preview, we can see how this
look in cycles. But to make better preview, we need to change
lighting settings and I will do this later. We can quickly add
sun lamp here, Light, let's bring this 0.2 and maybe add some
bluish color here. And we can now rotate this
to create some shadows. I will duplicate this with
D and move this down. Let's change this to area. And Al, we can set
rotation to zero. So I will press a R here. I will bring this maybe
to 100 or just 50. And we can change
this to orange light, or maybe just ten.
7. Fence and planks: And let's now create this broken fence here so
we can just go with ship. Try click again, cube
to scale this all down. X to scale this on X axis, Y to scale this on Y axis, control A applies scale. Now I will go with shield
to place one down, Shield again X, Y, scale this down, Z to
scale this Z axis, shield the X and
shift R to repeat. Last step, now we can
select all the parts. I will go with control
to join this in only one object and I will
go with shield the x. But I think this part should go here a
little more on left, and this one here if we want
to follow this reference. Okay, and what I can do now, I can go to edit
mode number one. And I just move this about here. And I can press L,
select this three, and go with shield x p here. Okay, I duplicate one and
I can delete vertices. Let's now add a lot of
imperfections here. I will move tab, select this and I will first maybe
delete two of this. Now I will press control
R, Move this here, Maybe this one, maybe we can also this one move here. Next I want to create
these plans here. For this, I download
one texture from Texture.com I will
share this with you. I will not create
first playing here. So shift and click. Now I will go with cube. Two meter is on x, axis is okay. But I want say 2 centimeters. I will type here
to M on the axis. I want to make maybe
15 centimeters. Okay. Now we have one plans
and I can go with Naples. Key to isolate this
control a apply scale. I will go with
Ped, one shield Z. Move this to about
here and she Z again. Maybe one more time. Now I will open here
shader editor and I will create new material
and I will call the plans. Now I will just drag
and drop this texture, but you can use any texture
you find on Internet. On this reference, I see
that the plans are white. The reason I download
this white texture. Now I will plug
here to Base Color. Okay, We cannot see anything because we are not
in Material Preview. So click here to go
to Material Preview. Now, because this
one, this material, we can select all this
and control control L, we can just link material. You can see this yellow line. That means that this is mainly selected object and
we need to select this one with hold
shift and click here. We need to select this
one because this one, this material and control
link material or you can Here under Material Settings, and you can just drag
and drop this here. Okay, Now I can go, I will select all this,
edit mode projection. Now I project this better, but I need UV editor here. So I will split this window
and I don't need this tab. And now I will select
from here UV editor. Now I can select this face
selection, this face here. First I will scale. I will select this face here. And I will press a
scale, this little. Select this one. And scale
this project to another one. And this one may be here. Okay? Now we have four
different variations of this. If we now go to
individual origin and X, we can rotate this metal on
X axis to get this effect. First I want to make
some seems here. I will go with control, scroll, mouth up to add two
of these look cuts, control B, scroll mouth,
exclude along normals. Just move this. Now I can select only these two edges and I can go with control B
to create bevel here. Okay, If we go to object mode, see this, he seems here. I will add here one in middle. Control control. I can scroll mouse up to add. Now I can go with amped
minus to subtract selection. Now I will press to
scale this down. I can go again with control
lumped plus to expand selection control to better. But now I know that I need one for this part
and one shorter. Also here I will, I will duplicate
this shield x and I will make another
variation here. Now I will go to
material preview. What I can do in x ray mode, I can select all the part
and delete vertices. This will not work. I
can just move this here, but you can see that I also
stretch this texture here. But if we enable this
correct phase attributes, we will not stretch
this anymore. I will move this about here. And let's move this here. Okay, now we have
one shorter part. Let's now back Naples Key
to our C. We can go to solid preview because it is much easier to see where it is. Now I will selected
this material. I will change just
viewport display color. This is visible
only in viewport. In solid rib, I will change color to make
this easier to see. Okay, now I will select
the bigger parts. Let's move this up. Let's place this here. I will go with amped one. I make this too small, but this is not so big problems, so I can go with x. I
can place this here, now I will go with shive Z or I don't make any
variation here, I will go with A to make
instance of this object. Now, all these are
part of same object. This will save some
memory in our scene. Will again, I will go with
x to move this about here. I will press X to
scale this a little. I can do same with this one. X to cover all this area a Z, so just be sure to cover all this area and
this will look fine. Okay, now we can
make some variation also here if you
want to go with Y. So said this to individual, and X may be L Y. Okay, let's see how
this looks now in red. Let's now duplicate a few
of these with shift D. Back this two bounding
box and her Y night, maybe we can place a
few of these heroes.
8. Details: Let's now create material
for the roof tiles. And I will call this roof tiles. We are now in solid
preview here. We can change only port
display color maybe to red. Okay, but to see how
this material look, we need to go to
material preview. Now I will just go with color M. I will just add some few
variations of reddish color. I will plug this two base color. Let's now add another color
here will add reddish color. I will add reddish color
bar to pretty dark. Let's add here
another variation. But we cannot see anything here because this is just a gradient. But if we go with noise texture, we can add noise here. If we plug this here, you can see that nothing
changed too much because this noise
is too smooth. We can change this
with another color. We can just this little
more to get more variation here because this
is not visible. This roof is pretty dark. You can see how this look. We don't need to spend too much time creating
this material, but to make some variation
in roughness and bump, I download this texture
from Texture.com You can use any texture
similar like this. I just search for
concrete or plaster. And I now bring this
here to blender. And let's see how this look. I can go control and to bring this mapping node
and texture coordinate. But for this unit,
activate node angular, just go to added preferences
and activate this head on. And let's scale this down, maybe 0.4, If you plug
this to roughness, you will get some
variation in roughness. Okay? The color M. You can control how much you
want to make this shiny. If we add more black color, it will be more shiny. White color will be more rough. I don't want to make
this too shiny, so I will bring
this little down. We can also use this texture
to create some bump. I will go with bump and plug
this to height to normal. Now we get bump, but this is too much. I will bring distance to 0.1
and I will bring this down. This will now look
a little better in render P. Let's also bring this plank material
to all these objects. I will just drag and
move the soles here, but we need to go to edit mode, projection and scale this up, also this part here, but this will be faster. In the material preview, I will select all these
objects without material. Now I will select
one of these planks and control link materials. Now I will select this and go
to edit mode, a projection. Let's now scale this z to rotate this to
another direction. I will just correct
this part here, z. Let's also improve
this material. Just little variation
in the roughness and bump color here. And this roughness, let's
see how this looks. This black part will
be more shiny and this one will be less shiny. I will bring this black. And let's maybe this one
little too black, okay? And for bump, I will
go again, call ramp, plug this here and
bump to height. And this to normal.
Now we can bring this 0.1 and this down. And one thing we can do here, because we already have here this concrete or
plaster material. I will go with
image texture and I will select this plaster
material we have from before. Now if I go with control
shift and click here, I can see how this looks. This scale of this
look pretty good. I can go with holding shift
and control and right click. We can mix these two textures. If I now set this to multiply, I can keep only darker part
from this bottom input here. I will say this to multiply. Let's now back
this material with control shift and click
on this last node. You can see what we get. If we go to left, we get only this texture. If we go to right, we get multiply this
second texture. If you want to make this
house a little more, you can use this here. But I will go with color ramp here to make this second
texture even more intense. Let's see how I just want some
of this area not too much. I will move this white
color hole to left. Now I can get the
details on less area, but you can a little more brown. These dark parts, we
can make brownish. You can quickly switch between solid view and
material and render Z. To add this roof material
to this object here, we can just cle the roof tiles. Now if we go to
Edit mode with Tab, we can press select this
loose part and assign this new material to
this small roof here. What I do last time, I add some details
from asset browser. For example, this IV here. This is from Quicksell bridge. But I will not show you how
to use Quicksell bridge. Now you can download and
install this for free. And okay, I need to update this. And then you can search for
a lot of different assets. But I make one shortcut here. I download assets I like
in my asset browser. For example, I can
just click here and I have a lot of assets
I usually use here. Plans, I have just this IV plan here and you can see how this, this look pretty bad
from solid preview. But if I go to render preview, this look pretty good. And I get a lot of details
with just drag and drop, for example, this piece here. Okay, We can maybe make
whole here if you want. You can just delete this and I think this will look better. One may be last thing I
will do in this house. I will create glass
material here. We can select this object and we can create new material glass. We can now go to she editor. We can delete this principle, BSDFn shift glass and
transparent shift. Mix the two shaders and
plug this to surface. Now we should get some
glass material here, but we didn't apply
this material anywhere. I will select and
withholding shift, I will just select where I
want to apply this material. Now, just select this
material. Assign. Okay. I think we
are done with this. I will continue with
tutorial tomorrow. But before I will
do one thing here, I will parent this house
to one empty cube. I will go with shift A. Now we can select this cube. If we go select objects, and we also have
this slide here, we can remove this
from this collection. I will set this to S collection. Now when we select this object, we select this house. We can scale this or move. But easy way to control
this is if we go me, no mesh with shift A empty be. Now I can go with up at one end. Just make this cube
bigger than house. Now I will go with
click Select Object. Just be sure to empty cube
is yellow selected object. This is not the case. If you get something like this,
you can go with Shift, click here, and control
and set parent to object. Now next time, if we need
to scale this house down, or we can just select this empty cube and
we can move this. But these objects here are
not part of this house. I will select all these objects. Now I will press M. I will
say this to house collection. We need parent to this object. Control set parent object. This should also follow
this empty cube.
9. Volumetrics: This is what we have for now, and let's continue
with Tutorial. I will again split
this window here, so left mouse click
and drag this to right and on left press
and to close this tab. And now I will go with
middle mouse button. And I will drag this on left. And I will click here
to render Tribe. Now we can create
volume metrics. For volume metrics,
I will go with Cube shift and right click
to place Origin here. And now I will go
with mesh cube. I will make very big
cube to cover all scene. I will go with y and X, control A and apply scale. Now in Viewport, this is
visible as a solid object. One said is to bounce
through this object. I can do this if I click here to Object View for display
and set this to bounce. Let's now go with double here and we can rename
these two Volumetrics. I will now remain this
material also to volumetrics. We can now bile this Principle
SDF and I will go with shift and search for
principle volume. Now we can plug this
to volume here. Let's bring density
to all to 0.0 15 last time said this
color to bluish color. I bring this
anaesotrophy to about 0.4 This will create a little
more misty atmosphere here. What I do last
time, I also bring this emission strength to 0.002 This also create a little more misty look but also back some
lighting in our scene. I will also said this emission
color to bluish color. Last time I also said this background or world
color or to black. I will move this almost
completely to black. We have one problem here. You can see that we cannot see in the background
this volumetric, We see only black color here. And that's because we need
change settings here. In camera settings, we have
this clip only to 100 meters. We can see about here. And we need just increase
this to maybe 1,000 Okay, we now fix this problem. We have this sunlight we
add before just for tests. So we can now delete this. We have this point Lam, four point lamp here. If you want to keep some
highlights on this roof, we can keep this but maybe
on the value of ten. Let's now keep this
for now but I will see later if you want
you can go with ship D Y and you can place behind this cabin
very strong lamp. For example, maybe
1,000 or 10,000 here. You can add also
bluish color here. But last time I do
something different, I place background image
behind this house here. Problem, we have this lamp, we always see this edge of
this point lamp, for example, we can make this radius big, but we still see this edge
of this point lamp here. One problem we have here, you can see that this roof is
about middle of this image. We need change camera settings. I will go here, I
will select camera. I will change this
rotation to about, maybe 92 degrees
or even more, 92.1
10. Sky texture: Let's now create a
background image. If I go to my last render, you can see how this looks. We have just a background
image of sky here. I share the links with you
so you can go to Splash. This is image one and
this is sky texture to. You can download both this image because we will mix
these two images. You can just click
here. Download free. I download this
large image here, this one and another one here. Let's download this again now. We can copy this address. Last time I go about 50
meters from this house here, I will place course
here and I will go with shift on y axis. I will type here 50. We can now place origin here. I know that this is about
50 meters and I can go with shift images as plain. If you don't see
the options here, you need to go to Edit
Preferences Heads. You can type here images, just activate the
images as played. Now we can go again with
Shift image images as plain. And now I will navigate to this folder where
I save the images, and this will be our main image. I will click here and I will
import this image here. I will scale this until I set this image inside
this camera frame. Now I will scale this
volumetric cube. Little to cover. Also to place this image
inside this volumetric cube, I can move this about here
and scale this little more. Let's now select this image. Let's play this material here. Blender automatically
create a new material with this background image. I will unplug this from alpha. I will open this
emission here and I will plug this to
color and to strength. Let's delete this
point, lam here. And you can see we get lighting from based
on this image here. For example, if we just for
test switch to this image, you can see cloud texture
from this image here. But let's back this first image. I will just search
for this image here. To back this image with Mt node, I will go with shift
and search for if we plug this bottom input and if we said this to multiply, we can control intensity
of this lighting. If you said this,
for example ten, we get a lot more light here. But last time I go
with the value of 1.4 I choose this
sky texture here. If we go to our reference image, we can see that we don't have a lot of cloud
texture here. We have very smooth image, that's the reason why I choose
this smooth texture here. But we can also multiply this with another image to
back some cloud texture. Because I like this details, we can go with shift D. Now I will select
this second image we download from before. And if we go with control
shift and click here, we can preview this image here. Now to these two images, we can go with control shift, right click, and just drag. And now we can set
this to multiply. Multiply will take dark part of this bottom input to
right, we can see that. Okay, let's now back this last
node here, control shift, and click here, you can
see if we go to left, we get only this texture. And more to right we take dark
part of this bottom input. Last time I go with value of 0.5 we still can see some of this cloud
texture, but not too much. I didn't use this
base color last time. I just need color and
this strength here. What I do last time, I
go with saturation node, because I think we have
a lot of purple color. Also here, I just
saturate this value of 0.3 We can see on this image, this purple color here. Instead of this color here, I want add bluish color. We can go with
another mixed mode. We can plug this here and
we can set this to color. Let's plug this to a, back this to color. We can set this to
color blending mode, and we can set this
to blue color. If you now bring
this factor to one, you can see that we get blue
color here in background. I will bring this
factor maybe to 0.8 This is very similar
like I do last time. We can go with 12 to
see how this look. Let's now create
this orange light. We can see here we have one
point lamp from before. We can just change
this lamp here. Last time I go with
value of about 100. And I said this to point lamp. Okay, this looks good. We can place this
point lamp here. I also duplicate this with x. To move this on x axis, I also place one lamp here. We can this also on this reference image that
we have light from here. If you go with F 11, you can open this image editor and you can go to slot two. And if you press F 12, render this with this
new lighting setup. If you now press on keyboard J, you can skip between two slots, slot one and slot two. Here we have only 22 samples. You can increase this value in render preview, For example, if you said this to 100, if you now go to slot three, it will be a little
slower but not too much. Last time was only 6 seconds. This will be about 12 seconds. Render time go double. But let's see, this is
before and this is after. Before and after. We get much more details here. What I do last time, I increased this resolution, I said this to 150. Now render time go to
24 seconds, this is 12. And now this go to double, but we get bigger
resolution here. This is before and
this is after.
11. Wheat: And let's now create
what, or grass here. This is file I will
share with you. And you can find
here we collection. Okay? So you can find
this collection. So you can just go, I
click Select Objects, and then you can find
the objects here. I will now press
Np key to isolate only the three models and
you can see how this looks. This is what I do for one
of my last tutorials. I will go again, select objects, You can these three objects and you can go
with copy objects. And now we can import this to our paste these objects here. If you don't see this move
tool, you can just click here. And let's now move this somewhere we can
see these objects. Let's again, we
selected these objects, press M to create
new collection. Now we can put this. Let's now set this
particle system so we can select this ground. And I will now close
this reference. This is not reference, this is sky texture here.
But I don't need this. So I can go right click and
Join Areas and click down. Okay, now when we have
selected this ground, we can click here to Particle and Add new
Particle system. And we can set this as here. Okay, let's go with the
control A and apply scale. You can see that this particles change because that means that this scale affect our particles. Okay, now I will say this, maybe to 41000 here. I will click here to advance. But I don't want this
blender to fall here. Particles, we, we, our
particles will go here. Rendered collection. We have this We collection here. From this collection we, you can see that we get
this weight on the ground. But we need to
change scale to one. Now we need fixed rotation. I will enable here
rotation and I will say this to global z, okay? But don't work. I think I need apply
rotation for this weight. But we don't need to do this. We can just play
with this value, global x work or global y. Okay, I check last time, I think this look too big. So we can bring this scale down. Last time I go with
value of about 1.4 You can see on left
that these particles, but if we change
scale of this plane, we will get the same amount of particles on a smaller area. If we just scale this area, we get more density of
this particle scale. I don't want any particles which are not visible in camera. I will go again with x. Okay, here we start. See this corner? I will
scale this now, y axis. What I do last time, because I want more
density, closer to camera, I will go again with y. I
will make this more dense. But here in background, I don't need too much
of the particles. I will go si y. I will scale this and make
this bigger in background, this means that we have same amount of these
particles on bigger area. I think last time, duplicate this even
one more time. So we can do this. I will go with Y. I will now go with X to place one
here, background. But depend on your computer, this can slow down your
computer if you want. You can go here in Particle
system settings and you can in Viewport display
bring this value down. If you type here 0.5 in Viewport you will see only
50% of the particles. But when you go
with 12 to render, you will get 100 of this render. But let's play a little
more with this setting. I think I can handle this. I will maybe scale
this a little more. I will just drag this
to about 0.47 I will say this increase this scale randomness when we
have this to zero. All these are same height, but if we scale this to about maybe 0.1 or 0.2 you can
see that some of these are, become bigger or smaller. We can also randomize
some rotation here. If we move this all
to one, we get this. But I will go with value of 0.2 or 0.15 We can also add some
randomized space here, just a small amount. I think I will
increase this value to maybe 4,500 Last time, this new color management
in Blender 4.0 said, I go here to color management
and I said this to GX. And you can see that this
now become little darker, but we can back this
exposure up and also this gum to back
some light here. And we can add more
atmosphere here. If we, in this volumetric cube, increase this emission
to maybe 0.0 004. Okay, let's or maybe 0.0 003. Let's keep this for now.
12. Human: And let's now import
this guy we have here. If you want to wonder which
model I use in this render, I use this Photoscan model from Blender market and I will copy this link if you
want buy this Don. This is not affiliated. I just like this model. This cost $7 if you
want to buy this. But for tutorial purpose
I always use free model. We will use one model from sketch fab for this tutorial and I also pay this link here. Human model, you
can copy this link. Now we will use this model. This is we can change
pose of this model. For this we will use, I will
show you how you can use. Let's now this model
I prepare for you. You can click here to
download three D model. You can use a few
of these options, but last time I go with FBX, you can just click
here to download. Now you can open
this folder here, this is where I download this. Now we can go with
click Extract files. We get this human character
here and other sources, we have this JakBx. You can just go with control, Copy this address here. And now we can go to do. If we now import this
model in vender, we will get this pose. But I want to change pose. You just need make
free profile on mix. You can just log
in after you file. I see this model
here because last time I applad this character, you just need to click
here. Applaud character. And now you can select
Character file. You can navigate to this
folder and just select this jack and click open. Now we can click next, but you also have three
characters here in, if you like any of this one
you can select from here. But I will now go to Animations and I will
now change pose. If we click to any of
the animations here, you can see that we apply
pose to this character. But because we only
need one frame here, you can trim the frames here, for example, only this one. Or you can even export
whole animation. And Justin Blander select
key frame you like. But let's choose something
similar like this pose here. You can also search
here for poses, but I will select just one
of standing pose here. Okay? I care only
about this pose here. So I will trim this even more. Okay? And now we can
click here to download. For this, I will use FBX 7.4 and I will say this
to 24 frame per second. But this is not important
because we need only one frame. And I will click
here to download. Now we download this
Jack but with this pose. So you can click here, we can copy this address. And I will now go to blend. I will go with file, import B. I will
import this blender. This guy is now
inside this house. I will go with y. I will go with L Z 108. Next time when you
want to move this guy, just be sure to
select this bone. If we select this, we get this. Just be sure to select this guy. And you can move this
and you can rotate this. Let's see how this
look here I want placed this guy about 10
meters from this house. Let's just quickly, we can
use this measure tool here. I will just press Y
to stick on axis. Okay, This is about 8 meters. So we can bring this y on axis. And about here. Let's also measure
how big this guy is. Let's go with shift cube. I think I need to
scale this little down cube two meter in brand. Let's scale this little down. If you want to disable
this overlays in brander, you can always click
here in our reference. We can see here on this guy. We can also go last time, also find this model here. We don't need
search, we can just download this from sketch file. This model, you can again
click here to download. We cannot see BX here, but this time we
can use this OBJ, Open this model here. Now I will extract files. Okay, and other sources, we again extract this extra
here, file, import LBJ. And let's face
this address here. Let's click this here. You can see that we
have this t here. Now I will go with non
pesky to isolate this. Let's go with X minus night
to rotate to this direction, Zeitz minus N. Now I will go to edit mode to
see mesh density of this. We can see that we have
a lot of polygons here, but we don't need this, especially because this is
too small and in distance. I will go with mesh. Cleanup. Decimate Geometry,
and I will set this to 0.1 or even less 0.0 y, okay? Or even 0.03 This is
enough information for us. And one thing I will, I will
go to material preview here. And we can see that this
texture don't work. So I will maybe, yes, we get this texture
if you want this texture. But let's check this resolution. You can see that we have 8 megabytes here,
four resolution. But one thing we can do
if we bank this material here in Blender settings. Under simplify that we want to use maximum
one resolution here. If you click here,
this is viewport. Viewport set even less, but for final red I will
use maximum one resolution. This texture limit affect whole, not just this head, this also affect cloud texture
we have in background. I will back this maybe
to two K because I don't want to reduce this
background sky too much. I will say this to two K. Let's see how this cat look. So we can keep this because this is only silhouette and
it's not visible. You can also delete
this material and maybe create new material with just brownish
color. And it will work. But let's now back to
our scene with Napa Key. Now I will select this guy, maybe just head and
here, and this part. Let's go with Nps key. So we can set this head
on this head here. I will press to scale this down. Now I will go with Numpad
three to side view. And let's place
this to this head. I think this look pretty okay, so we can make
another test trend. This is how this looks for. Now, one thing I want to enable
here is depth and field. You can see that everything
is in focus even here. We can go with slot six, We can select camera. I will enable this
depth and field. You can see that we
get a lot of bliness here because we need the
select focus point here. Now blender by default use
this value of 10 meters, which is maybe somewhere here. But I will now set this focus object and I
will select this guy here. Now we put this guy in focus, but this value is too low. Last time I go with
value of four. Let's now make the stnder again. This is before,
and this is after.
13. Trees and bushes: Let's import three model. Last time I use this free
model from sketch fab. We will import now
this is how this look. But if you want to
use this model, this is from paid ad
which is called botanic. If here this is how this look. Polygonic botanic
from polygonic. Let's see which model I use last time I go to this category
and I use this model. But because I want to
share this file with you, I will use free model. I also think that this
guy, the same model, you can see that
this look pretty similar like model
I use last time. I think this is
same model but of course you can use any
model you find online. But last time I
prepared this ing for you from Sketch Fab. We can download this model, you can again click here, Download Model, and we
can again go with OBJ. Now I will go here
and I will go to extract files under sources. I will again files
copy address of this source file, import OBJ. Let's import this object here. I will go with x n x minus. Let's scale this down. I place this object here. I will process again and
Z to move this down, we can go with RZ to
rotate this on the axis. If you want to make this preview faster, you can search here. For volumetrics,
because we rename this, we can disable this for now. You can just focus
on this tree here. I will now go with no pesky. You can see this mess here. That's because I think
this is Photoscan. With Photoscan, you
get a bad parts, but we can try fix
this a little. Let's disable this
render review for now because this slow down
our computer and you can see the loose parts if we go to edit mode
and if we press L, we can select this
one piece here. Now I will go with control
to invert selection, and I will press
Delete vertices. Now we keep only this
part which is connected. Next thing I will do here, I will go to Edit mode. We have a lot of vertices here. I will again go with mesh, clean up that's in my
geometry but I will, Brenda, remember this
value we used last time, but this is too much. I will go with 0.3 here to
back some of this mesh here, or 0.2 Next thing
I will do here, I will go to Scalp mode. With this smooth tool, I will try smooth this a little, okay, This strength
is too intense. We can play with these values. Now we can just go with this brush and we can
smooth the bad parts here. We can also go here in Render Preview to
see which part are bad. If you press nut zero, we go to camera view. We can see from Camera view
which part is bad here. This one you can see this here and this part here. Okay, I think now
this look better. I will back this volume metrics and let's place one
in our reference. We can see one in background
and one here in foreground. I will go with all the not shift D because I don't want
duplicate the whole mesh. I just want to make instance of this object and we
can scale this down. Maybe Z to rotate this little all to move
this in foreground. I just want to see
this part here. I will place this
here close to camera on this reference. We can see some
highlights on this area, but here is completely black. We can add some small area lamp here to back some details. I will go with shift light leak. If a light area M, you can see that we
get some details here. But I will set this
to bluish color and I will rotate with Y
to this direction. I don't want too much affect this D here in our reference we can see the bushes
here and I also add last time I use again, botanic Don because
I have this Don. But of course you can
search on sketch. Let's see what we can find here. You can find a lot
of free models, but I can also recommend you to download this free pack
from Three Shaker. I will share also
this link with you. I think you just need set your e mail and you can download all these
models for free. But I do this last time. I will now just open my browser and I have this threshold now. I can just bring
this to my scene. I will just use one of these models and I
will place this here. I will just go to
edit mode and I will check mesh density. This look okay, but I see that I have a lot
of texture here. All the text, all these
materials have texture, let's see, shape the editor, two or three texture. I want to reduce
this because this is visible, only a silhouette. And I will delete this
one and this one. Okay, this leaves. Use this one, so I will delete this one here. And I will just keep
this green texture here. Now I will be back to my scene and I will
just play with this.
14. Compositor 1: I think we are now done
with setting scene. We can now do some post
processing inside Blender, inside the compositing tab. But for this, I need
some passes here. I will enable this past. But we can change settings of mis pass here under
world and is past, but the default values
will not work for us. You can preview this
mis past if we go here under Material Preview, and we can select here is Past. You can see how this look basically get only
information which start from five meter from camera which
about here to 25 meters, about here I want to
change to about 30 meters. This is pass start now from here about the value
of after this house here we said this cabin to
60 meters from this camera. Now said this maybe
to 80 meters. Okay, now we can
make this combined. I will make here and I will also enable this glossy
direction pass here. Now if you want, you can increase the
render samples for final render maybe to 150. And we can now press 12. Now we can go to Compositing tab and we can click
here to use nodes. We have activated this backdrop, but you cannot see
anything in background. That's because we
need to activate. To activate this,
you need to go with control shift and click here. Now we can close this tab here because
we don't need this. And if you press on keyboard, you can zoom this out with all, you can zoom this, I will
press to close this step here. Now if we press Control
Shift click here, we can preview this mis
pass glossy direction. First thing I want to do here, I want to add more mist. How milo mist is basically blue, a far from camera. We can create this easy
if we go with blue node. If you plug this image, we can click here
with Control Shift. Click here to preview this. We can see that nothing
happened because we need to increase
this blue value. Now we have image
and blue image. If we now go with mix, if we plug to second
input and this first one, now we can choose how
much we want, blue. If we go all to left, we get only this value. If we go to right, we get this value. But to make this cleaner, I will now remove
this composite. This is how the result, and this is vide for example, if you go with, you can see
that now the result is black. But if you go to node, you get this will
for now remove this. And at the end, when we are happy
with this result, we can plug just this last
node to this composite. Okay? But I don't
choose percentage. When we move this, we
basically get blue our image. But I want to put this blue
only after this guy here. We can control mix
with Mi node here. If we plug this here, you can see that something
happened but not what. We want to control
this with color M, I will go with color M.
I will plug this in, this is pass here. Now if I go with
control shift here, I can see how this look
basically black color. We will get this first input
and there is white color, we will get this second input. Now we want to tweak this here. Let's see with control
shift here how this look. When we move this, we
basically get missed. This white color I want to put missed
only after this guy. Okay, let's try maybe 200. I will back to 100 or maybe 150 to preview before and after. You can select this node. And you can press this is
before and this is after. Or you can select all the nodes. You can also press, but
we can go even further and we can import over
instead of just blue image. I download from this video here. I will share this with you. I will paste this link here. You can find this link, I will call this overlays. And you can just
click on this link in description of
this video and you can download all the Ola. This is how this look, you get te, high
quality overlays. Now we can use
this in our scene. You can see resolution. This is too big. But now this blender compositor is
much faster than before. And I think we can handle this. I will use maybe this one, but you can use any of this. I will now import this drug and rob this to our
blender compositor. Now if we go with control
shift and click here, we can see how this look blender use relative
size of this image, whole images displayed here. But we need scale. I
will go with scale. I will say this to render size now will stretch
this to our render size. But I want, I don't
want stretch this. This is how this look. If we now go with Control Shift, right click this, we can
multiply these two textures. I will set this to
screamlending mode. Screamlending mode, ignore black color, and
keep only white. And that's what we want. I think this is still too big. So we can go with Shi. Duplicate this scale and we
can set this now to relative. Said this maybe 2.8
to make this smaller. Or 0.9 Now we can holding shift, bring this little down to about here to control where is this in tre this space we
can again go with mist past. I will go with shift D to duplicate this color
ramp again and pass here. Let's now preview this. This is the same
value we used before. Let's see how this look. If you plug this to factor, we get this fog texture
only after this guy. But we can play with
these settings. Now if we move this here, we can also put some fog
here closer to camera. But we can also paint this fog, now it's completely black. We can paint this to
bluish again, mix fog. Let's set this to multiply
by this bluish color. You can see that now
this become bluish. Maybe we can select
some of this color, but visibility also depends
of brightness of this color. Here, we need to bring
this value closer to one, or let's just select
some of this color here. You can also control
opacity with this white color this
to pay this effect. If you go to white, we bring this effect. We make this effect
more visible. If you want left some
folk in foreground. You can also play with
this black color, black color in blender zero
and white is value of one. If this is too sharp for you, you can always go with
another blue node. You can blur, you can
say this, maybe ten. Let's try 100 to see
how this affect you. Can see that we get blue, this sharp image here. But I will go maybe only
with value of of two. Let's import one more. I will use maybe this one. We can now place this here. Last note is what
we have for now. This is our new image. I will now mix this new
image with this overlay. But when I preview this, I get the same as I get before. Duplicate this, I
will plug this here. Okay, let's plug this here. We get smaller and bluish folk and now we can go
with another mix node M. Let's first input
and let's plug this to Wil. Now we multiply this,
this white color. If we go all to left, we have our image and let's
plug this to second input. This is our new folk texture. Now we need a new color. I will go with shift. Let's bring this here and let's
plug this mist path here. Let's use this aspect. And we again set this to
screen because we want to ignore this background
we have here or here. Okay. And we can see
this new texture here. Now we just need play
with this scale. I will move this maybe. Let's import one more. You can play whole
day with this, but let's try with
this texture here. Again, same process,
just control shift, click, set this to
screen blending mode, to ignore black color
and keep only this. Now this texture is too big, so we need to scale nodes. D, plug this here
and this one here. And now we scale this down. We can duplicate this
bluish color here. And let's now play
with this position, but I don't like
this image here. So maybe we can replace
this with another one. Let's see how this one
look. Okay, this one. Add a here. I will place this
behind this cabin. Okay. We can keep something
like this and let's see this. Okay. This is how this
looks for now and I think it thing is that you know how this works and you can
play with this holiday.
15. Compositor 2: Let's now create a
little glow effect with this orange light. You can see on my render how
I get this soft light here. And you can also note on
this reference image, and let's try create this now. For this, we can just
add orange color. How to add orange color? I will go with mix color here. I will set this to
orange color here. Now we choose between our
render and orange color, but I will say this to
screen blending mode. Now I need the mask, which can tell blender
where I want to put this orange glow effect. For this, I will now go horizontal split and I
will open new tab here. And I will now go
to image editor. We can create mask quickly. I will go here to mask. I will open note, basically I will
open our image here. Let's move this left
so we can see image. I will now create mask. You can create mask with holding control and
left click mouse. Okay, first we need create mask. First I will call
this orange globe. We can now go with
control control and click left click mouse. But I will not do this because
I want circle mask here. And we have one option here, so we can go with a circle. We basically add this mask here. I will now press, and I will press this mask on
this area here. And I will press to scale this. Or you can move this point
also with you can create mask. Now we have this mask here. How to import this in composite. Or you can go with shift A
and you can search for mask. Now I will select this
orange glow mask. And if we go with
control shift C here, you can see what we get. We basically get
black and white here. If we now use this factor
with tele blender, use this. Second input is white color. But we have a few problems. First, this is too sharp
and we can fix this. If we go with a select
this mask here. Now we can transform
scale feather. If we move mouse up a
feather to this mask. I will scale this a
lot to smooth this. Now I will press a and I
will scale all this down. Okay, we have another problem. We want to put this after this guy and only
in this area here. We can again use missed pass for this.
I will go with ship. I will again plug
missed path here. Now I will say this
completely. Let's try this. Okay, let's put this
to black. For now. We have this another mask here. We can multiply these two masks. If we go with control
shift and click, we can now set this to multiply, multiply from this image. With the part from this image, we keep only white
areas from this one. And we get basically this. I want also put this
fog after we part here. Let's see how this looks. I want move this
little more here. See how this look. Okay. If I press now M, I can see before and after. Okay, one thing we
can also do here, we can play with this mask. We can also bring this here and this one here. We can add. Okay, this will not
work, but with control. And let's click, we can
add New point here, but I will just play
with this values here. Also, I can scale this feather. If I just move this drug. And move this here. Okay. If I now press M, I can see before and after we get this problem because of this glass
texture blender. See this as transparent. We get more this
orange color here. Now this look a little like someone turn on
light inside this. But let's play with
these settings here. So you can now see
before and after. So before I put little focus with this
orange light to this area, I do this last time
in after effects. Here is much easier to control. I have same mask I created
with this pen tool. Here I have this missed pass where I put this
after this guide. This is how this look in after effects inventor is little
harder to control this, but same technique I use here because this is
Blender tutorial. I want to do this in
after effects now, but technique is same. Basically I create this
mask here and I multiply this mask is pass and I get and I put said
this to screen banding mode. This is before and after.
16. Compositor 3: And in after effects I do
similar with this sky. If I enable this, you can
see before and after. In after effects I create this gradient ramp and
send this to radial. And you can see how this looks. So basically I create this
circle with gradient effect. And we can now try
do this in blender. I will now back to blender
and I will create new mask. We have one mask here and
let's create new one. I will call this sky mask. We can now go again
with a circle. We can go with G And place
somewhere in middle here. I will press if we go with ship. And we can select now this sky mask here.
And we can preview. Basically we get
this and now we need a feathers of mask
transform scale feather. And just move this up
to feather this a lot. Now I will scale all this down. Let's see what happened if
we use after this blue node. Maybe we can smooth
this even more. I think this works. And maybe we can also
try it. Color ramp. If we said this to be spine, this should be more smooth, but this is too much. Okay with color. Ramp is too hard
to control this. But now we have this mask. Now we can again go
with mixed color. If we now this first input, we basically now get our render for second input here I will say this
to maybe bluish color, and I will say this to
screen bending mode. Now we can choose
between our image and this bluish color. But now I will use
this mask as factor. You can see what we get. Now again, we don't need
only this sky mask. Multiply this with our mist path to put this behind
this house here. I will duplicate this. She again, I will plug this
is path to this color ramp. Now again we have one
mask and another one. And we can now go with shift click and we can set
this to multiply. We basically get this. And we can now use this
as this is what we get. And now we need to play
with this color Mp. Okay? I want to put this behind, this house here is black. And I isolate this from the sky. And let's see how this look. Now. If we press M, this is before, and this is A. But this is obviously to intend. I will bring this white color
closer to black to fade this effect before and after. Let's see in after
effects how this look, I need back this and said
this to this effect I get. And this is similar in blender. One thing I do in after effects, I back some glossiness
on this roof. We can do this glossy
direction path. If we go with control
shift and click here, we can see this glossy
direction path, how this look, how we can use this, we can a mixed color we can in First Input and
we can now plug this. Glossy direction
to second input. We can now choose again how much we want second input and how much we want
this first input. But if we said this to
screen blending mode, we take only bright part
from this second input, we get basically this effect. But now I just maybe
only this part. On roof, I will go again, click here and I will
call this Roof mask. Now I need to create
another mask here. I will, now I will go
with control click. I will create this mask here. I will again go with a to select all mask transform scale father. Okay, now I think I invert something here because this mask go to opposite direction. I will try again with control. Click, left click. And let's try again. Mask scale, feather. Okay, now it's, now this work. So let's preview this mask. So I will go with
again with mask. Let's select this sky mask
here and control shift here. Let's see how this look. Okay, I can select
only this feather here and I can just smooth. Let's now do as we do before. I will duplicate
this color Mp and I will again go with plug. This is to this color Emp we need multiply
this two texture. If I now plug this
mask to this factor, I get this whole time
I have selected mask, I need to set this to
roof, here to roof. Okay, this is how this look now basically we get glossiness
only on this part here. And now I need again multiply this two texture control shift right click and set this
to multiply blending mode. Let's see how this look now in blender will put this screen blending
mode only on white part, but I want white part
on this roof here. Now tweak this color ramp, I will set this to white. I will now go to
another direction. This is before and after. You can see that we
get this glossiness only on this part white area. But this white area is too big. We also have white area on
this guy and the windows here, I will just play with this mask. You can see the difference
here before, this is after. That's how I get in
after effects before. And this is after. This is similar in after effects,
before and after.
17. Compositor 4 - Grain and Overlays: One thing which is
important here, I also add a lot of grain, every cinematic shot, a lot of grain for this use convert. But let's try to do
this in blender. For this we will use
another overlay pack. I download this long time ago, but I will share, I hope this link still work. You can download all this
texture from this link here, paste this link here, gray overlay, but you can find a lot of
similar things on Internet. Let's see what we can use here. Maybe we can try this one. I will import this in Blender
and let's place this here. Let's again just multiply this. Let's go with the
control shift and right click now we can mix
these two texture. If we said this, then I see that I have rot of
gray color here. Mostly use over blending mode. With the three blending modes, you can remove black colors
from this container. Here, you can remove
white colors, but when we have a
lot of green color, but when we have a lot
of gray color here, I mostly use over blend mode. This darken our image a lot. We can fade this a little, but we can always back some
brightness in our image. If we go here to
color management, and if we move this right, let's see how this look. Okay, If we preview this image, we again play with scale. I will scale and I will say
this again to render size, we can see how this look. Now I will just go
again with scale. I will scale this to maybe 1.2 because we have
the edges here. If I press M, this is
before and this is a. Let's add one more
intense, I will, I will just this intense
film grain texture. I will place this here and I will again go
with Shift and right click. Let's again go with scale. Set this to render size. Let's now set this maybe
over blending mode. This is obviously too intense. I will bring this hold
down maybe to 0.2 This is before and after we get some film grain
here, we can scale. I think grain is too big, so we can scale this. I will now go to relative and
I will say this, maybe two. Okay, I have this nice overlay. Use this in my scene. I don't have a link for
where I found this, but you can just Google
something like this. Cod overlay. And I think I'm sure
you can find a lot of similar things on Internet. I will try this overlay now I will go with Control
Shift, right click. I will set this to multiply bending mode
or screen lending mode. Scream blending mode will ignore black colors and keep
only this white part. Now I just need to play scale. I will again set this to
render size one more scale. Now to relative and I
will say this to one, maybe 1.51 0.1 Just scale at. Okay, let's see how this look. We can now go with curves. Maybe shift and curves, because I think we
need more light here. We can just bring this up to add more brightness
here, all too. Let's see how this look. If you want to play
with the curves, I will close this mask. Tap here because we
don't need this anymore. You can add another point here. And you can maybe just
dark color to shadows here and maybe more bright
color to highlights. But be careful with this curve, it is too sensitive. Let's see, before and after. Okay, this is without
this overlay, with this overlay here. Now if we want preview,
let's delete this. I'm not sure what we can select all these
nodes and we can press M. This is what we get from
without this compositing. And this is before. I think it is much better now. And this is Hall
for this tutorial. Thanks for watching. And I will share this blender file with you
and see you in next tutorial.
 šime Bugarija