Transcripts
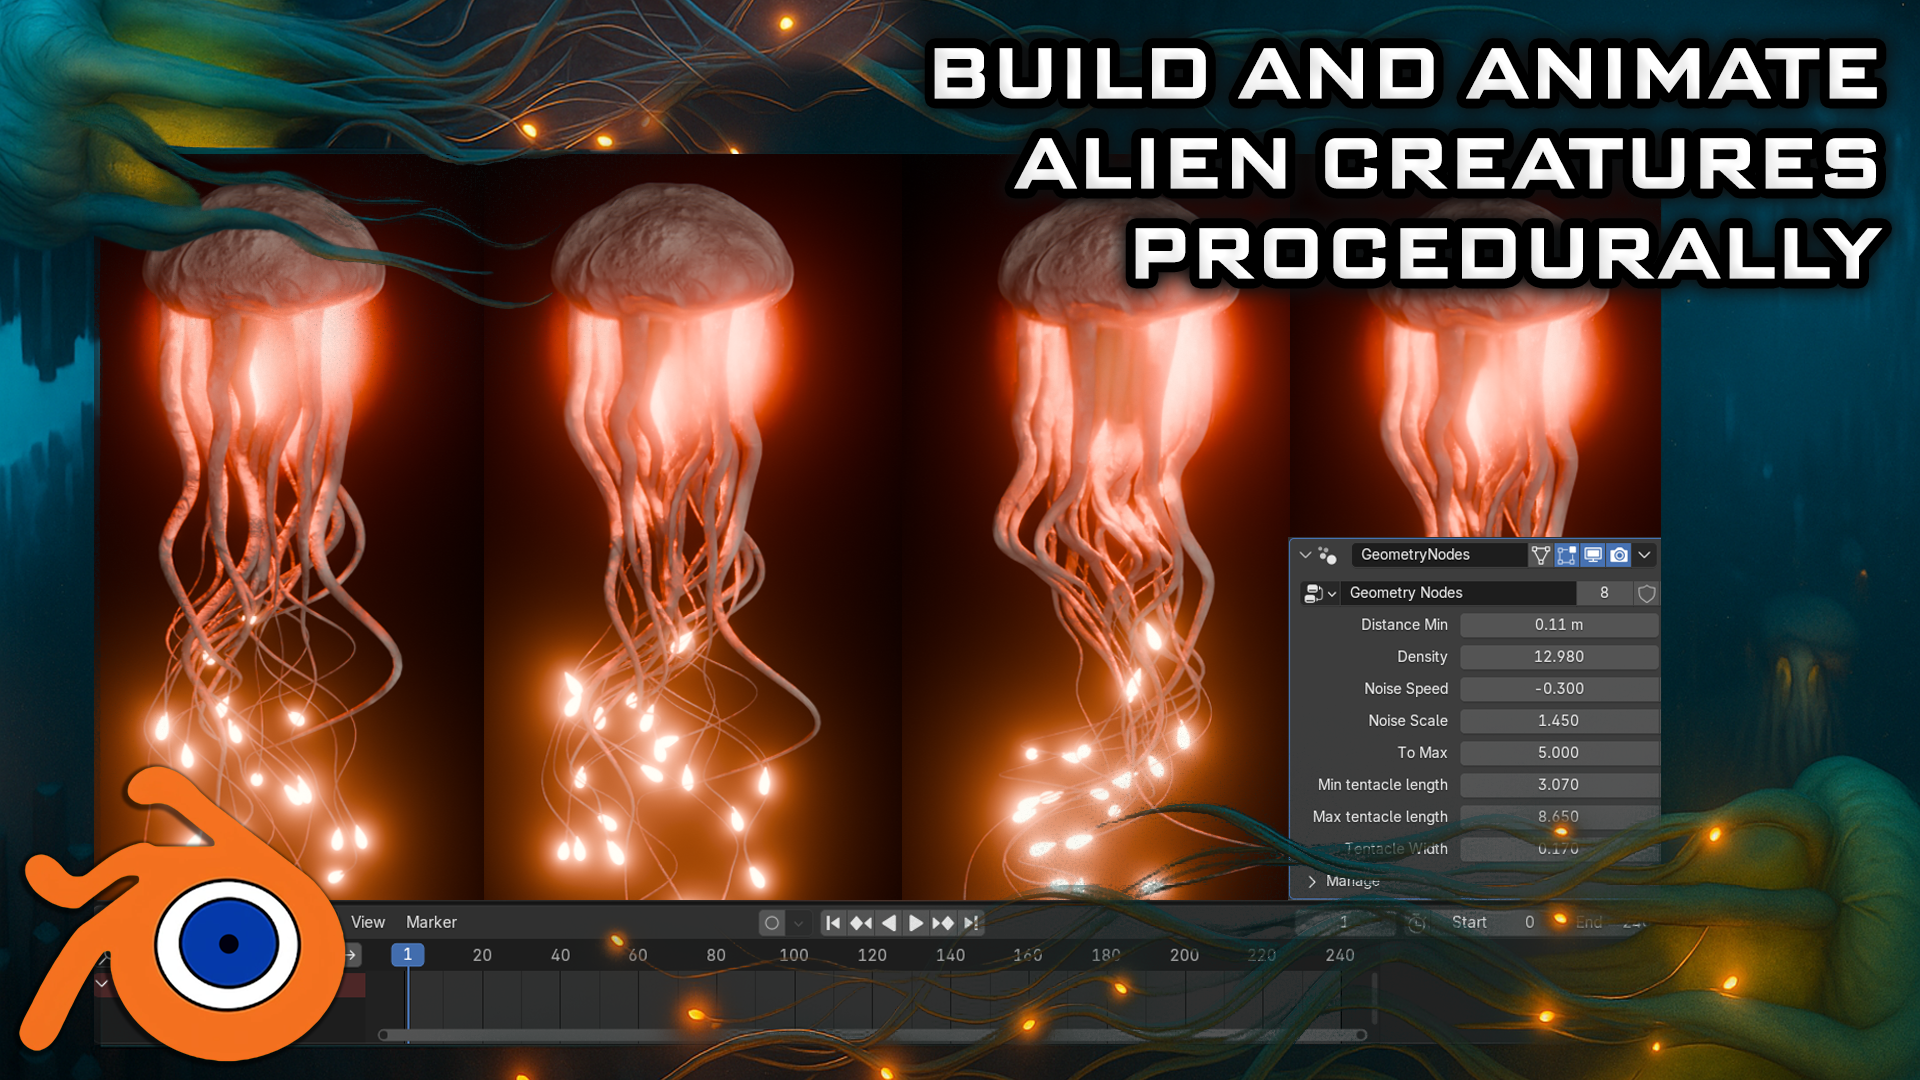
1. Intro Blender Geometry Nodes Alien Worlds Tentacles Terrain Lighting Masterclass: What if you could build an alien cave world procedurally
right inside blender, twisting tentacles to icy
terrain and cinematic lighting or without touching a sculpting brush or
normal polygonal modeling. Hey, I'm Josh. Over
the past few years, I've been crafting surreal
blender animations, Scifi landscapes,
organic scenes, abstract blenders that
push the boundaries of geometry nodes
in ways I enjoy. Now I've distilled all
of that experience into one focus course built to elevate your
blender skills fast. Welcome to blended
geometry notes, alien worlds, PedagalsTerrain,
and lighting master class. In this course, you'll
learn to construct eerie atmospheric cave
environments from the ground up, harnessing procedural
muddling, animation, and lighting to create
scenes that feel alive, deep, and strangely immersive. We'll be using Blender 4.3, and this course is perfect for three D artists, animators, and creatives ready to
dive into the weird, wild and wonderful world
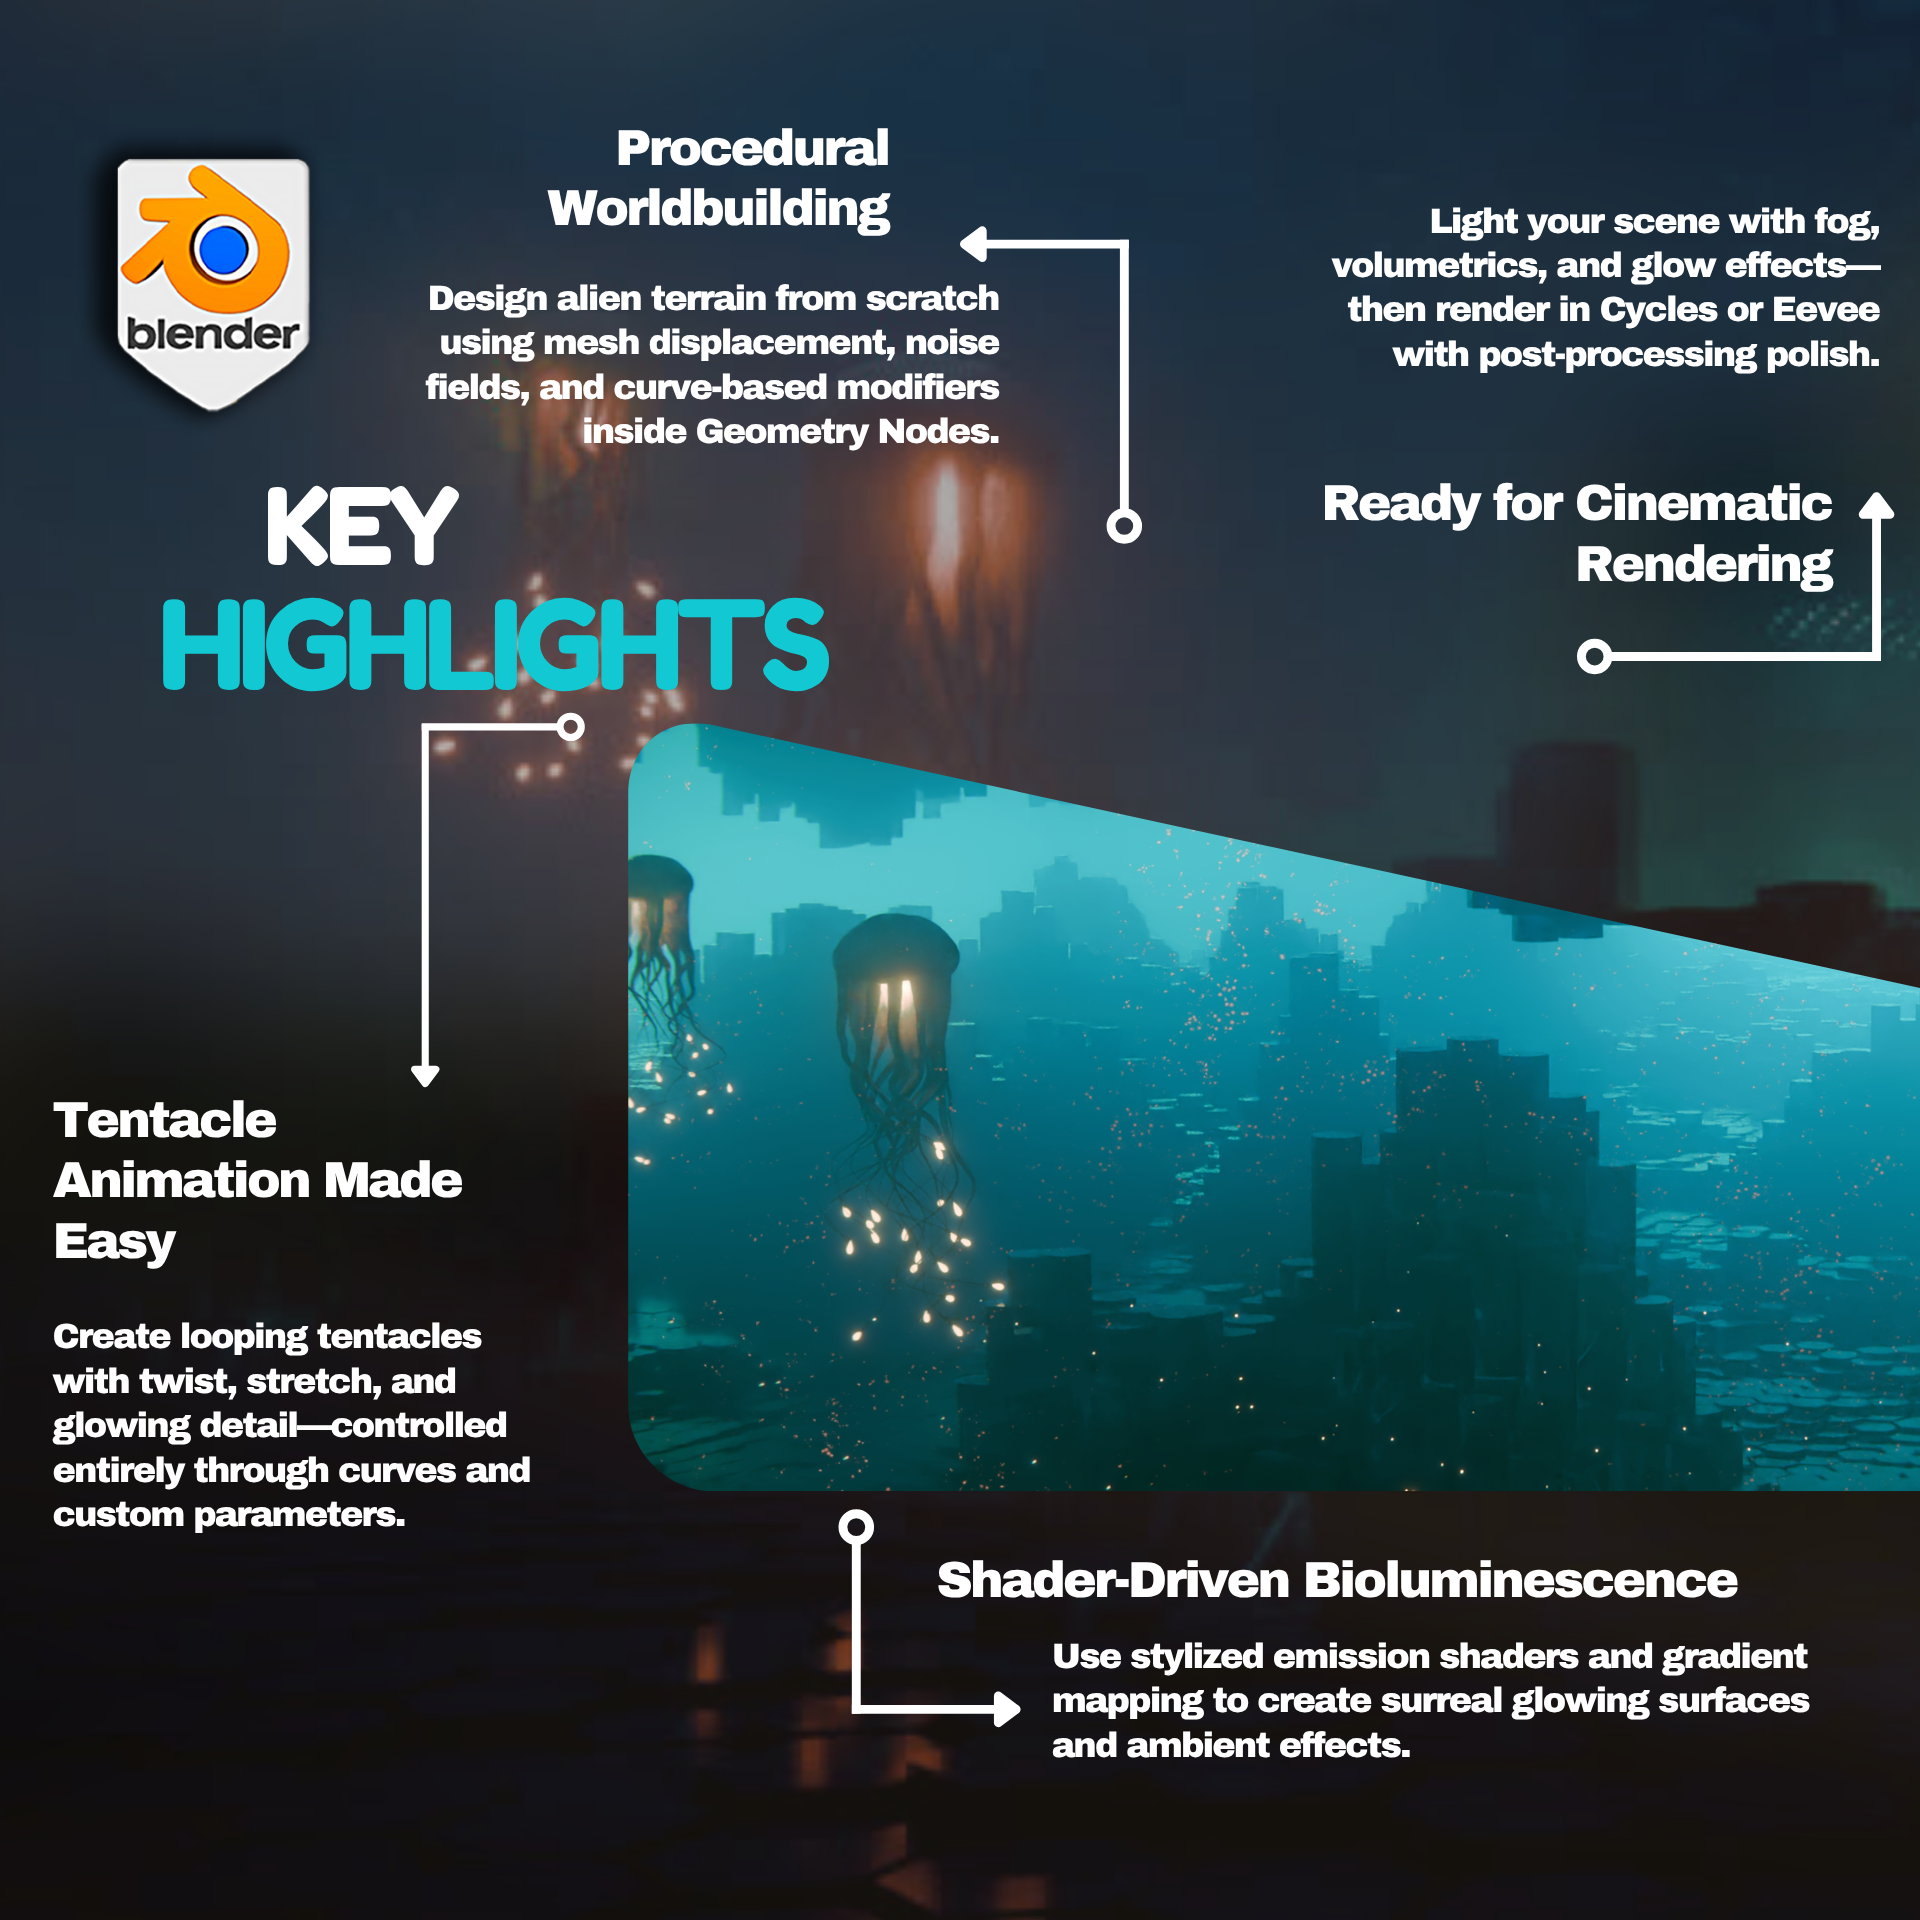
of procedural workflows. Here's what we'll do.
Procedural terrain, generate alien landscapes
with ridges, peaks, and crevices using
geometry notes and procedural mose textures. Technical generation
and animation. Design fully procedural
tentacles that twist, pulse and animate endlessly.
Lighting mastery. Create eerie cinematic
lighting setups with lights, fog volumes, and
layered gradients for dramatic atmosphere. Shaded design, build stylized
ice and stone materials to bring your environment to life with rich visual texture. Learn optimized work
flows and cycles plus pro level tips for post
processing and final render. We'll also cover procedural
animation, camera movement, and exporting a clean, impactful render, so your scene doesn't just look interesting.
It looks incredible. You'll get access to
all project files and custom node groups for instant
use in your own worlds. Whether you want to
master geometry nodes, great stand up renders
for your portfoliir or explore surreal visual style. This course will take your
skills to the next level. These are the exact
professional workflows that I use in my own animations, and I can't wait to
share them with you. Join now and blended geometry
notes, alien worlds, and let's build something
weird and wonderful together.
2. Navigating the Blender Viewport: Alright. Welcome. However, I know we're not getting into
the interesting stuff yet. First, I'm going to play a delightful little video
by the men upstairs. They've given me
this to show you how to introduce just an
introduction to blender so that, you know, we're all
on the same page. Welcome, everyone to the
basics of blender navigation. Now before we begin, it's
important to understand how the axises work within blender. So we can see at the
moment, we've got a green line going this way and a red line
going this way. This is called the Y axis, and this one is
called the X axis. We also have one
that is the Z axis, which we can't see right now. It doesn't actually come in with blender viewport as default. But if you want to
actually set it on, you just come up to the
top right hand side, where these two
interlocking balls are, and just click the Z axis, and now we can actually see so how do we actually move
around the blended viewport? There's a number of
ways of doing this. One of them is over on
the right hand side here. You can see if are over here, it's the zoom in and Zoom out. I can actually left
click and move these up and down then to
zoom in and Zoom out, or I can use the actual
mouse to actually zoom in and zoom out using
the actual scroll wheel. There's also another thing
you can do with Zoom, which is holding control shift and pressing the middle mouse, and you'll see you have
a lot more control over zooming in and zooming out. Now the next thing we
want to discuss is actually rotating
around an object. So how to do First of all, we'll bring in a
cube with Shift A, bring in a cube. Now, if I press the
middle mouse button and move my mouse left or right, you can see we can
actually rotate around. Unfortunately, though, we're not actually rotating
around this cube. So to actually fix that, we need to center our view
onto the actual cube. We basically want to focus our view onto this actual cube. So to do that, we're
just going to press the little dot button on
the actual number pad, and then you'll see that we
actually zoom in to the cube. If I scroll my mouse wheel out, you will see now if I hold the middle mouse button
and turn left and right, we're actually rotating
then around the cube. And this is important because if I actually bring
in another cube, so if I duplicate this
cube with Shift D, move it over, so bring
in my move Gizmo. And now you'll see if I
rotate around this cube, I'm not rotating
around this one. So to fix that just press
the dot button again, zoom out, and now
it can actually rotate around this
cube, as well. Now let's look at
something called panning, which means that we're actually going to move left and right. And we do this by holding the shift button, holding
the middle mouse, and then we can actually
scroll left and right around our
actual viewport. So now we've actually
discovered how to zoom in and the
different ways we can actually do how to rotate around an object and
how to actually pan. We can also come up to
the top right hand side here and use these buttons here. So again, remember we're
looking at the Yaxs, the X axis, and the Z axis. If we come to our Yaxs
and click that on, you will see now that you've got a front view of the Y axis. If you click the X axis, then we can change it
to that red X axis, and finally, the
Z axis, as well. Now, there are
other ways as well that we can actually look
around the viewport, and these involve using
the actual number. If I press one on
the number pad, it's going to take me into
that white axis or front view. If I press two, it's going to actually rotate
that slightly. And if I press two
again, it's going to rotate it slightly more. Now, if I press
the eight, it will rotate it the other
way, as well. Now, to go into the side
view or the X axis, we can also press three
on the number pad, and that will give
us that effect. We can also press seven to
go over the top, as well. Now, what about if we actually want to go
to the opposite? So instead of going from
the bird's eye view, we want to come to the
underside of our model. Well, that's actually
quite easy as well. All you need to do is
press Control seven, and that then will take you to the bottom view of
our actual model. We can also do the
same inside view and on the x axis and YXs. So, for instance,
if I press one, I'm going to be
going into Yaxis. If I press Control one, I'm going to be going into the opposite side on
the actual Y axis. Can also find these
options just in case you forget at the top left
hand side here under view. So if I go down to view and
go across the viewport, you can see here that this actually tells me exactly what I need to press to
get the viewpoint that I've just
actually explained. Now, we also have the button on the number pad, which
is number five, a number five button
in blender toggles between perspective
and autographic views. Perspective view offers a more natural realistic
viewpoint with objects appearing
smaller as they get further away, mimicking
human vision. Orthographic view removes
perspective distortion, making all objects appear at their true size,
regardless of distance. Useful for precision
modeling and technical work. The other thing that number
five does, for instance, if I come to my cube, at the moment, I am able to
actually zoom into the cube. However, if I press number five, I will not be able to
actually zoom into this cube no matter
how far I zoom in. I'll still be able
to move around it by pressing the little
dot button, like so. But if I actually
want to actually work on the inside of an object, I can quickly press number five, and then I can
actually go in and work around the inside as well. Now, if you're working on a
laptop or something like that or a tablet and it doesn't
actually have a number pad, you can also use,
if I press five, the actual squiggle key, which is under the escape board on the left hand side
of your keyboard, and that then will
give you pretty much the same options
as we had before. So we can click the right view, we can actually click the back and we can
click the left view, for instance, the opposite
to what we had before. So instead of pressing
one and three, we just press the
little squggle line, and then we can actually view
whichever side we need to. Now, we nearly at the end
of this short introduction, there are a couple more things
that you can actually do. If you come over to
the right hand side and you see here where we've actually got the name of the actual parts
within our scene, we can also grab them from here and then press the
little dot B to zoom in. So I can grab this one,
press the little dot B, and that then will zoom us in. The other great thing about
this is we can also come in, shift select them press
the little dot button, and then we're able
to actually rotate around both of these
cubes. Alright, everyone. So I hope you enjoyed the short introduction to the
navigation within Blender, and I hope from now on, it won't be a struggle
navigating around the viewport. Thanks, o, everyone. Cheers.
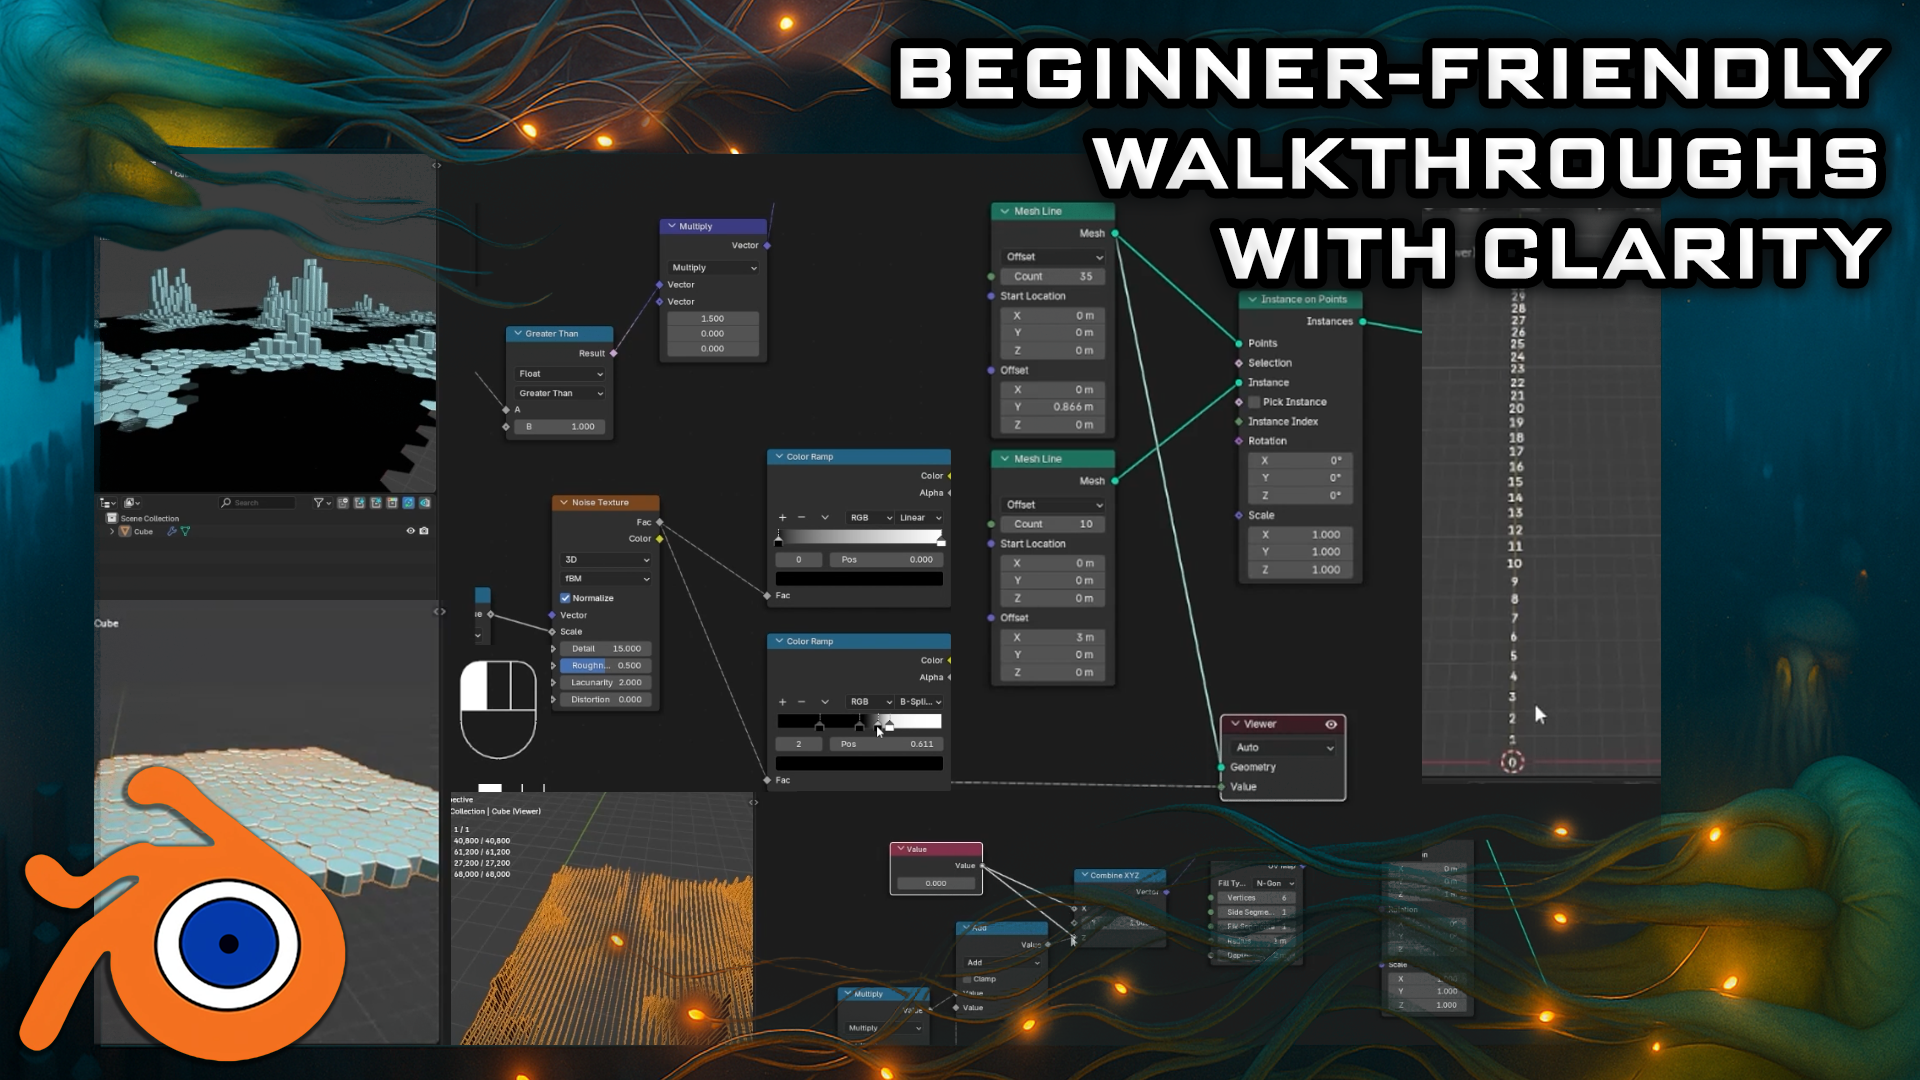
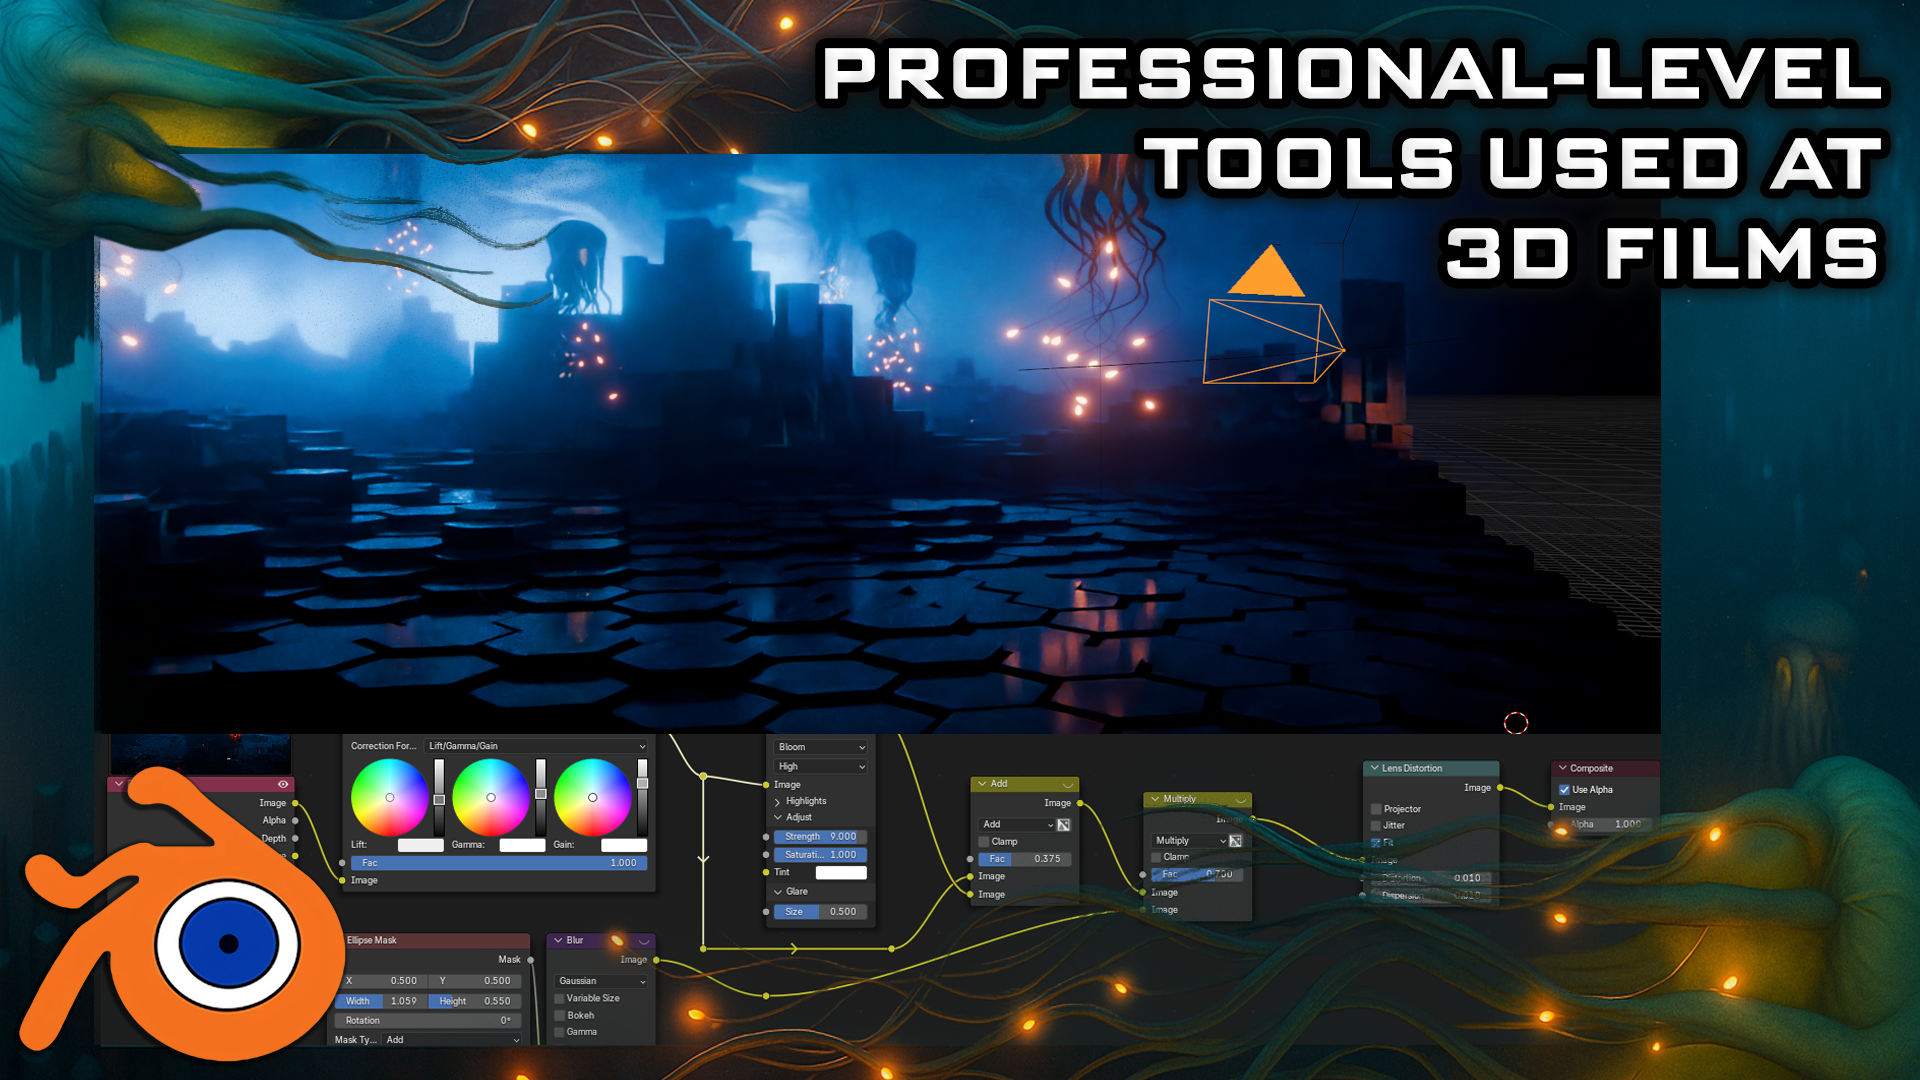
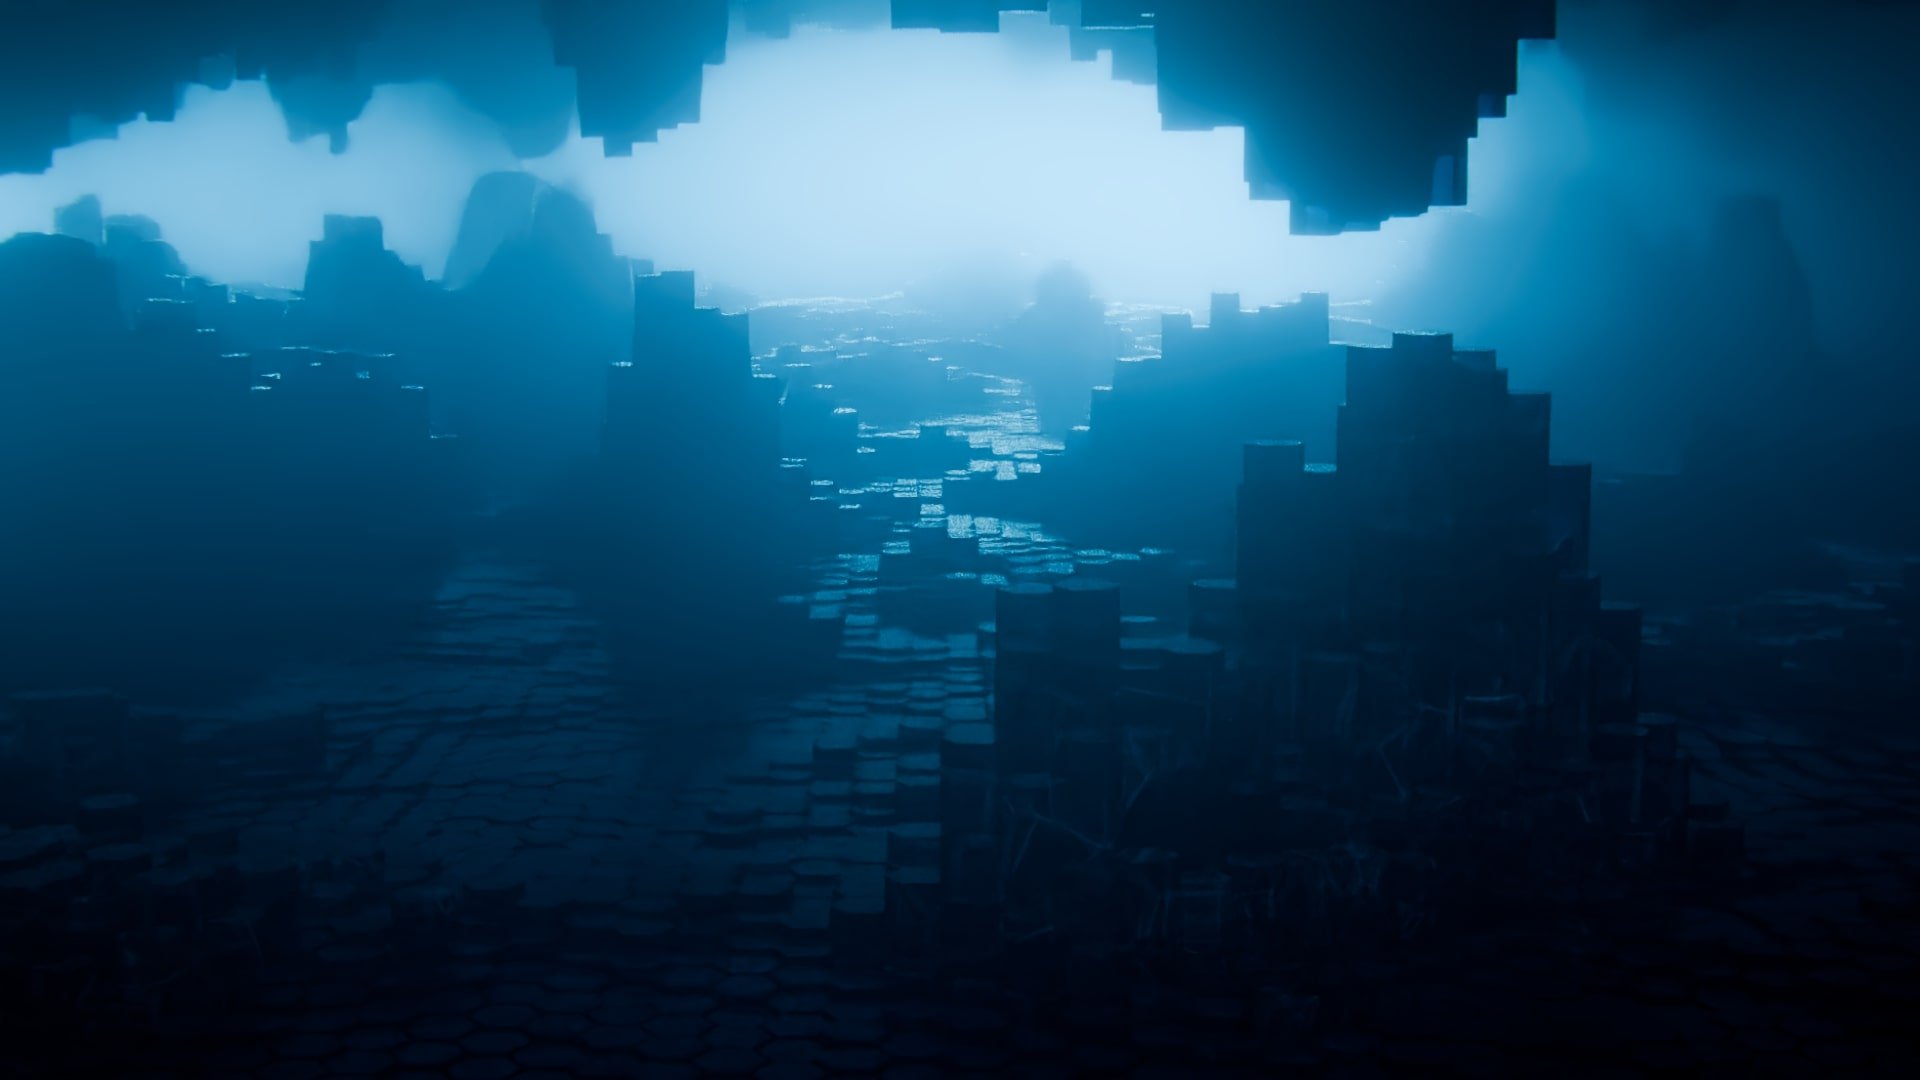
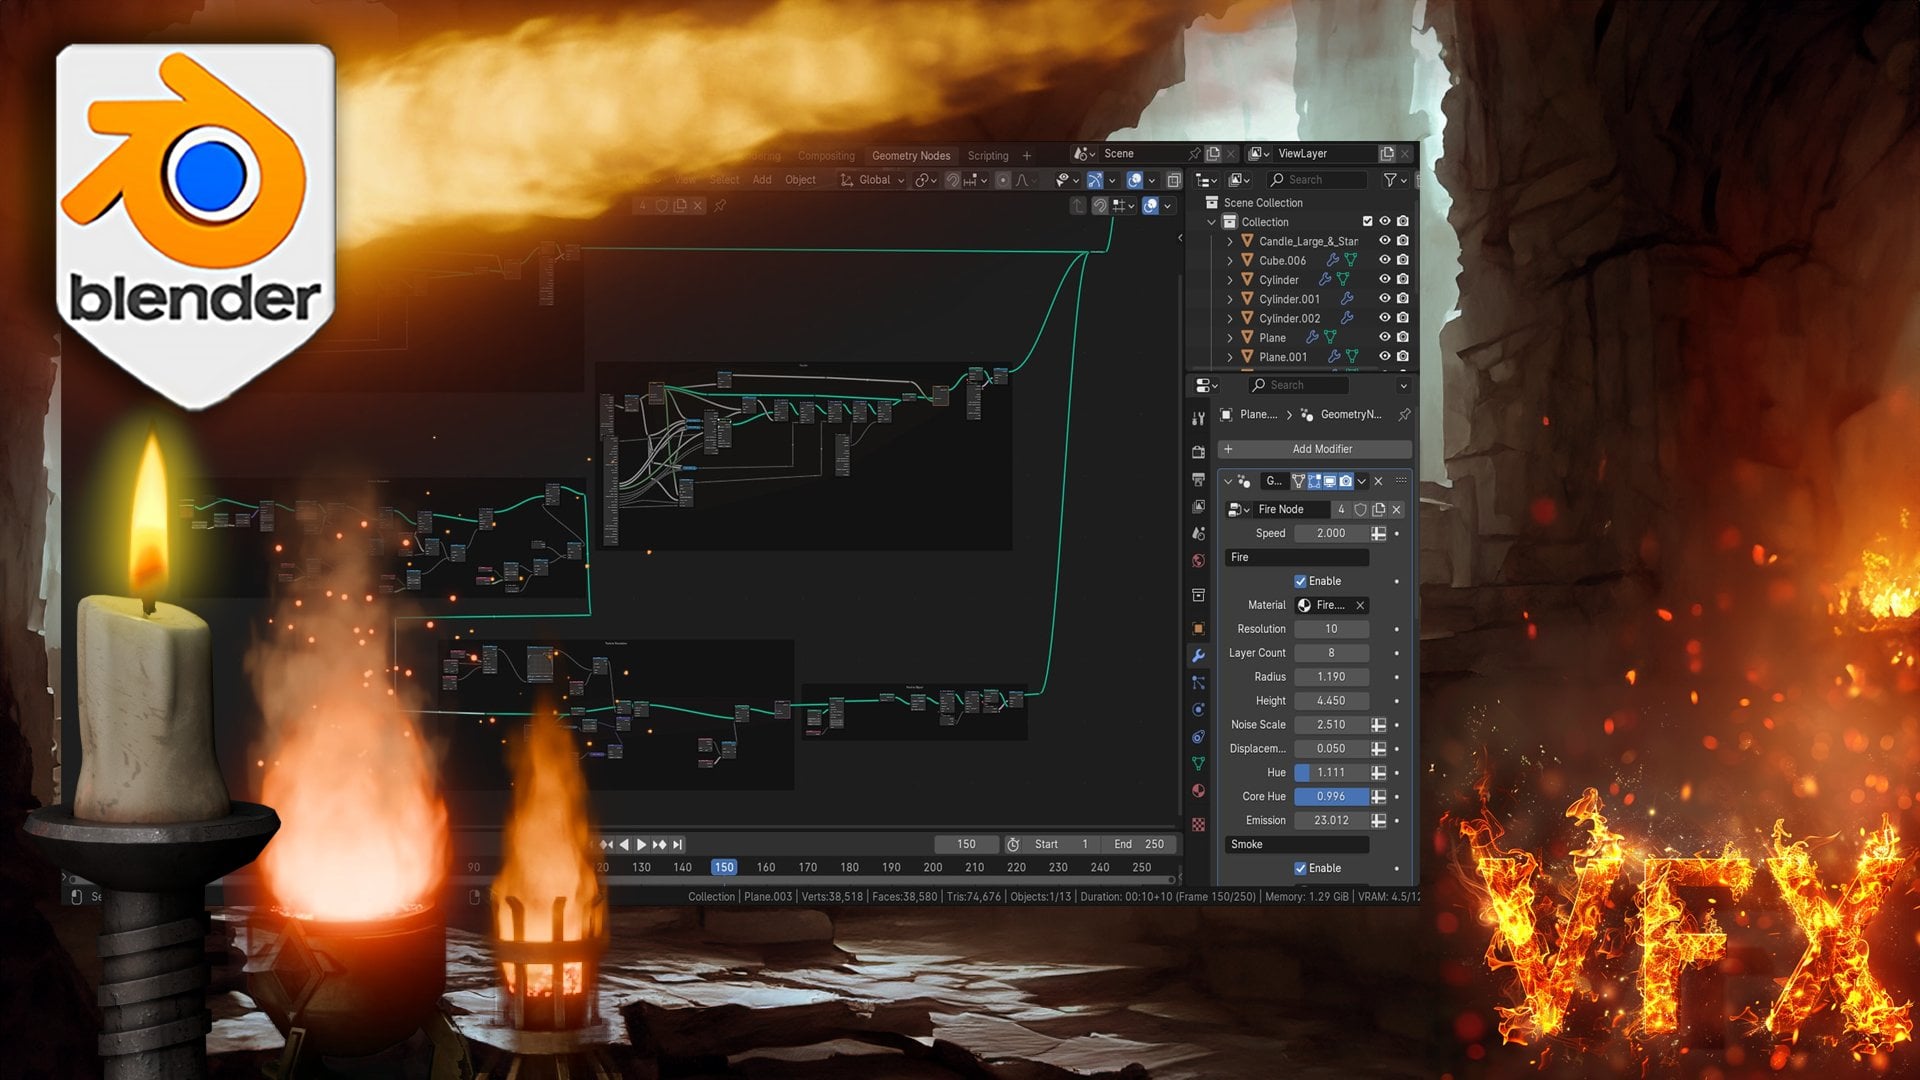
3. Setting Up a Hexagonal Terrain Grid: Welcome back to Blended
Geometry Nodes Alien Worlds. Tentacles train and
lighting master class. You watched the earlier video
on Viewport Navigation? Welcome back. If you
didn't, welcome anyway. Now, in this course, as you've probably seen, we're going to be making
some cool stuff. And most of it's going to
be made geometry notes. Very little actual modeling. So, you know, a bit of a
saving headache there, depending on whether you
like geometry nodes or not. Anyway, start off. We need two things, two add ons, which come built into blenders, so you don't need to go
searching for them. Don't worry. Go do Edit preferences or
Control comma, if you want. Search for node wrangler, make sure this one's enabled. Both of these you'll be
able to find anyway. And node Pi this one, this one. Some people
don't like this. So if you don't like it,
you don't have to have it, you can follow it still, but I like this because it
makes my life faster. I like going fast. Anyway,
now we've done all that, we're going to go
over here and we're going to add while we've
got this object selected, we're going to add a
geometry nose modifier. Great. Now, let's switch over to the geometry nose window so that we know
what we're doing. And we're going to add a new
geometry nodes modifier. Now, if you don't know what geometry notes
is, very, very, very fast version, this side is whatever you have already. This side is what we're going to have after we've made it. So if you go through
and you say, This is the node pie, it's super nice and fast. You transform job tree,
so you can move it. See, you can move it
along the X axis. Great. If I want to do it
again, I can do it again. So, let's say I want to
rotate it this time. Rotate it. Pretty cool. So it's going to, you know, it's going to have the
original version. It's going to have
the moved version, and it's going to have
the rotated version. That's procedural mesh. Now, you've noticed here, control shift left clicking.
We'll add a view node. That basically previews it here without having to
see this node here. So anything when you
don't have a viewer node, whatever you see in the viewport is whatever this group
output is getting. Wherever if you have
the viewer node, whatever you see
in the viewport is whatever that's plugged
into the viewer node. Pretty good. Now,
you don't need that. Another important thing
to know if we have oops, that's the original version. Um to laser connect nodes, you can hold Alt
and right click and drag from one to the other. This is kind of nice because
it means you don't have to, you know, grab this small ase. You don't have to
click around here for like ten years to get
this little thing, and then, you know, oh, I
missed it oops then you go. No, you can just
if it's not there, you can just alt
right, click, drag it. Simple. That's a start bit. Now, we don't need this
one because we're not, in fact, making a cube.
We've already done that. We are going to add
in a mesh line. Now, that will be up here in
the mesh primitive section. Mesh line, you
need two of these. Sweet. Now, we are
going to basically, we're going to make a grid, and we're going to have
all of our hexagons instincts on that grid. But because hexagons
aren't squares, we need to make sure
it's not a square grid, which is why we're
using all this instead of just a grid note. So what we're
basically going to do is we're going to
get this mesh line here and we're going to
make it go sideways, and it's going to have a
whole bunch of points on it, you know, Great. Then we're going to
instance this mesh line going sideways out here. So we have a whole bunch
of lines going sideways. I think you can see
where this is going. And all of these
are going to have their own little points on it, and then we're going to
instance out objects on those points and,
you know, grid. But the fun part
is we're going to offset each of
these, so, you know, one's not so far, one's further, one's not so far, this one will be further. That way, when they instance, they'll be offset like this so that we can fit them
into a hexagonal grid. Pretty good. Sweet.
Now, start off. Yeah, we're going to set
this one to if we're going to control shift glapClick on this, that way we can see it. You see, here's our mesh line. Pretty good. But problem is, it's not going
the right way. It's a bit of a
problem, I tell you, unless you want to, you
know, vertical terrain. Great. We don't want that. We're going to set
this on the Y axis 0.866 meters on the Y axis. Kind of a funny number. I'll
tell you about it later. My favorite word
later. Now, we're going to have this one here. Unfortunately, it's
also going straight up. We don't want that. We want this one to
go on the X 3 meters. Pretty good. Now we're
going to get rid of this. We're going to control A
to open our Pi or Shift A, and probably should
tell you this as well. Shift A opens up the search, and so you can start typing search for
instance on points. Oops. Instance on points or if you're using this
one, it's up here. Now, we're going to
plug the top one into the points and the
bottom one into the instance. If we control click on this, you can see where
we're getting there, you know, we're
getting there slowly. Now, the problem is, this is not a very square grid. Now we don't want
that. Also, I'm going to link this up to
the end just to be nice. Now, that's because this count
will basically control how long that line is. So we're
going to make it suare. Pretty good. Sweet. Now,
here comes the problem. We want to move
every single one of these lines to the right a bit, but we only want
every second one, so we don't want
every first one. So we need a way to go, you know, one, two, one, two, one, two, and then select all of the second ones and then move
them slightly to the right. Well, if you're
not aware of this, there's a lovely node called the index node,
which is up here. Oops that's the image. My bad. Index. Oh, sorry, it's
down here at Read. Now, if we preview both of
these at the same time, you'll see every single point on this curve slowly
gets longer and longer. It says 35 points, and there's 35 numbers. It's zero to 34. So that's pretty
good because if we manage to make a way for this to go instead
of going zero, one, two, three, four, it goes
zero or one, two, one, two, one, two, one,
two, that's great. There is, in fact, a way to do that, otherwise
it wouldn't be here. It's called the rap
Rap function on the math node. Math
wrap function. We're going to stick
it in right here. In a set this maximum
zero and the 22. This is going to do the
one, two, one, two, one, two, one, two, as
you can see right here. It's going one, two,
one, two, one, two. The Wrap function, basically, it goes up and then
it goes backwards. So it's like a
sawtooth function, which if you don't know,
it looks like this. Oops. No bad. So what's going to happen is every time it's
going to go one here, two here, and then
instead of three, it's going to go
back to one again. And instead of four, it's
going to go back to two again. That's how the rap function
works, which is pretty cool. Now, of course, we
only want, you know, two because we can't just
have every first one. And so we're going to use a
compare greater than one. So if it's greater than one,
you know, it's nothing. And we're viewing
this as integers so we can left click
on this one again, and you'll see it's
true and false. That basically means
every first one is yes, and every second one
is no. Pretty good. So now we have the mask to
move every second one across. Now what we're going to
do is we're going to grab a set position note, which is right down here. And we're going to plug the
result into the offset. Now, that's not
going to do anything because it's moving them
all the axes at once. What we want here is
we want a vector math, and we want to multiply
by 1.5. There we go. Every second line is
moved over. Pretty cool. You know, I can't believe this actually
worked, but it did. Do you actually
noticed it's 99% pain, 10% or 1% pure enlightenment. So if you're trying out
geometry nodes on your own, don't be disheartened
if it doesn't work, come back a year later, and it probably will work.
That's what I do anyway. Alright. Next, we need a realized instance point node because this isn't real yet, and we need it for doing
fancy stuff later. Pretty good. Alrighty. Now
we can do the fun bit. We can put the hexagons on it. So we're going to grab
another instance on points. That's where we put the
realized instances here. And we're going to
grab a cylinder, set the segments to six so that it's a
hexagon you can see. And we're going to plug
it into the instance. There you go. Hexagon grid. See, if we didn't have
this set position, they'd make this really goofy, like, line grid, and, you know, you'd have to, like, move
them all over the place. But since we have this
cool sideways grid with the offset lines, we have a hexagon grid.
That's pretty good. At least I think so. Also,
one thing to quickly note, add a self transform
geometry and move them up on the
Z axis by 1 meter. This basically means
they're going to all be flat on the X axis
instead of being, you know, not flat. I like. It just allows for the terrain
to look better later. Alright. Now we get to put a This is basically
what we're gonna do. We're going to add combine XYZ, so we're going to add
it combine an XYZ, so that we can access each of these individually
instead of having to Oh. You're going want to
set these all to one. I forgot about that. Otherwise it's
disappear. So now I can access the Z on these like
on their own, you know? It's not going to scale, and we're gonna have
holes in our mesh. That's not good S sponge. Um, now, we want to move these up and down
and make it look like rain. Now, I bet you know
what you're thinking. We're going to add
ourselves a noise texture and color ramp. I'll just press C
for that. Color Amp for some reason is not on
here. I don't know why. It's especially like that, so you're just going
to have to search up color ramp like that. We're gonna add that in here,
plug that into the Z axis. And because this noise
texture is so fine, we won't be able to see
the terrain until we turn the scale down
to, like, 0.00. So there we go. There we go. Now we're cooking. I also like to add in a
divide note here. I probably should
just duplicate that one and have it divided by five. That way, we can really
accurately change the scout. I could probably actually
do it to like ten. That way, it just
makes it much smoother to change it instead of, you know, having to screw around with really small values. Now, this is great, but it's not big enough.
It's not terrain. So we're going to
increase the count on both these to, I don't know, something like 100
let's see, what's that? Square square is about there,
whatever that is study for. And now you can see
we have that train. However, unfortunately, this train is not very interesting because
it's not very tall. Tall things are generally more interesting, at least
that's what I'm told. So I'm going to duplicate
this divide node, and I'm going to
switch to multiply, and we're going to
multiply it by ten. Oh, no. This is a little, little too too big. There we go. Another thing, turn the detail all the way out. That's just makes it
more interesting. Look, there's the train done. Sweet. Next video. You can
move on now. Yep. Bye.
4. Adding Peaks Using Color Ramps: Welcome back to Blended
Geometry notes, tentacles Train and
lighting master class. In our last lesson, we made a cool terrain using rap and incidencing and
a noise texture. Now, this would be great. Unfortunately, we're
not actually done yet. I know what you thought
thinking. This is a train. You could leave it
here, and you could, but it would be boring. We don't like boring.
We're three D artists. We want to do it the
hardest way possible. So instead of doing
the easy way, we're going to
come over here and we're going to duplicate this with Control
Shift D will allow it to maintain all its connections, or at least upstream, which is the node
it's connected to. And we're going to add in
another multiplayer node, and we're going to
plug it into here. Now, we're going to look
at this node on its own. Now, if you look at the original overview images
of what we're creating, you'll notice there is lots of, like, spas, spiky peaks. Well, we can achieve that by clamping in the noise
texture like this. Oh, you also want to
set this to Bastblin. Otherwise, things are
going to go sideways. Like that. And
then we got those. However, we've got one issue. Now, it's an interesting
thing to know about the beans bespline
mode of color Ms. This value all the way down
here is actually zero. It's actually 0.00 0001. So very, very small value. Like up here on the
white, it's actually one. It's zeroin nine,
no, no, no, no nine. So if you want to actually
get it all the way to black, you've got to add another color style and we're going to add in. Now we do want to
actually go black here. That basically means
that it's perfectly flat and it's intersecting
with each other, which is good because we
don't quite need it yet. It does look a bit goofy, but it also means that we
can quite clearly see where the where the peaks
are going to be. This one, I'm going to
set it to black also. Just go to screw
around with these until they provide
nice peaks like that. Oops. That's a little much. This is a tweak to your
own liking to taste, as they say in the
culinary industry. Just go to screw around with
that a little bit Whoops. You can see it's
hitting one there. Set it back down to here. Then I can just increase
this value to make them go higher. Hm. Pretty good. I make mine a little more bulky. I like it that
way. Wait. Now, as you can probably tell,
there's a problem. These things are perfectly flat, which means, you know, they're going to look horrible. That's where this
one comes in here. If we switch this
one back to here, and we also say this to Beast Blaine beast
Blaine. There we go. And we move it all the way
to the side like this. But on this mouth
blight, we set it to, like, you know, two. Maybe a little much a
little upwards like that. There we go. Now
it's nice and flat. So we want both
this tall version and the flat version
on the same thing. Well, it's quite simple.
We just add it together. Literally, that's simple.
Sometimes, you've got to think smarter
and not harder. That's what I tell
myself anyway. Now, we're pretty much done
here, in case you know. You can just tweak these settings here,
all these color ramps. You can, you know,
increase the height, make it more interesting.
Yada yada, yada. That's a little much. You can screw up the noise value
scale. There you go. See, this is what
happens if we hadn't changed the scale on
the noise texture. It looked like that. We can make it really big. We
can make it really small. For now, we want it about that size
because we're going to make it eventually a whole
lot bigger bigger is better. Now, last thing to do is we are going to
realize instances again, and we're going to add
in a set material node. Now, we don't really
need this right now. That's just for later because we're coming back at some point. Now, to make this really easy to access and
not like, you know, lose brain cells on later, we are going to add in
a group input node, or you can just go input. So we're going to add the
count on both of these. Now, open up the
panel by pressing N. As we'll open
up the group node, which allows you to see all of the inputs
here and rename them. Which is what we're going to do. Now, this top one
here goes on the YXs, so we're going to go
count spell it right. Count Y. And this one, as you guessed, is
going to be count X. Probably could have just
left the name there. Now, the other
important thing we're going to do is we're
going to go down here. I'm going to plug
into this value here. This value here is going to
be the noises Noi scale. Now, we're going to set the
minimum of this one to zero, by the way, just go to make
your life a little easier. Out, we're going to plug
this one and this one, these multiply nodes into into the group input that way we can control the scale and like the height of the
terrain from outside. Also, good idea to save. Please just save also. Trust me, not saving geometry nodes is the most painful thing
you're ever going to do. Now, if we have a look,
this one up here, this first one is
the flat height. So we're going to call
that the low height. And this bottom one
here is going to be the sparse height because
it's those sparse peaks, so we're going to
call it sparse. Mm. Good. Also, would suggest setting the minimum of
these both to zero. Alrighty. We're pretty
much done here. They're done and dusted. So a quick recap. What we're doing is we're making a line where giving that line
a whole bunch of numbers, we are basically wrangling
the numbers into one and two, or you're going to turn that
into not and on and off. Going to scale it by a bit, so you can see here, this one's scaled
and that one's not. Then we're going to
instance a whole bunch of hoops we're going to instance a whole bunch
of lines on that line, other lines on that line, so
we have this lovely grid. We're going to offset the grid by that number. We realize it. Then we're going to
instance a whole bunch of points on it and make this wacky noise
setup that will, you know, make it look cool. Last order of business,
add yourself in a value here and plug it into both
of these, set it to one. This just for later, save us
some headache because we're going to get enough of that
from other things. Alrighty. Here ends this lesson
and starts the pain and suffering of procedural
animated tentacles. Good luck.
5. Edit Mode and Basic Modeling Tools: Righty. Now, I know
what you're thinking. Fun stuff? Not quite. So remember that last video? Well, we're now going
to have another video by not yours truly, to explain how to use the Edit mode in Blender so that you
can actually do stuff. Welcome everyone to the basics
of modeling in blender. And this is a short
introduction just to get you started on a few of the
basics in modeling. So the first thing I want to
do is bring in a primitive. So the way that we're
going to bring into primitive is press Shift and A, and then what we're going
to do is open up a menu, and you can see that
we've got all of these things along this
actual primitives menu. But the one we want to focus
on is the actual mesh. And from here, you can
see we can bring in many, many things like cylinders, cubes, planes, and the
one we want to bring in just for now is
going to be our cube. That we brought our cube in
the next thing I want to discuss is object and edit mode. And you can see at the moment, over the left hand side, we're actually in something
called object mode, and this means basically we can manipulate this whole object. So if I press G, I can actually move it around
my viewport like so. If I press S to scale, I can actually scale the
whole of the object in. But the thing is, we
don't really want to work in object mode necessarily, and a lot of the
time, we're actually going to be working
in edit mode. So we can come up to
the top left hand side and put this in edit mode. Or we can actually press the tab button and jump
into Edit mode that way. You will notice once we've
actually gone into Edit mode, we have a lot more
options to use, and more importantly,
we have a lot of the topology now to
play around with. So the first thing you'll notice the difference being is that we have now these three
options up at the top side. And if you have over them, it will say vertex,
edges, and faces. Now, vertex is going to be
these little points here. The edges is going to be these edges of my cubes
or any of the edges. And finally, we've
got the faces, which is actually the
whole polygon face. Now, you can also, instead
of clicking on these, press one on the keyboard, and that then will jump
you into vertex select. If you press two, you
can go into edges, and three is going to
take you into faces. From here, we can actually
manipulate any of these parts. So you will notice
at the moment, I've got a gizmo here. Now, if you don't have
the Gizmo available, coming over to the
left hand side, and you'll have this
little button here that says move or you can press Shift Spacebar and bring
in your move tool like so. So now because I'm on faces, I can actually
pull out this face like so if I go to edges, I can actually grab one of the edges and pull
this out like so. And if we're on vertexes, I can grab this vertex or grab the second vertex with Shift Select and then
pull this out like so. Really, really easy to actually
manipulate things once you know how to select
each of these parts. Before we go too much
in the weeds with actually modeling in
this actual Edit mode, let's just jump back into
Object mode for now. What I want to show
you is how we can actually move this
actual cube around. So as well as moving it
with the actual gizmo here, we can also press G
and actually free move this object around or we
can press G and Y, too. Let's put it along the Y axis, move it around or the X axis, for instance, and
move it this way, or even the z axis and
move it up and down. To drop it back
where we started, let's just right click like so. So that's actually
moving the location of it's not a cube anymore, but let's just say it's a cube. We can also scale this in
as well with the S but so we can scale it in or
scale it out like so. Now we can also press the S but, hold the shift button,
and then we have a lot more finesse
on actual scale. You can also scale this up by, let's say, a factor of two. So S, two, enter,
and there we go. And of course, we can scale
it down pretty small as well. Now the next thing I want
to discuss is rotating, because if we rotate it with
R and just rotate it around, we haven't got a lot of
control over how this rotates. So what I want to do instead is, I always want to press R, then attach it to an axis,
which might be the Y, so the green one, and then
rotate it either by freehand. Or by actually inputting the
value under our number pad. So if I want to rotate it, let's say, by 90 degrees, press the end button,
and I've rotated this round by 90 degrees. Now, if I want to rotate
it back, I can press O Y, the little minus button
on the number pad, 90, and then we can
rotate it back. There is something else
that you need to know. We also want to reset
our transformations, and this is one of the most important things within blender, because if you don't reset
your transformations, Blender still
considers this a cube, even though it's not
really a cube anymore. So what we want to do to reset the transformations
is press control. A all transforms, and
then you'll notice that the orientation has
moved over here because it will always move
to the center of the world. From there, then we
want to actually reset our orientation, as well. So we want to right click
set origin to geometry, and then it's going to
put the origin right back in the center
of this object. Now, it's also important to know resetting the
transformations will also impact things like UV mapping, things
like modifiers. Basically, if you ever
have a problem in blender, always make sure that you
reset your transformations, and then most of those problems
will definitely go away. Alright, the next thing about resetting our
transformations, it makes it really
easy then to get something back to how
we had it before. In other words, if I press
S and scale this down, and then let's press R and Z and rotate it round this way, because before this, I
actually reset my rotations. What I can now do is press lns and put it back
to the scale that it was before I did anything
and then ln R and actually reset
that rotation as well. So really, really handy, once you've actually reset your transformations in
what you can actually. Moving on, we're
actually going to be looking now at duplication. So if I come round here, I'm able to actually
duplicate this. If I press Shift D and
then press the Enterbne, it's now a duplication, and I can move this over
to the right hand side. So now we have
actually two objects. Now, what if you want these two objects actually combined, and you didn't mean to actually duplicate it in object mode, for instance? Well, that's easy. We can just shift,
select the other one and press Control J, and now they're both actually join together,
as you can see. So if I press tab now, we're able to come in and actually work on them
both at the same time. What happens if we want to
actually split them up, so we don't want the objects
to actually be together. That's also easy. Just make sure that you select
one of them first, and then all you're
going to do is press L, just to select everything. So all of these faces, then you're going
to press P. Come down to where it says selection, and now if I press Tab, they're both actually split off. Now, of course, using
the same command, if I press tab, I can
actually come in, grab a face, for instance, press Shift D. I
can actually also duplicate things with
inside Edit mode as well. So we might want to duplicate
all three of these. Shift D, I can actually come in then and actually
duplicate them like. It also means, though,
is that these, when you duplicate them in edit mode will be part
of the same object, of course, because in edit mode, they're not actually
classed as an object. They're clustered as
the same actual part. Now, for the next
part, I'm going to bring in a brand new cube, and I'm just going
to show you some of the basic modeling
techniques within blender and go through
a few of the options. So here we have a
brand new cube, and the first one I'm
going to show you is, if we come into Edit mode, we'll always be working in edit mode to show you these things, make sure you're in edit mode. I'm going to grab the top face. And what I'm going
to do is press E, and that then is going
to extrude this out. Now, sometimes you will need
to extrude something out, and it will need to be
along A axis, for instance. So all I'm going to do is go to Edge Lect, grab this edge, and then what I'm going
to do is press E, and you can see, because it's not
tied to an axis, it's floating around everywhere. However, if I press the Xpon, you can see now it extrudes out, following along
that actual axis, which then makes it
really, really easy to manipulate it where I
actually need it to go. Next one we're going to look at is something called beveling, and then all I need to do is come in and I'm going
to grab my edge. So I'm going to press
two on the keyboard, grab an edge like so,
and then I'm just going to press
Control B like so. And you'll notice now it's actually bevelled off that side. You'll also notice down on
the left hand side here, we have something called
an operator panel. It will be closed. Just open it up, and from here then with the actual bevel, we're able then to
turn the bevels down, for instance, turn them
up, move how the shape of the actual bevel is going to be and all that
other good stuff. Pretty much anything you do in blender is going to give you
an operator panel like this. We're not going to go too much
into this, but basically, the moment that you press Tab button to come
out of Edit mode, this is going to disappear, and then you're locked in
with the actual shape that you've chose or the
insert or the extrusion. So just bear that in mind. So the moment I press tab,
that actually disappears. What about if we want to bevel off vertices and not edges? So, for instance, if I come to a vertice like this
and vertice like this, press Control B, you'll see
that it bevels off like this. But if I come to one that are the
opposites of each other, press Control B, you'll see
nothing actually happens. However, if I press
control shift and B, then we're actually
able to bevel off the actual verts like so. So that's another handy
tip for actually bevel. Now the next modeling
technique we want to discuss is actually edge loops. So how do we get more
geometry onto this? So, for instance, I want to
bring some edges on here. I can press Control, and that then will bring me
one edge in here. If I left click then, you can see that I can put this either this side or this side. But let's say I want it
right in the center. I'm just going to right
click on the mouse, and that then is going to
put it right in the center. Now, the other
thing I can do with the operator panel
again is then come in and turn all of these up to give me more
actual edge loops, and I can even move them
to the on the right. Now, I can also, if
I press Control Ed, come in, press control law. I can actually scroll up on the mouse wheel to give me as many edge loops
as I actually want. Or if I want a little
bit more finsse, I can actually type it out
on the actual number pad, so I can type out 120, for instance, and
have 120 edge loops. To cancel it at any time,
just press the escape board, and then that will
cancel it out. Now the next modeling
technique I want to show you requires two actual blocks
or two cubes like this. And all I'm going to do
is I'm going to come in, and I'm going to select
opposing faces like so. And then I want to actually join these together,
for instance. So all I'm going to do,
I've selected them both. I'm going to right
click and come down to where it
says bridge faces. And now you can see I can
actually join those together. Now, if I press Controls dead
and just go back a minute, you can also do this
by coming in and let's say and grabbing
this edge and this edge. And what I'm going
to do instead is, I'm going to press the F bone like so and come
down to the bottom, as well, and then
grab both of these and press the FBne like so. Sometimes bridge will
not work because bridge has to work with two edges
and nothing in between. In other words, nothing
selected there. If I come into this one
now and try right click and come down to it
says Bridge edge loops, you will see select at
least two edge loops. So we can't actually
join over from there, and that is when it's a good
idea to use the FBN instead. Now the final modeling
technique that I actually want to show you is
something called insert. So what I'm going to do is I'm going to grab this face here. I'm going to press the
ebonne and then you can see you can actually
insert this face in, and from there, you can actually extrude it out if you want to. You can also then
press Control B and bevel it off if you want to. And you can see now
it's really easy to use all of those techniques
that I've actually showed. Now, lastly, the
last thing I want to show you is the insert again, but this time we're
going to grab this base and this base, and if I press I,
it's true you can actually insert them
both at the same time. Now, the best thing
though about insert is, if I press the I and
then press I again, we can actually insert them separately from
each other like so. Now, I see a lot of
renders on Facebook and other social media that kind of look really,
really blocky. For instance, if I press Tab
now and go into object mode, you will see this actually
looks pretty blocky. But there's a really
easy fix for this, so it doesn't actually
have to look like that. All you need to do is once you've actually
finished, right click, come up and where it
says, shade auto, smooth, and that then will shade it off based on the actual angle. So really, really easy
to either shade flat, shade completely smooth like so, or shade auto smooth like so. If you actually are struggling
and you actually want it to shady a little bit
smoother than what it is, you can come over
to the right side where this little triangle is, go down and open up the normal, and from there, you can
actually increase this and shade it even more smooth
based on a higher angle. The default is always set to 30, just make sure you set it to 30 in case you actually overdo. The last thing I
want to show you in this introduction is
the actual cursor, because I think it's very, very important to actually modeling. So what I'm going to
do at the mono is I'm going to make another
cube with Shift D, and then I want this cube on top of this
cube, for instance. Now, if I move my
cursor over here, so shift right click. And then what I can do is
I can press Shift desk, and I'm going to go selection
to cursor, keep offset. And that then is going to move the exact center of this cube, all the orientation
to my actual cursor. Now, how would I get this
then on top of this cube? I would literally
grab this cube. I would first of all, right
click and set the origin to geometry just to make sure that origin is right
in the center like. So I would then press Shift
Desk cursor to selected, and that then is going to put my cursor right in the center. And then I would grab this
cube, and from there, I'm able to go Shift Des, selection to cursor,
keep offset. And now that cube is right
next to this actual cube here. From here then, I can
actually bring this up, and let's actually just have a quick play around of
everything that we've learned. So you can see now if I pull this going to join them both together
then with Control J. And then the first thing
I'm going to do is come in, grab this face and this face, and we're going to
right click then, and we're going to come
down to bridge faces. And then going to bring
in some edge loops. So let's bring in two
or three edge loops. Left click, right, click. And then what I'm going to
do is I'm going to press Alt Shift and click
just to select all of this edge going
around here and press the S but and pull
it out like so. There, then what I'm
going to do is I'm going to bevel off
both of these tops. I'm going to grab this
top, shifts like this top. I'm going to press Control B and actually bevel them off like so. From there, then I'm going
to bring in an insert, so I'm going to grab
the front off here. I'm going to insert this
with the eye button like so. And then from there, I'm
actually going to extrude out. So I'm going to extrude
this out like so. Now, let's say I want a
bigger piece on the next bit, I'm going to press
Shift D. Pull it out. So this is a duplicate
of this face. I want to press the S but to
make it a little bit bigger, and then I'm going to press E and pull that out
along the axis. Finally, then what
I'm going to do is grab this one and
this one and going to right click then and
bridge faces like so. And you can see just
how easy this really is now to actually start
building out some really, really complex models with everything that
you've just learned. Alright, everyone, so I
hope you enjoyed that, and I'll see on the
next one Cheers.
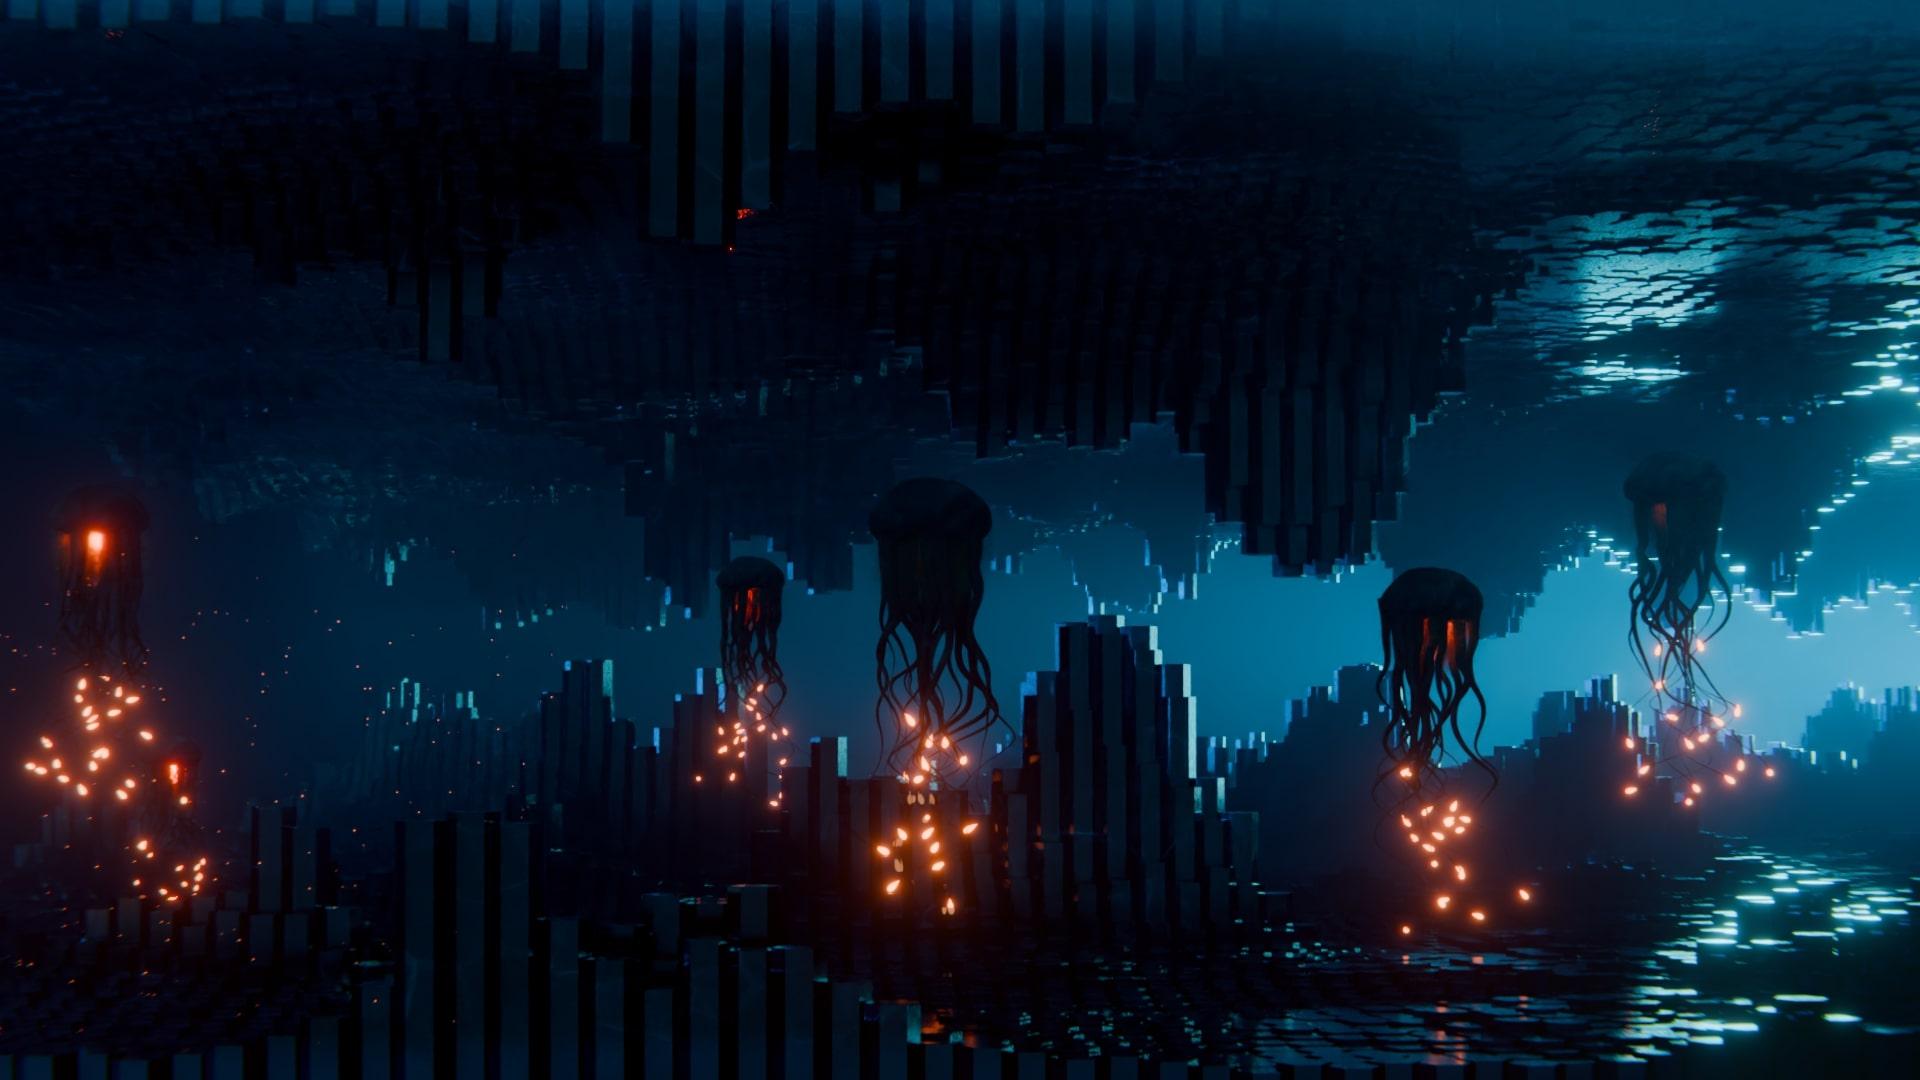
6. Procedural Tentacle Geometry: Welcome back to Blended
Geometry Nodes, Alien Worlds, tentacles Train and
lighting mask class where I teach you how to lose brain cells and
sanity by staring at something that looks
like this for way too long. In the last episode or
whatever we did lesson. Sorry, S TV, if probably could be Enough pain and suffering in this one. Any kind of tragedy. Last episode last lesson, we made this delightful terrain. Yes, that's what
we did. We did it. And it was minimal minimal
amount of sanity loss, thankfully, quite simple,
but quite interesting. Now, we're going to do
exactly what I never do, and we're going to name it. We're going to name
this the hex terrain. That way, if we come out here and we can also
name this hex terrain. Ing. Now we actually
know what we're looking at. Hm. Pretty good. Sweet. Now, we're moving on to that aforementioned pain and suffering of procedural
animated tentacles. And yes, you are actually
going to need luck to do this one because
this one is even worse. Okay. Now, I know I said we weren't actually
gonna do any modeling. But we are going to
do a little bit. So we're going to add in
ourselves UV UV square. This is in fact a square people. If you didn't know,
this is a square. This is in factor square
in case you didn't know. Anyway, sorry, my bad
UV sphere, UV sphere. You don't need any
extra subdivisions. What we're going to
do right now is going to go press tab and
go into Edit mode. Oh, I've got something on here. And we're going to right
click and go subdivide. And we're going to
open up this little panel on the bottom left, increase the subdivisions to three and increase
the smoothness to one until it becomes smooth instead of being horrible
and blocky like that. Great. Amazing. Now, we're going to switch to vertice
mode by pressing one. Yeah, going to Whoa,
something went wrong here. I'm going to completely ignore that like every artist ever. And I'm going to come down here. I'm going to grab that
bottom central vertice. To come up to the top year and turn on this
proportional editing. Or you can press
if you like that. And I'm going to press
G now and Z and move Mica up making this kind of
bell shape. It's a bit flat. Looks a bit like a
mushroom or a pancake. Weird looking
pancake, I tell you, and then I'm going to
press G again and Z, and I'm going to scroll
inwards upwards, so that the sphere of
effect gets a little small. Basically, what the proportional
editing does is that it does whatever you're doing
to this singular vertice. So if I move this one up and down, you know, I'm
not moving the rest. But if I turn on the
proportional editing by pressing O or
clicking on that, everything within
a certain range is going to be moved up
and down. Pretty cool. Good for pretty much everything. And I'm going to grab this and drag it down a little
so that it's not so, you know, it's not
completely flat on the bottom, because
that would be dokey. Okay. Well, by the way, if you want to go
into Flat View, press number one on the number pad if you
have a number pad, and if you don't, that's
just some skill issue, and you need to get
yourself a better keyboard. Yeah, anyway, now we have
this lovely bell shape. We're gonna right click and
go Shade Smooth. You're done. Congratulations. Wait, but
we're not actually done yet, because I thought about this one beforehand for
the first time in my life, actually thought about
it, and we're gonna do it again with another sphere. But this time, instead
of subdividing, we're just going
to grab the bottom and we're going to drag
it down a little bit, so it makes this
weird *** edge shape. So just so you know, you
can increase the size of the circle by
scrolling. Kind of neat. Sweet. Eggshape, grab the top
and switch this mode here, which is a little dropdowns, changes how it, like, registers which points
to move the most. And we're going to move this one upwards to make this
lovely teardrop shape. And cheese meat and scale down. Now we are finally done
with the modeling. I know that was such hard work. Never gonna recover, I tell you, mental trauma for the
rest of your life. Alright, let's switch back
to my geometry nodes, where I'm going to immediately do something I probably
should have done before and double
click on this sphere and name it to creature. And double click on
this sphere thing and the teardrop thing and call it a tentacle tip. Oops. I'm a master of spelling. Alright. Now, let's come back and
have a look at this. A, let's just ignore
the tube now. And if you want, you can
just name it terrain. And then completely
ignore it for the rest of the lesson. Pretty nice. Right. Now onto this part we actually care
about geometry notes. So we're going to
click the plus, add ourselves new geometry nodes. Then promptly move this one. We're actually going to
use the input this time, unlike every other time ever, and we're going to
move it all the way over here because we are, in fact, going to be doing a
whole beefy bit of noting. Alrighty. Now, this is going to be a rather long
and complicated tree, so bear with me,
but don't worry, you'll only lose
90% of your sanity. You'll still have 10% left. Alright. First out of business, distribute points on faces. I'm going to drag this in here, and we're going
to hold Alt right click case you missed it, that's the node wrangler
from last time. We're going to laser
select this into here. We're then promptly going
to control right, click, drag and cut that, and alt right click and drag
and laser that back in. So, basically what this
note does is it takes all the faces here and sticks a whole bunch
of points on them. You can have more
points or less points. You can have different
points using the seed. You can have fancy
possion disc poison disc. Yes. I love three D. They always name things the
most pronounceable things you could ever imagine. Great. Lovely.
Right. I've already got some preset numbers that I can plug into this one because I know
it's going to work, and it's going to save
me all that headache that I'm going to
be gaining later. We're going to set
the distance min. What the distance min
bas is basically, it tells you how close
these can be together. So if they say these things can't be closer than 0 meters,
so right now they're not. But if I increase
this, you'll see everything actually
evenly gets spread out. So Pssian disc is actually cool. Nice. Great for trees. It gets you wondering.
0.53. For now at least. And we're going to
have the density max, which is the maximum
amount of things we can have on it to 16 and
the density factor to one. Right, start off. We're going to do a lovely
little setup that I like to do when we're
doing organic things. Basically, it is a way to randomize a number based
on the location of something. So every time we move
this, it's going to get a different number and
plug it into the seed, so we'll have a different
set of tentacles. Every time we have different this thing is in
a different spot. That could be a problem
if you're animating it. But I don't care about that, so we're not going to do that. Anyway, we're going to add
ourselves a self object node, which is down here, if you're
wondering, self object. And we're going to
add object info, and we're gonna plug the
self object into the object. And we're going to add ourselves a lovely
little multiplier math. Plug that into the location. Set this to 1,000.
Yes, that's 1,000. Now we're going to add one more, which is the integer math, which is just add, and we don't really care
about that yet. Plug it into the C. So
now if you move this, the placement of the points
changes. Pretty cool. I like it. So we're going
to call this into a thing. We're going to press Control J and then click on the frame. This is called a
frame, by the way, press F two, which
is to name things. And we are going
to call this let's go location C. 'cause
that's what it does. Yeah, I'm calling
my thing something sane people, not
whatever this is. Alright. Now, unfortunately, if you
have a look at the original, jellyfish do not, in fact, have tentacles on the top or whatever this tentacle
thing we are making is. So, we are going to do some funny stuff using
the position node. Now, I know what
you're thinking. We could just use
like, Oh, my goodness. Uh let's completely
ignore that for now. As you know, position node. Basically the texture
coordinates from hada Node. And yes, we could separate
the XYZ, but that's boring. And we could do it this
way, which is 50% harder, but it actually does more
stuff, which is pretty cool. So what we're going to do is we are going to
have the position. We're going to grab
ourselves a vector math, which is going to be an
ad and a vector rotate, which is going to be a vector rotate because that does not, in fact, have multiple modes. Pretty good. And
the last piece of resistance that
we're going to do the super dumb brain way, we're going to add
ourselves gradient texture. Yep, it's a gradient text. That's literally how
I'm going to do it. Yeah, I know you're
going to roast me and tell me I'm really bad, but it's going to work, and it's going to
be better. So ha. On that note, let us
angle this because, in fact, this is not
going up and down, which is kind of stupid because we want to
go up and down. So with this lovely
vector rotate, we're going to set the
Y to one on the axis. That way, we're actually
rotating around the Y axis. And we're going to
set this tube -90. That way, we got
this little my bad, little white bit on the bottom, which is going to
be the selection. We're gonna plug this
color into the selection. So now if we have a
look at these points, they're all on the bottom. And if we move this up and down, we can control how far
up our points are. I'm actually going to
increase this density max and decrease the distance mean just so you can
see it really nice. E. Pretty cool. Now, to save some headache later because I love doing that. We're going to add a
combined XYZ so that we can access each of
these individually. And we're going to
add a math divide. Now, you remember that lovely precision value from before? We're going to do that again. So we're going to
set this to ten. And then we're just
gonna drag this until it looks
something like that. It's just on the bottom.
Now, we're going to organize these
because I'm a boy. I like organizing things because that's what boys always
do. They love organizing. I know what you're
talking about. Come on. Anyway, we're going to
Woops my bad PtJFrame it, and we're gonna call this
our bottom Oops mask. Pretty good. Alrighty.
That's enough for now. I know. Go find
yourself a pillow. We're gonna scream into
it for about 30 minutes, and then you can come back. I promise it. We'll
make you feel better. Um, yeah. Until the next episode. See ya. But
7. Animating Tentacles with Curves: Welcome back to blend
geometry nodes. Tenles train a
lighting master class. In the last bit, we
stuck our points on. We randomize them
based on the location, and we basically
made it so that they can only be on the bottom because we don't
want tentacles on the top. Alrighty. On that note, let's increase this backup again so that we don't
have 1 million tentacles, unless you particularly want
that, though I tell you, it doesn't quite look as good as you think
it's going to be. Are we going to
get into the meat of this geometry nodes,
Instance on points. And we're going
to grab ourselves a lovely curve primitive
called a quadratic Bezier. Mm, lovely naming. I can't believe it. And we're going to stick
that into the instance. Now, of course, this is
wrong because it's wrong. So we're going to
set the segments to Oops ten, 20, sorry. My bad 20. Ooh expert
at typing today. We're going to set
the start to zero, the middle to zero, and the end to zero, so they're all zero. Then we are going to make
the and Z value ten. They're all going to go
straight up. Mm. Pretty cool. I think you can see
where this is going. We're getting our lovely
lovely tentacles. So they're a bit straight,
they're not curvy, not fun looking tentacles. But we're going to
deal with that later. Later, my favorite word. If you were here last time,
you'd know that. Alright, we're going
to realize this because nothing interesting is going to happen
unless we do that, and we're going to go up and resample curve so that they can actually
do something fun. Now, instead of going to count, we're going to go to length. So basically the difference
between count and length is if I grab a preview. Don't ignore this,
completely ignore this. This just allows you to see it. So if you have a look,
these are all the points on our curve points, yeah,
points on our curve. And if we increase the
count here, they get more. However, if we set
this to length, and we like, sorry, my bad. But if you increase
this, you know, it's only ever
going to have ten, no matter how long it goes. But if you set this to length, we can have it so that they have a point every 0.59 meters. So if you increase this, it's still going to be
every 0.59 meters. Pretty cool. Ignore that. That's just for
visualization purposes. Alright, now, we're
going to set this 0.02. So that's going to
be a lot of points. Right. Now, the last piece of our meat is the
set position node. As you know, this
is very useful. It's used in, like, 90% of geometry nodes.
I'm pretty sure. It's a very educated opinion. And now we do the fun stuff. So basically, what we're
going to do is we are going to make a gradient going from start of the tentacle to the
end of the tentacle, and we're basically
going to make it displace it and
make it go sideways. Based on how far it is from the top because this is the
wrong way up right now. In fact, we should
do that 180 degrees on the Y axis. So now
they're going down. So it's going to
be really scaled up down here, but
all the way up here, there's not going to be much
that way they, you know, don't stray away from the
head of the jellyfish. Alrighty. Now, that's all good saying that.
Let's actually do it. And if you use
geometry nodes before, there's this delightful node
called the spine parameter. If you want to preview
it using these two, you'll see, Oh, my God, it's actually just there. We don't have to do
some painful math. It's just a singular node. Oh, I would I tell you this node is like the savior of most curve based geometry nodes. Anyway, as you can tell, we're going to have this
make it scale up at the bottom and not at the top. But to do that properly,
we need ourselves a math rage, man Map range. I cannot speak today. Alright. Instead of linear, we're gonna set this
to smooth the steps. This is basically the
Bast bline version of, you know, map range. And we're going to set
this to five because, yes, right, stop
previewing that now. Now, we've got this
delightful scouting, and we should probably
add ourselves a vector math and set this to scale so that it
actually scales our vector. L in the offset, by the way. I'm going to stick
that down here. Now, what we're going
to do is we are going to stick a noise
texture in here, noise texture that's
going to have some delightful vector math for the position so that the
noise goes down the lines instead of just moving around randomly because
that looks cool. And we like cool things. Those are, in fact,
good. So, let's add ourselves that
noise texture. And let's set this to 40.
I'll explain this later. But for now, we want to set the details of zero and
the roughness to zero, even though it's
completely irrelevant and the distortion to one. Great. Now we want another map range. We want to reset it by
pressing backspace. And we are going to set
this from float to vector, a whole lot more things. There's more beefy node. And we're going to plug
the color into the vector. Now, it is important.
I'll probably put up something on screen now. If you put the factor into the vector, this is what
you're going to get. It's kind of dokey because it only goes in two directions. Whereas if you use the
color, which is like three D, it does
all the cool stuff. So make sure if you've
got this problem, don't do that one.
Don't do the factor. And we're going to stick
that vector in the scale. And now you can see
this sort of working. You know, it's doing stuff that looks like something you'd find in your shower drain. Unfortunately, it's going
sideways, which we don't like. So we're going to set
all of the two men Oops my bad by clicking and
dragging to minus one. And all of these 21
and this 12 minus one. Pretty good. I still looks
like shower drain here, and I'm sorry, but you're going to have
to look at that for now. What we're going to do now is we are going to go up here and reduce the density because that's way too much to look at. As you can tell, these are getting a little
hectic down here. So we are going to promptly
do nothing about it as every true artist should
leave their problems B. We are going to add ourselves in this normal into the vector. Because if you think
about it, this normal for the ops my bad, is all of the normals
are the points and which direction the faces. So these faces all have normals. If you don't know what
a normal is, basically, it's a whole bunch of
lines sticking out from the let me how do I
turn it on again? Somewhere here.
Basically, all of the normals is basically a whole bunch of lines
pointing out from the faces, basically dictating which
way the face is facing. Lovely thing of this note here is it actually stores that. So when you have these
points, if you have, say, connect that normal rotation
in this case, into that, they'll all point out
from the direction that the faces were facing,
which is kind of fun. Now, we're going to use the normal in this case because
when using a vector. This could work, and it will, but we can't just have that. See, we need to mix
it with the position. Now, the position,
if you don't know in geometry nodes is basically the texta coordinates. I
think I said that before. It's the texta coordinates
of geometry nodes. And so we are just going to go vector math and
add these together. Now, in theory, this would work, but the scales too high. This should be about 0.75. Right now, it's
we're previewing it, by the way, so you should
you shouldn't There we go. See? Look, it's working now, so it's getting scaled up,
and it's nice and small. But the problem is,
it's not animated. If you press space
bar, it doesn't play, and no messing with the W
value does not look good. See, this is what
we're doing right now. Instead of doing this kind
of strange random movement, we're going to have
them move slowly undulating down along the
direction of the curve. And we're going to do
that by adding a Well, that's this vector math here. That's what it does. It dictates that the noise should
travel along the curve. But of course,
there's no movement. So we're going to grab
ourselves a scene time node, which basically all of these values, they
increase over time. So every second
this one goes up, every frame this one
goes up, pretty good. And we're going to grab
ourselves another multiply because we're going
to change the speed. And we're going to plug seconds into the value and the multiply. Now, the problem is, we want to multiply
these by that. Now, we could add another
multiply behind it, but there's a multiply add so that you can
save your sanity. Yeah. D know what I'm supposed to say to
that. It's there. It's good. So do it. And by the way, because this is going forward, we don't want to go
forward because Ford will actually be going upwards
if you have a look out. So you can see how
the noise is moving. It's moving along the curve. Pretty cool. But that's bad because it's
going the wrong way. So, you know, -0.3. Maybe a
little much less than -0.6. A, that's it for now. Uh Yep. Bye.
8. Trim Curves and Randomize Lengths: Welcome back to blend
geometry notes, tentacles, terrane,
lightning master class. In our last lesson,
we made tentacles. I know. That's nearly one
third of the whole course. And if you didn't, you're
gonna have problems. Anyway, in our last lesson, we pretty much just
made tentacles. We made them move.
We instance them. We turn them upside down.
You know, you name it. We did it. Right? Now, you can screw around
with these values. We'll dictate how spread
out that thing is. Pretty cool. I think I'm
just going to set mine to minus one for now because I know that's
going to look cool later. We're actually going to chop
it off probably about here. Yeah. So what's happening is we're getting like this we're
putting all the lines on. We're gonna making them curvy. By the way, if you
don't do this, um, yeah. Just so you know. So we're getting this
lovely noise texture, using the normal to go down down the curve with this
funny math and position. Then we're scaling it
so that it doesn't go, you know, sideways like before. And then this here, this scales it based on how far
it is from the top. So we're going to go
with that lovely frame again because I've been told
I need to organize this. Control J. F two. And we're going to
call this length. Oh wait, Length. Yeah, we're going to
call it bad spelling. Length, leg length Lang L. Length. I'm master of
spelling, I tell you. Length scale because this
scales up based on the length. We're going to call this here, and we're going to call this Uh, Yeh funny noise, because
that's basically what it is. Literally, yeah funny noise. Don't question my
naming conventions. Anyway, that's it for now. And now we have this
funny, funny, cool stuff. Don't worry if it's
doing funny things down here. We don't
care about that. Yeah. Alright. Welcome back
to Blended Geometry nodes. I forgot the name because
it's way too long. My bad. Anyway, last time, we made all of our lines.
We made them real. We sampled them, and
we set the position. We're using Y funny
noise and length scale, which I probably should named something goofy
because I like it. Anyway, that's relevant because we've done all of the
left hand side now, and we can move on to
the right hand side. Now, I know what you're saying. This is looking kind of stupid
down here. That's great. Now we're going to do what every great person ever does just remove
what we don't like. There's a lovely note in
here called trim curve. And basically what this does is it tells you how much
of the curve you want. I think you can see
where this is going. So we are, in fact,
going to trim the curve. But instead of having them all the same length
because that would be kind of boring and I don't
like boring. That's boring. Boring is boring, did you know? We're going to set
as a random value. By the way, we're going
to set this to length, too, just so you know. Alright, now we're going
to set this to 4.5. Oh, that's three. My bad. 4.5 and 15. And now we have these nice
random length tentacles. Hmm. Look at tentically. I'm kind of pissed at this noise scale. It's kind of looking
strange. Interesting. Alright. Anyway, back
to the fun stuff. We are going to randomize
the tangle length here so that they
look interesting. And then we're
going to yet again, resample the curve using shifty. I'm going drag that over here. But this one's going
to be actually count because yes, and
this is going to be 100. This will basically save your PC like calculating stuff later because if I whip out that
preview points thing again, show you, that's
a lot of points. Was if I stick it over here, you can see it's
not so many points, which is good, you know. By the way, if you're
wondering about this node, it's basically just
an instance on points with a single vertice, if you really, really
want to do it. I just have it just for
visualization purposes. Alright, now we're going to do something to save ourselves time later because
you know I love that. We're going to move this
using the transform geometry, we're going to move this up 0.4. Whoops my bad four
on the z axis. Okay, great. We're
going to hide this now because we're never
going to use it again. Sweet. Now, if you don't
know what a reroute is, reroute is basically a little
basically a node that does nothing that allows you to
modify where these noodles go. So you can get it by shift
right click and dragging. And yeah, I don't know
what you want me to say. It's a reroute. It goes
from here to there. So we only want one right now. It's great for spitting too,
'cause we can split it off. That's good. It's good.
Trust, it is good. Right, that's it for
now. You can go. You can pack down. You can go. You can go sleep,
you know, rest, go walk outside,
touch the grass, 'cause this is it for
now. See you later.
9. Curve Radius and Tip Instancing: Welcome back. Learn Geometry notes, tentacles, Train and lighting master class where I teach you
to make tentacles, terrain and lighting in a
masterful fashion, I hope. Anyway, in our last lesson, we improve the tentacles by
making them better and cut them and randomize them and stuck them on
points that are better. Oh, what we're going to do first is we're going to do
the unfun bit first. We're going to grab an
instance on points. Gonna hold right click and
drag down here. See it splits. Mm. Amazing. And we are going to get a
Instance on points. Oh, sorry. Object info. My bad. And we're going
to, actually, cool thing. You could actually
go and click on this eyedropper and click on the tentacle tip here
to get this is here. But also, you can just click in the outliner and
just drag it straight in. Fun. Also just a note that also selects it
in the viewpoint. And we're gonna stick
that into the instance. Yippie. Now we have that thing we preview
here? Oh, my goodness. Um, y, so these are
way too big. 0.05. Please, 0.05. Now you
can see the point. See, this is the points, yeah. So this is how you do
the preview points. Now, unfortunately, we only want the ends because we
want these to be like little lights on the
ends, like, you know, deep sea things and have
because it's not real, we can creative license, stop telling me I
shouldn't do it. Ah. Anyway, I'm going to want to only put it on
the ends of the tentacles. And like the spline parameter, there's this delightful
little node called endpoint selection
that literally selects just the endpoint. Also, so you know, it does actually select
the start as well, so you should just
set the start size to zero. And now they're
on the on the end. Happy. Problem solved. I love that. Endpoint selection and curve spline
parameter are so useful. Now, unfortunately,
if you look, Oh, my goodness, we might want to decrease
the length of that. That's a little long. It's
going all over the place. Anyway, the important
thing to note here is they're only facing upwards,
and that's kind of dokey. So we want them to face, like, the direction the
end of the tentacles go because that would be cool. Oh, that's why I said
this to way too high. 0.03. Oh, my bad -0.3. There we go. I'm legally dumb. Anyway, if we come
back over here, you can see, they're not
actually facing that direction. Now, only if we had one of those normal things
that worked on curbs. Well, we have one of the normal things
that works on curbs, basically the normal normal
thing, but for curbs. I love this. Anyway,
let's grab ourselves a vector math so that
we don't do this the wrong way because I promise you I will do it the wrong way. And we're going to grab an
align rotation to vector. If you're using before
whatever version does an added rotation stuff, this is called
align ulta vector. But of course,
we're not cave men, so we don't do that. We make sure you plug this into the vector,
not the rotation. Otherwise, bad things
are going to happen. Alright, we're going to set
this two minus one that way, 'cause if you don't
face the wrong way. They just face the
wrong way. So just minus one and set
this to multiply. And now they're facing the way. Yippee. Oops, that's
a little far. Yeah, of course,
LF two. Control J. Grab this F two.
We're gonna call this ten call tips Oops. Mashing. Alrighty. And oh, okay. Oh, I accidentally
bunt one of those. No. Now, for the fun bit
that actually makes our tentacles do something cause right now, they're
kind of just lines. If you rendered this,
nothing would happen. We're going to do curve radius. So we're going to grab
a set curve radius. This basically sets
the curve radius. Right now, it
doesn't do anything, but you'll see. You'll see. Trust Trust me. We're gonna go curve to mesh. And grab a primitive
curve circle. Now, just so you know,
this doesn't work with a mesh circle. It
has to be a curve circle. As you can see, this curve
radius set curve radius chooses how big these radius of the tubes are going to be. And yes, you could just
use this one here, but this one actually
works on the curve. So if you do that
spine parameter, which we're going to grab and you stick the factor
into the radius here, it's going the wrong way,
but we're going to fix that. You see it works, but if you do it into
the radius on this one, it doesn't just doesn't
an invalid link. So let's do that. And there's a few things we need to set up for
the curve radius. First off, we need to move this up and out of the way so that it does it doesn't bother
us. It's over here. And I'm going to set this
somewhere over here. Right. Now we need three notes. We need the display
parameter, which we've got. We need a math multiply because we can't do
anything without it, can't even leave
home without it. We're going to grab
a float curve. Now, I know, float
curve looks a little intimidating, but it's not. Basically, it's
like a color ramp, but it's just, basically, it's just a color ramp, but a different way
of looking at it. If we flip these,
this is basically just like reversing the
stops on the color ramp. So I'm just going to
add this multiply. This multiplier is just going to choose it's going to make
how overall thick it is. We're just going to leave
that there. But it's fun thing we can do with the
curve is we can curve it. Yes, we can curve the curve. And now these things
have like, you know, they're thick at the top,
then they slide slowly taper and then they get really thin because that's
how the curve goes. Although, I would suggest
moving this up off the bottom so that the ends aren't, you know,
perfectly zero. See, I'm going to add in
a little bit of flair at the bottom to accentuate
those tips we have below. Drake, that's too much. Just a little matched
tip. There we go. And I'm going to increase the scale of these
by doing that. Now, if you want
really thin tentacles, you can drag this all
the way over here. If you want thicker tentacles,
you drag it up here. I'm going to put it
somewhere a little bit in the middle where
it's like, chunky, but it does, like, fall off
and get thin at the end. That's how I did it originally,
and people want that. So we're gonna grab this. We're gonna go Control J. F two, and we're going to
call this curve radius. Great. That's it for now. Yeah. Until the next
episode. So yeah.
10. Tentacle Terrain and Displace Effects: Welcome back to blended
geometrre notes. Tentacles train and
lighting master class. I teach you to make tentacles,
train, and lighting. I hope it's masterfully. I think I've used
that one before. Oh, well, anyway, we made
tentacles last time, and we made them thick
because otherwise, you wouldn't see them,
which is unfortunate because I want to
see my tentacles. Anyway, if you have
a look, I know. They're kind of doing
stuff. But that's good because we want that. Now our last lesson, we did tips the tentacle tips, which we can now control shift right click
and drag and join with the curve to mesh as
this lively join geometry. Now if we have a look,
Yahoo. Look at that. You have tentacles,
and they have little glowing gonna be glowing
tips on them. Pretty good. And everything's organized. But that you can not lose your sanity later and can
only lose half of it. Use remember, geometry nodes is your free way to insanity. Trust me, I know. Help me. Anyway, we're going to
add some things now. They're going to be completely irrelevant at this
point in time, but we're going to come
back to them later. We're going to add
an object info. We're going to add a
collection info and a transform geometry, and
we're going to duplicate it. We're going to plug the geometry from both of these
into the geometry. We're going to set the as
instance on on the object info, and we're going to set
separate and reset children on on the collection info. We're now going to drag both of these with the right click. You can't see, my lovely little screen cast
keys down here. If you ever get lost, probably should have said that
before now, but, you know. And we're going to do interesting cot key
that I learned recently, Control Alt and right
click and we're going to drag and we're going to
turn these off, basically. And we're going to leave
them. Yeah, that's it. And I think we're
actually done here. All we have to do is
grab this group input, right click, drag it all
the way over to this input. Oh, look at that. Oh no. Old mates gone a
little too high. Right. Now, the problem
here is that we kind of have our thing too high. Remember here, there's
this precision value. It's a little too high. Yeah, that ain't
gonna work, brother. Alright, so I'm
just going to bring that down, increase the density. That's better. Yeah, this guy, this guy, he's looking a little
bit smoothained. He's looking a little bland. So we're going to go back
to the layout admire our hentacle dude
tentacling away. And we are going to turn
off geometry notes. Now I'm going to pause this
now. Is this animated. Okay. We're going to add
ourselves a modifier. We're going to add a
subdivision surface. If you don't know what the
subdivision surface is, you've obviously never
done three D before. Basically, it makes more. If you ever look here, if I turn on and off the subdivision
surface, it subdivides. So basically, it just
makes more geometry. And the nice thing is,
is it does it smooth. Like remember back
when we Ratclick subdivided, and we
get the smooth value. Well, this does it
with the smooth value. We're going to set
the viewport to two so that they're
both nice and smooth. And we're going to ignore
that geometry there. We're going to add in
a displaced modifier now what the display
does is it takes a black and white map or image, and it moves the geometry
up and down based on it. What you want to do now is
you want to click on New, and you want to click
on these little slider things all the
way on the right here. Show texture in texture tap. It'll take us down to this
texture thing down here. I'm going to switch this from
image and movie to clouds. And as you can see, he's
getting a little spiky now. And this is crazy site. So you can make cool
terrain using this. I don't know if you
know about height maps. There's some really,
really detailed way of creating terrain.
You do it like this. But because we don't
want this wobbly thing, we want those
lovely rounded sort of protrusions
from the original. We're going to set this
noise basis from original, two VoroneF one, and now
it looks like a rock. Valid rock shape, okay? Just you know, valid rock shape. We're gonna set this to two because we want
it nice and big. And down here under
the collars property, we're going to turn
on the color ramp. We're going to do this
little drop down thing, we're going to flip it, and we're going to set this
from linear to Bes blind. Eight. And now Mr. Bob has
his patricians. That's actually a little
bigger scale for me. I want a little bit smaller. He's a little he's
a little chunky. Let me good. Let
me turn it down. There we go. He's kind
of lumpy looking. Looks a little
weird. Just like me. And now, if we make sure that
we move this up past there, you probably drag it
up past the displace. You can now go turn
on geogometry notes. And we have our tentacle boy. Now, I'm looking at this, and this is looking
a little bit long. These tentacles are looking
a little long for me. I don't know what happened
here. Got some steroids. Back up a bit. There we go. He's cooking now.
He's chelin. Lights. Now, last order of business, we're going to add
in a set material. Choo this one, this
one, and this one. Now we are actually done with all the geometry
nodes, I think. Probably going to regret
saying this later, but we're done with
geometry nodes for now. But
11. Finalizing Tentacle Controls: Welcome back to blend
of geometry notes, tedaclestrain, and
lighting mask glass. I teach you how to do stuff. Really good. Alright.
That's all I got. Anyway, you know,
in our last lesson, we made our tentacles better, and we instanced on them to give them the
little glowing tips. Vardy call? I know. You remember how I
said we weren't doing any more geometry notes?
Well, you guessed it. I lied, but it's only
a little bit more. Now, what we're gonna do now is we're basically
going to hook up all the important things
into this input so that we don't ever have to look at this geometry nodes ever again. So, first of business, distance Min and density max. Now, if you don't
know, you can press N, open up this side panel here. This side panel is where
we have our group. Make sure you're on the
group tab, your group input. And if you remember the train, we're going to basically
do that for all of this. So this distance minimum, we're going to
keep that as that. We're going to keep
this as density. We are then going to go
down here and we are going to go to the Y funny
noise multiply value. And this is noise speed. Basically controls
how fast these go. Pretty good. The
only other things I can think of we
would need are, yeah, the noise scale. Name every one of
these funny noise, but it'd be a little long. And I'm going to grab this bottom two max value
on the map range as well. And I'm going to
leave that as to max. Alrighty. Now I'm going to duplicate this group input and press backspace to reset it. That doesn't work. Never mind. I'm going to put the minimum and maximum into the random bay. I'm going to grab
them over here. Minlk I spelled it right
the first time. Let's go. And we're going to call
it tentacle, sorry. Minimum tentacle length. And you guessed it
maximum tentacle length. Oops. There we go. This basically controls
how far those go. Sweet. I'm going to grab this and we're going to plug this
into the multiply. And this is going to
be t tackle width. Whoops, width, with
with with width. WIDTH because it's
wide and not Y. Mm. If you're questioning
what I'm saying, so am I. I'm pretty sure.
You probably could plug the tip scale in, but I don't really want to. Now, if you go out, you've got all of these lovely
parameters here, which we can tweak on the fly. It's something
interesting to know is, if you duplicate this
and move it over here, if you change one of these
inside the geometry nose, you want to change the
length using this, which don't the
way, don't do this. They'll affect everything every single thing that has
that jumpture nose. I actually looks kind
of cool. I want to just drag that down to
make it look like that. Mmm. Improvisation people. Um yeah. Oh, my goodness. Why didn't I not do this before? Yes, I'm a certified
professional people. I'm certified, certified, bad. Anyway, if you do that,
it affects everything. But if you do this
thing where you plug it into the top and you say, want to change the
tentacle length, maximum tentacle length, it will only affect that particular one. Pretty good. So you can actually tweak
each individual one, which is funny. Kind of nice. Alright. Now, we probably also
should grab this multiply because if you duplicate these
now, you duplicate multip. If you actually watch
us say play over, they're actually all using
the exact same noise pattern, which is not good. I mean, you don't
really see it because there's random
tedacle placement. But if you ever looked,
they've all got this bulge on the left hand side right here where that noise is
pushing out sideways. Whereas if you grab this
multiplier from our location C, which randomize based
on the location. And you see it into that W that I was
talking about before. Now each one has
its own noise seed. Smart smart, smart thinking. Alrighty. We've done this? Now one. Now we completely
dish geometry nodes, and we move on to the
joys of texturing.
12. Texturing Rocks and Adding Glow: Welcome back to
Blended Geometrnds tentacles train and
lighting master class. In last episode, we
randomize stuff. We made it cool.
We made it work. We plugged everything
in so that you don't have to go through
your spaghetti, trying to pick out your
olives and onions, okay? Don't worry. I saved
you the time there. Anyway, we are now going
to texture because that is important if you don't want everything in your
scene to be plain white, I would recommend
because it makes your renders just a little
bit more interesting. Now, what we're gonna do
is we are going to hold Zed and drag down to use
the material preview. See, look at this white
boy, kind of white. I don't know, if you so desire,
you can leave it white. I don't like white
because it looks dull. And I'm going to do something
better because I like better things than just
dull, plain diffuse white. Alrighty. So to start
with the chatting. I want to make these look like a sort of like a rocky texture, like a rocky skin, you know? That sounds pretty good to me. So, of course, we're
going to maintain with the principal BSDF because that's how you
make it look cool, where just can increase
the roughness all the way because that makes it like, less shiny and more rocky. Now, we are going
to grab ourselves a noise texture. Control A. See, the node pie
actually works here, too. Pretty cool. And
we're going to set this two ridged multifractal. Fancy. I love how people cannot name things like something that you
can say easily. It's always a mouthful. Also, object just
because it's better. And we're gonna plug
the energy here. Now we're going to move all of this all the way over here, and we're going to add
ourselves a color ramp. Color ramp, and we're going
to stick the factor this time into the color ramp
and control shift click on the color ramp
so that we see it. Now, remember how all of this
is done in geometry nodes. Well, none of the
materials actually apply unless we stick them in those apply material
nodes that we add. But there's currently
nothing in those. So we are, in fact, going to stick it in
the material nodes. So we're going to call
this rock skin real quick. Rock skin. That way we know which
one we're talking about. I know IL back to
the geometry nodes, and we're going to stick
both of these as rock skin. Back to shading. There we go. Now we can see it.
Also, would recommend saving because you
will actually want to literally not ever do
blender again if you crash during geometry nodes
and shading, for that matter. Shading is usually a little less involved unless you're
doing some crazy math. But yeah, now, there is some funny funny funny
numbers for this one. Feel free to copy, change, modify, would suggest because, you know, then it's
your own thing. Also, set this to
four d so that, you know, we can engage
our brain better. 0.88 on the scale, 12 on the detail, leave the roughness,
leave acurin. Yes, I naming. Thank you three D world for
giving me whatever that is. Acurinanic. I'm not even going
to try anymore. I'm going to set the gain to 1,000 and leave it like that. So now we have this kind of
weird *** fractal pattern, which is, you know, multifactal. Ah, I probably could increase
the scale bit. There we go. Pretty cool. Now,
this could look like a good rock texture if
we change the colors. So we do, in fact, want to
make this not perfectly black. We want to make this like
gray, something like that. Make this like light
gray instead of white. Like that. Pretty good. And just move the
server slightly. Alright, we're going to
plug this into the color? Now, unfortunately,
if we look at this, as much as gray as it
looks, what's it loads in? It doesn't look like
a rock because, like, there's no detail. It's just, like, flat. So we can grab one
of my favorite nodes and shading the bump node and plug our color
into the height. Make sure you do the kite here you can't laser connect it. Or if you really
want to be funny, like control shift right click, there's some chalk Oh Shift Alt, and you can choose the we can choose the factor
into the height. But that's funny stuff. Just just ignore that for now. Just do it the old
fashioned way. I'll stick this
sent to the normal. And now, who, detail. Go. I like detail. Oh, by the way, you don't want
the strength all the way. So it's like 0.5 or
so. There we go. Now, it looks like
a rock. Bro Brow stoned. Ever so slightly. Nice. Now, come down here onto the left hand side or yours will probably
be over here. I've set up mine
like this because I like looking at it like this. Now, come down to
the material tab, which is the kind of circle
with the checker thing that's weird and add in a new
thing and click New. And we're going
to call this tips because you guessed it,
it's going on the tips. We're going to delete the principal BSF because
we don't need it. And we're going to add
an emission shader. Drag it in. I'm going to do
mine's orange because yeah, why not? Drag it
all the way out. Now, remember that last
set material node Yep, I think you can see
where this is going. Alright, now, yeah, it
looks white and not orange, but that's because we
have no bloom enabled. Now, blender was Dokey
when they added EV next, and they removed bloom from EV. So now you have to do
it through compositing. So we're going to switch over to the compositing tab up here, and you're basically just
going to check's nodes and add in a glare and
then switch it to foglow. Now you might have bloom, I'm going to say mine
to bloom, actually. And my strength was
strength to something. I can't remember. You should probably just set yours to
fog low and just drop it on. I'll just work automatically. Yeah. That's all folks. Then if you come
back to the shading, you scroll all the way over to where the render options are. Set this compositor, two always. Now you've got your bomb.
Yippie. We have light. Alrighty. That's it for now.
13. Create a Volumetric Glow Effect: Welcome back.
Blended Tomsu notes, tentacle strain and
lighting master class where I teach you how to
make cool stuff, hopefully. In our last lesson, we
textured the tedacle boy. He now looks like he's
made of stone and has little glowing
tips on his tentacles. That's pretty good
if you ask me. Now, if you ever look
on the original render, there's this, like, sort
of glow thing down here. Now, I originally did this by just when I
duplicated all of these, I just placed a whole
bunch of spheres on them. But that was super
unintelligent and really dumb, which is basically
the same thing, but I'm saying it twice
because it was extra stupid. And I figured out a way
better way to do it. So what we're going to do
is going to go to layout, add ourselves just
a normal sphere. UV sphere. Right
click, Shade Smooth. And while we're here, we're
going to add a light point, and we're going to move
it over to the side. Now, we're going to do
something really goofy. We're going to go while we
have this light selection, selection, and we're
going to set it, call it creature light. I have issues talking and
typing at the same time. I'm sorry. I'm gonna call
this sphere, B, bog, sphere. Great. Now, we're gonna grab this sphere. We're gonna
go back to shading. And I know it's
gonna look really terrible and evy, but I'm
going to do it anyway. I'm going to grab
Oh, my goodness. What did I do? That's okay. There's some noodles here. We are going to add a
volume scatter note. This is basically
a volume. If you don't know, it's a
volume. It's volume. It's basically not It's like
folk and smoke, basically. You know, I love to turn on cycles to show you,
but take too long. What we're going to do
is we're going to add in a gradient texture
because we don't want it to be like you can see,
it's got a hard outline. We make sure you do this
control by the way, if you press Control T on one
of these gradient textures, probably should have
taught that earlier. Oh, well, make sure it's object and set it
from linear to spherical. Now we're going to
add ourselves color ramp and stick the color in. Yeah, we're going
to get funny here. We are going to set
this du best plan. We're going to drag
this all the way over, and this ever so slightly over. We're going to plug
this into the density. Now, if you see, it's
no longer a lock but now no longer got that hard
edge which we don't like. We're going to add
in a math node, by the way, multiply. So just control how
thick the fog is. Now, I encountered
issues down the track, so I'm going to solve it now. We're going to add ourselves
a volume absorption with the same thing
into the density. And we're going to
add an add shader, not a mix, add shader. I'm
going to add them together. We're gonna make this orange and this ever so
slightly orange. Sweet. Now we have this ugly looking orangy
brown smudge and this light. Also, the settings
for the light. It's 5.5 0.5 watts. So 500 milliwatts, and it's
going to be super orange. Pretty good. Right. Now back to
geometry nodes. I know. I told you we were
finished with it. You actually believe me. And
who's the fool here? Not me. Anyway, we're going to set
this to creature light. Now, something really stupid. You can't actually instance or use lights in geometry nodes. At least not with
the object info. If you put them in
a collection, they work. They just work. It's like, what you can't use the object info and use
you can select the light. It just doesn't do anything. Like if you grab
this point line, a point light. It just
doesn't do anything. It's like, What? Anyway, it's blended.
It's quirky. It's funny. Anyway, we're going to grab the
sphere, as you guessed. And control Alt and
drag, right click, drag. So now we have this
lovely sphere right here. Now, we're going to input
the numbers into here. Now, you can modify
these if you so desire, but I would suggest copying
just to start with. Now, we're going to set this
as -1.11 on the Z axis. We are going to -0.75
on the z axis again, but on the, that's the wrong. That's the wrong
button. We are going to do all of these scale are
going to be scale to four. Oops, I pressed four,
didn't I? There we go. So now Oh, my goodness. That's a little big, actually. Never mind, ditch
all the numbers, move it so it's on
top of the thing. Should be Oh, my goodness, should be ever so slightly down. So you should probably just
see the top of the bulb of the thingamajia
imdble up there. And this light, it
should be just below. You go press seven on
the number pad here. This light should be just below. Just below the Let's
use Y frame like intelligent people.
Bloody see it. Let's turn off the
tentacles real quick. That's the wrong one. Let's turn off the
tentacles real quick. Now let's move this so
it's just below the bell. And then we would control up. Right click, turn that back on. Righty. Now we're done for now. So now we have this setup. And if I switch to interview, nothing happens
because Oh, yuppie. Anyway, let's try. This is troubleshooting, troubleshooting and
real time people. We're going to increase
the strength of this light. Well, there we go. Set this to 2000. Let's set the radius
a little bigger. Set this 6,000. There we go. And there's a jelly machine, jelly jelly thingy, jelly
jelly, whatever we call it. We'll probably move the
light up a bit too. This one up. I like that. And we bring back
to chatting. E. And there's a tentacle creature. Now, I'm gonna end here
because my brain power is at an all time low, as
you just witnessed. And next lesson, we're gonna get on to setting up our scene
so that it looks good, which is a good thing. I hope. Alrighty. That's it for now. We're gonna get onto
the fun stuff later, though. Don't worry. But
14. Duplicating & Building the Scene: Welcome back to
blended Geoman shows, tentacles, terrain and
lighting master glass. I teach you how to put
some random things together to make them look
good, because guess what? We're on a scene setup
in case you didn't read. In our last episode,
we finished texturing. We added our little effects using the cursed part
of geometry nodes. And yeah, we're ready
to start cooking. Alright, we're going
to move these away because we don't want
them in our scene. Now, if you remember
from last time, I said, we're going
to set up the scene. Setting up scene is nearly as
painful as geometry nodes. Nearly. So we've got our
little guy here. We're going to move him
all the way over to the right. He's there. He's just gonna chill because we're not actually
going to use him. We're just going to
duplicate him every time. That way we have an
original one to mess with, which has all of
our settings saved. And I'm going to unhide
our terrain real quick. Oh, my goodness. That's big. Okay, we're going to move
all of these over here. I lied. All moving. Right. Now, if you look at the original rendu
there's one on top. And can you guess how
we get the one on top? I can't hear you because I'm pretty sure you
didn't get it right. Because if you didn't say, we're gonna duplicate it and flip it upside
down, you're wrong. And if you did, well, I don't really have as much
to say that's alright. Alright, we're
gonna rotate it by 90 degrees -90
degrees, apparently. Oh, that's not, in fact, the same. That's unfortunate. 180. Oh, my bad. Don't rotate. Okay. Anyway, here is out for rain. Now, I'm not, in fact, enjoying this being
not very bulky. Remember, I think I remember last time I said I
liked it being bulky, something you change down here. Increases interest. There we go. Taking tweaking
time. There we go. I know, you're probably bored
out of your brains by now. Go watch some
YouTube or something interesting because this is
definitely not I tell you. This is definitely not content. This is true insanity we're
delving into right here. Now, remember that lovely
value. Guess what? We're gonna set up 2.9. I told you it's gonna save us
headache later because now every one of these has
got a little gap in it. We're just going to do
some funny things later with our lights.
Now, this is small. This is way too small.
I know you've probably never had that one before,
but it is too small. Our environment is too small. We need to make it bigger. We're gonna do that by grabbing. Both of these holding
Alt and increase Alt and Shift Alt will basically copy what we're doing to all
of the available things. Both of these things have
this noise scale parameter, so it's going to move them
both at the same time. Pretty cool. And oh, that's how I did it.
Okay, never mind. I'm supreme dumb today. We're going to duplicate
this, and we're going to go Control M and then press E. Ah. And now everything's exactly
on top of each other. Just like in the original. Huh. I tell myself I'm smart.
It doesn't mean it's true. Anyway, we're gonna hold Alt and Shift to make it go slow, and we're going to
decrease this no scale. You make that larger terrain
I was mentioning before. I'm gonna hop back
in geometry notes and you guessed it tweak it. Intense tweaking.
Intense tweaking time. Right. I might increase
this roughness. Yeah. Nah, that looks
dokey. Alright. Remember the count?
We're going to grab it and we're going to go
count. Oops, my bad. I forgot like those. Count.
We're going to more count, way more count in
both directions. Now, warning, do not
drag this a whole way because it will crash blender and possibly
get a computer. Now you go. Now we can see
our scene. Pretty good. Right, that's it for now.
15. Creating Procedural Ice Material: Welcome back to blend
geometry notes, tentacles train and lightning
master class where I teach you how to turn this
into something better. I hope anyway, in our last
episode, we started the train. We started placing
things, you know, we started getting somewhere. Now, what we're going
to do is we're going to add ourselves a mesh cube. You scale it up, press
one on the number pad, or if you don't
have a number pad, that's just your problem,
and we are going to scale it up and yeah, so basically so it goes
from the top to bottom. That way, it's, you
know, interesting. It covers, and then we're
going to go S shifts there. Now what shifts there is
basically going to do. It's going to scale it
everything but what you press. So if I go scale shift Y, it'll scale it on
everything but the Y axis. If I go scale, shift Z, it won't scale it on the z
axis, which is important. Now, we're going to go to
the object properties, viewpot display and set
it from texture to wa. That way we can
just see through. Makes our life a little easier. All righty. Now, something I probably should have
got covered first. We're gonna grab one of
these terrain pieces, and we're gonna press slash. And yes, it's the same one that has the question mark on it. Not the backward
slash, the forth. One right next to shift. Oh, righty. We're
gonna switch this too. Render view. Now, if you
go to the drop down here, you can turn off scene
light and Scene World. That way, we can
use the Rendevie in preview mode. Pretty good. Now, I built this super cool
like ice texture thing, but someone didn't like
it, so I modified it, and it's now way, way less less cool looking
and more complicated. So what we're going
to do is we're going to add a new material. We're going to call it ice, and we're going to change
the color to like blue, and then we're going to go
back into geometry nodes. And in this material right here that we
put in way back when, we're going to set it to ice
and then go back to hating. Hey, and now we have our thing. Hey, look at. It's
blue. It's done. There's our ice. Do you
have a problem with that? I don't know. Anyway, start off with our roughness is
going to be 0.123. That way, it's nice and shiny. As you can see, it's
going to be reflective. Oh. Now, I would suggest
adding a camera here. I'm going to just shift A type camera zooming in
somewhere here. Press Control Alt
number pad zero. And then press G, Z, or just zoom backwards. That way you can you can look at it in a consistent
direction. Is good. Alright. Now comes the fun bit. We want a noise texture, but we also want it
inside the ice so that it's like no, it looks good. So what we're going to do
is we are going to grab a Voronoi texter because
we have that in here. And as you can see,
you can probably guess once we press Control
T and set this to object, I think you can see where
the ice is coming from. It's going to be icy, lovely, lots of ice looking
shapes. All right. Now, if you want the
specific numbers for this, the numbers I use were 0.2, but it's nice and big, probably
just move down a little. I don't think I used any detail in that, and it's
pretty much just that. Now, just to note, use the color because the
distance looks like this, and the position
looks like that. Anyway, the color
is the one we want. So what we're going
to do for here is we are going to plug this into a color I set my colo ramp
hot because I use it so much, but you can always just go
Control A Clams up there. Color ramps under converts
because it's a blue note. Now we're going to set
this two blue colors. Blue, that one, and blue that one. I'm
going to set my too. It's probably just a
deep blue at the moment. And we're gonna stick
this into the base color. Hey, look at that. We're like, 5%
closer to being ice. Nice. Nice. Now
comes the trouble. We're going to do some
funny things later. And one of them is going to be we're going to us transmission to
make this look like, you know? It's transparent now. And, trust me, this
will actually look a whole lot better once we, you know, do stuff. But something this has reminded me, looking
at this black stuff, if you go to the
render settings, 'cause you're going
to be using cycles. Don't do this Eve.
You pain, pain. Trust trust me, it
will be painful. You want to scroll down to
your light path bouncers. You want to make sure
your bouncers for transparent and transmission are set to 32 as well as the total. This will just make
it so that you won't get any black clipping in transparency. It
just causes bad. It is certified, not good
now, what are we going to do? This is a little
too perfect for me. I'm going to move these
all the way over here. I'm going to add myself
a noise texture. G to use this same
thing because it's not going to actually change,
the object coordinate. We're going to grab
this noise texture. We're going to
grab a color ramp, plug it into the color ramp. It's a little big, and we
are going to clamp it in. So it's just little little bits. And these are going to
be scratches on the ice. You increase the detail all the way and a bit of
the roughness too. And add in one of my delightful bump nodes and make sure you plug
this into the scout. Otherwise, it's not going to
Oh, this is displacement, my bad color into the
hight. No, look at this. So now we have these little I make sure you invert it too. That way, it goes inwards. Now we have these
lovely little dents in the ice, but I
want scratches. And remember that
ridged multifractal from before that looks
like a spaghetti. Yeah, you guessed it. We're going to set
this to 1,000. Use this to clamp it in. Oops. Actually, we're going to have clamp this one in all the way on the
right hand side. Is that where we get the
black lines that do stuff. Now, if you look at this, see, you got little scratches
on your eyes. There we go. I'm going to go to detail all
the way scale, much bigger. That way, our ice isn't like, you know, perfectly flat,
which would be kind of bad. Right, we're going to
duplicate this bump and post it here and you can notice
the normal can go in. You can stack bump
nodes even better. We're going to plug this
RNI texture into the bump. That way, it gives us
lovely little lines. I think we're gonna
probably stop here for now so that you can go and scream into a pillow
for 5 minutes. Yeah. See you soon or later, depending on how long
you can put up with me.
16. Gradient Control & Emissive Ice FX: Welcome back to blended
geometry nodes, tentacles, drain and
lightning master class. I teach you how to
use Shader nodes to decrease your sanity by 80%. In our last episode,
we did exactly that. We started our ice texture
for our landscape. Hopefully, you've screamed
into your pillow by now, and your sanity has
hopefully returned somewhat. I pray. But yeah, moving on, we are going to do some funny things
with gradients now. So due to some lights that
we're going to do later, we can't have like the bottom, these flat bits
being transparent. They need to be opaque. So we're going to grab ourselves a gradient texture gradient and a color ramp because what
will we do without colourm? Now, we're going to
move this texture coordinatet all the way up and duplicate this mapping node, and we're going to Ops mob. Object into the vector and
stick it into the vector here. Stick that into there, and now we have a gradient texture, which is bugging out
because why not? Well, my bad, this is
supposed to be generated. Oh, there we go. Anyway, we are going to rotate this so
that it goes up and down, just like the other texture
we were talking about. We're going to rotate this
90 degrees on the yxs and then we're going to use
this to clamp it in so make sure that only
the black, yeah we go. There we go. So all
those black bits are not going to be transparent. And we basically want
all the flat flat parts of the train to be
not transparent. Yeah, there we go. That kind of looks cool. I like the gray. The white and gray black
kind of looks cool. Anyway, that's not
important right now. What's important is
that we plug this into the weight on the
transmission panel. If you have a look now,
you can see these bits are transparent and these
bits aren't don't worry. You won't actually
see that that much, especially once we turn down
the value on that color. Pretty good. Is a little bit. There we go. Yeah, it looks like water almost pretty good. Now, something else
we're going to do just to make our lives
a little bit easier is we're going to plug this
into the fino texture here so that we don't get this
really weird light effect. So we're going to add
ourselves a mixed color, and we are going to
set this as multiply. Oh, that's where I can multiply. We're going to plug
this down here. There we go. Theres the
factor all the way. If we have look at
this, see how it's like it's blacking
out parts of it. And so it'll make, there we go. And now it's all dark down here so it doesn't look
so much like water. Pretty good. Um, I think that we need to do
funny stuff because funny is better piece you didn't know. I
like funny things. Funny things are good. So
we're going to make a volume. Why not? Why not? Why not? Why not add volume? Yay.
Volume volume's good. So we're gonna add in
a volume scatter node. Actually, no, not
the volume scatter. Emission. And we're gonna plug the emission into
the volume so that, oh my goodness, that's
way too bright. You might want to set
this to something nice and small so that you don't get over flash banged
while you do it. So basically what this does is, if you ever used a
principled volume node, this is basically the
emission strength for, like, the principal volume, but
it's just the emission, and you don't have to deal
with all the volume density. But the cool thing
what we're gonna do is we're going to make
like little prisms inside this piece of ice
so that it looks funny. And so you're going to see
it by the emission texture. So we're going to grab
this color amphia. We're going to grab
this color here. And this directly here, we're going to set
this to best spline, because we like bestblin. Bestplnes really
good. Ga set this to black so that we
get that effect again. And we are going to add
ourselves a new Vorono texture, we're going to control
shift D so that we retain that extra extra
thingy magic I should probably turn on
screen cast key so that you're not scratching your head too hard
on what I'm doing. Thought it would carry
over, but it didn't. Anyway, uh, we are going to
set this one from F one to distance to edge. Now what distance
to edge does is it makes this super
cool crack texture. Yes, this is the cell fracture
in case you're wondering. What we're going to do is
we're going to reverse it. Now, we're going to reverse
it on a very large scale. So we're going to grab
this noise and we're going to stretch it
so it's dummy thick. Now, we're going to flip these, flip these over, so
it's the white parts. Yeah, we go there we go,
there we go, there we go. And we're going to clip
these all the way. So if you're wondering, you can click one of these and you can actually manipulate the position
using this slider here. So we're going to hold
shift and get really, really, really close using that. Sweet. Now, we're going to
plug this into the strength. Oh, by the way, you're
going to add in and multiply because yeah, multiply it more,
more, multiply. Now, if you have a
look, there we go. It's probably probably
a little right. You can see there's
all these kind of, like, you know, inflections
inside the eyes. Pretty cool. Now, I'm
going to disclaimer here. Doing this and not just
having what we had before will slow down your
rendering by a lot. So if you're having issues with render times and you're
happy to sacrifice the cool looking ice
refraction inside, just disconnect the
emission from the volume. Fortunately, that's the
only way you can do it. Right. So we're going
to now duplicate this, multiply, stick down here, add this one to the bottom. We're going to plug
this die one up here. We're going to plug this
one up here into that one, into A, and then we're going
to put that one into B. We're going to plug that
one into the value. So if you have a look now, they are now randomly randomly
colored whereas before, and it was just this one, they'd all be like really
bright and even. Now they're like, colored
based on that, which is fun. And don't forget set
this to blue. Ice blue. Right, I think we're done.
Now we just plug this back in here and increase the
emission in here. And we look back in
here, and we've got this super duper
cool looking. Ie. Now, if you're wondering, yes, you can actually increase
the detail on this. I think I did, did I? I don't think I did, anyway. You could increase
the detail in here. It would look funny,
though, be aware. You'd get absolutely
no difference. That's Oh, there we go. Oh,
that looks cool. Ms a e. Ms a likey. Now, if
you look back at here, oh, yeah. So, here's
the difference. That's rendering with the
denoise occurs at ten samples. So that's this is how long it takes to get
ten samples rendered. And if I disconnect that,
that's ten samples instantly. Just just so you're aware
of the downfalls of this. Now, I don't like having these
really dark spots, okay? I'm going to be honest with
you. I don't like that. So I'm going to set
this to multiply add just like before, and I'm going to add
in ever so slightly. Oh, that's a little much.
That's not ever so slightly. A little bit of omission
to this volume. Big time. There we go. And now, it's
there. Pretty good. Alrighty. There's our ice. Now, just so you know,
this multiplier here. I'm going to set this
probably about four. This is how bright our ice is. Oops, that's two. Two, no, no, two. There we go. So now we have this ice, and you can't really
tell the difference between the opaque ice down here and the
transparent ice up there. But it's definitely not 11:00 P.M. And I'm definitely
not losing my mind, but, you know, everything for
the sake of geometry nodes. Yeah. There we go. I think I'm gonna stop
here so that you guys can Oops. Oh, no. Oh, no. Not good. Not good. So that you guys
can enjoy your ice? Um, yeah. That's probably a little much. Our week. There we go. Now
our ice is better. Alrighty. I'm gonna
stop it there for now, and I'll get back to you later. Which is probably actually
gonna be about 30 seconds.
17. Volumetrics and Backlighting Setup: Welcome back to
Blended Gem, you know. Das lighting master class where I teach you
how to make ice look like actual ice
and slow your pieces render down by 3,000%. In our last episode,
we did exactly that. We made ice, and we made it
slow our render down by, like, way, way, way,
way, way too much. It has actually been 30 seconds, but I'm better now. Now we're going to move
onto the volume metrics and the lighting part of the lighting masterclass.
That's so masterful. I can't even believe we
called it master class. So you've noticed the giant
*** cube from before, I'm sure. This giant *** cube. Well, we're going to give it
a funny texture right now to make it bright and
actually do something. No, it's only three
nodes, so don't worry. It's not some crazy
*** volume metrics. It's only going to be a scatter, an absorption, and
an add chatter. That's it. That's literally it. You can sigh in relief now.
You can mop your brow. Anyway, volume scatter. We're gonna keep this
as Henry Greystein because I'm Henry Greenstein. Mm. Thank you, three D. Mm. Anyway, we're gonna set this as some lovely light cyan blue. And the density is gonna be 0.7. Uh and the T search 0.6 for the Nsostropi if
I remember correctly, and 0.3 on the density for
the volume absorption. We're going to make this
blue as well, not as blue. Right. Now, these are
actually quite big. So make sure that setting your objects are
scaled correctly. These are absolutely
mind bogglingly huge, so it's probably going
to be perfectly fine. Now, what we're
going to do next is we are going to
add the lights in. We are going to add in
a giant R point light. Now, I was just
area light my bad. We're going to add this in
the layout, by the way, just so that you don't have
to look at that small screen. We're gonna shift right
click to place the cursor, and then shift left click
Shift S selection to cursor. That's gonna pop out
light right up here. By the way, I did add it. That's just to move it upwards. We're gonna scale
all the way up. Bigger bigger, bigger, bi and bigger have this large light. We could probably
scal it down a bit. We don't really
need a humongous. Make sure it doesn't
go past the edges. Right, we're gonna leave
that there for now. We're going to
duplicate this one though and move it over. Shift Z so that we don't
move it on the z axis. Going to scale it this
way so it's rectangular. Going to rotate
it on the y axis, 90 degrees, rotate it on
the z axis, 45 degrees. Pointing straight in
like this. This is going to be the
backlight, basically. Honestly, we're
going to scale XX, which is osorry scale YY, which is going to be it pressing Y twice basically goes from instead of going on
the Y axis like that, it's going to go to the Y axis of the object instead,
just makes it whiter. Now, both these lights have some funny parameters
in their light settings. Of course, this one's
going to be blue because it's ice, you know, blue. This is going to have
180 degree spread. However, this one over
here is, in fact, not. I never mind. It's actually, in fact, going
to have 180 degree spread, whereas also going
to be light blue. Mask glass, I tell you,
mask blast of two lights. Alrighty. Now comes
the fun bit rendering. We're gonna turn up this. And we are going to grab
this back light. And we're gonna crank it up? I'll say 5,000. 10,000. Not enough. 100,000. Right. Now, I think this
is getting a little large. So we're going to press
A, grab everything, and we're going to
scale them down. This is getting just
a little bit too big. Some of the volumetrics
probably won't work. So now everything
is much smaller. Hopefully, my tentacles
didn't break. Sweet, they didn't I would suggest never applying scale
or rotation to this thing. Otherwise, things
will go sideways. That is quite literally
will go sideways. Anyway, we're going to
switch this back on. We're going to grab our light. Why help, can't see the light. We'll see the light. Okay, there we go.
There's our light. It is, in fact,
not bright enough, so we're going to grab
this area light two, which is the one we
should we should call this the back light. And this is going to
be the top light. We're going to call
this backlight, I should probably be enough. For now, it'll get better
with the volumetric. If we have a look up here, we can increase this
top light strength to something like 10,000. Maybe it has to be
100,000 as well. And there we get that
delightful little effect where you can actually
see the roof. So we might actually
go 1 megawatt here. Just just so you
know, this may be modified once we get that
volumetrics working. Alright. Back to the shading because something
went horribly wrong. Our volumetrics did not
in fact volumetric. Oh, I'm smart. There's our volumetric.
Zero gravity. Oh, God. Oh, yes, would suggest turning this
down to like ten now. So it doesn't get
ugly googly large. Whoa, that's a lot of density. Back to the shading. It looks
like it's underwater now. Where's our cube? Is
it called cubes Del? Yes, it is. Okay, we're
going to call F two and go to call this volume. Let's just put this
to 0.1 and 0.05. You're way too much.
What the hell? 0.05 0.005 question Let's put this one to 0.00
s. This 10.003. So like that. Okay,
now, back up here. Remember those two scene
light and scene world. Let's turn them
off. We'll back on. Sorry. A, now we're cooking. This is W again. To
bloody. There we go. Now we're starting to cook. We are starting to cook
with gas. There we go. Now we're getting our
delightful lighting that I cannot see because
it's so bloody small. Okay, camera time. We're
going to click on our camera? We're going to go down
here? We're going to change the focal
length to something. Oh, that's way too small.
Something like 20. Basically, you want to
get as far as you can without seeing the
edge of the thing. You know, zooms in by
pressing G, and then Z twice. Press twice, so I
can aim the camera. Let's get back into solid V
so I can see what I'm doing. There we go. There we go. Let's just
let this render out. Oh, if you have a slower PC
under view port display, turn pass part out all
the way up. Here we go. Here's where it's
coming interesting. Alright. Now, of course, again, that emission strength on
the ice is now way too low, so let's turn it back
up to, like, seven. I think our volume metric
isn't good enough. It's all the way up. Off.
Let's put this back up to 0.3. Oh, God. I forgot about that. Yeah, 0.2, and we turn this
bone back up slightly. Ah, wet one. As you can tell, this is where
we tweak for way too long. I'm going to start
actually tweaking. 0.02. I'm just gonna sit here screwing with these values until I find
something that's actually good. Feel free to skip ahead
until I actually do. Maybe it's his thing. Top
light for now. Back light. Let's crack this up on a notch. There's a green. Yes. Might be contributing
to it, at least. Always turn the Alpha on
this down a little bit. Just make it completely
transparent. That'd be funny. Right now, I'm trying to
figure out why these are not transparent. They should be. Oh, that rendering is abysmal. Okay, I'm just gonna
abandon that for now. This would be a
good time to have Lux Cor still available. Save save my sanity with real time for physically
based light tracing. Point 0.1. Green, though.
Oh, that's way too much. Okay. Alright, we're going to
turn top light back on 500,000. There we go. Alrighty. It's better now. Basically, the top light
was way too bright, and it was lighting up
the scene way too much, meaning that you didn't
have nice contrast. I did try to screw around with the ice material, but
I didn't get anywhere. These are the final values
for the the volume. I know they're not exactly
like the original, but, you know, I think
this looks cool, too. Same idea. It's got
that lovely back light. It's probably This one's a little more dark
than the original. You know what I think it is? I think it's the scale on this spas height. There we go. Rest, go walk outside, touch the grass, 'cause this is it for now.
See you later.
18. Adding Particles and Camera Anim: Welcome back to Bland
Geometry nose Data Volt rain and Lighting master
class where I teach you how to
use volume metrics to lower your
sanity, all the way. Not just half, not 80%.
This one's all the way. In our last lesson, we
did the volume metrics. And so now you have to put up with them for the
rest of the course. Now, of course, you
got to position all the camera and
stuff correctly. That way you don't have just
random stuff everywhere. Right. Now we have all of this
part of the scene set up. We are going he
duplicate this little dude and stick them all over
the place. So chef deep. I want one of these right in the way of the camera
so I can look at it and admire it since I spent way too much
time working on them. No one can go over there.
Maybe it's a bit bigger. That's where one can go in the background.
It's a bit smaller. I'm going to add my camera. My camera is gonna probably
go somewhere through, like here like that. It's a horrible color
to the Oh, God. Anyway, so I'm going to have more things
over here on the right. Oops. That one's clipping
into the ground now. I have one all the
way up the back. It's gonna be like, really big. Cool like that. Oh, that seems it's a little
bit empty on the left. So that guy's behind a wall, so we don't see him
clipping into the ground. Do we have a look at this
now in the reterview? Oh, yes, we forgot to increase the strength on our
little point light here. Increase this to like 100 maybe. Enough. Yeah, let's
make this 1,000. Ooh, now we're cooking 5,000. We can now see it in the side. Probably want to move this all the way off to the
side somewhere. Just send it. There we go. Probably turn this off in the rendview so it
doesn't cause problems. Yes. Yes. Looks good. I'm happy with that. Now we're just gonna add some particular particular
little details. We are going to add ourselves a cube because what
else would we do? We definitely didn't
delete the default one. We're going to
increase the scale. And we're basically just gonna stick it right
in the camera. I remember my camera
is gonna go over here, so I'm gonna get
over here as well. Now, particle system. I know. I'm literally doing
everything in this course. Like, the only thing
I'm not doing is physics and quantum
science because, yeah. Volume, source volume. This basically means all the
particles will spawn inside the cube instead of randomly,
you know, anywhere. And we're going to set the
frame start and end to one. That way, they all spawn on the first frame so there we go. Now we're cooking right, so that I can actually
see what's going on. Viewport display, show a miter, turn it off. Same
with the render. Render, show a
miter, turn it off. Now, if you press play and
wait for your PC to lag out, yeah, gravity, we
forgot about that. Field weights, gravity
all the way off, shift Shift left arrow. Yeah, left arrow. We'll send it back to the start. There we go, but
they're still moving, and I don't like that. So we are going to go
in and under velocity, we're going to set this to zero. So they just sit still. Righty. I'm going to grab
all of these creatures. I'm going to go New
collection creatures I'm going to turn them
off using this one. Now, if you can't see
any of these symbols, under this option here, restriction toggles, you can
turn them on and off here. This is going to
make my viewport run much faster now it's only
simulating one of those. Now, we are going
to add ourselves a force field turbulence. I drag it over here. This is gonna make my
particles do funny things now. Oh, also, also note
lifetime thousand. That means they won't disappear. Won't vanish into thin air. Just like my sanity. Oh, that's a little. They're
going a little too far. I'm going to set
the flow to one, two, there we go. So now, if you look at
it through here, Hey, they're like little little
firefly kind of particle, ember, ash, whatever
you want it to be. Now, how are we
going to see these? Well, they're
obviously not going to show up like
that in the render. Let's just add ourselves
in an atmosphere. Right click, Shad smooth
and under the materials, we are going to add
a new material. But instead of clicking
a new one, we're going to drop down here
and we're going to select the tips because we already have that lovelier
orange emissive material. Now, we unfortunately cannot see this right now
because we haven't, I've clicked on this cube. You can actually click on it.
You can't click through it. It's kind of funny like
that. It's still there. But anyway, click on this to
get your particle settings back under render
set two object, ZllZoomO and click on
that circle sphere down. And now you have a
whole bunch of spheres. Scale randoms, all the way up, scale down, render view, go. That's way too big.
Still a bit too big. 05. Hey, look at that.
They're pretty cool. They're gonna move
around, too. You can't really see them right now, but they're they're doing stuff
in there, okay? Trust me. Right? We are nearly done. I
know what you're thinking. How? But we are, in fact, nearly done, and I am
nearly ready to fall over.
19. Animating the Camera with Constraints: Welcome back to
Blended Geomet nodes, teeuls rain lighting mask class. I teach you how to
use particle systems, which are cool and volumetrics, which are cool, but
painful to make your scene look better.
In our last lesson? Yeah, we did that,
in case you noticed. We use particle systems to add our little glowing
particulate lights and volumetrics so that
we can run around screaming with
pulling our hair out because that's what volumetric
does to your computer. For the home stretch, we're going to
animate the camera using some constraints
real quick. I'm also going to
hide this because I don't want to spend my
life clicking through it. We're going to add
ourselves a curve Bayesia. Bring it up. Move it over. And we're going to
go into top view by pressing seven
on your number pad, and I'm going to make the quip about not having a number pad, so just know that I'm thinking it and you should
be getting one. And I'm just going to move
this curve all the way over here so that I can
see it. There we go. Move it over. Well
if you don't know, you can press G and hold your middle mouse
button and drag and also snap to
one of the axes. It's kind of useful. I actually don't want that middle vertice. I'm gonna go Control X to
delete it. Curve it that way. And now comes the fun pit. I'm going to click tab back into Edit mode.
Sorry, my bad. Click on this camera, go under the constraints option and add the constraint follow path. All this follow path
is is basically it's going to stick the
camera on the path. I know, revolutionary.
By the way, because it's got
offset right now, it's going to send it
somewhere into random space. So just click on the
camera and press Alt G, and then you can, you
know, go back in. Alrighty. Now, this is still looking over
here, and that's great. Unfortunately,
it's not going in. If you see, it's not animated. So what you want to
do is this offset here is how far along
the curve it goes. So if we press this little
button here, make sure sorry, make sure that we're all
the way at the start of the timeline and click
on the little dot, go all the way to the
end of the timeline and type in -100. I know it's a bit strange,
but that's what it is. You have a look? Yep, we're
all the way over here now. So over the course of the thing, we're going to move
through our scene. And because the cameras
still separate, I'm actually going to
animate some rotation here. I'm going to go K
because this is blender, 4.3, and I'm going to
press for rotation. And I'm going to go to the end, and I'm going to rotate along
the z axis to over here. K R again. So now I'm going to
have a pan dolly. If you don't know
what cinematic set is basically moving forward and
rotating at the same time. You get a nice close up of
that thing, and I want, I think I actually want
for framings purposes, I want a creature right there. You're going to have
a friend right here. But big friend. Yes. What would you recommend hiding the
rest of the creatures so that you don't lose
sanity over them. Also, probably a good idea to
hide the original creature, just for ease of use. PC starting up bloody jet engine in the background. There you go. And if you want to Easy Ease, because you're
special character, go into animation, change
this to the graph editor. Click on your camera, and you will see this,
all of this stuff, press A, and then the full stop on the number of pad
to frame it all. And there's this
offset one here. You can grab that shift, grab that and press is
interpolation. We want Baysia. Now, we don't want
anything in here, so we want to scale all the way down, and now it's smooth. So if we go back here
and we look again, it. There we go. It's going
to be nice and fast. Going to slowly slow down. Then right at the end,
instead of jarring to a stop, it's just going to come
smoothly to a stop. Hey, that's pretty good. Okay, people, ladies
and gentlemen, I think we are officially done. As all of my
official things are, there's going to be like
three more hours of tutorial. So yeah, we're done. If you unhide everything with LTH you can pull
back the creatures, grab the rest of the creatures. All the creatures, open up
the rende Look at that. We have ourselves a delightful,
spooky alien scene. Why does that eye
look like a pancake? I don't want to know. I really don't and we have a lovely little
animation going through now. I'm going to have
to skip through this because I know it's not going to survive using all of those creatures
at the same time. The best part is you're
not actually going to see past the end of the world there. If you do end up doing it, grab the X and Y thing and
take it up or increase the density on the volume. I'm going to turn on bloom on this one so that
we can look cool. Send it back. Now, look
at that. There we go. Now, I'm going to stop here because I think I'm pretty
sure that's everything now. Help. Hold up, let
me step a few frames forward to get our
little particulates in there, little orange specs. Alrighty. That's it for now. We're gonna get
onto the fun stuff later, though. Don't worry.
20. Optimize Render Settings for Speed: Welcome back to Blend
Geometry notes, tentacles rain and
lighting master class. Alright, in our last
lesson, we did it. We did the big one. We put everything together. We
animated the camera. We put all the little
tentacle dudes everywhere. We
positioned the camera. It's good now. You could
say it's done here, but it's not because, you know, as I'd like to
say, we're ready at us. We don't do it the easy way. Why would we do
that? Why, why, why? Alright, I'm going to go
over some really fast. I'm going to go over some render settings to make your renders go faster because I know
this one is going to suffer because volume metrics. Volumetrics are like,
we're going to add 50% more than whatever you thought was more to
the render time. So it's like if you
thought it was going to go from 30 seconds to 5 minutes, well, you're going
to go to 10 minutes now because volume metrics. So, a good thing to do is always to have
a preview setting. So 0.5 on the noise threshold will make it go really fast, along with 128 samples. Oh, late. And check D noise. Open emiss denoise accurate
high, use your GPU. If you have one, if you don't probably aren't
going to undo this. And, yeah, that's just a
nice super fast render so that you can preview
whatever you're looking at. You can check it for issues, for objects that are floating
around for no reason, you know, problems. There we go. And there's your preview
render. It's not brilliant. You can see there's some
dithering over here. There's some questionable
sampling over there. These things these things
are not lines yet. They're kind of
broken into pieces. Anyway, I would suggest you do this first
just so that you, you know, don't
have any problems. Also, to make it go faster. You can turn these
back down to whatever the lowest setting is that you can't see a difference with. Turn off the core sticks
because we're not using casticks and that
will kill your PC as well. Come down here to performance. Now, this is my favorite part. Tiling. Tiling makes
everything better. I know you think it
doesn't it does. 256 is just the best
runner that I found out. If you're wondering what
tiling is, it's these buckets, these little squares where it does it at single
bit at a time, instead of doing a
whole if I do the 2048 it will render the
whole thing at once. No, I know what you're thinking. Yeah, this is
actually is faster. This will render it faster, but it will render it
at a lower quality. And I found that
using buckets at 2:56 will go faster
for the quality, the better quality than
doing a large scale. The large scale will go faster, yes, but you'll
get worse quality. Use the buckets will
go slightly slower, but you'll get much
better quality, quality that you would
have to crank up the samples a whole lot
more too to get better. Anyway, persistent data, that's for when
you do animation. This will just make it faster. If it's not animation, it
really doesn't matter. Also, just so you know,
these increase memory usage. So if you have horrible PC potato
and you don't have good memory, don't
turn this one on. Right. Now, for
the final render, I have a final final perfector. This is the settings I
use for my final render. Two k. Why is this
2048 should be 2048. 0.01. This basically is as perfect as you'll get
without setting it to zero. 2048 a whole bunch of samples, use the optics albedo
and normal denoiser. I will end up doing
compositing later. In fact, there probably
will probably be one more lesson with
compositing in it, once I've rendered
this out. But yeah. You could set it to
filming. That could be fun. I don't know. I just like AGX. AJX basically how
interesting the color goes. And if you're wondering
what that is, I have absolutely no clue, so you should
definitely not ask me. Right? That's it for
now. I'll see you later. One more more one more
episode tomorrow. Because one more episode
on Alien Worlds, I can't remember the name
because it's way too long. And it's, like,
nearly 12:00 P.M. So I'm suffering right now. But I hope you
enjoyed it because, uh I put a lot of work
into it, and you better. So, yeah, uh, last
tutorial is compositing.
21. Final Touches with Compositing: Welcome back to Blend Geometry knows tagles terrain and
lighting mask class. This is actually the final
time I'm gonna say this. So you better soak it up. In our last episode, we did everything.
It was finished. It's all finished. You can go home unless you
want the secret sauce. Because, yeah, episode of this week's special
Alien Worlds, Kennels Dream and Lighting
master class where we go through the way to turn this blend *** image into this super cool looking extra modified image
using compositing. And, no, we're not
actually using a lot of compositing.
It's just a little bit. They don't worry. You know, I ain't rocket science
until you make it a rocket. Alright, on that load.
Let's get into it. Alright. Something important to know is you won't have these. You'll basically have nothing. You'll have nothing,
like literally nothing. If you want to click on Use
nodes and these will pop up, you'll get your composite
and your render layers. Now, the render
layers is basically the image that you just rendered
using the render, okay? So this image here is the
one that you get in there. Yeah. And if you control shift left click,
you'll get your view a note. And I like to stick it all
the way over here and use shift right click and drag
to join these together. That way, we're seeing
what we're seeing here in the background is what the actual final image is
going to end up being. Righty. Now, I did some testing, and this is actually using that super low res preset
because it would get pretty funny and have lots of dots on it if I used one of
the higher sample rates. So this one is just using
standard open image denois. I could probably switch
it to optics if I wanted. And, yeah. So, we are going to improve it using the
power of compositing. Now, first of business, we're gonna color
correct it because, you know, Color cricket makes
everything look better. Now, you're going to get
this color balance note, and I know it looks
big and chunky, but it's quite simple. This lift, this is the shadows. Okay? So these are
all the dark parts. I make this brighter
and preview this. Oh, I forgot to turn on my
notes. And I look at it. S. What you don't know is
it's only affecting really the dark parts of the
scene if I go down here, you'll see these are
still quite bright here. Whereas if I modify the Gamma, which is the mid tones. You'll see it makes the mid
tones darker and lighter. And the same goes for the top. See, this one only
really affects the light parts of the scene. If I use this one, it kind
of does all the dark parts, which looks really y. And these color wheels, just if you want the dark
parts to be red, say. Oh, that's a bit much. The dark parts here
seem to be red. Now, all my shadows are
kind of red tinted, and I want the light
parts to be green, say. I can move this over here, and lo and behold, the
light parts are green. Probably got to strengthen up
that red down here, though. Anyway, that's what that does. But I basically use it as
just just the values here because I can adjust the contrast of different parts
of the scene more easily. Right. Now, what we're going
to want to do is we're going to want to make it so
that these shadows here, they're going to be
dark but not like, you know, too dark, that
they're black black. We want them to be,
you know, mysterious. Like, you could hide
something in tweak it a bit. Now, compositing is
like 80% tweaking, like 20% actually knowing
what you're doing. And for me, that's just 100% of not
knowing what I'm doing. So don't worry if
yours looks different. This is tweaked to taste. So whatever you pull out
that you think looks good. I'm going to take this one up
a bit, this one down a bit. I'm going to increase this
one because I want it to be, nice and bright in the
background. There we go. This is the difference. It
looks slightly lighter, slightly darker, you know. It's interesting. Now, let's
stick this back over here. Alright. Now we are going to add in bloom because
these tentacle tips, they're kind of, like, just
sitting there looking white, which is not correct because
they're actually orange. So we're going to add
ourselves a glarode. Now, if you're not
on 4.3 and before, this will work with
the fog lo option. But for me, I'm going
to use the bloom option because I'm cool like that. Now if we have a look
at this, basically what this does is it finds the bright parts of the image and it adds
the bloom to it. Yeah, no, pretty
self explanatory. And if you want to see
just the light parts, you can take this mix
all the way to one. So this is actually showing
you only the parts that it's applying the bloom to if you set the size all
the way to zero. So these are all parts of the image that are
going to get the bloom. Now, that's great.
Especially considering we're about to mix it back in using Control
Shift right click. We're going to drag
it back to here. We're going to get a mix node. We're going to set this to add. Now, unfortunately,
these here inputs are not in the right order. We want the glare to be on
the bottom. That's bright. There we go. So now, using this slider, we can
control how much bloom we have. Hm, look at that.
Pretty cool. Oh, we go. Something like that
looks pretty cool. I say, if you want
more, add more. If you don't want more,
don't add more, you know. All of these numbers should
be relative to what you want. Now, I'm going to set my high. And another thing to know about the glanoT threshold
basically dictates how bright something has to be to get the bloomofleque
applied to it. So if I take this
all the way down, you get more of the image
because more of it's, you know, that lower color. So at 0.2, it's getting a
lot of the image because, like, a lot of the image
is actually bright. Whereas if we set this up to, like, you know, six or seven, we're only getting the super, super bright parts of the
image, which are right here. So it's just something to know. I'm going to set
mine to one, one, because I like the stuff that's
coming out of it right now. Sweet. Now that's done. We are now going to
add in a distortion. Lens distortion, note. Now, lens distortion is
basically chromatic aberration. So if I crank these up
to like 0.1, you'll see, you get this super
super light, you know, it's the rainbow effect
that you see in, like, horror games or super
cinematic stuff. It's the where the light splits, and there's a
distortion as well. So I would suggest
click check in the fit. That basically means you won't
get horrible black edges. I'm going to set these 2.01. That way we get the slight bit of the chromatic
aberration effect. You probably can't see it
right now, but trust me, Oh, I can probably just zoom in. Ooh. Look at that. I'm being intelligent
today. There we go. You can see the chromatic
aberration effects, like, ever so slight right here. Just so you know, the distortion is like the fish eye
effect. Oh, that's trippy. Mm. Interesting.
And the dispersion is the chromatic aberration. So, the more
dispersion, you know, the more it's going to
disperse. That's pretty cool. Lovely little bit little bit
interesting. And vignette. Now, if you don't know
what a vignette is, it's basically the
dark area around a picture which focuses your
attention in the center. And I remember when I first discovered this
and implemented it, everything looks so
much better because, like, the whole image
wasn't quite so bright. I was like, directing
your attention to certain parts of the image. Um and I discovered a way to just build
it in blender without having to import an image or do some photoshopping or some
crazy stuff like that. You can just go
down here. You can grab yourself an ellipse mask, a blur node, and duplicate this ad node
and set it to multiply. If you ever look at
this ellipse mask by control shift left clicking, it's basically just a circle. You know, it's just
a modifiable circle. So we're going to
make this really wide to the edge of the screen and really tall to the
edge of the screen. And we're going to plug
it into the blur note. Now, make sure that you
plug it into the image. It doesn't work in the size. If we look at this
and we set this to 512 pixels, there we go. There's our vignette
pretty good. Now, you can of course, adjust the width and the height more depending on what you like. You know, you might want the
tops to be a little more dark than the edges.
Yada, yada, yada. And then we're
just going to plug this image into the image
down here on the multiply. Preview this. And
there's your vignette. It does make quite a
bit of a difference. Probably can't see it. Trust me. I'm going to set mine
to something noticeable but not completely
dark. Like that. That might be a little
much. There we go. Wait seven, it is. Alrighty.
Um, that's pretty much it. You know, let's just stick
our nodes back together. Now, it's kind of a short one. I could go all into the compositing using all
the view layers and stuff. But to be completely
honest with you, that would be
overkill and, like, you know, it would make a
whole bunch of things that you could tweak and crazy
stuff like that. You could adjust the colors of the lights after
you've rendered it, which is crazy, I know. But
some people want to do that. And if you're one of those
people, then you really don't need me to explain how to do
it because you already know. It's like, if you
want to do that, you already know how to do it. So I'm not going to explain it, because that would make me look stupid because I don't actually know what I'm talking about. But yeah, this is just the little bit of
extra sauce on the end to turn this kind of dull render
into this, you know, pops. It's flashy, looks cool. And yeah, we're done. You actually made it. I know. I didn't think you were
going to make it either. I didn't think I was going
to make it, to be honest. With the amount of
brain cells I've lost, I've lost at least 50% of my
IQ over the making of this. So I hope that you, in fact, have gained
some mileage from this. Yeah. It's kind of cool. You made it.
Congratulations. You made it to the end of the course. You can pat yourself
on the back, and, of course, you know, get
back to geometry notes. That's the only thing we
can really do from now. But, yeah. Um, I guess till
next time. See you around.
 3D Tudor, Bestselling Blender Author & 3D Educator