Transcripts
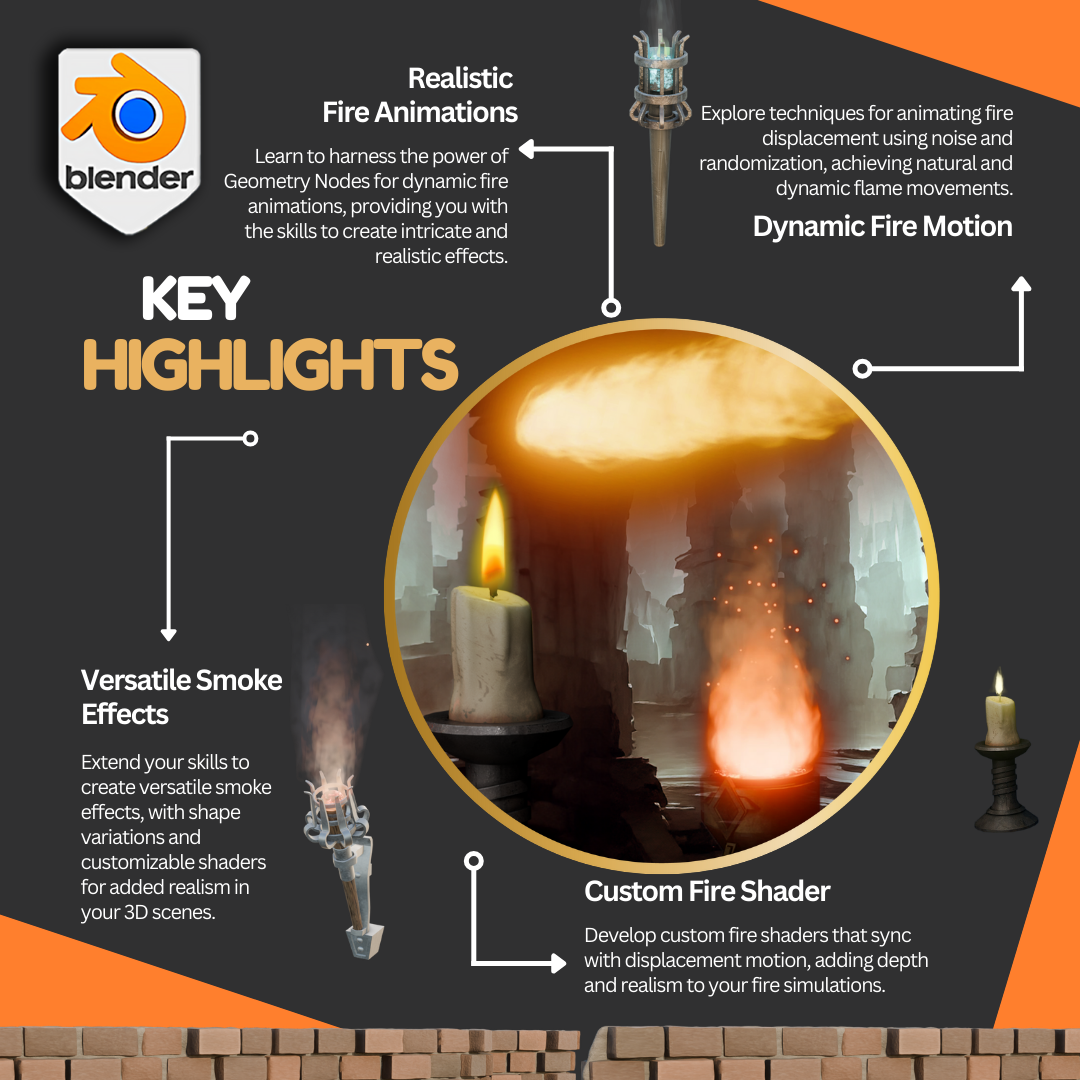
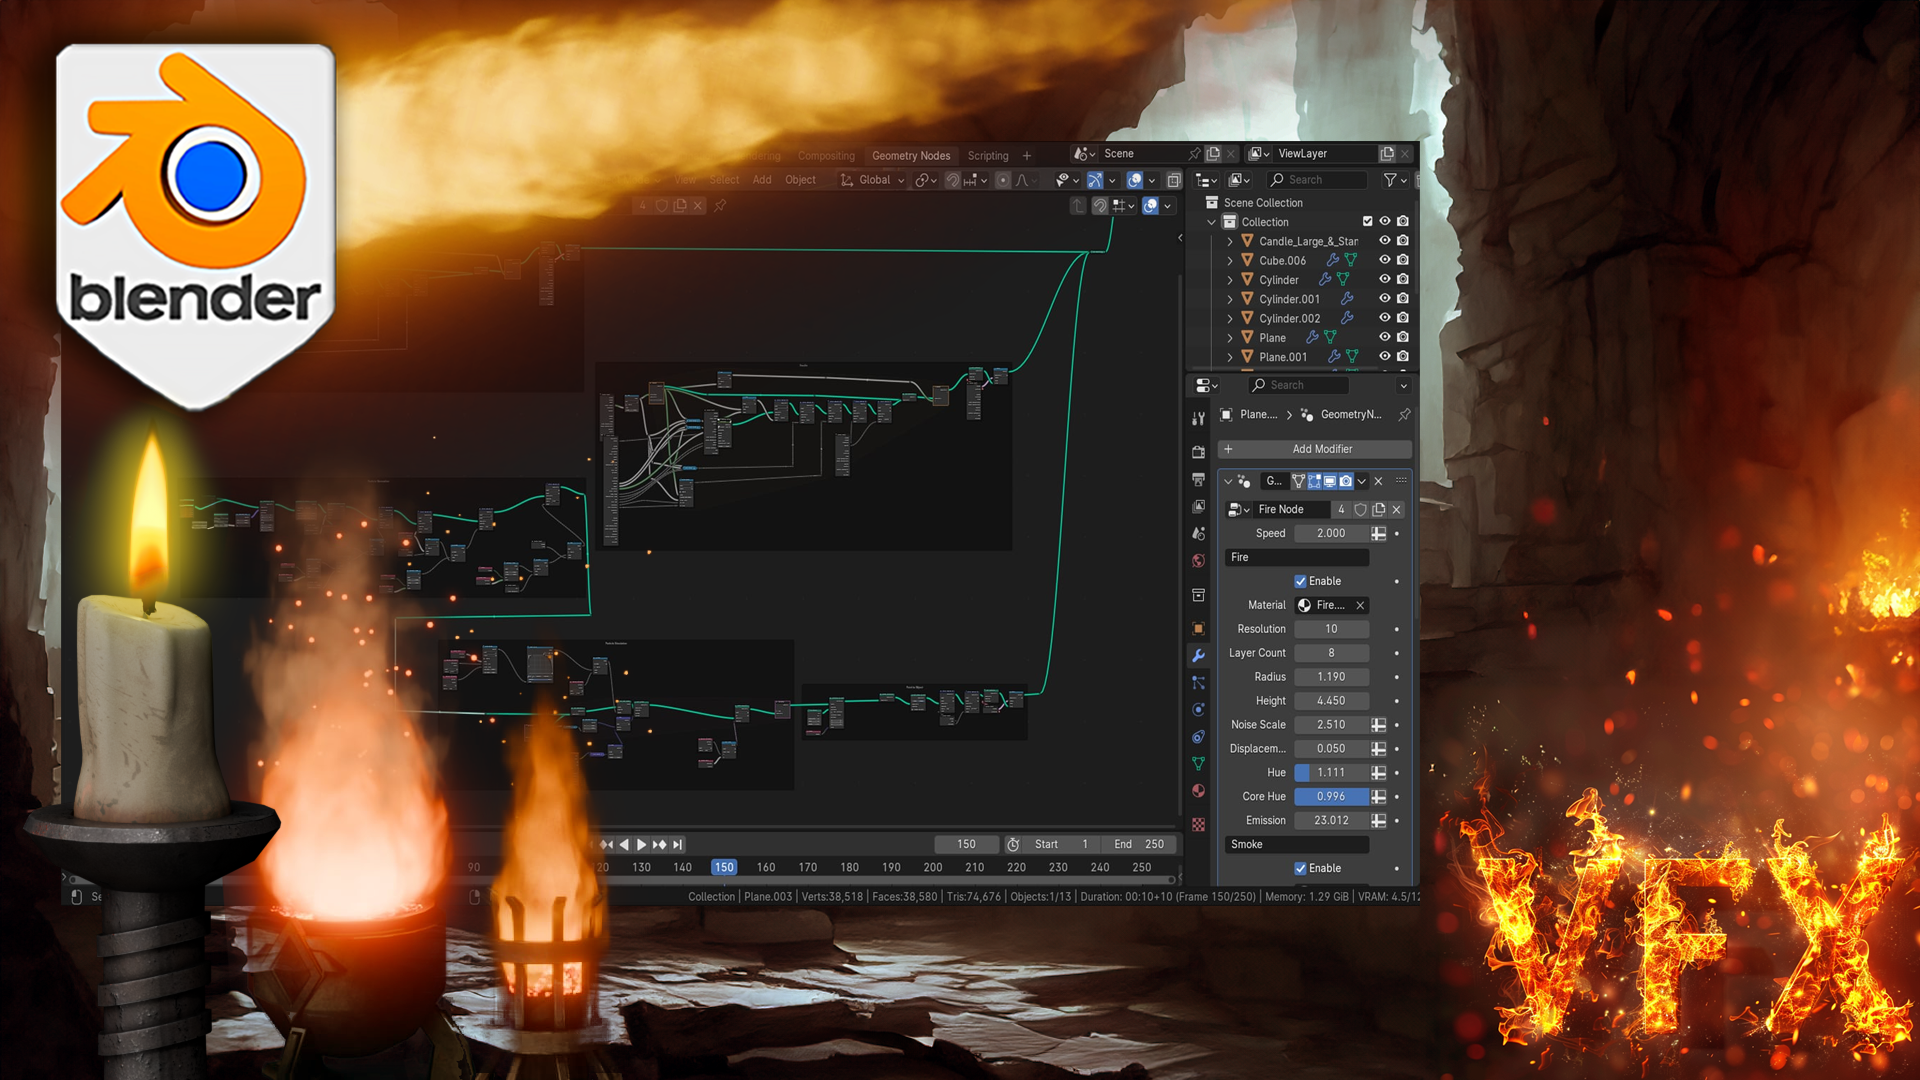
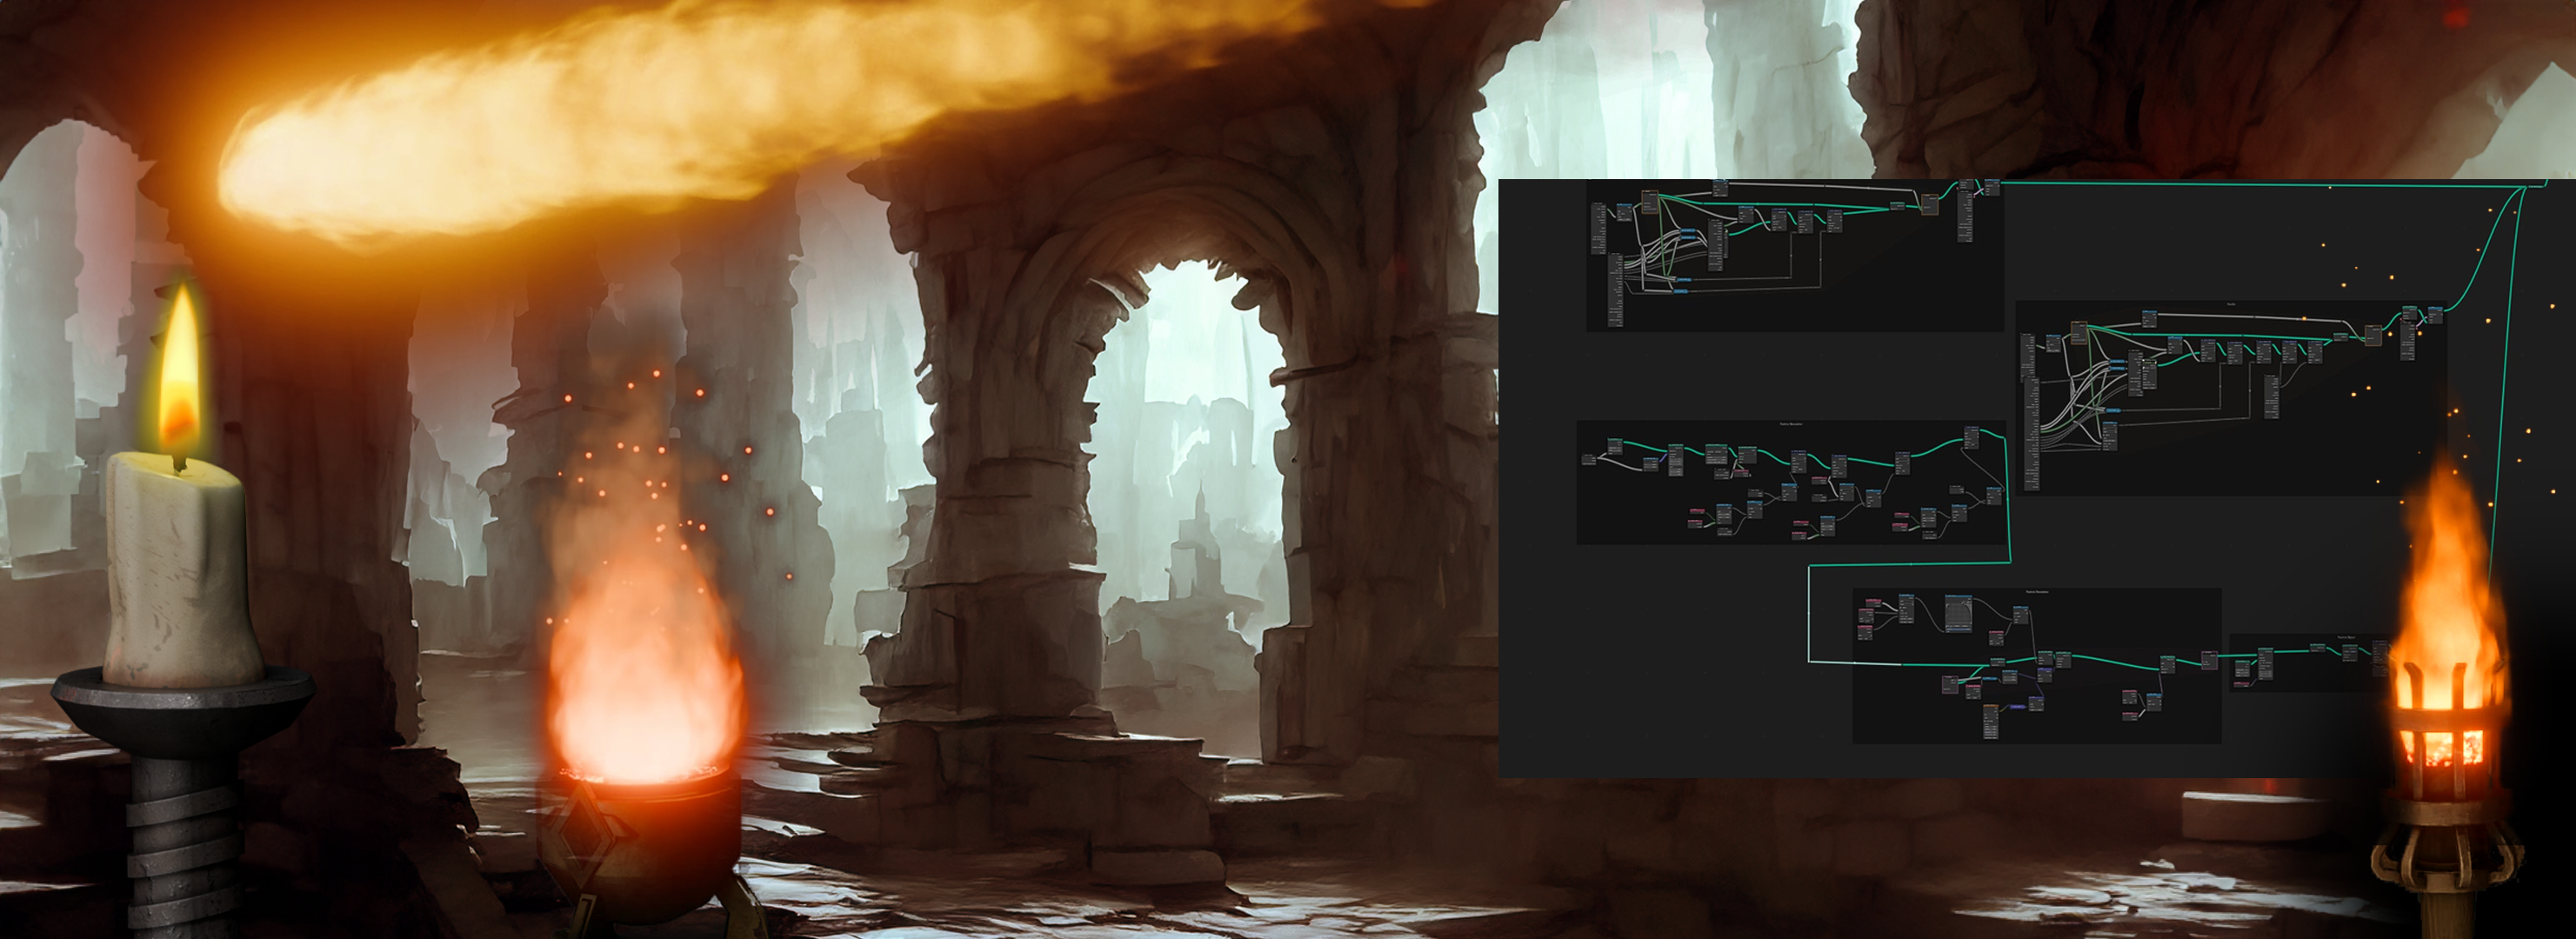
1. Blender Geometry Node Fire Animation: Welcome to the Blender Jomety
Node fire animation course. I'm Luke and I'm part of the three D team over
a three D tutor, where our focus is on enriching your environments through
expertise and tools. Additionally, we develop blender Jomety nodes to streamline
your workflows. In this comprehensive tutorial, we'll delve into fascinating
world of creating animated fire using
omety nodes in Blender. Let's ignite our creativity
and die right in. We'll begin with
an introduction to blend of viewport
and a basics of omegen nodes to ensure that
everyone is on the same page. Our first step involves
creating the shape of fire, using curvature and applying
mathematical formulas to dynamically adjust its radius
based on vertex position. This method grants us precise
control over the fi width. Next, we'll set up
dynamic resolution, ensuring consistent density for fire regardless of its
height and radius. This optimization ensures a
smooer animation experience. Leveraging the density
values will displace our mass using height
noise and randomization. Then we'll animate the
displacement to achieve the mesmerizing motion of buyer. Transitioning into
advanced techniques, we convert our
geometry node setup into geometry group to
create flame iterations. This allows us to construct flame volume using
layer repetition. Crafting a fire shader that follows the
displacement motion, ensures a consistent
animation speed, will delve into storing
values as attributes within the material setup
or seamless integration. Expanding or setup for
flame iterations will utilize the repeat zone to make sure that we're able
to add the parameters, such as beating out for the
top or changing color hue and adjusting it based on its core to enhance
the visual debt. Advancing the fires visuals, we'll employ the
fresnel masking, and fine tune 40 noise for a more realistic dynamic effect. Transitioning into
smoke effects. We'll repurpose
our code to create a smoke layer effect with a
unique opening at the top, crafting a smoke shader,
complementive flames, so we'll enhance
their appearance with opacity and
brightness controls. Afterwards, we'll introduce
particles into the mix. We'll utilize the
simulation fields to animate particles with
randomized motion. Setting a parameters, grants us organic control
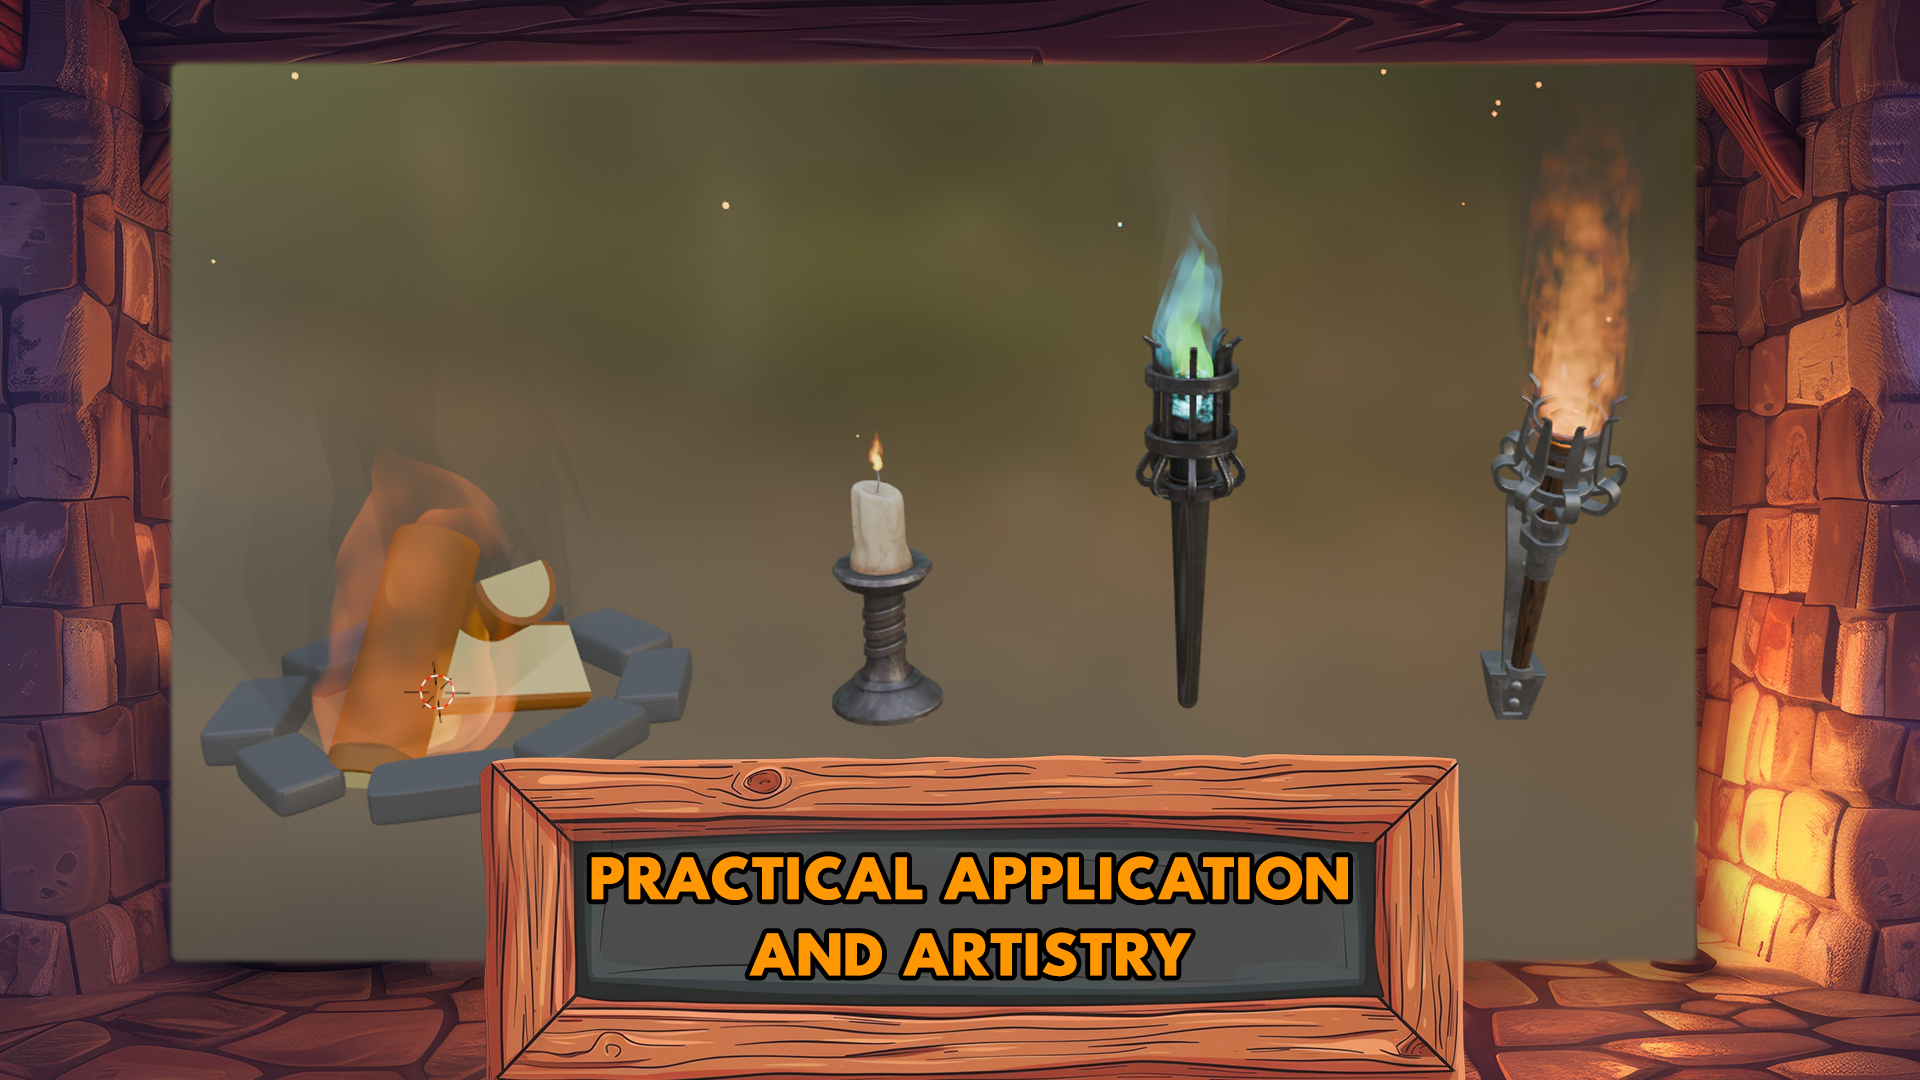
over the behavior. We're also going to optimize their lifespan for efficiency. Or creation at hand, we'll explore the practical
applications. From crafting a
stylized fireplace for a low poly art style, to optimizing fire
for a candle setup, will even transform
our flame into a blue glow to enhance our
magical free D environments. Finally, in attorial,
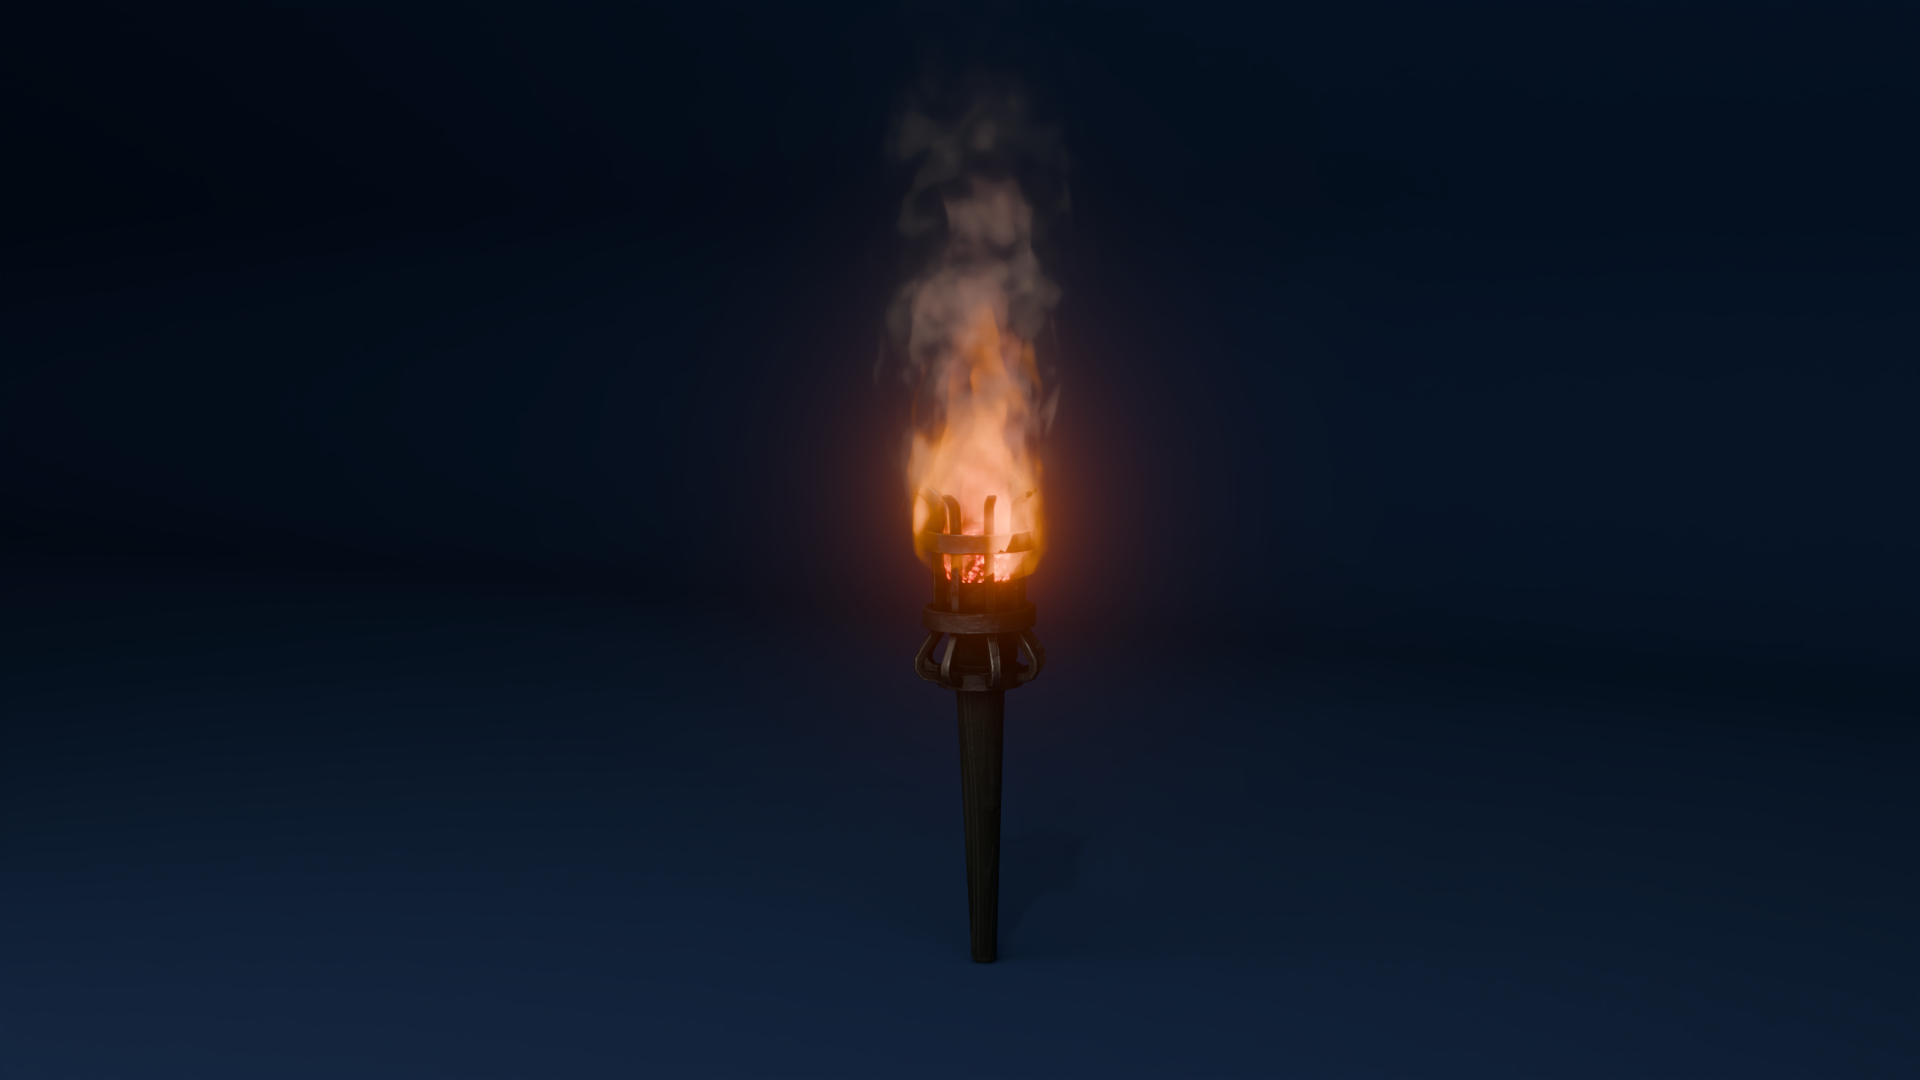
will guide you through the process of crafting
a lifelike fire setup, utilizing our carefully
curated parameters. By leveraging these
specific settings, you'll learn how to
intricately shape flames, adjust their dynamics, and infuse them with
realistic motion. Pin tuning the fire's intensity to controlling its
flickering behavior, our tailored approach ensures a captivating visual experience. This comprehensive
course is 25 lessons, totaling 4 hours and 50 minutes
of invaluable knowledge. By the end, you'll master
the art of creating mesmerizing fire animation
using blender geometry nodes. Let's set our creativity ablaze. Join out and embark on
this fire journey with us.
2. Blender Viewport Essentials: Mastering the Basics: Hello. Welcome everyone to Blender Geometry
Node Fire Animation. We're going to start off by introducing ourselves
to the Blender program. So to start off, I got myself open up Blender
software version 4.1. You can use anything above 4.0, and it will give you
the same results in regards to this project. So without further do,
let's get right onto it. I'm going to now play an introduory video in regards to the
interface to actually get ourselves familiarized with the overall setup of
the Blender viewpod. So thank you so much watching, and I will be seeing
you in the next lesson. Welcome everyone to the
basics of blender navigation. Now, before we begin, it's
important to understand how the axises work
within blender. So we can see at the moment, we've got a green
line going this way and a red line
going this way. This is called the y axis, and this one is
called the x axis. We also have one
that is the Z axis, which we can't see right now. It doesn't actually come in with Blender viewport as default. But if you want to
actually set it on, you just come up to the
top right hand side, where these two
interlocking balls are, and just click the Z axis, and now we can
actually see that. So how do we actually move
around the blended viewport? There's a number of
ways of doing this. One of them is over on
the right hand side here. You can see if over here, it's the zoom in and zoom out. I can actually left
click and move these up and down then to
zoom in and zoom out, or I can use the actual
mouse to actually zoom in and zoom out use in
the actual scroll wheel. There's also another thing
you can do with Zoom, which is holding control shift and pressing the middle mouse, and you'll see you have
a lot more control over zooming in and zooming out. Now, the next thing I want
to discuss is actually rotating around an object.
So how to do that. First of all, we'll
bring in a cube, we shift A, bring in a cube. Now if I press the
middle mouse button and move my mouse left to right, you can see we can
actually rotate around. Unfortunately though
we're not actually rotating around this cube. So to actually fix that, we need to center our view
onto the actual cube. We basically want to focus our view onto this actual cube. To do that, we're
just going to press the little dot button on
the actual number pad, and then you'll see that we
actually zoom in to the cube. If I scroll my mouse wheel, you will see now if I hold the middle mouse boron
and turn left and right, we're actually rotating
then around the cube. And this is important because if you actually bring
in another cube, so I duplicate this
cube with shift D, move it over, so bring
in my move gizmo. And now you'll see if I
rotate around this cube, I'm not rotating
around this one. So that's fixed side, just
press the Dub button. Again, zoom out, and now I can actually rotate around
this cube as well. Now let's look at
something called panning, which means that we're actually going to move left and right, and we do this by holding the shift button, holding
the middle mouse, and then we can actually
scroll left and right around our
actual viewport. So now we've actually
discovered how to zoom in and the different
ways we can actually do that. How to rotate around an object
and how to actually pan. We can also come up to
the top right hand side here and use these buttons here. So again, remember, we're
looking at the y axis, the x axis, and the Z axis. If we come to our y
axis and click that on, you will see now that you've got a front view of the y axis. If you click the x axis, then we can change it
to that red x axis, and finally, the Z axis as well. Now, there are other
ways as well that we can actually look
around the viewport, and these involve using
the actual number pad. If I press one on
the number pad, it's going to tap me into
that y axis or front view. If I press two, it's going to actually rotate
that slightly, and if I press two again, it's going to rotate
it slightly more. Now, if I press the eight, it will rotate it the
other way as well. Now, to go into the side
view or the x axis, we can also press three
on the number pad, and that will give
us that effect. We can also press seven to
go over the top as well. Now, what about if we actually want to go to the opposite? So instead of going from
the bird side view, we want to come to the
underside of our model. Well, that's actually
quite easy as well. All you need to do is
press Control seven, and that then will take you to the bottom view of
our actual model. We can also do the
same inside view and on the x axis and y axis. So, for instance,
if I press one, I'm going to be
going into y axis, if I press Control one, I'm going to be going into the opposite side on
the actual y axis. Can also find these
options just in case you forget at the top left
hand side of it under view. So if I go down to view
and go across to viewport, you can see here that this actually tells me exactly what I need to press to
get the viewpoint that I've just
actually explained. Now, we also have the button on the number pad, which
is number five. And number five button
in blender toggles between perspective and
orthographic views. Perspective view offers a more natural realistic
viewpoint with objects appearing smaller
as they get further away, mimicking human vision. Orthographic view removes
perspective distortion, making all objects appear at their true size,
regardless of distance. Useful for precision
modeling and technical work. The other thing that number
five does, for instance, if I come to my cube, at the moment, I am able to
actually zoom into the cube. However, if I press number five, I will not be able to
actually zoom into this cube no matter
how far I zoom in. I'll still be able
to move around it by pressing a little
dot button, like so. But if I actually
want to actually work on the inside of an object, I can quickly press number five, and then I can
actually go in and work around the inside as well. If you're working on a laptop or something like
that or a tablet, and it doesn't actually
have a number pad, you can also use
if I press five, the actual squiggle key, which is under the escape board on the left hand side
of your keyboard, and that then will
give you pretty much the same options
as we had before, so we can click the right view. We can actually
click the back view. And we can click the left, for instance, the opposite
to what we had before. So instead of pressing
one and three, we just press the
little squiggle line, and then we can actually view
whichever side we need to. Now, we're nearly at the end
of this short introduction. There are a couple more things
that you can actually do. If you come over to
the right hand side, and you see here where
we've actually got the name of the actual
parts within our scene, we can also grab them from here and then press a little
dot on to zoom in. So I can grab this one,
press a little dot dot on, and that then will Zoom as in. The other great
thing about this is, we can also come in.
Shift select them both. Pressed the little dot button, and then we're able to actually rotate around both
of these cubes. Alright, everyone, so
I hope you enjoyed the short introduction to the
navigation within Blender, and I hope from now on, it won't be a struggle
navigating around the viewport. Thanks a lot, everyone. Cheers.
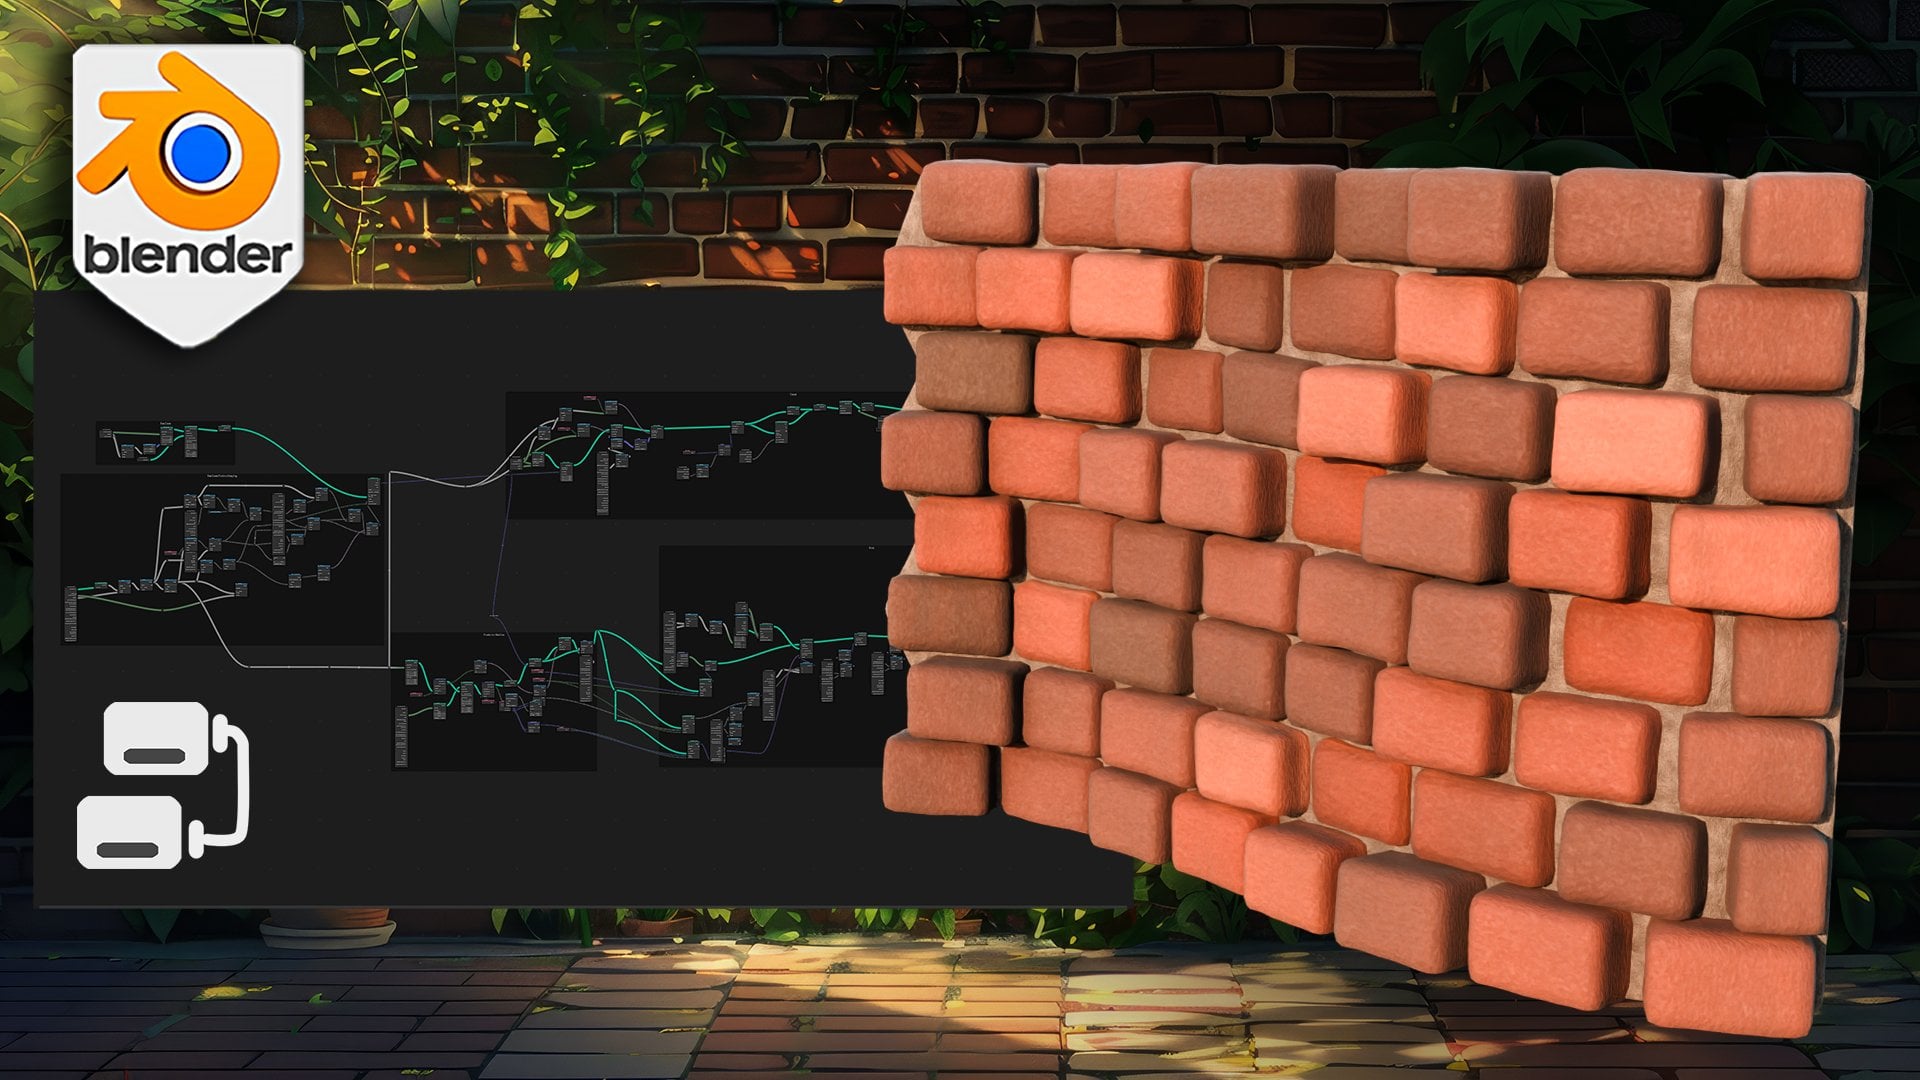
3. Geometry Node Fundamentals: Efficient Setup Techniques: Alone, welcome back and run to Blender Geometry Node
by your animation. In the last lesson, we
went over the basics of the interface
for Blender itself. Now we're going to start off by getting ourselves the
project cleaned up. By default, you're going
to get yourselves camera, cube, and light source. We don't really
need any of those. We can just go ahead and select them all by dragging it across, clicking delete to get ourselves a completely empty scene. And another thing
I would recommend you before starting off is to actually increase the amount
of undue steps you can do. You can do so by going on to edit on a upper
left hand corner, you can click preferences
and with fit it, you'll see that in the
system stab over here, you'll have undo steps. Currently, mine is set at 32, but you can increase it
to 50 or keep it at 32. But just make sure it's at
least above 50, otherwise, if you make a mistake
and you want to undo it, it's really sometimes
quite boersome. Within jumping to note, if you make a mistake. You don't necessarily
need to go back. You can easily fix it
through the notes itself, but sometimes it's nice
to know that you can actually undo some
mistakes. So there is that. Another thing before
closing it down that I would like to
mention is at the bottom, right hand corner, I
have a bunch of stats. We can see that at
the very corner, we see that the blender
is set as 4.1 0.0. That is the version
that I'm using. In order to see which version
you're using it yourself, you can go onto the interface on the upper left hand corner. Then within the interface, we're going to go
on to status bar, and we have a bunch of
options to tick on. And the main one that we want is going to be
blender version. This is what's going to
give you the information at the bottom right hand corner for which blender version
you're using. Make sure that the blender
version that you're using is set as 4.1. If you're using anything
older than that, it will still work quite nicely, but certain features, certain nodes might
be named differently, and that's why I do
recommend you to just use blender 4.1 or
anything above that. So that's pretty much
it in regards to it. Let's go ahead now and create
ourselves a basic object. Although we're
going to start off with creating the geometry node, we do need to apply the
Geometry node onto something. So we're going to
click Shift and A within the viewport mode, and we're going to go on to
the mesh and just create ourselves a brand new shape.
We can just create anything. It doesn't really matter because we're going to set ourselves up with unique shape
from the geometry node. So once we create
something like so, doesn't really matter
what it is because we're now going to
apply the jom node. So if we were to go onto the Modifier stab on
the right hand corner, we can click At Modifier
and select the Jome Node. So the geometry node is
a type of a modifier. Once we apply it, we actually
need to make sure that we tell what modifier
we're using, because we don't have
anything created yet, it's going to have no
options over here. But once we create
something afterwards, we can apply it onto
different objects, and it's just going to
give us the right setup. So for now though, let's go ahead and create a brand new geometry node like so. We can even change
the name for here, call it fire node or
anything of the sort. It really is up to you in regards to the
naming convention. Afterwards, once we create
ourselves a new geometry node, we're going to go ahead and
click on the upper section, there is a tab called
Geometry node. If you're using anything
older than 4.1, I believe that this tab
is not going to be here. But let's go ahead and
click on it for now and you can see that this is the type of a setup that
we're going to get. If you're not seeing this tab, you can also click
plus symbol over here. Within a general tab, you should be able to
see Geometry node. And again, if you're not seeing this type of a tab at all, Then you can also create it from scratch by going to something
like modeling mode. Then you can quickly
split off the panel. For example, this
panel over here. We can just right click
at the very bottom once we see this
arrow go both ways, and we can do a
horizontal split. Then we can just
drag it upwards like so and get ourselves
two windows. Those two windows,
we can just simply create A from the
left hand side. We can create if I
were to find it, there we go, geometry node editor. So that's what
we're going to get. That's what we're going
to be using basically. L though, I prefer
to already set up a geometry no tab over here. The only difference is
that it's also going to have this tab at the
top left hand corner, which I do prefer to keep, and I just make it much smaller. This is going to give us all the necessary information
for vertices, how many sides, how
many phases it's going to have during the
generation process. So for example, right now, because we are just
having a plane, it's going to give us
just four vertices, as you can see over here. And it gives you the cordans
of every single one of them. It's sometimes nice to know if, for example, a lot of points are being
spawned in one area. If the densities are actually
too big, for example, you can optimize
certain code basically. Now, at the bottom, we have the fire node. So we already created
the fire node over here. It's been selected, and we have ourselves a group input
and group output. These two nodes are basically
the starting point, what information the
object already has, in which case it has a plane, and we are outputting it to the very end,
which it's going to, of course, output exactly
the same information, which is going to be
the plane over here. If we want to, for example, take this off and
start from scratch, we can hold control, and
we can simply click left mouse button and drag it
out from the group input. And from the group output, and it's just going to
separate these two, and you can see that because
we have no information now, it's not going to give
us anything at all. But now though we can go
ahead and quickly reattach this just to see that
it works back nicely. So from this circle over here, I'm clicking and holding
a left mouth button and just reapplying it like so. And the key information when it comes to nodes is that everything
on the right hand side, so all of these
bubbles over here, they're going to represent
the information outcome. And everything on the left
hand side of the nodes, it's going to allow you to
give inputs into those nodes. That's a useful information to know for whenever
we're creating, we're making use out
of multiple nodes. The final thing that
we need to know is going to be the interface. So by default, we're not going to see anything
in regards to that. We need to click n over
the fire node Geomete tab. If you're not clicking it with the mouse hovering over this area, you're not
going to see this. For example, if I were to hover my mouse over here and click n, it's going to give you the
completely different type of menu based on where
you have your mouse. Just make sure you hover
over your mouse over here. As Blender is quite mouse location sensitive based on
the shortcuts you're using. And whatnot, for example, now if I were to
click Shift and A in this area over the fire node, you can see that we're getting completely different type
of a menu to add for the Geometry node in
comparison to what we can add over here in the
Free D view poard. So that's something
that's key to note whilst working with the
Geometry node. All right. So I'm going to make
this window quite a bit larger by just simply clicking and holding and dragging
it upwards like. So to have a little bit
more space to work with. I'm going to now click, and I'm going to talk a little bit
in regards to the interface. So the interface will allow
us to basically create the parameters that will appear within the
fire node itself, within the Geometry node panel. So right now we can click on
the plus symbol over here. And actually, before doing that, I'm going to click on
this bottom geometry because we want to
click on the new item, click input, and that's going to click create
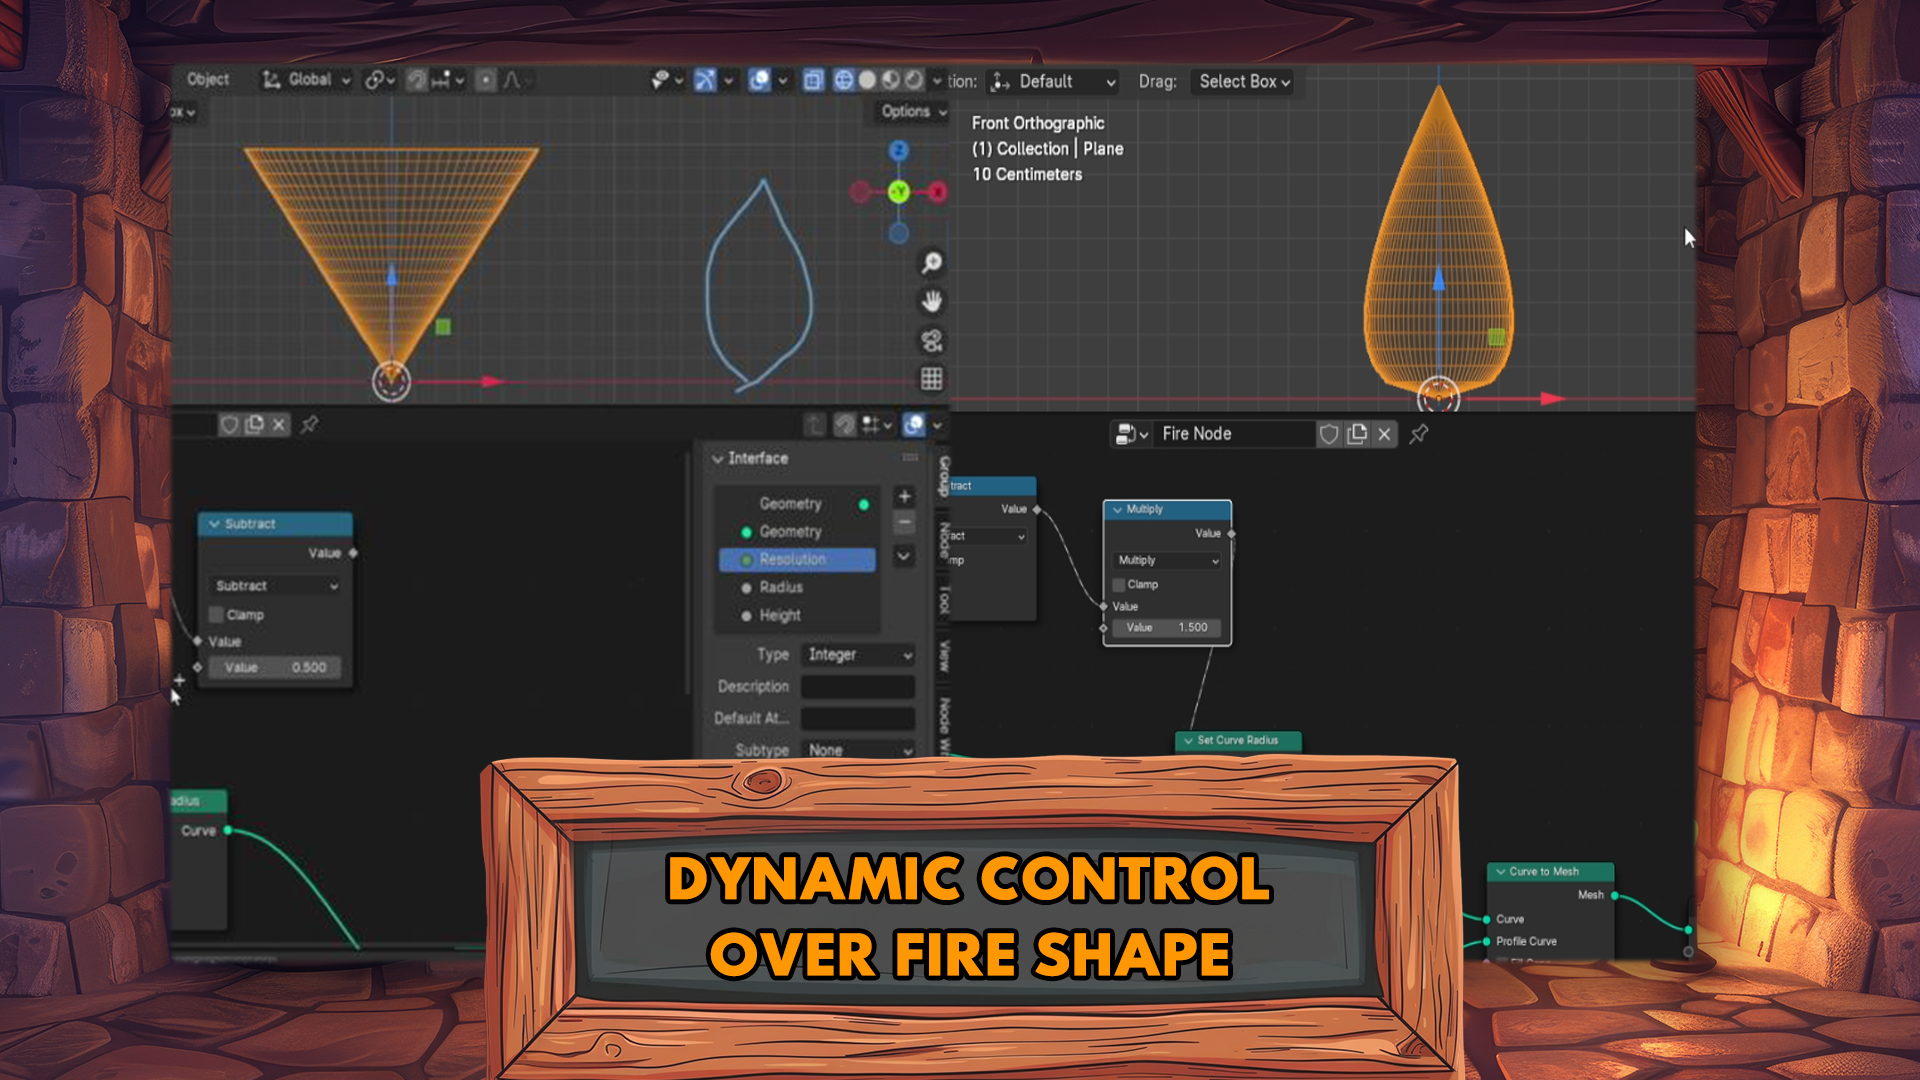
ourselves new socket. The socket is then
being created at the bottom underneath
this geometry note. The reason being is that
if we created above them, they're not going
to behave normally, it's going to glitch
out basically the geometry note itself. At the right hand side,
we can see that we have a parameter called socket. So by default is going to
create a name called socket, but if you double click on this, we can change the name. So at this point, we can just call this
radius, like so. And you can see that
also that socket, that parameter is being created within a
group input as well. This is what we're going to
be able to use to plug in different values
into the settings that we have within the nodes. So we're going to use a radius. This is going to be by default, a float type, as you
can see over here. We're going to be
changing and adding additional parameters for
the geometry node setup. But for now, we're
going to start off with the basics and get ourselves
the radius set up. We're also going
to need something else cold if we
create a new one. We're going to call it height. So we're going to
basically create ourselves radius and a height
to control the shape. The shape I'm talking
about is going to be for the fire itself. But since we are
running out of time, we're going to continue on
with this in the next lesson. Thank you so much for watching, and I will be seeing
you in a bit.
4. Crafting a Cylinder with Line Curves: Step-by-Step Guide: Hello and welcome
back everyone to Blender Geometry node
by our animation. In the last lesson,
we left ourselves off by getting ourselves a radius
and height parameters, and we still not touched the
geometry node graph itself. We still have only those group input and group output nodes. So to start off, let's
go ahead and actually start by getting ourselves
the shape of the fire. The way I'd like
to get it done is, if I were to just
show you as a sample, we're going to get ourselves a nice fire shape just
by making ourselves this type of a
silhouette to make it look more like a shape instead of just having
a simple plane. We're going to generate
the shape using curvature. And then we're going to apply some animation using
noise and height. Displacements. And yeah, for us to start off to
get that actual shape, we're going to make use
out of the curvature. So let's go ahead and click Shift and A within a graph node. We're going to search
for curve line. L so. Then we're just
going to go ahead and I'm going to actually just strike it down a little bit next to the group output. We're going to basically
attach this directly onto the geometry group
output like so, and you can see that the shape, the mesh that we had
previously for the plane actually
disappeared, and we are only getting
ourselves this line. This line by itself is not going to give
us the right set up because we actually
need to get ourselves a free dimensional
type of a shape. So we're going to make
sure we turn this into something that will
allow us to get ourselves an actual
free dimensional shape. So for us to do that, we're going to get ourselves simple node called curb to mesh. So we're going to attach this directly after the
curve to line, which is going to
actually turn this from a simple curvature
to an actual geometry. If we were to click
on the wi frame mode, which is this button over here. We're going to make it look
like it's actually the same, but it's actually showing
us the exact wire frame. So before we can see that it's actually a
much thicker line, which represents the
curvature itself, but now once we pug this
iner we actually see it. I'm not sure if
it's actually quite as visible within the video. But it basically turns this into an actual edge into a pline. From the curve just
plying into an edge. Which I, I believe
it is actually shown within the upper
left hand corner, so you can see before, we had no vertices, no edge, but now once we turn this
into an actual mesh, we can see that it turns
to vertices and an edge. So we're actually
getting ours topology. Curve line is great for when
we want to get ourselves a shape that averages out
the line between two points, and we have a lot
of control with it. We're not going to see much
of detail in regards to this. We're going to talk in regards to that a little bit later. But Although, let's go ahead
and actually turn this into a cylinder. So at
the curves to mesh. If we have both of them
selected, by the way, we can click G and move
this off to the site, get ourselves a little
bit more space. At the curves to mesh, we have something
called profile curve. This will allow us
to turn this type of a line into a three
dimensional shape to basically get ourselves
a radial shape or a shape that follows the
path to recreate this line. And now we just want to get ourselves a circle type
to get a cylinder. We're going to make use out of something called curve circle. Really great and basic setup to get again, the
circle of shape. Once we attach it, we can see we have this type of a setup now. We can actually go out
of the wireframe mode. We can see that this is
just a simple phase, and we can see that
amato vertices and edges and even fases have
been created for us. We can control
resolution with this, and that's going to lower
the amount of vertices and pass and give us that. We don't need to touch
it at the moment. We also are going
to have radius, which we're going
to be attaching it to the radius node over here, but we'll need to get
ourselves a shape first. And before all of that, we need to talk in regards
to the curve live. We have ourselves the starting
point and the end point. The end point is going to
be the one at the top. If I click one, I can
actually go to the side of. And see how it looks like. This is going to
be the top view. Currently, it's only
going in the Z axis, which is actually
exactly what we want. If we were to control this, we can actually control the high. We're going to want to start the original point at the start, which is going to be zero. That's exactly where
it's going to start. That's great for
the starting point, but end point is going to give us the
control for the high. To actually be able
to control this. You can see that this
only has one output. We want to make sure
that we have parameter out of it, and for That, we need to get ourselves another node called
combine x y z. We're not actually
combining anything now, but we are creating a link
from one point to another. And just a quick note, if we were to drag it from
this point from endpoint, drag it outwards to the graph, we're going to allow ourselves
to create the node that will connect from the vector to the end point over
here, giving us a link. And now we're going
to get ourselves these same controls
that we had previously. The only difference now is that we actually have three points over here. That we
can now connect. And if we have a look at it, they are gray, the vector,
as you can see over here, they were purple dots, meaning that they are
actually vectors, which has three
parameters, x y and z. But in this case, we're
breaking them up, so each of them are treated as separate individual
parameters, and the height is what we want, so we're going to
actually connect the height to the Z value, and it's going to give us this. By default, it's not
going to give us anything because the height
that we have over here, is set as zero. We need to make sure that we increase this and
we can see that by increasing it at the right hand side for the parameter, we can actually control
it through here for the actual geometry
node u modifier. So that's great. We have some control
in regards inside. What I would like
to mention is that even though we are changing
the parameter over here, if we were to make a duplicate out of this geometry
node, let's say, if we were to try to reuse
this in another section, and I'm just going to
show you as an example, going to create another
object over here. Add a modifier geometry node. We can now click on
this button over here to create ourselves
the geometry node. So again, we're going to go
into this a little bit later, but for now, as an example, I just want to show
you when we do add this geometry node
onto another object, it's actually going to give us the default height
value of zero. We don't want this to happen.
We want to make sure that this height that we have over here is set to a
default value of, let's say 0.5 by default, or actually, let's go ahead
and keep this as one. And, we want to make sure
that this is a default value. If we were to go
onto the interface, select the height, there is
an option called default, and this default value, if we were to set this to one, it's always going to be set as one whenever we
create a new option. Let's say we try to add a
geometry node over here. We can see that now the
height is set as one. So that's exactly what we want. And that's how ideally, we want to set it up throughout the parameters at a later
date at a later parts. And one more thing that
I'd like to mention is, let's say if we have
another height and if we want to reset this
to a default value, we can hover over the value, we can click back space, and that's going to actually bring it back to default value. So that's a quick bit of
useful information to know. We want to reset some values for example radius over here. If we want to increase it,
we can click back space, and that's going to get
back to zero since. We've not set up the
radius value yet. Yeah, that's pretty
much it for now. We set ourselves up with
a basic light curve, turn this into a cylinder. Now we're going to
be working on in regards to shape
to make sure that actually looks closer to this rather than what
we have ho p here. That's going to be
in the next lesson. Thank you so much
for watching, and I will be seeing you in a bit.
5. Dynamic Resolution for Cylinders: Height and Width Adjustment: Hello, and welcome back. I on to Blender Geometry
Node fire Animation. In the last lesson,
we left ourselves off by creating a simple cylinder, which we're now
going to make sure we get ourselves to shape. And actually, let's go ahead
and straight up attach the radius onto the
radius over here. So we'd be able to control
it through this parameter. Bieusly, I said that we're
going to create a shape first, but we might as well
just connect the radius. I'm going to go ahead
and just simply drag this across, connect the radius, and we're going
to make sure that we get ourselves a nice value, something like 0.5,
I think we'll do. And we're going
to make sure that the default value is also 0.5. And yeah, I think
that's all right. So the next thing
that we need to do is actually set ourselves
up with the resolution. But it's not the resolution
that you might think, it's not going to be this
resolution over here. We don't want to control
this radius at the moment. Instead, we need to make sure we have control in
regards to height. And for that, we're
going to make use out of a node called e sample
resample curve. So we're going to
put it right after the curve has been created
to get this set up, and this will give
us the control for the resolution in regards
to the vertical slices. So with this, it's already
looking pretty good. But let's go ahead
and actually create ourselves to
resolution parameter. We're going to click on
a plus symbol over here, click on the input, and we're going to get
ourselves a socket. The socket itself, we're
going to change the type. By default, it set us afloat, meaning that it actually
has decimal values, and we can change these. You can see that it
says 2.6, and so on. We can have it like so, but we need to have
this resolution to be set as an integer. Once we change this
as an integer, you can see that the value, the color coding
actually changes from gray that we had
before to green. The green will
allow us to change the value in regards
to just normal. We're going to now
change the name for this socket to be
called resolution. And we're going to change
the order that we have. Resolution right now is in the
middle. I don't want this. I don't want to be in between
the radius and height. We want it to be ideally
at the very top. So to change that, we can click and hold our
left mouse button, then release it, and
that's going to give us the value at the
top above radius. We want to get the value
for the resolution. Default can be set as ten. The minimum can be set as one, so it wouldn't go into
the negative value. Minimum and vacuum values are really useful
for whenever we want to user to
have the control, but at the same
time to limit them. So before it was going into
a negative value over here, so this allowed us
to go into negative, which we don't want
with the resolution. We want to make sure
that it only goes in regards to the positive, so we're going to set
the minimum to be one, and that will not allow us to
go below the value of one. That's very useful
for making sure that we don't actually break
the entire set up. And yeah, we're going to attach this resolution to
the sample curve. Right now, it is set, so whenever we are
increasing the count, it's going to start
increasing it like so. The thing that it has right now is it has it set as a count, meaning that it just
represents the count amount. So we could directly add this
resolution onto a count, and it would give
us a nice set up, but we want to make sure that it gives us the resolution
based on length, which is going to be quite
useful in the future, or controlling the density. So for that, I'd personally say, let's go ahead and change this
count from resample curve. Let's change the account
to length instead, and you can see that it actually
gives now length value. So by increasing this, we're going to get a less amount of resolution and lowering it. We're going to increase it. So that's exactly what we want. If we want to have it a little bit less in regards
to the sensitivity, we can hold shift while click whilst clicking
left mouse button, and that will allow us to control it more fine
tuning value over here. So we're going to
attach this value, the resolution value
to the length, but we cannot do it straightaway because
if we were to do it, so it's going to give us the resolution
in the opposite way. So as we start increasing it, it's actually going
to lower it down if we change to something
like minus ten, sir 0.1, it's only then going
to give us the right value. So we can actually go with the integer parameter
lower than a value of one. So instead, what we're
going to do is we're going to get ourselves
a quick maps node. Let's go ahead and
search for map. Like so. We're going to add it
in between the values. And actually, we need to
change this up to be divide. Let's go ahead and change it up. The mass value includes a
bunch of different maps nodes, and one of them is
going to be divide. We can click on this
button over here. Or alternatively, the
shortcut for it would be D by clicking D as a value.
We're going to get this. We can also quickly
switch up the values because we want this
to the resolution to be divided from the one. We're going to switch out values by simply holding control and just dragging it
to a lower version to a lower value over here. So now it's going to be dividing
from 0.5 Pi resolution, which at this point is one, so it's going to keep it as 0.5. If we were to change this value
from one from 0.5 to one, we can now divide
this and be saying it basically that it's
going to be 1/10, and that's in that way, is going to allow us
to nicely control the resolution with the length
from the resample curve. We now want to make sure
that the resolution or the circle curve is going to be constant in regards to the size. So we're going to go onto the
top down view real quick, and we basically have a circle. Each and every point
represents combined, represents the circumference
of the circle. And if we do want
to get ourselves the right parameter
of the circumference, we just simply have to use
this formula over here. So it's going to be
two Pi radius for going around our cylinder
basically from the top down. And that's going to control
this basically over here. So let's go ahead and do
that right away actually. Radius, we already have
radius connected over here. That's going to determine
the curve circle. So that's all right.
We can simply go from here to get ourselves math node. Let's go ahead and get
ourselves math node. And Actually, instead of that, we can just simply
write and multiply. That's going to make our
lives a little bit easier. Let's go ahead and multiply. Like so it's going to give us a math node with the
multiply already set up. What's nice about this is we not only can
write the values in, we can write in Pi over here, and that's going to
give us exact Pi value. We don't need the Pi as is because we
actually need two Pi, so we can type in Pi times two, click enter, and that's going
to give us exactly two Pi. So again, we already
have radius to circumference two Pi r. That's exactly what's
going to give us this, the outcome for the setup, and we want to make sure that this is turned into
a free D space. So we have it set for the
circle for the circumference. Now we want to actually include the length
of the sample curve, which is going to be
this one over here, the resolution coming from here. So we can get this value. And yeah, we can get this value from the resolution
that we divide it from. And we can simply
divide it again. We're going to go
ahead and actually just move everything a
little bit to the side. So from two pi r, we're going to extract
it and divide. So so two pi divided by the resolution of the height to get ourselves
a constant value for this. Now whenever we attach it, we should get ourselves
something like this that's going to have constant resolution
throughout this entire setup. So if we were to
increase the height, we should still see that these squares are still
being kept the same. And when we change
in the radius, again, these squares are going to give us
constant resolution. So by simply doing This set, we're able to get ourselves
constant density throughout the entire circumference
of our cylinder surface. So this is a good start for our shape creation because now we're able to create
the fire shape. We're going to continue
on with this though in the next lesson since we
are running out of time. So thank you so
much for watching, and I will be seeing
you in a bit.
6. Flame Formation with Mathematical Precision: Expert Techniques: Hello, and welcome
everyone to Blend the Geometr node fire animation. In a last lesson, we set ourselves up with
some nice density for the overall shape
of this cylinder. We're now going to go ahead and actually work on
the shape itself. So to start off, we need
to tell the program, we need to make sure we
tell the geometr node itself where the top
at the bottom is to actually control
the overall radius of each individual let's say, point, or in this case, edge loop to be able
to shape something more closely resembling
to that of a flame. For us to do that,
we're going to go ahead and actually add ourselves a nice node
called set curve radius, so we're going to just add it right after we
resample the curve, and we turn this into a mesh. This way, we'll be able to
control the mesh itself. The difference with this is that instead of just controlling the overall size,
overall radius, I believe, Yeah, overall radius, we're going to be
able to control the radius based
on the selection. So what I mean by that is, if we get information
of the spline, which we can do so
with spline parameter, We can get ourselves an entire length based
on the factor. The factor itself is going to tell that at the very start, the factor is going to be zero, and at the top, it's
going to be one. If we directly attach
this to the radius, we're going to see this
direct radius supply being applied onto the shape, giving us an inverse se. The top is going to be one, size of radius, and at the
bottom, is going to be zero. Using this information, we can get ourselves some more
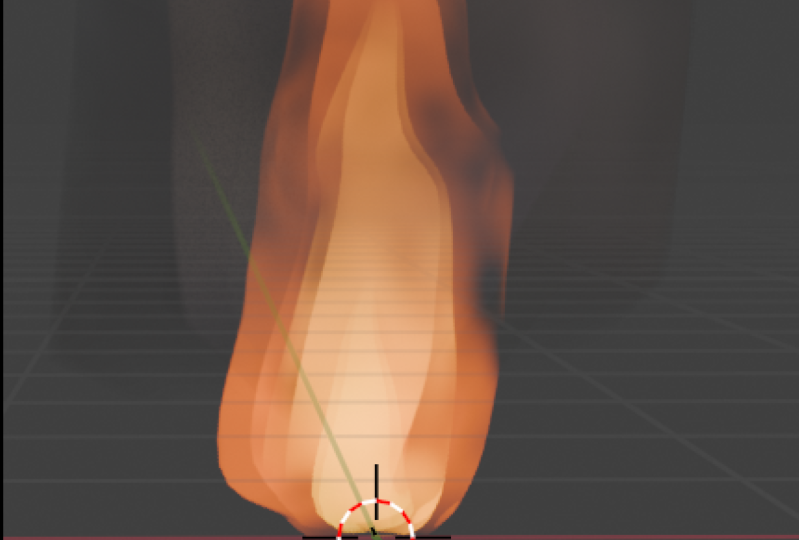
interesting and unique shapes. To get an actual shape, we're going to use
maps functions, and there is a very nice type
of function for the graph. If we use square
root of x minus x, we're going to get ourselves
this sort of a graph, which is going to give us a well partially a shape of the fire that
we're looking for. So we just simply need
to convert this type of a function into omg node. So
let's go ahead and do that. The x is, in this case, going to be factor, which, again, if we
start increasing it, is going to give us
different value, and we need to simply grab this and get square
root out of it, L so, and then subtract x
again, that's the wrong note. Sorry about that. S
tract. There you go. Subtract this value. So square root of x minus x, and this will, if we were to move this a
little bit more to the side, so we could have more
space to work with. This, attaching to the radius
will give us a tear shape. It's already looking
pretty good, but we just need to have
certain bit more control to control the overall
with of this setup. So let's go ahead and do that. All we need to do is
increase the overall value. And if we were to multiply
this, for example, let's say, on the edge, it's going to be a value
of something like 0.5. If we multiply
this, it's going to increase a wide amount. But as we go back to
the value of zero, it's going to give us
the normal amount, even if though we
are multiplying it. So all we need to
do in short is, let me just go back from here. All we need to do is simply
get ourselves math multiply. We can then attach
this multiply value to the radius and because it's half by default, it's
going to give us this. But by using the multiply value, we can just simply increase the overall scale of the
radius for this shape. And one thing to mention is
that later down the line, we are going to be
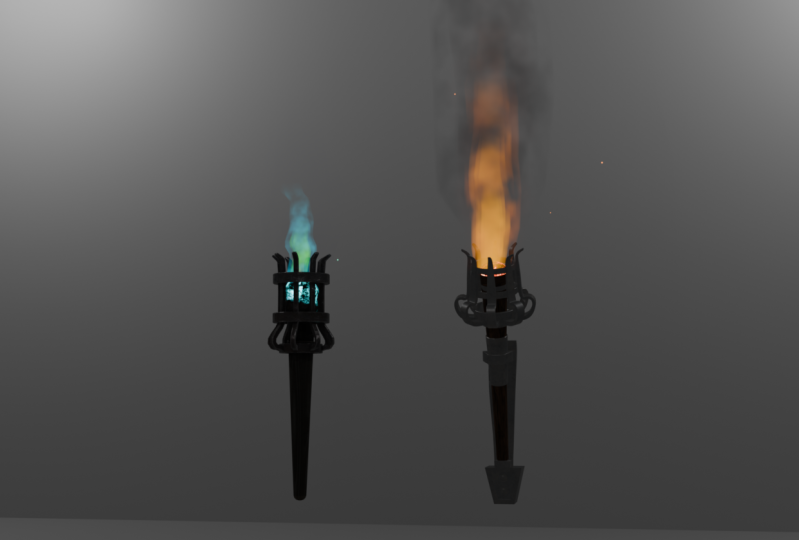
adding a smoke. The smoke itself is going to look a little bit different
in regards to the shape. So right now we have a
tear shape or a flame. Then afterwards, we're
going to add a smoke that's going to have
a similar shape, but the end of it
needs to be kept open. Basically, can't just close
off in the middle over here. The reason for it is because it's going to be transparent. We want to make sure we have
a certain effect that makes the entire flame
look a little bit more realistic when it
comes to just its effects. The flame itself in the middle is going
to be a nice shape, but again, the smoke will
need to be opened up. We're going to move on with
that later down the line. The thing that we do
need to work with now is going to be with
the motion itself. Need to make sure that
we are offsetting each one of those vertices with
a certain amount of noise. We distort the overall geometry just a little bit just
to make sure that we have a bobble motion of
a flame from this setup. So let's actually, first of all, see if it's going to look
quite nice in free DVew. And yeah it does
look quite nice. And looking at a time, it's better for us to go
ahead and this lesson here. And then in the next lesson, we're going to start off with the distortion of the
flame in animation. So thank you so
much for watching, and I will be seeing
you in a bit.
7. Dynamic Flame Animation: Utilizing Noise Displacement: All and welcome back
everyone to blend the geometry node
fire animation. In the last dozen, we
left ourselves off by creating a nice
shape for the fire. We're now going to continue on with the setup and get ourselves some displacement to be
set with the animation. So for us to do
that, we're going to go all the way to the end. And after we get curve to mesh, we're going to implement
some displacement. For that, we're going to use something called
set position. Set, sorry, set
position. There we go. We're going to attach it
after the curve to mesh. And this will basically allow us to offset
the entire setup. So with these setups, we can see that it
moves it in regards to x y and z. I'm going to
go ahead and reset it. And by the way, if
you want to reset it, you can just click back space, and whilst hovering over with
the mouse over the value, go in to put it back to 000. So the offset, if we were to
use it right off the bat, is just going to
offset everything. We want to make sure that
we're offsetting it only in regards to a certain noise. So for that, we're going to use something called
noise texture. Noise texture is really good, especially the three
d one free diversion, by default, it should
be set up like that. This will give us basically the setup that will
allow us to control the position of each
individual vertice based on the texture
of the noise. The best way to visualize
what this is doing is by using control shift
and tapping on the noise. This will give us from the
factor to value attached. And then we just need to tell what kind of a
viewer we want to be setting it up with the geometry because we were using
the noise texture, didn't have any geometry to actually preview
within the window. So we're going to click and hold control shift and just
tap on curve to mesh, and that's going to attach
to geometry value over here. So this way, we can actually visualize what the
noise texture is doing, and we can see that by
changing the scale, we can change the way
this noise is behaving. Each individual vertice is going to have its
own unique offset. If we were to directly
place it into the offset, we can see that what it's doing, we can't actually
see it because we need to go ahead and
delete the viewer. Once the viewer is deleted, we can see that it's
actually affecting the vertices a little
bit different. But of course, we need
to make sure we are setting it up with
proper values. So for that, We're going to get ourselves a bit
of a different setup. We're going to get ourselves
something called scale. Or sorry, we're going to
get ourselves Math vector. This one over here, vector math. This is going to be
attached on to offset, and we're going to
change from add. We're going to
change it to scale. Scale, by scaling it directly, we can affect it
basically in regards to how much it's affecting
the offset itself. So it's a real nice and
easy way to control that. We can see what it's doing. And before doing that, I'd
like to also change up how it's behaving in regards
to the displacement, because right now
this noise texture, if we have a look at it again, sorry, that's the wrong one. If we have a look at it again, it has some darker spots, it has some widest spots, and whenever there are wide spots, it's just going to move
into the positive value. We want to make sure
that the geometry node actually goes not only outwards, it goes inwards into
itself as well. This will allow it to be keeping the position more
stable in regards to the overall setup for
the geometry node because everything now is just going in the positive direction, as you can see, it's
not going actually anything in this to
the left basically. So for us to do that, we're
going to re map this range. We're going to click Shifted A. We're going to search
for Map range over here, and we're going to attach it. And this is float by default. We need to make sure
that we are changing this to be a vector. To make sure that we're keeping all three dimensional space. And that's what we're
going to get by default. It should be kept as
the same type of value. And actually, I
just realized that because we just changed
this to a vector, it's going to detach everything, let's go ahead and quickly attach everything back, like so, and that's what we're going
to get exactly the same, because it's going from
a value of zero to one. We want to make sure
that we are changing it. Right now, we're getting
the value over here from minimum of zero
to maximum one, which is exactly what
the tu noise provides. But we're remapping basically the overall setup
to be only 0-1, but to be from minus one. And that's what
we're going to get In regards to the overall range. And as you can see, not only is it going in
the positive value, it's also going in the
negative value as well now. So this way we can control how we're getting
this type of a shape. Now, to get the actual motion
for this type of a shape, we're going to make use of the noise texture
vector input over here. We're going to create
ourselves position position, which is basically what's
being used by default if we were to plug this in is going to give us
the default value. But we want to add
vector vector math. To this position that
we had it by de fol. And we're going to combine
this or that value. So if we want to move this
that value over here, we can see the type of
change that we're getting. I just realize that the scale itself is a little
bit too high up. I'm going to hold shift and just drag this downwards
a little bit, so we get this sort of a shape. That's looking much better. Now when we're moving value, I'm going to hold
shift again for this. We can see the type of
motion that we're getting. We want this to be moving
upwards like this, so we're going to have to invert the value and
make sure that it actually is going downwards in regards to the value itself. Before doing that, we
actually need to get the type of motion
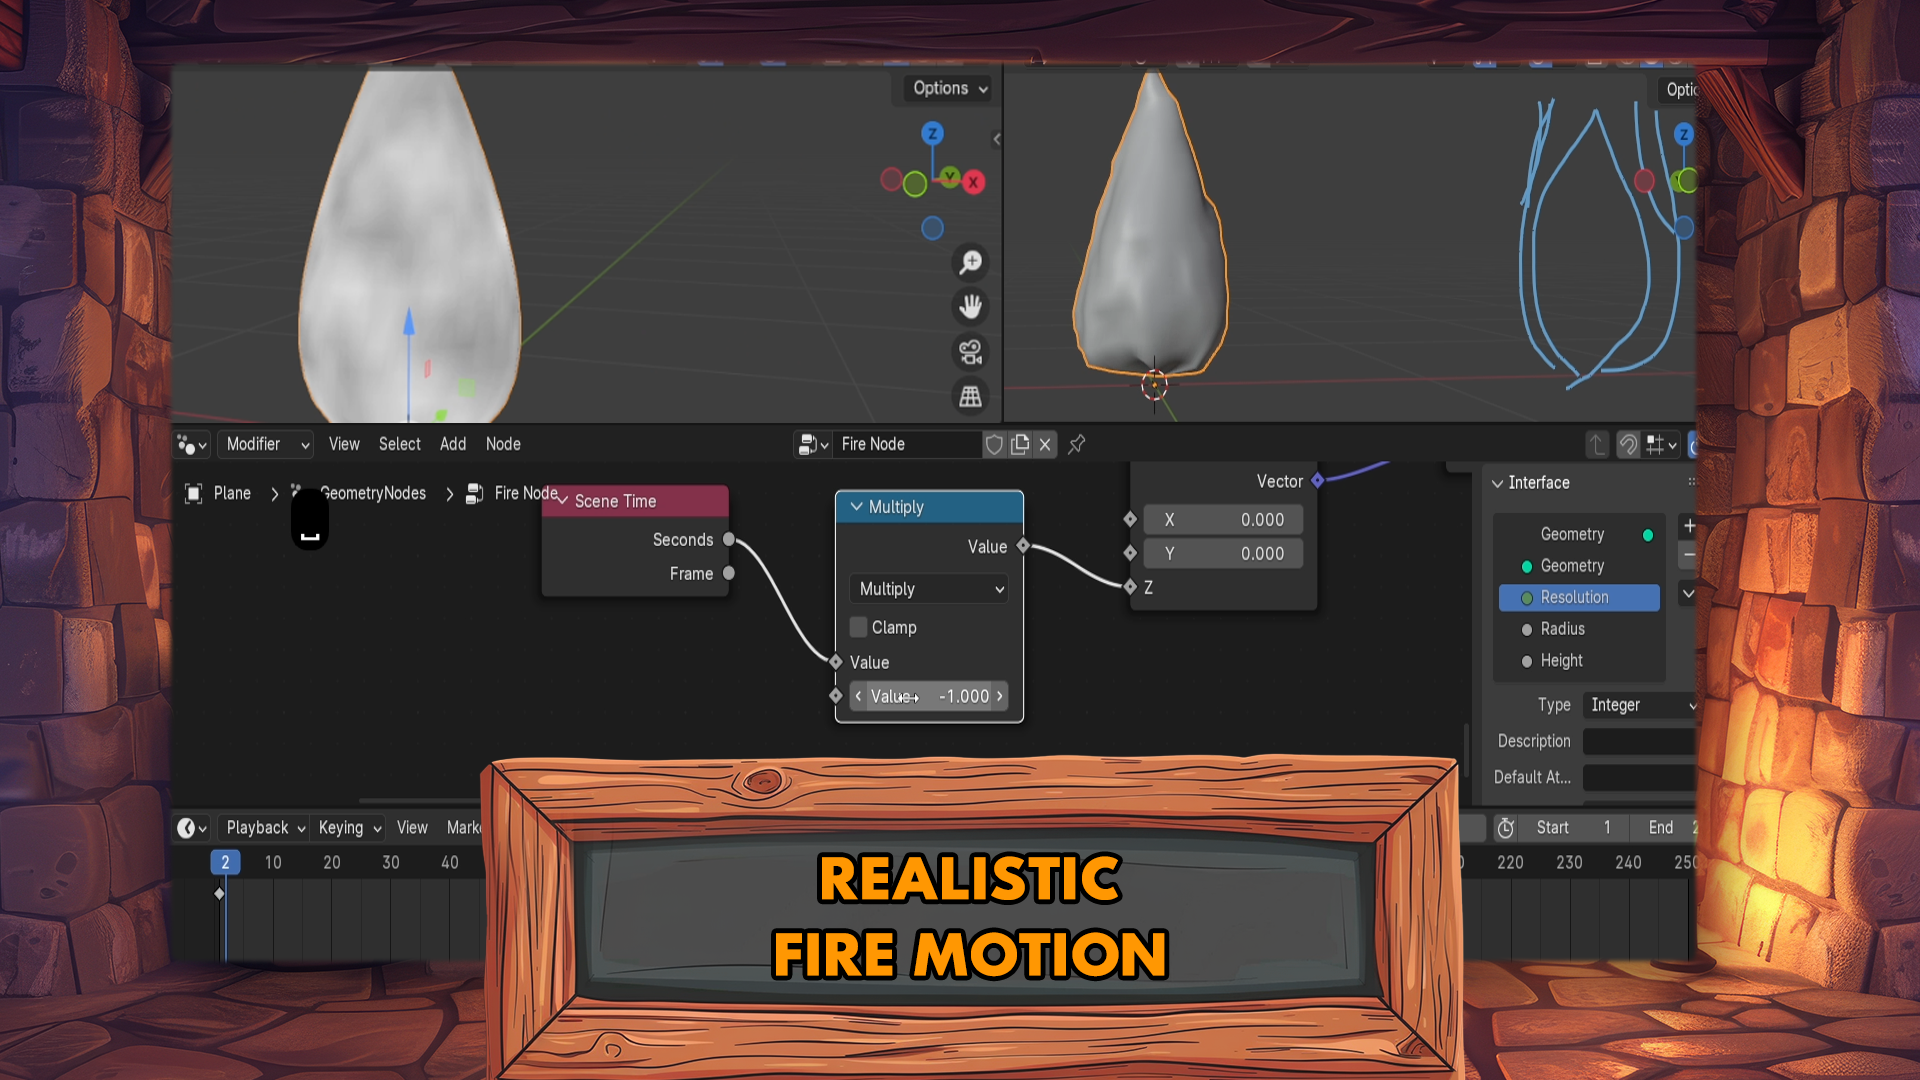
based on the value. So we're going to make use out of something called scene time. Like so. We're going to attach the seconds to the Z
value for us to do that. We need to break this vector up, so we're going to
use combined X Y Z. So if we were to directly
attach this to the seconds, we can see that it's
actually when we click space to run this by the way, this playback over here
at the very bottom. When we click space, we can see It gives us a motion
based on the animation, and that's already looking good, but we need to make
sure that it's going upwards in regards to it being going in
the negative value. We can just simply invert this. We can use a math node over here and change
this to multiply, and the multiply,
we can simply make this negative value by turning this into
a negative value. It's going to inverse
this overall value, and it's going to give us a motion that's moving
upwards, which is really nice. So it's already
looking quite nice, let's say in regards
to the flame shape. So yeah, that's all it
takes for the animation. And just a quick thing, if you're not seeing this at the very bottom of your setup, the playlist over
here, the timeline. Just make sure to split up
the window so you can just right click as we talked
previously horizontal split, and then afterwards,
just go onto this but over here
and select timeline, and that's where
you're going to get. Afterwards, you can click space
to play or alternatively, this button over here, that's
going to do the same thing. So that's pretty
much it. I'm just going to make this
extremely small, so it wouldn't get in our way. And now we need to control
the speed, of course, if we were to hit play, we're going to have
the default speed in regards to the same time. So we're going to create a parameter out
of the interface. Quick reminder, you can
click n to open this up. Let's go ahead and
create an input, a float value for speed. L so the default
can be set as two, let's say, and I'm
going to go ahead and make use of
the value of two. If we want to reset it
to a default value, we can hover over within
the Geomet node itself, it pack space, and that's going to set it to a default value. Now we can go ahead
and click Shift and A, search for group input. That's going to create
ourselves a new group input. Previously, we were only using. Yeah, I believe we were only using just this one over here. So we just essentially created ourselves a new group input. Again, And we can attach
the speed onto the time. We cannot attach it to this multiplier because it's
just inverting the value. We need to create
ourselves new math node. I'm going to click
on this button over here and click for multiply. And then afterwards,
we can go ahead and attach this
to speed like so. So it's going to
multiply the time. We can click space and see that it's actually
moving much faster. We can slow this down to a value that's actually going to be
much slower as well, like so. And there we go. We got to sells a nice animation
for the core flame. So that's going to be
it from this lesson. Thank you so much for watching, and I will be seeing
you in a bin.
8. Node Group Creation and Optimization: Best Practices: Alone, welcome
back. I on to Blend the Jo Nodfier animation. In last lesson, we left
ourselves off with animating this overall
shape of aire. And now we have a couple of more options parameters to add. As you remember previously, we had a setup with the noise, and we actually got ourselves the intensity out
of this scale over here. So we can control the noise scale itself through
this area like, which might be quite
good actually. So then also we'll need
to change the intensity. And, let's go ahead and just quickly grab our cell
sameters for those two. We're going to create an
input a socket over like so. I'm going to click and
hold and drag it to the very bottom to
get it at the bottom. Then let's go ahead and rename
this one to noise scale. And the second one needs
to be called displacement, scale like so, and
we'll need group input. For the group inputs. This is going to be the noise scale, like so, and the second one. Going to go ahead and
just select this, click Shift D, duplicate
it, put it off to the side. Use the displacement
scale for this one, and we need to make sure that we have nice
values by default. Right now, it's
set as zero, zero. So the noise scale, I believe it can be set as let's go ahead
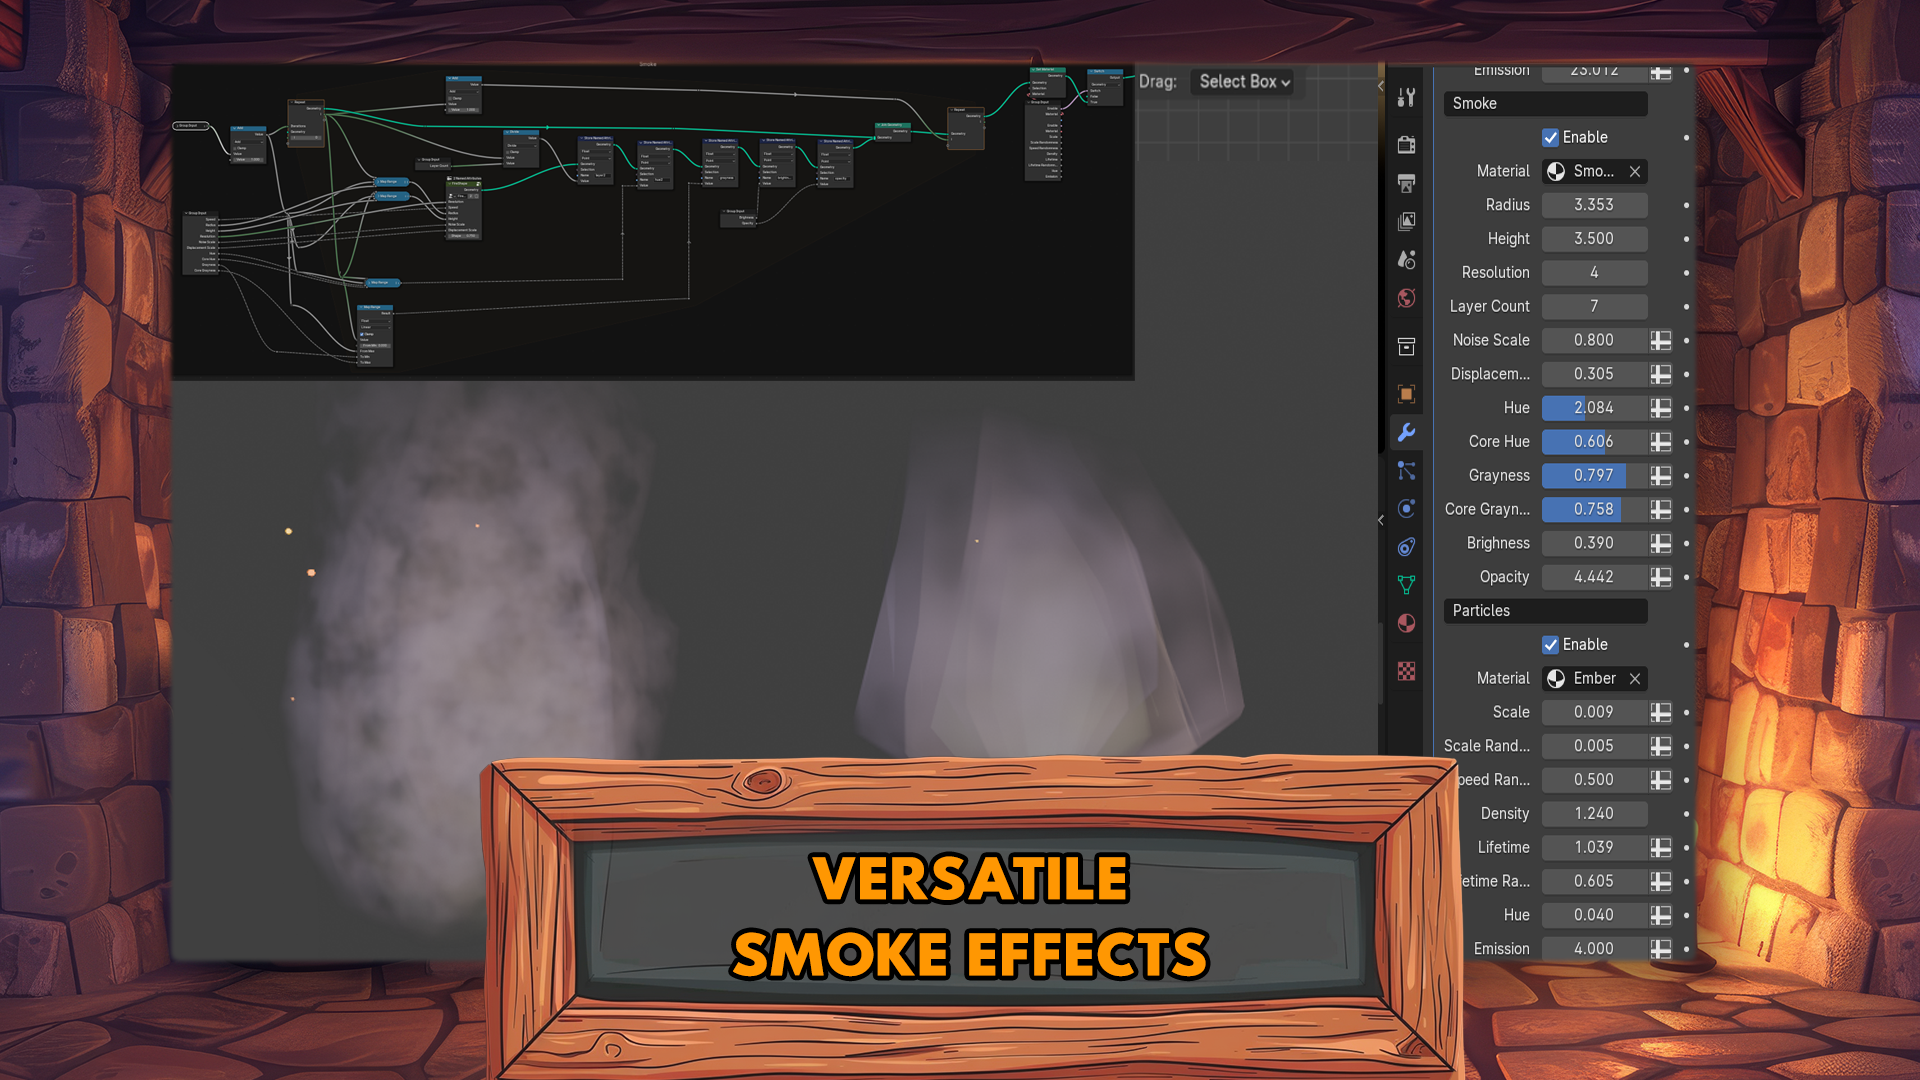
and actually look. I'm going to decrease the
value just a little bit, so it would actually
be visible for us. So Noisecale can be set as 0.8, and placement I would say keeping it as 0.2
is quite all right. Let's make sure we
have those same values placed in or into
our default setup. So we get a shape. Yeah. This shape is
quite nice for us, especially for a stylized look, it's going to look quite nice. If we want to, we can always
just increase the scale, and that's going
to give us I'd say more realistic type of
a look out of the fire. But for now, let's
go ahead and just focus on more of a
stylized approach. It's going to
definitely look better overall. So noise scale. This one is going
to be the old 0.8, displacement scale 0.2, and we're going to get ourselves a nice value by the end of it. Now we will also need to
get some UV coordinates. We're going to be working with Shad related down the line, but we need to make sure that the UVs are set up properly. We are actually applying certain UV information
onto this shape. So for us to do that, we're going to go ahead
and go to the very end. After we create everything and set ourselves up
with the position, we're going to make use
something called store. Named attribute. This is going
to be quite useful for us. I'm not going to place it right away because I want to make sure that we're changing
from float to a vector. Then I'm going to go
ahead and touch it. So we're storing
the information, a certain value information
after the geometry. The information we're storing of the vector is going
to be position value, just a simple position
value like so, and we're going to get
ourselves a nice set. The thing that
we're left to do is make sure that we have the name. We can go ahead and just
call it UV underscore map. Make sure this because this is a key sensitive type of naming, so we're just not going
to use any capitals, or if you are using capitals, just make sure you're using
it in the shader as well. But yeah, just using UV underscore map is
going to be good for us. And that's pretty much it. We got selves a nice setup
for this overall type. We now need to make sure we are creating a
group out of this. Reason we're creating a group
is because we're going to reuse this overall setup
that we have over here, and we're going to reuse it multiple times because firstly, we need to let's see. Yeah, firstly,
we'll need to make multiple layers of
this ti fier core. And secondly, we will need
to make a smoke variant, which I just realized in order
to make the smoke variant, we talked a little bit
in regards to opening up the upside, the upward section. For us to do that,
all we need to do is get ourselves annu
math node over here. So we're going to use
the same overall setup for multiple parts, for the core of the fire
as well as the smoke. And for us to do
that, we need to add ourselves another
setup over here. We're going to make sure we
set it up with the multiply. And now, once we have
this multiply value, can see that by
lowering the value, we're actually opening
up this end over here, which is exactly what
we want for the fier. So we're simply preparing this overall node setup to be
used for multiple sections. And right now we're going
to keep this multiply as one to make sure that this is the original
shape that we have. But this will allow us to get some lice
controls, basically. Alright, so to get the set
the overall setup over here, To actually group everything up. We're going to go ahead and
select everything except for the initial group input and
the final group output. Then afterwards, once we
have it all selected, we're going to click Control G, and it's going to slightly
adjust everything. You'll notice that everything looks a little bit different. The main thing that you need to know is that at the very top, we have instead of
just fire node, we have fire node that
goes into the node group. So this note group is
inside of the fire node, imagine a folder within
a folder, basically. So to go out of this,
we can hit tab, and this will give us back the node group that
we had previously. This is what it's going
to create essentially. It's going to group
everything up and place it into one node. In order to access this node
back, we can select it, click the tab, and
we're going to go back onto the node had. The thing now is that this group input is actually
responsible for all of these values over here at the input of the
node that we have. So we need to make sure
we have them all renamed properly to make sure that everything fits
the right values. And let me just have a look. Yeah, that's going to
be pretty much it. You'll notice that
everything in regards to group inputs We have all of these group inputs
coming out of the one value, and the best thing to do
for us now in order to optimize a little bit for now to just leave the
group itself as is. We're going to go
out of this group, and we're going to make
sure that we are using only this one group input in order to get all
of these information. Reason we're doing
this is to make sure that we're
simplifying everything. So let's go ahead and do that. We don't have all the naming
properly set up just yet, but it's actually quite easy for us to just make use out
of one group input. So, for example, over
here, we can see that this group input is being
placed at the very bottom. We're just going to go
ahead and locate the speed. This group input,
and we're going to place it over here at the
bottom of this value. Can now go ahead and
delete this group input. We can grab this up one,
which is noise scale. The noise scale is going to be placed over here for this scale. Let's go ahead and just
replace it, delete this. And they're pretty much
being used the same values, but we're only just
cleaning this up a little bit before
we're moving on. So displacement scale,
let's go ahead and just attach this displacement
scale over here. And we should still keep
this identical shape. Everything is still the
same except everything nice is now nice and
clean like this. All right. So inside
this group node, we can go ahead and access it. Now we need to make sure
we are renaming everything in regards to the node itself. So for us to do that,
the easiest way is going to be to just
check the group input, see that it starts with resolution speed radius,
the first naming. We can go ahead and just sorry, that's not going to
be the right set up. The reason being is go
ahead and have a look. We're going to, in fact, yeah, we're going to have
radius as the first one, which is already renamed for us. Then the height value
is going to be said, and resolution is going
to be just called value. So radius, height,
and resolution. Let's go ahead and access this. We're going to call this
radius height. And resolution. You'll notice me that once I
enter this fire node group, we can have the same interface, but this time the interface
itself is just going to be showing what is being inputted
into this group node. So that's why we're just rename this resolution
resolution. L, so now we can exit
this and see that this is actually
having the same name. And to top it off, to make sure that
it's even nicer, we can move the values around. For example, resolution
is at the top. We can grab this,
drag this to the top, and it's going to automatically
re route everything, we can hit tab and see that
it's now properly set up. The only one that we actually need to change at very least for me is to make sure that the
speed is at the very bottom. I'm just going to go
ahead and do that. I just realize I'm not
sure which one is which, so it's called value. Let me just go ahead
and rename this speed. That's so and Yeah,
from the top. Yeah. After resolution, this
is going to be the speed. I'm going to go ahead and just simply move the speed upwards. And there we go. Nothing is tangled up. Everything is nice. All we need to do is now
change the last two, which is going to be noise scale and noise and
displacement scale. Let's go ahead and
change that up. So noise scale
displacement scale. The reason we're
doing this, again, is because we want to make
sure that everything is nicely is because we want to make sure that
everything is nice and clean. So, now that we
have it like this, we'll notice that
everything is a little bit messy over here. We might need to clean this up. But honestly, as is, It's going to be good for us. There are some
overlapping sections, and I reckon we can
spend an entire lesson just cleaning everything up once we're getting closer
to the finish line. So yeah, let's go ahead
and leave this as is. It's not going to
impact our setup. And once we start
changing up this group, it's going to be applied onto all the groups that we're
going to be setting up. So, let's leave it as is. And let's end this lesson. So that's going to be
it from this lesson. Thank you so much for watching, and I will be seeing
you in a bit.
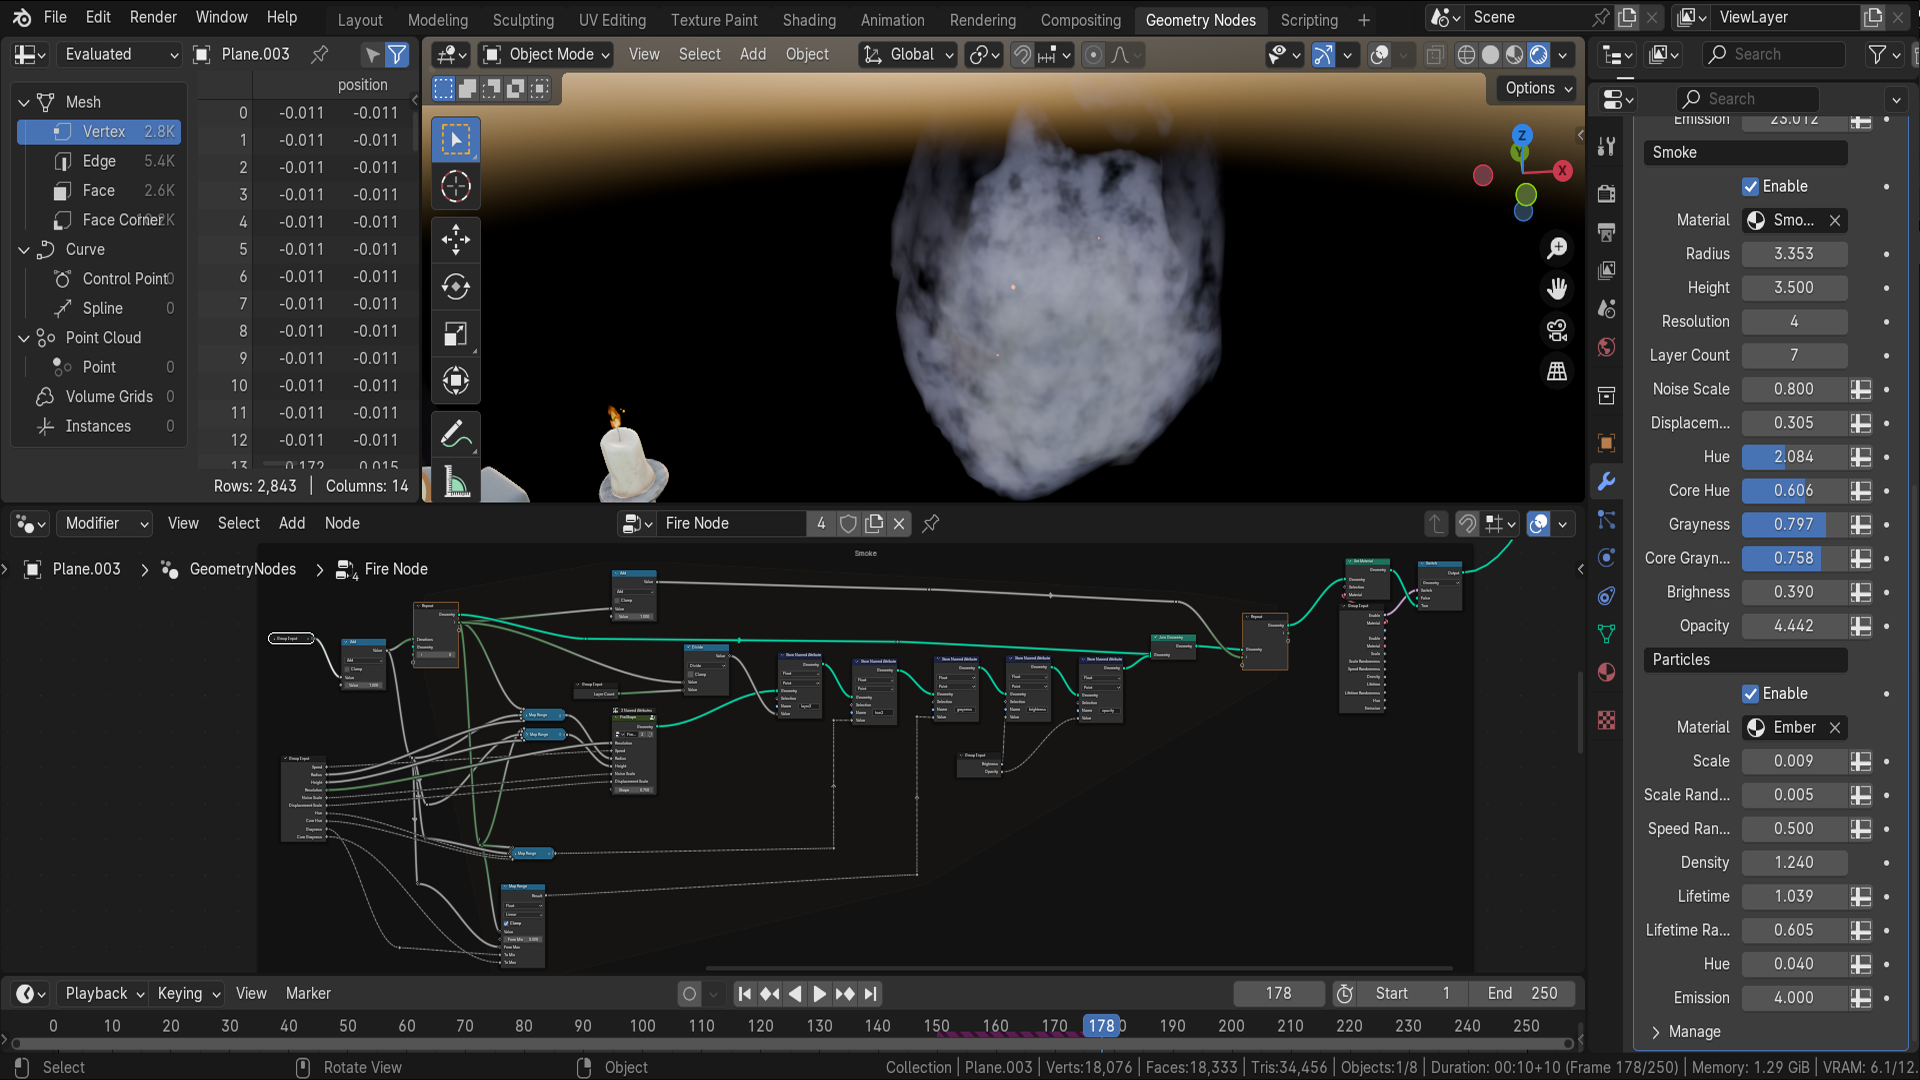
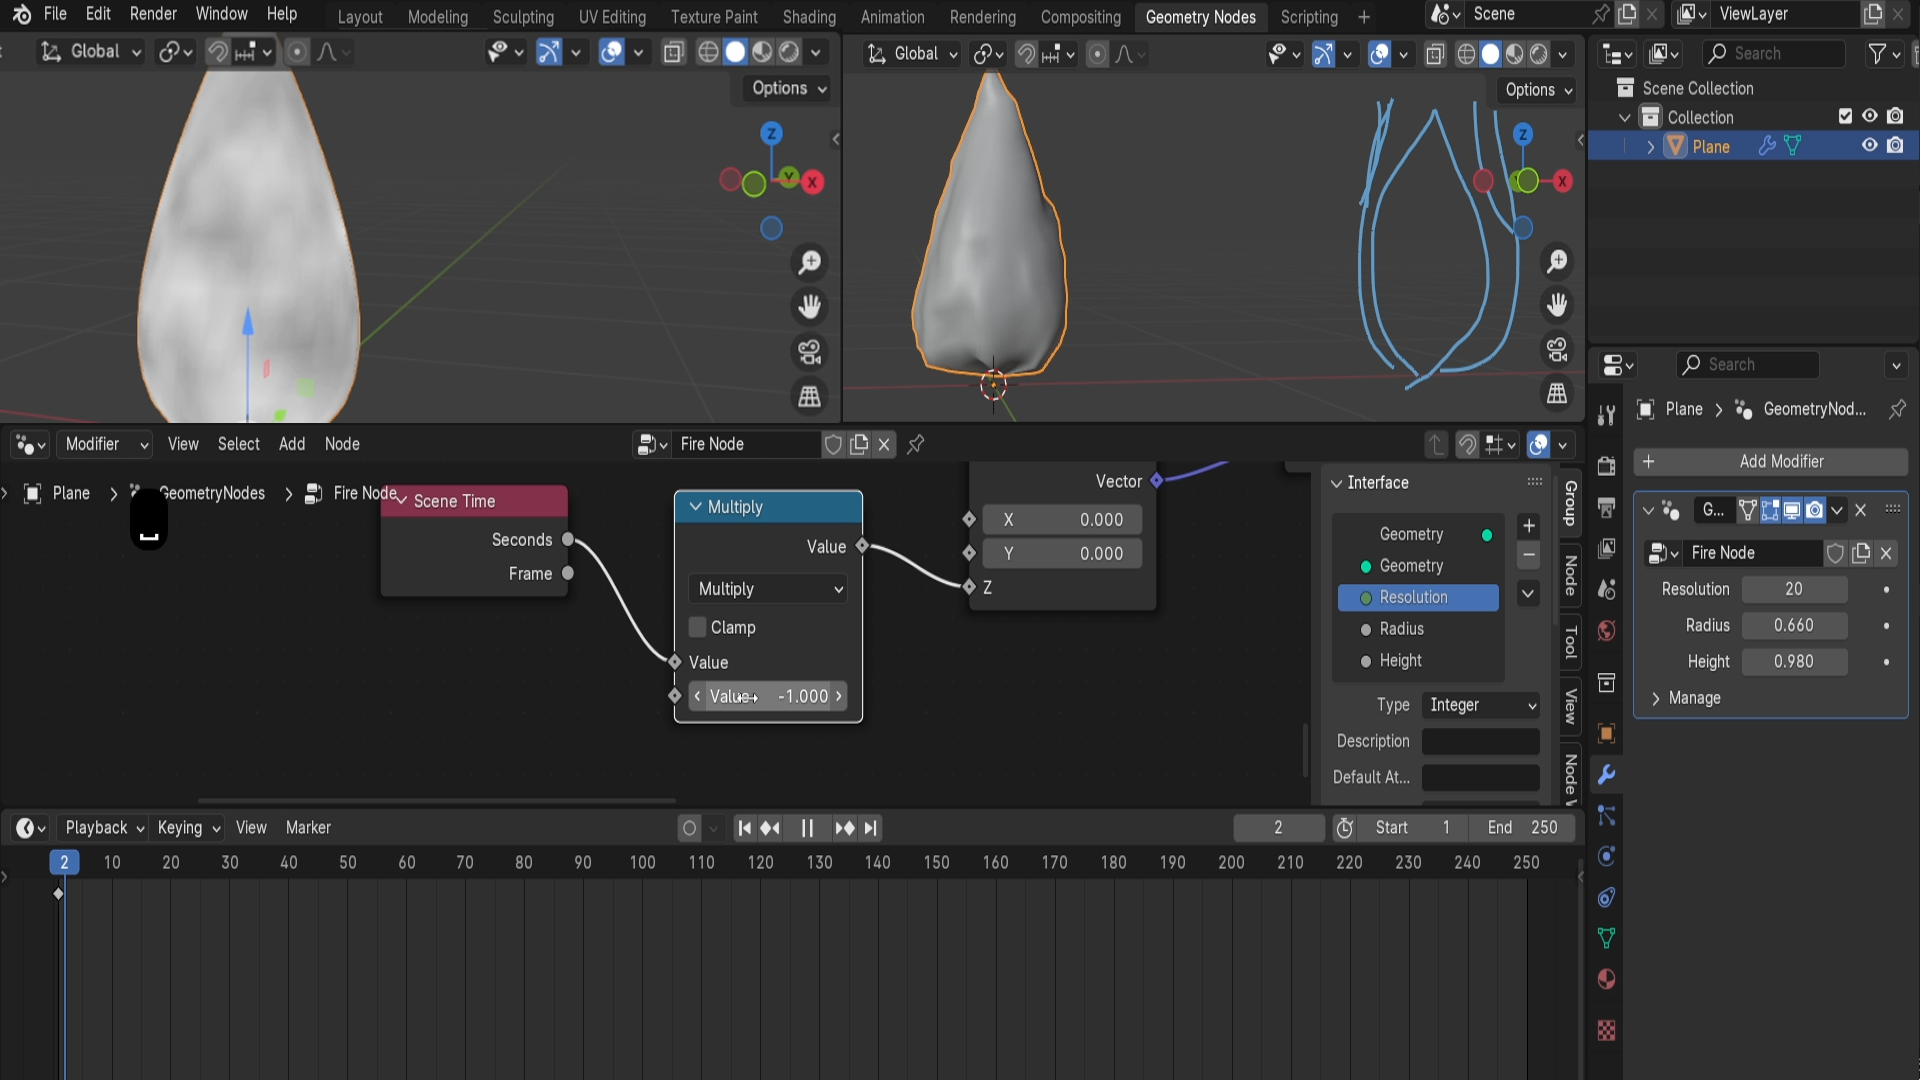
9. Blender Material Mastery: Shader Essentials: Hello, and welcome back Ebron to Blender Geometry
note, Fire Animation. In a last lesson, we create
ourselves this note group, which we can actually rename it. All we need to do is just
click on this one over here, and we can call this fire shape to make our lives a
little bit easier. The next thing that
we're going to do is add a little bit
of material set up for the Shader itself
to make sure that we're not just looking
at a gray object. So let's go ahead and do that. We're going to
click Shift and A. We're going to search for
set material. Like so. Let's go ahead and click Enter, and I'm going to
add it right after the fire shape Geometry group. Then we need to make
sure we are able to control what type of
material we're attaching it. So we're going to go ahead and create a new input
for the interface. And for this type of socket, we're going to just
change it to B. So we're to find it
material. There we go. We're looking for a material. This can be called I can just
call this material like so. And for the material itself, what I'd like to
personally do now is just go on to modeling tab. So we'd have more to work with. Actually did this. Yeah, I'm going to go ahead
and join this area. So previously, just
to showcase it how to add a geometry node tab. I just had this, but
you should be able to just see something
like this instead for the Mlling mode
with a bit more of an open field to look at in
regards to the viewport. The material itself,
what I'd like to do is, I'd like to go onto object mode, and I'd like to add a new
object or UV sphere, like so, put it off to the side,
make it maybe a little bit smaller and right
click, shade OS Mu. The reason I'm doing
this is because it allows me to create
a material bubble. It just allows me to just preview the overall shade
that I'm working on. And the other thing is that whenever we're working
with materials, based on the selection, it's
going to be changing what material you're able to work
with in a shading panel. So for now, I'm
going to click on the material, going
to click new, and I'm just going to
call this one Yeah, let's go ahead and
call this one fire. So now we have a sphere that
has a material called fire. If we were to go back
onto our geometry node, we're going to see that it doesn't have the fire material, but we can go onto
the modifier stab or the geometry node itself, and we can just select this
material section over here, select fire, like so, and we'll have this
parameter set as a fire. So The reason, again, we don't touch this to
have a material over here is simply because we'll personally like to
have more control in regards to what
I'm working with. Now if we were to go back
onto another panel, actually, instead of Jermis,
we're going to this time go onto
shading tab over here. The top section, we
can click shading. We're going to get this tab, which will allow us to work with this graph over
here for shading. Now you can see that it
allows us to click new, but we already created ourselves this fire material
shader over here. Once we click on this sphere, we can preview it like so, and it has a basic principle BSD F. I will play an
introdury video to the shader setup that
will explain and give you the overall overview
of the shading graph. And that will help you to transition into this
part over here. You don't need to follow along
in regards to the setup. All you need to do is listen, maybe take some
notes if you prefer. And then in the next
css and we can continue on with the setup for the fire. So thank you so
much for watching and I will be seeing
you in a bit. Welcome everyone to
the blender shading and texturing introduction. And you can see here
within my scene, I've actually brought
in a few shaders just to kind of explain
how they actually work. So first of all, what
is an actual shader? A blender shader is a
type of material that can be applied to three D
models within blender. Shaders define the
way surface of objects appear under various
lighting conditions, simulating a wide range of materials and effects
such as metals, glass, plastics, wood, and more. Essentially, shaders tell
blender how to render the surface of an object based on its
properties like color, transparency, shyness,
texture, and reflection. So, within Blender,
we use actually a no based system for creating
and customizing shaders, particularly within its
powerful rendering engines like cycles and the newer
EV render engine. Now, it's important to note
that the actual shaders within Blender react differently to each of those shaders. So at the moment, you can see that I've actually
got this on EV. But the moment I
put this to cycles, these actual shaders,
some of them, at least, will
react differently. So now you can see
that our emission here that we had
that was glowing, doesn't glow anymore,
and that's what happens in typically
in blender cycles. Also, the glass now, we can actually see
through the glass and see this is actually
a glass shader. So it's important
to know straight off the get go that some shades will work in EV and
some in cycles. Now, next of all,
we need to look at the different types of
shades within blender. So some are created entirely in blender
through node systems, which we're going to look
at in just 1 minute, and the others are
created through textures. Generally, these will
be PBR textures. Now, a PBR texture is a physically based
rendered texture. And it's a texture map
designed to mimic the way light interacts with
surfaces in the real world, based on physically
accurate models. These textures ensure
that materials rec to lighting conditions in
a realistic manner, making them essential
for creating lifelike three D models and
environments within blender. So now, north of all the
back story on textures, let's actually go up then. And first of all, we want
to bring in an add on. Now, this add on is in
bill within blender. In other words, it
comes with blender. I wish they would
actually turn this on a standard, but So far, you have to actually enable it, but trust me want
to say it's one of the best add ons that
blender ever produced. So let's go up to edit. What we're going to do
is come to preferences. We're going to go
over to add ons, and the add on we want is
called the node wrangler. Type in node, make sure the
node wrangler is turned on, and then all you need to do
is just close this down. Next of all, we're going to
go over to our shading panel, which is this one over here. And then what we're
going to do, we're going to click on this cube, which at the moment,
doesn't actually have a shader on it
or any material. We know that because if we come over to the
right and the side, where our material
panel is here, you can see this is
completely empty. Also in the shader panel, you can also see if I zoom out, this is also completely empty. If you do happen to
have a shader in here, and then there's
nothing in here, just zoom out as far as you can, and then you'll find
all of the nodes. Now, what I'm going
to do, first of all, is adding a new shader, and what we'll do is
we'll double click it and we'll call it wood, like so. And now you can
see it is actually set something up within blender, just a basic principle BSDF. Now, this basically
is the super node. It's where all of the
texture maps will plug into. This is the main node that
you will be using. All right. So now what I want
to do is, I just want to click on this node. And what I'm going
to do is I'm going to press control, shift, and T. And what then that
will enable me to do is open up my actual
computer file. And from there, I just
want to find my textures. So here are my textures that I'm going to use as an example. And you can see here
we've got wood grain, and you can also check out
what these actually look like by coming over to
the right hand side here and clicking this on, and now you have a good idea of what these are actually
going to look like. We can also make them larger
as well, if we need to. So you can see here
at the moment, the size is 128, and we can just bring that
up to actually make them bigger and see exactly
what textures they are. Now, to bring them in, all I need to do is select
the first one. Shift select the last
one, so we've got a more selected and click
principal texture. And what Blender is
going to do from there is is actually going to bring them all in and set
them up for us like so. So you can see now because
of the node wrangler, everything is set up for us. Now, within our
actual shading panel, you will see over
the left hand side, we actually have a UV map here, and it's not actually showing
anything at the moment. If we come on over and we select one of these actual
textures like so, you will see if I Zoom, we've actually selected this
actual metallic shader. I can also come down and select the roughness, for instance, I can select normal, or I can select the actual
image texture like so. Just remember, if it's
on the wrong one, it's probably because
you've got one of the textures or the wrong
texture actually selected, and I generally want to
have it on the base color. Now with blender four, comes
a new principled BSDF, and now a lot of the options are actually hidden behind
these little tabs here. Emission, for instance, is now hidden behind here, so
I can turn this up, as you can see, bring it down and change the color
of it if I sell one. Just remember that some of
them might actually be hidden. Because this is a basic video, we're just going to
go through a few of the actual options
that we normally get within our actual textures. So A PBR setup
normally consists of a base color known as the
Albedo or cut just a color map, a metallic map, a roughness
map, and the normal map. There are no more maps, but they take a
little bit of work to actually set them
up within blender, and this is a basic video, so we won't be going into those, but we will be going into
those later on in the course. The first one, which
is the albedo map, it just defines
the basic color of the material without any
lighting or shading effects. It represents how the material looks under natural lighting. If we go to the next
one, we've got metallic, and this map defines which parts of the texture
are metallic and which are not influencing how the material reflects light. Metals have a high reflectivity and distinct coloration
in their reflections. Now, you will notice if
I click on this one, it's completely black because this wood has
absolutely no metallic. If this was completely white, all of this wood would
be completely metallic. Has kind of graze in there, that then is defined the roughness of the
actual metallic. In other words, those
little spots that you see when you shine
light on something. The next one is roughness, and this isn't to
be confused with metallic because roughness
is how shiny something is, and metallic is obviously
how metallic something is. Generally, as well
with metallic, either something's
metallic or it isn't. You don't really get in the
real world half and half. The roughness map
controls how rough or smooth the surface of
the material appears, affecting how sharp or
blurred the reflections are. A lower value results in a smoother surface with
sharp reflections. Why a higher value leads to rough surface with
diffused reflections. Now, when I'm talking
about values, I'm talking about
these values here. So the more sharp this is, or the more blurred this is, or the more darker
these little spots are, that will give you the result that you actually looking for. Finally, we're going to go now to the normal map, perhaps, one of the most important maps and the normal map simulates small surface
details and textures without actually changing the geometry of
the three D model. It affects the way light
bounces off the surface, creating the illusion
of depth and detail. And this is used
a lot in games to actually look as though there's more geometry than
what there is. Now, let me show you
how that works, then. So if I come down to this
strength at the moment, you can see that we've
got our wood here, and it's kind of defined,
so if we look from here, it kind of looks like it's, three D and these little
groves are going in. But if we turn this
all the way up now, you can see that's the
effect we actually get. You can see now it
looks as though it's much more ripply
along the edges. We can see big groups
going down there, and this is what the
normal map actually does. Now at the moment,
with our actual cure, you can see we've only got
one actual material on there. And what about if
you want to put multiple materials
onto an actual object? I'm going to do is, I'm just going to
click the plus button. I'm going to click
the down arrow. I'm just going to
choose one like glass. I want to click the
plus button again. Click the down arrow,
and this time, I'll choose one that says stone. Now, if I go into my cube and press the tab button
in actual edit mode, come over, select
one of these faces. It only works on faces. By the way, you can't select an edge and apply a
material on there. You have to select a
face or multiple faces. So what I'm going to do
then is come down to glass. And finally, then I'll
click a sign like soap. Then I'll come round
to the other side. I'll click this
face and this face. And what I'll do
is, I'll come down, click the Stone
and click a sign. And there we go. Now
we've actually got stone, we've got wood, and
we've got glass. And if we put this on
our render view now, you can see exactly how
that's going to look, and you can see how the lie is interacting with all
of these surfaces. I come over just
to the right side quickly and turn around
my sun rotation, we can get a clearer view of
what we're talking about. If I come even further around and bring it to the front light, so you can actually
see that glass then is actually starting
to be seen through, and you can also see that actual normal map working on the
inside of this cube. Now, let's quickly
go back to our wood. So to do that, what I'm
going to do at the moment, you can see that
we're probably on the stone in this
shade of view here. It says actually stone here. Actually come down
and click on my wood, for instance, and
then it will take me and put the wood
on there as well. So that's another way
to actually apply them. Instead of the stone,
it's actually just put on wood instead,
as you can see. Now, what I do want to do is, I want to come in
to my actual wood. So that's the one that
we actually brought in this one here,
and just show you, for instance, can actually interact with all of
these texture maps. Now, there's thousands of
nodes available in blender, and the way that you
put them all together, it can become extremely
complex with huge, 100 node maps and shaders. So I'm just going to
show you something of the basics just
to get you started, and that will be an RGB curve. So an RGB curve, as those of you may
know who use photoshop, changes basically how the
actual image is actually lit, darker spots, lighter
spots, things like this. So if I come in and
press shift Day, search RGB, and you can see, I've got an RGB curve here. Now, just before we do that, if you do press shift
day, you can come down, you can just see get a flavor of how many nods there are
actually within Blender, and you can see also how many shaders there
are within blender. Let's discuss that after, but first of all, we're
going to go with RGB curves. Bring that in and drop
that down like so. And from here now, you can see
that I can actually affect the color of this actual wood on the fly in real
time, like so. We can also put this onto the metallic onto the roughness, and even onto the normal
to get different effects and different ways
that the metallic or roughness actually work. Now the next thing is we want
to discuss is just shaders. So as I said, this is the
main shader within blender. This is like the one
ring of shaders, and basically, this will be the main one that
you actually use. But of course, there's
plenty of shaders. So depending on what you want
to do, if you come down, you can see, we've got diffuse, we've got emission shaders, we've got glass glossy
and a whole range of other shaders that you can
actually try out and use. Now that we've discussed that, let's actually come out
over two our actual shaders that have got to set up here. Now you can see with
this glass one, it's just a very
simple shader of glass and got some roughness on, and of course, an IOR value. Next of all, then, we've
got an emission shader, and you can see now this
is using texture maps, and it's slightly more complex, and you can see how all
of these things plug in. In other words, what
I'm showing you is that Shaders can be very, very simple or get
to be very complex. So the next one is the metal, and you can see this
gets even more complex. The next 1 stone, and
you can see again, this is slightly more complex, and the final one is wood. And you can see
things like this. So we can see that
we've actually got some edgeware on this wood, and all of this is actually
done within blender, again, with quite a big
setup for the nodes. But it's unbelievable
really what you can actually do
with these shaders. Once you've actually
got your head around how to set up
the node systems. Really are just
scratching the surface in this blender shaders and
texturing introduction. And even on the right
hand side here, you can see you've got
all of these options, as well to play around with, as well as the fact
that you can actually put these into your
asset manager as well. But this is just a
basic introduction just to get you started. Alright, everyone, so I hope
you learned a lot from that, and I'll see you
on the next one. Thanks a lot. Cheers.
10. Noise Transparency Dynamics: Motion Speed Parameters: S. Hello, welcome back. I' on to blend the Geometry
Node, fire animation. In a last lesson,
we create ourselves a shader or the material. We got ourselves
this sphere over here, just a quick preview. And we're going to start
working with the overall setup. So for us to do that, we're going to go
ahead and just select the sphere with the
materials placed on it. We're going to go ahead and now add a noise texture to start working with the actual colors
for the for the flames. Let's go ahead and
click Shift and A. And just like we did
in our Geometri, we're going to search
for noise texture. There we go, noise texture.
This one over here. If we were to add it right away, we have two options, by
the way, factor and color. Factor would be just
simple black and white. Same we had with the fire. With the displacement,
if we were to use color, we're going to get
ourselves, wait for it. There we go a full
range of colors. So we can make use out
of this for the fire. And right away, we can make use out of the parameters
for this fire over here. And I believe, yeah, we have the material
on this fire, but we're not seeing anything. The reason being is that
we need to make use out of this vector over here to
tell the color information. So, for us to do that,
I'm going to quickly get ourselves attribute
in Puth attribute, which will allow us to
select the geometry. And based on geometry, we can tell what type of
vector we want to use. Right now, if I were
to attach it like so, it's not going to
give us anything. But if I was to
write UV map, which, if we remember going
back to geometry node, if we remember
correctly, within here, we saved it, stored this data over here,
stored name attribute, UV map as just a
simple position of each one of the coordinates
or the vertices. Doing so. We can just simply also just copy
this name over here, so U V and score map, clicking Control seat, copy it, going back to Shader and just selecting this
sphere over here. We can just paste in this name, like so, clicking Enter, and now it should
give us a setup. So I'm just looking at this. And it doesn't seem to
want to give it to me, so I'm trying to figure
out by that is the case. So the sphere will disappear
because it doesn't actually have attribute
with the name UV map. But this on the other
hand, should have that. And the reason this is not
going to give us fine node, I just realized my mistake. We applied this
parameter for fire, but if we were to go
back to geometry node, have a quick check. I'm going to go
out of this group. We have not actually connected
this to the material. So that was a quick
mistake on my hand. Let me just go ahead and make a duplicate photo group input and attach this to the
material over here, like so, now let's go
back on the shading, and this is what we
should be seeing. If you're not seeing
this, make sure you go from viewport shading
onto material view, and you should be
able to see it. And from this time, the sphere is not going
to have the setup, but that's all right because we can preview it on the fire. It's still a little
bit easier to just select it from
one to another. Personally, that's
what I prefer. The other thing is now if
we were to click space, and we are going
to have an issue. As you can see, the
bier itself is moving, but the texture for it is
just being kept the same. So that's going to give
us a very trippy effect. It's not actually
going to look natural. We need to make sure
that the texture itself flows with
the overall set up. For that, I would say that we can go
back to geometry node. For the fire. And we have
this group over here. What's nice about
this group is that if even if we were to make
a duplicate out of this, we can go onto the fire node
over here, for example. And if I was to move
one of the nodes, we can then access
this over group, and it will have the changes
already changed, basically. So this is very nice because even if we have multiple
duplicates out of this, we could still go into
it and access one, make some changes, make
some variants, and whatnot. And then we can have
that same change applied onto all of the duplicates.
Is going to be quite nice. Right now, we only have one, so we don't really need
to worry about it, but it's still a
good thing to know. So what is happening
right now is that we're storing the
vertex data over here, but we want to make sure
that we are storing it with the motion that
we had in this section. Let me just go ahead
and have a look. So right before we add it
onto this noise texture, which affects the displacement, we want to also
grab this data and place it in to our
stored name attribute, instead of just normal position. This will allow us
to store the data. For the motion of the timing. Let's go ahead and do that.
I'm just going to quickly, let me think the best
way of doing it. I think the easiest way without overwhelming the overall setup. I could just drag this down, and grab this ad. And place it in a value
instead of a position. This way, whenever we hit play, you can see the motion
in our texture, which is exactly what we want. Even if we were to
change the speed, for example, to make
it much faster, we're going to still see
that same texture being applied directly with the combination of
the displacement. So that's exactly what
we want. All right. Just going to go ahead and just slightly reposition these. Make sure they don't intersect. Again, we're going to make
sure we spend some time cleaning up this entire
mess. Later downline. For now though, let's
go ahead and go out of this back onto our shading. So now we want to make
sure we have some opacity, some transparency through this. So we're going to make
use out of something called if I was to
find it over here, Alpha, Alpha will allow you
to change the transparency. We're not seeing it over here. The reason being is
that we need to go on to where is it onto the
material properties, and we need to go onto settings. There is an option
called blend mode. Blend mode will allow
us to change it between Alpha the
way it behaves. Alpha clip will
allow you to make it transparent or non
transparent, a sort of a mask, or we can change it to blend, which will allow us to make it partially transparent,
if it were to load. There we go. This is only
within the viewport itself. If we are rendering it, or if we are within
the rendevew, it would give us a proper
view regardless of this. I believe if I was even
to change this to opaque, No, it's only actually
within the renders. So this option is just
for the viewp basically. Let's go ahead and click Alpha blend to get
this sort of a result. I'm going to go back
onto the material mode. And there you go. Zero Alpha is going
to be invisible. Setting it to one is going to
make it completely visible. Although it's giving
me bizarre artifacts. I'm going to go ahead
and actually change this from Alpha blend to Alpha, which is going to give
us similar effect. The difference is
that it's going to make it this noisy
grainy type of a look. Again, when rendering, it
doesn't really matter, so it's really up to
you which one you use. Okay. So what do we
want to use this with? Well, we want to make sure we're using it with the noise texture. We're going to go ahead and
start off with the black and white because this is what
it's going to give us. If we were to
directly attach it, we're going to give it a partial transparency might not be quite as visible if I were to make
it partially like this. I'm going to hold control
and just take it off from base color to
make it easier to see. And yeah, we're
seeing it already, but we're going to
go ahead and add something to make sure we
have control over this. We're going to hit shift and A. We're going to search for color. Like, so add it over here. Now once we start dragging
it from the black side, they have two arrows, basically, the color ramp will
allow you to adjust and in a way remap the
overall information. This is where the
darkest spots are, and this is where the
brightest spots are. And if I was to drag
the darkest spot, we're going to get the
Alpha to be close to zero. We're going to get
this start disappear. Now if I was to start dragging
it from the whitest areas, we're going to start
increasing the contrast basically between
white and dark areas. And this transition, you see the area in the
middle is going to get smaller and smaller until we get this sort of a result. So if I was to change the scale, maybe to a little bit higher
up, we're going to get this. I'm going to lower actually the darkness quite a bit.
Maybe something like this. Now if I was to click play, we're going to get this result. So it's already
looking quite nice. Then we will want to make
sure that the fire itself has an actual look of a fire. And it's actually quite easy
to do with some emission. At the very bottom, we
can see we have emission. If I want to open it
up, we can change up the color to be orange, and then we start
increasing the strength, and we're going to get
ourselves an interesting look. So this type of a look is not going to
look quite as nice. I am going to change this to Alpha clip just so we
could see a little bit better the mask and talk a little bit better
in regards to that. So what we want to do is we want to make sure that we
don't only change the color. We're also changing
the overall variation. We're going to make use of
the noise texture over here. Before doing that though,
I'd like to go to base color and just make sure
that this is set to black. The reason being is that once we start turning
down the strength, we can see that we are seeing
the actual color behind. So we want to make sure that we have a more stylized look, and only the emissive is
affecting this fire essentially. So, over here, what we
need to do is going to be mixing up the noise
texture with the emission. We're going to go
ahead and do that by grabbing something
called color mix. We're going to hit shift in A. We're going to serve color
mix, mixed color over here. Essentially like a math
node except for colors. We still have all the options, for example, over here, for mix, we can change them up
and they have a bunch of options and tools to make
our lives a little easier. The only thing that we need to worry now is about multiply. Multiply will basically
get the color, which is going to be
orange in this case, like so, and it's going to darken every parts that
needs to be darkening. If I was to drive
the noise texture directly and put it to A, then attach it to the noise like so we're going to get
this type of result. Essentially, it darkens up our areas where it needs to be. I think I'm just going to lower this ad just a little bit. Let me just go back to. There we go. Go to go ahead
and select the sphere. I'm not sure where my spirit
has disappeared actually. Let me just go
ahead and find it. Oh, it's because it has no it's because it has no Alpha completely. That's all right. So I will go and change the blend mode back
to Alpha Alpha blend. Hopefully, this time, it's not going to be glitching
out as much. There were going now, it is
giving us a better look. And that's what
we're going to get. So, already it's
looking quite nice. I'm going to go ahead
and lower down the speed of this oral setup
to 0.5 just so we could actually
see what's happening with the way fire is interact. Glitch over there that you saw. The reason being is that it went all the way to the
end of the sequence. And when it starts again, it just reset the timer. So that's why it's doing that. If we don't want this, all we
need to do is just increase the sequence time whenever we're doing rendering
and whatnot, but even when we're rendering, we are going to get the exact
amount of sequence time. So we don't really
need to worry about that glitch that you just saw. And let's go back
now to shading. So we have ourselves
a basic set up. We're now going to
go ahead and work in regards to setting up. The fire to look a
bit more stylized. I'm going to increase
the strength a bit to something like three or actually make it a little bit
more red this time. There we go.
Something like this. I'm quite happy with this. H
the strength a little bit. There we go. All right. So in the next
lesson, we're going to continue on
with stylizing it. Thank you so much for watching, and I will be seeing
you in a bit.
11. Iterative Geometry Nodes for Layered Fire Effects: Hello and welcome back,
everyone to blend the geometry node,
fire animation. Now that we have ourselves the basic setup for the shader. Let's go back onto
the geometry nodes. We're going to go
ahead and open up the tab that we had previously. Let's go ahead and
click on the fire so we could get the
fire nodes set up. We want to make sure
that we're getting multiple layers for
this fire over here, so it's not going to
be just this shape, it's also going to
be surrounding it. The reason why we created
the group to begin with is because we want to
just repeat it basically. So for us to do that, we're
going to hit shift and A, we're going to
search for repeat. Zone over here. It's going to give us a
combination of two nodes, and there's going to be
a zone in the middle. We're going to make
use of it in order to repeat this group that
we set up over here. So we will want to tell how many layers
we're going to be doing. So we're going to make sure that we have set up for
the iteration. That's going to be set
up with a new parameter. Let's go ahead and
create a new input. We can change this
to be a string, not a string
integer. Here we go. And we're going to change the name for this to be a layer. Layer. Count like this. Then let's go ahead and drag
it all the way to the top right under the
resolution like so. We have this nice
value over here. By default, let's
go ahead and change the default value to one and
minimum to zero, like this. Sorry, the minimum to
one as well as the, the minimum amount
of iterations we should have is always
going to be one. So in order to expand
this zone over here, we're going to select
one of the groups. We're going to click G and
just move it off to the side, so we have some working space to do working space for the setup. We're then going to
go ahead and actually just duplicate the group input. Let's go ahead and
click Shift D. So we can get the layer count
to be set as iterations. Then before adding
the geometry itself, we will want to also
be able to tell which exact iteration we're
using within the setup. So we'd be able to have some
individual controls over it. F to do that, we're
going to select the last repeat node over here. Then we're going to go onto
the node setup tab over here, which is going to
give us a similar tab to what we had in
a group interface, except for this,
we can make use of it to grab the information
that we want to output. So right now we're only
outputting the geometry tab, this little dot over here. We will also want to have the node selected
and add another one. For this, we're going to
make sure that we have it as an integer, just like that. This integer, we can call
this one I for iteration. Can see that we're having ourselves this value over here
at the very start as well. Basically, in each iteration, we will also want to add a one. It's going to be
every new iteration going to have an additional
value added on top of it, so it's going to actually
give us a count, 123 and so forth, an ID, let's say. For us to get that, we're
going to do add like this. Whenever we're repeating this, we're going to add the
value for the iteration. We're going to set it to
one, and that's going to be added to the iteration
like this. And there we go. It's going to start off
with zero over here. Then it's going to
starts repeating, it's going to add
one, and then it goes this to one and so forth. Let's go ahead and make use
out of the item over here. I'm just going to simply copy the setup at
the very start. Let's copy this group input and fire shape. I'm
going to hit shift D. Move it down like so. And we're going to make sure
that whenever we repeat it, we add this geometry
with joint geometry. This node over here,
we're going to add it right underneath the
add value over L so. Let's go ahead and make
sure that it's part of it. Like this. We're adding a
geometry just like that. What it's basically doing
is whenever it repeats, it's going to add this
geometry over here, and right now it's by
default, set to zero, so it's not going to give
us anything if we were to connect this to an output, Like so, it's not going
to give us anything. Once we start increasing
the layer count, they're setting it to
one, we're going to see that it's going to
give us something. So it's going to give us to the pole shape
that we had previously, once we start adding
a second one, it's going to look identical. The reason being
is that it's not actually offsetting anything, and we're having the same shape. But if we look at the top left hand corner
in regards to vertices, for example, we can
see that it doubles the moto vertices and
the faces and so on. That means that we
are adding geometry, we're duplicating this
geometry basically. So now we need to make use out of the integer that we have. In order to offset the shape. To get the displacement for
each one of the layers. What we need to do
is we need to make use out of the i that
we set up over here. I'm going to
actually just create a little bit more space, and we're going to
make use out of this i in order to offset and
change the radius over here. I'm going to put at this point the fire
shape into the section. So just going to move
it a little bit down. I think that's all
right actually. After every integer, we
need to remap the value. We need to get ourselves
the setup for the radius. We're going to go ahead
and search for Map range, which will allow us to, I'm just going to undo it because I added it
onto the wrong side. Let me just go ahead and undo
it, put it off to the side. Let me just grab everything
and reposition it ale bit, so we'd have more
space to work with. In short, going to
do it a bit more. There we go. Oh. D. There we go. In short, what we want to do
is we want to grab a value from zero to the integer that we have to the
amount of layers, which in this case,
is going to be i. Imagine that we're
grabbing all the values from where is it maximum, going to be this one over
here, the ay account. We're going to grab
the maximum amount from the maximum. There we go. Imagine from zero to, let's say three in this
point at this point or whichever number you're
using for lay account, then we're going to remap it to the value of the
integer that we're having, L so, and we're basically changing the integer
to be used as a radius. Instead of using the
integer over here, which is going to be the current
position of which spawn, which duplicate
it is being used, from the maximum
amount of layers, we're going to change
that up to be from zero to the maximum
radius value. If we were to add
this radius value to the maximum over here, we now have ourselves
a remapped radius. That's going to be each
change individually based on which version of the duplicate is being used for this shape. Now, if I was to add this result onto the radius over here,
just go ahead and do that. We're going to get
ourselves this shape, which might not seem
to be anything, but if we were to
increase the radius, and if I was to go
onto the bio frame, we can see that it's
actually doing something. So that's quite nice. If we were to increase
the layer count, we can see it's actually
shaping up like an onion. So that's good for us. The only thing that
now needs to be changed is the fact
that this onion over here also ends up being the same height
for every single point. If I was to change the height, it's just going to
squish everything in in regards to
the whole set up. So for us to do
that to fix that, to make sure that the
height is a little bit changed in regards
to each layer, we're going to do
a similar set up, what we had for the map range. We're going to just
simply duplicate this, map range, click Shift D.
Make a duplicate out of this. Or better yet. I'll
show you a nicer way. We can select this. We can click Control Shift D at this point. And if we were to click Control Shift D
instead of Shift D, it's actually going to give us the input sockets already
placed in the right position. All we need to do for this is instead of adding the radius, we need to change up to height, and that's going to give us the right setup of what we want. We're not going to go
ahead and change this to height to get output to height, and that's
what we're going to get. It's basically giving us a different scale for the
height at every point. And we can check the height
as well to see if it works, and it seems to be working. Alright, so it's
looking quite nice. It's shaping up to be nicely. We're not going to
be seeing anything es yet because we need to set it up with the material
and everything of the sort. But we're going to continue on with this in the next lesson. Thank you so much for watching, and I will be seeing
you in a bit.
12. Fire Iteration Techniques: Layered Approach: Hello and welcome
back around to Blend omit Node of fire animation. In the last lesson, we left
ourselves off by getting a nice size variance
in regards to each layer and regard
ourselves an onion, let's say, but we're
still not quite done. We need to make
sure we set up with a material for
starters for the core. So for us to do that, we're
going to quickly start off by getting where would it
be setup for the material. And that's going to
be it over here. We're just going to
go ahead and just make a duplicate out of it here. We're just going to add
it onto this section like so right after the
repeat. Over lake. And we should see ourselves, the nice material that
we had previously. The thing is right now that we have is going to
maybe look good, but it's going to be
exactly the same. Each lay is going to have
identical type of A pi. We don't want this. We want to make sure
we have some variance. So for Asia, we're going
to store some information, and we're going to
sort it over here. All we need to do is just grab this integer value and store
it as a named attribute. So let's do that, actually.
Yeah. Let's do that. I'm right before we join
anything over here, to make a little bit more space. Right before we join anything, I'm going to create a new node called store name attribute, going to add it in over here. And every time we're
creating a new one. We are going to be storing
the integer value over so, which is going to look a little
bit messy at this point. Let's go ahead and actually move everythin down like this. That's all right.
Yeah, we're storing the value for every integer. We can call this one layer, since we're just
literally storing every layer for iteration. If we now go back on to shading, onto our fire node, we can make use out
of this attribute. I'm going to make a duplicate out of the attribute of here. We can change the
name to be layer. So in order for us to
get a noise variance, we're going to let me
just think for a second. We're going to change the
noise texture to four d, which will open up with
a W value over here. This will allow us to if
we were to change it, have some variants basically. And we can use this as a sort of a seed from the attribute. If we were to just
connect this to W. We can see that
each and every single one of them would have its own different W. I'm not sure if it's
actually quite visible, but now we do have some variance with each and
every single one of them, maybe if we click one, we can see it a little
bit better so before. I was like this, just a small version
of each other. But now we're going to
have some variance. All right. The thing
is though now, although it will works well. Later downline, we'll
want each core, each layer to have a
variance in opacity. And for us to do that, the best ways if
we'd have a value instead of just what we
have over here for layer, if we'd have it in of
just each layer count, I we'd have it this as a
float value instead 0-1, that would help us
a great deal in regards to setting
it up or capacity. So let's go ahead and
do that real quick. Instead of just I just
realized that yeah, it was set as a float already. It just go ahead and fix that. So we had a float value. We want to make sure it's set 0-1 instead of just
the count number. So we're just going to divide the current layer by
the maximum amount, and that's going to
give us a value 0-1. So, let's do that real quick, instead of just
using an integer. We're going to get sel
math value over here, just attach it right
before restoring this. And let's go ahead
and divide it. We're going to divide it by
the layer count over here. You might as well just
everything a little bit more to the side just like that. So we can just get ourselves
a new group input, going to put it over here
and get the lay account. To make the smaller, we can
always minimize some values. I'll show you how to clean
it up later down the line. But for now, all we need to do is just click this
button over here, and that's going to be giving us this big chunky type of a node. There are other
ways of doing it. But for now, let's
keep it simple, and let's just
make sure we focus on creating this fire system. So now for opacity
to preview it, we can go on to shading, we can select the
shader that we had, and I can simply add
this to the Alpha of here just as a preview just to make sure it
actually works properly, and it should give us
something like this, which I think y, we can see that on the outside, we have it more
transparent on the inside, if we look at it from
the inside itself, we should have it
less transparent, which might be a little
bit hard to see. Hopefully. That makes sense. Let's go ahead and make
use out of the value. I'm going to plug this set
up back in for the Alpha. Lo so. We're going to now combine these two
together with what we had. For us to do that, we can Let's just grab the
attribute again for the layer. We're going to now
get a math node. Over S. We can just
change this to multiply, grab the factor and just set up the values L
S. Attached to Alpha. What this is going
to do is whenever the brightness is lower for the layer is going to
give us more of a value. I'm not sure if that's visible. I'm going to actually
lower the amount perhaps just to make sure we see it
a little bit more of that. We're not seeing it as
much and we might need to tweak this attribute
value over here itself. Let's go ahead and do
that using color m. So, we're just going to attach it. And instead of having
this as a linear, we're going to change this
to ease interpolation. That's going to give us an
ease off, so and I think. We might need to just
go ahead and check. Yeah, the inside actually
starts disappearing faster. I think those values are
opposite of what we want. I'm going to grab those arrows and switch
them around by just simply using our mouse to and there we go, now
we're getting something. At the outer edge, we're going to get
a much nicer fade in comparison to the inner core. That's exactly what we want. I think I'm going to leave
it as is by default, and it's already
looking pretty nice. I'm going to actually
lower the layer count to three or actually four. There we go. For some reason when
it's at layer one, it's going to disappear. I'm trying to figure out
why that is the case. Go to go back to
the geometry node. I'm going to pause the timeline and see why that
would be the case. I believe we can just go
into the node itself with the repeat and change
the intersection to one, which now give us a better
outcome, but I'm not sure why. It's still not giving
us the right amount. So I'm just going to check real quick if when we have
layer count one, if we have no wire frame, and it doesn't seem
to be the case. So the eases fix, let
me think for a second. The eases fix will be
just simply adding plus one over here
one to our integer. So let's go ahead
and just do that. Over here. I just going
to attach everything so layer count to this
and value plus one. Now by default, we should
always have a default of one, and once we start increasing it, we should have a nice fire. The only thing now is that the upper section doesn't
have any shading for opacity. Let's go ahead and pix
that within the shader. So this is because
I believe of this. We just see before
hand, ye, it is. We basically the last point, the outer core, will
have a value of zero. So we don't want this happen. We want to make
sure that we select this arrow over here
at the very top, which has a value of zero.
We work to click on this. We can see that the
raise it. Then Alpha. The value over here
is going to be zero. This is what
represents what we're doing for in regards to opacity. So if we were to change this to one it is going to give
us the right setup. I'm going to change
this to something like 0.99, or sorry, 0.001. Or maybe 0.01 like this to get an outer
layer just like that. Maybe even 0.1, there we go. I'm quite happy
with this result. We go to sell a nice
set up for capacity. Let's go ahead and actually
increase the layer counts. Now we have one, two, three, four, yeah,
it looks quite nice. The only downside for this is
that I would say the layers are even though we're planning
to use pacity layers, we set it up in regards to
integer being zero to one. It's still not going
to look quite as nice or this W coordinate. If I was to take this off, what we're getting
over here, is. Let me just go ahead
and quickly selected. What we're getting over
here is zero to one. So it's barely, if I
want to hold shift, is barely moving and
adjusting that value, that transition, as
you can see over here. I'm barely moving
this value 0-1, and it's not giving
me the right amount. So what I'm going to
do is c control then. I'm just going to multiply
this value over here with just by 100 or something of the sort to
give more extreme value. Now the variation for this fire is going to
look a lot better. All right. I might as well just increase the strength just
a little bit more. The value of free
for the emission. We can adjust the value
slate down line once we're done with the
ming chain itself. But for now, it's
looking quite nice. Yeah, in the next lesson, we're going to continue
on with the setup. Thank you so much
for watching, and I will be seeing you in a bit.
13. Advanced Fire Enhancement: Fresnel and Masking: Hello, and welcome
back everyone to blend the geometry node
fire animation. In the last lesson,
we left ourselves of by setting up a bit of a shading setup for the
opacity of inner core. Now we're going to continue on working with the shader itself. We're going to go
ahead and quickly, set it up with in
regards to the edge. As you can see right
now over here, each one of those
edges are quite sharp. We don't really want
this. We want to make sure we blur it
out a little bit. So for us to do
that, we're going to use something called Fresnel. If I was to show you what
Fresnel does, real quick. I can do, let me think. Yeah. Let's go ahead and
just add Fresnel real quick, and I will just add it onto We can click Control shift and just tap on the fresnel itself
and see what it does. And basically, it
highlights the edges. It's going to give you a sort of a mask around each
individual geometry to get a nice mask for the
sides of the said geometry. So let's go ahead and
make use out of that. For starts, we're going to just switch it up a little bit. We're going to use
for ramp again. We're going to add it in.
And for this color ramp, we want to switch this over. We want to make sure
that the darkened edges, Alpha is going to be darkened
over on the corners right now with the white mask
is going to be where the Alpha is going to be kept,
so we want to invert this. Let's go ahead and
mix these flips around basically. L so. And we're going to bring this darkness a little
bit more to the edge, just like that, to get
this type of a look. You can see that it
just slightly blurs out this whilst giving you the complete black
mask at the very edge. That's exactly what we want. We're now going to go ahead
and click Shift and A, search for Maths node, get it over here
and use multiply, just like we did previously. To go ahead and now
click control shift and tap on principal BDSF
to make sure that the material output
is being kept as it was previously to give
us the original fire. Now we're going to attach this what we got with
the color ramp and fresnel and add it onto the color value over
here, just like that. And now, we're going to get those edges a little
bit more blurred out, as you can see, to make it
a little bit more nicer. So now, I would also like to show
you how to add a variance. We pin the shader
itself hut dynamation, just by making use out
of the value as well. So for that, I'll go ahead and show you using
the noise texture. We can click Shift
and A search for value and get ourselves
just a normal value. But if we go into this
type pin hashtag frame, so we're going to get ourselves the exact frame of
where we're staying in. If I were to show
you D D animation. I could probably
just go over here in where we have
it in a timeline. So right now it's 204, we go to shading and it's a 204, we can click space to play, and that's going to just show you which exact frame it is. This is very useful. We can also turn that
down a little bit in regards to the
intensity or the variance. So if I was to do hashtag
frame divided by 60, that's going to give
us seconds, I believe, because if we're using
60 frames per second, that's going to just
give us 1 second. So yeah, that's going
to look like this. I'm not sure if it's not
previewed for some reason. Just wondering why that is the case. It seems
to be running. Let's go ahead and attach
this directly into W and instead of using this attribute over here
because we're going to switch it over with the vector values. Right now, this is
what. We're getting those nice chunks and clusters to help us break down
the overall flame. But at the same time we
want some variation. We're going to make use out of the attribute in of what we had. With the layer count
and the UE map. We're going to make sure we
combine them two together. We're now going to
go ahead and get a vector map over here to make sure that we are adding to the
vector the layer count, so each one of them would be
different, just like that. And we're going to get ourselves a nice result. Je like this. Just looking for
some reason, this. I'm going to real quick, redo this so frame Tbta by 60. For some reason,
it's not working. I'm going to take this
away for a second. Hashtag frame. And it doesn't
seem to want to work, just trying to figure out why. Going to just quickly create a new value tag frame
divided by 60. There we go. Now it seems to show the previa. It was working, but it just
was broken with the previous, so quick fix to just redo
the value. There we go. There we go. That's what
we're going to get. It's already looking better. The other way that we
can improve this is by making sure that as the
fire goes higher up, it's going to lower down
the opacity a little bit. Because by default,
if we look at it, these top points are two pointy. I think it's best if we were to just lower them
down a little bit. And let's go ahead and do that. We're going to go onto
the geometry node itself, we're going to access
the fire shape. Within the fire shape. All we need to do is make use
out of the factor, which gives us zero to one
in regards to the curve. So we're going to
make use out of that. We're going to grab our
cells store named attribute, and we're going to place
it right before we turn this into curve
mesh, just like that. Then we're going to
get spline parameter. I'm going to duplicate
this section over here, and take the factor value to put it into the value itself. We can call this
factor, just like that. Now if we were to go to shading, we should be able to access
this. Let's go ahead and see. We to go ahead and just
select the sphere. Grab, let's go ahead and just grab this attribute we here
and rename this to factor. So we're going to
access the right value. I'm going to click
Shift Control shift, tap on this, and we should
see something like this. At the bottom, it's
going to be darker, the top is going to be wider, so we can have some masking
information to make use out. Now we're going to make the
actual use out of this. I'm going to go
to principal BSF, click Control Shift, stop on this to get back
onto our material, going to select this
attribute that we had and make use out of
it over here, I believe. Just have a quick
look. We're going to use it at the very
end for the Alpha. I'm going to grab a number of multiply actually
just duplicate it, like so. The value for the
attribute needs to be controlled with the setup. Let me just go ahead and have a look with the
setup for the color. Ramp, and we can connect
this color to the value. Let's see what it
does. It should remove the stuff at the bottom actually and keep it
bright at the top, which is the opposite
of what we want. Let's go ahead and
flip these arrows around to invert
the color range. There we go,
something like this. It's looking quite nice. We can even play around with this ale bit so I think that's, yeah, that's looking
pretty nice. Now we finally need
to work in regards to the hue and the
emission strength. So, we're running out of
time with this lesson. I think we're going to continue on with it in the next lesson. Thank you so much for watching, and I will be seeing
you in a bit.
14. Hue Variation for Enhanced Fire Emission: Hello, welcome
back. On the Blend the Geometry node,
pire animation. And last lesson, we left
ourselves off by creating some additional adjustments to the shader to make
the pire look nicer. We still have quite a way to
go in regards to making it look a bit more vibrant. We're going to continue
on with the set up. So what I mean by that
is we need to have some color variants for
each one of the sessions. We're going to make
sure we do that. We're going to low that lay
account a little bit to something like four to make it a little bit more manageable. And I think we can
work with that. I am also going to
increase the opacity by quite a bit because I think
now that we have the setup, it's going to look a little
bit to underwhelming. Let's go ahead and do that. Going to increase it
like so over here, and that's what
we're going to get. I think that's a
little bit better. Looking from a distance. Yeah, sharpening
it up, basically. It's going to look nicer. All right. Now we need to make sure we go back onto the
geometric node. Let's go ahead and do that. We're going to go onto
the group interface. We're going to create a couple
of additional parameters. Let's go ahead and
create three of them. Three new sockets. One is going to be for
controlling the hue. Another one is going to be
for controlling the core hue. What I mean by that
is it's going to need to have some variance
in regards to the center piece to help us out a little bit. Let's
go ahead and do that. Core Q. I'm going to actually
rename this with a capital letter just to make it more
consistent with naming. The last one is going to
be emission strength. So we can just call it emission. Now, to make use out
of it in order to get the core and
emission values, we're going to go out of
the fire note group back onto the repeat
section over here. We're going to make some space for additional store
name attributes, just like that, and add a
couple of them over here. This one is going
to be called u, and this one is going
to be called core. We have everything that
we need over here. I'm just making sure
it's properly set up. I think I might have
made a mistake. Yeah, I did make a huge mistake, actually, sorry about that. What I did was, I created the parameters
over in this section. Let me just take
this off real quick and redo that step in regs to We need to create the
parameters for the changes, we're going to go onto our
fire node by clicking tab. We can go out of the group that we had, and we're going to. Firstly, make sure that we have some new parameters over here. I'm going to add input
after displacement, a couple of them
actually or three. The first one can be. The second one can be core u because we're
going to be changing it, changing the setup
based on where it is. The last one is going
to be emission just to make sure that we have
control over the emission itself, the strength of it. I think that's enough. We're going to now go
ahead and just quickly, duplicate this store
name attribute, make sure you have enough space, so I just drag off to
the side a little bit and make a couple of duplicates for the
store name attribute. This one is going to be u. This other one is going
to be called core. Let's make sure that we're using underscore Q instead of space because that's
the preference for the store name attributes. For starters, we're
going to grab another map range over here. We're going to hit
control ship D, make a duplicate,
then remove two max. And instead, and yeah,
for this map range, in order to make use
of the value for u, we're going to mix
it up with core u as well just to make sure that they're intertwined
with one another. So we have core u
parameters over here with, and we're just going to say that we're going to get
the value between the minimum and maximum with the u and u values over here. To get the output for
U value over here, just like that. Yeah. That seems to be right. Now we can bring it
this to the shading. Let's go ahead and do that. Right after Yeah, we
can it underneath get our attribute and call
this one H or I believe. Let me just check real quick. If we were to go to this, just making sure that it
has no capital letters, which doesn't seem
to be the case. A H. This will give us
a simple parameter for the value we can just directly make use of it within
our emission over here. We need to make sure we're
using a certain certain value. If we were to just simply
plug this in into the color, it's just going to
give us black and white like once
it loads like so. And for us to make use
out of this properly, we're going to make use out of something called hue
saturation value. So this has a parameter
for changing the hue. If we were to change
the hue over here, we should be able to switch
this setting around, which is not going
to happen because we need a color parameter first. I'm going to go onto here and
just turn this completely. Completely blue. Going to change this value to one, the u 2.5, like so just to keep
the consistency, and y it's just going to be
at a top for green and blue. So once we start adjusting
the u over here, it's going to work in a
way like a clock wise. So 90 degrees will
be more purplesh. If we get this to be
zero for causally, if we get this to
be a value of 0.5, is going to be a default value. Once we start increasing it, it's going to turn more
purplish, like so. And then once we go
to value of one, I believe it's going
to just turn red. If we wanted to go to green, we can just continue
on from the up side, and it's going to turn
green just like that. So, we can use the
attribute from the hue and attach this to
the hue value over here, which is going to be with the core hue and hue parameters, and it should give
us nice setup. If we were to start changing it over
here, you can see the hue. I'm changing simply the
hue value over here and it starts to change the inner
core, whilst at the same time, it's changing the value on the sides like
this, and we can, for example, turn this more Let's say
purplish, there we go. It's going to give us a nice
setup, and then afterwards, we can tweak the
core hue as well to make sure we have a lot of control over the parameter over the outside color
and inside color. And just like that,
we're going to get ourselves a very nice
and simple setup. All right. To make sure that they
are set consistent. All it is is just a value 0-1, and then it's going to be
looping back and forth again. I'm going to go back on to
the Geomet node itself, going to select a
u and core u and change the subtype
to be a factor, so minimum of zero, maximum one, going to the
same thing for the core u. That's just going to be allowing us to have a simple value 0-1, zero to one factor. And we're going to leave
di mission off for now. Now, once we start changing it, you can see that
it all goes 0-1, which is pretty nice. Let's find the color that would be more towards the
orange side, like so. I'm trying to find the color. That's going to be. The thing, the reason
that's happening, I can't go past to get more
of an orange color if I set this value to two,
or actually five. You see that we are changing this and turning this into
more orange there we go, that's a nice orange value. It is because it's giving
us the range between a hue value and core
hue value of our setup. F u, actually, we're going to change this
maximum to be five, and that's going to fix the
issue to make sure that we are grabbing the full
range just like that. All right. There we go. We're going to get ourselves. A nice variance. There we go. That's a very nice
type of a setup. I personally prefer
this to be the default. What I'm going to
do is, I'm going to grab this value for. Going to paste this in
as a default value, I'm going to just use it as one. That's going to give
us a nice setup. There we go. All right. Maybe it's a little
bit too green. Going to lower this
down a little bit. So we can just play around
with the colors actually, but I know the colors
that I had previously was it nice there we go,
something like this. Quite happy with that. Now the only thing that's left is going to be the emission, which we're going to
store it over here. Just realize the mistake
I've done is we're not actually using
this core hue as is. We're only storing the emission. We basically made
u to connect with the core hue parameters
over here to give us a range for the
shift of the color. So this time, we're
going to just use this stored name node
to get emission. Like so. This emission is
going to be a new map range. Control shift control shift D. Let me just drag it even lower. This map range is going
to be minimum from zero and maximum is going to
be from the emission itself. That's going to give
us strength control based on the parameter
that we have over here. This is going to be
going to shading, select this, and
that's going two, give us the strength over here. Let's grab the attribute value. Let's change the
name to emission, like so and attach this. Factor to strength, which is not going to give
us anything by default, I believe, because
it's set to zero. If we start dragging it up, we're going to start seeing
this type of a change, which is looking pretty good. I think, the thing is right now is The base is set
to a value of zero. We need to go back
onto geometry node and change the range to be minimum instead
of zero to be 0.3. Actually a value
of 0.5, I'd say. So. Now once we start
increasing that mission, it's going to give
us a nice brightness in the center whilst the outer sections are going to be slightly more dim,
which is very nice. A little bit too
much brightness. Let's go ahead and
lower this down to a value of something
like let's say ten. There we go. We're going to increase
the height a bit, just to make this flame. Just like that. I think the noise scale is
a little bit too, that's noise displacement scale. We need to grab the shader. T real quick to fix the
noise texture scale itself. I think it's a little bit
too small at this point. Let's go ahead and lower this down to more manageable version, something to a value
of two, I believe. There we go to get a much
nicer effect overall. Displacement now
needs to be just increased for the
displacement intensity. There you go 0.5. There we go. We're going to get
ourselves a nice motion. Maybe 0.4. Let's keep it sm. There we go. And yeah, there we go. We got ourselves a
nice flame setup, and all we need to do
is a little bit of clean up in our geometry notes. So we're going to
continue on with this in the next lesson. And then afterwards,
we're going to add
15. Geometry Node Organization and Cleanup: Expert Tips: Hello, welcome back
every room to blend the Geometry node
fire animation. In last lesson, we left
ourselves off by creating emission strength with
u and core values, and we have ourselves
a nice fire setup. Now we're going to continue on, and before getting into
the effects themselves, we're going to
clean up everything in regards to the
fire node itself. So before we get right into it, I'd like to firstly minimize
all of the group inputs. Instead of just doing it like this by clicking
on the arrow, what we can do instead is click Control and H. Control and H will hide everything
that's not being used. In this case, everything
that's not being used is pretty much everything
except for layer count. And the thing is, if we are to use something
like this over here, clicking Control
and H, it's going to keep most of the
stuff except for, again, the things that
are being active, if we want to unhide it, in certain cases
where we want to unhide things and reuse
the same group input, we can click Control H again, and that's going to
unhide everything. Bear in mind that
whenever we are working with
additional parameters, whenever we are adding
additional parameters, this list is going
to start expanding. So what I mean by that
is if I were to click on a plus symbol after I hide everything over here
in a group input, notice that it
appears over here, so just adds everything even though the list
has been hidden. In which case, you need to
click Control H again a couple of times in order to unhide and then
hide it again, and that's going to fix it. So that's pretty much it
in regards to the setup. And let's go ahead and look in regards to
these setups over here. So we have a lot of values
in regards to the map range. We can actually hide
them away a little bit, minimize the map range by
clicking on the ros over here. I think that's going to be a lot better for us, just like that. In regards to the
e value over here, we can see that there's a
bunch of lines going over making a sort of a noodle
section over here for us. So what I personally
recommend you do is find those
free lines over here that go all to those free map ranges over here.
These free lines. And what we can do is
whilst holding shift, we can drag our
right mouse button across those free
lines just like that, you'll see there's a jaggered line that's going to be created, and once we release our
right mouse button, it's going to create this re
route socket node over here. Which we can use to
move things around. So it basically combines all of those free lines
into one line and then uses this point over here to get them around, basically. So what I'm going to do
is, I'm just going to move this off to the
bottom like this, and that's going to
help us in regards to cleaning a little bit up
with these values over here. O thing that we can do is we can rename this little
button over here. No button, sorry, this dot over here by selecting
it and clicking F two, and that will allow us to
node to label this node. In this case, I'm just going
to call this I over here, and we can see what kind of
value this is giving us. So that's quite useful, and we can pretty much do the same thing for the rest of the items, although
for this case. Let me check this real quick. I was just checking if this line is going
through that mission, which seems to be the case. We need to slightly
clean up in regards to some of those
values over here. So everything is going
through one another, and it's not really
good visually looking when we
want to understand what's going on with the setup. So in that case, I recommend you holding shift and just dragging across one
of those lines. Oh, sorry, we drag
it across two lines. If we only drag it
across one line, we're going to get
that same dot, which will allow us to move the things around, in this case. We can just move it
slightly like this, and I'm going to do one
at the top as well. We have both them selected,
we can click S X zero, and that's going to horizontally
squish everything down, making this perfectly
straight line. Then I can select this and click G Y to move it
upwards like this. So X in regards to
moving it around. If you use GX, that's going to make
it move horizontally. If you click G Y, it's going
to move it vertically. So that's quite
useful no in order to just reorganize
things a little bit. All right. So this
was a lier count, which I believe we can
simply combine them all. If you don't like the
buttons over here. To read art nodes. What you can do is you can just simply go and reattach it, holding control, reattach it back to original value, L Stow. And then afterwards,
you can just delete them just like that. In this case, I think, I'm going to grab all four of those, just like that
because it's one and the same type of a line and just slightly clean this up in regards to making them a
little bit more vertical. Just like that. It'll
be a little bit more obvious what is going
on with these lines. Just like that. All right. Then in regards to all of
these lines going over here, what we can do is we can just do that same type of a setup in order to help us out
with cleaning up the lines, just like that. And I'm going to select, I'm going to select both
of them like so. Click S X zero, just to make sure it's straight. And I'm going to grab a
couple of lines over here. Make sure I straighten knees up. There we go S X zero, this process is a bit
tedious at times. But when we are working
with more complexity, we're adding more items, it's really useful to actually
clean it up a little bit. For example, this one over here, this i value is going all the way across.
We don't want this. We want to make sure that
we re route this line. I think that's all
right. And maybe this green line over here should be slightly straightened
up like this. It's going to be a
little bit better. When zooming out,
we then starting to see what exactly is going on. This can be hidden away, put underneath, even though
this is crossing the lines. By just having this underneath, we know that it's actually
being used up like this, and we can just put
this on the top, or actually sorry this one is going to be going on
the side since it's an output like so
check in final lines. And yeah, this is all right. The thing that we could
do is, for example, for this one over here, all
these group input lines. We could actually just
grab a group input, a separate one and just
place it over here, so it wouldn't get in our way. But certain parts,
like, for example, it comes out from MP
range and whatnot, and I really wouldn't
want to mess them up. So I'm going to keep them as is actually going to move
this upwards a little bit. So these two because
they are being used by the It's going to be more
visible on what they're doing. All right. I think
that's better. Now we can go into this
group node over here, which we had MI set up, and let's see what we're
doing with this one. So yeah, that's fine. All right. I'm just going to slightly
tweak them up a little bit, just like we did previously, going to click S zero, scale this up, and
leave it as this. This part over here, I'm not quite keen about it as it has a lot of parts that
are actually overlapping. This seems to be
all right. We can then after we're done with the re route nodes and
all of their connections, which can be even simplified
a little bit more. I would say something like this. There we go. Alright,
that much better. Once we have
everything like this, we can even move it
around a little bit more in regards to what each
part of this does. So for example, this
part on the top, we know that it
goes into radius. So we know that this is going
to be the shape of a plane. We can go ahead and select
this, and then afterwards, we can click Control and J, which is going to create
this sort of a box. This box will allow us to
just select the box itself, click G and just move
everything within it. If we want to move anything
outside of this box, which as you can see, you can, you would need
to click Control and P or sorry Alton P. And that's going to split
it off from the box. If you want to put
it back in a box, all you need to do is just
drag it into the box, and then it's going to join it automatically, just like that. And then afterwards, we can even add some comments onto it.
You can select the box. We can click F two, and we
can rename this as shape. Or yeah, I can call
this shape, so. Then afterwards, this
is quite a best. I'm going to get this
range to be minimized. We don't need it to be this big. Everything else seems
to be all right. I'm going to grab
these parts over here. This is what's
controlling the speed. We can grab these
parts just like that, and select all of them. I will go ahead and
select them all. Then I'm going to
actually move them a little bit to the
side to the bottom. I'm going to click Control
J to connect them all, and I'm going to call this what's it called
noise animation. That's what it is. Then
we need to fix it up real quick in regards to the
offsets, just like that. So. Yeah, that's going to
work much better overall. I think I can actually
just leave it like this. Going to select
that zero, sorry. Going to select
these both thoughts. There we go, S, there we go. Let's see if everything
is just in a logical way. Everything is nicely set up. This part over here, I'd like
to ideally move it upwards, which I think I'm
going to do by opening some of the space,
just like that. L I'm going to go ahead and quickly
check please do. I'm going to select this, this is going to
be curve to mesh, just going to go ahead
and select all Control J. All this curve to
mesh, es like that. Set position, the position
is going to be offset, which we might as well add it onto our box over here actually. And this is going to be a UV, so it's going to
be quite obvious. The rest is okay. All right. So I'm quite
happy with this result. I took us a little bit, but
we got there in the end. And now if we were to use this
fire ship geography note, ome note again, this group, it's going to already be
nicely cleaned up for us. So yeah, thank you so
much for watching, and I will be seeing
you in a bit.
16. Transforming Geometry Fire to Smoke: Efficient Workflow: Hello, welcome back everyone to Blender Jump node
fire animation, in which we left ourselves off by cleaning up the Jump
node a little bit. Now we're going to continue
on with the setup, and we're going to make
some smoke for this fire. So, for us to do that, we'll firstly just go ahead and delete the thing at the
top. We don't really need it. The reason being is that
we have this cleaned up, and we can just simply reuse
this as part of the smoke. Before doing that, we
should create ourselves new parameters for
the smoke itself. We're going to start off by
creating new item, new input, and we're going to just
change this to a string, which will allow us to in a
way have this as a label. If we were to delete socket, the name itself, and
just keep it empty, can see that this
is just going to give us a label at
the right hand side. By default, we can
just call this smoke. And we can hover over
this bar over here. Just click backspace to
give us this default value, which is smoke, and that's going to just give us that
label over here. And whenever the setup
is being copied, it's going to always give
you the smoke a label. So what we need in
this setup is going to be pretty much identical
to what we had before. I'm going to actually
make a new label at the top as well
right underneath. L et me think for a second. The speed itself is going to be for both the smoke and fire. We might as well just
put it at the top. Then right underneath it. We're going to add a socket,
which is going to be, again, a string with no name. And that's going to say by
the fold bier just like that. So we're going to have two
labels a top at the bottom, and you can see the group inputs have these already empty, which is in a way helps us to break down the parameters
just a little bit. Okay, so we need for
the smoke itself, we need pretty much the same
setup as we have over here. So we can go ahead and
start copying everything. I'm actually going to move
this material for fire to fire section over here, and the rest seems
to be all right. Okay, so what we're going
to do is because we want to basically have similar
settings to fire. We're going to duplicate
all of those parts. Let's go ahead and
start doing that. And we don't need to change
name because we're moving everything underneath
this smoke tab. So that's going to be all right. And let's just go ahead
and do it for every single one of the parts like so, except for the hue. Going to do it a little bit
differently for the hue. And then displacement, also
needs to be set like this. The smoke itself, in
regards to the color, we are going to have a Que. Let's go ahead and
actually do that. Yeah. The way we're going to do it is, we are going to have the color, ability to switch the color. But for in regards to the, we're going to have
something else, which is going to be, if I
were to now add a new input, it's going to be grayness, so how saturated something
is and then I'm going to duplicate it because
this one is going to be called core grayness
there we go. We have all of these options
just like that. All right. So we can now duplicate
this entire setup actually. Just like that, I'm going
to move everything, sorry, the group output to the right, and everything is now going
to be going to be duplicated. For minimizing all of
these group inputs, we can simply select one of this group input and then click Control H.
Then we can hold shift and use a square
bracket or holding shift, it actually gives more
of a quickly bracket. It basically is going
to allow you to select the next group of
that same type. So holding shift,
I can either use one type of bracket or
another to go between them. And this way, we can
just click Control H a couple of times and go
for every single one, just making sure that we are hiding them away,
just like that. It's nice and simple. All right, so we're going to go ahead
and select this all. Click Shift D, move it
downwards like this. And for this part, we're going to select it all, click Control J to
make a comment box. Click F two called
this one fire. Then select the bottom one. Click Control J, F two smoke. Just like that. And then what we can do also in
order to connect both of these parts is we can use control
shift and right click. And then if we are dragging
it from one end to another in regards to set material node, we
can then release it. So Control shift
and right click, it's automatically going
to connect both of them. So this type of a line, if we were to basically drag it from one set
material to another, it's going to automatically join these with a joint ome node. So it's quite
convenient when we want to just combine the
nodes together. So in this case, we're going to unhide
everything over here, click in Control and H and just simply recombining
everything. So speed is not
necessarily resolution, is going to be needed
to be over here. The material. I realize that
it's going to be over here. We need to make sure weekly
control for this one and just reconnect it from this material at the
very lowest area. So, we get from the
smoke section over here. Basically, I'm going
to just move it back. Then we have what is it? Ayer Laycunt, I believe was
actually from over here. Let's go ahead and combine
it from here instead. So Layer count. Do I have lay
count, I might have forgot. I believe I forgot
to lay account, we might as well just
quickly pick that up. Wait to make a duplicate, track it to the
bottom over here. There we go. Lay
count, lay count, L A is good so far. Then we have the
setup over here. After the layer count, radius is going to be over here. Height is going to be Do I
forget the height as well. Let me check real quick. Radius height, it seems like I have actually
forgot the height. Let's go ahead and
fix that real quick. Height. Go after radius, and now you should be able to just repurpose this noise scale. We're going to move
this to the side, displacement scale, move the u. Move the u, like this
in regards to mission, we are going to find
this map range, then it's not going to be
emission, but the greatness. And in regards to the minimum, it's going to be core greatness. What we're essentially doing
is we're only changing the maximum map range in
regards to the setup. What a layer count. We're
also going to be adjusting the minimum count as
well, just like that. The other thing that we
need to change is going to be the store named attributes. We're going to simply call
this one Layer two, two. Doesn't seem to want to
be able to change it. Let me just go ahead and
click two and click on this plus symbol over here
to make sure we change it. But the emission, we're
going to be calling it instead grains. Over here. Yeah. We're going to call it grains or saturation
even better. It doesn't matter
actually grains up to you as it's going to just basically control the
saturation of this. We have it all connected. All we need to do
is just make sure that the material is set up, and we're going to continue on with this in the next lesson. For now, let's go
ahead and actually see if this is behaving properly. I'm going to increase this and
it is seems to be working. I'm not sure why there we go. We just need to
increase the height. And. All seems to be all right. So yeah, we're
going to work with this wide blob to
make sure that we are getting a nice type of a smoke
shade and a nice lesson. Thank you so much
for watching, and I will be seeing you in the bin.
17. Smoke Shader Material Setup: Step-by-Step Guide: Hello. Welcome back,
everyone to blend the geometry node,
fire animation. And the last lesson, we
left ourselves off by getting some starting point
for the smoke itself. We reworked some of the nodes, and now we're going
to continue on to get this onto the material. So to make make our lives
a little bit easier. We're going to grab the
material for the fire. And I'm just going to
quickly duplicate it, make a new material
using this p here, which is going to make
a duplicate out of it. Actually, Yeah, I'm sorry, I'm going to go ahead and
duplicate this sphere, so shift the G x, put
it off to the side. Then I'm going to duplicate it, so one is going to
be the original fire and the other one is going
to be the duplicate for it. This duplicate, I'm
going to call it smoke like so and we're going to attach this directly onto
this setting over here. So by default, this is
what we're going to get. The reason being is that
we have some settings. So this is already giving
us a black type of smoke. The reason being
is that we've not attach these stored
name attributes. Let's go on to shading panel, and let's work with
smoke parameters. So for Ss, let's just rename
everything that we need. I actually forgot
what we called it. So Layer two, two,
and grayness. Okay. So let's go ahead and do that. Layer two. Two. There we go. For the grayness, it's going to be
over here, grayness. That's going to be the
second one, and again, I'm going to go ahead and
check this real quick, so it had no capital letter. We need to make sure
that it also has no capital letter over
here. Just like that. I'm going to go back on to
the fire just to see if it is actually affecting
this setup, and it doesn't want to work. I'm just trying to figure
out why that is the case. The color is over here?
That's the base color. If we were to change, it is
going to affect it over here. Emission, this is going to
be by default ticked off, so that's why it wasn't
giving us any color because we're not we shouldn't be
only using the emission, which is going to
make it brighter, but it's also going to
use the base color. So I'm going to take this away. The question is, we actually
use the base color? If we are to use
the emission as is, It would be pretty
good for us in regards to the setup if we want to let's see if we want to
have it partially lit up. It's quite nice for
certain stylized scenes. Right now, let's
go ahead and just fix the color first because
that's getting in my way. So for us to do that, we're going to get this
attribute for grayness, and we're going to attach
this vector two saturation. Yeah. So this saturation, what's going to
control our setup. Let's go back on to the smoke, and let's see so greatness. If we increase this, it's
going to give us a nice value. We want this to be e zero
or one or value in between. We're going to real
quick fix that up in the geometry node
or the grainess, is going to be a
factor zero to one. There we go. Now
let's go back to shading and the
shading over here. It's going to give
us a nice control, but we want to
actually invert this. The reason being is that when it's set to zero for grayness, we want to actually
have the color. When it's set to one, we want to start removing some
of that color. So core grates should
be set as one, and there we go, it's going to help us out with in
regards to that. What we need to do now is simply make sure that we
flip this value around. So we're going to use
map. No it over here. We're going to
subtract from one, we're going to subtract this. And what this is going to do is basically going to
invert this entire value. Oh, I'm going to
click zero because I accidentally did it the wrong way in regards to attaching
it to hue, not saturation. So now when this is the
grains is set to zero, is going to do nothing, but when it starts increasing, it's actually going
to pick that up. So that's quite nice for us. I'm going to take
off the fire for now layer count just so we're
going to have any fire. I'm just going to write
in the manually there we go to see what's actually
going on with the smoke. So this is what we're getting with in regards to the smoke. We should be able to
control the core as well. We're going to make the
core grains set zero. So give us trying to see if it's actually
giving us a nice setup. I'll change the radius for this just so we can see what
is going on with the fire. Going to increase the height
a little bit. All right. To get it a little bit nicer, we're going to first of all, find the smoke back. We're going to
increase the amount within a multiplier
within the Alpha. That's going to be a
much better setup. We're going to It is not
working in a way that I want. I'm trying to figure
out what is the case. I think we might need to go back real quick
onto the geometry node. Just to quickly check
the group inputs. I'm going to make sure that
they're properly attached. For the smoke, and
I believe yeah, there we go as
what's causing it? We basically need to get
a different lay acount. Right now it's still
using fire ayercunt, which is why it's not giving us that variation that
we're looking for. Let's go ahead and
attach this to divide, control and H. Now
I'm going to go ahead and test out While we're at it, we're also going to change the core graines to be
a factor as well 0-1, since we don't need anything else in regards to the setup. Now we're going to actually, what's going on with the
layer count There you go. Let's go ahead and increase it. We're going to quite nice. The core grayness has to be
inverted for us actually. The reason we want
to invert this is because at the bottom, if we have a look at it, let me just go ahead and change
the color a little bit. Once we start increasing this, the outer layer is turning gray. But we want the opposite
effect for that. So to invert the core grayness. We're going to go
back on to shader. We're going to select the smoke and where is it there we go. The core gree it's
going to be Oh, sorry, that's I just realize there is a mistake
over here as well. Attribute, we need to make sure that this is also
used in layer two. And that's going to
give us right set. Now, in regards to what
I was talking before, all the core here. Let me just go ahead and
check it up real quick. That's going to be core grates, just the grates itself. Yeah, we need to change it
within the geometry node. Core gratess is going to
be a parameter over here. That's going to
be minus a minus. Yeah, we're going to just
switch them over, basically. The reason being is
that this is going to give us an inverted value. Inverted value will
allow us to if we go to shading again to see.
It's hard to see now. The reason being is
that we need to fix up or is it Alpha over here? Alpha over here can be
increased quite a little bit. And I'm just looking
where that would be. I'm going to change
up to here as well. Just to make sure we're
seeing something at least. For this, we need to. There we go. We're
changing the Alpha. It's being multiplied over here. Be Fresnel. I'm trying to figure
out where exactly we're getting this
lowered Alpha. The easiest way
for us to go over it is by just going over
every single multiply. Clicking control shift and
just tapping it on the screen. I think this one is the reason. We need to slightly
increase it like so, and that's going to be Fresnel, actually, that's going
to be Layer two. Which is going to give us
based on layer set up. Now we should have ourselves
a much nicer smoke. Going to increase
this visibility as well just to
see what is going on with this. There we go. If we were to lower it down, we're going to get our
cells darker smoke. But honestly, this is set up
with a Yeah, with emission. We don't want the smoke
itself to be emission. We want it to be
base color just to make sure it doesn't
glow on its own. Once we set it up with this, we're going to change
the emission color to black and strength
set it to zero, and that's going to give
us a neutral setup. Then afterwards, we can
work with the smoke itself. So we need to get, where is it? What do we need to get? We
need to get this value over here to allow us to change
the brightness of it. I'm going to make sure we
have a setup for that, or we could just
use the grayness. We could definitely use the
grayness if we were to just plug in the greatness
for its value, not only will it just
simply use the saturation. We're also going to
start darkening it down, which is going to be quite
nice actually for us. Something like this. It's
going to work quite nice. The layer count should be set to something like two, radius, a little bit
increased, and we need to unclench the topper section. Actually, layer,
we can increase it all the way to four, double it. Like this. We're
going to need to tweak the color itself just a little bit more
in regards to the setup. We need to make
sure that it's not just giving us the base color, which is not actually
previewing me setup. There we go. For stars, we're going to change this mixer from
multiply to an overlay. This will allow it to be
the brighter colors to be brighter and darker
colors to be darker, giving us more variation
overall like this. Scale needs to be a little
bit higher up as well. Lower down and change it to 1.5. There we go. Now if we enable the lay
count for the fire, we should get
ourselves a nice set up for the smoke.
Something like this. The only control that we need to also set up is going to be the pastic control and the brightness for
the smoke itself, a couple of additional options, just to make sure that we
have that extra control, which we're going to
talk a little bit in regards to that in
the next lesson. Thank you so much for and I
will be seeing you in a bit.
18. Smoke Shape and Shader Fine-Tuning: Optimization Strategies: Hello, welcome back
everyone to blend the geometry node pi animation. In the last lesson,
we left ourselves off with a nice set
up for the smoke, which we have controls for the, and we can switch up the
color tint a little bit. We can change up how the
inside is going to look like, for example, to get
it a nicer shift. So the only thing now
that we need to do is we need to make sure that we set it up
with the brightness control. As well as the
opacity, the Alpha. We could actually control how much of the smoke we
wanted to be visible. For that, I'm going to real
quick go on to geometry node. Go to make a duplicate, a couple of duplicates actually duplicates out of the
store name attribute. This, the first one is going
to be called brightness. I'm going to just
use non capital. The second one is
going to be called opacity, just like that. Then we're going to get
ourselves new group input. It going to move it
off to the side. L so. Going to click
input a couple of times. This one is going
to be brightness. And this one is going
to be called a pase. Just like that, we're
going to comnect these two points,
brightness over here. And opacity over here as
well, just like that. We might as well make
this minimum to be zero for both of them, like that. We can make default value
set to one for both, and if we were to
go now to shading, select the smoke that we
have, we can set them up. Alpha, if we were to make never attribute over
here, call opacity, and use this with a multiplier value lake It's going to allow us
to once this loads up, give it a second to load
it up. There we go. It's going to give us the
control to increase capacity, how much we want for the smoke. It's a really nice type of touch for the controls of
the smoke itself. The other section if I was to find it was for the
control of the brightness, and that's going to be in this section over here
for the value itself. We connected it
to the greenness, which it works in a way, but at the same time, it's not giving us that nice control. I reckon we should
just set it up as its own value. That's
why we're doing this. Let's go back on to the
smoke, grab the attribute. This one, can we
call brightness? And just straightway, attach
to the value over here. Once we attach the value, we can go back to the
smoke and within here, we should be able to
control the brightness, which is not being controlled. So I'm just wondering
what's happening over here. Let's go ahead and
quickly check. The value for the
brightness, by default. If it's set to one.
Let's see what happens. I might have just
misspelled this. Does seem to work. I'm not sure. Does seem to work, but I'm not sure why it's not working over here
with attribute. Let me just go ahead and check the geometry node
itself for the fire. If it's properly
storing the value. I'm just going to go
ahead and just copy this. I misspelled it over
here. Brightness. There we go. That seems seems to not
want to There we go. Brightness. Let's go ahead and
just use it in a shader. Over here, brightness. I'm going to just paste it in. Control C control always
helps with the human errors. Let's go ahead and add this
onto the value over here. Now finally, we'll be able
to control the brightness. There we go. So we can make it whichever
way we want it still has some variants with the core
and outer core layers, but it gives us a nice control. The other thing that we
need to do is going to be, if you remember correctly, back in our previous
lessons at the very start, pire shape had an
option within it. Once we had a look over
here, for multiply. This will allow us
to change the shape. We can have a very bizarre looking tornado if we so desire. But honestly, all we
need to do is just have a control coming from the
group input over here. I'm going to make a
duplicate over here. Just going to
attach an empty dot onto the value just like that. It's going to give
us a new value. This value should be by
the fold set to one, and we can just call
this shape like this. I think that's all
right. We can just leave it as is, we can hit tab. And now we should have, as you can see over
here in a group, we can have in a
shape parameter. We don't really need
to have the shape to control the shape from within
the geometry node itself. I personally never do that because we still
have the radius. Even if we were to
change the shape over here to change the smoke, we're still going to be able to change the radius overall. So we're just changing the base, the way the curve interacts
with the original shape. Honestly, we don't really need this to be anything else
in regards to that. I'm going to change
it to 0.75 to have an open top and it's already
looking much, much better. We might even lower the
amount of count to three, increase capacity
just a little bit. And yeah, it's
looking quite good. The only thing I would
say that we should change is the fact that we also need to lower the opacity at the very bottom of
this smoke over here. We don't need this to be
having any smoke impact. So let's go ahead and do that. We're going to go
on to the shading. Go back to the smoke, and let's find where we had
the factor in the setup. I believe it was over here. Let me just go ahead and
check it out real quick. Yes, I believe
that was the case. So what I'm going
to do is Actually, I'm just check in real quick
if that's the section. Now, that's only for
the core. I see. The core itself should
have a little bit less in regards to the opacity
just a little bit like so. Then the presnl is over
here and factor over here. We're using the factor to change the opacity for
the overall layer. By dragging this,
we can see that the upper section starts
to disappear from the top. We don't want this.
We want to make sure that the bottom
starts disappearing. What we can do is we
can just select this plus over here and
click plus symbol. Sorry, we can select this arrow over here and click
the plus symbol. So then drag this
to the up side, just like that, and I'm going to change the color for this to
be black, completely black. So you can see the very bottom is going to have this
part disappeared, just like I think that makes smoke look quite
a bit nicer actually. But I'm going to increase it just
by a little bit. I'm going to select this again. I'm going to click
on the plus symbol, and I'm going to change this to white so to have more control with the way it eases
off to this section. Something like this
just needs to be a little bit, that's fine. All right. Now I'd like to, I think I'm going to
lower the radius by a little bit like so. And the height, just
going to lower this a little bit as well.
Just like that. I will just brighten
this down a little bit, to make it darker. There we go. Actually, quick set
up at the very start. We did say that we want this to be, there we go over here. We did say we want to
be slightly adjusted, but we might need to
do it a bit more. There we go something
like this because I didn't like the
part in the middle, giving us a very bizarre
type of a shape. Something like this
might be quite nice actually if we now increase capacity overall just a little bit and low
with the radius. There we go. Yeah, I'm quite
happy with this result. The only thing that we need
to do now is real quick. We need to change the
geometry node, bulions. We need to make sure we are able to enable the disabled fire. So for that, we're going to
go onto the geometry node. We're going to go
onto the inface. Click input, change
this to a bleion, which is an off or on switch. Basically, we've
not used it yet. We're going to double click
on it, call it enable. By default is going to
be enabled, like so. Then when the geometry
just before it joins in, we're going to make a couple
of switches actually, so we're going to make a
duplicate out of this enable. I'm going to put one at the very top right where
the smoke has the title. Where the fire has the title and where the smoke has
the title there we go. No, that's another section make sue to move where
the smoke is there we go. One p smoke and one p five. Now we're going to add a switch. This will allow us
to grab a setup, and if it's true, it's going to enable be enabled, it's going to be on. If it's false, it's just
not going to do anything, and the opposite should be the case for the switch
over here for the smoke. Switch over here. If it's True. I'm just trying to figure out
what's going on over here. I'm going to click
Control and He and see this one over here, enable, if it's true, it's going to be
giving us a setup. There we go. Both of
them are enabled. It's going to give
us a nice setup, and if we want, let me just see. There we go. Both of them enabled,
it's going to give us the setup if the smoke
or fire is disabled. It's going to disable the both. Okay, so yeah, that's
pretty much it. We rushed it at the
end with the switches, but hopefully that made sense
in regards to the setup. It's actually quite
simple. If it's true, it's going to add in
this entire setup. If it's false, it's not
going to do anything and just add an empty
slot onto joint geometry, which is then going to
give us the group output. So that's going to
be from this lesson. Thank you so much for watching, and I will be seeing
you in a bit. A
19. Particle Generation with Simulation Zones: Advanced Techniques: And, welcome back
everyone to Blend the German node fire animation, in which we left ourselves
off with a nice fire setup, which now has a bit of a smoke. And it's looking pretty nice, but we're still missing that extra bit in regards
to the animation, and that is going to be amber. So what I mean by that is we
want some of that animation. We're basically of pieces flying out from the fire itself. We're going to make use
out of the particle setup. So for us to do that, we need to set ourselves up with
certain parameters. So at the very bottom, actually, within the
interface itself, at the very bottom,
we're going to make sure that we set ourselves
up with a string. Let's go ahead and just
select the bottom piece. So whenever we click
a plus symbol input, it's going to create
it at the bottom. So now we can go ahead
and select integer. Sorry, not integer
string. There we go. We're going to keep this empty, and we're going to call this. Particles within a default. So articles, so. Let's go ahead and hit back
space at the very bottom of this to get a new tab over here. Then we'll need a
bunch of materials, so no materials, a
bunch of parameters. Let's go ahead and
create a new one. This one is going
to be a material. Over here, we can just
change the name to be terial like so. Afterwards, we'll need a new one and we are going
to duplicate this. We might as well create all
of the parameters right away, so we can just start
working with them. Well let's see. Six, seven and total. So let's go ahead and
duplicate this six more times. One, two, three, four, five, six. There we go. We got our cells.
Seven in total. The first one is going
to be control the scale, which is going to be just shaping how big those
particles are going to be. The second one is going
to be scale randomness, which is going to affect the
variance in the particles. And we're going to go
work with density. Density, how many are
spawning, afterwards, lifetime, how long they're going to be staying for and
lifetime randomness. Again, for variation. Then we'll want to make sure we have
control for the color. So Hue and how bright they're
going to be emission. And that's all the
settings that we're going to need. All right. We're now going to start by
creating ourselves something called simulation zone.
Let's go ahead and do that. By clicking shift in A, we can search for simulation zone. This little guy over here. This is going to be
based on the time. We can select them both
actually and click S to expand this entire section
just so we could have our work space
in a middle so. We will want every frame
to spawn new geometry, so let's go ahead and add
something join geometry. So we're going to
be adding onto it. Then we'll want to be
displacing the points. Let's go ahead and add points, and we'll be able to
displace the positions. That's not where I
want to place it. Let me just go ahead
and click control Z. I'll want to basically add
it onto joint geometry. And now we can just get a
random value for the position. And we're going to change this random
value to be a vector, which will give us a free
x y z values basically. We're going to then right
away add this two position. We're then going to Yeah, we're going to
basically just add this onto our joint
geometry over here. So when the stimulation
is running, we're going to just quickly
hold control shift. Add this to. I'm able to see it. There we go. And this
to join geometry. Or we could just simply
drag this out like so, might as well make our
lives a little bit easier, not just have too many
join geometry setups. I'm just going to make this
be over here, just like that. So we're just joining
geometry from the simulation. Now when we hit play, we should be able
to see some points. Just wondering where they are. Let's go ahead and increase the count real quick just
to see where they are. If we want to see those points, all we need to do is
just go on there we go. We can just go onto the y frame and it'll
be easier to see. We can see a bunch of
points pointing over here. If we want to offset them, we can get ourselves
set position. So just place it after the
geometry is being added. Now if I was to
put this like 0.1, we should have them when
we click play going upwards so there we go. The first thing that you're
going to notice is that every time it's creating
those random points, although we are
using random value, they're going to be giving
us the same exact pattern. So we need to make sure we
are adjusting the seed, and we're going to do that using simple scene time as a
just seed randomizer. If we were to add
the frame as a seed. Now when we hit play,
it's going to give us a much more randomized
pattern, just like that. We now want to essentially grab a spawn point as a sphere. We're going to make a sphere right in the middle
of where the fire is. The radius of that
sphere is going to be controlled by the fire itself. So we'll need to
make sure we set that up before we're
spotting the particles. We're going to do so by
grabbing a simple UV sphere. The resolution of the
sphere doesn't really matter because we're going to be just using it as a saw point. The radius for this
has to be from group input from the
radius of or fire. Like so, I'm just going to
go ahead and attach this. I'm going to kick control
H to hide this away. We're now going to just detach the points for now and
attach the sphere, see what it gives
us, and it should. Or actually, we can just preview it control shift, just
happing on a sphere. There we go. That's
what we're getting. We want this sphere
instead of it being spawn in the
center point over here. We want it to be
spawn on the top of where the fire is
essentially over here. So we're going to make sure
we need to offset this first. The easiest way for us
to do that because we're using the radius of the fire. We can just offset it
by the radius as well. So if we look at
transform geometry, we can make use out of this. Two, if I wish to move
these points downwards. Now, we can make use of this in order to offset
the translation. We're going to grab ourselves a combined x y z to
the translation, and we're going to
offset it by the radius. Now, when we click on this, we see that it's going to be nicely positioned at the top, which is very nice for us. Now we're going to turn
this entire sphere into a volume which will then allow us to spawn the
points within that volume. So let's go ahead and do that. We're going to get
ourselves mesh to volume. There we go, mesh to volume. No over here. We can
leave this by default. If we were to click control
shift and stop on this, we can see that this is
what is giving us like so. The thing that we need
to do now is going to be distributing this
along the volume point. Distribute distribute
distribute points in volume. There we go. That's
what we're looking for. Once we have it like this, We can actually preview it. So I'm going to click
control shift and see that this is what we're getting
can increase the density, and you can see that
that's how it's going to look if we change
the radius of the fire. It's going to be
smaller or bigger, and it's going to adjust based
on the scale of the fire. So that's pretty nice for us. The density itself
can be controlled with the density group input, and it's going to be all the
bottom density over here. Let's go ahead and
attach it to the density of distribution
points like this. We're not going to
simply reuse what we had previously with this basic
setup and add it over here. In this case, the
seat is already set for us in regards
to the spam points. If I wish just to
look at the setup. Should, or let me just
increase the density over here actually because we
have it set zero at point. At this point, I'm going
to set it to ten for now and see that this
is what we're getting. If we were to change the seed, going to have
different pond points. So all we need to do is just use that same
previous set up for the seed scene time and
just use frames as a seed. And that's going to give us
this nice type over set. Then afterwards,
we pretty much go ourselves a nice point setup.
We don't really need this. We already made use out of a randomizer using
this sd over here. So we can just go ahead and
actually just delete this. And afterwards, we're
going to add this as a geometry on to join
geometry over here. And because this has that position offset,
when we click play, we're going to have this nice type particle cluster
going upwards. So it's already looking
kind of like amber as is, but we need to work on
it a little bit more. We're going to continue on with this in the next lesson, though, thank you so much for watching, and I will be seeing
you in a bit.
20. Organic Particle Velocity: Fine-Tuning Dynamics: Hello, welcome back.
Everyone to Blend the German node Fire animation. I last lesson, we left
ourselves off with some points that we're going to use as
particles for the fire. We're now going to
make sure that we started off with just
making sure that the speed for the animation is right in regards to
the particle setup. If we were to click play, we can seem a bunch of
them going upwards. I am actually going to
lower down in the density. To one just to make
sure it doesn't overwhelm our processing
power for the computer. And yeah, let's go ahead, straightaway, fix the speed. We're going to simply put it up in regards to the set position. We're going to grab our
cells combined X Y Z, as we often do, combine X Y Z, just to make sure that we get the
value for the Z. Then we're going to grab
our cells Delta time, and we're going to multiply
this. So multiply. Here. Multiply this with a
group input for this speed. So we don't need to have
multiple parameters for that. Speed over here. Now it's going to be directly
affected by the speed. We of course need to
make sure that we have it added onto
a combined x y z. Let's just simply add this
entire set up onto the value, and we should have them moving in the same speed as we
have the flame going. So that's going to be pretty
nice for us, like so. The next step that we need
to do is making sure that we have some variation
when it moves upward, so it would go in sideways a little bit as well
just to make sure it looks a little
bit more organic. So for that, we're
going to go ahead and move the set position
a little bit to the side. We're going to add, use Map vector ad
leg Then for this, we're going to use noise
texture, noise texture, which we're going to change up the color and remap its range. Otherwise it is going
to be zero to one. We want to make sure it
goes negative one to one. So it would go into
both directions instead of just going
into one direction. So map range vector over here, and we're only going to
want Basically, yeah, 0-1, we're going to
remap it onto minus one. I'm going to go ahead and use my left mouse button to
select both of them. Minus one, and to positive one, the maximum for z should be zero because we don't want this
to be affecting the Z value, and we're going to just
add it in like this. Let's go ahead and
see if it gives us the right setup to be going a
little bit off to the side. And There we go. It's a little too much, a little bit too much for us, but we can see it
ping in the works. So for that, let's
go ahead and just scale it down, like so. And we should scale
down to value of 0.1. There we go. It looks nicer. The noise itself is a
little bit too small, so it just wibbles them
in all directions. So we're going to
change the scale to one for the noise
texture, and there we go. It starts nicely flowing in and out a really nice type
ofganic look. All right. Now we're going to
go ahead and work with speed randomization itself. Let's go ahead and do that. Which I just realized
that we've not added in here in regards
to the parameters. So real quick, I'm
just going to go ahead and do that within the setup. We'll actually just
scale randomness. I will just duplicate that to get speed randomness
there we go. Now we're going to go
all the way to the back until we get distribute
points in volume. We're then going to store the
point the data over here, so store name attribute. We can call this
one speed, like so. This way, we'll have some
information to work with, and we're going to,
essentially, just have a look. Then we're going
to grab ourselves quick random value random value from minimum minus
one, maximum one. We're going to multiply
this with speed. So let's go ahead and do that. Just going to grab a group input and grab the random value. We multiply them both. So this multiplied with
not the speed randomness. We're going to multiply
that with speed randomness, which we just created over here. Let's go ahead and
multiply those two. Then we need to make
sure that this value is being applied on two. Let me just have a look. Yeah. This value needs to be applied randomly onto each one of those particles
that we creating. That's the way we're going to do it is we're going to
grab the same time, apply it to the seed, and this is still
not going to give us the unique ID for each
one of those particles. So we're going to grab an index of each one of those
points added to the ID. This way, it's going to
truly give us the right set up for randomizing
the speed of them. We're then going to
store this value over here for the
stored name attribute. That way, now that we have the speed randomness
set up or speed, we can go ahead and simply
multiply it with the Delta T. Instead of just
using group input, we can just go ahead
and delete this. We're now going to
be able to grab ourselves an attribute name
attribute. There we go. This is going to be speed, just like that as an attribute. There we go. That's what
we're going to get. And Let me just have a look. Right now it's not
going upwards. We're not going to see anything. The reason being is that
the speed right now, the speed randomness
is set to zero. Let's go ahead and set this
to something like ten, just to get an extreme value and once this timeline resets, we should be able to see
that some particles, they're moving upwards, but they're not moving upwards to. Let me just go
ahead and change to one, see if this works. I'm just wondering if the
speed itself is set properly. So at the very top speed, let's go ahead and
changes to one and see if this behaves properly.
Doesn't seem to want to work. In this case, let me
just go ahead and see, for some reason, it didn't pat in the speed attribute name. Let me just go ahead and
click Enter, and there we go. It's now going to
give us proper setup, and it's going to be
moving up and down. The reason being is that yeah, it's moving up and
down because we've not added the speed
parameter itself. So that's the issue on my end. Right now, we're
just randomizing, it's purely going the speed purely going on
the random values. We want to make sure we add the randomized setup onto the
speed group input itself. So let's go ahead and do that. I'm going to quickly add
use Math ad over here. Just simply find speed
that we're going to add. So now the proper speed
value is going to be added, and this will give us the
right result. There you go. Some of them are
moving upwards faster, some of them moving upwards slower based on the
speed parameter, which is then going to be added with the speed random value. So that's looking really great. And just a quick test, let's go ahead and
just lower down the speed randomness
to something like 0.1. So all of them are going to
be moving in the same setup. If we set this to ten,
We're going to get, way too much an extreme value. Let's go ahead and set this
to something like free. Then it's going to
give us there we go. Some of them are
still going to be moving downwards
because of the extreme. If we set this to two, let's just go ahead
and see. There we go. Some of them are
lingering around. Some of them are
going up so fast. So this is clear a
little bit too much. We can set this to
a value of 0.5, and I think that's going
to be more than enough. There we go. Alright, so that's looking
pretty good for us. So I think that's
going to be it in regards to randomizing
some values. We're going to continue on with the lifetime in this case, making sure that they start disappearing exactly
when we want. We're going to do that
in the next lesson. So thank you so
much for watching, and I will be seeing
you in a bit.
21. Particle Lifetime and Scale Randomization: Pro Tips: Hello and welcome
back everyone to Blend the Jome to
notifier animation. In last lesson, we
left ourselves off by making some of those particles
to look more organic. They're still set
as point tough, and we're going to
continue on working, implementing a little bit more of detail and depth into them, we're going to do so by
getting lifetime set up. And what I mean by
that is if we were to just move everything a
little bit more to a side, we're going to store
some information. We're going to grab,
store name attribute. A couple of them, actually. One is going to be set
for the starting point, and another one is going to
be set for the endpoint. So for that, going to
call this one start, like so, and the second one. So this is how it's
going to be. The start. It's going to just grab the
scene time and it's going to indicate when it starts in
regards to the seconds. The end point is going to be
pretty much the same except. We're going to add Math ad. We're going to add the lifetime. So let's go ahead and
just grab a group input, find ourselves the lifetime. There we go, and we're going to grab it and add it
directly onto the stuff. So it's going to be the same
time plus the group input. All right, let's
go ahead and just add this in to the end. Then let's not forget
the speed sorry, lifetime randomness as well. We're actually going to do
something a bit cheeky, and we're going to
grab random value over here that already has
index and same time set up. We're just going to instead
of speed randomness, we're going to change this
to a lifetime randomness. Let's go ahead and grab
those nodes just like that. We then going to
add the randomness, multiply it with the
lifetime over here. And I'm going to just move
this a little bit to the side. There we go. And we're going to now add this onto the value. So yeah, we're just adding a random value just like
that for the lifetime. Now let's go ahead and
make use out of it. If at the end, we don't have anything, it's just going to continue
on spawning until we just refresh the frame rate for the playback until it
goes back to zero, which it might look like
it just deletes itself, but if we start adding more
of the frames for, like, rendering and whatnot,
I just continues on spawning in those
points non stop. We need to make sure we add
a node for deleting them, so let's go ahead and
delete geometry over here. In regards to the selection, we're going to essentially say, we're going to grab name
attribute for the end. The one that we just named it
over here for the lifetime, then we're going to say that if this is less than
the scene time, then we're going to delete
that particle that point. So let's say that we have
the lifetime of 9 seconds. If the scene is past nine, if it's like 10 seconds, it's going to select that
and delete it as a geometry. Now if we hit play, it's not going to do anything. The reason being is
that the lifetime needs to be set to a value
at the very least. Let's go ahead and
set this to one and see how this works.
And there we go. Everything is being spawned. Maybe five is a little bit too much just so we could
actually see what's going on and set it to
two, and we should. There we go. They're all being spawned and
then they start disappearing after 2
seconds and randomness. If we set it to a
value of one for now, we're going to start seeing
them randomly disappearing, so they're not just going to
be disappearing at one area. So, that's quite nice. All right. Now we're going to work on the
scaling for them as well. We're actually let's just go ahead and make our
lives a little bit easier. We're going to find the
lifetime and lifetime randomness or actually speed and speed randomness over here. Let's go ahead and
just copy this, set up just like that. Put it over here, and
I'm going to move everything off onto the
side just like that. Because this time, we need
to grab ourselves the scale. Let's see. We have scale
and scale randomness. We're going to instead
of just having speed and speed randomness, we're going to change those up to scale and scale randomness. So where speed was, we're going to change the scale, and where speed randomness was, We're going to change it to
scale randomness and this. Let me just have a
look. This will. Yeah, this will give
us the right setup. All we need to do now
is just store this in. We're now going to store
another attribute. This time it's going
to be called scale. Let's go ahead and add it in. Just like that. So we're
storing the scale value. Where should we use it?
Well, we should probably use it after just see real quick. After we join geometry, we should just scale
it up over here. We can do set point radius, point radius, right
after we join them all together over here. Us itself, we can just do named attribute and call this scale. There we go, attribute to scale, and let's go ahead and
change the scale over here, set it 21, and let's see if it actually
works for starters. So this should give us some points. Oh,
that's way too big. Let's go ahead and change
it 2.1, and there we go, starts 0.1, and
we're also going to change this scale randomness
to be, let's say 0.05. So it should give us a
bit more randomness. Or maybe, maybe I'm just going to change the
scale randoms to one. That's way too big. Let's go
ahead and change this 2.5, and see if this
is going to work. So we can see that
it is working. Yeah, this is way too big 0.1
as well. Probably we'll do. I'm just wondering
just having a look real quick if those
points are not too big, and they are too big, honestly, but let's go ahead before
actually fixing up the scale. Let's go ahead and turn these
points into an actual mesh. If we were to go to
material preview, we'll notice that we don't see anything because they're
just simple points. We're going to make use out
of these points in order to spawn our setup in order
to spawn the mesh. Yeah, the way we're going
to do it is we're going to spawn instance on
points on points. We're going to put it
after the simulation, so we're just pawning mesh where the exact location
is of these points. And for the instance, we
can just use UV sphere. UV sphere. So, this
should be really small. Otherwise. They're going to
have a lot of resolution because those
ambers are going to be tiny and they're going
to be many of them. We really don't want to
impact performance in regards to our engine in
regards to blender. So what we're going
to do is we're going to lower this
down by quite a lot, we're going to change
the segments to eight and rings to four. And that's going to give us a nice spherical setup with a
minimal amount of topology. Regards to the scale itself, we're going to now just
grab a radius radius, we're just going to grab the
information of the point, and we're going to just
apply it as a scale. And that's what
we're going to get. Now we can go ahead and set it up with a normal
size, I suppose. Let's go ahead and
just try 0.03. If it's still a
little bit too big, I'm going to go onto the material mode now to
see how it looks like. And, this is a
little bit too big. Let's go ahead and
low this to 0.01. Perhaps this is
going to be better. Going to change the
scale redness to zero, so we could actually
see what it looks like. And this is too
small, way too small. All right. Let's change
this to 0.03. There we go. Nice pieces, nice sits, going to change to 0.01. And this is too much. I reckon. 05, putting it in half. I think. Honestly, I
quite like the setup. So yeah, it's quite nice. I would say that the lifetime
is a little bit too much. Let me just go ahead
and lower this down. So Lifetime, we could set it to one lifetime randomness, 0.5. I think that's going
to be quite all right. Let's remember that we also have a random speed
applied onto them, so it's not going to just
end at the very top, even if we are zero or
four lifetime randomness, but it still helps us to make it a little bit
more organic looking. Alright, so we're pretty much set with the
measures now we need to work on actually
turning them into ambers. And we're going to continue on with this in the next lesson. Thank you so much for watching, and I will be seeing
you in a bit.
22. Organic Particle Scaling: Graph-Based Approach: Hello, welcome back.
I wrote to blend the geometry node
fire animation. In the last lesson,
we left ourselves off by setting up the radius, setting up some mesh for
this type of particles. And we're still not quite
done in regards to that. We have a couple of
things to take care of that's going to be in
regards to the scaling. And before doing that, I also forgot one more tiny
detail that we need to turn these into an actual mesh. So we need to just simply add realized instances to make sure that each individual one of these parts are set as meshes, which is going to
help us with in regards to shading afterwards. But let's not worry about
the shading es yet. Because what I want to do is, I want to make sure that these particles that we
have over here, they start off a
little bit smaller, then they are a bit larger, and they turn small again. So if we think on a
scale as a graph, we'd have something like this. We'd start a bit smaller, then go up, and then we
get them small again. So this is like, let's say, time, and this would be scale. And The reason we
don't want to start this off at the very bottom
is because these ambers, when you think about
them being created in real life or just even
in a style I've seen. They have that popping effect. Each fire would have a sound effect that just
how should I put it? We just have cracking
sound, crackling sound. That crackling sound would
come from ambers just being bursted open basically and
carrying on that heat. So they just at the very start, they'd be almost instantaneous. They wouldn't just
slowly appear. They would just slightly pop off from the fuel
source, let's say. And so for us to imitate that, we're going to start them
off not completely at zero, but we're going
to start them off in this section over here. Then they're going to
turn bigger over here. And as the heat dissipates as they are burning
up at the very top, they're going to be,
much smaller over here. So they're going to
just turn into, like, smaller pieces, if
that makes sense. And with all that said and done, we're going to now go
ahead and actually set this up within our system. So let's go ahead and do that. We will want to go into where
we had the scale set up. So in this area over here, where we had the radius, before adding the radius, we're going to grab a map range. And for the map range,
we're going to grab ourselves the time that we
have this particle created. So same time, that as
a value in seconds. And then if you
remember previously, we had ourselves see start and end stored
name attributes. So we're going to now make
use out of them in order to change the route, change the range or this value to be saying that where the particle starts
and where it ends, and then we're going
to make use of that to change the
scale for that. And let's go ahead and do that. We're going to grab
ourselves name attribute. We're going to find start. So then we're going to find end. We're going to connect
from minimum to maximum, just like that from
minimum from maximum, and this is going
to detect again, the value and turn it
into zero to one value, essentially giving us a nice
used for a float curve. So we're going to attach it
to the float curve value. This is going to give us this. If we were to directly
use this with our scale, we can actually
see what happens. Let me show you. We'll just simply multiply these
two values like so, then attach it directly onto
the radius, just like that. Now when we hit play, we should see that
they start off tiny and they go larger like so. Knowing that this
actually works, we can work let me just go
ahead and see real quick. Yeah, I start smaller
and go off larger. We can change this temporarily. You want to see a little bit more clearly.
That's a little bit too much. Maybe 0.5. Just want to make sure it's on
the video itself. And this is still too much 0.1, hopefully. There we go. So They start from zero, which is the dot over
here, all the way to one. And this is going to
be quite nice to use. We can simply click on
the part in the middle, which will give us
a dot to work with. We can also hold and just drag it outside to
remove that dot. A nice and simple to use. And we're just going to recreate the graph we're talking about, so we're going to
put it at a value that's almost in the middle. The end point is going
to be set as zero, and then the middle part is
going to be set as this. But we don't want this
to be just weird curve, so we're going to set two
points over here to make sure that we have a nice
setup just like that. And I'm just wondering
Maybe I should also add another point over here just to equalize
it a little bit. This should be
ideally set to one. If we click on it, we can see
that this value over here, set to is 0.85. We need to make sure
that this top piece is going to be set to one to make sure that the scale
is set to a nice value, and that's that's how we're going to create
it just like that. Like this. One, one,
one at the top, it's going to start
with in regards to it being close to value of 0.5, 0.4 over here, and then
going to go onto a value of one and stop at the end at zero. Let's check if it works nicely. Again, we have the scale a
little bit set up higher. Just wondering if that's
going to be nice. Eight. Maybe I should lower down the
density a little bit, just to see what the
hell is going on. A little bit too much
for my eyes, wye. Let's see if this
is a nice value. So I'm just trying to
follow individual pieces. I don't like how they
appear to be honest. I want them to appear faster, so I'm going to move this bit closer to the starting point, like so now let's
go ahead and see. This is purely artistic setup, and for some reason, let me just go ahead and see. They seem to be I
think they're okay. I need to increase the
lifetime a little bit, maybe just to see
what is going on. I'm not sure why but this. I'm going to remove the point
in the middle actually. So it's not going to give
us any issues there we go. Now it's going to just
stick to the top section, and it's going to appear, and as it goes further down, they're going to
start disappearing. All right. So there we go. Now we got to cells
and nice set up. Let's go ahead and
change up the scale back to what we had previously
scale for this. Density can be set
to one lifetime, we can change to 1.5. I reckon. There we go. Net ambers. All right. I'm really happy
with this result. And now we can actually start doing some work in
regards to these particles. Thing, though, we can
notice that these are quite visible with in
regards to the topology. So we're going to
smooth them out, and we can just do set shade
smooth like this to make sure that they're not giving us each each individual
pass topology. We didn't see the
edges like this. And yeah. All right. So now in the next lesson, we're going to continue on with this with the shading
set up and whatnot. So thank you so
much for watching, and I will be seeing
you in a bit.
23. Emissive Shader Setup for Particles: Professional Techniques: Hello and welcome back
everyone to Blend the Jome note by your animation. In the last lesson,
we set ourselves up, some nice particles
going within the plane. We're now going to continue on with this in our Shader tab. And to do that, we
need to set ourselves up with the actual material. Let's go ahead and do
that. I'm going to quickly set material over here. Just like that,
we're going to get group input to grab the material from the
very bottom over here. The list is getting quite large, but we're almost
done with the setup, so there's no need
to worry about that. The material itself,
let's go ahead and create a new new sphere. We can just do it that. And, let me just go ahead and
create a new one. I'm just going to move it off to the side,
just like that. This part can be called amber. Ember. So, we're going to start off to change
the color to this. Then let's go back
on to our flame to get the ember set up there. We have the basics of it done. Let's go onto the shading
table now and start working with this
ember over here. Time, we don't really need
to use principle BSF. All we need to do is just
simply use emission. It's a much simpler shade. It will just allow us to get a color without any
shadows or any shading, anything of the sort,
and that's not going to be impacted by the light
because such small particles, we don't really
need principle BSF. We're going to directly connect this to the
surface instead. And you can see that this
is what we're going to get a default lit
type of a set up. If we were to change the
color, we can see that we're actually just getting a
real nice basic emission. So we're going to make
use of attribute. Attribute over like this. And the hue that we're
going to need is, let me just go ahead
and check that real quick because we did
ended up creating it. So hue is going to be
over here. Then emission. Yeah, let's go ahead and
just make use of that. Because it's only being
used once in the setup. I was worried that it's going to have the same hue as over here. But we should be right. Let's go ahead and
just type in hue or actually just
want to check if y, u and emission over here. But we cannot put them in as direct parameters
because we need to store them in as values. Let's go ahead and do
that actually real quick. Going back to geometry node, before we set the material, we don't really need
this part over here. We can just move it a
little bit to the side, and we can store a couple
of name attributes. One is for. Another
one is for emission. So then this is going
to be group input, just like that for
at the very bottom. And admission over here
as well, just like that. Just hide this out of the way, put it off to the side, and we should get
ourselves the ability to change this to Q and
emission over here. So for the emission, we can simply use the factor
over here as strength, and we should if we go back
on to the emission strength, we should be able to just
there we go, change the color. But if fault, we should
change this to three, this should give us a
nice type of a love or maybe two really
depends up to you. I still think though that the scale is a
little bit too big. I'm going to change this to
25 for the scale of the Yeah, that's going to look
nicer, actually. What I'm going to do is, I'm
going to change it to two, and I'm going to increase
the emission to four, and that's going to make it
glow really nicely like this. I'm quite happy with the set up. The only thing that
I'm worried about is. Yeah, we need to change the hue now. I think that's quite right. Let's go ahead back onto
the sphere and change this hue u saturation value. The default color is
going to be blue. Blue and green, just change
them both to the top, for a sy and color. We're going to put
this into the hue, put this into the
color, and we should get ourselves by
default a nice setup. Although we can just play
around with the value to get more nice sep of density is a bit too much
going to change this 2.5. Maybe it's a little
bit better like. I want to lower down the radius perhaps of
the fire, just a little bit. L There we go. All right. I think that's quite all right? Maybe the opacity should be
lower down for the smoke, just a little bit like so. Okay, so yeah, I'm quite
happy with this result. Now let's go and actually
save those all of these parameters
that we have for particles onto the
setup that we have. I'm going to go
back onto the Jome. Going to just
basically duplicate what we have over
here with the setup. So material, it's going
to be Ember scale, is going to be default 0.02. Minimum zero. Maximum, we can just levize
is scale randomness, minimum zero, default is
this value over here. I'm just going to go ahead
and copy it speed randomness. We can just copy this again. Minimum zero, density, 0.5, quite all right, minimum zero, Lifetime, can be this as well. Minimum zero,
lifetime randomness, minimum zero, lifetime
randomness copied. Yeah, I'm just copying each parameter from
one to another, making sure that whenever
we duplicate this, it's going to give
us the exact set up. Default is this, minimum zero, emission is going to be
four. Zero, there we go. As a quick check, we should probably do the same
for the rest just in case, making sure that we
have the same setup. So opacity, 3.53 0.5, brightness can be this as well. Core grates, would that be there we go core
grass. There we go. I'm going to actually just
make this quite a bit larger just so we can see the
entire set up a little bit. Core gratess, we got
it, the grate itself. Let's go ahead and grab
this grammar as well. C u. Let's go ahead and do that. The u. Let's paste
it in as well. There we go. Displacement itself, I think I'm going to increase the displacement strength
just a little bit. If we look at this mesh, it's just too smooth, we might as well
play around with it. So displacement
strength. There we go. Making it a little
bit more wobbly, a little bit more alive. Fun smoke, makes it look so
much nicer. So there we go. Displacement is going
to look quite nice. There you go. A noise scale. The fall seems to be all right. L count is going to be this
one over here, y count three, resolution two, height, 3.5, radius 1.8. And material should be
set default to smoke. Then enabled by default, yes. In regards to enableing it, we should do the same
thing over here as well, going to create a quick
input switch or actually, just going to go ahead
and remove this set. We're going to duplicate the
enable button over here. Put it right underneath this
blue dot, just like that. Graber cells switch. Put it before this part
over here, just like that. And now this switch can
work with the grouping, but we can just use
this part over here, and if it's true, it's going to be enabled. Just going to make sure that by default ticked on, which it is, and just going to check if ticked off, it's
going to disable it. Perfect. All right. So that's it
in regards to the setup. I'm going to check real quick, the rest real quick. Again, we're just
making sure that this setup is pretty
much the same. So emission core is set to one, is going to be
1.111, spare enough. Displacement should
be already set up, but I'm just making sure
that they did not set up, so I'm just making sure
that they are noise scale. This is set up. Just
checking. Noise scale height. I can just type it in myself, or in this case, 2.5 radius. Small tweaks like that is sometimes a little
bit more of a hassle. But once you do it,
you're done with it, and you don't really need to
worry about it when you're creating a new set
up from scratch. Resolution. We can set
it to 20. Why not? Or actually, let me check
if we can lower this down. Now, going to be the
right amount. Yeah, sure. All right. Finally,
the material? Let's see. Yes, we don't have the material for
fire. There we go. The final thing that we
should do is real quick, a small clean up. So yeah, let's do that. I'm going to just
move this whole set up if I were to select at all, so just move it downwards
a little bit so we can have more
space to work with. Then this part at the bottom. Which it controls the particles, how they're being
generated over here. That is going to be. Let me just check real quick.
Yeah, that's going to be. We can just join them in so and call this
particle generation. Then this part itself is a
particle simulation over here. Particle simulation,
just like that. Going to just clean
it up a little bit. In regards to the cleanup, I can see that this arrow over here is a little bit messy when it comes
to joining them together, so I'm just going to lick H to get these parts
slightly smaller. I think that's much
better. I just make this a little
bit straighten up. So. Map range. We can just hide
it away as well. You don't need
this entire setup. O, let's go ahead and
hide it out of the way. That file piece over here. We turn this
particles to objects, so let's go ahead and all that. Or points to object. I think that would be better. Really, doesn't matter as long as we ourselves understand
what it's doing. We're just fine. Now that we have
everything cleaned up, we have ourselves a real
nice setup, finally. We can make use out of it
and set it up for the. We're going to learn
how to do that in the next lesson, though. So thank you so
much for watching, and I will be seeing
you in a bit. Oh.
24. Practical Applications: Stylized Fireplace and Candle Optimization: Hello and welcome back we on to Blender Geometry
node, Fire Animation. In the last lesson,
we left ourselves off by completing the Geometry node, and now we can actually
make use out of it. So, I'm really excited about
this because we are going to show some applications in
regards to different scenes, different scenarios,
and whatnot. And I do have a resource pack
provided within the setup, which has three different items, a fireplace, a candle, and a more magical
torch, I would say. Let's go ahead and
make use out of our geometry node in order to apply it onto all
of these settings. So for that, We're going to in order to bring this
onto another project, all we need to do is simply
select our geometry node, hit Control C, and then we
can go on to our project, hit Control V. That's
going to bring everything that was used within
the setup itself. It's not going to bring
the sphere previews that we had for the Chads, but everything that is
using this geometry node, including all the
shades and whatnot, are still going to be brought
up with this setting. And we could create now that
we have it within the scene, we could create it from scratch
in regards to adding it to any object pretty much.
We can click Shift and A. We can go onto adding any
object onto the scene. And once we add it
onto the scene, we can click A Modifier
at ometr node, and then we're going to
see that within here, we're going to have Fire node. Once we select the Fire node, we're going to have
this type of a setting, and that's pretty cool when
it comes to the setting that we don't really need
to do anything else in regards to getting it set up. I'm going to just to make
it easier for myself. I'm going to just put
it off for each and every single one
of these settings. I'm just going to
just quickly check. These the radius and height. I think they have it
slightly messed up. So instead of just adjusting it, we can also just grab the
one that we just copied, click shift in D
to duplicate it, place it onto these
different settings, and let's start off with
this fireplace over here. So we just made a copy
just to make sure we're using it from scratch. But for now, let's go
ahead and make use out of it in order to set
it up for the fireplace. So for Sarus, the fire
itself over here, I believe it's a little
bit too much when it comes to the height. We're going to lower this down, just to make sure that this fire is not just looking like it's flaming hot in regards to
just going everywhere. We're going to lower this
down by quite a bit. I would say 1.6 in regards to the height, that's going to be
quite all right. 1.8 actually closer
to that value. Radius, we can increase it, make sure it covers up this
entire log stylus log part. That's going to be quite nice. I think that's quite
all right. We can lower this down bier now. The rest, by default, we can click play,
we can see that it's looking quite nice already is, we can adjust The emission a little bit make it a little
bit brighter if we want to. We can do that easily, so that's going to
look quite nice. Now, in regards to the smoke. We also need to
make some settings. Before doing the smoke, though, I would prefer to change up
the particles a little bit. It's a little too much. The particles themselves,
you can see they're way too big when it
comes to the size. We're going to take
them down in a half. The randomness, scale
randomness is okay, still, I thing that's
quite all right. Then the particles themselves, I think they're spawning
a little bit too much. I'm going to set it down to 0.2. And let's see in regards to the lifetime if they're
going to be quite right, they're going all
the way over here. And personally, when it
comes to fireplaces, I think that they often have a lot of more randomization
for those particles. So lifetime randomization,
I'm going to put them as I would say as one and then lower this down the lifetime itself 2.5
because I don't want the random value to be going all the way
just way too high up. But if we are setting
it like this, should have those particles. Some of them just quickly
appearing, disappearing, and others should be going up. Maybe it's a
little bit too much. So let's go ahead and
put this two point 0.7, like so, and now, I believe they're going
to be quite nice. Although lifetime itself can
be increased a little bit, small tweaks like
that in regards to just artistic perspective is going to be really
good, and there we go. Small flakes. There we go. Small flakes going up, just like that, really
nice looking set up. The smoke itself, personally, it could be kept as is just going to lower down
the flame just a little bit. So Actually, I'm going to
check if it's right in the middle of the
setup, which it is now. The smoke itself pretty
much is looking quite nice, but we can, for example, lower down the opacity. We don't need to have it quite as visible,
setting it to 1.3. Value close to that is
going to be quite a right because we need more
fire and less of smoke. It's a pretty hot fireplace
that we're having. We're also going to lower
down the brightness of it. We're going to make it
darker by just lowering this down to a value of 0.03. There we go. So it's
going to be much darker. Rest. We don't really need to do anything in
regards to the setup. I think that's going
to be quite all right. And the resolution, let me
just go ahead and check. I think, yeah, the rest
is quite all right. On On the height. I'm not quite keen
about the height. We need to again, I'm
lowering this down purely for the sake of making it look like it's more of a fire
and less smoke. So it's going to look a little
bit more hot. There we go. So all in all, this is quite a nice setup
for this fireplace. Let's go ahead and now look
into this type of A fire. So we could work
on radius, height, and everything in between to make sure we tweak all
the values all at once. But whilst we do have
this geometry node, we can just click S and
scale everything down. So all of the smoke and all of the amber particles are
going to look much nicer. Bringing it down like
this all at once. I'm going to just
reposition everything real quick to make sure that we have it right in
the center wave we want it, and you can see the
initial issue right away. This fire is way too intense. It's going all over dancing
on this tip way too much. Let's go ahead and
fix that right away. So for that, we are going
to lower the displacement. Yeah, lower the
displacement over here, the strength to a value of 0.18. Yeah. There we go. That's
going to look quite nice. Then in regards to
actually, sorry. That was a mistake on
my end. This was smoke. I just realized that this is the displacement
we're looking for. So 10.18, close to
the value of that. There we go, it's going
to keep it more constant. The smoke itself,
we don't need it. We can disable it because
it's just a small type of a flame coming from the
tip of this, candle. The next thing that we
need to set up is going to be this overall color. So personally, I prefer to just tweak the core value first, make sure that the base has a nice variation
because I wanted to be a little bit more offset
if we have it like this. I don't quite like the setup, so I'm just going to load a
core value just a little bit. And then while holding
shift, while holding shift, I'm going to just slightly
tweak this until I get a value that's Almost turning
green, as you can see, like it's turning green after a certain amount, but not quite, so we're going to have a really, really nice really
nice type of a setup. And in regards to the layers, I think it's too many layers. One reason is because
it's going to make it look a little bit too
complex for such a small flame. It's just going
to make it noisy. O reason is if we have
a multiple candles, we really really want to lower down the
resolution the amount. By quite a bit in
regards to that and layer count is also
going to be lower down. So we're going to have
a very nice basic type of a flame like this. Actually, I do like the layer
count to be set as free. I think it's low enough as is. For something like
fire, for example, we could have increased
it just by one, and maybe that looks better. It really is up to a
personal preference. I think the original one
looked quite alright. This, again, we're going to
keep it as is resolution, we lowered it down,
so it should be enough for in regards
to optimization. Then in regards to particles, actually, let me just go ahead
and check the noise scale. The noise scale can be slightly increased just a little bit, just to make sure it doesn't ogle too much when
it's so small. I think it's quite right. Yeah, that seems
to be quite nice. Core hue. I'm not quite
keen on the core hue. I'm just going to increase it just by a little
bit holding shift. There we go. That's more like it. I'm quite
happy with this. Going to make this actually
a little bit smaller like this. And radius. I'm going to lower down
the radius a bit as well. Just to make it a
little bit inner. Maybe the height is a
little bit as well. There we go. There we go.
I'm quite happy with that. The particles themselves,
quite easy to fix. They're going to be, let
me just have a look. Yeah, the scale. We need to
increase that a little bit. I'm just going to
set this to 0.03. Just to make sure we
have those larger chunks coming out to make it more visible when they're so far behind when we're looking
from a distance basically. Then at the density, we're just going to
lower this down to 1.15, I reckon, that's going
to be quite all right. Overall, And we don't need to do much else
in regards to that. Honestly, it's
looking quite nice. Maybe lifetime, we
can lower this down, just to make sure or sorry, increase it, just to make
sure it goes a little bit higher up than the flame
itself at certain points. And there we go. I'm going to just click
it off from the side because there was an origin
point that was in the way. But other than
that, there we go. A simple setup. Finally, we have ourselves the
magical torch, but I'd like to move on with
this in the next lesson d. And then I will also
show you how to randomize the positions
in regards to making it the overall setup look unique after
every duplication, because when we're
duplicating it now, we have the same
setup over here. We're going to learn a
little bit how to It says. So that's going to be
it from this lesson. Thank you so much
for watching, and I will be seeing it Hello, and welcome back over on to Blender Jome to Node
Fire animation. In last lesson, we started off the example set up for the
fireplace and for the candle. Now we're going to continue
on with the setup to get this magical torch
looking a little bit more mystical, let's say. Let's go ahead and start
it off with a fire setup. We're going to adjust the hue until we find the right value. And right away, once
we go past two, it's going to give us a
real nice type of setup. I'm going to go to
a value of 3.9. And maybe adjust
whilst holding shift, adjust the core itself. There we go. Oh, this is
look Oh, there we go. This is looking really nice. We're getting ourselves a
real nice greenish core. I would say that's
really nice, actually. Let's see if we should fix up the mission amount. Maybe not. Now, let's go ahead and leave it is honestly, I
really like this. All we need to do now is simply make this a little
bit smaller, seven. Reposition this to be right
in the middle, there we go. And that's going
to give us a very, very nice type of a look. Now, in regards to the
radius and the height, let's see if we need to adjust anything in
regards to that. Maybe lower down the
radius a little bit, just to make it look
not too high up. Resolution, we're going
to lower this down to 15. It's not as small as a candle, but it still needs to be a little bit smaller in
regards to the optimization, I reckon. Then, let's see. I think for the fire smoke, we can lower this down to two like this in regards
to the lay count. And honestly, it's It's
looking quite nice. I'm quite happy about it. Maybe the brightness. Yeah. If we're looking
at it from a distance, especially in contrast
to other objects, I think it's a
little bit too dark as smoke. We're going
to increase that. There we go, much, much better. 2.5, giving us more
of a whitish setup. I'm going to hold shift
and just lower opacity, actually without holding shift, the value there we go,
something like this. We can also lower down the grayness as well to
get that nice int. There we go. We can change
the hue a little bit to get that nice blue tint and there we go.
Something like this. We now need to adjust
the particles, the color itself or the
particles. Let's see. They're definitely not
the right type of color. Let's go ahead and change the hue until we
find the right type. Maybe more There you go, sen type like this. Emission, we could even
increase it a little bit, like, so we can even go to
the rende real quick just to see how it looks like
in complete pitch darkness. We simply change the
hue and emission, we might lower it a little
bit if we so desire. Yeah, I think lowering it
to something to a value. That's free, might be
quite a good idea. And yeah, that's going to
be it from this lesson. And next one, we're
going to learn how to create a more realistic
type of a torch. So thank you so
much for watching, and I will be seeing
you in a bit.
25. Realistic Fire Geometry Node Adjustments: Final Touches: Alone, welcome
back Iron to blend the Geometry node,
fire animation. In the last lesson, we went
over a couple of samples in order to learn how to make
use out of the geometry node. Now we're going to learn
a little bit in regards to how to make it look a
little bit more realistic, a little bit more believable for those granger type of styles, for those realistic
types of environments. So if we want to make use of omete node to make it more fitting for those
kind of scenes, we're going to learn
how to set it up to be a little bit more
believable as a fire. So without further deal,
let's get started. We're going to start by grabbing ourselves
one of the fires. It doesn't really
matter which one we can always adjust it, and then we're
going to work on in regards to making sure
that it's more realistic. I'm going to grab myself
the scandal over here, going to hit chip D, G X,
move it out to the side, G D and just position it
nicely, going to click seven, to go to the top downview, and position it to
be right over here. Might as well just make it
a little bit larger leg, so Next thing that
I want to do is actually make use of of the
material shade is set up, but I don't want to tweak any of the values that I have for
my previous materials. We're going to make
sure that we are grabbing a separate
shader for that. And the same goes for
the smoke as well. We do want a smoke
for this fire. I'm going to disable it
for now just to make sure that we're setting it
up for a nice fire. And yeah, let's go ahead and create ourselves
a new material. For me, personally, we could make use out of what
we have over here, but I'd like to have
preview spheres on the side so I can easily make different
selections between fire and smoke and make some
adjustments based on that. What I'm going to do is, I'm going to go to the side view, going to create a couple of UVs spheres and put them off
on the side over here, one for smoke and one for fire. If we directly apply the
setup on to the spheres, it's not going to be visible, but nonetheless, let's
go ahead and do that. The first one is going
to be called fire. The second one is going
to be called smoke. Let's go ahead and
apply those materials within the material tab. Let's go ahead and do that. As you can see over
here, right away, we're not going to see anything. Smoke. We can also just use
search bar for the search. There we go. We're not
going to see anything. If we were to go
out of the material pre we will see them.
But it doesn't matter. We just need to make
sure we can just go between those selections. Now one thing that we want to do is just again, differentiators. We want to make sure that we're not working on the
same materials. The easiest way to fix
that will be just to click this button over
here with an material tab, new material, and that's
going to create a duplicate. I'm going to also do
the same for the smoke. Like so, and there we go. Smoke 001, fire 001. Now we can go into the shading panel and work on in regards to the fire setup. All right. Let's go on
to the shading tab. First thing that I'm
going to want to do is we locate the entire setup,
which is over here. Now real one, two, have a look from the side view, is going to zoom
in a little bit, so we could have a
better visibility of the fire itself, like so. And the first thing
that we're going to do is lower the shape overall. If we have a look, the top
is slightly faded out, but the middle section
is very sharp, extremely sharp, and we do have a shape form for the smoke,
but not for the fire. We can just make sure
that we fade out the top a little bit to
soften up this sharp edge. It's going to be more
realistic overall. So we're going to locate
the factor over here. If we were to click
control shift and just tap on attribute,
we can see that. Or it should show us that
it is set up, and it's not. I just realized
going to real quick, go back on the principal BSP. I just realize
that we're not set up the materials over here. Let's go ahead and
do that real quick. The ones that reduplicated. We're going to go onto
the geometry tab. We're going to change
from fire to fire 001, and smoke is 001 as well. Let's just go ahead and
quickly find it like so. Now, once we go onto
our bubble over here, we can see that once we
click Control shift, tap on attribute,
we're going to preview it just to make sure that it's the right one that we're using. Then afterwards, we'll want
the y to go all the way to the edge over here so we can only control the
dark side over here. We're going to make use
out of this to just drag it down quite
drastically actually so. Before doing that, Yeah, before doing that, we need to increase the height
for these actually. I want to lower this down in
regards to the shape to make sure that we're getting
a nice type of a set up. Something like that's
a little bit too much, actually, 0.6, 0.6
should do the trick. There we go.
Something like this, but the shape itself
is very now short. We need to make sure
it's quite a bit larger. So I'm going to go on to
the Geometry node itself. I am then going to find
the height for it, and I'm just going to increase
the height over here. And there we go, we're getting that same type of height
that we had before. 4.4 seems to do
the trick for me. I'm liking this setup. I might even increase it just in regards to read this
as well a little bit. Just a little bit, not too much, something like this
over here, like this. Now we're getting a nice shape. We're still not getting
that realistic type of a fire particle setup. So let's go back onto the fire and see what
else we can do about it. So after we set up the factor, the next thing is going to be setting up the
fresnel over here. If we zoom in, we can see
those sharp edges over here, so we're going to go
ahead and fix that up. We're going to go all the way to the white edge over here. We can see that we're getting
the most of the values. And I'm actually
just going to click Control Shift onto
color ramp, like so, so we can see what
we're getting, and we can see those darkened edges over here on the side. It Seems like it's glitching out a little bit in regards to the setup over on the corners, but that's quite all right. Because when we're rendering it, it should give us
the right setup. I'm going to just drag
this quite a bit, quite harshly to value of 0.25. There we go, something
to that value. Then I'm going to go
back on to the setup. Actually, I will also check
the IQR IOR real quick, which affects the Fresnel, and I'm just going to lower it, so the fault was 1.5. By lowering it, we're slightly offsetting it
back onto the corners. So not too much though a value
of 1.45 will do the trick. Now we can go ahead and check back out looks and there we go, those nice and smooth edges. Right. The next thing
that we need to do is make sure that the
particle itself, the fire that we're
having is going to look a lot more detailed. And if we go on to the
noise show over here, all we need to do here is
simply increase the scale, and that's going to
fix all of our issues. So once we increase it
to a value of four, go ahead and see 4.2. 4.2 looks quite nice. We can see that
this is what we're getting enough when we hit play. That's what we're
getting. It's already looking really, really nice. Now that we have this
kind of breakage, the type of color that
we're having right now, I think we need to
adjust it a little bit. The inside is just looking a little too
unnatural for now. Let's go back onto our geometry node and see what we can do with
in regards to the hue. I'm going to go ahead
and just increase this. Closer to value of one would be, very close to nine to one. 0.9 9993, should be all right. Now we can just slightly
tweak the hue itself till we get this reddish
type of a setup. 1.1 and even more actually. There we go. I go to increase
this a little bit again. So 0.996 for core u
and for the u itself, 1.08, seems to be all right. And emission in regards
to the brightness, we can leave it as is actually. Let's go ahead and hit play. It's already looking more
fiery, more realistic, ready. We now need to just let's see, increase the layer
count, actually, because right now we don't have that nice transition
in between layers. We're going to increase to quite a high amount to
eight and there we go. We are already getting this nice type of a set up
and going to real quick, just tweak the huge just a
little bit to the right. There we go, looking
much better, all in all. And Let's go back onto the Shader and see what
else we're missing. Actually, before going
back onto Shader, one thing I would like
to do when we hit play, even though my FDS right now, you can see it's going to 25. It's still right. But the speed itself is a little too slow. Let's go ahead and increase
this bit by amount of two. It's going to speed
up the entire fire, going to make it more fierce. Looking, and I think all in all, that's going to look more nicer. The other thing that
we should do is going to be change up
the displacement. Placement is nice
when it comes to fire for especially
stylized slow type of fire, but when it's too fast, it's just going to
look too chaotic. So let's go ahead
and change that up. We're going to start off
by increasing the scale. So it would give us more
of a noisy type of setup. 2.5 seems to be doing the trick. For the scale itself or
the strength of this, it has to be quite small, so value of 0.0,
even lower actually. 0.05 will do the trick. So just a little bit of a
displacement like this. Just going to make it look
quite a bit more unique. And in regards to the fi itself, we are getting a real
nice type of setup. I think we're going to
leave it as is for now, we're going to continue on
with it in the next set up. We still have smoke, and we have some couple of adjustments
in regards to the shader. But you can see how
easy it is to make personal tweaks
and adjustments in regards to the
parameters itself. So yeah, we're going to finish this off in
the next lesson. Thank you so much for watching, and I will be seeing
you in a bit.
26. Perfecting Realism: Final Adjustments and Tips: Hello and welcome
back around to Blend the Geomet note, Fire animation. In the last lesson,
we left ourselves off with a more realistic
type of a fire. We're still not quite there
in regards to the setup. We still have a way to go. But we're getting
there, so let's go ahead and continue
on with the setup. The next thing that we should do is go back on to the Shader. So let's go ahead and click
on this bubble over here. If you're not seeing
it, just, you can go out of the material
just select it, and that's going to be fine. And let's see what
else we can do. The next thing is
this layer over here. The layer of control
is going to affect. I don't think, it's not going
to be quite as visible. It's basically going to affect or the closer
it is to the core, the more of a multiplier
we're going to get. And I really do think
that we need to adjust that for a more realistic
type of a setup. Let's go ahead and
do that. Let me just go back on to the fire so. And for this, I'm
going to start off by getting the end value
all the way to black. And that's going to
be quite all right. Let me just go ahead and
see. Changes to black. What this will do is, we can
see if we set it to white, all of the layers are
going to be visible. But if we set this to black, the very end one is not
going to be visible. But as you get outside, a bit by bit is just going
to fade in that color, which is just going to make it look more like an
actual particle, like it has a volume in it. Instead of just having layers and layers on
top of one another. I think that's
going to make much better in regards to the setup, and it's giving us a nicer
type of look for the fire. And in regards to tweaking
this setup over here, we can just drag this a
little bit more the wide a little bit more outwards in order to get the core stronger, for example, going to drag it a little bit
more out like this, and I think that's going
to look quite right. In regards to making a core
look a little bit more glowy. Then let's not forget
the texture itself. We have color ram
control over here, or if we were to
just load this in, doesn't seem to want to
load. I'm not sure why. Let's see why. There we
go now want to load. Let's strike this
upwards a little bit in regards to the
setup for the position. Yeah. If we were to increase, you can see it lowering down and just breaking
it up a little bit. Let's go back onto
the principal BDSF to see how it actually affects. It helps us to break down
the fire completely. We don't want this to
be totally too much, but just changing it
to a value of 0.44 is going to give us more breaking
points in between layers. I think that's going to give
us a nice result overall. And let's go ahead and have a look in regards to
the final pieces. I think all in all though, let's pretty much it in
regards to the fire. Let's go now and move
on to the smoke itself. If you remember, underneath
this sphere over here, we still have this one that's going to be in charge
of the smoke itself. And I'm going to go onto the
geometry smoke enable this. And first of all, the first
thing that we should do is adjust the parameters
that we have over here. So the radius, let's go ahead and see what the
radius looks like. The radius self can be
a little bit smaller. It would be closer to the fire, so the height, we
can keep it as is. I'm quite happy with. We can see where it ends
in regs to fire. I'm quite happy with
that. Resolution, we can keep it as is as well. It doesn't need to be
super complicated. Lay account should
be the same noise. Displacement scale. We can keep it as is. For now, we just need to
focus on the texture itself. So we can work on
that, although pacity, I will definitely
increase pacity so we can have more visibility
of our smoke. Let's go ahead and
change it to a value of six or value close to six, and there we go. That's
what we're getting. The first thing that we're
going to perhaps change for the specific fire because we're increasing opacity
is the inside part. Very, very distracting when
the smoke itself is just overlaying the fire
itself and just giving us very weird results. Let's go ahead and fix
that right away actually. So we have the information
for Layer two over here. And what we're going to
do is, we're going to, first of all, we're
just going to drag this gray all
the way to the end. So the end points are
going to be more visible, which we're going to break
down later down the line. And then the starting
point, which is going to be
represented with this, it's going to be actually
just going to be black. Now there we go. Now, we can see that the
inside is being removed. And once we drag
it out like this, we can see that the core
itself is not visible at all, which is nice for us. I'm going to just move this somewhere over here to
more of a middle part, and that just helps us to take off that middle annoying
part that was just A little way too much,
way too much, honestly. Then afterwards, let's
go ahead and just go straight up to the noise,
texture, the scale. We need to just
make sure it aligns with the fire itself in
regards to the noise, although we can
just make it just a little bit larger 4.5, something like this
will do the trick. There we go, we're getting somewhere in regards
to the set up. The fresnel itself, needs to be broken down just
like we did previously. And I'm going to just strike
this to the very end. Start dragging this
to the edge as well. Like this, just to
help us break it down nicely so it's already
looking quite nice. Factor value. I don't think we need to
change that actually. I think that's
quite right as is. Yeah, that looks fine to me. I think that's it in
regards to the fire. Let's go ahead and just
have a look in regards to the parameters itself
within the geometry node. The smoke, maybe just a little bit lower in
regards to the opacity. Just a little bit.
We don't need to overwhelm the flame itself. And noise. I don't like the noise
displacement honestly for the where is it? There we go. Over here. I don't like the displacement
for this section, I'm going to lower this down
by quite a large amount. Well, not quite 0.3.
Think we'll do the trick. There we go out follows
nicely with in regards to the fire itself.
What else should we do? Should we change the Let's go and have a look.
Resolution is fine. Honestly, for the
smoke itself because it's such a small opacity, it's going to be quite
all right for the setup. We might even just lower
down opacity overall. Like, there we go. Now we're going
getting somewhere. The only thing that
we need to do is also increase the particles. Right now, the
particles are massive. They need to be much smaller, and I'm going to increase the geometry node
over here as well. The thing that we need
to do is just change up the scale to be lower value. 0.01, go ahead and
change it like this. 0.009. Yeah, that looks good. The scale randomness
can be all right. Speed. Let's go ahead
and look at the speed. Speed is okay, I reckon, density, now that it's smaller should
definitely be larger. Let's go ahead and keep
increasing it 1.2. Something like this looks
nice. I'm quite likeing that. Lifetime should
be lower I reckon because you can see that it
ends all the way over here. It doesn't need to for a torch. If it was a bonfire or
something of the sort, larger volume would
require us to have it at a nice lifetime, but here I think we can just increase the lifetime
randomness is 1.6 get something like this, and density, life randomness. We also need to change
you, of course. So Actually, I'm going to
change real quick the scale. I'm going to copy the
scale, the value over here, so 0.009, and I'm going
to just increase it, so I could actually see what
I'm doing with these setups and I'm going to lower this
down to a value of 0.04, there we go nice
setup like this. Just going to change back to
the scale, just like that. I think I think this is
pretty good, actually, so that's all it takes so we can basically get ourselves
a nice realistic type of a fire out of this as well. And that's going to be it. Thank you so much for watching. I really hope you
enjoyed this setup. If you did make sure to give us a review and give
us some feedback, as it really helps
us with improving our future learning
experience for you guys. So, thank you so
much for watching, and I hope to be seeing you
in our other videos as well. Happy modeling, everyone.
 3D Tudor, The 3D Tutor